
9962 - Dishwasher MAYTAG - Free user manual and instructions
Find the device manual for free 9962 MAYTAG in PDF.


| Product Type | Built-in Dishwasher |
| Brand | Maytag |
| Model | 9962 |
| Width | 24 inches |
| Height | 35 inches |
| Depth | 25 inches |
| Weight | 95 lbs |
| Power Supply | 120 V, 60 Hz, 15 A |
| Energy Star Rated | Yes |
| Number of Cycles | 5 (Heavy, Normal, Light, Rinse, Quick) |
| Soil Sensor | Yes |
| Noise Level | 50 dBA |
| Filter Type | Self-cleaning |
| Interior Material | Stainless Steel |
| Racks | Upper and lower with fold-down tines |
| Child Lock | Yes |
| Delay Start | Up to 24 hours |
| Maintenance | Clean spray arms and filter monthly |
| Repairability Index | 7.3/10 |
| Common Spare Parts | Spray arm, filter, pump, heating element |
| Manual Language | English |
| Manual Pages | 15 |
Frequently Asked Questions - 9962 MAYTAG
User questions about 9962 MAYTAG
0 question about this device. Answer the ones you know or ask your own.
Ask a new question about this device
Download the instructions for your Dishwasher in PDF format for free! Find your manual 9962 - MAYTAG and take your electronic device back in hand. On this page are published all the documents necessary for the use of your device. 9962 by MAYTAG.
USER MANUAL 9962 MAYTAG
| Page | |
| Safety Instructions | 1 |
| Loading Information | 2-4 |
| Adding Detergent | 5 |
| Checking Rinse Aid | 6 |
| Ensuring Hot Water | 6 |
| Special Tips | 6 |
| Selecting Cycles/Options | 7-8 |
| Starting the Dishwasher | 8-9 |
| Water Conditions | 9 |
| Energy Saving Tips | 10 |
| Maintaining the Dishwasher | 10 |
| Washing Special Items | 11 |
| Before You Call | 12-13 |
FOR FUTURE REFERENCE
Congratulations on your choice of a Maytag Jetclean™ dishwasher! As you use your new appliance you will appreciate the many features that have made it the Consumer Rated No. 1 Dishwasher.
The following pages provide a wealth of information regarding your new Maytag dishwasher. If you have any additional questions, please contact us. (Be sure to provide a complete model number.)
MAYTAG CONSUMER EDUCATIONONE DEPENDABILITY SQUARE
NEWTON, IOWA 50208
(515) 791-8911
Mon. - Fri., 8am - 5pm CST
Internet: http://www.maytag.com
NOTE: For service information see pages 12–13.
IMPORTANT: Keep your sales slip or cancelled check for warranty service. Proof of original date of purchase is needed.
We suggest you retain this manual for future reference. Please record the model and serial numbers in the spaces below. These can be found in the upper left corner of the tub opening.
Model Number
Serial Number
WARNING - Check with the installer to make sure the appliance has been properly grounded to avoid possible electrical shock. Be sure you read the IMPORTANT PERSONAL SAFETY INSTRUCTIONS on page 1 before you start to use this dishwasher.
NOTE: In our continuing effort to improve the quality of our dishwashers, it may be necessary to make changes to the appearance without revising this manual.
CONSUMER PUBLICATIONS
For additional information order the following booklets from Maytag at the prices indicated*. Send your name, address, booklet title, form number and payment to the address listed earlier on this page.
Accomodating Kitchens — 43PR \$1.00
Appliance Buying Guides \$0.50 each
Washer — 211YG
Dryer — 212YG
Dishwasher — 213YG
Refrigerator — 276YG
Cooking Appliances — 277YG
*Please allow 4–6 weeks for delivery.
IMPORTANT PERSONAL SAFETY INSTRUCTIONS
Products with a ⑩ label have been listed with Underwriter's Laboratories, Inc. – those with a CSA tag have been listed with Canadian Standards Association. Nevertheless, as with any other equipment using electricity and moving parts, there is a potential hazard.
WARNING - When using your dishwasher, follow basic precautions, including the following:
- Read all instructions before using the dishwasher.
- Use the dishwasher only for its intended function.
- Disconnect electrical power to dishwasher before attempting to service.
- To avoid electrical shock hazard, the sides and back must be enclosed and the front panels must be attached before electrical power is applied to the dishwasher. Refer to the installation instructions for proper grounding procedures.
- Connect to a properly rated, protected and sized power supply circuit to avoid electrical overload.
- Children should never be permitted to operate, or play in, with, or around this dishwasher.
-
To reduce the risk of injury when loading items to be washed, sharp or pointed items should be located with the handles up. Also, load sharp items so they are not likely to damage the door seal.
-
Be careful not to touch the heating element on the bottom of the tub during or at the completion of a cycle. It may be hot.
- Use only detergents and rinse additives designed for an automatic dishwasher. Never use soap, laundry detergent, or hand washing detergent in your dishwasher. Keep these products out of reach of children.
- Do not sit, stand on or abuse the door or dish racks of the dishwasher.
- Under certain conditions, hydrogen gas may be produced in a hot water system that has not been used for two weeks or more. Hydrogen gas is explosive. If the hot water system has not been used for such a period, turn on all hot water faucets and let the water flow from each for several minutes. This will release any accumulated hydrogen gas. As the gas is flammable, do not smoke or use an open flame during this process.
- Do not wash plastic items unless marked "dish-washer safe" or the equivalent. For plastic items not so marked, check the manufacturer's recommendations.
- Do not tamper with controls.
- Always remove the door to the washing compartment when removing an old dishwasher from service or discarding it.
SAVE THESE INSTRUCTIONS
LOADING INFORMATION
Before Washing
Typically, the majority of loads contain items of varying size and type. That's why your new Maytag dishwasher is designed to accommodate a variety of dishes, glasses, stemware, utensils and pots and pans.
The following illustrations and information will help you become more familiar with your dishwasher rack-ing system. After a few disloads, you will be able to determine the best arrangement for your items.
- Don't Prerinse! Simply scrape off any bones or large food particles. The disposer in your dish-washer will handle the occasional pits, fruit seeds and popcorn. These items will be chopped into small pieces during drain and removed with the drain water. You may hear a chopping noise during drain. This is normal.
- If connected to a food waste disposer, make certain the disposer is empty before starting the dishwasher. This allows proper draining.
- Remove certain foods (such as mustard, mayonnaise, lemon juice, vinegar, salt or dressings) from stainless steel flatware as soon as possible. These foods may cause rusting and pitting if allowed to remain in contact with the surface for an extended period of time.
- Scrape or soak items with burnt on foods as they require more energy than the rest of the load to clean satisfactorily.
- Soak or wipe a starchy film from utensils used to cook foods such as potatoes, pasta, rice, oatmeal, etc...as they require more energy than the rest of the load to clean satisfactorily.
General Recommendations
- Place all items in the racks so they are separated and facing center. This ensures the water spray can reach soiled surfaces for good washing and rinsing results.
- Wedge flat, lightweight items (such as plastic lids) next to the silverware basket or along the sides and back of the racks.
- Load items so they do not rest over the top of the wash tower. This water spray is needed to properly clean items in the upper rack.
- Avoid blocking the upper and lower spray arms by not allowing items to extend beyond the racks.
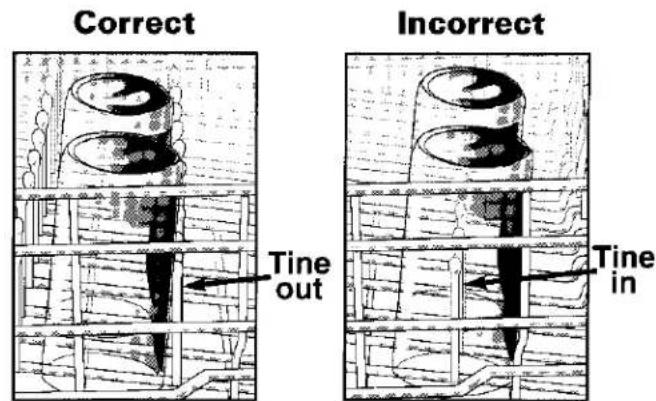
- Place glasses in any row of the racks for proper cleaning and rinsing. Do not load glasses over the tines.
Upper Rack (Features vary depending on model)
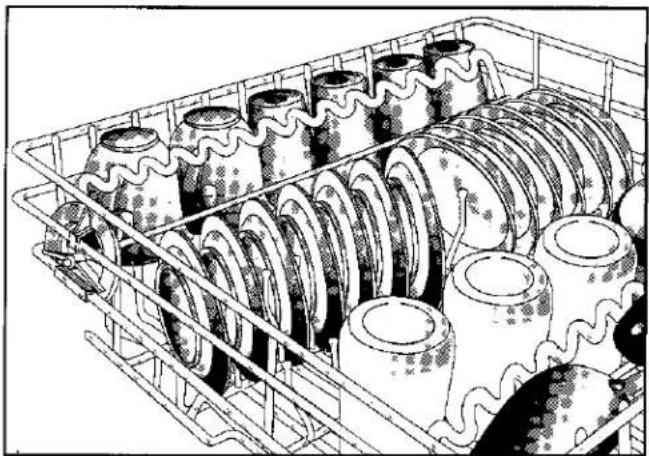
The upper rack is designed with great flexibility and versatility. Glasses, cups, stemware, light-weight plastics, small plates, bowls, pans, long-handled utensils etc. can be loaded in this rack.
natural_image
Illustration of a multi-cylinder storage rack with multiple cylindrical containers (no text or symbols visible)Items can be centered behind a single tine or loaded at an angle to maximize space. For best results, leave a small space between pieces so they do not touch during the cycle.
natural_image
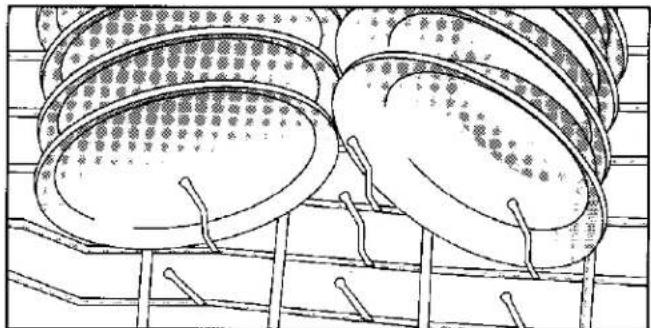
Illustration of multiple circular trays with patterned surfaces and handles, arranged in a row (no text or symbols)Glasses, tumblers, stemware and cups can be placed in the top rack. Do not load these items over the tines. It makes them more difficult to rinse.
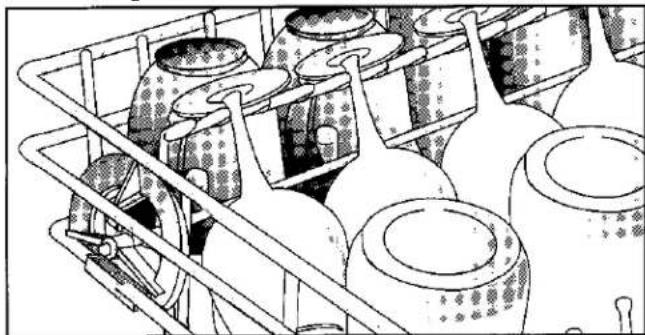
Place stemware in the Stem-Lock area(s) for added support. The curved design on the Vari-Lock Support (left) and Stack-Rack (right) holds stemware in place. Taller stemware will fit better on the right side as the rack is deeper there.
natural_image
Line drawing of various ceramic jars arranged in a basket (no text or symbols)The Vari-Lock Snugger on the left (select models) can be adjusted by grasping the wire and rotating it left or right as needed. Simply move the wire to the left to snug items against the rack or to the right and rest it on top of lightweight cups or plastics. Do not load items on top of the wire.
natural_image
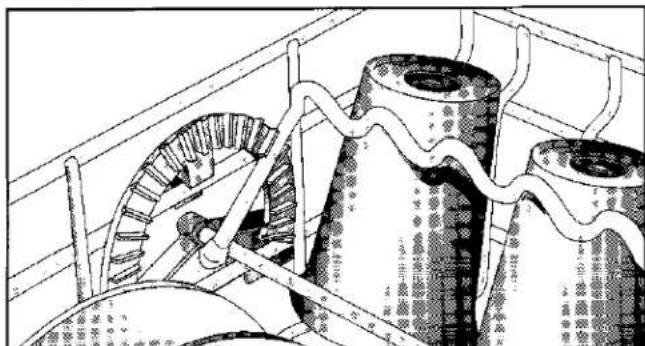
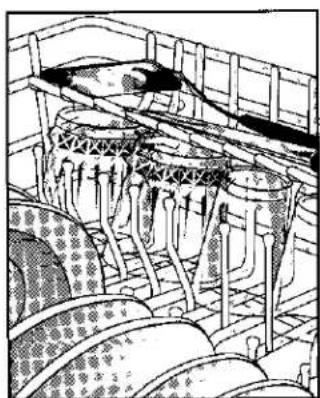
Technical line drawing of mechanical components with no visible text or symbolsThe Stack-Rack design on the right side of the upper rack folds up or down for loading flexibility of a variety of items. Fold it down to hold long-handled knives, spatulas and spoons or short items like cups or juice glasses. Fold it up for taller items like glasses, bowls, plates, etc.
natural_image
Illustration of a bird feeding in a barn with feeding buckets and patterned bedding (no text or symbols)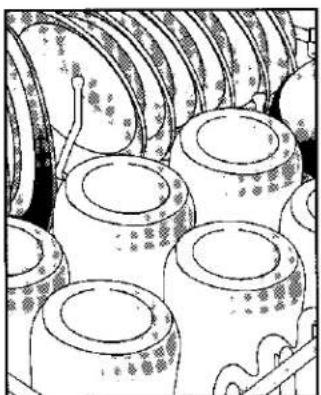
natural_image
Illustration of cylindrical mechanical components with textured surfaces (no text or symbols)Lower Rack
(Features vary depending on model)
The lower rack is designed to accommodate a variety of large items such as dinner plates, mixing bowls, pots and pans, baking dishes, etc.
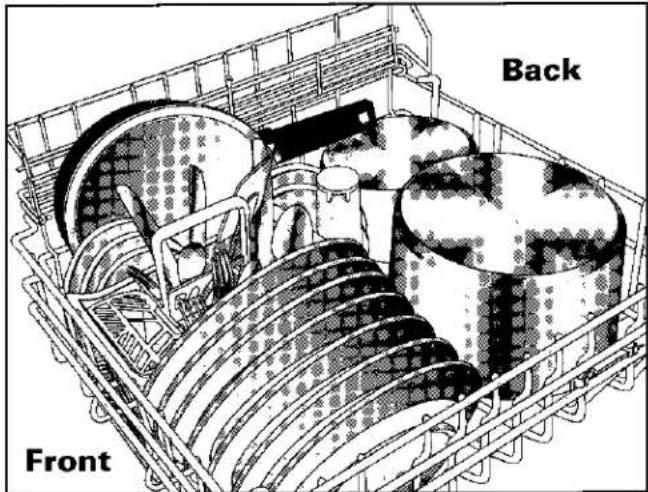
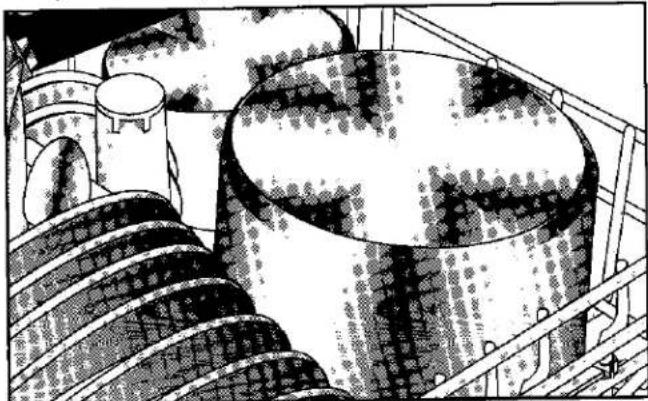
Tall items such as bakeware and large platters can be placed on the left side or across the back of this rack.
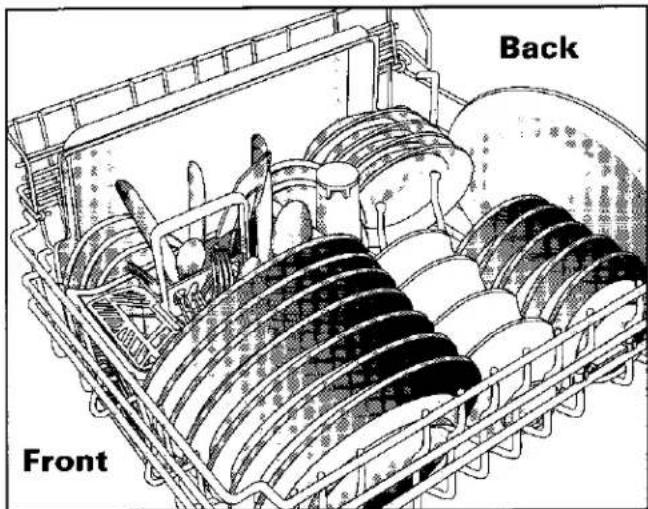
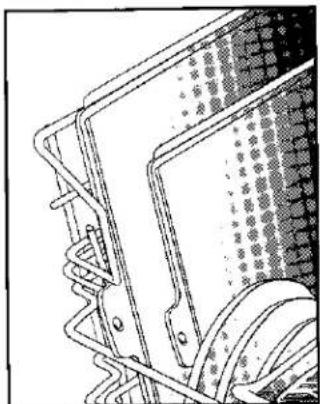
With the Stack-Rack shelf raised, thin items like cookie sheets or pizza pans may be placed along the left side. With the shelf down, two levels of glasses and cups can also be loaded.
natural_image
Technical line drawing of a mechanical component with no visible text or symbols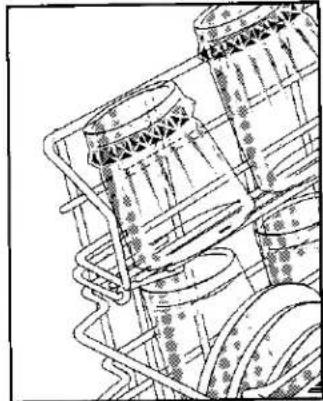
natural_image
Technical line drawing of industrial equipment with pipes and tanks (no visible text or symbols)Positioning the Fold-Away tines flat in the back left corner provides convenient loading space for large, bulky items like pots and pans or mixing bowls.
natural_image
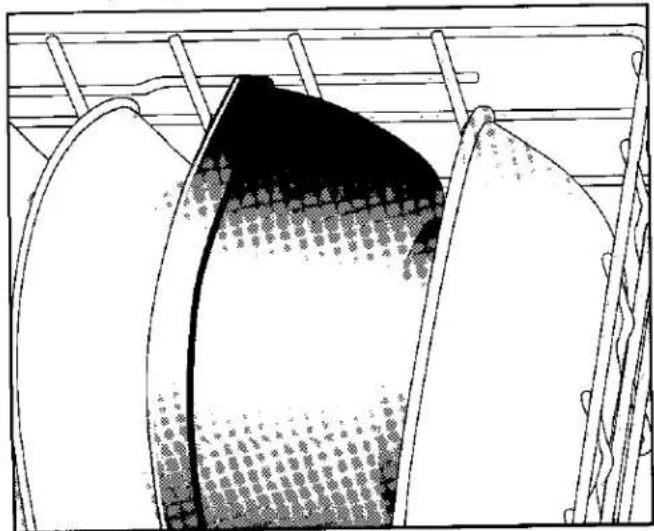
Illustration of industrial storage tanks and pipes in a processing facility (no text or symbols visible)Convertible tines in the back right corner can be positioned to provide narrow spacing for loading dinner plates or wide spacing for loading deep bowls, pots or pans.
natural_image
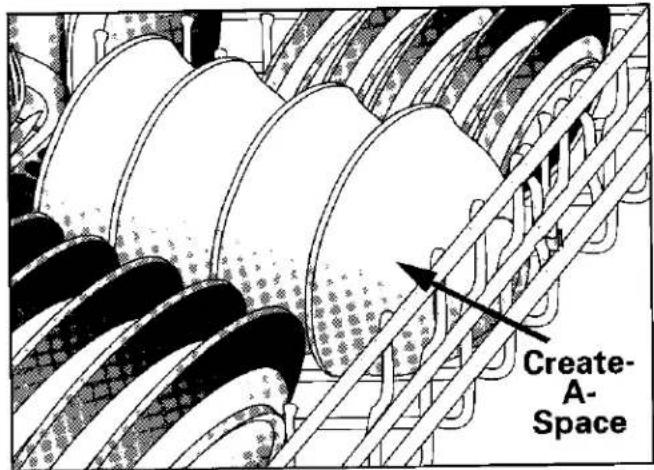
Diagram of a container with two curved containers filled with different patterns, mounted on a rack (no text or symbols)Create-A-Space tines across the center of the lower rack allow saucers and bowls to be loaded between rows of plates.
Removable Utensil Basket (Design varies depending on model)
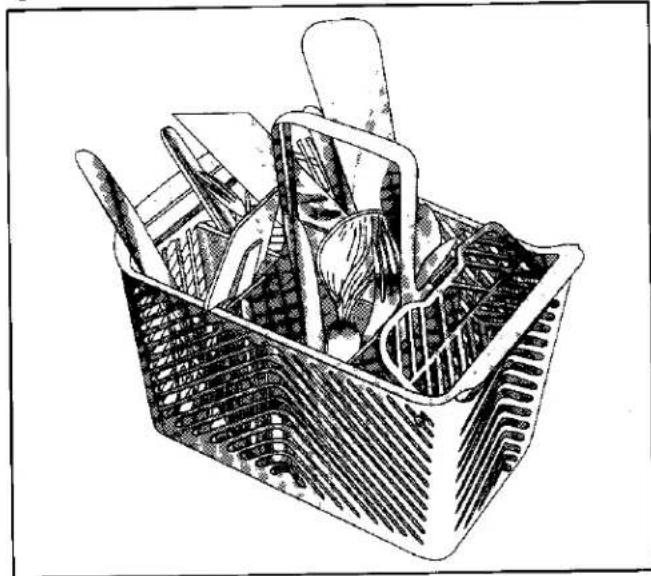
The basket can be removed for ease in loading and unloading items. Place items in the basket with some handles up and some down. This prevents them from nesting together and improves cleaning results. (Most knives or sharp, pointed items should be placed in the basket with the handle up. Be sure thin, finely pointed items do not extend through the basket and block the lower wash arm.)
Use the covered section of the basket for small, lightweight items like baby spoons, plastic measuring spoons, small plastic items, etc. Close the cover.
natural_image
Illustration of a plastic kitchen drawer with cutlery and utensils (no text or symbols)ADDING DETERGENT
Use a detergent designed specifically for use in an automatic dishwasher. Be sure it is fresh and stored in a cool, dry place (not under the sink).
Never use laundry detergent or hand dish-washing detergent in your dishwasher as it will cause severe oversudsing and possible leaks.
Recommended Amount
The amount of detergent to use depends on the water hardness (measured in grains per gallon — gpg) and the amount of soil on the dishes. Too little detergent results in poor cleaning, hard water filming and spotting and poor drying. Too much detergent causes permanent etching/cloudiness.
As a rule, use 1 teaspoon of detergent per grain of water hardness. Use a minimum of 3 teaspoons in soft water. Place the recommended amount of detergent in both cups for Normal and longer cycles. Do not divide the recommended amount between the cups.
The following chart includes specific recommendations. (Refer to the package directions on concentrated detergents.)
| Water Hardness ^a | Detergent Use |
| Soft (0–3 gpg) | 3 teaspoons |
| Medium (4–9 gpg) | 4–9 teaspoons |
| Hard (10–12 gpg) | 10–12 teaspoons |
*Your local water utility or state university extension service can tell you the degree of water hardness in your area.
For water hardness of 13–14 gpg add more detergent (1 teaspoon for each gpg) to the beginning of the main wash portion of the cycle. Unlatch the door. Open it slowly and add detergent to the bottom of the tub. The dishwasher will continue through the cycle.
If water hardness is 15 gpg or harder, it is virtually impossible to get good results with any dishwasher. The only solution is a mechanical water softener to improve water quality and detergent effectiveness.
Detergent Placement
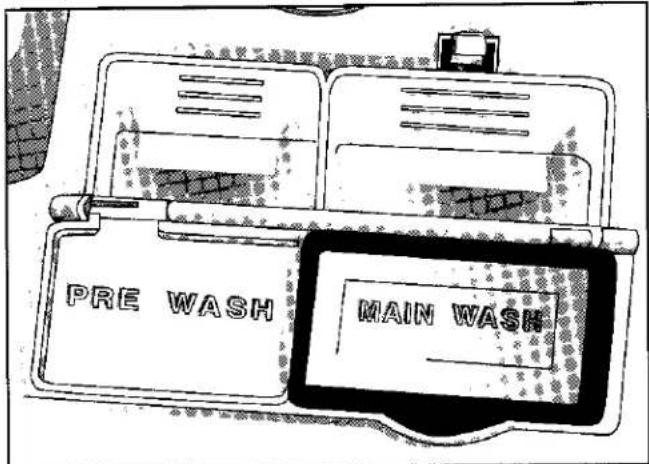
Add detergent to dispenser cup just before you select the cycle and options.
Smart Start
If dishes are not prerinsed, place proper amount of detergent in both PRE WASH and MAIN WASH cups. If dishes are prerinsed, add detergent only to the MAIN WASH cup. Close the cover.
Sani Scrub
Place proper amount of detergent in both the PRE WASH and MAIN WASH cups. Close the lid.
Quick Wash
Place the proper amount of detergent in the MAIN WASH cup only. Close the lid.
Rinse & Hold
Do NOT use detergent in this cycle.
*If the Delicate Wash option is selected, use half the normal amount of detergent.
CHECKING RINSE AID
Regular use of a rinse aid improves drying and reduces spotting and filming.
Your Maytag Jetclean™ dishwasher features an automatic rinse aid dispenser located near the detergent cups in the door.
The clear window in the center of the dispenser cap allows you to see if there is rinse aid in the reservoir. When it is time to refill the dispenser, the words "LOW RINSE AID" will light in the control panel display.
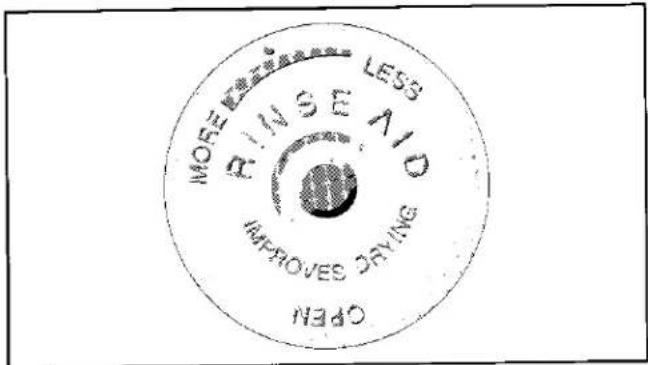
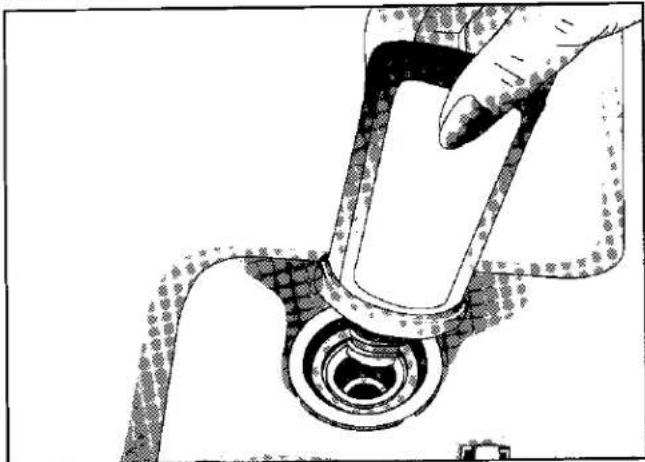
To add rinse aid to the dispenser, turn the cap counterclockwise to open. Remove the cap and pour liquid rinse aid into the opening. Replace the cap and turn it clockwise.
natural_image
Mechanical assembly diagram showing a hand pressing a component into a bearing (no text or symbols visible)An adjustable cap found on some models allows you to adjust the amount of rinse aid dispensed. A raised dot on the cap indicates the recommended initial setting. Typically, use the LESS setting for soft water and the MORE setting for hard water. Set the cap anywhere between these amounts as needed. To improve drying, turn the cap towards the MORE setting. When adjusting or replacing the cap, be sure it is securely in place before closing the dishwasher door.
ENSURING HOT WATER
For good cleaning and drying results, hot water is necessary. The incoming water temperature should be 120-140°F to properly activate the detergent and melt greasy food soils.
To check the incoming water temperature, turn on the hot water faucet nearest the dishwasher and let it run into a glass in the sink. Place a candy thermometer in the glass and check the temperature once it has stopped rising. If the temperature is below 120^ F ( 49^ C), have a qualified person raise the water heater thermostat setting.
Before starting the dishwasher, turn on the hot water faucet and let it run until the water is hot.
SPECIAL TIPS
- Select Smart Start
This selection monitors the items which affect results and develops a cycle for best results.
- Use HOT Water
Hot water dissolves and activates the detergent, dissolves grease from the load and improves drying results. Refer to page 6 for more information.
• Use Proper Detergent Amount
For best soil removal, good drying results and prevention of filming, etching and spotting, the proper amount of detergent must be used. Refer to page 5 for recommended amounts.
- Use a Rinse Aid
Regular use of a rinse aid improves drying results and reduces spotting and filming. See page 6 for more information.
- Load the Dishwasher Properly
To ensure soiled surfaces get adequate wash action, carefully follow the loading instructions on pages 2–4.
- Select Heated Dry
For improved drying select Heated Dry.
SELECTING CYCLES & OPTIONS
Your dishwasher is designed with a system which allows computer controls to interpret and adapt to various situations with human-like reasoning. It also provides you the opportunity to select various cycles and options of your choosing. The following information will help you select the appropriate cycle and options for each load.
SMART START
This utilizes sensors to develop an optimum cycle based on the water temperature, soil level, detergent presence, and wash arm speed and rotation. The sensors continuously monitor these conditions to adjust the cycle and time up or down as needed. You may notice the time in the display change as the cycle is adjusted.
It is activated by pressing the SMART START pad. The indicator on the pad will light and a tone will sound. WASH, and an estimated cycle time will appear in the display.
You may want to select a drying option with this cycle. The control remembers the last option selected so it is not necessary to reselect it each time unless you want to change the option. Refer to HEATED DRY on page 9 for more information.
DELAY START
This feature can postpone or interrupt any cycle from 10 minutes to 12 hours by pressing the DELAY pad. The time increases by 10 minute increments until 30 minutes is reached. It then increases to 60 minutes and continues to increase in 1 hour increments until 12 hours is reached.
To set up a delay:
Press SMART START and/or any options. Then, quickly press and hold the DELAY pad until the desired amount of delay time appears in the display.
NOTE: If delay is chosen without first selecting a cycle and/or options, the dishwasher will select the last wash cycle used in the delay mode.
The indicator on the pad lights and a tone sounds when selected. DELAY and the delay time remaining appear in the display as the time is counted down to the start of the cycle.
To interrupt a cycle:
Press and hold the DELAY pad until the desired amount of time is displayed. The cycle will resume when the delay time runs out or when the DELAY pad is pressed again.
To cancel a delay:
Press the DELAY pad again. The indicator light will go out and the cycle will start immediately.
OPTIONS
Pressing the OPTIONS pad allows you to select any of the six additional lit pads. When selected, the pad will light and a tone will sound. Options include:
SANI SCRUB is designed for loads with heavy or dried-on soils. It checks the water temperature of the main wash and final rinse to improve cleaning and drying results. (HEATED DRY may or may not be selected with this cycle.)
When selected, the indicator on the pad will light and a tone sounds. WASH, and an estimated cycle time appear in the display.
QUICK WASH is a short cycle for use on dusty or very lightly soiled items you wish to store or reuse immediately.
When selected, the indicator on the pad will light and a tone sounds. WASH, and an estimated cycle time appear in the display.
RINSE & HOLD is a cycle designed to rinse a few soiled dishes being held until the dishwasher is full. It helps to minimize any potential food odors. A dry cycle is not available with this cycle since the dishes are not yet washed.
| CYCLE | SEQUENCE | WATER USE |
| SANI SCRUB adjusts the cycle for loads with heavy or dried on soils. Press the Sani Scrub pad. | PreWash2 RinsesMain Wash2 RinsesDry | 11Gal. |
| QUICK WASH washes dusty or very lightly soiled items you plan to store or reuse immediately. Towel drying is necessary. | Wash2 RinsesDry. | 5Gal. |
| RINSE & HOLD rinses dishes being held for a full load to reduce potential food odor in the dishwasher. | RinseOFF | 2Gal. |
When the cycle is selected, the indicator on the pad will light and a tone sounds. RINSE, : and an estimated cycle time appear in the display.
HEATED DRY improves drying by adding heat to the dry cycle. When selected, the indicator on the pad will light and HEATED DRY will appear in the display.
If you choose not to use this option, press the HEATED DRY pad to turn the light off and the dishes will be fan dried only. Towel drying of some items may be necessary.
With either of these dry options you may notice moist air being released from the dishwasher through the vent located below the controls. You may also notice that some items with concave bottoms or Teflon-coatings are difficult to dry and may need towel drying before putting them away.
NOTE: For best drying results, use a rinse aid and HEATED DRY and make sure the incoming water temperature is 120^-140^ F.
DELICATE WASH can be used with any cycle, including Smart Start to create a gentle wash and dry cycle for china and crystal. Press the Delicate Wash pad after selecting a cycle. The indicator on the pad will light and a tone will sound. DELICATE WASH will light in the display. Use half as much detergent as normally required.
CANCEL any cycle before it's finished by pressing this pad. The indicator on the pad will light and a tone will sound. The dishwasher will drain, if needed, and shut off.
Child Lock
To prevent children from accidentally starting the dishwasher or changing the cycle and options, press the padlock symbol located next to the Smart Start pad 3 times within 3 seconds. LOCKED will appear in the display. To cancel, again press the padlock 3 times within 3 seconds.
NOTE: This does not lock the door, only the controls.
STARTING THE DISHWASHER
After loading, close the door; press the door until the latch clicks.
NOTE: If your water heater is located a long distance from the kitchen, run the water from the hot water tap to clear the line of cold water before starting.
Turn the dishwasher on by firmly pressing the pad corresponding with the chosen cycle. Pressing Smart Start, or an optional cycle (Sani Scrub, Quick Wash or Rinse & Hold) will start the dishwasher (fill will begin). The indicator light for the selected cycle will glow.
Display Window
Through words, symbols and numbers the display window indicates what is happening in the dishwasher.
Cycle Progression:
The dishwasher will indicate the portion of the cycle it is currently in. Estimated time remaining in the cycle (in minutes) also appears in the display.
WASH - This symbol flashes to indicate the wash circulation has started. Soiled items can be added while in this portion of the cycle.
RINSE - This symbol flashes to indicate the rinse circulation has started.
DRY - The fan symbol will light during the dry period and the fan blades will flash when the fan is on. The heat symbols will light when Heated Dry is selected. If the sensors indicate that additional drying is needed, the fan may run for a few minutes after the end of the cycle.
Special Indicators:
CLEAN - appears at the end of a complete wash cycle. It will remain lit until the door has been opened continuously for 60 seconds.
DELAY - appears when the Delay pad is pressed. The time (in hours or minutes) is also displayed.
DELICATE WASH - appears when this option has been chosen with any wash cycle.
HEATED DRY - appears if Heated Dry is selected.
HEATING – appears when the water temperature is low and the heating element is on during washing or rinsing portions of the cycle. It is NOT lit during the drying portion of the cycle.
LOCKED - appears when the Child Lock has been activated.
LOW RINSE AID – appears at the end of the cycle as a reminder to add more rinse aid to the dispenser in the door. It shuts off after the door is opened.
PF – appears when there has been a power failure. Any option selected before the power failure will need to be reselected.
RINSED - appears after a Rinse & Hold cycle.
Service Indicators:
Refer to the "Before You Call For Service" section if BLOCKED DRAIN, BLOCKED WASH ARM or WASH ARM appears in the display. If any other code appears, contact your local servicer, or Maytag Customer Service (U.S. 1-800-688-9900; Canada 1-800-688-2002).
Adding a Forgotten Item
For proper cleaning, the forgotten item should be added early in the cycle, while the wash symbol ( ### ) is lit.
- Unlatch the door and wait until the sound of circulating water stops.
- Open the door and add the item.
- Latch the door. The cycle will continue at the point it was interrupted.
WATER CONDITIONS
Hard Water containing calcium minerals can cause a lime film or deposit on the tub and dishes. You may first notice this as "cloudy" glasses.
To confirm if the film is due to hard water, soak a glass approximately 5 minutes in undiluted white vinegar. Rinse and dry. If the film is removed, it is due to hard water (if not removed, see Soft Water).
To correct:
- Adjust the detergent amount to the degree of water hardness. (See pg. 5)
- Check water temperature. (See pg. 6)
- Use a rinse aid to improve the sheeting action of the water. (See pg. 6)
To remove film:
(Try one of the following.)
- A damp cloth and mild scouring powder.
- A half-cup white vinegar in a Rinse & Hold cycle (without dishes and detergent). Follow with a regular detergent wash.
Soft Water can promote etching if too much detergent is used, items are prerinsed or the water temperature is too high. It is a permanent film which pits or erodes the surface of the glass.
The beginning stages can be identified by a "rainbow" look — shades of blue, purple, brown or pink when the glass is held at an angle to the light. In advanced stages the surface appears frosted, spotted or cloudy.
Etching can happen in any dishwasher and there is no relationship to the cost or quality of the glass.
To prevent:
- Adjust the detergent amount to water hardness. (See pg. 5)
- Adjust the water temperature. (See pg. 6)
- Don't prerinse. This removes food soils and aggravates etching.
Rust Minerals can turn the dishes or tub interior a brown, red or black color if iron or manganese is in the water.
To prevent:
- Drain your home's water heater once a year to flush away any mineral deposits.
- Check with a water treatment company like Culligan or Kinetico to see if a filter is needed in the home.
To remove:
(Do not use this method on metal items.)
- Use a rust removing compound like RoVer Rust Remover (available from Maytag Parts Distributors by using Part No. 57961).
- Select the Rinse & Hold cycle. Add 1/2 cup RoVer Rust Remover and let the dishwasher complete the cycle.
- Follow with a detergent wash.
The only permanent solution is to install special filters which can remove iron and manganese from the water.
ENERGY SAVING TIPS
- Don't prerinse!
- Wash full loads. The same amount of electricity and water are used.
- Load correctly for best washing results.
- Operate the dishwasher during off-peak hours. Check your local utility for rates.
MAINTAINING THE DISHWASHER
Your new Maytag Jetclean™ dishwasher requires little maintenance attention. However, if you are going on vacation, leaving a summer home or storing the dishwasher for an extended period of time, you may want to review the following information.
Dishwasher Interior
The inside design is normally self-cleaning. However, you may want to periodically check the bottom of the dishwasher tub to see if any large particles have not gone through the strainer portion of the module.
You may also want to wipe the edge of the inner door liner to remove any food soil splashes which occurred during loading.
Odors
Any odor inside the dishwasher is likely related to a chemical (chlorine) odor from the detergent or a food odor from soiled items sitting in the dishwasher. Try using a different detergent, especially a lemon-scented one, or purchase a fresh package and see if the odor decreases.
We also recommend using the Rinse & Hold feature if dishes are to be held for a couple of days before washing. This will remove most food soils that may cause an odor.
For a strong odor, try one of the following:
-
Place baking soda in both sides of the detergent cup. Select Light/China and let the water circulate for about 10 minutes. Stop the dishwasher by unlatching the door and let stand overnight. Then restart the dishwasher by latching the door and let it complete the cycle.
-
Select the Light/China cycle and let the dishwasher fill with water. Then open the door and pour one cup of chlorine bleach into the bottom of the dishwasher. Latch the door and let the dishwasher complete the cycle.
Storage/Moving
Fill both detergent cups with a fresh-scented dishwasher detergent or baking soda and select a Normal cycle. Allow the dishwasher to complete the cycle. Then turn the water supply off and set the dishwasher to drain. Operate the drain twice to ensure most of the water is removed. Last, disconnect the electrical supply and prop open the door.
Dishwasher Exterior
The front of the dishwasher can be cleaned with a soft damp cloth and liquid spray cleaner. Do not use any abrasive powders or cleaning pads.
Knowing what can and cannot be washed in your dishwasher is important. Most tableware, cookware and silverware can be washed safely in your dishwasher. However, if you have any doubts about an item, check with the manufacturer. If you cannot reach the manu-
facturer, simply test-wash one small item for several washes before attempting to wash an entire set.
NOTE: It is the user's responsibility to determine if dishware should be washed in a dishwasher.
| Material | Dishwasher Safe? | Special Information | Material | Dishwasher Safe? | Special Information |
| Aluminum | Yes, except anodized aluminum and some cook-ware. | High water temperature and detergents may affect finish. Check cleaning instructions. | Pewter | No | High water temperature and detergents may discolor or pit finish. |
| Disposable Plastics | No | Cannot withstand high water temperatures and detergents. | |||
| Cast Iron | No | Seasoning will be removed, and iron will rust. | Plastics | Yes (If labeled “dishwasher safe”) | Always check manufacturer's recommendation before washing. Plastics vary in their capacity to withstand high water temperatures and detergents. |
| China/ Stoneware | Yes, except antique or hand-painted china. | Always check manufacturer's recommendation before washing. Antique hand-painted or over-the-glaze patterns may fade. Gold leaf may discolor. If in doubt, test-wash a small item for several weeks before washing entire set. | Stainless Steel | Yes | Run a Rinse & Hold Cycle (select models) if not washing immediately. Prolonged contact with foods containing salt, vinegar, milk products or fruit juice could damage finish. |
| Crystal | Yes, except antique or lightweight delicate crystal. | Always check manufacturer's recommendation before washing. Some types of leaded crystal may etch with repeated washings. If in doubt, test wash a small item for several weeks before washing an entire set. | Sterling Silver or Silverplate | Yes, except with commercial “darkening”. | Run a Rinse & Hold Cycle (select models) if not washing immediately. Prolonged contact with food containing salt, acid or sulfide (eggs, mayonnaise and seafood) could damage finish. Commercial “darkening” may be removed by detergent. |
| Glass | Yes, except milkglass. | Milkglass will yellow with repeated dishwasher washing. | Tin | No | May rust. |
| Wooden Items | No | Always check manufacturer's recommendation before washing. Wood may warp, crack or discolor. | |||
| Gold-Plated Flatware | No | Will discolor. |
BEFORE YOU CALL...
Check these points to help save you time and money:
| Won't Fill | ·Be sure door is latched securely.·Be sure the water is turned on.·Check that the dial/pad is properly selected for a cycle.·Allow time for select models to drain/pause before filling.·Check your home's circuit breaker or fuse box.·If LOCKED appears in the display, press the Lock Pad 3 times within 3 seconds to unlock.·Check inlet hose for a kink.·Check water valve inlet for sediment and clean if necessary. |
| Won't Drain/Water in Tub Bottom | ·If hooked up to a food waste disposer, be sure the knock-out is removed from the disposer inlet.·Be sure the drain hose is elevated at least 32" so water cannot siphon back into the tub.·Check drain hose for a kink.·Check your home's circuit breaker or fuse box.·Check that the cycle is completed. |
| Detergent Cup Not Empty | ·Check that the cycle is completed.·Be sure dispenser is not blocked.·Use fresh detergent stored in a cool, dry place. |
| Seems Noisy | ·A water valve hiss during fill is normal.·Water circulation sounds are normal.·A thumping sound may be a wash arm bumping an item that is extending beyond the racks.·Chopping or grinding sounds may be heard during drain as the internal food disposer chops hard items like fruit seeds, nuts, etc.·Humming during drain is normal.·A snap noise is the detergent cup lid hitting the door liner when the dishwasher door is opened at the end of the cycle. This is normal.·Proper installation affects the noise level. |
| Cycle Takes Too Long | ·Check to see that the incoming water temperature is at least 120-140°F. |
| Has An Odor | ·Dishes being held for a full load may need to be run through a Rinse & Hold cycle while waiting. (Select models)·Many dishwashers have a "new" smell when first installed. It dissipates with use.·A chemical odor is usually the chlorine bleach in dishwashing detergents. You may want to try another brand.·Dishwasher not draining properly. (See "Won't Drain" section.) |
| Leaks | ·Check that the dishwasher is level. (Refer to the Installation Instructions.)·Suds can cause the dishwasher to overflow. Measure the detergent carefully and use only detergents designed for use in a dishwasher. Less detergent is needed in soft water. Try another brand if sudsing continues.·Follow directions closely on how to add a forgotten item. (See pg. 9)·To avoid rinse aid leaking from the dispenser, be sure the lid is securely attached. |
| Displays WASH ARM | ·The lower wash arm is turning too slow due to excessive sudsing. Try another brand of detergent and use recommended amounts. |
| Displays BLOCKED DRAIN and beeps | ·Make sure the food waste disposer is empty to allow proper draining.·If the disposer is empty, the drain hose may be blocked and service is needed. |
| Displays BLOCKED WASH ARM and beeps | ·Check lower dish rack for items extending below the rack (such as flatware, small lids, etc.) which would prevent the lower wash arm from turning properly. ·Check that drain hose loop is 32" high. Refer to installation instructions. |
| (Dry fan) turns on after cycle is complete | ·Drying time will be added if the water temperature is low. Refer to page 8. |
| Food Soil Remains On Dishes | ·Check water temperature. (See pg. 6) ·Run hot water at the sink before starting the dishwasher. ·Select Sani Scrub cycle. ·Check water hardness and adjust detergent amount accordingly. (See pg. 5) ·Use fresh detergent stored in a cool dry place. ·Load items so they do not block the wash arms or center tower. (See pg. 4) ·Load the utensil basket with some handles up and some down. ·Do not place glasses over tines. |
| Glasses Are Cloudy/Spotted | ·Adjust detergent amount to water hardness. (See pg. 5) ·Check water temperature. Incoming hot water should be between 120-140°F. (See pg. 6) ·Use a rinse aid like Jet-Dry or Cascade Rinse Aid® regularly, to improve drying. ·Don't prerinse. The detergent needs food soils to act on. |
| Items are Stained/Discolored | ·Aluminum utensils can leave marks when they rub against other things. Leave a slight space between items. ·Iron deposits in the water can leave a yellow, brown or orange film on dishes. A filter may be needed or periodically use RoVer Rust Remover.° ·Food soil stains normally require hotter water and more detergent to remove and prevent. |
| Items Not Properly Dried | ·Be sure Heated Dry is selected. ·Use a rinse aid like Jet Dry or Cascade Rinse Aid® regularly, to improve drying. ·Turn the rinse aid cap towards the MORE setting. ·Check water temperature. (See pg. 6) ·Select Sani Scrub. ·Increase detergent amount to match water hardness. ·Load properly. (See pgs. 2-4) ·Plastic items have a porous surface and tend to collect water droplets. Towel drying may be necessary. ·Glasses and cups with concave bottoms hold water and require towel drying. |
| Dishware is Chipped | ·Load dishes according to instructions so they do not strike each other.(See pgs. 2-4) ·We do not recommend washing fine antique china/crystal in the dishwasher. ·Do not load glasses over the tines. ·Do not overload. |
* Brand names are trademarks of the respective manufacturer.
For further assistance contact Maytag Customer Assistance: U.S. 1-800-688-9900 Canada 1-800-688-2002
MAYTAG INTELLISENSE™ DISHWASHER WARRANTY
Full Three Year Warranty
For THREE (3) years from the date of original retail purchase, any part which fails in normal home use will be repaired or replaced free of charge.
Limited Fourth Through Fifth Year Warranty
After the third year from the date of original retail purchase through the fifth year, all of the following components which fail in normal home use will be repaired or replaced free of charge for the part itself; with the owner paying all other costs, including labor, mileage and transportation.
These components include:
Any parts of the Jetclean system for all models, including the complete power module assembly, center spray nozzle, spray arms, wash process sensor, top wash arm hose, and motor.
Computer Touch Controls - any microprocessor and touch pad assemblies:
All models against rust, including exterior cabinet and front panels of convertible models, the exterior front panels and accessory side panels or built-in models, and nylon coated racks (available on selected models).
Full Life Time Warranty
Fourth through Lifetime
After the third year from the date of original retail purchase through the lifetime of the product, should the tub or door liner develop a water leak in normal home use, repair or replacement of the tub and/or door liner will be made FREE OF CHARGE. PLEASE NOTE: These full warranties and the limited warranty apply when the dishwasher is located in the United States or Canada. Dishwashers located elsewhere are covered by the limited warranty only, including parts which fail during the first three years.
Canadian Residents
This warranty covers only those dishwashers installed in Canada that have been listed with Canadian Standards Association unless the dishwashers are brought into Canada due to transfer of residence from the United States to Canada.
The specific warranties expressed above are the ONLY warranties provided by the manufacturer. This Warranty gives you specific legal rights, and you may also have other rights that vary from state to state.
To Receive Warranty Service
To locate an authorized service company in your area contact the Maytag dealer from whom your appliance was purchased; or call Maytag Customer Service at the number listed below. Should you not receive satisfactory warranty service, please call or write:
Maytag Customer Assistance
c/o Maytag Customer Service
P.O. Box 2370
Cleveland, TN 37320-2370
U.S. 1-800-688-9900
CANADA 1-800-688-2002
When contacting Maytag Customer Service be sure to provide the complete model and serial number of your appliance, the name and address of the dealer from whom you purchased the appliance and the date of purchase.
Should you still have a problem, write to: Major Appliance Consumer Action Program, 20 North Wacker Drive, Chicago, Illinois 60606. MACAP is an industry sponsored but independent group of consumer experts who receive and act on complaints from appliance owners.
NOTE: When writing about an unsolved service problem, please include the following information:
(a) Your name, address and telephone number;
(b) Model number and serial number (found on the upper left corner of the tub opening) of your appliance;
(c) Name and address of your dealer and the date the appliance was bought;
(d) A clear description of the problem you are having.
(d) Water hardness, detergent brand and amount, water temperature, and cycle used.
MAYTAG • One Dependability Square • Newton, Iowa 50208
- FOR FUTURE REFERENCE
- CONSUMER PUBLICATIONS
- IMPORTANT PERSONAL SAFETY INSTRUCTIONS
- SAVE THESE INSTRUCTIONS
- LOADING INFORMATION
- Before Washing
- General Recommendations
- Upper Rack (Features vary depending on model)
- Lower Rack
- (Features vary depending on model)
- Removable Utensil Basket (Design varies depending on model)
- ADDING DETERGENT
- Recommended Amount
- Detergent Placement
- Smart Start
- Sani Scrub
- Quick Wash
- Rinse & Hold
- CHECKING RINSE AID
- ENSURING HOT WATER
- SPECIAL TIPS
- - Select Smart Start
- - Use HOT Water
- • Use Proper Detergent Amount
- - Use a Rinse Aid
- - Load the Dishwasher Properly
- - Select Heated Dry
- SELECTING CYCLES & OPTIONS
- DELAY START
- To set up a delay:
- To interrupt a cycle:
- To cancel a delay:
- OPTIONS
- Child Lock
- STARTING THE DISHWASHER
- Display Window
- Cycle Progression:
- Special Indicators:
- Service Indicators:
- Adding a Forgotten Item
- WATER CONDITIONS
- ENERGY SAVING TIPS
- MAINTAINING THE DISHWASHER
- Dishwasher Interior
- Odors
- Storage/Moving
- Dishwasher Exterior
- BEFORE YOU CALL...
- MAYTAG INTELLISENSE™ DISHWASHER WARRANTY
- Full Three Year Warranty
- Limited Fourth Through Fifth Year Warranty
- Full Life Time Warranty
- Canadian Residents
- To Receive Warranty Service
Brand : MAYTAG
Model : 9962
Category : Dishwasher