M6654W - Washing machine SERVIS - Free user manual and instructions
Find the device manual for free M6654W SERVIS in PDF.

| Product Type | Washing Machine |
| Brand | Servis |
| Model | M6654W |
| Capacity (Cotton) | 6 kg (typical) |
| Height | 85 cm (approx) |
| Width | 60 cm (approx) |
| Depth | 60 cm (approx) |
| Net Weight | 70 kg (approx) |
| Electrical Supply | 230 V, 50 Hz, 13 A fuse |
| Water Pressure | 0.5 - 10 bar (5 - 100 N/cm²) |
| Water Fill | Hot and cold water fill |
| Drum Material | Stainless steel |
| Detergent Drawer | 3 compartments: pre-wash, main wash, softener |
| Spin Speed | High speed with electronic balancing system |
| Programmes | Multiple wash programmes including rinse and spin |
| Door | Porthole door with safety interlock |
| Levelling | Adjustable front feet with lock nuts |
| Pump Filter | Inspectable and cleanable at front bottom right |
| Installation | Free-standing, require levelling and proper plumbing |
| Safety Features | Door safety interlock, electronic imbalance protection, earth connection |
| Maintenance | Descaling, drawer cleaning, filter cleaning |
| Customer Careline | 08705 168299 |
| Warranty | Guarantee against faulty workmanship (proof of purchase required) |
Frequently Asked Questions - M6654W SERVIS
User questions about M6654W SERVIS
0 question about this device. Answer the ones you know or ask your own.
Ask a new question about this device
Download the instructions for your Washing machine in PDF format for free! Find your manual M6654W - SERVIS and take your electronic device back in hand. On this page are published all the documents necessary for the use of your device. M6654W by SERVIS.
USER MANUAL M6654W SERVIS
WASHING MACHINE OWNERS HANDBOOK
CUSTOMER CARELINE
08705 168299
Customer Careline: 08705 168299
Thank you for purchasing a Servis Washing Machine.
The responsibility for correctly installing your washing machine rests entirely with you, the owner, so please read the safety and installation instructions carefully. Remember, it may be necessary to pull your appliance from its working position for servicing so do not make the water and electrical connections too short.
Do not tamper with the appliance until you have read and understood the instructions fully.
INDEX
INTRODUCTION
| Safety | Instructions | 4 |
INSTALLATION
| Unpacking | Instructions | 5 |
| Electrical | Information | 6 |
| Velling the Appliance | 8 | |
| Plumbing | Installation | 9 |
OPERATION
| How to Do a Wash 13 | ||
| Laundry | Preparation | 15 |
| Loading the Appliance 15 | ||
HINTS & ADVICE
| Detergents and Additives 16 | ||
| Care of Your Appliance | 17 | |
| Stain | Removal | 19 |
| Troubleshooting | 21 | |
| AFTER SALES SERVICE | 22 |
SAFETY INSTRUCTIONS
1 Please read the installation and connection instructions before attempting to install this appliance.
2 Ensure you have followed the 'Unpacking Instructions' section carefully.
3 You should run an initial wash cycle without laundry to remove residues of factory-applied grease from the drum and tub. We suggest a rinse and spin programme with a small amount of detergent.
4 It is important that when you have selected a rinse and spin programme, you attend the machine throughout the cycle, which will also ensure that all installation connections have been correctly made.
5 It is also recommended after seven days use, that the connections to the outlet hoses are checked at the taps and the appliance.
6 You may find some water deposits in the tub; this is the residue from the thorough testing, which your appliance was subjected to in the factory.
7 Before using your appliance for the first time, please make sure that the mains voltage and supply indicated on the rating plate (situated inside the fi Iter door on the front bottom right hand corner of the appliance) agree with the mains voltage where the machine is to be used.
8 Before cleaning or care and maintenance work, make sure that the appliance is switched off. For safety reasons we strongly advise that you pull the mains plug out of the socket, switch off at the power point or completely remove the fuse box servicing the circuit (see Electrical Information).
9 Never direct water onto the outer casing of the appliance.
10 Never use the supply lead to pull the mains plug out of the socket. Pull the plug.
11 Never operate the machine if the appliance shows visible signs of damage to the control panel, worktop or bottom plinth.
12 We advise that for your safety and the continued trouble free operation of your appliance, all repairs and maintenance should be carried out by an approved Servis UK engineer using only genuine parts.
13 Children may not realise the dangers of improper use of electrical appliances. Therefore, please ensure that children are kept away at all times.
14 During certain programmes, the glass on the porthole door could become very hot, please ensure therefore that children are kept away at all times.
15 When it is finally time to replace your washing machine, please make sure that you de-activate the door lock and cut the electrical supply lead, (after disconnecting) and dispose of the lead and plug safely.
16 If you operate this appliance incorrectly or use it for any purpose other than that for which it is intended, we cannot accept liability for any possible damage caused.
17 When cleaning the stainless steel drum, never use any iron-containing scouring agents or steel wool.
18 If the supply cord is damaged, it must be replaced by the manufacturer or its service agent.
19 The appliance must be positioned so that its plug is easily accessible. It is also important that your appliance has adequate ventilation and that air flow underneath the appliance is not impeded.
WARNING! Socket outlets are not permitted in bathrooms, neither should any provision be made for connecting moveable electrical appliances. No stationary appliance is to be installed within reach of a person using a bath or shower.
Cold fi II only machines improve the performance of biological detergents as well as increasing stain removal capabilities: all contributing to an “A” wash performance. Apart from having lower water consumption and energy costs, it also offers the convenience of a one pipe installation connection.
UNPACKING INSTRUCTIONS (ACCORDING TO MODEL)
1 Washing Machine
2 Owners Handbook
3 Hot and Cold High Pressure Hoses
4 Plastic Hole Plugs
5 Water Inlet Cap
6 Rubber Washers
7 Mesh Filters
8 Hose Crook
The machine must be installed by professionally qualified technicians, according to the manufacturer's indications. Incorrect installation may result in damage to persons and property.
The machine can be installed anywhere, provided the temperature in the place of installation is not below 3^ C and the cables and hoses at the rear of the machine are not crushed in any way.
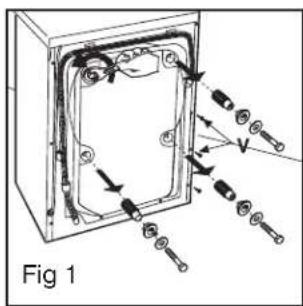
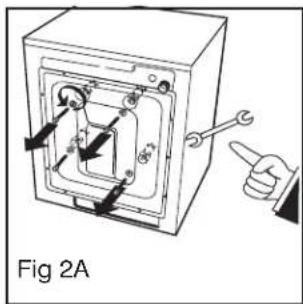
For transport purposes the swinging unit in the machine is blocked using 4 spacers with screws. Before starting the machine these spacers and lock screws must be removed, and stored for use in the event of a possible change of location.
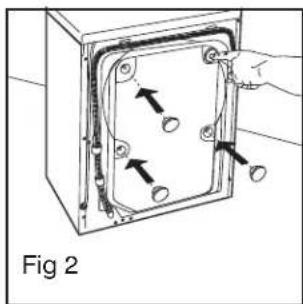
Block off the holes with the plugs provided, which can be found in the bag containing the documents.
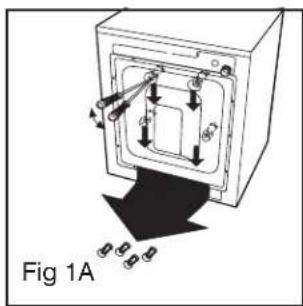
For transport purposes the swinging unit in the machine is blocked using 4 spacers with screws. Before starting the machine these screws must be removed using a screwdriver.
Insert a screwdriver in the holes and proceed as shown in the figure to recover the 4 plastic spacers.
ELECTRICAL INFORMATION
Before using this appliance ensure that the voltage in your home corresponds with the voltage indicated on the machine rating plate, which can be found inside the filter door - front bottom right hand corner.
Warning – This appliance must be earthed.
The mains lead of the appliance is fitted with a BS 1363A 13 amp fused plug.
To change a fuse in this type of plug, proceed as follows:
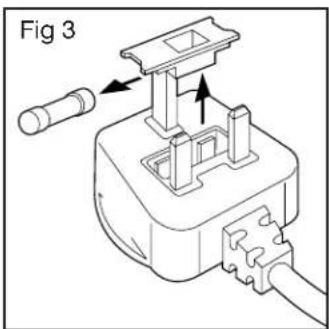
1 Remove the fuse cover (A) and the fuse (Fig 3).
2 Fit a replacement fuse which should be BS 1362 13 amp.
Important:
1 The fuse cover must be replaced after changing a fuse.
2 In the event of a fuse cover being misplaced, the plug must not be used until a correct replacement is fitted.
3 Please ensure that the replacement fuse cover is of the same colour as the insert or has the colour embossed in words on the base of the plug.
4 For replacement fuse covers please consult your local electrical store.
Please state the colour of your plug insert.
If the fi tted plug is not suitable for your socket outlets, it should be cut off and disposed of immediately to avoid a possible shock hazard should it be inserted into a 13 amp fuse elsewhere. A suitable alternative plug should then be fi tted to a cable.
Warning – This appliance must be earthed.
Important: The wires of the mains lead fitted to this appliance are coloured in accordance with the following code:
natural_image
Technical line drawing of a mechanical component with no visible text or symbols| 1 | GREEN AND YELLOW – EARTH |
| 2 | BLUE – NEUTRAL |
| 3 | BROWN – LIVE |
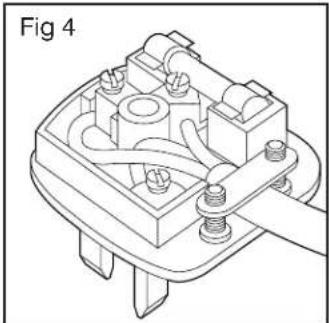
As the colour of the wires in the mains lead fitted to this appliance may not correspond with the coloured markings identifying the terminals in the plug 9 (Fig 4), proceed as follows:
1 The GREEN & YELLOW wire must be connected to the terminal in the plug which is marked with the 'E' or by the earth symbol ⊥ or coloured green or green and yellow.
2 The BLUE wire must be connected to the terminal, which is marked with the 'N' or coloured black.
3 The BROWN wire must be connected to the terminal in the plug, which is marked with the 'L' or coloured red.
4 If the terminals in the plug are unmarked or if you are in any doubt as to the correct connections, consult a qualified electrician.
For the Republic of Ireland only
The information given in respect of Great Britain will frequently apply, but a third type of plug and socket is also used, the 2-pin, side earthed type. In this case, the wire, which is coloured green and yellow must be connected to the earth contact and the other two wires to the two pins, irrespective of colour. The supply to the socket must be fitted with a 16 amp fuse.
Warning
Do not plug a tumble dryer and washing machine into an adaptor for connection to a single socket outlet. Plug the dryer and washing machine into separate socket outlets.
On completion of the installation, the appliance must be connected to the mains supply through a two-pole switch.
Special Electronic System
Your appliance is fitted with a special electronic system that allows your appliance to spin at very high speed if the load is distributed correctly. Prior to spin, the electronic system allows the drum to rotate in both clockwise and anti-clockwise directions to distribute the wash load evenly. If this doesn't happen, sometimes large towels and sheets tangle into a ball, the electronic system will recognise the imbalance in the drum and reduce the spin cycle. This will result in the wash items being more damp than usual.
Where the imbalance is significant and could be detrimental to the appliance the system will automatically halt the spin cycle. The wash items will therefore be wet.
If this happens, wait until the door safety inter-lock has released the door catch, remove the clothes, spread them out inside the drum and then reset the appliance to the spin programme.
Note: If your appliance stops and your wash items are wet or more damp than usual, this is not a fault. The electronic system is there to protect your appliance against excessive movement and vibration.
LEVELLING THE APPLIANCE
Having completed the electrical connections, move your appliance to its operating position. To minimise vibration and noise during spinning your appliance must be level and in fi rm contact with a well supported or preferably solid floor. Failure to level the appliance could lead to instability and consequent damage to adjacent equipment.
Suspended, wooden floors or plinths might be needed to distribute the weight evenly.
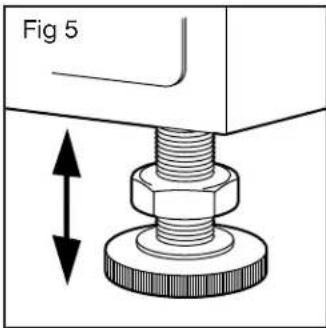
1 One or both of the front feet should be adjusted in order to level the appliance. The back feet also need to be secured by adjusting the nuts. (Fig 5).
natural_image
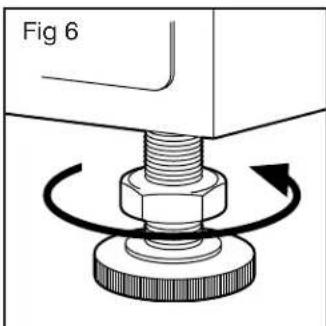
Mechanical assembly diagram showing a bolt pressing into a nut, with rotational arrows indicating motion (no text or symbols)2 Screw the foot up or down until the appliance is level in both front to rear and side to side directions. Turn feet clockwise to lower the appliance (Fig 6).

natural_image
Diagram of a device with mounting screws and a circular component, labeled Fig 7 (no text or symbols on the diagram itself)3 Lock the feet by screwing up the nuts using a 16mm spanner so that they are in firm contact with the underside of the machine (Fig 7).
PLUMBING INSTALLATION
Location
Modern washing machines spin at high speed. To avoid excessive vibration during spinning, install the appliance on a properly supported floor.
Always leave at least 5cm of space on each side of the appliance to allow for possible vibration during spinning of unbalanced loads.
Space for servicing and fi tting
Allow space on either side of the appliance for access and servicing.
Water Board Regulations
These instructions are intended only as a general guide and local by-laws and water board regulations regarding the water connections and drainage from the appliance must be observed.
Water Pressure
The appliance will operate within a wide range of water pressures.
Cold Water minimum 5 N/cm2 (0.5 bar) (7 psi)
Bleu Coloures maximum 100 N/cm2 (10 bar) (150 psi)
Hot Water (if fi tted) minimum 5 N/cm2 (0.5 bar) (7 psi)
Red Coloures maximum 100 N/cm2 (10 bar) (150 psi)
N.B.: Use the new pipe supplied with the machine and do not re-use theold one.
The height of the storage tank in the house must be a minimum of 8 feet above the top of the appliance to meet the minimum pressure requirements.
Permanent plumbing for Hot and Cold fi II machines only.

natural_image
Technical line drawing of a mechanical device with three legs and a central shaft (no text or symbols)If only cold water supply is available it will be necessary to fit a special adaptor (Fig 8).
Both the hot and cold hoses are provided with a standard 3/4 "B.S.P female connector which is to be fitted to a suitable tap. The hot water inlet can be identified by the red coloured filter inside the inlet valve. Remember to fit the rubber washers into the ends of the hoses prior to connection to the supply or appliance.
Water Supply
1 Most domestic hot water systems are suitable.
2 Multi-point gas heaters can be used if sufficient water pressure is available (check with manufacturer).
3 Single point instantaneous gas water heaters MUST NOT BE USED.
4 If you are in any doubt about the suitability of your hot water system, consult the manufacturer of the heating appliance or the Gas or Electricity Board.
Water Connections
All the connections and adaptors mentioned in this section can be purchased from your local builder, plumber or from large DIY stores and electrical outlets.
Filling hoses

All our washing machines are supplied with special high pressure filling hoses complete with a 3/4" BSP (19mm) female coupling.
Important: Under no circumstances should this coupling be removed from the hoses (Fig 9).
We will not accept any responsibility for failure of the hoses or water connections if the factory fitted couplings are removed. The hoses are designed to be long enough to stay connected while the appliance is pulled forward for cleaning and servicing.
Fitting the hoses
Important: Remove the hoses from their storage in the drum and fi t them to the inlet valves situated on the rear panel of the appliance. Remember to fi t the red hose to the red valve and to insert the rubber washers into the couplings.
Insert the filter washers (Fig 11/12) in the other end of the filling hoses as shown. Screw the red hose to the hot tap and the other hose to the cold tap.
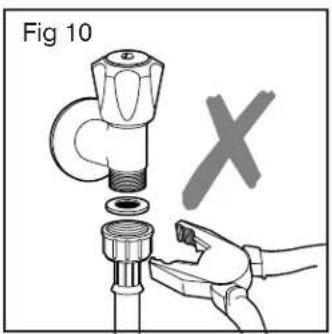
You should not need tools to make a satisfactory seal; excessive force may damage the connections (Fig 10). It should be sufficient to firmly tighten them by hand.
Permanent Plumbing
Please make provisions to shut off the water supply to the appliance completely. A separate isolation valve Temporary drainage connection

should be fitted. This will:
1 Avoid the possibility of flooding when the machine is not in use.

natural_image
Technical line drawing of a mechanical connector assembly (no text or symbols)2 Allow the appliance to be moved for cleaning and servicing. If you do not have an existing installation for connecting your appliance, consult a qualified plumber. There are various methods available.
NB: the appliance is to be connected to the water mains using new hose-sets and old hose-sets should not be reused.
Discharge into a standpipe - drainage

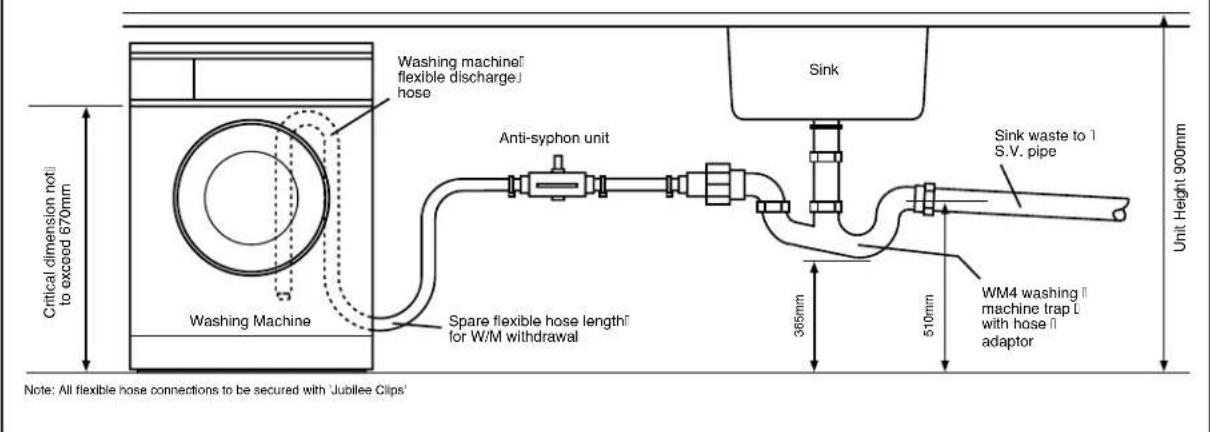
The top of the standpipe should be approximately 610mm (24") from the ground. The dimensions from the floor to the underneath of the bend in the drain hose, should be between 600 - 900mm (23"-1/2";35"-1/2") (Fig 13). The take off pipe must be capable of taking a flow of 6 gallons (27 litres) per minute. The minimum diameter of the standpipe must be 3.81cm (11/2") and there must be an air gap around the appliance drain hose when fl tting into the standpipe.
Recommended way to plumb in a washer dryer from a combined waste trap
Temporary connections
Fig 14
It is best to avoid temporary connections where possible. When the appliance runs from sink taps, it can mean that you are unable to use the sink for over an hour while the appliance completes a programme. In addition, very hot water will be discharged from the drain hose into the sink and this could be a safety hazard, especially if you have children close by.
If you must make a temporary connection, be sure that you check the condition of your tap and keep children away from the discharge area.
The closing of the water valve in automatic appliances is instantaneous and will cause back pressure to the tap. It is therefore essential that your taps are in good condition or they may leak during use. Even though your taps may be adequate for everyday use, it is advisable to check the spindle sealing gland of the tap before connecting your appliance for the first time. To do this, connect the appliance fill hoses to the tap using your chosen adaptor, making sure the hose sealing washer is in place. If water escapes from the top of the tap, the gland may need tightening or replacing.
Tap adapters
Tap adapters are available to fit the majority of tap designs. Always ensure that the mesh filter is correctly positioned in the fill hose coupling. These taps are normally fitted with 5/8" BSP threads (17mm). An adapter to convert the tap thread to the required 3/4" (19mm) is available from you local builder/plumber merchant.

natural_image
Line drawing of a faucet with crossed X marks indicating no change or failure, labeled 'Fig 15' (no text or symbols on the diagram itself)DO NOT CONNECT TO MIXER TAPS!
The end of the drain hose should be placed over the edge of the sink (Fig 16). Ensure that:

1 The hose cannot be easily displaced (a piece of string or wire can be threaded through the hole in the plastic moulded hose crook and then attached to the tap).
2 The water level in the sink cannot cover the end of the drain hose.
3 The plug is removed and the water is able to drain.
4 Children are kept away from the sink while the machine is in operation.
HOW TO DO A WASH
IMPORTANT
You should run an initial wash cycle without laundry to remove residues of factory-applied grease from the drum and tub. We suggest a rinse and spin programme with a small amount of detergent.
Use of detergents
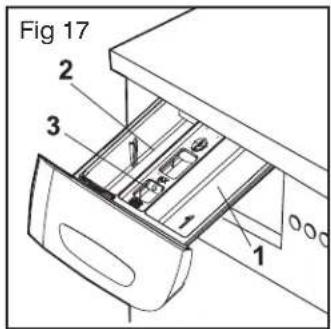
The washing machine is fitted with a three-compartment detergent drawer:
Compartment on the right is for the pre-wash soap powder
Compartment on the left is for liquid detergent or soap powder for the main wash
The centre compartment ✿ is for the softener, perfume, starch or bleach
NOTE: When using a liquid detergent (recommended for programs without pre-wash) proceed as follows: remove the baffle from its housing at the front of compartment 2 and insert it in the guides near the centre of the same compartment.
Remember to replace it in its front housing when using soap powder.
Close the detergent drawer before starting the wash.
WARNING! Do not attempt to remove the detergent drawer while the appli-
ance is operating, as this may cause water to flow out.
natural_image
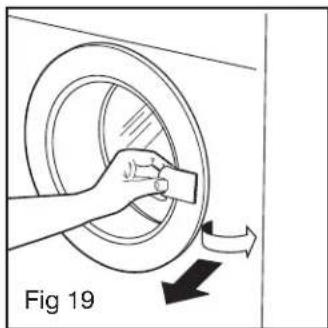
Diagram showing a hand holding a circular component with arrows indicating motion, labeled 'Fig 19' (no text or symbols on the diagram itself)Load the laundry
Open the door by pulling the catch outwards. Load the items to be washed one at a time and close the door (Fig 19).
natural_image
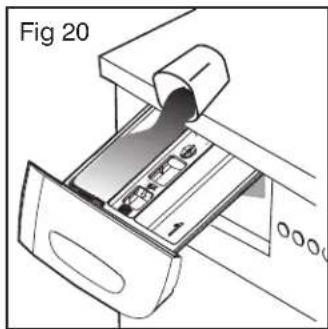
Diagram of a device being inserted into a drawer, labeled Fig 20 (no text or symbols on the diagram itself)Add the detergent
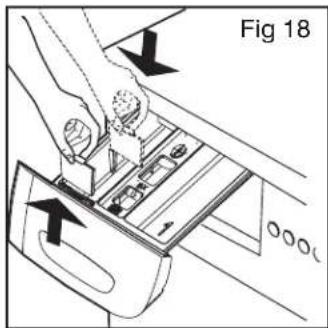
Open the detergent drawer by pushing the lower section of the drawer front
Measure the required quantity of washing powder and pour it into the detergent compartment (Fig 20) or directly into the drum of the appliance if you are using a wash ball. (See section on Detergents and Additives).

How to remove the detergent drawer
open the drawer, press on the word push and use the other hand to pull it out (Fig.21).
Start up

Check that:
1 The appliance is plugged in.
2 The water taps are on.
3 The drain hose is correctly positioned. Then push the ON/OFF button (Fig 22) then the start button
The end
At the end of a programme the appliance automatically stops. Push the ON/OFF button to turn the appliance OFF. The door is controlled by a safety device.
Open the door once the safety catch is released and remove all the articles of clothing. When the programme has finished, you are advised to unplug the appliance and turn off the water taps.
NOTE: Should you turn past the required programme continue to turn the dial to reset. Do not turn the programme selector dial whilst the machine is switched on and working, if necessary switch off the machine before attempting to move the dial.
LAUNDRY PREPARATION
Before you start washing, sort out your laundry into washing loads according to type of fabric, degree of soiling, colour fastness, drip dry, etc. All the articles in a load must be able to be washed at the same temperature. You will then obtain the best washing results.
NOTE: Clothing care labels on all clothes must be adhered to at all times.
1 Check the clothing care label on all articles; if in doubt refer to the sections on main wash programmes & fabric guide.
2 Fasten zips – these can cause damage to other articles.
3 Tears and open seams should be mended before washing.
4 Secure loose buttons.
5 Empty pockets of all contents, coins, keys, etc. can cause internal damage to your appliance.
6 Put lace, belts and children's clothes (bootees, etc.) into a pillowcase to prevent tangling around clothes.
7 Treat any stains before washing (see section on "Stain removal").
8 If you are unsure about the colour fastness of fabrics, wash in low temperature at 40oC.
9 New denims should be washed separately in case of colour run. Afterwards they can be washed according to instructions.
10 Bulky articles – sleeping bags, quilts etc, should be washed on the wool programme to get best results.
Wash one at a time.
LOADING THE APPLIANCE
How much is in a load? Your appliance will wash the following dry weights. (On selected models).
Cottons and Linens 5kg 11lbs 6kg 13.3lbs 7kg 15.4lbs 8kg 17.6lbs
| Absorbent materials, towels, nappies, flannelette | 2.5kg | 5.5lbs | 3kg | 6.6lbs | 3.5kg | 7.7lbs | 4kg | 8.8lbs |
| Manufactured fibres | 2kg | 4.4lbs | 2.5kg | 5.5lbs | 3kg | 6.6lbs | 3.5kg | 7.7lbs |
| Machine washable woollens | 2kg | 4.4lbs | 2.5kg | 5.5lbs | 3kg | 6.6lbs | 3.5kg | 7.7lbs |
A guide to the approximate dry weight of articles.
| Double sheet | 907gm | |
| Single sheet | 680gm | |
| Table cloth | 453gm | |
| Bath towel | 453gm | |
| Hand towel | 227gm | |
| Tea towel | 113gm | |
| Skirt | 340gm | (3/4 lb) |
| Pyjamas | 340gm | (3/4 lb) |
| Underwear | 113gm | (3/4 lb) |
| Aprons | 113gm | (3/4 lb) |
| Blouses | 113gm | (3/4 lb) |
| Nightdresses | 113gm | (3/4 lb) |
Two typical loads:
Programme 2 (Load 10lbs)
2 tea towels, 1 tablecloth,
2 bath towels, 2 hand towels,
1 single sheet, 2 double sheets.
Programme 4 (Load 5 lbs)
5 pairs pants, 3 blouses,
2 nightdresses, 3 shirts
2 pairs pyjamas, 1 apron.
IMPORTANT!
DONOTOVERLOAD
Overloading will affect the efficiency of the wash and in the long term, it can damage the appliance. This is particularly important with machine washable wool, and with man made fibres, such as Acrilan, Bri-nylon, Terylene, Crimplene, Dralon, Trevira and Courtelle. They need plenty of room, so keep within the weight limit. Take them out of the appliance as soon as possible after the wash programme is completed.
DETERGENTS AND ADDITIVES
How much and where?
Deciding on the soil level of your clothes is very difficult. However it is also very important to make sure you dose the correct amount of detergent. To help you, we have included the soil level symbols as you see them on the Ariel pack. We have also explained what these soil levels mean and have included garment types and items which fall into each category.
Soil levels

Light soil - No stains are noticeable on the garments, you would just like to refresh the clothes you've been wearing. (eg: sweaters, curtains, jackets).

Normal soil - Garment that have been worn for a dy and which may show some stains, although not all stains are visible (eg: blouses, shirts).

Heavy soil - Garments that have been worn for at least one day or are own in high body soil areas (eg: underwear, towels, socks, baby clothes).
Very heavy soil - Items which are very dirty (for example kitchen towels) or garments which have tough stains on them such as mud, grass, motor oil (eg: tea towels, bed linen, sportswear).
Getting the right dosage
For the best laundry results, it's important to use the right amount of detergent. Modern washing machines use less water and some people believe it is okay to use less detergent. This is not true and will lead to problems in the wash. Detergent dosage is based on the amount of soil on the laundry and the hardness of the water.
As well as ingredients designed to remove stains, detergents also contain ingredients which hold the removed stains in solution. Underdosing the detergent will result in too little of this ingredient being able to hold all of the removed stains in solution. This will build-up with time resulting in laundry which is not as white or bright as it should be.
Underdosing: will result in limescale build-up in your machine thus reducing its efficiency and increasing the running cost.
Overdosing: the detergent is uneconomical and may result in rinsing problems.
By following the dosing table on your Ariel pack, you should be able to work out the correct amount of detergent for your particular wash load.
NOTE: Always follow the recommended dosages of detergent, which can be found on every pack.
Servis recommend the use of Ariel, Ariel Color and Ariel Non-Bio in their washing machines, all of these products are available in powder, liquid, tablet or liquidab form to keep you clothes looking newer for longer.
CARE OF YOUR APPLIANCE
Successful washing and smooth running of your appliance depends on routine maintenance, which should be carried out on a regular basis.
IMPORTANT: You must unplug the appliance before all cleaning and maintenance operations.
Decalcifi cation
The water we normally use contains lime; therefore, it is a good idea to occasionally use a water softener powder in the appliance (more frequently in hard water areas). Add the powder according to the manufacturer's instructions. This will prevent the formation of lime deposits, which can affect the performance of your appliance.
After each wash
Leave the door slightly open. This helps prevent mould and stagnant smells forming inside the appliance. Turn the drum slowly so that no small items have been overlooked. Wipe the inside of the drum and door seal with a dry cloth (It is normal if a certain amount of water has collected in the rim of the door seal).
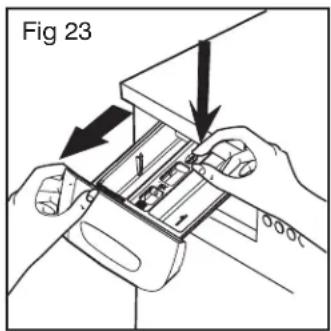
Cleaning the drawer
The drawer should be cleaned when there is a build-up of residual detergent. To remove the drawer, press on the plastic part of the conditioner grill marked 'PUSH' (Fig 23) then clean it by running it under warm water.
External cleaning
Use soap and water only and then dry thoroughly.
Inspectionable pump fi Iter
ATTENTION!! Before starting the operations described below, make sure that the washing machine is empty. Do not remove the fi Iter while the machine is running, or when full of water.
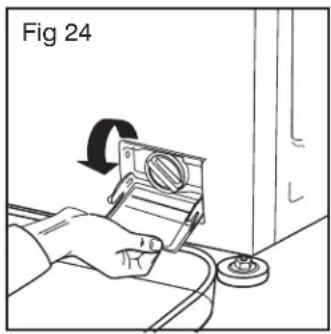
1 Open the panel, which is situated at the bottom, right corner on the front of the machine and place a container underneath to catch any spillage (It is normal for a certain amount of water to collect in the filter) (Fig 24).
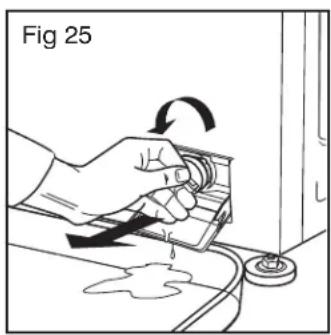
2 Unscrew the fi Iter - 2 turns anticlockwise (Fig.25) remove and rinse.
3 Replace the fi Iter carefully, putting it on its guides, push in and screw it in fi rmly until black seal is not showing.
If the filter is blocked and the appliance is unable to drain, you will need to remove the water from the appliance at this stage. To do this:
1 Unhook the drain hose from the standpipe or sink.
2 Hold the end of the hose over the bowl on the floor. The water should drain by gravity into the bowl.
3 When the bowl is full, hook the hose back up and empty. Repeat the procedure until the water stops flowing.
4 Clean the filter in the normal way.
NOTE: Never remove the filter during a wash cycle, always wait until the appliance has finished its cycle and is empty. When replacing the filter ensure that it is securely retightened. This will prevent leaks and stop young children from being able to undo the filter.
STAIN REMOVAL
Here are some common stains, their nature and the ideal reagent to use to remove the stain.
A = absorbed, B = built up, C = compound.
STAIN TYPE TREATMENT
Ballpoint Ink C Methylated spirit
Beer A Hydrogen peroxide, dilute if necessary to avoid bleaching
Blood C Soak in washing powder
Chocolate C Remove excess chocolate and treat any remaining stains with hydrogen peroxide
Coffee A Soak in washing powder
Chewing Gum B Hold an ice cube against the gum until it can be crumbled away
Candle Wax B Scrape off excess and iron between two sheets of white blotting paper, treat with methylated spirit
Eggs C Soak in washing powder
Grass C Methylated spirit
Gravy C Soak in washing powder
Grease or Oil C Methylated spirit
Ink A A cold water diluted solution of washing up liquid or similar liquid
Rust C Small stains – lemon juice Heavy stains – proprietary rust remover if suitable for material
Lipstick C Washing up liquid or methylated spirit
Mildew C Hydrogen peroxide
Milk A Washing up liquid or washing powder
Nail Varnish C Acetone (except on triacetates) or nail varnish remover: hand wash immediately before machine washing
Paint C Emulsion – cold water or Polyclens, hand wash immediately before machine washing Gloss or undercoat - Polyclens hand wash immediately before machine washing
Perspiration A Ammonia followed by hydrogen peroxide if any residual stains
Rubber C Methylated spirit followed by dry cleaning
Scorch Marks C Rub in glycerine and soak for 10-15 mins, then wash followed by diluted hydrogen peroxide
Soot C Washing up liquid
Tar C Polyclens or washing up liquid wash then treat with hydrogen peroxide Hand wash immediately before machine washing
Tea A Soak in washing powder rub in a little glycerine leave for 10-15 minutes before re-washing
Wine A Soak in washing up liquid. If coloured treat with hydrogen peroxide
Warning: Keep all chemicals out of reach of children.
Dealing with stains
There are three types of stains:
1 Absorbed stains – caused by liquids, which penetrate the garment easily, e.g. tea, coffee, wine, beer, etc.
2 Built up stains – stay on the surface and do not flow into the fi bres.
3 Compound stains – are absorbed into the fabric and leave residue on the surface, e.g. blood and certain food stains.
Basic rules
1 Remove all stains as soon as possible after they occur and try to stop the stain setting in by soaking in cold water, NEVER hot water.
2 Blot off what you can with a clean cloth.
3 Identify the stain and fabric.
4 Try the simplest remedy fi rst.
5 Test the stain removal agent on an unseen part of the garment.
6 Local treatment is best.
Soaking can play a valuable part in the removal of many common stains.
Heavy duty washing products usually contain a bleaching ingredient which removes stains such as tea, coffee and fruit juice by oxidation; some also contain enzymes which break down protein stains such as blood, gravy, egg yoke and milk. At lower temperatures, enzymes work by tackling protein stains, which could be fixed by the use of hot water. Long soaking times allow the dirt to settle back into the fabric. Two half hour soaks are better than one soak lasting an hour. Soaking works best at 40^ C to 50^ C.
When soaking
1 Always check each individual garment's Clothing Care Label.
2 Make sure the stained article is suitable for soaking. Whites and fast coloureds can usually be soaked.
3 NEVER soak silk, wool, leather, garments with metal fasteners or any article with a flame resistant finish.
4 NEVER soak articles of doubtful colour fastness (see section on testing for colour fastness).
5 Use a container such as a sink or plastic bowl (but NOT an enamel bath) large enough to hold garments
freely and fi ll it with warm water (40°C) where there are blood, gravy, egg or milk stains. Use hand hot water (50°C) for other soaking.
6 If using a powder, ensure that it is fully dissolved before putting articles in. After soaking, rinse the articles
before continuing with the soaking. NOTE: Although modern detergents can deal with most household
stains, once a stain has set it may be necessary to wash it two or three times.
7 Greasy or oily collar and cuff marks can be pre-treated with neat washing liquid. Work the liquid into the
affected area, and then continue with a normal wash.
Testing for colour fastness
Always test a fabric for colour fastness before trying to remove a stain.
Remember too, that some dyes only stay fast for a limited number of washes. It is therefore well worthwhile to re-test a coloured fabric even if you have previously found it to be colour-fast, particularly if you are planning to use a prolonged contact time with the stain removal agent or washing solution.
1 Apply the stain removal solution to an inconspicuous part of the garment (e.g. inside the hem).
2 Place the treated area between two pieces of white cloth and press with a warm iron.
3 Examine the pieces of white cloth. If no colour has been transferred, the dye is fast and you can proceed.
4 If colour has been transferred, the dye is not fast; advice should be sought from a dry cleaner.
TROUBLESHOOTING
If your appliance fails to operate, to avoid unnecessary and possibly expensive service calls, it is in your own interest to make the following preliminary checks:
If the appliance does not start
1 Is the electricity on? (Check another appliance in the same socket).
2 Is the plug firmly in the socket?
3 Is the fuse in the plug working? (Try another fuse).
4 Is the door closed properly?
5 Is the programme selected properly?
NOTE: If the appliance has just filled up with water it is probably just heating up. Wait a few minutes and it should continue.
If the appliance does not drain or spin
1 Check that the drain hose is not kinked.
2 Check that the filter is clear (See section on 'Care of Your Appliance').
3 Check that the outlet hose is correctly fitted and has not been kinked during installation, or if the appliance has moved.
4 If drain hose is connected under a sink, check the connection for an obstruction.
If the appliance does not fi ll with water
1 Check that the taps are turned on.
2 Check that the fi lling hoses are not kinked.
3 Check that the water fi lter inlet is clean.
NOTE: Your appliance is designed to use less water, therefore do not worry if the water is not immediately visible (Wash results are not affected).
If the appliance is noisy or not sitting evenly on the floor
1 Check that the adjustable feet are properly set and the lock nuts are tight (See section on 'Levelling the Appliance').
2 Check that nothing has fallen down the back or side of the appliance
3 Check that the appliance is not touching any pipes or any other appliances.
4 Check that the appliance is not over-loaded or under-loaded
5 Check that the appliance is evenly loaded.
6 Check removal of transit screws, and the suspended floor if used.
If the appliance appears to be leaking
1 Check that the water hose connections are tight (switch off electricity first).
2 Check the mesh/washers are fitted
3 Check that the soap dispenser is not blocked with unused powder.
4 Check that the drain hose is not kinked.
5 Have you remembered to fit the rubber washers to the water hoses?
6 If installed into as standpipe, check for blockage.
If the appliance still fails to operate, you must call for an engineer. In the event of a power cut during the spinning stage, switch off and reset the programme selector to the appropriate spin position when the power is restored again. This will ensure that the appliance goes through the set balancing sequence using a slow spin to evenly distribute the laundry. This is necessary to achieve stability during the final spin.
AFTER SALES SERVICE
If you think your automatic Washer Dryer is not working properly, ensure that you have referred to the following before you call for service. The company reserves the right to charge for a service call if an inspection reveals that the appliance is in fact in working order. We advise that for your safety and the continued trouble free operation of your appliance, all repairs and maintenance should be carried out by our authorised agents using genuine parts.
For advise on the use of your appliance and after sales service calls, telephone the Customer Careline 08705168299 with the following information:
1 Your name, address and postcode.
2 Your telephone number.
3 Model number for the appliance (See the section on Technical Information).
4 The date you purchased the appliance.
5 Clear and concise details of the fault.
6 The guarantee only covers defects resulting from faulty workmanship or components.
7 To obtain your free in-guarantee service repair, proof of purchase must be provided or a charge will be made.
This appliance is marked according to the European directive 2002/96/EC on Waste Electrical and Electronic Equipment (WEEE).
By ensuring this product is disposed of correctly, you will help prevent potential negative consequences for the environment and human health, which could otherwise be caused by inappropriate waste handling of this product.
The symbol ☒ on the product, or on the documents accompanying the product, indicates that this appliance may not be treated as household waste. Instead it shall be handed over to the applicable collection point for the recycling of electrical and electronic equipment.
Disposal must be carried out in accordance with local environmental regulations for waste disposal.
For more detailed information about treatment, recovery and recycling of this product, please contact your local city office, your household waste disposal service or the shop where you purchased the product.

Servis
SERVIS UK LIMITED
P.O. BOX 14, DARLASTON ROAD, WEDNESBURY, WEST MIDLANDS, WS10 7TJ
TEL: 0121 568 8333 FAX: 0121 568 8500
CONSUMER CARELINE: 08705 168299
461306651
STMAPA TLF 03/04/2007
SM2099/02
- Customer Careline: 08705 168299
- Thank you for purchasing a Servis Washing Machine.
- INDEX
- SAFETY INSTRUCTIONS
- UNPACKING INSTRUCTIONS (ACCORDING TO MODEL)
- ELECTRICAL INFORMATION
- Warning – This appliance must be earthed.
- Important:
- Please state the colour of your plug insert.
- For the Republic of Ireland only
- Warning
- Special Electronic System
- LEVELLING THE APPLIANCE
- PLUMBING INSTALLATION
- Location
- Space for servicing and fi tting
- Water Board Regulations
- Water Pressure
- Permanent plumbing for Hot and Cold fi II machines only.
- Water Supply
- Water Connections
- Filling hoses
- Fitting the hoses
- Permanent Plumbing
- Discharge into a standpipe - drainage
- Temporary connections
- If you must make a temporary connection, be sure that you check the condition of your tap and keep children away from the discharge area.
- Tap adapters
- HOW TO DO A WASH
- IMPORTANT
- Use of detergents
- Load the laundry
- Add the detergent
- How to remove the detergent drawer
- Start up
- The end
- LAUNDRY PREPARATION
- LOADING THE APPLIANCE
- Two typical loads:
- Programme 2 (Load 10lbs)
- Programme 4 (Load 5 lbs)
- IMPORTANT!
- DONOTOVERLOAD
- DETERGENTS AND ADDITIVES
- How much and where?
- Soil levels
- Getting the right dosage
- CARE OF YOUR APPLIANCE
- Decalcifi cation
- After each wash
- Cleaning the drawer
- External cleaning
- Inspectionable pump fi Iter
- STAIN REMOVAL
- STAIN TYPE TREATMENT
- Dealing with stains
- Basic rules
- When soaking
- Testing for colour fastness
- TROUBLESHOOTING
- If the appliance does not start
- If the appliance does not drain or spin
- If the appliance does not fi ll with water
- If the appliance is noisy or not sitting evenly on the floor
- If the appliance appears to be leaking
- AFTER SALES SERVICE
- Servis
Brand : SERVIS
Model : M6654W
Category : Washing machine