
AWD10 - Washing machine Ariston Thermo - Free user manual and instructions
Find the device manual for free AWD10 Ariston Thermo in PDF.


| Product Type | Washer-dryer |
| Model | AWD10 |
| Brand | Ariston Thermo |
| Dimensions (W x H x D) | 59.5 cm x 85 cm x 53.5 cm |
| Wash Capacity | 1 to 5.5 kg |
| Drying Capacity | 1 to 2.5 kg |
| Electrical Supply | 230/240 V, 50 Hz |
| Maximum Power Absorption | 1850 W |
| Water Pressure | 0.5 bar (min) to 10 bar (max) |
| Drum Capacity | 46 litres |
| Maximum Spin Speed | 1000 rpm |
| Programme Selector | Rotary knob with 11 wash programmes + drying & delay start |
| Drying Options | Time-based (40-150 min) or moisture-based (Iron, Wardrobe, Extra Dry) |
| Special Features | A wash performance (40°C like 60°C), Daily wash (30 min), Rinse hold, Slow spin, Delay start (3/9/12 h) |
| Detergent Dispenser | 3 compartments: pre-wash, main wash, fabric softener |
| Door Lock | Electronic lock with safety interlock |
| Water Connections | Hot and cold water inlets (red hose for hot, white for cold) |
| Drain Hose Height | 60 to 100 cm |
| Safety Features | Child safety, door lock during cycles, anti-siphon, earth connection |
| Maintenance | Clean dispenser regularly, check pump pre-chamber, inspect rubber hose annually |
| Compliance | Low Voltage Directive 73/23/EEC, EMC Directive 89/336/EEC |
Frequently Asked Questions - AWD10 Ariston Thermo
User questions about AWD10 Ariston Thermo
0 question about this device. Answer the ones you know or ask your own.
Ask a new question about this device
Download the instructions for your Washing machine in PDF format for free! Find your manual AWD10 - Ariston Thermo and take your electronic device back in hand. On this page are published all the documents necessary for the use of your device. AWD10 by Ariston Thermo.
USER MANUAL AWD10 Ariston Thermo
M The secrets of facts How to get better results
ARISTON
Instructions for installation and use
"A" wash performance
The first washer dryer to give a perfect wash at only 40°C
Assistance' Spare parts and Accessories?
Call your nearest
Customer Service
Centre or dial
0870 607 0805
Margherita
Washer-dryer
safe
and easy to use
Quick guide to
Margherita
I've made 300's kniplined in 'sManual' Read' learn and have fun: you will discover many secret ways to get a better wash' more easily and making your washer-dryer last longer……and especially keeping an eye on safety

Installation and removal (p: 11)
Installation after delivery or transport is the most important operation for the correct functioning of your Margherita washer dryer Always check:
1* That the electric system complies with the law;
2' That the injet and draining pipes are connected correctly. Never use hoses that have already been used, always use the new ones provided with your machine.
3' That the washer-dryer is levelled properly, something worth checking for the life of your washer-dryer and the quality of your wash;
4 That the drums fixing screws have been removed from the back of the washer dryer

What goes in your washer"dryer and how to start it (p' 2)
A correct distribution of your laundry is vital to both the successful outcome of the wash and the life of the washer-dryer Learn all the tips and secrets to dividing your linen colour type of fabric and tendency of creating fuzz are the most important criteria

Guide to understanding labels (p' 6)
The symbols on the labels of your garments are easy to understand and equally important for the success of your wash. The guide includes simple instructions to help you choose the right temperature wash cycles and ironing methods.

Useful tips to avoid mistakes (p' 7)
Yeras back our grandmothers were the ones who gave us good advice and in those days synthetic fibres did not exist washing was easy. Today Margherita offers you helpful advice allowing you to wash cashmere and wool even better than an expert jaundress would by hand

The detergent dispenser (p' 8)
How to use the detergent dispenser

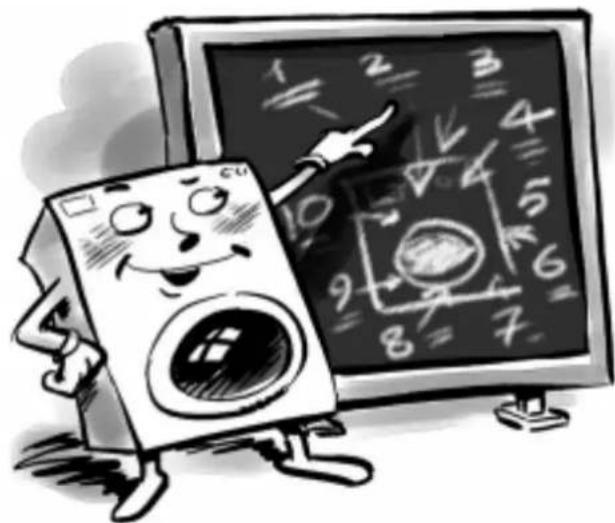
Understanding the control panel (p-3)
Margherita's control panel is very simple. It has only a few essential buttons to help you choose any type of wash cycle, ranging from the most energetic capable of cleaning a mechanic's overalls' to the most delicate for cashmere. Familiarising with it will help you get the best out of your wash while helping your washer dryer last longer. It's easy

Guide to Margherita's programmes (p. 4)
Herein is an easy table to help you choose the right programme, temperature, detergents and possible additives. Choose the right programme and you will get better results with your wash while saving time water and energy day after day

How to dry (p' 5)
A few handy tips to get the best drying cycle from your appliance

Care and maintenance (p' 13)
Margherita is a true friend. With just a bit of care, it will repay you with loyalty and devotion. With the necessary upkeep, it will wash for years and years to come

problems and solutions (p' 9 and 10)
Before calling a technician read these pages: immediate solutions may be found for a number of problems. If the problem persists call Ariston customer services and any failure will be repaired as soon as possible.

Technical characteristics (p' 10)
Herein are the technical features of your washer dryer: model type number electric and water specifications' size capacity speed of the spin cycle and compliance with Italian and European rules and regulations.

Safety for you and your children (p. 14)
Here you will find the necessary guidelines for the safety of your entire household because safety is very important indeed

Ariston stays with you after your purchase (P'15)
Ariston supports its products after their purchase by offering you a range of special services' professional assistance' spare parts and quality accessories
What goes in your washer dryer?
Dividing your garments according to fabric and colour' is very important for good results
Before washing you can do a great deal for better results' Divide your garments according to fabric and colour. Read the labels' follow their indications and alternate small items with large ones
Before washing
Divide your washing according to the type of fabric and colour resistance: sturdy fabrics should be separated from delicate ones Light colours should be separated from dark ones
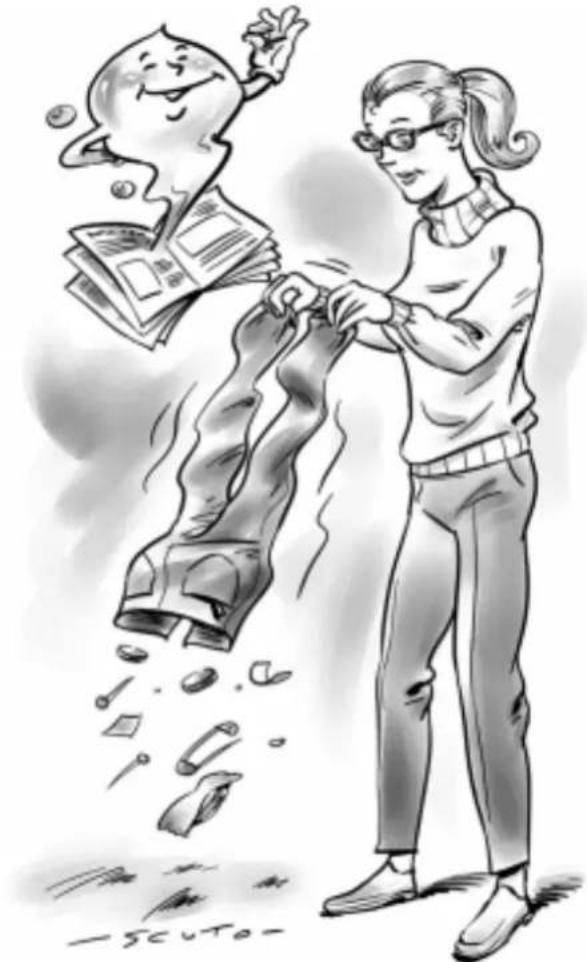
Empty all pockets (coins' paper money and small objects) and check the buttons' Mend immediately or remove loose buttons as they could fall off during the wash cycle.
The labels say it all'
Always look at the labels: they tell you everything about your garment and how to wash it in the best way possible.
The table on page 6 shows you all the secrets of the symbols found on labels. Their indications are a valuable guide to a better wash and to longer lasting clothes.
Big and small happily together"
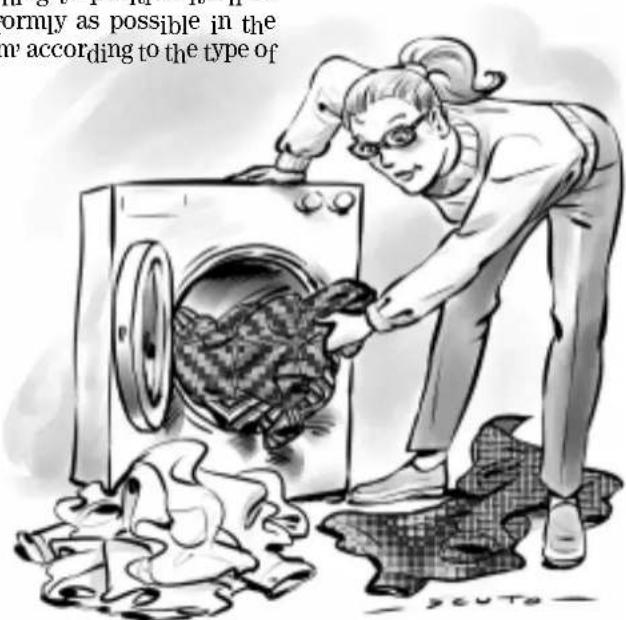
This washer dryer has a special electronic control device for distributing the wash load evenly. before the spin cycle starts this device allows the washing to position itself as uniformly as possible in the drum according to the type of
washing and initial positioning For this reason even at top spin the washer dryer does not vibrate or make any noise
Starting Margherita After installing your new washer dryer
wash cycle by setting programme "1" at 90 degrees
Starting Margherita in the right way is important for the quality of your wash' for preventing problems and for lengthening the life of your appliance. After loading your washing and pouring in the detergent together with any additives always check that:
For more delicate garments:
protect underwear' tights and stockings and delicate items by placing them in a canvas pouch
1' The door is correctly shut 2' The plug is inserted in the socket
3' The water tap is open 4' Selector knob A is positioned on one of the symbols (Stop/Reset)
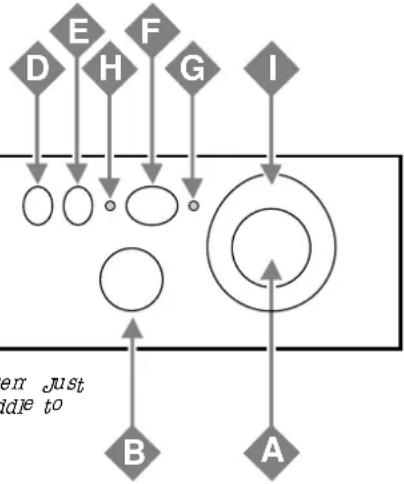
Choose the desired programme The programme is selected according to the type of garments that need to be washed. To choose a programme refer to the table on page 4' Turn knob A until the selected programme coincides with the pointer situated on the upper part of glass I' make sure knob B is in the required position and' if necessary use buttons D' E and then press on/off button F (position ON).
Remember that if you want to use it the "programmed start" should be set before the wash cycle.
At the end of the wash cycle... Lamp G will flash quickly for a few seconds' then it will begin flashing more slowly
Then turn Margherita off by pressing on-off button F (OFF position)
You can now open the washer-dryer door safely. After having removed the freshly cleaned washing leave the door open or a jar so that the humidity left inside can evaporate.
Always close the water tap Remember that' in the event of a power failure' or should the washer-dryer switch itself off the programme chosen will be memorised
How to eliminate the most common stains
Ink and biro Dab with a wad of cotton soaked in methyl alcohol or alcohol at 90°
Tar Dab with fresh butter" rub in turpentine then wash immediately
Wax scrape away then run a hot iron between two sheets of absorbent paper. Then rub in cotton with turpentine or methyl alcohol
Chewing gum Rub in nail polish remover and wipe with a clean rag
Mold Cotton and white linen should be placed in a solution of 5 parts water one bleach and a spoon of vinegar then washed immediately. For other white fabrics' use hydrogen peroxide at 10 volumes and wash immediately
Lipstick Dab with ether on wool or cotton Use tricloroetilene for silk
Nail polish Place a sheet of absorbent paper on the side of the stain wet it with nail polish remover shifting the garment as the sheet gradually changes colour
Grass Dab with a wad of cotton soaked in methyl alcohol
Understanding the control panel
Here I'm in command
Making the right choice is important And it's easy
flowchart
graph TD
    A --> B
    B --> C
    C --> D
    D --> E
    E --> F
    F --> G
    G --> I
    I --> C
    style A fill:#f9f,stroke:#333
    style B fill:#ccf,stroke:#333
    style C fill:#cfc,stroke:#333
    style D fill:#fcc,stroke:#333
    style E fill:#cff,stroke:#333
    style F fill:#ffc,stroke:#333
    style G fill:#cfc,stroke:#333
    style I fill:#fcc,stroke:#333

programme selector knob and programmed start
Use this knob to select the wash programme
Turn this knob clockwise only To select a programme you should turn the knob so that the symbol number of the desired programme is in line with the pointer on the glass I
Now press on/off button F (position ON) pilot lamp G will start flashing
After 5" the setting will be accepted' pilot lamp G will stop flashing(staying lit) and the wash cycle will begin
Should you wish to interrupt the programme in progress or set a new one' select one of the symbols (Stop/Reset) and wait 5": when the cancellation has been accepted' pilot lamp G flashes' and you can then turn the appliance off
You can use this knob to delay the appliance's operation Select one of the 3 delay time positions press the on/off button F (position ON) and wait 5" The setting has now been accepted (pilot lamp G stays lit) and you can select the programme you desire
Pilot lampG has a particular fashing motion (2" on and 4" off) to indicate that a delayed start has been set
During this phase you can open the appliance door and change the washing load should you wish to do so
After the wash cycle has been set and accepted by the washer-dryer turning the knob will have no effect (except for when it is on position Stop/Reset)

natural_image
Cartoon illustration of a surprised face with arms and legs, pointing at the mouth (no text or symbols)The detergent dispenser is here.

Drying cycle knob
Use this knob to select the desired drying cycle. Two options are available:
A ^- Based on time:
From 40 minutes to 150
B ^- Based on the damp level of the dry clothes:
iron ≅ slightly damp clothes, easy to iron
Wardrobe: dry clothes to put away
Extra dry Ⅱvery dry clothes
recommended for towelling and bath robes
A cooling stage is foreseen at the end of the drying cycle.

Detergent dispenser
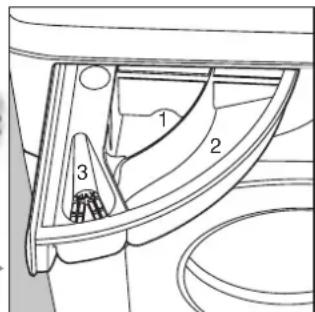
It is divided into three compartments:
- Detergent for pre-washing;
2' Detergent for the wash cycle;
3 Fabric softeners' starches' perfumes

Rinse-hold
This button allows you to interrupt a programme (onsymbol)
▲) keeping the washing soaking in water before the spin cycle. It is a very useful button in particular because it can be used for delicates and synthetics. It is
only to be used with wash programmes for synthetic fabrics' silk and curtains when it is impossible for you to take the washing out immediately before opening the washing machine door finish the wash cycle as follows:
Silk and curtains: press button D and Margherita will drain the water
Synthetic fabrics: press button D if you want a spin cycle or turn knob A to symbol if you want the water to be drained
NB:
- when setting a drying cycle, this function is not performed
- with "Daily wash" or "Hand wash" this function is not performed

Slow spin
Use this button to reduce the spinning speed from 1000 to 500 rpm for the cotton programmes and from 850 to 500 rpm for the synthetic fabrics programmes

On-off
When button F is pressed, the washer-dryer is switched on when it is not the machine is switched off. Turning the appliance off does not cancel the selected programme.

On-off lamp / door locked
Lamp G flashes slowly when the appliance is switched on and awaiting instructions and at the end of a cycle' indicating that the door can be opened. It flashes quickly when the door should not be opened. A steady light means the appliance has accepted the selected programme.

Drying cycle lamp
When this lamp is on it means that knob B has been set on a drying cycle and at the end of the wash cycle the appliance will run the selected tumble drying cycle
What are you washing today?
A programme for all seasons
me knob
for
for wash
softener
Length of
the cycle
(minutes)
| COTTONS | |||||
| Exceptionally soiled whites (sheets' tablecloths' etc') | 1 | ◆ | ◆ | ◆ | 165 |
| Exceptionally soiled whites (sheets' tablecloths' etc') | 2 | ◆ | ◆ | 145 | |
| Heavily soiled whites and fast colours | 3 | ◆ | ◆ | 130 | |
| Heavily soiled whites and fast colours | 4 | ◆ | ◆ | 150 | |
| Slightly soiled whites and delicate colours (shirts' jumpers' etc') | 5 | ◆ | ◆ | 95 | |
| Rinse cycles | ◆ | ||||
| Spin cycle Draining and final spin cycle | |||||
| Drying cycle for cotton fabrics | |||||
| Stop/Reset | ● | ||||
| SYNTHETICS | |||||
| Heavily soiled fast colour synthetics (baby sheen' etc.) | 6 | ◆ | ◆ | 100 | |
| Heavily soiled fast colour synthetics (baby sheen' etc.) | 7 | ◆ | ◆ | 95 | |
| Delicate colour synthetics (all types of slightly soiled garments) | 8 | ◆ | ◆ | 70 | |
| Delicate colour synthetics (all types of slightly soiled garments) | 9 | ◆ | ◆ | 30 | |
| Rinse cycles | ◆ | ||||
| Fabric softener | ◆ | ||||
| Spin cycle Draining and delicate spin cycle | |||||
| Drying cycle for synthetic fabrics | |||||
| Stop/Reset | ● | ||||
| WOOL | |||||
| Hand wash | 10 | ◆ | ◆ | 45 | |
| Rinse cycles | ◆ | ||||
| Spin cycle Draining and delicate spin cycle | |||||
| Stop/Reset | ● | ||||
| SILK | |||||
| Particularly delicate garments and fabrics (curtains' silk' viscose' etc') | 11 | ◆ | ◆ | 50 | |
| Rinse cycles | ◆ | ||||
| Draining Draining | |||||
| Stop/Reset | ● | ||||
| PROGRAMMED START | |||||
| 12-9-3 hour delay Start is delayed by 12-9-3 hours | |||||
| Stop/Reset | ● | ||||
Important: to cancel the wash programme you have just set select one of the symbols (Stop/Reset) and wait for at least 5"
The data found in the table is purely indicative and can vary according to the quantity and type of washing the water system temperature and the room temperature.
Special programmes
"A" wash performance Margherita has a special programme to allow you to obtain optimum results even at low temperatures. By setting programme 4 at a temperature of 40^ C' the results you will obtain will be the same as you would normally obtain at 60^ C thanks to the washer-dryer's action and the length of the wash cycle.
Daily wash Margherita has a programme studied for the washing of lightly soiled garments in a short amount of time. By setting programme 9 at a temperature of 30^ you can wash different types of fabrics together (except for wool and silk) with a maximum load of 3 kg This programmes allows you to save on both time and energy as it only lasts around 30 minutes We recommend the use of liquid detergent.
How to dry
A combined Washing and Drying Programme
Look at table A to the side and follow the instructions provided for MAX load to have an automatic washing and drying cycle.
Follow the instructions for wash only (see page 2' the paragraph entitled "Starting Margherita") and use knob B to set the type of drying cycle desired' then press button F (ON position)
If the laundry load to be washed and dried exceeds the maximum load foreseen (see table A) then follow the instructions provided for wash only (see page 2' the paragraph entitled "Starting Margherita")
When the wash cycle has finished, remove your washing divide it up and replace part of it inside the drum.
Now follow the instructions provided for a dry only cycle. Repeat this procedure for the remainder of the load.
Dry only
Once you have loaded the washing that needs drying(2'5 kg max' for cottons' see table for other fabrics) make sure that:
^- the door is shut correctly,
- the plug is inserted in the socket;
- the water tap is turned on;
`-button F has not been pressed (OFF position)`
And now set the wash cycle knob
Set knob A on the appropriate drying setting depending on the type of fabric select the type of drying cycle required using knob B and then press on-off button F(ON position).
At the end of the drying cycle...
Wait for lamp G to flash slowly then turn the washer dryer off by pressing on-off button F (OFF position). Now you can open the appliance door Once you have removed the washing from the appliance leave the door open or a jar to avoid the formation of bad odours and turn off the water tap.
A.
| Fabric type | Load type | Max' load (kg) | Drying time (Min') | ||
| Extra dry | Wardrobe iron | ||||
| Cotton' Linen | Clothing of different sizes | 2'5 150 | 145 140 | ||
| Cotton Terry towels | 2'5 150 | 145 140 | |||
| Terital' Cotton | Sheets' Shirts | 2'5 100 | 90 85 | ||
| Acrylics Pyramas' socks' etc | 1 | 6 | 5 | 6 | |
| Nylon Slips | tights' stockings' etc | 1 | 6 | 5 | 6 |
The data contained in the table are purely indicative
For cotton loads of less than 1 Kg' use the drying programme designed for synthetic fabrics.
IMPORTANT
A spin cycle is carried out during the drying if you have set a cotton programme and a level of dryness (Extra dry, Wardrobe Iron)
WARNING
During the drying phase, the door tends to get quite hot.
Do not use the appliance to dry clothes that have been washed with flammable solvents (e.g. trichlorethylene).
- Do not use the appliance to dry foam rubber or similar elastomers:
- Make sure that the water tap is turned on during the drying cycles.
This washer-dryer can only be used to dry clothes which have been pre-washed in water.
Understanding labels
Learn the meaning of these symbols and you will get better results' your garments will last longer and your machine will repay you by washing better
All over Europe' garment labels contain messages expressed in small yet important symbols. Understanding them is very important if you want to get better results and treat your garments the way they deserve to be treated.
These symbols are divided in five different categories and shapes: washing □, bleaching △, ironing △, dry cleaning and drying □.

natural_image
Illustration of a person holding up a card and papers, with no visible text or symbolsMake sure you select the right temperature!
Useful tips
Turn shirts inside out to get better results and make them last longer
Always empty pockets of their contents'
Look at the label: it will always give you useful advice.
When loading your washing' alternate large and small garments
Consult and learn the symbols in this table: they will help you obtain a better wash' treat your clothes properly' and get a better performance out of your Ariston Margherita'
| Wash Bleaching | Ironing Dry cleaning | O | ☐ | |
| StrongactionDelicate action | High tempLow Temperat | |||
| 95Wash at 95°C | CIBleaching only in cold water | Hot iron at max 200°C | ADry clean with any solvent | Machine dryable |
| 60Wash at 60°C Do not bleach | A | Medium hot ironing at max 150°C | PDry clean only with perchloride' benzine av' pure alcohol' R111 and R113 | Do not machine dry |
| 40Wash at 40°C | do not dry clean | Iron at max 110°C | FDry clean with av' benzine' pure alcohol and R113 Spread to dry | - |
| 30Wash at 30°C Not ironable D | ☒ | Hang to dry without spin drying | ||
| Hand wash | Dry on clothes hanger | |||
| Not washable in water | ||||
Useful tips to avoid mistakes
Never use your washer-dryer to wash… torn fraying or non-hemmed linen. If it is absolutely necessary place it in a bag for protection. Brightly coloured linen with whites
How much does it weigh?
1 sheet 400 500 gr
1 pillow case 150-200 gr
1 tablecloth 400-500 gr
1 bathrobe 9001'200 gr
1 towel 150°250 gr

Watch the weight!
For best results do not exceed the weight limits stated below (figures show weight when dry):
* Resistant fabrics: 55kg maximum
Synthetic fabrics: 2.5kg maximum
Delicate fabrics: 2kg maximum
Pure new wool: 1 kg maximum

Coloured T-shirts' printed ones and shirts last longer if turned inside out before washing printed T-shirts and sweatshirts should always be ironed inside out;

Salopette alert
very popular "salopette" type overalls have straps with hooks that can damage the drum of your washer-dryer or other garments during the wash. By placing the hooks in the bib pocket and fastening them with safety pins' all risks are avoided
Holidays: unplug the appliance
When you go on holiday we recommend that you unplug your washer dryer shutting off the water inlet tap and leaving the door opened or a jar in this way both the drum and the gasket will remain nice and dry and unpleasant odours will not develop inside the washer dryer
WOOL CYCLE
For best results' we recommend you use a specific detergent taking care not to wash more than 1 kg of laundry.
How to wash almost anything
Curtains
Curtains tend to crease a great deal. Here is a tip to reduce creasing: fold the curtains and place them in a pillow case or mesh bag. Do not load anything else so that the overall weight does not exceed the half load. Remember to use the specific programme 11 which automatically excludes the spin cycle.
Quilted coats and wind eaters
You can wash quilted coats and wind cheaters' too' if they are padded with goose or duck down. Do not load more than 2.3 kg and never load 5.5 kg. Repeat rinse once or twice using the gentle spin.
Trainers
Once you have removed mud and dirt from trainers' you can wash them with jeans and other tough garments. Do not wash trainers with whites.
It's important for a good wash
The secrets of the detergent dispenser
The first secret is the easiest: the detergent dispenser is opened by rotating it outwards.
You must add detergent and any additives following the dosage recommended by the manufacturers: generally all the indications you need are on the box. Doses vary according to wash load' the water hardness and how soiled the washing is. Experience will help you select the right dosage almost automatically: it will become your secret
When pouring in the softener in compartment 3' avoid making it overflow from the grate.
The washer dryer automatically adds the softener to the wash in each programme.
Liquid detergent is to be poured into compartment 2 only a few seconds before starting the wash cycle.
Remember that liquid detergent is particularly indicated for wash cycles of up to 60 degrees on non pre-wash items.
natural_image
Diagram of a car interior showing internal components and directional arrows (no text or labels)Liquid or powder detergents are sold together with special containers that are to be placed directly inside the washer-dryer drum according to the instructions found on the detergent box.
Never use hand wash detergent because it may form too much foam which could damage the washer dryer
Detergents that are specifically indicated for both hand and machine wash are an exception. One last secret: when washing with cold water always reduce the amount of detergent you use: it dissolves less easily in cold water than in hot water so part of it would be wasted.
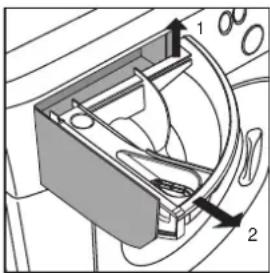
The detergent dispenser can be removed and cleaned: just lift it up and pull it outwards, as indicated in the figure. Then leave it under running water for a few minutes.
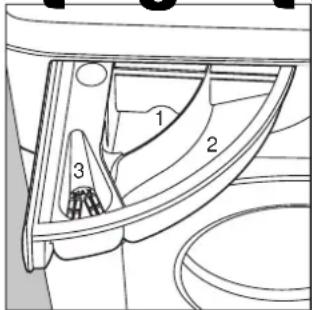
in compartment 1:
Detergent for pre-washing (powder)
In compartment 2:
Detergent for washing
(powder or liquid)
In compartment 3:
Additives (softeners, perfumes, etc.)
Cutting costs efficiently
MAXIMISE THE LOAD SIZE
Achieve the best use of energy' water' detergent and time by using the recommended maximum load size.
SAVE up to 50% energy by washing a full load instead of 2 half loads.
DO YOU NEED TO PREWASH?
For heavily soiled laundry only!
SAVE detergent' time' water and between 5 to 15% energy consumption by NOT selecting Prewash for slight to normally soiled laundry
IS A HOT WASH REQUIRED?
Pretreat stains with stain remover or soak dried in stains in water before washing to reduce the necessity of a hot wash programme.
SAVE up to 50% energy by using a 60°C wash programme
BEFORE USING A DRYING PROGRAMME \*\*\*
SAVE energy and time by selecting a high spin speed to reduce the water content in laundry before using a drying programme.
A guide to
environmentally
friendly and economic
use of your appliance
Before calling' read the following
can be easily solved without having to call for a technician. Before calling for assistance, always check these points:
The washer-dryer fails to start'
Is the plug correctly inserted into the socket? It could have been moved whilst cleaning
Is there electricity in the house?
A circuit breaker could have gone off perhaps because too many appliances are on at the same time. Or perhaps because of a general power failure in your entire area
Is the washer-dryer door closed properly? Forsafety reasons' the washer
dryer cannot work if the door is open or not shut properly
Is the On/Off button pressed?
If it is then a programmed start has been set
Is the programmed start knob' on those models concerned' in the correct position?
Is the water tap open? For safety reasons' if the washer dryer does not load water it cannot start a wash cycle.

natural_image
Black-and-white illustration of a mythological figure kneeling beside a giant creature, both engaged in conversation (no text or symbols present)WRONG
RIGHT
Close the tap after every wash cycle. Limit the use of the washer-dryer's hydraulic system and eliminate leakage risks when no one is at home.
Always leave the appliance door ajar to avoid bad odours'
Clean the appliance's exteriors delicately' To clean the exteriors and the rubber parts of the appliance' always use a rag dipped in lukewarm water and soap'
Leave the washer' dryer plugged in while cleaning' Even during mainte- nance' the appliance should always be unplugged'
Use solvents and aggressive abrasives' Never use solvents or abrasives to clean the external and rubber parts of the washer-dryer
Neglect the detergent dispenser' It is removable and can easily be cleaned by leaving it under running water'
Go on holiday without thinking about her. Before leaving always make sure that the washer dryer is unplugged and that the water tap is closed"
But where did all the water go?
Simple: with the new Arston technology you need less than half of it to get good results on twice as much! This is why you cannot see the water through the door: because there is little' very little of it' to respect the environment yet without renouncing maximum cleanliness. And' on top of that' you are also saving electricity

natural_image
Cartoon illustration of a smiling washing machine holding a magnifying glass (no text or symbols)
The washer"dryer fails to load water"
Is the tap correctly attached to the pipe?
Is there a water shortage? There could be work in progress in your building or street.
Is there enough pressure? The autoclave may be malfunctioning
Is the tap filter clean? If the water is very calcareous' or if work has recently been carried out on the water piping the tap filter could be clogged with particles and debris
Is the rubber hose bent? The tract of the rubber hose bringing water to the washer dryer must be as straight as possible. Make sure it is not squashed or bent
The programme selector knob keeps turning?
Wait a few minutes for the drain pump to empty the tub switch Margherita off select one of the symbols stop/reset, then switch it back on. If the knob continues to turn call for assistance because it is reporting an anomaly

natural_image
Cartoon illustration of a washing machine with a hand cleaning it, next to a potted plant (no text or symbols)The washer-dryer continuously loads and unloads water
Is the drain hose positioned too low? It must be installed at a height ranging from 60 to 100 cm
Is the hose's mouth immersed in water?
Does the wall drainage system have a breather pipe? If the problem persists even after these checks close the water tap switch the appliance off and call for assistance
If you live on an upper floor of your building, there may be a problem with your drain trap. To solve this problem: a special valve must be installed.

natural_image
Cartoon illustration of a person running away from a computer monitor (no text or symbols)The washer-dryer does not drain or spin
Does the selected programme foresee water draining? Some wash cycles require enabling the draining manually
Is the "Rinse hold" function where provided - enabled? This function require enabling the draining manually
Is the drain pump clogged? To check it close the tap unplug the washer dryer and follow the instructions on page 13' or call for technical assistance.
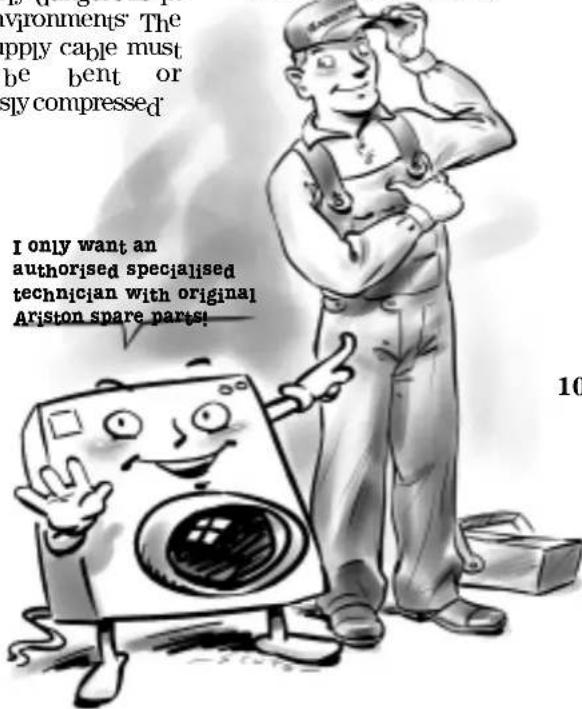
Always get assistance from authorised technicians and always insist on original spare parts.
Is the drain hose bent? The tract of the drain hose must be as straight as possible. Make sure it is not squashed or bent
Is the washer dryer's drain duct clogged? Is there an extension of the drain hose? If so is it positioned incorrectly blocking the water flow?

The washer-dryer vibrates too much during the spin cycle
Has the internal floating unit been correctly unblocked during installation? See following page on installation procedures
Has the washer dryer been
levelled correctly? The
levelling of the appliance
should be checked
periodically in time the
machine could move
imperceptibly Adjust the feet
and check them with a level
Is the appliance closed in between furniture and a wall? If it is not a built-in model the washer-dryer needs to oscillate a bit during the spin cycle. A few cm of space should therefore be left around it

The washer-dryer leaks'
Is the metal ring of the inlet hose properly attached? Close the tap' unplug the appliance and try tightening its attachment without forcing it
Is the detergent dispenser obstructed? Try extracting it and washing it under tap water
Is the drain hose well attached? Close the tap' unplug the appliance and try tightening its attachment

Too much foam
Is the detergent appropriate for machine washing? Check whether its label reads the definition "for machine wash" or "hand and machine wash" or other similar indications
Is the correct amount being used? An excessive amount of detergent' besides producing too much foam' does not guarantee a more effective wash' and causes scaling in the internal parts of the appliance
The washer-dryer does not dry
Check whether: the plug has been correctly inserted into the socket; there is electricity in your home; the appliance door has been shut properly; a delayed start (if available) has not been selected; programme knob A has been set to position (Stop/Reset); the drying cycle knob B has been set to position 0.
The washer-dryer doesn't dry properly
Check whether: the end of the drain hose is underwater; the drain pump is obstructed; the advice given on the maximum loads has been taken; the water tap has been turned on
If despite all checks' the washer dryer fails to function and the problem persists' call your nearest authorised Customer Service Centre' providing the following information: - the type of malfunctioning - the model type no (Mod '....') - the serial number (S/N '....') These indications can be found on the data plate situated on the back of the washer dryer
Technical characteristics
| Model | AWD 10 |
| Dimensions | width 59'5 cmheight 85 cmdepth 53'5 cm |
| Capacity | from 1 to 5'5 kg for the wash programme; from 1 to 2'5 kg for the drying programme |
| Electrical connections | voltage 230/240 Volt 50 Hzmaximum absorbed power 1850 W |
| Water connections | maximum pressure 1 MPa (10 bar)minimum pressure 0'05 MPa (0'5 bar)drum capacity 46 litre |
| Spinning speed | up to 1000 rpm |
| Control programs in compliance with IEC regulation 456 | wash: programme 3; temperature 60°C Carried out with 5 kg loaddrying run with a load of 2'5 kg and knob B set to position [E] |
| This appliance conforms with the following E' E' C' directives:-73/23/EEC of 19/02/73 (Low Voltage) and subsequent modifications-89/336/EEC of 03/05/89 (Electromagnetic Compatibility) and subsequent modifications |
Installation and removal
When Margherita arrives
Whether new or just transported to a new house installation is extremely important for the correct functioning of your washer-dryer
After removing the appliance from its packaging check that it is intact. If in doubt contact a qualified technician immediately. The inside of the machine is supported for transportation by four screws on the back panel.
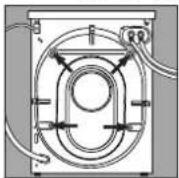
Before using the washer-dryer remove the screws' remove the spacers together with the rubber tubes attached to them (keeping all the parts) and use the plastic plugs provided to fill in the holes.
Important: Use the cap(provided) to close the 3 holes which housed the stop pin situated in the right-hand part of the lower back of the washer dryer
Levelling
The washer dryer must be levelled appropriately in order to guarantee its correct functioning. To level the appliance, the front feet must be adjusted; the angle of inclination measured according to the worktop must not exceed 2°. When placed on carpet make sure the ventilation is not reduced
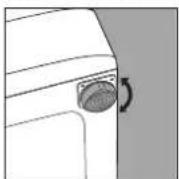
The front feet are adjustable.

Connection to the water mains
Both hot and cold water supplies are preferable and they should be between 34'5kN/m²(5lb/in²) and 1034'2kN/m²(150lb/in²) pressure. The hose having the red end fitting should be encountered between the hot supply and the threaded connection adjacent to the letter H on the rear of the machine. The hose having the white end fittings should be connected between the cold supply and the threaded connection adjacent to the letter C on the rear of the machine. Remember to insert a sealing washer dryer at each connection to ensure watertight joints. Do not overtighten the connections by using tools hand tight is sufficient to prevent leaks. It is generally more convenient to have these supplies away from the sink taps. Where no suitable hot water supply is available or it does not meet these requirements both inlet hoses may be connected to a cold supply by using two taps etc" or a "T" junction on the plumbing however use of cold water only will increase programme times. Note: the maximum temperature should not exceed 70°C (158°F).
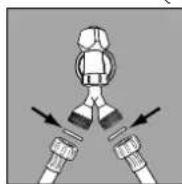
The rubber gasket.
Connect the inlet hose to the threaded connector on the machine rear
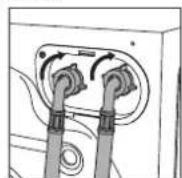
Water pipe inlet at the top right.
natural_image
Illustration of a woman pushing a smiling computer with a paper nearby (no text or symbols)Connecting the drain hose
The drain hose (hooked pipe) is secured to the rear of the machine by support clips and may be routed to right or left as required.
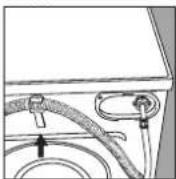
The hook to be used in case the drain hose ends at a height below 60 cm.
The drain hose should be placed in a stand pipe with a minimum internal diameter of 38 mm (1½ inches) or it can be positioned over a sink or it can be connected as shown in Fig. A The height of stand pipe or sink should be between 60 and 100 cm (24 and 40 inches). Care must be taken that the hose is not obstructed, twisted, submerged or linked. If the hose is connected with an airtight joining provision should be made to prevent syphoning
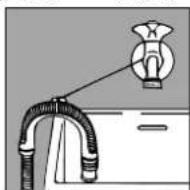
The guide for draining into tubs and sinks.
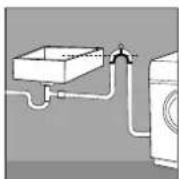
Fig. A
Electric connection
Your appliance is now supplied with a 13 amp fused plug it can be plugged into a 13 amp socket for immediate use. Before using the appliance please read the instructions below
WARNING "THIS APPLIANCE MUST BE EARTHED" THE FOLLOWING OPERATIONS SHOULD BE CARRIED OUT BY A QUALIFIED ELECTRICIAN
Replacing the fuse:
When replacing a faulty fuse' a 13 amp ASTA approved fuse to BS 1362 should always be used and the fuse cover re-fitted. If the fuse cover is lost the plug must not be used until a replacement is obtained

Replacement fuse covers:
If a replacement fuse cover is fitted, it must be of the correct colour as indicated by the coloured marking or the colour that is embossed in words on the base of the plug. Replacements can be obtained directly from your nearest Service Depot.
Removing the plug:
If your appliance has a non-rewireable moulded plug and you should wish to re-route the mains cable through partitions' units etc' please ensure that either:
the plug is replaced by a fused 13 ampere re-wearable plug bearing the BSI mark of approval or.
the mains cable is wired directly into a 13 amp cable outlet controlled by a switch' (in compliance with BS 5733) which is accessible without moving the appliance.
Disposing of the plug:
Ensure that before disposing of the plug itself you make the pins unusable so that it cannot be accidentally inserted into a socket
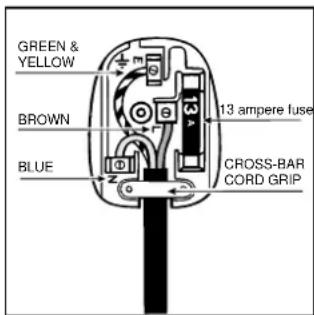
Instructions for connecting cable to an alternative plug:
Important: the wires in the mains lead are coloured in accordance with the following code:
Green & Yellow Earth
Blue Neutral Brown Live
As the colours of the wires in the lead may not correspond with the coloured markings identifying the terminals in your plug proceed as follows:
Connect Green & Yellow wire to terminal marked E or = or coloured Green or Green & Yellow
Connect Brown wire to terminal marked L or coloured Red
Connect Blue wire to terminal marked N or coloured Black
If a 13 amp plug (BS1363) is used it must be fitted with a
13 amp fuse either in the plug or adaptor or at the distribution board
If you are in any doubt the electrical supply to your machine consult a qualified electrician before use.
How to connect an alternative plug:
The wires in this mains lead are coloured in accordance with the following code:
BLUE NEUTRAL(N)
BROWN LIVE (L)
Disposing of the appliance:
When disposing of the appliance please remove the plug by cutting the mains cable as close as possible to the plug body and dispose of it as described above.
Treat her well and she'll be your
Your washer dryer is a reliable companion in life and on the job. It is just as important for you to keep it in shape.
friend forever
Margherita is a washer-dryer designed to last a lifetime without any problems. A few simple steps help keep it in shape and last longer. Firstly you must close the water tap after each wash: the constant pressure of water could warp a few of the component parts:
In addition by doing so you will avoid the risk of leaks when no one is at home
If the water in your area is too hard' use a delimming product (water is hard if it often leaves whitish stains around taps or drains' especially of bath tubs' for more accurate information as to the type of water in your system' call the local water works or a local plumber' pockets must always be emptied removing even pins' badges and any other hard object
The washer dryer exterior should be cleaned with a rag dipped in lukewarm water and soap
It is important to wash the detergent dispenser regularly. To prevent dried washing powder from accumulating place the dispenser under running water for a few minutes.
Never exaggerate with doses'
Normal detergents already contain deliming agents. Only if the water is particularly hard that is rich in lime content do we recommend the use of a specific product at every wash.
A periodical wash cycle with a dose of a delimming product without detergents or washing may prove useful
Never use too much detergent or additives because this could cause an excess amount of foam scaling and possible damage to the component parts of your washer dryer
natural_image
Illustration of a woman stretching with a smiling character emerging from the air, surrounded by falling documents and coins (no text or symbols)Do not forget to empty all pockets: small objects can cause damage to your friend Margherita.
When in need check the pump and the rubber hose
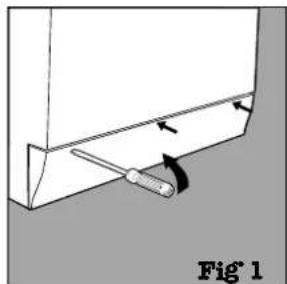
Margherita comes equipped with a self-cleaning pump that does not require any cleaning or maintenance. Small objects may accidentally fall into the pump: coins' hair clips' loose buttons and other small items. To avoid possible damage, they are withheld in an accessible pre-chamber' situated at the lower end of the pump.
natural_image
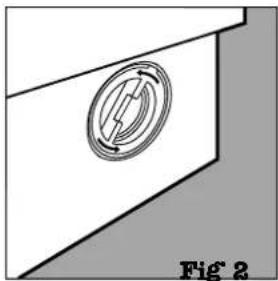
Diagram of a screwdriver inserted into a rectangular component, labeled Fig 1 (no text or symbols on the diagram itself)To access this pre-chamber just remove the panel covering the bottom of the washer-dryer using a screwdriver (figure 1); then lift the cover rotating it anticlockwise (figure 2) and check its contents accurately.
The rubber hose
Check the rubber hose at least once a year. If you see any cracks' replace it immediately. When you use your washer-dryer' water pressure is very strong and a cracked tube could easily split open.
natural_image
Diagram of a mechanical component with a circular feature and directional arrows, labeled Fig 2 (no text or symbols on the diagram itself)Attention: make sure that the wash cycle has come to a full stop and unplug the appliance before removing the lid as well as before any type of maintenance procedure. It is normal to find that a little water comes out after removing the lid. When replacing the panel, make sure you insert the hooks situated at the bottom of the washer-dryer in the right slots before pushing it back against the appliance.
More and more important
Your safety and that of The greater safety benefit in our finance with the strictness of international safety regulations. To protect you and all your family
your children
Read the information and all the information in this manual carefully: they are an important source not only of numerous useful tips but also of vital information on safety use and maintenance.
1' Margherita should not be installed in an outdoor environment' not even when a roof shelters the area because it may be very dangerous to leave it exposed to rain and thunderstorms
2' It must only be used by adults and exclusively for washing clothes following the instructions provided in this manual.
3' Should it have to be moved' proceed with the help of two or three people and handle it with the utmost care. Never try to do this alone because the appliance is very heavy
4' Before loading the washer
dryer make sure the
drum is empty
dryer when barefoot or with wet or damp hands or feet
6' Never use extensions or multiple plugs' which are particularly dangerous in humid environments. The power supply cable must never be bent or dangerously compressed
Never open the detergent dispenser while the appliance is functioning; do not use hand wash detergent because the abundance of foam could damage its internal parts
8' Never pull on the plug or the washer-dryer to disconnect it from the wall socket: it is extremely dangerous.
9' While the appliance is functioning do not touch the drain water as it could reach very high temperatures. The appliance door during wash cycles' tends to become heated; keep it out of children's reach. Never force the washer dryer door because this could damage the safety block on the opening, which serves to protect from accidental openings.
10' In case of malfunctioning' first close the water tap and unplug the appliance from the wall socket; do not under any circumstances touch internal parts in order to attempt repairs:
How to change the power supply cable (For this operation we suggest you contact a qualified engineer)
The Margherita power supply cable is special and can be purchased exclusively from authorised Technical Service Centres'
To replace the cable: 1. Make sure that Margherita is switched off and unplugged.
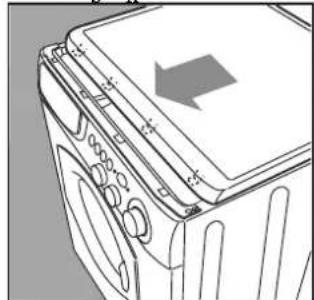
2 Remove the covering lid by unscrewing the two screws I and then pull it towards you [fig 3]
3 Disconnect the wires from the radio interference suppressor F [fig 4] noting as to their position (Blue=N wire; Brown=L wire) leaving the earth wire until last
NB: letters L' N and the symbol = are indicated on the radio interference suppressor
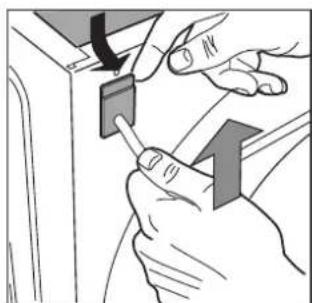
4 Remove the upper part of the cable slightly from the back panel of the appliance' pull the power supply cable upwards and take it out [fig 5]
To connect the new power supply cable' reverse the procedure
To put the covering lid back on rest it on the washer-dryer [fig 6] and let it slide forwards until the hooks situated on the front slide into the special slots formed into the control panel and tighten the screws back on
natural_image
Line drawing of a refrigerator with door, wheels, and a gray arrow indicating direction (no text or symbols)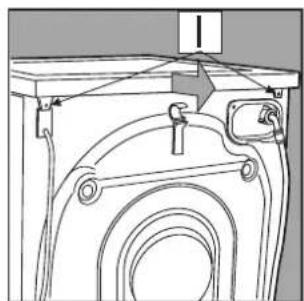
natural_image
Technical line drawing of a mechanical assembly with curved components and mounting brackets (no text or symbols)Fig 3
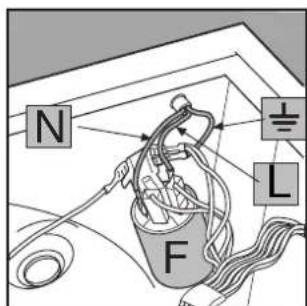
Fig 4
natural_image
Illustration of hands using a tool to adjust or install a component, no text or symbols visibleFig 5 Fig 6
Stay in touch

natural_image
Cartoon illustration of a smiling washing machine character with arms and legs, pointing forward (no text or symbols)THANK YOU for choosing an Ariston appliance. We are confident you have made a good choice and that your new appliance will give many years of excellent service.
And we're there when you need us'
Register your purchase now
This will confirm your entitlement to free spare parts for five years' and you could also be lucky enough to recover the cost of your purchase in our quarterly prize draw
Simply complete and return the Registration Form supplied with the appliance documents' using the FREEPOST envelope supplied. Or call the Registration Hotline on 0870 010 4305.
Enjoy complete peace of mind. By registering now you automatically qualify for a full year's guarantee on parts and labour PLUS free functional parts cover for a further 4 years' provided they are genuine Ariston spare parts fitted by an Ariston Service Engineer
We're as close to you as your telephone
For direct access to Genuine Ariston Spare Parts and Accessories,
call 0870 558 5850 and speak to our skilled staff who can help you to identify and purchase the item you require
For a Rapid Response to a problem with your appliance call 0870 607 0805. We're open from Monday to Saturday (8am - 5'30pm weekdays' 9am - 5pm Saturday). We have our own department of highly trained Ariston service staff. For most calls our Service Engineer can fix the problem on the first visit
Please have the following details to hand when you ring us:
The nature of the problem the Model Number and the Serial Number
These numbers can be found on the appliance and on the portion of the Registration Card which you retain
- M The secrets of facts How to get better results
- "A" wash performance
- Assistance' Spare parts and Accessories?
- Margherita
- safe
- Quick guide to
- Installation and removal (p: 11)
- What goes in your washer"dryer and how to start it (p' 2)
- Guide to understanding labels (p' 6)
- Useful tips to avoid mistakes (p' 7)
- The detergent dispenser (p' 8)
- Understanding the control panel (p-3)
- Guide to Margherita's programmes (p. 4)
- How to dry (p' 5)
- Care and maintenance (p' 13)
- problems and solutions (p' 9 and 10)
- Technical characteristics (p' 10)
- Safety for you and your children (p. 14)
- Ariston stays with you after your purchase (P'15)
- What goes in your washer dryer?
- Before washing
- The labels say it all'
- Big and small happily together"
- Starting Margherita After installing your new washer dryer
- How to eliminate the most common stains
- Understanding the control panel
- Here I'm in command
- programme selector knob and programmed start
- Drying cycle knob
- Detergent dispenser
- Rinse-hold
- NB:
- Slow spin
- On-off
- On-off lamp / door locked
- Drying cycle lamp
- What are you washing today?
- A programme for all seasons
- Special programmes
- How to dry
- A combined Washing and Drying Programme
- Dry only
- And now set the wash cycle knob
- At the end of the drying cycle...
- IMPORTANT
- WARNING
- Understanding labels
- Useful tips to avoid mistakes
- Watch the weight!
- Salopette alert
- WOOL CYCLE
- How to wash almost anything
- Curtains
- Quilted coats and wind eaters
- Trainers
- It's important for a good wash
- The secrets of the detergent dispenser
- Cutting costs efficiently
- MAXIMISE THE LOAD SIZE
- DO YOU NEED TO PREWASH?
- IS A HOT WASH REQUIRED?
- BEFORE USING A DRYING PROGRAMME \*\*\*
- Before calling' read the following
- The washer-dryer fails to start'
- WRONG
- RIGHT
- But where did all the water go?
- The washer"dryer fails to load water"
- The programme selector knob keeps turning?
- The washer-dryer continuously loads and unloads water
- The washer-dryer does not drain or spin
- The washer-dryer vibrates too much during the spin cycle
- The washer-dryer leaks'
- Too much foam
- The washer-dryer does not dry
- The washer-dryer doesn't dry properly
- Installation and removal
- When Margherita arrives
- Levelling
- Connection to the water mains
- Connecting the drain hose
- Electric connection
- Replacing the fuse:
- Replacement fuse covers:
- Removing the plug:
- Disposing of the plug:
- Instructions for connecting cable to an alternative plug:
- Green & Yellow Earth
- How to connect an alternative plug:
- BLUE NEUTRAL(N)
- Disposing of the appliance:
- Treat her well and she'll be your
- friend forever
- Never exaggerate with doses'
- When in need check the pump and the rubber hose
- The rubber hose
- More and more important
- Your safety and that of The greater safety benefit in our finance with the strictness of international safety regulations. To protect you and all your family
- your children
- How to change the power supply cable (For this operation we suggest you contact a qualified engineer)
- Stay in touch
- Register your purchase now
- We're as close to you as your telephone
Brand : Ariston Thermo
Model : AWD10
Category : Washing machine