
S1200UK - Washing machine Ariston Thermo - Free user manual and instructions
Find the device manual for free S1200UK Ariston Thermo in PDF.


| Product Type | Washing Machine |
| Brand | Ariston Thermo |
| Model | S1200UK |
| Energy Class | A+ |
| Spin Speed | 1200 rpm |
| Capacity | 8 kg |
| Height | 85 cm |
| Width | 60 cm |
| Depth | 60 cm |
| Weight | 70 kg |
| Power Supply | 220-240 V ~ 50 Hz |
| Water Consumption | 60 L per cycle |
| Noise Level (Wash/Spin) | 60 dB / 75 dB |
| Number of Programs | 16 |
| Delay Timer | Up to 24 hours |
| Child Lock | Yes |
| Detergent Drawer | 3 compartments |
| Drum Material | Stainless steel |
| Anti-Flood System | Yes |
| Spare Parts Availability | Door seal, pump, belt, heater |
| Repairbility | User-serviceable parts, professional recommended |
Frequently Asked Questions - S1200UK Ariston Thermo
User questions about S1200UK Ariston Thermo
0 question about this device. Answer the ones you know or ask your own.
Ask a new question about this device
Download the instructions for your Washing machine in PDF format for free! Find your manual S1200UK - Ariston Thermo and take your electronic device back in hand. On this page are published all the documents necessary for the use of your device. S1200UK by Ariston Thermo.
USER MANUAL S1200UK Ariston Thermo
Thank you for choosing an Ariston product. This washer is reliable and easy to use.
We suggest you read your owner's manual carefully. This will help you become familiar with your washer and its functions in order to obtain years of trouble free performance.
Controlled consumption
The machine automatically adjusts the amount of water used in the wash to the size of the load, giving optimum use of water, energy and detergent.
Double-action wash
Clothes are soaked in water and detergent, water then "rains" steadily through the clothes.
Saves while it washes
The double action wash penetrates so deeply that at just 60^ C you obtain the same results you would normally obtain at 90^ C with a traditional washer.
Safety, a good habit to get into
CAUTION
Please read the instructions in this handbook carefully, as they contain important information about safe installation, operating and servicing.
This washer is manufactured in compliance with international safety regulations designed to safeguard the consumer.
- This appliance is designed to be used indoors and under no circumstances should it be installed outside.
- This appliance should only be used in a domestic environment by a responsible person to wash household laundry according to the instructions.
- Under no circumstances should children be allowed to operate or tamper with this product.
- Beware, this appliance is heavy, do not attempt to move it, unless you are able to do so.
- Before the introduction of a new wash load into the machine, please ensure all previous items have been removed.
- For electrical safety do not attempt to operate this machine with wet hands or feet.
- Do not operate this appliance connected to an extension lead. If a longer supply cable is required this must be replaced with one of the same specifications in compliance with the current electrical regulations. This operation should be carried out by a qualified person.
-
After putting in the detergent, ensure the soap drawer is fully closed before operating the appliance. Only automatic detergent should be used, or too many suds will be produced and damage may occur to internal parts.
-
Do not pull the supply cable to disconnect the plug from the wall socket.
- Beware that during the wash cycle the door glass can become hot. Children should not be left unsupervised whilst the appliance is in operation. During operation the door is locked at all times. On each stop position the door will release after an approximate 3 minute time delay. Do not attempt to open the door before this time otherwise damage may occur to the door release mechanism.
To maintain the EFFICIENCY and SAFETY of this appliance, we recommend:
• use only the MANUFACTURER Service
• use only ORIGINAL Spare Parts
Overview
flowchart
graph TD
    A["Start"] --> B["Process Block"]
    B --> C{Decision}
    C -->|Yes| D["Output 1"]
    C -->|No| E["Output 2"]
    D --> F["Check Point"]
    E --> G["Check Point"]
    F --> H["Final Output"]
    G --> H
    H --> I["End"]
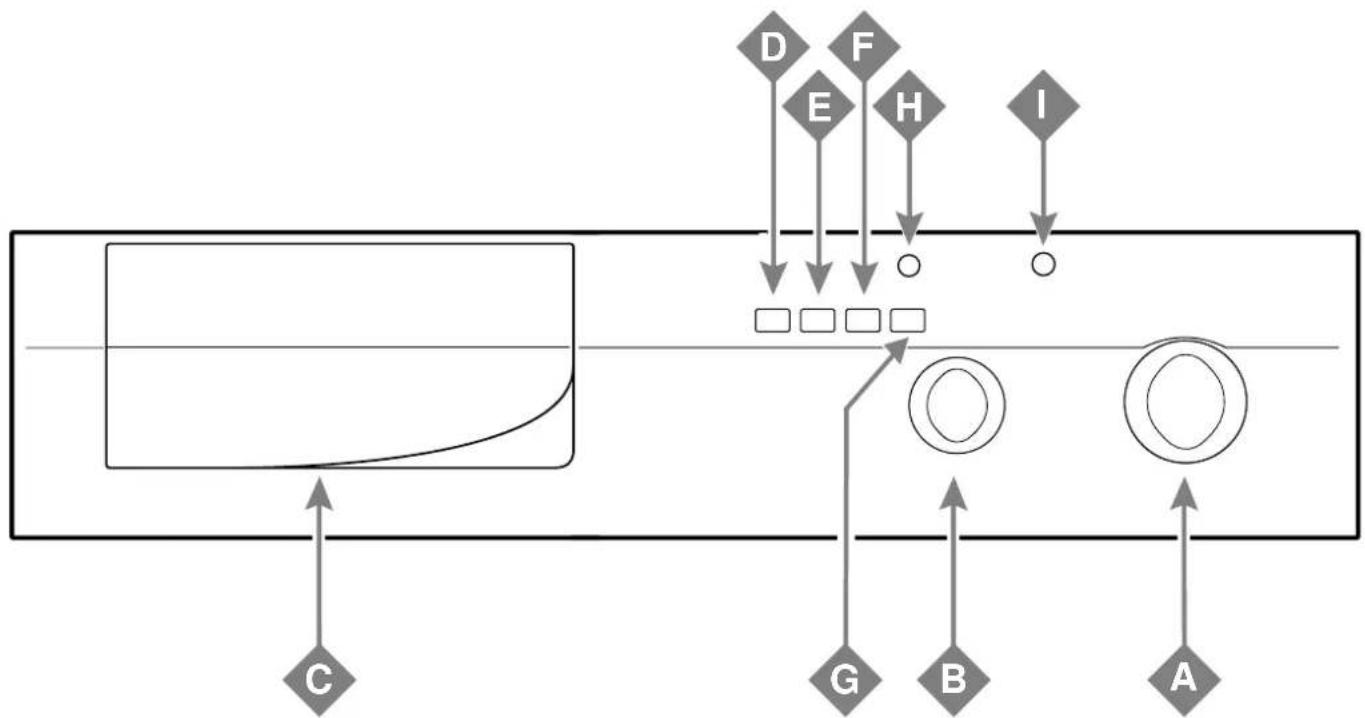
A. Programme selector
Use this dial to select one of the 18 wash programmes available for all your laundry requirements (see programme table on page 5).
Remember that this dial should be turned in a clockwise direction and only when the machine is off.
B. Temperature selector
Use this dial to set the wash temperature shown in the programme table (page 5). You may reduce the recommended wash temperature of the programme you have selected or run a cold wash (symbol
Note: When using cycle number 2, do not use temperature settings below 60°C.
C. Detergent dispenser
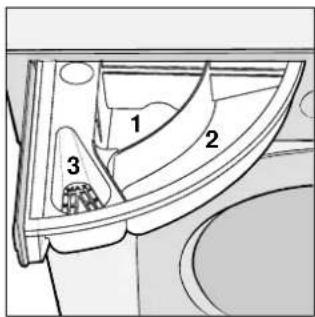
The detergent dispenser has three compartments marked
1, 2 and 3:
1 prewash detergent
2 wash detergent
3 fabric softener.
D. Rinse Hold button
This function interrupts the cycle so that the laundry is left soaking in water before the spin cycle.
This function is extremely useful because it stops delicate or synthetic fabrics from creasing (for example when one has
to wait several hours before removing the laundry load). It should be used only with the programmes for synthetic fabrics and woollens.
IMPORTANT: Before opening the door, drain away the water by setting knob A on "drain". To carry out the spin cycle, simply press D.
E. Care wash button
This button reduces the speed of the drum during washing giving a more delicate wash cycle.
F. Slow spin button
Use this button to reduce the spinning speed from 1200 to 600rpm for the cotton and linen programmes and from 850 to 600rpm for the synthetic fabrics programmes.
G. ON-OFF button
This button turns your appliance ON/OFF. Press button G to turn on the washer and depress button G to turn off the washer.
H. ON/OFF Indicator light
When this is lit, the machine is on.
I. Door Lock indicator light
This shows that the door is locked.
Wait at least three minutes after the light turns off (about 3 minutes after the end of the wash programme) before opening the door.
Using your washer
Preparing your laundry....
Divide your laundry by fabric and colour fastness. Wash white and coloured items separately.
Remember to empty pockets, removing especially those small items like coins, paper, pins and badges that might jam the pump. Fasten or remove loose buttons and fasten zippers. Turn shirts inside out for better results.
Check wash labels
Garments and laundry generally have wash instruction labels (which tell you if they shloud be dry-cleaned, hand washed or machine washed) showing the wash temperature, how to iron etc.
Important: fabrics should only be machine washed if their labels show the appropriate symbol (see table 1 page 4).
Alternate small and large items when loading your washer
This washer has an electronic load balancing control: before carrying out the spin cycle, this device ensures that the laundry is arranged as evenly as possible in the drum, according to the type of fabric and the way it was initially loaded. This will minimize vibration and noise even during the fastest spin cycle. For best results however, we recommend you alternate small and large items when you load your washer-dryer remember to spread them out; never wash large loads of terry cloth items.
Detergents and fabric softener
Open detergent dispenser C by pulling it outwards. Fill with detergent and conditioner using the quantities indicated by the manufacturer on the packet according to the load you are washing, the water hardness and how soiled your laundry is. As you become more familiar with your washer, you will regulate the quantities according to your own personal experience.
Compartment 1
Prewash cycle detergent (powder)
Compartment 2
Wash cycle detergent (powder or liquid)
Compartment 3
Fabric softner
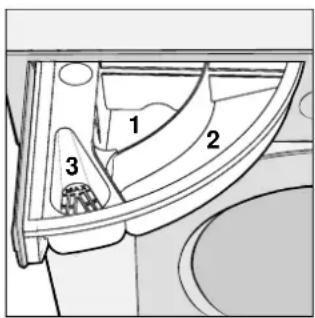
Never fill compartment 3 above the grid.
Use compartment 2 for liquid detergent, filling the compartment just before you start the washer. Remember that liquid detergent is ideal for wash cycles with temperatures up to 60°C and for the programmes with no prewash cycle. Dispensers for liquid and powder detergents which are placed inside the drum of the washer, are sold on the market.
To improve the effectiveness of the washing cycle, we recommend that you insert a detergent dispenser in the drum before loading the laundry.
Do not use hand washing detergents since these produce very heavy suds.
When using cold wash cycles, remember to reduce the detergent dosage.
- Understanding the labels
 Wash Wash | StrongactionDelicateaction |  Wash at95°C Wash at95°C |  Wash at60°C Wash at60°C |  Wash at40°C Wash at40°C |  Wash at30°C Wash at30°C | Hand wash | Notwashablein water |
| 95 | 60 | 40 | 30 | ||||
| Bleachin | Bleachingonly incold water | Do notbleach | |||||
| Ironing | Hot ironat max200°C | Medium hotironing atmax 150°C | Iron atmax 100°C | Notironable | |||
| Drycleaning | Dry cleanwith anysolvent | P Dry cleanonly with,perchloridebenzineav., purealcohol,R111 andR113 | F Dry cleanwith av.benzine,purealcoholand R113 | Do not dryclean | |||
| Drying | HighTemperat | Machinedryable | Do notmachine dry | Spread todry | Hang todry | Dry onclothes | |
Starting up your washer
Run the first wash without laundry using programme 2 at 90°C.
Load your laundry in the washer, add the detergent and fabric softener and remember to:
- shut the door properly
- plug the washer in at the mains
- turn on the water supply
- check that button G is not pressed in (position O)
Selecting the programme
The table on pages 5 will help you choose the right programme. Turn dial A to the programme number you have chosen. Set the temperature on dial B and, if necessary, press function button (D, E, F); set ON/OFF button G to position I (ON).
At the end of the wash cycle...
Wait for indicator light I to turn off (about three minutes), switch off the washer by setting the ON/OFF button G to O (OFF); you can now open the door. Once you have removed your clean laundry from the washer, remember to leave the door open or at least ajar (this will prevent the formation of an unpleasant odour) and shut off the water supply.
Selecting the programmes
The description of the wash programme by type of fabric is shown on the detergent dispenser.
| Type of Fabric & How Dirty Cycle | Knob | Temp. Knob | Pre-wash Detergent | Wash Detergent | Softener Description of Wash Cycle |
| HEAVY FABRICS | |||||
| Extremely dirty whites (sheets, tablecloths, etc.) | 1 MAX | ◆ ◆ ◆ | Warm prewash - wash at 90°C - rinses - intermediate and final spins. | ||
| Very dirty whites (sheets, tablecloths, etc.) | 2 MAX | ◆ | ◆ Wash at 90°C - rinses - intermediate and final spins. | ||
| Very dirty heavy whites and colours | 2 60°C | ◆ | ◆ Wash at 60°C - rinses - intermediate and final spins. | ||
| Very dirty heavy whites and colours. | 2 40°C | ◆ | ◆ Wash at 40°C - rinses - intermediate and final spins. | ||
| Fairly dirty heavy whites and colours (coloured underwear, house coats, etc.) | 3 60°C | ◆ | ◆ Wash at 60°C - rinses - intermediate and final spins. | ||
| Whites and delicate colours that are not very dirty. | 3 40°C | ◆ | ◆ Wash at 40°C - rinses - intermediate and final spins. | ||
| Whites and delicate colours that are not very dirty (shirts, T-shirts, etc.) | 4 40°C | ◆ | ◆ Wash at 40°C - rinses - intermediate and final spins. | ||
| Rinses | 5 | ◆ Rinses with automatic softener dispensing - intermediate and final spins. | |||
| Softener | 6 | ◆ Rinses with automatic softener dispensing - intermediate and final spins. | |||
| Spin | 7 | Drain and final spin. | |||
| SYNTHETICS | |||||
| Very dirty heavy synthetic colours (underwear for infants, etc.). | 8 60°C | ◆ | ◆ Wash at 60°C - rinses - wrinkle-guard (button) or delicate spin. | ||
| Very dirty synthetic colours. | 8 50°C | ◆ | ◆ Wash at 50°C - rinses - wrinkle-guard (button) or delicate spin. | ||
| Very dirty, delicate synthetic colours. | 8 40°C | ◆ | ◆ Wash at 40°C - rinses - wrinkle-guard (button) or delicate spin. | ||
| Fairly dirty delicate synthetic colours. | 9 50°C | ◆ | ◆ Wash at 50°C - rinses - wrinkle-guard (button) or delicate spin. | ||
| Not very dirty delicate synthetic colours (all types of underwear). | 10 40°C | ◆ | ◆ Wash at 40°C - rinses - wrinkle-guard (button) or delicate spin. | ||
| Rinses | 11 | ◆ Rinse with automatic softener dispensing, wrinkle-guard (button) or delicate spin. | |||
| Softener | 12 | ◆ Rinse with automatic softener dispensing, wrinkle-guard (button) or delicate spin. | |||
| Spin | 13 | Drain and delicate spin. | |||
| DELICATES | |||||
| Wool (machine washable) | 14 40°C | ◆ | ◆ Wash at 40°C - rinses - wrinkle-guard (button) or delicate spin. | ||
| Rinses | 15 | ◆ Rinse with automatic softener dispensing, wrinkle-guard (button) or delicate spin. | |||
| Softener | 16 | ◆ Rinse with automatic softener dispensing, wrinkle-guard (button) or delicate spin. | |||
| Spin | 17 | Drain and delicate spin. | |||
| Drain | 18 | Drain without spin. | |||
N.B: 50°C washes a below cannot fill with hot water because the incoming water could exceed the temperature of the wash programme.
Washing tips
Stain removal
The most common stains will disappear during the wash. If they are particularly stubborn, soak the garment in water and rub a little detergent onto the stain before putting it in the washing machine.
Greasy marks (especially old ones) need treating with a stain-remover. Be careful not to mark the fabric with remover.
Pre-treatment for awkward stains
- Ink: ball point/felt tip; Put a few drops of nail varnish remover or surgical spirit onto a piece of cotton wool and dab the stain. Wash at 90°C (NB. This is only suitable for colourfast cottons)
- Tar and oil; Scrape off any thick tar or oil on the surface. Soften the remainder with margarine or butter and wipe away with a clean cloth. Treat any residual stain with turpentine, then wash according to the fabric
- Wax; Scrape off, then put the stained garment between two pieces of blotting paper and press with a hot iron. Dab the stain immediately with cotton wool dipped in turpentine
- Chewing gum; Apply nail varnish remover to the gum, then remove it carefully
- Lipstick; Pretreat with a liquid detergent using the dosing ball, rub vigorously and rinse before washing
- Grass; Soak in a warm washing solution using a biological washing product, then wash according to the fabric. Alternatively, saturate the stain with white methylated spirit. Rinse and wash normally
- Paint: Water based latex, acrylic and school paints, emulsion paints; Treat stains while still wet. Rinse thoroughly under running water to flush out the paint, then wash according to the fabric.
Oil based paint/varnish; Sponge with white spirit or paint brush cleaner before washing in the normal way.
Do not exceed the recommended weights shown in the table
For best washing results, do not exceed the recommended weights shown in the table; the weights shown refer to dry laundry.
| Maximum dry laundry load | How heavy is your laundry? |
| heavy fabrics | 1 sheet 400-500 g |
| maximum 4,5 kg | 1 pillow case 150-200 g |
| delicate fabrics | 1 table cloth 400-500 g |
| maximum 2 kg | 1 bathrobe 900-1200 g |
| pure new wool | 1 bathroom towel150-250 g |
| maximum 1 kg | |
| mixed loads | |
| maximum 2,5 kg |
What not to wash in your appliance?
- Torn, frayed or unhemmed items; in order to wash items of this kind, wrap them in a linen bag to prevent them from tearing during the wash.
- Dark coloured items with white items. Dark items should be washed separately.
Curtains
Curtains tend to crease badly. Try this washing hint to prevent creases: fold the curtains carefully and place in a pillow case or loose mesh bag; wash separately ensuring that the weight is no more than a half wash load.
Quilts, tennis shoes and wind-cheaters
Contrary to common belief, goose or duck down quilts and wind-cheaters, can in fact be machine washed, provided the instructions shown on the label are followed carefully. Remember however to load no more than 2-3 kg of laundry and to repeat the rinse cycle once or twice following with a gentle spin. In the case of tennis shoes, wipe off mud and then machine wash with denims or heavy fabrics (but not white fabrics).
Energy saving hints
- Try to wash complete laundry loads: this saves unnecessary consumption of water and energy.
- Select the right programme for your laundry: this will obviously depend on the type of fabric and how soiled your laundry is; we recommend the use of programmes without prewash which will save you time, water and energy. The prewash cycle should in fact be used only for heavily soiled, cotton fabrics.
- Set the right temperature: use temperatures above 60^ C only for very stubborn dirt but remember that modern detergents are very efficient even at low temperatures.
- Use the correct quantities of detergent: do not use too much detergent; remember that not only will this make rinsing more difficult but also pollutes the environment.
-
Use the economy buttons: when washing small laundry loads use the Economy button if available on your washer and reduce the detergent quantity.
-
Your washer features automatic consumption control, this means that you can wash laundry loads from 1 - 4,5 kg with considerable savings. Your washer will use just the right amount of water and electricity. All you need to do is dose the detergent.
- Fabric softeners: always use a softener; not only do these perfume and soften your laundry, they also make it easy to iron, saving you time.
General maintenance
After every wash
Leave the door open and wipe the door gasket dry after each wash so that damp or odours do not form.
Remove the plug
Before cleaning or servicing always remove the plug from the socket. This is for safety reasons.
No solvents or abrasive substance
You do not need solvents or abrasive substances to clean the outside of the washing-machine and the rubber parts. Just use a cloth, warm water and soap.
Detergent dispenser drawer
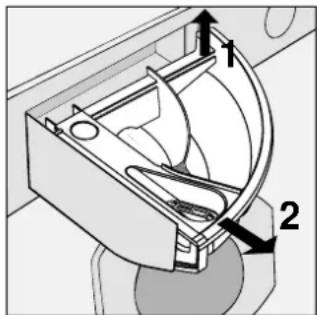
This can be removed and cleaned. Just pull it towards you, as shown in the diagram, and leave it under running water for a few minutes.
Unplug the machine when you go away
It's best to unplug the machine when you go away, turn off the water supply and leave the machine door open or ajar. The drum and rubber door lining will dry and no unpleasant odours will form inside.
When moving house
When you move, all you need to do is secure the inside of the machine with the transit screws (supplied with the packaging of the machine) so that it will not be damaged.
Cleaning and special servicing
Hose
Check the hose once a year. It should be replaced if any signs of splitting or damage can be seen. The machine is under a lot of strain while operating and this may cause a cracked hose to split open suddenly.
Inspecting the drain pump
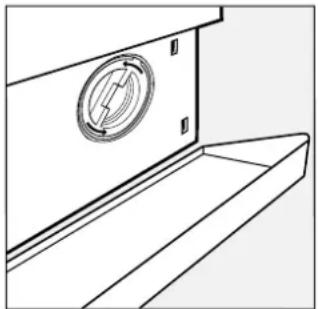
Your washer has a self-cleaning pump and therefore requires no cleaning or maintenance. Remember however that small items such as buttons or coins may accidentally fall into the pump. To remove these items, the pump comes equipped with an "prechamber" which is accessible from the front of the pump. To gain access to this prechamber simply remove the panel located on the bottom part of the washer (figure 1), place it on the ground near the machine (figure 2), and remove the lid by turning it in the counter clockwise direction. Carefully inspect the inside of the pump. Important: before removing the lid check that the wash cycle has ended and unplug the washer from the mains. It is normal for a small quantity of water to spill out once the lid is removed. The panel positioned at the base of the machine will catch the water that spills out. Remember to shut the lid firmly when you replace it.
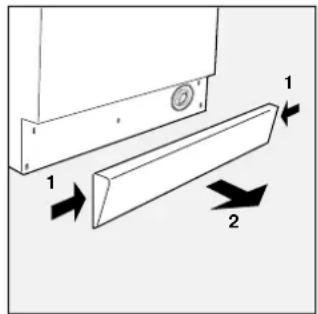
Fig. 1
natural_image
Technical line drawing of a door panel with a circular vent (no text or symbols)Fig. 2
Removing limescale
Water contains increasing amounts of limescale because of pollution. If you live in a hard water area in addition to using water-softener in each wash, it is a good idea to put the machine through a cycle without laundry or detergent, just using limescale remover.
Trouble shooting
If the machine does not seem to be working properly before calling the service engineer there are a number of things you can check. Perhaps you have forgotten to push in a button or you are not using the machine properly.
Machine won't start
Make sure:
the appliance is plugged to the mains socket; you have electricity in your home, the door is firmly shut, the ON/OFF button G is on I, the programming cycle knob, in washers which have one, is on O, the programme is properly set and the mains water tap is open.
Machine won't fill
Make sure:
the water tap is open and connected correctly to the hose; the water mains has not been cut off and that water pressure is sufficient; also check the hose for kinks.
Water is pumping in and out all the time
Make sure:
there are no kinks in the drain pipe and that it is at least at a height of 60-100 cm; the pipe mouth is not below water level and that the wall drain has no air outlet. If the problems continue even after you have checked these points, shut the water tap and turn off your washer.
Problems with pumping out water or spinning
Make sure:
the programme selected has a draining cycle; the non creasing "hydropstop" button, on washers which have one, has not been pressed accidentally; the drainage pump is not jammed; the drain pipe is bent; the drainage piping is plugged; any drainage pipe extensions are properly connected and do not prevent water flow.
Lots of vibration during the spin
Make sure:
the internal oscillating unit was released correctly at the time of installation (see installation instructions); the washer is levelled correctly or too tightly fitted between furniture units and the wall.
Your washer is leaking.
Make sure:
the ring nut of the supply pipe is firmly tightened; the detergent dispenser is not plugged and the drainage pipe is firmly fixed.
Excessive formation of suds.
Make sure:
the type of detergent you have used - is it suitable for an automati washer - have you used too much detergent?
If despite all this your washer is still not running properly, call your local Authorized Service Centre providing the following information:
- fault
- model code (Mod. ....)
and serial number (S/N ....)
shown on the data plate at the back of your washer.
Never use the services of an unauthorised servicing technician and insist on the use of original spare parts.
Installation
Transit packing
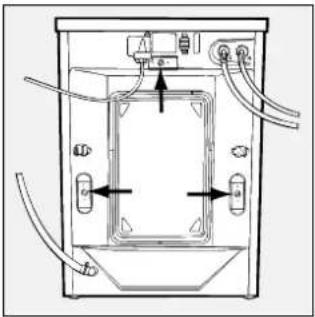
After removing the packing, check the appliance for damage. If you have any doubts do not use the washer and call a qualified technician. Keep the packaging components (plastic bags, polyester foam, nails etc.) out of the reach of children since they could be dangerous. The interior of the washer, has an oscillating unit which is fixed on the back by 3 screws during transport (fig. 3). Before starting up the washer, release the unit, by unscrewing the 3 screws. Seal the screw holes with the plastic plugs supplied with the appliance.
natural_image
Technical diagram of a device interior with labeled ports and wiring (no text or symbols)Fig. 3
natural_image
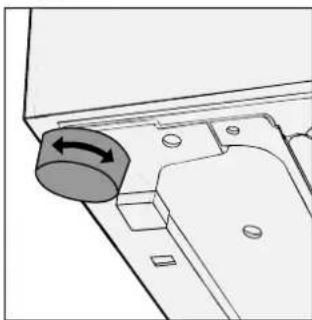
Diagram of a mechanical component with a circular arrow indicating rotation (no text or symbols)Fig. 4
Levelling
The washer must be perfectly levelled. To level the appliance, only the front feet need to be adjusted (see fig. 4); remember that the inclination of the working surface must not be more than 2 degrees. If the washer is installed on a carpeted floor, check that there is sufficient ventilation space between the floor and the bottom of the washer.
Water supply
Both hot and cold water supplies are preferable and they should be between 34.5kN/m²(5lb/in²) and 1034.2kN/m² (150lb/in²) pressure. The hose having the red end fitting should be encountered between the hot supply and the threaded connection adjacent to the letter H on the rear of the machine. The hose having the white end fittings should be connected between the cold supply and the threaded connection adjacent to the letter C on the rear of the machine (see fig. 5). Remember to insert a sealing washer at each connection to ensure watertight joints. Do not overtighten the connections by using tools -hand tight is sufficient to prevent leaks. It is generally more convenient to have these supplies away from the sink taps. Where no suitable hot water supply is available or it does not meet these requirements, both inlet hoses may be connected to a cold supply by using two taps etc., or a «T» junction on the plumbing (see fig. 6) however, use of cold water only will increase programme times.
Note: the maximum temperature should not exceed 70^ C ( 158^ F).
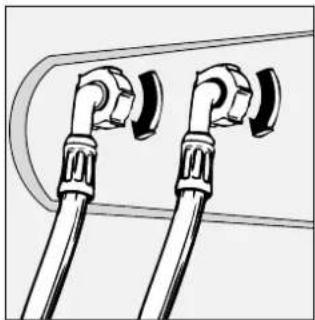
natural_image
Illustration of two connected electrical connectors with switches and diodes (no text or symbols)Fig. 5
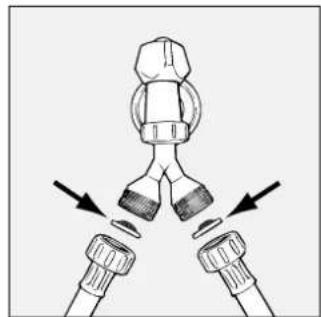
natural_image
Diagram showing two mechanical components with arrows indicating movement or force, no text or symbols presentFig. 6
Drain hose
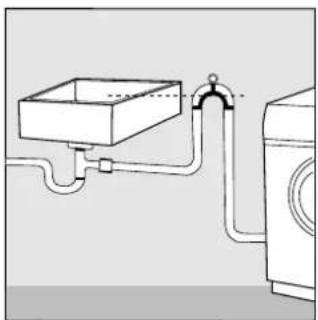
The drain hose (hooked pipe) is secured to the rear of the machine by support clips and may be routed to right or left as required (see fig. 7). The drain hose should be placed in a stand pipe with a minimum internal diameter of 38 mm (1½ inches) or it can be positioned over a sink (see fig. 8) or it can be connected as shown in fig. 9. The height of stand pipe or sink should be between 60 and 100 cm (24 and 40 inches). Care must be taken that the hose is not obstructed, twisted, submerged or kinked. If the hose is connected with an airtight joining, provision should be made to prevent syphoning.
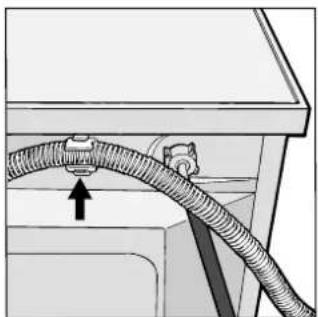
natural_image
Diagram of a mechanical or electrical component with a coiled cable and directional arrow (no text or symbols)Fig. 7
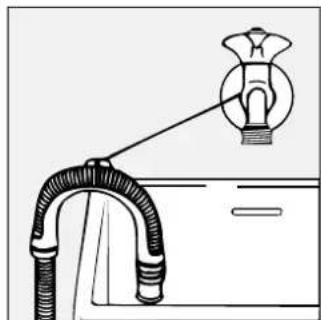
natural_image
Diagram of a hairdryer with a bulb inserted into a pipe (no text or labels)Fig. 8
natural_image
Simple line drawing of a washing machine connected to a square sink (no text or symbols)Fig. 9
Electrical connection (figure 10)
Your appliance is now supplied with a 13 amp fused plug it can be plugged into a 13 amp socket for immediate use. Before using the appliance please read the instructions below.
WARNING - THIS APPLIANCE MUST BE EARTHED.
THE FOLLOWING OPERATIONS SHOULD BE CARRIED OUT BY A QUALIFIED ELECTRICIAN.
Replacing the fuse:
When replacing a faulty fuse, a 13 amp ASTA approved fuse to BS 1362 should always be used, and the fuse cover refitted. If the fuse cover is lost, the plug must not be used until a replacement is obtained.
Replacement fuse covers:
If a replacement fuse cover is fitted, it must be of the correct colour as indicated by the coloured marking or the colour that is embossed in words on the base of the plug. Replacements can be obtained directly from your nearest Service Depot.
Removing the plug:
If your appliance has a non-rewireable moulded plug and you should wish to re-route the mains cable through partitions, units etc., please ensure that either:
the plug is replaced by a fused 13 ampere re-wearable plug bearing the BSI mark of approval.
or:
the mains cable is wired directly into a 13 amp cable outlet, controlled by a switch, (in compliance with BS 5733) which is accessible without moving the appliance.
Disposing of the plug:
Ensure that before disposing of the plug itself, you make the pins unusable so that it cannot be accidentally inserted into a socket.
Instructions for connecting cable to an alternative plug:
Important: the wires in the mains lead are coloured in accordance with the following code:
Green & Yellow Earth
Blue Neutral
Brown Live
As the colours of the wires in the lead may not correspond with the coloured markings identifying the terminals in your plug, proceed as follows:
Connect Green & Yellow wire to terminal marked E or ± or coloured Green or Green & Yellow.
Connect Brown wire to terminal marked L or coloured Red. Connect Blue wire to terminal marked N or coloured Black.
If a 13 amp plug (BS 1363) is used it must be fitted with a 13 amp fuse, either in the plug or adaptor or at the distribution board.
If you are in any doubt the electrical supply to your machine, consult a qualified electrician before use.
How to connect an alternative plug:
The wires in this mains lead are coloured in accordance with the following code:
BLUE NEUTRAL (N)
BROWN LIVE (L)
GREEN & YELLOW EARTH (E)
Disposing of the appliance:
When disposing of the appliance please remove the plug by cutting the mains cable as close as possible to the plug body and dispose of it as described above.
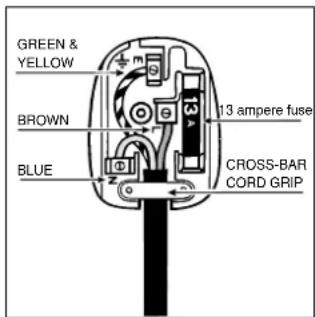
Fig. 10
Technical characteristics
m odel S 1200
dimension width cm 59,5
height cm 85
depth cm 55
capacity 1 - 4,5 Kg
electrical voltage 230/240 Vol:50Hz
connections maxin um absorbed power 2300 W
water maxin um pressure 1 M Pa (10 bar)
connections min in um pressure 0,05 M Pa (0,5 bar) drum capacity 42 lbs
spinning speed up to 1200 rpm
Control Cotton program :
program s in
compliance Turn knob A to the "program 2" setting;
with EC Turn knob B to the "60°C" setting;
regulation 456


This appliance conforms with the following E.E.C. directives:
-73/23/EEC of 19/02/13 (Low Voltage) and subsequent modifications
-89/336/EEC of 03/05/89 (Electromagnetic Compatibility) and subsequent modifications
- Controlled consumption
- Double-action wash
- Saves while it washes
- Safety, a good habit to get into
- CAUTION
- Overview
- Programme selector
- Temperature selector
- Detergent dispenser
- Rinse Hold button
- Care wash button
- Slow spin button
- ON-OFF button
- ON/OFF Indicator light
- Door Lock indicator light
- Using your washer
- Preparing your laundry....
- Check wash labels
- Alternate small and large items when loading your washer
- Detergents and fabric softener
- Compartment 1
- Compartment 2
- Compartment 3
- Starting up your washer
- Selecting the programme
- At the end of the wash cycle...
- Selecting the programmes
- Washing tips
- Stain removal
- Pre-treatment for awkward stains
- Do not exceed the recommended weights shown in the table
- What not to wash in your appliance?
- Curtains
- Quilts, tennis shoes and wind-cheaters
- Energy saving hints
- General maintenance
- After every wash
- Remove the plug
- No solvents or abrasive substance
- Detergent dispenser drawer
- Unplug the machine when you go away
- When moving house
- Cleaning and special servicing
- Hose
- Inspecting the drain pump
- Removing limescale
- Trouble shooting
- Machine won't start
- Make sure:
- Machine won't fill
- Water is pumping in and out all the time
- Problems with pumping out water or spinning
- Lots of vibration during the spin
- Your washer is leaking.
- Excessive formation of suds.
- Installation
- Transit packing
- Levelling
- Water supply
- Drain hose
- Electrical connection (figure 10)
- Replacing the fuse:
- Replacement fuse covers:
- Removing the plug:
- Disposing of the plug:
- Instructions for connecting cable to an alternative plug:
- How to connect an alternative plug:
- Disposing of the appliance:
- Technical characteristics
Brand : Ariston Thermo
Model : S1200UK
Category : Washing machine