
6427CTF - Television SYLVANIA - Free user manual and instructions
Find the device manual for free 6427CTF SYLVANIA in PDF.


| Product Type | CRT Television |
| Brand | Sylvania |
| Model | 6427CTF |
| Screen Size | 27 inches (measured diagonally) |
| Dimensions (W x H x D) | 25.6 x 22.0 x 19.7 inches |
| Weight | Approximately 72 lbs (32.7 kg) |
| Power Supply | 120V AC, 60Hz |
| Power Consumption | 95W (typical) |
| Inputs | RF coaxial (antenna/cable), Composite video (RCA), S-Video, Component video (Y/Pb/Pr) |
| Outputs | Audio out (RCA), Headphone jack |
| Audio | Stereo speakers (2 x 5W), MTS/SAP decoder |
| Tuner | NTSC analog tuner (VHF/UHF) |
| Remote Control | Infrared (IR) remote included |
| On-Screen Display (OSD) | Yes, with multiple languages |
| Closed Captioning | Yes, analog CC |
| V-Chip | Parental control (V-Chip) |
| Sleep Timer | Yes, up to 120 minutes |
| Channels | 181 channel capability (1-125 cable, 2-69 VHF/UHF) |
| Cabinet Color | Black/silver |
| Cleaning Instructions | Unplug TV, wipe with dry soft cloth. Do not use liquid or abrasive cleaners. |
| Safety | Do not expose to moisture or heat sources. Use grounded outlet. Keep ventilation slots clear. |
| Serviceability | No user-serviceable parts inside. Refer to qualified service personnel. |
| Spare Parts Availability | Contact Sylvania customer service or authorized dealers for replacement parts. |
Frequently Asked Questions - 6427CTF SYLVANIA
User questions about 6427CTF SYLVANIA
0 question about this device. Answer the ones you know or ask your own.
Ask a new question about this device
Download the instructions for your Television in PDF format for free! Find your manual 6427CTF - SYLVANIA and take your electronic device back in hand. On this page are published all the documents necessary for the use of your device. 6427CTF by SYLVANIA.
USER MANUAL 6427CTF SYLVANIA
We appreciate your purchase of a SYLVANIA Home Entertainment product. We take pride in the quality of our products and have manufactured your new Home Entertainment unit to exacting quality standards. We feel confident that in normal use, it will provide you with satisfactory performance. However, should you experience difficulty, you are protected under the provisions of this warranty.
SYLVANIA Home Entertainment products are warranted against manufacturing defects in materials and workmanship in normal use for the following periods from the date of purchase by the original user, and is conditional upon the unit being installed and used as directed in the instruction manual.
Product
| Colour Televisions |
| Remote Control |
| B/W Televisions |
Labour
| 1 Year | 1 Year |
| 90 Days | 90 Days |
| 90 Days | 1 Year |
Picture Tube
| 3 Years |
SYLVANIA's obligation under this warranty shall be limited to the repair, including all necessary parts and the cost of the labour connected therewith, or at our option the exchange of any Home Entertainment product which shows evidence of a manufacturing defect within the warranty period.
Replacement parts, furnished in connection with this warranty shall be warranted for a period equal to the unexpired portion of the original equipment warranty.
CUSTOMER OBLIGATIONS
This warranty applies to the product from the original date of purchase at retail. Therefore, the owner must provide a copy of the original, dated bill of sale. No warranty service will be performed without a bill of sale. Transportation to and from the service depot is the responsibility of the owner.
WARRANTY EXCLUSIONS
This warranty is extended to SYLVANIA Home Entertainment products purchased and used in Canada. This warranty shall not apply to appearance or accessory items including but not limited to: antenna, cabinet, cabinet parts, knobs, batteries, connecting cables. This warranty shall, in addition, not apply to damages due to handling, transportation, unpacking, set-up, installation, customer adjustments that are covered in the instruction book, repair or replacement of parts supplied by other than the SYLVANIA authorized service depot, any malfunction or failure caused by or resulting from abnormal environmental conditions, improper unauthorized service, improper maintenance, modifications or repair by the consumer, abuse, misuse, neglect, accident, fire, flood, or other Acts of God, and incorrect line voltage. This Home Entertainment product is only warranted to the original retail purchaser. This warranty becomes void in the event of commercial or rental use. This warranty becomes void in the event serial numbers are altered, defaced or removed. SYLVANIA reserves the right to make changes in design or to make additions to or improvements upon this product without incurring any obligation to install the same on products previously manufactured. The foregoing is in lieu of all other warranties expressed or implied and SYLVANIA neither assumes nor authorizes any person to assume for it any other obligation or liability in connection with the sale or service of this product. In no event shall SYLVANIA or its SYLVANIA dealers be liable for special or consequential damage arising from the use of this product, or for any delay in the performance of this warranty due to cause beyond our control.
The purchaser may have other rights under existing provincial or federal laws, and where any terms of this warranty are prohibited by such laws, they are deemed null and void, but the remainder of the warranty shall remain in effect.
HOW TO OBTAIN SERVICE
Should this product require service, you may obtain specific information on how to obtain service by contacting the SYLVANIA Dealer from whom this product was purchased, or by contacting us directly:
SONIGEM SERVICE
300 Alden Road
Markham, Ontario
L3R 4C1
PHONE: (905) 940-5089 FAX: (905) 940-2303
1-800-287-4871
0EMN01976 Printed in Malaysia
L1524CE * * * * *
Owner's Manual
SYLVANIA
27 INCH COLOR TELEVISION
6427CTF
FEATURES
- Flat Screen Tube and Comb Filter
• MTS/SAP Tuner
• 181 Channel Selection- All VHF/UHF channels plus up to 125 cable channels. - PLL Frequency Synthesized Tuning- The latest PLL frequency synthesized electronic tuning system provides free and easy channel selection, and lets you tune directly to any channel using the channel number buttons (0\~9 and +100-key) on the remote control.
- On-Screen Function Display.
• Full-Function Remote Control - Sleep Timer
- Closed Caption Decoder- You may view specially labeled (cc) TV programs, movies, news, prerecorded tapes, etc. with either a dialogue caption or text display added to the program.
- Auto Shut Off Function- If there is no air signal input from the antenna terminal and no user operation for 15 minutes, the TV will turn itself off automatically.
• V-CHIP- Enables parents to prevent their children from watching inappropriate material on TV. - S-VIDEO Input- allows you to get better picture detail and clarity for the playback of S-VIIS VCR tapes or Video Discs.
PRECAUTIONS
● Place your TV in a room with adequate ventilation.
- Keep your TV set away from sources of direct heat, such as heat registers or direct sunlight.
- Do not place your TV on soft surfaces, such as rugs or blankets.
- Leave enough room for air to circulate around the bottom, top and back of the set.
NOTE: CHANNEL SET UP MUST BE COMPLETED BEFORE THE SET WILL FUNCTION PROPERLY. SEE INSIDE FOR PROCEDURE.
The serial number of this product may be found on the back of the TV. No others have the same serial number as yours. You should record the number and other vital information here and retain this book as a permanent record of your purchase to aid identification in case of theft.
| Date of Purchase | Dealer Phone No. | ||
| Dealer Purchase from | Model No. | ||
| Dealer Address | Serial No. |
This Owner's Manual is made of recycled paper.
IF YOU NEED ADDITIONAL ASSISTANCE FOR SET-UP OR OPERATING AFTER READING OWNER'S MANUAL, PLEASE CALL TOLL FREE 1-800-287-4871.
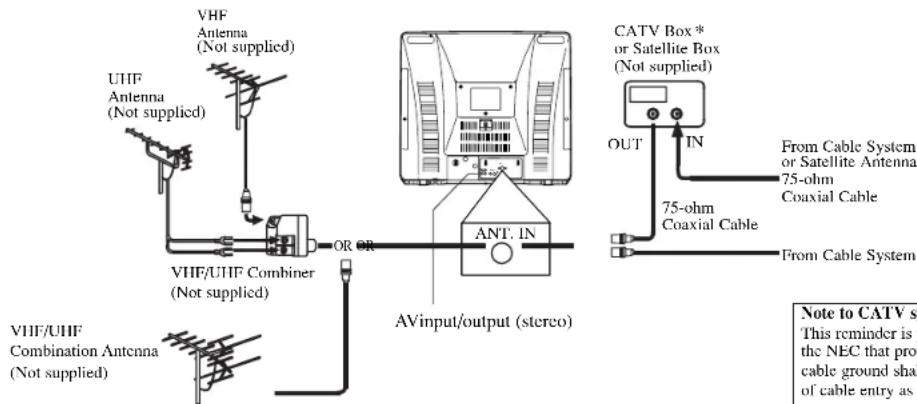
ANTENNA/CABLE CONNECTIONS
CAUTION: TO PREVENT ELECTRIC SHOCK, MATCH WIDE BLADE OF PLUG TO WIDE SLOT, FULLY INSERT.
CLOSED CAPTION
This TV can receive C1 and C2 Caption and Text.
Caption Mode
(1) Closed Caption Characters can be displayed on the TV screen only when the received broadcast signal contains Caption Signals.
(2) Paint-on mode: Displays input characters on the screen immediately.
Pop-on mode: Once characters are stored in memory, they are displayed all at once.
Roll-up mode: Displays the characters continuously by scrolling (max. 4 lines)
Note: If CAPTION C1 or C2 is selected but a Closed Caption signal is not included, characters will not be displayed.
Text Mode
(1) Displays the text on the screen by scrolling (max. 7 lines)
(2) If the received broadcast signal does not contain caption or text signals, no change will occur.
*Some cable TV systems use scrambled signals and require a special converter to receive these channels. Consult your local cable company.
DEGAUSSING :
Magnetism from nearby appliances might affect the color of the TV picture.
If this happens, move this unit away from the appliance. If the color is still not correct, press the POWER button on the set or the remote control to turn off the power first and then press this button again 30 minutes or so later to turn on the power.
Note to CATV system installer:
This reminder is provided to call the CATV system installer's attention to Article 820-40 of the NEC that provides guidelines for proper grounding and, in particular, specifics that the cable ground shall be connected to the grounding system of the building as close to the point of cable entry as practical.
Notes:
(1) When your TV receives a special effects playback signal (i.e., Search, Slow, Still) from a VCR's video output channel (CH3 or CH4), your TV may not display the correct caption or text.
(2) Captions and texts may not match the TV voice exactly.
(3)Interference may cause the closed caption system not to function properly.
(4) The caption or text characters will not be displayed while the menu display or functions display is shown.
(5) If you see this screen:

If your TV displays a black box on the screen, this means that your TV is set to TEXT mode. To clear screen, select CAPTION C1, C2 or CAPTION [OFF].
WARNING:
TO REDUCE THE RISK OF FIRE OR ELECTRIC SHOCK, DO NOT EXPOSE THIS APPLIANCE TO RAIN OR MOISTURE.

CAUTION: TO REDUCE THE RISK OF ELECTRIC SHOCK, DO NOT REMOVE COVER (OR BACK) NO USER SERVICEABLE PARTS INSIDE. REFER SERVICING TO QUALIFIED SERVICE PERSONNEL.

THIS SYMBOL. INDICATES THAT DANGEROUS VOLTAGE CONSTITUTING A RISK OF ELECTRIC SHOCK IS PRESENT WITHIN THIS UNIT.

THIS SYMBOL INDICATES THAT THERE ARE IMPORTANT OPERATING AND MAINTENANCE INSTRUCTIONS IN THE LITERATURE ACCOMPANYING THE APPLIANCE.
The important note is located on the rear of the cabinet.
IMPORTANT SAFEGUARDS
-
Read instructions-All the safety and operating instructions should be read before the appliance is operated.
-
Retain Instructions-The safety and operating instructions should be retained for future reference.
-
Heed Warnings-All warnings on the appliance and in the operating instructions should be adhered to.
-
Follow Instructions-All operating and use instructions should be followed.
-
Cleaning-Unplug TV from the wall outlet before cleaning. Do not use liquid cleaners or aerosol cleaners. Use a damp cloth for cleaning.
EXCEPTION: A product that is meant for uninterrupted service and, that for some specific reason, such as the possibility of the loss of an authorization code for a CATV converter, is not intended to be unplugged by the user for cleaning or any other purpose, may exclude the reference to unplugging the appliance in the cleaning description otherwise required in item 5.
-
Attachments-Do not use attachments not recommended by the TV manufacturer as they may cause hazards.
-
Water and Moisture-Do not use this TV near water, for example, near a bath tub, wash bowl, kitchen sink, or laundry tub, in a wet basement, or near a swimming pool, and the like.
-
Accessories-Do not place this TV on an unstable cart, stand, tripod, bracket, or table. The TV may fall, causing serious injury to someone, and serious damage to the appliance. Use only with a cart, stand, tripod,
bracket, or table recommended by the manufacturer, or sold with the TV.
Any mounting of the appliance should follow the manufacturer's instructions and should use a mounting accessory recommended

by the manufacturer. An appliance and cart combination should be moved with care. Quick stops, excessive force, and uneven surfaces may cause the appliance and cart combination to overturn.
-
Ventilation-Slots and openings in the cabinet and the back or bottom are provided for ventilation and to ensure reliable operation of the TV and to protect it from overheating, these openings must not be blocked or covered. The openings should never be blocked by placing the TV on a bed, sofa, rug, or other similar surface. This TV should never be placed near or over a radiator or heat register. This TV should not be placed in a built-in installation such as a bookcase or rack unless proper ventilation is provided or the manufacturer's instructions have been adhered to .
-
Power Sources-This TV should be operated only from the type of power source indicated on the marking label. If you are not sure of the type of power supply to your home, consult your appliance dealer or local power company. For TVs intended to operate from battery power, or other sources, refer to the operating instructions.
-
Grounding or Polarization-This TV is equipped with a polarized alternating-current line plug(a plug having one blade wider than the other). This plug will fit into the power outlet only one way. This is a safety feature. If you are unable to insert the plug fully into the outlet, try reversing the plug. If the plug should still fail to fit, contact your electrician to replace your obsolete outlet. Do not defeat the safety purpose of the polarized plug.
-
Power-Cord Protection-Power-supply cords should be routed so that they are not likely to be walked on or pinched by items placed upon or against them, paying particular attention to cords at plugs, convenience receptacles, and the point where they exit from the appliance.
-
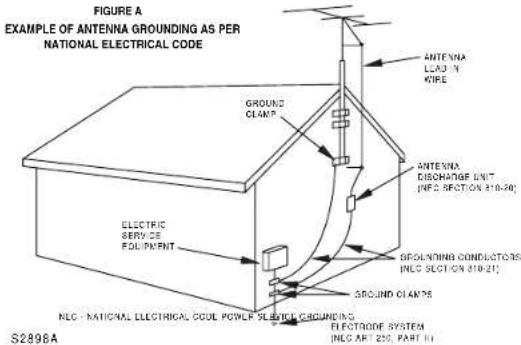
Outdoor Antenna grounding-If an outside antenna or cable system is connected to the TV, be sure the antenna or cable system is grounded so as to provide some protection against voltage surges and built-up static charges. Article 810 of the National Electrical Code, ANSI/NFPA No. 70, provides information with respect to proper grounding of the mast and supporting structure, grounding of the lead-in wire to an antenna discharge unit, size of grounding conductors, location of antenna-discharge unit, connection to grounding electrodes, and requirements for the grounding electrode. (Fig. A)
-
Lightning-For added protection for this TV receiver during a lightning storm, or when it is left unattended and unused for long periods of time, unplug it from the wall outlet and disconnect the antenna or cable system. This will prevent damage to the TV due to lightning and power-line surges.
-
Power Lines-An outside antenna system should not be located in the vicinity of overhead power lines or other electric light of power circuits, or where it can fall into such power lines or circuits. When installing an outside antenna system, extreme care should be taken to keep from touching such power lines or circuits as contact with them might be fatal.
-
Overloading-Do not overload wall outlets and extension cords as this can result in a risk of fire or electric shock.
-
Object and Liquid Entry-Never push objects of any kind into this TV through openings as they may touch dangerous voltage points or short out parts that could result in a fire or electric shock. Never spill liquid of any kind on the TV.
-
Servicing-Do not attempt to service this TV yourself as opening or removing covers may expose you to dangerous voltage or other hazards. Refer all servicing to qualified service personnel.
-
Damage Requiring Service-Unplug this TV from the wall outlet and refer servicing to qualified service personnel under the following conditions:
a. When the power supply cord or plug is damaged or frayed.
b. If liquid has been spilled, or objects have fallen into the TV.
c. If the TV has been exposed to rain or water.
d. If the TV does not operate normally by following the operating instructions. Adjust only those controls that are covered by the operating instructions, as improper adjustment of other controls may result in damage and will often require extensive work by a qualified technician to restore the TV to its normal operation.
c. If the TV has been dropped or damaged in any way. f. When the TV exhibits a distinct change in performance—this indicates a need for service.
-
Replacement Parts-When replacement parts are required, be sure the service technician uses replacement parts specified by the manufacturer that have the same characteristics as the original part. Unauthorized substitutions may result in fire, electric shock, injury to persons or other hazards.
-
Safety Check-Upon completion of any service or repairs to this TV, ask the service technician to perform routine safety checks to determine that the TV is in proper operating condition.
-
Heat-This TV product should be situated away from heat sources such as radiators, heat registers, stoves, or other products (including amplifiers) that produce heat.
OPERATING CONTROLS AND FUNCTIONS
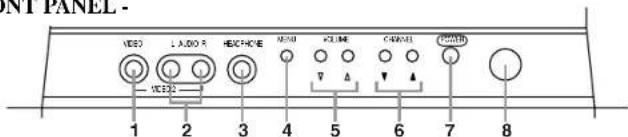
- FRONT PANEL -
- REMOTE CONTROL -
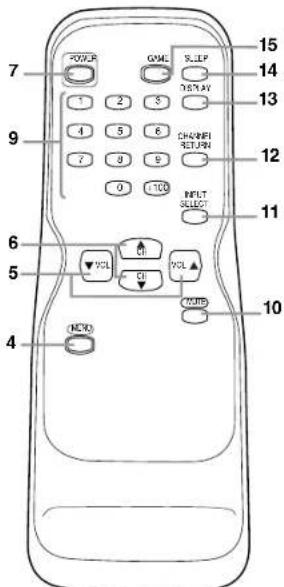
-
VIDEO (in) jack- Connect to the video output jack of a video camera or VCR.
-
AUDIO L/R IN jacks- Connect to the left/right channel audio output jacks of a video camera or VCR. NOTE: The AUDIO L (IN) jack is for mono input. The sound is heard from both speakers. Use this jack for monaural audio equipment to be hooked up.
-
HEADPHONE jack- To connect earphone (not supplied) for personal listening.
-
MENU button- Press to display the menu on the TV screen.
-
VOLUME ▲/▼ buttons- Press to control the volume level.
Press to determine the setting mode from the menu on the TV screen. (only the VOL ▲ button)
Press to select or adjust from a particular menu. (for example: Language Selection, Channel Presetting, Closed Caption Selection, Picture Adjustment, V-CHIP Set Up)
- CHANNEL ▲/▼ buttons- Press to select memorized channel.
NOTE: You MUST PRESET channels BEFORE using CHANNEL ▲/▼ button. (See CHANNEL PRESETTING.)
Press to select the setting mode from the menu on the TV screen. Press to select item you want to adjust in the picture control mode.
-
POWER button- Press to turn the TV ON and OFF.
-
Infrared Sensor Window- Receives the infrared control signals from the remote control unit.
-
CHANNEL NUMBER button- Press two digits to directly access the desired channel. Remember to press a "0" before a single digit channel.
+100 button- Press to select cable channels higher than 99.
10.MUTE button- Press the MUTE button to turn off the sound portion of the TV program. (Volume level display turns LIGHT RED from LIGHT BLUE.) Press the MUTE button again or press the VOL(ume)
▲ or ▼ button to restore sound.
- REAR PANEL -

- INPUT SELECT button- Press to select TV or the external input (VIDEO1 or VIDEO2) mode.
(See USING AUDIO/VIDEO INPUT JACKS.)
12.CHANNEL RETURN button- Press this button to go back to the previously viewed channel. For example, pressing the CHANNEL RETURN button once will change channel display from CH 3 (present channel) to CH 10 (previously viewed channel), and pressing it a second time will return from CH 10 to CH 3.
13.DISPLAY button- Press to display the channel number on the screen. If you press it again, the channel number will disappear.
14.SLEEP button- Press the SLEEP button to display the sleep timer and start the function. The shut off time can be determined by the number of times you press the button. (0, 10, 20, 30, ..90, 0 minutes)
15.GAME button- Press to set the Game mode and external input mode at the same time. To exit, press the INPUT SELECT button.
(See USING AUDIO/VIDEO INPUT JACKS and PICTURE ADJUSTMENT.)
16.S-VIDEO input jack- Connect to the S-VIDEO output jack of a video camera or VCR using the S-VIDEO cable (not supplied).
NOTE: The S-VIDEO jack on the rear panel is given priority over the VIDEO jack.
-
ANT(enna). IN jack- Connect to an antenna, cable system, or satellite system.
-
AC cord- Connect to a standard AC outlet (120V/60Hz).
NOTE: Unwrap the AC cord completely from the backcover before plugging the cord into an AC outlet.
- AUDIO L/R OUT jacks- Connect to the left/right channel audio input jacks of a video camera or VCR.
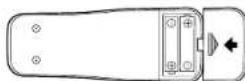
INSTALLING THE BATTERIES
1) Slide the battery compartment cover back on the remote unit.
2) Insert 2 "AA" penlight batteries into battery compartment in the direction as indicated by the polarity (+ / -) markings. Batteries installed with incorrect polarity may damage the remote unit.
3) Replace the cover.
USING AUDIO/VIDEO INPUT JACKS
When you use the AUDIO/VIDEO input jacks, select "VIDEO1" or "VIDEO2" mode by pressing the INPUT SELECT button on the remote control.
- To use the jacks on the back of the TV, select "VIDEO1".
- To use the jacks on the front of the TV, select "VIDEO2".
NOTES:
- You may also set the Game mode and external input mode at the same time by pressing the GAME button on the remote control. "GAME" appears on the TV screen. In this case, connect the external source to the AUDIO/VIDEO jacks on the front panel. (See PICTURE ADJUSTMENT.)
- When you use the S-VIDEO connection, S-VIDEO jack on the rear panel is given priority over the VIDEO jack.
LANGUAGE SELECTION
If you want to change the language of the on-screen menu, follow the procedure below.
1) Connect the power cord to a standard AC outlet.
Note: If some digits appear in the corner of the screen,
press the POWER button without unplugging the power cord.
2) Press the POWER button to turn on the TV.
3) Press the MENU button so that the menu display appears on the TV screen.
4) Press the CH(annel) ▲ or ▼ button to point to "[ENGLISH]".
5) Select "ENGLISH" or "FRANÇAIS" = French by using the VOL(ume) ▲ or ▼ button.
6) Press the MENU button to exit the menu.
▶ PICTURE CHANNEL SET [ENGLISH]FRANÇAIS V-CHIP SET UP CAPTION [OFF]
PICTURE CHANNEL SET ▶ [ENGLISH]FRANÇAIS V-CHIP SET UP CAPTION [OFF]
CHANNEL PRESETTING
NOTE: You MUST PRESET channels BEFORE using CHANNEL ▲ or ▼ button.
To preset a channel or to change a preset channel, follow the procedure below.
1) Press the POWER button to turn on the TV.
2) Press the MENU button so that the menu display appears on the TV screen.
3) Press the CH(annel) ▲ or ▼ button to point to "CHANNEL SET". Then, press the VOL(ume) ▲ button.
4) Press the CH(annel) ▲ or ▼ button to point to "AUTO MEMO". Then, press the VOL(ume) ▲ button.
The tuner scans and memorizes all active channels in your area.
● The TV distinguishes between standard TV channels and cable (CATV) channels.
- When AUTO MEMO action is completed, the lowest memorized channel reappears on the screen.
- When you press the CII(annel) ▲ or ▼ button after selecting AUTO MEMO,
the tuner will stop at the memorized channels only.
● The TV may detect TV channels as CATV channels if the receiving conditions are poor. In this case, try AUTO MEMO action again when receiving conditions are better.
[ADD/DELETE FUNCTION]
1) Press the MENU button so that the menu display appears on the TV screen.
2) Press the CH(annel) ▲ or ▼ button to point to "CHANNEL SET". Then, press the VOL(ume) ▲ button.
3) Press the VOL(ume) ▲ button so that "ADD/DELETE" is selected.
4) Use the CH(annel) ▲ or ▼ button to select the channel you wish to put into memory or to erase from memory.
PICTURE
▶ CHANNEL SET
[ENGLISH]FRANÇAIS
V-CHIP SET UP
CAPTION [OFF]
Note: The display will return to a normal screen in about 10 seconds. Perform "ADD/DELETE" function while this display appears on the screen.
- Press the VOL(ume) ▲ or ▼ button to light up the channel number in LIGHT BLUE if you wish to add the channel into memory.
- Press the VOL(ume) ▲ or ▼ button to light up the channel number in LIGHT RED if you wish to erase the channel from memory.
5) Press the MENU button to exit the menu.
MTS (Multi-Channel Television Sound) System
You can listen to a program in MTS stereo by following the steps below.
| Type of broadcast | MENU SELECTION | Display on the TV screen |
| Regular (monaural audio) | -Invalid- | -None- |
| Stereo broadcast | STEREO [ON] | STEREO |
| STEREO [OFF] | MONO | |
| SAP | MAIN/SAP [MAIN] | MAIN |
| MAIN/SAP [SAP] | SAP |
▶ ADD/DELETE AUTO MEMO STEREO [ON] MAIN/SAP [MAIN]
[To Select STEREO or MONO in Stereo broadcast]
1) Press the MENU button so that the menu display appears on the TV screen.
2) Press the CH(annel) ▲ or ▼ button to point to "CHANNEL SET".
Then, press the VOL(ume) ▲ button.
3) Press the CH(annel) ▲ or ▼ button so that "STEREO" is selected.
4) Press the VOL(ume) ▲ or
▼ button to select the stereo mode on or off. Stereo sound is effective when the "STEREO" is on.
ADD/DELETE AUTO MEMO STEREO [ON] MAIN/SAP [MAIN]
To show the status, press the DISPLAY button on the remote control.
SAP: Second Audio Program, which means your program, can also be received in a second language or sometimes a radio station.
[To Select MAIN or SAP in Bilingual broadcast]
1) Press the MENU button so that the menu display appears on the TV screen.
2) Press the CH(annel) ▲ or ▼ button to point to "CHANNEL SET".
Then, press the VOL(ume) ▲ button.
3) Press the CH(annel) ▲ or ▼ button so that "MAIN/SAP" is selected.
4) Press the VOL(ume) ▲ or
▼ button to select the "MAIN" or "SAP".
Bilingual sound is effective when the "SAP" is selected.
ADD/DELETE AUTO MEMO STEREO [ON] MAIN/SAP [SAP]
RESUME FUNCTION
If the power fails or is disconnected while the TV is powered on, the TV will turn on automatically when the power resumes.
OPERATIONS
WATCHING A TV PROGRAM
1) Press the POWER button to turn on the TV.
2) Select the desired channel with the CH(annel) ▲ or ▼ button.
3) Adjust the volume to the desired listening level using the VOL(ume) ▲ or ▼ button.
4) Adjust picture controls for a natural looking image. (See "PICTURE ADJUSTMENT".)
SETTING THE SLEEP TIMER
The sleep timer function enables you to shut off the power without pressing the POWER button after a desired time period.
1) Press the POWER button to turn on the TV and press the SLEEP button on the remote control.
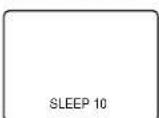
2) You may change the sleep time by pressing the SLEEP button on the remote control repeatedly. The timer can be set up to 90 minutes, 10 minutes each time the SLEEP button is pushed. (The timer display counts up and sleep timer will be displayed on the screen when you press the SLEEP button on remote control.)
Note: When you disconnect the unit from the AC outlet, or if you have a power failure, the sleep time will be lost
CLOSED CAPTION SELECTION
You may view specially labeled (cc) TV programs, movies, news, prerecorded tapes, etc. with either a dialogue caption or text display added to the program.
Tocancel the sleep timer: Press the SLEEP button repeatedly until "SLEEP 0" is displayed.
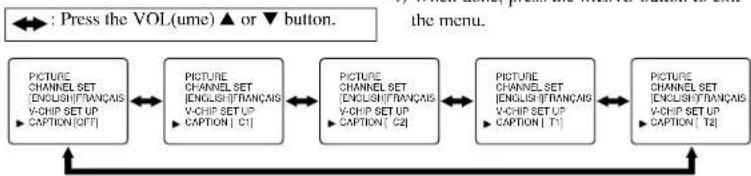
flowchart
graph LR
    A["Picture CHANNEL SET [ENGLISH"] [FRANÇAIS V-CHIP SET UP CAPTION (OFF)]] --> B["Picture CHANNEL SET [ENGLISH"] [FRANÇAIS V-CHIP SET UP CAPTION (C1)]
    B --> C["Picture CHANNEL SET [ENGLISH"] [FRANÇAIS V-CHIP SET UP CAPTION (C2)]
    C --> D["Picture CHANNEL SET [ENGLISH"] [FRANÇAIS V-CHIP SET UP CAPTION (T1)]
    D --> E["Picture CHANNEL SET [ENGLISH"] [FRANÇAIS V-CHIP SET UP CAPTION (T2)]
    E --> F["Press the VOL(ume) ▲ or ▼ button."]
    style A fill:#f9f,stroke:#333
    style B fill:#f9f,stroke:#333
    style C fill:#f9f,stroke:#333
    style D fill:#f9f,stroke:#333
    style E fill:#f9f,stroke:#333
    style F fill:#f9f,stroke:#333
PICTURE ADJUSTMENT
1) Press the MENU button so that the menu display appears on the TV screen.
2) Press the VOL(ume) ▲ button so that "PICTURE" is selected.
3) Select the feature you wish to adjust with the CH(annel) ▲ or ▼ button and adjust it with the VOL(ume) ▲ or ▼ button.
GAME MODE
Set to the most suitable position for TV
GAME.
[+] : ON
- : OFF
BRIGHT
Adjust until the whitest parts of the picture are as bright as you prefer.
[+] : increase brightness
[-] : decrease brightness
CONTRAST
Adjust to increase or decrease contrast.
[+] : increase contrast
[-] : decrease contrast
COLOR
Adjust to be brilliant or pale color.
[+] : be brilliant color
[-]: be pale color
TINT
Adjust to obtain natural skin tones.
[+] : greenish tone
[-] : reddish tone
Notes:
- "+" is achieved by pressing the VOL(ume) button and "-" by pressing the VOL(ume) button.
- In the above steps, the picture adjustment display will disappear from the TV screen automatically after about 10 seconds if you do not press any buttons. Press the MENU and VOL(ume) ▲ button so that "PICTURE" is selected. Then, press the CH(annel) ▲ or ▼ button repeatedly until the display returns to the screen.
- If you adjust the other Picture control after you set the Game mode to [ON], the Game mode is set to [OFF] automatically.
[USING THE GAME BUTTON]
You may also set the Game mode and external input mode at the same time by pressing the GAME button on the remote control. "GAME" appears on the TV screen. In this case, connect the external source to the AUDIO/VIDEO jacks on the front panel.
- To exit the Game mode and external input mode, press the INPUT SELECT button on the remote control.
- To cancel the Game mode only, adjust the picture control. In this case, "VIDEO2" instead of "GAME" appears on the TV screen.
- If you press the GAME button when the TV is off, the TV turns on and will be in the Game mode and external input mode automatically.
←: Press the CH(annel) ▲ or ▼ button.
![SYLVANIA 6427CTF - [USING THE GAME BUTTON] - 1](/content/2026/06/1187179/images/bfa0f4b6b69f02013bcc52b44b6b6001d8d2f5f69fc3c14d1d587f4d02db9f6d.jpg)
flowchart
graph LR
    A["["] GAME_MODE["-"]] --> B["["] RRIGHT["-"]]
    B --> C["["] CONTRAST["-1"]]
    C --> D["["] COLOR["-1"]]
    D --> E["["] TANT["-"]]
    E --> A
V-CHIP SET UP
V-CIIP enables parents to prevent their children from watching inappropriate material on TV. V-CHIP reads the ratings for programming (except for news and sports programs, unedited movies on premium cable channels, and Emergency Broadcast System signals), then denies access to programming if the program's rating meets the limitations you select. In this case, "PROTECTED PROGRAM by ..." message appears on the TV screen. To block ratings, follow the steps below.
- Programming may be rated by the Motion Picture Association of America (MPAA) or according to the Television Parental Guidelines. In order to block any inappropriate programming, set your limits in both places (MPAA RATING and TV RATING).
- You cannot access the menu when the "PROTECTED PROGRAM by ..." message appears. In this case, change to the unblocked channel, then press the MENU button.
[MPAA RATING SET UP]
1) Press the MENU button so that the menu display appears on the TV screen.
2) Press the CH(annel) ▲ or ▼ button to point to "V-CHIP SET UP". Then, press the VOL(ume) ▲ button.
3) Press the CII(annel) ▲ or ▼ button to point to "MPAA RATING". Then, press the VOL(ume) ▲ button.
4) Press the CH(annel) ▲ or ▼ button to point to your desired item. Then, press the VOL(ume) ▲ button to select [BLOCK] or [VIEW].
| • G: | General Audience |
| • PG: | Parental Guidance suggested. |
| • PG-13: | Unsuitable for children under 13 |
| • R: | Restricted; under 17 requires accompanying parent or adult guardian |
| • NC-17: | No one under 17 admitted |
| • X: | Mature audience only |
| PICTURECHANNEL SET[ENGLISH]FRANÇAIS▶V-CHIP SET UPCAPTION [OFF] |
| TV RATING |
| MPAA RATING |
| G | [VIEW] |
| PG | [VIEW] |
| PG-13 | [VIEW] |
| R | [BLOCK] |
| NC-17 | [BLOCK] |
| X | [BLOCK] |
- When you select the rating category and turn it [BLOCK], the higher rating will turn [BLOCK] automatically. Also, the lower rating will turn [VIEW] automatically.
- When you turn "G" to [BLOCK] or [VIEW], then all ratings will turn to [BLOCK] or [VIEW] automatically.
- When you turn "X" to [VIEW], then all ratings will turn to [VIEW] automatically.
5) Press the MENU button to exit the menu.
TROUBLESHOOTING GUIDE
Sometimes a performance problem can be easily solved by checking seemingly apparent but often overlooked possibilities. Before arranging for service, check these items. It could save you time and money.
| QUICK SERVICE CHECK LIST | PROBLEM | Remote Control Doesn't Work | Bars On Screen | Picture Distorted | Picture Rolls Vertically | No Color | Poor Reception on Some Channels | Weak Picture | Lines or Streaks in Picture | Glasses in picture | Picture Blurred | Sound OK, Picture Pour | Picture OK, Sound Poor | No Picture or Sound |
| POSSIBLE REMEDY | ||||||||||||||
| Try a new channel, if OK, then possible station trouble. | X | X | X | X | X | X | X | X | X | X | X | |||
| Is TV plugged in?Power at outlet? | X | X | ||||||||||||
| Is TV's POWER button on? | X | |||||||||||||
| Is antenna connected to terminal on the back of the set? | X | X | X | X | X | X | ||||||||
| If outside antenna is being used, check for broken wire. | X | X | X | X | X | X | X | X | X | X | X | |||
| Check for local interference. | X | X | X | X | X | X | X | |||||||
| Turn off with POWER button and then turn it on after about a minute. | X | |||||||||||||
| Adjust COLOR control. | X | |||||||||||||
| Adjust CONTRAST & BRIGHT control. | X | X | ||||||||||||
| Check batteries in Remote Control. | X | |||||||||||||
| Closed Caption Problem | Possible Remedy |
| My TV is showing captions that are misspelled. | You are watching a live broadcast and spelling errors made by the closed captioning production company may pass through uncorrected. A prerecorded program will not show any misspelled words because of the normal time available for editing the captions. |
| My TV will not show the text in its entirety or there is a delay of what is being said. | Captions that are delayed a few seconds behind the actual dialogue are common for live broadcasts. Most captioning production companies can display a dialogue to a maximum of 220 words per minute. If a dialogue exceeds that rate, selective editing is used to insure that the captions remain up-to-date with the current TV screen dialoguc. |
| My captions are scrambled with white boxes on the TV screen. | Interference caused by building, power lines, thunderstorms, etc. may cause scrambled or incomplete captions to appear. |
| My program guide listed a TV show as being closed captioned but none of the captions were displayed. | Broadcasters may at times use a time compression process to the actual program so that additional advertising time can be given. Since the decoder cannot read the compressed information, captions will be lost. |
| My prerecorded videotape does not show any captions. The tape box mentions it being closed captioned. | The videotape was either an illegal copying or the tape duplicating company accidentally left out the captioning signals during the copying process. |
| My TV screen shows a black box on certain channels. | You are in the TEXT mode. Select CAPTION mode or CAPTION [OFF]. |
[TV RATING SET UP]
1) Press the MENU button so that the menu display appears on the TV screen.
2) Press the CII(annel) ▲ or ▼ button to point to "V-CIIP SET UP". Then, press the VOL(ume) ▲ button.
3) Press the CII(annel) ▲ or ▼ button to point to "TV RATING". Then, press the VOL(ume) ▲ button.
4) Press the CH(annel) ▲ or ▼ button to point to your desired item. Then, press the VOL(ume) ▲ button to select [BLOCK] or [VIEW].
| • TV-Y:Appropriate for all children• TV-Y7:Appropriate for children seven and older• TV-G:General Audience• TV-PG:Parental Guidance suggested.• TV-14:Unsuitable for children under 14• TV-MA: Mature audience only |
| PICTURECHANNEL SET[ENGLISH]FRANÇAIS▶V-CHIP SET UPCAPTION [OFF] |
| ▶TV RATINGMPAA RATING |
| TV-Y | [VIEW] |
| TV-Y7 ( ) | [VIEW] |
| TV-G | [VIEW] |
| TV-PG ( ) | [VIEW] |
| TV-14 ( ) | [VIEW] |
| TV-MA ( ) | [VIEW] |
- When you select the rating category and turn it [BLOCK], the higher rating will turn [BLOCK] automatically. Also, the lower rating will turn [VIEW] automatically.
- When you turn "TV-Y" to [BLOCK] or [VIEW], then all ratings will turn to [BLOCK] or [VIEW] automatically.
- When you turn "TV-MA" to [VIEW], then all ratings will turn to [VIEW] automatically.
When you select TV-Y7, TV-PG, TV-14, or TV-MA and you press the VOL(ume) ▲ button, the sub-ratings will appear on the TV screen. If you select the rating category (example: TV-PG) and turn it [BLOCK] or [VIEW], the sub-ratings (example: V for Violence) will turn [BLOCK] or [VIEW] automatically. You can set the sub-ratings to [BLOCK] or [VIEW] individually when the rating category is set to [BLOCK]. To set the sub-ratings individually, follow the steps below.
- When you select [TV-Y7]: Press the CII(annel) ▲ or ▼ button to select "FV" (Fantasy Violence). Then, press the VOL(ume) ▲ button to select [BLOCK] or [VIEW].
- When you select [TV-PG], [TV-14] or [TV-MA]: Press the CH(annel) ▲ or ▼ button to select "D"(Suggestive Dialog), "L"(Coarse Language), "S"(Sexual Situation), or "V"(Violence). Then, the VOL(ume) ▲ button to select [BLOCK] or [VIEW]. Note: When you select [TV-MA], "D" does not appear on the TV scre
● The sub-ratings which set to [BLOCK] appears next to the rating category in the TV RATING menu.
5) Press the MENU button to exit the menu.
| TV-Y7 | [BLOCK] |
| ▶FV | [BLOCK] |
| TV-PG | [BLOCK] |
| ▶D | [BLOCK] |
| L | [BLOCK] |
| S | [BLOCK] |
| V | [BLOCK] |
| TV-Y | [VIEW] |
| TV-Y7 ( ) | [VIEW] |
| TV-G | [BLOCK] |
| TV-PG (DLSV) | [BLOCK] |
| TV-14 (DLSV) | [BLOCK] |
| TV-MA ( LSV) | [BLOCK] |
MAINTENANCE
CABINET CLEANING
● Wipe the front panel and other exterior surfaces of the TV with a soft cloth immersed in lukewarm water and wrung dry.
● Never use a solvent or alcohol. Do not spray insecticide liquid near the TV. Such chemicals may cause damage and discoloration to the exposed surfaces.
PICTURE TUBE CLEANING
Wipe the picture tube of the TV with a soft cloth. Before cleaning the picture tube, disconnect the power cord.
SUPPLIED ACCESSORIES
Remote control unit (N0160UD)
Batteries ("AA" x 2)

Owner's Manual
SPECIFICATIONS
GENERAL SPECIFICATIONS
Television system: NTSC-M TV Sta
Closed Caption
System: §15.119/FCC
Channel coverage
VIIF: 2 \~ 13
UHF: 14 \~ 69
CATV: 2 \~ 13, A \~ W, W+1 \~ W+84, A-5 \~ A-1, 5A
Tuning System 181 channel
frequency synthesized tuning system
Channel access: Direct access keyboard, programmable scan and up/down
Terminals
Antenna input: VHF/UHF/CATV 75 ohm unbalanced (F-type)
S-Video input: Mini DIN 4-pin jack
Video input: RCA connector x 2
Audio input: RCA connector x 4
Audio output: RCA connector x 2
Headphone: 1/8" stereo (3.5mm)
Stereo Sound System
2 speakers
Front/rear AV input
ELECTRICAL SPECIFICATIONS
Sound output:
3W, 8 ohm x2
OTHER SPECIFICATIONS
Remote control: Digital encoded infrared light system
Operating temperature
5^ to 40^ (41^ 104^)
Power requirements: AC120V, 60Hz Power consumption
(Maximum): 125W
Picture tube: 27"
Dimensions: H : 24" (610mm) W: 27-1/16" (688mm) D : 19-7/8" (505mm) Weight: 92.6 lbs. (42kg)
- Designs and specifications are subject to change without notice. - If there is a discrepancy between languages, the default language will be English.
- CUSTOMER OBLIGATIONS
- WARRANTY EXCLUSIONS
- HOW TO OBTAIN SERVICE
- SONIGEM SERVICE
- Owner's Manual
- SYLVANIA
- INCH COLOR TELEVISION
- 6427CTF
- FEATURES
- PRECAUTIONS
- NOTE: CHANNEL SET UP MUST BE COMPLETED BEFORE THE SET WILL FUNCTION PROPERLY. SEE INSIDE FOR PROCEDURE.
- IF YOU NEED ADDITIONAL ASSISTANCE FOR SET-UP OR OPERATING AFTER READING OWNER'S MANUAL, PLEASE CALL TOLL FREE 1-800-287-4871.
- ANTENNA/CABLE CONNECTIONS
- CLOSED CAPTION
- Caption Mode
- Text Mode
- DEGAUSSING :
- Notes:
- IMPORTANT SAFEGUARDS
- OPERATING CONTROLS AND FUNCTIONS
- INSTALLING THE BATTERIES
- USING AUDIO/VIDEO INPUT JACKS
- LANGUAGE SELECTION
- CHANNEL PRESETTING
- [ADD/DELETE FUNCTION]
- [To Select STEREO or MONO in Stereo broadcast]
- [To Select MAIN or SAP in Bilingual broadcast]
- RESUME FUNCTION
- OPERATIONS
- WATCHING A TV PROGRAM
- SETTING THE SLEEP TIMER
- CLOSED CAPTION SELECTION
- PICTURE ADJUSTMENT
- GAME MODE
- BRIGHT
- CONTRAST
- COLOR
- TINT
- [USING THE GAME BUTTON]
- V-CHIP SET UP
- [MPAA RATING SET UP]
- TROUBLESHOOTING GUIDE
- [TV RATING SET UP]
- MAINTENANCE
- CABINET CLEANING
- PICTURE TUBE CLEANING
- SUPPLIED ACCESSORIES
- SPECIFICATIONS
- GENERAL SPECIFICATIONS
- ELECTRICAL SPECIFICATIONS
- OTHER SPECIFICATIONS
Brand : SYLVANIA
Model : 6427CTF
Category : Television