FOPM-210 - Informatique et périphériques Black Box - Free user manual and instructions
Find the device manual for free FOPM-210 Black Box in PDF.

User questions about FOPM-210 Black Box
0 question about this device. Answer the ones you know or ask your own.
Ask a new question about this device
Download the instructions for your Informatique et périphériques in PDF format for free! Find your manual FOPM-210 - Black Box and take your electronic device back in hand. On this page are published all the documents necessary for the use of your device. FOPM-210 by Black Box.
USER MANUAL FOPM-210 Black Box
Deluxe Optical Power Meter with Memory
Works with an optical laser source to test optical fiber cables for optical loss.
Works at six wavelengths: 850, 1300, 1310, 1490, 1550, and 1625 nm.

text_image
1888 nm REF 270Hz 1kHz -8.88.8 dBm 2kHz TWN AUTO-OFF >2s PERM ON OFF λ dBm/ dB/mW >2s SAVE +2s SET LOAD REFFEDERAL COMMUNICATIONS COMMISSION AND INDUSTRY CANADA RADIO FREQUENCY INTERFERENCE STATEMENTS
This equipment generates, uses, and can radiate radio-frequency energy, and if not installed and used properly, that is, in strict accordance with the manufacturer's instructions, may cause interference to radio communication. It has been tested and found to comply with the limits for a Class A computing device in accordance with the specifications in Subpart B of Part 15 of FCC rules, which are designed to provide reasonable protection against such interference when the equipment is operated in a commercial environment. Operation of this equipment in a residential area is likely to cause interference, in which case the user at his own expense will be required to take whatever measures may be necessary to correct the interference.
Changes or modifications not expressly approved by the party responsible for compliance could void the user's authority to operate the equipment.
This digital apparatus does not exceed the Class A limits for radio noise emission from digital apparatus set out in the Radio Interference Regulation of Industry Canada.
WARNING: Never look directly into optical outputs or a fiber while the equipment is on. Invisible and visible laser beams may damage your eyes.
Do not short-circuit the AC adapter/charger terminal and the batteries. Excessive electrical current may cause personal injury due to fumes, electric shock, or equipment damage.
Connect the AC power cord to the equipment and wall socket properly. When you insert the AC plug, make sure there is no dust or dirt on the terminals and both plugs are fully seated.
WARNING: If the AC plug is not connected properly, fuming, electric shock, or equipment damage might occur and may result in personal injury.
Do not operate the equipment near hot objects, in hot environments, in dusty/humid atmospheres, or when condensation is present on the equipment. This may cause electric shock, product malfunction, or poor performance.
TRADEMARKS USED IN THIS MANUAL
Black Box and the Double Diamond logo are registered trademarks of BB Technologies, Inc.
Excel is a registered trademark of Microsoft Corporation.
Any other trademarks mentioned in this manual are acknowledged to be the property of the trademark owners.
- Specifications....6
1.1 Optical Specifications....6
1.2 General Specifications 6
- Overview....7
2.1 Introduction....7
2.2 What's Included 7
2.3 Features....7
- Operation....8
3.1 Battery Indicator 8
3.2 AC Operation 9
- Using the Deluxe Optical Power Meter with Memory...... 10
4.1 Display and Controls.... 10
4.1.1 Keypad 10
4.1.2 Connectors.... 11
4.1.3 LCD.... 12
4.2 Turning the Optical Power Meter On and Off 12
4.3 Setting the Wavelength....13
4.4 Switching Measurement Mode 13
4.5 Setting and Checking the Reference Level.... 14
4.6 Switching the LCD Backlighting On and Off.... 14
4.7 Frequency Detecting....14
4.8 Measured Power Value Overflow 15
4.9 Storing the Current Test Value.... 15
4.10 Checking the Storage Records 15
4.11 Connecting to the Optical Laser Source 16
- Maintenance....17
Appendix. Troubleshooting 18
A.1 Calling Black Box 18
A.2 Shipping and Packaging....18
1. Specifications
1.1 Optical Specifications
NOTE: Valid at 1550 nm, CW. 23^ C ±3^ C, relative humidity less than or equal to 70% with FC connector.
Table 1-1. Optical Specifications
Function Value
| Auto Power-off Yes | |
| Backlighting Yes | |
| Calibrated Wavelength (nm) 850/1300/1310/1490/1550/1625 | |
| Data Storage Yes | |
| Detector Type InGaAs | |
| Frequency Detecting Range -40 ±10 dBm | |
| Measuring Range (dBm) -70 ±10 @ 1550 nm | |
| Operating Wavelength (nm) | 800–1700 |
| Precision | ±5% ±1 |
| Reference Value | Yes |
| Resolution | 0.01 dB |
| Tone Detection | 270 Hz, 1 kHz, 2 kHz |
| USB Interface | Yes |
| Wavelength Detecting Range | -40 ±10 dBm |
| Wavelength Recognition | Yes |
1.2 General Specifications
Connectors: FC/PC (SC/PC, ST/PC interchangeable connectors optional)
Temperature Tolerance: Operating: -10 to +50°C; Storage: -20 to +70°C
Humidity Tolerance: Less than 90%
Power: (2) 1.2-V Ni-MH batteries; AC adapter for continuous use
Size: 6.3"H x 3"W x 1.8"D (16 x 7.6 x 4.5 cm)
Weight: 0.59 lb. (0.27 kg)
2. Overview
2.1 Introduction
Use the Deluxe Optical Power Meter with Memory (FOPM-210) with an optical laser source (FOLS-SM-200 or FOLS-MM-200) to identify optical fiber strands, measure optical attenuation, verify continuity, and test optical transmission quality in laboratories, LANs, WANs, telecommunications networks, and other long-distance optical applications.
The FOPM-210 has a memory capacity of 1000 data items and supports data transfers via a USB port and the included software. The data can be saved as an Excel® file or plain text.
2.2 What's Included
Your package should include the following items. If anything is missing or damaged, contact Black Box Technical Support at 724-746-5500.
- Main Unit
• Quality Check Report - Carrying Case
- AC/DC Adapter
- User's manual on CD-ROM
- Printed Quick Start Guide
• (2) 1.2-volt NiMH batteries - Small Phillips screwdriver
- USB cable
- FC/PC connector (SC/PC, ST/PC interchangeable connector optional)
2.3 Features
- Small, compact unit is lightweight and is easy to carry
- Shifts units automatically, also has auto-off, power capacity display, and recharging display on the LCD
- Includes linear and logarithmic optical power display
- Has memory capacity of 1000 data points
3. Operation
3.1 Battery Indicator
A battery indicator on the screen shows the remaining charge. See Figures 3-1 and 3-2. Table 3-1 describes the LED status.

text_image
1550 nmFigure 3-1. Battery indicator full.

text_image
1550 nmFigure 3-2. Battery indicator empty.
Table 3-1. Battery indicator status.
Status Icon Description
Full Battery at 100% capacity
2 Bars Battery at 50.75% capacity
1 Bar Battery at 25-50% capacity
Empty Battery at 0-25% capacity
The battery icon flashes when the power is almost depleted. Connect the AC adapter to the power meter to recharge the battery.
NOTES: To replace the batteries, use a screwdriver to remove the battery plate on the back of the power meter.
The AC indicator is not displayed when power is supplied by battery.
To eliminate the possibility of acid leakage, remove the battery if you won't use the power meter for an extended time.
3.2 AC Operation
If you will use the power meter at one location, for example, in a laboratory or test department, you can use the AC adapter to power it instead of batteries. Plug the AC adapter's output cable into the DC input jack on the bottom of the power meter. When the AC adapter is plugged in, the AC indicator on the LCD will be displayed. See Figure 3-3.
1550 nm
-
Figure 3-3. AC adapter indicator.
NOTES: Power is supplied by the AC adapter even if a battery is installed. The battery indicator does not display on the screen when AC adapter is plugged in.
Make sure that the AC adapter's operating voltage is within the range of the local AC voltage. For example, input: AC 100–240 V, 50–60 Hz.
- Using the Deluxe Optical Power Meter with Memory
4.1 Display and Controls

text_image
1888 REF STRAW FATH RASS -8.8.8.8 dBm 2 3 4 5 6Figure 4-1. Keypad functions: Number 1 through 6.
4.1.1 Keypad
Use the keypad to access a wide range of power meter functions. See Table 4-1.
Table 4-1. Keypad functions.
Number Key Function
1

Switches tester on/off. Press and hold for more than two seconds while turning on to disable the auto-off feature.
2 Press to set the wavelength. Select from six possible wave-lengths: 850, 1300, 1310, 1490, 1550, and 1625 nm. Press and hold to activate auto-wavelength recognition.
3 Press to select the measurement mode. Three modes are available: dBm for the power value, dB for the relative value, and mw for the logarithmic value. (HI/LO will be displayed if the measured power value is out of range.)
4 Press to display the last record stored. Press and hold to store the current test value.
5

Press for less than two seconds to display the wavelength reference level. Press and hold for two more seconds to set a new wavelength reference level.
Table 4-1 (continued). Keypad functions.
Number Key Function
6 Press to switch backlighting on/off.
4.1.2 Connectors
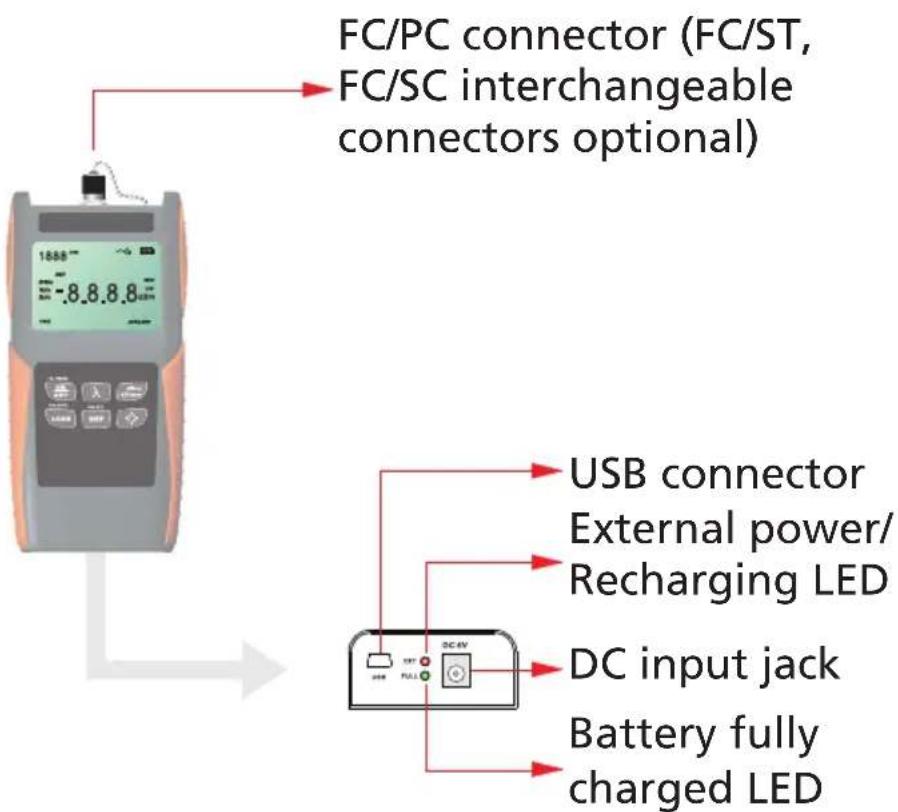
flowchart
graph TD
    A["FC/PC connector (FC/ST, FC/SC interchangeable connectors optional)"] --> B["USB connector\nExternal power/\nRecharging LED"]
    A --> C["DC input jack\nBattery fully\ncharged LED"]
Figure 4-2. Deluxe Optical Power Meter with Memory, bottom view.
NOTE: The recharge LED lights when recharging batteries. The AC adapter LED lights when recharging finishes.
4.1.3 LCD

text_image
Wavelength 1888 nm AC adapter Reference Frequency REF 270Hz 1kHz 2kHz -8.8.8.8 mw uw dBm Battery indicator Measurement unit TWIN AUTO-OFF Auto- wavelength recognition Power Auto-offFigure 4-3. LCD.
4.2 Turning the Optical Power Meter On and Off
- Press the key briefly. The power meter powers on, and backlighting switches on.
If the unit doesn't power on, check the battery charge and make sure the battery is connected properly. If the battery fails, contact Black Box Technical Support at 724-746-5500.

Figure 4-4. Powering on the power meter.
-
Press the key briefly again. The instrument powers off, and backlighting switches off and the buzzer sounds briefly. When the battery capacity indicator flashes on the LCD, recharge the battery or install a new battery.
-
Turn on/off the auto-off function. The power meter powers off automatically if you do not press a key within 10 minutes. Press the key for about two seconds to deactivate the auto-off function and the indicator will disappear on the LCD. The power meter powers off if the battery capacity is too low to support operation.
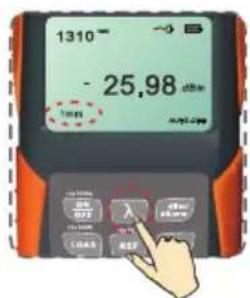
4.3 Setting the Wavelength
Press the key repeatedly until the desired wavelength displays. Select from six possible wavelengths: 850, 1300, 1310, 1490, 1550, and 1625 ~nm . The default wavelength is 1550 ~nm .
The power meter defaults to the wavelength that you set in the last test.
When used with an optical laser source, the wavelength will shift according to the laser source's output wavelength. Press and hold the key to activate auto-wavelength recognition.
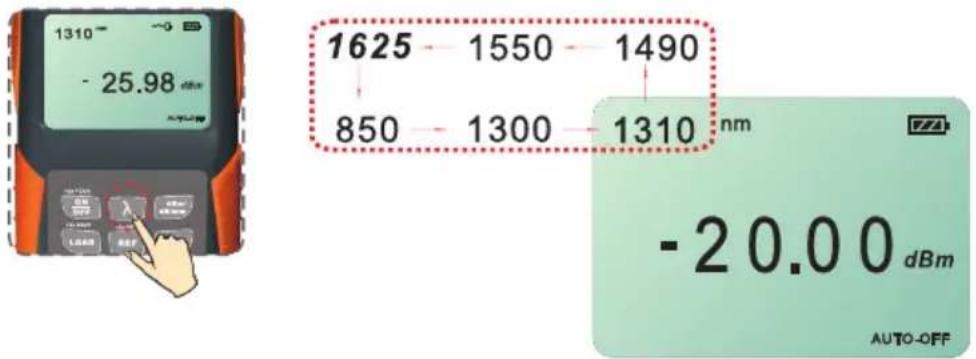
text_image
1310 - 25.98 1625 - 1550 - 1490 850 - 1300 - 1310 nm -20.00 dBm AUTO-OFFFigure 4-5. Press repeatedly to select the wavelength.
text_image
1310 - 25.98 dB 1mm OFF OFF OFF OFF OFF OFF OFF OFF OFF OFF OFF OFF OFF OFF OFF OFF OFF OFF OFF OFF OFF OFF OFF OFF OFF OFF OFF OFF OFF OFF OFF OFF OFF OFF OFF OFF OFF OFF OFF OFF OFF OFF OFF OFF OFF OFF OFF OFF OFF OFF Offs Offs Offs Offs Offs Offs Offs Offs Offs Offs Offs Offs Offs Offs Offs Offs Offs Offs Offs Offs Offs Offs Offs Offs Offs Offs Offs Offs Offs Offs Offs Offs Offs OffsFigure 4-6. Press and hold to activate auto-wavelength recognition.
4.4 Switching Measurement Mode
Press the key to select from three measurement modes: dBm for the power value, dB for the relative value, and mw for the logarithmic value.
4.5 Setting and Checking the Reference Level
-
Setting the reference level: Press and hold the key for more than two seconds to store the presently measured value as the new reference level for the current wavelength. Once you set the new reference level, the LCD displays 0.00 dB, the buzzer sounds, and the power meter switches to dB measurement mode.
-
Checking the reference level: Press the key to display the stored reference level for the current wavelength. will be displayed on the LCD to indicate that it is a reference value. The reference value will only be displayed for about one second. The instrument then switches to the dB measurement mode.
4.6 Switching LCD Backlighting On and Off
-
Press the key. Backlighting switches on.
-
Press the key again. Backlighting switches off.

text_image
1310 nm -5.0 dBm AUTO-OFF 1310 nm -5.0 dBm AUTO-OFFFigure 4-7. Turning ON/OFF backlighting.
4.7 Frequency Detecting
If the tested wavelength is carrying a tone of 270 Hz, 1 kHz, or 2 kHz, the frequency shows on the screen.
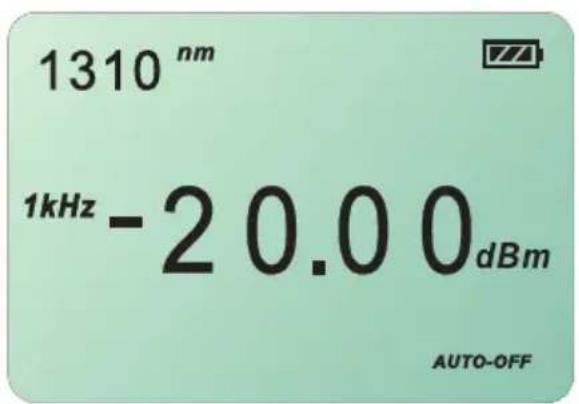
text_image
1310 nm 1kHz -2 0.0 0 dBm AUTO-OFFFigure 4-8. Frequency.
4.8 Measured Power Value Overflow
If the measured power value is higher than the highest value of the measuring range, the LCD screen displays HI.

text_image
1310 nm HI AUTO400Figure 4-9. Power value high.
If the measured power value is lower than the lowest value of the measuring range, the LCD screen displays LO.

text_image
1310 L0Figure 4-10. Power value low.
4.9 Storing the Current Test Value
Press and hold the key for more than two seconds. Save flashes on the LCD screen and the power meter buzzes. The LCD displays the stored value and storage serial number. The power meter returns to the test state automatically.
4.10 Checking the Storage Records
Press the key to display the latest record.
Press the key to browse forward through records.
Press the key to browse backward through records.
Press the and keys to delete all records.

text_image
1888 REF 2750m 1888m 240m -8.8.8.8 mm dBm A019-009 ON OFF 入 载荷 载荷率 LOAD REFFigure 4-11. Checking storage records.
4.11 Connecting to the Optical Laser Source
When connected to the dual-wavelength laser source (FOLS-SM-200 or FOLS-MM-200), the Optical Power Meter (FOPM-210) accurately measures loss at distances up to 250 kilometers at 1550 nm. On-the-spot measurement will differ with the working wavelength, fiber attenuation, and the testing environment.
5. Maintenance
Disconnect the AC adapter/charger and replace the protective dust cap once you finish using it.
Clean the connector and the instrument when they get dirty from use. We recommend using optical cleaning pads and anhydrous alcohol. Be careful not to get liquid inside the instrument.
For measurement accuracy, calibrate the power meter once a year.
Appendix. Troubleshooting
A.1 Calling Black Box
If you determine that your Deluxe Optical Power Meter with Memory is malfunctioning, do not attempt to alter or repair the unit. It contains no user-serviceable parts. Contact Black Box Technical Support at 724-746-5500.
Before you do, make a record of the history of the problem. We will be able to provide more efficient and accurate assistance if you have a complete description, including:
- the nature and duration of the problem.
- when the problem occurs.
- the components involved in the problem.
- any particular application that, when used, appears to create the problem or make it worse.
A.2 Shipping and Packaging
If you need to transport or ship your Deluxe Optical Power Meter with Memory:
- Package it carefully. We recommend that you use the original container.
- If you are returning the unit, make sure you include everything you received with it. Before you ship for return or repair, contact Black Box to get a Return Authorization (RA) number.
Three-Year Limited Warranty
Products are warranted against defective components and workmanship for three years from the date of delivery to the original customer. Any product found to be defective within the warranty period can be returned to an authorized service center for repair, replacement, and calibration.
Exclusions
The warranty on your equipment does not apply to defects resulting from unauthorized repair or modification, misuse, negligence, or accident.
Black Box Tech Support: FREE! Live. 24/7.
Tech support the way it should be.

natural_image
Portrait of a smiling woman wearing a headset, against a blue background (no text or symbols visible)Great tech support is just 20 seconds away at 724-746-5500 or blackbox.com.

BLACK BOX®
NETWORK SERVICES
About Black Box
Black Box Network Services is your source for more than 118,000 networking and infrastructure products. You'll find everything from cabinets and racks and power and surge protection products to media converters and Ethernet switches all supported by free, live 24/7 Tech support available in 20 seconds or less.
© Copyright 2009. All rights reserved.