
KEZ-C2TR28V12XIR - Security Camera KT&C - Free user manual and instructions
Find the device manual for free KEZ-C2TR28V12XIR KT&C in PDF.


| Product Type | HD-TVI 1080p Varifocal IP66 Super Beam IR True WDR Turret Camera |
| Image Sensor | Progressive Scan CMOS (megapixel) |
| Resolution | 1080p (1920 x 1080) at up to 30 fps |
| Lens Type | Varifocal lens with manual zoom and focus |
| IR Illumination | Super Beam IR LEDs for long-range night vision |
| Video Output | HD-TVI (BNC) and CVBS (BNC) with switchable WDR |
| Wide Dynamic Range | True WDR and Digital WDR (OSD selectable) |
| Day/Night Mode | Color, B/W, and External (EXT) switchable via OSD |
| White Balance | Manual, ATW, AWC->SET |
| Noise Reduction | 2D NR and 3D Smart NR (0-100 level) |
| Shutter Speed | Auto, 1/25 ~ 1/50,000 sec, FLK, x2 ~ x15 |
| AGC | 0 to 15 dB adjustable |
| Power Supply | 12 VDC SELV, Limited Power Source (observe polarity) |
| Protection Rating | IP66 (weatherproof for outdoor use) |
| Mounting | Wall or ceiling mount with 3-axis adjustment |
| Pan/Tilt/Rotate | Pan 0°~360°, Tilt 0°~75°, Rotate 0°~360° |
| OSD Menu | Yes, accessed via HD-TVI UTC control (Coaxitron protocol) |
| Smart Focus | On-screen numeric indicator for optimal focus |
| Privacy Mask | Up to 4 areas with INV, MOSAIC, COLOR, or OFF |
| Motion Detection | Up to 4 areas with adjustable sensitivity |
| Languages | English, Japanese, Chinese, Korean, German, French, Italian, Spanish, Polish, etc. |
| Compliance | FCC Part 15, CE (LVD, EMC, RoHS), WEEE |
| Operating Temperature | -10°C to 50°C (14°F to 122°F) typical for outdoor IP cameras |
| Dimensions (Approx.) | Turret form factor, typical diameter ~120 mm, height ~100 mm |
Frequently Asked Questions - KEZ-C2TR28V12XIR KT&C
User questions about KEZ-C2TR28V12XIR KT&C
0 question about this device. Answer the ones you know or ask your own.
Ask a new question about this device
Download the instructions for your Security Camera in PDF format for free! Find your manual KEZ-C2TR28V12XIR - KT&C and take your electronic device back in hand. On this page are published all the documents necessary for the use of your device. KEZ-C2TR28V12XIR by KT&C.
USER MANUAL KEZ-C2TR28V12XIR KT&C
Megapixel over coax and UTP
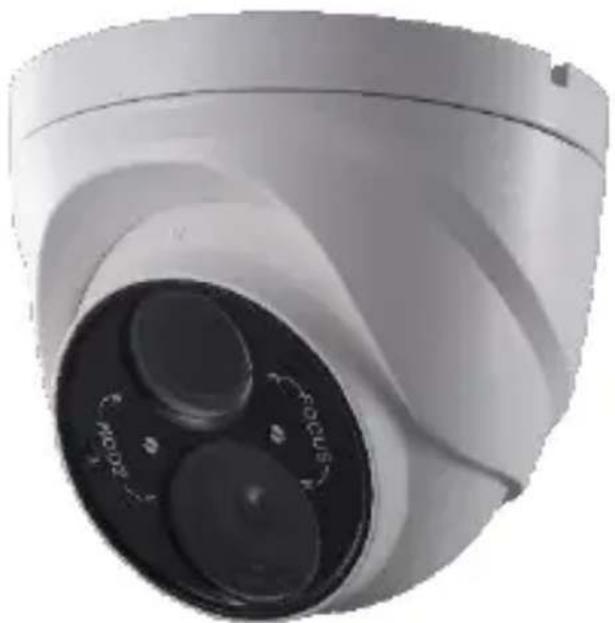
KEZ-c2TR28V12XIR
HD-TVI 1080p Varifocal IP66 Super Beam IR True WDR Turret Cameras with OSD, CVBS Output and UTC Control
Quick Operation Guide
Thank you for selecting this KT&C Omni EZHD Series product. For additional information please refer to the complete User Guide for this cameras series. End users should contact their KT&C Certified Dealer for service. Certified Dealers can obtain support directly from KT&C.
About This Guide
While KT&C makes every effort to insure the completeness and accuracy of the information contained in this Guide, we are not responsible for typographical errors or misprints. At the same time, KT&C reserves the right to make changes to improve the performance of our products at any time without notice, and so the specifications and content of this document are subject to change without notice. Every effort will be made to include updates in new versions of this manual and/or online.
Regulatory Information
FCC Information
FCC compliance: This equipment has been tested and found to comply with the limits for a digital device, pursuant to part 15 of the FCC Rules. These limits are designed to provide reasonable protection against harmful interference when the equipment is operated in a commercial environment. This equipment generates, uses, and can radiate radio frequency energy and, if not installed and used in accordance with the instruction manual, may cause harmful interference to radio communications. Operation of this equipment in a residential area is likely to cause harmful interference in which case
the user will be required to correct the interference at his own expense.
FCC Conditions
This device complies with part 15 of the FCC Rules. Operation is subject to the following two conditions:
- This device may not cause harmful interference.
- This device must accept any interference received, including interference that may cause undesired operation.
EU Conformity Statement

This product and - if applicable - the supplied accessories too are marked with "CE" and comply therefore with the applicable harmonized European standards listed under the Low Voltage Directive 2006/95/EC, the EMC Directive 2004/108/EC, the RoHS Directive 2011/65/EU.

2012/19/EU (WEEE directive): Products marked with this symbol cannot be disposed of as unsorted municipal waste in the European Union. For proper recycling, return this product to your local supplier upon the purchase of equivalent new equipment, or dispose of it at designated collection points. For more information see: www.recyclethis.info.

2006/66/EC (battery directive): This product contains a battery that cannot be disposed of as unsorted municipal waste in the European Union. See the product documentation for specific battery information. The battery is marked with this symbol,
which may include lettering to indicate cadmium (Cd), lead (Pb), or mercury (Hg). For proper recycling, return the battery to your supplier or to a designated collection point. For more information see: www.recyclethis.info
Safety Instructions
These instructions are intended to ensure that the camera is installed in a manner that avoids danger to persons or property loss.
These precautionary measures are divided into “Warnings” and “Cautions”
Warnings: Serious injury or death may occur if any of the warnings are neglected.
Cautions: Injury or equipment/property damage may occur if any of the cautions are neglected.
 |  |
| Warnings Follow these safeguards to prevent serious injury or death. | Cautions Follow these precautions to prevent potential injury or material damage. |

Warnings
- In the use of the product, you must be in strict compliance with the electrical safety regulations of the nation and region. Please refer to technical specifications for detailed information.
- Input voltage should meet the requirements for both the SELV (Safety Extra Low Voltage) and Limited Power Source for 12 VDC according to the IEC60950-1 standard. Please refer to technical specifications for detailed information.
- If connecting several devices to one power supply, to avoid any overload that may cause over-heating or a fire hazard insure that the power supply is adequate for the power load.
- Please make sure that all plugs are firmly connected to the power sockets. When the product is mounted on wall or ceiling, the device shall be firmly attached, taking into consideration any wind, snow loading, or other factors. The mounting surface shall be capable of supporting several times the base weight of the camera.
- If smoke, unusual odors or noise come from the device, turn off the power at once and unplug the power cable, and then contact authorized service personnel.

Cautions
- Make sure the power supply voltage is correct before using the camera.
- Do not drop the camera or subject it to physical shock.
- Do not touch lenses or sensor modules with fingers. If cleaning is necessary, use clean cloth with a bit of ethanol and wipe gently.
If the camera will not be used for an extended period, please protect the lens openings from damage and/or debris.
- Avoid aiming the camera at the sun or extremely bright light sources. Blooming or smearing may occur in excessive light (which is not a malfunction), and could compromise the performance of the sensor.
- The sensor may be damaged if exposed to laser energy, so when any laser equipment is in use, make sure that the sensor will not be exposed to the laser beam.
- Do not place the camera in extremely hot or cold (see camera specifications) locations. Do not exceed the rated environmental (indoor) conditions. Do not expose the camera to high levels of electromagnetic (RF) radiation.
- To avoid heat accumulation, good ventilation is required in the operating environment.
- Keep the camera away from solvents while in use; exposure to liquids should not exceed IP66 environmental conditions.
- During shipping, the camera shall be packed in its original packing, or packing providing the equivalent protection.
- Improper use or replacement of any batteries (if so equipped) may result in the hazard of explosion. Replace with the same or equivalent type only. Dispose of used batteries according to the instructions provided by the battery manufacturer.
If the product does not function properly, Dealers please contact KT&C; End Users please contact your KT&C Certified Dealer or an authorized service center. Do not disassemble the camera for repair
or maintenance by yourself. (KT&C shall not assume any responsibility for problems caused by unauthorized repair or maintenance.)
Table of Contents
1 Appearance and Description ....7
2 Installation....8
3 Camera Connection & Focus.... 12
4 OSD Menu Operation 14
1 Appearance and Description
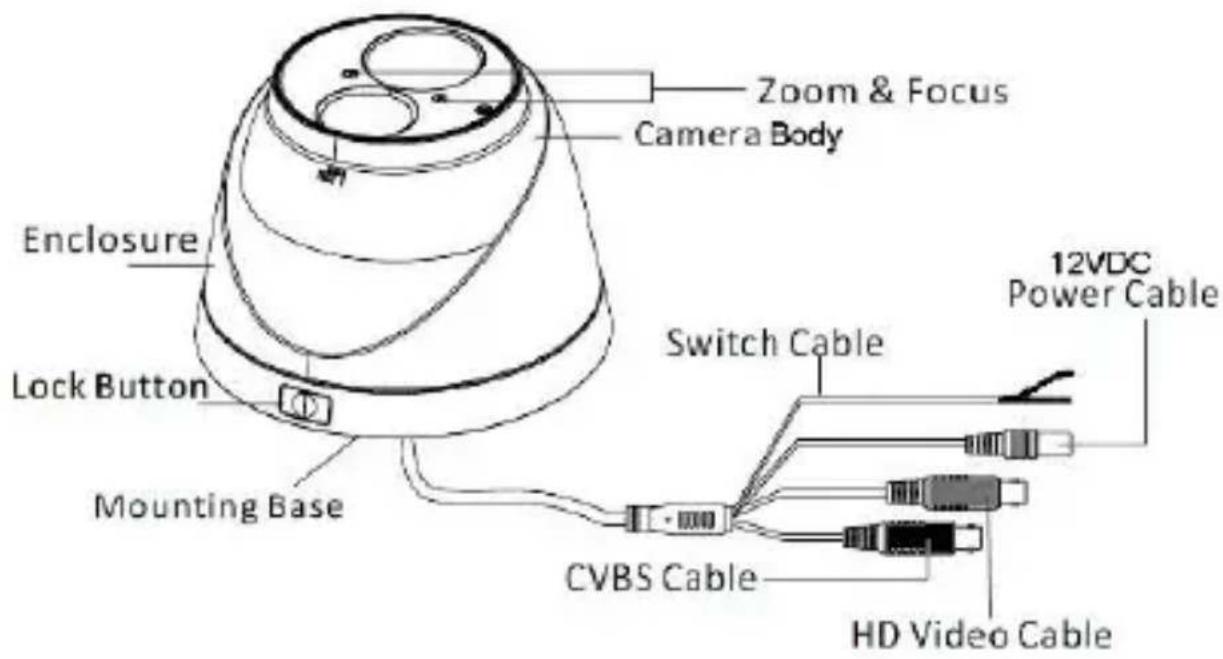
Figure 1-1 Varifocal Turret Camera Overview
Note: True WDR processing and downscaling from 1080p to CVBS both demand significant processor resources. CVBS output and digital zoom are disabled when True WDR is active; where full time CVBS
output is desired, Digital WDR is an OSD menu option. WDR status is easily controlled by connecting together (or disconnecting) the bare ends of the 'switch cable' (if WDR was ON, connecting the wires will turn it OFF; if WDR was OFF, connecting the wires will turn it ON). To employ a CVBS test monitor connected to the black CVBS BNC connector, if True WDR is on, connect the wires; when ready to put the camera in service, disconnect the wires. If True WDR was not active (and CVBS output is enabled), if desired after the CVBS output is no longer required, connecting the wires will turn True WDR ON.
2 Installation
Before you start:
● Make sure the camera is in good condition and all the accessory parts are included.
● Make sure all related equipment is powered-off during the installation.
- Check to insure that the specifications of the camera are correct for the installation environment.
● Make sure the power supply voltage is 12VDC to avoid damage to the camera. OBSERVE POLARITY!
- If the product does not function properly, Dealers please contact KT&C; End Users please contact your KT&C Certified Dealer or an authorized service center. Do not disassemble the camera for repair or maintenance by yourself.
● Make sure that the mounting surface is strong enough to withstand three times the weight of the camera.

If the IR LED in this camera will be active, you must observe the following precautions to prevent IR reflection:
- Dust or grease on the lens/dome cover will cause IR reflection. Please do not remove the cover protective film until the installation is finished. If there is dust or grease on the lens/dome cover, clean the lens/dome cover with clean soft cloth and isopropyl alcohol.
- Make sure that there is no reflective surface too close to the camera lens. The IR light from the camera may reflect back into the lens causing haze, distortion or improper scene exposure.
Steps:
- Attach the drill template on the wall or ceiling.

Figure 2-1 Attach the template
- Separate the camera from the mounting base (see Figure 2-2). Secure the base to the wall or ceiling with the supplied screws and expansion anchors (if required).

Figure 2-2 Separate the Camera from the Mounting Base
- Connect the power and video wires. Place the camera onto the mounting base and secure with the enclosure/outer housing.

Figure 2-3 Place camera body and enclosure into base
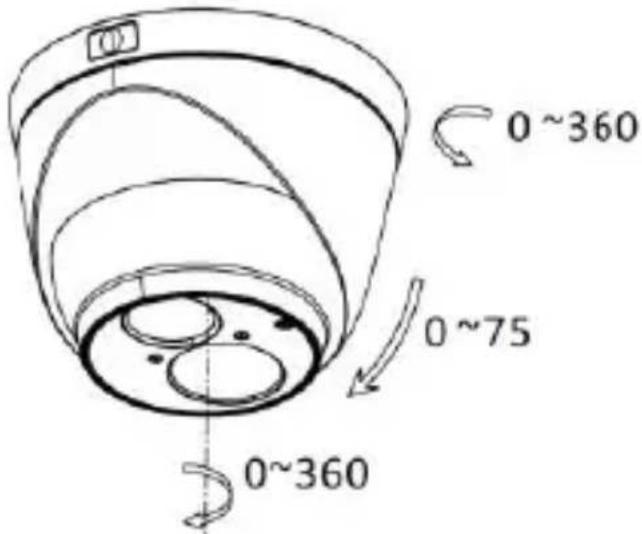
Figure 2-4 3-axis Adjustment
- Adjust the camera direction:
1). Adjust the pan angle [P] of the camera [0\~360°].
2). Adjust the tilt angle [T] of the camera [0\~75°].
3). Rotate the body [R] 0\~360° so that the image is upright.
3 Camera Connection & Focus

Figure 3-1 Camera Connection
NOTE
Note: True WDR processing and downscaling from 1080p to CVBS both demand significant processor resources. CVBS output and digital zoom are disabled when True WDR is active; where full time CVBS output is desired, Digital WDR is an OSD menu option. WDR status is easily controlled by connecting together (or disconnecting) the bare ends of the ‘switch cable’ (if WDR was ON, connecting the wires will turn it OFF; if WDR was OFF, connecting the wires will turn it ON). To employ a CVBS test monitor connected to the black CVBS BNC connector, if True WDR is on, connect the wires; when ready to put the camera in service, disconnect the wires. If True WDR was not active (and CVBS output is enabled), if desired after the CVBS output is no longer required, connecting the wires will turn True WDR ON.
Or, to view the camera video, connect the camera BNC output to an EZHD Series DVR and observe the video via the monitor output, or over a network connection (web browser, OMNI CMS or OMNI Remote smart phone app).
Camera Focus
The varifocal lens controls are on the face of the camera body.

Make the adjustments to capture the desired field of view while observing the image though a test monitor or the EZHD DVR system as described above. This camera has a Smart Focus OSD option that displays an easy to read number on screen (the Smart Focus function can be called from the EZHD DVR using Up-the-Cable control/PTZ, and the index number observed at the camera on a hand held test monitor). Maximize the number to set optimum focus; then dismiss the Smart Focus readout using the PTZ/UTC controls DVR when complete.
The OMNI Focus utility can also be employed on a PC networked to the DVR to optimize the focus (see OMNI Tools / OMNI Focus documentation).
4 OSD Menu Operation
The OSD menu can ONLY be accessed via the HD-TVI connection “Up the Cable” from an EZHD recorder. UTC control will not be available when using the CVBS connection.
When a KT&C Up-the-Cable [Coaxitron] capable camera such as this one is connected, you can select the PTZ protocol to be HDCAM-C.
To access the OSD menu on KT&C Up-the-Cable compatible cameras use the “IRIS +” [iris open] function as the “MENU” or “ENTER” function. Otherwise, the OSD menus can be navigated via the up/down direction buttons, and one can scroll through selection choices by using the left/right direction buttons. The direction button roles may change in various OSD sub-menus.
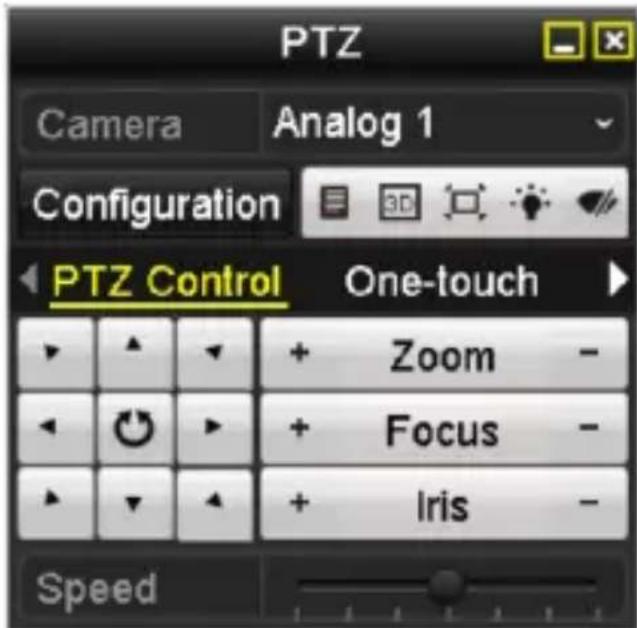
Figure 4-1 PTZ Menu for UTC Control
If the HDCAM-C UTC protocol is already selected, clicking on IRIS + will bring up the OSD menu. To set/verify the protocol click on “Configuration” to bring up the detailed PTZ configuration screen.
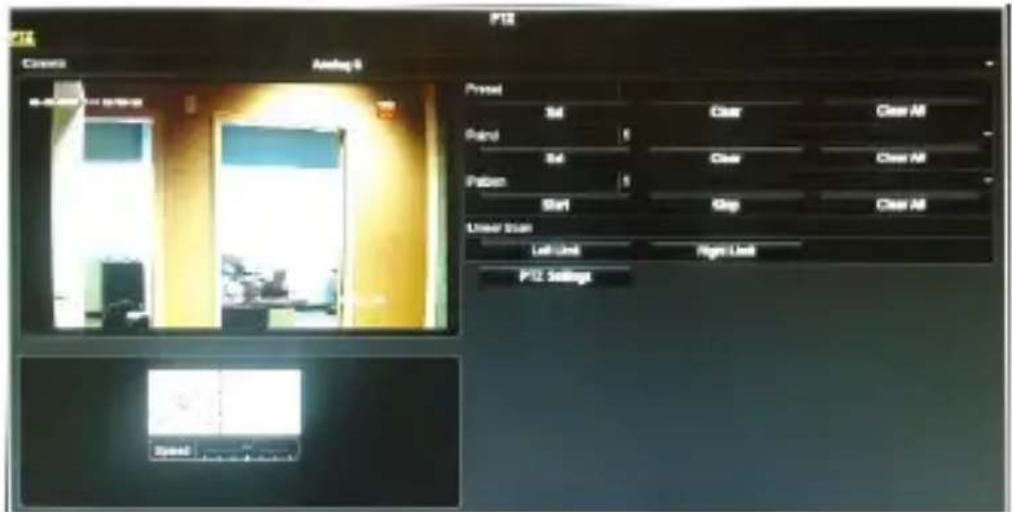
Figure 4-2 PTZ Configuration Screen
To check/change the protocol, click on the “PTZ Settings” button to bring up that screen.
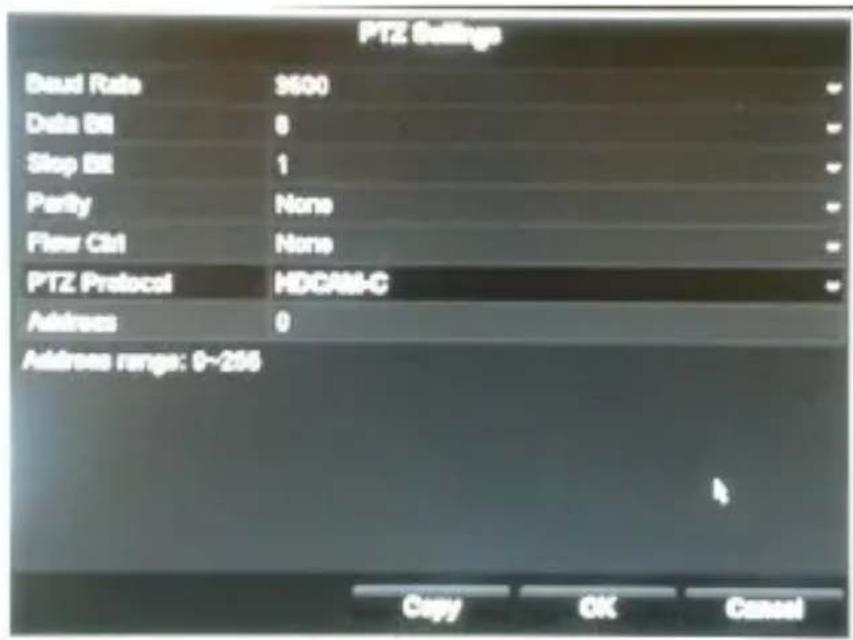
Figure 4-3 PTZ Protocol Setting for UTC Control
Choose HDCAM-C protocol from the "PTZ Protocol" drop down menu.
Once HDCAM-C has been selected, click OK, then using the PTZ controls click IRIS+ to bring up the camera OSD menu.
NOTE: While the EZHD DVRs can display the CVBS image from the camera, Up-the-Cable control is only active on the HD-TVI video cable from the camera.

Figure 4-4 TVI and CVBS Connections
![graph TD A["Menu"] --> B["VIDEO"] A --> C["SETUP"] A --> D["LAYOUT"] B --> E["SMART FOCUS"] B --> F["SCENE"] B --> G["LENS"] B --> H["EXPOSURE"] B --> I["BACKLIGHT"] B --> J["WB"] B --> K["DAYSIGHT"] B --> L["NR"] C --> M["SPECIAL"] C --> N["ADJUST"] C --> O["RESET"] E --> P["INDOOR"] P --> Q["OUTDO…](/content/2026/06/1186590/images/85abfa02cce99ba8b6db812f8f35aef890961afcf78386b2263d6353f71dcfec.jpg)
Figure 4-5 Menu Overview
4.1 VIDEO.OUT
PAL or NTSC is selectable.
4.2 LANGUAGE
English, Japanese, CHN1, CHN2, Korean, German, French, Italian, Spanish, Polish, etc., are selectable.
4.3SETUP
4.3.1 SMART FOCUS
Display easy to read numeric value on screen, maximize value to set optimum focus.
4.3.2 SCENE
You can select indoor, outdoor, indoor 1 and low-light as the working environments.
4.3.3 LENS
The camera is equipped with a fixed ins lens.
4.3.4 EXPOSURE
SHUTTER: AUTO, 1/25, 1/50, FLK, 1/200, 1/400, 1/1k, 1/2k, 1/5k, 1/10k, 1/50k, x2, x4, x6, x8, x10, and x15 are selectable.
AGC: You can set the AGC value from 0 to 15.
SENS-UP: You can set the SENS-UP to OFF or AUTO.
BRIGHTNESS: You can set the brightness value from 1 to 100.
DEFOG: You can set the defog function as ON to enable the function. Position, size, and the defog gradation are configurable.
D-WDR: You can set D-WDR as ON or OFF.

Figure 4-6 Exposure

Figure 4-7 HSBLC
4.3.5 Backlight
Backlight Compensation (BLC):
-GAIN: Set the gain of BLC as High, Middle, or Low.
-AREA: Press the up/down/left/right button to define the BLC position and size. Select RET or AGAIN to go back the BLC menu or re-define the BLC area.
-Default: Restore the BLC settings to the default. HSBLC: Select an HSBLC area. Set the DISPLAY status as ON. Press the up/down/left/right button to define the area position and size. Set the HSBLC LEVEL from 0 to 100. Select ALL DAY or Night for the HSBLC mode. Set the BLACK MASK status as ON or OFF.
True Wide Dynamic Range (WDR):
- GAIN: Set the gain for WDR to High, Middle or Low.
- BRIGHTNESS: Set the WDR brightness level
- OFFSET: Set the WDR offset level
4.3.6 White Balance (WB)
MANUAL, ATW (Auto-tracking White Balance), AWC→SET are selectable.
4.3.7 Day & Night
Color, B/W, and EXT are selectable for DAY and NIGHT switches.
4.3.8 NR
3D NR: You can set 2D NR status as ON or OFF.
3D NR: Set the Smart NR status as ON and adjust the 3D smart NR sensitivity ranges from 0 to 100.
Set the 3D NR LEVEL ranges from 0 to 100. Set the START, AGC level as the threshold to enable AGC, and set the END. AGC level as the threshold to disable AGC.
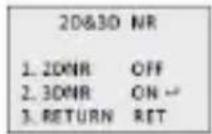
Figure4.8 NR
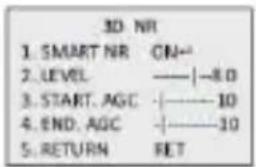
Figure4.9 3D NR
4.3.9 SPECIAL
Camera Title: Edit the camera title on this section. D-effect:
-FREEZE: Set the freeze function as ON or OFF.
-MIRROR: OFF, MIRROR, V-FLIP, and ROTATE are selectable for mirror.
-D-ZOOM: Define the zoom area by configuring the position from PAN & TILT.
-SMART D-ZOOM: The D-Zoom area, sensitivity and time are configurable.
-NEG.IMAGE: Set the NEG IMAGE as ON or OFF.
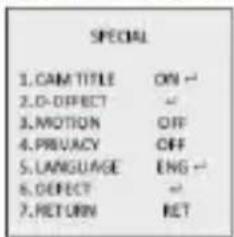

Figure4.10 Special Figure4.11 Motion Detection
Motion: Select a MOTION area. Set the DISPLAY status as ON or OFF. Press the up/down/left/right button to define the position and size of the area. Set the SENSITIVITY from 0 to 60. Set the MOTION VIEW status as ON or OFF.
Privacy: Select a PRIVACY area. Set the DISPLAY status as INV, MOSAIC, COLOR or OFF. Press the up/down/left/right button to define the position and size of the area.
Defect: LIVE DPC, STATIC DPC and Black DPC are adjustable in this section.

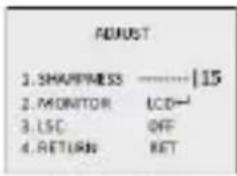
Figure4-12 Privacy Mask
Figure4-13Adjust
4.3.10 ADJUST
Sharpness: Adjust the sharpness from 0 to 15. Monitor: Monitor CRT, and Monitor LCD are selectable.
LSC: Set the LSC status as ON or OFF.
4.3.11 RESET
Reset all the settings to the default.
4.3.12 EXIT
Press OK to exit the menu.
- KEZ-C2TR28V12XIR
- ABOUT THIS GUIDE
- REGULATORY INFORMATION
- FCC INFORMATION
- FCC CONDITIONS
- EU CONFORMITY STATEMENT
- SAFETY INSTRUCTIONS
- CAUTIONS
- TABLE OF CONTENTS
- 1 APPEARANCE AND DESCRIPTION
- 2 INSTALLATION
- BEFORE YOU START
- STEPS
- 3 CAMERA CONNECTION & FOCUS
- NOTE
- CAMERA FOCUS
- 4 OSD MENU OPERATION
- 4.1 VIDEO.OUT
- 4.2 LANGUAGE
- 4.3SETUP
- 4.3.1 SMART FOCUS
- 4.3.2 SCENE
- 4.3.3 LENS
- 4.3.4 EXPOSURE
- 4.3.5 BACKLIGHT
- TRUE WIDE DYNAMIC RANGE (WDR)
- 4.3.6 WHITE BALANCE (WB)
- 4.3.7 DAY & NIGHT
- 4.3.8 NR
- 4.3.9 SPECIAL
- 4.3.10 ADJUST
- 4.3.11 RESET
- 4.3.12 EXIT
Brand : KT&C
Model : KEZ-C2TR28V12XIR
Category : Security Camera