PSWGM64BK - Portable radio Pyle - Free user manual and instructions
Find the device manual for free PSWGM64BK Pyle in PDF.

User questions about PSWGM64BK Pyle
0 question about this device. Answer the ones you know or ask your own.
Ask a new question about this device
Download the instructions for your Portable radio in PDF format for free! Find your manual PSWGM64BK - Pyle and take your electronic device back in hand. On this page are published all the documents necessary for the use of your device. PSWGM64BK by Pyle.
USER MANUAL PSWGM64BK Pyle
text_image
95 mm 95 mm 70 mm saddle wire folding lineAPN ref. no: A89085
Date: 26-05-2011
Vendor ref:
no. of color: 1C + 1C
B&W artwork attached:
Presentation
Testing
Production/Shipment
| Prepared by: | Date: |
| Checked by: | Date: |
| Approved by: | Date: |

text_image
PYLE SPORTS "Recreational Gear For The Great Outdoors" IMPORTANT IN FACTS NAMELY IN ORIGINAL PACKAGE IF POSSIBLE. YOU ARE NOT RESPONSIBLE FOR DAMAGE PROCESSED IN RECURRING ITEMS FOR SEPAR. A Better Sticking you can't invest in a new, daily phone number, and the position you are representing should be to be tested. You need to choose a copy of the original object a speed of directed performance. PSWGM64 USER'S MANUAL PYLE® SPORTS "Recreational Gear For The Great Outdoors" Back page (Black) Front page (Black)1.0 Introduction on
■ Thank you for purchasing of this Watch.
- Trip Variables current time, daily alarm, chronograph, countdown timer, power and dual time function.
In addition to normal linekeeping function, this Watch includes two special features, they are pacer watch and multi-liner function.
■ The Psoar Watch which combines the chronograph and the psoar function together, hence two functions can be activated at the same time. While the multilimer which combines two or more timers together to extend the time function to measure multi-phase leapas time
■ Be sure to carefully read this manual and keep it on hand for later reference when necessary.
■ To get the most of your purchase, it is advisable to use this watch in conformity with the below notes:
■ Avelchexposing the to the extreme conditions for an unreasonable time.
■ Avoid through uses or severe impacts to the
■ Donald open the case unless a certified
сокись аудиту.
■ Classified Levi tch o with a soft and moistened cloth
■ Store the Watch in a dry place when it is not in use for a long time.
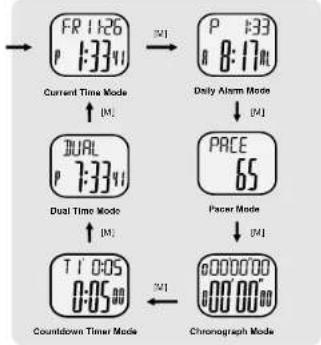
3.0 Major Functi on Modes
flowchart
graph TD
    A["Current Time Mode"] --> B["Dual Time Mode"]
    B --> C["T1 0:05 0:05"]
    C --> D["Chronograph Mode"]
    A --> E["Daily Alarm Mode"]
    E --> F["PACE 65"]
    F --> G["Packet Mode"]
    G --> H["Chronograph Mode"]
    style A fill:#f9f,stroke:#333
    style B fill:#ccf,stroke:#333
    style C fill:#cfc,stroke:#333
    style D fill:#fcc,stroke:#333
    style E fill:#cff,stroke:#333
    style F fill:#ffc,stroke:#333
    style G fill:#cfc,stroke:#333
    style H fill:#fcc,stroke:#333
2.0 Button and its Function

Mode Button [M]
■ To select among the Current Time, Daily Alarm, Pacer, Chronograph, Timer and Dual Time Mode.
■ To select setting display.
Start/Stop Button [S/S]
■ To select among the setting items during setting display.
■ To switch between 12 and 24 hour format
■ To activate the 'start' or 'stop' function during Chromograph Maria and Tissue Mode.
Lap/Reset Button [L/R]
■ To view and activate 'lap' or 'reset' function during Chronograph Mode.
■ To select between different timer displays. To load or clear the starting value for the timer(s).
■ To activate the 'start' or 'stop' Pacer function during Pacer mode.
■ To set the hourly chime function ON or OFF.
■ To increase the digits during setting display.
EL Button [EL]
■ To turn on the EL back light for about 3 seconds.
NOTE: The major key operations are summarized on the above paragraphs, however please read the coming chapters for the detail operations.
4.0 Current Time Mode - Current Time Display
![Pyle PSWGM64BK - Lap/Reset Button [L/R] - 1](/content/2026/06/1186585/images/daf21048ac39281974ee9226f74ba505ad1373ec57d510e2e9c880f1869028f3.jpg)
text_image
day of work AM/FM indicator current time FR 26-11 1:33:41 DATE (day, month) 12 hours Display Chime OFF house [S/S] FR 1:26 1:33:41 Calendar (month, day) 12 hours Display Crime OFF [S/S] [1-24] FR 1:26 13:33:41 FR 1:26 1:33:41 Hourly chime indicator 24 hours Display Hourly chime ONCurrent Time Display
- When the Current Time Mode is selected, the Watch will show the following items on the display:
- The day of week and date of the current time are exhibited on the 1st row of the display.
- The current time (hour, minute, second) is exhibited on the 2nd row of the display.
How to Switch between 12 and 24 hour format
■ To switch between 12 and 24 hour format, press the [S/S] button following the adjacent diagram. How to Switch between Month-day and day-month format
■ To switch between month-day and day-month format, hold down the [S/S] button following the adjacent diagram.
To Set the Hourly Chime ON/OFF
■ To set the hourly chime between ON or OFF, press the [UR] button following the adjacent diagram. - When the chime indicator is appeared on the display, the chime is ON. During the hourly chime is ON, the Watch will sound 'beep beep' every hour on the hour (e.g 1:00 00, 2:00 00, 3:00 00)
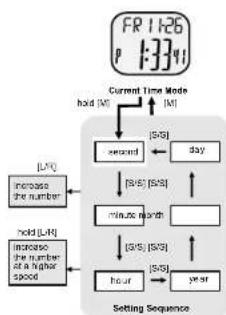
4.1 Current Time Mode - Setting the Current Time
flowchart
graph TD
    A["FR 1:26 P 1:34"] --> B{Current Time Mode}
    B -->|hold (M)| C["day"]
    B -->|hold (M)| D["second"]
    D --> E["LNR"]
    E --> F["increase the number"]
    F --> G["hold (LNR)"]
    G --> H["increase the number at a higher speed"]
    H --> I["hour"]
    I --> J["day"]
    J --> K["time at month"]
    K --> L["S/S"]
    L --> M["year"]
How to Set the Current Time
■ To select the setting display, hold down the [M] button for 2 seconds in the Current Time Mode, and then the 'Second' digits will start flashing.
■ In setting display, press the [S/S] button to move the flashing following the adjacent diagram to select among different settings
■ During one of the settings (minute, hour, year, month, day) is flashing, press the [L'R] button to change the number (hold down the button to change the number at a higher speed).
■ When the second digits start flashing, press the [L/R] button to reset them to zero.
■ When the setting is completed, press the [M] button once to exit the setting display. The Watch will also exit the setting display if NO key-stoke has been activated for 1 minute.
5.1 Daily Alarm Mode - Setting the Daily Alarm

flowchart
graph TD
    A["Daily Alarm Display"] --> B{hold["V"]} --> C["mnalo"]
    C --> D{hold["V"]} --> E["load [V"]]
    E --> F["Settling Sequence"]
    F --> G["hour"]
    G --> H{hold["V"]} --> I["increase the number at a higher speed"]
    I --> J{increase the number at a higher speed}
    J --> K["Increase the number"]
How to Set the Daily Alarm
- To select the setting display, hold down the [MODE] button for 2 seconds in the Daily Alarm Mode, and then the 'minute' digits will start flashing.
- In setting display, press the [S/S] button to move the flashing following the adjacent diagram to select among different settings.
- During one of the settings (minute, hour) is flashing, press the [L/R] button to change the number; hold down the [L/R] button to change the number at a higher speed.
- When the setting is completed, press the [M] button once to exit the setting display. The Watch will also exit the setting display if NO key-stoke has been activated for 1 minute.
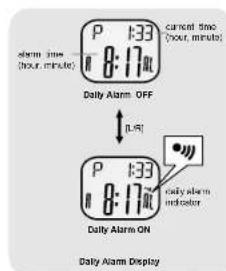
5.0 Daily Alarm Mode - Daily Alarm Mode
text_image
P 133 8:17m Current time (hour, min) Daily Alarm OFF ↓ P 133 8:17m daily alarm indicator Daily Alarm DisplayDaily Alarm Mode
■ This Watch includes a daily alarm function for the current time.
■ When the daily alarm is ON, the Watch will beep for 20 seconds at the alarm time every day.
Daily Alarm Display
■ When the Daily Alarm Mode is selected, the Watch will show the following items on the display:
■ The current time (hour, minute) is exhibited on the 1st row of the display.
■ The daily alarm lime (hour, minute) is exhibited on the 2nd row of the display
To Set the Daily Alarm ON/OFF
■ To set the daily alarm between ON and OFF, press the [L/R] button in the Daily Alarm Display.
■ When the daily alarm indicator is appeared, the daily alarm is ON.
To Test the Daily Alarm Sound
■ To test the alarm sound, hold down the [S/S] button in the Daily Alarm Display. The Watch will beep as long as the button is hold.
6.0 Pacer Mode - Pacer Display

Pacer Mode
This Watch includes a pacer function which generate regular beeps at a pre-defined rate. That pre-defined rate can be set within in a range from 40 to 180 beats per minute (bpm).
■ The pacer will sound more beeps within a minute for a higher bpm rate (e.g. 50) setting than a lower bpm rate (e.g. 30) setting.
Pacer Display
■ When the Pacer Display is selected, the beeping rate is exhibited on the 2nd row of the display.
How to Use the Pacer
■ When the pacer has been set with a beeping rate, for example 65 bpm, press the [L/R] button once will start the beeping.
■ During the Watch is beeping, press the [LR] button once again to stop the beeping.
6.1 Pacer Mode - Setting the Pacer Beeping Rate

flowchart
graph TD
    A["65"] --> B["Pacer Display"]
    B --> C["hold [M"]]
    C --> D["40"]
    D --> E["190"]
    E --> F["Setting Sequence"]
    G["hold [M"]] --> H["increase the number"]
    I["hold [M"]] --> J["increase the number at a higher speed"]
    H --> D
    J --> D
To Set the Pacer Beeping Rate
■ To select the setting display, hold down the [M] button for 2 seconds in the Pacer Display, and then the beeping rate digits will start flashing.
■ In the setting display, press the [L/R] button to change the number; hold down the button to change the number at a higher speed.
■ When the setting is completed, press the [M] button once to exit the setting display. The Watch will also exit the setting display if NO key-stoke has been activated for 1 minute.
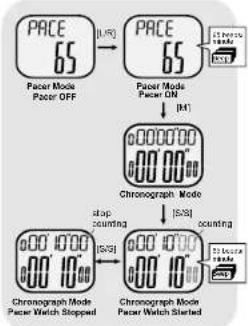
6.2 Pacer Mode - Using the Watch as a Pacer Watch
flowchart
graph TD
    A["PACE 65"] --> B["1.5V"]
    B --> C["Pacer Mode Pacer OFF"]
    C --> D["PACE 65"]
    D --> E["Pacer Mode Paser ON"]
    E --> F["H1"]
    F --> G["Chronograph Mode"]
    G --> H["S/S"]
    H --> I["stop counting"]
    H --> J["S/S"]
    I --> K["Chronograph Mode Paser Watch Stopped"]
    J --> L["Chronograph Mode Paser Watch Started"]
    K --> M["20 seconds"]
    L --> N["20 seconds"]
How to Use the Watch as a Pacer Watch
To use the Watch as a pacer watch following the below steps:
■ When the pacer Display is selected, press the [L/R] to turn on the pacer function.
■ When Pacer function is on, press the [M] button to switch the display to Chronograph Mode, and then press the [S/S] button once will start the pacer and chronograph function at the same time.
■ Then the watch will become a Pacer Watch which the chronograph is counting and the pacer is beeping at the pro-defined rate.
■ During the Pacer Watch is counting and beeping, press the [S/S] button once will stop the beeping and counting.
7.0 Chronograph Mode - Chronograph Mode
Chronograph Mode
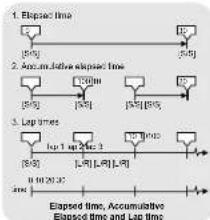
■ This Watch includes a stopwatch function which measures.
■ Elapsed time, accumulative elapsed time (multi-phase elapsed time) and Lap time (get a elapsed time without stopping the counting)
■ The measuring capacity of the chronograph:
■ Measuring unit: 1/100 second,
■ Measuring range: 9 hours, 59 minutes and 58.98 second.
■ Lap Memory: a maximum of 50 laps.
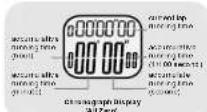
Chronograph Display
■ When the Chronograph Display is selected, the Watch will show the following items on the display:
■ During the chronograph is counting: The current lap time and the accumulative elapsed time is exhibited on the 1st and 2nd row respectively. NOTE: The current lap time will be the same as the accumulative elapsed time for lap 1.
■ During the chronograph is stopped: The current lap time and lap number are exhibited on the 1st row, and the accumulative elapsed time is exhibited on the 2nd row.
■ During the Lap Display is displaying: The current lap number and the lap time is exhibited on the 1st and 2nd row respectively.
flowchart
graph TD
    A["1. Elapsed time"] --> B["10"]
    C["2. Accumulative Elapsed time"] --> D["130m"]
    E["3. Lap times"] --> F["10 1mp 24ac 2"]
    G["Elapsed time, Accumulative Elapsed time and Lap time"] --> H["0 0 20.32"]
7.1 Chronograph Mode - Using the Chronograph

flowchart
graph TD
    A["Step Counting Display"] --> B["All Zero Display"]
    B --> C["Counting Display"]
    C --> D["LAP Time Display"]
    A -->|slapped time (stop counting)| E["Hold L/R"]
    B -->|slapped 5 ms counting| F["All Zero Display"]
    C -->|5 seconds ↑↓ L/R| G["LAP Time Display"]
    D --> H["lap number"]
    D --> I["lap time"]
How to Measure Elapse Time
■ During the 'Al Zero' Display, press the [S/S] button once will start the counting, and press the [S/S] button again will stop the counting.
■ The elapsed time between the above 2 key-stokes will be exhibited on the 1st row of the display. Repeat the above key operations to get the accumulative elapsed time.
How to Get a Lap Time
■ When the chronograph is counting, press the [L-R] button to get and view the Lap Display for 5 seconds. In the Lap Display, the current lap number and lap time will appear on the 1st and 2nd row of the display respectively.
■ After the 5 seconds, the Watch will return to counting display automatically. Then the now lap time and the accumulative elapsed time will be exhibited on the 1st and 2nd row of the display respectively. Repeat the above key operations to get another lap time.
How to Recall/Reset the Lap Time
■ During the chronograph is stopped:
■ Press the [UR] button one by one to review the recorded lap times, or
■ Hold down the [L/R] button for about 2 seconds to clear the lap time, and reset the display to 'All Zero' display.
8.0 Countdown Timer Mode - Countdown Timer Display
text_image
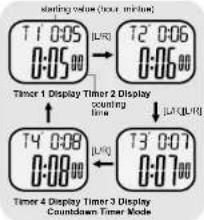
Starting value (hour: minute) T1 0:05 0:05 T2 0:06 0:06 Timer 1 Display Timer 2 Display scouting time T4 0:08 0:08 T3 0:07 0:07 Timer 4 Display Timer 3 Display Countdown Timer ModeCountdown Timer Mode
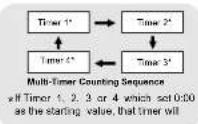
This Watch includes 4 countdown timers. They are Timer 1, 2, 3 and 4. Using one timer (Single Timer) which can run normal timer function. But combines two or more timers (Multi-Timer) can extend the timer function to measure multi-phase lapse time.
■ The measurement unit of these timers is 1 second, and the starting value of these timers can be set up to a maximum of 23 hours and 59 minutes.
■ When a timer which set 0:20 as the starting value, that timer will be excluded from the counting sequence.
■ When the timer is started, the Watch will count repealingly unless it is stopped by pressing the [S/S] button. During the counting, the Watch will be sp once when a timer counts to the last 1 and 0 second Single Timer and Multi-Timer
- When using Single Timer (one timer), it must exclude other timers from the counting sequence by selling their starting value to 0:00.
■ When using Multi-Timer, it is counting on a sequence which starts the counting from Timer 1 to another timers following the adjacent diagram.
How to Select Different Timer Display
■ To select different countdown timer display during the timer is stopped, press the [L/R] button one by one following the adjacent diagram.
8.2 Countdown Timer Mode - Loading and Resetting the Timer

flowchart
graph TD
    A["Counterclock Time Display Stop Counting"] --> B["Load [L-R"]]
    B --> C["Ld ALL yes No"]
    C --> D["Load the time into the counter sequence"]
    D --> E["Load [L-R"]]
    E --> F["CLR ALL yes No"]
    F --> G["Reset of shifting value to zero"]
    H["Confirm the boating or resetting"] --> I["M"]
    J["Abort the boating or resetting"] --> K["L/R"]
How to Load the Timers
■ If the starting value has been set for the timer(s), they must be loaded into the counting sequence before it is ready for counting.
■ To load the timer(s) into counting sequence, hold down the [L/R] button in Timer Display (when the timer is stopped) until the 'Ld ALL' indicator appeared following the adjacent diagram.
■ When the 'Ld ALL' indicator is appeared, press the [M] or [L/R] to confirm or abort the loading.
■ If the Timer Display is returned after the loading, the timer(s) is ready to count.
How to Reset the Timers
■ During the 'Ld ALL' indicator is appeared, hold down the [L/R] button until the 'cLR ALL' indicator appeared following the adjacent diagram.
■ When the 'cLR ALL' indicator is appeared, press the (M) or [L/R] to confirm or abort the resetting.
■ If the Timer has been reset, all starting values will be reset to 0:00.
8.1 Countdown Timer Mode - Setting the Countdown Timer

flowchart
graph TD
    A["Counterclock Timer Display"] --> B["hold (N)"]
    B --> C["LNR"]
    C --> D["Increase the number"]
    D --> E["minutes"]
    E --> F["hold (LNR)"]
    F --> G["Increase the number at a higher speed"]
    G --> H["Settling Sequence"]
    H --> I["hour"]
    I --> J["(5/8)"]
How to Set the Countdown Timer
■ The following paragraphs will illustrate the procedure for setting the timer 1. Even so, setting the other timers will work on the similar procedure.
■ To select the setting display, hold down the [M] button for 2 seconds in the Timer 1 Display, and then the 'Minute' digits start flashing on the display.
■ In setting display, press the [S/S] button to move the flashing following the adjacent diagram to select among different settings.
■ When one of the settings (minute, hour) is flashing, press the [L/R] button to change the number (hold down the button to change the number at a higher speed).
■ When the setting is completed, press the [M] button once to exit the setting display. The Watch will also exit the setting display if NO key-stoke has been activated for 1 minute.
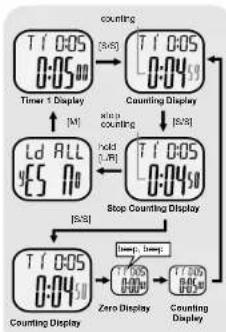
8.3 Countdown Timer Mode - Using the Single Timer
flowchart
graph TD
    A["Timer 1 Display"] --> B["Counting Display"]
    B --> C["Stop Counting Display"]
    C --> D["Zero Display"]
    D --> E["Counting Display"]
    style A fill:#f9f,stroke:#333
    style B fill:#f9f,stroke:#333
    style C fill:#f9f,stroke:#333
    style D fill:#f9f,stroke:#333
    style E fill:#f9f,stroke:#333
How to Use the Single Timer
■ When using one timer only (Single Timer), excludes other timers by setting their starting values to 0:00.
■ Once the starting value has been set for the last Timer, it must be loaded in to the counting sequence before it is ready for counting. Check previous chapter 8.2 for more detail on how to load the starting value into the counting sequence.
■ Press the [S/S] button to start the counting. The counting will be restarted automatically when it reaches zero unless the counting is stopped by pressing the [S/S] button.
How to Re-load the Timer
■ To re-load the timer to its original starting value during the timer is stopped, perform the loading process following the previous chapter 8.2.
Timer Alarm Sound
■ During the counting, the Watch will beep once when a timer counts to the last 1 and 0 second.
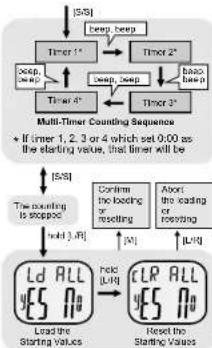
8.4 Countdown Timer Mode - Using the Multi-Tmer
flowchart
graph TD
    A["Start"] --> B{Ld ALL}
    B --> C["Lead the Starting Values"]
    C --> D{Hold U/LU}
    D --> E["Reset the Starting Values"]
    E --> F{AND}
    F --> G["To the counting is stopped"]
    G --> H{Confirm the loading or resetting}
    H --> I["About the loading or resetting"]
    I --> J{OR}
    J --> K["Reset the Starting Values"]
    K --> L{Reset the Starting Values}
    L --> M["End"]
    style A fill:#f9f,stroke:#333
    style M fill:#f9f,stroke:#333
How to Use the Multi-Timer
■ To use the Multi-Timer function which combines two or more timers to measure multi-phases elapse time, it must set the starting value for each timer.
■ Once the starting value has been set for the timer(s), they must be loaded into the counting sequence before it is ready for counting. Check the previous chapter 8.2 for more detail on how to load the timer into the counting sequence.
- Pressing the [S/S] button will start the counting sequence. The Multi-Timers will start the counting from Timer 1 to another timer's following the adjacent diagram. Pressing the [S/S] button once again will stop the counting.
■ The Watch will count repeatedly unless it is stopped by pressing the [S/S] button.
Timer Alarm Sound
■ During the counting, the Watch will beep once when a timer counts to the last 1 and 0 second.
How to Re-load/Reset the Starting Values
■ To re-load or reset the Starling Values during the timer is paused, perform the loading or resetting process which mentioned in the adjacent diagram to re-load or reset the starting
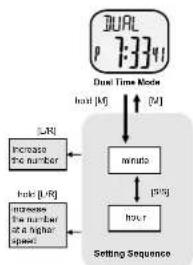
9.1 Dual Time Mode - Setting the Dual Time
flowchart
graph TD
    A["DUAL 7:33V"] --> B["Dual Time Mode"]
    B --> C["load [M"]]
    C --> D["minutes"]
    D --> E["load [s"]]
    E --> F["Settling Sequence"]
    F --> G["IUR"]
    G --> H["Increase the number"]
    H --> I["load [L/R"]]
    I --> J["Increase the number of a higher space"]
    J --> K["IUR"]
    K --> L["load [s"]]
    L --> M["Settling Sequence"]
To Set the Dual Time
■ To select the setting display, hold down the [M] button for 2 seconds in the Dual Time Mode, and then the 'Minute' digits start flashing.
■ In the setting display, press the [S/S] button to select the flashing (setting item) as shown in the diagram.
■ When one of the settings (minute, hour) is flashing, press the [L/R] button to change the number, hold down the button to change the number at a higher speed.
■ When the setting is completed, press the [M] button once to exit the setting display. The Watch will also exit the setting display if NO key-stoke has been activated for 1 minute.
9.0 Dual Time Mode - Dual Time Mode
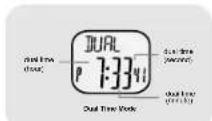
Dual Time Mode
Dual Time Display
■ This Watch includes a dual time which shows the current time of the second time zone.
■ The second digits are same as the one of current time.
■ When the Dual Time Display is selected, the dual time (hour, minute, second) is exhibited on the 2nd row of the display.
10.0 Specifications
Current Time Mode
■ Time System: AM, PM, Hour, minute, second
■ Time Format: 12-hour or 24-hour format
■ Calendar: Month, date and day of week display (Auto-Calendar function for leap year and day of week)
Alarm Mode
■ Daily alarm and hourly chime
■ Alarm sound: 20 seconds
Chronograph Mode
■ Resolution: 1/100 second
■ Measuring Range: 9 hours 59 minutes 59.99 seconds
■ Lap memory: 50 lap memories
Countdown Timer
Timer: 4 timers
■ Resolution: 1 second
■ Measuring Range: 23 hours 59 minutes
■ Timer Sounds: the Watch will beep once when a timer counts to the last 1 and 0 second.
Pacer Mode
Dual Time Mode
■ Setting Range: 40 bpm to 180 bpm
■ Setting step: 5 bpm
■ Time System: AM, PM, Hour, minute, second
Back Light
■ Back Light Type: Electro-Lumine scent (EL) back light