EGS-D7402RG(BK) - Cooker Elba - Free user manual and instructions
Find the device manual for free EGS-D7402RG(BK) Elba in PDF.


| Product Type | Freestanding Cooker |
| Brand | Elba |
| Model | EGS-D7402RG(BK) |
| Color | Black |
| Width | 60 cm |
| Depth | 60 cm |
| Height | 85-90 cm (adjustable) |
| Weight | Approx. 50 kg |
| Power Supply | 220-240 V ~ 50/60 Hz (electric oven), Gas (hob) |
| Gas Type | Natural Gas / LPG (convertible) |
| Number of Burners | 4 (including one wok burner) |
| Burner Power | Up to 3.5 kW (wok), 1.2-2.0 kW (others) |
| Oven Type | Electric fan-assisted oven |
| Oven Capacity | 70 L |
| Oven Functions | Conventional, Grill, Fan, Defrost |
| Energy Efficiency Class | A+ (oven) |
| Cleaning | Enamel interior, easy-clean |
| Safety Features | Flame failure device (hob), child lock (oven), auto shut-off |
| Door Type | Drop-down with cool touch glass |
| Included Accessories | Grill pan, baking tray, grid shelf |
| Warranty | 2 years (parts and labor) |
Frequently Asked Questions - EGS-D7402RG(BK) Elba
User questions about EGS-D7402RG(BK) Elba
0 question about this device. Answer the ones you know or ask your own.
Ask a new question about this device
Download the instructions for your Cooker in PDF format for free! Find your manual EGS-D7402RG(BK) - Elba and take your electronic device back in hand. On this page are published all the documents necessary for the use of your device. EGS-D7402RG(BK) by Elba.
USER MANUAL EGS-D7402RG(BK) Elba
Please read this manual carefully before operating your set.
Retain it for future reference.
Record model number and serial number of the set.
See the label attached on the set and quote this information to your dealer when you require service.
For The Warranty Terms & Conditions, Please Refer To Warranty Certificate
Please read this instruction carefully. It is advisable to keep this instruction manual in a safe place for future reference.
SAFETY PRECAUTIONS
- Keep electrical appliances out of reach from children. Do not let them to operate the appliances without supervision.
- This product is for household and indoor use only.
- This product is not intended for use by person (including children) with reduced physical, sensory or mental capabilities unless they have been given supervision or instruction concerning use of the appliance by a person responsible for their safety.
- If the ignition knob or any part of the burner has damaged, it must be replaced by the service centre or a qualified service technician to avoid hazard.
- Before installation, check if the gas supply pressure is matched with the rated pressure stated on the rating plate of the appliance. Use only the specified type of gas stated on the rating plate.
- There must be adequate air ventilation of the room when the product is used.
- There is a risk of fire if cleaning is not carried out in accordance with this instruction.
- Do not touch the stove exterior during or after cooking with bare hand.
- Before maintenance, disconnect the appliance from the gas supply and wait for it to cool down.
- Do not store or place flammable liquids or items in the vicinity of this appliance. Do not place the appliance near any flammable materials.
- Always shut of the gas supply when the appliance is not in use.
- Do not use harsh abrasive cleaners or sharp metal scrapers to clean the appliance as it will scratch the surface, which may result in shattering of the glass.
TROUBLESHOOTING
CAUSE SOLUTIONISSUE
| After the ignition knob is released, the flame extinguished. | The ignition knob is not turned on properly. | Turn it counter clockwise. |
| The burner does not light up. | Air is entrapped in the rubber gas hose. | Open the main valve.Repeat turning it on for several times. |
| The ignition spark device is dirty or wet.The rubber hose is bent. | Clean or dry up. Install the appliance properly without bending the rubber hose. | |
| Uneven flame.The flame extinguished while the unit is in use. | Short of gas supply.The burner ring is not in a fixed position. | Replace gas cylinder.Fixed and fit the burner rings. |
| Abnormal sound during combustion. | The silts in the burner caps are clogged.The burner caps not mounted properly. | Clean the cap.Mount the burner caps in place. |
| Smell of gas. | Gas leakage from cracks of rubber hose.Loose connection of rubber hose. | Replace the rubber hose.Secure the rubber hose with the hose clamp. |
Please consult qualified service technician or contact the service centre if you may not solve the problem. Make sure to turn off the main valve at the gas cylinder.
CARE OF YOUR APPLIANCE PRODUCT DESCRIPTION
Before the maintenance, make sure the appliance is cool and the main cock is turned off.
• Perform the following maintenance periodically.
• Do not use the appliance if it has damaged in any way. Refer to the troubleshooting guide before calling service.
- Do not carry out repairs on the appliance by yourself.
| PARTS MAINTENANCE | |
| Ring Caps | Check if the slits in the burner ring are clogged with dirt. Clean them with a wire brush.After washing the burner caps, dry them completely before assembly. 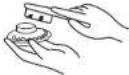 |
| Burners,Ring CapsPan Support | Make sure the cap is mounted in place.(If the ring caps are not mounted properly,gas distribution may not be even.) 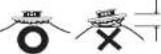 |
| Cook Top andControl Panel | When they get dirty, use a soft cloth damped with mild detergent to wipe off dirt. Do not use thinner or benzine for cleaning. This may damage the appliance. |
| Rubber Hose | Make sure the rubber hose is tightly secured over gas supply outlet and secure it with the hose clamp. If there are cracks in the hose, replace it. |
| Cook Top | When they get dirty, use a soft cloth to wipe off dirt.Make sure to wipe off dirt every time when they get dirty, if they are kept dirty for a long time (more than one week), they will become stained or it will cause the stripping of the coating material.If the dirt is difficult to wipe off, use a soft cloth damped with a neutral detergent solution or water.The coating material of the appliance is weak against a physical shock or high temperatures. The following must be kept in mind.a) Do not use polishing powder, cleanser, knife, alkaline detergent or bleaching solution to wipe off the dirt.b) Do not give a physical shock to the appliance.c) Do not give excessive heat to the appliance by covering the burner with a large iron plate or a large pot.It is expected that the section below the pan support will be scratched and a white surface comes out. This will not cause any problems in your daily use. |
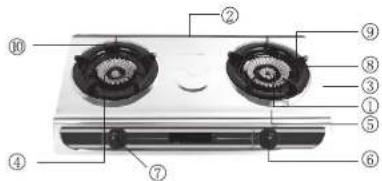
① Burner Cap (right)
② Gas Inlet
(At the rear of the unit)
③ Rating Plate (side)
④ Burner Cap (left)
⑤ Cook Top
⑥ Ignition Knob (right)
⑦ Ignition Knob (left)
⑧ Drip Pan
⑨ Pan Support (right)
⑩ Pan Support (left)
INSTALLATION INSTRUCTION
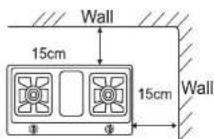
Remove the packaging material of the appliance. Assemble the rubber foot to the bottom of the appliance.
Mount the left and right burner caps and make sure it sits properly.
Place the left and right pan support on the appliance and fix it properly.
CAUTIONS
1) Make sure the appliance is installed in a room where no strong airflow and away from windows.
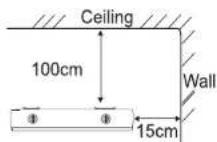
2) Allow at least 15cm from the wall and 100cm from the ceiling.
3) Do not bend, twist or stretch the rubber hose. Fit the rubber hose onto the gas inlet and secure it with a hose clamp.
OPERATING INSTRUCTIONS
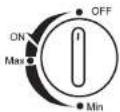
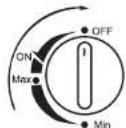
Before using the unit, make sure the ignition knob is in the "OFF" position and turn on the main cock. After using, ensure to turn off the ignition knob and main cock.
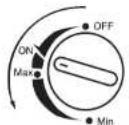
TURNING ON THE APPLIANCE
Turn the ignition knob counter clockwise to the "ON" position slowly. Pressing it for a few seconds, make sure that the burner has lit.
Remark:
When you start to use the appliance for the first time or the appliance has not been used for long time, it happens that the burner is not ignited for the first few attempts. It is because air has been trapped in the rubber hose. Repeat the ignition few times until the burner is lit.
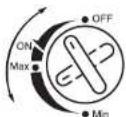
FLAME CONTROLLER
Control the knob between Max and Min to regulate the flame power output. Turn the knob counter clockwise to the minimum flame position to set for the lowest power output level.
TURNING OFF THE APPLIANCE
Turn the ignition knob clockwise up to its original position by pressing it. After using, make sure to turn off the main cock.
Remark:
When the burner is shut off, it will create a noise. This is normal.
IMPORTANT SAFETY INSTRUCTIONS PRECAUTIONS
Before using the appliance be sure the type of gas supplied is the one specified on the rating plate attached to the side of the appliance.
ENSURE FIRE SAFETY
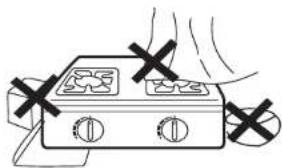
- Do not place the appliance near flammable materials. E.g. curtains, cooking oil, etc.
- Be sure to turn off the burners and main cock if the appliance is not in use.
- Use a heat proof panel to protect walls if required.
natural_image
Simple line drawing of a portable stove with two outlets and a handle, no text or symbols presentUSE THE APPLIANCE IN WELL VENTILATED ROOM
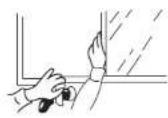
Ensure proper ventilation. If the appliance is used in a poor ventilated room, the air may be harmful to health.
PREVENT GAS LEAK
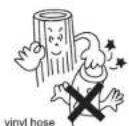
Use a rubber hose of the approved type only. Do not use a vinyl hose as it may not resist high temperatures and may be softened by heat.
While using the appliance, occasionally check that the burners are lit.
After using, turn off the burners and main cock. Make sure the main cock is turned off before leaving the appliance.
In any case of gas leaks, turn off the main cock immediately and ventilate the room by opening window and doors. Contact the fire rescue department if necessary.
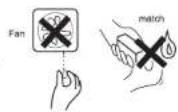
WARNING:
In case of gas leaks, DO NOT turn the fans or other electrical appliances on or off. Do not light a match of use a lighter.
- Use the appliance for cooking purposes only. Do not use the appliance for other purposes to prevent fire hazard.
- Do not hang up clothes, towel, etc above the appliance to dry.
- Do not use a large iron plate to cover the burners.
- Do not touch the pan support. The appliance may be hot after cooking.
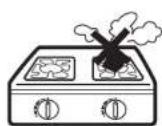
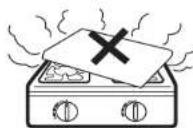
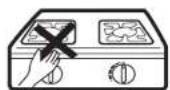
NOTE:
In any case with signs of abnormal combustion, including strange sound when the burners are lit, turn off the burners and the main cock immediately and contact the service centre.
- SAFETY PRECAUTIONS
- TROUBLESHOOTING
- CARE OF YOUR APPLIANCE PRODUCT DESCRIPTION
- INSTALLATION INSTRUCTION
- CAUTIONS
- OPERATING INSTRUCTIONS
- TURNING ON THE APPLIANCE
- Remark:
- FLAME CONTROLLER
- TURNING OFF THE APPLIANCE
- IMPORTANT SAFETY INSTRUCTIONS PRECAUTIONS
- ENSURE FIRE SAFETY
- USE THE APPLIANCE IN WELL VENTILATED ROOM
- PREVENT GAS LEAK
- WARNING:
- NOTE:
Brand : Elba
Model : EGS-D7402RG(BK)
Category : Cooker