
MSS6000B - Barbecue Chief - Free user manual and instructions
Find the device manual for free MSS6000B Chief in PDF.


| Product Type | LCD Display Mount / Stand |
| Brand | Chief |
| Model | MSS6000B |
| Maximum Weight Capacity | 150 lbs (68.04 kg) |
| Display Size Compatibility | Supports displays up to 42 inches (typical) |
| Mount Type | Freestanding or anchored to surface |
| Height Adjustment | Yes, with adjustable slide plate |
| Swivel Range | ±45 degrees (with adjustable stops at 15°, 25°, 35°) |
| Roll/Tilt Adjustment | Yes, limited for leveling |
| Construction Material | Steel |
| Color | Black |
| Cable Management | Yes, three routing options (A, B, C) |
| Locking Mechanism | Padlock or pin/nut for security |
| Installation Type | Freestanding with rubber bumpers or anchored with screws |
| Included Hardware | Rubber bumpers, fasteners, washers, spacers |
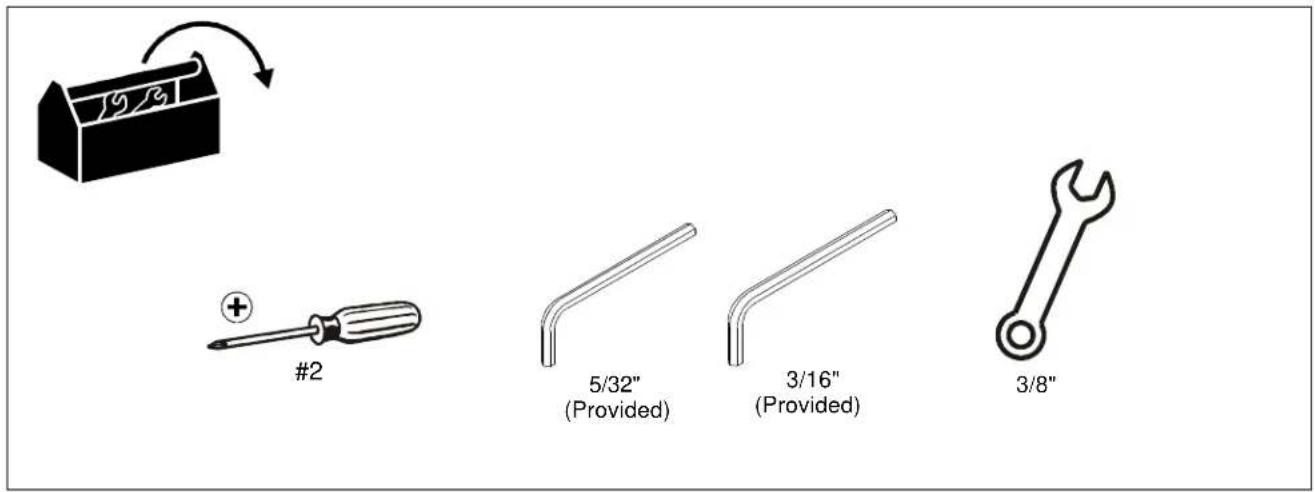
| Tools Required | Phillips screwdriver, open-ended wrench, hex-key |
| Safety Warnings | Must support 5x combined weight; do not exceed 150 lbs |
| Warranty | Refer to manufacturer for warranty details |
| Compliance | Industry standard VESA patterns supported via interface bracket |
Frequently Asked Questions - MSS6000B Chief
User questions about MSS6000B Chief
0 question about this device. Answer the ones you know or ask your own.
Ask a new question about this device
Download the instructions for your Barbecue in PDF format for free! Find your manual MSS6000B - Chief and take your electronic device back in hand. On this page are published all the documents necessary for the use of your device. MSS6000B by Chief.
USER MANUAL MSS6000B Chief
INSTALLATION INSTRUCTIONS
natural_image
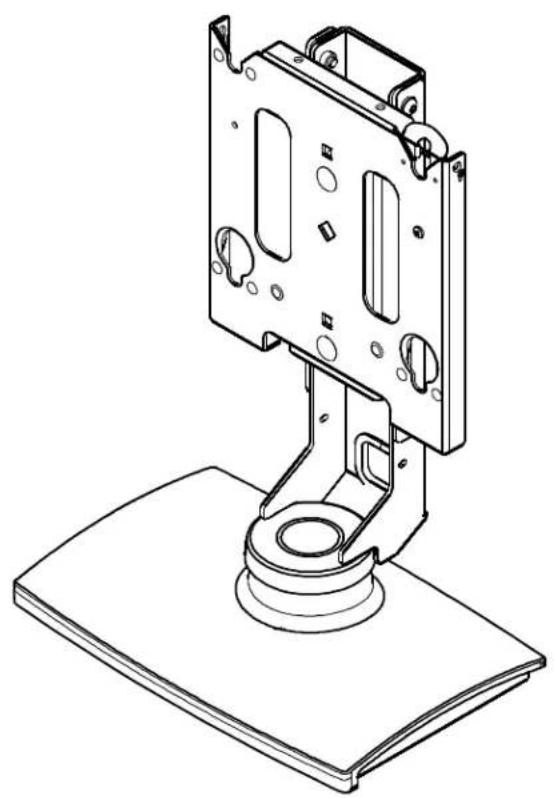
Technical line drawing of a mechanical device with mounting base and housing (no text or symbols)LCD Swivel Stand
DISCLAIMER
Milestone AV Technologies, Inc., and its affiliated corporations and subsidiaries (collectively, "Milestone"), intend to make this manual accurate and complete. However, Milestone makes no claim that the information contained herein covers all details, conditions or variations, nor does it provide for every possible contingency in connection with the installation or use of this product. The information contained in this document is subject to change without notice or obligation of any kind. Milestone makes no representation of warranty, expressed or implied, regarding the information contained herein. Milestone assumes no responsibility for accuracy, completeness or sufficiency of the information contained in this document.
®Chief is a registered trademark of Milestone AV Technologies. All rights reserved.

IMPORTANT WARNINGS AND TIONS!

WARNING: A WARNING alerts you to the possibility of serious injury or death if you do not follow the instructions.

CAUTION: A CAUTION alerts you to the possibility of damage or destruction of equipment if you do not follow the corresponding instructions.

WARNING: Failure to read, thoroughly understand, and follow all instructions can result in serious personal injury, damage to equipment, or voiding of factory warranty! It is the installer's responsibility to make sure all components are properly assembled and installed using the instructions provided.

WARNING: Failure to provide adequate structural strength for this component can result in serious personal injury or damage to equipment! It is the installer's responsibility to make sure the structure to which this component is attached can support five times the combined weight of all equipment. Reinforce the structure as required before installing the component.

WARNING: Exceeding the weight capacity can result in serious personal injury or damage to equipment! It is the installer's responsibility to make sure the combined weight of all components located on the MSS (including the display) does not exceed 150 lbs (68.04 kg).
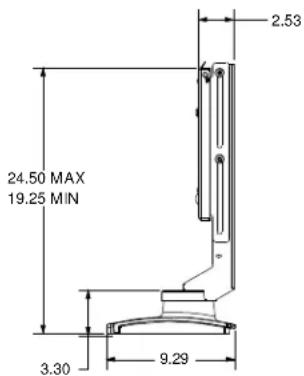
DIMENSIONS

NOTE: CUSTOM INTERFACE BRACKET NOT SHOWN. THE CUSTOM INTERFACE BRACKET NEEDED FOR YOUR DISPLAY WILL ADD BETWEEN 1/2" AND 2" IN DEPTH AND MAY AFFECT LOCATION OF DISPLAY ON THE MOUNT.
SEE MSB-XXXX DRAWING ALSO.

natural_image
Technical line drawing of a mechanical assembly with mounting base (no text or symbols)LEGEND
 | Tighten Fastener |
| Apretar elemento de fijación | |
| Befestigungsteil festziehen | |
| Apertar fixador | |
| Serrare il fissaggio | |
| Bevestiging vastdraaien | |
| Serrez les fixations | |
 | Loosen Fastener |
| Aflojar elemento de fijación | |
| Befestigungsteil lösen | |
| Desapertar fixador | |
| Allentare il fissaggio | |
| Bevestiging losdraaien | |
| Desserrez les fixations | |
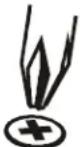 | Phillips Screwdriver |
| Destornillador Phillips | |
| Kreuzschlitzschraubendreher | |
| Chave de fendas Phillips | |
| Cacciavite a stella | |
| Kruiskopschroevendraaier | |
| Tournevis à pointe cruciforme | |
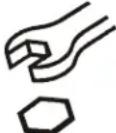 | Open-Ended Wrench |
| Llave de boca | |
| Gabelschlüssel | |
| Chave de bocas | |
| Chiave a punte aperte | |
| Steeksleutel | |
| Clé à fourche | |
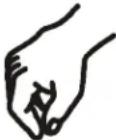 | By Hand |
| A mano | |
| Von Hand | |
| Com a mão | |
| A mano | |
| Met de hand | |
| À la main | |
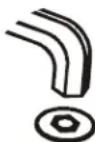
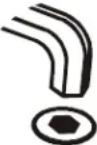 | Hex-Head Wrench |
| Llave de cabeza hexagonal | |
| Sechskantschlüssel | |
| Chave de cabeça sextavada | |
| Chiave esagonale | |
| Zeskantsleutel | |
| Clé à tête hexagonale |





TOOLS REQUIRED FOR INSTALLATION
PARTS

INSTALLATION
Mount Installation
Free Standing (not anchored) Applications Only:
NOTE: Do not perform this step if you are going to anchor the stand to a surface.
- Install five rubber bumpers (B) on bottom of stand. (See Figure 1)
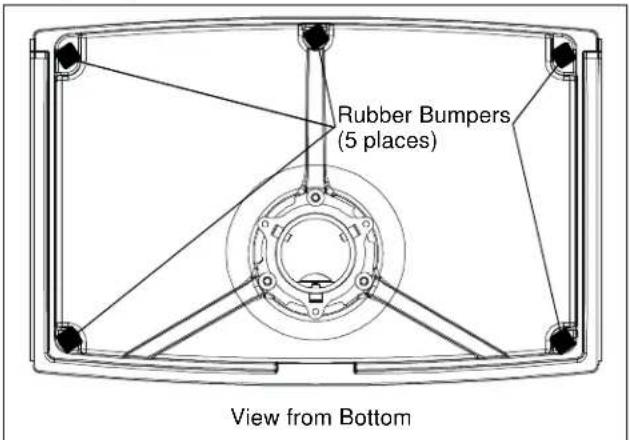
Figure 1
Display 24 Inches High or Smaller:
- Loosen the four height adjustment screws and raise the slide to its maximum height. (See Figure 2)
- Secure the slide by tightening the four height adjustment screws.

Figure 2
Display More Than 24 Inches High:
NOTE: The MSS6000 comes pre-configured for displays 24" in height or less. If a display with a height greater than 24" is being installed follow the instructions below.
- Remove slide plate assembly from the base by removing four 5/16-18 x 3/4" button head cap screws, and four 1/4" flat washers. (See Figure 3)
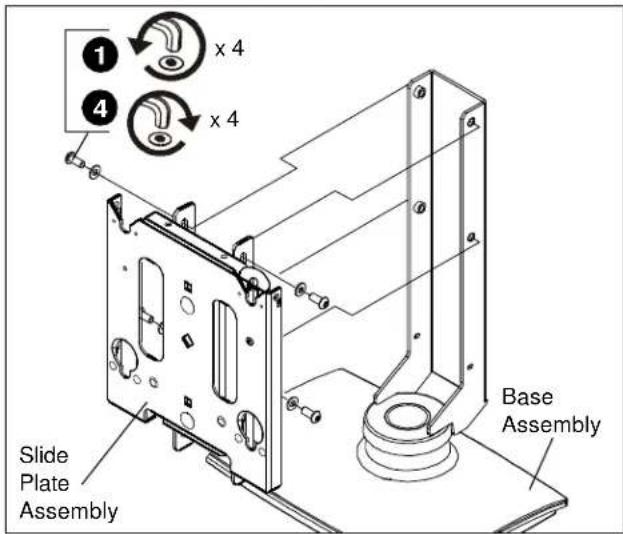
Figure 3
- Remove face plate from slide plate assembly by removing two 3/8"-16 x 1" round head carriage bolts, two 1" OD x .563 ID spacers, two 3/8" flat washers, and two 3/8-16 lock nuts. (See Figure 4)
- Reinstall face plate into upper mounting holes of slide plate using two 3/8"-16 x 1" round head carriage bolts, two 1" OD x .563 ID spacers, two 3/8" flat washers, and two 3/8-16 lock nuts removed in Step 2. (See Figure 4)
- Reinstall slide plate assembly onto base using four 5/16-18 x 3/4" button head cap screws and four 1/4" flat washers previously removed in Step 1. (See Figure 3)
- Raise slide plate assembly to maximum height.
- Secure slide plate in place by tightening the four height adjustment screws. (See Figure 2)
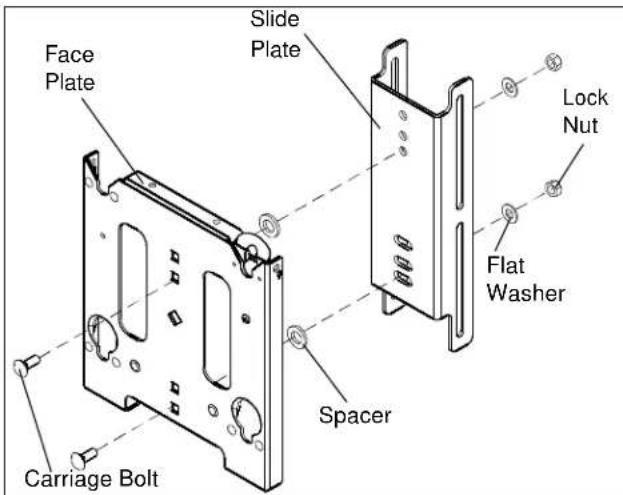
Figure 4
Site Preparation for Mounting to Surface

WARNING: EXCEEDING WEIGHT CAPACITY CAN RESULT IN SERIOUS PERSONAL INJURY OR DAMAGE TO EQUIPMENT! It is the installer's responsibility to make sure the combined weight of all components does not exceed 150 lbs (68.04 kg).

CAUTION: TURNING DISPLAY CAN CAUSE DAMAGE TO SURROUNDING OBJECTS. Make certain location provides enough area for the display to rotate ±45^ without being obstructed.
NOTE: See Display Swivel Stop Location Adjustment section for information on adjusting rotation.
- Locate a flat dry surface on which to mount the MSS6000 assembly.
- Measure the hole locations on bottom of MSS6000 and mark the four mounting hole locations on mounting surface. (See Figure 5)
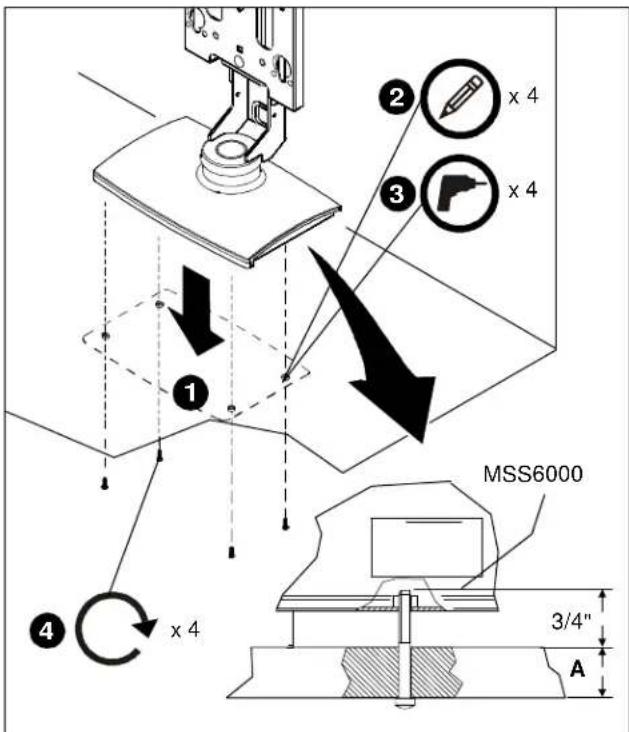
Figure 5
- Drill four 1/4" diameter holes through mounting surface at marks.
- Secure mount to mounting surface using four 1/4-20 cap screws (not provided) with a length equal to the thickness of the mounting surface A plus 3/4". (See Figure 5)
Display Installation
The following procedure assumes that the proper interface bracket for the display being mounted has already been installed on the display.
If no interface bracket is present on display, install bracket to display using the instructions included with the interface bracket before proceeding.
If an interface bracket for the display being mounted needs to be obtained, or additional assistance is required, contact a Chief Customer Service representative.
NOTE: If the display being mounted has a height of more than 24" the mount needs to be modified prior to display installation. (See Display More Than 24 Inches High section.)
To install the display:
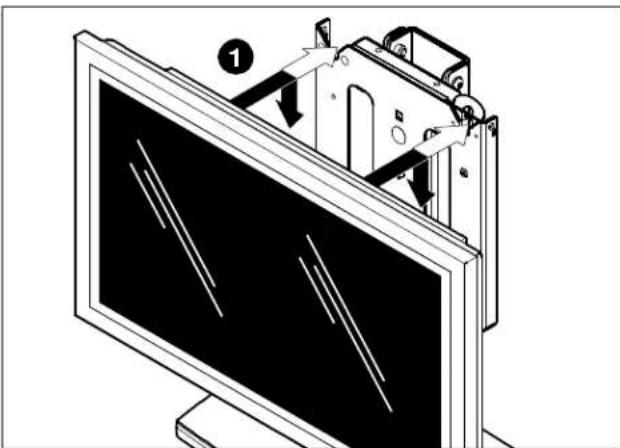
- While supporting both sides of display, align four mounting buttons on display or interface bracket with four mounting holes in faceplate. (See Figures 6 & 7)
natural_image
Diagram of a computer monitor with an open rear panel showing internal components and a numbered label (1), no text or symbols present.Figure 6
- Lower display into place listening for audible "click" to ensure recessed area of mounting buttons are properly seated in lower area of mounting holes. (See Figures 6 & 7)

WARNING: IMPROPER INSTALLATION CAN LEAD TO DISPLAY FALLING CAUSING SERIOUS PERSONAL INJURY OR DAMAGE TO EQUIPMENT! Ensure mounting buttons are completely engaged in mounting holes.
NOTE: Holes are provided in the faceplate for use with a padlock or similar locking device, if desired. In addition, the pin and nut may be removed from the upper holes and moved to the lower holes for use as a more permanent locking device. (See Figure 7)
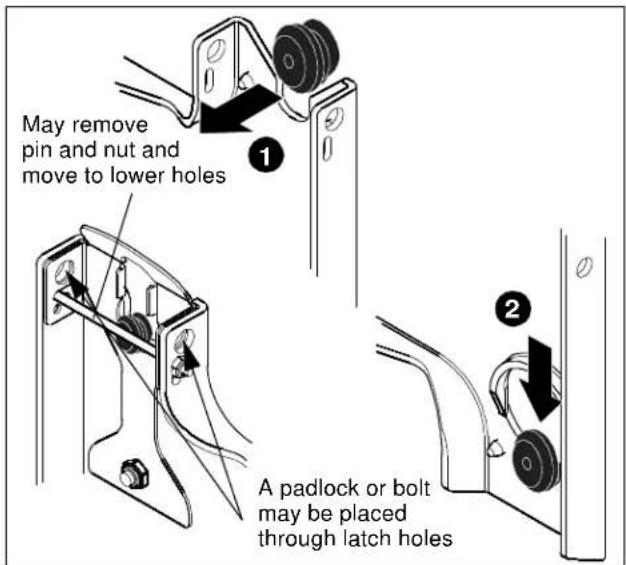
Figure 7
Removing Display from Mount
- Remove bolt or padlock from faceplate (if used). (See Figure 8)
NOTE: The pin may have been used as a more permanent locking device. If so, remove nut and pin and move from the lower holes to the upper holes. - Pull back on flag on upper mounting hole and press pin down into "Open" position. (See Figure 8)
- Carefully lift display from mount.
- Lift up on pin and place flag back against faceplate to return it to "Closed" position. (See Figure 8)

Figure 8
ADJUSTMENTS
Display Height Adjustment

CAUTION: Displays are fragile. Allowing the display to drop to bottom of stand may result in damage to the display.
- While holding the display, loosen the four height adjustment screws. (See Figure 9)

CAUTION: Make sure all cables and wires are not pinched when raising or lowering display.
- Position display at the desired height.
- Tighten four height adjustment screws. (See Figure 9)
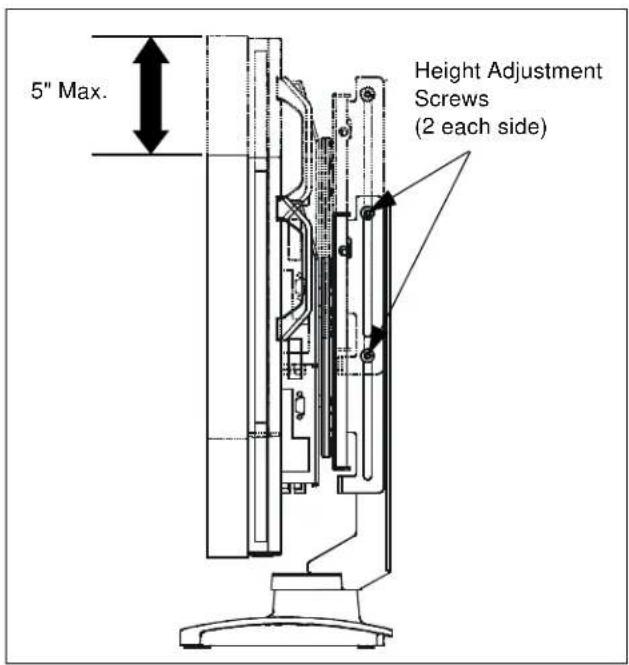
Figure 9
Display Roll Adjustment
The MSS6000 provides limited display roll adjustment for the purpose of leveling the display.
To level the display:
- Loosen upper and lower roll adjustment nuts. (See Figure 10)
- Level display. (See Figure 10)
- Tighten roll adjustment nuts.

Figure 10
Display Swivel Tension Adjustment
Display swivel tension is pre-set at the factory. Swivel tension will vary depending on the weight of display being mounted.
If swivel tension adjustment is required:
- Disconnect all cords and cables from display.
- Follow steps in Removing Display from Mount section.
- Lay mount on back. (See Figure 11)
- Locate three tension adjustment screws. (See Figure 11)
- Turn each adjustment screw either clockwise to increase tension, or counter-clockwise to decrease tension.
NOTE: It is important that all adjustment screws are turned equal amounts in the same direction for the display to turn properly.

Figure 11
- Install display following the instruction outlined in Display Installation section.
- Test display swivel tension by grasping each side of display and turning display left and right.
If additional swivel tension adjustment is required, repeat steps 1 through 7 above.
Display Swivel Stop Location Adjustment
The MSS6000 allows for the installation of swivel stops that limit the amount of display travel. Stops can be installed at +/- 15°, 25° or 35°.
- Follow steps 1 through 3 of Display Swivel Tension Adjustment section.
- Insert one 10-24 X 1/2" Phillips head cap screw in one of the three swivel stop holes (15°, 25° or 35°) in the base of the stand. (See Figure 12)
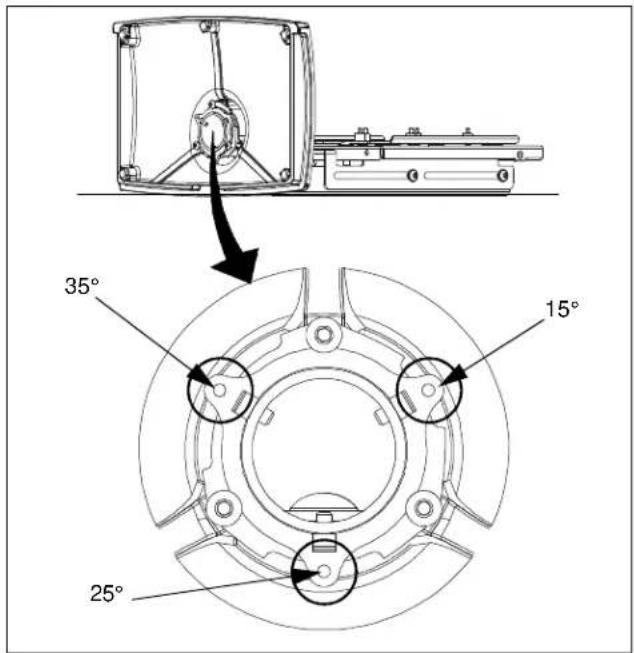
Figure 12
Cable Management
The MSS6000 has been designed to provide multiple cable management/routing options.
Option A
Option A does not use the cable access features of the MSS6000 and simply routes the cables away from the display and mount. (See Figure)

Figure 13
Option B
Option B uses the cable access at the center of the MSS-6000 and then routes the cables across the mounting surface and out the rear cable access slot in the back of the mount.
(See Figure 14)
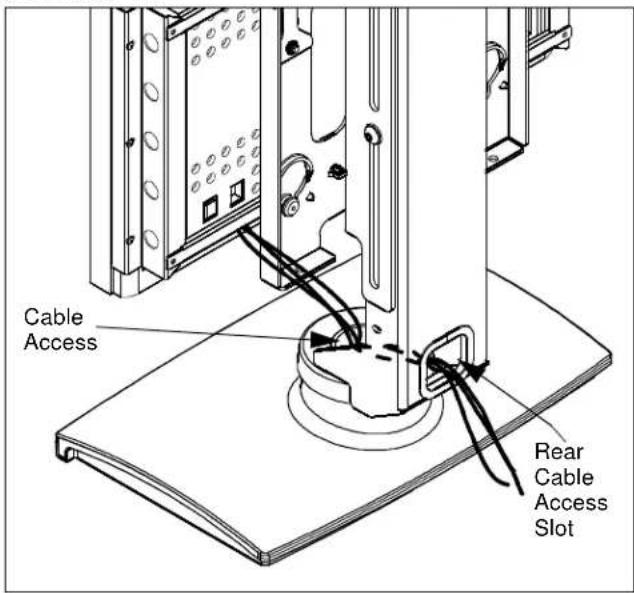
Figure 14
Option C
Option C uses the cable access at the center of the MSS6000 and then routes the cables down through an access hole or slot in the mounting surface. (See Figure 15)
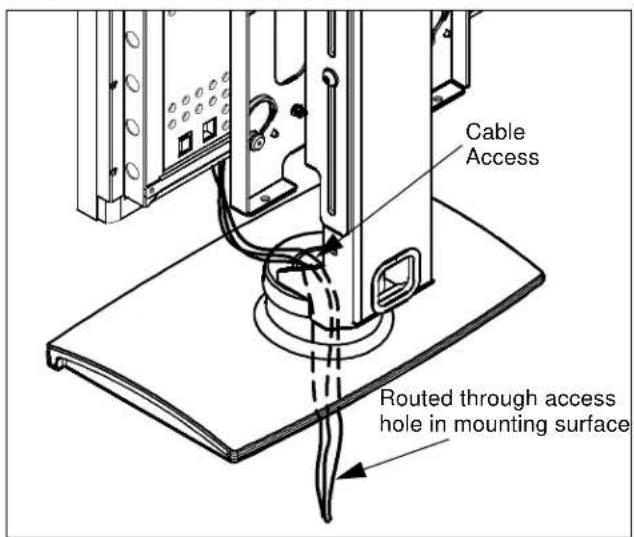
Figure 15
- INSTALLATION INSTRUCTIONS
- DISCLAIMER
- IMPORTANT WARNINGS AND TIONS!
- DIMENSIONS
- INSTALLATION
- Mount Installation
- Display 24 Inches High or Smaller:
- Display More Than 24 Inches High:
- Site Preparation for Mounting to Surface
- Display Installation
- Removing Display from Mount
- ADJUSTMENTS
- Display Height Adjustment
- Display Roll Adjustment
- Display Swivel Tension Adjustment
- Display Swivel Stop Location Adjustment
- Cable Management
- Option A
- Option B
- Option C
Brand : Chief
Model : MSS6000B
Category : Barbecue