KHCAMKDACTA - Action Camera Kogan - Free user manual and instructions
Find the device manual for free KHCAMKDACTA Kogan in PDF.


| Product Type | Action Camera |
| Brand | Kogan |
| Model | KHCAMKDACTA |
| Dimensions | Approx. 60 x 40 x 25 mm |
| Weight | Approx. 70 g |
| Power Source | Rechargeable lithium-ion battery (900 mAh) |
| Charging | USB charging (5V/1A) |
| Video Resolution | Up to 4K at 30 fps / 1080p at 60 fps |
| Photo Resolution | Up to 16 MP |
| Field of View | 170° wide angle |
| Waterproof | With housing up to 30 m |
| Storage | microSD card up to 64 GB (not included) |
| Connectivity | Wi-Fi, micro USB |
| Display | 2.0" LCD touchscreen |
| Main Functions | Video recording, photo capture, time-lapse, loop recording |
| Mounting | Standard tripod mount and adhesive mounts included |
| Care & Cleaning | Clean lens with soft microfiber cloth; wipe housing with damp cloth |
| Safety | Do not disassemble; avoid exposure to extreme temperatures; keep away from water without housing |
| Spare Parts & Repairability | Batteries, mounts, and charging cables available on Kogan.com; not user-repairable |
| General Information | Includes: camera, waterproof housing, mounting accessories, USB cable, manual |
Frequently Asked Questions - KHCAMKDACTA Kogan
User questions about KHCAMKDACTA Kogan
0 question about this device. Answer the ones you know or ask your own.
Ask a new question about this device
Download the instructions for your Action Camera in PDF format for free! Find your manual KHCAMKDACTA - Kogan and take your electronic device back in hand. On this page are published all the documents necessary for the use of your device. KHCAMKDACTA by Kogan.
USER MANUAL KHCAMKDACTA Kogan
HD Sports Action Camera
KHCAMKDACTA
USER MANUAL
natural_image
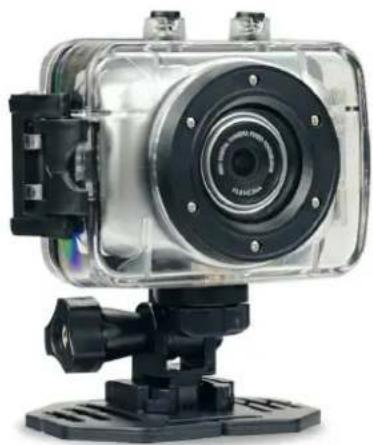
Exterior view of a silver and black hover camera with mounting base (no text or symbols visible)Thank you for purchasing this Kogan HD sports action camera. You should read these instructions thorough before use. The camera has no internal memory, so prior to taking photographs or footage, you should insert a microSD card.
Ensure the camera is turned off prior to inserting or removing a memory card, and be sure to insert it in the correct direction. Do not insert the card if you feel any obstruction or resistance.
WARNING
-
This battery contains a lithium battery. It should not be used in flammable or explosive environments or put into a fire, as it will explode easily.
-
Do not expose the camera to direct sunshine and do not point the lens directly at the sun. Doing so may cause damage to the image sensor.
-
Take good care of the camera to ensure that no water or sand particles enter the camera when it is being used at the beach or in water. Water, sand, salt and other components containing salt may cause internal damage to the camera.
-
Keep the camera free of dust or chemical materials. Store it in a cool, dry, well ventilated location.
Getting to know your camera

1: Power button 2: Mic 3: Shutter button
4: UP button 5: DOWN button 6: Indicator light
7: MENU button 8: Playback button 9: Mode switch
10: Wrist strap hole 11: Lens 12: USB interface
13: Reset button 14: microSD memory card slot
Accessories
Waterproof casing, USB cable, car charger, handlebar post mount (optional), helmet mount (optional), shield, suction-cup mount
Accessory Assembly Setup
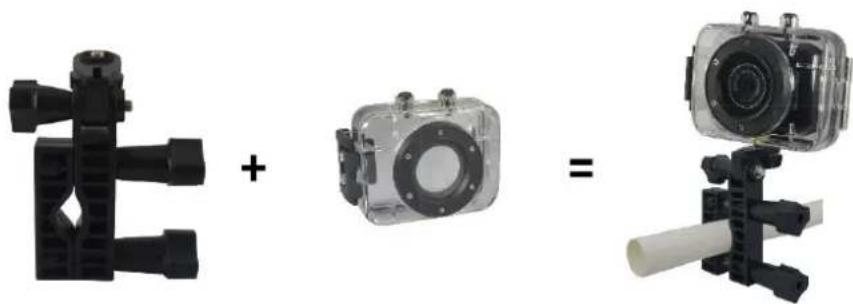
1 - Bike/Motorbike Sport Assembly
natural_image
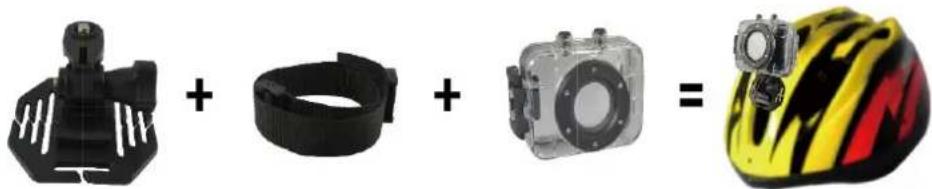
Three black plastic camera modules with different mounting tips, shown in plus, clear, and separate views (no text or symbols)2 - Helmet Assembly
natural_image
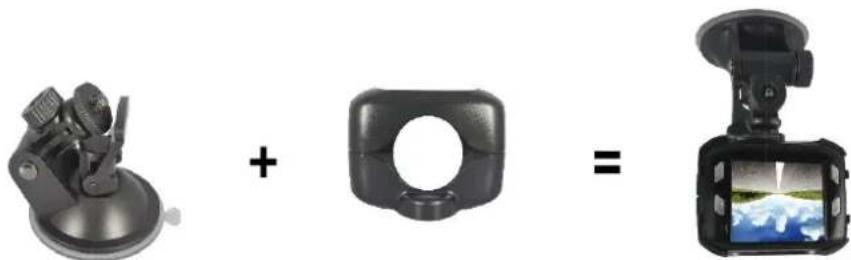
Three product images: a black gear, a black strap, and a silver camera with a yellow helmet (no text or symbols)3 - Car Mount Assembly
natural_image
Three-panel image showing a car-mounted sensor, a black rectangular device with a circular hole, and a camera mounted on a screen (no text or symbols)Charging of Lithium Battery
When the camera is low in power, the battery will charge when the camera is connected to a PC with the USB cable or connected to the car charger. While charging, the indicator light will light up in blue. When the battery is full, the light will go out.
Note: The is a visual power indicator in the right corner or the LCD display.



When the camera is low in power, “LOW POWER” information will be displayed on the LCD screen, and then the camera will power down automatically after a few seconds.
Car Charger Use
With the camera turned off, you can insert the car charger into the charging port to charge the battery. Once inserted, you can press the power button to turn the camera on. Now you can use the camera to take videos, pictures and view playback functions.
Note: in this mode, the car charger with both charge the battery and supply the running power to the camera.
Installing the microSD Card
The camera has no internal memory, so you will need to use a microSD card to store your recordings. Turn the camera off before inserting or removing the memory card. Insert it facing the correct direction and do not force it if you feel any resistance.
Recording Functions
Photographs
Insert the memory card, press the power button and wait for the screen to display the opening picture. The camera will then startup in photograph mode. Frame whatever you want to capture in the view-finder and then press the shutter button. The camera will make a “beep” sound and a photo will have been taken. The total number of photos shown at the top right corner will reduce by one.
Press MENU to select the photograph mode: OFF / 2S / 5S / 10S / Cancel self timers and 3 multi-snapshot.
Videos
When in photography mode, turn the mode switch to the video position (middle position). The recorder will go into video mode. Press the shutter to start recording footage in this mode, at which point the indicator light will start to flash. Press the shutter again to stop the recording.
Press the MENU button in video mode to change the recording quality settings.
Sport Video Recording
In photography mode, turn the mode switch to the sport video position (bottom). The recorder will now be in sport video mode, meaning the unit will record in cycles of 5 minutes.
Press the MENU button to set different time cycles.
Playback Functions
Photo Playback
With the mode switch in the photograph capture mode (top), press the playback button to enter photo playback mode. Press UP or DOWN to preview the photos.
Note: Video and Sport Video files cannot be viewed in photo playback mode.
Video Playback
With the mode switch in the video capture mode (middle), press the playback button to enter video playback mode. Press UP or DOWN to preview the video files.
Press the shutter button to play the video file and press it again to stop playback. Press the MENU button to pause the video.
Note: Photo files cannot be viewed in video playback mode. Sport Video files can be viewed in this mode.
Sport Video Playback
With the mode switch in the sport video capture mode (bottom), press the playback button to enter video playback mode. Press UP or DOWN to preview the sport video files.
Press the shutter button to play the video file and press it again to stop playback. Press the MENU button to pause the video.
Note: Photo and video files cannot be viewed in sport video playback mode.
Zoom in and Out (4x)
In any mode, press the UP button to engage the digital zoom. Each time the scene is magnified by between 1 \~ 4 times. Press the DOWN button to reduce the zoom down from between 4 \~ 1 times.
MENU Introduction
When the camera is turned on, pressing the MENU button will take you to the menu interface.
Press UP and DOWN to choose new parameters.
Press the MENU button to confirm and/or enter second-level menu.
Press the PLAYBACK button to exit out of the current menu.
Photo Mode Menu
Photo size: set the pixel density and quality. More pictures mean better image quality, however it takes up more space on your memory card.
12M (4000 x 3000), 5M (2592 x 1944), 3M (2048 x 1536), 1.3M (1280 x 1024)
Scene: Supports many different kinds of scenes that will improve the quality of the image when taken. Scenes include auto, night, portrait, scenery, backlight, sport, party, beach, high sensitivity.
Self Timer: Off, 2sec, 5sec, 10sec, cancel.
Multi-Snapshot: Off, On, Cancel
Face Detect: Off, On, Cancel
White Balance: Auto, daylight, cloudy, tungsten, fluorescent, Cancel
Exposure: -3, -2, -1, 0, 1, 2, 3, Cancel
ISO Value: Auto, ISO 100, ISO 200, ISO 400, Cancel
Image Quality: Super Fine, Fine, Normal, Cancel
Sharpness: Sharp, Normal, Soft, Cancel
Anti-Shake: On, Off. (Will make the camera avoid taking photos where the results will be jittery or blurred.)
Setup: This option will send you to the following sub-menu (overleaf).
•Language: English, German, French, Spanish, Italian, Turkish, Russian
- Set Date: Press MENU, UP and DOWN to set current time and date.
•Auto Power Off: Off, 1min, 3min, 5min, 10min, Cancel Note: If you choose off, then the camera will stay on until the battery runs flat or until you manually turn it off.
•Frequency: 50Hz, 60Hz. (Default is 50Hz)
- Beep: Off, On, Cancel
- Format: Will format the micro SD card. Will remove all files on the card, include protected files.
- Default Setting: Restores the camera back to the original factory settings.
Video Mode Menu
Video Size: 1280 x 720 HD, 640 x 480, Cancel
Other parameters are the same as photo mode.
Sport Video Mode Menu
Video Size: 1280 x 720 HD, 640 x 480, Cancel
Record Time: 3 minutes, 5 minutes, 10 minutes, cancel
Other parameters are the same as photo mode.
Playback Mode Menu
Pressing menu while viewing a video file will show two options.
Protect: Lock this, unlock this, lock all, unlock all, cancel
Lock: Protect your stored images and videos to stop them being deleted by accident.
Unlock: Cancel the file protect
Delete: Delete this file, Delete All, Cancel
Removable Disk
Connect the camera to the computer via USB, then turn the camera on.
"Removable disk" will appear in your computer. Double-click the disk enter the drive, where you can review and copy files in the DCIM folder.
| Technical Specifications | |
| Sensor 1.3MP Low Illumination level CMOS sensor. | |
| Function Mode Photo/Video/Sport Video/Playback | |
| LCD 2.0” TFT LCD (960x240) | |
| Lens F3.0, f=2.3mm | |
| Image Size 12M, 5M, 3M, 1.3M | |
| Video Size 1280x720(HD)/30fps, 640x480(VGA)/30fps | |
| Cycled Recording Times 3 minutes, 5 minutes, 10 minutes | |
| Capture Single, 2sec, 5sec, 10sec, Multi-snap | |
| File Format JPEG/AVI | |
| White Balance Auto, Daylight, Cloudy, Tungsten, Fluorescent | |
| Storage Memory MicroSD up to 32GB | |
| Interface | USB 2.0 |
| Power Supply | Built in 3.7 rechargeable lithium-ion |
| Dimension | 69x47x30mm |
| Weight | 48g |

- WARNING
- Getting to know your camera
- Accessories
- Accessory Assembly Setup
- Charging of Lithium Battery
- Car Charger Use
- Installing the microSD Card
- Recording Functions
- Photographs
- Videos
- Sport Video Recording
- Playback Functions
- Photo Playback
- Video Playback
- Sport Video Playback
- Zoom in and Out (4x)
- MENU Introduction
- Photo Mode Menu
- Removable Disk
Brand : Kogan
Model : KHCAMKDACTA
Category : Action Camera