WNL-U554M - Network adapter Planet - Free user manual and instructions
Find the device manual for free WNL-U554M Planet in PDF.

| Product Type | Wireless USB Network Adapter |
| Model | WNL-U554M |
| Brand | Planet |
| Wireless Standard | IEEE 802.11n |
| Frequency Band | 2.4 GHz |
| Maximum Data Rate | 150 Mbps |
| Interface | USB 2.0 |
| Antenna Type | Internal |
| Security | WEP, WPA, WPA2 |
| Dimensions | 8.5 cm x 2.5 cm x 1.2 cm |
| Weight | 25 g |
| Power Source | USB powered |
| Operating Temperature | 0°C to 40°C |
| Operating Humidity | 10% to 90% non-condensing |
| Supported OS | Windows, Mac OS, Linux |
| Maintenance | Keep dry and clean; avoid physical impact |
| Spare Parts | Not applicable (no user-replaceable parts) |
| Repairability | Non-repairable; replace if defective |
Frequently Asked Questions - WNL-U554M Planet
User questions about WNL-U554M Planet
0 question about this device. Answer the ones you know or ask your own.
Ask a new question about this device
Download the instructions for your Network adapter in PDF format for free! Find your manual WNL-U554M - Planet and take your electronic device back in hand. On this page are published all the documents necessary for the use of your device. WNL-U554M by Planet.
USER MANUAL WNL-U554M Planet
natural_image
Two electronic devices: a small USB device labeled 'PLANET' and a white USB device with network ports (no visible text beyond branding)User's Manual
802.11n
Wireless USB Adapter
WNL-U554 / WNL-U554A / WNL-U554M

natural_image
Woman in business attire using a laptop outdoors, stone steps in background (no visible text or symbols)Copyright
Copyright © 2011 by PLANET Technology Corp. All rights reserved. No part of this publication may be reproduced, transmitted, transcribed, stored in a retrieval system, or translated into any language or computer language, in any form or by any means, electronic, mechanical, magnetic, optical, chemical, manual or otherwise, without the prior written permission of PLANET.
PLANET makes no representations or warranties, either expressed or implied, with respect to the contents hereof and specifically disclaims any warranties, merchantability or fitness for any particular purpose. Any software described in this manual is sold or licensed "as is". Should the programs prove defective following their purchase, the buyer (and not PLANET, its distributor, or its dealer) assumes the entire cost of all necessary servicing, repair, and any incidental or consequential damages resulting from any defect in the software. Further, PLANET reserves the right to revise this publication and to make changes from time to time in the contents hereof without obligation to notify any person of such revision or changes.
All brand and product names mentioned in this manual are trademarks and/or registered trademarks of their respective holders.
Federal Communication Commission Interference Statement
This equipment has been tested and found to comply with the limits for a Class B digital device, pursuant to Part 15 of FCC Rules. These limits are designed to provide reasonable protection against harmful interference in a residential installation. This equipment generates, uses, and can radiate radio frequency energy and, if not installed and used in accordance with the instructions, may cause harmful interference to radio communications. However, there is no guarantee that interference will not occur in a particular installation. If this equipment does cause harmful interference to radio or television reception, which can be determined by turning the equipment off and on, the user is encouraged to try to correct the interference by one or more of the following measures:
- Reorient or relocate the receiving antenna.
- Increase the separation between the equipment and receiver.
- Connect the equipment into an outlet on a circuit different from that to which the receiver is connected.
- Consult the dealer or an experienced radio technician for help.
FCC Caution
To assure continued compliance. (Example - use only shielded interface cables when connecting to computer or peripheral devices). Any changes or modifications not expressly approved by the party responsible for compliance could void the user's authority to operate the equipment.
This device complies with Part 15 of the FCC Rules. Operation is subject to the Following two conditions: (1) This device may not cause harmful interference, and (2) this Device must accept any interference received, including interference that may cause undesired operation.
Federal Communication Commission (FCC) Radiation Exposure Statement
This equipment complies with FCC radiation exposure set forth for an uncontrolled environment. In order to avoid the possibility of exceeding the FCC radio frequency exposure limits, human proximity to the antenna shall not be less than 20 cm (8 inches) during normal operation.
CE mark Warning
This is a class B device, in a domestic environment; this product may cause radio interference, in which case the user may be required to take adequate measures.
R&TTE Compliance Statement
This equipment complies with all the requirements of DIRECTIVE 1999/5/CE OF THE EUROPEAN PARLIAMENT AND THE COUNCIL OF 9 March 1999 on radio equipment and telecommunication terminal Equipment and the mutual recognition of their conformity (R&TTE). The R&TTE Directive repeals and replaces in the directive 98/13/EEC (Telecommunications Terminal Equipment and Satellite Earth Station Equipment) As of April 8, 2000.
Safety
This equipment is designed with the utmost care for the safety of those who install and use it. However, special attention must be paid to the dangers of electric shock and static electricity when working with electrical equipment. All guidelines of this and of the computer manufacture must therefore be allowed at all times to ensure the safe use of the equipment.
EU Countries Intended for Use
The ETSI version of this device is intended for home and office use in Austria Belgium, Denmark, Finland, and France (with Frequency channel restrictions). Germany, Greece, Ireland, Italy, Luxembourg. The Netherlands, Portugal, Spain, Sweden and United Kingdom. The ETSI version of this device is also authorized for use in EFTA member states Iceland, Liechtenstein, Norway and Switzerland.
WEEE regulation

To avoid the potential effects on the environment and human health as a result of the presence of hazardous substances in electrical and electronic equipment, end users of electrical and electronic equipment should understand the meaning of the crossed-out wheeled bin symbol. Do not dispose of WEEE as unsorted municipal waste and have to collect such WEEE separately.
Revision
User's Manual for PLANET 802.11n Wireless USB Adapter
Model: WNL-U554 / WNL-U554A / WNL-U554M
Rev: 1.0 (March, 2011)
Part No. EM-WNLU554v5_U554M_v1.0 (2081-E23140-005)
CONTENTS
Chapter 1. Product Introduction ...... 5
1.1 Package contents 5
1.2 Product Features 5
1.3 Hardware Description 5
Chapter 2. Installation....6
2.1 Driver Installation....6
2.2 Connect to Wireless Access Point.... 10
2.2.1 PLANET 11n USB Wireless LAN Utility 10
2.2.2 Windows Zero Configuration.... 14
Chapter 3. PLANET USB Wireless LAN Utility.... 19
3.1 Connection Profile Management.... 19
3.1.1 Add a new profile....20
3.1.2 Remove an existing profile.... 22
3.1.3 Edit an existing profile 23
3.1.4 Make a copy of existing profile....24
3.1.5 Set as the default profile 25
3.2 General Information, Status, and Network Statistics 26
3.2.1 General Information 26
3.2.2 Status 27
3.2.3 Network Transmission Statistics.... 28
3.3 Miscellaneous Settings....29
3.4 Wi-Fi Protected Setup (WPS) 30
3.4.1 PIN Input Config (PIN) 31
3.4.2 Push Button Config (PBC) 33
Chapter 4. Soft Access Point.... 35
4.1 Switch between Access Point Mode and Station Mode.... 35
4.1.1 Configure SSID and Channel....37
4.1.2 Soft Access Point Security 38
4.2 Advanced Settings.... 40
4.3 Wireless Transmission Statistics 40
4.4 Internet Connection Sharing (ICS) 41
Chapter 1. Product Introduction
1.1 Package contents
The following items should be contained in the package:
▶ Wireless USB adapter
Quick Installation Guide
CD (includes driver/utility/user's manual)
Note: If there is any item missed or damaged, please contact the seller immediately.
1.2 Product Features
2.4GHz ISM band
➢ Compliant with IEEE 802.11b, IEEE 802.11g, IEEE 802.11n
➢ Provides up to 150Mbps download and 150Mbps upload data rate
Wi-Fi Protected Setup (WPS) support
Supports WEP 64/128-bit, WPA/WPA2, WPA-PSK/WPA2-PSK with TKIP/AES encryption
Supports Software AP mode
USB 2.0 attached interface
Mini-size Design
Supports most popular operating systems including Windows 2000, XP, Vista, Win7, Linux, and MAC OS X.
1.3 Hardware Description
There is a LED equipped on the wireless adapter. When the data is transmitting, the LED will be flashing.
Chapter 2. Installation
2.1 Driver Installation

- If you had ever installed other wireless adapters before, please uninstall the existed drivers and utilities first.
- The following installation is performed in Windows XP. The procedures in other OS are similar.
Before installing the driver and utility of wireless adapter, do not insert the device into the USB port of your computer.
Please follow the instructions below to install the USB Wireless Adapter:
Step 1. Insert the bundled CD into the CD-ROM drive. Then a webpage will appear. Click the "Windows Utility" hyperlink to initiate the installing wizard.
Step 2. Click "Next" button to start installing the driver and utility.
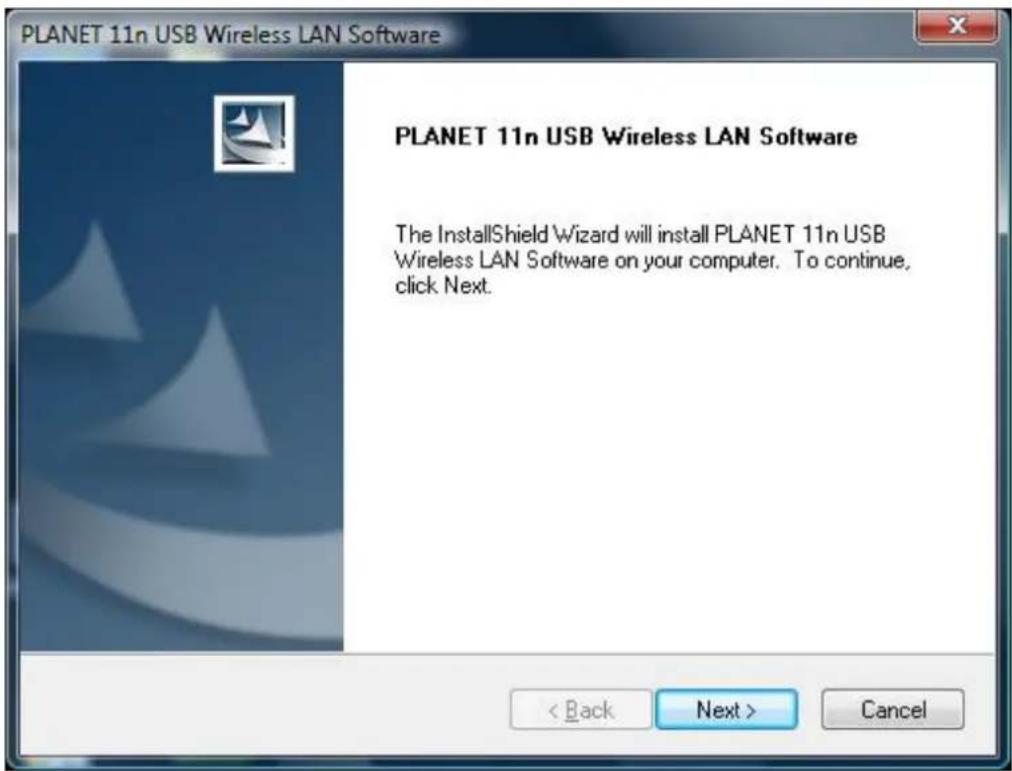
text_image
PLANET 11n USB Wireless LAN Software PLANET 11n USB Wireless LAN Software The InstallShield Wizard will install PLANET 11n USB Wireless LAN Software on your computer. To continue, click Next.
If the screen below appears during installation, please click "Continue Anyway" button to continue.
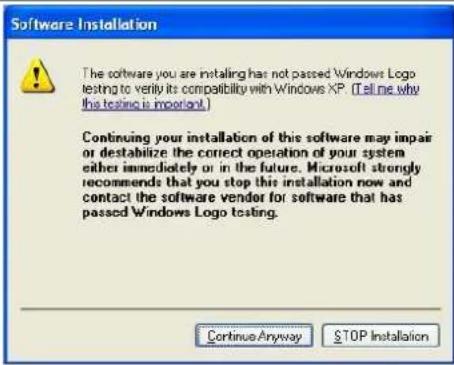
text_image
Software Installation The software you are installing has not passed Windows Logo testing to verify its compatibility with Windows XP. (Tell me why this testing is important.) Continuing your installation of this software may impair or destabilize the correct operation of your system either immediately or in the future. Microsoft strongly recommends that you stop this installation now and contact the software vendor for software that has passed Windows Logo testing. Continue Anyway STOP InstallationStep 3. After the software has been installed successfully, choose "Yes, I want to restart my computer now." and click "Finish" button to restart your computer.
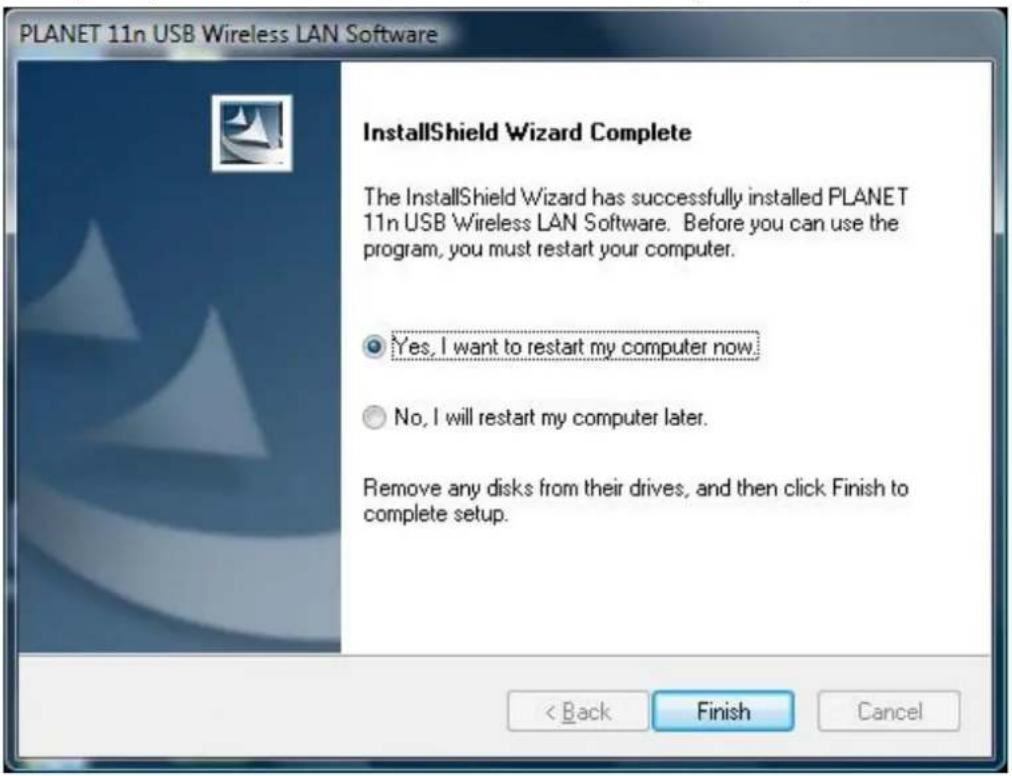
text_image
PLANET 11n USB Wireless LAN Software InstallShield Wizard Complete The InstallShield Wizard has successfully installed PLANET 11n USB Wireless LAN Software. Before you can use the program, you must restart your computer. Yes, I want to restart my computer now. No, I will restart my computer later. Remove any disks from their drives, and then click Finish to complete setup. < Back Finish CancelStep 4. After restarting the computer, insert the wireless adapter into an empty USB port of your computer. Never force to insert the adapter if you feel it get stuck. Flip the adapter over and try again. Then you'll see the following message pop-up at lower-right corner of the screen.

text_image
Found New Hardware Planet Wireless LAN 802.11n USB 2.0 Network Adapter 11:08 AMStep 5. The following window will be pop-up. Choose "No, not this time" and click "Next" button to continue.
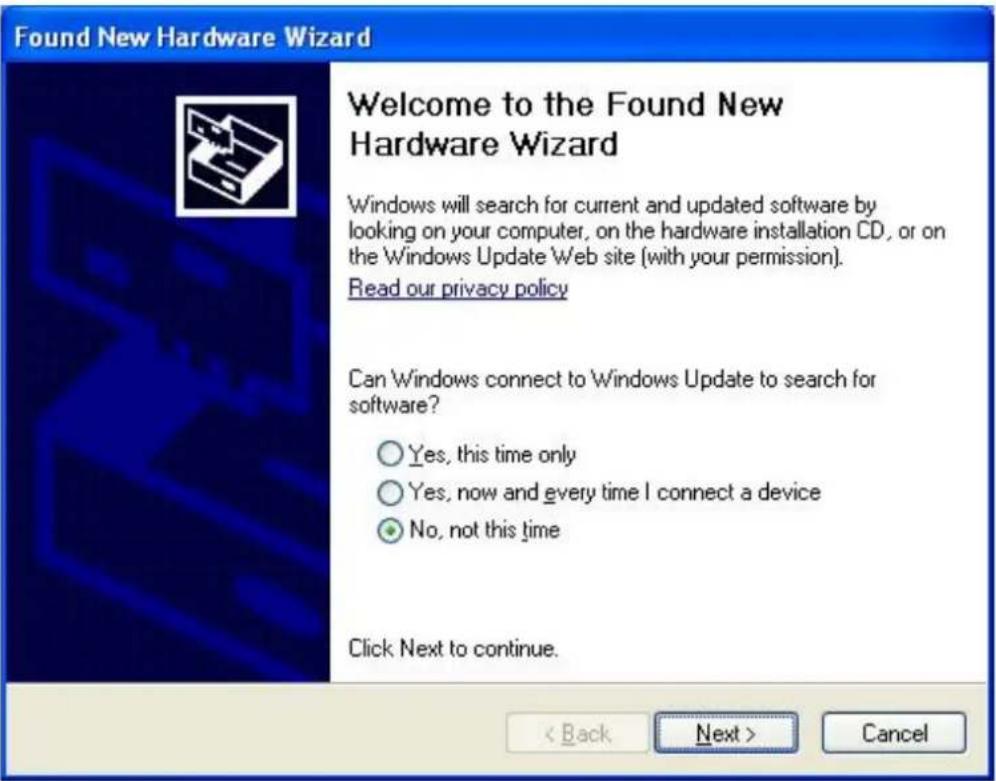
text_image
Found New Hardware Wizard Welcome to the Found New Hardware Wizard Windows will search for current and updated software by looking on your computer, on the hardware installation CD, or on the Windows Update Web site (with your permission). Read our privacy policy Can Windows connect to Windows Update to search for software? ○ Yes, this time only ○ Yes, now and every time I connect a device ● No, not this time Click Next to continue. < Back Next > CancelStep 6. Choose "Install the software automatically (Recommended)", and click "Next" button to install the driver.

text_image
Found New Hardware Wizard This wizard helps you install software for: Planet Wireless LAN 802.11n USB 2.0 Network Adapter If your hardware came with an installation CD or floppy disk, insert it now. What do you want the wizard to do? ○ Install the software automatically (Recommended) ○ Install from a list or specific location (Advanced) Click Next to continue. < Back Next > Cancel
If the screen below appears during installation, please click "Continue Anyway" button to continue.

text_image
Hardware Installation The software you are installing for this hardware: Planet Wireless LAN 802.11n USB 2.0 Network Adapter has not passed Windows Logo testing to verify its compatibility with Windows XP (Tell me who this testing is important.) Continuing your installation of this software may impair or destabilize the correct operation of your system either immediately or in the future. Microsoft strongly recommends that you stop this installation now and contact the hardware vendor for software that has passed Windows Logo testing. Continue Anyway STOP InstallationStep 7. Once the installation is finished, click "Finish" button.
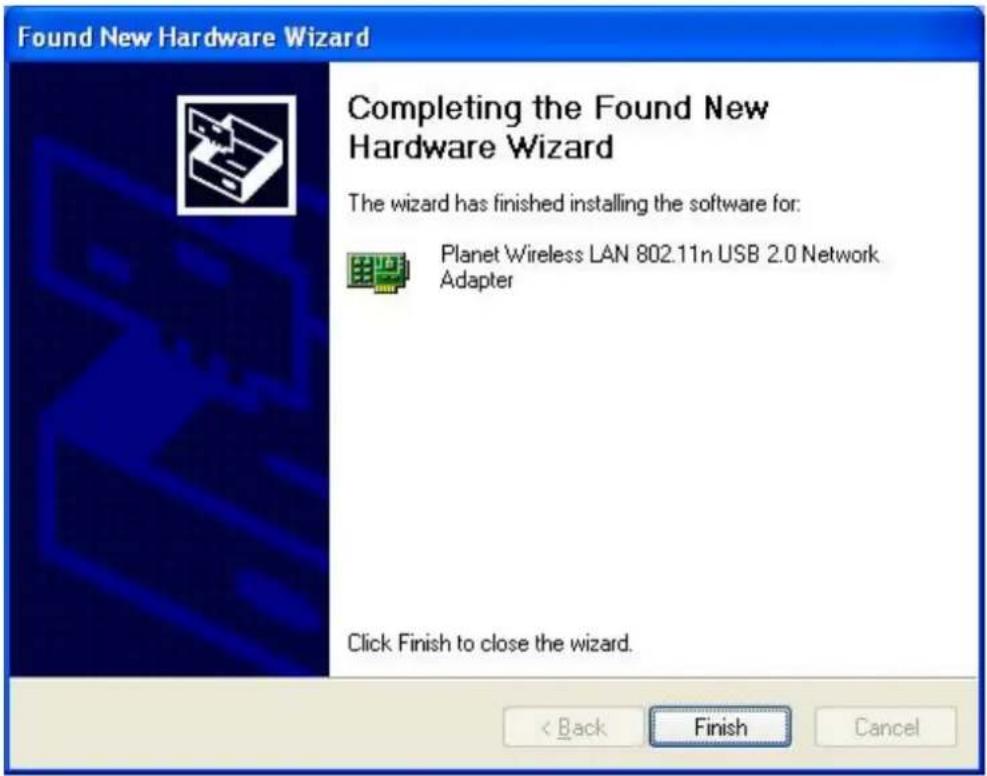
text_image
Found New Hardware Wizard Completing the Found New Hardware Wizard The wizard has finished installing the software for: Planet Wireless LAN 802.11n USB 2.0 Network Adapter Click Finish to close the wizard. < Back Finish CancelAfter the driver of wireless adapter has been installed successfully, you'll see another message pop-up at lower-right corner of the screen. And there is also a new icon appeared on the system tray.

text_image
Found New Hardware Your new hardware is installed and ready to use.Left-click the new icon will launch PLANET 11n USB Wireless LAN Utility, and right-click the icon will show the quick menu of configuration utility. This icon also uses different colors to show the status of wireless connection:

Wireless connection is established, good signal reception.

Wireless connection is established, weak signal reception.

Connection is not established yet.

Wireless network card is not detected.
2.2 Connect to Wireless Access Point
To use wireless network, you have to connect to a wireless access point first. You can either use PLANET 11n USB Wireless LAN Utility (comes with network adapter), or Windows Zero Config utility (comes with Windows operating system).
2.2.1 PLANET 11n USB Wireless LAN Utility
Please follow the instructions below to connect the wireless access point via PLANET 11n USB Wireless LAN Utility.
Step 1. Left-click the PLANET Wireless Utility icon located at lower-right corner of the screen, and configuration menu will appear:

Step 2. Click "Available Network" label. Please wait for a while, and all wireless access points nearby which can be reached by the wireless adapter will be displayed here.
If the wireless access point you wish to connect does not appear here, you can click "Refresh" button to scan for wireless access points again; if the wireless access point you're looking for still not appear, try to move the computer closer to the access point.

text_image
PLANET 11n USB Wireless LAN Utility Refresh(R) Mode(M) About(A) MyComputer PLANET Wireless General Profile Available Network Status Statistics Wi-Fi Protect Setup Available Network(s) SSID Channel Encryption Network Authentication Signal 5460AP 1 None Unknown 48% Ir IAP-2000 1 None Unknown 26% Ir PLANET 4 AES WPA2 Pre-Shared Key 100% Ir default 6 None Unknown 100% Ir 1 11 None Unknown 26% IE 3333 11 TKIP/AES WPA Pre-Shared Key/... 26% Ir 5460AP 11 None Unknown 42% Ir Refresh Add to Profile Note Double click on item to join/create profile. Show Tray Icon Radio Off Disable Adapter Windows Zero Config CloseStep 3. When the access point you're looking for is on the list, left-click it and then double click it or click "Add to Profile".
Step 4. If a password (Network Key) is required to access the wireless access point, please input it in "Network key" field, and input it again in "Confirm network key" field for confirmation. Click "OK" after the password is already properly inputted.

Network security option ("Network Authentication" and "Data encryption") will be selected automatically based on the security setting of the wireless access point you selected. It's not necessary to change these settings by your own self.
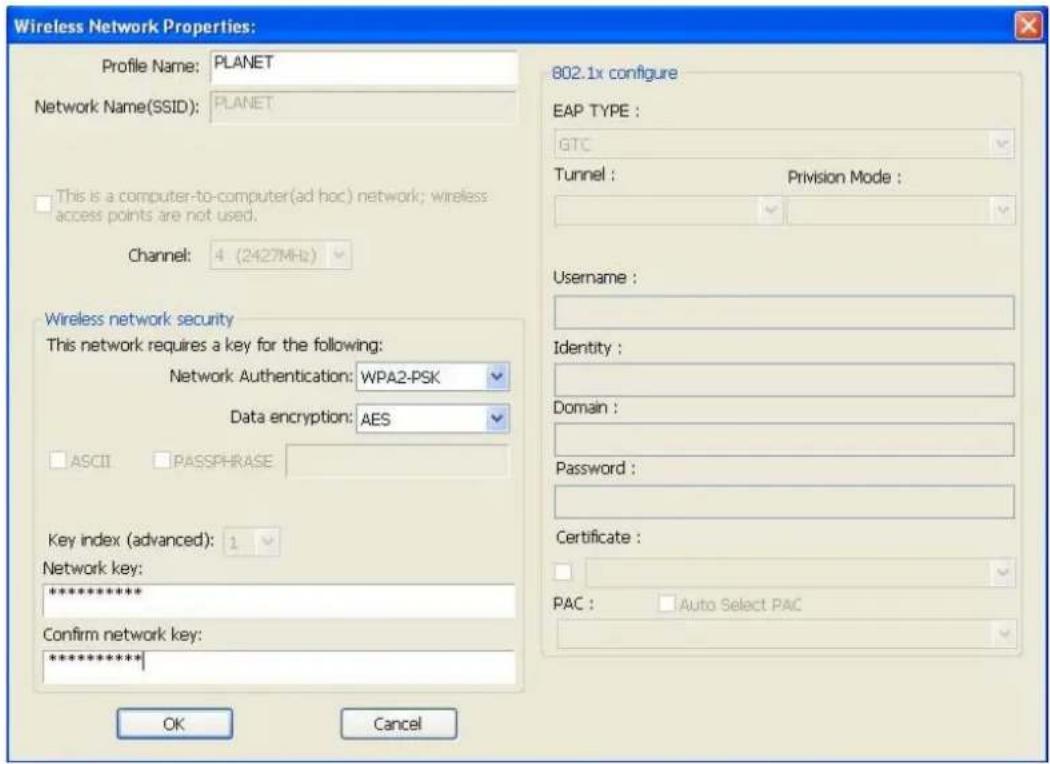
text_image
Wireless Network Properties: Profile Name: PLANET Network Name(SSID): PLANET This is a computer-to-computer(ad hoc) network; wireless access points are not used. Channel: 4 (2427MHz) Wireless network security This network requires a key for the following: Network Authentication: WPA2-PSK Data encryption: AES ASCII PASSPHRASE Key index (advanced): 1 Network key: ********** Confirm network key: ********** OK Cancel 802.1x configure EAP TYPE : GTC Tunnel : Provision Mode : Username : Identity : Domain : Password : Certificate : PAC : Auto Select PACAll options in this page will be filled automatically according to the access point you wish to add to profile. However, you can still modify any of them to meet your requirement.
| Profile name | You can give a name to this profile, so you can remember its purpose easily. It can be any phrase to help you remember. |
| Network Name (SSID) | The SSID (Service Set IDentifier, i.e. access point's name). This field will be filled as the access point you selected when SSID is not hidden and grayed out. If SSID is hidden, you have to input correct SSID you yourself. |
| This is a computer-to-computer (ad-hoc) network | Check this box if you wish to connect to another computer / network device by ad-hoc method. When not accessing to wireless access point, you have to check this box. |
| Channel | Select wireless channel for ad hoc connection. This option only appears when you're using ad-hoc connection. |
| Network Authentication | Select the network authentication type from drop-down menu. This setting must be identical with the setting of wireless access point you with to connect. |
| Data encryption | Select the data encryption type from drop-down menu. This setting must be identical with the setting of wireless access point you with to connect. |
| ASCII / PASSPHRASE | When the encryption type is “WEP”, it's required to input a set of “passphrase” to connect to wireless access point. Check “ASCII” or “PASSPHRASE” depends on the security setting of access point, and input it in the box; if you select“PASSPHRASE” you also need to select the length of the key.The passphrase must be identical with the setting of wireless access point you with to connect. |
| Key index | Select WEP key index. For most of access points you can select “1”, but please refer to the setting of the access point. |
| Network key / Confirm network key | When the encryption type is “WPA” or “WPA2-PSK”, it’s required to input a set of “passphrase” to connect to wireless access point. Please input the same passphrase in two boxes for confirmation. |
| EAP TYPE / Tunnel / Provision Mode | When authentication type is any of 802.1X, you have to select EAP type, tunnel, and provision mode from dropdown menu. This setting must be identical with your 802.1x authentication server. |
| Username / Identity / Domain / Password | Please input 802.1x related authentication information here. |
| Certificate | If certification is required to authenticate with 802.1x authentication server, please select a local certificate from dropdown list. |
| PAC | Check this box and PAC (Privilege Access Certificate) will be automatically selected. |
Please click "OK" when ready.
Step 5. Wireless adapter will attempt to connect to access point, this may require few seconds to minutes. When the "Status" become "Associated", your computer is connected to access point you selected. Click "Close" to close configuration window.
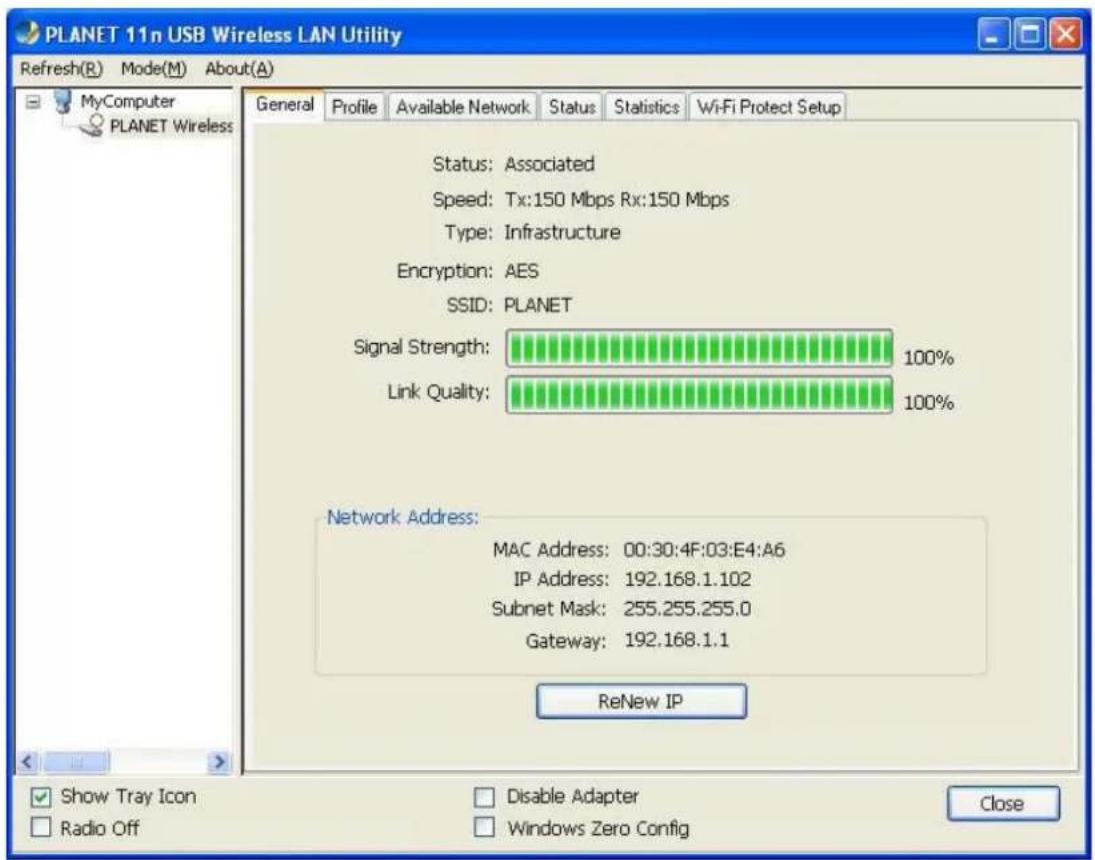
text_image
PLANET 11n USB Wireless LAN Utility Refresh(R) Mode(M) About(A) General Profile Available Network Status Statistics Wi-Fi Protect Setup Status: Associated Speed: Tx:150 Mbps Rx:150 Mbps Type: Infrastructure Encryption: AES SSID: PLANET Signal Strength: 100% Link Quality: 100% Network Address: MAC Address: 00:30:4F:03:E4:A6 IP Address: 192.168.1.102 Subnet Mask: 255.255.255.0 Gateway: 192.168.1.1 ReNew IP Show Tray Icon Radio Off Disable Adapter Windows Zero Config Close
If you connected to an access point but the connection was dropped soon, please check security settings and re-check password spelling.
2.2.2 Windows Zero Configuration
Windows XP / Vista / 7 has a built-in wireless network configuration utility, called as "Windows Zero Configuration" (WZC). You can also use WZC to configure your wireless network parameter:
Step 1. Right-click PLANET Wireless Utility icon, and click "Open Config Utility".
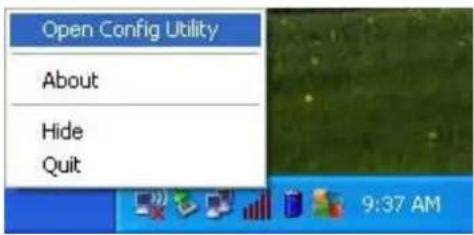
text_image
Open Config Utility About Hide Quit 9:37 AMStep 2. Check "Windows Zero Config" box.

text_image
PLANET 11n USB Wireless LAN Utility Refresh(R) Mode(M) About(A) General Profile Available Network Status Statistics Wi-Fi Protect Setup Status: Not Associated Speed: N/A Type: N/A Encryption: N/A SSID: Signal Strength: Link Quality: Network Address: MAC Address: 00:30:4F:03:E4:A6 IP Address: 0.0.0.0 Subnet Mask: 0.0.0.0 Gateway: ReNew IP Show Tray Icon Radio Off Disable Adapter Windows Zero Config CloseStep 3. There is message appeared indicating that you've been already switched to Windows Zero Config mode.
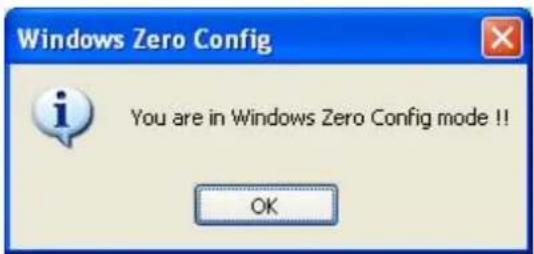
text_image
Windows Zero Config You are in Windows Zero Config mode !!
To return to use PLANET wireless utility, uncheck "Windows Zero Config" box.
Step 4. Click "Start" button (should be located at the bottom-left corner of windows desktop), click "Control Panel", then click "Network and Internet Connections" in Control Panel.

text_image
Control Panel File Edit View Favorites Tools Help Back Search Folders Address Control Panel Control Panel Switch to Classic View See Also Windows Update Help and Support Other Control Panel Options Pick a category Appearance and Themes Printers and Other Hardware Network and Internet Connections User Accounts Add or Remove Programs Date, Time, Language, and Regional Options Sounds, Speech, and Audio Devices Accessibility Options Performance and Maintenance Security CenterStep 5. Double click "Network Connections".

text_image
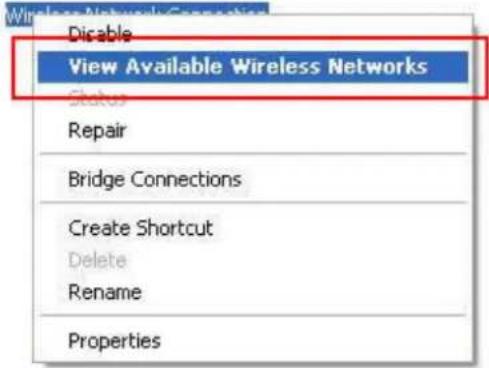
Network and Internet Connections File Edit View Favorites Tools Help Back Search Folders Address Network and Internet Connections Go See Also My Network Places Printers and Other Hardware Remote Desktop Phone and Modem Options Troubleshooters Home or Small Office Networking Internet Explorer Network Diagnostics Network and Internet Connections Pick a task... Set up or change your Internet connection Create a connection to the network at your workplace Set up or change your home or small office network Set up a wireless network for a home or small office Change Windows Firewall settings or pick a Control Panel icon Internet Options Network Connections Network Setup Wizard Windows Firewall Wireless Network Setup WizardStep 6. Right-click "Wireless Network Connection" (it may have a number as suffix if you have more than one wireless network adapter, please make sure you right-click the PLANET Wireless LAN 802.11n USB Network Adapter), then select "View Available Wireless Networks".

Local Area Connection 2

Local Area Connection

text_image
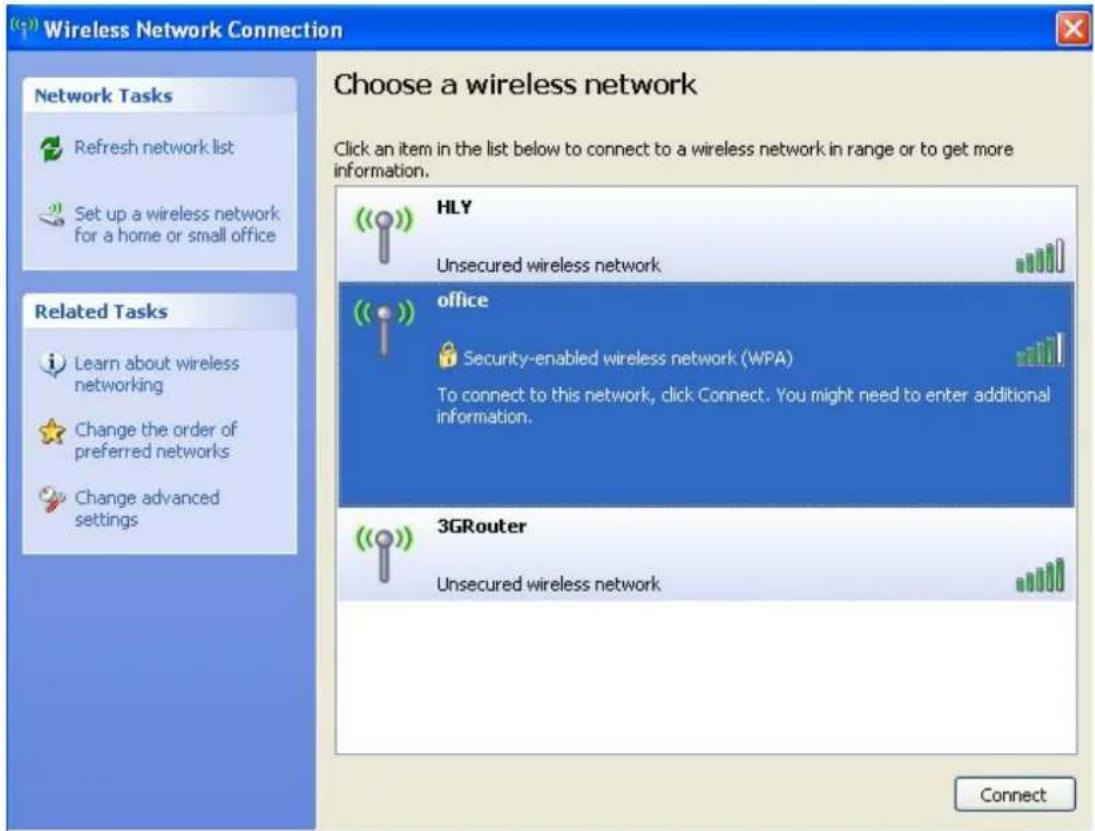
Disable View Available Wireless Networks Status Repair Bridge Connections Create Shortcut Delete Rename PropertiesStep 7. All wireless access points in proximity will be displayed here. If the access point you want to use is not displayed here, please try to move your computer closer to the access point, or you can click "Refresh network list" to rescan access points. Click the access point you want to use if it's shown, then click "Connect".
text_image
Wireless Network Connection Choose a wireless network Click an item in the list below to connect to a wireless network in range or to get more information. Network Tasks Refresh network list Set up a wireless network for a home or small office Related Tasks Learn about wireless networking Change the order of preferred networks Change advanced settings HLY Unsecured wireless network office Security-enabled wireless network (WPA) To connect to this network, click Connect. You might need to enter additional information. 3GRouter Unsecured wireless network ConnectStep 8. If the access point is protected by encryption, you have to input its Network key or passphrase here. It must match the encryption setting on the access point. If the access point you selected does not use encryption, you'll not be prompted for network key or passphrase.

text_image
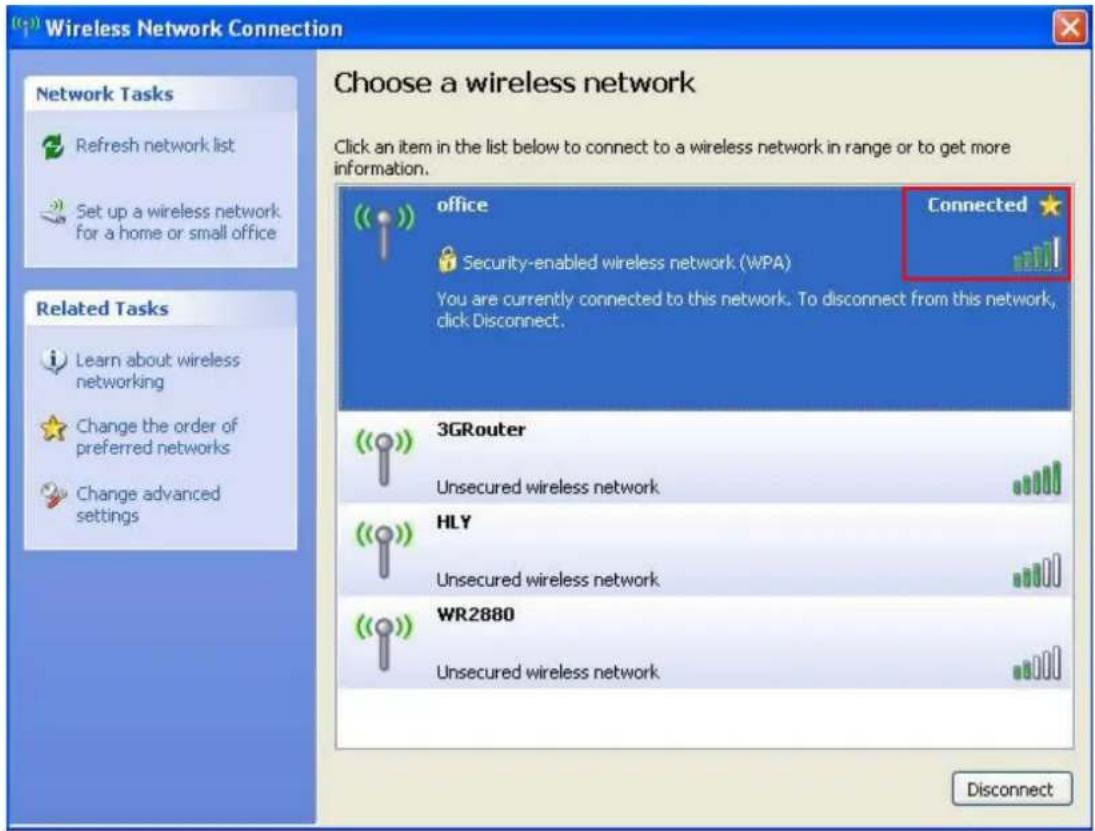
Wireless Network Connection The network 'office' requires a network key (also called a WEP key or WPA key). A network key helps prevent unknown intruders from connecting to this network. Type the key, and then click Connect. Network key: Confirm network key: Connect CancelStep 9. If you can see "Connected" message, the connection between your computer and wireless access point you selected is successfully established.
text_image
Wireless Network Connection Choose a wireless network Click an item in the list below to connect to a wireless network in range or to get more information. Office Connected Security-enabled wireless network (WPA) You are currently connected to this network. To disconnect from this network, click Disconnect. Related Tasks Learn about wireless networking Change the order of preferred networks Change advanced settings 3GRouter Unsecured wireless network HLY Unsecured wireless network WR2880 Unsecured wireless network DisconnectChapter 3. PLANET USB Wireless LAN Utility
3.1 Connection Profile Management
If you need to connect to different wireless access points at different time, like access point at home, office, cyber-cafe, or public wireless service, you can save the connection parameters (encryption, passphrase, security, etc.) as profiles for every access point, so you don't have to input these parameters every time when you want to connect to the specific wireless access point.
To manage profiles, right-click the PLANET wireless utility icon located at lower-right corner of the screen, then click "Open Config Utility".

text_image
Open Config Utility About Hide Quit 9:37 AMClick the "Profile" label.
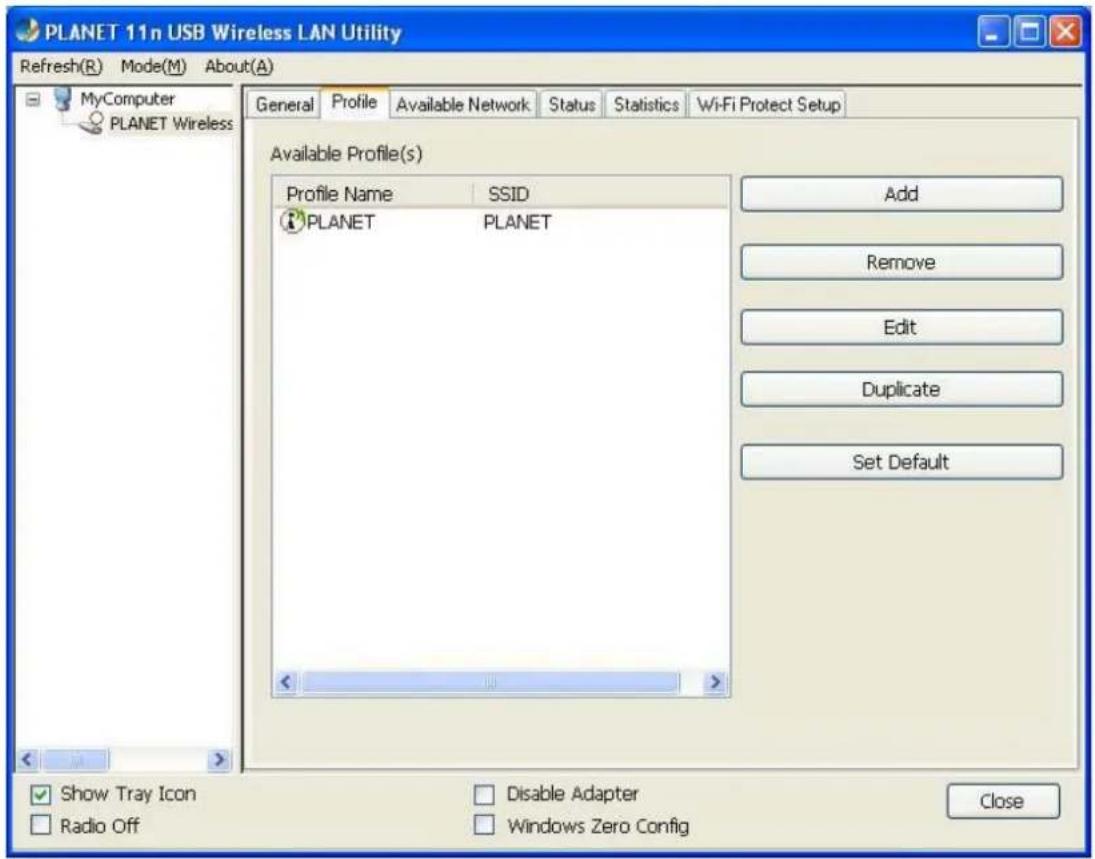
text_image
PLANET 11n USB Wireless LAN Utility Refresh(R) Mode(M) About(A) General Profile Available Network Status Statistics Wi-Fi Protect Setup Available Profile(s) Profile Name SSID PLANET PLANET Add Remove Edit Duplicate Set Default Show Tray Icon Radio Off Disable Adapter Windows Zero Config Close3.1.1 Add a new profile
You can setup the connection parameters for the specific wireless access point in advance. If you want to create a new profile, click "Add" button.

text_image
PLANET 11n USB Wireless LAN Utility Refresh(R) Mode(M) About(A) General Profile Available Network Status Statistics Wi-Fi Protect Setup MyComputer PLANET Wireless Available Profile(s) Profile Name SSID PLANET PLANET Add Remove Edit Duplicate Set Default Show Tray Icon Radio Off Disable Adapter Windows Zero Config CloseYou'll be prompted to input connection parameters for the wireless access point you wish to connect:
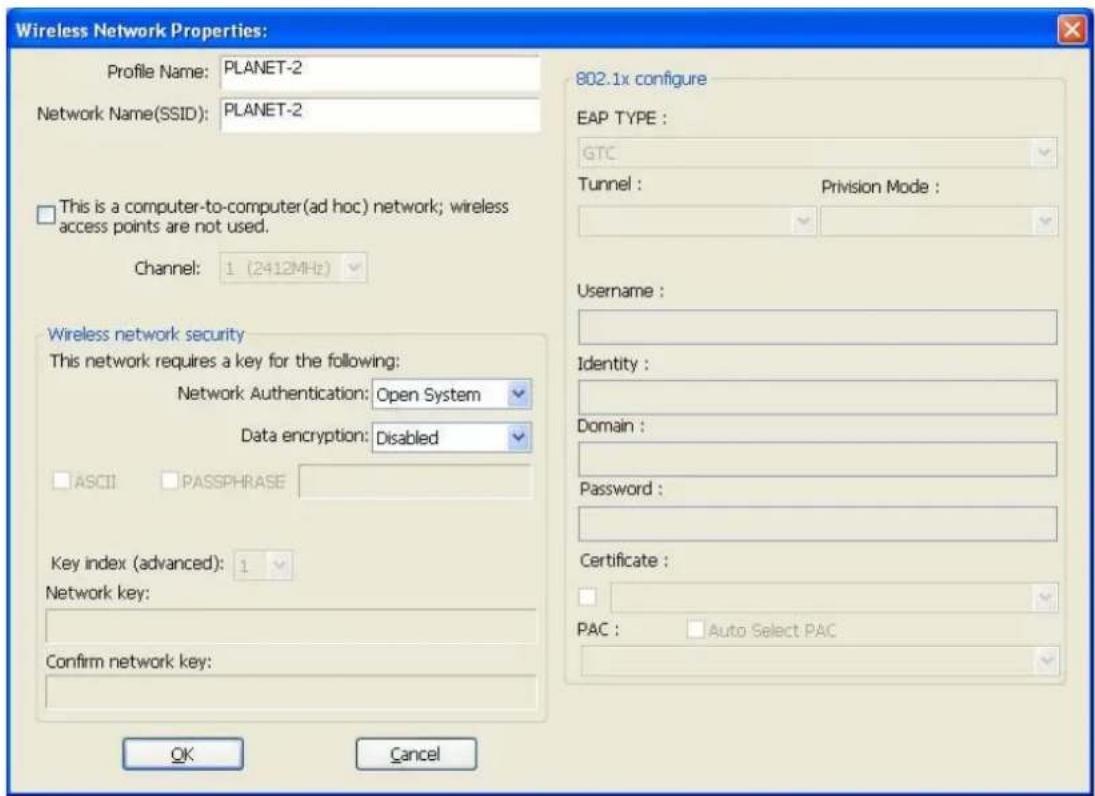
text_image
Wireless Network Properties: Profile Name: PLANET-2 Network Name(SSID): PLANET-2 This is a computer-to-computer(ad hoc) network; wireless access points are not used. Channel: 1 (2412MHz) Wireless network security This network requires a key for the following: Network Authentication: Open System Data encryption: Disabled ASCII PASSPHRASE Key index (advanced): 1 Network key: Confirm network key: 802.1x configure EAP TYPE : GTC Tunnel : Provision Mode : Username : Identity : Domain : Password : Certificate : PAC : Auto Select PAC OK CancelRequired parameters are as follows:
| Profile name | You can give a name to this profile, so you can remember its purpose easily. It can be any phrase to help you remember. |
| Network Name (SSID) | The SSID (Service Set IDentifier, i.e. access point"s name). This must be identical with the SSID of the access point you wish to connect. |
| This is a computer-to-computer (ad-hoc) network | Check this box if you wish to connect to another computer / network device by ad-hoc method. When not accessing to wireless access point, you have to check this box. |
| Channel | Select wireless channel for ad hoc connection. This option only appears when you're using ad-hoc connection. |
| Network Authentication | Select the network authentication type from drop-down menu. This setting must be identical with the setting of wireless access point you with to connect. |
| Data encryption | Select the data encryption type from drop-down menu. This setting must be identical with the setting of wireless access point you with to connect. |
| ASCII / PASSPHRASE | When the encryption type is “WEP”, it's required to input a set of “passphrase” to connect to wireless access point. Check “ASCII” or “PASSPHRASE” depends on the security setting of access point, and input it in the box; if you select “PASSPHRASE” you also need to select the length of the key.The passphrase must be identical with the setting of wireless access point you with to connect. |
| Key index | Select WEP key index. For most of access points you can select “1”, but please refer to the setting of the access point. |
| Network key / Confirm network key | When the encryption type is “WPA” or “WPA2-PSK”, it's required to input a set of “passphrase” to connect to wireless access point. Please input the same passphrase in two boxes for confirmation. |
| EAP TYPE / Tunnel / Provision Mode | When authentication type is any of 802.1X, you have to select EAP type, tunnel, and provision mode from dropdown menu. This setting must be identical with your 802.1x authentication server. |
| Username / Identity / Domain / Password | Please input 802.1x related authentication information here. |
| Certificate | If certification is required to authenticate with 802.1x authentication server, please select a local certificate from dropdown list. |
| PAC | Check this box and PAC (Privilege Access Certificate) will be automatically selected. |
When all required parameters are set, click "OK" to create and save a new profile.
3.1.2 Remove an existing profile
If you want to remove a profile no longer needed, click "Profile" label, then select the existing profile you wish to remove, and click "Remove" button.
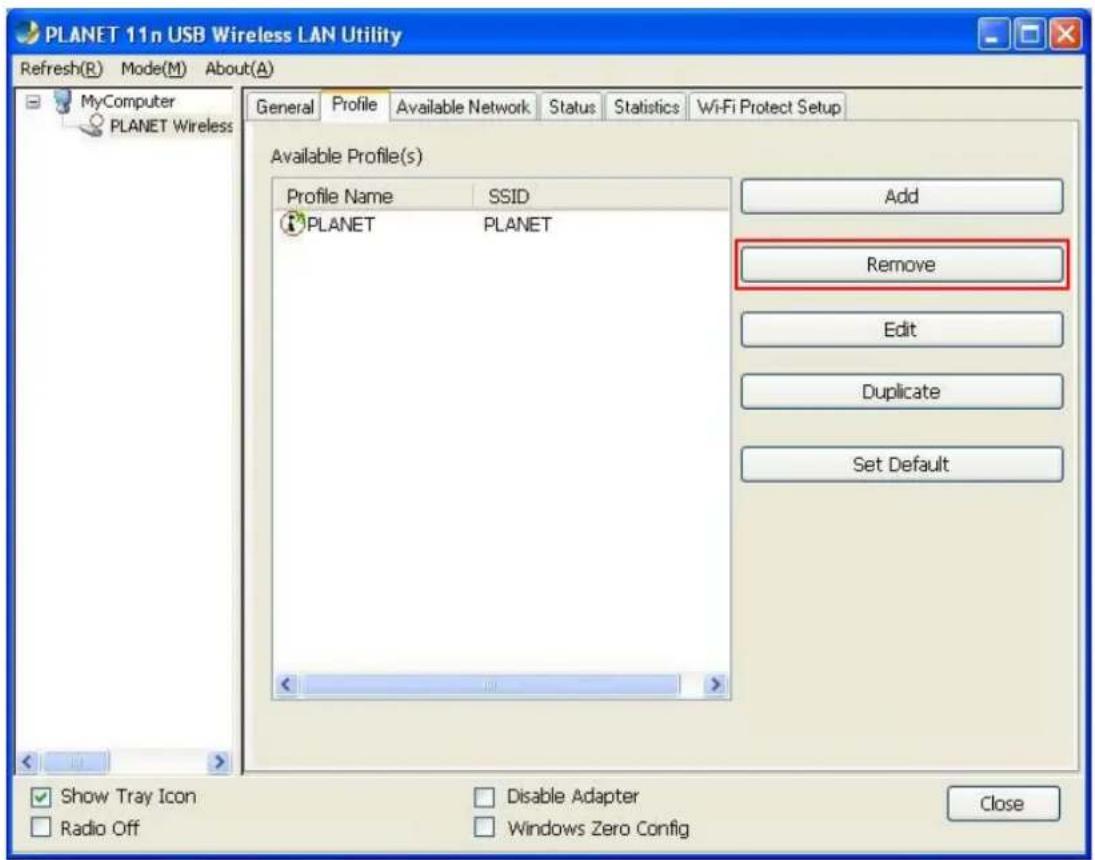
text_image
PLANET 11n USB Wireless LAN Utility Refresh(R) Mode(M) About(A) General Profile Available Network Status Statistics Wi-Fi Protect Setup MyComputer PLANET Wireless Available Profile(s) Profile Name SSID PLANET PLANET Add Remove Edit Duplicate Set Default Show Tray Icon Radio Off Disable Adapter Windows Zero Config Close3.1.3 Edit an existing profile
If you have added a profile before, and now you wish to change the settings of the profile, you can use this function. Please select the profile from the list first, then click "Edit" button. The contents of the selected profile will appear. After editing them, you can click "OK" to save changes, or click "Cancel" to discard changes.
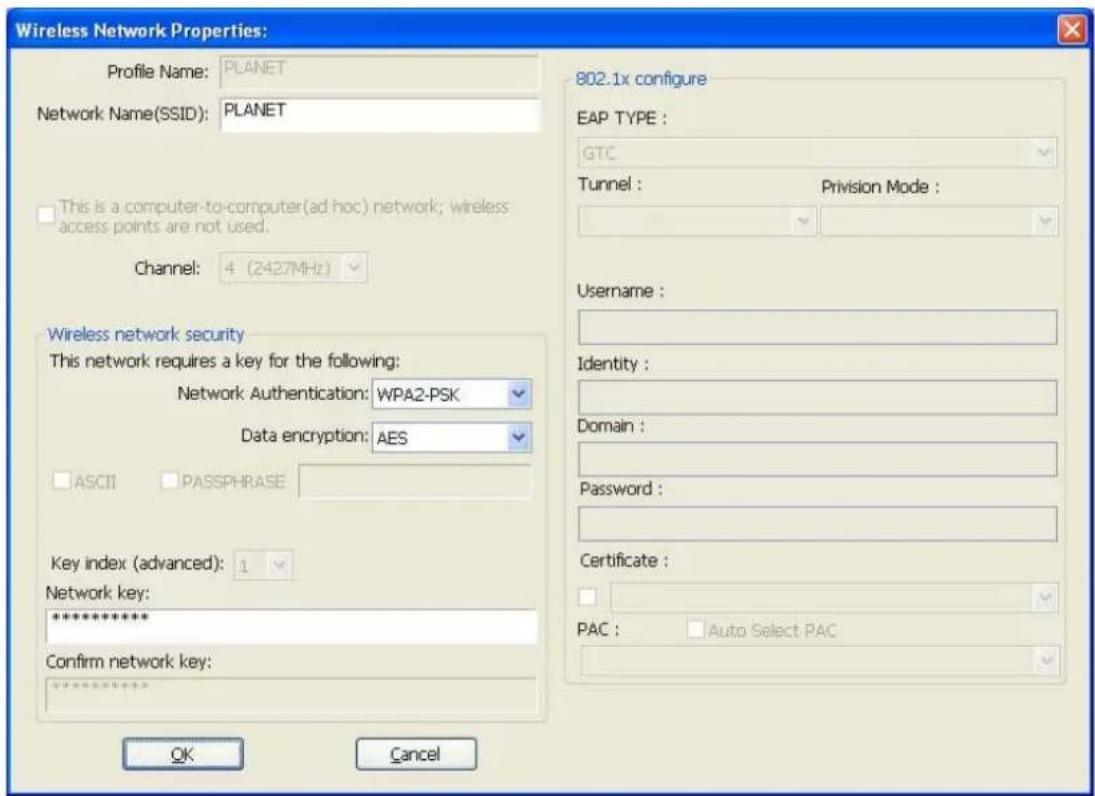
text_image
Wireless Network Properties: Profile Name: PLANET Network Name(SSID): PLANET This is a computer-to-computer(ad hoc) network; wireless access points are not used. Channel: 4 (2427MHz) Wireless network security This network requires a key for the following: Network Authentication: WPA2-PSK Data encryption: AES ASCII PASSPHRASE Key index (advanced): 1 Network key: ********** Confirm network key: OK Cancel 802.1x configure EAP TYPE : GTC Tunnel : Provision Mode : Username : Identity : Domain : Password : Certificate : PAC : Auto Select PAC3.1.4 Make a copy of existing profile
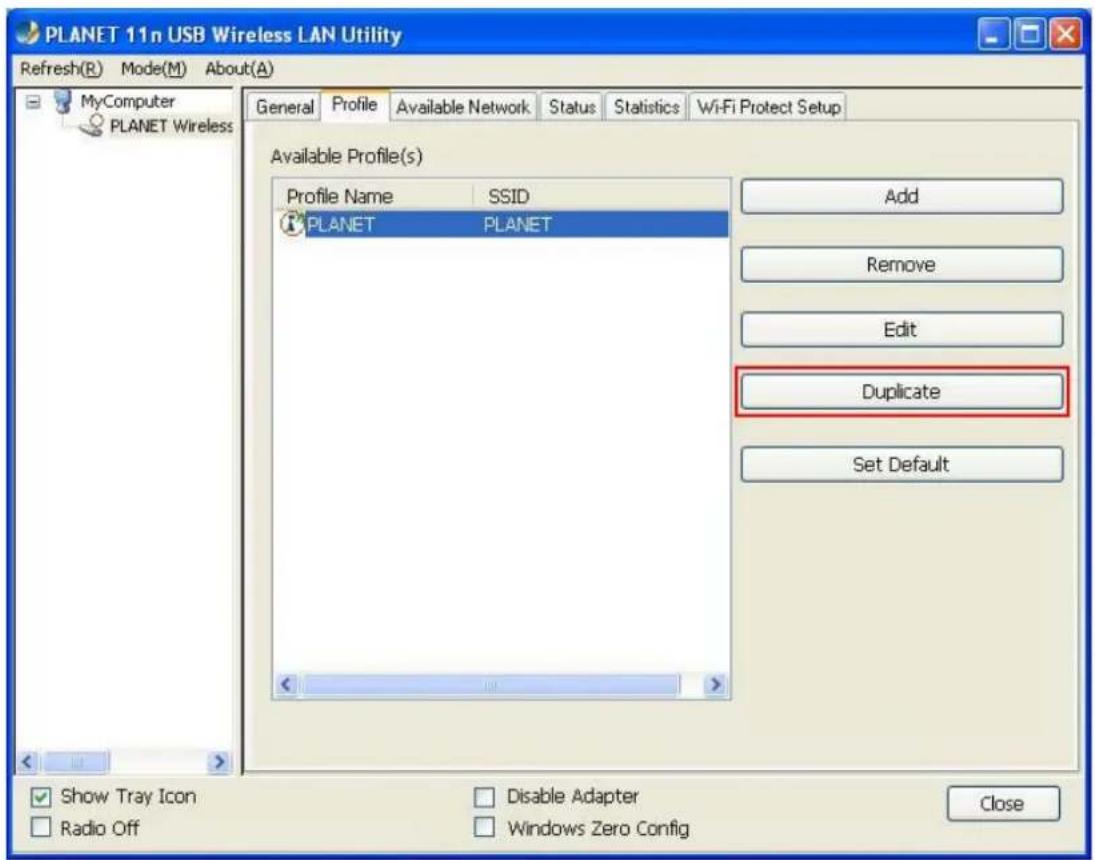
If you need to create a new profile which parameters are similar to any existing profile, you can make a copy of a specific profile and edit the copy to save as a new profile.
To do this, select an existing profile, then click "Duplicate" button.
text_image
PLANET 11n USB Wireless LAN Utility Refresh(R) Mode(M) About(A) MyComputer PLANET Wireless General Profile Available Network Status Statistics Wi-Fi Protect Setup Available Profile(s) Profile Name SSID PLANET PLANET Add Remove Edit Duplicate Set Default Show Tray Icon Radio Off Disable Adapter Windows Zero Config CloseYou'll be prompted to input a new profile name. Please use an identical name that does not exist in the profile list.
3.1.5 Set as the default profile
If you wish to use a specific profile as the default wireless connection, you can select the profile in the list, and click "Set Default". The selected profile will become default selection and PLANET wireless utility will attempt to connect to the selected access point.

text_image
PLANET 11n USB Wireless LAN Utility Refresh(R) Mode(M) About(A) General Profile Available Network Status Statistics Wi-Fi Protect Setup MyComputer PLANET Wireless Available Profile(s) Profile Name SSID PLANET PLANET Add Remove Edit Duplicate Set Default Show Tray Icon Radio Off Disable Adapter Windows Zero Config Close3.2 General Information, Status, and Network Statistics
The PLANET wireless utility provides the detailed information about the wireless connection you're using.
3.2.1 General Information
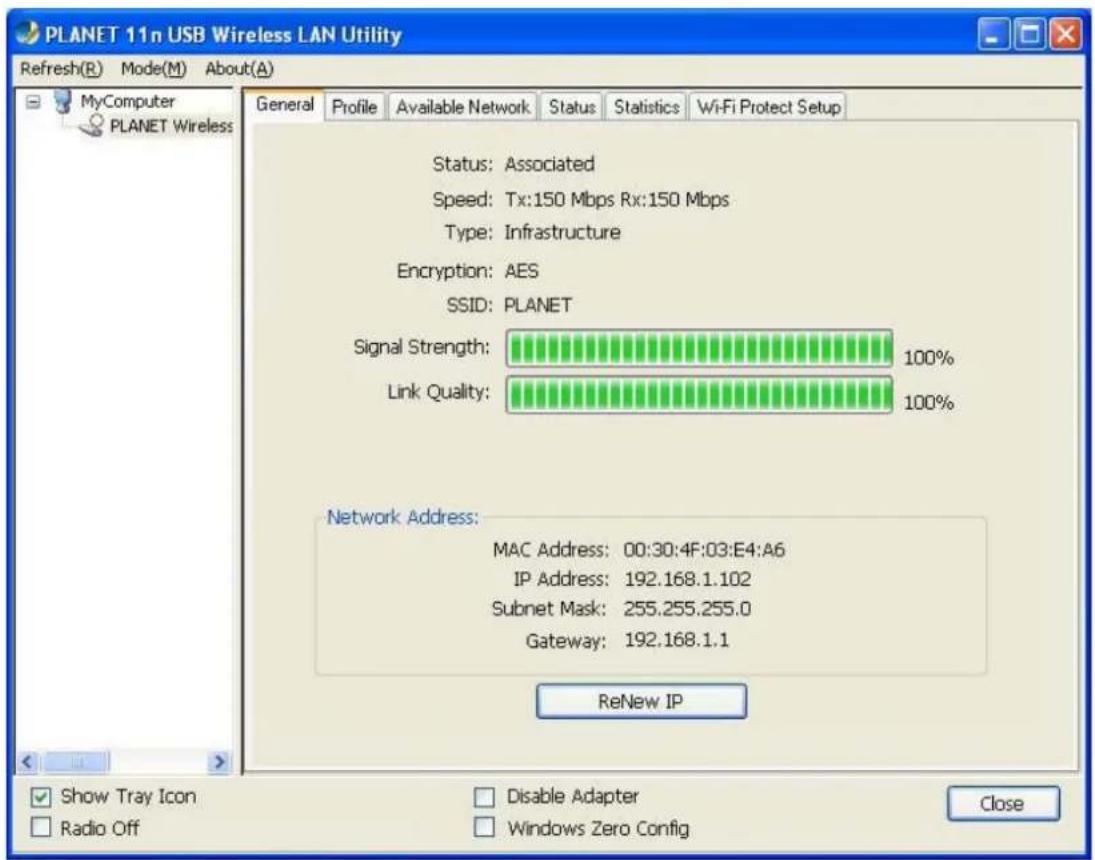
If you want to know the general information of the access point you're connecting to, click "General" label:
text_image
PLANET 11n USB Wireless LAN Utility Refresh(R) Mode(M) About(A) General Profile Available Network Status Statistics Wi-Fi Protect Setup Status: Associated Speed: Tx:150 Mbps Rx:150 Mbps Type: Infrastructure Encryption: AES SSID: PLANET Signal Strength: 100% Link Quality: 100% Network Address: MAC Address: 00:30:4F:03:E4:A6 IP Address: 192.168.1.102 Subnet Mask: 255.255.255.0 Gateway: 192.168.1.1 ReNew IP Show Tray Icon Radio Off Disable Adapter Windows Zero Config CloseAll general information like signal strength and link quality will be displayed here. The information is very useful when you encounter some problems in connecting to access point.
If you wish to get a new IP address from DHCP server, you can click "ReNew IP" button.
3.2.2 Status
If you want to know the status of your wireless network card, click "Status" label:

text_image
PLANET 11n USB Wireless LAN Utility Refresh(R) Mode(M) About(A) General Profile Available Network Status Statistics Wi-Fi Protect Setup Manufacturer PLANET NDIS Driver Version 1012.1.131.2011 Short Radio Header Yes Encryption AES Authenticate WPA2-PSK Channel Set ETSI MAC Address 00:30:4F:03:E4:A6 Data Rate (AUTO) Tx:150 Mbps Rx:150 Mbps Channel (Frequency) 1 (2412 MHz) Status Associated SSID PLANET Network Type Infrastructure Power Save Mode None Associated AP MAC 00:30:4F:DF:21:F2 Up Time (hh:mm:ss) 0:39:07 Show Tray Icon Disable Adapter Radio Off Windows Zero Config Close3.2.3 Network Transmission Statistics
To view the statistical data of wireless adapter, click "Statistics" label, and the statistics of wireless connection will be displayed:

text_image
PLANET 11n USB Wireless LAN Utility Refresh(R) Mode(M) About(A) General Profile Available Network Status Statistics Wi-Fi Protect Setup MyComputer PLANET Wireless Counter Name Value Tx OK 1504 Tx Error 0 Rx OK 2406 Rx Packet Count 2406 Rx Retry 65 Rx ICV Error 0 Reset Show Tray Icon Disable Adapter Radio Off Windows Zero Config CloseAll connection-related statistics is displayed here. You can click "Reset" button to reset the statistics of all items back to 0.
3.3 Miscellaneous Settings
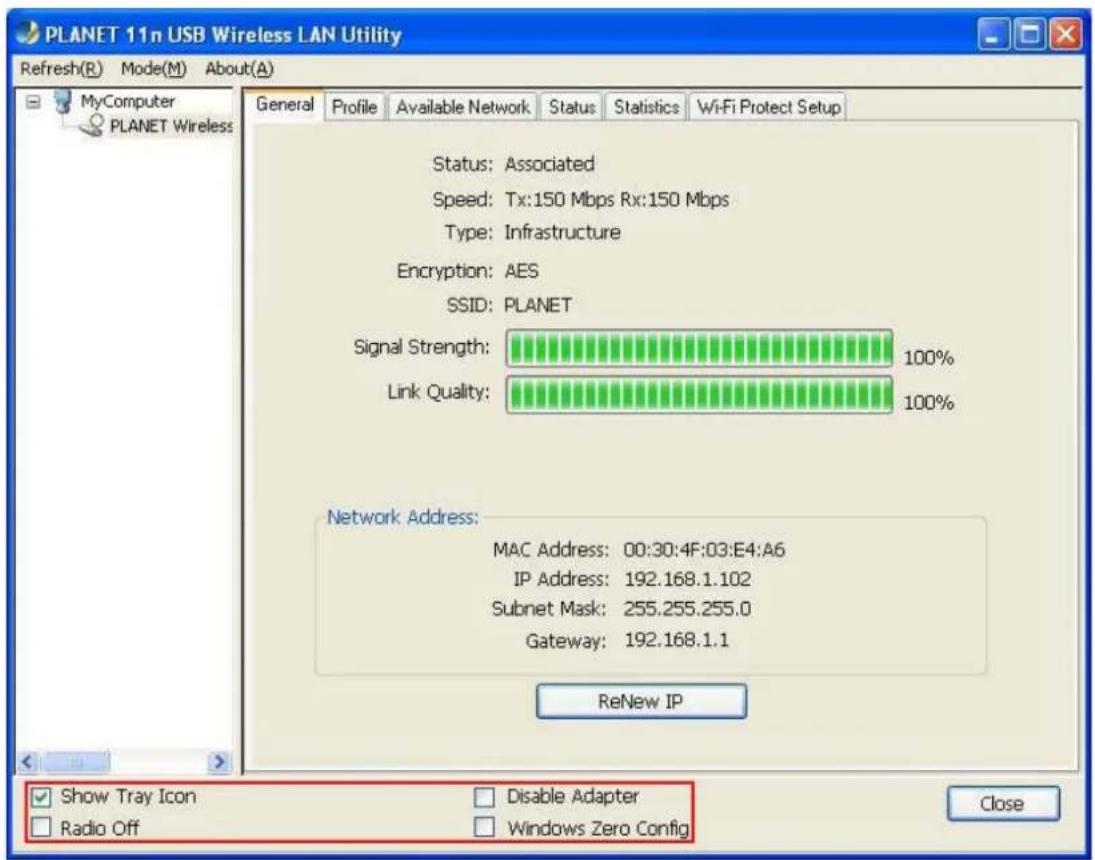
There are some other functions provided by PLANET wireless utility, and you can access these functions from the bottom of configuration window:
text_image
PLANET 11n USB Wireless LAN Utility Refresh(R) Mode(M) About(A) General Profile Available Network Status Statistics Wi-Fi Protect Setup Status: Associated Speed: Tx:150 Mbps Rx:150 Mbps Type: Infrastructure Encryption: AES SSID: PLANET Signal Strength: 100% Link Quality: 100% Network Address: MAC Address: 00:30:4F:03:E4:A6 IP Address: 192.168.1.102 Subnet Mask: 255.255.255.0 Gateway: 192.168.1.1 ReNew IP Show Tray Icon Radio Off Disable Adapter Windows Zero Config CloseThe descriptions of the function are listed as follow:
| Show Tray Icon | Check this box to show an icon on system tray. Uncheck this box to hide it. |
| Radio Off | Switch wireless radio off. Wireless network functionalities are disabled. |
| Disable Adapter | Disable wireless adapter. All functionalities of configuration menu will disappear. To resume, uncheck “Disable Adapter”. |
| Windows Zero Config | Use Windows Zero Configuration to manage wireless connections. See chapter 2.2.2. |
3.4 Wi-Fi Protected Setup (WPS)
Wi-Fi Protected Setup (WPS) is the latest wireless network technology which makes setting up wireless network more quickly and easily. If you have WPS-supported wireless access point, and you want to establish a secure connection to it, you don't have to configure the wireless access point and setup data encryption by your own self.
There are two kinds of WPS method supported, "PIN Input Config (PIN)" and "Push Button Config (PBC)". Please follow the instructions below to establish the secure connection between WPS-supported wireless access point and the PLANET wireless adapter.
Step 1. Right-click PLANET wireless utility icon, and click "Open Config Utility".

text_image
Open Config Utility About Hide Quit 9:37 AMStep 2. Click "Wi-Fi Protect Setup" label.
Step 3. You can choose which WPS method to use, PIN Input Config (PIN) or Push Button Config (PBC), and WPS-supported wireless access point must use the same method. See the next two chapters for detailed instructions of each WPS method.
3.4.1 PIN Input Config (PIN)
Please click "Pin Input Config (PIN)" button:

text_image
PLANET 11n USB Wireless LAN Utility Refresh(R) Mode(M) About(A) General Profile Available Network Status Statistics Wi-Fi Protect Setup Wi-Fi Protected Setup (WPS) An easy and secure setup solution for Wi-Fi network Pin Input Config (PIN) After pushing the PIN button.Please enter the PIN code into your AP. PIN Code : 97116042 Pin Input Config (PIN) Push Button After pushing the PBC button.Please push the physical button on your AP or visual button on the WPS config page. Push Button Config (PBC) Show Tray Icon Radio Off Disable Adapter Windows Zero Config CloseYou'll be prompted to select an access point you wish to connect. If you know its SSID, click "Yes", otherwise click "No".

text_image
Wi-Fi Protected Setup (WPS) Do you want to select a specific AP ? Yes NoIf you select "Yes", a list of all WPS-supported AP nearby will be displayed. You can click "Refresh" button to rescan. Click an access point you want to connect and click "Select" button.

text_image
Wi-Fi Protected Setup - Select AP WPS AP Name WPS AP MAC PLANET 00:30:4F:DF:21:F2 Refresh Select CancelIf you select "No", wireless adapter will prompt you to enter 8-digit PIN code into your access point, without selecting an access point in advance.
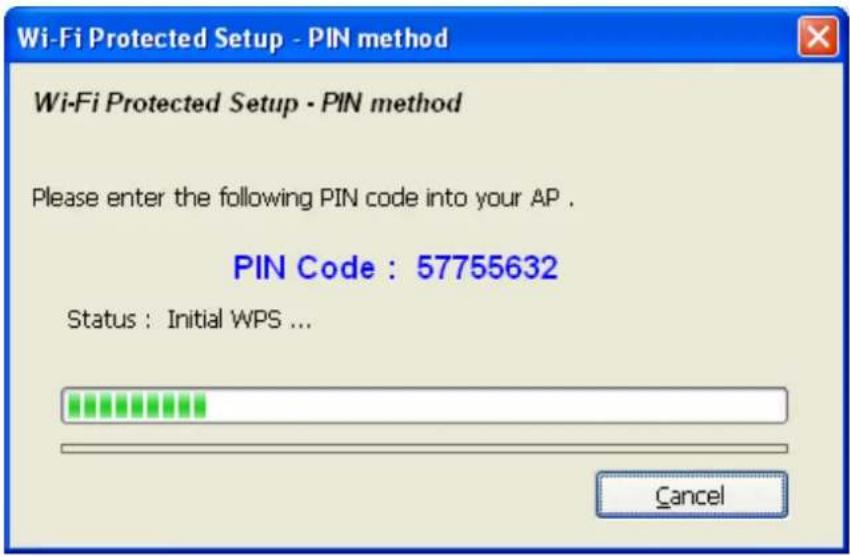
After you select "Yes" or "No" in previous step, wireless adapter will attempt to connect to WPS-supported access point, and an 8-digit number will appear. Please input this number to the configuration of the access point within 2 minutes, and the secure connection between wireless adapter and the WPS-supported access point will be established automatically.
To stop this procedure before connection is established, click "Cancel" button.
text_image
Wi-Fi Protected Setup - PIN method Wi-Fi Protected Setup - PIN method Please enter the following PIN code into your AP . PIN Code : 57755632 Status : Initial WPS ... Cancel3.4.2 Push Button Config (PBC)
This is the easiest way to establish secure connection by WPS, but if there're more than one WPS-supported access point using Push-Button config, please use PIN Input Config (PIN) instead.
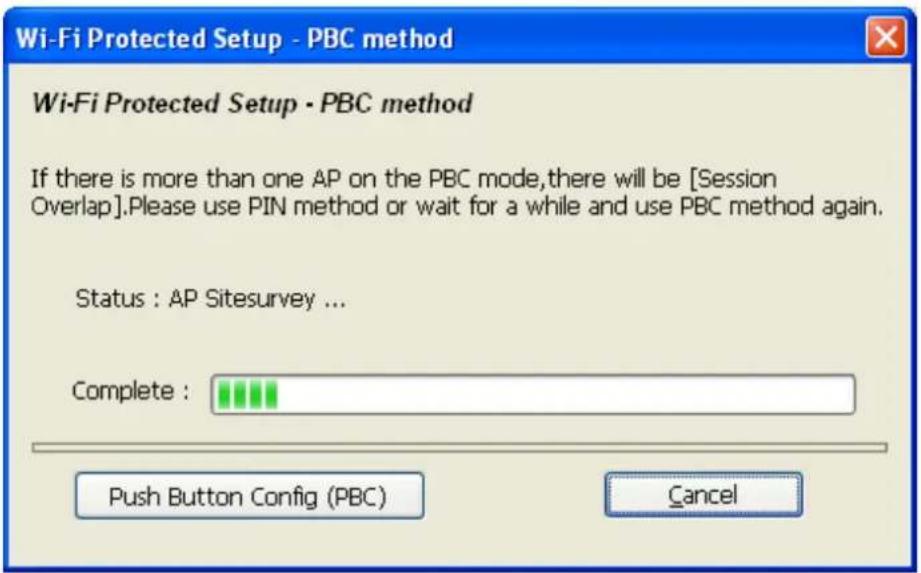
Please click "Push Button Config (PBC)" button.

text_image
PLANET 11n USB Wireless LAN Utility Refresh(R) Mode(M) About(A) General Profile Available Network Status Statistics Wi-Fi Protect Setup Wi-Fi Protected Setup (WPS) An easy and secure setup solution for Wi-Fi network Pin Input Config (PIN) After pushing the PIN button.Please enter the PIN code into your AP. PIN Code : 97116042 Pin Input Config (PIN) Push Button After pushing the PBC button.Please push the physical button on your AP or visual button on the WPS config page. Push Button Config (PBC) Show Tray Icon Radio Off Disable Adapter Windows Zero Config CloseThen a message window will appear:
text_image
Wi-Fi Protected Setup - PBC method If there is more than one AP on the PBC mode,there will be [Session Overlap].Please use PIN method or wait for a while and use PBC method again. Status : AP Sitesurvey ... Complete : Push Button Config (PBC) CancelPlease activate WPS function of wireless access point now, and the secure connection between wireless adapter and the WPS-supported access point will be established automatically.
Chapter 4. Soft Access Point
Excepting be a wireless client of other wireless access points, the PLANET wireless adapter can also act as a wireless service provider. You can switch the operation mode of wireless adapter to “Access Point” mode to simulate the function of a real wireless access point by software. And all other computers and Wi-Fi supported devices can connect to your computer wirelessly, even share your internet connection service.
4.1 Switch between Access Point Mode and Station Mode
The default operating mode of the wireless adapter is “Station Mode” (being a client of other wireless access points).
Please follow the instructions below to switch to Access Point mode:
Step 1. Right-click PLANET wireless utility icon, and click "Open Config Utility".

text_image
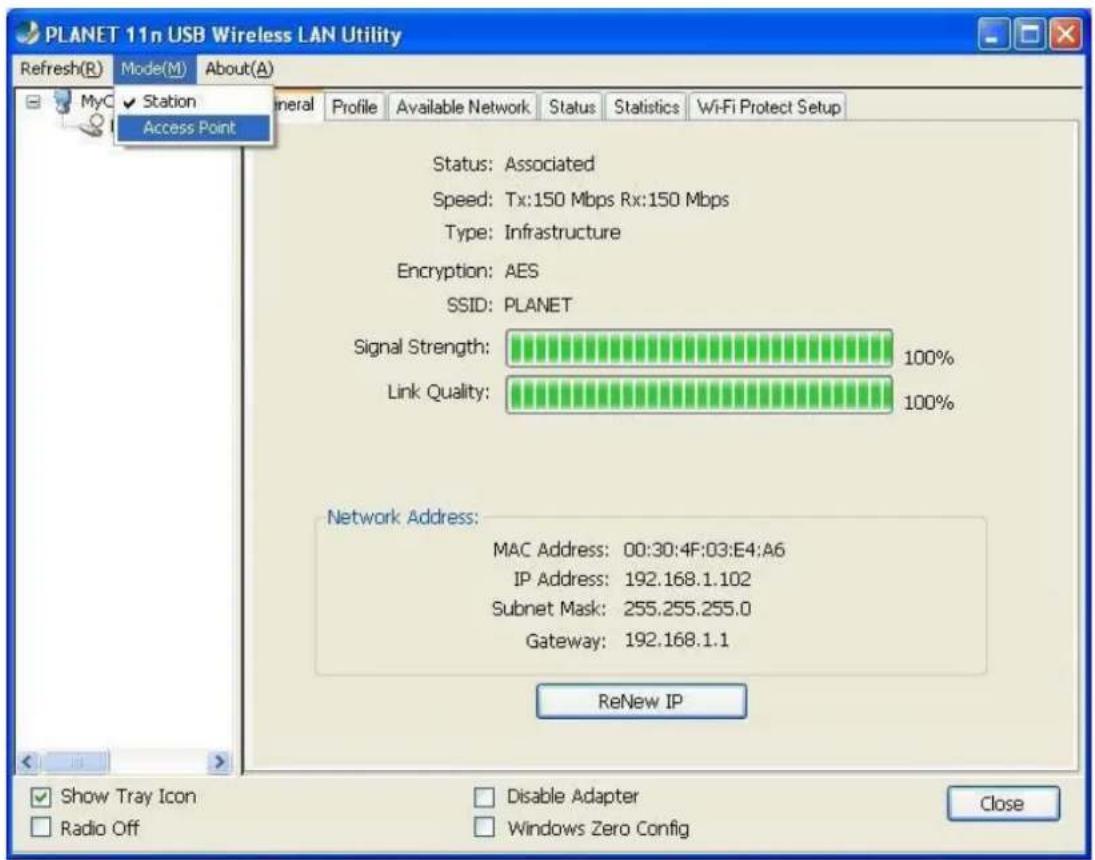
Open Config Utility About Hide Quit 9:37 AMStep 2. Select "Mode(M)", and then click "Access Point".
text_image
PLANET 11n USB Wireless LAN Utility Refresh(R) Mode(M) About(A) MyC ✓ Station Access Point General Profile Available Network Status Statistics Wi-Fi Protect Setup Status: Associated Speed: Tx:150 Mbps Rx:150 Mbps Type: Infrastructure Encryption: AES SSID: PLANET Signal Strength: 100% Link Quality: 100% Network Address: MAC Address: 00:30:4F:03:E4:A6 IP Address: 192.168.1.102 Subnet Mask: 255.255.255.0 Gateway: 192.168.1.1 ReNew IP Show Tray Icon Radio Off Disable Adapter Windows Zero Config CloseIt requires few seconds to switch mode. After the mode switch is complete, the window of general information about software access point will appear, includes SSID and connected wireless clients.

text_image
PLANET 11n USB Wireless LAN Utility Refresh(R) Mode(M) About(A) MyComputer PLANET Wireless General Advanced Statistics ICS SSID: planet-b814a474_AP BSSID: 00:30:4F:01:0C:28 Association Table AID MAC Address Life Time Config Show Tray Icon Radio Off Disable Adapter CloseStation mode icon:

Access Point icon:

4.1.1 Configure SSID and Channel
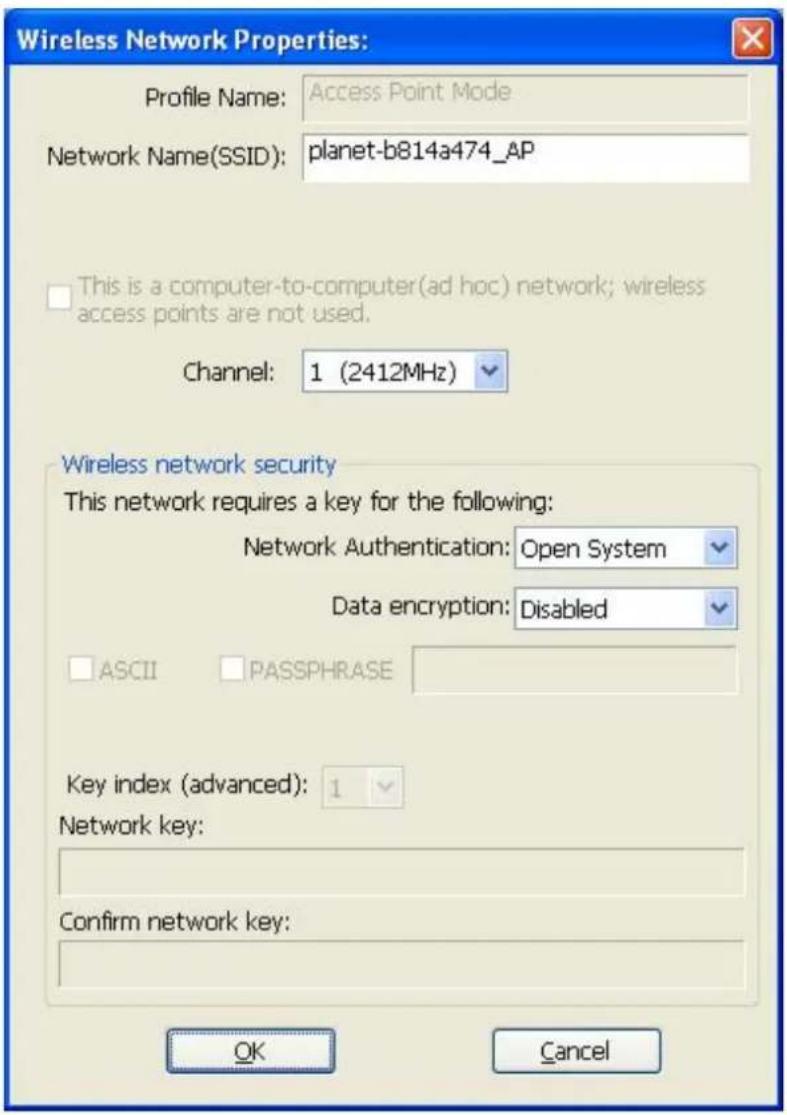
To configure software Access Point, click "Config" button, and the "Wireless Network Properties" will be displayed.
text_image
Wireless Network Properties: Profile Name: Access Point Mode Network Name(SSID): planet-b814a474_AP This is a computer-to-computer(ad hoc) network; wireless access points are not used. Channel: 1 (2412MHz) Wireless network security This network requires a key for the following: Network Authentication: Open System Data encryption: Disabled ASCII PASSPHRASE Key index (advanced): 1 Network key: Confirm network key: OK CancelPlease note that Ad-Hoc mode is not available when the wireless adapter is in Access Point mode. The setup options are listed below:
| Network Name (SSID) | Please input the SSID (the name used to identify this wireless access point) here. Up to 32 numerical characters can be accepted here, excepting space. |
| Channel Please select the wireless channel you wish to use, from 1 to 13. | |
To save changes, click "OK"; otherwise click "Cancel" to discard changes.
4.1.2 Soft Access Point Security
To setup security options for Soft Access Point, configure "Wireless Network Security" as follows:

text_image
Wireless Network Properties: Profile Name: Access Point Mode Network Name(SSID): planet-b814a474_AP This is a computer-to-computer(ad hoc) network; wireless access points are not used. Channel: 1 (2412MHz) Wireless network security This network requires a key for the following: Network Authentication: Open System Data encryption: Disabled ASCII PASSPHRASE Key index (advanced): 1 Network key: Confirm network key: OK CancelThe setup items about wireless security are listed below:
| Network Authentication Select network authentication mode from dropdown menu. | |
| Data Encryption Select data encryption method from dropdown menu. | |
| ASCII / PASSPHRASE If the encryption method is WEP, check either “ASCII” or “PASSPHRASE” box and input it in the box as WEP passphrase. | |
| Key Index Select WEP key index (1-4). If you don’t know which one you should use, select 1. | |
| Network key / Confirm network key | IF network authentication mode is WPA, please input WPA passphrase in both box. |
To save changes, click "OK"; otherwise click "Cancel" to discard changes.
4.2 Advanced Settings
Click "Advanced" label to setup advanced settings of software access point. If you don't know the meaning and affects of these settings, please keep them as default.

text_image
PLANET 11n USB Wireless LAN Utility Refresh(R) Mode(M) About(A) General Advanced Statistics ICS General Beacon Interval 100 DTIM Period: 3 Preamble Mode Short Set Defaults Apply Show Tray Icon Radio Off Disable Adapter CloseThe setup items are listed below:
| Beacon Interval Please input wireless beacon time interval here. | |
| DTIM Period Please input DTIM (Delivery Traffic Indication Message) here. | |
| Preamble Mode Select wireless frame preamble mode (long or short) from dropdown menu. | |
| Set Defaults Reset all settings back to factory default value. | |
| Apply | Save changes. |
If you changed any setting here and cause some problem on communicating with wireless clients, click "Set Defaults" to reset all settings back to default settings.
4.3 Wireless Transmission Statistics
Click "Statistics" label and the data statistics about software access point will be displayed.

text_image
PLANET 11n USB Wireless LAN Utility Refresh(R) Mode(M) About(A) MyComputer PlanET Wireless General Advanced Statistics ICS Counter Name Value Tx OK 16922 Tx Error 0 Rx OK 15046 Rx Packet Count 15046 Rx Retry 460 Rx ICV Error 0 Reset Show Tray Icon Radio Off Disable Adapter CloseClick "Reset" button to reset the value of every item back to "0".
4.4 Internet Connection Sharing (ICS)
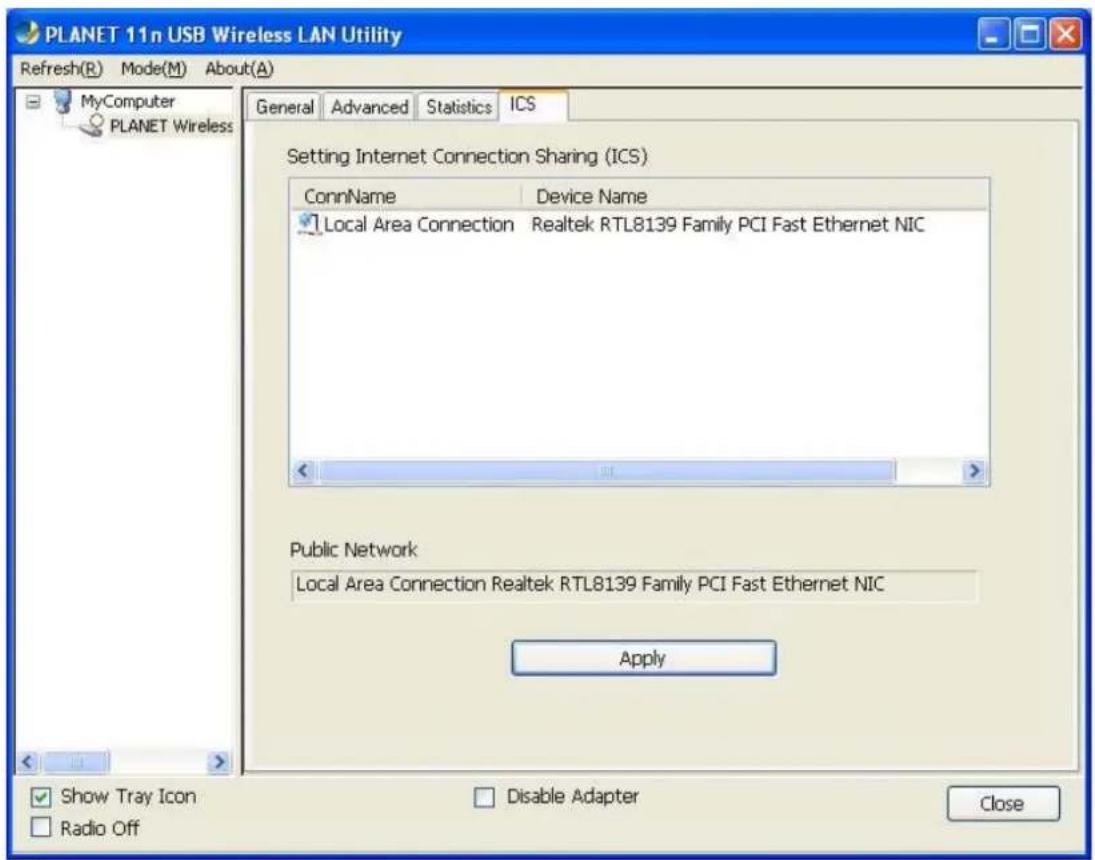
You can assign a network adapter on your computer as the path for all wireless clients to get connected to Internet. If you have only one network adapter (except the software access point), you don't have to select network adapter here; if you have more than one network adapter, select the one you wish to be used as Internet gateway.
text_image
PLANET 11n USB Wireless LAN Utility Refresh(R) Mode(M) About(A) General Advanced Statistics ICS MyComputer PLANET Wireless Setting Internet Connection Sharing (ICS) ConnName Device Name Local Area Connection Realtek RTL8139 Family PCI Fast Ethernet NIC Public Network Local Area Connection Realtek RTL8139 Family PCI Fast Ethernet NIC Apply Show Tray Icon Radio Off Disable Adapter CloseClick "Apply" button to save changes ("Apply" button is grayed out when no changes are made in this label).
EC Declaration of Conformity
For the following equipment:
*Type of Product : 802.11n Wireless USB Adapter
*Model Number : WNL-U554 / WNL-U554A / WNL-U554M
* Produced by:
Manufacturer's Name : Planet Technology Corp.
Manufacturer's Address: 10F., No.96, Minquan Rd., Xindian Dist.,
New Taipei City 231, Taiwan (R.O.C.)
is herewith confirmed to comply with the requirements set out in the Council Directive on the Approximation of the Laws of the Member States relating to 1999/5/EC R&TTE.
For the evaluation regarding the R&TTE the following standards were applied:
EN 300 328 V1.7.1 (2006-10)
EN 301 489-1 V1.8.1
EN 301 489-17 V1.3.2
EN 55022 (2006)
EN 61000-3-2 (2006)
EN 61000-3-3
EN 61000-4-2
EN 61000-4-3
EN 61000-4-4
EN 61000-4-5
EN 61000-4-6
EN 61000-4-11
EN 60950-1 (2006)
EN 50392 (2004)
Responsible for marking this declaration if the:
☑ Manufacturer ☐ Authorized representative established within the EU
Authorized representative established within the EU (if applicable):
Company Name: Planet Technology Corp.
Company Address: 10F., No.96, Minquan Rd., Xindian Dist., New Taipei City 231, Taiwan (R.O.C.)
Person responsible for making this declaration
Name, Surname Kent Kang
Position / Title : Product Manager
Taiwan
Place
^th March., 2011
Date