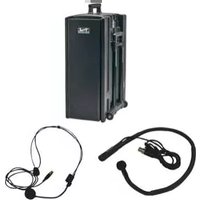
BDP-7500/CM/HBM - Loudspeaker Anchor Audio - Free user manual and instructions
Find the device manual for free BDP-7500/CM/HBM Anchor Audio in PDF.


| Product Type | Portable PA Sound System |
| Brand | Anchor Audio |
| Model | BDP-7500/CM/HBM (Beacon) |
| Dimensions (H x W x D) | 26.25 x 11 x 18 inches (66.7 x 28 x 45.7 cm) |
| Weight | 51 lbs (23 kg) |
| Power Output (Rated) | 150 W AC / 125 W DC |
| Max SPL | 112 dB |
| Frequency Response | 60 Hz - 15 kHz (±3 dB) |
| Battery Type | Two 12V rechargeable, 9.0 Ah each |
| Battery Life | 6-8 hours (medium volume), 2-4 hours (full volume) |
| Charging Time | Approximately 7 hours |
| AC Power Requirements | 100-240 VAC, 50/60 Hz, 300W max |
| DC Output | 12V 500mA |
| USB Output | 5V 500mA |
| Microphone Inputs | 2 (Lo-Z XLR balanced, Hi-Z 1/4" unbalanced); phantom power 36V |
| Line Inputs | 1/8" stereo, 1/4" phone, RCA stereo (unbalanced) |
| Line Output | 1/4" phone (isolated, 600Ω) |
| Wireless System | 16-channel UHF diversity wireless (built-in receiver) |
| MP3 Player | Built-in (supports MP3, WMA, WAV via USB/SD/AUX) |
| Warranty | 6-year limited (system), 2-year limited (microphones) |
Frequently Asked Questions - BDP-7500/CM/HBM Anchor Audio
User questions about BDP-7500/CM/HBM Anchor Audio
0 question about this device. Answer the ones you know or ask your own.
Ask a new question about this device
Download the instructions for your Loudspeaker in PDF format for free! Find your manual BDP-7500/CM/HBM - Anchor Audio and take your electronic device back in hand. On this page are published all the documents necessary for the use of your device. BDP-7500/CM/HBM by Anchor Audio.
USER MANUAL BDP-7500/CM/HBM Anchor Audio
Beacon® Sound System Owners Manual
MADE IN USA

SIX YEAR WARRANTY

A Message from the President
Congratulations on purchasing an Anchor Audio sound system, the choice of thousands of satisfied customers including the White House, prestigious universities, school districts nationwide, police and fire departments, and all branches of the U.S. military. Our products are made of the finest materials and built with pride in the U.S.
We've incorporated the latest technology into your sound system yet kept it simple to use. Just take a few minutes to review this manual to ensure the maximum enjoyment of your Anchor system. Or, you can view a demonstration video complete with a trouble shooting section at www.anchoraudio.com.
Feel free to call our friendly customer support staff at 1-800-ANCHOR1 Monday thru Friday between 7:00am and 5:00pm Pacific Standard Time with any questions. We love to hear from our customers.

Janet Jacobs, President on behalf of all Anchor employees
CONTENTS
GETTING STARTED / WARRANTY INFORMATION .... 1
Please check your new unit carefully for any damage which may have occurred during shipment. Each Anchor product is carefully inspected at the factory and packed in specially designed boxes for safe transport.
Notify the freight carrier immediately of any damage to the shipping box or product. Repack the unit in the original box and wait for inspection by the carrier's claim agent. Notify your dealer of the pending freight claim.
NOTE: All damage claims must be made with freight carrier!
RETURNING SYSTEMS FOR SERVICE OR REPAIR
For service or repair, please contact the dealer you purchased your system from or Anchor Audio Customer Service at 800.262.4671 to obtain a RA (Return Authorization) number. You may also complete an online RA request form at www.anchoraudio.com. All shipments to Anchor Audio must include a RA number and must be shipped prepaid. C.O.D. shipments will be refused and returned at your expense.
IMPORTANT: Save the shipping box & packing materials,
they were specially designed to ship your unit!
WARRANTY REGISTRATION
Visit our website at www.anchoraudio.com and select "Warranty Registration." Complete the online form to activate the six-year limited warranty on your Beacon sound system and two-year limited warranty for the microphones.
100-0190-000 rev. A 11/10
Beacon® Sound System Owners Manual
MADE IN USA

SIX YEAR WARRANTY
NOTE: Fully Charge Batteries Before First Use!
- Remove Travel Dolly (page 3) and open Line Array (below)
- Set all Input Levels to minimum & Tone Controls to flat (middle) setting
- Plug wired microphone into the MIC 1 or MIC 2 jacks and/or any audio source into the LINE-IN jacks
- Switch POWER to ON, Power ON LED will light
- Slowly increase Level Controls for active Input Jacks to desired volume
- Adjust Tone Controls for desired sound quality
IMPORTANT: Make all connections with shielded cables to avoid hum, buzzing or interference.
OPENING BEACON LINE ARRAY
- Open Array latches
- Grasp handle and remove Array from base
- Turn Array over and place on top of base
- Close Array latches
- Slowly flip Array Tower up until locked securely into place
IMPORTANT: Latches MUST be locked and grill MUST face forward for system to work!
CLOSING BEACON LINE ARRAY
- Turn POWER to OFF
- Fold Array in half (apply slight pressure)
- Open latches and remove folded Array
- Turn Array over grasp handle and slide into base
- Close Array latches
BACK PANEL OF BEA-7500MU2

Beacon® Sound System Owners Manual
MADE IN USA

SIX YEAR WARRANTY
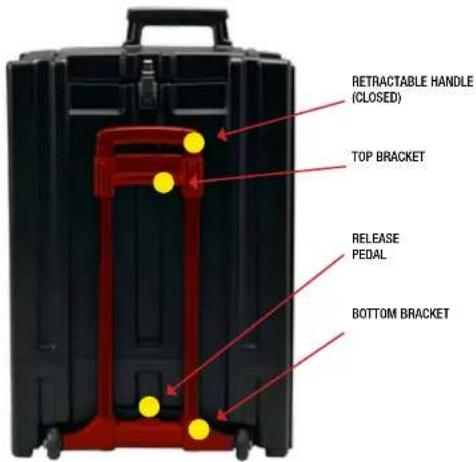
BEACON TRAVEL DOLLY
Beacon Portable sound systems are equipped with a removable Travel Dolly which features wheels and a retractable handle. To eliminate possible vibration from effecting the performance of your unit, we recommended that you remove the Travel Dolly before operating the system.
REMOVING TRAVEL DOLLY
- Press & hold the spring-loaded Release Pedal located on the Bottom Bracket
- Swing the dolly bottom away from the system
- Lift Handle up to remove dolly from the Top Bracket
Reverse steps to reattach the dolly
CORRECT SYSTEM PLACEMENT WRONG SYSTEM PLACEMENT


CONTROLLING FEEDBACK
Feedback, a howling noise or shrill sound, is self-generated by the sound system. It's caused by a microphone picking up the sound coming from the speaker and then re-amplifying it. Once a feedback loop starts, it continues until the system is adjusted.
FEEDBACK CAUSES
- Microphone too close, pointing towards or in front of speaker
• Volume setting is too loud for room
• Sound reflecting off hard surfaces
AVOIDING & ELIMINATING FEEDBACK
- Point microphone in a different direction
- Keep microphone away from the speaker
• Place speaker in FRONT of the microphone - Reduce the sound system volume levels
CAUTION: Feedback can damage your equipment & may be hazardous to hearing.
Beacon® Sound System Owners Manual
MADE IN USA

SIX YEAR WARRANTY
USING THE BUILT-IN MP3 PLAYER
Your MP3 player supports WMA and WAV files as well as MP3. Input slots for play are USB, SD card slot and AUX port for other music player devices.
Insert your memory card or USB stick and turn on the MP3 POWER. Push MODE button until your device is displayed. The auxiliary port becomes active when 3.5mm cable is inserted.
The LCD displays functions as used:
POWER: press once for ON or OFF
MODE: displays mode of operation
MUTE: press once for mute ON and again to mute OFF
RPT: press and release to repeat song
TRACK+: press and release to next track
TRACK-: press and release for previous track
ALBUM+: press and release for next album or hold and release until correct album is found
ALBUM-: press and release for previous album or hold and release until correct album is found

EXTERNAL ACCESSORY VOLUME CONTROL
DIVERSITY WIRELESS BY ANCHOR AUDIO
Anchor Audio UHF wireless is a 16 channel, diversity wireless system that receives signals with two independent antennae. With diversity wireless the receiver processes the stronger signal, effectively minimizing dropouts and interference from other transmitting sources. The antennae are mounted internally so there are no obstructions or risk of damage.
CHANNEL SELECTION - BUILT-IN RECEIVER
Select a channel, set the built-in receiver & microphone transmitter to that channel before using your wireless system.
- Choose any available wireless channel/frequency from 1 thru 16 (see page 5 for transmitter instructions)
- Set the Wireless Channel Selector Knob to the channel/frequency you choose in step 1
If you have two wireless receivers repeat above for the second receiver. Remember, each receiver/transmitter pair must be set to different channels to avoid interference.

NOTE: Ongoing wireless interference? The frequency you selected may be in use by other systems in the area! Change channels until you find a clear frequency!
Beacon® Sound System Owners Manual
- Unscrew battery cover on bottom of microphone
- Set the CHANNEL SELECTOR dial to match the channel setting of your receiver
- Replace battery cover and tighten firmly
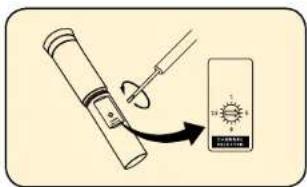
CHANNEL SELECTION - BODY-PACK TRANSMITTER
- The channel selection dial is located on the side of the transmitter
- Set the CHANNEL selection dial to match the channel setting of the receiver

NOTE: When using dual wireless, each microphone must be set to a different channel!
After you have set the transmitter channel (see above) you are ready to use your wireless microphone:
- Body-pack transmitter users must insert the mic
plug into the transmitter jack marked MIC -
Turn the transmitter power switch to ON (The red LED will flash when the mic is turned on. If the red LED stays on, the battery is low)
-
Turn the Beacon power switch to ON
- The RX indicators will light (only one indicator will light at a time) when the wireless signal is being transmitted and received
CAUTION: Harmful feedback may occur when walking in front of a sound system or speaker with a wireless microphone. Always point microphone away from speakers!
REPLACE BATTERY - HANDHELD TRANSMITTER
- Unscrew battery cover on bottom of microphone
- Replace old batteries with two fresh size 'AA' alkaline batteries
- Replace battery cover and tighten firmly


REPLACE BATTERY - BODY-PACK TRANSMITTER
- Slide open battery cover on front of transmitter
- Replace old batteries with two fresh size 'AA' alkaline batteries
- Replace battery cover by sliding firmly into place


NOTE: Transmitter power must be OFF when changing batteries!
For System Setup & Operation Videos Visit Our Website: www.anchoraudio.com
Beacon® Sound System Owners Manual
MADE IN USA

SIX YEAR WARRANTY
BATTERY REPLACEMENT
The batteries must be replaced every 2 – 3 years depending on usage over time. Call Anchor Audio at 800.262.4671 to order batteries.
To replace your batteries you will need a Phillips screwdriver and follow these procedures:
- Be sure the power switch is in the OFF position
- Remove the screws in the lower cover panel of the Beacon
- Gently slide the cover panel with the battery tray out of the case
- Unclip each battery connection cable and remove the batteries from the tray
- Connect each new battery to the connection cable, attach plate to the tray and slide the tray into the Beacon
6 Replace each screw in the cover panel
Fully charge batteries before storage. For extended periods of storage either leave system plugged into an AC outlet or charge the system at least once each month for a minimum of 24 hours.

BUILT-IN BATTERY MAINTENANCE
To preserve battery life the built-in batteries MUST be FULLY charged before the first use. Regardless of length of operation, it is recommended that batteries be fully charged as soon as possible after each use.
Beacon Sound Systems include an automatic charging system designed to properly charge and maintain the systems built-in batteries. To charge batteries plug the system into an AC outlet and operate as normal while built-in batteries are charging. The CHARGE STATUS LED will light when charging. Bright red indicates charge process has begun. Amber indicates the charge process is almost complete, and green indicates full battery. It takes approximately 7 hours to charge the completely drained Beacon batteries.
BATTERY SERVICE TIME
Fully charged batteries will yield approximately 6 - 8 hours of continuous music at medium volume level (2 - 4 hours at full volume or longer for speech only). However, service times vary depending on control settings and use of accessories.
BATTERY COMPARTMENT
Waste electrical and electronic products must not be disposed of with household waste. Please recycle where facilities exist. Check with your Local Authority or Retailer for recycling advice.

NOTE: System Can Be Used During Charging!
Beacon® Sound System Owners Manual
MADE IN USA

SIX YEAR WARRANTY
HAVING TROUBLE WITH YOUR SOUND SYSTEM?
CONDITION
No Sound (power LED off)
POSSIBLE SOLUTION
- turn POWER switch ON
- charge battery or plug in AC cord
- safety shut down if unit overheats, turn volume lower & turn speaker ON
- check for output from source
• make sure all cables are completely plugged in
• turn up volume control of input used - remove plug from speaker output if not using external speaker output
- charge battery fully; if battery life continues to deteriorate, contact Anchor Audio customer service: 800.262.4671
- lower system volume control
- use shielded cables
- use balanced microphone
HAVING TROUBLE WITH YOUR WIRELESS SYSTEM? (Wireless Models Only)
CONDITION
No Sound (RX Indicator: ON)
POSSIBLE SOLUTION
- set MUTE switch to on (handheld mic only)
• turn up WIRELESS volume control
• make sure mic is plugged into body pack transmitter - push mic power button
- turn Beacon POWER switch on
• make sure transmitter power switch is on - set receiver and transmitter to same channel
- replace battery in transmitter
NEED MORE HELP? Beacon Sound System Setup & Operation Videos!
Visit Our Website: www.anchoraudio.com

Scan for Beacon
Technical Specs

Scan for Beacon
Brochure
Scan for Beacon
Website

Scan for How to
Videos & Articles
BEACON TECHNICAL SPECIFICATIONS
Rated Power Output 150 watts AC / 125 watts DC
Max SPL @ Rated Power 112 dB
Battery Two 12V rechargeable, 9.0 AH
Full recharge: approx 7 hrs
Frequency Response 60 Hz - 15 kHz = 3dB
Line Output (post lader) isolated, 600Ω , 1/4" phone
AC Power Reqs. 100-240 VAC, 50/60 Hz, 300W
max
DC Out 12V 500mA
USB 5V 500mA
Dimensions (HWD) 26.25" x 11" x 18" (66.7 x 28 x
45.7cm)
Weight 51 lbs / 23 Kg

Mic Inputs: Lo-Z (1 KΩ), balanced, XLR
12 VDC condenser mic (phantom)
power
Hi-Z (10 KΩ), unbalanced, 1/4" phone
Hi-Z (10 KΩ), unbalanced. 1/8" stereo.
1/4" phone
Line In/Out unbalanced, stereo RCA
Sensitivity For Rated Output
Lo-Z Microphone -52 dBV (2.5 mVrms)
Hi-Z Microphone -43 dBV (7.5 mVrms)
Auxiliary (line) -14 dBV (200 mVrms)
Phantom Power 36V
(Specifications Subject to Change Without Notice)
ANCHOR AUDIO CUSTOMER SERVICE
800.262.4671
FOR ADDITIONAL INFORMATION
visit www.anchoraudio.com
- BEACON® SOUND SYSTEM OWNERS MANUAL
- A MESSAGE FROM THE PRESIDENT
- CONTENTS
- RETURNING SYSTEMS FOR SERVICE OR REPAIR
- WARRANTY REGISTRATION
- OPENING BEACON LINE ARRAY
- CLOSING BEACON LINE ARRAY
- BEACON TRAVEL DOLLY
- REMOVING TRAVEL DOLLY
- CONTROLLING FEEDBACK
- FEEDBACK CAUSES
- AVOIDING & ELIMINATING FEEDBACK
- USING THE BUILT-IN MP3 PLAYER
- THE LCD DISPLAYS FUNCTIONS AS USED
- DIVERSITY WIRELESS BY ANCHOR AUDIO
- CHANNEL SELECTION - BUILT-IN RECEIVER
- CHANNEL SELECTION - BODY-PACK TRANSMITTER
- REPLACE BATTERY - HANDHELD TRANSMITTER
- REPLACE BATTERY - BODY-PACK TRANSMITTER
- BATTERY REPLACEMENT
- BUILT-IN BATTERY MAINTENANCE
- BATTERY SERVICE TIME
- HAVING TROUBLE WITH YOUR SOUND SYSTEM
- CONDITION
- POSSIBLE SOLUTION
- HAVING TROUBLE WITH YOUR WIRELESS SYSTEM? (WIRELESS MODELS ONLY)
- BEACON TECHNICAL SPECIFICATIONS
- ANCHOR AUDIO CUSTOMER SERVICE
- 800.262.4671
- FOR ADDITIONAL INFORMATION
- VISIT WWW.ANCHORAUDIO.COM
Brand : Anchor Audio
Model : BDP-7500/CM/HBM
Category : Loudspeaker