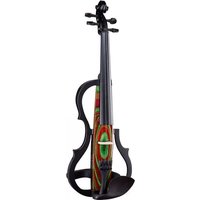
HBV 990RGR - Musical instrument Harley Benton - Free user manual and instructions
Find the device manual for free HBV 990RGR Harley Benton in PDF.


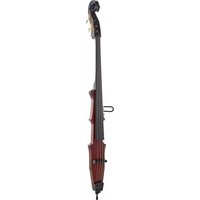
| Product Type | Electric Violin |
| Model | Harley Benton HBV 990RGR |
| Colour | Red + Green |
| Scale Length | Approx. 32.6 cm |
| Body Material | Birch |
| Fretboard Material | Maple |
| Neck Material | Maple |
| Pickup System | Active piezoceramic with 9V battery |
| Machine Heads | Standard machine heads |
| Total Length | Approx. 60 cm |
| Lower Bout Width | Approx. 20.5 cm |
| Body Length | Approx. 35 cm |
| Mid Bout Width | Approx. 11 cm |
| Saddle Width | Approx. 2.5 cm |
| Maximum Height | Approx. 9 cm |
| Weight (without battery) | 580 g |
| Power Supply | 9V battery (included) |
| Connections | 1/4" line out, 1/4" headphone, 3.5 mm mic input, 3.5 mm audio input |
| Controls | Volume, Bass, Mid, Treble |
| Included Accessories | Bow, rosin, transport bag |
| String Tuning | g-d'-a'-e" (standard violin) |
| Cleaning | Dry, soft cloth; avoid alcohol or thinner |
| Intended Use | Indoor use only |
| Safety Warning | Keep away from children; hearing damage risk at high volume |
Frequently Asked Questions - HBV 990RGR Harley Benton
User questions about HBV 990RGR Harley Benton
0 question about this device. Answer the ones you know or ask your own.
Ask a new question about this device
Download the instructions for your Musical instrument in PDF format for free! Find your manual HBV 990RGR - Harley Benton and take your electronic device back in hand. On this page are published all the documents necessary for the use of your device. HBV 990RGR by Harley Benton.
USER MANUAL HBV 990RGR Harley Benton
Musikhaus Thomann
Thomann GmbH
1.1 Further information.... 4
1.2 Notational conventions.... 4
1.3 Symbols and signal words.... 5
2 Safety instructions.... 6
3 Scope of delivery.... 7
4 Assembly instructions.... 8
4.1 Tuning the strings.... 9
5 Connections and controls.... 10
5.1 Connecting and inserting the battery.... 12
5.2 Connecting the instrument cable.... 12
5.3 Connecting headphones....12
5.4 Connecting audio devices.... 12
5.5 Adjusting Volume and Tone.... 12
6 Maintenance.... 13
6.1 Changing strings.... 13
6.2 Battery change.... 13
7 Technical specifications.... 14
8 Plug and connection assignment.... 16
9 Cleaning.... 17
10 Protecting the environment.... 18
1 General information
This manual contains important instructions for the safe operation of the unit. Read and follow the safety instructions and all other instructions. Keep the manual for future reference. Make sure that it is available to all those using the device. If you sell the unit please make sure that the buyer also receives this manual.
Our products are subject to a process of continuous development. Thus, they are subject to change.
1.1 Further information
On our website (www.thomann.de) you will find lots of further information and details on the following points:
| Download This manual is also available as PDF file for you to download. | |
| Keyword search | Use the search function in the electronic version to find the topics of interest for you quickly. |
| Online guides | Our online guides provide detailed information on technical basics and terms. |
| Personal consultation | For personal consultation please contact our technical hotline. |
| Service | If you have any problems with the device the customer service will gladly assist you. |
1.2 Notational conventions
This manual uses the following notational conventions:
Letterings
The letterings for connectors and controls are marked by square brackets and italics.
Examples: [VOLUME] control, [Mono] button.
Instructions
The individual steps of an instruction are numbered consecutively. The result of a step is indented and highlighted by an arrow.
Example:
- Switch on the device.
- Press [Auto].
⇒ Automatic operation is started. - Switch off the device.
1.3 Symbols and signal words
In this section you will find an overview of the meaning of symbols and signal words that are used in this manual.
| Signal word Meaning | |
| DANGER! This combination of symbol and signal word indicates an immediate dangerous situation that will result in death or serious injury if it is not avoided. | |
| CAUTION! This combination of symbol and signal word indicates a possible dangerous situation that can result in minor injury if it is not avoided. | |
| NOTICE! This combination of symbol and signal word indicates a possible dangerous situation that can result in material and environmental damage if it is not avoided. | |
Warning signs Type of danger

Warning - danger zone.
2 Safety instructions

DANGER!
Danger for children
Ensure that plastic bags, packaging, etc. are properly disposed of and are not in the reach of babies and young children. Choking hazard!
Ensure that children do not detach any small parts (e.g. knobs or the like) from the product. They could swallow the pieces and choke!
Never let children play unattended with the product.

CAUTION!
Possible hearing damage
Making music for a prolonged period and at high volume can cause hearing damage.
Avoid playing the unit at full volume, especially when using headphones.

NOTICE!
Operating conditions
This device has been designed for indoor use only. To prevent damage, never expose the device to any liquid or moisture. Avoid direct sunlight, heavy dirt, and strong vibrations.

NOTICE!
Possible damage by leaking batteries
Leaking batteries can cause permanent damage to the device.
Take batteries out of the device if it is not going to be used for a longer period.

NOTICE!
Possible property damage by magnetic fields
Loudspeakers produce a static magnetic field. Therefore, maintain an appropriate distance to devices that can be adversely affected or damaged by an external magnetic field.
3 Scope of delivery
Thank you very much for purchasing this electric violin. The package includes the following components:
1 × electric violin
■ 1 × bridge (pre-assembled)
■ 1 × strings set (pre-assembled)
1 × composite bow
1 × bow rosin
■ 1 × suitable transport bag
Assembling and tuning your instrument are described in detail in the following sections.
4 Assembly instructions
Overview
A

B


| A (front side) 1 Bridge | |
| 2 Chin rest | |
| B (rear side) 3 Machine heads | |
| C Operating elements | |
| C (operating ele-ments) | 5 [MIC]Connector for microphones (3.5 mm jack, stereo). |
| 6 [PHONE]Headphones socket (3.5 mm jack, stereo) | |
| 7 [LINEOUT]6.35 mm jack to connect the instrument cable | |
| 8 [Volume]With this control you can adjust the volume | |
| 9 [Bass]With this control you can adjust the low frequencies | |
| 10 [Midd]With this control you can adjust the tone (mid frequencies) | |
| 11 [Treb]With this control you can adjust the high frequencies | |
| 12 Battery compartment | |
4.1 Tuning the strings
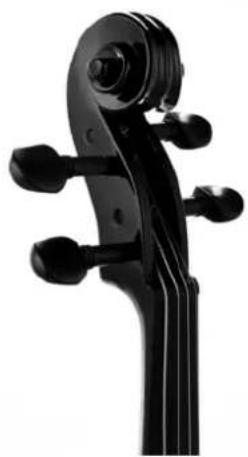
Tune all strings with the machine heads using a tuner device to the correct pitch (usually g-d'-a'-e").
5 Connections and controls

CAUTION!
Possible hearing damage
Making music for a prolonged period and at high volume can cause hearing damage.
Avoid playing the unit at full volume, especially when using headphones.

NOTICE!
Risk of breakage, possible deformation
When placing the instrument with the fretboard down, there is a risk of damaging the fingerboard and the tailpiece.
Avoid any compressive load on the rear of the instrument, if it is placed for the assembly or for service work with the fretboard down on a solid surface.

Before you connect amplifiers or microphones, the volume controls of the violin and the devices to be connected must be set to "Minimum". This avoids loud crack noises when switching on.

HBV 990...
5.1 Connecting and inserting the battery
On delivery of the instrument, a suitable battery is enclosed.
Open the battery compartment cover on the back of the instrument and connect the lead wire with correct polarity to the battery. Insert the battery into the battery compartment and close the battery compartment cover.

NOTICE!
Possible damage by leaking batteries
Leaking batteries can cause permanent damage to the device.
Take batteries out of the device if it is not going to be used for a longer period.
5.2 Connecting the instrument cable
The connector for the instrument cable (1/4" jack, mono) is located on the back of the instrument.
5.3 Connecting headphones
The connector for the headphone (1/4" jack, mono) is located on the back of the instrument.

When using a headphone with 3.5 mm jack, you need an appropriate adapter.
5.4 Connecting audio devices
The connector for audio devices (3.5 mm, mono) is located on the back of the instrument.
5.5 Adjusting Volume and Tone
The controls to adjust the volume [Volume] and the tone (treble, bass) [Treble]/[Bass] are located on the back of the instrument.
6 Maintenance
6.1 Changing strings
Proceed as follows to change the strings:
Strings are subject to a natural aging process, which is also affected by the frequency of use of the instrument. Changing the strings is recommended if the sound quality of the instrument decreases audibly. Always replace the complete set of strings (strings of 4/4 length) and always go string by string. In this way you avoid a strong temporary bending of the neck due to reduced string tension. The bridge also remains in the correct position and does not have to be readjusted.
- For example, loosen the run-down E string from the capstan of the machine head and from the tailpiece.
- Thread the new E string into the tailpiece, pull it over the bridge into the capstan bore of the machine head.
- Hook the string end to the capstan and tighten the string tension slowly. At the first windings, pay particular attention that the string is taut to the mechanics.
- Make sure that the string is running correctly through the grooves of bridge and nut at the upper end of the neck.
- Slowly increase the string tension until the correct pitch is reached. Use a tuner or a pitch pipe for reference.
- Proceed in the same way with the A, D and G strings and then tune all strings again successively to the correct pitch. Note that the string tension will drop a little and the instrument needs to be retuned several times until the strings stay in tune.
6.2 Battery change

Replace the inserted battery if necessary (weak output signal) or at regular intervals.
Open the battery compartment cover on the back of the instrument. Remove the battery and unplug the connection cable from the battery terminals.
Clamp the power cable with the correct polarity to the new battery. Insert the battery into the battery compartment and close the battery compartment cover.
7 Technical specifications
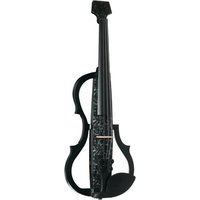
| HBV 990BEM HBV 990BCF HBV 990GW HBV 990SKL | |||
| Item no. 325869 325871 325875 325873 | |||
| Colour Birds Eye Maple Black Carbon Fiber Grey Wood Skulls | |||
| Scale approx. 32.6 cm | |||
| Body material Maple Maple Basswood Maple | |||
| Fretboard material Birch | |||
| Neck material | Maple Maple Basswood Maple | ||
| Pick-up | Active piezoceramic pick-up system with 9 V battery power supply | ||
| Machine heads | Machine heads | ||
| Dimensions | Total length: approx. 60 cm | ||
| Lower bout width: approx. 20.5 cm | |||
| Body length: approx. 35 cm | |||
| Mid bout width: approx. 11 cm | |||
| Saddle width: approx. 2.5 cm | |||
| Maximum height: approx. 9 cm | |||
| Weight | 580 g, without battery | ||
| HBV 990BK | HBV 990AM | HBV 990WH HBV 990RD | ||
| Item no. 351782 351786 351784 351785 | ||||
| Colour Black | Amber | White | White | |
| Scale approx. 32.6 cm | ||||
| Body material Basswood | ||||
| Fretboard material Birch | ||||
| Neck material | Basswood | |||
| Pick-up | Active piezoceramic pick-up system with 9 V battery power supply | |||
| Machine heads | Machine heads | |||
| Dimensions | Total length: approx. 60 cm | |||
| Lower bout width: approx. 20.5 cm | ||||
| Body length: approx. 35 cm | ||||
| Mid bout width: approx. 11 cm | ||||
| Saddle width: approx. 2.5 cm | ||||
| HBV 990BK HBV 990AM HBV 990WH HBV 990RD | ||||
| Maximum height: approx. 9 cm | ||||
| Weight 580 g, without battery | ||||
| HBV 990GBY HBV 990RGR HBV 990AMB HBV 990BLU | |||
| Item no. 417284 417283 417280 417282 | |||
| Colour Green + blue + yellow | Red + green Amber Blue + black | ||
| Scale approx. 32.6 cm | |||
| Body material Birch | |||
| Fretboard material Maple | |||
| Neck material Maple | |||
| Pick-up | Active piezoceramic pick-up system with 9 V battery power supply | ||
| Machine heads | Machine heads | ||
| Dimensions | Total length: approx. 60 cm | ||
| Lower bout width: approx. 20.5 cm | |||
| Body length: approx. 35 cm | |||
| Mid bout width: approx. 11 cm | |||
| Saddle width: approx. 2.5 cm | |||
| Maximum height: approx. 9 cm | |||
| Weight 580 g, without battery | |||
HBV 990...
8 Plug and connection assignment
Introduction
This chapter will help you select the right cables and plugs to connect your valuable equipment in such a way that a perfect sound experience is ensured.
Please note these advices, because especially in 'Sound & Light' caution is indicated: Even if a plug fits into the socket, an incorrect connection may result in a destroyed power amp, a short circuit or 'just' in poor transmission quality!
Balanced and unbalanced transmission
Unbalanced transmission is mainly used in semi-professional environment and in hifi use. Instrument cables with two conductors (one core plus shielding) are typical representatives of the unbalanced transmission. One conductor is ground and shielding while the signal is transmitted through the core.
Unbalanced transmission is susceptible to electromagnetic interference, especially at low levels, such as microphone signals and when using long cables.
In a professional environment, therefore, the balanced transmission is preferred, because this enables an undisturbed transmission of signals over long distances. In addition to the conductors 'Ground' and 'Signal', in a balanced transmission a second core is added. This also transfers the signal, but phase-shifted by 180°.
Since the interference affects both cores equally, by subtracting the phase-shifted signals, the interfering signal is completely neutralized. The result is a pure signal without any noise interference.
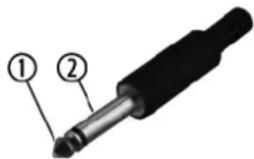
1/4" TS phone plug (mono, unbalanced)
Three-pole 1/8" mini phone jack (stereo, unbalanced)

1 Signal
2 Ground, shielding
1 Signal (left)
2 Signal (right)
3 Ground, shielding
9 Cleaning
Clean the instrument and especially the strings after playing with a dry, soft, lint-free cloth. Stubborn dirt can be removed with a slightly dampened cloth.
Never use cleaners containing alcohol or thinner.
10 Protecting the environment
Disposal of the packaging material

For the transport and protective packaging, environmentally friendly materials have been chosen that can be supplied to normal recycling.
Ensure that plastic bags, packaging, etc. are properly disposed of.
Do not just dispose these materials with your normal household waste, but make sure that they are fed to a recovery. Please follow the notes and markings on the packaging.
Disposal of batteries

Batteries must not be disposed of as domestic waste or thrown into fire. Dispose of the batteries according to national or local regulations regarding hazardous waste. To protect the environment, dispose of empty batteries at your retail store or at appropriate collection sites.
Disposal of your old device

This product is subject to the European Waste Electrical and Electronic Equipment Directive (WEEE) in its currently valid version. Do not dispose with your normal household waste.
Dispose this device through an approved waste disposal firm or through your local waste facility. When discarding the device, comply with the rules and regulations that apply in your country. If in doubt, consult your local waste disposal facility.



- 2 SAFETY INSTRUCTIONS.... 6
- 3 SCOPE OF DELIVERY.... 7
- 4 ASSEMBLY INSTRUCTIONS.... 8
- 5 CONNECTIONS AND CONTROLS.... 10
- 6 MAINTENANCE.... 13
- 7 TECHNICAL SPECIFICATIONS.... 14
- 8 PLUG AND CONNECTION ASSIGNMENT.... 16
- 9 CLEANING.... 17
- 10 PROTECTING THE ENVIRONMENT.... 18
- 1 GENERAL INFORMATION
- 1.1 FURTHER INFORMATION
- 1.2 NOTATIONAL CONVENTIONS
- LETTERINGS
- INSTRUCTIONS
- EXAMPLE
- 1.3 SYMBOLS AND SIGNAL WORDS
- WARNING SIGNS TYPE OF DANGER
- 2 SAFETY INSTRUCTIONS
- DANGER
- DANGER FOR CHILDREN
- CAUTION
- POSSIBLE HEARING DAMAGE
- NOTICE
- OPERATING CONDITIONS
- POSSIBLE DAMAGE BY LEAKING BATTERIES
- POSSIBLE PROPERTY DAMAGE BY MAGNETIC FIELDS
- 3 SCOPE OF DELIVERY
- 4 ASSEMBLY INSTRUCTIONS
- 4.1 TUNING THE STRINGS
- 5 CONNECTIONS AND CONTROLS
- RISK OF BREAKAGE, POSSIBLE DEFORMATION
- 5.1 CONNECTING AND INSERTING THE BATTERY
- 5.2 CONNECTING THE INSTRUMENT CABLE
- 5.3 CONNECTING HEADPHONES
- 5.4 CONNECTING AUDIO DEVICES
- 5.5 ADJUSTING VOLUME AND TONE
- 6 MAINTENANCE
- 6.1 CHANGING STRINGS
- 6.2 BATTERY CHANGE
- 8 PLUG AND CONNECTION ASSIGNMENT
- INTRODUCTION
- BALANCED AND UNBALANCED TRANSMISSION
- 1/4" TS PHONE PLUG (MONO, UNBALANCED)
- THREE-POLE 1/8" MINI PHONE JACK (STEREO, UNBALANCED)
- 9 CLEANING
- 10 PROTECTING THE ENVIRONMENT
- DISPOSAL OF THE PACKAGING MATERIAL
- DISPOSAL OF BATTERIES
- DISPOSAL OF YOUR OLD DEVICE
Brand : Harley Benton
Model : HBV 990RGR
Category : Musical instrument