XL-POD8LR - Loudspeaker PowerBass - Free user manual and instructions
Find the device manual for free XL-POD8LR PowerBass in PDF.


| Product Type | Marine Wakeboard Tower Speaker (Pod) |
| Model | XL-POD8LR |
| Woofer Size | 8.0 inches |
| Power Handling (RMS) | 125 Watts |
| Power Handling (Peak) | 250 Watts |
| Frequency Response | 45 Hz - 22 kHz |
| Nominal Impedance | 4 ohms |
| Sensitivity (1W/1M) | 101 dB |
| Dimensions (A x B x C x D) | 11.37 x 5.75 x 8.7 x 12.2 inches (288.7 x 146.1 x 221 x 311 mm) |
| Hang Weight | 11.4 lbs (5.2 kg) |
| Enclosure Material | UV Stable Injection Molded Plastic (Marine Grade Polymer) |
| Mounting System | Chrome Plated Die-Cast Swivel Clamp (fits bars 1.5" - 3.0") |
| Cone Material | Polypropylene Injected (Waterproof, UV Inhibitors) |
| Surround Material | TPU (Thermoplastic Urethane) |
| Tweeter Type | Compression Horn Tweeter |
| Lighting | RGB Illumination with RF Remote Control (20 colors, 19+ modes) |
| Safety Feature | Braided Safety Cable Included |
| Recommended Amplifier | External 4-ohm stable amp, RMS rating equal to or slightly above 125W |
| Break-In Period | 40 hours at no more than 1/3 maximum volume |
| Cleaning Instructions | Soapy water and damp cloth; no solvents or cleaners |
| Warranty | 1 year (3 years if installed by authorized dealer) |
| Included Accessories | Speaker wire, Allen wrench, RGB extension cable (18 ft), RF remote control |
Frequently Asked Questions - XL-POD8LR PowerBass
User questions about XL-POD8LR PowerBass
0 question about this device. Answer the ones you know or ask your own.
Ask a new question about this device
Download the instructions for your Loudspeaker in PDF format for free! Find your manual XL-POD8LR - PowerBass and take your electronic device back in hand. On this page are published all the documents necessary for the use of your device. XL-POD8LR by PowerBass.
USER MANUAL XL-POD8LR PowerBass
powerbass® X T R E M E
natural_image
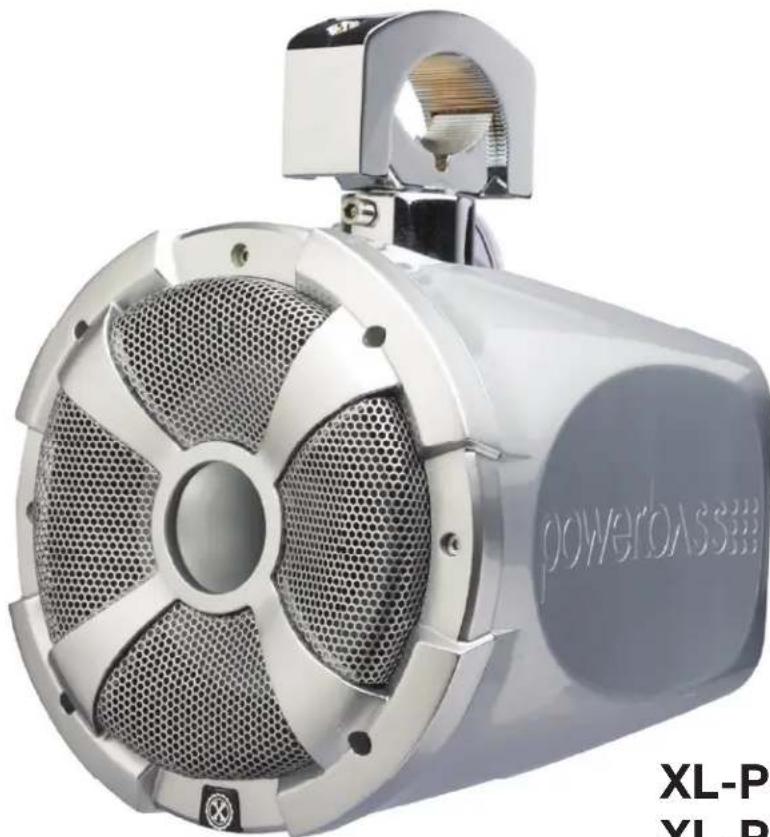
Exterior view of a powertrain with mesh fan and external mounting bracket (no text or symbols visible on main body)XL-POD6LR
XL-POD8LR
XL-POD10LR

with Remote Controlled RGB Illumination
Application Guide
Please read through this manual to familiarize yourself with your new speakers. Should your PowerBass Xtreme marine speakers ever require service, you will need to have the original dated receipt.
powerbass® X T R E M E
Thank you and Congratulations
Congratulations on your purchase of PowerBass Xtreme Marine speakers. You now own a speaker of uncompromising design and engineering from a factory that truly believes in the relentless pursuit of perfection. Incorporating the highest quality parts and state-of-the-art materials, these speakers display the ultimate balance between high fidelity, performance and long-lasting reliability.

At PowerBass USA, Inc. we are confident you will have many years of outstanding enjoyment from this great SPEAKER investment. For maximum performance we recommend that you have your new PowerBass Xtreme product installed by an Authorized PowerBass Xtreme Dealer.
To learn more about PowerBass, please visit us on the World Wide Web at
http://www.powerbassusa.com
Δ Warning Δ
Continuous exposure to sound pressure levels in excess of 100 dB can cause permanent hearing loss. PowerBass Speakers are capable of producing sound pressure levels well over 170 dB. Please observe all local sound ordinances while listening to your PowerBass system. PowerBass USA, Inc. accepts no liability for hearing loss, bodily injury, or property damage due to the result of use or misuse of this product.
POWERBASS XTREME LONG RANGE POD FEATURES
UV Stable Injection Molded Plastic Pod: Molded from marine grade polymer (poly-plastic composite) materials houses the speaker and protects it from the effects of the outdoor environment while providing great looks.
Chrome Plated Die-Cast Swivel Clamp System: Solid marine-grade zinc alloy provides strength and corrosion resistance accepts bar sizes from 1.5" to 3.0".
Polypropylene Injected Cone: Chosen for its strong yet lightweight body this waterproof woofer cone has UV inhibitors to minimize cracking and fading.
TPU Surround: A synthetic material known for its toughness and flexibility, the black TPU (Thermo-plastic Urethane) surround rejects water, sun and salt spray while at the same time offering superior cone-edge suspension.
Compression Horn Tweeter: A special horn tweeter was chosen to deliver loud, crisp and clean highs that can be heard well beyond the boat.
RGB Illumination: User selectable RGB lighting that can be linked to multiple speaker on a single remote control. Select up to 20 different colors and over 19 different lighting modes.
Safety Cable: A braided wire cable provides an extra level of security for the Pod when mounted around the tower bar.
UNPACKING THE ENCLOSURE
Every attempt has been made to transport your new PowerBass Marine Pod system safely. Carefully unpack the enclosure and inspect it thoroughly for any damage that may have occurred during shipping. Notify your local PowerBass dealer immediately should you notice any damage prior to installing the unit. Be sure to keep the carton and packing material until your system is operational. The original boxes will do the best job of protecting your speaker system if they need to be transported.
INSTALLATION EXPERIENCE
Installation of PowerBass Xtreme Marine Speakers requires experience with a variety of mechanical and electrical procedures. This manual only provides general installation and operating instructions. If you have any reservations about your installation skills or lack the proper tools, please contact your local PowerBass Xtreme dealer for assistance.
POD PLACEMENT TIPS AND WIRING RECOMMENDATIONS
When running the speaker wire through the tower bar make sure there is a clear run so the wire can enter and exit the tubing (some towers have obstructions in the tube). If you are not sure, check with the manufacturer of the tower bar.
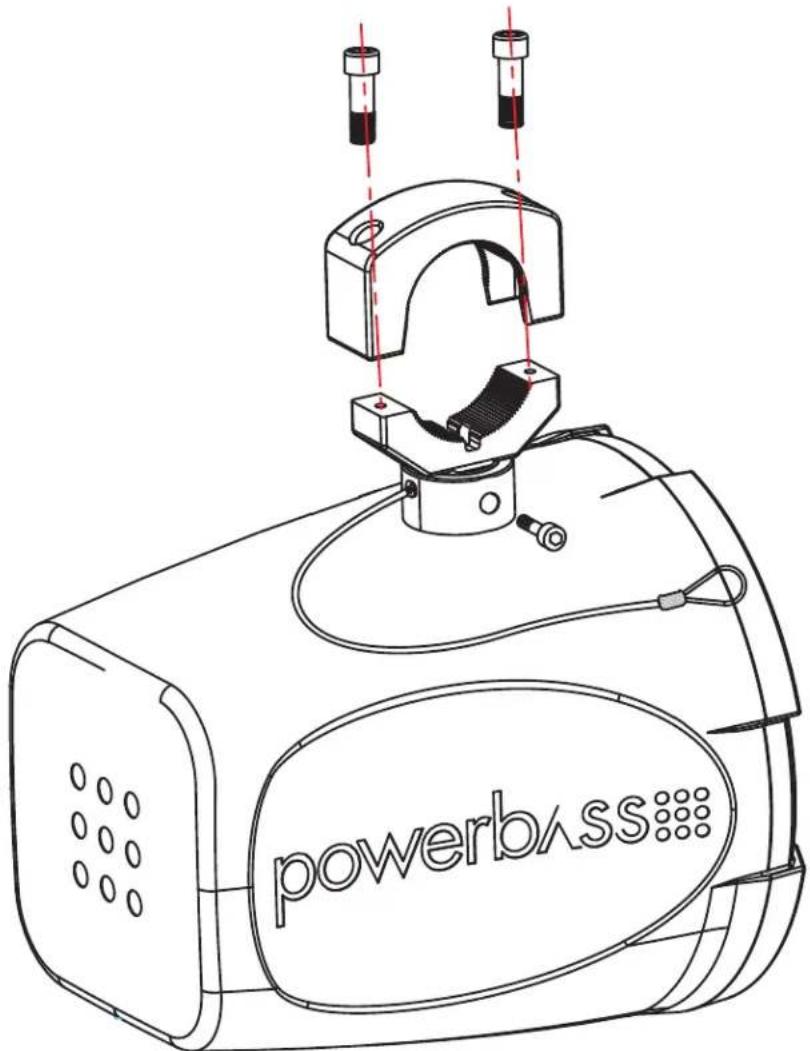
Fig.2
MOUNTING, WIRING AND CONNECTIONS
PowerBass highly recommends that a professionally trained installer mount and wire the Pod. This application guide explains how to install PowerBass waketower Pods in a general sense, it may not show the exact installation method for your particular situation. If you feel unsure about personally installing this wakeboard tower Pod speaker system, don't attempt the installation yourself.
CAUTION: Failure to properly mount the Pod could result in the following:
A) The reliability and performance will suffer due to the movement of the Pod caused by vibration,
B) A serious safety hazard can result if the Pod is not securely mounted and falls from the tower.
Read these instructions thoroughly before starting installation. For easier assembly, we suggest you run all wires prior to mounting your Pod speakers.
- Determine where the Pod will be placed on the tower bar and a what angle the speaker will be mounted. Mark the bar with a felt-tip pen. This will be where the speaker wire comes through the bar and to the Pod. NOTE: This first step is VERY important. Make sure of the exact location and orientation you want BEFORE drilling any holes.
- Drill a 0.25 to 0.5-inch hole for the speaker wire on the mark made on the tower bar. De-burr the hole to keep from damaging the wire's insulation and causing a short. It is a good idea to treat the hole to inhibit corrosion.
- Remove the Allen Screws securing the Aluminum Top Bracket to the Aluminum Base.
- Using the Safety Cable hang the Pod on the tower bar near its eventual mounting location.
- Run minimum of 16-gauge speaker wire (included) through the tower bar and leave 8" to 12" of the wire hanging out of the hole you previously drilled. Then run the speaker wire through the hole in the insert.
- Connect the speaker wire coming out of the tower bar to the speaker wire coming out of the Pod. Note the polarity (the black stripe wire from the Pod is negative –)
- When using the RGB Illumination, see pg 10 for detailed instructions.
- Hold the Pod and place the Aluminum Base flush with the tower bar. Be sure to push any excess speaker wire back into the tower bar. Make sure the speaker hole from the Aluminum Base of the Pod (or insert) is aligned with the hole in the tower bar—use caution not to pinch the wires.
- Affix the Aluminum Top Bracket over the tower bar and screw in the two Allen Head bolts at first by hand. Next using the supplied Allen wrench tighten the bolts evenly. When fully tightened the Pod should not move.
- Connect the other end of the speaker wire to the amplifier following the instructions supplied with the amplifier. Be sure to observe proper polarity of the speaker wire when connecting to the amplifier.
- To use the Safety Cable, detach it from the pod. Wrap it around your tower bar and back through the large eyelet. Then pull tight and secure back onto the pod. See Fig. 3
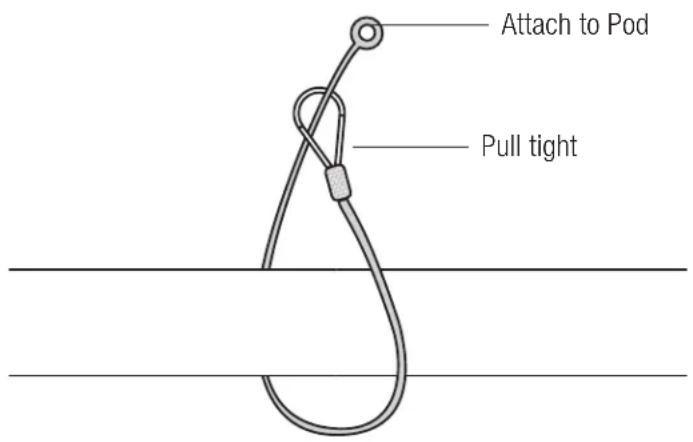
Fig. 3
RECOMMENDED POWER
The XL-POD6LR is designed to handle up to 75 watts RMS (continuous) and 150 watts maximum (peak) of input power.
The XL-POD8LR is designed to handle up to 125 watts RMS (continuous) and 250 watts maximum (peak) of input power.
The XL-POD10LR is designed to handle up to 150 watts RMS (continuous) and 300 watts maximum (peak) of input power.
Therefore an outboard amplifier optimized at 4-ohms will be necessary to drive this system. You will want to use an amplifier powerful enough to provide listening comfort. Generally speaking, an amplifier with the same or slightly higher power rating than the RMS power handling should be selected.
CROSSOVER SETTINGS
The POD system is designed for full range listening enjoyment. If your amplifier includes an electric (active) crossover, experiment using the settings in High Pass or the Full position. Optimum adjustment can be achieved after listening to your favorite music and varying the crossover frequency.
BREAK IN PERIOD
To get the most from your speaker we recommend a “break-in” period of at least 40 hours at no more than 1/3 of maximum volume. During this time the cone and spider assembly will gradually break in resulting in greater performance and more listening enjoyment.
CAUTION: Damage to the woofers can occur when an amplifier, regardless of its wattage, is made to play at higher listening levels than its power can clearly produce (usually beyond the "1 to 2 o'clock" position on the amplifier gain). This results in very high levels of audible distortion. Contrary to popular belief, a speaker is more likely to be damaged by trying to get too much volume from a low-powered amp than from a high-powered amp.
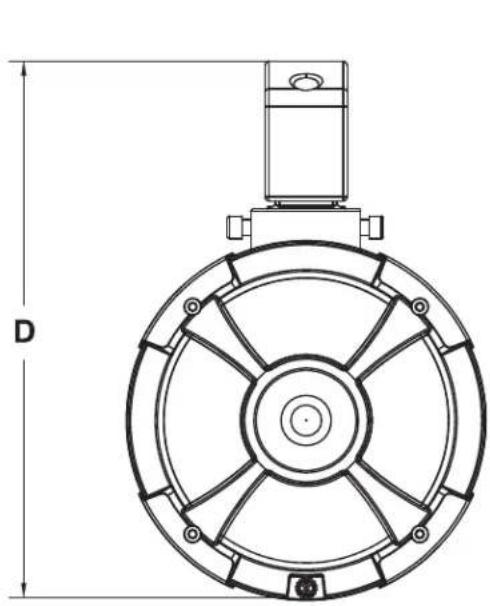
ENCLOSURE DIMENSIONS AND SPECIFICATIONS
natural_image
Technical line drawing of a circular mechanical component with radial slots and mounting bracket (no text or symbols)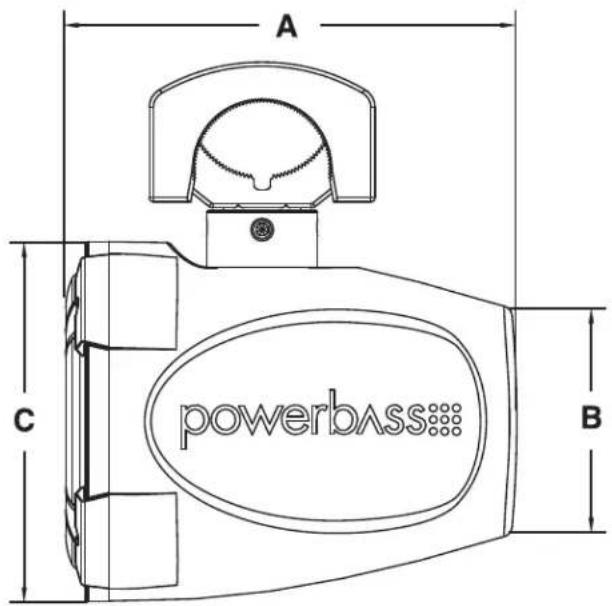
| Specifications XL | POD6LR XL-POD8LR XL-POD10LR | ||
| Woofer Size 6.5" 8.0" | 10.0" | ||
| Power RMS/Peak 75W | 150W 125W/250W | 50W/300W | |
| Frequency Response 50Hz - 22kHz 45Hz - 22kHz 40Hz - 22kHz | |||
| Nominal Impedance 4-ohm 4-ohm 4-ohm | |||
| Sensitivity (1W/1M) 10 dB 101dB 101dB | |||
| Hang Weight | 8.4 lbs (3.8 kg) | 11.4 lbs (5.2 kg) | 18.8 lbs (8.5 kg) |
| Dimensions | A | B | C | D |
| XL-POD6LR | 8.6" (219.7mm) | 4.25" (108.7mm) | 6.8" (175mm) | 10.4" (265mm) |
| XL-POD8LR | 11.37" (288.7mm) | 5.75" (146.1mm) | 8.7" (221mm) | 12.2" (311mm) |
| XL-POD10LR | 12.5" (317.5mm) | 7.15" (181.7mm) | 10.9" (278mm) | 14.4" (365mm) |
Your PowerBass Xtreme Long Range Pods come equipped with RGB lighting that can be controlled via the supplied remote control allowing the user to pick between 20 different colors and over 19 different lighting effects. You can link multiple speakers to a single RF receiver for easy control from a single remote.
Once you have found your mounting location and made the proper fitment tests you will next need to route your RGB extension cable. This supplied 18ft extension wire allows you to easily route to other RGB equipped speakers and up to your radio / control panel. Connect the extension cable to the speakers RGB plug / connectors matching colors for example Green to Green, Blue to Blue. Route your wire to the next speaker in the series (for a daisy chain type installation see pg 14 for details) or route the RGB cable up to the radio / control panel.
After you have connected all desired Pods RGB wires and routed your extension wire it is now time to connect the RGB RF Receiver.
If you used a daisy chain connection style you will have a single set of RGB wires to connect to your RGB RF Receiver, however if you simply ran them all to your radio/ control panel then you will now need to connect all corresponding colors to each other. Once this is ready you can now connect the RGB wires to the RGB side of the RF Receiver.
Next you will need to connect the power side of the RGB RF Receiver to 12V power and Ground. To prevent battery drain install a switch on the RED +12V wire so you can turn off the RGB RF Receiver when not in use or when stored.
- You can use the remote turn on lead from your radio to trigger a relay. However do not connect your RGB RF Receiver to the head unit Remote wire as this pulls more current than a typical turn on circuit provides.
- You can also use a rocker style switch to turn the receiver on and off. If your boat comes equipped with a radio power rocker switch you can use this as your power source as well.
**Do not install the RGB RF receiver in enclosed metal, as this may interfere with connectivity between it and the remote controller.
If you do not want to use a remote control and only want to display a single color this can easily be done by connecting the BLACK wire in the 4-wire RGB cable to +12V Power and then connecting the following wire to ground to illuminate the corresponding color.
**You will need to connect the BLACK +12V power to switched power either with a relay or switch to prevent battery discharge when using single color mode.
COLOR COMBINATIONS:
Connecting multiple Pods to a single receiver allows you to control the lighting and effects using a single remote control. You can connect up to 12 speakers or Pods (6 pair) to one receiver.
RGB LED RF REMOTE CONTROL
Your PowerBass Xtreme Marine Pods comes compete with RGB illumination that is controlled with the supplied RF Remote Control. Use this remote control to select up to 20 different colors and over 15 different lighting effects.
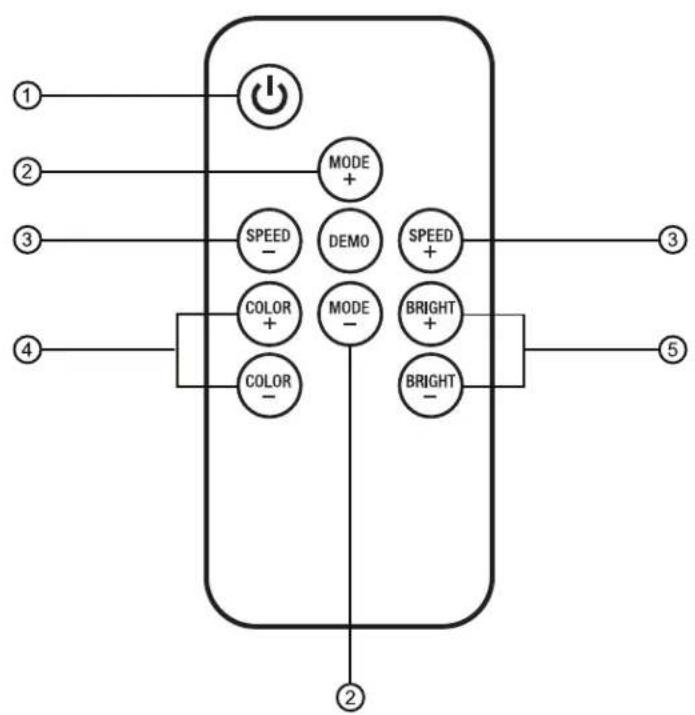
- Turn On/OFF - This button turns on or off the RGB RF Receiver.
- Dynamic Lighting Effect Mode Adjustment - Switch between static lighting or dynamic effect mode, or switch between effect when in Dynamic mode.
- Dynamic Lighting Speed Adjustment - Adjust the speed up + or down - to the desired pattern. If in Static mode the unit will switch to dynamic when the speed is adjusted.
- Static Color Adjustment - Switch to Static Color mode. Select between 20 different colors.
- Brightness Adjustment - Static color mode brightness adjustment. Press + to increase brightness or - to decrease brightness. If in Dynamic mode the unit will switch to Static when the brightness is adjusted.
CARE AND CLEANING
The enclosure is constructed of high impact molded plastic and should be cleaned after use with soapy water and a damp cloth. The polished aluminum mounting hardware can be cleaned the same way.
Do not use any cleaners or solvents on the enclosure or grills, otherwise the UV inhibitors may be affected and/or the plastics may discolor.

Product Disposal – Certain international, national and/or local laws and/or regulations may apply regarding the disposal of this product. For further detailed information, please contact the retailer where you purchased this product or the PowerBass Importer/Distributor in your country.
This manual is the exclusive property of PowerBass USA, Inc. Any reproduction of this manual, or use other than its intentions is strictly prohibited without the express consent of PowerBass USA, Inc. Copyright 2017 PowerBass USA, Inc.
POWERBASS XTREME SPEAKER LIMITED WARRANTY POLICY
PowerBass USA, Inc. offers limited warranty on PowerBass products under normal use on the following terms:
PowerBass Xtreme Speakers are to be free of defects in material and workmanship for a period of one (1) year. The warranty is extended to three (3) years for parts and labor, if an Authorized PowerBass Xtreme Dealer completes the installation.
This warranty applies only to PowerBass products sold to consumers by Authorized PowerBass Dealers in the United States of America. Products purchased by consumers from a PowerBass dealer in another country are covered only by that country's Distributor and not by PowerBass USA.
This warranty covers only the original purchaser of PowerBass product. In order to receive service, the purchaser must provide PowerBass with a valid purchase receipt from an authorized reseller stating the consumer name, dealer, product and date of purchase.
Products found to be defective during the warranty period will be repaired or replaced (with a product deemed to be equivalent) at PowerBass's discretion and will not be liable for incidental or consequential damages. PowerBass will not warranty this product under the following situations:
- Speakers received with bent frames or water damage
- Abuse such as holes in the cone, surround or ripped spider
- Voice coil damage due to amplifier clipping or distortion
- Product that has not been installed according to this owners manual
Any implied warranties including warranties of fitness for use and merchantability are limited in duration to the period of the express warranty set forth above. Some states do not allow limitations on the length of an implied warranty, so this limitation may not apply. No person is authorized to assume for PowerBass any other liability in connection with the sale of this product.
Please call (909) 923-3868 for PowerBass Customer Service. You must obtain an RA# (Return Authorization Number) to return any product to PowerBass. The RA number must be prominently marked on the outside of the shipping carton or the delivery will be refused. Please pack your return carefully; we are not responsible for items damaged in shipping. Return the defective product along with a copy of the original dated retail sales receipt, plus \$12.00 for handling and diagnostic evaluation to:
Residents of HI, AK and US territories will be charged for return shipping. All inquires regarding service and warranty should be sent to the above address.

PowerBass Xtreme (PBX) – A division of PowerBass USA, Inc.
2133 S. Green Privado – Ontario, CA 91761
Tel. (909) 923-3868 - Fax (909) 923-8048
www.powerbassusa.com
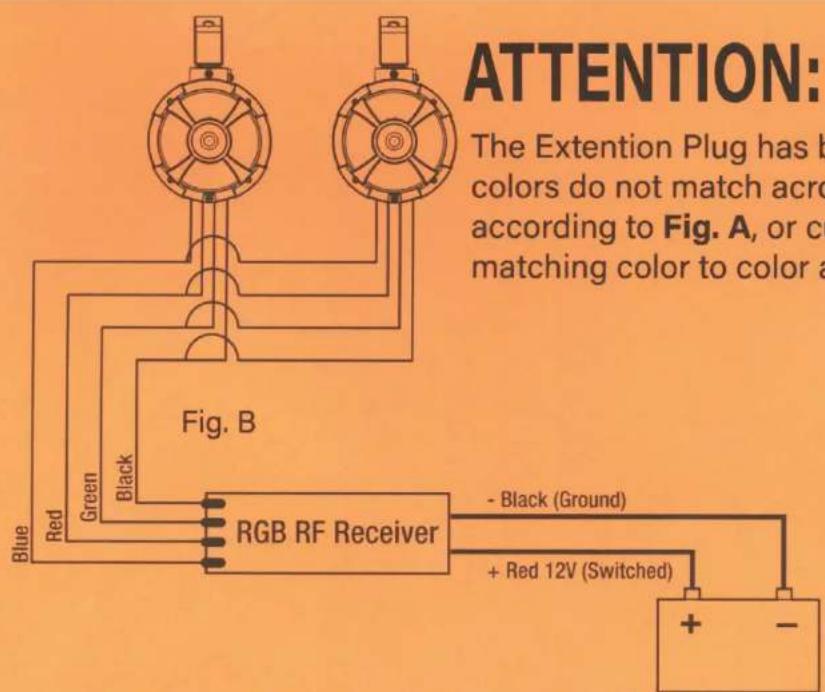
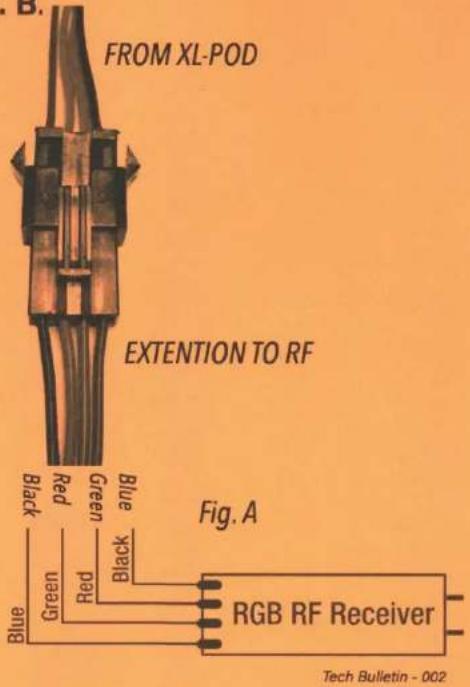
ATTENTION: The XL-POD RGB Extention Wire Plug Has been found to be pinned incorrectly
The Extention Plug has been pinned backwards. Notice the wire colors do not match across the plug. Simply wire to the Rf Reciever according to Fig. A, or cut the plug off of both sides and wire together matching color to color as seen in Fig. B.
Connecting multiple Pods to a single receiver allows you to control the lighting and effects using a single remote control. You can connect up to 12 speakers or Pods (6 pair) to one receiver.
NOTE: USE ONLY ONE RF RECEIVER to control ALL connected XL-POD lighting effects at once.
powerbass: CAR AUDIO
POWERSPORTS
MOBILE
MARINE
powerbass
powerbass®
www.powerbassusa.com

@powerbassusainc

@powerbassusa

@PowerBass USA
- powerbass® X T R E M E
- with Remote Controlled RGB Illumination
- Application Guide
- Δ Warning Δ
- POWERBASS XTREME LONG RANGE POD FEATURES
- UNPACKING THE ENCLOSURE
- INSTALLATION EXPERIENCE
- POD PLACEMENT TIPS AND WIRING RECOMMENDATIONS
- MOUNTING, WIRING AND CONNECTIONS
- Read these instructions thoroughly before starting installation. For easier assembly, we suggest you run all wires prior to mounting your Pod speakers.
- RECOMMENDED POWER
- CROSSOVER SETTINGS
- BREAK IN PERIOD
- ENCLOSURE DIMENSIONS AND SPECIFICATIONS
- RGB LED RF REMOTE CONTROL
- CARE AND CLEANING
- POWERBASS XTREME SPEAKER LIMITED WARRANTY POLICY
- ATTENTION: The XL-POD RGB Extention Wire Plug Has been found to be pinned incorrectly
- POWERSPORTS
- MOBILE
- MARINE
- powerbass®
Brand : PowerBass
Model : XL-POD8LR
Category : Loudspeaker