
RoadMate 1230 - Gps MAGELLAN - Free user manual and instructions
Find the device manual for free RoadMate 1230 MAGELLAN in PDF.


| Product Type | Vehicle Navigation System (GPS) |
| Brand | Magellan |
| Model | RoadMate 1230 |
| Display | Touchscreen color display |
| Dimensions | Approx. 4.5 x 3.0 x 0.7 inches (114 x 76 x 18 mm) |
| Weight | Approx. 5 oz (142 g) |
| Power Source | 12V vehicle power adapter (included); optional AC adapter |
| Battery | Rechargeable Li-ion, non-removable; charge time approx. 6 hours |
| Processor | Centrality chipset |
| Maps | NAVTEQ preloaded maps (Lower 48 states, Puerto Rico, Hawaii) |
| Points of Interest (POI) | Preloaded with categories and subcategories; user-created POI via SD card |
| Address Entry | QuickSpell feature with city, zip code, or previous city |
| Route Calculation | Fastest Time, Shortest Distance, Least/Most Use of Freeways |
| Trip Planner | Multiple destinations with optimization and guide me |
| Traffic | RDS-TMC TrafficKit (free subscription included; requires activation) |
| Mounting | Windshield or dashboard mount with adhesive disk; adjustable swivel mount |
| Connectivity | USB connector, SD card slot, FM antenna connector |
| Safety Features | Auto power-off, on-battery dimming, detour options, mute function |
| Cleaning and Care | Clean mount area with alcohol pad; avoid extreme temperatures |
| Spare Parts and Repairability | Battery non-removable; contact Magellan support for battery issues; accessories available at Magellan store |
| General Information | FCC Class B compliant; designed for vehicle navigation assistance only |
Frequently Asked Questions - RoadMate 1230 MAGELLAN
User questions about RoadMate 1230 MAGELLAN
0 question about this device. Answer the ones you know or ask your own.
Ask a new question about this device
Download the instructions for your Gps in PDF format for free! Find your manual RoadMate 1230 - MAGELLAN and take your electronic device back in hand. On this page are published all the documents necessary for the use of your device. RoadMate 1230 by MAGELLAN.
USER MANUAL RoadMate 1230 MAGELLAN
Magellan® RoadMate™ 1230
User Manual
IMPORTANT SAFETY WARNINGS
The Magellan RoadMate is a vehicle-navigation aid designed to assist you in arriving to your selected destinations. When using the Magellan RoadMate, these safety rules must be followed to prevent accidents that can result in injury or death to yourself or others:
- California and Minnesota law prohibits mounting any item to your windshield. Please check with your state or local law enforcement for applicable regulations regarding windshield mounting. Go to www.magellanGPS.com for alternate mounting solutions. An adhesive disk is supplied with the Magellan RoadMate for use as an alternate mounting solution to the dashboard.
- When driving, the need to view the display is minimal. The driver should enter data or program the Magellan RoadMate only when the vehicle is stopped. Only a vehicle passenger should enter data or program the Magellan RoadMate while the vehicle is moving.
- It is your responsibility to comply with all traffic laws.
- Every attempt is made to ensure that the database is accurate. However, roadways, points of interest (POIs), and business and service locations may change over time. The database does not include, analyze, process, consider, or reflect any of the following: legal restrictions (such as vehicular type, weight, height, width, load and speed restrictions); road slope or grade; bridge height, width, weight, or other limits; population density; neighborhood quality or safety; availability or proximity of law enforcement, emergency rescue, medical, or other assistance; construction work zones or hazards; road or lane closures; road, traffic, or traffic facilities' safety or condition; weather conditions; pavement characteristics or conditions; special events; traffic congestion. It is your responsibility to disregard any unsafe, hazardous, or illegal route suggestions.
- Keep the Magellan RoadMate safe from extreme temperature conditions. For example, do not leave it exposed to direct sunlight for an extended period of time.
- Take care when mounting the Magellan RoadMate in your vehicle, whether using the windshield mount or other mounting accessories, that it does not obstruct the driver's view of the road, interfere with the operation of the vehicle's safety devices such as air bags, or present a hazard to occupants of the vehicle should the Magellan RoadMate be dislodged while driving. You assume the risks associated with damage to your vehicle or vehicle occupants as the result of your choices in mounting the Magellan RoadMate.
- The battery in the Magellan RoadMate is rechargeable and should not be removed. In the event it should need to be replaced, please contact Magellan Technical Support.
About Charging the Magellan RoadMate
- An optional AC adapter is available as an accessory for your Magellan RoadMate. Use of another type of AC adapter can result in malfunction and/or possible fire hazard due to battery over heating.
- Use only the vehicle power cable approved for / supplied with your Magellan RoadMate. Use of another type of vehicle power cable will result in malfunction and/or damage to the receiver.
- For safety reasons, the battery in your Magellan RoadMate will stop charging when the ambient temperature is less than 32^ F ( 0^ C) or more than 113^ F ( 45^ C).
- It will take approximately 6 hours of charging the Magellan RoadMate through the vehicle power adapter or optional AC adapter to obtain a full battery charge.
About the Battery
- Do not attempt to replace the battery. Please contact Magellan Technical Support for issues related to the battery.
- Use only the charger approved for your Magellan RoadMate.
IMPORTANT SAFETY WARNINGS
Federal Communication Commission Interference Statement
This equipment has been tested and found to comply with the limits for a Class B digital device, pursuant to Part 15 of the FCC Rules. These limits are designed to provide reasonable protection against harmful interference in a residential installation. This equipment generates, uses and can radiate radio frequency energy and, if not installed and used in accordance with the instructions, may cause harmful interference to radio communications. However, there is no guarantee that interference will not occur in a particular installation. If this equipment does cause harmful interference to radio or television reception, which can be determined by turning the equipment off and on, the user is encouraged to try to correct the interference by one of the following measures:
- -Reorient or relocate the receiving antenna.
- Increase the separation between the equipment and receiver.
- Connect the equipment into an outlet on a circuit different from that to which the receiver is connected.
- -Consult the dealer or an experienced radio/TV technician for help.
This device complies with Part 15 of the FCC Rules. Operation is subject to the following two conditions: (1) This device may not cause harmful interference, and (2) this device must accept any interference received, including interference that may cause undesired operation.
FCC Caution: Any changes or modifications not expressly approved by the party responsible for compliance could void the user's authority to operate this equipment.
IMPORTANT NOTE:
FCC Radiation Exposure Statement:
This equipment complies with FCC radiation exposure limits set forth for an uncontrolled environment. End users must follow the specific operating instructions for satisfying RF exposure compliance.
This transmitter must not be co-located or operating in conjunction with any other antenna or transmitter.
In order to maintain compliance with FCC regulations, shielded cables must be used with this equipment. Operation with non-approved equipment or unshielded cables is likely to result in interference to radio and TV reception. The user is cautioned that changes and modifications made to the equipment without the approval of manufacturer could void the user's authority to operate this equipment.

The Magellan RoadMate must be installed and operated at a distance no closer then 8 inches (20 cm) from the user.
This Class B digital apparatus meets all requirements of the Canadian Interference-Causing Equipment Regulations.
Operation is subject to the following two conditions:
- This device may not cause interference and
- This device must accept any interference, including interference that may cause undesired operation of the device.
IMPORTANT NOTE:
IC Radiation Exposure Statement:
This equipment complies with IC radiation exposure limits set forth for an uncontrolled environment. End users must follow the specific operating instructions for satisfying RF exposure compliance.
This transmitter must not be co-located or operating in conjunction with any other antenna or transmitter.
The information provided in this document is subject to change without notice. Improvements and enhancements to the product may occur without any formal notification. Check the Magellan website (www.magellanGPS) for product updates and additional information.
© 2008 Magellan Navigation, Inc. All rights reserved. The Magellan Logo, Magellan, Magellan RoadMate, TrueView, SmartDetour, and SmartVolume are trademarks of Magellan Navigation, Inc. No part of this user manual may be reproduced or transmitted in any form or by any means, electronic or mechanical, including photocopying and recording, for any purpose other than the purchaser's personal use, without the prior written permission of Magellan Navigation, Inc.
604-0104-001 A
Table of Contents
Magellan RoadMate 1230 ....1
Magellan RoadMate 1230 2
Installation Instructions ....3
Selecting the Location 3
Cleaning the Area 3
Applying the Adhesive Disk .... 3
Attach the Cradle to the Swivel Mount 4
Secure the Swivel Mount to the Windshield or Adhesive Disk 4
Attaching the Magellan RoadMate to the Cradle 4
Adjust the Mount for Optimum Viewing 4
Connecting Power 5
Check Connection and Final Adjustments 5
Security 5
Region 5
Fundamentals 6
Powering on the Magellan RoadMate 6
Turning the Magellan RoadMate On 6
Turning the Magellan RoadMate Off 6
Selecting Auto-Power Shutdown Time 6
Volume 6
Changing the Volume from the Map Screen. 6
Changing the Volume from User Options 7
Brightness 7
Accessing the Brightness Control 7
The Main Menu 7
Accessing the Main Menu 7
.Main Menu - Page 1 8
.Main Menu - Page 2 9
The Keypad 10
Keypad Overview 10
Special Keys 10
Selecting From List 10
Notes on Entering Data 11
Map Screen 12
Accessing the Map Screen 14
2D Mode 14
Setting the Map Modes (2D or 3D) .... 14
Panning on the Map 14
Saving a Position While Panning 14
Routing to a Panned Position 15
Current Location Screen 15
Accessing the Current Location Screen 15
Saving Your Current Location to Your Address Book 15
Maneuver List Screen 16
Accessing the Maneuver List 16
Excluding a Maneuver 16
GPS Status Screen 16
Accessing the GPS Status Screen 17
Zoom Levels 17
Setting Zoom Levels 17
Volume 17
Changing the Volume from the Map Screen. 17
Home Address 18
Creating a Home Address 18
Creating a Route to the Home Address 18
Changing the Home Address 18
Accessing the Home Address from the Address Book 19
Enter Address 20
Entering an Address 20
Creating a Route to a New Address 20
My Addresses 22
Accessing the My Addresses Menu 22
Previous Destinations 22
Routing to a Previous Destination (Method 1) ...... 22
Routing to a Previous Destination (Method 2) ...... 23
Saving a Previous Destination to Your Address Book 23
Deleting a Previous Destination 23
Address Book 24
Accessing an Address in Your Address Book 24
Routing to an Address in Your Address Book 24
Editing an Address in Your Address Book. 24
Deleting an Address in Your Address Book. 24
Favorites 24
Accessing an Address from Favorites 25
Routing to an Address from Your Favorites List 25
Editing an Address from Your Favorites List 25
Deleting an Address from Your Favorites List 25
Creating a New Entry 25
Creating a New Entry to You Address Book by Selecting on the Map 25
Creating a New Entry to You Address Book by Entering an Address 26
Creating a New Entry to You Address Book from a POI 26
Creating a New Entry to You Address Book from by Intersections 27
Intersection 27
Creating a Route to Two Intersecting Streets 27
Points of Interest (POI) 29
Categories and Subcategories 29
Creating a Route to a POI by Category 29
Creating a Route to a POI by Name 30
Enhanced POIs 30
Loading a POI File 30
Selecting Categories for Display on the Map 31
Setting Alarms 31
Setting Alarm Parameters 32
Routing to an Enhanced POI 32
Saving an Enhanced POI to Your Address Book 33
Travelling on a Route 34
Map Screen 34
Split-Screen 34
Maneuver List ....34
You Have Arrived 35
Types of Routes 35
Route Method 35
Special Routing Functions 36
Routing to a POI Near an Approaching Freeway Exit 36
Cancelling a Route 36
Detouring off a Route 36
Changing the Route Method 37
Traffic 38
Activating the Free Subscription 38
Glossary 39
Understanding How The TrafficKit Works 39
RDS-Traffic Operating Modes 39
Selecting Categories of Traffic Events 40
Re-routing Mode 40
Traveling with the Re-routing Mode On 41
Alert Only Mode 41
Traveling with the Alert Mode On 42
Traffic Alert Icon 43
Viewing Traffic Details 43
Viewing Traffic Details at Higher Zoom Levels 43
How To Disable the RDS 43
FAQs 44
Trip Planner 45
Creating a Trip 45
Optimizing a Trip 46
Starting a Trip 47
Editing a Trip 47
Deleting a Trip 47
Renaming a Trip 47
Exit POIs 49
Routing to a POI Near an Approaching Freeway Exit 49
User Options 50
Selecting Map Region 50
Accessing System Settings 50
Checking Battery Life 50
Adjusting the Volume 50
Adjusting the Display Brightness 51
Setting Auto Power Off Time 51
Setting Time Zone 51
Selecting Units of Measure 52
Displaying Contact Us Information 52
Displaying Product Information 52
Performing Diagnostics 53
Accessing the Trip Computer 53
Selecting POIs to be Displayed on the Map 54
Deleting Addresses from the Address Book (Global) 54
Setting the Map in 3D or 2D Mode .... 54
Setting the Map Display to Heading Up or North Up 55
Setting Split Screen (TrueView™) Options 55
Setting Auto Night Map Display 55
Setting Detour Options 56
Using the Simulator 56
Setting Tone Options 57
Setting Text-To-Speech Use 57
Viewing Technical GPS Information 57
Setting the GPS Position 58
Backing Up and Restoring Data 58
Backing Up Data 58
Restoring Data 58
Viewing Map Information 59
Magellan RoadMate 1230
The Magellan RoadMate 1230 is a vehicle navigation product that utilizes GPS signals from satellites to calculate your precise location and compute details about its travel. Knowing its position and movement, it can then overlay this information on detailed maps provided by NAVTEQ ^® to provide a visual representation of your location.
With the Magellan RoadMate 1230 you can:
- Store your home address and quickly get routing details to your home.
- Create and save addresses in your address book that can be accessed at any time and get routing information to that address.
- Route to an address that you enter using the keypad and Magellan's QuickSpell feature for easy, errorless address entry.
- Route to any point of interest (POI) that has been preloaded into your Magellan RoadMate.
- Route to a POI that appears on the map while traveling simply by tapping on the POI icon.
- Route to an intersection by selecting the intersecting streets.
- Create a trip with multiple destinations using the trip planner. Handy for business people who need routing information to many destinations.
- View POIs that are ahead of you on the freeway. The exit POI function provides you with a list of gas stations, restaurants, hotels and auto repair shops located nearby exits you are approaching while traveling on a freeway.
- Customize your Magellan RoadMate to meet your needs using the User Options menu.
The interface for the Magellan RoadMate is easy and simple to follow once you understand the basics. You may never need to refer to this manual but if you do we have tried to present it in a form that you can access the function you are trying to complete and follow the steps provided.
The Magellan RoadMate has a built-in battery so in most cases you will be able to follow these instructions while reading them on your computer screen without plugging the Magellan RoadMate to AC power. You should note that while indoors you may not get any satellite signals so your location information would not be updated. However, the Centrality™ chipset installed in the Magellan RoadMate will get satellite signals in some very rough locations so you may notice the Magellan RoadMate computing a position, even indoors.
This document is set up to be printed on 8.5" x 11" (letter) paper should you desire a printed version for your reference.
Magellan RoadMate 1230
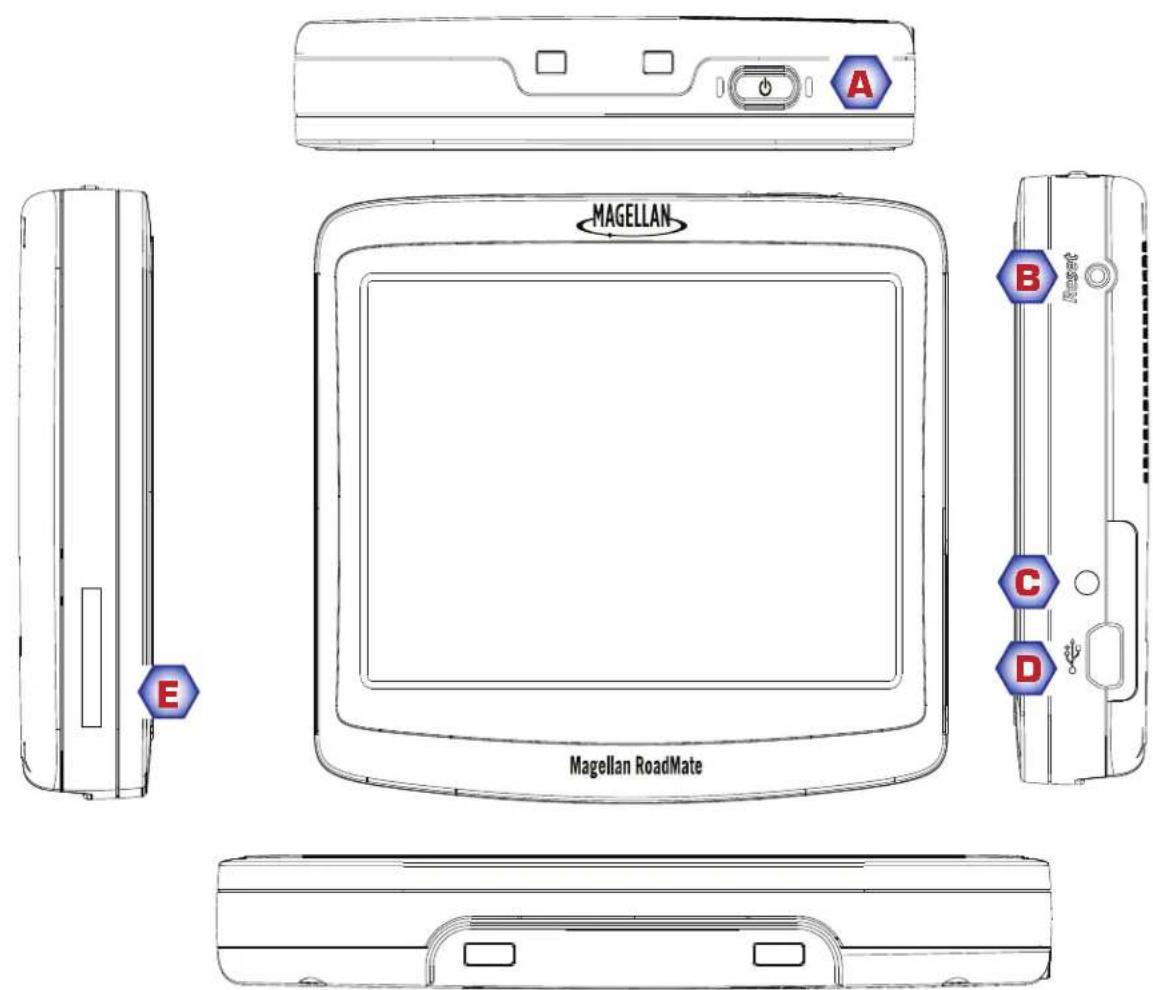
A Power Button
B Reset Button
C FM Antenna connector (traffic)
D USB connector. Power input from vehicle power adapter cable or AC power adapter (+5 VDC / 2A).
E SD Card slot
Installation Instructions
Installation of the Magellan RoadMate is simple and easy. The hardest part will be picking the best location.
Selecting the Location
A few tips on selecting the proper location.
- Mount the Magellan RoadMate in a place where it can be easily seen and will not interfere with your view of the road.
- The Magellan RoadMate should be mounted in such a way that the antenna, (located in the top of the receiver), has an unobstructed view of the sky through the windshield.
- Select whether it will be mounted using the adjustable mount to the windshield or an adhesive disk. Be sure to check your local and regional laws before mounting to the windshield. Some states, like California and Minnesota, have laws restricting the mounting of any device on the windshield. (Adhesive Disks are available from the Magellan Store at www.magellanGPS.com if one was not supplied with the Magellan RoadMate.)
- If planning to use the adhesive disk, a smooth surface on the dash board will need to be selected. Do not attach the adhesive disk to the windshield nor airbag covers.
- Make sure that the Magellan RoadMate nor any cabling will be disturbed in the event that the airbags are deployed.
Cleaning the Area
Use the alcohol pad that came with the Magellan RoadMate to clean the area on the windshield or dash that has been selected for mounting the Magellan RoadMate. Let the area dry completely.
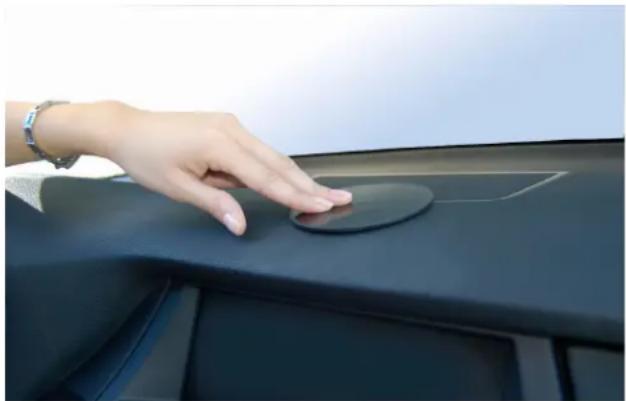
Applying the Adhesive Disk
(Skip if mounting directly to the windshield.) Remove the protective tape from the back of the adhesive disk. Apply the disk with the adhesive side towards the dash. Maintain pressure on the disk for 5 minutes to allow it to set in place. Allow the disk 24 hours to cure before continuing.
natural_image
Hand touching a circular electronic device on a dark vehicle dashboard (no visible text or symbols)Please note that the swivel mount supplied with the Magellan RoadMate may be different then the one shown in this document.
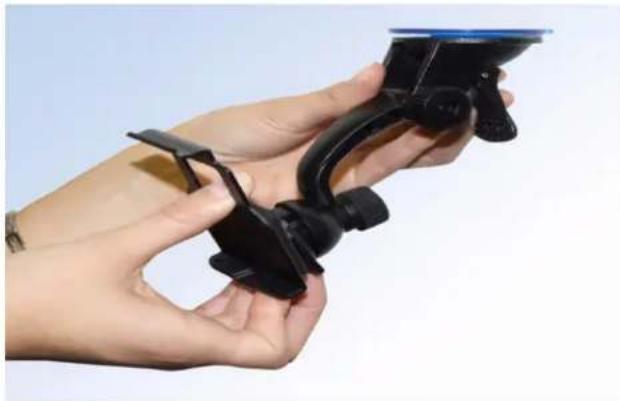
Attach the Cradle to the Swivel Mount
Line up the two tabs on the swivel mount with the holes on the back of the cradle. Push the cradle down until it locks in place with the swivel mount.
natural_image
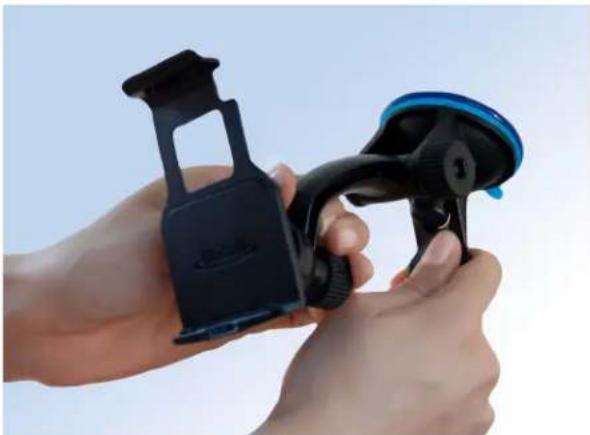
Close-up of hands holding a black plastic clip device with a blue top, against a plain light background (no text or symbols visible)Secure the Swivel Mount to the Windshield or Adhesive Disk
Make sure that the lever at the base of the adjustable mount is in the up position. Place the base of the swivel mount firmly over the area of the windshield to be used or the adhesive disk. Push the lever at the base of the swivel mount all the way down until it snaps in place. Carefully let go of the assembly, making sure that it is securely mounted.
natural_image
Close-up of hands holding a black Sony Smartwatch (no visible text or symbols)Attaching the Magellan RoadMate to the Cradle
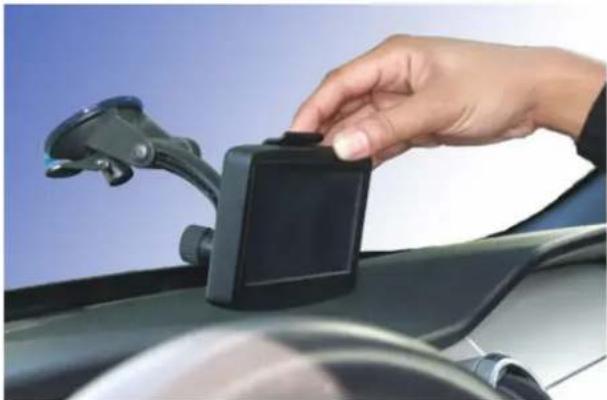
Align the tabs on the cradle to the indents on the bottom of the Magellan RoadMate. Swivel the cradle up so that it is flush against the back of the receiver and snap it into place.
natural_image
Close-up of a hand holding a black rectangular device mounted on a car hood (no visible text or symbols)Adjust the Mount for Optimum Viewing
Loosen the adjustment locking knobs and position the Magellan RoadMate for optimum viewing. Once set, tighten the locking knobs. (Never attempt to adjust the mount while driving.)
Connecting Power
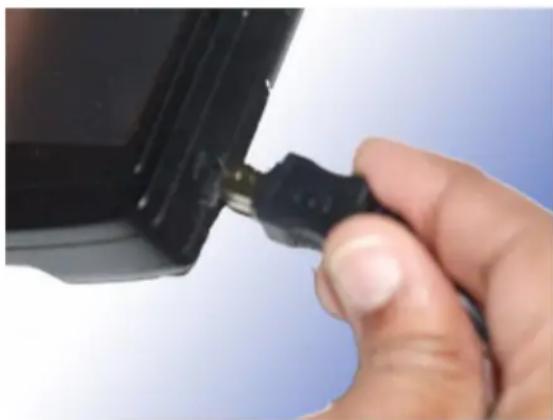
Plug the end of the cigarette lighter adapter into a 12 VDC vehicle power receptacle. Connect the other end of the cable to the Magellan RoadMate's USB connector as shown. If there is power at the receptacle, the Magellan RoadMate will power on. (Note: some vehicles apply power to the vehicle power receptacle only when the ignition is on.)
Connect the FM Traffic Antenna connector (from the vehicle power adapter cable) into the FM antenna recepticle located above the power connector.
natural_image
Close-up of a hand inserting a USB into a black plastic component (no text or symbols visible)Check Connection and Final Adjustments
If the power indicator light on the vehicle power cable connector is on, power is being supplied to the Magellan RoadMate. If it is not on, check the cable connection to the vehicle power receptacle. If the light is still not on, turn the vehicle's ignition on.
Press the power button (located at the bottom right side of the RoadMate) and hold down for a few seconds. The Magellan RoadMate will power on. Sit in a normal driving position and make any final adjustments to the swivel mount for optimum viewing. Tighten the adjusting knobs on the swivel mount to hold the Magellan RoadMate firmly in place.
Press the power button again to turn the Magellan RoadMate off and turn the ignition switch to the vehicle to off. The Magellan RoadMate is connected and ready for use.
Security
It is recommended that the Magellan RoadMate is not left in plain view while unattended for reasons of theft.
Please note that the Magellan RoadMate is a receiver only and does not transmit GPS location signals. The receiver nor the vehicle can be tracked using the Magellan RoadMate.
Region
By default, the Magellan RoadMate has the region setting for the lower 48 United States. When the receiver is turned on for the first time it may ask you to assign regions. Select the map region you want to use by tapping on the item from the list.
If you are travelling in other regions you will need to change the map region by using the following steps.
1 From the Main Menu, tap on the right arrow to access the second page of the Main Menu.
2 T a p o n User Options.
3 T a p o n Region.
4 Tap on the map region desired.
The Region option will display the map regions that are available for the Magellan RoadMate you are using.
Fundamentals
Powering on the Magellan RoadMate
The On/Off button is located on the bottom right side of the Magellan RoadMate as shown in the Overview chapter.
Turning the Magellan RoadMate On
- Press and hold the On/Off button for 1-2 seconds.
- Read the Warnings and tap OK.
Turning the Magellan RoadMate Off
- Press and hold the On/Off button for 1-2 seconds.
Selecting Auto-Power Shutdown Time
The Magellan RoadMate can be set up to shut down automatically using the time durations you can select. The receiver will turn off after the selected duration has passed when; A) the position hasn't changed and B) the touchscreen hasn't been pressed.
- Access the Main Menu.
- Tap the Next arrow to access the Main Menu Page 2.
- Tap User Options.
- Tap System Settings.
- Tap Power.
- Select Auto-Power Off time; Never, 10 Minutes, 20 Minutes or 30 Minutes.
- Tap Save.
- Tap the Back arrow to return to the Main Menu.
Volume
There are two ways to access the volume controls; one is tapping the speaker icon on the Map screen and the other is through User Options.
Changing the Volume from the Map Screen.
-
Tap the speaker icon .
-
Tap on the Mute button to mute the volume or tap inside the volume adjust bar below the Mute button to change the volume levels.
-
Step .
If you have the volume muted the speaker icon is displayed with a line through it indicating it is muted. To unmute, tap the speaker icon again and the Magellan RoadMate will automatically unmute. To make any other adjustments to the volume, press the speaker icon again.
Changing the Volume from User Options
- Access the Main Menu.
- Tap the Next arrow to access the Main Menu Page 2.
-
Tap User Options.
-
Tap System Settings.
-
Tap Volume.
-
Tap on the Mute button to mute the volume or tap inside the volume adjust bar below the Mute button to change the volume levels.
7.
Stape
Brightness
Accessing the Brightness Control
- Access the Main Menu.
- Tap the Next arrow to access the Main Menu Page 2.
- Tap User Options.
- Tap System Settings.
- Tap Brightness.
- Tap inside the brightness adjust bar to set the desired brightness.
7.
STape
On the Brightness screen there is a checkbox for “On-battery dimming (75%)” When checked, the Magellan RoadMate will dim to 75% of the brightness when operating exclusively on battery power. This prolongs the battery life between charges. It can be turned off by tapping on the checkbox.
The Main Menu
The Main Menu screen is the center for all the available functions for the Magellan RoadMate. The Main Menu consists of two pages with large, easy to access icons.
Accessing the Main Menu
From the Map screen tap the Menu button.
MENU
From the other screens, tap the Back button.

.Main Menu - Page 1
flowchart
graph TD
    A["Show Map"] --> B["Enter Address"]
    A --> C["Points of Interest"]
    B --> D["Enter Address"]
    C --> D
    D --> E["Current Location"]
    E --> F["322-55 PM 07/05/2007"]
    F --> G["Route Home"]
    G --> H["Route Change"]
    H --> I["3:20 PM MENU 0 mph"]
    I --> J["Search Points of Interest"]
    J --> K["Search By Name Search By Category Enhanced"]
    K --> L["Current region: Lower All States"]
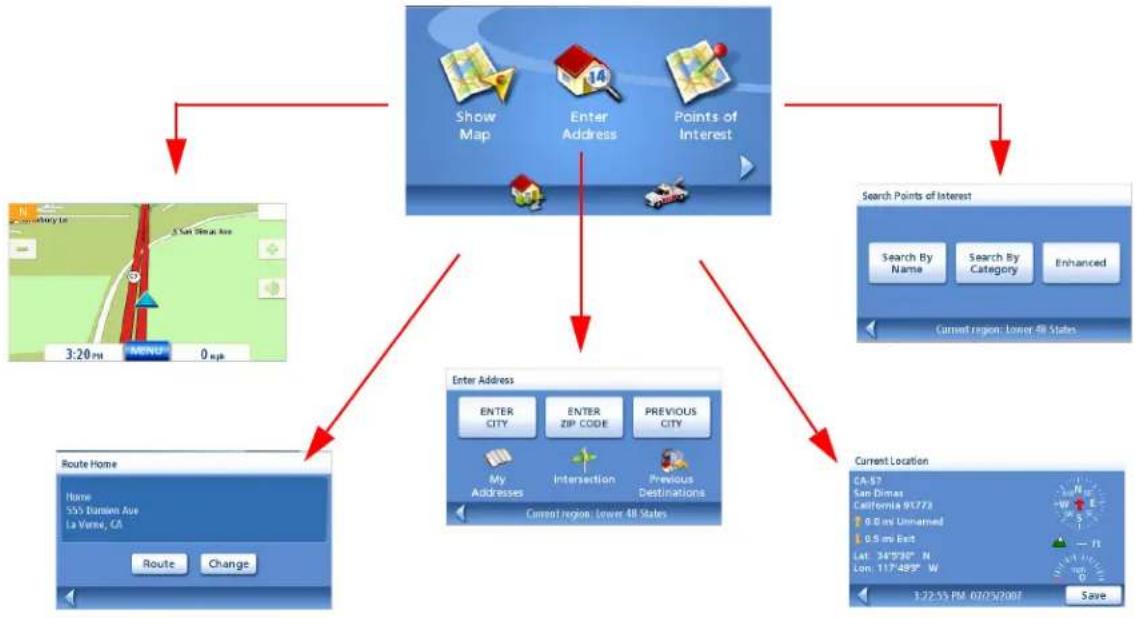
Show Map: Displays the map with your current position (if computing a position from the GPS signals) indicated by the blue triangle. See the Map Screen chapter for details.
Enter Address: Displays Enter Address menu. Addresses can be entered by first entering the city, zip code, or by selecting a city from a list of cities you have already used as destinations. Also provides access to your address book (my addresses) or to create a route to an intersection. See the chapter on Routing to an Address for details.
Points of Interest: Displays the Search Points of Interest menu. Search for POIs by entering the name or by selecting from a list of available categories.
Home: If you have created a Home address, press the Home button for quick access for routing to your home. If a Home address has not been created, a prompt is displayed to do so. See the Home Button chapter for more information.
Roadside Assistance: Displays the Locate screen for easy access to information about your present position should you require assistance.
.Main Menu - Page 2
flowchart
graph TD
    A["Trip Planner"] --> B["Exit POIs"]
    B --> C["User Options"]
    C --> D["Current Location"]
    D --> E["Exit (mi) Select Exit"]
    E --> F["Route Home"]
    F --> G["Home: 55% Dominion Ave La Verne, CA"]
    F --> H["Route Change"]
    I["User Options"] --> J["Region: System Settings, Trip Computer, PCI Selection, Address Book Options"]
    J --> K["3.72.55 PM 07/23/2007 Save"]
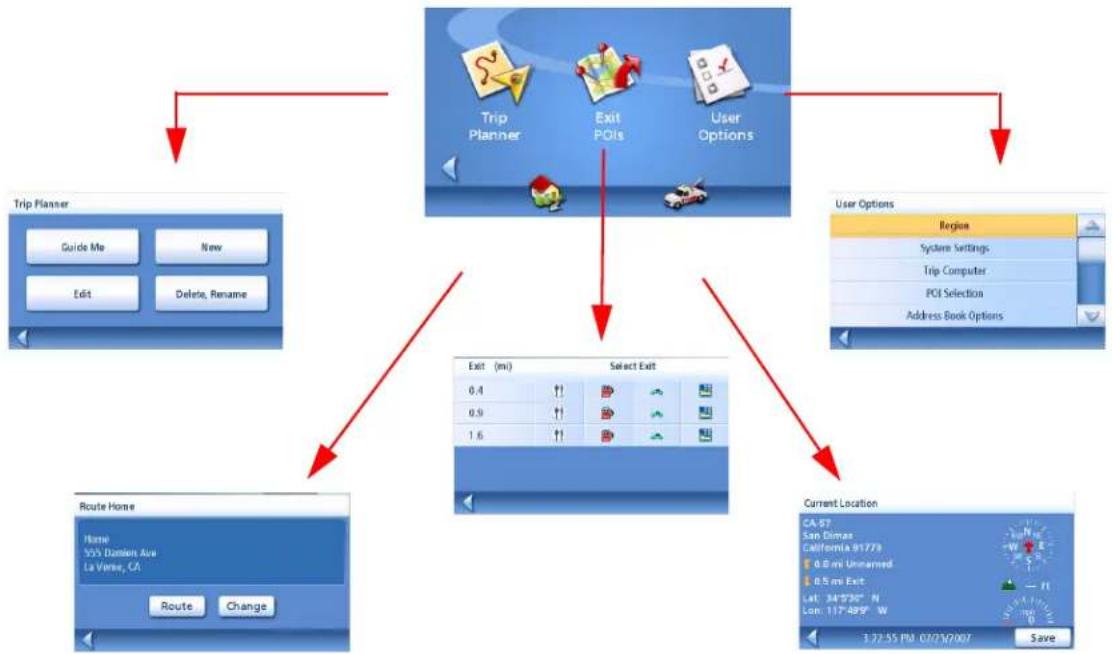
Trip Planner: Opens the Trip Planner menu where you can create, edit, delete, rename or activate a trip.
Exit POI's: (Accessible only while on a freeway.) Provides a listing of restaurants, gas stations, or hotels near approaching freeway exits. You can select one of the POIs presented and create a route to it.
User Options: Accesses the User Options menu. This menu can be used to access functions used to customize the Magellan RoadMate to your personal needs.
Home: If you have created a Home address, press the Home button for quick access for routing to your home. If a Home address has not been created, a prompt is displayed to do so. See the Home Button chapter for more information.
Roadside Assistance: Displays the Locate screen for easy access to information about your present position should you require assistance.
The Keypad
Understanding the keypad while entering an address is an important part of using your Magellan RoadMate. The keypad is the most common means of entering data into the Magellan RoadMate.
Keypad Overview
![More Space 123 & - . ' / @ : $ ! " # % ( ) * + < > = ? . _ \ ^ More Space 123 [ ] OK More Space ABC 0 OK](/content/2026/06/1181534/images/b7ab69cda26718ba8aee0b5112bee766e7f49e3bf96303018c65baf77d4df8bb.jpg)
Special Keys
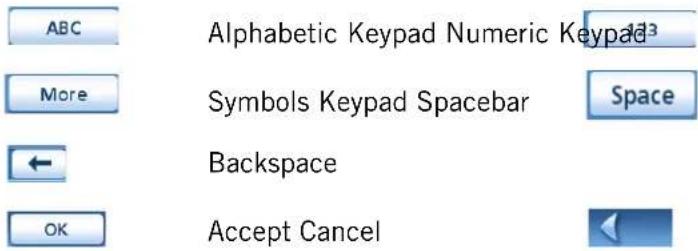
Selecting From List
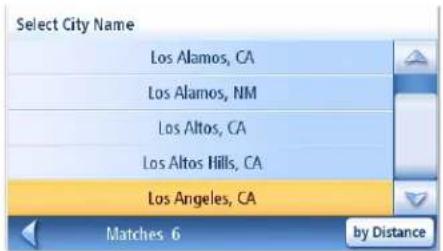
After tapping "OK" to accept your input you may get a list of items found in the database. The sample here shows the result of tapping "OK" after entering "LOS A". Use the scroll bar to move up and down the list and tap on the desired item in the list to continue.
Notes on Entering Data
If you are having trouble getting the results you expected here are a few useful tips.
- Make sure that you have spelled the name correctly. If you are unsure of the spelling, just enter a few characters and tap "OK". A long list of names will be displayed but you can step through the list and probably be able to find the correct spelling.
- Check for apostrophes and hyphens. If you are not seeing the POI you are looking for in the POI list, check to see if the name has an apostrophe or hyphen.
- When entering a street name you can use the street prefix (N. E. W. S. etc.) to narrow the search. For example to find N. Main St. you could enter "N. Main" or "N Main".
- The more characters you enter, the smaller the list of possible options from which to choose.
Map Screen
The most commonly used screen will be the Map screen. Whether on a route or just travelling around town, chances are the Map screen will be displayed. There are two unique modes that the Map screen can be displayed in; normal and routing.
In normal mode, your position is shown on the map along with the time and your speed. As you travel, your position will be updated, giving you a clear view of your position and surrounding streets.
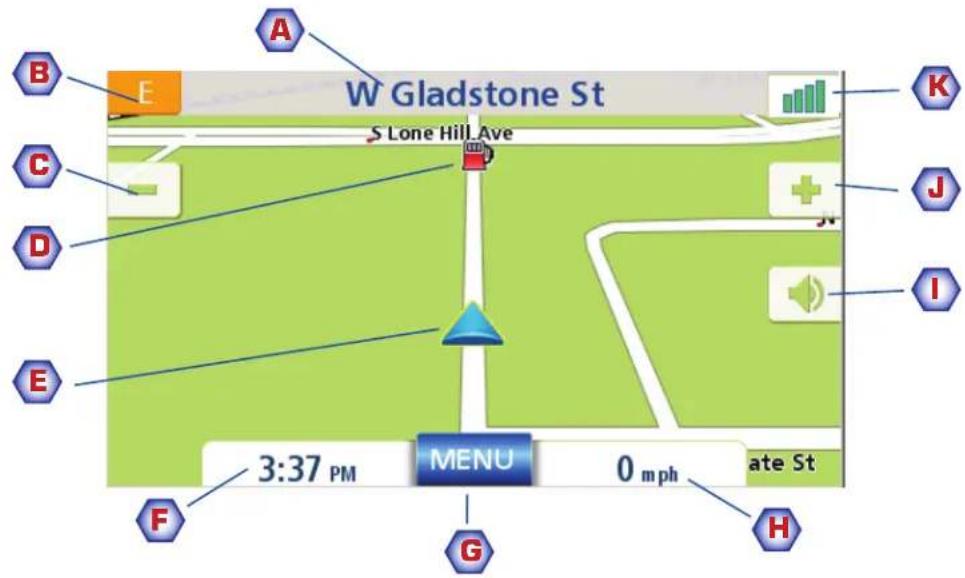
Map Screen - Normal Mode
A Street name currently on.
B Direction indicator. Tap to view the Current Location screen where you can save your position into your Address Book.
C Zoom out
D POI icon. Sample shown here is for a gas station. Tap on the POI icon to create a route to that POI. Note: If there are multiple POIs in the same area, a list of those POIs will be displayed. Tap on the name in the list to access the routing function.
E Current position icon
F Time of day
G Main Menu button. Tap to display the Main Menu.
H Current speed of travel
Volume control. Tap to display the Volume Setting screen where the loudness can be adjusted or muted. (If the volume has been muted, tapping this button unmutes the volume without displaying the Volume Setting screen.)
J Zoom in
K Satellite Status. All four bars in green is optimal. Tap to display the GPS Status screen.
In routing mode additional information is displayed providing detailed information about the route you've selected.
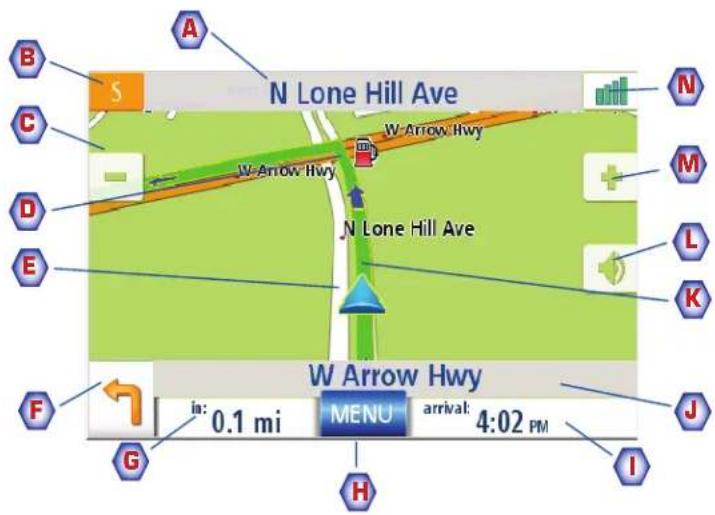
Map Screen - Routing Mode
A Street name currently on.
B Direction indicator. Tap to view the Current Location screen where you can save your position into your Address Book.
C Zoom out
D POI icon. Sample shown here is for a gas station. Tap on the POI icon to create a route to that POI. Note: If there are multiple POIs in the same area, a list of those POIs will be displayed. Tap on the name in the list to access the routing function.
E Current position icon
F Next maneuver icon. Tap on the icon to display the Maneuver List screen.
G Distance to next maneuver. Tap to repeat the last voice command.
H Main Menu button. Tap to go to the Main Menu screen. Note that the Main Menu screen is different when there is an active route. See the chapter on Routing for details.
Tap to toggle between distance remaining to reach destination, approximate time remaining until the destination is reached and the approximate the time of day to arrive at the destination.
J Street name for the next maneuver
K Graphical representation of the route
L Volume control. Tap to display the Volume Setting screen where the loudness can be adjusted or muted. (If the volume has been muted, tapping this button unmutes the volume without displaying the Volume Setting screen.)
M Zoom in
N Satellite Status. All four bars in green is optimal. Tap to display the GPS Status screen.
Accessing the Map Screen
- On the Main Menu, tap Show Map.

2D Mode
The map is normally displayed in 3D mode but you can set the map to 2D mode if so desired. Choose the mode that is best suited for you.
In 2D mode, you can pan across the map looking for a location to route to or save in your address book.
Setting the Map Modes (2D or 3D)
- From the Map screen, tap MENU.
- Tap the Next arrow to access page 2 of the Main Menu.
- Tap User Options.
- Tap Map Options.
- Tap 3D Map or 2D Map.
- Tap Save.
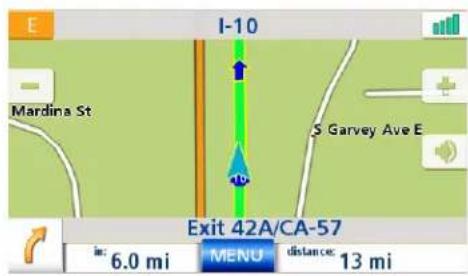
Map Screen in 2D Mode
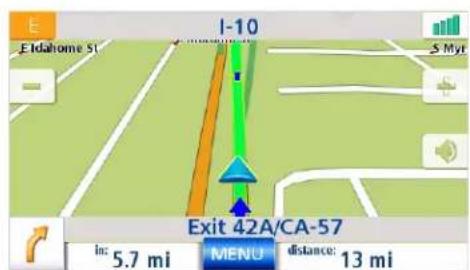
Map Screen in 3D Mode
Panning on the Map
-
While viewing the Map screen in 2D mode, slide your finger or stylus across the map.
-
The location icon changes to 📄. (The circle is the crosshairs for a position and the red arrow points to your current location.
-
To exit panning, tap and the map is returned to your current position.
Saving a Position While Panning
- Pan the map until the icon crosshairs are over the location you want to save to your address book. (Must be a position that is does not have a POI icon displayed.)
-
Tap in the center of the icon circle. (If nothing happens then you are not zoomed in enough. Tap the zoom in icon and try again.)
-
On the Route To This Address? screen, tap . Save
-
Edit Information:
Tap on the Edit Name line to create a name for this location. Tap on any of the three (work, home, mobile) phone buttons to enter a phone number. Tap on the Edit Information line to add additional information. (Up to 35 characters can be entered.)
-
If you want to tag this location as one of your favorites, tap on the "Favorite" check box.
-
When the details for this address are acceptable, tap . Save
-
If you want to now route to this address tap or if you are done tap.

- Tap to exit panning and return the icon to your current position.
Routing to a Panned Position
-
Pan the map until the icon crosshairs are over the location you want to route to.
-
Tap in the center of the icon circle. (If nothing happens then you are not zoomed in enough. Tap the zoom in icon and try again.)
-
On the Route To This Address? screen, tap, Route
-
Select the routing method desired and tap the Calculate Route button.
Current Location Screen
This screen is accessed from the Map screen whether you are on a route or just normal driving.
The Current Location screen displays approximate address information, the next and previous cross streets, as well as your latitude/longitude. To the right is a compass point in your direction of travel, calculated elevation, and speed. The bottom bar displays the current time and date.
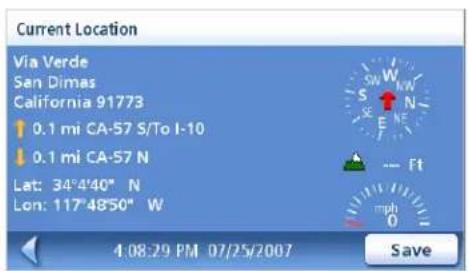
Accessing the Current Location Screen
- From the Map screen, tap the direction icon in the upper left corner.
Saving Your Current Location to Your Address Book
-
Access the Current Location screen.
-
Tap Save
-
Edit Information:
Tap on the Edit Name line to create a name for this location. Tap on any of the three (work, home, mobile) phone buttons to enter a phone number.
Tap on the Edit Information line to add additional information. (Up to 35 characters can be entered.)
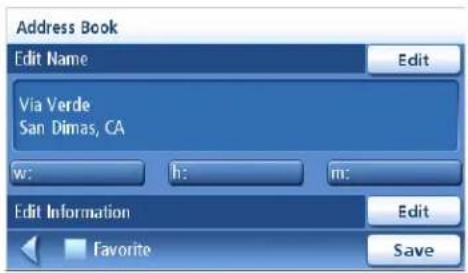
Saving Current Location
-
If you want to tag this location as one of your favorites, tap on the "Favorite" check box.
-
When the details for this address are acceptable, tap .

Maneuver List Screen
This screen is accessed from the Map screen and only when routing. (Note: The Maneuver List screen is not available until you begin moving on the route.)
Each line in the maneuver list provides details about the maneuver in the order that they are to be made, with the next maneuver at the top.
The bottom bar of the Maneuver List indicates the distance and time to the next maneuver as well as the total distance computed for the route.
The Maneuver List can be modified if you want to exclude one of the maneuvers should you want to avoid travelling one of the streets listed. Instructions to exclude one of the maneuvers is described in this chapter.
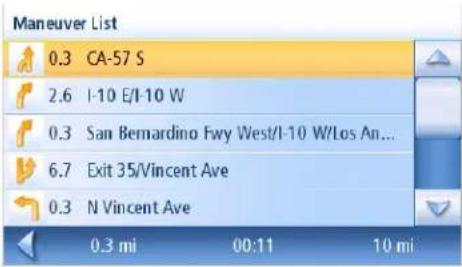
Maneuver List
The maneuver highlighted indicates that you will be instructed to make a left turn in 0.3 miles on CA-57 S
Accessing the Maneuver List
- Tap the maneuver icon in the lower left corner of the Map screen. This icon is displayed only while on an active route.
Excluding a Maneuver
This is used to modify the route to possibly avoid routing on a particular street.
- Access the Maneuver List.
- Tap on the item in the list with the street you want to try and avoid.
- Confirm the exclusion by tapping on . (Tap the back arrow to cancel.)
- The Magellan RoadMate recalculates the route and displays the Maneuver List with the newly computed maneuvers.
GPS Status Screen
- The GPS Status screen is also accessed from the Map screen and displays the status of the GPS satellites in a graphical format. (More technical information on the GPS status can be found in under the User Options menu: Main Menu Page 2 > User Options > GPS Options > GPS Status.)
Green bars indicate that the Magellan RoadMate is using these satellites to compute the position; orange bars indicate that the Magellan RoadMate is trying to lock on to
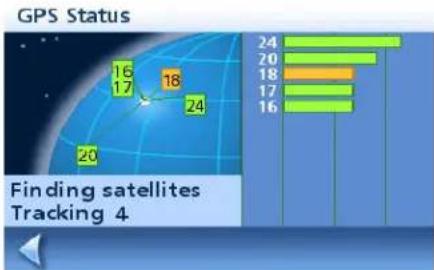
bar
GPS Status | Category | Count | |---|---| | 1 | 20 | | 2 | 16 | | 3 | 17 | | 4 | 18 | | 5 | 24 | | 6 | 24 | | 7 | 20 | | 8 | 20 | | 9 | 18 | | 10 | 17 | | 11 | 16 | Finding satellites Tracking 4GPS Status Screen
the satellite signal; and no bar shown indicates a satellite that is not being tracked. The longer the bars, the better the signal.
Accessing the GPS Status Screen
- From the Map screen, tap the GPS Signal Strength icon in the upper right corner.
Tap on the back arrow to return to the Map screen.
Zoom Levels
There are 23 zoom levels in the Magellan RoadMate, ranging from 100 feet to 1200 miles. Select the zoom level that best suits your needs.
Setting Zoom Levels
- While viewing the Map screen, tap on the ☐ (zoom in) or ☐ (zoom out).
Volume
The volume can be adjusted or muted from the Map screen. (The volume can also be adjusted from User Options > System Settings > Volume.)
Changing the Volume from the Map Screen.
-
Tap the speaker icon .
-
Tap on the Mute button to mute the volume or tap inside the volume adjust bar below the Mute button to change the volume levels.
-
Stap
If you have the volume muted the speaker icon is displayed with a line through it indicating it is muted. To unmute, tap the speaker icon again.
Home Address
Your home address can be entered and saved in the Magellan RoadMate for quick and easy access when you need to create a route home.
Creating a Home Address
These instructions only apply if you have never entered a home address or if it has been deleted.
- Tap the Home Address icon
on the Main Menu screen.
- Confirm "Do you want to enter your HOME address?" Tap Yes.
- Follow the prompts to enter the address to be used as your HOME address.
- When the Address screen is displayed, edit the information and top SAVE to continue.
- The HOME address is saved in your address book and you are returned to the Main Menu screen.
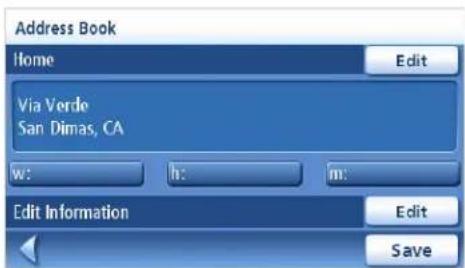
Creating a Route to the Home Address
- Tap the Home Address icon
on the Main Menu screen. - Tap Route.
- Select the Route Method desired and tap the orange Calculate Route button.
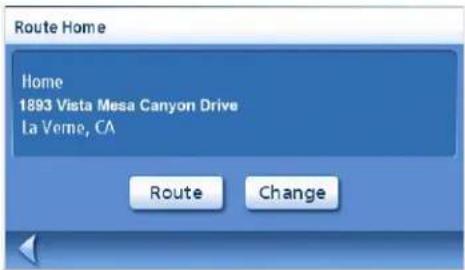
Changing the Home Address
- Tap the Home Address icon
on the Main Menu screen.
- Tap Change.
- Confirm "Do you want to replace the HOME address with a new address?" Tap Yes.
-
Follow the prompts to enter the address to be used as your new HOME address.
-
When the Address screen is displayed, edit the information and top SAVE to continue.
- The new HOME address is saved in your address book and you are returned to the Main Menu screen.
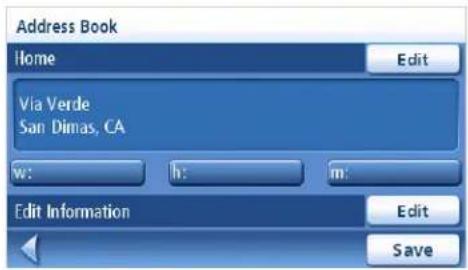
Accessing the Home Address from the Address Book
- From the Main Menu, tap the Enter Address icon.
- Tap the My Addresses icon.
- Tap Address Book.
- Tap List All.
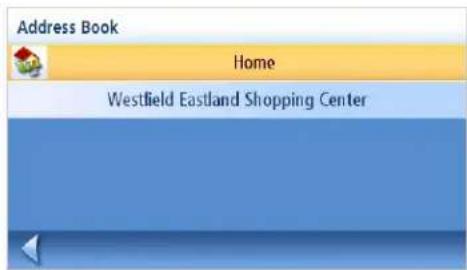
- The list of addresses in your address book are displayed with the home icon on the line of your HOME address.
- Tap on the home item in the list to create a route to, edit or delete the HOME address.
Enter Address
The Enter Address function is used to create a route from a newly entered address, an address in your address book or to an intersection of two streets.
Entering an Address
While creating an address the first step is to indicate what city the address is in. This can be done by inputting the name of the city, entering the zip code for the city or by selecting a city that has been previously used.
Creating a Route to a New Address
- From the Main Menu, tap the Enter Address icon.

- Select the method to enter the city: Enter City, Enter Zip Code, or Previous City.
Enter City:
Use the keypad to enter the first few characters of the city name. Tap OK to display the list of cities found.
The button in the lower right corner is used to select the sorting order of the list, by zip code or alphabetically.
Tap on the desired city in the list.
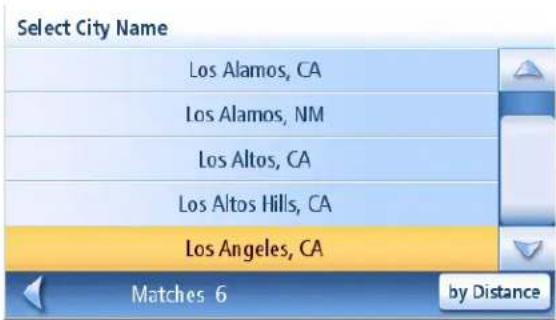
List of Cities
Enter Zip Code:
Use the keypad the zip code for the city. Tap OK when the zip code is complete.
The button in the lower right corner is used to select the sorting order of the list, by zip code or alphabetically.
Tap on the desired city in the list.
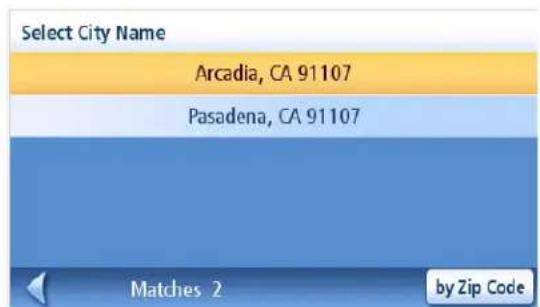
Cities with the Zip Code Entered
Previous City:
Tap on the desired city in the list.
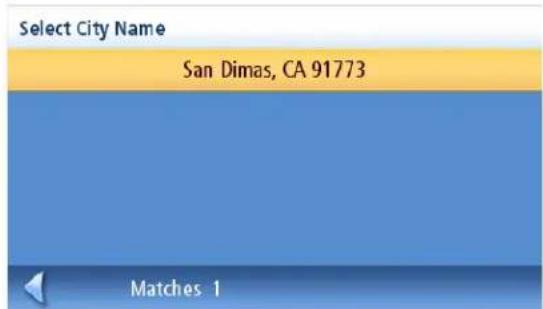
List of Cities Previously Used
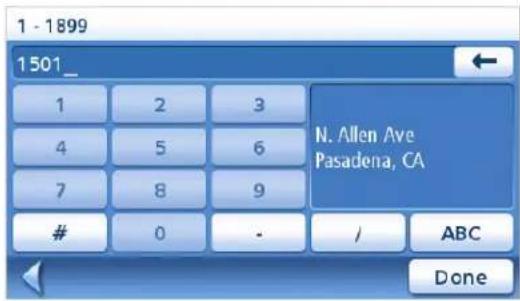
- With the city selected, the keypad will be displayed asking for the street name. Use the keypad with QuickSpell to enter the street name. Enter the first few characters of the street name and tap OK or continue entering characters until the list of streets is displayed. You can use street prefixes (N, E, W, S, etc.) if desired.
Samples the city Pasadena, California:
Entering "ALLE" results in:
Select Street Name
N. Allen Ave
S. Allen Ave
Allen Ct
Allendale Rd

Pasadena
Entering "N A" or "N. A" results in:
Select Street Name
N. Allen Ave
N. Altadena Dr
N. Arroyo Blvd
N. Arroyo Pky
N. Avenue 64

Pasadena
Entering "NOR"
Select Street Name
Normandy Dr
Northcliff Rd
Northrup Ave
Northup Ave
Norwood Dr

Pasadena
Entering "NORTH"
However, typing in "NOR" can give some unexpected results if you are trying to type in the word "NORTH ALLEN".:
To resolve this, use the back arrow from the street list and continue typing in the word NORTH. Now all streets beginning with "North" as well as streets with the north prefix are displayed.
Select Street Name
Northcliff Rd
Northrup Ave
Northup Ave
N. Allen Ave
N. Altadena Dr

Pasadena
-
Use the scroll bars to the right if necessary to view the name of the street desired. Tap on the street name to continue.
-
Use the keypad to enter the street number for the address. Note in the top left corner is the range of acceptable street numbers.
-
Tap Done when the address is complete.
-
Select the desired route method and tap the orange Calculate Route button to begin routing.
My Addresses
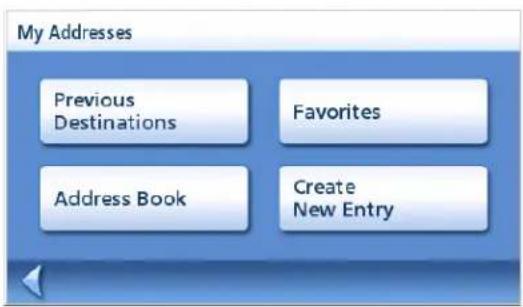
My Addresses is where you store addresses that you want to keep as future destinations as well as access addresses that you have gone to recently that may not be in your address book. The address book can hold up to 100 addresses.
Accessing the My Addresses Menu
- From the Main Menu, tap the Enter Address icon.

- Tap on the my addresses icon.

- The My Addresses Menu is displayed.
Previous Destinations
Routing to a Previous Destination (Method 1)
- From the Main Menu, tap the Enter Address icon.

- Tap on the Previous Destinations icon.

-
Select the destination from the list of previous destinations.
-
Select the Route Method and tap the orange Calculate Route button.
Routing to a Previous Destination (Method 2)
- From the Main Menu, tap the Enter Address icon.


- Tap on the my addresses icon.
- Tap on Previous Destinations.
- Select the destination from the list of previous destinations.
- Tap on Route.
- Select the Route Method and tap the orange Calculate Route button.
Saving a Previous Destination to Your Address Book
- From the Main Menu, tap the Enter Address icon.


- Tap on the my addresses icon.
- Tap on Previous Destinations.
- Select the destination from the list of previous destinations.
- Tap on Edit.
- Apply any edits you want to make to this destination before saving.
- Check Favorite if you want this addresses store in your address book as a Favorite.
- Tap Save to store the address.
- The Previous Destination screen is displayed. Tap Route to route to this destination or the Back arrow to return to the list of previous destinations.
Deleting a Previous Destination
- From the Main Menu, tap the Enter Address icon.


- Tap on the my addresses icon.
- Tap on Previous Destinations.
- Select the destination from the list of previous destinations.
- Tap on Delete.
- Confirm Deletion. Tap Yes.
- The Enter Address Menu will be displayed.
It is possible to delete all of the destinations in the Previous Destination List by accessing User Options > Address Book Options > Clear Previous.
Address Book
Accessing an Address in Your Address Book
- From the Main Menu, tap the Enter Address icon.

- Tap on the my addresses icon.

-
Tap on Address Book
-
Tap List All to view the entire contents of your address book or tap on Search Address Book to search for entries by searching on the name.
- From the list of addresses found, tap on the address record desired.
Routing to an Address in Your Address Book
- Access the address record from your address book as described in Accessing an Address in Your Address Book.
- Tap on Route.
- Select the Route Method and tap on the orange Calculate Route button to continue.
Editing an Address in Your Address Book.
- Access the address record from your address book as described in Accessing an Address in Your Address Book.
- Tap on Edit.
- Use the Edit Address Book screen to modify the name, information or phone numbers. The street address cannot be changed.
- Tap Save when done.
Deleting an Address in Your Address Book.
- Access the address record from your address book as described in Accessing an Address in Your Address Book.
- Tap on Delete.
- Confirm deletion. Tap Yes.
- You are returned to the list of addresses in your address book. If the list is now empty, you are returned to the previous screen.
Favorites
Favorite addresses operate the same as other addresses in your address book. Addresses in your address book can be marked as favorites to speed up the search for commonly used addresses.
Accessing an Address from Favorites
- From the Main Menu, tap the Enter Address icon.
- Tap on the my addresses icon.

-
Tap on Favorites
-
From the list of addresses found, tap on the address record desired.
Routing to an Address from Your Favorites List
- Access the address record from your Favourites as described in Accessing an Address from Favorites.
- Tap on Route.
- Select the Route Method and tap on the orange Calculate Route button to continue.
Editing an Address from Your Favorites List
- Access the address record from your Favourites as described in Accessing an Address from Favorites.
- Tap on Edit.
- Use the Edit Address Book screen to modify the name, information or phone numbers. The street address cannot be changed.
- Tap Save when done.
Deleting an Address from Your Favorites List
- Access the address record from your Favourites as described in Accessing an Address from Favorites.
- Tap on Delete.
- Confirm deletion. Tap Yes.
Creating a New Entry
This is used to create a new address and save it in your address book. You can create an entry by selecting it on the map, entering the address, selecting an address from the list of POIs or choosing a street intersection.
Creating a New Entry to You Address Book by Selecting on the Map
- From the Main Menu, tap the Enter Address icon.

- Tap on the my addresses icon.

-
Tap on Create New Entry.
-
Tap on Select on Map.
-
The Map screen is displayed in 2D mode. Use your finger or stylus to pan around the map. When the crosshair icon is over the location you want to add to your address book, tap in the center of the crosshairs. (Note: you may need to zoom into a lower zoom level if the edit Address Book screen is not displayed.)
-
Edit the name, information and phone numbers for the location you selected on the map. Tap the Favorites checkbox if you want this saved as a favorite address.
-
Tap Save.
Creating a New Entry to You Address Book by Entering an Address
- From the Main Menu, tap the Enter Address icon.

- Tap on the my addresses icon.

-
Tap on Create New Entry.
-
Tap on Enter Address.
-
Enter the address following the prompts. Detail on address entry can be found in this chapter in the Entering an Address section,
-
Edit the name, information and phone numbers for the location you selected on the map. Tap the Favorites checkbox if you want this saved as a favorite address.
-
Tap Save.
Creating a New Entry to You Address Book from a POI
- From the Main Menu, tap the Enter Address icon.

- Tap on the my addresses icon.

-
Tap on Create New Entry.
-
Tap on POIs.
-
Select the category from the list of POI categories.
-
If a subcategory list is displayed, select ALL Subcategories or one from the list.
-
Select search criteria:
Near Current Position Displays POIs in the category selected nearest to your current position. If no POIs are within a 50 mile radius, the search is empty and an alert displayed.
Near City: Enter a city name using the keypad (no QuickSpell) and select the city center desired from the resulting list. This will display POIs in the category selected nearest to the city center selected.(
Near Address: Enter an address using the standard address entry function. This will display POIs in the category selected nearest to the address entered.
-
Tap on the POI name desired from the list. Use the Prev and Next buttons to scroll up and down the list.(
-
Edit the name, information and phone numbers for the POI selected. Tap the Favorites checkbox if you want this saved as a favorite address.
-
Tap Save.
Creating a New Entry to You Address Book from by Intersections
- From the Main Menu, tap the Enter Address icon.

- Tap on the my addresses icon.

-
Tap on Create New Entry.
-
Tap on Intersection.
-
Select the city that the intersection is located in by entering the city name, entering the zip code or selecting from the previous cities list.
-
Search for the first street by spelling out the street name following the guidelines presented in Entering an Address. Tap on the street from the list of streets.
-
Search for the second street the same as in step 6. However, the Magellan RoadMate uses QuickSpell to allow you to select only streets that intersect with the street selected in step 6. Tap on the intersecting street from the list of streets.
-
Edit the name, information and phone numbers for the POI selected. Tap the Favorites checkbox if you want this saved as a favorite address.
-
Tap Save.
Intersection
Creating a Route to Two Intersecting Streets
- From the Main Menu, tap the Enter Address icon.

- Tap on the intersection icon.

- Select the city that the intersection is located in by entering the city name, entering the zip code or selecting from the previous cities list.
- Search for the first street by spelling out the street name following the guidelines presented in Entering an Address. Tap on the street from the list of streets.
- Search for the second street the same as in step 6. However, the Magellan RoadMate uses QuickSpell to allow you to select only streets that intersect with the street selected in step 6. Tap on the intersecting street from the list of streets.
- Select the Route Method and tap on the orange Calculate Route button.
Points of Interest (POI)
The Magellan RoadMate has POIs preloaded that can be used as a destination for a route. Selecting a restaurant or finding an ATM nearby is at your fingertips.
Categories and Subcategories
POIs are categorized into unique categories from gas stations to wineries. Most, but not all categories are further organized into subcategories. Restaurants have, for example, 16 subcategories that provide a way to search for restaurants serving Chinese food, or fast food, and even Swiss food.
Creating a Route to a POI by Category
- From the Main Menu, tap the Points of Interest icon.
- Select Search by Category.
-
Use the scroll bars to view the categories and tap on the desired category name.
-
If a subcategory is displayed, use the the scroll bars to view the subcategories and tap on the desired subcategory name. Select ALL SUBCATEGORIES if you are unsure what subcategory best suits your needs.
- Select the search criteria: Near Current Position, Near What City? (requires entering a city name) or Near Address (requires entering an address).
- The top portion of the display shows detailed information about the highlighted POI in the list. The arrow and distance indicates the direction and distance in a straight line from your current position to the POI. Use the Prev and Next buttons to step up and down the list of POIs found. Tap on the POI name to continue.
- Select the route method and tap on the orange Calculate Route button to begin.
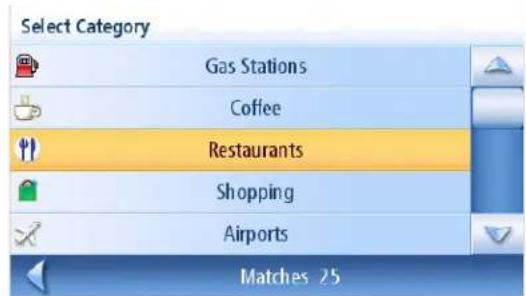
Category List
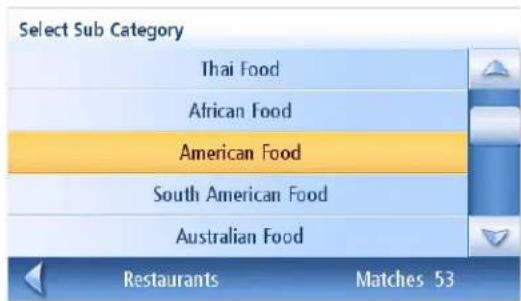
Sample Restaurant Sub Category List
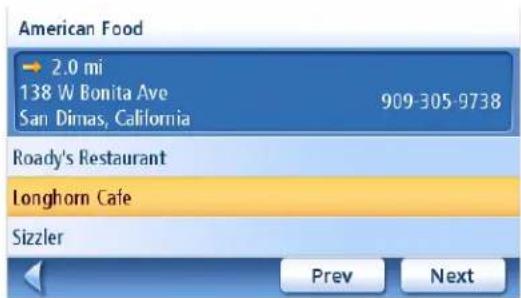
Restaurants Near Current Position
Creating a Route to a POI by Name
- From the Main Menu, tap the Points of Interest icon.
-
Select Search by Name.
-
Spell the name of the POI to be used as the destination. You need not enter the full name, but the more characters you enter, the easier it will be to find the exact POI you are searching for.
-
Select the search criteria: Near Current Position, Near What City? (requires entering a city name) or Near Address (requires entering an address).
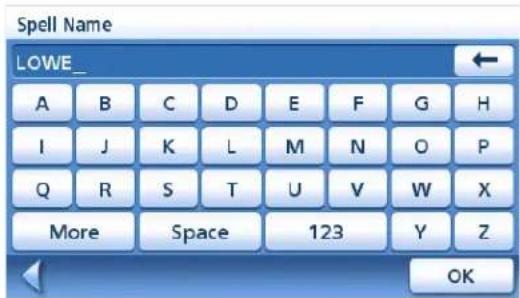
Sample Search by Name Input
- The top portion of the display shows detailed information about the highlighted POI in the list. The arrow and distance indicates the direction and distance in a straight line from your current position to the POI. Not that searching by name will show all POIs that meet the name criteria, regardless of category. In the sample shown here, there are home improvement centers (Lowe's) and parks (Lowell Brandt Park).
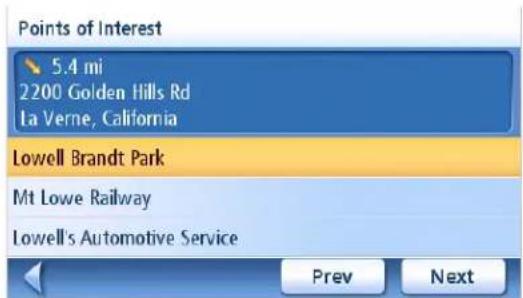
Search Result for LOWE Near Position
Use the Prev and Next buttons to step up and down the list of POIs found. Tap on the POI name to continue.
- Select the route method and tap on the orange Calculate Route button to begin.
Enhanced POIs
Enhanced POIs are points of interest that are user-created using the POI Manager software found on the CD-ROM. POI files created with the Magellan POI Manager software can be saved to the SD card in the Magellan RoadMate.
Loading a POI File
-
Save a POI file created with the Magellan POI Manager to an SD/MMC card installed in the bottom of the Magellan RoadMate
-
From the Main Menu, tap the Points of Interest icon.
-
Select Enhanced.
-
Select My POI.
-
Select Change My POI File.
-
Select Select a POI File.
-
Select the POI file to be loaded from the list of available POI files by tapping on the file name.
Selecting Categories for Display on the Map
A POI file must be loaded (see Loading a POI File) for this function to operate.
- From the Main Menu, tap the Points of Interest icon.
-
Select Enhanced.
-
Select My POI.
-
Select Change My POI File.
-
Select Display Categories.
-
Use the checkbox to the left of the category name to select or deselect the category. (Checked means this category will have its icon displayed on the map.)
Tap Mark All to check all categories or Clear All to uncheck all categories.
- Tap Save when done.
Setting Alarms
A POI file must be loaded (see Loading a POI File) for this function to operate. An enhanced POI can have an alarm that will alert you when you are in range set by “Alert Parameters.” Note that all POIs in the categories selected will have their alarms set to on. A POI file must be loaded (see Loading a POI File) for this function to operate.
- From the Main Menu, tap the Points of Interest icon.
-
Select Enhanced.
-
Select My POI.
-
Select Change My POI File.
-
Select Set Alarms.
-
Use the checkbox to the left of the category name to select or deselect the category. (Checked means this category will have its alarms turned on.)
Tap Mark All to check all categories or Clear All to uncheck all categories.
- Tap Save when done.
Setting Alarm Parameters
An enhanced POI can have an alarm that will alert you when you are in range set by “Alert Parameters.” Note that all POIs in the categories selected will have their alarms set to on. A POI file must be loaded (see Loading a POI File) for this function to operate.
- From the Main Menu, tap the Points of Interest icon.
-
Select Enhanced.
-
Select My POI.
-
Select Change My POI File.
-
Select Set Alarms.
-
Select the category from the category list whose alarm parameters are to be changed.
-
Set the detection angle, the first warning and the last warning by tapping on the button with the current setting.
-
Use the keypad to enter in new values and tap OK.
-
Tap Save when done.
Routing to an Enhanced POI
A POI file must be loaded (see Loading a POI File) for this function to operate.
- From the Main Menu, tap the Points of Interest icon.
-
Select Enhanced.
-
Select My POI.
-
Select Select Category.
-
Select the category containing the POI you want to route to from the category list.
-
Select Nearest (near your current position) or Spell POI Name (requires entering the POI name).
-
Select the POI to be routed to from the "Select POI" list.
-
Tap Route.
-
Select the routing method desired and tap the orange Calculate Route button to continue.
Saving an Enhanced POI to Your Address Book
A POI file must be loaded (see Loading a POI File) for this function to operate.
- From the Main Menu, tap the Points of Interest icon.
- Select Enhanced.
- Select My POI.
- Select Select Category.
- Select the category containing the POI you want to route to from the category list.
- Select Nearest (near your current position) or Spell POI Name (requires entering the POI name).
- Select the POI to be routed to from the "Select POI" list.
- Tap Save.
- Edit the POI information and tap Save.
- The Route To This POI screen is displayed again. Tap on Route to create a route or Cancel to quit.
Travelling on a Route
Map Screen
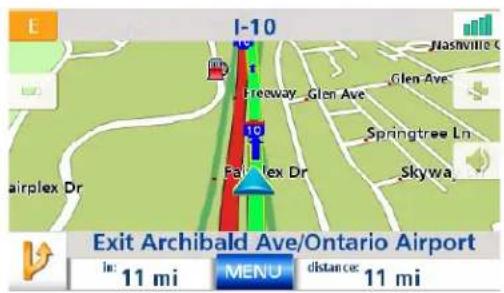
When a route has been calculated it will be displayed on the Map screen in green with blue arrows indicating direction of travel. The top of the screen displays the name of the street you are on. The bottom provides information about the next maneuver needed.
The sample to the right shows that the next maneuver will be to turn right in 3.3 miles on Fairplex Dr. The total distance to the destination is 4.7 miles.
Map Screen with Route Shown
As the route progresses, voice alerts will be used to prompt you of upcoming maneuvers. If you miss a prompt, or want it repeated, tap on the 'next maneuver in xxx mi." data field.
There is also a bell that will alert you where the maneuver is to be performed. (This tone can be changed in User Options > Tone Options.)
Split-Screen
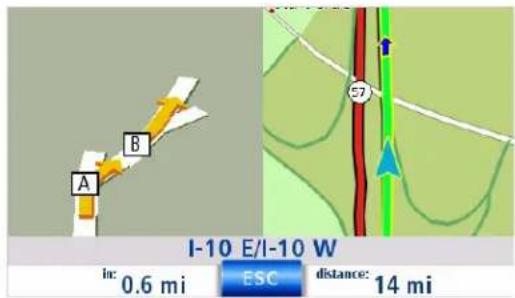
As a maneuver is approached, the Magellan RoadMate displays a split-screen alerting you of the upcoming maneuver. This screen will close automatically as the maneuver gets closer or you can tap ESC to close this screen and return to the Map screen. (This screen can be set to not display in User Options >Map Options.)
Split-Screen
Maneuver List
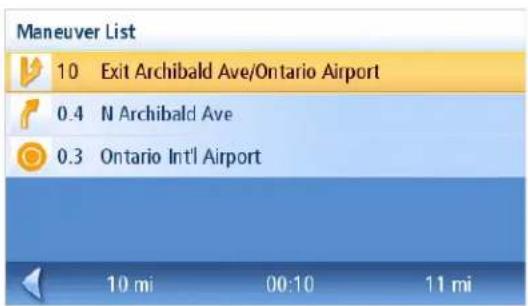
The Maneuver List displays all of the maneuvers needed to be made to complete the route and arrive at the destination. To view the Maneuver List, tap on the maneuver icon in the bottom left corner of the Map screen. (The Maneuver List is described in detail in the Map chapter of this manual.)
Maneuver List
You Have Arrived
Finally, the Magellan RoadMate will provide a visual alert when you have arrived at the destination. Tap the Back arrow to return to the Map screen. (The Magellan RoadMate will automatically return to the Map screen after a fixed time if you do not tap the Back arrow.)
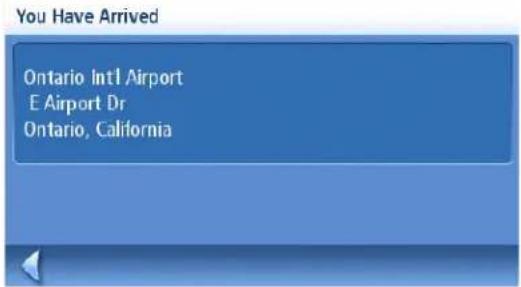
You Have Arrived.
Types of Routes
There are a wide variety of ways to create a route and each of them are discussed in the chapter that they are associated with. Some of the more common methods and the chapter they are described are:
- A route to a new address (Street Address)
- A route to an address in your address book (Street Address)
- A route to a Previous Destination (Street Address)
- A route to a street intersection (Street Address)
- A route to a POI preloaded in the Magellan RoadMate (Points of Interest)
- A trip (a route with multiple destinations) (Trip Planner)
- A route to your home address (Home Address)
Route Method
Regardless of which route type has been created, the Magellan RoadMate needs to know how the route is to be calculated. Routes can be calculated by Fastest Time, Shortest Distance, Least Use of Freeways or Most Use of Freeways. To select the route method, tap on the radio button for the desired method.
The Magellan RoadMate can be set to avoid toll roads as much as possible by tapping on the Avoid Toll Roads checkbox.
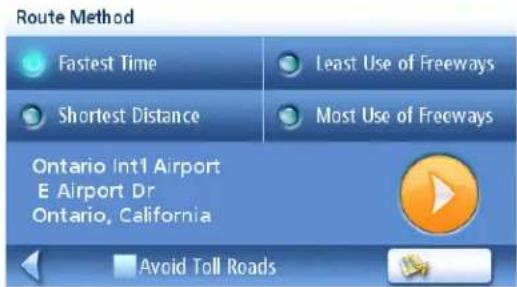
Route Method
The View on Map button displays the Map screen with the destination shown. Tap on ESC to return to the Route Method screen.
When the route method has been selected and you are ready to begin calculating the route, tap on the Route Calculate button.

Route Calculate button
Special Routing Functions
When a route is active, the Main Menu functions are changed to support special routing functions.
Routing to a POI Near an Approaching Freeway Exit
Note: This function is available only while on a freeway. Also, when you create a route to a POI near an exit, the original route will be cancelled. You will need to reset the original route when you are ready to continue.
-
From the Map screen, tap MENU.
-
Tap the Exit POIs icon.
-
Tap on the POI icon (restaurant, gas station or hotel) for the exit required.
-
A list of POIs in the category selected that are near the exit chosen will be displayed.
-
Tap on the POI in the list that you want routing directions to.
-
Select the Route Method and tap the orange Calculating Route button.
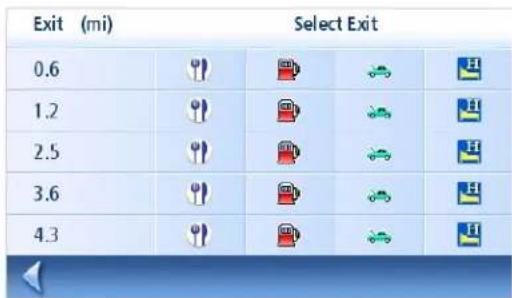
Exit POI List
Cancelling a Route
-
From the Map screen, tap MENU.
-
Tap the Cancel Route icon.

- Confirm cancelling of the route. Tap Yes.
Detouring off a Route
-
From the Map screen, tap MENU.
-
Tap the Detour icon.

-
Select the distance to avoid (3 mi., 5 mi., 10 mi. or Custom) that will be used to calculate the route will then put you back on the original route.
-
Tap Route.
-
The detour will be calculated using the same routing method used to create the route.
Changing the Route Method
If you travel off the computed route, the Magellan RoadMate will automatically re-calculate the routing information to get you to your original destination using the routing method you selected when creating the route. However, if you want to change the routing method (while on or off the route), you will need to use the re-route function.
-
From the Map screen, tap MENU.
-
Tap the Reroute icon.

- Select the desired routing method and tap the orange Calculate Route button.
Traffic
A subscription is required to be able to receive and use the traffic alert information. Included with the TrafficKit is a coupon providing you with a limited free subscription. When the free subscription is about to expire you will be prompted with information reminding you that you need to renew the subscription. You can find information about renewing your subscription at www.magellanGPS.com.
Activating the Free Subscription
- Locate the serial number for your Magellan vehicle navigation receiver. It can be found on the back of the unit. Write this number down as you will need it later. S/N: ____
- Locate the subscription coupon that is included in the Magellan TrafficKit. At the bottom of the coupon is a Subscription Activation Code that you will need to enter when prompted.
- Go to www.magellanGPS.com/Traffic-Coupon and follow the instructions.
- Write down the activation code that you receive upon completing the instructions. Code: ____
- Turn on the receiver.
-
Access the Traffic Options function. (Select 'User Options' from the Main Menu.)
-
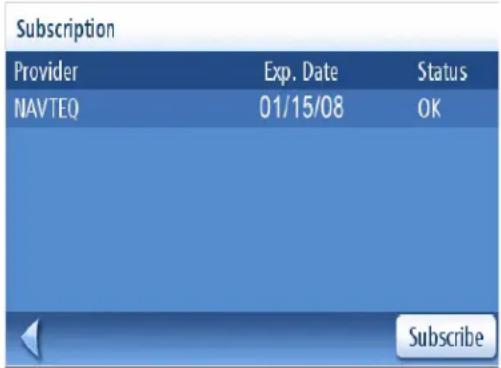
Select Subscription from the menu. At the Subscription screen, select Subscribe.
-
Using the keypad, enter the code you received in step 4 and press OK.
-
Your subscription is active and your vehicle navigator is Traffic-Ready.
Glossary
RDS: Radio Data System. Infrastructure that broadcasts digital information on the FM band. The TrafficKit module can only receive and decode the free-access service.
TMC: Traffic Message Channel, one of the types of information that a Radio Data System can broadcast.
TrafficKit: TrafficKit is the Magellan brand name for the RDS-Traffic module which receives the Traffic messages.
Traffic Message: A message received by the TrafficKit module that contains the description of a Traffic event.
Traffic Event: An event liable to disturb the flow of traffic. The list of possible Traffic events that can be received are provided below, along with the corresponding road sign:
| Sign Meaning Sign Meaning | |
| Danger Road Closed | |
| Slow or Stationary Traffic | |
| Lane Reduction | |
| Road Work | |
| Accident | |
| Severe Weather | |
| Special Equipment Required | |
| Vehicle Related Restriction | |
Alert Mode: Traffic events are received for informational purposes.
Re-routing Mode: This mode will reroute the vehicle if a Traffic event impacts the route, and a faster alternative route is available.
Understanding How The TrafficKit Works
Please read the following statements before using the TrafficKit.
- You can enable and disable Traffic event categories. By default, all categories are enabled.
- Selected Traffic events will either alert and/or re-route you depending on the operating mode.
- All selected event categories will be displayed on the map screen in the form of traffic event icons.
- If you are not routing to a destination, the RDS function will only display Traffic events on the map screen.
RDS-Traffic Operating Modes
Traffic events that impact your route can be processed in one of the following two modes:
Re-routing Mode. (Default) Traffic events affecting your route will trigger the receiver to automatically calculate a new route, if a faster alternative route is available.
Alert Mode. Traffic events affecting your route will be reported to you in the form of warning messages.
Selecting Categories of Traffic Events
You may choose the Traffic event categories you would like to be informed of as they occur:
- Access the Main Menu and select User Options.
- Scroll down the list and select Traffic Options.
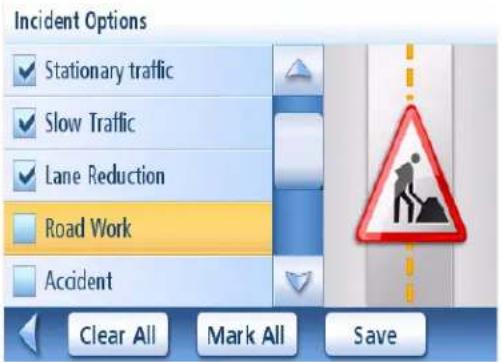
- Select Incident Options.
- In the displayed list, check all categories of Traffic events (incidents) you want processed, and deselect events that are of no interest. For best routing Magellan recommends leaving all of the boxes checked.
- The existing categories of Traffic events are listed at the beginning of this manual in the Glossary.
- Checking an option in this list implies that:
- The Map screen will show ALL the received events pertaining to this category at their respective locations.
- Select the Save button to confirm all your choices.
Re-routing Mode
Setting the Re-routing Mode
- Access the Main Menu and select User Options.
- Scroll down the list and select Traffic Options
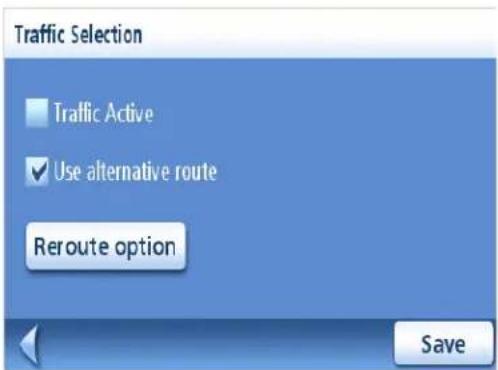
- Select Traffic Selection.
- Unless already done, check the Traffic Active option.
- Check the Use alternative route option. Note that this causes the button just underneath to be renamed "Reroute option".
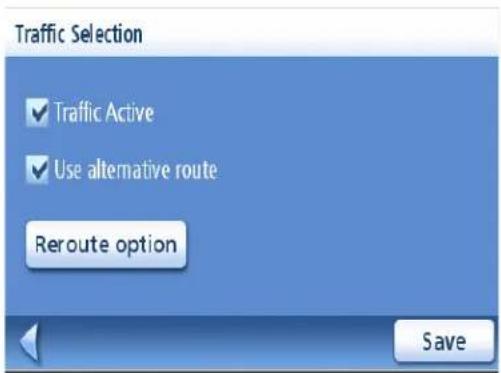
- Select the Reroute Option button on the screen. A new screen appears on which you can set the distance from the event that will trigger the alternative route.
Check one of the following options:
Live Alert: With this option checked, the receiver will search for a faster alternative route whenever a Traffic event arises on your current route. This will happen at the time the event is received, regardless of your distance to the event.
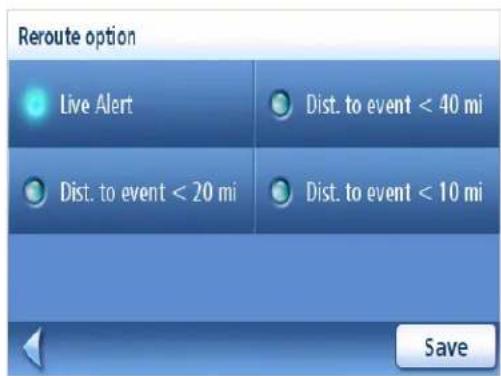
Dist. to event < 40 mi: With this option checked, the receiver will re-route you only if the distance to this Traffic event, is less than 40 miles from your current location (not a point-to-point distance but that measured along the route).
Dist. to event < 20 miles: Same as above for a distance of 20 miles.
Dist. to event < 10 miles: Same as above for a distance of 10 miles.
- Select Save to confirm your choice and then Save again to return to your guidance screen.
Traveling with the Re-routing Mode On
The following will occur whenever a Traffic event that affects your route is received:
• The receiver will analyze the impact this event will have on your route.
- A "Re-calculating the route" message will pop up on the screen along with the reason for the re-calculation.
- Once the alternate route has been computed, it will compare the alternative route with the original route, and will decide which is the best route to follow, taking time and distance into consideration.
- If the original route is still the best one to follow, the route will be unchanged, and the time portion of the status bar will be updated to reflect the delay. The traffic icon will appear in the lower right corner of the map display. Tapping this icon brings up a list of the traffic events on the route.
- If the alternative route is the best route to follow, the receiver will start guiding you along this route.
- The map screen will also show road signs corresponding to Traffic events, including those not affecting the route.
- Events that affect your route will also appear as road signs in the maneuver list.
Alert Only Mode
This mode will not provide you with new routing information, it will only alert you to the event.
-
Access the Main Menu and select User Options.
-
Scroll down the list and select Traffic Options
- Select Traffic Selection.
- Check the Traffic Active option and make sure the Use alternative route option is deselected.
- Select the Alert Options button on the screen. A new screen appears on which you can set the options relevant to the Alert mode.
Check one or more of the following options:
Live Alert: When checked, the receiver will inform you of a traffic event located along your route as soon as it is detected.
Reminder at 40 mi: If you check this option, the receiver will remind you of the traffic event it has received earlier. The message will appear
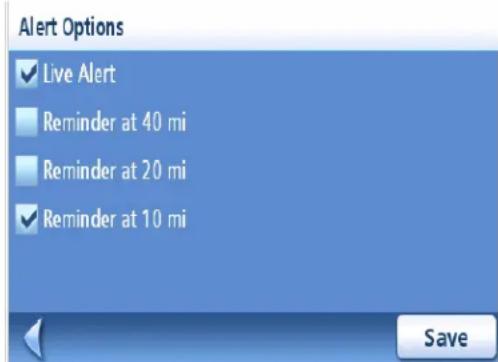
when this event, located somewhere along your route, is 40 miles away from your current location (not a point-to-point distance but measured along the route).
Reminder at 20 mi: Same as above but the distance from the event is only 20 miles
Reminder at 10 mi: Same as above but the distance from the event is only 10 miles
- Select Save to validate your choices and then come back to your usual guidance screen.
Traveling with the Alert Mode On
When you use the TrafficKit in the Alert Mode, the following will occur when new Traffic events are received:
- If an event affects your route, a warning message will appear on the screen at a time or distance defined in the Alert Options menu.
- If you do not acknowledge the message by pressing the ENTER button, it will automatically disappear after 10 seconds. Additional warning messages, if any, will appear in turn on the screen.
- Events that affect your route will also appear as road signs in the maneuver list, and also in the lower part of the TrueView screen.
- The map screen will show road signs corresponding to the Traffic events, including those which do not affect the route. You can obtain detailed information on any event by selecting the icon on the map screen. A dialog box will open containing a description of the event.
Traffic Alert Icon

If a traffic incident occurs on your route, the traffic alert icon will be displayed in the lower right corner of the map screen.
Viewing Traffic Details
- While viewing the Map screen and traveling on a route, tap on the Traffic Alert icon when it is displayed. A Traffic Event List is displayed with all known traffic incidents listed in order of distance from your present position on your route.
- Tap on one of the events listed to receive additional details about the traffic event.
• (Detailed information can also be displayed by tapping on an event icon displayed on the map.)
Viewing Traffic Details at Higher Zoom Levels
To avoid cluttering the screen, as you zoom out beyond the 8-mile zoom level, only the following events are displayed:
- Accidents
- Slow traffic (moving less than 20 mph)
- Road closed
• Special equipment required - Severe weather.
How To Disable the RDS
When you do not want to use the RDS function:
- Access the Main Menu and select User Options.
- Scroll down the list and select Traffic Options
- Select Traffic Selection.
- Deselect the Traffic Active box
- Click Save to confirm your choice.
When the RDS function is off all incoming Traffic messages are ignored.
FAQs
Q1- How does the TrafficKit module choose the frequency on which to receive Traffic data?
A1: This is an automated procedure. When you turn on the system, the TrafficKit module analyzes the 5 best frequencies stored in its memory. These frequencies are classified in order of signal strength. The module then tests if Traffic data is available on the first station. If the first station is sending Traffic messages, the module will stay on that frequency, otherwise it will test the next one until it finds a station that delivers Traffic data.
If none of the 5 frequencies can be used, the TrafficKit module will start scanning the entire FM band. It will search for the best five frequencies on which Traffic data is available and will tune in to the strongest station. These five best frequencies will be saved in memory to be used the next time the system is powered up.
Q2- Why do we have to wait between 2 and 5 minutes before the RDS module starts delivering RDS data?
A2: This is the average time for the module to test all the possible frequencies on the FM band and choose the best one in terms of signal level and Traffic data availability/quality.
Trip Planner
The Trip Planner is used to create a route with multiple destinations. In this document we refer to a route with multiple destinations as a "Trip".
Creating a Trip
- From page 2 of the Main Menu, tap the Trip Planner icon.

- Select New from the Trip Planner Menu.
- Use the keypad to enter in a name for this trip.
-
Tap OK.
-
Begin by adding the first destination in the trip. Tap Add.
- Select the method to be used to find or create the destination icon: Enter Address, Address Book, POIs, or Intersection.
- Follow the instructions for the method chosen to select the destination.
See the chapters on Enter Address and POI for help in selecting destinations.
- When the destination is found the Add Address to Trip screen is displayed. Tap Save.
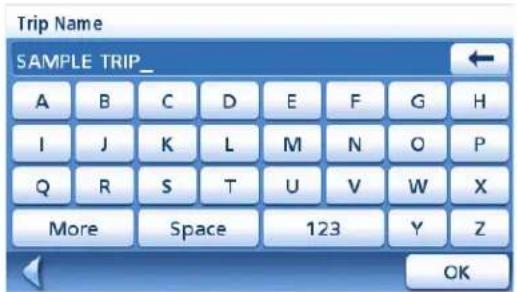
Enter a Trip Name
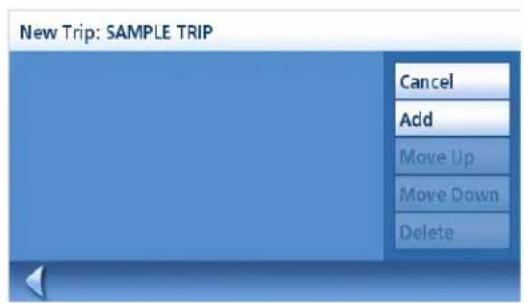
Tap add to begin
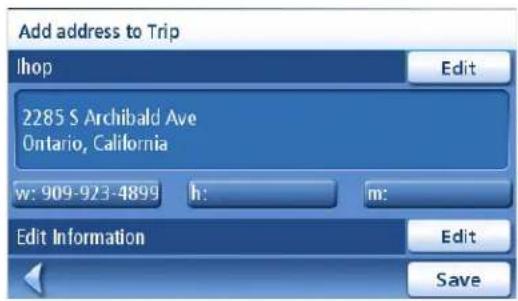
Tap Save to Add the Address
- The list of trip destinations is displayed.
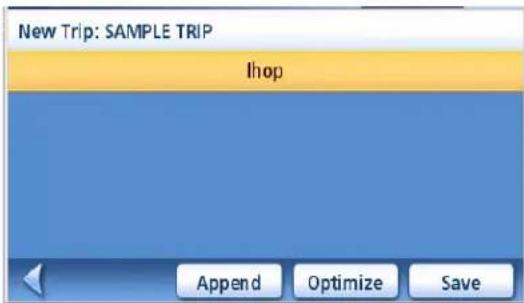
First Destination Added
- Tap on the destination name to bring up the menu or tap Append.
- Repeat steps 5 though 9 until the trip is complete with all desired destinations.
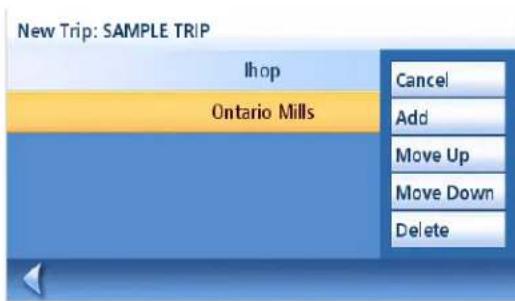
Tap to open menu.
- Tap Save.
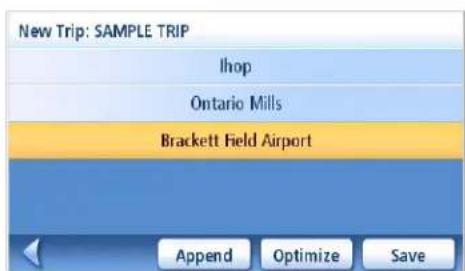
Saving completed trip.
Optimizing a Trip
While creating a trip or editing a trip you can optimize the order of the destinations but using the Optimize button.
- View the trip list, either while creating the trip or from the Edit button when selecting Trip Planner.
- Tap Optimize.
- Tap Save to store the changes to the trip.
Starting a Trip
- From page 2 of the Main Menu, tap the Trip Planner icon.

-
Select Guide Me from the Trip Planner Menu.
-
Select the trip to be used from the stored trips list.
-
Tap on the destination in the list to be used to as the first destination in the trip.
-
Select the routing method to be used and tap the orange Calculate Route button.
Editing a Trip
- From page 2 of the Main Menu, tap the Trip
Planner icon.

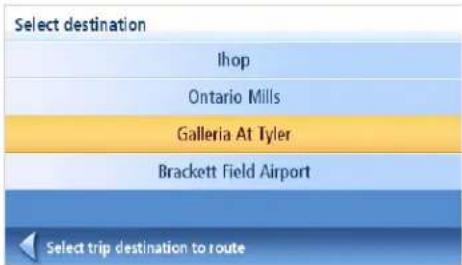
Select first destination.
-
Select Edit from the Trip Planner Menu.
-
Select the trip to be edited from the stored trips list.
-
Tap on the destination to be edited. You can:
Add a destination following the one selected.
Move the destination up in the list.
Move the destination down in the list.
Delete the destination from the trip.
- When the trip has been edited, tap Save.
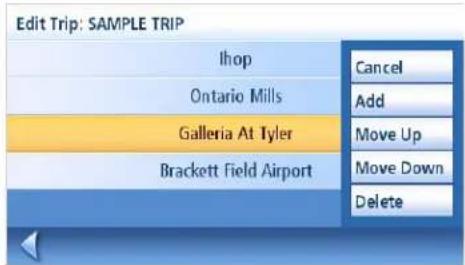
Edit Trip
Deleting a Trip
- From page 2 of the Main Menu, tap the Trip Planner icon.

-
Select Delete, Rename from the Trip Planner Menu.
-
Tap Delete.
-
Select the trip to be deleted from the stored trips list.
-
Confirm the deletion of the trip. Tap Yes.
Renaming a Trip
- From page 2 of the Main Menu, tap the Trip Planner icon.

-
Select Delete, Rename from the Trip Planner Menu.
-
Tap Rename.
-
Select the trip to be renamed from the stored trips list.
-
Use the keypad to edit the name of the trip.
-
Tap OK.
Exit POIs
The Exit POI function provides a way of accessing commonly used POIs that are near an exit you are approaching while travelling on a freeway. Exit POIs include restaurants, gas stations and hotels. Exit POIs can be accessed while on a route or just driving, as long as you are on a freeway.
Routing to a POI Near an Approaching Freeway Exit
Note: This function is available only while on a freeway. Also, when you create a route to a POI near an exit, the original route will be cancelled if you are travelling on a route. You will need to reset the original route when you are ready to continue.
-
From the Map screen, tap MENU.
-
Tap the Exit POIs icon.
- Tap on the POI icon (restaurant, gas station or hotel) for the exit required.
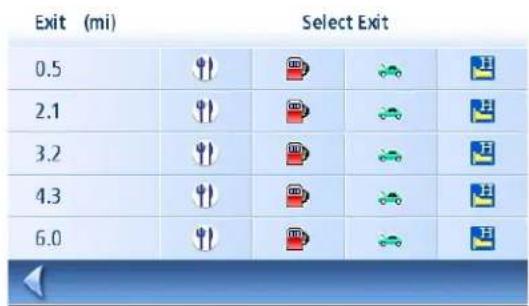
Exit POI List
-
A list of POIs in the category selected that are near the exit chosen will be displayed.
-
Tap on the POI in the list that you want routing directions.
-
Select the Route Method and tap the orange Calculating Route button.
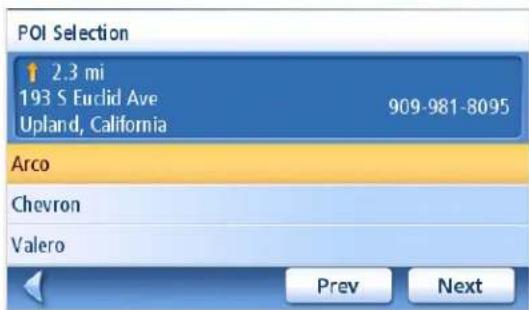
Sample List of Automotive POIs
User Options
Use User Options to customize the Magellan RoadMate to better suit your needs from a GPS navigator.
Tapping the Back arrow from any of the User Option screens will cancel the changes.
Selecting Map Region
Choose the map region you will be travelling in.
- From page 2 of the Main Menu, tap User Options.
- Tap Region.
- Tap on the desired map region (Lower 48 States, Puerto Rico or Hawaii).
Accessing System Settings
Commonly used settings are found in the System Settings section of User Options.
- From page 2 of the Main Menu, tap User Options.
- Tap System Settings.
Checking Battery Life
- From page 2 of the Main Menu, tap User Options.
- Tap System Settings.
- The battery life indicator is found at the bottom of the screen. All green indicated full battery life.
Adjusting the Volume
Volume can also be adjusted by tapping on the speaker icon on the Map screen.
- From page 2 of the Main Menu, tap User Options.
- Tap System Settings.
- Tap Volume.
- Tap along the adjustment bar to increase or decrease the speaker volume.
-
Tap Mute to turn the speaker off. Tap Mute again to turn the speaker back on.
-
Tap Save.
Adjusting the Display Brightness
- From page 2 of the Main Menu, tap User Options.
-
Tap System Settings.
-
Tap Brightness.
-
Tap along the adjustment bar to increase or decrease the display brightness.
-
Tap On-battery dimming (75%) to set it on or off. (Checked is on.) Checking it on will save battery life while operating the Magellan RoadMate without external power.
-
Tap Save.
Setting Auto Power Off Time
The auto power setting will define the time that the Magellan RoadMate will automatically turn off if it hasn't moved or the touchscreen accessed.
- From page 2 of the Main Menu, tap User Options.

-
Tap System Settings.
-
Tap Power.
-
Select Never, 10 Minutes, 20 Minutes or 30 Minutes.
-
Tap Save.
Setting Time Zone
- From page 2 of the Main Menu, tap User Options.
-
Tap System Settings.
-
Tap Time Zone.
-
Use the “-” and “+” buttons to set through the time zones until the time zone for your area is displayed.
-
Check Daylight Savings if daylight savings is in effect for your time zone. (Daylight savings is not automatically adjusted.)
-
Tap Save.
Selecting Units of Measure
- From page 2 of the Main Menu, tap User Options.
- Tap System Settings.
- Tap Units of Measure.
- Select Miles/Feet or Kilometers/Meters.
- Tap Save.
Displaying Contact Us Information
- From page 2 of the Main Menu, tap User Options.
- Tap System Settings.
3.

- Tap Contact Us.
- Tap Back arrow.
Displaying Product Information
- From page 2 of the Main Menu, tap User Options.
- Tap System Settings.
- Tap Next.
- Tap Product Information.
- Tap Next to view additional product information.
Tap Prev to return to page 1.
- Tap the Back arrow to exit.



Performing Diagnostics
- From page 2 of the Main Menu, tap User Options.
-
Tap System Settings.
-
Tap Next.
-
Tap Diagnostics.
-
Tap Audio Test, Touchscreen Test or Video Test.
-
When done, tap the Back arrow to exit.
Accessing the Trip Computer
The trip computer records your average speed, the time in hours of the trip, the time in hours that you were driving, and the distance of the trip. This information can be saved to a file for easy access when the information is needed.
- From page 2 of the Main Menu, tap User Options.
-
Tap Trip Computer.
-
Select the Current Trip or a Saved Trip from the list.
-
Select Stop to stop recording information.
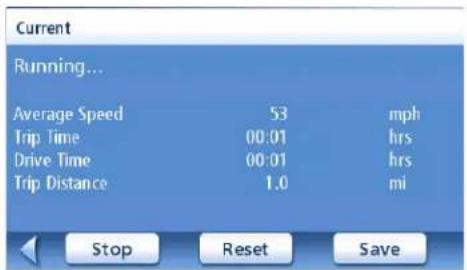
Select Reset to set all the information to zero. Select Reset when you are starting a trip or route that you want to record details for.
Current Trip Computer
Select Save to store the trip computer information to a file. You will be prompted to enter a name for the file. Input a name and tap OK.
- Tap the Back arrow to exit.
Selecting POIs to be Displayed on the Map
In some areas the map can be cluttered with POIs making it difficult to find what you are looking for. Use POI Selection to set what categories of icons will be shown and which ones will be hidden.
- From page 2 of the Main Menu, tap User Options.

-
Tap POI Selection.
-
Tap on the POI category in the list to toggle its display setting on or off. (Checked POIs will be displayed.
Tap Mark All to check all POI categories.
Tap Clear All to uncheck all POI categories.
- Tap Save to save changes and exit.
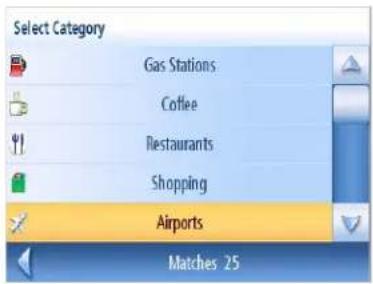
POI Selection Screen
Deleting Addresses from the Address Book (Global)
The chapter on addresses discusses how to delete individual addresses from the address book. Address Book Options provides a way of globally deleting addresses from the address book.
- From page 2 of the Main Menu, tap User Options.
-
Tap Address Book Options.
-
Tap Clear Addresses to delete all of the addresses in your Address Book.
Tap Clear Favorites to delete only those addresses marked as Favorites from your Address Book.
Tap Clear Previous to delete previous destinations from the Address Book.
- Tap the Back arrow to exit.
Setting the Map in 3D or 2D Mode
See the chapter on Maps for information regarding 3D and 2D modes of the map.
- From page 2 of the Main Menu, tap User Options.

-
Tap Map Options.
-
Select 3D Map or 2D Map.
-
Tap Save to record the changes and exit.
Setting the Map Display to Heading Up or North Up
The map can be displayed with the top of the display in the direction of your heading or North.
- From page 2 of the Main Menu, tap User Options.

-
Tap Map Options.
-
Select Heading Up or North Up. (Note, North Up is available only when the map is set to 2D mode.)
-
Tap Save to record the changes and exit.
Setting Split Screen (TrueView™) Options
As you approach a maneuver, the display changes to the split screen mode. Under Map Options you can turn off the split screen or set it to be just the TrueView portion of the split screen.
- From page 2 of the Main Menu, tap User Options.
-
Tap Map Options.
-
Tap Auto TrueView to turn set it to on or off. (Checked is on and the TrueView image will be displayed.)
-
Tap Split TrueView to set the TrueView display to split or single view. (Checked sets split screen on.)
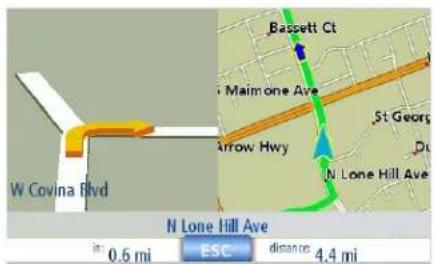
TrueView Split Screen
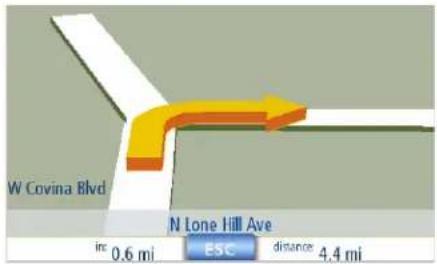
TrueView Single Screen
- Tap Save to record the changes and exit.
Setting Auto Night Map Display
Normally the map is displayed in the pastel colors for daytime use and a black background for nighttime use. Unchecking the Auto Night Mode will keep the map display using the pastel colors.
- From page 2 of the Main Menu, tap User Options.

-
Tap Map Options.
-
Tap on Auto Night Mode. (Checked indicates that the map will automatically change to night colors; unchecked and the map will always use the day colors.) Note: If the screen has
already switched to night colors, unchecking the box will not cause the display to go to the day colors. The switch to day colors will occur the following morning and then stay in day colors.)
- Tap Save to record the changes and exit.
Setting Detour Options
Normally the map is displayed in the pastel colors for daytime use and a black background for nighttime use. Unchecking the Auto Night Mode will keep the map display using the pastel colors.
- From page 2 of the Main Menu, tap User Options.

-
Tap Detour Options.
-
Select the default for the distance to be used to detour around traffic problems while routing.
Set the alert timer. (Enter the time from the keypad.)
Check Enable automatic detour on or off. (Checked is on and the Magellan RoadMate will automatically offer detour routing when it computes you are stuck in slow or stopped traffic situations.)
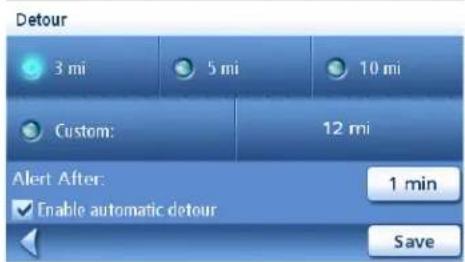
Detour Options Screen
- Tap Save to record the changes and exit.
Using the Simulator
When turned on, the simulator will offer the option of simulating movement on a route. Useful for learning about the Magellan RoadMate while not driving.
- From page 2 of the Main Menu, tap User Options.

-
Tap Simulator Mode.
-
Tap Propose simulator mode when calculating route. When checked, the Magellan RoadMate will ask if you want the route simulated when it is created. Simulation mode will ignore actual movement and should only be used for training purposes.
Tap on the speed factor desired.
Tap <<1mi or 1m>> to set the route forward or backwards 1 mile.
Tap Restart to begin the route you are currently simulating back to the beginning.
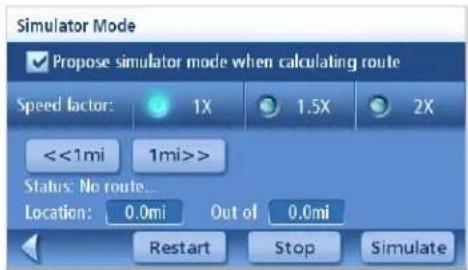
Simulator Mode Screen
Tap Stop to end simulating the current route you are simulating.
(The Simulate button is presently not active.)
- Tap Back arrow to record the changes and exit.
Setting Tone Options
Provides a way of selecting the tone used to announce arrival at a maneuver or destination.
- From page 2 of the Main Menu, tap User Options.
-
Tap Tone Options.
-
Select Bell, Chime or Beep.
-
Tap Save to record the changes and exit.
Setting Text-To-Speech Use
- From page 2 of the Main Menu, tap User Options.
-
Tap Navigation Instruction.
-
Tap "Announce street name" or "Announce exit ramp name" to select when text-to-speech will be used to indicate maneuvers.
-
Tap Save to record the changes and exit.
Viewing Technical GPS Information
This screen provides technical information about the satellites being used to compute the GPS position.
- From page 2 of the Main Menu, tap User Options.
-
Tap GPS Options.
-
Tap GPS Status.
PRN: pseudo random number that identifies the satellite
AZ: Azimuth of the satellite
EL: Satellite elevation
SNR: Satellite signal-to-noise ratio
TTFF: Time to First Fix (in seconds)
MFG GPS Status
| PRN | AZ | EL | SNR |
| 00 | 000 | 00 | 0 |
| 01 | 009 | 02 | 4 |
| 02 | 018 | 04 | 8 |
| 03 | 027 | 06 | 12 |
| 04 | 036 | 08 | 16 |
| 05 | 045 | 10 | 20 |
| 06 | 054 | 12 | 24 |
| 07 | 063 | 14 | 28 |
- Tap Back arrow to exit.
Setting the GPS Position
Setting a GPS position is useful if you are not getting satellite information quickly because the Magellan RoadMate has travelled over 500 miles while turned off. Setting the GPS position will allow the Magellan RoadMate to compute which satellites are available and calculate the position quicker.

- From page 2 of the Main Menu, tap User Options.
- Tap GPS Options.
- Tap Set GPS Position.
- Follow the prompts to enter the address where you currently are.
- Tap Done when finished entering the address.
Backing Up and Restoring Data
Backup and restore provides a way of storing the address book and other data to a SD/MMC card. When the data has been backed up, it can be restored at any time. Please note that when you restore from backed up data, address book and other data will be replaced with the data. The Magellan RoadMate cannot append backed up data to your existing data.
Backing Up Data
- From page 2 of the Main Menu, tap User Options.

- Insert a SD or MMC card with available space into the SD slot of the Magellan RoadMate. Note that backing up data will overwrite any back up files on the SD or MMC card.
- Tap Backup and Restore.
- Tap Backup.
- Confirm backup. Tap Yes.
- Operation successful! Tap OK.
- Tap Back arrow to exit.
Restoring Data

- From page 2 of the Main Menu, tap User Options.
- Insert a SD or MMC card with available space into the SD slot of the Magellan RoadMate. Note that backing up data will overwrite any back up files on the SD or MMC card.
- Tap Backup and Restore.
- Tap Restore.
-
Confirm restore. Tap Yes.
-
Operation successful! Tap OK.
- Tap Back arrow to exit.
Viewing Map Information
- From page 2 of the Main Menu, tap User Options.
- Tap Map Information.
- Tap Back arrow to exit.
Map Information
| Geographic Area: | USA |
| Basemap NavStreets version: | 29 |
| Detailed map NavStreets version: | 29 |
Map Information Screen
- Magellan® RoadMate™ 1230
- User Manual
- IMPORTANT SAFETY WARNINGS
- About Charging the Magellan RoadMate
- About the Battery
- Federal Communication Commission Interference Statement
- IMPORTANT NOTE:
- FCC Radiation Exposure Statement:
- IC Radiation Exposure Statement:
- Table of Contents
- Magellan RoadMate 1230 ....1
- Installation Instructions ....3
- Fundamentals 6
- Map Screen 12
- Home Address 18
- Enter Address 20
- Points of Interest (POI) 29
- Travelling on a Route 34
- Traffic 38
- Trip Planner 45
- Exit POIs 49
- User Options 50
- Magellan RoadMate 1230
- Installation Instructions
- Selecting the Location
- Cleaning the Area
- Applying the Adhesive Disk
- Attach the Cradle to the Swivel Mount
- Secure the Swivel Mount to the Windshield or Adhesive Disk
- Attaching the Magellan RoadMate to the Cradle
- Adjust the Mount for Optimum Viewing
- Connecting Power
- Check Connection and Final Adjustments
- Security
- Region
- Fundamentals
- Powering on the Magellan RoadMate
- Volume
- Changing the Volume from User Options
- Brightness
- Accessing the Brightness Control
- The Main Menu
- Accessing the Main Menu
- .Main Menu - Page 2
- The Keypad
- Keypad Overview
- Special Keys
- Selecting From List
- Notes on Entering Data
- Map Screen
- Accessing the Map Screen
- 2D Mode
- Setting the Map Modes (2D or 3D)
- Panning on the Map
- Saving a Position While Panning
- Routing to a Panned Position
- Current Location Screen
- Accessing the Current Location Screen
- Saving Your Current Location to Your Address Book
- Maneuver List Screen
- Accessing the Maneuver List
- Excluding a Maneuver
- GPS Status Screen
- Accessing the GPS Status Screen
- Zoom Levels
- Setting Zoom Levels
- Home Address
- Creating a Home Address
- Creating a Route to the Home Address
- Changing the Home Address
- Enter Address
- Entering an Address
- Enter City:
- Enter Zip Code:
- Previous City:
- - / ABC
- My Addresses
- Accessing the My Addresses Menu
- Previous Destinations
- Routing to a Previous Destination (Method 2)
- Saving a Previous Destination to Your Address Book
- Deleting a Previous Destination
- Address Book
- Favorites
- Accessing an Address from Favorites
- Routing to an Address from Your Favorites List
- Editing an Address from Your Favorites List
- Deleting an Address from Your Favorites List
- Creating a New Entry
- Intersection
- Points of Interest (POI)
- Categories and Subcategories
- Creating a Route to a POI by Name
- Enhanced POIs
- Loading a POI File
- Selecting Categories for Display on the Map
- Setting Alarms
- Setting Alarm Parameters
- Routing to an Enhanced POI
- Travelling on a Route
- Split-Screen
- Maneuver List
- You Have Arrived
- Types of Routes
- Route Method
- Special Routing Functions
- Cancelling a Route
- Detouring off a Route
- Changing the Route Method
- Traffic
- Activating the Free Subscription
- Glossary
- Understanding How The TrafficKit Works
- RDS-Traffic Operating Modes
- Selecting Categories of Traffic Events
- Re-routing Mode
- Traveling with the Re-routing Mode On
- Alert Only Mode
- Traveling with the Alert Mode On
- Traffic Alert Icon
- Viewing Traffic Details
- Viewing Traffic Details at Higher Zoom Levels
- How To Disable the RDS
- FAQs
- Trip Planner
- Creating a Trip
- Optimizing a Trip
- Starting a Trip
- Editing a Trip
- Planner icon.
- Deleting a Trip
- Renaming a Trip
- Exit POIs
- Routing to a POI Near an Approaching Freeway Exit
- User Options
- Selecting Map Region
- Accessing System Settings
- Checking Battery Life
- Adjusting the Volume
- Adjusting the Display Brightness
- Setting Auto Power Off Time
- Setting Time Zone
- Selecting Units of Measure
- Displaying Contact Us Information
- Displaying Product Information
- Performing Diagnostics
- Accessing the Trip Computer
- Selecting POIs to be Displayed on the Map
- Deleting Addresses from the Address Book (Global)
- Setting the Map in 3D or 2D Mode
- Setting Detour Options
- Using the Simulator
- Setting Tone Options
- Setting Text-To-Speech Use
- Viewing Technical GPS Information
- Setting the GPS Position
- Backing Up and Restoring Data
- Backing Up Data
- Restoring Data
Brand : MAGELLAN
Model : RoadMate 1230
Category : Gps