CM-10 - Wall mount DataVideo - Free user manual and instructions
Find the device manual for free CM-10 DataVideo in PDF.

User questions about CM-10 DataVideo
0 question about this device. Answer the ones you know or ask your own.
Ask a new question about this device
Download the instructions for your Wall mount in PDF format for free! Find your manual CM-10 - DataVideo and take your electronic device back in hand. On this page are published all the documents necessary for the use of your device. CM-10 by DataVideo.
USER MANUAL CM-10 DataVideo
THREE YEAR WARRANTY 4
DISPOSAL 4
INTRODUCTION 5
PARTS ASSEMBLY AND INSTALLATION .... 5
PRE-WORK 5
PROCEDURE....6
FREQUENTLY ASKED QUESTIONS....15
DIMENSIONS AND WEIGHT 16
SPECIFICATIONS 18
SERVICE AND SUPPORT 20
Disclaimer of Product & Services
The information offered in this instruction manual is intended as a guide only. At all times, Datavideo Technologies will try to give correct, complete and suitable information. However, Datavideo Technologies cannot exclude that some information in this manual, from time to time, may not be correct or may be incomplete. This manual may contain typing errors, omissions or incorrect information. Datavideo Technologies always recommend that you double check the information in this document for accuracy before making any purchase decision or using the product. Datavideo Technologies is not responsible for any omissions or errors, or for any subsequent loss or damage caused by using the information contained within this manual. Further advice on the content of this manual or on the product can be obtained by contacting your local Datavideo Office or dealer.
Warranty
Standard Warranty
- Datavideo equipment is guaranteed against any manufacturing defects for one year from the date of purchase.
- The original purchase invoice or other documentary evidence should be supplied at the time of any request for repair under warranty.
- The product warranty period beings on the purchase date. If the purchase date is unknown, the product warranty period begins on the thirtieth day after shipment from a Datavideo office.
- All non-Datavideo manufactured products (product without Datavideo logo) have only one year warranty from the date of purchase.
- Damage caused by accident, misuse, unauthorized repairs, sand, grit or water is not covered under warranty.
- Viruses and malware infections on the computer systems are not covered under warranty.
- Any errors that are caused by unauthorized third-party software installations, which are not required by our computer systems, are not covered under warranty.
- All mail or transportation costs including insurance are at the expense of the owner.
- All other claims of any nature are not covered.
- All accessories including headphones, cables, batteries, metal parts, housing, cable reel and consumable parts are not covered under warranty.
- Warranty only valid in the country or region of purchase.
- Your statutory rights are not affected.
Three Year Warranty
- All Datavideo products purchased after July 1st, 2017 qualify for a free two years extension to the standard warranty, providing the product is registered with Datavideo within 30 days of purchase.

- Certain parts with limited lifetime expectancy such as LCD panels, DVD drives, Hard Drive, Solid State Drive, SD Card, USB Thumb Drive, Lighting, Non-PCIe Card and third party provided PC components are covered for 1 year.
- The three-year warranty must be registered on Datavideo's official website or with your local Datavideo office or one of its authorized distributors within 30 days of purchase.
Disposal

natural_image
Symbol of a trash bin crossed with no text or labels, representing waste sorting or disposal (no text present)For EU Customers only - WEEE Marking
This symbol on the product or on its packaging indicates that this product must not be disposed of with your other household waste. Instead, it is your responsibility to dispose of your waste equipment by handing it over to a designated collection point for the recycling of waste electrical and electronic equipment. The separate collection and recycling of your waste equipment at the time of disposal will help to conserve natural resources and ensure that it is recycled in a manner that protects human health and the environment. For more information about where you can drop off your waste equipment for recycling, please contact your local city office, your household waste disposal service or the shop where you purchased the product.

CE Marking is the symbol as shown on the left of this page.
The letters "CE" are the abbreviation of French phrase "Conformité Européenne" which literally means "European
Conformity". The term initially used was "EC Mark" and it was officially replaced by "CE Marking" in the Directive 93/68/EEC in 1993. "CE Marking" is now used in all EU official documents.
Introduction
CM-10 is a ceiling mount designed for PTR robotic pan tilt head, securing your PTR robotic pan tilt head to the ceiling.
Parts Assembly and Installation
In this section, you will be shown how you can assemble and install your CM-10.
Pre-work
- First check you have all the parts listed in the table below.
Note: There is a bubble level meter on the ceiling bracket A.
| No. | Part Names | Qty |
| 1 | Ceiling Mount Bracket A | 1 |
| 2 | Ceiling Mount Bracket B | 1 |
| 3 | Camera Mount Arm | 1 |
| 4 | Expansion Bolt | 6 |
| 5 | M3 x 6mm Screw (Silver) | 2 |
| 6 | M3 x 6mm Screw (Black) | 4 |
| 7 | M4 x 8mm Screw (Black) | 4 |
| 8 | M4 x 9.6mm Screw (Silver) | 3 |
Procedure
Follow the steps outlined below to assemble the ceiling and camera mounts and secure them to your PTR robotic pan tilt head.
- Secure the ceiling mount bracket B to the ceiling.

text_image
Ceiling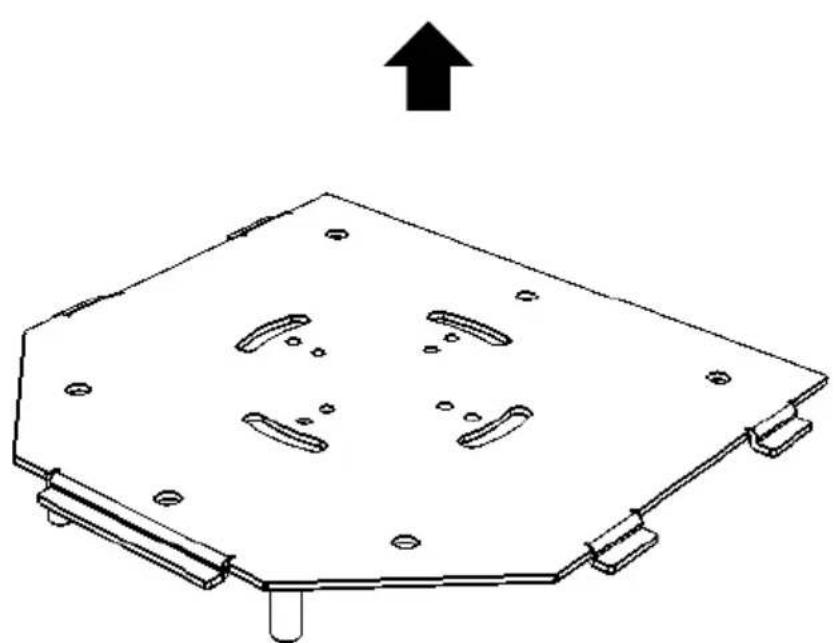
natural_image
Technical line drawing of a hexagonal mechanical component with mounting holes and a black upward arrow indicating force or direction (no text or symbols)Ceiling Mount Bracket (B)
The dimensions diagram of the ceiling mount bracket B is shown below.

text_image
197 182.40 162 69.18 6.Ø6.50 4.44 20 20 55 63.12 68 RØ4 83.25 45 64 20 59.89 84.10 84.10 96 101.40 57.46 60 80If your ceiling is made of concrete, then on the surface where the PTR robotic pan tilt head is to be installed, drill six holes spaced according to the dimensions indicated in the diagram above (enclosed by six rectangles) then use the six expansion bolts in your product package to secure the ceiling mount bracket B to the ceiling.
If your ceiling is made of wood, then on the surface where the PTR robotic pan tilt head is to be installed, drill four holes spaced according to the dimensions indicated in the diagram above (see the arc shaped holes enclosed in a circle) then use four self-tapping screws to secure the ceiling mount bracket B to the ceiling. Please note that self-tapping screws are not provided in the product package.
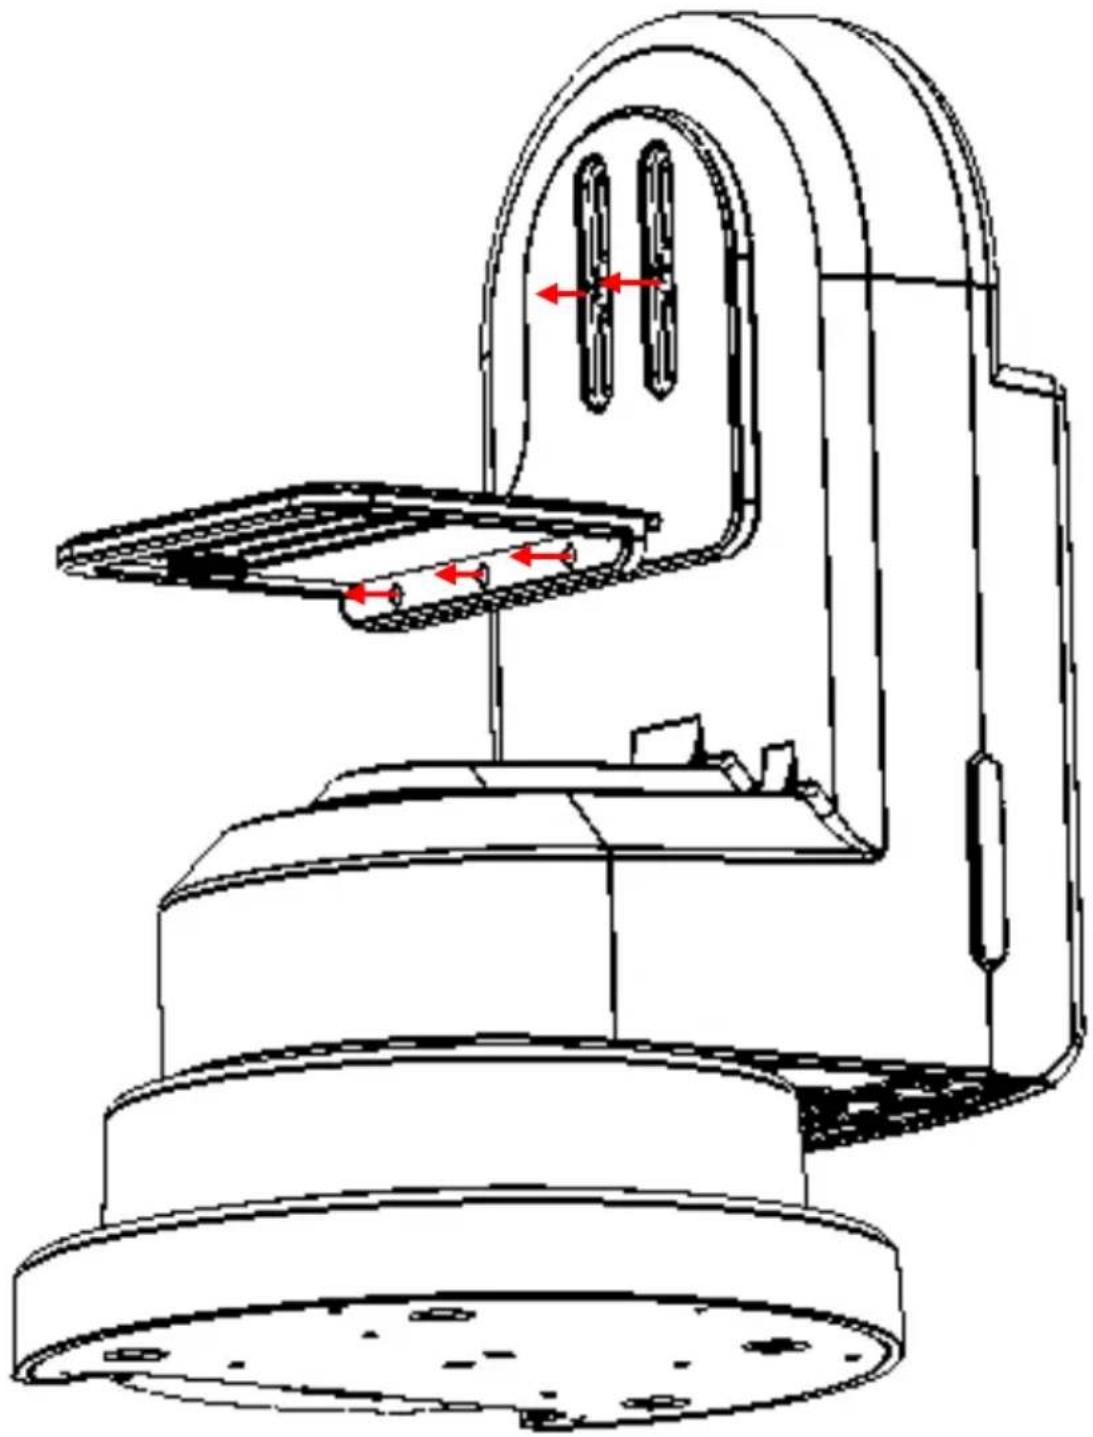
- Remove the screws as depicted in the diagram below to unload the camera mount of the PTR robotic pan tilt head.
natural_image
Technical line drawing of a mechanical device with internal components and red directional arrows indicating flow or movement (no text or symbols)3. Re-assemble the camera mount
text_image
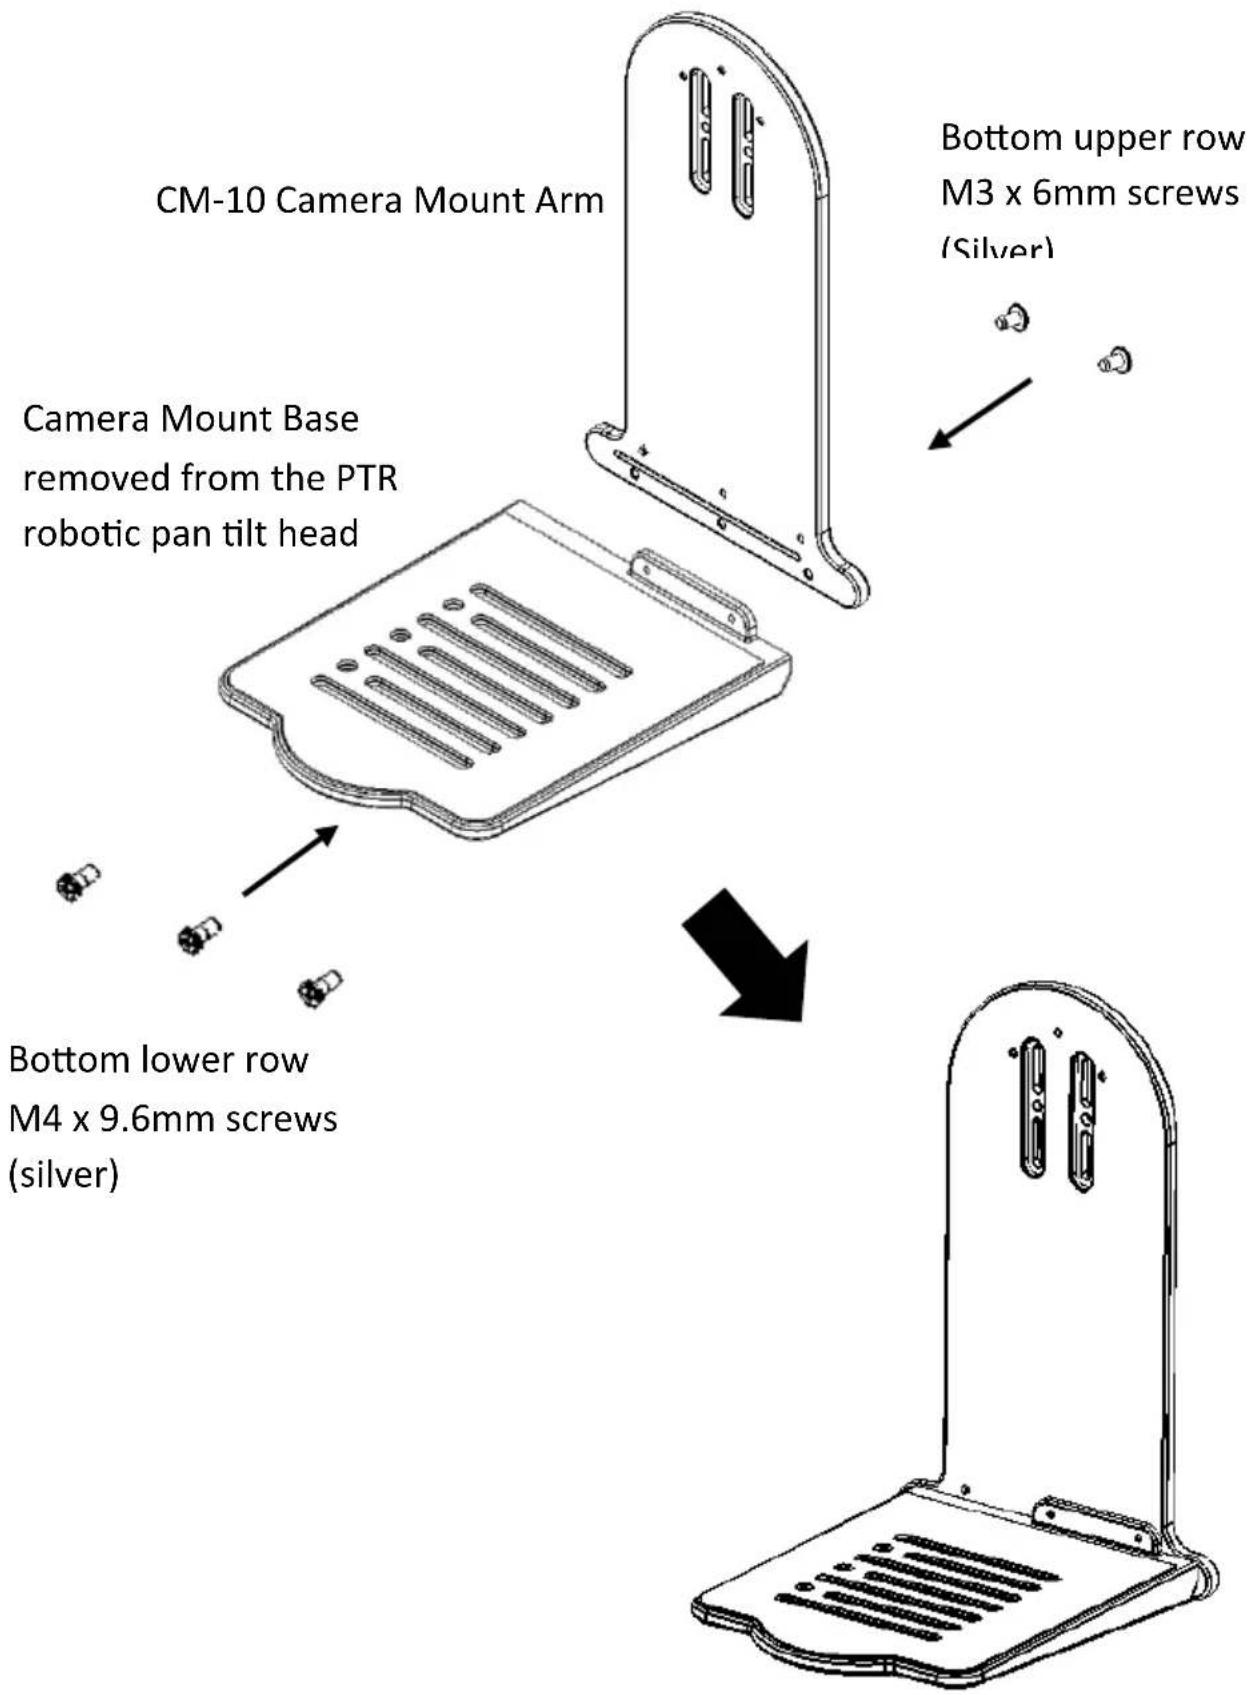
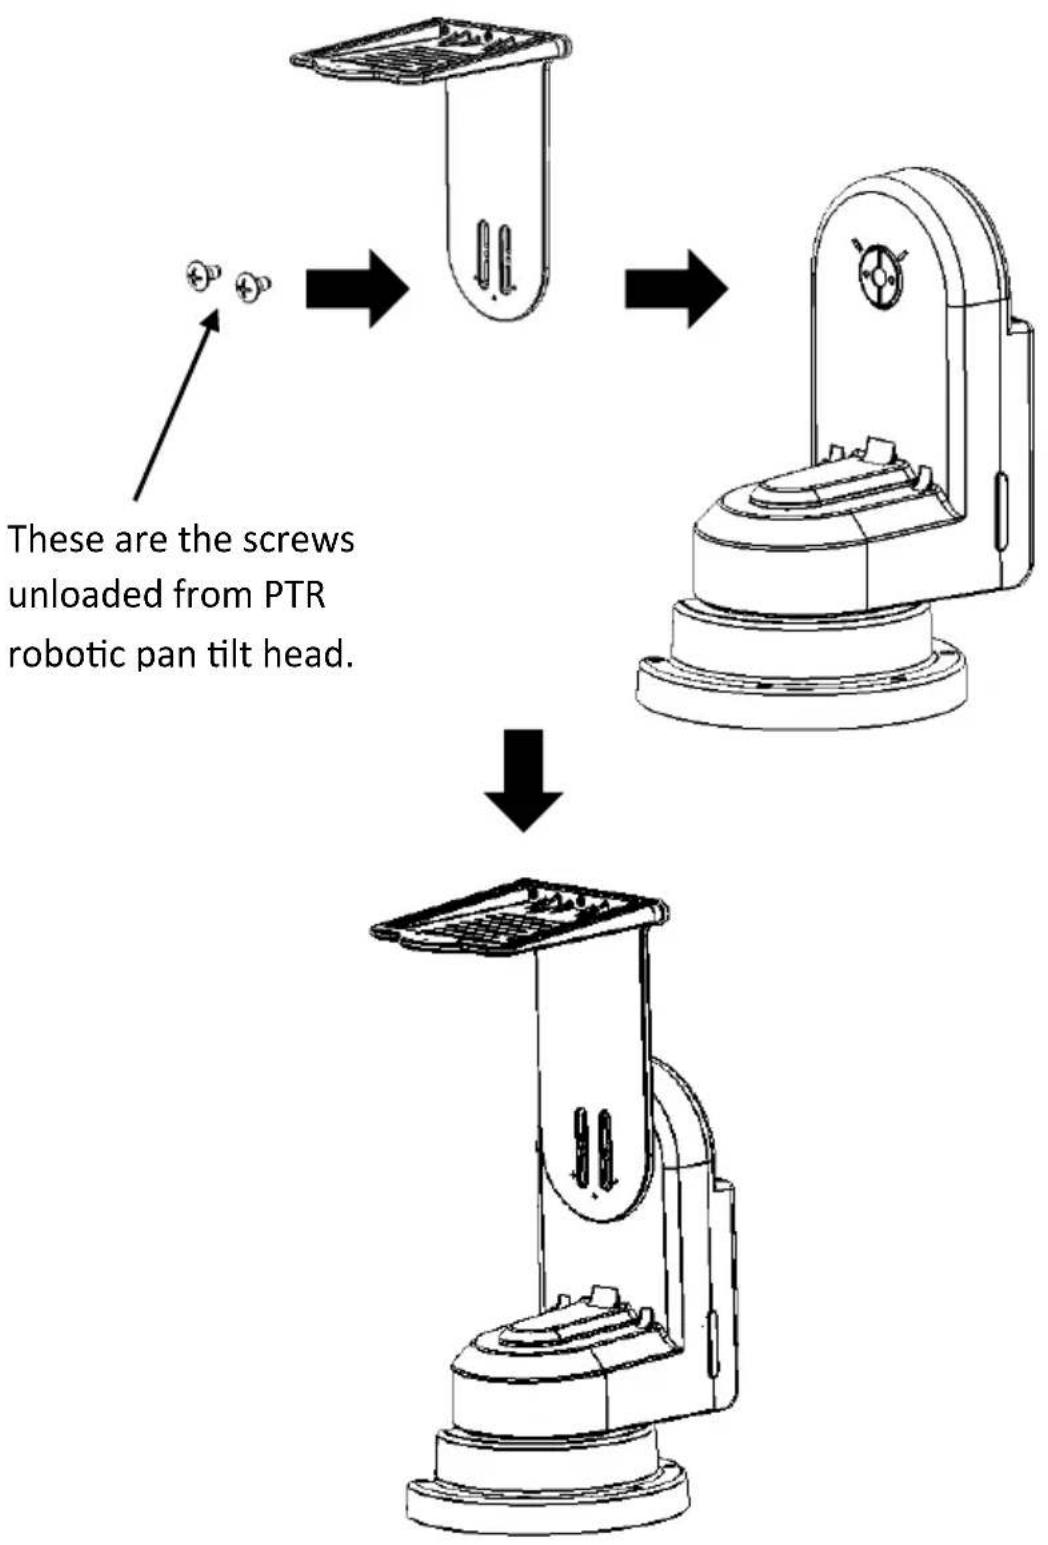
CM-10 Camera Mount Arm Camera Mount Base removed from the PTR robotic pan tilt head Bottom lower row M4 x 9.6mm screws (silver) Bottom upper row M3 x 6mm screws (Silver)- Secure the camera mount to the PTR robotic pan tilt head.
flowchart
graph TD
    A["Initial Sensor"] --> B["Unloaded Sensor"]
    B --> C["After Unloaded Sensor"]
    note1["These are the screws unloaded from PTR robotic pan tilt head."]
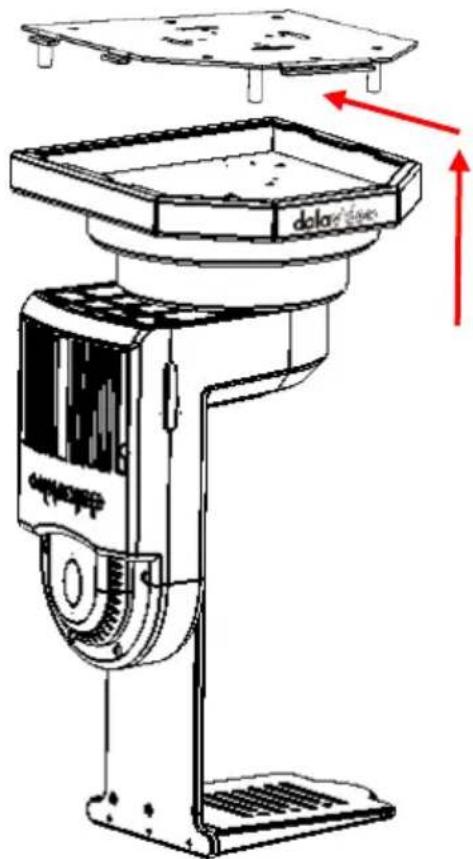
- Secure the ceiling mount bracket A to the base of the PTR robotic pan tilt head.
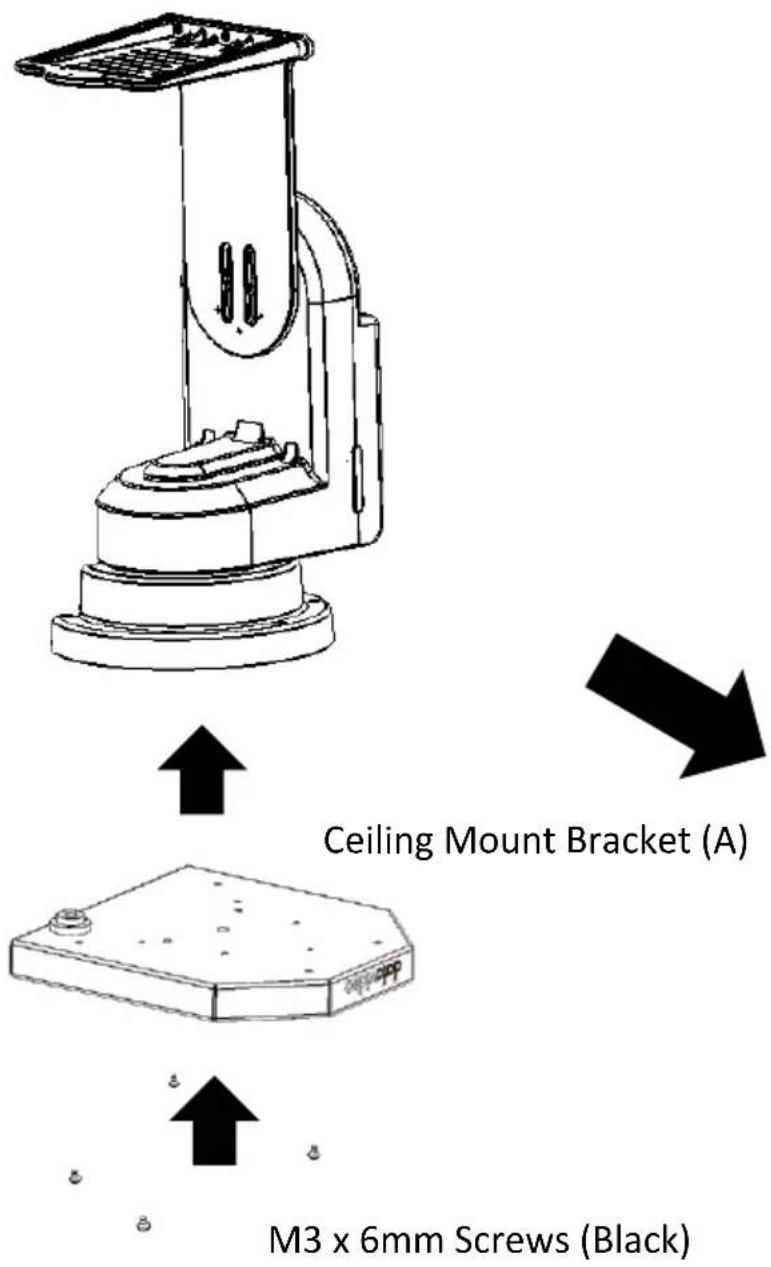

natural_image
Technical line drawing of a mechanical device with a top-mounted component and base (no text or symbols)- As shown in the diagram, push the ceiling mount bracket A along with the PTR robotic pan tilt head into the ceiling mount bracket B secured to the ceiling then backwards until the two brackets click into place.
Ceiling
text_image
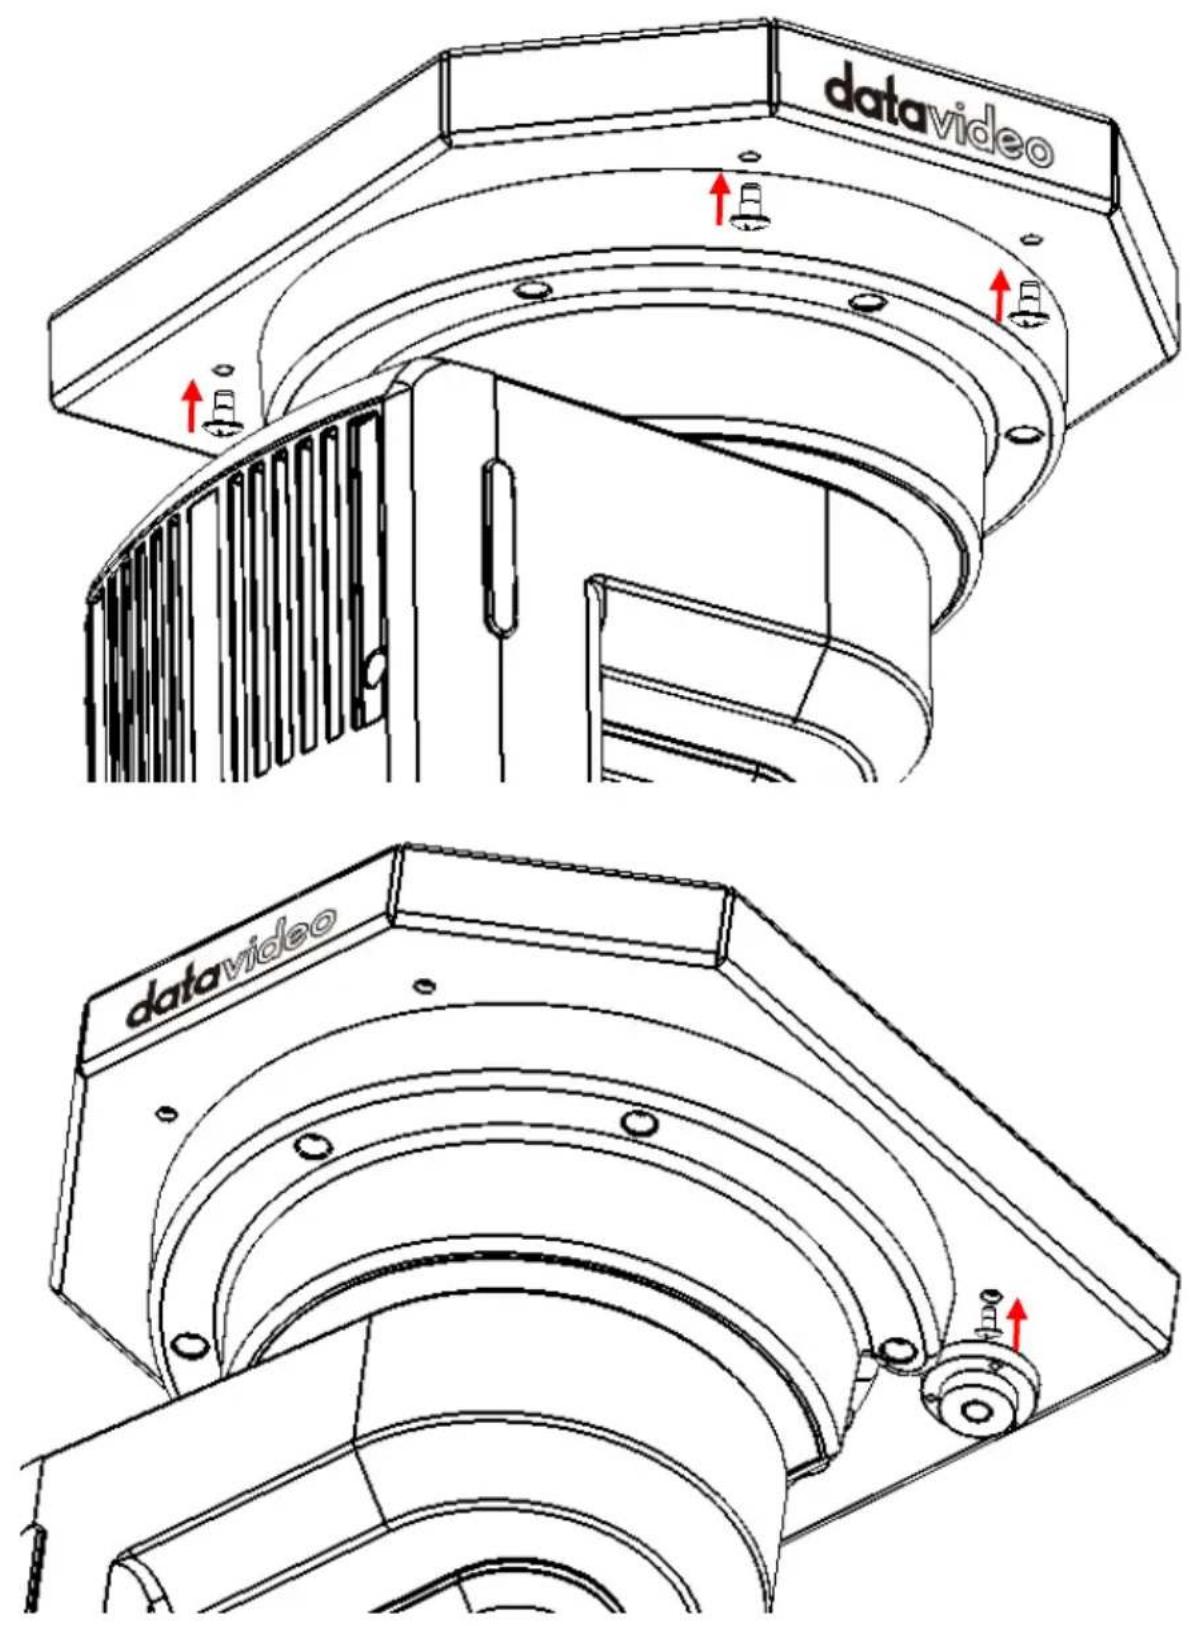
dolard cheese- Insert the four M4 x 8mm screws (black) into each of the four holes in the four corners of the ceiling mount bracket A then tighten.
- Finally secure your camera to the camera mount base as shown in the diagram below.
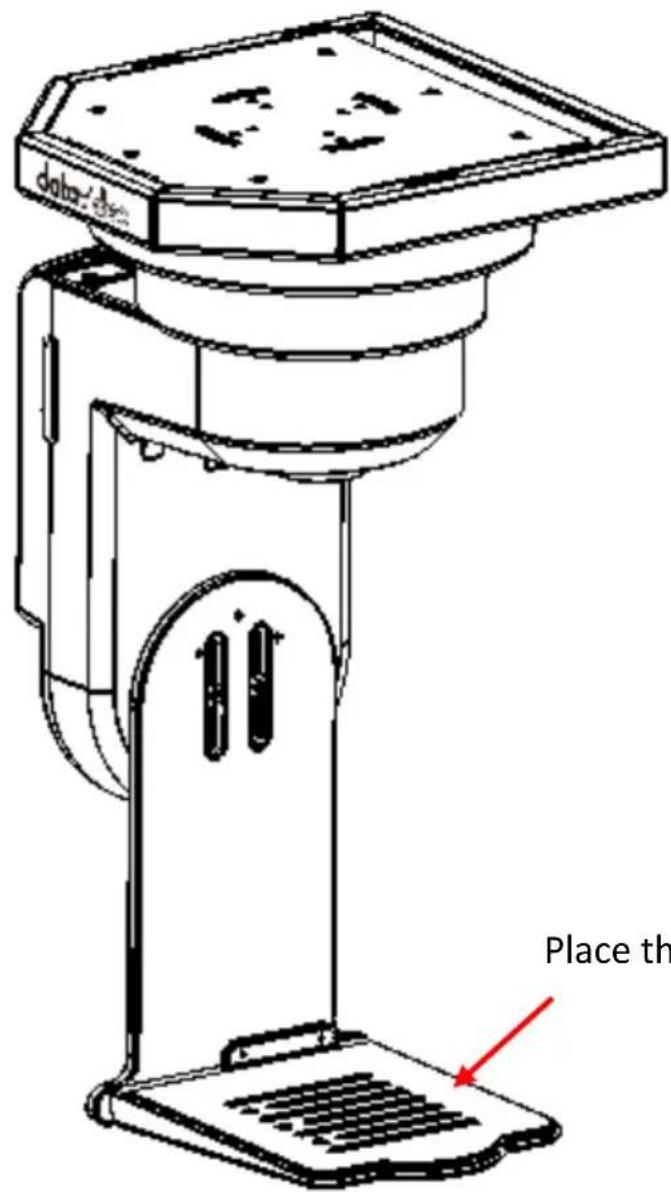
text_image
dato_doo Place thPlace the camera here.
Frequently Asked Questions
This section describes problems that you may encounter while using CM-10. See related items for suggested solutions. If problem still exists, please contact your distributor or the service center.
| No. | Problems | Solutions |
| 1 | The bubble level meter of the ceiling mount bracket A shows that the PTR robotic pan tilt head is not aligned after installation. | You can insert some soft pads into the space between the ceiling mount bracket B and the ceiling to align the PTR robotic pan tilt head horizontally. |
Dimensions and Weight
Ceiling Mount
Unit: mm

natural_image
Top-down schematic of a mechanical or architectural component with symmetrical cutouts and circular holes (no text or symbols)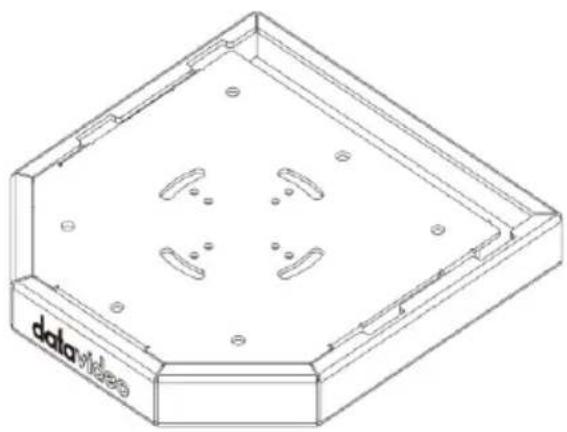
natural_image
Technical line drawing of a hexagonal electronic device casing with internal components and mounting holes (no text or symbols)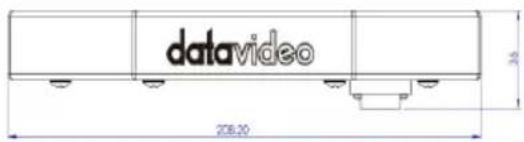
text_image
datavideo 208.20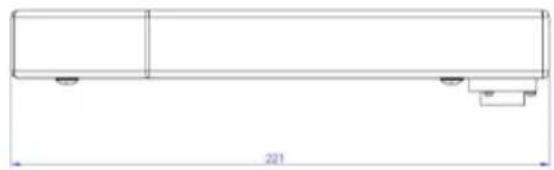
natural_image
Pure technical line drawing of a rectangular object with two vertical sections and a small protrusion, labeled '221' at the bottom (no text or symbols within the diagram itself)Weight: 1.66 kg (3.66 lb)
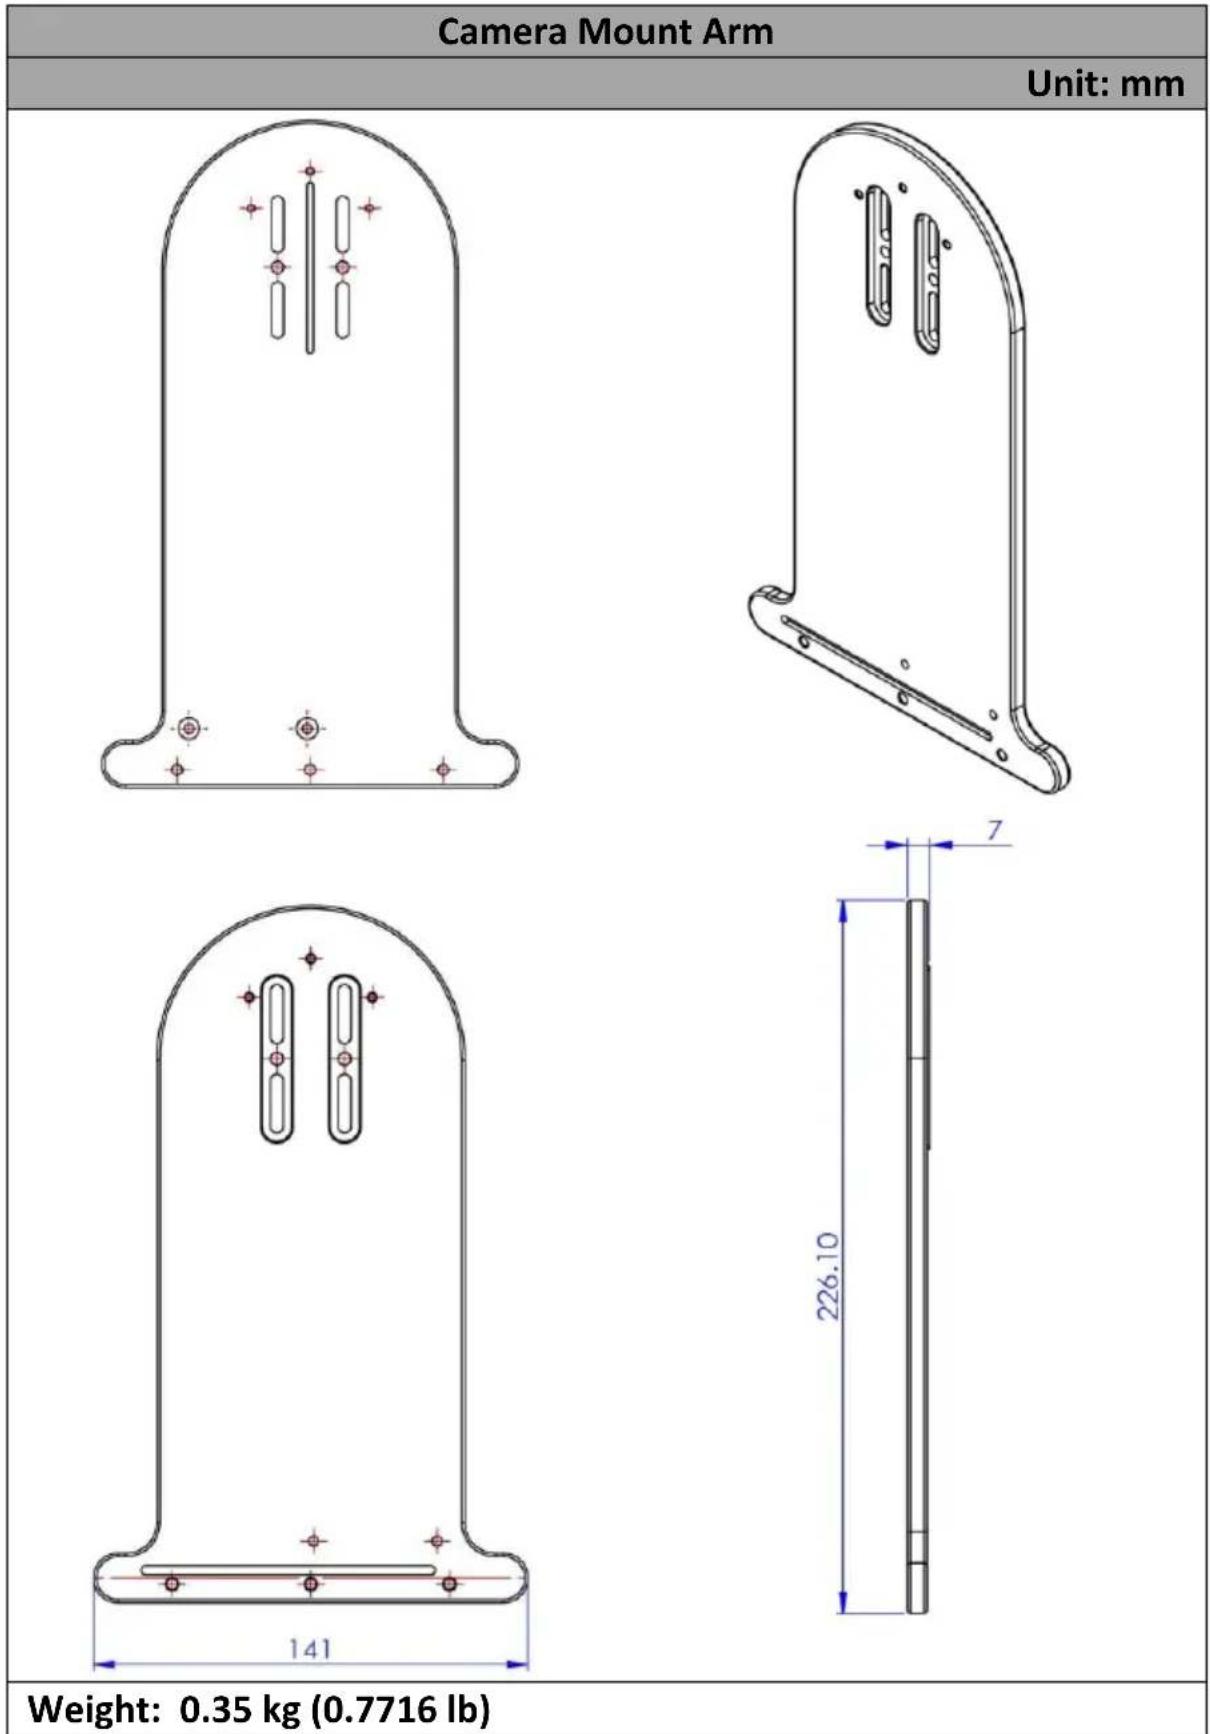
text_image
Camera Mount Arm Unit: mm Weight: 0.35 kg (0.7716 lb)Specifications
| Model No. | CM-10 |
| Name | Professional Ceiling Mount for Robotic Pan Tilt Head |
| Weight | Ceiling Mount: 1.66 kg (3.66 lb)Camera Mount Arm: 0.35 kg (0.7716 lb) |
| Dimensions | Ceiling Mount: 208 x 221 x 35 (mm)Camera Mount Arm: 7 x 141 x 226 (mm) |
| Max. Load Weight | 10 kg |
Notes
Service & Support
It is our goal to make your products ownership a satisfying experience. Our supporting staff is available to assist you in setting up and operating your system. Please refer to our web site www.datavideo.com for answers to common questions, support requests or contact your local office below.
Please visit our website for latest manual update.
https://www.datavideo.com/product/CM-10
datavideo
www.datavideo.com

@DatavideoUSA @DatavideoIndia2016
@DatavideoEMEA @Datavideojapan
@DatavideoTaiwan @DatavideoLatam
@DatavideoAsia @DatavideoBrasil

@Datavideo
@Datavideo EMEA
@Datavideo Taiwan

@DatavideoUSA
@DVTWDVCN

@DatavideoUSA
@DatavideoEurope
All the trademarks are the properties of their respective owners.
Datavideo Technologies Co., Ltd. All rights reserved 2020