E6s - Microphone Countryman - Free user manual and instructions
Find the device manual for free E6s Countryman in PDF.


| Product Type | Directional Earset Microphone |
| Weight | 0.07 oz (2 g) |
| Frequency Response | 30 Hz to 15 kHz |
| Operating Current | 400 µA |
| Operating Voltage | 1 to 2 Volts |
| Power Supply Voltage | +3V with 2.7 kΩ load, +6V with 5.6 kΩ load, +9V with 15 kΩ load |
| Polar Patterns | Cardioid (C cap) or Hypercardioid (H cap), interchangeable |
| Sensitivity (E6DW5) | 6.0 mV/Pascal |
| Equivalent Acoustic Noise (E6DW5) | 24 dBA SPL |
| Overload Sound Level (E6DW5) | 120 dB SPL |
| Sensitivity (E6DW6) | 1.9 mV/Pascal |
| Equivalent Acoustic Noise (E6DW6) | 29 dBA SPL |
| Overload Sound Level (E6DW6) | 130 dB SPL |
| Sensitivity (E6DW7) | 0.60 mV/Pascal |
| Equivalent Acoustic Noise (E6DW7) | 39 dBA SPL |
| Overload Sound Level (E6DW7) | 140 dB SPL |
| Cable | Detachable snap-on, 1 mm or 2 mm diameter |
| Accessories Included | Carrying case, black & white cable clips, windscreen, cardioid & hypercardioid caps |
| Cleaning | Earpiece, boom, and caps: alcohol wipes, spirit gum remover, or acetone. Capsule: do not use water or chemicals. |
| Bending Radius | Minimum 1/2" diameter; avoid bending near capsule or connector |
Frequently Asked Questions - E6s Countryman
User questions about E6s Countryman
0 question about this device. Answer the ones you know or ask your own.
Ask a new question about this device
Download the instructions for your Microphone in PDF format for free! Find your manual E6s - Countryman and take your electronic device back in hand. On this page are published all the documents necessary for the use of your device. E6s by Countryman.
USER MANUAL E6s Countryman
natural_image
Close-up portrait of a smiling woman with short dark hair, wearing a green shirt and ear tag (no text or symbols visible)Thanks for choosing the Countryman E6 Directional Earset microphone. We're confident you'll find it the finest, most natural sounding, and most unobtrusive directional microphone available.
The Earset directional mic provides high-quality pickup while rejecting noise, bleed from stage monitors, and feedback—it’s a world-class vocal mic with far better isolation than an omnidirectional mic can provide. The ultra-miniature condenser element is held close to the mouth by a thin boom and comfortable ear pad. The entire assembly weighs less than one-tenth of an ounce and almost disappears against the skin, so performers can forget it’s there and audiences barely see it.
Changeable end caps let you select a cardioid pickup pattern for ease of placement, or a hypercardioid pattern when more isolation is needed.
We use innovative engineering to pack this great a sound into such a tiny mic. For this reason, getting the best results requires some simple techniques that might not be immediately intuitive. This booklet will help you get the most out of your E6 Directional Earset.
Contents
Handling the E6 3
Connecting Snap-On Cables 5
Custom Fitting the E6 6
Using Directional Caps 12
Using Collar Clips 14
Back Port Cleaning Procedure 15
Specifications 16
Declarations 18
natural_image
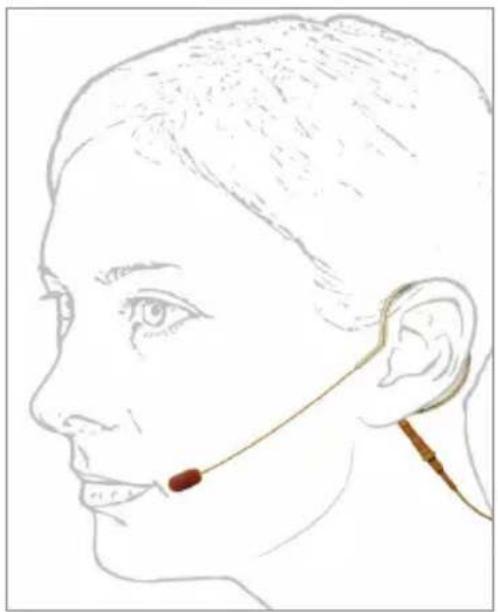
Line drawing of a human head profile with ear and earlobe connector (no text or symbols)Handling the E6
While the E6 Directional is designed for durability, moisture-resistance and flexibility, it is a high-precision instrument and we do suggest some basic precautions to prevent damage or sonic degradation:
- Always use the E6 with a cap in place. The end caps are critical to the sound quality and also protect the capsule from makeup, moisture, and debris.
- When a protective cap is not in place, avoid touching the end of the capsule with fingers or obstructing the opening with foreign substances.
- The earpiece, boom, and end cap may be cleaned with alcohol wipes, spirit gum remover, or acetone. Do not use water or chemicals on the capsule itself.
- Clean the caps separately.
natural_image
Illustration of a hand holding a wooden stick with a red X mark, no text or symbols presentHandling the E6 (cont.)
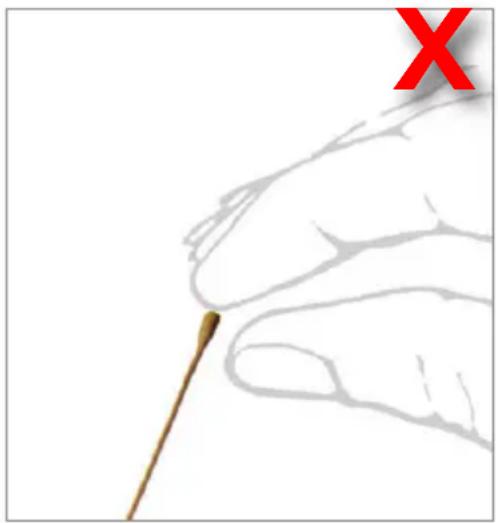
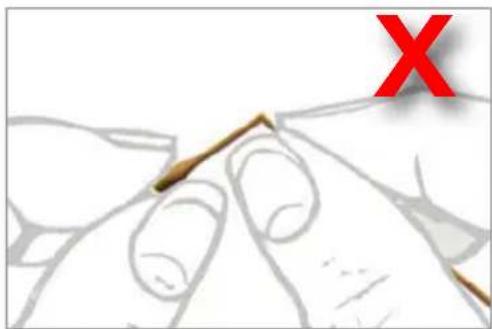
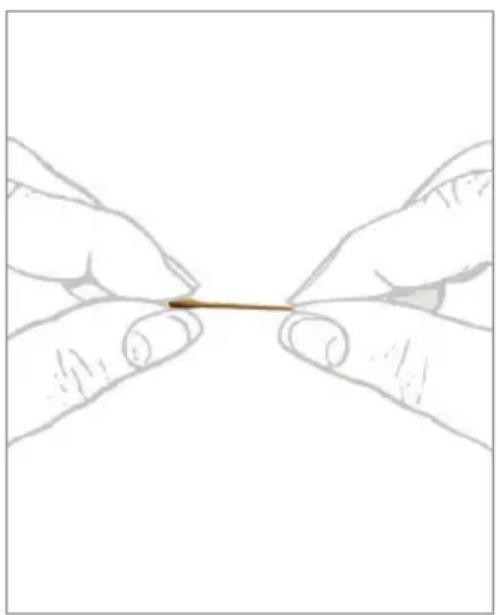
The E6's earpiece and boom are constructed of an exceptionally flexible material which can be easily shaped to the wearer's needs. To prevent damage to your Earset:
- Avoid bending it over sharp angles (such as the end of your fingernail) or around a tight radius (less than 1/2" diameter).
- Avoid bending the booms within 1/2" of the capsule or the earpiece within 1/2" of the connector.
- Use the side of your finger or other rounded object.
natural_image
Close-up of hands holding a small wooden stick with a red 'X' mark in the corner (no text or symbols on the stick or background)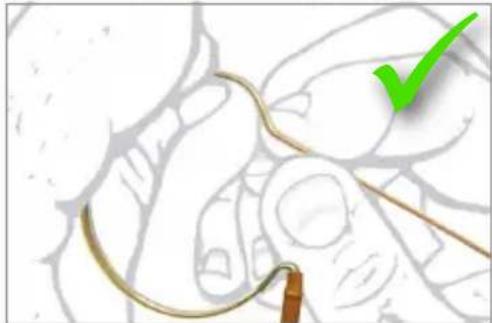
natural_image
Illustration of a hand holding a coiled wire with a green checkmark (no text or symbols)Connecting Snap-On Cables
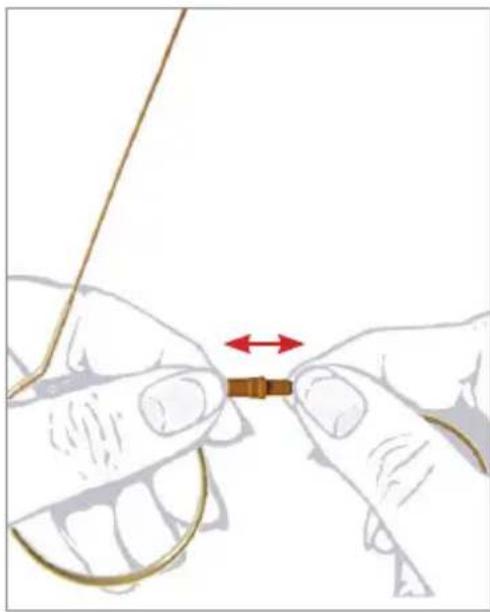
The Earset cable is easy to remove and change, allowing you to swap transmitter types, switch colors, or replace damaged parts in the field. Exercise care in connecting and disconnecting the cable connector.
• Always grasp the connectors near the outer ends of the rubber sleeves and pull the connectors straight apart. When connecting listen for a click.
- The connectors do not unscrew and normally rotate freely.
- Avoid grasping the connectors where the sleeves overlap, as this can weaken the moisture-resistant seal and deteriorate the integrity of the connection.
- Do not pull by the cable, boom, or springy part of the Earset.
natural_image
Illustration of hands tying a knot with a small brown object, no text or symbols presentCustom Fitting the E6
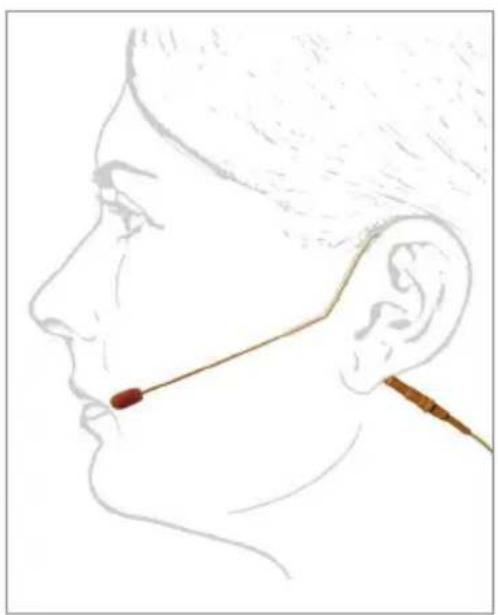
Head-worn mics provide isolation by keeping the element near the mouth. The ideal placement is with the tip of the element at the corner of the mouth, about 1/4" away from the face. Since every performer's face is different, we've made it easy to custom fit the E6 Directional Earset:
1. Try it on
Pull the "C" shaped part of the earset open and clip it over your ear, so that the connector sits behind the earlobe and the boom goes over the top of your ear and runs along your face.
You should feel the E6 gripping the top of your ear and sitting in the pocket behind your earlobe.
natural_image
Side profile sketch of a human head and ear with a medical instrument inserted, no text or symbols presentCustom Fitting the E6 (cont.)
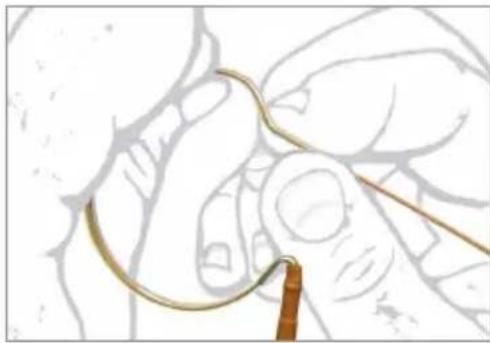
2. Curve the Boom
The Directional Earset is designed for a particular side (usually left). Curve the boom left if you intend to wear the earset on your right side; curve it to the right to wear it on your left side.
Form the earpiece and overall shape with your fingertips. Make sure there is a short straight section between the boom and the earpiece—this sits in front of the ear, locking the Earset in place.
To curve the Earset, press and slide your thumb and forefinger along the boom several times. Don't be afraid to form the boom as long as you are curving—not kinking—the tube.
natural_image
Close-up of hands holding a coiled metal wire, no visible text or symbols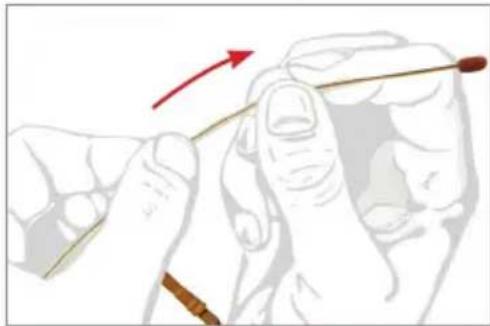
natural_image
Illustration of a hand holding a pen with a red arrow indicating direction (no text or symbols)Custom Fitting the E6 (cont.)
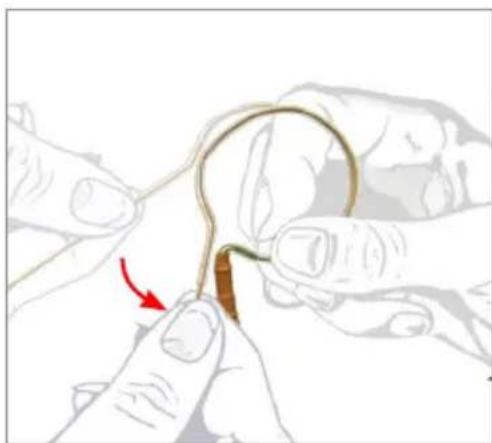
3. Tighten the loop
Gently twist the loop so that it is smaller than your ear, then allow it to return to its regular shape (this is less important with the E6i). The loop should now be smaller than it was before and there should be slight tension when the Earset is on your ear. The amount you tighten this loop makes a big difference in how stable and tight the earset feels.
natural_image
Illustration of hands tying a knot with a red arrow indicating the knot's direction (no text or symbols present)Custom Fitting the E6 (cont.)
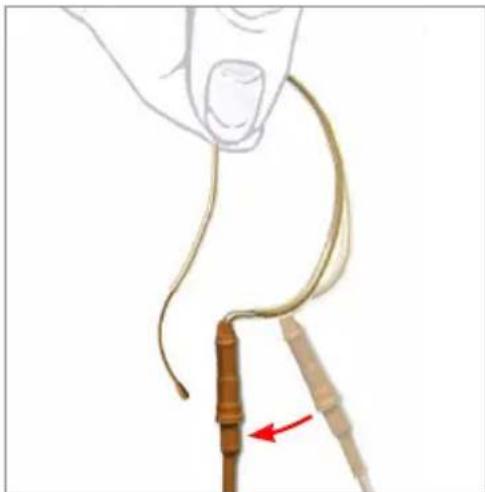
4. Spring the loop
Holding the boom, gently pull the base of the Earset. When you clip the earset behind your ear, the connector will push out against your earlobe and the boom will press smoothly along your face.
This is the fastest way to get a really tight fit if the Earset feels loose.
natural_image
Illustration of a hand holding two wires with a red arrow pointing to one (no text or symbols)Custom Fitting the E6 (cont.)
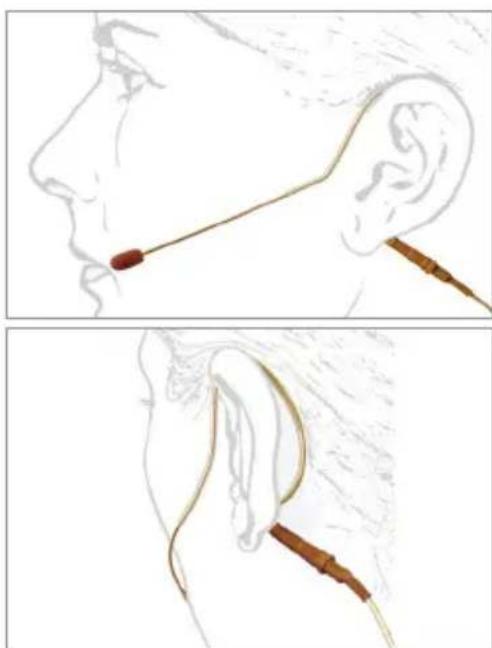
5. Position the boom
The Earset should now be firmly on your head, but the end of the microphone may be too high or too low, too far back or too far out in front of your mouth.
Form the boom with your fingers until you get it comfortable and sounding good. The best spot is usually just back from the corner of your mouth when you are smiling.
The boom should be very close to your face, or gently touching it, for most of its length.
natural_image
Illustration of a human ear with a medical instrument inserted into the ear, showing anatomical details (no text or symbols present)Custom Fitting the E6 (cont.)
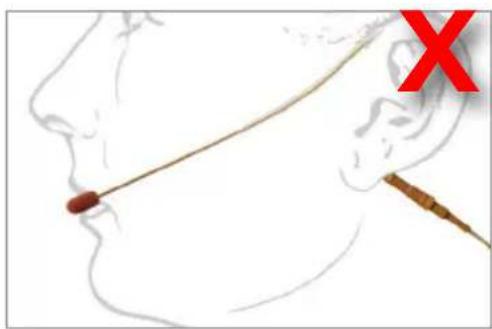
- Placing the microphone too far forward can result in breath-related pops. Resist the urge to position the capsule directly in front of the mouth.
- Placing the microphone too far back will impact bass response and isolation.
- The perfect position is with the mic within about a 1" spot at the corner of the mouth, about 1/4" away from the face and pointed slightly inward.
- Curve the boom any way you like—the goal is to put the tip in the right place. A great technique is to plug the mic into a mixer and wear the Earset with headphones while making adjustments. You can easily hear the effect of placement on the sound.
natural_image
Illustration of a human face with a needle inserted into the mouth, marked with a red X (no text or symbols present)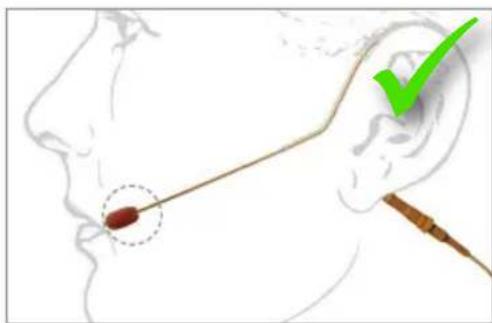
Using Directional Caps
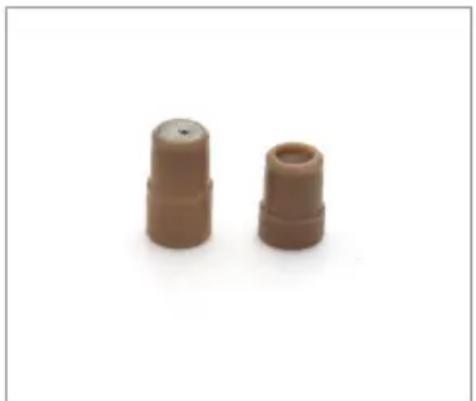
The C (cardioid) and H (hypercardioid) end caps modify your Earset's directionality. The Earset should always have a protective cap in place to keep sweat, makeup and other foreign material out of the microphone.
The hypercardioid cap provides the best isolation from all directions, with a null towards the floor where “wedge” monitors are often placed. The hypercardioid is slightly more sensitive to air movement and handling noise and should always be used with a windscreen.
The cardioid cap is slightly less directional, with a null roughly towards the performer's back. It's most useful for tradeshow presenters or others who have a monitor speaker over their shoulders or behind them.
natural_image
Two brown cylindrical mechanical components with flanges, shown against a white background (no text or symbols)directional caps
left: H (hypercardioid) cap
right: C (cardioid) cap
Using Directional Caps (cont.)
When removing and replacing the protective caps:
- Grasp the microphone low on the boom, close to the capsule.
- Hold the protective cap by the sides and pull straight off to remove.
- To replace the protective cap, position the cap, hold the sides and press straight on firmly.
- Never touch the sides or top of an uncapped mic element. Do not let your fingers slide across the element when removing the cap.
natural_image
Illustration of two hands holding a thin rod, no text or symbols presentUsing Collar Clips
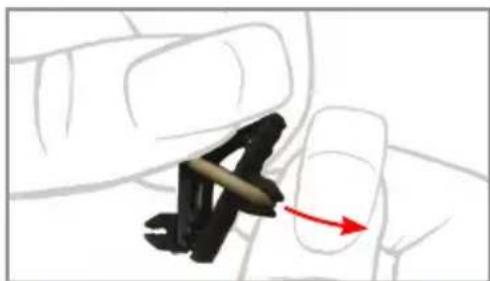
The Earset comes with two collar clips: one black and one white. These clips prevent movement in the cable from dislodging the Earset and can reduce cable noise. They are specifically designed to match the diameter of your E6 cable, either 1mm or 2mm.
Gently pull the cable down into the opening to attach the clip. Gently pull the cable out to remove the clip.
We recommend always using a collar clip with the Directional E6. Use both attachment points as shown. We recommend leaving the clip attached to the cable when possible to minimize repetitive strain.
natural_image
Close-up of a hand holding a car component with a red arrow indicating direction (no text or symbols)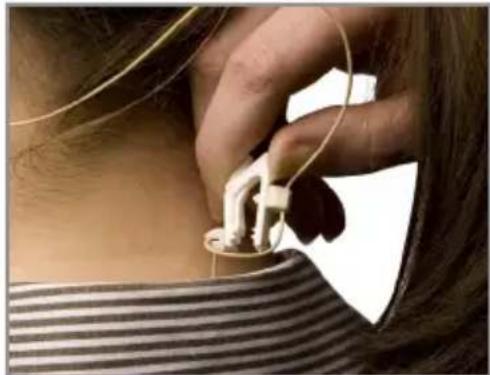
natural_image
Close-up of a person's hand holding a medical or electronic device attached to a striped shirt (no visible text or symbols)Back Port Cleaning Procedure
This procedure is rarely necessary, but it may help if frequency response and directionality have deteriorated because the back ports on the element are contaminated with dust or makeup.
Make sure your hands, the work area, the Earset's boom and end cap are clean. Take a 6" - 8" piece of clean painter's or gaffer's tape and form it into a circle, sticky side out. Stick it down on the top of a table, near the edge. Do not use tapes that may leave adhesive on the mic.
Remove the cable and end cap. Hold the Earset by its boom, about an inch from the bare mic element. Lay the element down on the adhesive, with the earpiece hanging off the edge of the table. Gently roll the mic a full 360^ along the adhesive to remove dust or debris. Replace the end cap and cable.
Specifications
Frequency Response: 30Hz to 15kHz
Operating Current: 400uA
Operating Voltage: 1 to 2 Volts
Power Supply Voltage: +3V with 2.7kOhm load
+6V with 5.6kOhm load
+9V with 15kOhm load
Weight: 0.07oz (2g)
Supplied Accessories:
Carrying case, black and white cable clips, wind screen, and hypercardioid and cardioid caps.
Detailed information on connecting Earsets to wireless transmitters can be found at:
http://www.countryman.com
The E6 Earset is available in three sensitivities to match a wide range of applications:
Model E6DW5 for general speaking
Sensitivity: 6.0 mV/Pascal
Equivalent Acoustic Noise: 24 dBA SPL
Overload Sound Level: 120 dB SPL
Model E6DW6 for strong speaking and vocals
Sensitivity: 1.9 mV/Pascal
Equivalent Acoustic Noise: 29 dBA SPL
Overload Sound Level: 130 dB SPL
Model E6DW7 for strong vocals and monitors
Sensitivity: 0.60 mV/Pascal
Equivalent Acoustic Noise: 39 dBA SPL
Overload Sound Level: 140 dB SPL
Specifications (cont.)
Frequency Response
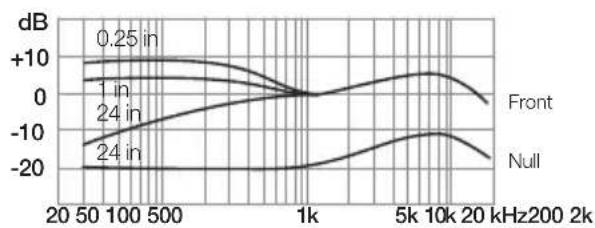
line
| Frequency | Front (dB) | Null (dB) | | --------- | ---------- | --------- | | 20 | -10 | -20 | | 50 | -5 | -15 | | 100 | 0 | -10 | | 500 | 5 | -5 | | 1k | 0 | 0 | | 5k | 5 | 5 | | 10k | 10 | 10 | | 20 | 5 | 5 |1 kHz Polar Response
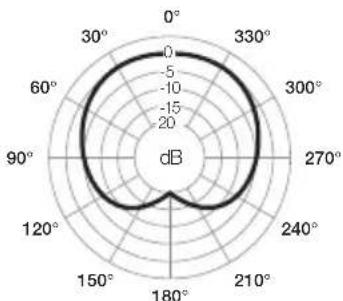
radar
| Angle | Value | |---|---| | 0° | -5 | | 30° | -10 | | 60° | -15 | | 90° | -20 | | 120° | -15 | | 150° | -10 | | 180° | -5 | | 210° | 0 | | 240° | 5 | | 270° | 10 | | 300° | 15 | | 330° | 20 | | 360° | 25 |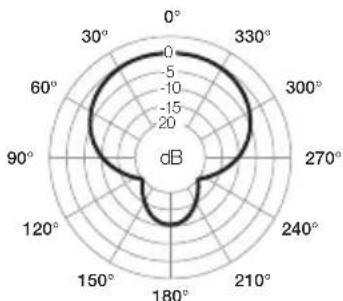
radar
| Angle | Value (dB) | |---|---| | 0° | 0 | | 30° | 5 | | 60° | 10 | | 90° | 15 | | 120° | 20 | | 150° | 15 | | 180° | 10 | | 210° | 5 | | 240° | 0 | | 270° | -5 | | 300° | -10 | | 330° | -15 | | 360° | -20 |cardioid cap hypercardioid cap
Declarations
We, Countryman Associates Inc., declare under our sole responsibility that the following products:
E6 / E6i Directional Earset Microphone models E6*, E6D*, E6ID*, WCE6D*, WCE6ID*
To which this declaration relates are in compliance with the essential requirements of:
2004/108/EC EMC
EN 55103-1
EN 55103-2
2002/96/EC WEEE
2003/108/EC
2002/95/EC RoHS
When used as specified.
RoHS


Countryman Associates, Inc. 195 Constitution Drive, Menlo Park, CA 94025
Phone: (800) 669-1422 or (650) 364-9988 Fax: (650) 364-2794
Email: sales@countryman.com Web: www.countryman.com

- Contents
- Handling the E6
- Handling the E6 (cont.)
- Connecting Snap-On Cables
- Custom Fitting the E6
- Try it on
- Custom Fitting the E6 (cont.)
- Curve the Boom
- Tighten the loop
- Spring the loop
- Position the boom
- Using Directional Caps
- directional caps
- Using Directional Caps (cont.)
- Using Collar Clips
- Back Port Cleaning Procedure
- Specifications
- Supplied Accessories:
- Specifications (cont.)
- Declarations
Brand : Countryman
Model : E6s
Category : Microphone