LW142D - Wine cellar Lanbo - Free user manual and instructions
Find the device manual for free LW142D Lanbo in PDF.


| Product Type | Wine Cellar |
| Brand | Lanbo |
| Model | LW142D |
| Bottle Capacity | 142 bottles (standard Bordeaux 0.75L) |
| Dimensions (H x W x D) | 84.1 x 59.7 x 57.2 cm |
| Net Weight | 46.5 kg |
| Power Supply | 220-240V ~ 50Hz |
| Power Consumption | 150W |
| Temperature Range | 5°C to 18°C |
| Cooling System | Thermoelectric (compressorless) |
| Control Type | Digital touch panel with LCD display |
| Interior Lighting | Soft blue LED light |
| Shelves | 8 removable wooden shelves (slide-out) |
| Door | Reversible, double-pane tempered glass with UV protection |
| Lock | Yes, with key |
| Vibration Dampening | Low noise and vibration for optimal aging |
| Noise Level | < 38 dB |
| Climate Class | N (16°C - 32°C ambient) |
| Cleaning & Maintenance | Clean interior with mild soap and water; avoid abrasives |
| Warranty | 2 years |
Frequently Asked Questions - LW142D Lanbo
User questions about LW142D Lanbo
0 question about this device. Answer the ones you know or ask your own.
Ask a new question about this device
Download the instructions for your Wine cellar in PDF format for free! Find your manual LW142D - Lanbo and take your electronic device back in hand. On this page are published all the documents necessary for the use of your device. LW142D by Lanbo.
USER MANUAL LW142D Lanbo
natural_image
Line drawing of a multi-tiered stainless steel refrigerator with cooling fins and ventilation grilles (no text or labels)FOR MODEL:
LW28D/LBUS33D/LW46D/LBUS54D/LW80D/LW72D/LW142D/LW165D
LW306D/LW328DD
LB36BD/LBUS36B/LB36BAA/LW3370B/LBUS66B/LB66BAA
LW33S/LBUS33S/LW52S/LW80S/LW155S/LW177S/LW321S/LW328SD
LW133DD/LW162DD/LW144T
LB80BC/LBUS33BC/LB148BC/LBUS54BC
LW168TS/LW328TS
CONGRATULATIONS
Congratulations, and thank you for purchasing your new Lanbo Appliances product. We are confident you will be pleasantly surprised with the simplicity of use. Before installing and operating your new appliance, please thoroughly read through this manual for product description and functions.
To avoid any risks associated with using an electric appliance, it is important that you read the safety instructions and that the appliance is installed properly in accordance with the instructions to avoid potential hazards. Please keep this instruction manual for future reference if needed.
After unpacking the appliance, please inspect it to verify it is not damaged. If in doubt, do not use the appliance and contact Lanbo Appliances customer service center.
Important Tips for Product Use.
BEFORE USE:
-
After unpacking and inspecting your new Lanbo appliance, allow to sit and stabilize for 24 hours before connecting to a power source. This will reduce the possibility of a malfunction in the cooling system from handling during transportation
-
Set temperature for select wines:
a. Merlot, Shiraz and Cabernet Sauvignon – Temp. Range from 64-66°F
b. Chardonnay and Chablis – Temp. Range 48-52°F
c. Pinot Noir – Temp Range 60-64°F
d. Dessert Wines, Sparkling wine or Champagne - Temp 40°F
e. Pinot Grigio and Sauvignon Blanc – Temp Range 45-48°F
USAGE:
- Doors must be closed properly at all times. Open door only when necessary in order to maintain optimum cabinet temperature and environment to preserve integrity of wine.
- Place bottles on racks and avoid unnecessary movement until you are ready to enjoy your favorite bottle of wine. Maintaining minimal movement and vibration is essential in allowing wines to age to their fullest potential for maximum flavor.
CUSTOMER SERVICE:
For assistance or questions regarding your product, please contact our customer service team at service@lanboappliances.com or call us on (833) 600-8766.
Thank you for your trust and support in Lanbo Appliances!
LANBO INTERNATIONAL INC.
Website: www.lanboappliances.com
Email: service@lanboappliances.com
TEL: (833) 600-8766
Warning: We do not recommend our customer remove or install shelves at will. If you need to remove and install the shelves, please contact our customer service team first. We will provide professional guideline. We will not be responsible for any property damage caused by removing and installing shelves unauthorized.
CONTENTS
Important Safety Instructions ---- 5
Diagram of Product 7
Installation Instructions 19
Operation Instructions 20
Care and Maintenance 37
Troubleshooting 39
Product Specifications 40
Warranty 44
1. Important Safety Instructions:
| Warnings | To reduce the risk of fire, electrical shock, or injury when using your appliance, follow these basic precautions: |
| Carefully read all instructions before operating appliance.Keep children away from the wine cooler. Never allow children to operate, play with, or crawl inside the appliance.Never clean appliance parts with flammable liquids. Fumes can create a fire hazard or explosion.If wine cooler stops working, please contact LANBO customer service department or certified repair technician to inspect the appliance. Avoid injury or accident, and never attempt to repair yourself.If power cord becomes worn or damaged, contact a certified repair technician to replace the faulty power cord. Avoid injury, Do Not attempt to replace power cord by yourself.Make sure to unplug cord before cleaning, moving or repairing. Never unplug the cooler by pulling the electrical cord as this may damage it. Grip the plug firmly and pull straight out.Keep ventilation openings in the appliance enclosure clear of obstruction.Do not use mechanical devices or other means to accelerate the defrosting process other than those recommended by the manufacturer.Do not damage the refrigerant circuit.Do not use electrical appliances inside the food storage compartments of the appliance unless they are of the type recommended by the manufacturer.-Save these instructions- | |
Notes
- In order to avoid damage to door seal, make sure the door is completely opened when removing the adjustable shelves.
- Place the cooler close to a direct power source or outlet.
• Once wines have been stored inside the cooler, avoid moving.
- Choose a location for your cooler that isn't too cold. The ambient room temperature should be above 50^ F . Stand your cooler in a dry place – avoid areas of high moisture or humidity. Don't put the cooler in frosty or unprotected areas like a garage or patio. Keep the cooler out of direct sunlight. Have adequate space at the back and sides for air circulation.
- Do not power on the wine cooler repeatedly. Power on in 5 minute intervals.
- DANGER or WARNING: Risk of child entrapment and suffocation. Before disposing your old wine cooler: Remove the door/s, Leave the shelves in original place so children may not easily climb inside.
- This appliance uses R600a refrigerant. Keep all flammable and explosive articles away from appliance to avoid fire or explosion.
- Under supervision or guidance, this appliance may be operated by children ages 8 years and above, or any persons with reduced physical, sensory or mental capabilities, provided proper operating and safety instructions have been administered.
- Do not allow children to play with appliance. Cleaning and maintenance shall not be performed by children without adult supervision.
- If supply cord is damaged, it must be replaced by the manufacturer, its service agent or certified repair technician, in order to avoid a hazard.
- Please keep this user manual for future reference, if you misplace or lose the user manual, please contact us at
service@lanboappliances.com or call us on (833) 600-8766.
- or call us on (833) 600-8766. This appliance is intended to be used in household and similar applications such as:
Residential: houses, apartments, townhomes, condos
– Work Environment: kitchen areas, lunch rooms, cafeterias, offices and other working environments;
- Hospitality: hotels, motels, bed and breakfast
– Commercial: restaurants, catering and similar applications
Appearance and structure of the product may be different from the manual, however, this does not affect the normal use of the product.
2. Diagram of Product
1.LW33S/LBUS33S/LW52S/LW155S/LW177S/LW321S
structure diagram:
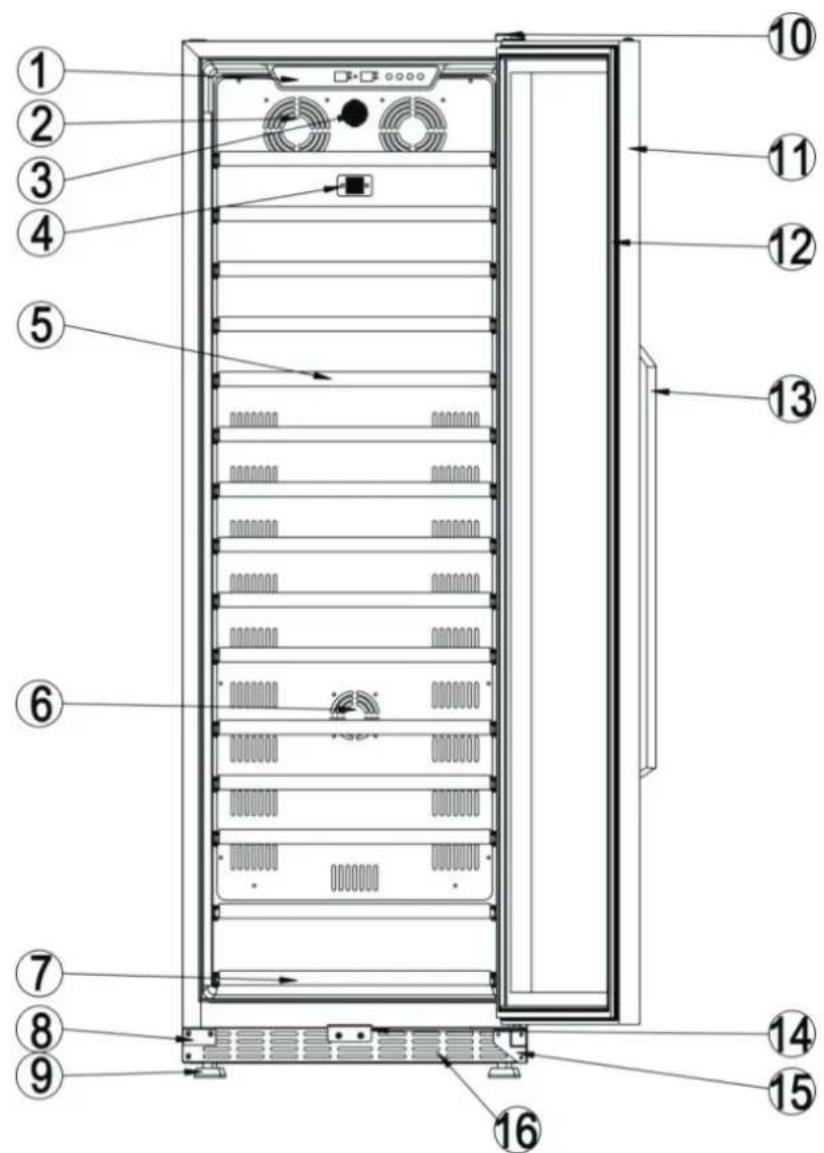
(1) Control Panel (2) Evaporator Fan (3) Carbon Filter (4) Sensor
(5) Full Wooden Shelf (6) Heating Fan (7) Small Wooden Shelf (8) Door
Support Bracket (9) Adjustable Feet (10) Upper Door Hinge (11) Glass
Door With Lock (12) Door Seal (13) Handle (14) Lock Hook (15) Lower
Door Hinge (16) Front Vent
2. LW28D/LBUS33D/LW46D/LBUS54D/LW72D/LW142D/LW165D/
LW306D structure diagram:
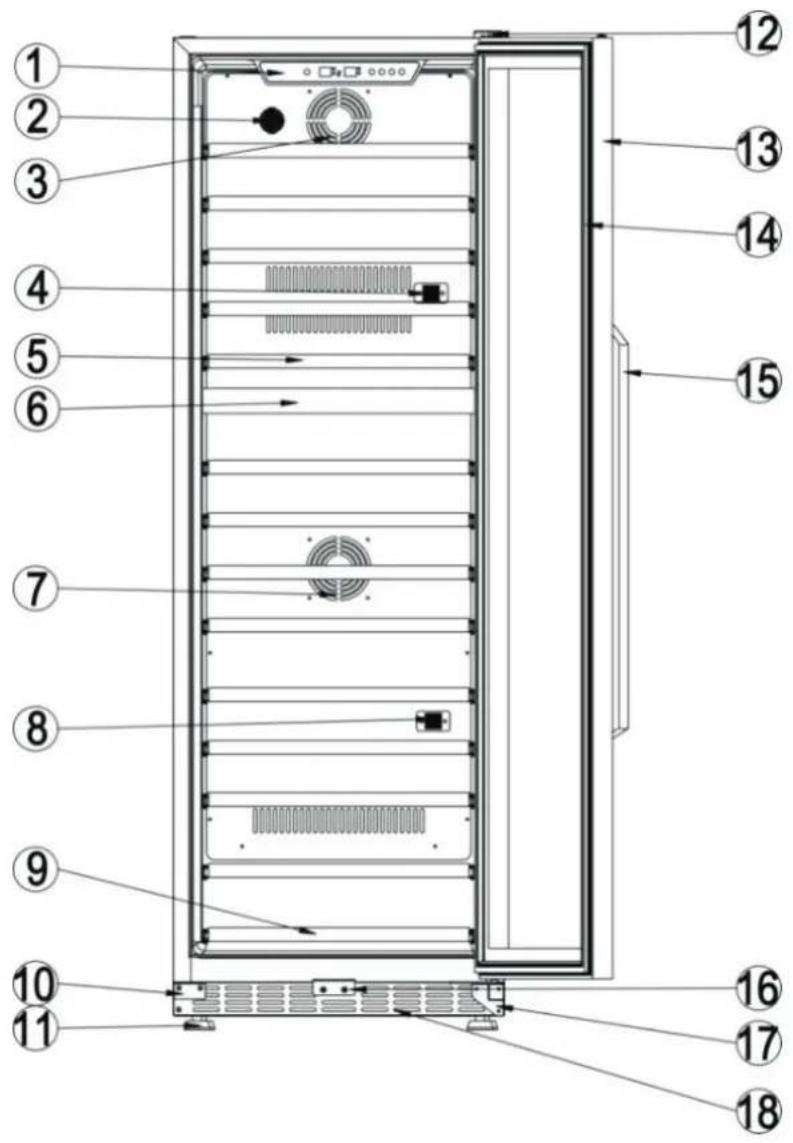
(1) Control Panel (2) Carbon Filter (3) Evaporator Fan (4) Upper Sensor
(5) Full Wooden Shelf (6) Baffle Plate (7) Heating Fan (8) Lower Sensor
(9) Small Wooden Shelf (10) Door Support Bracket (11) Adjustable Feet
(12) Upper Door Hinge (13) Glass Door With Lock (14) Door Seal (15)
Handle (16) Lock Hook (17) Lower Door Hinge (18) Front Vent
3. LW133DD/LW162DD structure diagram:
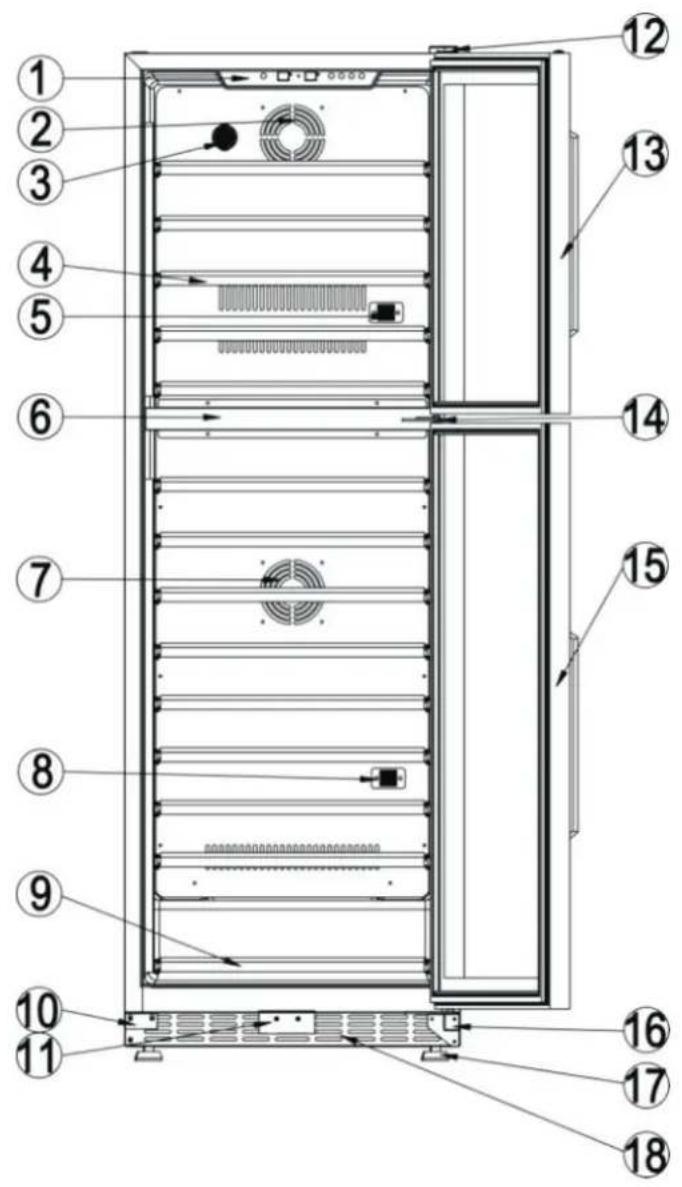
(1) Control Panel (2) Evaporator Fan (3) Carbon Filter (4) Full Wooden
Shelf (5) Upper Sensor (6) Baffle Plate (7) Dan Heater (8) Lower Sensor
(9) Small Wooden Shelf (10) Door Support Bracket (11) Lock Hook (12)
Upper Door Hinge (13) Glass door with handle/gasket (14) Middle Door
Hinge (15) Glass door with handle/gasket (16) Lower Door Hinge (17)
Adjustable Feet (18) Front Vent
4. LW144T structure diagram:
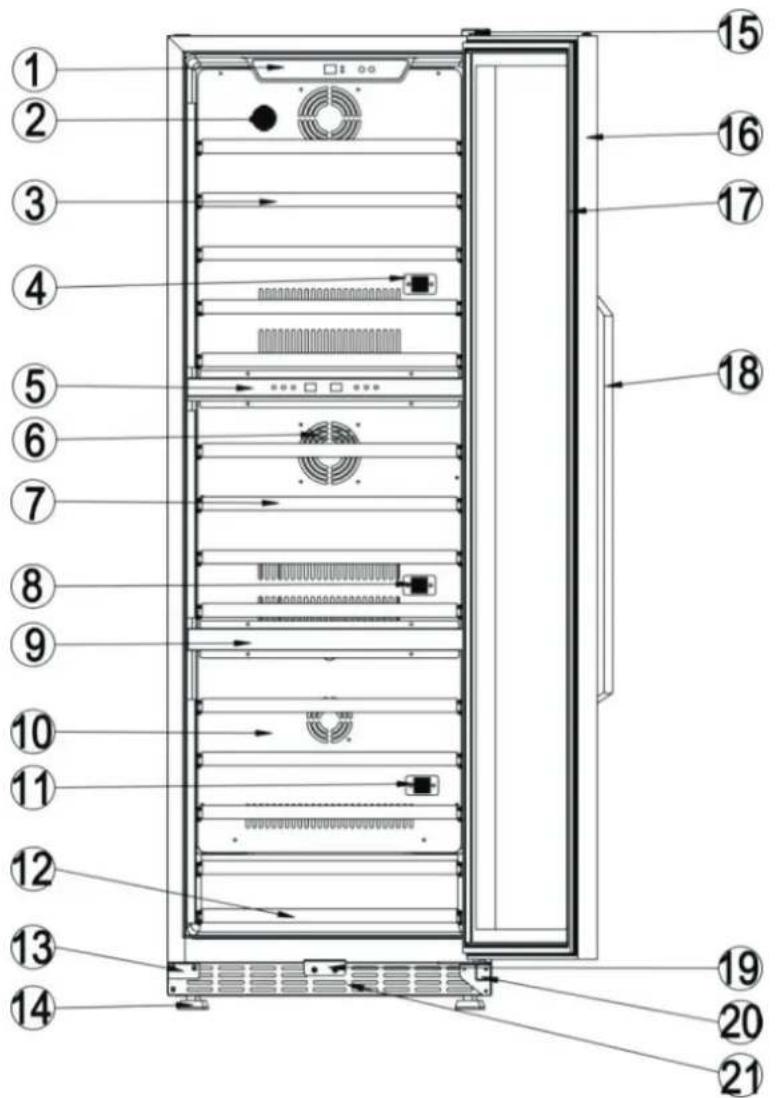
(1) Upper Control Panel (2) Carbon Filter (3) Full Wooden Shelf (4)
Upper Sensor (5) Middle Control Panel (6) Middle Fan (7) Full Wooden
Shelf (8) Middle Sensor (9) Baffle Plate (10) Rear Air-Duct Board (11)
Lower Sensor (12) Small Wooden Shelf (13) Door Support Bracket
(14) Adjustable Feet (15) Upper Door Hinge (16) Glass Door With Lock
(17) Door Seal (18) Handle (19) Lock Hook (20) Lower Door Hinge (21)
Front Vent
5. LB80BC/LBUS33BC/LB148BC/LBUS54BC structure diagram:
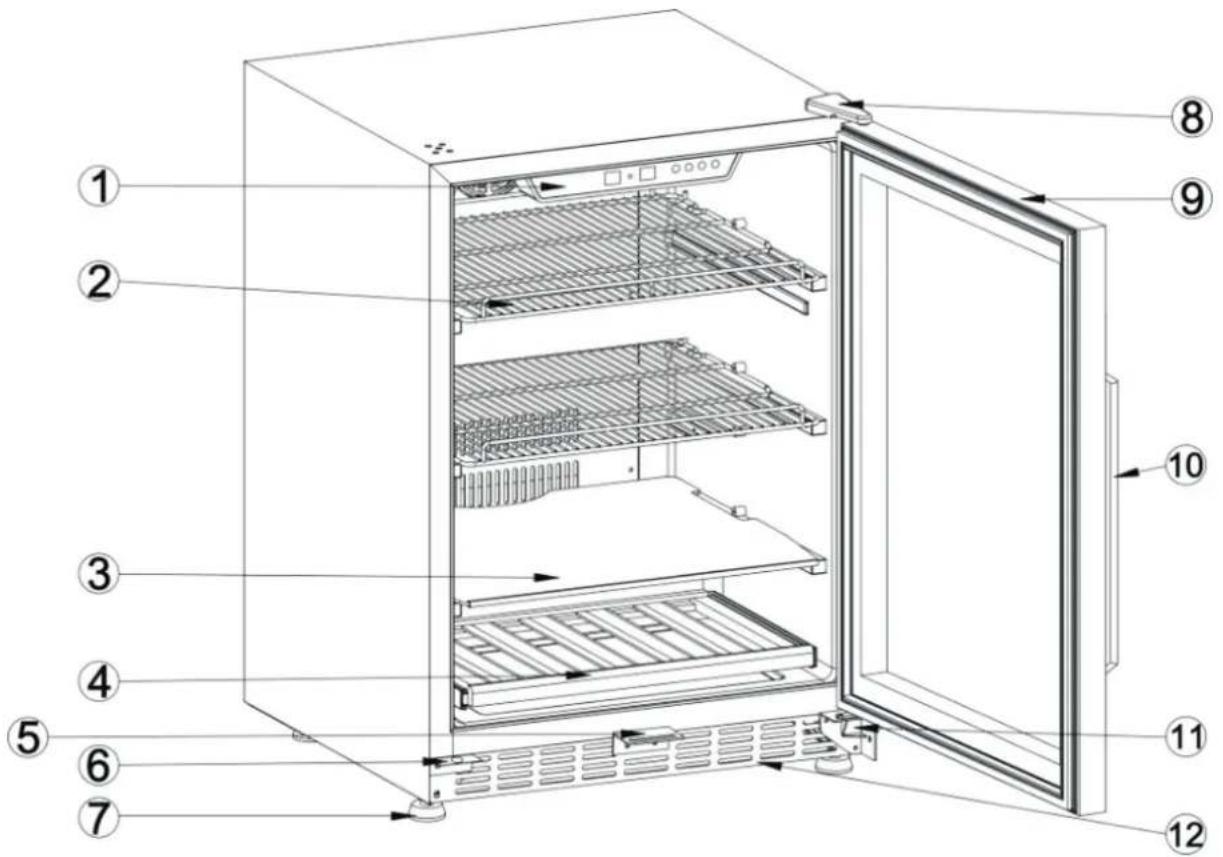
(1) Control Panel (2) Wire Shelf (3) Glass Shelf (4) Small Wooden Shelf
(5) Lock Hook (6) Door Support Bracket (7) Adjustable Feet (8) Upper
Door Hinge (9) Glass Door With Lock/Gasket (10) Handle (11) Lower Door
Hinge (12) Front Vent
6.LB36BD/LBUS36B/LB36BAA/LW3370B/LBUS66B/LB66BAA structure diagram:
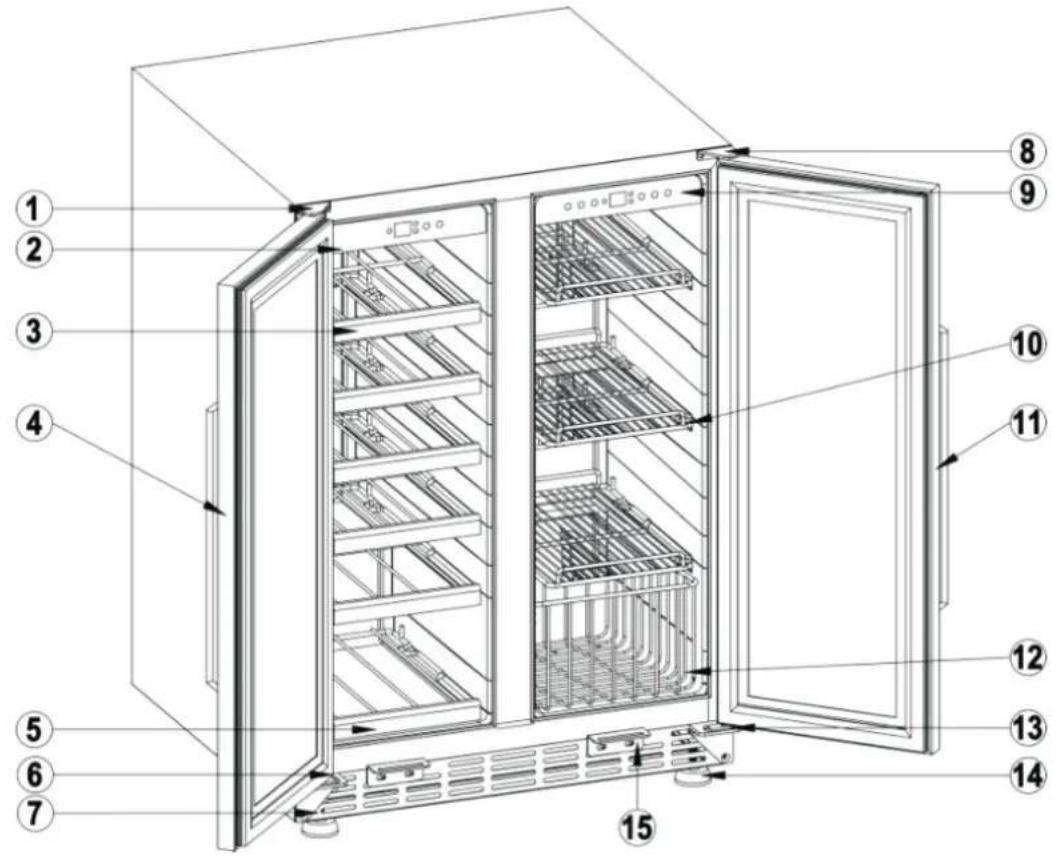
(1) Left Upper Door Hinge (2) Left Control Panel (3) Large Wire Shelf with
Wooden Front (4) Left Glass Door with Lock/Gasket & Handle (5) Small
Wire Shelf with Wooden Front (6) Left Lower Door Support (7) Front Vent
(8) Right Upper Door Hinge (9) Right Control Panel (10) Wire Shelf (11)
Left Glass Door with Lock/Gasket & Handle (12) Wire Basket (13) Right
Lower Door Support Bracket (14) Adjustable Feet (15) Lock Hook
7.LW328SD structure diagram:
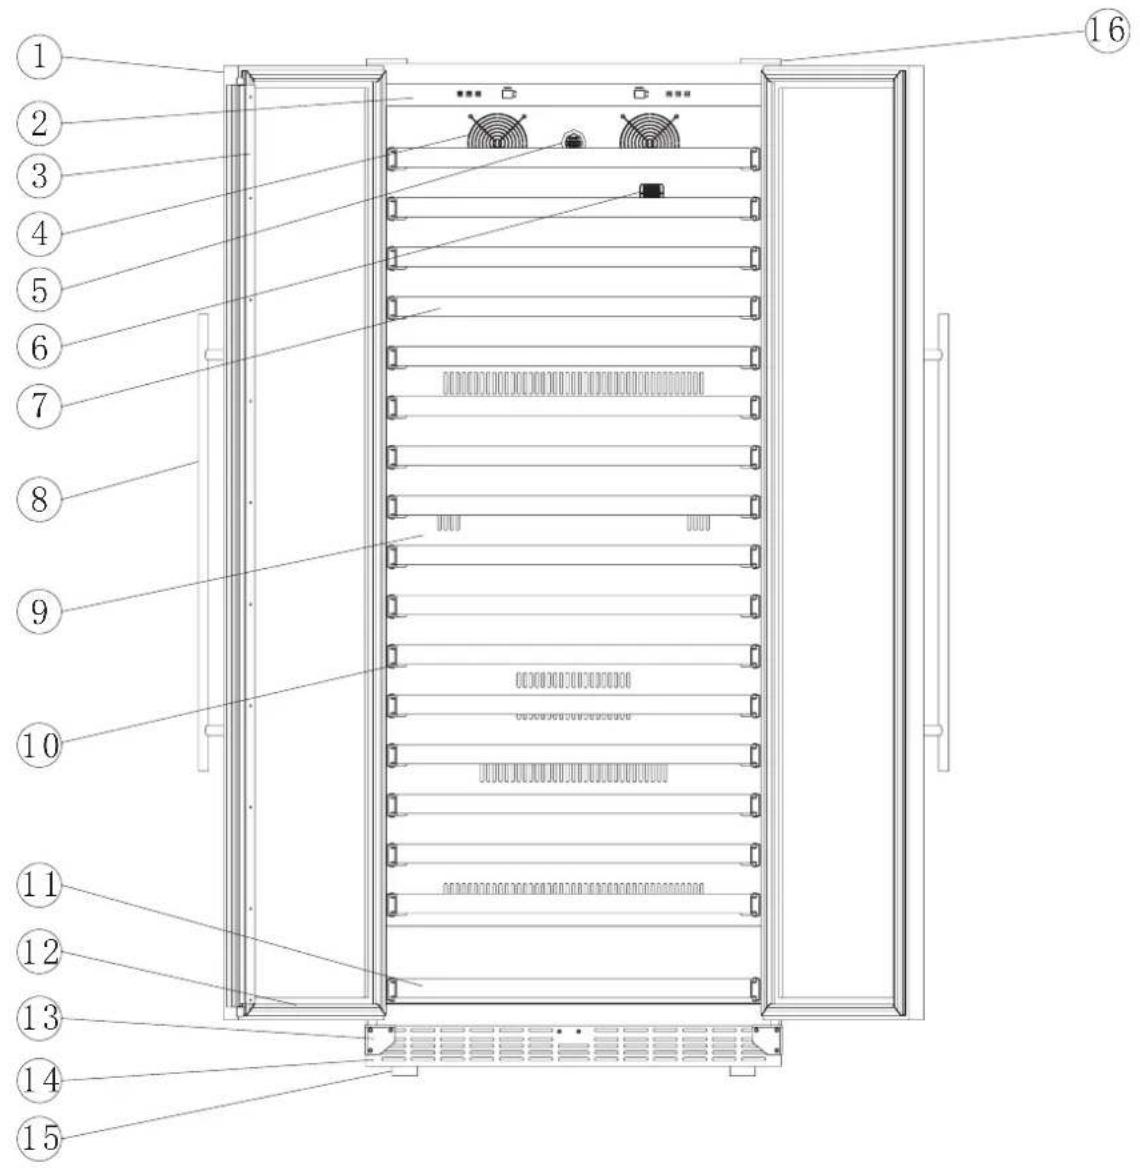
(1) Glass Door (2) Control Panel (3) Middle Crosser (4) The Fan of Evaporator
(5) Carbon Filter (6) Sensor (7) Full Wooden Shelf (8) Handle (9) Air-duct
Board (10) The Rolling Guide (11) Half Wooden Shelf (12) Door Gasket
(13) Prevent Fall Device of The Door (14) The Front Vent (15) Adjustable
Feet (16) Upper Hinge
8.LW328DD structure diagram:
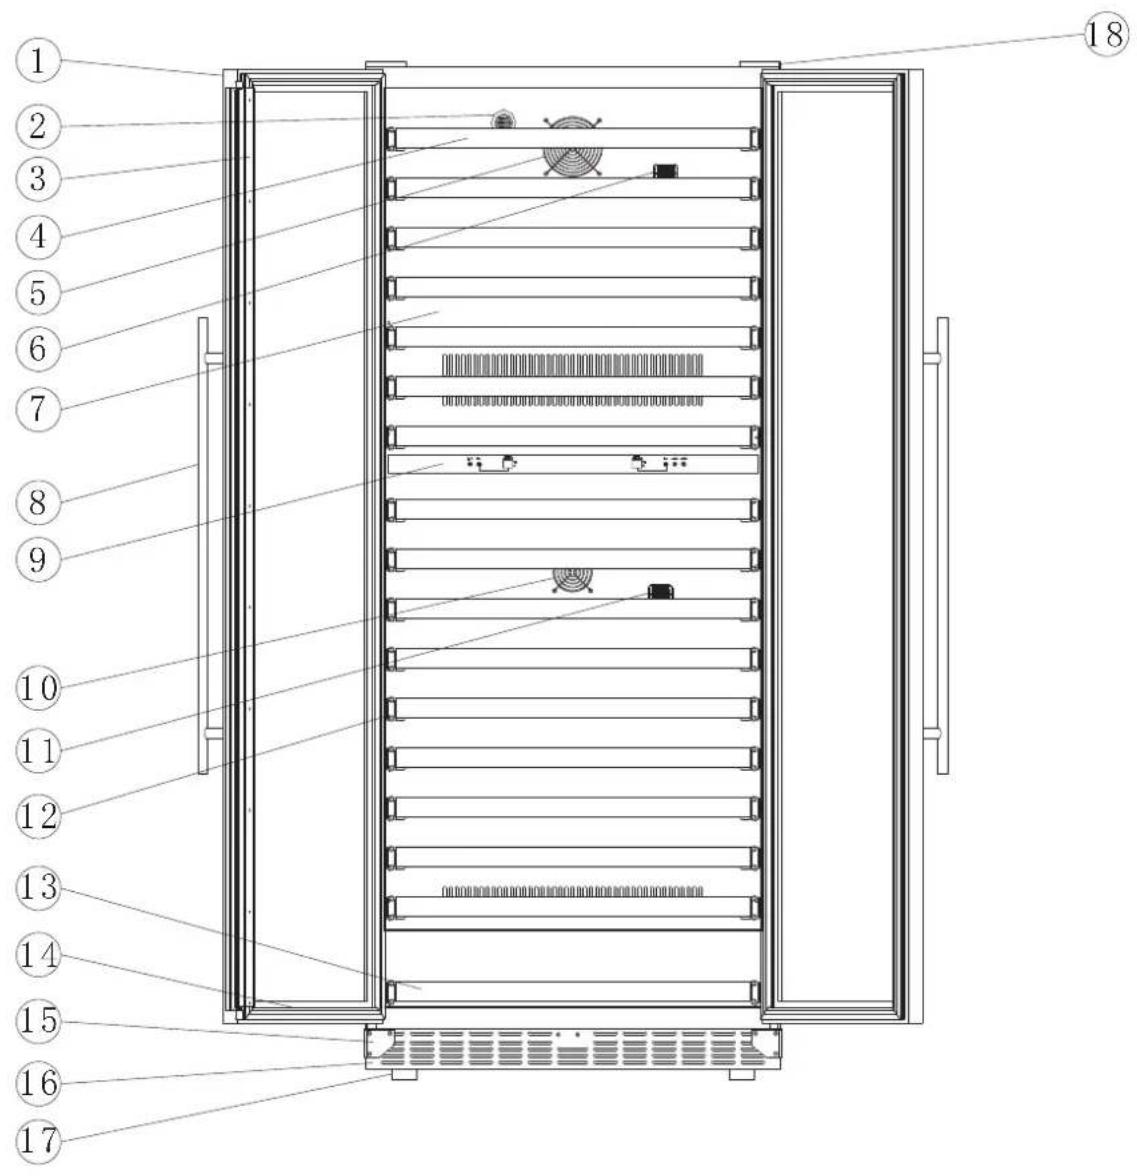
(1) Glass Door (2) Carbon Filter (3) Middle Crosser (4) Full Wooden Shelf
(5) The Fan of Evaporator (6) The Upper Sensor (7) Air-duct Board (8)
Handle (9) Control Panel (10) Heating Fan (11) The Lower Sensor
(12) The Rolling Guide (13) Half Wooden Shelf (14) Door Gasket (15)
Prevent Fall Device of The Door (16) The Front Vent (17) Adjustable Feet
(18) Upper Hinge
9.LW328TS structure diagram:
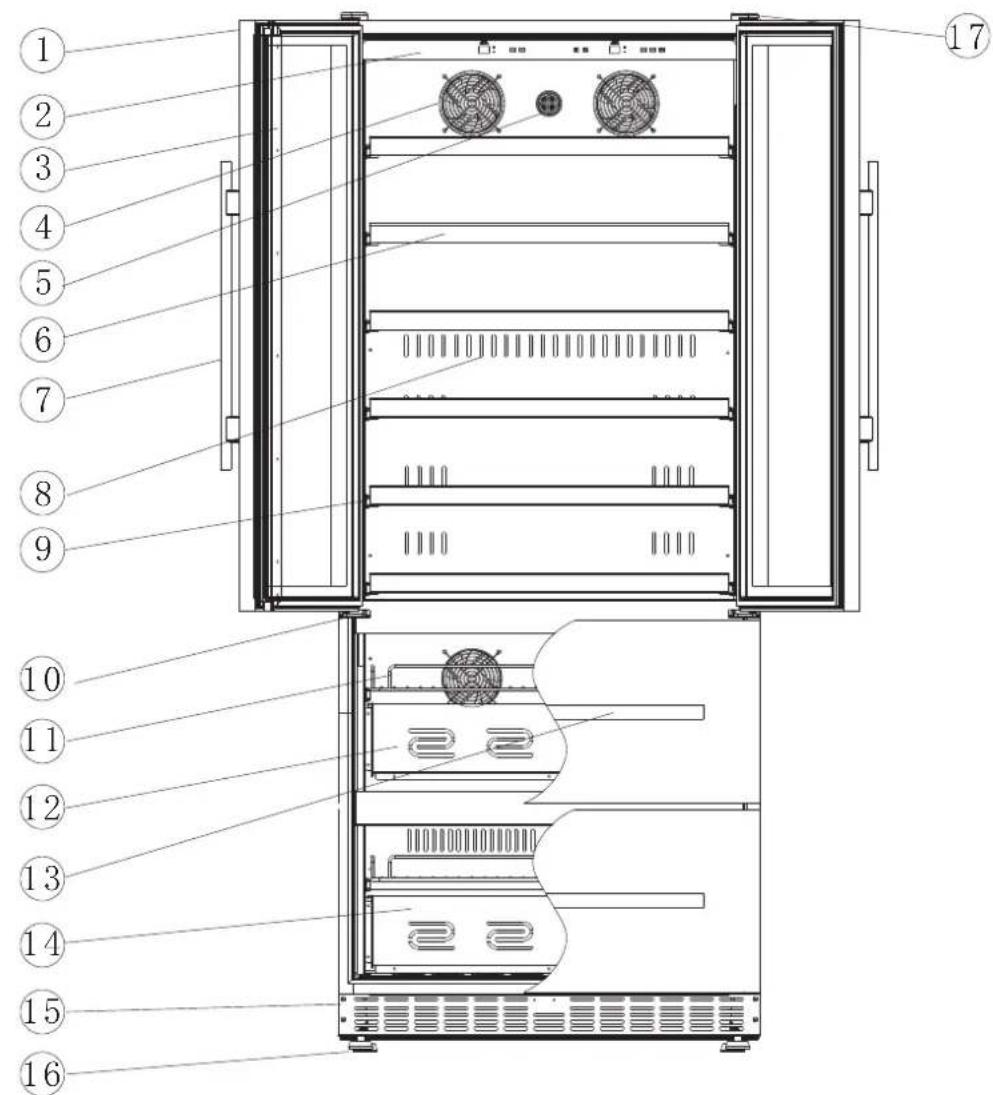
(1) Glass Door (2) Control Panel (3) Middle Crosser (4) The Fan of Evaporator
(5) Carbon Filter (6) Full Wooden Shelf (7) Handle (8) Air-duct Board (9) Guide
rail (10) Hinge (11) Electroplating Layer Frame (12) Stainless Steel Drawer
(13) Drawer Handle (14) Bottom Stainless Steel Drawer (15) The Front Vent
(16) Adjustable Feet (17) Upper Hinge
10.LW168TSstructure diagram:
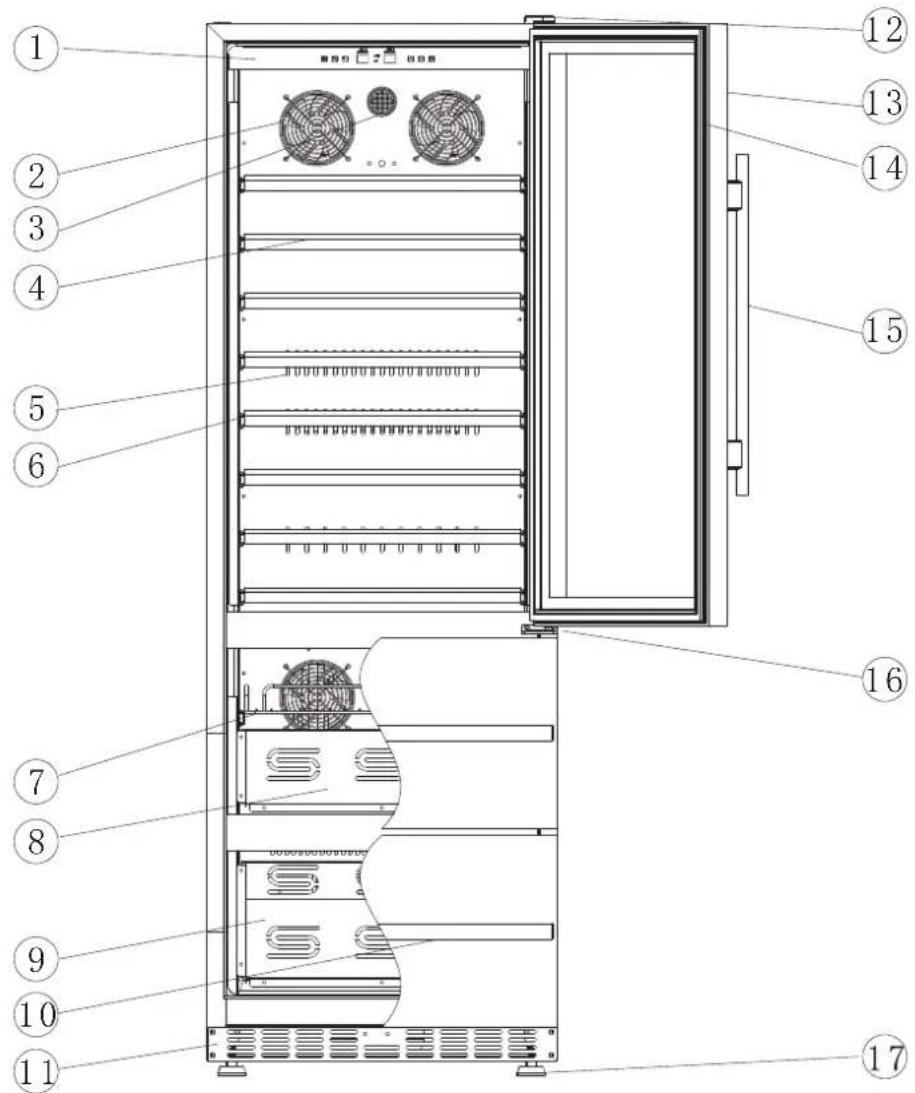
(1) Control Panel (2) The Fan of Evaporator (3) Carbon Filter (4) Full Wooden
Shelf (5) Air-duct Board (6) The Rolling Guide (7) Bottom Stainless Steel Drawer
(8) Stainless Steel Drawer (9) Bottom Stainless Steel Drawer (10) Handle (11)
The Front Vent (12) Upper Hinge (13) Glass Door (14) Door Seal (15) Handle
(16) Hinge (17) Adjustable Feet
11.LW80Sstructure diagram:
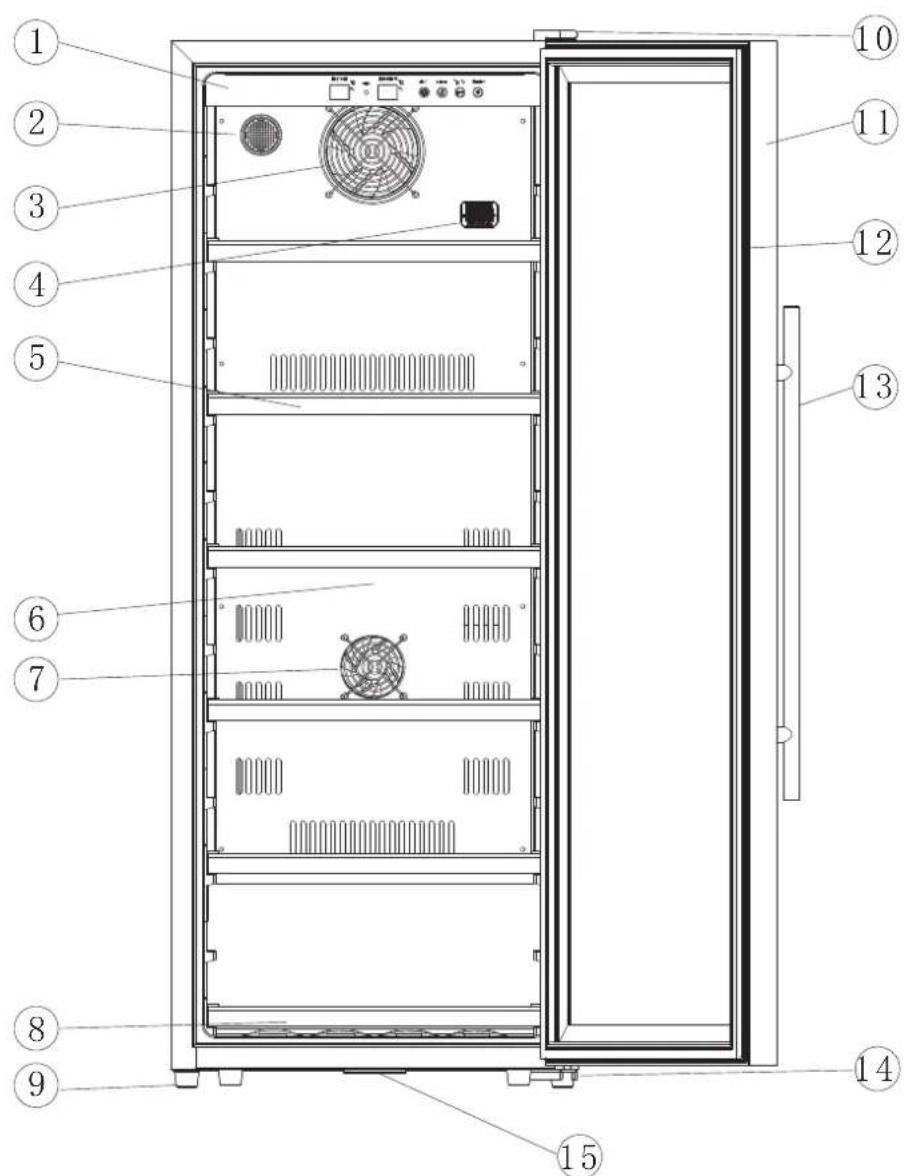
(1) Control Panel (2) Carbon Filter (3) Evaporator Fan (4) Sensor (5) Full
Wooden Shelf (6) Air Duct Board (7) Heating Fan (8) Small Wooden Shelf
(9) Adjustable Feet (10) Upper Door Hinge (11) Glass Door With Lock (12)
Door Seal (13) Handle (14) Lower Door Hinge (15) Locking Hook
12.LW80D structure diagram:
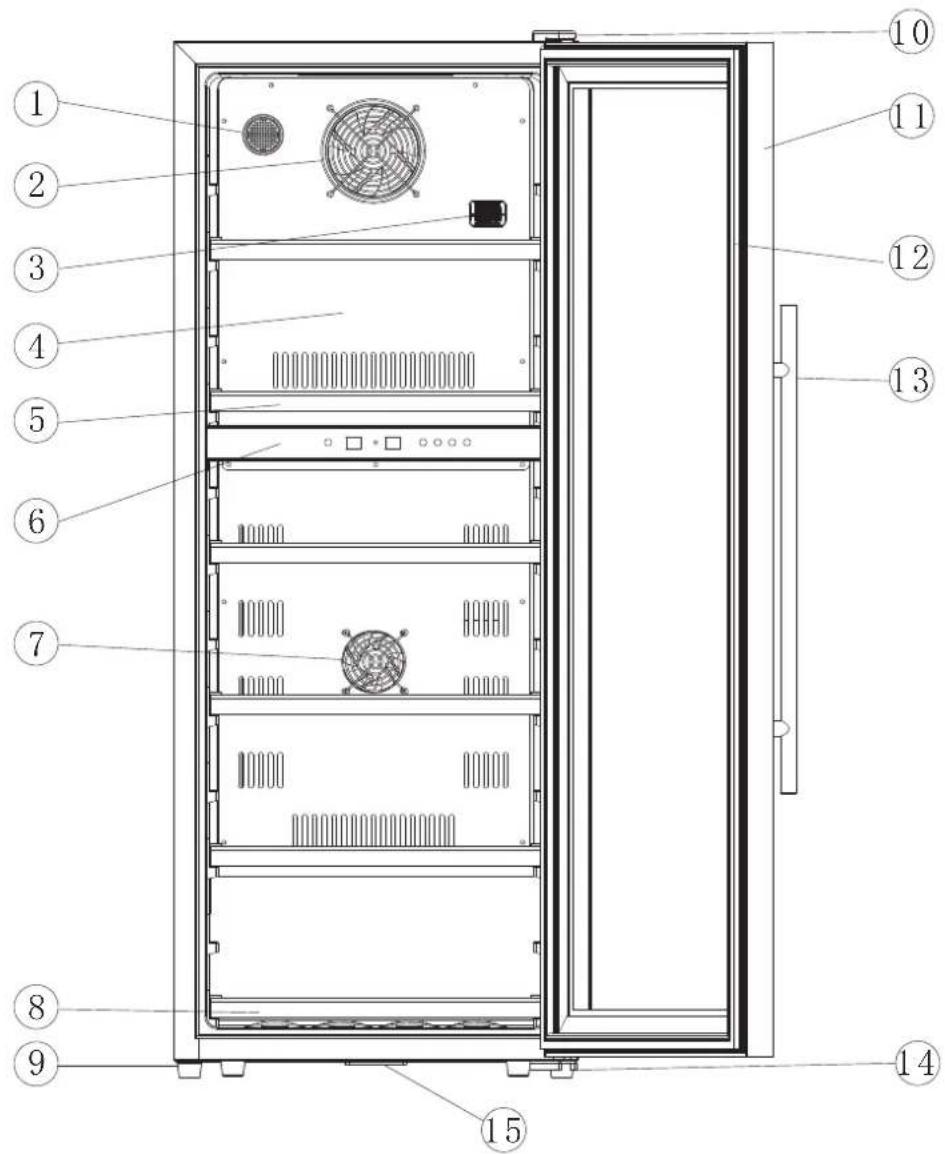
(1) Carbon Filter (2) The Fan Of Evaporator (3) Sensor (4) Air Duct Board (5)
Full Wooden Shelf (6) Control Panel (7) Heating Fan (8) Small Wooden Shelf
(9) Adjustable Feet (10) Upper Hinge (11) Glass Door With Lock (12) Door
Seal (13) Handle (14) Lower Door Hinge (15) Locking Hook
3. Installation Instructions
Before Using Your Wine Cooler / Beverage Cooler
- Remove the exterior and interior packing.
- Before connecting the wine cooler / beverage cooler to the power source, let it stand upright for approximately 24 hours. This will reduce the possibility of a malfunction in the cooling system from handling during transportation.
● Clean the interior surface with lukewarm water with a soft cloth.
● The cooler is specially designed for wine storage, please do not put in other goods.
Installation:
- The cooler should be placed independently so as to make sure good heat dissipation. If you want to place it built-in, you should leave suitable space for your unit, usually 0.59 inches at least for both sides and 0.39 inches at least for the back and height.(Note: For model LW328SD/LW328DD, you should leave 0.79 inches for both sides and for model LW80S/LW80D, you should leave 0.79 inches at least not only for both sides, but also for the back and height.)
- Place your wine cooler / beverage cooler on a floor that is strong enough to support it when it is fully loaded. To level your wine cooler, adjust the front leveling leg at the bottom of the wine cooler.
- Locate the wine cooler / beverage cooler away from direct sunlight and sources of heat (stove, heater, radiator, etc.). Direct sunlight may affect the acrylic coating and heat sources may increase electrical consumption. Extreme cold ambient temperatures may also cause the unit not to perform properly.
- Avoid locating the unit in moist areas.
- Plug in the proper power socket. Make sure that the shape and voltage of the socket is consistent with the nameplate on the back of the cooler.
4. Operation Instruction
4.1 Control Panel Below (LW33S/LBUS33S/LW52S/LW155S/LW177S/LW321S/LB80BC/LBUS33BC/LB148BC/LBUS54BC):

◎ Display Windows
- RUN light: Indicator light of compressor working. While the compressor operating, the red light is on. While it stops operating, the red light is off.
- SETTING: Display of the temperature you set. The range of temperature setting is 0^ C 37^ C or 32^ F 99^ F .
- CHAMBER: Display of the actual temperature inside the cabinet; The range is 0^ 37^ or 32^ 99^ .
- ℃/℉ light: When the ℃ light is on, it indicates Celsius temperature; When the ℃ light is on, it indicates Fahrenheit temperature.
◎ Button Operation
- SET Button : Temperature setting button; Once you press the button, the temperature increased 1°C or 1°F. Note: It will come back to the lowest automatically when the temperature number reached to the highest. Detail temperature setting range as following:
For LB80BC/LBUS33BC is between: 3°C\~18°C or 37°F\~64°F;
For LB148BC/LBUS54BC is between: 3°C\~18°C or 37°F\~64°F;
For LW33S/LBUS33S/LW52S/LW155S/LW177S/LW321S is between: 5^ 18^ or 41^ 64^ .
·LIGHT Button: Cabinet light control button; Note: Once the light is turned on, it will automatically shut off after 10 minutes in order to protect the wines inside.
- °C/°F Button: Celsius and Fahrenheit conversion button;
- ON/OFF button: Power on and off button; Press the button for 3 seconds, to start; press it 3 seconds again, to stop.
4.2 Control Panel Below(LB36BD/LBUS36B/LB36BAA):
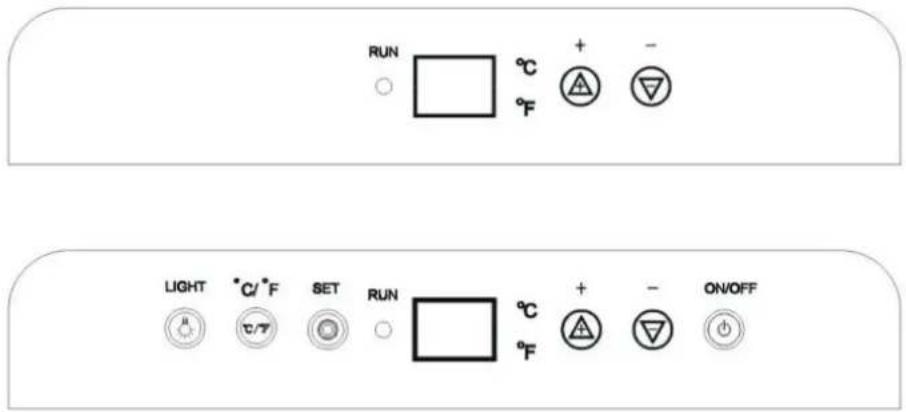
◎ Display Windows
- RUN light: Indicator light of compressor working. While the compressor is operating, the red light is on. When it stops operating, the red light is off.
- CHAMBER: Display of the setting and actual temperature inside the cabinet; The range is 0°C\~37°C or 32°F\~99°F.
- ℃/℉ light: When the ℃ light is on, it indicates Celsius temperature; When the ℃ light is on, it indicates Fahrenheit temperature.
◎ Button Operation
“+” “-” Button: Temperature setting button; Once you press “+” button, the temperature increase 1^ C or 1^ F; if you want to decrease the temperature, press the “-” button, the temperature decreased 1^ C or 1^ F each time.
Detail temperature setting range as following:
5^ 18^ or 41^ 64^ for the left zone, 4^ 10^ or 39^ 50^ for the right zone;
·LIGHT Button: Cabinet light control button; Note: Once the light is turned on,
- °C/°F Button: Celsius and Fahrenheit conversion button;
- ON/OFF button: Power on and off button; Press the button for 3 seconds, to start; press it 3 seconds again, to stop.
4.3 Control Panel Below (LW3370B/LBUS66B/LB66BAA/LW133DD/LW162DD):
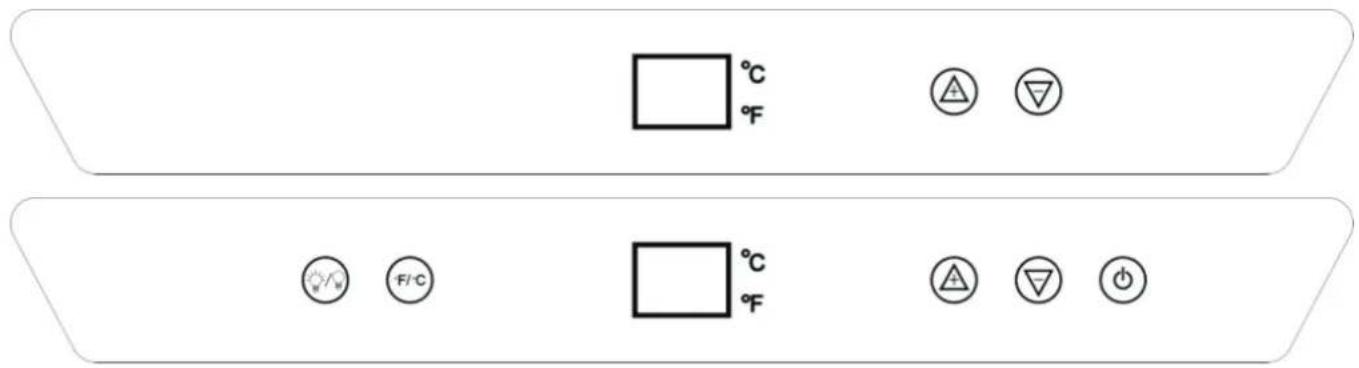
◎ Display Windows
- CHAMBER: Display of the setting and actual temperature inside the cabinet; The range is 0^ 37^ or 32^ 99^ .
- ℃/℉ light: When the ℃ light is on, it indicates Celsius temperature; When the ℃ light is on, it indicates Fahrenheit temperature.
◎ Button Operation
“+” “-” Button: Temperature setting button; Once you press “+” button, the temperature increase 1^ C or 1^ F; if you want to decrease the temperature, press the “-” button, the temperature decreased 1^ C or 1^ F each time.
Detail temperature setting range as following:
For LW3370B/LBUS66B is between: 5°C\~18°C or 41°F\~64°F for the left zone, 4°C \~10°C or 39°F\~50°F for the right zone.
For LW133DD/LW162DD is between: 5°C\~18°C or 41°F\~64°F both for upper and lower zone.
·LIGHT Button: Cabinet light control button; Note: Once the light is turned on, it will automatically shut off after 10 minutes in order to protect the wines inside.
- ℃/℉ Button: Celsius and Fahrenheit conversion button;
- ON/OFF button: Power on and off button; Press the button for 3 seconds, to start; press it 3 seconds again, to stop.
4.4 Control Panel Below ( only for model LW144T):
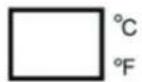


(Upper Control Panel)
◎ Display Windows
- CHAMBER: Display of the actual temperature of the upper chamber. The range is 0^ 37^ or 32^ 99^ .
◎ Button Operation
“+” “-” Button: Temperature setting button. Each time you press the button “+” button the temperature increased 1°C or 1°F. Or press “-” button the temperature decreased 1°C or 1°F; Setting range is between 5°C\~18°C or 41°F\~64°F of upper zone.

(Middle and Lower Control Panel)
◎ Display Windows
- MIDDLE CHAMBER: Display of the actual temperature of the middle chamber. The range is 0^ 37^ or 32^ 99^ .
- LOWER CHAMBER: Display of the actual temperature of the lower chamber; The range is 0°C\~37°C or 32°F\~99°F.
- ℃/℉ light: When the ℃ light is on, it indicates Celsius temperature; When the ℃ light is on, it indicates Fahrenheit temperature.
◎ Button Operation
- “+” “-” Button: Temperature setting button; If you need setting the temperature
of middle chamber, press the 📋 button one time, the screen of middle chamber will be flashing, then press “+” or “-” to set the temperature of middle chamber, setting range is between 5°C\~12°C or 41°F \~54°F. If you need setting the
temperature of lower chamber, press the 📋 button two times, the screen of lower chamber will be flashing, press “+” or “-” to set the temperature of lower chamber, setting range is between 12°C\~18°C or 54°F\~64°F.
· LIGHT Button: Cabinet light control button; Note: Once the light is turned on, it will automatically shut off after 10 minutes in order to protect the wines inside.
- ON/OFF button: Power on and off button; Press the button for 3 seconds, to start; press it 3 seconds again, to stop.
4.5 Control Panel Below (LW28D/LBUS33D/LW46D/LBUS54D/LW72D/LW142D/LW165D/LW306D):

◎ Display Windows
- RUN light: Indicator light of compressor working. While the compressor operating, the red light is on. While it stops operating, the red light is off.
- UPPER CHAMBER: Display of the actual temperature of the upper chamber. The range is 0^ 37^ or 32^ 99^ .
- LOWER CHAMBER: Display of the actual temperature of the lower chamber; The range is 0°C\~37°C or 32°F\~99°F.
- ^ C / ^ F light: When the ^ C light is on, it indicates Celsius temperature; When the ^ F light is on, it indicates Fahrenheit temperature.
◎ Button Operation
- SET Button : Temperature setting button; Once you press the button, the temperature increased 1°C or 1°F. Note: It will come back to the lowest automatically when the temperature number reached to the highest. Detail temperature setting range as following:
For LW28D/LBUS33D/LW46D/LBUS54D/LW72D/LW142D/LW165D/LW306D is between:
5^ 12^ or 41^ 54^ for upper zone, 12^ 18^ or 54^ 64^ for lower zone;
· LIGHT Button: Cabinet light control button; Note: Once the light is turned on, it will automatically shut off after 10 minutes in order to protect the wines inside.
- °C/°F Button: Celsius and Fahrenheit conversion button;
- ON/OFF button: Power on and off button; Press the button for 3 seconds, to start; press it 3 seconds again, to stop.
4.6 Control Panel Below (Only for model LW328SD) :

○ Display Windows
- SETTING: Display of the temperature you set. The range of temperature setting is 0°C\~37°C or 32°F\~99°F.
- CHAMBER: Display of the actual temperature inside the cabinet; The range is 0^ 37^ or 32^ 99^ .
- ℃/℉ Light : When the ℃ light is on, it indicates Celsius temperature; When the ℃ light is on, it indicates Fahrenheit temperature.
○ Button Operation
- Button: Temperature setting button; Once you press the button, the temperature increased 1°C or 1°F. Detail temperature setting range as following:
For LW328SD is between: 8^ C\~18°C or 46^ F\~64°F.
·LIGHT Button: Cabinet light control button; Note: Once the light is turned on, it will automatically off after 10 minutes all out of protecting the wines inside.
- °C/°F Button: Celsius and Fahrenheit conversion button;
Button: Power on and off button; Press the button for 3 seconds, it starts; press it 3 seconds again, it stops.
4.7 Control Panel Below(LW328DD):

○ Display Windows
- RUN Light: Indicator light of compressor working. While the compressor operating, the red light is on. While it stops operating, the red light is off.
- UPPER CHAMBER: Display of the actual temperature of the upper chamber. The range is 0^ 37^ or 32^ 99^ .
- LOWER CHAMBER: Display of the actual temperature of the lower chamber; The range is 0°C\~37°C or 32°F\~99°F.
- ℃/℉ Light : When the ℃ light is on, it indicates Celsius temperature; When the ℃ light is on, it indicates Fahrenheit temperature.
○ Button Operation
Button: Temperature setting button; Once you press the button, the temperature increased 1^ or 1^ . Note: It will come back to the lowest automatically when the temperature number reached to the highest. Detail temperature setting range as following:
For LW328DD is between:
8°C\~12°C or 46°F\~54°F for upper zone, 12°C\~18°C or 54°F\~64°F for lower zone;
·LIGHT Button: Cabinet light control button; Note: Once the light is turned on, it will automatically off after 10 minutes all out of protecting the wines inside.
- °C/°F Button: Celsius and Fahrenheit conversion button;
Button: Power on and off button; Press the button for 3 seconds, it starts; press it 3 seconds again, it stops.
4.8 Control Panel Below(LW168TS)


○ Display Windows
- SETTING: Display of the temperature you set. The range of temperature setting is 0°C\~37°C or 32°F\~99°F.
- CHAMBER: Display of the actual temperature inside the cabinet; The range is 0^ 37^ or 32^ 99^ .
- ℃/℉ Light : When the ℃ light is on, it indicates Celsius temperature; When the ℃ light is on, it indicates Fahrenheit temperature.
○ Button Operation
Button: Temperature setting button; Once you press the button, the temperature increased 1°C or 1°F. Detail temperature setting range as following:
For LW168TS is between:
5°C\~18°C or 41°F\~64°F for upper zone, 4°C\~10°C or 39°F\~50°F for lower zone;
·LIGHT Button: Cabinet light control button; Note: Once the light is turned on, it will automatically off after 10 minutes all out of protecting the wines inside.
- °C/°F Button: Celsius and Fahrenheit conversion button;
Button: Power on and off button; Press the button for 3 seconds, it starts; press it 3 seconds again, it stops.
4.9 Control Panel Below(LW328TS)

○ Display Windows
- SETTING: Display of the temperature you set. The range of temperature setting is 0°C\~37°C or 32°F\~99°F.
- CHAMBER: Display of the actual temperature inside the cabinet; The range is 0^ 37^ or 32^ 99^ .
- ℃/℉ Light : When the ℃ light is on, it indicates Celsius temperature; When the ℃ light is on, it indicates Fahrenheit temperature.
○ Button Operation
- Button: Temperature setting button; Once you press the button, the temperature increased 1°C or 1°F. Detail temperature setting range as following:
For LW328TS is between:
5°C\~18°C or 41°F\~64°F for upper zone, 4°C\~10°C or 39°F\~50°F for lower zone;
·LIGHT Button: Cabinet light control button; Note: Once the light is turned on, it will automatically off after 10 minutes all out of protecting the wines inside.
- °C/°F Button: Celsius and Fahrenheit conversion button;
Button: Power on and off button; Press the button for 3 seconds, it starts; press it 3 seconds again, it stops.
4.10 Control Panel Below(LW80S)

◎ Display Windows
- RUN light: Indicator light of compressor working. While the compressor operating, the red light is on. While it stops operating, the red light is off.
- SETTING: Display of the temperature you set. The range of temperature setting is 0°C\~37°C or 32°F\~99°F.
- CHAMBER: Display of the actual temperature inside the cabinet; The range is 0^ 37^ or 32^ 99^ .
- ℃/℉ light: When the ℃ light is on, it indicates Celsius temperature; When the ℃ light is on, it indicates Fahrenheit temperature.
◎ Button Operation
- SET Button : Temperature setting button; Once you press the button, the temperature increased 1°C or 1°F. Note: It will come back to the lowest automatically when the temperature number reached to the highest Detail temperature setting range as following:
For LW80S is between: 5°C\~18°C or 41°F\~64°F;
·LIGHT Button: Cabinet light control button; Note: Once the light is turned on, it will automatically shut off after 10 minutes in order to protect the wines inside.
- ℃/℉ Button: Celsius and Fahrenheit conversion button;
- ON/OFF button: Power on and off button; Press the button for 3 seconds, to start; press it 3 seconds again, to stop.
4.11 Control Panel Below(LW80D)

◎ Display Windows
- RUN light: Indicator light of compressor working. While the compressor operating, the red light is on. While it stops operating, the red light is off.
- UPPER CHAMBER: Display of the actual temperature of the upper chamber. The range is 0^ 37^ or 32^ 99^ .
- LOWER CHAMBER: Display of the actual temperature of the lower chamber; The range is 0°C\~37°C or 32°F\~99°F.
- ^ C / ^ F light: When the ^ C light is on, it indicates Celsius temperature; When the ^ F light is on, it indicates Fahrenheit temperature.
◎ Button Operation
- SET Button : Temperature setting button; Once you press the button, the temperature increased 1°C or 1°F. Note: It will come back to the lowest automatically when the temperature number reached to the highest. Detail temperature setting range as following:
For LW80D is between:
5^ 12^ or 41^ 54^ for upper zone, 12^ 18^ or 54^ 64^ for lower zone;
· LIGHT Button: Cabinet light control button; Note: Once the light is turned on, it will automatically shut off after 10 minutes in order to protect the wines inside.
- °C/°F Button: Celsius and Fahrenheit conversion button;
- ON/OFF button: Power on and off button; Press the button for 3 seconds, to start; press it 3 seconds again, to stop.
Note: This series of wine coolers has its delay protection function. The compressor will start to work about 3 to 5 minutes after it is power has been connected or powered on. Please use the wine cooler under the T type of climate. The temperature inside the cabinet will fluctuate and influence the refrigerating effect if the surrounding temperature is too high or too cold.
Shelf Change LW46D,LBUS54D,LW80S,LW80D,LW72D, LW142D,LW165D,LW306D,LW133D,LW162DD,LW52S,LW155S, LW177S,LW321S,LW144T,LW328SD,LW328DD,LW168TS,LW328TS
Follow the diagram below to remove or change the adjustable shelves
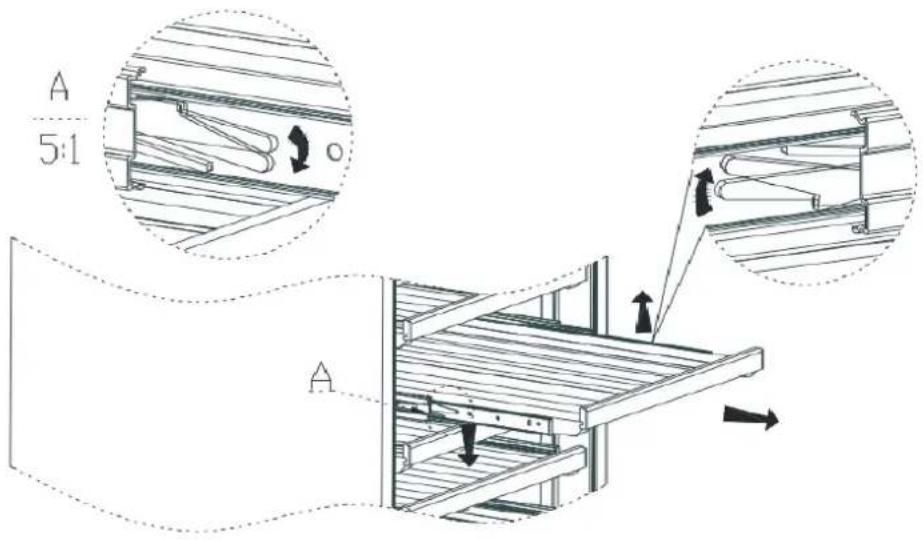
First, remove all wines from the shelves and pull shelf out to the limit. Then press up the left plastic bracket of sliding rail while pressing down on the right one, pull the shelves out at this time. It could be easily pulled out if doing the three steps (Press up left bracket, press down on the right one and pull out) all at the same time.
Shelf Change LB80BC, LBUS33BC, LB148BC, LBUS54BC, LB36BD, LBUS36B, LW3370B, LBUS66B, LB36BAA, LB66BAA
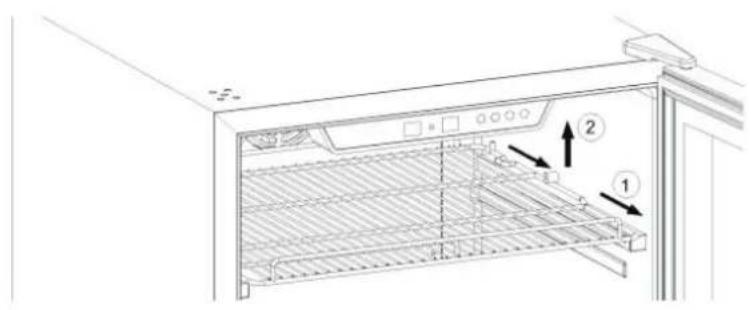
Pull out the wire shelf, make the cove position toward to the pillar at two sides of the cabinet, then lift up and pull out the wire shelf.
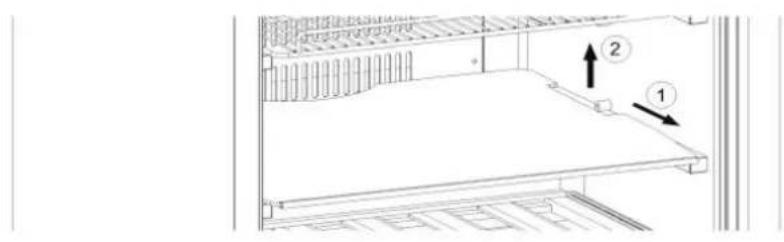
natural_image
Technical line drawing of a mechanical assembly with labeled components (1 and 2), no readable text or symbols present.Pull out the glass shelf, make the cove position toward to the pillar at two sides of the cabinet, then lift up and pull out the glass shelf.
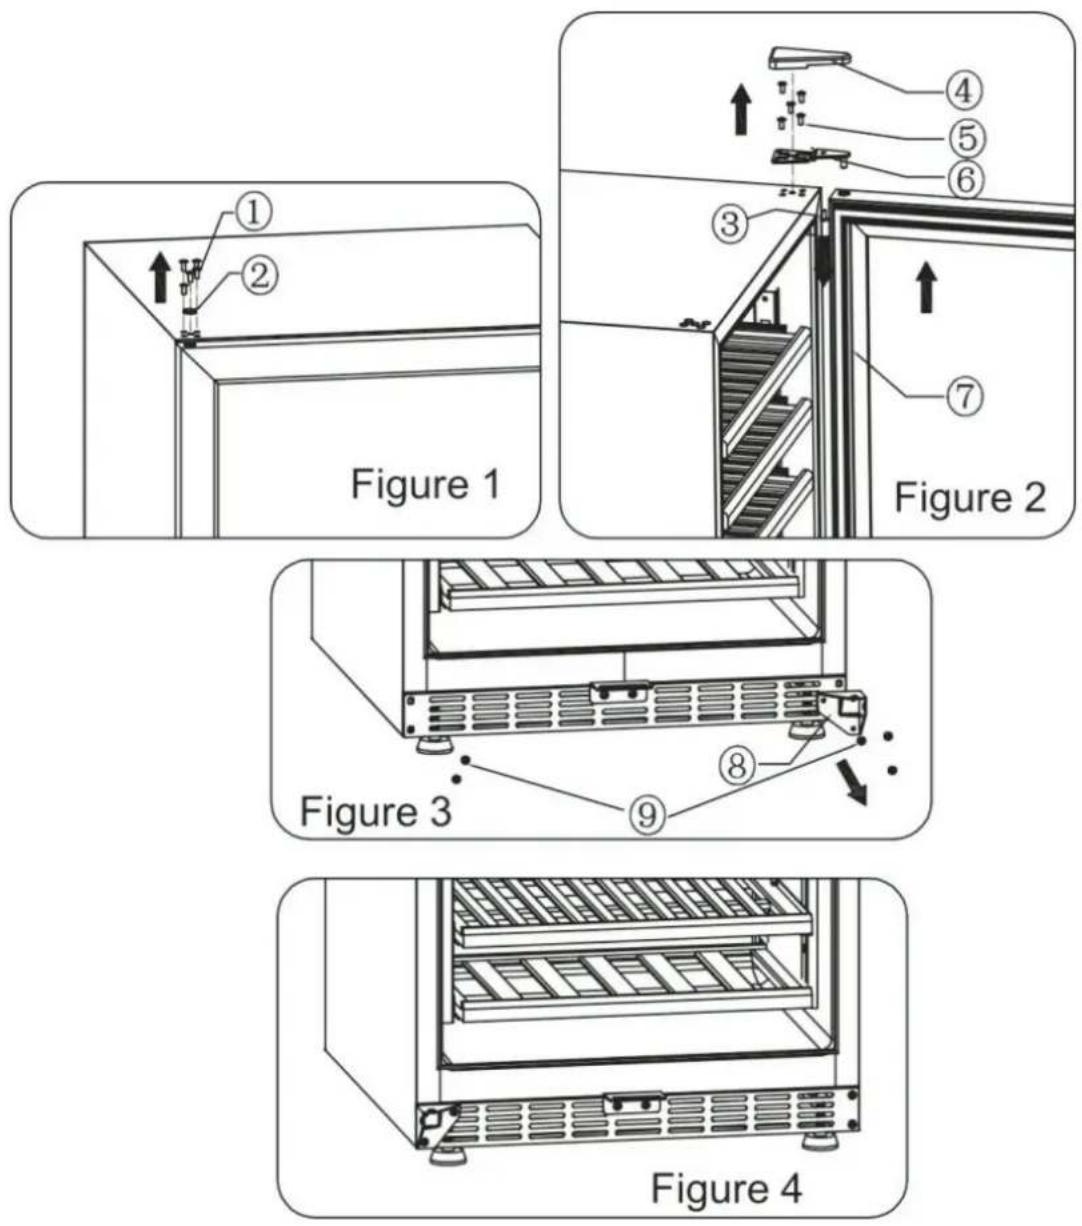
Reversing the door swing of your appliance (only suitable for model LW46D, LBUS54D, LB148BC, LBUS54BC, LW80S, LW80D, LW72D, LW142D, LW165D, LW52S, LW155S, LW177S, LW144T, LW168TS)
The unit is delivered to you with the door opening from the left side (hinge on right side). The door of this appliance is capable of opening from either the left or right side. To reverse the door swing of your cooler and open from the right side, please follow the instructions and diagram as follows.
Placement and storage of wines Several common layouts of wines:
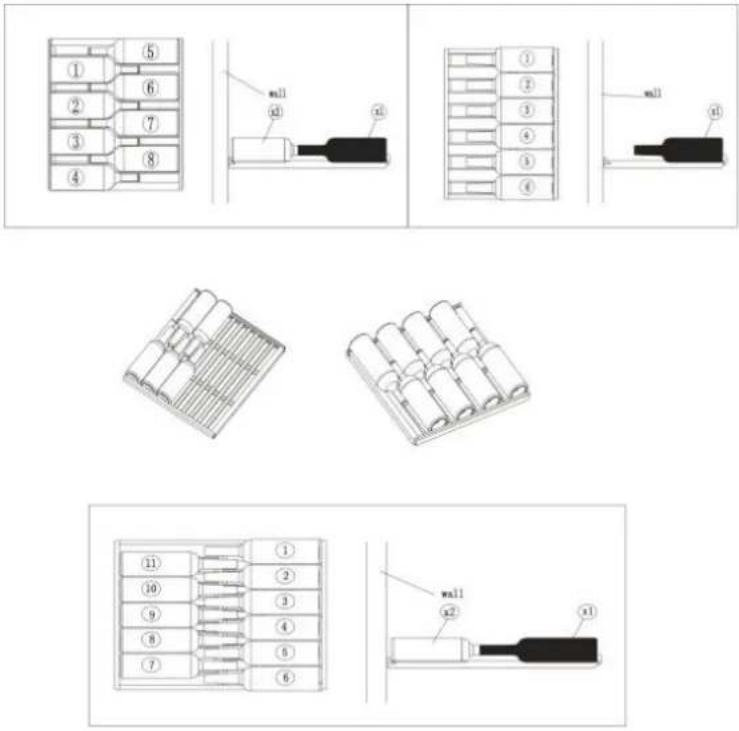
Your cabinet was designed to store a maximum number of bottles adequately. The shelves are designed to accommodate wines uniformly.
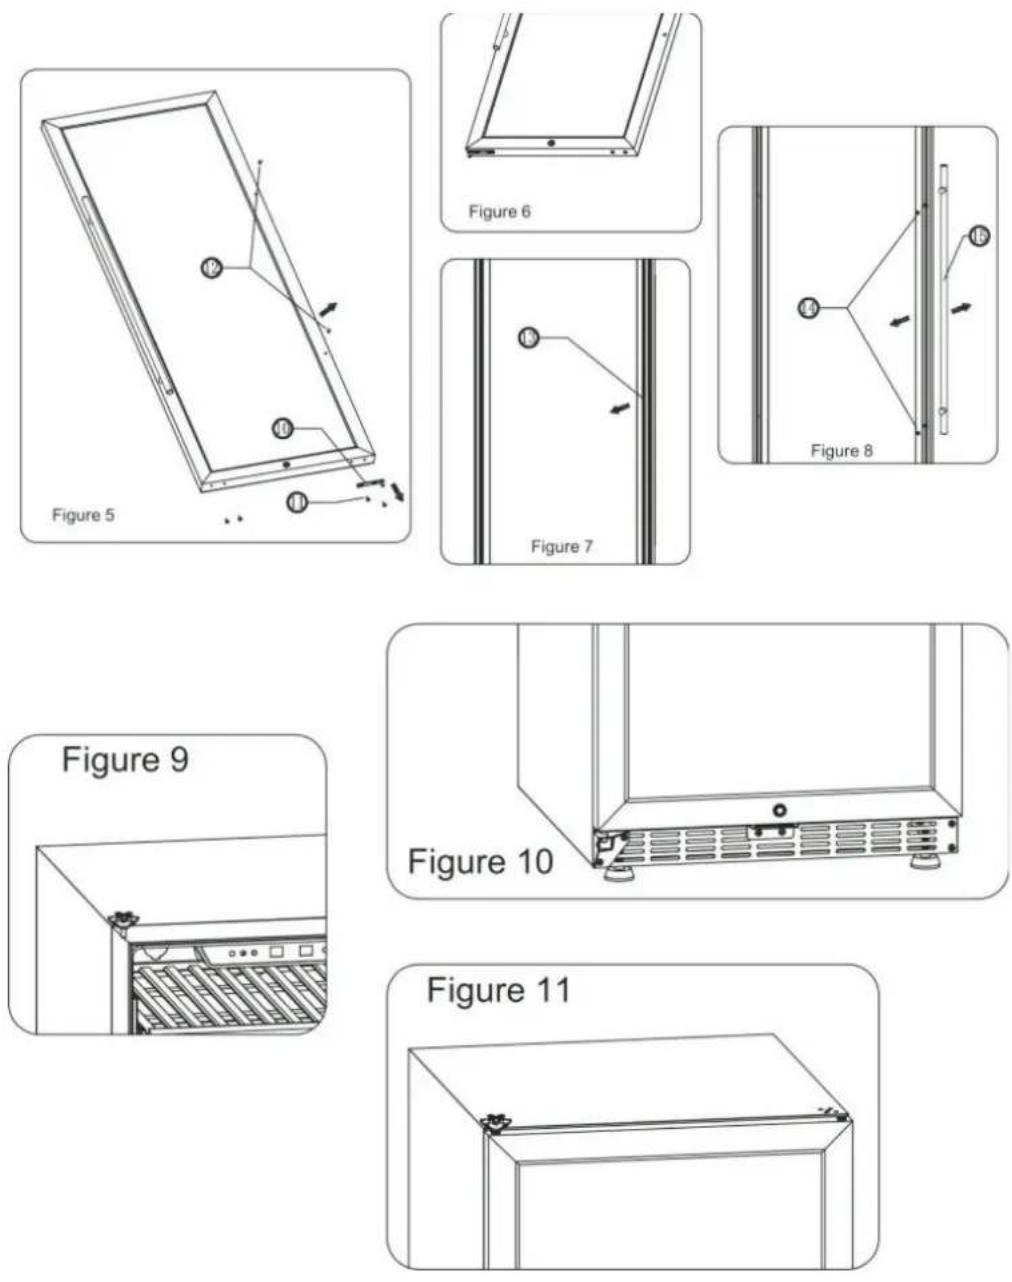
NOTE: All parts removed must be saved to allow the door swing to be reversed
- Use the sharp tools to pry the decoration nail on the top of the cabinet and the cap of door spindle carefully. (Fig 1)
-
Open the door to an angle, unscrew the screw of the door hinges cover, remove the cover of the upper door hinge; then unscrew all the screws on the upper door hinge. Be careful to hold the glass door firmly after removing the screw and take off the door. (Fig 2)
-
Remove the screw of lower door hinge and the left side screw of the front vent (Fig 3); and then install the lower door hinge at the designated position on the opposite side.(Fig 4)
- Remove the screw of door handle, then remove the bottom screw of left side of the door and remove the lower supporter of the door(Fig 5); Install the lower support of the door to the opposite side.(Fig 6)
- Pull open middle section of the door gasket, then it will come out the handle screw hole(Fig 7); remove the handle and install it on the opposite side.(Fig 8)
- Install the upper door hinge to the opposite side and tighten the screws. (Fig 9)
- Set glass door shaft to aim the shaft of lower door hinge (Fig 10); and then aim the upper door hinge (Fig 11); adjust the door and the cabinet is aligned and leveled, then tighten all the lock screws.
You also can call customer service for reversal instructions if it is necessary.
5. Care and Maintenance
Cleaning Your Wine Cooler
- Wash the inside surfaces with warm water and baking soda solution. The solution should be about 2 tablespoons of baking soda with a quart of water.
● Wash the shelves with a mild detergent solution. - Turn off the power, unplug the appliance, and remove all items including shelves and rack.
- Wring excess water out of the sponge or cloth when cleaning area of the controls, or any electrical parts.
- Wash the outside cabinet with warm water and mild liquid detergent. Rinse well and wipe dry with a clean soft cloth.
Power Failure
- Most power failures are corrected within a few hours and will not affect the temperature of your appliance if you minimize the number of times the door is
opened. If the power is going to be off for a longer period of time, you need to take the proper steps to protect your contents.
Vacancy time
● Short vacancy: Leave the Wine Cooler off for around three weeks.
- Long vacancy: If the appliance will not be used for several months, remove all items and turn off the appliance. Clean and dry the interior thoroughly so as to restraint odors and mold. Leave the door open slightly all the time if necessary.
Moving Your Wine Cooler
- Remove all items.
- Securely tape down all loose items (shelves) inside your appliance.
● Turn the adjustable leg up to the base to avoid damage.
- Shut door/s.
- Be sure the appliance stays secure in the upright position during transportation.
● Also protect outside of appliance with a blanket, or similar item.
Energy saving Tips
● The Wine Cooler should be located in the coolest area of the room, away from heat producing appliances, out of the direct sunlight
6. Troubleshooting
You can solve many common wine cooler problems easily, saving you the cost of a possible service call. Try the suggestions below to see if you can solve the problem before calling the service.
| PROBLEM | POSSIBLE CAUSE | SOLUTION |
| Refrigerator does not operate | Not plugged inThe appliance is turned OFF at the control panelThe circuit breaker has tripped or a fuse has blown out | Press ON/OFFCheck and make sure the power plug is well connectedAsk an engineer for help |
| Refrigerator is not cold enough; can not cool down to the preset temp. | Compressor does not start | Ask an engineer for help / check the connection of the compressor |
| Compressor self-protected and has stopped operating | The ambient temperature is too high ( over 38C degree Celsius) The air venting is not smooth, check that the air duct is not blocked Fan operates slowly or is faulty and has stopped operating.The door is not closed completely, or the door opened too long The compressor, or its components are faulty | |
| Fans stop working or operate at low speed | Ask an engineer for help. Power the refrigerator ON and OFF. Check the fan and whether the voltage is normal.If the voltage is normal, then the fan should be damaged | |
| Evaporator ices up | Turn OFF the refrigerator for one hour and open the door. The ice on the evaporator will melt. Check the door seal for any air gaps. | |
| Door is not closed properly | Check the door lock, shelves, or other objects, make sure door is well closed.Check the rubber seal for any air gaps.Check the door hinges, make sure they are not loose | |
| Condenser is dusty | Wash and clean the condenser | |
| Cooling system faulty (Gas leakage or blockage) | Ask an engineer for help | |
| Compressor starts and stops frequently | The door gasket does not seal properly. | Use low heat on a hair dryer to make the door seal take shape. |
| The sensor connection is wrong. | Read the wiring diagram to make the correct connection of sensor | |
| The sensor is faulty. | Replace with a new sensor | |
| The door is opened too often. | Reduce the times / frequency of door openings. | |
| The light does not work. | Not plugged in, or the light button is “OFF”. Light itself faulty. | Check and make sure the light button is ON, or ask an engineer for help. |
| The Refrigerator seems to make too much noise. | The stand feet is not leveling, vibrations lead to noise | Adjust the stand feet and ensure they are level. |
| Copper pipe hits other objects and makes noise | Gently adjust the position of the pipe. | |
| When the compressor shuts down or starts, it is normal for noise from the vibrations generated by the internal moving parts due to inertia. | Take no action | |
| A liquid plumbing noise may come from the flow of the refrigerators gases, which is normal.As each cycle ends, you may hear gurgling sounds | Take no action | |
| The door will not close properly. | Door is blocked by the door lock, shelves, or other objects. | Remove the barrier |
| Door sealing rubber is deformed | Repair or replace the rubber seal | |
| Door hinges are not loose. | Adjust and fasten the hinges. | |
| Ice up | Outlet / suction outlet blockage | Remove the barrier |
| Fans stop working or operate at low speed. | Ask an engineer for help. Power the refrigerator ON and OFF. Check the fan and the voltage. If the voltage is normal, the fan may be damaged. | |
| The door gasket does not seal properly; or door is opened too often | Use low heat on a hair dryer to make the door seal take shape. | |
| Gas leakage or cooling system blockage | Ask an engineer for help | |
| External cabinet seems too hot | Ambient temperature is too high, or direct sunshine | Operating conditions need to be improved |
| Front grill outlet / suction outlet blockage | Remove the barrier | |
| Fans stop working or low speed operating | Ask engineer for help, power on the refrigerator, check the fan whether the voltage is normal or not. If the voltage is normal, the fan should be damage | |
| Water drop on glass door | Ambient humidity is high | Use a soft cloth to clean the water |
| Door is opened too often | Reduce the times / frequency of door opening. | |
| The door gasket does not seal properly | Use low heat on a hair dryer to make the door seal take shape. |
7. Product Specifications
| MODEL NO. | LB80BC | LW28D | LB148BC | LW46D | LB36BD |
| VOLUME | 2.83 CF ( 80 Liter ) | 2.83 CF ( 80 Liter ) | 5.79 CF ( 164 Liter ) | 5.44 CF ( 154 Liter ) | 4.59 CF (130 Liter) |
| TYPE OF COOLING | compressor with air-circulated fan cooling | compressor with air-circulated fan cooling | compressor with air-circulated fan cooling | compressor with air-circulated fan cooling | compressor with air-circulated fan cooling |
| REFRIGERANT R600A MASS(G) | 25g | 25g | 30g | 30g | 28g |
| NOMINAL VOLTAGE/FREQUENCY | 110-120V/60HZ | ||||
| RATED POWER(W) | 90W / 1.3A | 90W / 1.3A | 100W / 1.3A | 100W / 1.3A | 90W / 1.3A |
| AMBIENT TEMPERATURE | 32 - 100 °F | 32 - 100 °F | 32 - 100 °F | 32 - 100 °F | 32 - 100 °F |
| TEMPERATURE RANGE | 3°C~18°C or 37°F~64°F | 5°C~12°C or 41°F~54°F12°C~18°C or 54°F~64°F | 3°C~18°C or 37°F~64°F | 5°C~12°C or 41°F~54°F12°C~18°C or 54°F~64°F | 5°C~18°C or 41°F~64°F for the left zone4°C~10°C or 39°F~50°F for the right zone |
| NET WEIGHT | 82 lbs (37 KGS) | 86 lbs (39 KGS) | 106 lbs (48 KGS) | 117 lbs (53 KGS) | 123 lbs (56 KGS) |
| PRODUCT DIMENSION | 14.96"W x 23.62"D x 34.45"H | 14.96"W x 23.62"D x 34.45"H | 23.43"W x 23.62"D x 34.45"H | 23.43"W x 23.62"D x 34.45"H | 23.43"Wx23.62"Dx3 3.86"H |
| MODEL NO. | LW33S | LW52S | LW155S | LW177S | LW321S |
| VOLUME | 2.83 CF ( 80 Liter ) | 5.44 CF ( 154 Liter ) | 13.42 CF ( 380 Liter ) | 15.89 CF ( 450 Liter ) | 26.84CF (760 Liter) |
| TYPE OF COOLING | compressor with air-circulated fan cooling | compressor with air-circulated fan cooling | compressor with air-circulated fan cooling | compressor with air-circulated fan cooling | compressor with air-circulated fan cooling |
| REFRIGERANT R600A MASS(G) | 25g | 30g | 48g | 50g | 75g |
| NOMINAL VOLTAGE/FREQUENCY | 110-120V/60HZ | ||||
| RATED POWER(W) | 90W / 1.3A | 100W / 1.3A | 130W / 1.8A | 140W / 1.9A | 220W / 2.5A |
| AMBIENT TEMPERATURE | 32 - 100 °F | 32 - 100 °F | 32 - 100 °F | 32 - 100 °F | 32 - 100 °F |
| TEMPERATURE RANGE | 5°C~18°C or 41°F~64°F | 5°C~18°C or 41°F~64°F | 5°C~18°C or 41°F~64°F | 5°C~18°C or 41°F~64°F | 5°C~18°C or 41°F~64°F |
| NET WEIGHT | 82 lbs (37 KGS) | 112lbs (51 KGS) | 196 lbs (89 KGS) | 216 lbs (98 KGS) | 309 lbs (140 KGS) |
| PRODUCT DIMENSION | 14.96"W x 23.62"D x 34.45"H | 23.43"W x 23.62"D x 34.45"H | 23.42"W x 26.77"D x 63.98"H | 23.42"W x 26.77"D x 71.26"H | 32.28"W x29.33"D x 79.21"H |
| MODEL NO. | LW72D | LW142D | LW165D | LW306D | LW3370B |
| VOLUME | 8.48 CF ( 240 Liter ) | 13.42 CF ( 380 Liter ) | 15.89 CF ( 450 Liter ) | 26.84CF (760 Liter) | 5.93 CF (168 Liter) |
| TYPE OF COOLING | compressor with air-circulated fan cooling | compressor with air-circulated fan cooling | compressor with air-circulated fan cooling | compressor with air-circulated fan cooling | compressor with air-circulated fan cooling |
| REFRIGERANT R600A MASS(G) | 38g | 48g | 50g | 75g | 28g |
| NOMINAL VOLTAGE/FREQUENCY | 110-120V/60HZ | ||||
| RATED POWER(W) | 110W / 1.4A | 130W / 1.8A | 140W / 1.9A | 220W / 2.5A | 90W / 1.3A |
| AMBIENT TEMPERATURE | 32 - 100 °F | 32 - 100 °F | 32 - 100 °F | 32 - 100 °F | 32 - 100 °F |
| TEMPERATURE RANGE | 5°C~12°C or 41°F~54°F12°C~18°C or 54°F~64°F | 5°C~12°C or 41°F~54°F12°C~18°C or 54°F~64°F | 5°C~12°C or 41°F~54°F12°C~18°C or 54°F~64°F | 5°C~12°C or 41°F~54°F12°C~18°C or 54°F~64°F | 5°C ~18°C or 41°F ~64°F for the left zone4°C~10°C or 39°F ~50°F for the right zone |
| NET WEIGHT | 143lbs (65 KGS) | 201 lbs (91 KGS) | 220 lbs (100KGS) | 320lbs (145KGS) | 137 lbs (62 KGS) |
| PRODUCT DIMENSION | 23.43"W x 23.62"D x 48.23"H | 23.42"W x 26.77"D x 63.98"H | 23.42"W x 26.77"D x 71.26"H | 32.28"W x29.33"D x 79.21"H | 29.53"W x23.62"D x 34.45"H |
| MODEL NO. | LW144T | LW133DD | LW162DD | LW328DD | LW328SD |
| VOLUME | 15.89 CF ( 450 Liter ) | 13.42 CF ( 380 Liter ) | 15.89 CF ( 450 Liter ) | 26.84CF (760 Liter) | 26.84CF (760 Liter) |
| TYPE OF COOLING | compressor with air-circulated fan cooling | compressor with air-circulated fan cooling | compressor with air-circulated fan cooling | compressor with air-circulated fan cooling | compressor with air-circulated fan cooling |
| REFRIGERANT R600A MASS(G) | 50g | 48g | 50g | 75g | 75g |
| NOMINAL VOLTAGE/FREQUENCY | 110-120V/60HZ | ||||
| RATED POWER(W) | 140W / 1.9A | 130W / 1.8A | 140W / 1.9A | 220W / 2.5A | 220W / 2.5A |
| AMBIENT TEMPERATURE | 32 - 100 °F | 32 - 100 °F | 32 - 100 °F | 32 - 100 °F | 32 - 100 °F |
| TEMPERATURE RANGE | 5°C~18°C or 41°F ~64°F for the upper zone5°C~12°C or 41°F~54°F for the middle zone12°C~18°C or 54°F~64°F for the lower zone | 5°C~18°C or 41°F~64°F | 5°C~18°C or 41°F~64°F | 8°C~12°C or 46°F~54°F12°C~18°C or 54°F~64°F | 8°C~18°C or 46°F~64°F |
| NET WEIGHT | 220 lbs (100KGS) | 201 lbs (91 KGS) | 220 lbs (100KGS) | 320lbs (145KGS) | 309 lbs (140 KGS) |
| PRODUCT DIMENSION | 23.42"W x 26.77"D x 71.26"H | 23.42"W x 26.77"D x 63.98"H | 23.42"W x 26.77"D x 71.26"H | 32.28"W x29.33"D x 79.21"H | 32.28"W x29.33"D x 79.21"H |
| MODEL NO. | LB36BAA LB66BAA LW168TS LW328TS | |||
| VOLUME | 4.59 CF (130 Liter) | 5.93 CF (168 Liter) | 15.89 CF ( 450 Liter ) | 26.84CF (760 Liter) |
| TYPE OF COOLING | compressor with air-circulated fan cooling | compressor with air-circulated fan cooling | compressor with air-circulated fan cooling | compressor with air-circulated fan cooling |
| REFRIGERANT R600A MASS(G) | 28g | 28g | 50g | 75g |
| NOMINAL VOLTAGE/FREQUENCY | 110-120V/60HZ | |||
| RATED POWER(W) | 90W / 1.3A | 90W / 1.3A | 140W / 1.9A | 220W / 2.5A |
| AMBIENT TEMPERATURE | 32 - 100 °F | 32 - 100 °F | 32 - 100 °F | 32 - 100 °F |
| TEMPERATURERANGE | 5°C~18°C or 41°F~64°F for the leftzone4°C~10°C or 39°F~50°F for the rightzone | 5°C~18°C or 41°F~64°F for the leftzone4°C~10°C or 39°F~50°F for the rightzone | 5°C~18°C or41°F~64°F4°C~10°C or39°F~50°F | 5°C~18°C or41°F~64°F4°C~10°C or39°F~50°F |
| NET WEIGHT | 123 lbs (56 KGS) | 137 lbs (62 KGS) | 220 lbs (100KGS) | 320lbs (145KGS) |
| PRODUCTDIMENSION | 23.43"Wx23.62"Dx33.86"H | 29.53"W x23.62"D x34.45"H | 23.42"W x 26.77"D x71.26"H | 32.28"W x29.33"Dx 79.21"H |
| MODEL NO. | LW80S LW80D | |
| VOLUME | 7.06CF(200 Liter) | 6.88CF(195 Liter) |
| TYPE OF COOLING | compressor with air-circulated fan cooling | compressor with air-circulated fan cooling |
| REFRIGERANT R600A MASS(G) | 30g | 30g |
| NOMINAL VOLTAGE/FREQUENCY | 110-120V/60HZ | |
| RATED POWER(W) | 140W / 1.9A | 130W / 1.8A |
| AMBIENT TEMPERATURE | 32 - 100 °F | 32 - 100 °F |
| TEMPERATURE RANGE | 5°C~18°C or 41°F~64°F | 5°C~12°C or 41°F~54°F12°C~18°C or 54°F~64°F |
| NET WEIGHT | 121.5 lbs(56KGS)119 lbs(54KGS) | |
| PRODUCT DIMENSION | 19.49"W x 23.62"D x 50"H | 19.49"W x 23.62"D x 50"H |
WARRANTY INFORMATION
Please speak to your retailer before calling Lanbo International Inc. if you did not purchase your refrigerator directly from LANBO.
Limited warranty - If your refrigerator is not operating properly, LANBO reserves the right to repair or replace the refrigerator. LANBO may request the consumer to contact a local refrigeration company to service the refrigerator. LANBO provides 12 months warranty for the whole unit and the parts. If LANBO deems the unit not repairable. LANBO will use the value of your original order toward a replacement.
For customer service, please contact Lanbo International Inc. By email:
service@lanboappliances.com or tel: (833) 600-8766
The limited warranty does not cover: Damage due to such things as accident, misuse, abuse, mishandling, neglect, unauthorized repair or any other cause beyond the control of the seller whether similar or dissimilar to the foregoing. Purchaser understands and acknowledges that the goods sold here are WINE / BEVERAGE COOLERS. Purchaser assumes all the risk of using these units, including risk of spoilage, humidity variations, temperature variations, leaks, fires, water damage, mold, mildew, dryness and similar perils that may occur.
SPECIAL NOTE: Warranty is only honored for the unit which is purchased and used in United States of America. And, if your product was purchased at any 3rd party retailer and not directly from LANBO, we do not offer an extended warranty policy. You must contact the retailer of purchase directly. In the event your retailer does not offer an extended warranty plan, we recommend you contact a third party warranty provider. However, regardless of point of purchase, all LANBO coolers are backed by a 12 months manufacturer's warranty from date of sale.
Prop. 65 Warning for California Residents
WARNING
Cancer and Reproductive Harm - www.P65Warnings.ca.gov
- FOR MODEL:
- CONGRATULATIONS
- Important Tips for Product Use.
- BEFORE USE:
- USAGE:
- CUSTOMER SERVICE:
- CONTENTS
- Important Safety Instructions:
- Notes
- Diagram of Product
- 1.LW33S/LBUS33S/LW52S/LW155S/LW177S/LW321S
- LW28D/LBUS33D/LW46D/LBUS54D/LW72D/LW142D/LW165D/
- LW133DD/LW162DD structure diagram:
- LW144T structure diagram:
- LB80BC/LBUS33BC/LB148BC/LBUS54BC structure diagram:
- 6.LB36BD/LBUS36B/LB36BAA/LW3370B/LBUS66B/LB66BAA structure diagram:
- 7.LW328SD structure diagram:
- 8.LW328DD structure diagram:
- 9.LW328TS structure diagram:
- 10.LW168TSstructure diagram:
- 11.LW80Sstructure diagram:
- 12.LW80D structure diagram:
- Installation Instructions
- Before Using Your Wine Cooler / Beverage Cooler
- Installation:
- Operation Instruction
- Control Panel Below (LW33S/LBUS33S/LW52S/LW155S/LW177S/LW321S/LB80BC/LBUS33BC/LB148BC/LBUS54BC):
- ◎ Display Windows
- ◎ Button Operation
- Control Panel Below(LB36BD/LBUS36B/LB36BAA):
- Control Panel Below (LW3370B/LBUS66B/LB66BAA/LW133DD/LW162DD):
- Control Panel Below ( only for model LW144T):
- (Upper Control Panel)
- (Middle and Lower Control Panel)
- Control Panel Below (LW28D/LBUS33D/LW46D/LBUS54D/LW72D/LW142D/LW165D/LW306D):
- Control Panel Below (Only for model LW328SD) :
- ○ Display Windows
- ○ Button Operation
- Control Panel Below(LW328DD):
- Control Panel Below(LW168TS)
- Control Panel Below(LW328TS)
- Control Panel Below(LW80S)
- Control Panel Below(LW80D)
- For LW80D is between:
- Placement and storage of wines Several common layouts of wines:
- NOTE: All parts removed must be saved to allow the door swing to be reversed
- Care and Maintenance
- Cleaning Your Wine Cooler
- Power Failure
- Vacancy time
- Moving Your Wine Cooler
- Energy saving Tips
- Troubleshooting
- Product Specifications
- WARRANTY INFORMATION
- Prop. 65 Warning for California Residents
- WARNING
Brand : Lanbo
Model : LW142D
Category : Wine cellar