
DR7400CP1M - DVD Burner LG - Free user manual and instructions
Find the device manual for free DR7400CP1M LG in PDF.


| Product Type | DVD Recorder (DVD±R/RW) |
| Dimensions (approx.) | 430 x 49 x 300 mm (W x H x D) without foot |
| Weight (approx.) | 2.7 kg |
| Power Requirements | AC 110-240V, 50/60 Hz |
| Power Consumption | 19W |
| Operating Temperature | 5°C to 35°C |
| Operating Humidity | 5% to 90% |
| Recording Media | DVD+RW, DVD+R |
| Recording Format | DVD-Video (MPEG-2) |
| Record Modes | HQ (1h), SQ (2h), LQ (4h), EQ (6h) per 4.7GB disc |
| Playback Discs | DVD, VCD, Audio CD, CD-R/RW, MP3, JPEG |
| Video Output | SCART x2 (Composite), S-Video input, Front AV |
| Audio Output | Digital coaxial, Analog (SCART x2) |
| Tuner | PAL/SECAM, up to 99 channels |
| Region Code | 2 (Europe) |
| Remote Control | Included, also controls LG TVs |
| Safety Features | Class 2M laser, auto power-off, child lock via parental control |
| Maintenance | Clean disc from center out; avoid moisture and direct sunlight |
| Spare Parts / Repairability | Refer servicing to qualified personnel; no user-serviceable parts inside |
Frequently Asked Questions - DR7400CP1M LG
User questions about DR7400CP1M LG
0 question about this device. Answer the ones you know or ask your own.
Ask a new question about this device
Download the instructions for your DVD Burner in PDF format for free! Find your manual DR7400CP1M - LG and take your electronic device back in hand. On this page are published all the documents necessary for the use of your device. DR7400CP1M by LG.
USER MANUAL DR7400CP1M LG
Before connecting, operating or adjusting this product, please read this instruction booklet carefully and completely.



CAUTION
RISK OF ELECTRIC SHOCK DO NOT OPEN

CAUTION: TO REDUCE THE RISK OF ELECTRIC SHOCK
DO NOT REMOVE COVER (OR BACK) NO USER-SERVICEABLE PARTS INSIDE REFER SERVICING TO QUALIFIED SERVICE PERSONNEL.

This lightning flash with arrowhead symbol within an equilateral triangle is intended to alert the user to the presence of uninsulated dangerous voltage within the product's enclosure that may be of sufficient magnitude to constitute a risk of electric shock to persons.

The exclamation point within an equilateral triangle is intended to alert the user to the presence of important operating and maintenance (servicing) instructions in the literature accompanying the product.
WARNING: TO PREVENT FIRE OR ELECTRIC SHOCK HAZARD, DO NOT EXPOSE THIS PRODUCT TO RAIN OR MOISTURE.
WARNING: Do not install this equipment in a confined space such as a bookcase or similar unit.

CAUTION:
This product employs a Laser System.
To ensure proper use of this product, please read this owner's manual carefully and retain it for future reference. Should the unit require maintenance, contact an authorized service center.
Performing controls, adjustments, or carrying out procedures other than those specified herein may result in hazardous radiation exposure.
To prevent direct exposure to laser beam, do not try to open the enclosure. Visible laser radiation when open. DO NOT STARE INTO BEAM.
CAUTION:
CLASS 2M VISIBLE AND INVISIBLE LASER RADIATION WHEN OPEN AND INTERLOCKS DEFEATED DO NOT STARE INTO THE BEAM OR VIEW DIRECTLY WITH OPTICAL INSTRUMENTS.
CAUTION: The apparatus should not be exposed to water (dripping or splashing) and no objects filled with liquids, such as vases, should be placed on the apparatus.

This product is manufactured to comply with the radio interference requirements of EEC DIRECTIVE 89/336/EEC, 93/68/EEC and 73/23/EEC.
CAUTION concerning the Power Cord
Most appliances recommend they be placed upon a dedicated circuit;
That is, a single outlet circuit which powers only that appliance and has no additional outlets or branch circuits. Check the specification page of this owner's manual to be certain.
Do not overload wall outlets. Overloaded wall outlets, loose or damaged wall outlets, extension cords, frayed power cords, or damaged or cracked wire insulation are dangerous. Any of these conditions could result in electric shock or fire. Periodically examine the cord of your appliance, and if its appearance indicates damage or deterioration, unplug it, discontinue use of the appliance, and have the cord replaced with an exact replacement part by an authorized servicer.
Protect the power cord from physical or mechanical abuse, such as being twisted, kinked, pinched, closed in a door, or walked upon. Pay particular attention to plugs, wall outlets, and the point where the cord exits the appliance.
SERIAL NUMBER:
You can find the serial number on the back of the unit. This number is unique to this unit and not available to others. You should record requested information here and retain this guide as a permanent record of your purchase.
Model No. ____
Serial No. ____
Contents
Introduction 4-8
Symbol Used in this Manual ....4
Notes on Discs 4
Recordable and Playable Discs .....5
Playable Discs 5
Disc-related terms 6
Front Panel 7
Rear Panel 7
Remote Control 8
Remote Control Operation ....8
Hookup and Settings 9-23
Connections to Your TV and Aerial .....9
Connecting to an Amplifier .....9
Accessory Audio/Video (A/V) Connections ....10
Auto Set Up 11
About DVD Recorder Initial Setup menu .....11
Using the Initial Setup menu .....12
TV Setup 12-14
Auto Scan 12
Program Edit 13
Manual Setting 13
Auto Install 14
Recording Setup....14
Record Mode Set 14
Overwrite 14
Chapter Mark 14
General Setup ....15
TV Display 15
Angle Mark 15
OSD (On-Screen Display) Language .....15
Clock Setting 15
Video Setup 16
Quality 16
Audio Setup 16-17
Post DRC (Dynamic Range Control) .....16
SPDIF Setup 16
Dolby Digital 17
3D Surround .....17
Preference 18-19
TV Type 18
Audio/Subtitle/Disc Menu Language .....18
Parent Control 18-19
Default 19
Using the Disc Operation menu .....20-22
Disc Erase .....20
Finalize 21
Disc Protect 21
Make Edits Compatible .....21
Adapt 22
Disc Information .....22
General Explanation of On-Screen Display ....23
Using the On-Screen Display .....23
Playback ....24-30
Playing a DVD, Video CD, or Audio CD . . . .24-27
Playing an MP3 File .....28
Viewing a JPEG File .....29
Using the thumbnail menu for JPEG file .....30
Using Playlist with MP3 or JPEG files .....30
Recording .31-34
About DVD recording .....31
Basic Recording from a TV 32
OTR (One Time Recording) .....32
Timer Recording 33
Checking Timer Recording Details .....34
Recording from an External Input .....34
Editing 35-42
Title List and Chapter List Menu Overview . . . .35
Deleting a Title 36
Naming a Title 36
Changing Title Thumbnails .....37
Divide One Titles Into Two .....37
Adding Chapter Markers .....38
Deleting Chapter Markers .....38
Hide a Chapter 38
Using the Disc Edit menu .....39
Naming a Title .....39-42
Erasing a Title 40
Protect a Title 40
Changing Title Thumbnails .....40
Editing a Title by Chapter .....41
Adding Chapter Markers .....41
Deleting Chapter Markers .....42
Hide a Chapter 42
Overwriting Recording 42
Reference 43-47
Controlling Your TV with the Supplied
Remote Control 43
Language Codes ....44
Area Codes 44
Troubleshooting 45-46
Specifications 47
Introduction
To ensure proper use of this product, please read this owner's manual carefully and retain for future reference.
This manual provides information on the operation and maintenance of your recorder. Should the unit require service, contact an authorized service location.
Symbol Used in this Manual

The lightning flash symbol alerts you to the presence of dangerous voltage within the product enclosure that may constitute a risk of electric shock.

The exclamation point alerts you to the presence of important operating and maintenance / servicing instructions.

Indicates hazards likely to cause harm to the unit itself or other material damage.
Note:
Indicates special notes and operating features.
Tip:
Indicates tips and hints for making the task easier.
A section whose title has one of the following symbols is applicable only to the disc represented by the symbol.
+RW DVD+RW disc
+R DVD+R disc
DVD DVD-Video disc
VCD Video CDs
ACD Audio CDs
MP3 MP3 files
JPEG JPEG files
About the Symbol Display
" may appear on your TV display during operation and indicates that the function explained in this owner's manual is not available on that specific DVD video disc.
Notes on Discs
Handling Discs
Do not touch the playback side of the disc. Hold the disc by the edges so that fingerprints do not get on the surface. Never stick paper or tape on the disc.


Storing Discs
After playing, store the disc in its case. Do not expose the disc to direct sunlight or sources of heat and never leave it in a parked car exposed to direct sunlight.
Cleaning Discs
Fingerprints and dust on the disc can cause poor picture quality and sound distortion. Before playing, clean the disc with a clean cloth. Wipe the disc from the center out.
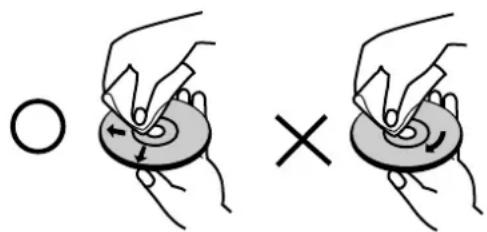
Do not use strong solvents such as alcohol, benzine, thinner, commercially available cleaners, or anti-static spray intended for older vinyl records.
Moisture Condensation
Never operate this product immediately after moving it from a cold location to a warm location. Leave it for two or three hours without operating it. If you use this product in such a situation, it may damage discs/tapes and internal parts.
Recordable and Playable Discs

DVD-ReWritable
DVD+RW (Digital Video Disc + ReWritable)
- These Discs can be recorded on repeatedly. Recordings can be erased, then you can record again on the same Disc.
- Playable on DVD+RW compatible players (automatically finalization)
- The edited contents is playable on DVD+RW compatible players only after finalizing
• Recordings can be edited the title/chapter

DVD+R
DVD+R (Digital Video Disc + Recordable)
- These Discs can be recorded only once. After you finalize a DVD+R, you cannot record on it or edit it any more.
- Playable on DVD+R compatible players (after finalization)
- Any edited contents are not be compatible on DVD+R compatible players. (Hide, chapter combine, added chapter mark, etc.)
- Limited title/chapter editing features.
The recommendable recordable DVD discs
DVD+R DVD+RW
SONY (2.4x, 4x, 8x, 16x) SONY (2.4x)
TDK (4x) TDK (2.4x)
Mitsubishi (4x, 8x) Philips (4x)
Ricoh (2x, 4x, 8x) Ricoh (2.4x)
HP (2.4x, 4x)
Note:
If a DVD+RW discs is recorded using a personal computer or other DVD recorder, you cannot format the disc using this recorder. So if you want to use the disc on this recorder, you must format the disc using the original recorder.
playable Discs

VIDEO
DVD (8 cm / 12 cm disc)
• Discs such as movies that can be purchased or rented

Video CD (VCD) (8 cm / 12 cm disc)
• VIDEO CDs or CD-Rs/CD-RWs in VIDEO CD/Super VIDEO CD format

Audio CD (8 cm / 12 cm disc)
• Music CDs or CD-Rs/CD-RWs in music CD format that can be purchased

CD-R/CD-RW (8 cm / 12 cm disc)
- CD-R/CD-RW discs that contain audio titles, MP3 or JPEG files.

Notes:
- Depending on the conditions of the recording equipment or the CD-R/RW (or DVD±R/±RW) disc itself, some CD-R/RW (or DVD±R/±RW) discs cannot be played on the unit.
- Do not attach any seal or label to either side (the labeled side or the recorded side) of a disc.
- Do not use irregularly shaped CDs (e.g., heart-shaped or octagonal). Doing so may result in malfunctions.
- Depending on the recording software & the finalization, some recorded discs (CD-R/RW or DVD±R/RW) may not be playable.
- DVD±R/RW and CD-R/RW discs recorded using a personal computer or a DVD or CD Recorder may not play if the disc is damaged or dirty, or if there is dirt or condensation on the Recorder's lens.
- If you record a disc using a personal computer, even if it is recorded in a compatible format, there are cases in which it may not play because of the settings of the application software used to create the disc. (Check with the software publisher for more detailed information.)
Disc-related terms
DVD +R / DVD +RW
DVD +R is two different standards for recordable DVD drives and discs. This format allows information to be recorded onto the DVD disc only once.
DVD +RW is two standards for re-writable media, meaning the DVD content can be erased and re-recorded. Single-sided discs can hold 4.38 Gigabytes and double-sided discs hold twice as much.
VCD (Video CD)
A VCD holds up to 74 minutes (650 MB disc) or 80 minutes (700 MB disc) of MPEG-1 full-motion video along with quality stereo sound.
MPEG
MPEG is an international standard for video and audio compression. MPEG-1 is used in encoding video for VCD and provides for multichannel surround sound coding such as PCM, Dolby Digital, DTS and MPEG audio.
MP3
MP3 is a popular compression format used for digital audio files that yields very high near-CD quality.
JPEG
Joint Pictures Expert Group. JPEG is a compressed file format that allows you to save images with no limit on the number of colors.
PBC: Playback Control (Video CD only)
Playback control is available for Video CD (VCD) version 2.0 disc formats. PBC allows you to interact with the system via menus, search functions, or other typical computer-like operations. Moreover, still pictures of high resolution can be played if they are included in the disc. Video CDs not equipped with PBC (Version 1.1) operate in the same way as audio CDs.
Title (DVD video discs only)
A title is generally a distinct section of a DVD disc. For example the main feature could be title 1, a documentary describing how the film was made could be title 2, and cast interviews could be title 3. Each title is assigned a reference number enabling you to locate it easily.
Chapter (DVD video discs only)
A chapter is a segment of a title such as a scene in a film or one interview in a series. Each chapter is assigned a chapter number, enabling you to locate the chapter you want. Depending on the disc, chapters may not be recorded.
Scene (VCD)
On a video CD with PBC ( playback control) functions, moving pictures and still pictures are divided into sections called "scenes". Each scene is displayed in the menu screen and assigned a scene number, enabling you to locate the scene you want. A scene is composed of one or several tracks.
Track
A distinct element of audiovisual information, such as the picture or sound track for a specific language (DVD), or a musical piece on a video or audio CD. Each track is assigned a track number, enabling you to locate the track you want. DVD discs allow one track of video (with multiple angles) and several tracks of audio.
Regional code of the recorder and DVDs
This recorder is designed and manufactured for playback of Region 2 encoded DVD software. The region code on the labels of some DVD discs indicates which type of the recorder can play those discs. This unit can play only DVD discs labeled 2 or ALL. If you try to play any other discs, the message “Incorrect region code. Can’t play back” will appear on the TV screen. Some DVD discs may not have a region code label even though their playback is prohibited by area limits.
Notes on DVDs and Video CDs
Some playback operations of DVDs and Video CDs may be intentionally fixed by software manufacturers. As this unit plays DVDs and Video CDs according to disc content designed by the software manufacturer, some playback features of the unit may not be available or other functions may be added. Refer also to the instructions supplied with the DVDs and Video CDs. Some DVDs made for business purposes may not be played on the unit.
Front and Rear Panel

1 POWER button
Switches the recorder ON or OFF.
2 PLAY (▶)
Starts playback.
3 ■ (STOP)
Stops playback or recording.
4 ● (REC)
Starts recording. Press repeatedly to set the recording time.
5 PROG. (▼/▲)
Scans up or down through memorized channels.
6 Disc Tray
Insert a disc here.
7 ▲ (OPEN/CLOSE)
Opens or closes the disc tray.
8 Display window
Shows the current status of the recorder (clock, program number, etc).
9 Remote Sensor
Point the recorder remote control here.
10 VIDEO IN/AUDIO IN (Left/Right)
Connect the audio/video output of an external source (Audio system, TV/ Monitor, VCR, Camcorder, etc.).
11 S-VIDEO IN
Connect the S-Video output of an external source (TV/ Monitor, VCR, Camcorder, etc.).

1 AERIAL
Connect the aerial to this terminal.
2 RF. OUT
Passes the signal from the AERIAL to your TV/monitor
3 EURO AV 1 AUDIO/VIDEO
Connect to a TV with SCART jack.
4 EURO AV 2
Connect the audio/video output of an external source (Set Top Box, VCR, etc.).
5 COAXIAL (Digital audio out jack)
Connect to digital (coaxial) audio equipment.
6 AC Power Cord
Plug into the power source.
Remote Control

0-9 numerical buttons: Selects numbered options in a menu.
◀ / ▶ / ▲ / ▼ (left/right/up/down): Selects an option in the menu.
PR ▲ / ▼ (up/down): Scans up or down through memorized channels.
A-B: Repeat sequence.
AUDIO: Selects an audio language (DVD) or an audio channel (CD).
AV: Changes the input to use for recording (Tuner, SCART 1, SCART 2, Front AV).
CHP. ADD: Inserts a chapter marker when playing/recording.
CLEAR: Removes a track number on the Program List or a mark on the Marker Search menu.
DISPLAY: Accesses On-Screen Display.
ENTER
- Acknowledges menu selection.
- Displays information while viewing a TV program.
INSTANT SKIP: Skips 30 seconds forward on the disc (about the length of a typical TV: commercial).
MARKER: Marks any point during playback.
MENU/LIST: Accesses menu on a DVD disc.
OPEN/CLOSE (▲): Opens and closes the disc tray.
PAUSE/STEP (III) : Pause playback or recording temporarily, press again to exit pause mode.
PLAY (▶): Starts playback.
POWER: Switches the recorder ON or OFF.
REC (●): Starts recording. Press repeatedly to set the recording time.
REC MODE: Selects the recording mode (HQ, SQ, LQ or EQ).
REPEAT: Repeat chapter, track, title, all.
RETURN (○)
- Removes the menu.
- Displays the menu of a video CD with PBC.
SCAN (◀◀ / ▶▶): Search backward or forward.
SEARCH: Displays Marker Search menu.
SETUP: Accesses or removes the Setup menu.
SKIP (I◄◄ / ►►I): Go to next chapter or track. Returns to beginning of current chapter or track or go to previous chapter or track.
STOP (■): Stops playback or recording.
SUBTITLE: Selects a subtitle language.
THUMBNAIL: Selects a thumbnail picture for the current title and chapter for use in the Title List.
TIMER REC: Displays Timer Record menu.
TITLE: Displays the disc's Title menu, if available.
TV Control Buttons
- POWER: Turns the TV on or off.
- AV: Selects the TV's source.
- PR +/-: Selects TV's channel.
- VOL +/-: Adjusts TV's volume.
ZOOM: Enlarges video image.
Remote Control Operation
Point the Remote Control at the remote sensor and press the buttons.
Remote Control Battery Installation
Remove the battery cover on the rear of the Remote Control, and insert two R03 (size AAA) batteries with + and - matched correctly.


Caution
Do not mix old and new batteries. Never mix different types of batteries (standard, alkaline, etc.).
Hookup and Settings
Connections to Your TV and Aerial
- Remove the aerial cable plug from your TV set and insert it into the aerial socket at the back of the recorder.
- Connect the RF. OUT jack on the recorder to the aerial input jack on the TV using the 75-ohm Coaxial Cable supplied (R). The RF. OUT jack passes the signal through from the AERIAL jack.
- Connect the EURO AV1 AUDIO/VIDEO scart jack on the recorder to the corresponding in jacks on the TV using the scart cable (T).

Caution
- Make sure the recorder is connected directly to the TV. Tune the TV to the correct video input channel.
- Do not connect your recorder via your VCR. The DVD image could be distorted by the copy protection system.

Rear of the recorder
Connecting to an Amplifier
Connecting to an amplifier equipped with two channel digital stereo (PCM) or to an Audio/Video receiver equipped with a multi-channel decoder (Dolby Digital™, MPEG 2, or DTS)
- Connect one of the recorder's DIGITAL AUDIO OUT jacks to the corresponding in jack on your amplifier. Use an optional digital audio cable.
- You will need to activate the recorder's digital output. (See "Audio Setup" on page 16-17).
Digital Multi-channel sound
A digital multi-channel connection provides the best sound quality. For this you need a multi-channel Audio/Video receiver that supports one or more of the audio formats supported by your recorder (MPEG 2, Dolby Digital and DTS). Check the receiver manual and the logos on the front of the receiver.

Caution:
Due to the DTS Licensing agreement, the digital output will be in DTS digital out when DTS audio stream is selected.
Notes:
- If the audio format of the digital output does not match the capabilities of your receiver, the receiver will produce a strong, distorted sound or no sound at all.
- Six Channel Digital Surround Sound via digital connection can only be obtained if your receiver is equipped with a Digital Multi-channel decoder.
- To see the audio format of the current DVD in the on-screen display, press AUDIO.
- This recorder does not perform internal (2 channel) decoding of a DTS sound track. To enjoy DTS multi channel surround, you must connect this recorder to a DTS compatible receiver via one of this recorder's digital audio outputs.

Amplifier (Receiver)
Accessory Audio/Video (A/V) Connections
Connecting to the EURO AV2 jack
Connect a VCR or similar recording device to the EURO AV2 jack of this recorder.

Rear of the recorder
Notes:
- Pictures containing copy protection signals that prohibit any copying cannot be recorded.
- If you pass the recorder signals via the VCR, you may not receive a clear image on your TV screen. Be sure to connect your VCR to the recorder and your TV in the order shown below. To watch video tapes, watch the tapes through a second line input on your TV.
![graph LR A["VCR"] --> B["REORDER"] B --> C["TV"] D["Line input 1"] --> C E["Line input 2"] --> C](/content/2026/06/1169419/images/fed22058118b7f89a0f46b9c5f11603a8562a7d4852223d38acc179cf2b6dc5b.jpg)
- If you are using a B Sky B tuner, be sure to connect the tuner's VCR SCART jack to the EURO AV2 jack.
- If you disconnect the recorder's mains lead, you will not be able to view the signals from the connected VCR or tuner.
Connecting to the Front Panel's Input Jacks
Connect the input jacks on the recorder's front panel to the audio/video out jacks on your accessory component, using audio/video cables.
Note:
If you use the S-VIDEO IN jack on the front panel, the VIDEO IN jack on the front panel is not available.
Jack panel of Accessory Component (VCR, Camcorder, etc.)

Front of the recorder
Auto Set Up
After the POWER is pressed for the first time to turn on the unit, the [Initial Setup Wizard] function sets the clock, OSD language and tuner channels automatically.
Follow the step-by-step questions until the setup is complete.
- Press ENTER to move next step.

- Enter the necessary information for date and time.
◀ / ▶ (left/right) buttons: Moves the cursor to the previous or next column.
▲ / ▼ (up/down) or number buttons: Changes the setting at the current cursor position. ENTER button: Confirms your setting.
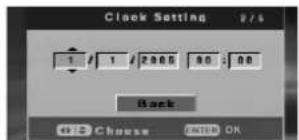
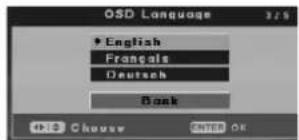
- Select a language for the Setup menu and on-screen display. Press ▲ / ▼ to select a language then press ENTER.
- The recorder will automatically cycle through all available channels in the area and place them in the tuner's memory.

- Press ENTER while [Finish] is highlighted to finish setup.

About DVD Recorder Initial Setup menu
By using the Setup Displays, you can make various adjustments to items such as picture and sound.
- Press SETUP and the [DVD Recorder Initial Setup] menu appears.

- [Timer REC] (Timer Recording) For unattended recording, you can 7 programs within a period of 1 month. (page 33)
- [Disc Oper] (Disc Operation)
You can do following functions: Erase, finalize, protect, make comp, adapt, check disc information. (page 20-22)
• [Disc Edit] You can do following edit functions for titles: Label, Erase, Protect, Chapter Edit, Index Picture. (page 39-42) -
[Init Setup] (Initial Setup) By using the Initial Setup, you can make various adjustments to items such as picture and sound, as well as select a language for the subtitles. (page 12-19)
-
Use ◀ / ▶ to select an option then press ENTER.
Using the Initial Setup menu
- Press SETUP and the [DVD Recorder Initial Setup] menu appears.
- Use ◀ / ▶ to select [Init Setup] option then press ENTER. Initial Setup Menu appears.

- Use ▲ / ▼ / ◀ / ▶ to select an option.
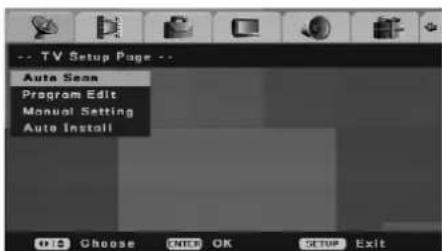
- Press ENTER to confirm your selection.
- Press SETUP to exit the Setup menu.
Notes:
- Press ◀ to go back to the previous level.
- To return to the [DVD Recorder Initial Setup] menu, select [←] option on the [Initial Setup] menu then press ENTER.
TV Setup
Auto Scan
This recorder is equipped with a frequency synthesized tuner capable of receiving up to 99 TV channels.
Preparation:
- Connect the recorder to the desired type of aerial, as shown in "Connections to Your TV and Aerial" on page 9.
- Select the [Auto Scan] option.
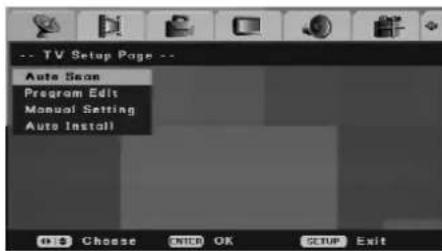
- Press ENTER to begin the channel search. The tuner will automatically cycle through all available channels in the area and place them in the tuner's memory.

- Press SETUP to exit the Setup menu.
Program Edit
You can edit a channel manually (add, delete, name, move, etc.).
- Select [Program Edit] option on the [Initial Setup] menu.

- Press ENTER.
The [Program Edit] menu appears.

- Use ▲ / ▼ / ◀ / ▶ to select a PR number then press ENTER.

- CLEAR button: Deletes a program you do not need.
▲ / ▼ (up / down) buttons: Sorts the program positions on the Program Edit menu. Press ▲ / ▼ to move the selected program position to a new location then press ENTER.
REC (●) button: Edits the program.
• While channel number is highlighted, press
▲ / ▼ to set the channel manually.
- While channel station name is highlighted, press ENTER to changes the station name. The display for entering characters appears. To enter characters, see page 39.
- To exit [Program Edit] menu, press ENTER while [OK] or [Cancel] is highlighted.
The Initial Setup Menu appears.
[OK] Exits with save the editing.
[Cancel] Exits without save the editing.
Manual Setting
You can perform a search to select and store TV channels manually.
- Select [Manual Setting] option on the [Initial Setup] menu.
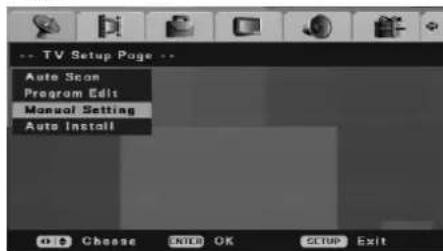
- Press ENTER.
The [Manual Setting] menu appears.
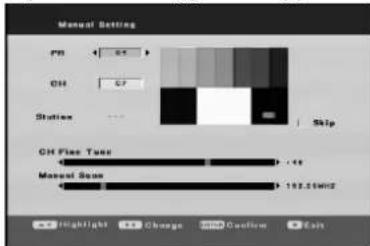
• [PR] Selects a PR number.
- [CH] Selects the Channel number. Press AV to select "S--" or "C--". You can use number buttons to select channel number.
- [CH Fine Tune] Fine tunes the channel to obtain a clearer picture.
- [Manual Scan] Searches for a channel automatically. Searching stops when the recorder tunes in a channel.
- [Skip] If there is not check mark, current channel is memorized. If you want to delete the channel from memory, press ENTER so check mark appears.
- Enter the necessary information for date and time.
◀ / ▶ (left/right) buttons: Changes the setting at the current cursor position.
▲ / ▼ (up/down) buttons: Moves the cursor to the previous or next column.
ENTER button: Confirms the setting and returns to the [Initial Setup] menu.
STOP button: Exits the menu.
Auto Install
Re-configure initial settings.
Select [Auto Install] option on the [Initial Setup] menu then press ENTER. [Initial Setup Wizard] menu screen appears.
See "Auto Set Up" on page 11.

Recording Setup
Record Mode Set
You can set the picture quality for recording; HQ (High Quality), SQ (Standard Quality), LQ (Low Quality), EQ (Extend Quality).

Overwrite
To overwrite a new video recording on a previously recorded title, set [Overwrite] option to [On]. This feature is not available for DVD+Rs, that always record at the end of the disc.

Chapter Mark
Chapter markers are put in specified setting. You can change this interval to 5 minutes, 10 minutes or 15 minutes. If you select [Off], switch off automatic chapter marking altogether with the [Off] setting.

General Setup
TV Display
Selects the aspect ratio of the connected TV.
[Pan Scan] Select when a standard 4:3 TV is connected. The video material formatted in the Pan & Scan style is played back in that style (Both sides of the picture are cut off).
[Letter Box] Select when a standard 4:3 TV is connected. Displays theatrical images with masking bars above and below the picture.
[Wide] Select when a 16:9 wide TV is connected.

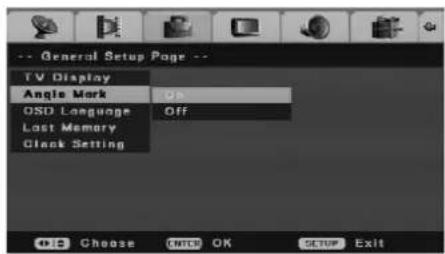
Angle Mark
Some DVDs feature scenes filmed at different angles, which you can select using On-Screen Display. You can have the recorder alert you when multiple angles are available by displaying an Angle Mark icon on screen.
[On] Displays an Angle Mark icon on screen. [Off] Angle Mark icon is not displayed.
OSD (On-Screen Display) Language
Select a language for the Setup menu and on-screen display.

Last Memory
This recorder memorizes the user settings for the last disc that you have viewed. Settings remain in memory even if you remove the disc from the recorder or switch off the recorder. If you load a disc that had its settings memorized, the latest stop position is automatically recalled. To use this effect, set [Last Memory] option to [On].

Clock Setting
- Select [Clock Setting] option on the [Initial Setup] menu.
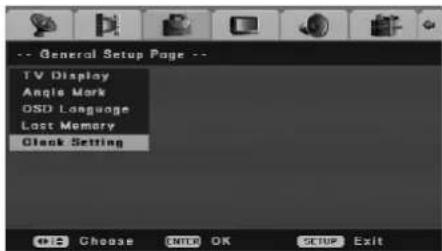
- Press ENTER.

- Enter the necessary information for date and time. ◀ / ▶ (left/right): Moves the cursor to the previous or next column.
▲ / ▼ (up/down) or number buttons: Changes the setting at the current cursor position.
- Press ENTER to confirm your setting.
Video Setup
Quality
Set video quality in the aspects of brightness, contrast, hue, or saturation.
- Select [Quality] option then press ▶ on the [Initial Setup] menu
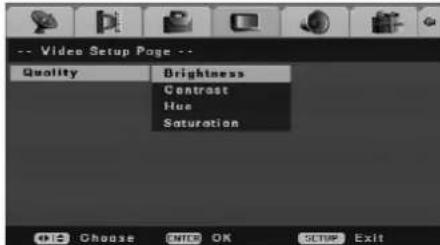
- Press ▲ / ▼ to select the desired option then press ENTER. The status bar appears. Example: Brightness

- Press ◀ / ▶ to select the desired position then press ENTER to confirm your setting.
Audio Setup
Post DRC (Dynamic Range Control)
Makes the sound clear when the volume is turned down when playing a DVD that conforms to [Post DRC].
[On] Makes low sounds clear even if you turn the volume down.
[Off] Normally select this.
[Auto] Decreases Dynamic value automatically.

SPDIF Setup
- SPDIF (Digital Audio) Output
Selects the signal type when using the DIGITAL OUT jack.
[SPDIF RAW] Select this when the recorder is connected to an audio component without a built-in Dolby Digital, DTS or MPEG decoder.
[SPDIF/PCM] Select this when the recorder is connected to an audio component with a built-in Dolby Digital, DTS or MPEG decoder.
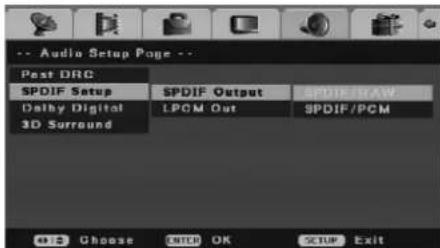
- LPCM Out
Selects the sampling frequency of the digital audio signal.
[48K] The audio signals of DVD VIDEOS are always converted to 48 kHz/16 bit.
[96K] All types of signals, including 96 kHz/24 bit, are output in their original format.

Dolby Digital
- Dual Mono
You can select a audio channel of Dolby Digital.
[Stereo] The left channel sound (L) is heard from the left speaker and the right channel sound (R) is heard from the right speaker.
[L-Mono] The left channel sound (L) is heard from both speakers.
[R-Mono] The right channel sound (R) is heard from both speakers.
[Mix-Mono] The mixed sound (both left and right channel) is heard from both speakers.

- Dynamic
This setting optimizes the dynamics of the sound with low volume playback for less disturbance in quiet environments. This only works for Dolby Digital audio on DVD video discs.
- Select [Dolby Digital] option then press ▶ on the [Initial Setup] menu
- Press ▲ / ▼ to select the [Dynamic] option then press ENTER. The status bar appears.
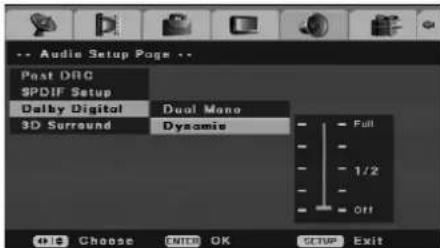
- Press ▲ / ▼ to select then press ENTER to tune dynamic range compress.
The high of dynamic range compress, the gap between Treble and bass will be not Obvious.
3D Surround
This unit can produce a 3D Surround effect, which simulates multi-channel audio playback from two conventional stereo speakers, instead of the five or more speakers normally required to listen to multi-channel audio from a home theater system.
To use this effect, set [3D Surround] option to [On].

Preference
TV Type
You must select the appropriate system mode for your TV system.
- When the selected system does not coincide with the system of your TV, normal color picture may not be displayed.
[PAL] When this recorder is connected with PAL-TV.
[Auto] When this recorder is connected with Multi system TV.
[NTSC] When this recorder is connected with NTSC-TV.

Audio/Subtitle/Disc Menu Language
Select a language for the disc's Menu, Audio, and Subtitle.
[Original] Refers to the original language in which the disc was recorded.
[Others] To select another language, press number buttons then ENTER to enter the corresponding 4-digit number according to the language code list in the reference chapter (see page 44).

Parent Control
Playback of some DVD VIDEOs can be limited according to a predetermined level, such as the age of the users. Scenes may be blocked or replaced with different scenes.
Select [Parental Ctrl] on the setup menu.
- Parental
Selects the limitation level.
Rating one (1) has the most restrictions and rating eight (8) is the least restrictive.

Note:
Password needs to change the parental level if [Password Mode] option is set to [On].
- Area Code
Selects a code for an area as the playback limitation level. See "Area Code" (page 44).
- Select [Parental Ctrl] option then press ▶ on the [Initial Setup] menu

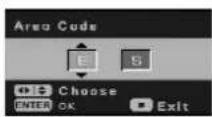
- Press ▲ / ▼ to select the [Area Code] option then press ENTER. [Area Code] menu appears.
-
Press ▲ / ▼ to enter the first character of the area and press ▶.
-
Press ▲ / ▼ to enter the second character and press ENTER.
- Password Mode
Activates or disables the Parental Control feature. [On] To play back a rated movies or to change setting an Parental Control options (Parental, Area Code, etc.), you must enter the 4-digit password. [Off] Parental control is not active and the disc plays in full.

Note:
Password needs to change the setting.
- Password
Changes the password for Parental Control features.
-
Select [Parental Ctrl] option then press ▶ on the [Initial Setup] menu
-
Press ▲ / ▼ to select the [Password] option then press ▶.

- Press ENTER while [Change] is highlighted. [Input Password] menu appears.

-
Enter old four-digit password using the number buttons. If you have not entered a password yet, [Old Password] column is disabled.
-
Enter new four-digit password using the number buttons. Enter the password again to confirm, and press ENTER while [OK] is selected. The password is stored.
If you forget your password
If you forget your password, to clear the current password, follow the procedure below.
- Press SETUP to display the [DVD Recorder Initial Setup] menu.
- Use the Number buttons to enter the 6-digit number "210499". Confirm message will appear.
- Select [Yes] then press ENTER. The 4-digit password is cleared. Enter a new code.
Default
Select this to reset the recorder to all its default settings. The [Parental Control] settings remain as stored. [Initial Setup Wizard] menu screen appears. See "Auto Set Up" on page 11.

Using the Disc Operation menu
- Press SETUP and the [DVD Recorder Initial Setup] menu appears.
- Use ◀ / ▶ to select [Disc Oper] option then press ENTER. Disc Operation Menu appears.

- Use ▲ / ▼ to select an option.
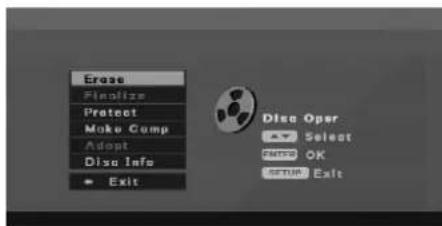
- Press ENTER to confirm your selection.
- To exit the menu, press SETUP or select [← Exit] option on the [Disc Oper] menu then press ENTER.
Disc Erase
If you load a completely blank disc, The recorder will erase the disc automatically.
Also, you can erase the DVD+RW from the Setup menu as below.
- Select [Erase] option on the [Disc Oper] menu.

- Press ENTER. [Erase] menu appears.
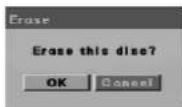
- Use ◀ / ▶ to select [OK] then press ENTER. It takes a few moments to erase the disc.
Caution
If you want to erase the disc, everything recorded on the disc will be erased.
Finalize
Finalizing 'fixes' the DVD+R recordings in place so that the disc can be played on a regular DVD player or computer equipped with a suitable DVD-ROM drive.
Finalizing a disc creates a menu screen for navigating the disc. This is accessed by pressing MENU/LIST or TITLE.

Caution
Once you have finalized a DVD+R disc, you cannot edit or record anything else on that disc.
- Select [Finalize] option on the [Disc Oper] menu.
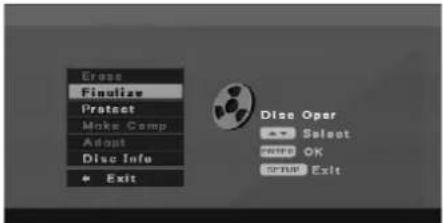
- Press ENTER. [Finalize] menu appears.
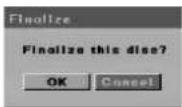
- Select [OK] then press ENTER. The recorder starts finalizing the disc.
Note:
How long finalization takes depends on how much is recorded on the disc, and the number of titles on the disc.
Tip
If [Protect] option is set to active, the finalize is not available. To finalize, set the disc to [Unprotect].
Disc Protect
Use the [Protect] option to prevent accidental recording, editing or deleting of the disc loaded.
- Select [Protect] option on the [Disc Oper] menu.

- Press ENTER. [Protect] menu appears.

- Select [OK] then press ENTER. The disc is protected. So you cannot record, erase, and edit. If you need to unlock the disc to make edits, select [Unprotect] on the [Disc Oper] menu.
Make Edits Compatible
Use the [Make Comp] option when the current DVD+RW is not compatible with other DVD Players because you have added Chapter Markers.
- Select [Make Comp] option on the [Disc Oper] menu.
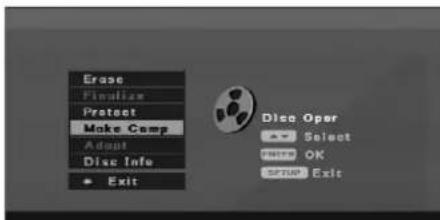
- Press ENTER. [Make Comp] menu appears.

- Select [OK] then press ENTER.
Adapt
Disc recorded on other recorder will not use on your recorder. You can use the disc after adapting the disc at your recorder.
- Select [Adapt] option on the [Disc Oper] menu.

- Press ENTER. [Adapt] menu appears.

- Select [OK] then press ENTER.
Disc Information
You can view the informations for loaded DVD+R/RW disc. (Disc Label, Media, Title number, Status, Remaining time)
- Select [Disc Info] option on the [Disc Oper] menu.

- Press ENTER. [Disc Info] menu appears.
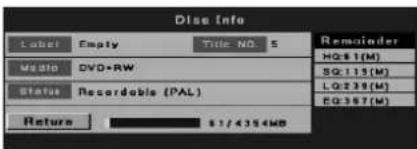
- To return to the [Disc Oper] menu, press SETUP, RETURN, or ENTER.
General Explanation of On-Screen Display
This manual gives basic instructions for operating the recorder. Some DVDs require specific operation or allow only limited operation during playback. When this occurs, the symbol ② appears on the TV screen, indicating that the operation is not permitted by the recorder or is not available on the disc.
Displaying Information While Watching TV
During viewing the TV, press DISPLAY to display/remove the information displayed on-screen.
Indicates channel number, station name, and audio signal (STEREO, MONO) received by the tuner.
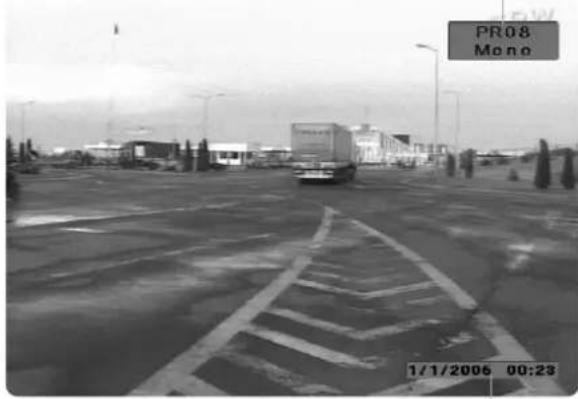
Indicates current date and time.
Using the On-Screen Display
The On-Screen Display contains many playback features. To see the On-Screen Display, press DISPLAY while a disc is playing. The On-Screen Display appears across the top of the screen. Each feature is illustrated with an icon. Use the
▲ / ▼ / ◀ / ▶ buttons to move through the different icons in the On-Screen Display.
When an icon is highlighted, use the ▲ / ▼ buttons to scroll through the choices displayed in the text box under the icons.
The On-Screen Display features are only available if the disc was created with that particular feature (i.e., if you select the Subtitle icon, you won't be able to change the subtitle language unless the author of the disc created the disc with subtitles). You can display various information about the disc loaded on-screen.
For details about each item, see the pages in parentheses.

DVD
Title number (Current / Total) (page 24)
601/001: Chapter number (Current / Total) (page 24)
: Elapsed playing time of title (page 25)
A Audio encoding and language (page 26)
: Subtitle number (page 26)
01/01: Angle number (Current / Total) (page 26)
on : Repeat mode (page 25)
: A-B repeat mode (page 25)
: Sound effect mode (page 27)
: On-Screen Display language
ACD
01/98 : Track number (Current / Total) (page 24)
: Elapsed playing time of track (page 25)
ΩSTH : Audio channel (page 26)
: PBC mode (Video CD only) (page 24)
: Repeat mode (page 25)
: A-B repeat mode (page 25)
Edit program playback (Audio CD only) (page 27)
: Random Playback (Audio CD only) (page 25)
ENQ : On-Screen Display language
Playback
Playing a DVD, Video CD, or Audio CD
Playback Setup
- Turn the TV on and select the video input source connected to the recorder.
-
Audio system: Turn the audio system on and select the input source connected to the recorder.
-
Load your chosen disc in the tray, with the playback side down.
If a menu screen is displayed
The menu screen may be displayed first after loading a DVD or Video CD which contains a menu.
DVD
Use the ◀ / ▶ / ▲ / ▼ buttons to select the title/chapter you want to view, then press ENTER to start playback.
Press TITLE or MENU/LIST to return to the menu screen.
VCD
- Use the number buttons to select the track you want to view.
Press RETURN (♂) to return to the menu screen. -
Menu setting and the exact operating procedures for using the menu may differ depending on the disc. Follow the instructions on the each menu screen. You may also set PBC to OFF on the On-Screen Display. See page 24.
-
To stop the playback, press STOP (■).
The unit records the stopped point, depending on the disc. “■” appears on the screen briefly. Press PLAY (▶) to resume playback (from the scene point). If you press STOP (■) again or unload the disc (“■” appears on the screen.), the unit will clear the stopped point.
Press OPEN/CLOSE (▲) to remove the disc. Press OPEN/CLOSE (▲) to close disc tray or press POWER (○), the disc tray closes automatically and unit turns off.
Notes:
-
If Parental Control is set and the disc is not within the Rating settings (not authorized), the 4-digit code must be entered and/or the disc must be authorized (see "Parental", on page 18).
• DVDs may have a Region Code.
Your recorder will not play discs that have a region code different from your recorder. The region code for this recorder is 2 (two). -
To view TV channel or video input source during Audio CD playback, press STOP (■).
- Unless stated otherwise, all operations described use the remote control. Some features may also be available on the Setup menu.
On and off the PBC function VCD
PBC stands for Playback Control and refers to special menus and navigation features that are available on some Video CDs.
- Press DISPLAY and press ◀ / ▶ to select the PBC icon.
- Press ▲ / ▼ to set the PBC mode to [On] or [Off]. [On] Video CDs are played according to the PBC, if available. [Off] Video CDs are played the same way as Audio CDs.
Moving to another TITLE

When a disc has more than one title, you can move to another title as follows:
- Press DISPLAY during playback then use ◀ / ▶ to select the title icon then press ENTER.
- Press the appropriate numbered button (0-9) or ▲ / ▼ to select a title number.
Tip:
You can also select title in stop mode. Press DISPLAY twice and title icon appears. Use number button to select a title number then press ENTER. The title's playback starts.
Moving to another CHAPTER/TRACK
When a title on a disc has more than one chapter or a disc has more than one track, you can move to another chapter/track as follows:
- Press SKIP I◀◀ or ▶▶ briefly during playback to select the next chapter/track or to return to the beginning of the current chapter/track.
- Press SKIP I◄◄ twice briefly to step back to the previous chapter/track.
- To go directly to any chapter/chapter during playback, press DISPLAY and press ◀ / ▶ to select the chapter/track icon. Then, input the chapter/track number or use ▲ / ▼.
Search
-
Press SCAN (◀◀ or ▶▶) during playback.
-
Press SCAN ( ◀◀ or ▶▶) repeatedly to select the required speed. DVD; 5 steps (forward and backward) Video CD, Audio CD; 3 steps (forward and backward)
-
To exit SEARCH mode, press PLAY.
Still Picture and Frame-by-Frame
Playback VCDI
-
Press PAUSE/STEP (Ⅲ) during playback. Advance the picture frame-by-frame by pressing PAUSE/STEP (Ⅱ) repeatedly.
-
To exit still motion mode, press PLAY.
Pause ACD
-
Press PAUSE/STEP (Ⅲ) during playback.
-
To return to playback, press PLAY (▶) or press PAUSE/STEP (■) again.
Slow Motion VCDI
-
Press PAUSE/STEP (Ⅲ) during playback. The recorder will now go into PAUSE mode.
-
Use the SCAN (◀◀ or ▶▶) to select the required speed. DVD; 4 steps (forward and backward) Video CD; 3 steps (forward only)
-
To exit Slow Motion mode, press PLAY (▶).
Repeat
Press REPEAT to select a desired repeat mode.
• [CH] repeats the current chapter. (DVD)
• [TT] repeats the current title. (DVD)
• [ALL] repeats the all tracks. (Video CD, Audio CD)
- [Track]: repeats the current track. (Video CD, Audio CD)
• [Off] does not play repeatedly.
Note:
On a Video CD with PBC, you must set PBC to OFF on the On-Screen Display to use the Repeat function. See page 24.
Repeat A-B
To repeat a sequence.
- Press A-B at your chosen starting point. "A-" appears briefly on the TV screen.
- Press A-B again at your chosen end point. "A-B" appears briefly on the TV screen and the repeat sequence begins.
- Press A-B again to cancel.
Time Search
To start playing at any chosen time on the disc:
- Press DISPLAY during playback. The Time icon shows the elapsed playing time.
- Press ▲ / ▼ to select the time Time icon and "0:00:00" appears.
- Input the required start time in hours, minutes, and seconds from left to right. Playback starts from the selected time.
Note:
On a Video CD with PBC, you must set PBC to OFF on the On-Screen Display to use the Repeat function. See page 24.
Zoom VCDI
The Zoom function allows you to enlarge the video image and to move through the enlarged image.
-
Press ZOOM during playback or still playback to activate the Zoom function.
Each press of the ZOOM button changes the TV screen in the sequence shown below. x2 size → x4 size → normal size -
Use the ◀/▶/▲/▼ buttons to move through the zoomed picture.
-
To resume normal playback, press ZOOM repeatedly until the normal picture appears.
Note:
The zoom function may not work for some DVDs.
Random ACD
- Press DISPLAY and press ◀ / ▶ to select the Random icon.
- Use ▲ / ▼ to select [On] or [Off] then press ENTER.
[On] The unit automatically begins Random Playback.
[Off] To return to normal playback.
Tip:
By pressing SKIP ▶▶ during Random playback, the unit selects another track and resumes Random playback.
Marker Search VCDI
To enter a Marker
You can start playback from up to 12 memorized points. To enter a marker, press MARKER at the desired point on the disc. The Marker icon appears on the TV screen briefly. Repeat to enter up to 12 markers.
To Recall or Clear a Marked Scene
- During disc playback, press SEARCH. The marker search menu appears on the screen.
- Use ◀/▶/▲/▼ to select a marked scene that you want to recall or clear.
- Press ENTER and playback starts from the marked scene. Or, press CLEAR and the marked scene is erased from the marker search menu.
- Press RETURN to exit the menu.

Checking the Contents of DVD Video Discs: Menus
DVDs may contain menus that allow you to access special features. To open the disc menu, press MENU/LIST. Then, press the appropriate number button to select an option. Or, use the ◀ / ▶ / ▲ / ▼ buttons to highlight your selection, then press ENTER.
Title Menu DVD
- Press TITLE.
If the current title has a menu, the menu will appear on the TV screen. Otherwise, the disc menu may not appear. - The menu may contain camera angles, spoken language and subtitle options, and chapters for the title.
Disc Menu DVD
- Press MENU/LIST.
The disc menu is displayed. - To remove the disc menu, press MENU/LIST again.
Camera Angle DVD
If the disc contains scenes recorded at different camera angles, you can change to a different camera angle during playback.
-
Press DISPLAY and press ◀ / ▶ to select the Angle icon.
-
Use ▲ / ▼ to select a desired angle.
Tip:
The ANGLE indicator will blink on the TV screen at scenes recorded at different angles to indicate that angle switching is possible.
Changing the Audio Soundtrack

Press AUDIO repeatedly during playback to hear a different audio language or audio soundtrack if available.
Note:
Some discs feature both Dolby Digital and DTS soundtracks. There is no analog audio output when DTS is selected. To listen to the DTS soundtrack, connect this recorder to a DTS decoder via one of the digital outputs. See page 9 for connection details.
Changing the Audio Channel ACDV
Press AUDIO repeatedly during playback to hear a different audio channel.
Subtitles DVD
Press SUBTITLE repeatedly during playback to see the different subtitle languages.
Instant Skip DVD-
Each press INSTANT SKIP skips forward 30 seconds.
Note:
If appears, the feature is not available on the disc.
Last Condition Memory DVD
This recorder memorizes the user settings for the last disc that you have viewed. Settings remain in memory even if you remove the disc from the recorder or switch off the recorder. If you load a disc that had its settings memorized, the latest stop position is automatically recalled.
Notes:
- Settings are stored in memory for use any time.
- Settings are stored in memory only when [Last Memory] option is set to [On] on the setup menu.
- This recorder does not memorize settings of a disc if you switch off the recorder before commencing to play it.
Sound Effect □ □ □ VCDI
You can choose among 7 sound mode.
- Press DISPLAY and press ◀ / ▶ to select the Sound Mode icon.
- Use ▲ / ▼ to select a desired sound mode then press ENTER.
Using the Program Play Feature ACD
To use the Program Playback option, you must enter the order in which you want the tracks on the Audio CD to play by creating a program.
- Press DISPLAY and press ◀ / ▶ to select the Program icon.
- Press and ENTER and the Program screen appears.
- Use the number and ▲ / ▼ / ◀ / ▶ buttons to enter the track number.
- Continue adding tracks as explained in steps 3 until your program is complete.
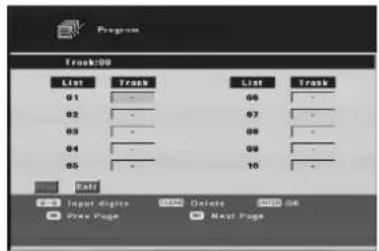
- Use CLEAR button to delete the track number.
-
Use SKIP (I◄◄ or ►►I) button to move to previous or next page.
-
You can play your program by highlighting Play and pressing ENTER.
Note:
The program will be erased when you stop the playback, remove the disc from the recorder or the recorder is turned off.
Playing an MP3 File
The recorder can play MP3 files on CD-ROM, CD-R/RW or DVD±R/RW discs. Before playing MP3 files, read "About MP3 audio files" on the right.
- Load a disc that contains MP3 files. The Browser menu appears on the TV screen.

- On the [Browser] menu, use ▲ / ▼ and ENTER to open a folder contains MP3 files. The file and sub folder list for the folder appears. To disappears MP3 files and sub folders, select the folder then press ENTER again.
- Press ▲ / ▼ to select an MP3 file then press ENTER. Playback starts.
- To stop playback at any time, press STOP.
Tips:
- You can select an MP3 file on the [File list] menu. Press ▶ repeatedly to select [File list] word on top of the menu then press ENTER and the all files except folders will display.
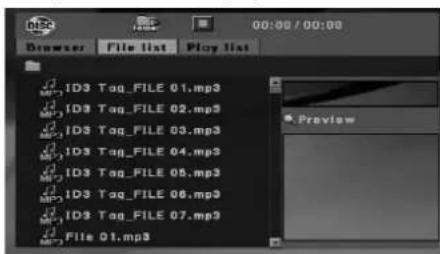
- To view the TV program and exit the menu, press STOP repeatedly. To return to the [Browser] menu, press MENU/LIST.
- To show other pages, press SKIP ◀◀◀ or ▶▶◀ briefly in stop mode (when “■” appears on the menu.)
About MP3 audio files
MP3 file compatibility with this recorder is limited as follows:
• Sampling frequency: within 8 - 48 kHz
- Bit rate: within 8 - 320kbps
- The recorder cannot read an MP3 file that has a file extension other than “.mp3”.
- CD-R physical format should be "ISO 9660" and "JOLIET".
- If you record MP3 files using software that cannot create a file system (eg. Direct-CD) it is impossible to playback MP3 files. We recommend that you use Easy-CD Creator, which creates an ISO 9660 file system.
- File names should have a maximum of 8 letters and must incorporate an .mp3 extension.
- They should not contain special letters such as / ? * : “ < > | etc.
- The total number of folders and files on the disc should be less than 4,500 and the total number of files in a folder should be less than 500.
This recorder requires discs and recordings to meet certain technical standards in order to achieve optimal playback quality. Pre-recorded DVDs are automatically set to these standards. There are many different types of recordable disc formats (including CD-R containing MP3 files) and these require certain pre-existing conditions (see above) to ensure compatible playback.
Customers should note that permission is required in order to download MP3 files and music from the Internet. Our company has no right to grant such permission. Permission should always be sought from the copyright owner.
Viewing a JPEG File
The recorder can play JPEG files on the CD-R/RW or DVD±R/RW. Before playing JPEG recordings, read "About JPEG image files" on page 30.
- Load a disc that contains JPEG file. The [Browser] menu appears on the TV screen.
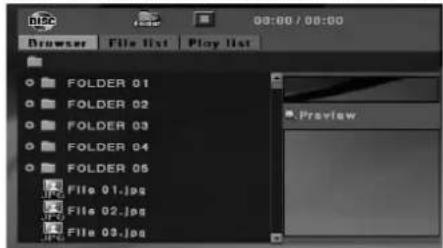
- On the [Browser] menu, use ▲ / ▼ and ENTER to open a folder contains JPEG files. The file and sub folder list for the folder appears. To disappears JPEG files and sub folders, select the folder then press ENTER again.
- Press ▲ / ▼ to select a JPEG file then press ENTER. Slide Show starts.
- To return to the [Browser] menu during Slide Show, press MENU/LIST.
Tips:
- You can select an MP3 file on the [File list] menu. Press ▶ repeatedly to select [File list] word on top of the menu then press ENTER and the all files except folders will display.
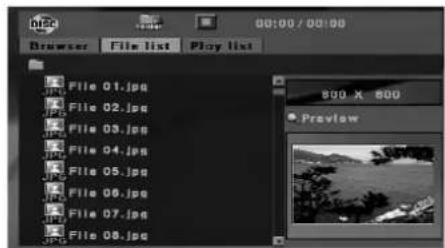
- To view the TV program and exit the menu, press STOP repeatedly. To return to the [Browser] menu, press MENU/LIST.
- To show other pages, press SKIP ◀◀◀ or ▶▶◀ briefly in stop mode (when "■" appears on the menu.)
To Pause the Slide Show
- Press PAUSE/STEP (III) during slide show.
- When you want to continue slide show, press PLAY (▶) or PAUSE/STEP (■).
Skip Images
While viewing a picture, press SKIP (I◄◄ or ►►I) once to advance to the next file or return to the previous file.
Rotate Images
Use ◀ / ▶ while viewing a picture to flip the picture clockwise or counterclockwise.
To flip the picture
Press ▲ / ▼ during showing a picture to flip the picture horizontally or a vertically.
Still Picture
- Press PAUSE/STEP during slide show. The recorder will now go into PAUSE mode.
- To return to the slide show, press PLAY or press PAUSE/STEP again.
Zoom
- Press ZOOM during viewing picture. The recorder will now go into ZOOM mode.
- Press SCAN (◀◀ or ▶▶) in ZOOM mode to zoom in or zoom out. (50%, 100%, 150%, 200%)
Using the thumbnail menu for JPEG file
If you press STOP during Slide Show, the thumbnail menu will appear. You can find a picture you want to view easily.
Use ▲ / ▼ / ◀ / ▶ to select a picture or option icon then press ENTER press ENTER.
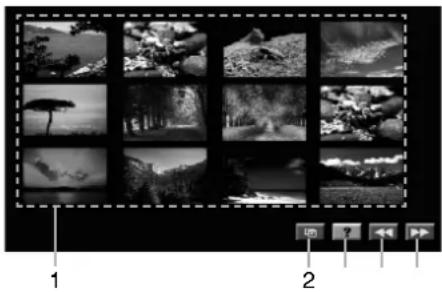
- Starts the Slide Show from the picture.
- Starts the Slide Show
- Shows the [Remote Key Function] menu.
- Shows the previous page.
- Shows the next page.
Using Playlist with MP3 or JPEG files
Playlist enables you to make custom playlists of MP3 or JPEG files. Playlist can contain up to 256 files.
- On the [Browser] or [File list] menu, select a file then press MARKER to add the file to the [Playlist] menu. Press CLEAR again to cancel the checked file.
- Repeat step 1 to mark additional file.
- Press ◀ repeatedly to select [Playlist] word on top of the menu then press ENTER and the [Playlist] menu will appear.

- Select a file on the [Playlist] menu then press ENTER and playback begins in the order in which you programmed.
Erasing a file from the [Playlist] menu
- Select the file you wish to erase then press MARKER.
- Repeat step 1 to mark additional file.
- Press ◀ repeatedly to select [Delete] word on the [Playlist] menu then press ENTER. The marked file(s) is erased from the menu.
Erasing all file from the [Playlist] menu
- Press ◀ repeatedly to select [Delete All] word on the [Playlist] menu then press ENTER. All files are erased from the menu.
About JPEG image files
JPEG disc compatibility with this recorder is limited as follows:
-
Depending upon the size and number of JPEG files,
3 it could take a long time for the recorder to read the files. If you don't see an on-screen display after several minutes, some of the files may be too large — reduce the resolution of the JPEG files to less than 4M pixels. -
The total number of folders and files on the disc should be less than 4,500 and the total number of files in a folder should be less than 500.
- Some discs may be incompatible due to a different recording format or the condition of disc.
- Ensure that all the selected files have the ".jpg" extensions when copying into the CD layout.
- If the files have ".jpe" or ".jpeg" extensions, please rename them as ".jpg" file.
- File names without ".jpg" extension will not be able to be read by this recorder. Even though the files are shown as JPEG image files in Windows Explorer.
- Progressive and lossless compression JPEG image files are not supported.
Recording
About DVD recording
Notes:
- This recorder cannot make recordings on CD-R or CD-RW discs.
- Our company takes no responsibility for recording failure due to power outages, defective discs, or damage to the Recorder.
- Fingerprints and small scratches on a disc can affect playback and/or recording performance. Please take proper care of your discs.
Disc types and recording formats, modes, and settings
This recorder can play three different kinds of DVD discs: pre-recorded DVD-Video discs, DVD+RW, and DVD+R discs. The DVD+R and DVD+RW discs are always "Video format"—the same as pre-recorded DVD-Video discs. This means that once finalized or make edits compatible, you can play a DVD+R, or DVD+RW in a regular DVD player.
Recording time and picture quality
There are four preset recording quality modes:
- HQ – Highest quality setting, gives about 1 hour of recording time on a DVD (4.7GB).
- SQ – Default quality, sufficient for most applications, gives about 2 hours of recording time on a DVD (4.7GB).
- LQ – Slightly lower video quality, gives about 4 hour of recording time on a DVD disc (4.7GB).
- EQ – Lowest video quality, gives about 6 hour of recording time on a DVD (4.7GB).
Copyright
- Recording equipment should be used only for lawful copying and you are advised to check carefully what is lawful copying in the area in which you are making a copy. Copying of copyright material such as films or music is unlawful unless permitted by a legal exception or consented to by the rights owner.
- This product incorporates copyright protection technology that is protected by method claims of certain U.S. patents and other intellectual property rights owned by Macrovision Corporation and other rights owners. Use of this copyright protection technology must be authorized by Macrovision Corporation, and is intended for home and other limited viewing uses only, unless otherwise authorized by Macrovision corporation. Reverse engineering or disassembly is prohibited.
Notes for recording
- The recording times shown are not exact because the recorder uses variable bit-rate video compression. This means that the exact recording time will depend on the material being recorded.
- When recording a TV broadcast, if the reception is poor or the picture contains interference, the recording times may be shorter.
- If you record still pictures or audio only, the recording time may be longer.
- The displayed times for recording and time remaining may not always add up to exactly the length of the disc.
- The recording time available may decrease if you heavily edit a disc.
- When using a DVD+R disc, you can keep recording until the disc is full, or until you finalize the disc. Before you start a recording session, check the amount of recording time left on the disc.
- The Delete Title option in the Title List menu only hides the title, it does not actually erase the title from the disc and increase the recording time available (except for the last recorded title on a DVD+RW disc).
- When using a DVD+R/RW, the recorder will execute the Menu-making operation to update the new title and editing when removing the disc from the recorder. So you must remove the disc after selecting the recorder's operation mode to DVD mode.
- This recorder records with NTSC or PAL signal depend on the source. But the recorder cannot record NTSC and PAL signals on a DVD disc simultaneously.
Basic Recording from a TV
Follow the instructions below to record a TV program. Recording starts immediately and continues until the disc is full or you stop the recording.
Note:
You must load a recordable disc for DVD recording.
- Set a recording mode as necessary by pressing REC MODE repeatedly. (HQ, SQ, LQ, EQ)
- Use PR (▲ / ▼) buttons to select the TV channel to record.
Changing TV Audio Channel
You can select the audio channel (language) to listen by pressing AUDIO during viewing TV program. The current audio channel is displayed on-screen.
Mono/Main → Stereo/Main → Stereo/Sub
- If the sound is poor quality when set to Stereo, you can often improve it by changing to [Mono/Main].
- Press REC (●) once.
Recording will start. (The REC appears in the display window.)
- To record for a fixed length of time, see OTR (One Time Recording) on right.
- Press STOP (■) to stop recording.
To Pause the Recording
-
Press PAUSE/STEP (III) to pause recording.
-
When you want to continue recording, press PAUSE/STEP (■) or REC (●).
-
Press PAUSE/STEP (III) to pause recording.
- When you want to continue recording, press PAUSE/STEP (III) or REC (●).
OTR (One Time Recording)
OTR (One Time Recording) allows you to make a recording easily of a preset length without using the program timer.
- Follow steps 1-3 as shown left (Basic Recording from a TV).
- Press REC (●) repeatedly to select the recording time length.
Recording starts after the first press. Each subsequent press increases the recording time within free space.
The recording time is displayed on the TV screen. At the end of the recording, the recorder will stop recording and shut off.
Checking the Recording Time
Press DISPLAY to check the recording time. The recalled setting will automatically return to the TV screen for a moment.
Also, remaining time of recording is shown in the display window.
To Extend the Recording Time
The recording time can be extended anytime by pressing REC (●).
Each subsequent press increases the recording time within free space.
Caution
If the recorder is unplugged (or there is a power failure) while the recorder is recording, the recording will be lost.
Timer Recording
This recorder can be programmed to record up to 7 programs within a period of 1 month. For unattended recording, the timer needs to know the channels to be recorded, the starting and ending time.
1. Press TIMER REC.
The [Timer Recording] list screen will appear.

2. Select [New Input] then press ENTER.
The Timer Record menu will appear.
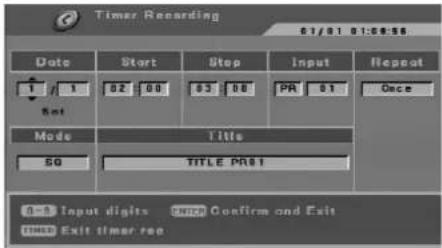
• [Date] Choose a date up to 1 month in advance.
• [Start] Set the start time.
• [Stop] Set the stop time.
- [Input] Choose a memorized program number, or one of the external inputs from which to record.
- [Repeat] Choose a desired repeat (Once, Daily, Monday-Friday, or Weekly).
- [Mode] Set a recording mode. (HQ, SQ, LQ, EQ)
- [Title] Edits the title name. Press REC (●) to changes the title name. The display for entering characters appears. To enter characters, see page 39.
3. Enter the necessary information for your timer recording(s).
- ◀ / ▶ (left/right) – move the cursor left/right
- ▲ / ▼ (up/down) or number buttons – change the setting at the current cursor position
- Press ENTER after filling in all the program information.
-
Press TIMER REC to exit the Timer Record menu.
-
Press ENTER, the program will be memorized by the recorder.
To check the programming, the [Timer Recording] list screen will appear.
[Result] field's [Valid] on the [Timer Recording] list screen indicates that the timer recording is programmed correctly. - Press TIMER REC to exit the Program List.
- Make sure that you load a recordable DVD disc for recording.
Checking Timer Recording Details
Programming can be checked whenever the recorder is turned on. Press TIMER REC twice.
- Use ▲ / ▼ to select a timer recording.
- Press ENTER to edit the selected program. Timer Record menu appears.
- Press CLEAR to delete the selected program from the Timer Record List.

Canceling a Timer Recording
You can clear a timer setting anytime before the recording actually starts.
- Use ▲ / ▼ to select a program you want to erase on the Timer Recording list.
- Press CLEAR.
Confirm message appears.
- Select [Yes] then press ENTER.
Stopping a Timer Recording in Progress
After a timer recording has started, you can still cancel the program.
- Press STOP.
Timer Recording Troubleshooting
Even though the timer is set, the recorder will not record when:
• There is no disc loaded.
- A non-recordable disc is loaded.
- [Protect] option is set to [ON] in the Setup menu. (see page 21).
- There are already 49 titles recorded on the disc.
You cannot enter a timer program when:
• A recording is already underway.
- The time you're trying to set has already passed.
- There are already 7 timer programs set.
If two or more timer programs overlap:
• The earlier program takes priority.
- When the earlier program finishes, the later program starts.
- If two programs are set to start at exactly the same time, the program entered first takes priority.
If the disc is damaged, the recording may not complete successfully. In this case even though the [Result] field shows [Valid], it may not be.
Recording from an External Input
Recording from External Components
You can record from an external component, such as a camcorder or VCR, connected to any of the recorder's external inputs.
- Make sure that the component you want to record from is connected properly to the recorder. See page 10.
-
Press AV repeatedly to select the external input to record from.
-
Tuner: Built-in tuner
- SCART1: EURO AV1 AUDIO VIDEO mounted on back panel
• SCART2: EURO AV2 mounted on back panel -
Front AV: VIDEO, AUDIO (L/R), S-VIDEO IN mounted on front panel
-
Select the recording mode as necessary by pressing REC MODE repeatedly. (HQ, SQ, LQ, or EQ)
- Press REC (●) once.
Recording will start. (The REC appears in the display window.)
- Recording continues until you press STOP (■) or the disc is full.
-
To record for a fixed length of time, see "OTR (One Time Recording)" on page 32.
-
Press STOP (■) to stop recording.
Note:
If your source is copy-protected using CopyGuard, you will not be able to record it using this recorder.
See Copyright on page 31 for more details.
Editing
You can edit video content using [Title List] menu or [Disc Edit] menu.
• To use Title List menu, see pages 35-38.
• To use Disc Edit menu, see pages 39-42.
Title List and Chapter List Menu Overview
Using the Title List menu you can edit video content. The editing features available in the Title List menu depend on whether you are editing video on DVD.
- Press MENU/LIST to display the Title List menu. Playback should be stopped when you do this.
- When selecting titles, use the ▲ / ▼ buttons to display the previous/next page if there are more than three titles.
On the left side of the screen are the menu options. The main part of the screen shows thumbnails of the titles (or chapter) on the DVD. You can change these thumbnails—see Changing Title Thumbnails on page 37 or page 40.
After selecting a title or chapter on the Title List or Chapter List menu, then press ENTER. The menu options appears on the left side of the menu. Use ▲ / ▼ to select a option then press ENTER to confirm your selection.
- To exit the Title List menu, press STOP (■).
1 Menu options: To display menu option, select a title or chapter then press ENTER. The options displayed differ depending on the disc type.
• [Add] Displays menu for adding the chapter.
• [Chapter] Displays Chapter List of the title.
- [Delete] Deletes the title or chapter mark. (page 36 or page 38)
• [Divide] Divides a title into two (page 37).
- [Hide (Unhide)] Hides (or Unhides) the selected chapter. (page 38)
- [Play] Plays back the selected title or chapter. The hidden chapters cannot be played.
• [Rename] Edits the title name. (page 36)
• [Title] Displays Title List of the chapter.
- [Thumbnail] Displays menu for changing th thumbnail (page 37)
2 Thumbnail
3 Shows the title name, recorded date, and recording length and recording mode.
4 Shows the current page number.

Title List menu

Chapter List menu
Deleting a Title
If you choose to delete a title from the Title List menu, the title is actually deleted from the disc.
-
Use ▶/▶/▲/▼ to choose a title you want to delete on the Title List menu then press ENTER. The menu options appears on the left side of the screen.
-
Select [Delete] option from the options on the menu. Delete options appears.

- Select an option then press ENTER.
The title(s) is deleted.
After pressing ENTER, the new, updated menu is displayed.
[Erase selected title(s)] Deletes the selected title only.
[Erase all titles] Deletes all titles on the disc.
[Cancel] Returns to previous menu.
-
Repeat steps 1 - 3 to continue to delete from the menu.
-
Press STOP to exit the menu.
Notes:
- The deleted title's name is changed to [EMPTY].
- If more than two titles are repeatedly deleted, the titles are combined into one.
- When you are deleting a title, only the last one on DVD+RW increases remaining recording time.
Naming a Title
You can name titles independently. Names can be up to 32 characters long but it displays up to 15 characters long on the Title List.
- Choose the title you want to name on the Title List menu, then press ENTER.
The menu options appears on the left side of the menu.

- Use ▲/▼ to select [Rename] option then press ENTER.
Keyboard menu appears.

- Enter a name for the title. Use ◀/▶/▲/▼ to select a character then press ENTER to confirm your selection.
Tip:
Remote control buttons for entering a name
- SKIP (I◄◄ / ►►I): Changes keyboard type
- SCAN (◀◀): Deletes the previous character at the cursor position.
- ◀ / ▶: Moves cursor to left or right.
-
Numbers (0-9): Inputs Digit at the cursor position.
-
Choose [OK] then press ENTER to fix the name and return to the previous menu screen.
Choose [Cancel] then press ENTER to return to the previous menu screen without saving.
Choose [Reset] then press ENTER to delete all characters.
Notes:
- For discs formatted on a different recorder, you will see only a limited character set.
- The entered name is displayed on the DVD player only after finalization or making compatible.
Changing Title Thumbnails
You can select a favorite scene for the thumbnail picture shown in the Title List menu.
-
Use ◀/▶/▲/▼ to choose a title on the Title List menu then press ENTER. The menu options appears on the left side of the screen.
-
Select [Thumbnail] from the options.
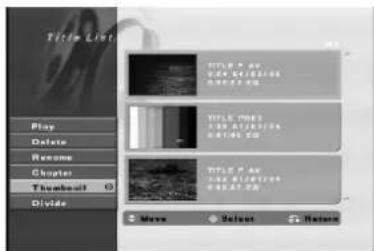
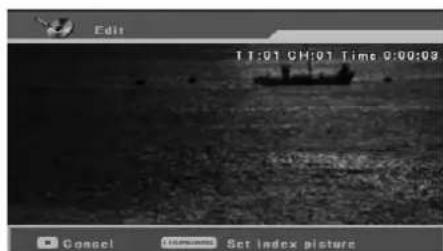
- Press ENTER. The menu appears as shown below.
-
Use play, pause step, search and slow-motion to find the scene you want.
-
Press THUMBNAIL to make the currently displayed picture the one that appears in the Title List menu. The still picture that you choose appears in Title List menu.
Divide One Titles Into Two +RW
Use this command to split a title up into two new titles.
-
On the Title List menu, select a title you want to divide then press ENTER. The menu options appears on the left side of the screen.
-
Select [Divide] option.
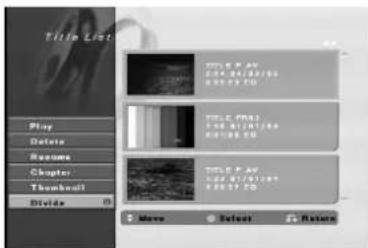
- Press ENTER. The menu appears as shown below.

-
Use play, pause step, search and slow-motion to find the point you want to divide the title.
-
Press REC (●) at the point. The title is divided into two new titles. It take up to 4 minutes to divide.
Note:
You cannot select dividing point less than 3 seconds.
Adding Chapter Markers
You can create chapters within a title by inserting chapter marks at the desired points.
-
Use ◀ / ▶ / ▲ / ▼ to choose a chapter on the Chapter List menu then press ENTER. The menu options appears on the left side of the screen.
-
Select [Add] from the options.

- Press ENTER. The menu appears as shown below.

-
Use play, pause step, search and slow-motion to find the scene you want.
-
Press CHP. ADD to add chapter mark.
-
Repeat step 4 to continue to add chapter from the menu.
Note:
Chapter markers are inserted at regular intervals automatically. You can change this interval from the Initial Setup menu (see "Chapter Mark" on page 14).
Deleting Chapter Markers
You can delete chapter markers.
-
Use ◀/▶/▲/▼ to choose a chapter on the Chapter List menu then press ENTER. The menu options appears on the left side of the screen.
-
Select [Delete] from the options.

-
Press ENTER. The confirm message for deleting will appear.
-
Use ◀ / ▶ to select [OK] then press ENTER. The selected chapter mark is deleted.
Hide a Chapter +R+
You can skip playing chapters without deleting from the disc.
-
Use ▲▼◀▶ to choose a chapter you want to hide on Chapter List menu, then press ENTER. Options appear on the left side of the screen.
-
Select [Hide] from the options.

- Press ENTER.
Note:
If you select a hidden chapter on the Chapter List menu, you can 'unhide' it by choosing [Unhide] option on the menu. After doing that, you are able to play back the chapter.
Using the Disc Edit menu
-
Press SETUP and the [DVD Recorder Initial Setup] menu appears.
-
Use ◀ / ▶ to select [Disc Edit] option then press ENTER. Disc Edit Menu appears.

- Use ▲ / ▼ to select a title then press ENTER. The menu options appears on the right side of the menu.

- Select an option then press ENTER to confirm your selection.
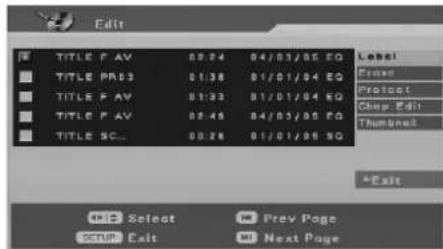
[Label] Edits the title name. (See page 39.)
[Erase] Erase the title. (See page 40.)
[Protect] Protects accidental recording, editing or deleting of the title. (See page 40.)
[Chap Edit] Displays [Chap Edit] menu. (See page 41-42.)
[Index Pic] Changes a favorite scene for the thumbnail picture shown in the Title List menu. (See page 40.)
- To exit the menu, press SETUP or select [← Exit] option on the [Edit] menu then press ENTER.
Naming a Title
You can name titles independently. Names can be up to 32 characters long.
- Choose the title you want to name on the [Edit] menu, then press ENTER.
The menu options appears on the right side of the menu.

- Use ▲/▼ to select [Label] option then press ENTER.
Keyboard menu appears.

- Enter a name for the title. Use ◀/▶/▲/▼ to select a character then press ENTER to confirm your selection.
Tip: Remote control buttons for entering a name
- SKIP (I◄◄ / ►►I): Changes keyboard type
- SCAN (◀◀): Deletes the previous character at the cursor position.
- ◀/▶: Moves cursor to left or right.
-
Numbers (0-9): Inputs Digit at the cursor position.
-
Choose [OK] then press ENTER to fix the name and return to the previous menu screen.
Choose [Cancel] then press ENTER to return to the previous menu screen without saving. Choose [Reset] then press ENTER to delete all characters.
Erasing a Title
If you choose to erase a title from the [Edit] menu, the title or chapter is actually deleted from the disc.
-
Use ◀ / ▶ / ▲ / ▼ to choose a title you want to erase on the [Edit] menu then press ENTER. Repeat this step to select additional title. The menu options appears on the right side of the screen.
-
Select [Erase] option from the options on the menu.
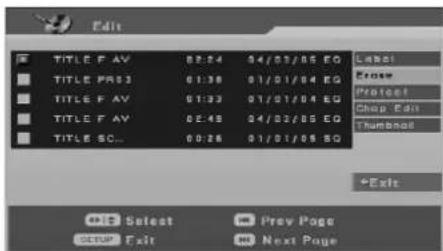
- Press ENTER.
The confirm message for deleting will appear.
-
Use ◀ / ▶ to select [OK] then press ENTER. The selected title(s) is deleted.
-
Repeat steps 1 - 3 to continue to erase from the menu.
Notes:
- If more than two titles are repeatedly deleted, the titles are combined into one.
- When you are deleting a title, only the last one on DVD+RW increases remaining recording time.
Protect a Title +RW
Use this function to protect against accidental recording, editing or deleting of the title.
-
Use ◀/▶/▲/▼ to choose a title you want to protect on the [Edit] menu then press ENTER. Repeat step 1 to select additional title. The menu options appears on the right side of the screen.
-
Select [Protect] from the options.
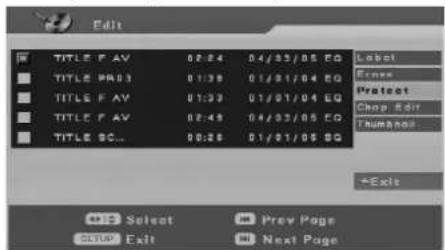
- Press ENTER.
The confirm message for protect will appear.
- Use ◀ / ▶ to select [OK] then press ENTER. The lock mark will appear to the left of the title name.
Tip
If you select a title that has already been protected on the [Edit] menu, you can 'unprotect' it by choosing [Unprotect] option from the [Edit] menu options. After doing that, you can edit and delete the title.
Changing Title Thumbnails
You can select a favorite scene for the thumbnail picture shown in the Title List menu.
-
Use ◀/▶/▲/▼ to choose a title on the [Edit] menu then press ENTER. The menu options appears on the right side of the screen.
-
Select [Thumbnail] from the options.

- Press ENTER. The menu appears as shown below.

-
Use play, pause step, search and slow-motion to find the scene you want.
-
Press THUMBNAIL to make the currently displayed picture the one that appears in the Title List menu. The still picture that you choose appears in Title List menu.
Editing a Title by Chapter
The [Chapter Edit] menu is where you can add/delete chapter mark and use other function for chapter.
- Use ◀/▶/▲/▼ to choose a title on the [Edit] menu then press ENTER. The menu options appears on the right side of the screen.

-
Select [Chap Edit] option then press ENTER from the options on the menu. The [Chap Edit] menu will appear.
-
Use ◀/▶/▲/▼ to choose a chapter on the [Chap Edit] menu then press ENTER. Repeat this step to select additional title. The menu options appears on the right side of the screen.

[Title] Returns to [Edit] menu.
[Play] Play backs the chapter.
[Add Mark] Adds chapter mark. (See page 41.) [Del Mark] Deletes chapter mark. (See page 42.) [Hide] Hides chapter mark. (See page 42.)
- Use ◀/▶/▲/▼ to choose an option then press ENTER from the options on the menu.
Adding Chapter Markers
You can create chapters within a title by inserting chapter marks at the desired points.
-
Use ◀/▶/▲/▼ to choose a chapter on the [Chap Edit] menu then press ENTER. The menu options appears on the right side of the screen.
-
Select [Add Mark] from the options.

- Press ENTER. The menu appears as shown below.
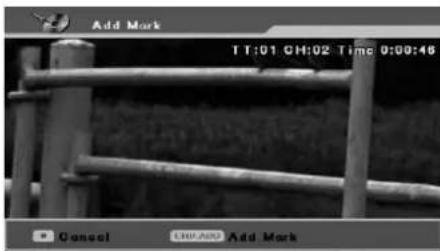
-
Use play, pause step, search and slow-motion to find the scene you want.
-
Press CHP. ADD to add chapter mark.
-
Repeat step 5 to continue to add chapter from the menu.
Note:
Chapter markers are inserted at regular intervals automatically. You can change this interval from the Initial Setup menu (see "Chapter Mark" on page 14).
Deleting Chapter Markers
You can delete chapter markers.
-
Use ◀/▶/▲/▼ to choose a chapter on the [Chap Edit] menu then press ENTER. Repeat this step to select additional chapter. The menu options appears on the right side of the screen.
-
Select [Del Mark] from the options.

- Press ENTER.
The confirm message for deleting will appear.
- Use ◀ / ▶ to select [OK] then press ENTER. The selected chapter mark(s) is deleted.
Hide a Chapter
You can skip playing chapters without deleting from the disc.
-
Use ◀/▶/▲/▼ to choose a chapter on the Chapter List menu then press ENTER. The menu options appears on the right side of the screen.
-
Select [Hide] from the options.
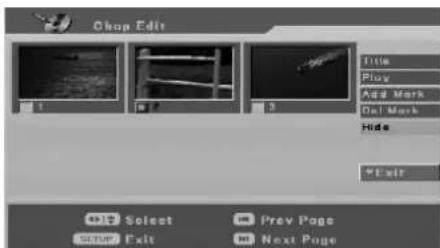
- Press ENTER.
The [Hide] appears on the right of the chapter number.
Note:
If you select a hidden chapter on the [Chap Edit] menu, you can 'unhide' it by choosing [Unhide] option on the menu. After doing that, you are able to play back the chapter.
Overwriting Recording +RW
To overwrite a new video recording on a previously recorded title, follow these steps. This feature is not available for DVD+Rs, that always record at the end of the Disc.
- Press MENU/LIST to display the Title List menu.
- Use ▲ / ▼ to choose a title you want to overwrite.
- Select input source you want to record (TV channel or AV input).
- Press REC (●) to start overwrite recording. Overwrite recording starts from the start point of the title.
- Press STOP (■) to stop the overwrite recording.
Notes:
- This function is not available when [Overwrite] option is set to [Off] in the [Initial Setup] menu (page14).
- If the protected title is selected, confirm message will appear. Select [Yes] then press ENTER to start overwrite recording.
Reference
Controlling Your TV with the Supplied Remote Control
You can control the sound level, input source, and power switch of your LG TV with the supplied remote.
You can control your TV using the buttons below.

By pressing You can
| POWER Turn the TV on or off. |
| AV Switch the TV's input source between the TV and other input sources. |
| PR +/- Scans up or down through memorized channels. |
| VOL +/- Adjust the volume of the TV. |
Controlling other TVs with the remote
You can control the sound level, input source, and power switch of non-LG TVs as well. If your TV is listed in the table below, set the appropriate manufacturer code.
-
While holding down TV POWER button, press the number buttons to select the manufacturer code for your TV (see the table below).
-
Release TV POWER button.
Code numbers of controllable TVs
If more than one code number is listed, try entering them one at a time until you find the one that works with your TV.
Manufacturer Code Number
| LG / GoldStar 1 (Default), 2 |
| Zenith 1, 3, 4 |
| Samsung 6, 7 |
| Sony 8, 9 |
| Hitachi 4 |
Notes:
- Depending on your TV, some or all buttons may not function on the TV, even after entering the correct manufacturer code.
- If you enter a new code number, the code number previously entered will be erased.
- When you replace the batteries of the remote, the code number you have set may be reset to the default setting. Set the appropriate code number again.
Language Codes
Use this list to input your desired language for the following initial settings:
Disc Audio, Disc Subtitle, Disc Menu.
| Language | Code | Language | Code | Language | Code | Language | Code |
| Abkhazian | 6566 | Fiji | 7074 | Lingala | 7678 | Singhalese | 8373 |
| Afar 6565 | Finnish | 7073 | Lithuanian | 7684 | Slovak 8375 | ||
| Afrikaans | 6570 | French | 7082 | Macedonian | 7775 | Slovenian | 8376 |
| Albanian | 8381 | Frisian 7089 | Malagasy | 7771 | Somali | 8379 | |
| Ameharic | 6577 | Galician | 7176 | Malay | 7783 | Spanish | 6983 |
| Arabic | 6582 | Georgian | 7565 | Malayalam | 7776 | Sudanese | 8385 |
| Armenian | 7289 | German | 6869 | Maltese | 7784 | Swahili | 8387 |
| Assamese | 6583 | Greek | 6976 | Maori | 7773 | Swedish | 8386 |
| Aymara | 6588 | Greenlandic | 7576 | Marathi | 7782 | Tagalog | 8476 |
| Azerbaijani | 6590 | Guarani | 7178 | Moldavian | 7779 | Tajik 8471 | |
| Bashkir | 6665 | Gujarati | 7185 | Mongolian | 7778 | Tamil 8465 | |
| Basque | 6985 | Hausa | 7265 | Nauru | 7865 | Tatar 8484 | |
| Bengali; Bangla | 6678 | Hebrew | 7387 | Nepali | 7869 | Telugu | 8469 |
| Bhutani | 6890 | Hindi | 7273 | Norwegian | 7879 | Thai | 8472 |
| Bihari | 6672 | Hungarian | 7285 | Oriya | 7982 | Tibetan 6679 | |
| Breton | 6682 | Icelandic 7383 | Panjabi | 8065 | Tigrinya | 8473 | |
| Bulgarian | 6671 | Indonesian | 7378 | Pashto, Pushto | 8083 | Tonga | 8479 |
| Burmese | 7789 | Interlingua | 7365 | Persian | 7065 | Turkish | 8482 |
| Byelorussian | 6669 | Irish | 7165 | Polish | 8076 | Turkmen | 8475 |
| Cambodian | 7577 | Italian | 7384 | Portuguese | 8084 | Twi | 8487 |
| Catalan | 6765 | Japanese | 7465 | Quechua | 8185 | Ukrainian | 8575 |
| Chinese 9072 | Javanese | 7487 | Rhaeto-Romance | 8277 | Urdu | 8582 | |
| Corsican 6779 | Kannada | 7578 | Rumanian | 8279 | Uzbek | 8590 | |
| Croatian | 7282 | Kashmiri | 7583 | Russian | 8285 | Vietnamese | 8673 |
| Czech | 6783 | Kazakh | 7575 | Samoan | 8377 | Volapük | 8679 |
| Danish | 6865 | Kirghiz | 7589 | Sanskrit | 8365 | Welsh | 6789 |
| Dutch 7876 | Korean | 7579 | Scots Gaelic | 7168 | Wolof | 8779 | |
| English 6978 | Kurdish | 7585 | Serbian | 8382 | Xhosa | 8872 | |
| Esperanto | 6979 | Laothian | 7679 | Serbo-Croatian | 8372 | Yiddish | 7473 |
| Estonian | 6984 | Latin | 7665 | Shona | 8378 | Yoruba | 8979 |
| Faroese 7079 | Latvian, Lettish | 7686 | Sindhi | 8368 | Zulu | 9085 |
Area Codes
Choose a area code from this list.
| Area Code | Area Code | Area Code | Area Code | ||||
| Afghanistan AF | Ethiopia ET | Malaysia | MY | Saudi Arabia | SA | ||
| Argentina AR | Fiji | FJ | Maldives | MV | Senegal | SN | |
| Australia AU | Finland FI | Mexico MX | Singapore SG | ||||
| Austria AT | France FR | Monaco | MC | Slovak Republic | SK | ||
| Belgium BE | Germany | DE | Mongolia | MN | Slovenia | SI | |
| Bhutan BT | Great Britain | GB | Morocco MA | South Africa | ZA | ||
| Bolivia BO | Greece | GR | Nepal NP | South Korea | KR | ||
| Brazil BR | Greenland | GL | Netherlands | NL | Spain ES | ||
| Cambodia KH | Islands HM | Netherlands Antilles | AN | Sri Lanka | LK | ||
| Canada CA | Hungary | HU | New Zealand | NZ | Sweden SE | ||
| Chile CL | India | IN | Nigeria NG | Switzerland CH | |||
| China CN | Indonesia | ID | Norway | NO | Thailand | TH | |
| Colombia CO | Israel | IL | Oman | OM | Turkey TR | ||
| Congo CG | Italy | IT | Pakistan | PK | Uganda UG | ||
| Costa Rica CR | Jamaica | JM | Panama | PA | Ukraine | UA | |
| Croatia HR | Japan JP | Paraguay PY | United States | US | |||
| Czech Republic | CZ | Kenya KE | Philippines | PH | Uruguay | UY | |
| Denmark | DK | Kuwait KW | Poland PL | Uzbekistan UZ | |||
| Ecuador | EC | Libya | LY | Portugal | PT | Vietnam | VN |
| Egypt | EG | Luxembourg | LU | Romania | RO | Zimbabwe | ZW |
| El Salvador | SV | Russian Federation | RU | ||||
Troubleshooting
Check the following guide for the possible cause of a problem before contacting service.
| Symptom | Cause | Solution |
| No power. | The power cord is disconnected. | Plug the power cord into the wall outlet securely. |
| No picture. | The TV is not set to receive recorder signal output. | Select the appropriate video input mode on the TV so the picture from the recorder appears on the TV screen. |
| The video cable is not connected securely. | Connect the video cable securely. | |
| The connected TV power is turned off. | Turn on the TV. | |
| No sound. | The equipment connected with the audio cable is not set to receive recorder signal output. | Select the correct input mode on the audio receiver so you can listen to the sound from the recorder. |
| The audio cables are not connected securely. | Connect the audio cable securely. | |
| The power of the equipment connected with the audio cable is turned off. | Turn on the equipment connected with the audio cable. | |
| The audio connecting cord is damaged. | Replace it with new one. | |
| The playback picture is poor. | The disc is dirty. | Clean the disc. |
| The recorder does not start playback. | No disc is inserted. | Insert a disc. (Check that the disc indicator in the display window is lit.) |
| An unplayable disc is inserted. | Insert a playable disc. (Check the disc type, color system, and regional code.) | |
| The disc is placed upside down. | Place the disc with the playback side down. | |
| The disc is not placed within the guide. | Place the disc on the disc tray correctly inside the guide. | |
| The disc is dirty. | Clean the disc. | |
| The Rating level is set. | Cancel the Rating function or change the rating level. | |
| The picture from the external input is distorted | The video signal from the external component is copy-protected. | You cannot connect via this recorder. Connect the component directly to your TV. |
| Some channels are skipped over when using ▲ / ▼. | Those channels are not stored in the recorder. | Restore channels. See “Program Edit” on page 13. |
| The picture or sound of broadcasting channel is weak or missing. | Aerial or cables are loose. | Tighten connections or replace cable. |
| The picture from the external input is not shown. | The recorder's source is incorrect. | Use AV to select input channel (SCART 1, SCART 2, Front AV) |
| Cannot play a disc recorded using this recorder on another player. | The disc was recorded in Video mode. | Finalize the disc. (page 21) |
| Some players will not play even a finalized disc recorded in Video mode. | No solution. | |
| Discs recorded with copy-once material cannot be played on other players. | No solution. | |
| Cannot record or did not record successfully. | The remaining blank space on the disc is insufficient. | Use another disc. |
| The source you are trying to record is copy protected. | You cannot record the source. | |
| When setting the recording channel, the channel is tuned on the TV's own tuner. | Select the channel on the recorder's built-in TV tuner. | |
| Timer recording is not possible. | Clock in recorder is not set to correct time. | Set clock to correct time. See “Clock Setting” on page 15. |
| Timer has been programmed incorrectly. | Reprogram Timer. See “Timer Recording” on page 33. | |
| Stereo Audio Record and/or Playback is not present. | TV is not Stereo-compatible. | No solution. |
| Broadcast program is not in stereo format. | No solution. | |
| The recorder A/V Out jacks are not connected to TV A/V In jacks. | Make A/V connections. Stereo is available only via A/V output from the recorder. | |
| The recorder Audio/Video Out is not selected for viewing at the TV. | Select AUX or A/V source as TV input. | |
| The recorder's TV audio channel is set to mono. | Set TV audio channel mode to Stereo. See “Changing TV audio channel” on page 32. | |
| The remote control does not work properly. | The remote control is not pointed at the remote sensor of the recorder. | Point the remote control at the remote sensor of the recorder. |
| The remote control is too far from the recorder. | Operate the remote control within 7 m. | |
| There is an obstacle in the path of the remote control and the recorder. | Remove the obstacle. | |
| The batteries in the remote control are exhausted. | Replace the batteries with new ones. |
Specifications
General
Power requirements AC 110-240V, 50/60 Hz
Power consumption 19W
Dimensions (approx.) 430 X 49 X 300 mm (w x h x d) without foot
Mass (approx.) 2.7 kg
Operating temperature 5°C to 35°C
Operating humidity 5 % to 90 %
Television system PAL I, B/G, I/I, SECAM D/K, K1 colour system
Recording format PAL or NTSC
Recording
Recording format DVD-VIDEO
Recordable media DVD+ReWritable, DVD+Recordable
Recordable time DVD (4.7GB): Approx. 1 hour (HQ mode), 2 hours (SQ mode),
4 hours (LQ mode), 6 hours (EQ mode)
Video recording format
Sampling frequency 27MHz
Compression format MPEG 2 (VBR support)
Audio recording format
Sampling frequency 48kHz
Compression format Dolby Digital
Playback
Frequency response DVD (PCM 48 kHz): 8 Hz to 20 kHz, CD: 8 Hz to 20 kHz
DVD (PCM 96 kHz): 8 Hz to 44 kHz
Signal-to-noise ratio More than 100 dB (AUDIO OUT connector)
Harmonic distortion Less than 0.008% (AUDIO OUT connector)
Dynamic range More than 95 dB (AUDIO OUT connector)
Inputs
AERIAL IN Aerial input, 75 ohms
VIDEO IN 1.0 Vp-p 75 ohms, sync negative, RCA jack / SCART x 2
AUDIO IN 0 dBm more than 47 kohms, RCA jack (L, R) / SCART x 2
Outputs
VIDEO OUT SCART x 2 (Composite video only)
Audio output (digital audio) 0.5 V (p-p), 75 Ω, RCA jack x 1
Audio output (analog audio) SCART x 2
Accessory:
Remote control .....1 RF Coaxial Cable .....1
Batteries 2
- Design and specifications are subject to change without notice.
Manufactured under license from Dolby Laboratories. "Dolby", "Pro Logic", and the double-D symbol are trademarks of Dolby Laboratories.
"DTS" and "DTS Digital Out" are trademarks of Digital Theater Systems, Inc.
P/NO : 3834RD0052H


- CAUTION
- CAUTION CONCERNING THE POWER CORD
- SERIAL NUMBER
- CONTENTS
- INTRODUCTION 4-8
- HOOKUP AND SETTINGS 9-23
- PLAYBACK ....24-30
- RECORDING .31-34
- EDITING 35-42
- REFERENCE 43-47
- INTRODUCTION
- SYMBOL USED IN THIS MANUAL
- NOTE
- TIP
- ABOUT THE SYMBOL DISPLAY
- NOTES ON DISCS
- HANDLING DISCS
- STORING DISCS
- CLEANING DISCS
- MOISTURE CONDENSATION
- RECORDABLE AND PLAYABLE DISCS
- DVD+RW (DIGITAL VIDEO DISC + REWRITABLE)
- DVD+R (DIGITAL VIDEO DISC + RECORDABLE)
- THE RECOMMENDABLE RECORDABLE DVD DISCS
- PLAYABLE DISCS
- DVD (8 CM / 12 CM DISC)
- VIDEO CD (VCD) (8 CM / 12 CM DISC)
- AUDIO CD (8 CM / 12 CM DISC)
- CD-R/CD-RW (8 CM / 12 CM DISC)
- NOTES
- DISC-RELATED TERMS
- DVD +R / DVD +RW
- VCD (VIDEO CD)
- MPEG
- MP3
- JPEG
- PBC: PLAYBACK CONTROL (VIDEO CD ONLY)
- TITLE (DVD VIDEO DISCS ONLY)
- CHAPTER (DVD VIDEO DISCS ONLY)
- SCENE (VCD)
- TRACK
- REGIONAL CODE OF THE RECORDER AND DVDS
- NOTES ON DVDS AND VIDEO CDS
- FRONT AND REAR PANEL
- REMOTE CONTROL
- ENTER
- RETURN (○)
- TV CONTROL BUTTONS
- REMOTE CONTROL OPERATION
- REMOTE CONTROL BATTERY INSTALLATION
- HOOKUP AND SETTINGS
- CONNECTIONS TO YOUR TV AND AERIAL
- CONNECTING TO AN AMPLIFIER
- DIGITAL MULTI-CHANNEL SOUND
- ACCESSORY AUDIO/VIDEO (A/V) CONNECTIONS
- CONNECTING TO THE EURO AV2 JACK
- CONNECTING TO THE FRONT PANEL'S INPUT JACKS
- AUTO SET UP
- ABOUT DVD RECORDER INITIAL SETUP MENU
- USING THE INITIAL SETUP MENU
- TV SETUP
- AUTO SCAN
- PREPARATION
- PROGRAM EDIT
- MANUAL SETTING
- AUTO INSTALL
- RECORDING SETUP
- RECORD MODE SET
- OVERWRITE
- CHAPTER MARK
- GENERAL SETUP
- TV DISPLAY
- ANGLE MARK
- OSD (ON-SCREEN DISPLAY) LANGUAGE
- LAST MEMORY
- CLOCK SETTING
- VIDEO SETUP
- QUALITY
- AUDIO SETUP
- POST DRC (DYNAMIC RANGE CONTROL)
- SPDIF SETUP
- SPDIF (DIGITAL AUDIO) OUTPUT
- LPCM OUT
- DOLBY DIGITAL
- DUAL MONO
- DYNAMIC
- 3D SURROUND
- PREFERENCE
- TV TYPE
- AUDIO/SUBTITLE/DISC MENU LANGUAGE
- PARENT CONTROL
- PARENTAL
- AREA CODE
- PASSWORD MODE
- PASSWORD
- IF YOU FORGET YOUR PASSWORD
- DEFAULT
- USING THE DISC OPERATION MENU
- DISC ERASE
- FINALIZE
- DISC PROTECT
- MAKE EDITS COMPATIBLE
- ADAPT
- DISC INFORMATION
- GENERAL EXPLANATION OF ON-SCREEN DISPLAY
- DISPLAYING INFORMATION WHILE WATCHING TV
- USING THE ON-SCREEN DISPLAY
- DVD
- ACD
- PLAYBACK
- PLAYING A DVD, VIDEO CD, OR AUDIO CD
- PLAYBACK SETUP
- IF A MENU SCREEN IS DISPLAYED
- VCD
- ON AND OFF THE PBC FUNCTION VCD
- MOVING TO ANOTHER TITLE
- MOVING TO ANOTHER CHAPTER/TRACK
- SEARCH
- STILL PICTURE AND FRAME-BY-FRAME
- PLAYBACK VCDI
- PAUSE ACD
- SLOW MOTION VCDI
- REPEAT
- REPEAT A-B
- TIME SEARCH
- ZOOM VCDI
- RANDOM ACD
- MARKER SEARCH VCDI
- TO ENTER A MARKER
- TO RECALL OR CLEAR A MARKED SCENE
- CHECKING THE CONTENTS OF DVD VIDEO DISCS: MENUS
- TITLE MENU DVD
- DISC MENU DVD
- CAMERA ANGLE DVD
- CHANGING THE AUDIO SOUNDTRACK
- CHANGING THE AUDIO CHANNEL ACDV
- SUBTITLES DVD
- INSTANT SKIP DVD
- LAST CONDITION MEMORY DVD
- SOUND EFFECT □ □ □ VCDI
- USING THE PROGRAM PLAY FEATURE ACD
- PLAYING AN MP3 FILE
- TIPS
- ABOUT MP3 AUDIO FILES
- MP3 FILE COMPATIBILITY WITH THIS RECORDER IS LIMITED AS FOLLOWS
- VIEWING A JPEG FILE
- TO PAUSE THE SLIDE SHOW
- SKIP IMAGES
- ROTATE IMAGES
- TO FLIP THE PICTURE
- STILL PICTURE
- ZOOM
- USING THE THUMBNAIL MENU FOR JPEG FILE
- USING PLAYLIST WITH MP3 OR JPEG FILES
- ERASING A FILE FROM THE [PLAYLIST] MENU
- ERASING ALL FILE FROM THE [PLAYLIST] MENU
- ABOUT JPEG IMAGE FILES
- JPEG DISC COMPATIBILITY WITH THIS RECORDER IS LIMITED AS FOLLOWS
- RECORDING
- ABOUT DVD RECORDING
- DISC TYPES AND RECORDING FORMATS, MODES, AND SETTINGS
- RECORDING TIME AND PICTURE QUALITY
- COPYRIGHT
- NOTES FOR RECORDING
- BASIC RECORDING FROM A TV
- CHANGING TV AUDIO CHANNEL
- TO PAUSE THE RECORDING
- OTR (ONE TIME RECORDING)
- CHECKING THE RECORDING TIME
- TO EXTEND THE RECORDING TIME
- TIMER RECORDING
- PRESS TIMER REC
- SELECT [NEW INPUT] THEN PRESS ENTER
- ENTER THE NECESSARY INFORMATION FOR YOUR TIMER RECORDING(S)
- CHECKING TIMER RECORDING DETAILS
- CANCELING A TIMER RECORDING
- STOPPING A TIMER RECORDING IN PROGRESS
- TIMER RECORDING TROUBLESHOOTING
- RECORDING FROM AN EXTERNAL INPUT
- RECORDING FROM EXTERNAL COMPONENTS
- EDITING
- TITLE LIST AND CHAPTER LIST MENU OVERVIEW
- DELETING A TITLE
- NAMING A TITLE
- CHANGING TITLE THUMBNAILS
- DIVIDE ONE TITLES INTO TWO +RW
- ADDING CHAPTER MARKERS
- DELETING CHAPTER MARKERS
- HIDE A CHAPTER +R
- USING THE DISC EDIT MENU
- TIP: REMOTE CONTROL BUTTONS FOR ENTERING A NAME
- ERASING A TITLE
- PROTECT A TITLE +RW
- EDITING A TITLE BY CHAPTER
- HIDE A CHAPTER
- OVERWRITING RECORDING +RW
- REFERENCE
- CONTROLLING YOUR TV WITH THE SUPPLIED REMOTE CONTROL
- CONTROLLING OTHER TVS WITH THE REMOTE
- CODE NUMBERS OF CONTROLLABLE TVS
- LANGUAGE CODES
- AREA CODES
- TROUBLESHOOTING
- SPECIFICATIONS
- GENERAL
- VIDEO RECORDING FORMAT
- AUDIO RECORDING FORMAT
- INPUTS
- OUTPUTS
- ACCESSORY
Brand : LG
Model : DR7400CP1M
Category : DVD Burner