UC8000 - Blender ATEN - Free user manual and instructions
Find the device manual for free UC8000 ATEN in PDF.

User questions about UC8000 ATEN
0 question about this device. Answer the ones you know or ask your own.
Ask a new question about this device
Download the instructions for your Blender in PDF format for free! Find your manual UC8000 - ATEN and take your electronic device back in hand. On this page are published all the documents necessary for the use of your device. UC8000 by ATEN.
USER MANUAL UC8000 ATEN
MicLIVE™ 6-CH AI Audio Mixer User Manual
Compliance Statements
FEDERAL COMMUNICATIONS COMMISSION INTERFERENCE STATEMENT
This equipment has been tested and found to comply with the limits for a Class B digital service, pursuant to Part 15 of the FCC rules. These limits are designed to provide reasonable protection against harmful interference in a residential installation. Any changes or modifications made to this equipment may void the user's authority to operate this equipment. This equipment generates, uses, and can radiate radio frequency energy. If not installed and used in accordance with the instructions, may cause harmful interference to radio communications. However, there is no guarantee that interference will not occur in a particular installation. If this equipment does cause harmful interference to radio or television reception, which can be determined by turning the equipment off and on, the user is encouraged to try to correct the interference by one or more of the following measures:
◆ Reorient or relocate the receiving antenna.
- Increase the separation between the equipment and receiver.
- Connect the equipment into an outlet on a circuit different from that to which the receiver is connected.
- Consult the dealer or an experienced radio/TV technician for help.
The device complies with Part 15 of the FCC Rules. Operation is subject to the following two conditions: (1) this device may not cause harmful interference, and (2) this device must accept any interference received, including interference that may cause undesired operation.
FCC Caution: Any changes or modifications not expressly approved by the party responsible for compliance could void the user's authority to operate this equipment.

text_image
CE FC 20 E3914 UK CAKCC Statement
Industry Canada Statement
This Class B digital apparatus complies with Canadian ICES-003.
CAN ICES-003 (B) / NMB-003 (B)
RoHS
This product is RoHS compliant.

D33866 RoHS
| Product Name: 6-CH Al Audio Mixer, Model: UC8000 | ||||||
| Unit | Restricted Substances and Their Chemical Symbols | |||||
| Lead(Pb) | Mercury(Hg) | Cadmium(Cd) | Hexavalent chromium( Cr^+6 ) | Polybrominated biphenyls(PBB) | Polybrominated diphenyl ethers(PBDE) | |
| Cable — O | O O O | O | ||||
| PCBA — O | O O O | O | ||||
| Plastic / Other Parts | O | O | O | O | O | |
| Metal Parts — | O O O | O O | ||||
Note:
- "Exceeding 0.1 wt %" and "exceeding 0.01 wt %" indicate that the percentage content of the restricted substance exceeds the reference percentage value of presence condition.
- "O" Indicates that the percentage content of the restricted substance does not exceed the percentage of reference value of presence.
- “—” indicates that the restricted substance corresponds to the exemption.
User Information
Online Registration
Be sure to register your product at our online support center:
International http://eservice.aten.com
Telephone Support
For telephone support, call this number:
| International 886-2-86 | 92-6959 |
| China 86-400-810-0-8 | 10 |
| Japan 81-3-5615-581 | 1 |
| Korea 82-2-467-6789 | |
| North America 1-888- | 999-ATEN ext 4988 |
| 1-949-428-1111 |
User Notice
All information, documentation, and specifications contained in this manual are subject to change without prior notification by the manufacturer. The manufacturer makes no representations or warranties, either expressed or implied, with respect to the contents hereof and specifically disclaims any warranties as to merchantability or fitness for any particular purpose. Any of the manufacturer's software described in this manual is sold or licensed as is. Should the programs prove defective following their purchase, the buyer (and not the manufacturer, its distributor, or its dealer), assumes the entire cost of all necessary servicing, repair and any incidental or consequential damages resulting from any defect in the software.
The manufacturer of this system is not responsible for any radio and/or TV interference caused by unauthorized modifications to this device. It is the responsibility of the user to correct such interference.
The manufacturer is not responsible for any damage incurred in the operation of this system if the correct operational voltage setting was not selected prior to operation. PLEASE VERIFY THAT THE VOLTAGE SETTING IS CORRECT BEFORE USE.
Product Information
For information about all ATEN products and how they can help you connect without limits, visit ATEN on the Web or contact an ATEN Authorized Reseller. Visit ATEN on the Web for a list of locations and telephone numbers:
| International http://www.aten.com |
| North America http://www.aten-usa.com |
Package Contents
Check to make sure that all the components are in working order. If you encounter any problem, please contact your dealer.
1 MicLIVE™ 6-CH MicLIVE™ 6-CH AI Audio Mixer
1 USB Type-C cable
1 user instructions
Contents
Compliance Statements ...... ii
User Information iv
Online Registration iv
Telephone Support iv
User Notice iv
Product Information v
Package Contents vi
Contents vii
About this Manual ix
Conventions ......x
1. Introduction
Overview 1
MicLIVE™ 6-CH 1
OnAir™ Audio 1
No Prior Knowledge Needed....1
Features 2
MicLIVE™ 6-CH Components 3
Top 3
Rear / Side 4
OnAir™ Audio GUI (Graphical User Interface) 5
2. Getting Started
Audio Mixing Flowchart....7
-
Items to Prepare ....8
-
Connecting Your Audio Devices 9
-
Installing OnAir™ Audio on Your Host Computer 11
-
Tuning Your Audio Devices 12
Tuning Each Audio Track Independently 12
Tuning Your Audio Mix 13
3. AI Smart EQ
Try It! (Using AI Smart EQ) 16
4. Auto Ducking
Try It! (Applying Auto Ducking)....17
Adjusting Auto Ducking....18
Auto Ducking for Input 3 Only (Input 4 Disabled) .....18
Auto Ducking for Input 4 Only (Input 3 Disabled) .....18
5. Jingles (Audio Effects)
Try It! (Using Jingles) 19
How to Customize Your Jingles .....20
Recording a Jingle 20
Downloading a Recorded Jingle 21
Replacing a Jingle with an Audio File 22
Adjusting a Jingle 23
6. Voice FX
Try It! (Applying Voice FX) 26
Applying Voice FX via MicLIVE™ 6-CH ..... 26
Applying Voice FX via OnAir™ Audio 28
How to Define a Customized Voice FX. 29
Using Custom Voice FX 31
7. Advanced Audio Settings
Configuring Audio Inputs 33
8. Other Settings (including Updates)
Settings Page 35
Updating Firmware / Application....36
Resetting to Factory Default 36
Appendix
Safety Instructions 37
General 37
Technical Support 39
International 39
North America 39
Specifications 40
Limited Warranty 41
About this Manual
This manual is provided to help you get the most out of your MicLIVE ^TM 6-CH. It covers all aspects of the device, including installation, configuration, and operation.
Items covered in this manual include:
| Model Product Name | |
| UC8000 MicLIVE ^TM 6-CH AI Audio Mixer (hardware) | |
| OnAir ^TM Audio OnAir ^TM Audio Mixer (software) |
An overview of the information covered is provided below.
Chapter 1, Introduction introduces you to MicLIVE™ 6-CH AI Audio Mixer and its coupled application OnAir™ Audio, with their purpose, features, and components described.
Chapter 2, Getting Started provides an audio mixing flowchart that covers all of the steps that are involved in producing your audio mix.
Chapter 3, AI Smart EQ explains the AI Smart EQ functions and how to use it.
Chapter 4, Auto Ducking explains the ducking functions and how to use it.
Chapter 5, Jingles (Audio Effects) describes the 8 jingles (effects) pads provided by MicLIVE™ 6-CH.
Chapter 6, Voice FX describes the Voice FX (voice changer) modes provided by the MicLIVE™ 6-CH, and how to define a customized Voice FX.
Chapter 7, Advanced Audio Settings describes the various advanced audio settings that can be adjusted via OnAir™ Audio.
Chapter 8, Other Settings (including Updates) describes other settings provided by OnAir™ Audio, including how to update the firmware and application, as we ll as how to reset the mixer back to factory default settings.
Appendix provides a list of safety instructions and precautions, product specifications, and other technical information.
Note:
- Read this manual thoroughly and follow the installation and operation procedures carefully to prevent any damage to the unit or connected devices.
- The product may be updated, with features and functions added, improved, or removed since the release of this manual. For an up-to-date user manual, visit http://www.aten.com/global/en/
Conventions
This manual uses the following conventions:
MonospacedIndicates text that you should key in.
[] Indicates keys you should press. For example, [Enter] means to press the Enter key. If keys need to be chorded, they appear together in the same bracket with a plus sign between them: [Ctrl+Alt].
- Numbered lists represent procedures with sequential steps.
◆ Bullet lists provide information, but do not involve sequential steps.
Indicates selecting consecutive options (such as on a menu or dialog box). For example, Start > Run means to open the Start menu, and then select Run.
Indicates critical information.

Overview
MicLIVE™ 6-CH
The MicLIVE™ 6-CH is the industry's first AI-optimized audio mixer for podcasting as it adopts SmartEQ technology to deliver acoustic enhancement for an optimized voice recording experience. Integrating audio mixing equipment into a compact stage box housing, this audio mixer offers up to 6-channel audio inputs, a built-in DSP and AD / DA converter, and it adds audio up to 24-bit / 96 kHz to any USB-C-enabled laptop or tablet.
To polish user's audio creation, the MicLIVE™ 6-CH features the capability of varying a user's voice effect with 24 Voice FX programs, SmartEQ, the jingle pads that can save up to 8 special audio samples, and the auto ducking function. In addition, it ships with a built-in preamp that provides gain for the microphone's signal, and a phantom power (+48V) power supply, which is suitable for connecting condenser microphones.
Usually, broadcasting a live performance requires a team of professionals to assist with BGM or volume control, but thanks to the MicLIVE ^TM 6-CH, now just one user can create a pro-level broadcast. The MicLIVE ^TM 6-CH is an all-in-one solution tailor-made for podcasts, talk shows, livestreaming, worship, and music applications.
OnAir™ Audio
Apart from its easy-to-use, flexible hardware design, the MicLIVE ^™ 6-CH works with dedicated ATEN software, OnAir ^™ Audio, which supports Windows and Mac OS, giving users complete control over every parameter while allowing them to simply assign audio samples from their computers through an intuitive interface.
No Prior Knowledge Needed
Together, MicLIVE™ 6-CH with OnAir™ Audio, boasts as the best way to start your first podcast instantly and effortlessly, novice or expert! To get started, simply connect your microphone and host computer, installed with OnAir™ Audio, and you are ready to go.
Features
- All-in-one design simplifies audio mixing work flow for podcasting — offers up to 6-channel audio inputs, DSP and AD / DA converter, and adds audio up to 24-bit / 96 kHz to any USB-C-enabled laptop or tablet
- The industry’s first AI-optimized audio mixer — enhances microphone audio quality with enhanced acoustic models, SmartEQ, so anyone can have a real-time, high-quality recording
- Jingle pads save up to 8 sound samples that can be customized from audio sources from a computer, microphone, and other audio inputs for a professional radio programming experience
- Contains 24 Voice FX programs, including 6 adjustments in reverb effect, 6 in pitch effect, and 12 in gender effect
- The auto ducking function lowers background music anytime one speaks, ensuring the speaker’s voice is always heard, loud, and clear, during broadcasting
- Diversified input interface options — supports audio media from professional XLR combo microphones, musical instruments, USB audio sources, and phone-in for mixing
Built-in preamp that provides gain for instruments and the microphone's signal, and a phantom power supply that delivers reliable +48V phantom power for condenser microphones - Supporting Windows and Mac OS, the OnAir™ Audio software gives users complete control over every parameter while allowing them to simply assign audio samples from their computers through an intuitive interface
MicLIVE™ 6-CH Components
Top
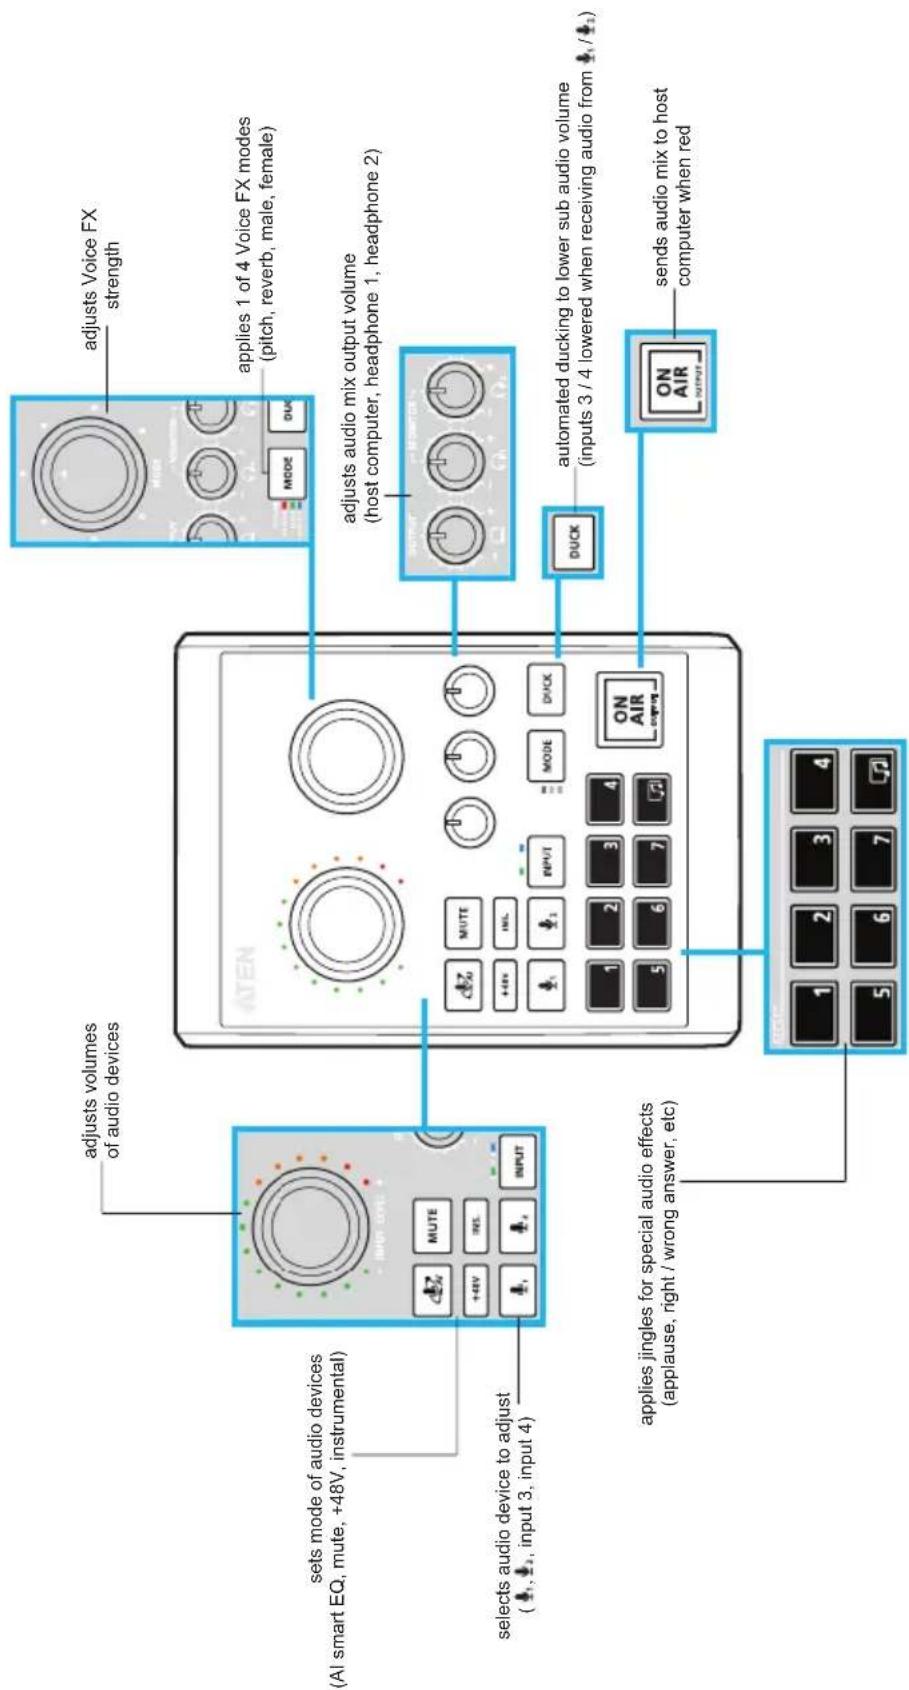
text_image
adjusts volumes of audio devices sets mode of audio devices (Al smart EQ, mute, +48V, instrumental) selects audio device to adjust (↓↓↓, input 3, input 4) ON AIR ON AIR OUTPUT 1 2 3 4 5 6 7 ON AIR 1 adjusts voice FX strength applies 1 of 4 Voice FX modes (pitch, reverb, male, female) adjusts audio mix output volume (host computer, headphone 1, headphone 2) DUCK automated ducking to lower sub audio volume (inputs 3 / 4 lowered when receiving audio from ↓↓↓↓) sends audio mix to host computer when redRear / Side
Output / Input 4: connects to host computer via USB-C (for bus power, audio mix output, and input 4)
Input 3: connects to sub audio (BGM) via 3.5 mm TRRS
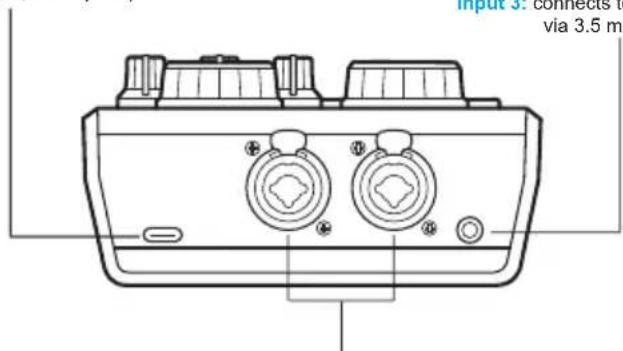
text_image
Input 3: connects to via 3.5 m- / 1.: connects up to 2 main audio (mic / musical instrument) via XLR combo

text_image
: connects up to 2 headphones via 3.5 mm TRS (for monitoring audio mix)OnAir™ Audio GUI (Graphical User Interface)
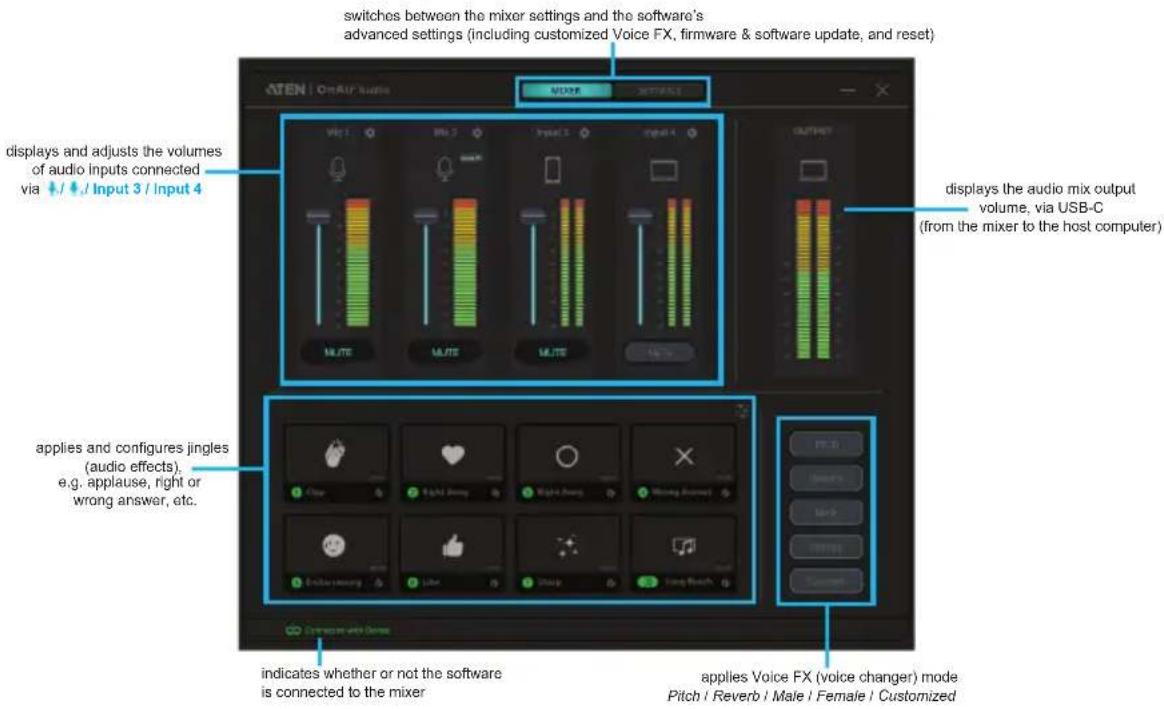
Below provides a quick look at the OnAir™ Audio software that shall be installed on the host computer that connects to your MicLIVE™ 6-CH.
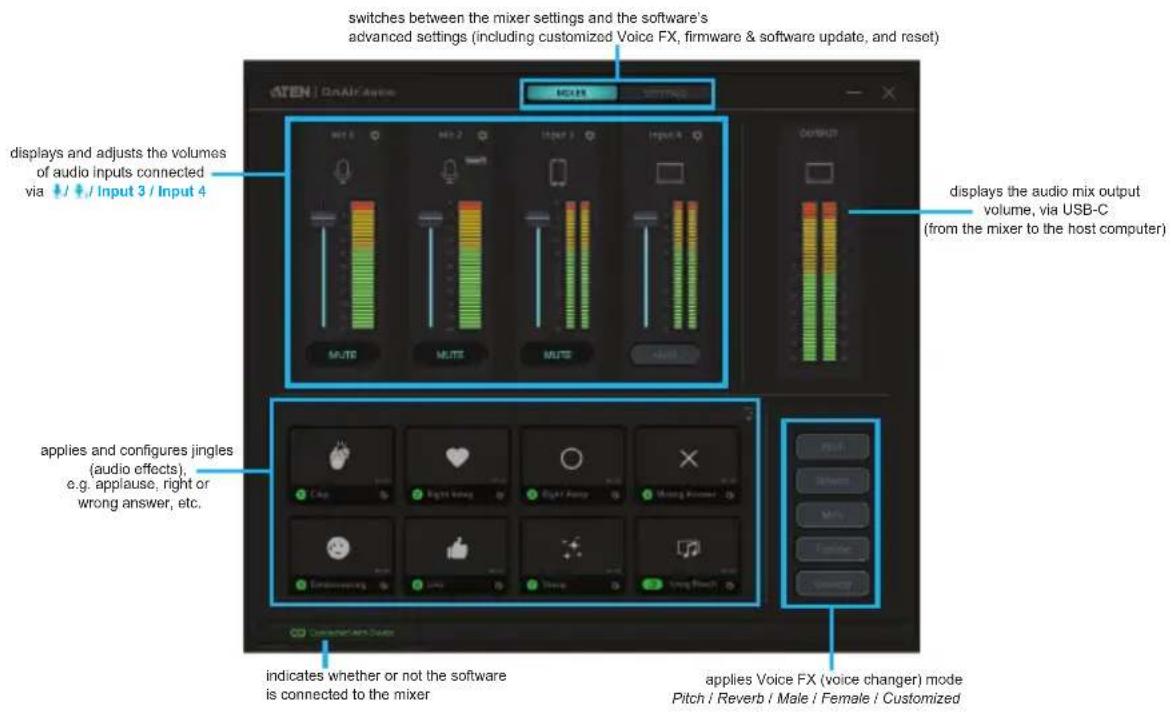
text_image
ATEN DAIA Audio switches between the mixer settings and the software's advanced settings (including customized Voice FX, firmware & software update, and reset) DISPLAY displays and adjusts the volumes of audio inputs connected via / Input 3 / Input 4 DISPLAY displays the audio mix output volume, via USB-C (from the mixer to the host computer) applies and configures jingles (audio effects), e.g. applause, right or wrong answer, etc. indicates whether or not the software is connected to the mixer applies Voice FX (voice changer) mode Pitch / Reverb / Male / Female / CustomizedNote: For details on connecting MicLIVE™ 6-CH and installing OnAir™ Audio, respectively see 2. Connecting Your Audio Devices, page 9, and 3. Installing OnAir™ Audio on Your Host Computer, page 11.
This Page Intentionally Left Blank

Please review the safety information regarding the placement of the mixer before starting (see Safety Instructions, page 37).
Audio Mixing Flowchart
Refer to the flowchart below that will guide you through how to use the MicLIVE ^™ 6-CH AI Audio Mixer from start to finish.
■ Preparation
- What to prepare?
see 1. Items to Prepare, page 8 - How to connect?
see 2. Connecting Your Audio Devices, page 9 - How to install OnAir™ Audio on your host computer?
see 3. Installing OnAir™ Audio on Your Host Computer, page 11
■ Testing Audio
- How to tune each audio track (input) and the audio mix as a whole?
see 4. Tuning Your Audio Devices, page 12
■ Audio Mixing
- What is AI Smart EQ and how to use it?
see AI Smart EQ, page 15
- What is Auto Ducking and how to use it?
see Auto Ducking, page 17
■ Advanced Functions
- What are jingles (audio effects) and how to use them?
see Jingles (Audio Effects), page 19
- What is Voice FX and how to use it? see Voice FX, page 25
1. Items to Prepare
Below is a list of items you should prepare before using your MicLIVE™ 6-CH AI Audio Mixer.
◆ 1 host computer (for power and OnAir™ Audio) with the following specs:
| OnAirTM Audio system requirements | |
| OS Windows 10 (64-bit) | |
| Processor Intel multi-core i3/5/7 series 2 GHz (or AMD equivalent) or above | |
| Memory Minimum: | 2 GB RAMRecommended: 8 GB RAM |
| Storage 100 MB available hard disk space | |
| USB USB-C compatible | |
◆ 1 \~ 2 main audio devices as exemplified below.
| Examples of main audio devices | |
| microphone | ◆ dynamic or condenser (up to +48V)◆ XLR or 6.35 mm TRS compatible |
| musical instrument XLR or | 6.35 mm TRS compatible |
◆ 1 \~ 2 headphones (3.5 mm TRS compatible)
◆ 1 sub audio device (3.5 mm TRRS compatible; for background music)
2. Connecting Your Audio Devices
To connect your audio devices, do the following.
- Connect your host computer, installed with OnAir™ Audio (see 3. Installing OnAir™ Audio on Your Host Computer, page 11, for details), to the mixer with the USB-C cable provided
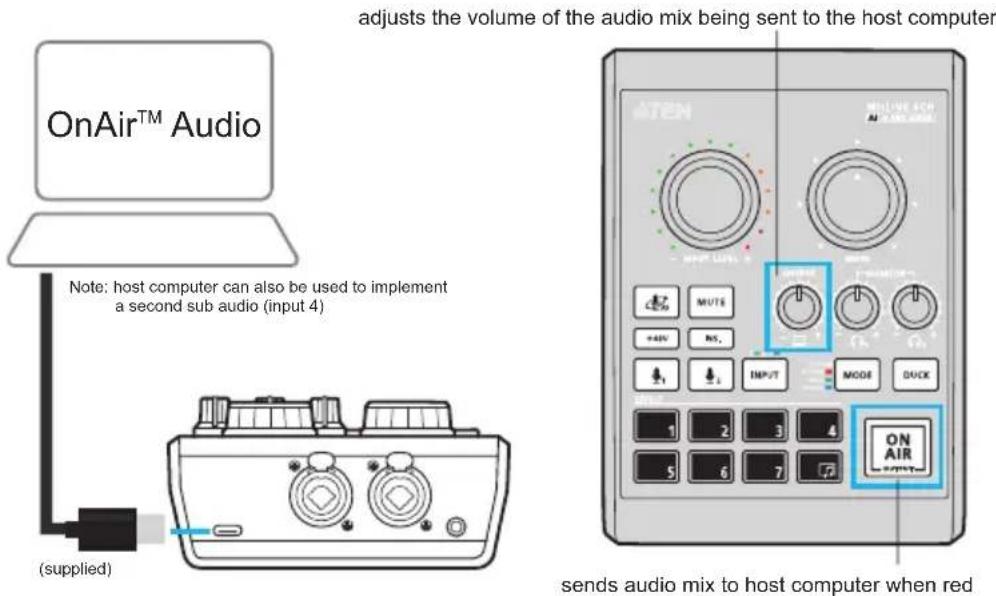
text_image
OnAir™ Audio Note: host computer can also be used to implement a second sub audio (input 4) (supplied) adjusts the volume of the audio mix being sent to the host computer ONAIR™ Audio MUTE +4kV RS. INPUT MODE DUCK ON AIR sends audio mix to host computer when red- Connect 1 \~ 2 main audio devices, such as microphones and/or musical instruments, to the mixer using self-supplied XLR and/or 6.35 mm TRS cables.
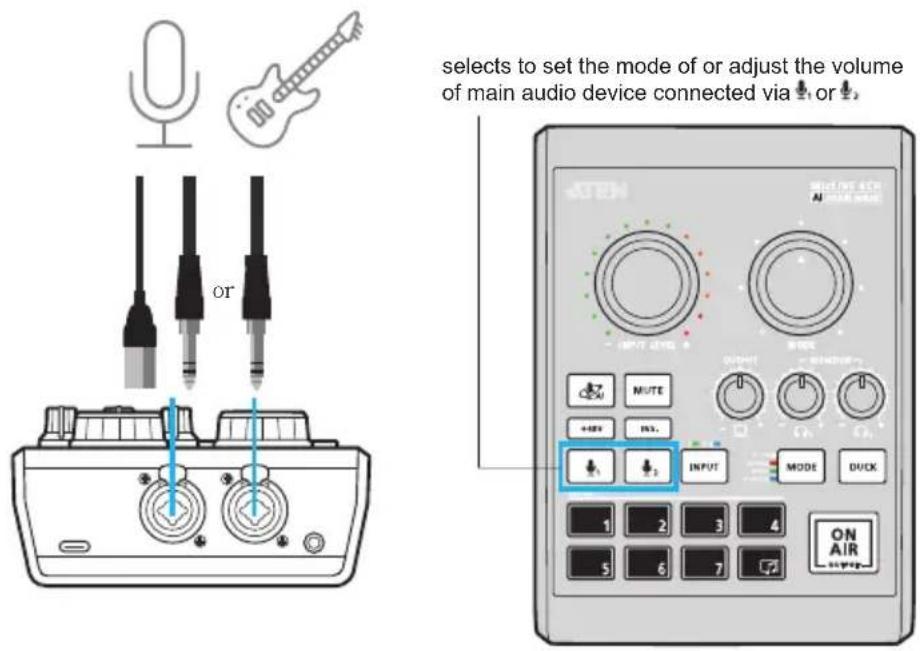
text_image
selects to set the mode of or adjust the volume of main audio device connected via ↓ or ↓ ON AIRNote: If your microphone doesn't work, try applying +48V. See4. Tuning Your Audio Devices, page 12, for details, specifically Step 2 \~ 5.
- Connect 1 \~ 2 headphones to the mixer for listening to your audio mix via its 3.5 mm TRS headphone ports

text_image
adjusts the volume of ⭕₁ or ⭕₂ ATEN Multi-ECN AI INPUT LEVEL OUTPUT MUTE +4kV INS. INPUT MODE D/OK 1 2 3 4 5 6 7 ON AIR OUTPUT- (Optional) Connect 1 sub audio device, such as a mobile device, to the mixer's input 3 using a self-supplied 3.5 ~mm TRRS cable for bidirectional audio, e.g. implementing background music or conducting and recording a remote interview.
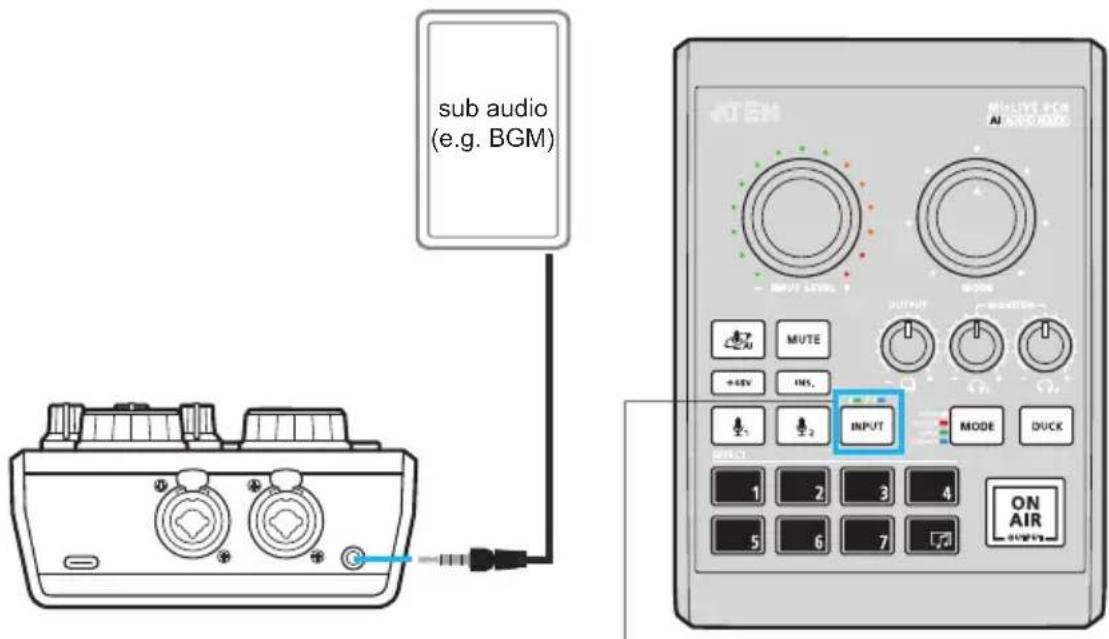
text_image
sub audio (e.g. BGM) INPUT LEVEL MUTE +40V INS. INPUT MODE DUCK ON AIRselects to set the mode of or adjust the volume of sub audio from input 3 or input 4 (host computer)
Once connected, you can test and tune each audio device by listening through the headphones (see 4. Tuning Your Audio Devices, page 12).
3. Installing OnAir™ Audio on Your Host Computer
To install OnAir™ Audio, an audio mixing software exclusively designed for MicLIVE™ 6-CH AI Audio Mixer, do the following.
- On your host computer, which is used to connect to and power your MicLIVE™ 6-CH, go to the audio mixer's download page by accessing
Mac: https://apps.apple.com/app/aten-onair-audio/id1633942143?mt=12
Windows: https://apps.microsoft.com/store/detail/onair-audio/9PGMTCFLXJ78
♦ ATEN official website: https://tinyurl.com/nsp6tnfn.
- From the download page, download and install OnAir™ Audio.
- Once installed, launch ATEN OnAir™ Audio. The following graphical user interface (GUI) appears.
text_image
switches between the mixer settings and the software's advanced settings (including customized Voice FX, firmware & software update, and reset) ATEN | OnAir audio MODE MODE DISPLAY vi:1 vi:2 input 1 input 4 U3TE U3TE U3TE U3TE U3TE U3TE U3TE U3TE U3TE U3TE U3TE U3TE U3TE U3TE U3TE U3TE U3TE U3TE U3TE U3TE U3TE U3TE U3TE U3TE U3TE U3T U3T U3T U3T U3T U3T U3T U3T U3T U3T U3T U3T U3T U3T U3T U3T U3T U3T U3T U3T U3T U3T U3T U3T U3T U3M U3M U3M U3M U3M U3M U3M U3M U3M U3M U3M U3M U3M U3M U3M U3M U3M U3M U3M U3M U3M U3M U3M U3M U3M U3N U3N U3N U3N U3N U3N U3N U3N U3N U3N U3N U3N U3N U3N U3N U3N U3N U3N U3N U3N U3N U3N U3N U3N U3N U3O U3O U3O U3O U3O U3O U3O U3O U3O U3O U3O U3O U3O U3O U3O U3O U3O U3O U3O U3O U3O U3O U2B0000000000000000000000000000000000000000000000000000000000000000000000000000000000000000000000000000u1/1/1/1/1/1/1/1/1/1/1/1/1/1/1/1/1/1/1/1/1/1/1/1/1/1/1/1/1/1/1/1/1/1/1/1/1/1/1/1/1/1/1/1/1/1/1/1/1/1/1/ dipsays and adjusts the volumes of audio inputs connected via / / / Input 2 / Input 4. dipsays and adjusts the volumes of audio inputs connected via / / Input 2 / Input 4. dipsays and adjusts the volumes of audio inputs connected via / / Input 2 / Input 4. dipsays and adjusts the volumes of audio inputs connected via / / Input 2 / Input 4. dipsays and adjusts the volumes of audio inputs connected via / / Input 2 / Input 4. dipsays and adjusts the volumes of audio inputs connected via / / Input 2 / Input 4. dipays and configures jingles (audio effects), e.g. applause, right or wrong answer, etc. dipays and configures jingles (audio effects), e.g. applause, right or wrong answer, etc. dipays and configures jingles (audio effects), e.g. applause, right or wrong answer, etc. dipays and configures jingles (audio effects), e.g. applause, right or wrong answer, etc. dipays and configures jingles (audio effects), e.g. applause, right or wrong answer, etc. dipay and configures jingles (audio effects), e.g. applause, right or wrong answer, etc. dipay and configures jingles (audio effects), e.g. applause, right or wrong answer, etc. dipay and configures jingles (audio effects), e.g. applause, right or wrong answer, etc. dipay and configures jingles (audio effects), e.g. applause, right or wrong answer, etc. dipay and configures kings (audio effects), e.g. applause, right or wrong answer, etc. dipay and configures kings (audio effects), e.g. applause, right or wrong answer, etc. dipay and configures kings (audio effects), e.g. applause, right or wrong answer, etc. dipay and configures kings (audio effects), e.g. applause, right or wrong answer, etc. dipay and configures kings (audio effects), e.g. applause, right or wrong answer, etc. dipay and configures kings (audio effects), e.g. applause, right or wrong answer, etc. dipay and configures kings (audio effects), e.g. applause, right or wrong answer, etc. dipay and configures kings (audio effects), e.g. applause, right or wrong answer, etc. dipay and configures kings (audio effects), e.g. applause, right or wrong answer, etc. dipay and configures kings (audio effects), e.g. applause, right or wrong answer, etc. dipay and configures kings (audio effects), e.g. applause, right or wrong answer, etc. dipay and configures kings (audio effects), e.g. applause, right or wrong answer, etc. dipay and configures kings (audio effects), e.g. applause, right or wrong answer, etc. dipay and configures kings (audio effects), e.g. applause, right or wrong answer, etc. dipay and configures kings (audio effects), e.g. applause, right or wrong answer, etc. dipay and configures kings (audio effects), e.g. applause, right or wrong answer, etc. dipay and configures kings (audio effects), e.g. applause, right or wrong answer, etc. dipav and configures kings (audio effects), e.g. applause, right or wrong answer, etc. dipav and configures kings (audio effects), e.g. applause, right or wrong answer, etc. dipav and configures kings (audio effects), e.g. applause, right or wrong answer, etc. dipav and configures kings (audio effects), e.g. applause, right or wrong answer, etc. dipav and configures lncs (audio effects), e.g. applause, right or wrong answer, etc. dipav and configures lncs (audio effects), e.g. applause, right or wrong answer, etc. dipav and configures lncs (audio effects), e.g. applause, right or wrong answer, etc. dipav and configures lncs (audio effects), e.g. applause, right or wrong answer, etc. dipav and configures lncls (audio effects), e.g. applause, right or wrong answer, etc. dipav and configures lncls (audio effects), e.g. applause, right or wrong answer, etc. dipav and configures lncls (audio effects), e.g. applause, right or wrong answer, etc. dipav and configures lncls (audio effects), e.g. applause, right or wrong answer, etc. dipav and configures lncs (audio effects), e.g. applause, right or wrong answer, etc. dipav and configures lncls (audio effects), e.g. applause, right or wrong answer, etc. dipav and configures lncls (audio effects), e.g. applause, right or wrong answer, etc. dipav and configures lncs (audio effects), e.g. applause, right or wrong answer, etc. dipav and configures lncs (audio effects), e.g. applause, right or wrong answer, etc. dipav and configures lncls (audio effects), e.g. applause, right or wrong answer, etc. dipav and configures lncs (audio effects), e.g. applause, right or wrong answer, etc. dipav and configures lncls (audio effects), e.g. applause, right or wrong answer, etc. dipav and configures lncs (audio effects), e.g. applause, right or wrong answer, etc. dipav and configures lncs (audio effects), e.g. applause, right or wrong answer, etc. dipav and configures lncs (audio effects), e.g. applause, right or wrong answer, etc. dipav and configures lncsl (audio effects), e.g. applause, right or wrong answer, etc. dipav and configures lncsl (audio effects), e.g. applause, right or wrong answer, etc. dipav and configures lncsl (audio effects), e.g. applause, right or wrong answer, etc. dipav and configures lncsl (audio effects), e.g. applause, right or wrong answer, etc. dipav and configures lncls (audio effects), e.g. applause, right or wrong answer, etc. dipav and configures lncsl (audio effects), e.g. applause, right or wrong answer, etc. dipav and configures lncsl (audio effects), e.g. applause, right or wrong answer, etc. dipav and configures lncsl (audio effects), e.g. applause, right or wrong answer, etc. dipav and configures lncs (audio effects), e.g. applause, right or wrong answer, etc. dipav and configures lncsl (audio effects), e.g. applause, right or wrong answer, etc. dipav and configures lncsl (audio effects), e.g. applause, right or wrong answer, etc. dipav and configures lncs (audio effects), e.g. applause, right or wrong answer, etc. dipav and configures lncs (audio effects), e.g. applause, right or wrong answer, etc. dipav and configures lncs (audio effects), e.g. applause, right or wrong answer, etc. dipav and configures lncss (audio effects), e.g. applause, right or wrong answer, etc. dipav and configures lncss (audio effects), e.g. applause, right or wrong answer, etc. dipav and configures lncss (audio effects), e.g. applause, right or wrong answer, etc. dipav and configures lncss (audio effects), e.g. applause, right or wrong answer, etc. dipav and configures lncs (audio effects), e.g. applause, right or wrong answer, etc. dipav and configures lncs (audio effects), e.g. applause, right or wrong answer, etc. dipav and configures lncs (audio effects), e.g. applause, right or wrong answer, etc. dipav and configures lncns (audio effects), e.g. applause, right or wrong answer, etc. dipav and configures lncns (audio effects), e.g. applause, right or wrong answer, etc. dipav and configures lncns (audio effects), e.g. applause, right or wrong answer, etc. dipav and configures lncns (audio effects), e.g. applause, right or wrong answer, etc. dipav and configures lncs (audio effects), e.g. applause, right or wrong answer, etc. dipav and configures lncs (audio effects), e.g. applause, right or wrong answer, etc. dipav and configures lncns (audio effects), e.g. applause, right or wrong answer, etc. dipav and configures lncs (audio effects), e.g. applause, right or wrong answer, etc. dipav and configures lncs (audio effects), e.g. applause, right or wrong answer, etc. dipav and configures lncs (audio effects), e.g. applause, right or wrong answer, etc. dipav and configures lncn (audio effects), e.g. applause, right or wrong answer, etc. dipav and configures lncn (audio effects), e.g. applause, right or wrong answer, etc. dipav and configures lncn (audio effects), e.g. applause, right or wrong answer, etc. dipav and configures lncn (audio effects), e.g. applause, right or wrong answer, etc. dipav and configures lncns (audio effects), e.g. applause, right or wrong answer, etc. dipav and configures lncns (audio effects), e.g. applause, right or wrong answer, etc. dipav and configures lncns (audio effects), e.g. applause, right or wrong answer, etc. dipav and configures lncn s (video switch) e.e., applies to the mixer: a) a) a) a) a) a) a) a) a) a) a) a) a) a) a) a) a) a) a) a) a) a) a) a) a) a) a) a) a) a) a) a) a) a) a) a) a) a) a) a) a) a) a) a) a) a) a) a) a) a) a) b) a) b) b) b) b) b) b) b) b) b) b) b) b) b) b) b) b) b) b) b) b) b) b) b) b) b) b) b) b) b) b) b) b) b) b) b) b) b) b) b) b) b) b) b) b) b) b) b) b) b) b) c) a) a) a) a) a) a) a) a) a) a) a) a) a) a) a) a) a) a) a) a) a) a) a) a) a) a) a) a) a) a) a) a) a) a) a) a) a) a) a) a) a) a) a) a) a) a) a) a) a) c) a) b) c) a) b) b) b) b) b) b) b) b) b) b) b) b) b) b) b) b) b) b) b) b) b) b) b) b) b) b) b) b) b) b) b) b) b) b) b) b) b) b) b) b) b) b) b) b) b) b) b) b) b) b) c)4. Tuning Your Audio Devices
Tuning Each Audio Track Independently
To test and tune a main / sub audio, do the following.
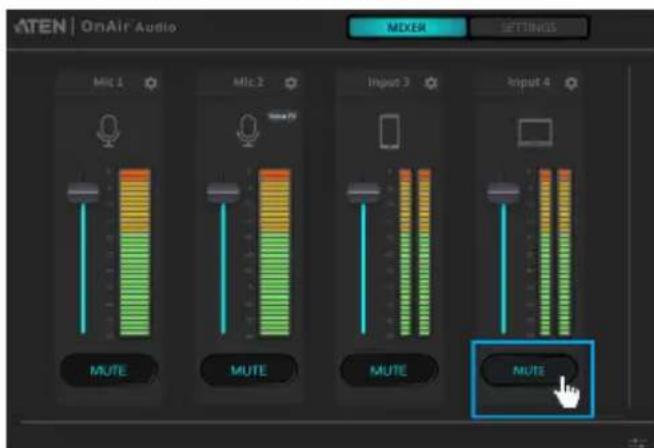
- First, mute all incoming audio except for the one you are tuning using 1 of the 2 following methods.
- on MicLIVE™ 6-CH Mixer: to mute an audio, select that audio by pressing , ↓ or (press once or twice for input 3 or 4). Then press .MUTE
- via OnAir™ Audio: to mute an audio, click Mute below that audio.
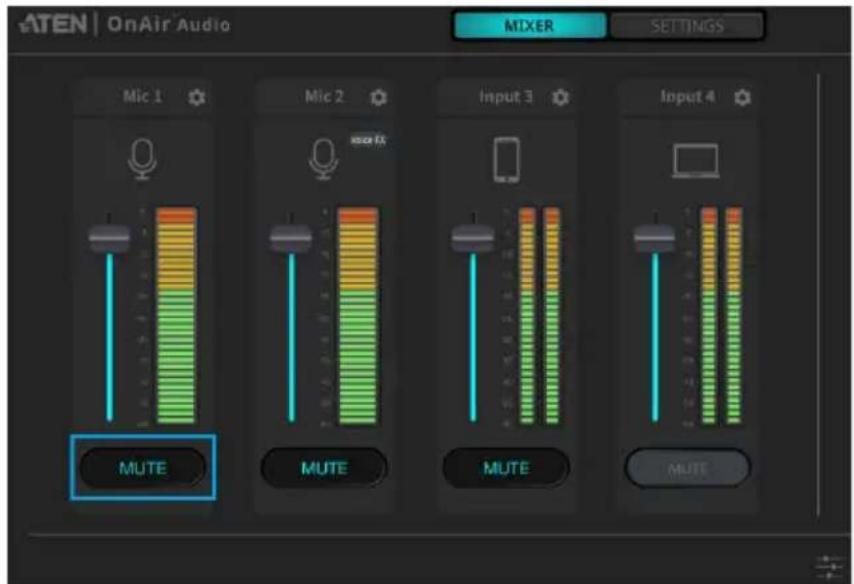
text_image
ATEN | OnAir Audio MIXER SETTINGS Mic 1 Mic 2 Input 3 Input 4 MUTE MUTE MUTE MUTE- Second, make sure your headphones are properly connected and have an adequate output volume by adjusting the mixer's .
-
Select the main / sub audio you want to test and tune by pressing, or (press once or twice for input 3 or 4) on the mixer.
-
Then select the input modes you want to set it as:
-
Ins. (Instrumental) INS.: applies EQ settings that are ideal for musical instruments.
◆ +48 V : applies +48 V to microphones that require so.
- AI (AI Smart EQ) : must be calibrated before use (see AI Smart EQ, page 15, for details), applies AI Smart EQ that automatically adjusts the mixer's equalizer according to your voice and recording environment.
- Adjust the volume of the main / sub audio as desired.
- via MicLIVE™ 6-CH: adjust by using

text_image
ATEN INPUT LEVEL- via OnAir™ Audio: adjust by using the volume T-bar
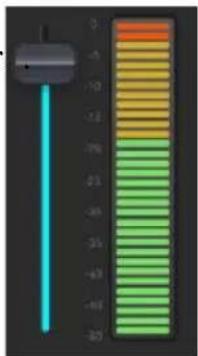
text_image
Digital thermometer display showing a color scale from -25 to 30 with a blue pointer at approximately -1.5.Tuning Your Audio Mix
- Once every audio track has been tuned, unmute each audio track you want to use in forming your audio mix, using 1 of the 2 following methods.
- on MicLIVE™ 6-CH Mixer: to unmute an audio, select an audio that's muted by pressing , or (press once or twice for input 3 or 4). Then press to disable mute.
- via OnAir™ Audio: to unmute an audio, disable mute by clicking Mute below an audio that’s muted.
text_image
ATEN | OnAir Audio MIXER SETTINGS MIC 1 MIC 2 Input 3 Input 4 MUTE MUTE MUTE MUTE- After all audio tracks you want to use are unmuted, adjust the volume of each as needed.
- on MicLIVE™ 6-CH Mixer: to adjust the volume of an audio, select by pressing , or (press once or twice for input 3 or 4).
Then adjust by using

text_image
• ATEN INPUT LEVEL 4- via OnAir™ Audio: to adjust the volume of an audio, use the volume T-bar below it.
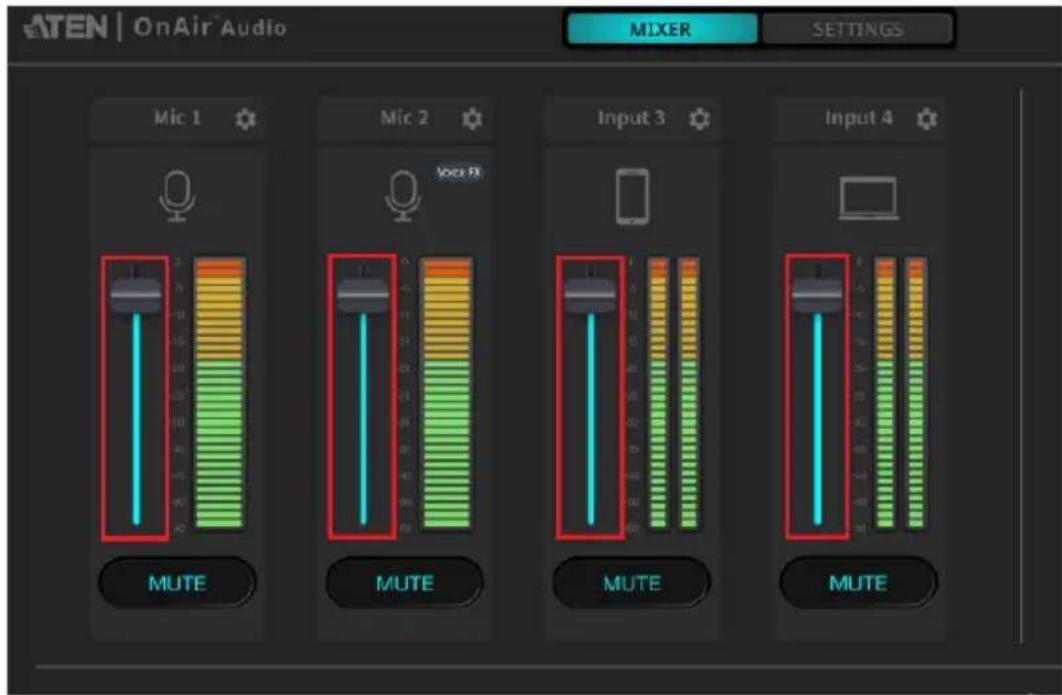
text_image
ATEN | OnAir Audio MIXER SETTINGS Mic 1 Mic 2 Voice PI Input 3 Input 4 MUTE MUTE MUTE MUTENote: Your host computer, installed with OnAir™ Audio, must be connected to the mixer for the software to work.
Chapter 3
AI Smart EQ
AI Smart EQ is MicLIVE™ 6-CH's signature function that can automatically adjust the mixer's equalizer settings according to your voice audio and recording environment for an optimal voice recording performance.

text_image
ATEN MicLIVE 6CH AI AUDIO MIXER INPUT LEVEL + MODE OUTPUT MONITOR AI MUTE +48V INS. INPUT MODE DUCK 1 2 3 4 5 6 7 EFFECT ON AIR OUTPUTNote: AI Smart EQ is only recommended to be used for voice recording.
Try It! (Using AI Smart EQ)
Prior to using AI Smart EQ, it must first be calibrated in an environment that's the same or similar to your voice recording scenario.
-
Select the audio input you want AI Smart EQ to be calibrated for and applied to by pressing or on the mixer.
-
To start calibrating, do one of the following.
- If this is your first time using AI Smart EQ, you can start calibrating it by pressing AI (AI Smart EQ) once.
- If this is not your first time using AI Smart EQ, you can recalibrate it by long pressing AI (AI Smart EQ) [icon] (about 3 seconds) until the mixer's Effects button start to flash.
- When the mixer's Effects buttons start to flash in sequence, as exemplified below, start speaking through the microphone mimicking your voice recording scenario until the buttons no longer flash. This shall take about 10 \~ 15 seconds.

text_image
INPUT LEVEL MODE OUTPUT MONITOR AI MUTE +48V INS. INPUT FITCH REVERSE MAIN FEMALE MODE DUCK 1 2 3 4 5 6 7 ON AIR OUTPUTOnce AI Smart EQ has been calibrated, it is automatically applied to the audio track currently selected.
Chapter 4
Auto Ducking
MicLIVE™ 6-CH's Auto Ducking function, when applied, can automatically lower the volumes of the mixer's sub audio (input 3 & input 4) whenever there's sound detected coming from the mixer's main audio (microphone 1 and/or 2).
This function is especially useful during a music podcast, where the host does not need to manually lower the volume of music played through input 3 and/or 4 when speaking.
Try It! (Applying Auto Ducking)
- To apply auto ducking, simply press on your MicLIVE™ 6-CH AI Audio Mixer.

text_image
ATEN MicLIVE 6CH AI AUDIO MIXER INPUT LEVEL + MODE OUTPUT MONITOR MUTE +48V INS. INPUT MODE DUCK EFFECT 1 2 3 4 5 6 7 ON AIR OUTPUT- Once applied, while playing music through the mixer's input 3 and/or 4, try speaking through a connected microphone. The volumes of inputs 3 & 4 shall be lowered automatically when you speak.
Adjusting Auto Ducking
By default, auto ducking is applied to both inputs 3 and 4. If you want auto ducking to be applied only to input 3 or input 4, but not the other, do the following.
- Make sure auto ducking is applied by pressing so that its LED is lit.
- Select input 3 or 4 by pressing once (green) or twice (blue).
- Once you have selected input 3 or 4, the button's LED shall be either flashing or lit, as explained below.
| Ducking Status Description | |
 flashing flashing | Auto ducking is enabled for the input selected (input 3 or 4). |
 lit and not flashing lit and not flashing | Auto ducking is disabled for the input selected (input 3 or 4) |
- You can change the status of the DUCK by long pressing it for 3 seconds, i.e. enabling / disabling auto ducking for input 3 or 4.
Note: Auto ducking cannot be disabled for both inputs 3 and 4 at the same time. Disabling input 3 or 4 will automatically enable the other.
Auto Ducking for Input 3 Only (Input 4 Disabled)
When auto ducking is applied only to input 3, input 3's volume is lowered automatically whenever there's sound detected coming from any of the mixer's other audio inputs (microphone 1 & 2 and input 4).
Auto Ducking for Input 4 Only (Input 3 Disabled)
When auto ducking is applied only to input 4, input 4's volume is lowered automatically whenever there's sound detected coming from any of the mixer's other audio inputs (microphone 1 & 2 and input 3).
Chapter 5
Jingles (Audio Effects)
To add a personalized touch to your podcast show and/or digital music event, MicLIVE™ 6-CH provides 8 customizable jingle (audio effect) pads for you to play the wanted sound effects whenever you see fit, e.g. crowd laughter sounds right after a joke, a round of applause after introducing a guest, etc.
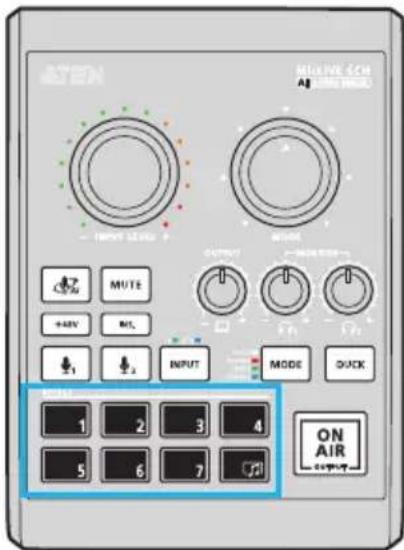
text_image
ATEN MUTE 4CH AI INPUT DIAL OUTPUT MUTE +ABV INT. INPUT MODE DOCK ON AIR 1 2 3 4 5 6 7Jingle (audio effect) pads on MicLIVE™ 6-CH

text_image
ATEN | OnAir MOSER R1000 MOUT MUTE MUTE MUTE OUTPUT Lamp Right Angle Right Angle Strong Direction Entertainment Live Tharp Long/Short ControlJingle (audio effect) buttons on ATEN OnAir™ Audio
Try It! (Using Jingles)
- on MicLIVETM 6-CH Mixer: simply press any 1 of the 8 jingle pads on your mixer.
- via OnAir™ Audio: to play a jingle, simply click any 1 of the 8 jingle icons on the ATEN OnAir Audio software on your connected host computer.
How to Customize Your Jingles
There are two ways to customize a jingle, as described below:
- Record a jingle using the audio devices connected to your MicLIVE™ 6-CH AI Audio Mixer (see Recording a Jingle, below).
- Uploading a jingle via OnAir™ Audio on your connected host computer (see Replacing a Jingle with an Audio File, page 22).
Recording a Jingle
You can replace any existing jingle using sounds recorded through your connected audio devices. The maximum length of a jingle is 20 seconds.
- To record a jingle, long press (about 3 seconds) the jingle pad you want to replace until it starts flashing, indicating that it is ready to record.

text_image
INPUT LEVEL MODE OUTPUT MONITOR AI MUTE +48V INS. INPUT FITCH REVERSE MALE FEMALE MODE DUCK 1 2 3 4 5 6 7 ON AIR OUTPUTNote: If you change your mind and want to cancel, long press (about 3 seconds) the flashing jingle pad again to exit record mode.
- To start recording, press the flashing jingle pad, and then press it again to stop recording once you are done.
Downloading a Recorded Jingle
If you want to download the jingle you've recorded onto your host computer, you can do so by doing the following.
- On your connected host computer, click in OnAir™ Audio's jingles section.

text_image
MUTE MUTE MUTE Pitch Reverb Right Away Right Away Wrong Answer- On the jingle settings page that appears, select the jingle you want to download.

text_image
1 2 3 4 5 6 7 Icon Playback Color Green Red Blue White Purple Volume 00:10 Download Replace Apply- Click Download to save the jingle onto your connected host computer as an audio file.

text_image
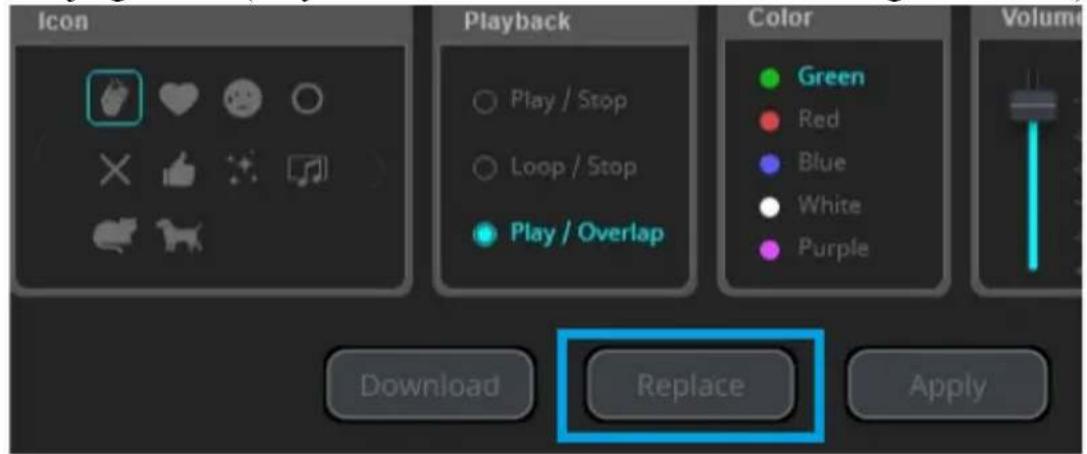
Icon Playback Color Green Red Blue White Purple Download Replace ApplyReplacing a Jingle with an Audio File
You can replace any existing jingle with an *.wav audio file from your connected host computer via OnAir™ Audio.
- To replace a jingle with an audio file, click in OnAir™ Audio's jingles section.

text_image
MUTE MUTE MUTE Pitch Reverb Right Away Right Away Wrong Answer- On the jingle settings page that appears, select the jingle you want to replace.

text_image
1 2 3 4 5 6 7 Icon Playback Color Green Red Blue White Purple Volume 00:10 Download Replace Apply- Click Replace to browse for and select the audio file you want to replace the jingle with (only the first 20 seconds is used if it is longer than 20 s).
text_image
Icon Playback Color Green Red Blue White Purple Download Replace Apply4. Click Apply to save your settings.

Adjusting a Jingle
To adjust jingles, via OnAir™ Audio on your connected host computer, access the jingle settings page by clicking on the upper-right corner of the software's jingles section.

text_image
MUTE MUTE Pitch ReverbThe following settings appear.
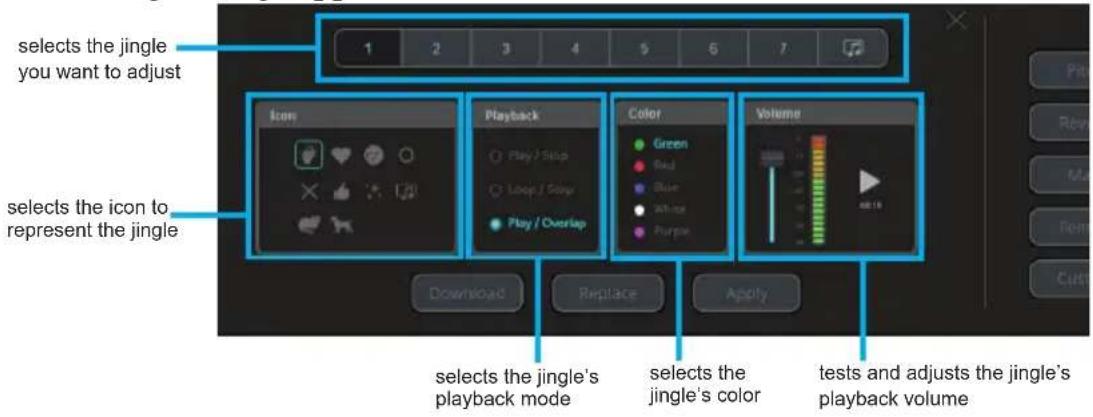
text_image
selects the jingle you want to adjust selects the icon to represent the jingle Icon Playback Color Volume Download Replace Apply selects the jingle's playback mode selects the jingle's color tests and adjusts the jingle's playback volume| Component Description | |
| Icon Selects an icon to represent the jingle. | |
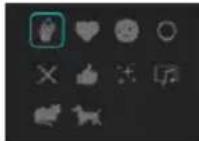 | |
| Playback Selects method in which the jingle is played back. | |
 | Play / Stop: Plays the jingle from start to finish.Loop / Stop: Repeats the jingle endlessly until clicking again to stop.Play / Overlap: Plays the jingle and click again to replay from start. |
| Color Selects a color for the jingle. | |
 | |
This Page Intentionally Left Blank
Chapter 6
Voice FX
By default, MicLIVE™ 6-CH offers 4 Voice FX (voice changer) modes that can be applied during voice recording via the microphones connected.
The 4 Voice FX modes include:
| Voice FX Color Description | |
Pitch Elevates the pitch of your voice. | |
Reverb Fills up your voice for a more “full” and “natural” effect. | |
Male Changes a female voice to male. | |
Female Changes  | voice to female. |
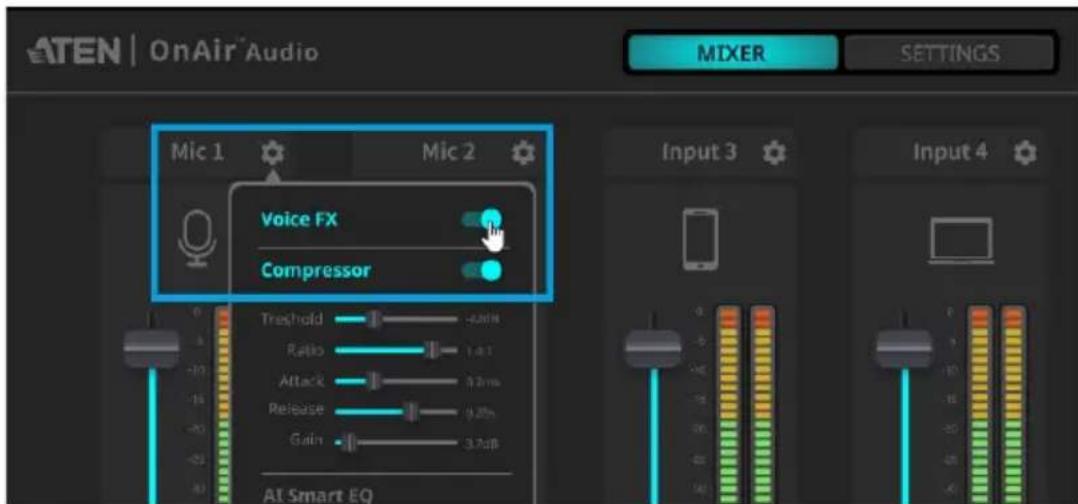
Note: By default, Voice FX only affects microphones connected via Mic 2 but not Mic 1. If you want Voice FX to be applied to microphones connected via Mic 1, click next to Mic 1 on the OnAir™ Audio on your connected host computer, and then enable Voice FX, as illustrated below.
text_image
ATEN | OnAir Audio MIC 1 Mic 2 Voice FX Compressor Threshold 4.20Hz Ratio 1.4Ω Attack 3.3ms Release 9.20Hz Gain 3.7dB AI Smart EQ MIXER SETTINGS Input 3 Input 4For further details on adjusting audio input settings, see Configuring Audio Inputs, page 33.
Try It! (Applying Voice FX)
There are two ways of applying Voice FX.
- to apply Voice FX on your MicLIVE™ 6-CH Mixer, see Applying Voice FX via MicLIVE™ 6-CH, page 26.
- to apply Voice FX via OnAir™ Audio on your host computer, see Applying Voice FX via OnAir™ Audio, page 28.
Applying Voice FX via MicLIVE™ 6-CH
- To apply Voice FX your MicLIVE™ 6-CH, simply press ,MODE 4 times, on the mixer.

text_image
ATEN MICLIVE 6CH AI AUDIO MIXER INPUT LEVEL + MODE OUTPUT MONITOR AI MUTE +48V INS. INPUT MODE DUCK 1 2 3 4 5 6 7 ON AIR OUTPUT♦ Pitch: press MODE once, where it shall be lit in white.
♦ Reverb: press MODE twice, where it shall be lit in red.
Male: press MODE 3 times, where it shall be lit in green.
- Feamel: press MODE 4 times, where it shall be lit in blue.
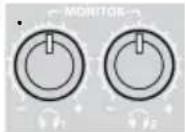
- If you want to adjust the strength of the Voice FX mode applied, simply rotate the mixer's Voice FX strength controller.

text_image
ATEN MicLIVE 6CH AI AUDIO MIXER INPUT LEVEL + MODE OUTPUT MONITOR AI MUTE +48V INS. INPUT MODE DUCK 1 2 3 4 5 6 7 ON AIR OUTPUT♦ Rotate clockwise to increase the strength of Voice FX applied.
- Rotate counterclockwise to decrease the strength of Voice FX applied.
Note: If you want to define a customized Voice FX mode, see How to Define a Customized Voice FX, page 29.
Applying Voice FX via OnAir™ Audio
- To apply Voice FX via OnAir™ Audio on your connected host computer, simply click 1 of the 4 Voice FX icons on the software.

text_image
ATEN | OnAir® MultiLine MIXER SETTINGS Mio 1 Mio 2 Input 3 Input 4 MUTE MUTE MUTE OUTPUT Clap Right Away Right Away Wrong Answer Blush Reverb Male Female Custom Embarrassing Like Sharp Long BeachNote: Custom is only available after you have defined a customized Voice FX mode of your own. See How to Define a Customized Voice FX, page 29.
- After selecting a Voice FX mode, adjust its strength by clicking clicking and dragging its strength T-bar, as exemplified below.
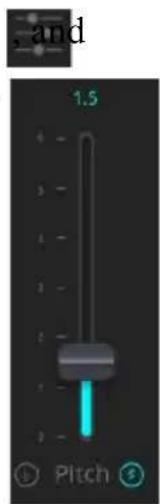
text_image
, and 1.5 PitchHow to Define a Customized Voice FX
- To define Custom Voice FX, access OnAir™ Audio's Settings tab on your connected host computer. Then select Voice FX
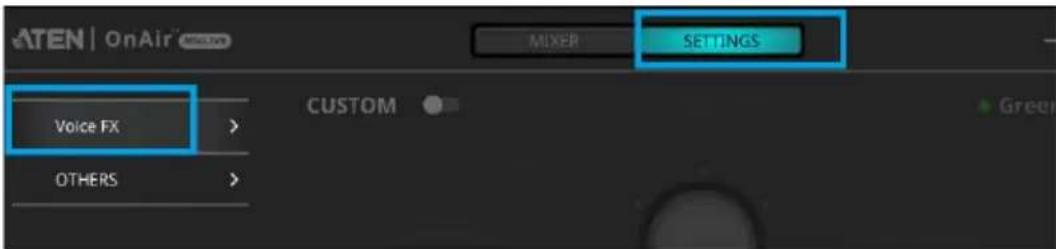
text_image
ATEN | OnAir MIXER SETTINGS Voice FX OTHERS CUSTOM Green- Enable CUSTOM.
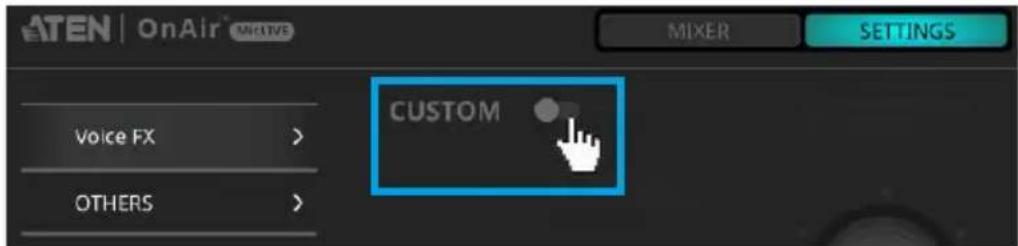
text_image
ATEN | OnAir® NHIVE VOICE FX > OTHERS > CUSTOM MIXER SETTINGS- Once enabled, the following settings are enabled.
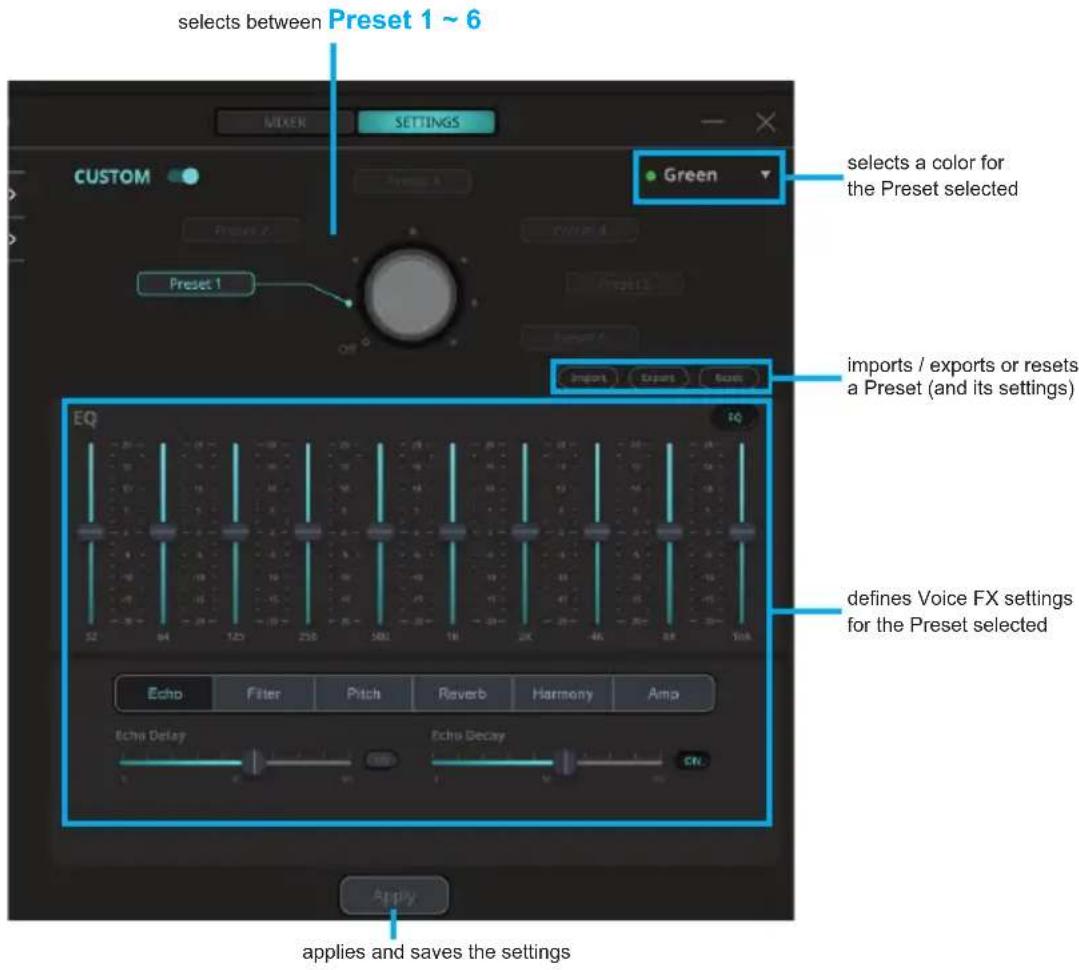
text_image
selects between Preset 1 ~ 6 MIXER SETTINGS CUSTOM Green Preset 1 Selects a color for the Preset selected imports / exports or resets a Preset (and its settings) Import Select Save EQ 52 84 123 230 380 18 24 46 88 108 defines Voice FX settings for the Preset selected Echo Filter Pitch Reverb Harmony Amp Echo Delay Echo Decay Apply applies and saves the settings- Select a color, in which the mixer's Mode button will be lit, for Custom Voice FX from the color dropdown menu
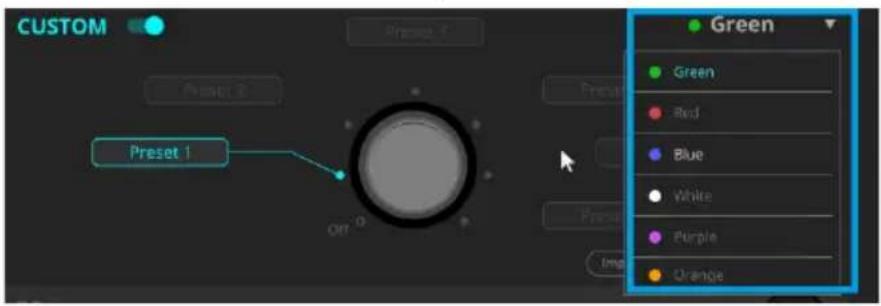
text_image
CUSTOM Preset 1 Off Green Red Blue White Purple Orange- Select Preset 1. Once selected, this is the Preset that your customized Voice FX settings will be saved under.

text_image
CUSTOM Preset 3 Green Preset 2 Preset 4 Preset 5 Preset 6 Preset 1 Off- Enable EQ and define a set of Voice FX settings you want to save under the Preset, as exemplified below.
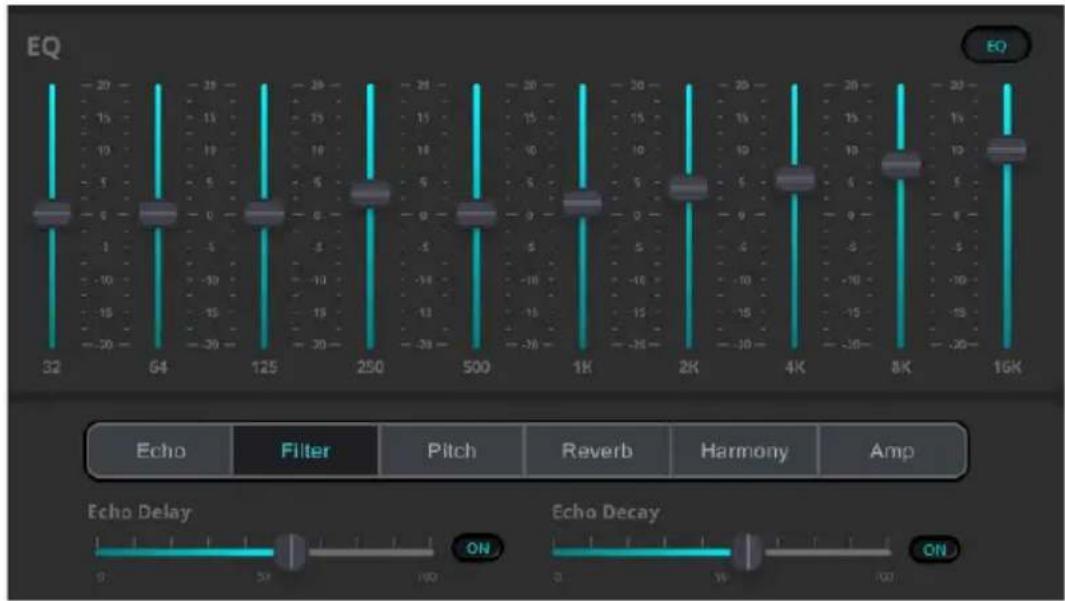
text_image
EQ 32 64 125 250 500 1K 2K 4K 8K 16K EQ Echo Filter Pitch Reverb Harmony Amp Echo Delay Echo Decay ON ON- Click Apply to save your settings.

- If you want to define more than 1 set of customized Voice FX settings, select another Preset, e.g. Preset 2, and repeat Step 5 \~ 7.
Note: OnAir™ Audio can define and save up to 6 sets of customized Voice FX settings, under Preset 1 \~ Preset 6.
Using Custom Voice FX
After defining the Custom Voice FX, you can apply it by doing the following.
-
Press press 5 times on your MicLIVE™ 6-CH Mixer, where it shall be lit in the color that Custom Voice FX is set as.
-
Rotate the mixer's Voice FX strength controller to select the Preset you want to use.
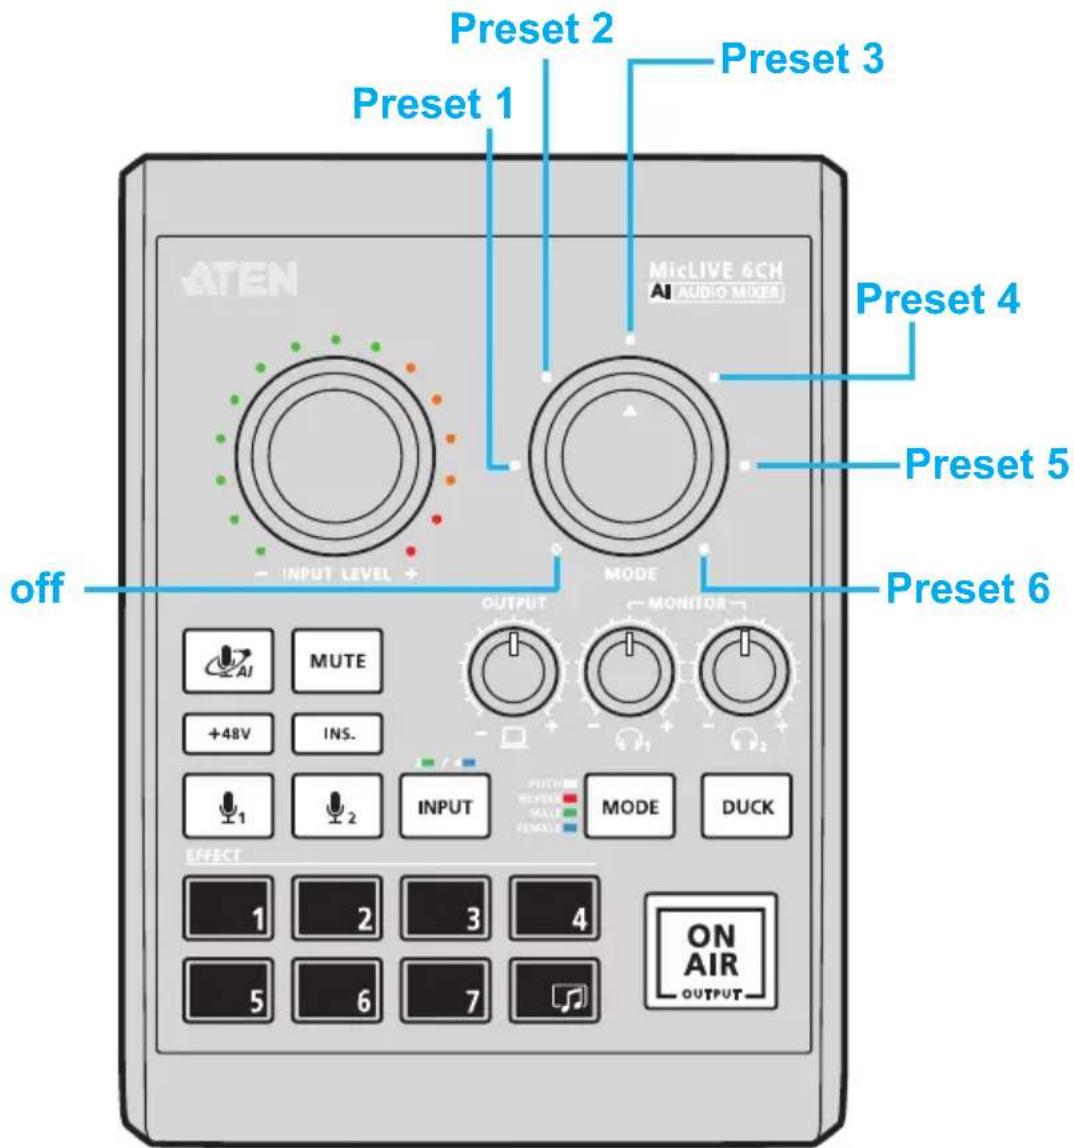
text_image
Preset 2 Preset 1 Preset 3 Preset 4 Preset 5 Preset 6 off INPUT LEVEL + MODE OUTPUT MONITOR AI MUTE +48V INS. INPUT MODE DUCK 1 2 3 4 5 6 7 ON AIR OUTPUTThis Page Intentionally Left Blank
Chapter 7
Advanced Audio Settings
Through OnAir™ Audio, you can adjust the advanced audio settings for each of your main / sub audio.
Configuring Audio Inputs
To access the advanced audio settings of a main / sub audio, click next to that audio on the OnAir™ Audio on your connected host computer, as exemplified below.
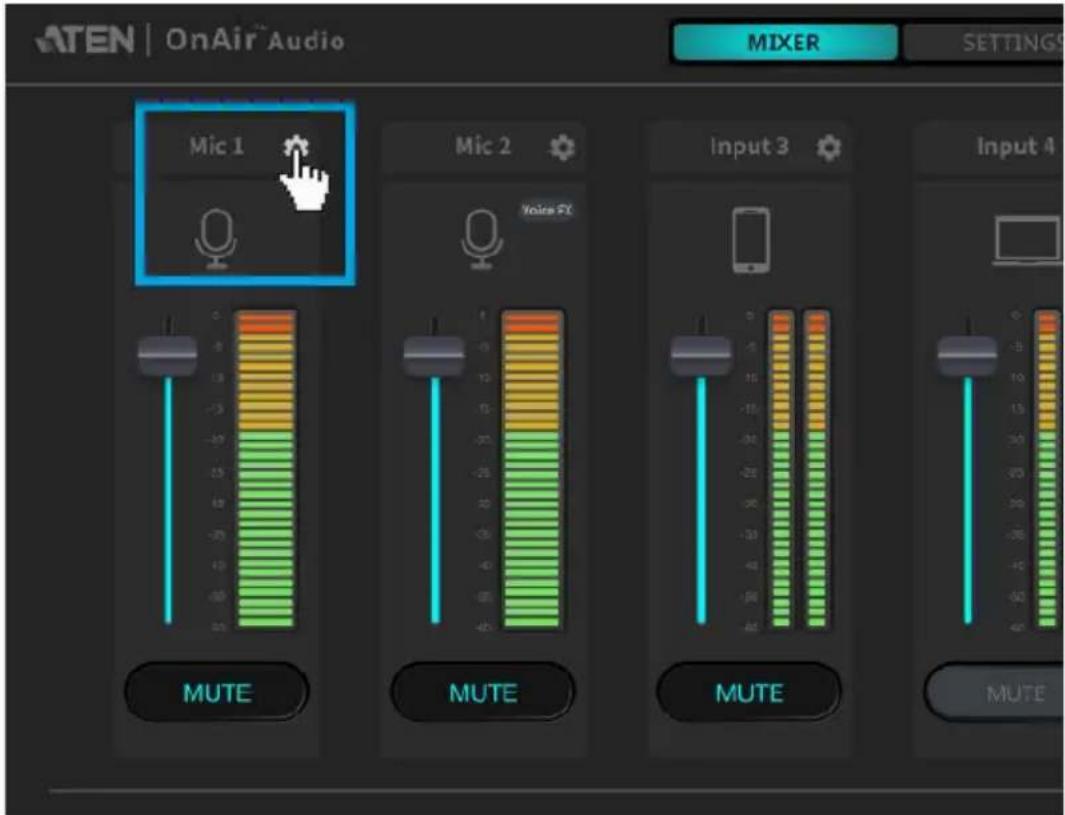
text_image
ATEN | OnAir Audio MIXER SETTINGS Mic 1 Mic 2 MUTE MUTE Input 3 MUTE Input 4The following settings appear.
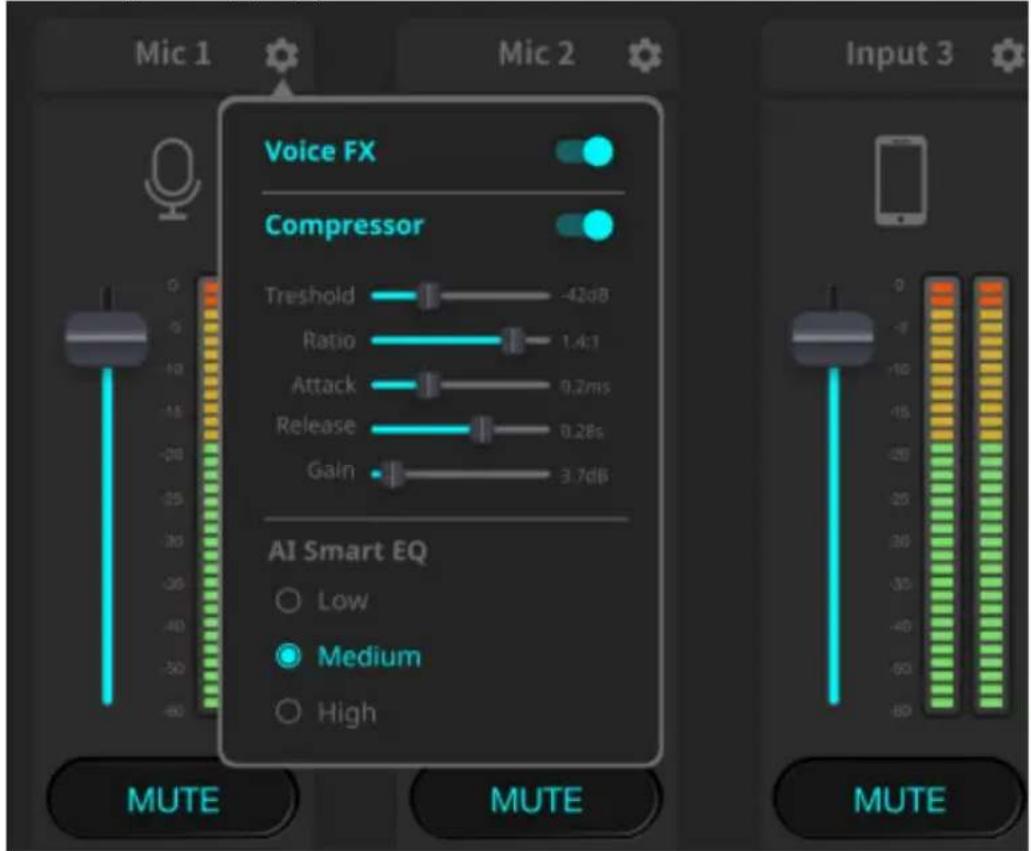
text_image
Mic 1 Mic 2 Voice FX Compressor Treshold -42dB Ratio 1.4:1 Attack 9.2ms Release 0.28s Gain 3.7dB AI Smart EQ Low Medium High MUTE MUTE Input 3| Component Description | |
| Voice FX | Enables / disables Voice FX for the audio input, as explained below.◆ Enabled: When Voice FX mode is applied, it is applied to this audio.◆ Disabled: When Voice FX mode is applied, it is not applied to this audio. |
| Compressor | Enables / disables Compressor for the audio input, and provides compressor-related settings. |
| AI Smart EQ | Selects the frequency level, Low, Medium, or High, AI Smart EQ is most sensitive to when it is being calibrated. |
Chapter 8
Other Settings
(including Updates)
This chapter covers other settings provided by OnAir™ Audio, including firmware / application update, reset to factory default settings, and tutorial.
Settings Page
To access OnAir™ Audio's Settings page, select Settings > Others. The following page appears.
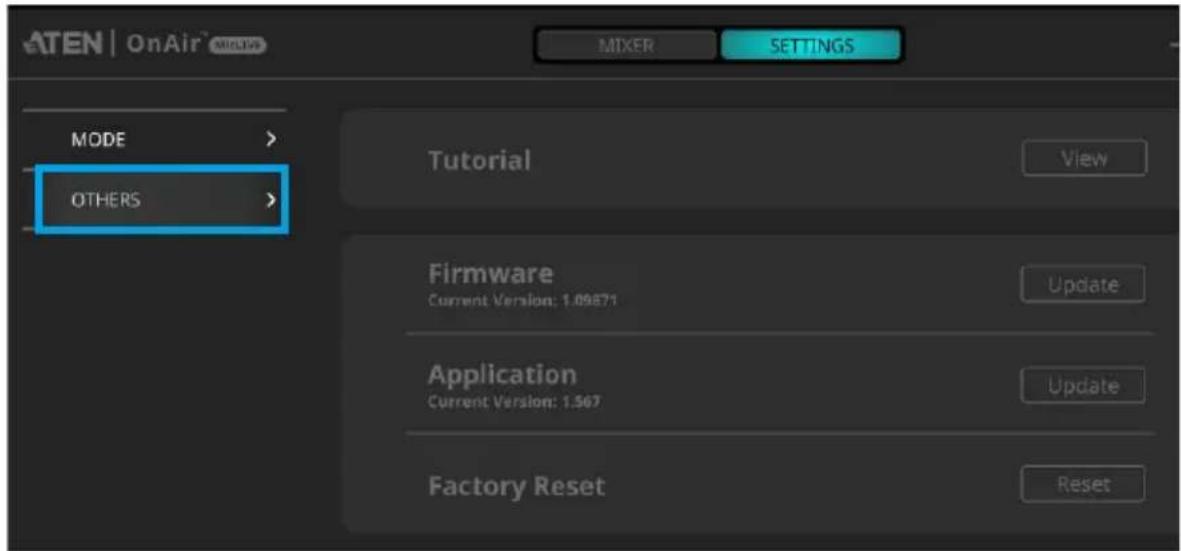
text_image
ATEN | OnAir® MULTIP MIXER SETTINGS MODE > OTHERS > Tutorial View Firmware Current Version: 1.09871 Update Application Current Version: 1.567 Update Factory Reset Reset| Component Description | |
| Tutorial Provides tips on how to use MicLIVE ^TM 6-CH AIAudio Mixer, including:◆ How to connect audio devices.◆ How to use the following functions:◆ AI Smart EQ◆ Jingles (Effects)◆ Voice FX◆ Ducking | |
| Firmware / Application | Displays the current version of firmware / application and lets you update it to the latest version. |
| Factory Reset Resets the mixer to factory default settings. | |
Updating Firmware / Application
- To update your MicLIVE™ 6-CH Mixer's firmware or the OnAir™ Audio application, select Settings > Others on OnAir™ Audio.
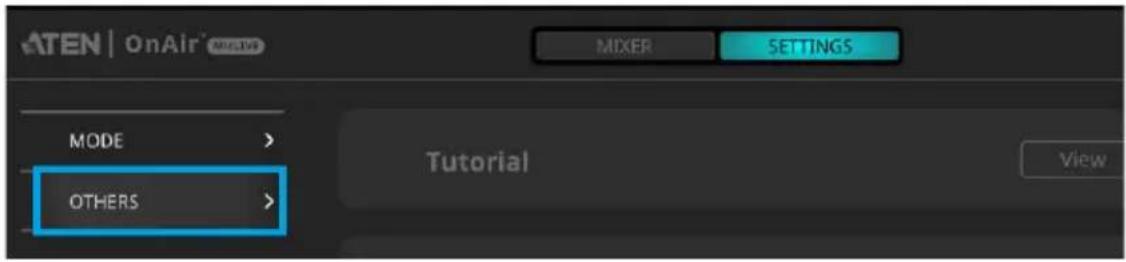
text_image
ATEN | OnAir® MODE > OTHERS > MIXER SETTINGS Tutorial View- Click Update next to the item you want to update, Firmware or
Application.

- If you're asked to browse for an update file, download it from the mixer's download page at https://tinyurl.com/nsp6tnfn.
Resetting to Factory Default
- To reset your MicLIVE™ 6-CH Mixer back to factory default settings, select Settings > Others on OnAir™ Audio.

text_image
ATEN | OnAir® MODE > OTHERS > MIXER SETTINGS Tutorial View- Click Reset next to Factory Reset.

Safety Instructions
General
- This product is for indoor use only.
- Read all of these instructions. Save them for future reference.
◆ Follow all warnings and instructions marked on the device. - Do not place the device on any unstable surface (cart, stand, table, etc.). If the device falls, serious damage will result.
- Do not use the device near water.
- Do not place the device near, or over, radiators or heat registers.
- The device cabinet is provided with slots and openings to allow for adequate ventilation. To ensure reliable operation, and to protect against overheating, these openings must never be blocked or covered.
- The device should never be placed on a soft surface (bed, sofa, rug, etc.) as this will block its ventilation openings. Likewise, the device should not be placed in a built-in enclosure unless adequate ventilation has been provided.
- Never spill liquid of any kind on the device.
- Unplug the device from the wall outlet before cleaning. Do not use liquid or aerosol cleaners. Use a damp cloth for cleaning.
- The device should be operated from the type of power source indicated on the marking label. If you are not sure of the type of power available, consult your dealer or local power company.
- To prevent damage to your installation it is important that all devices are properly grounded.
- Do not allow anything to rest on the power cord or cables. Route the power cord and cables so that they cannot be stepped on or tripped over.
- Position system cables and power cables carefully; Be sure that nothing rests on any cables.
- Never push objects of any kind into or through cabinet slots. They may touch dangerous voltage points or short out parts resulting in a risk of fire or electrical shock.
- Do not attempt to service the device yourself. Refer all servicing to qualified service personnel.
- If the following conditions occur, unplug the device from the wall outlet and bring it to qualified service personnel for repair.
- The power cord or plug has become damaged or frayed.
♦ Liquid has been spilled into the device. - The device has been exposed to rain or water.
- The device has been dropped, or the cabinet has been damaged.
- The device exhibits a distinct change in performance, indicating a need for service.
- The device does not operate normally when the operating instructions are followed.
- Only adjust those controls that are covered in the operating instructions. Improper adjustment of other controls may result in damage that will require extensive work by a qualified technician to repair.
Technical Support
International
- For online technical support – including troubleshooting, documentation, and software updates: http://support.aten.com
- For telephone support, see Telephone Support, page iv:
North America
| Email Support support@aten-usa.com | ||
| Online Technical Support | Troubleshooting Documentation Software Updates | http://www.aten-usa.com/support |
| Telephone Support 1-888-999-ATEN ext 4988 | 1-949-428-1111 | |
When you contact us, please have the following information ready beforehand:
Product model number, serial number, and date of purchase
- Your computer configuration, including operating system, revision level, expansion cards, and software
◆ Any error messages displayed at the time the error occurred
- The sequence of operations that led up to the error
◆ Any other information you feel may be of help
Specifications
| Function MicLIVETM | 6-CH | |
| Audio Inputs | XLR Combo 2 x | XLR-3-31 (1: GND, 2: HOT, 3: COLD) or 6.35 mm (1/4") standard TRS jack female (T: HOT(L) R: COLD(R), R: GND) |
| Line-in 1 x 3.5 | mm (1/8") 4-pole TRRS phone female (T: HOT(L) R: COLD(R), R: GND, S: MIC. CTIA standard) | |
| USB Audio-in | 1 x USB-C female | |
| Audio Output | Line-out 1 x 3. | 5 mm (1/8") 4-pole TRRS phone female (T: HOT(L) R: COLD(R), R: GND, S: MIC. CTIA standard) |
| Headphones (monitoring) | 2 x 3.5 mm (1/8") TRS phone female | |
| USB Audio-out | 1 x USB-C female | |
| Audio Sampling 24-bit / 96 kHz | ||
| Connection 1 x USB-C female; USB bus-powered | ||
| Environmental | ||
| Operating Temperature 0 – 40 °C | ||
| Storage Temperature -20 – 60 °C | ||
| Humidity 0–80% RH, Non-Condensing | ||
| OS Support | ◆ Mac OS 10.11 or later (64-bit only)◆ Windows 10 or later (32/64-bit)◆ Intel i3-series 2 GHz multicore processor (or AMD equivalent) or above◆ 2 GB RAM (8 GB or more recommended)◆ USB-C interface with USB 2.0 or higher compatibility | |
| Power | ||
| Power Consumption DC 5 V : 2.55 W : 12 BTU | ||
| Physical Properties | ||
| Housing Plastic | ||
| Weight 0.42 kg (0.93 lb) | ||
| Dimensions (L x W x H) | 13.05 x 18.09 x 6.27 cm (5.14 x 7.12 x 2.47 in) | |
Limited Warranty
ATEN warrants its hardware in the country of purchase against flaws in materials and workmanship for a Warranty Period of two [2] years (warranty period may vary in certain regions/countries) commencing on the date of original purchase. This warranty period includes the LCD panel of ATEN LCD KVM switches. Select products are warranted for an additional year (see A+ Warranty for further details). Cables and accessories are not covered by the Standard Warranty.
What is covered by the Limited Hardware Warranty
ATEN will provide a repair service, without charge, during the Warranty Period. If a product is detective, ATEN will, at its discretion, have the option to (1) repair said product with new or repaired components, or (2) replace the entire product with an identical product or with a similar product which fulfills the same function as the defective product. Replaced products assume the warranty of the original product for the remaining period or a period of 90 days, whichever is longer. When the products or components are replaced, the replacing articles shall become customer property and the replaced articles shall become the property of ATEN.
To learn more about our warranty policies, please visit our website: http://www.aten.com/global/en/legal/policies/warranty-policy/
© Copyright 2022 ATEN® International Co., Ltd.
Released: 2022-08-19
ATEN and the ATEN logo are registered trademarks of ATEN International Co., Ltd. All rights reserved. All other brand names and trademarks are the registered property of their respective owners.