MI-3774 - Uncategorized Mount-It! - Free user manual and instructions
Find the device manual for free MI-3774 Mount-It! in PDF.


| Product Type | Tablet Wall Mount with Swing Arm |
| Brand | Mount-It! |
| Model | MI-3774 |
| Compatible Devices | iPad Pro 10.5", iPad Air 10.5", iPad 9/8/7 10.2", iPad Pro 11", iPad Air 10.9", iPad 10 10.9" |
| Mount Type | Wall-mounted swing arm |
| Mounting Surface | Wood stud or concrete/brick wall |
| Installation | Professional installation recommended |
| Included Components | Mount Arm (#A), VESA Plate (#B), Tablet Case (#C), Tablet Adapters D, E, F, Hardware Kit (bolts, washers, nuts, lag screws, concrete anchors), Key (#K), Button Cover (#G) |
| Lockable | Yes (padlock not included) |
| Cable Management | Integrated cable management clips on arm joints |
| Orientation | Portrait and landscape (adjustable) |
| VESA Compatible | Yes, VESA plate included |
| Usage | Indoor only |
| Maintenance | Check every 3 months |
| Safety Features | Weight capacity warning, choking hazard for small parts, professional installation recommended |
| Customer Support | Phone: (855) 925-5668 (Mon-Fri 8am-4pm PST), Email: support@mount-it.com |
| Warranty | Product registration and warranty information available at www.mount-it.com |
| Manual Languages | English (EN) |
Frequently Asked Questions - MI-3774 Mount-It!
User questions about MI-3774 Mount-It!
0 question about this device. Answer the ones you know or ask your own.
Ask a new question about this device
Download the instructions for your Uncategorized in PDF format for free! Find your manual MI-3774 - Mount-It! and take your electronic device back in hand. On this page are published all the documents necessary for the use of your device. MI-3774 by Mount-It!.
USER MANUAL MI-3774 Mount-It!
natural_image
Technical line drawing of a mechanical assembly with two vertical arms and a rectangular panel (no text or symbols)
Please scan this QR code to visit the product page.
TABLET WALL MOUNT WITH SWING ARM

HAVE QUESTIONS?
Monday - Friday from 8:00am - 4:00pm PST

support@mount-it.com

(855) 925-5668

www.mount-it.com
Thank you for choosing Mount-It!
EN Read the entire instruction manual before you start installation and assembly. If you have any questions regarding any of the instructions or warnings, please contact Wount H for assistance.
CAUTION: Live with products heavier than the rated weights indicated may result in variability causing possible injury.
- Safety gear and proper tools must be used. This product should only be installed by professionals.
- This product is designed to be installed on solid concrete walls, masonry walls or wood stud walls.
* Make sure that the supporting surface will safely support the combined weight of the equipment and all attached hardware and components. Use the mounting stone provider and DO NOT OVER TIGHTEN mounting scheme.
* This product contains small items that could be a choking hazard if swallowed. Keep these items away from children.
• This product is intended for indoor use only. Using this product outdoors could lead to product failure and personal injury.
IMPORTANT: Ensure that you have reserved air parts according to the component checked at prior to installation. If any parts are missing or faulty, contact K2481-47 for a maintenance
MAINTENANCE: Check that the product is secure and safe to use at regular intervals (at least every three months).
Mount and Accessories
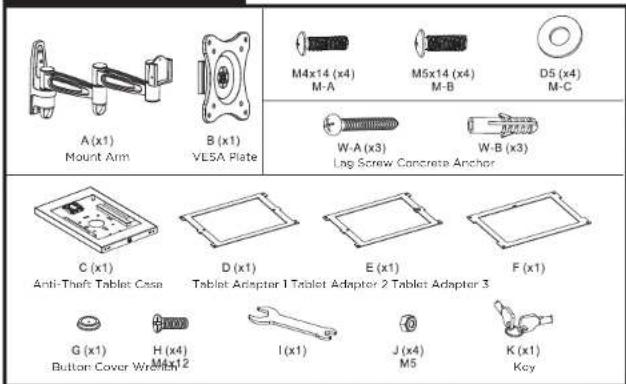
Check carefully to make sure there are no missing or defective parts. Some hardware provided may not be used. Use the correct mounting hardware suitable for your installation.
CHOKING HAZARD. Package includes small parts.
Not for children under 3 years. Adult supervision is required.
Missing Parts? Call us at (855) 925-5668 and we will ship replacement parts free of charge.
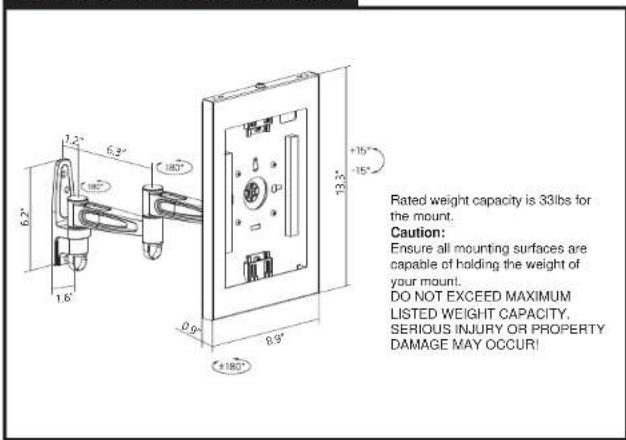
DIMENSIONS & WEIGHT CAPACITY
Step 1
Step 1a
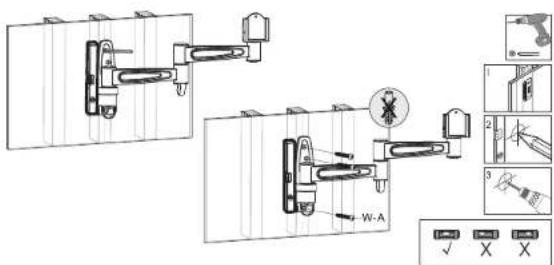
Wood Stud Mounting Option
- With a stud finder locate the stud, hold the Mount Arm (#A) against the wall and centered on the stud at the desired height. Using a bubble level to ensure straightness mark the center of the mounting holes with a pencil.
- Use a 5/32" drill bit and drill on the marked locations to a depth of 2". Secure the Mount Arm (#A) to the wall using Lag Screws (#W-A). Tighten the screws until secure.

Step 1b
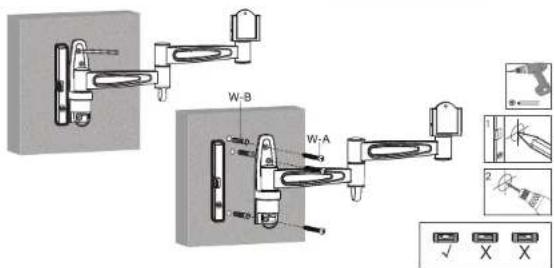
Concrete/Brick Mounting Option
- Using a bubble level to ensure straightness hold the Mount Arm (#A) to the desired location on the wall and mark the center of the mounting holes with a pencil.
- Use a 3/8" drill bit and drill on the marked locations to a depth of 2.4". Clear any dust and debris from the holes and insert the Concrete Anchors (#W-B). Secure the Spring Arm (#A) to the wall using Lag Screw (#W-A). Tighten the screws until secure.
Note: Do not drill mounting holes into mortar (such as between bricks or stones) only drill and install into solid stone or concrete surfaces.

Step 2
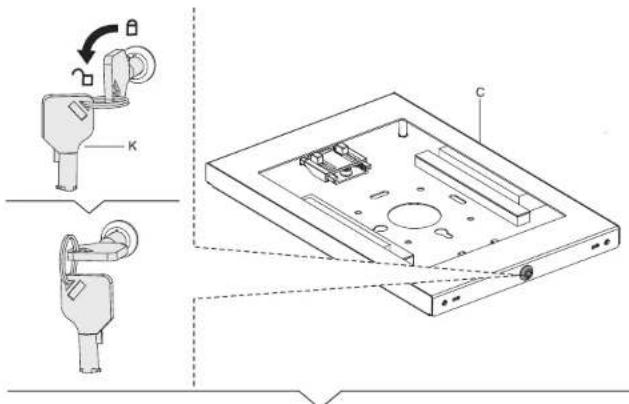
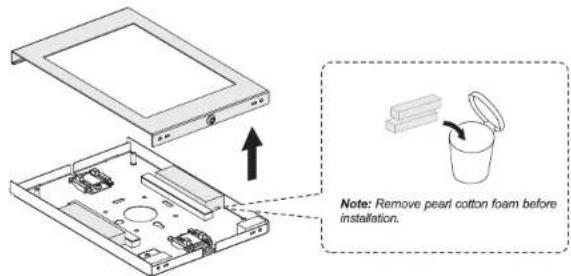
Open the Tablet Case
• To open the Tablet Case (#C) insert the Key (#K) and turn counterclockwise to unlock (clockwise to lock.)
Step 3
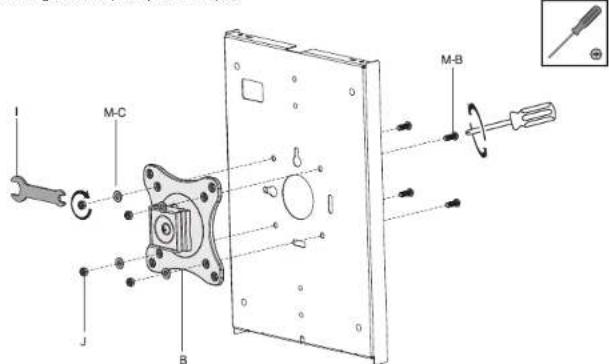
Attach the Tablet Case to the VESA Plate
- Attach the back half of the Tablet Case to the front of the VESA Plate (#B) using Bolts (#M-B) through the 4 bolt holes on the interior of the Case in the orientation shown here. Secure the bolts on the opposite side using Washers (#M-C) and Nuts (#J).
Step 4
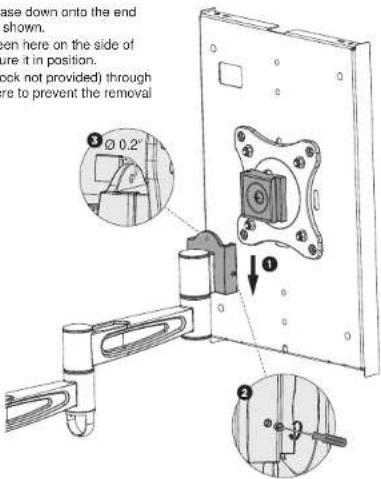
Attach the Tablet Case to the Mount Arm
- Slide the Tablet Case down onto the end of the Mount Arm as shown.
- Tighten the bolt seen here on the side of the connector to secure it in position.
- Insert a lock (padlock not provided) through the hole indicated here to prevent the removal of the tablet case.

Step 5
Select the Tablet Adapter
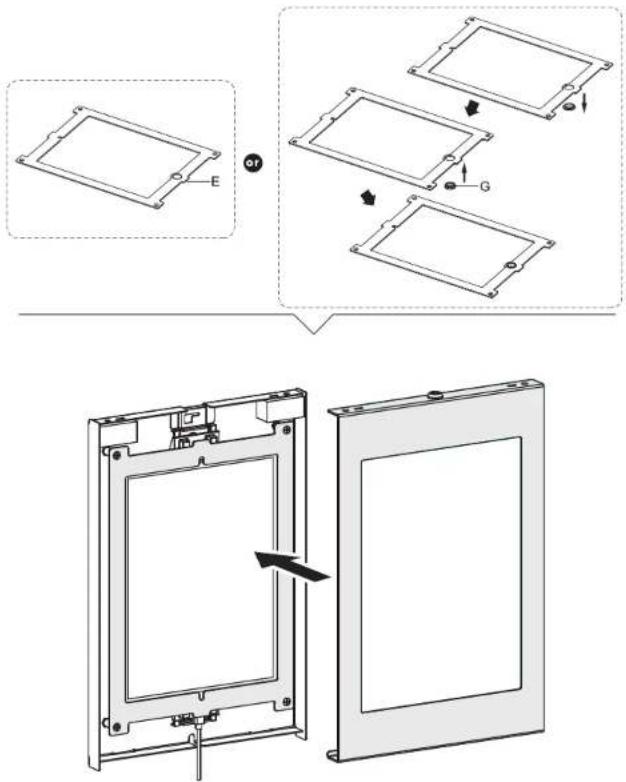
- Select the Tablet Adapter (#D, E, F) for your tablet (see the table below for compatibility) and attach it over the tablet inside the case using the 4 Bolts (#H). Before fully tightening the bolts, center the tablet in the adapter if needed by squeezing the tabs on the clamps and adjusting them left or right.
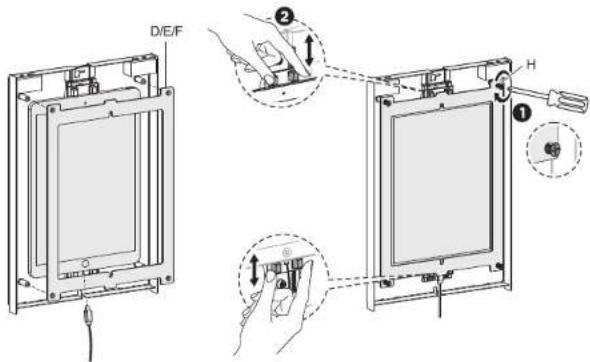
Insert the Tablet
- Select the appropriate Tablet Adapter for your tablet by referencing the compatibility guide below.
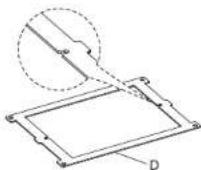
D: No home button access
Pad Pro (10.5).
Pad Air (10.5"),
Pad 9(10.2").
Pad 8(10.2")
Pad 7(10.2")
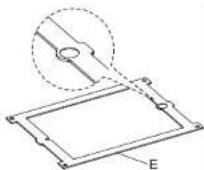
E: Home button access present
iPad Pro (10.5").
iPad Air (10.5),
iPad 9(10.2")
iPad 8(10.2")
iPad 7(10.2")
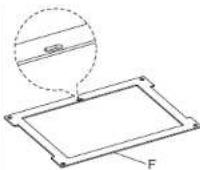
F: Front facing camera cutout
on the side
iPad Pro (11").
iPad Air (10.9").
iPad10(10.9")
- Tablet Adapter (#E) can be used with the preinstalled soft button cover to allow for the tablet home button to be pressed, or it may be removed and replaced with the hard Button Cover (#G) which will prevent the tablet home button from being pressed.
Step 6
Final Adjustments
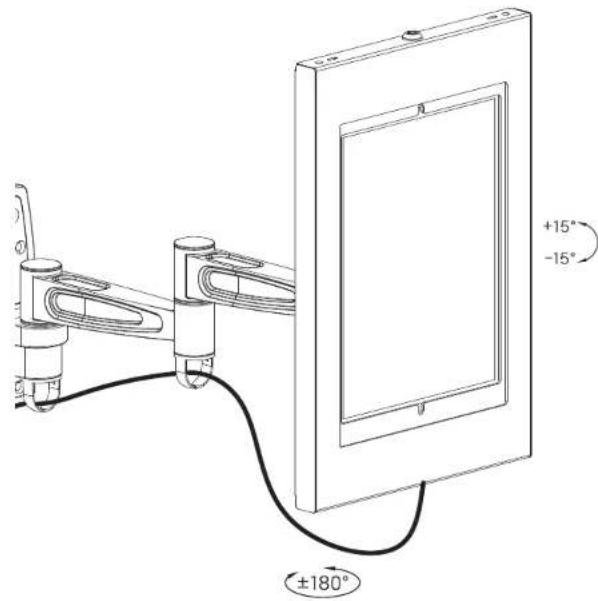
• Power cables can be run through the cable management clips on the bottom of the Mount Arm joints.
Visit us at www.mount-it.com for product registration and warranty information.
Our US based customer service team is standing by to answer any questions you have about your Mount-It! product.
Available by phone Monday - Friday from 8:00am to 4:00pm PST.
Chat live with an agent on our website!

support@mount-it.com

(855) 925-5668

www.mount-it.com
- TABLET WALL MOUNT WITH SWING ARM
- Thank you for choosing Mount-It!
- Step 1
- Step 1a
- Wood Stud Mounting Option
- Step 1b
- Concrete/Brick Mounting Option
- Step 2
- Open the Tablet Case
- Step 3
- Attach the Tablet Case to the VESA Plate
- Step 4
- Attach the Tablet Case to the Mount Arm
- Step 5
- Select the Tablet Adapter
- Insert the Tablet
- Step 6
- Final Adjustments
Brand : Mount-It!
Model : MI-3774
Category : Uncategorized