RM/342 - Oven Ramtons - Free user manual and instructions
Find the device manual for free RM/342 Ramtons in PDF.


| Product Type | Countertop Oven |
| Brand | Ramtons |
| Model | RM/342 |
| Dimensions (Approx.) | 45 x 35 x 30 cm |
| Weight (Approx.) | 8 kg |
| Power Supply | 220-240 V, 50/60 Hz |
| Power Consumption | 1500 W |
| Capacity | 42 liters |
| Main Functions | Bake, Grill, Broil, Convection |
| Temperature Range | 100°C - 250°C |
| Timer | Up to 120 minutes with auto shut-off |
| Interior Light | Yes |
| Door Type | Tempered glass, drop-down |
| Control Type | Knobs and dials |
| Cleaning | Wipe interior with damp cloth; do not use abrasive cleaners |
| Safety Features | Overheat protection, cool-touch handle, automatic shut-off |
| Spare Parts Availability | Contact Ramtons support for heating elements, thermostats, door gaskets |
| Included Accessories | Baking tray, wire rack, crumb tray |
| Certifications | CE, RoHS |
Frequently Asked Questions - RM/342 Ramtons
User questions about RM/342 Ramtons
0 question about this device. Answer the ones you know or ask your own.
Ask a new question about this device
Download the instructions for your Oven in PDF format for free! Find your manual RM/342 - Ramtons and take your electronic device back in hand. On this page are published all the documents necessary for the use of your device. RM/342 by Ramtons.
USER MANUAL RM/342 Ramtons
natural_image
Technical line drawing of a microwave oven with control panel and three buttons (no text or symbols)MODEL:RM/342
Read this booklet thoroughly before using and save it for future reference
IMPORTANT SAFEGUARDS
When using electrical appliances, basic safety precautions should always be followed including the following:
- Read all instructions.
- Do not touch hot surface. Use handles or knobs.
- Before using check that the voltage power corresponds to the one shown on the appliance nameplate.
- This appliance has been incorporated with a grounded plug. Please ensure the wall outlet in your house is well earthed.
- To protect against electrical shock do not immerse cord, plugs in water or other liquid.
- The appliance can be used by children aged from 8 years and above and persons with reduced physical, sensory or mental capabilities or lack of experience and knowledge if they have been given supervision or instruction concerning use of the appliance in a safe way and understand the hazards involved. Children shall not play with the appliance. Cleaning and user maintenance shall not be made by children unless they are older than 8 and supervised.
- Keep the appliance and its cord out of reach of children less than 8 years.
- Unplug from outlet when not in use and before cleaning. Allow to cool before putting on or taking off parts.
- Do not operate any appliance with a damaged cord or plug or after the appliance malfunctions or has been damaged in any manner. Return appliance to the nearest authorized service facility for examination, repair or adjustment.
- Use extreme caution when removing tray or disposing of hot grease.
- Oversize foods or metal utensils must not be inserted in a toaster-oven as they may create a fire or risk of electric shock.
- A fire may occur if the toaster oven is covered or touching flammable material, including curtains, draperies, walls, and the like, when in operation. Do not store any item on top of the appliance when in operation.
- Do not clean with metal scouring pads, for finish may break off and the electrical parts may become touchable which may result in a risk of electric shock.
- Extreme caution should be exercised when using containers whose materials are not metal or glass.
- Do not store any materials, other than accessories recommended by manufacturers in this oven when not in use.
- Do not store any of the following materials in the oven, i.e., paper, cardboard, plastic and the like.
- Do not cover crumb tray or any part of the oven with metal foil, for it will cause overheating.
- The use of accessories not recommended by the appliance manufacturer may cause injuries.
- To disconnect, turn any controls to "OFF", then remove the plug from wall outlet.
- Do not let cord hang over edge of table or counter or touch hot surface.
- Do not place on or near a hot gas or electric burner, or in a heated oven.
- Do not use outdoors.
- Do not use the appliance for other than intended use.
- The appliance is not intended to be operated by means of an external timer or separate remote-control system.
- This appliance is intended to be used in household and similar applications such as: - staff kitchen areas in shops, offices and other working environments;
- farm houses;
– by clients in hotels, motels and other residential type environments;
- bed and breakfast type environments.
- Save these instructions.
DESCRIPTION
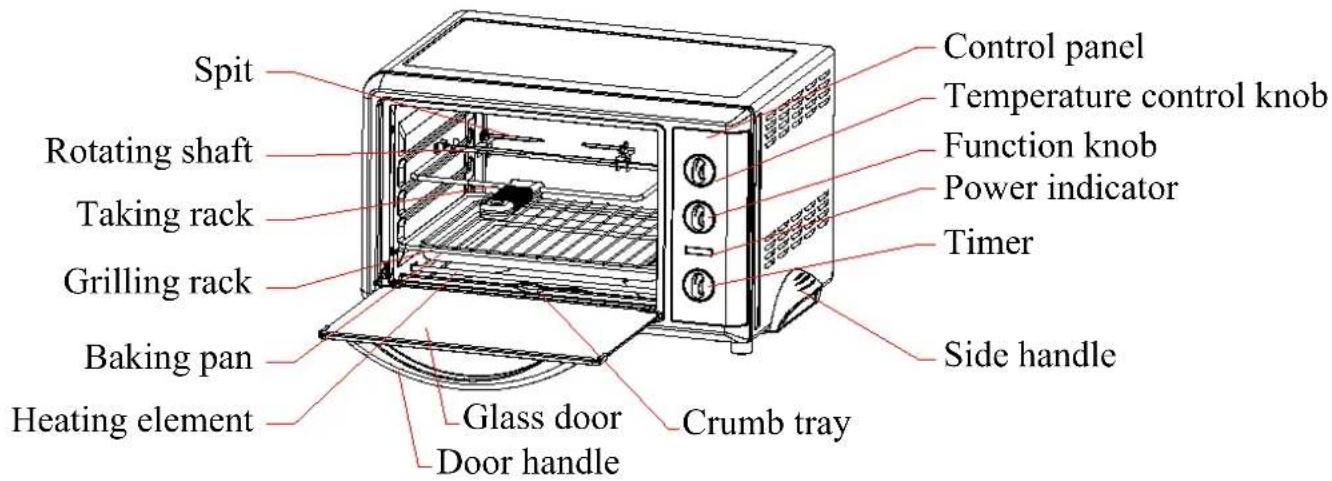
CONTROL PANEL

flowchart
graph TD
    A["Temp/℃"] --> B["Min"]
    B --> C["85"]
    C --> D["120"]
    D --> E["150"]
    E --> F["180"]
    F --> G["200"]
    G --> H["230"]
    H --> I["Max"]
    J["Function"] --> K["Power"]
    K --> L["Control Unit"]
    K --> M["External Control Unit"]
    K --> N["External External Control Unit"]
radar
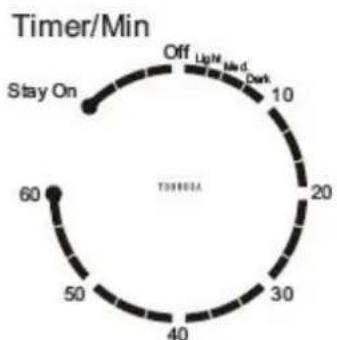
Timer/Min | Time (minutes) | Value | | :--- | :--- | | 10 | Off | | 20 | Light | | 30 | Med | | 40 | Dark | | 50 | | | | | | | | | | | | | | | | | | | | | | | | | | | | | | | | | | | | | | | | | | | | | | | | | | | | | 60 | Stay On | The chart displays a circular layout with concentric rings indicating duration ranges. The text 'T39803A' appears at the center.Temperature control knob
Turn this knob to get your desired temperature, the min temperature is 70^ C and the max temperature is 250^ C.
Function knob
Turn the knob to choose function,
“☐” means that only the top heating elements will work;
“☐” means that only the lower heating elements will work;
“☐” means that the top and the lower heating elements will work;
“means that the top heating elements will work and at the same time the convection function will operate;
“”means that all the heating elements and the convection function will work. In convection mode, hot air is circulated throughout the inner cavity to brown and crisp the food quickly and evenly;
“stands for that the top elements will work and at the same time the rotating shaft will rotate;
“means that all the heating elements and the rotating shaft will work. In rotating mode, the rotating shaft will rotate to grill the chicken or chop more evenly.
“☐.” means that all the heating elements, the rotating shaft and the convection function will work.
Timer
Timer, turn it to get the desired toasting time, and the longest toasting time that can be set is 60 min.
BEFORE THE FIRST USE
Unpack the appliance and place it on a horizontal surface. Remove out all insert cards, plastic bags. Then wipe the inner walls and housing carefully use a damp cloth. Clean all the detachable parts in hot, sudsy water before using.
NOTE:
- Initial start-up operation may result in a bit smell and smoke (about 15 min.). It is normal. It is due to the protective substance on heating elements which protect them from salt effects during shipping.
- The least distance between the food and the top heating elements should be 30mm, for the perfect result.
- There are 4 rack guides (slots) in different height in the inner cavity. You can choose the proper rack slot to get the best toasting performance depending on the working status of heating element and the size of food. If only the top heating elements are energized it is suggested to place the rack on the first slot to obtain heat directly provided that the least 30mm distance has been maintained.
- When setting the timer for less than 5 minutes, always rotate timer to over 5 minutes and then rotate it back to your chosen time. This will ensure a safe and accurate setting.
- Keep on monitoring the food during operation to ensure that it is not overcooked.
- This appliance has convection function, it can make your food brown and crisp more quickly, if you want this effect, turn function knob to choose your desired function.
Caution: when removing the food from oven always use oven mitts to reduce the possibility of getting scalded.
- Rotate the temperature knob clockwise to choose your desired temperature, turn the function knob to the ☐” position, let the top and lower heating elements to work together. Insert grilling rack into the proper rack slot and place the bread on the grilling rack, you can toast 6 slices at most at one time. It is recommended to insert the grilling rack to the lowest
slot.
Note: The grilling rack can be inserted into the rack slot only one direction, if it can not be inserted, reverse it and insert a

natural_image
Pure line drawing of a curved road or bridge with diagonal stripes and marked points (no text or symbols)(see the right picture).
- Choose your toast color by adjusting the timer. Generally, toasting time is about
3-6minutes. When the toast cycle is finished the bell will ring and the electrical power is automatically switched off. Remember that the longer the time you select, the darker the bread will be.
Note: The more the slices toasted the lighter the color will be, so adjust timer accordingly.
- You can stop the cycle at any time, turn the timer to "off" position and the bell will ring
Note: bread may burn so do not choose too long time, and close supervision is necessary.
Baking
It is recommended to preheat the oven before putting in food. When the temperature of cavity has reached the preset temperature the heating elements will stop preheating.
-
Set the operating temperature and time depending on the thickness of your food and your favor.
-
Set the desired operating status of heating elements by turning function knob.
-
Place food on the baking pan after preheating. Then insert the baking pan into proper rack slot.
Note: during the operation, the heating elements will cycle on & off to maintain a constant temperature.
-
When finished, the timer will back to “off” position, a bell ring will be heard, then the appliance and indicator will turn off automatically.
-
Take out the baking pan with oven mitt.
Caution: be careful! The baking pan may be very hot, fetch it with oven mitt, and do not touch hot parts!
Grilling
This appliance can be used for grilling.
-
It is recommended to preheat the oven, set a desired temperature and when the temperature is got, the appliance will stop working automatically.
-
Set working temperature, working status of heating elements, and working time.
-
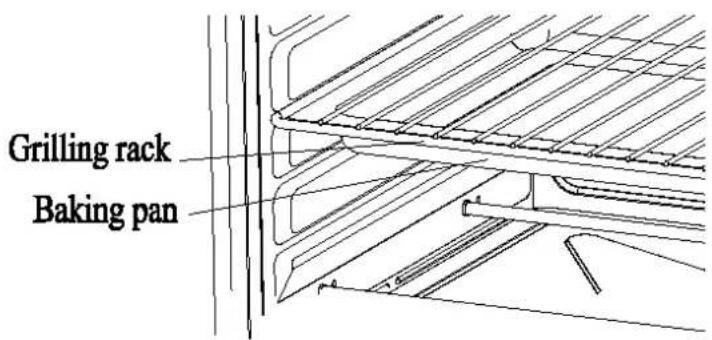
You can put food in baking pan for grilling. Or you can put the food on the grilling rack for grilling, in this method you should insert the baking pan and the grilling rack into the
same rack slot, and let the baking pan under the grilling rack to get dregs (see the right
picture).
-
After the grilling has been finished, and bell will ring, and the appliance will switch off automatically.
-
Take out the food with oven mitt.
Caution: be careful! The grilling rack may be very hot, fetch it with oven mitt, and do not touch hot parts!
Grilling whole chicken or chop
This toaster oven can grill whole chicken or chop.
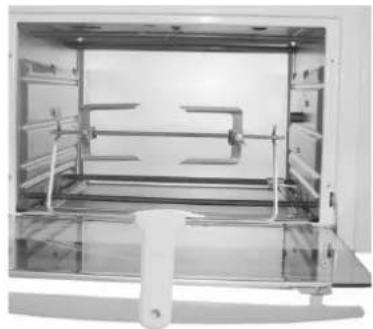
- After preprocessing, pierce the chicken from head to end with rotating shaft, locate the drumsticks with a spit, and locate the head and wings with the other spit. Then fix the two spits on the rotating shaft.
-
Before grilling it is recommended to preheat the appliance. Choose proper temperature and grilling time. (Generally, the preheat temperature is about 200^ C, and the preheat time is about 10 min.)
-
After preheat, position the rotating shaft with chicken into the toaster oven.
-
Choose your favorite function from “⇨” and “≡”. Set working temperature and timer.
And the rotating shaft will rotate and it will begin to grill.
- When it finished grilling, the bell will ring, take out the rotating shaft using taking rack (see the right picture), then you can take the chicken out from rotating shaft and spits.
Caution: be careful! The rotating shaft, spits and chicken may hot, wear oven mitts to protect yourself from burning.
natural_image
Interior view of a laboratory apparatus with metal fixtures and glass casing (no visible text or symbols)Defrosting
-
When defrosting, remove all paper/ plastic wrappings or aluminum foil. Do not preheat the appliance, and do not choose convection function.
-
Open the glass door and put the food on the baking pan, close the door.
-
Connect the plug into a power outlet.
-
Set the temperature knob to "70" position.
- Set the timer knob to your desired setting.
- When the defrosting cycle is finished the bell will ring and the electrical power is automatically turned off.
NOTE: to avoid contaminating, the food to be defrosted should be refrigerated or fully cooked. Do not set the temperature control knob at high temperature to avoid incompletely defrosting.
USEFUL TIPS
- Condensation will appear on the oven door for some foods and then disappear. It's normal.
- Cook food immediately after defrosting.
- Frozen foods and thick meat should be cooked for longer time.
- When defrosting, place the food on the baking pan.
- Do not open the oven door too frequently to prevent heat loss.
- When toasting, frozen bread and slices should be at a darker setting than 1 regular slice.
- When baking, smoke may appear. Removing excess fat prior to baking can reduce this.
CLEAN AND MAINTENANCE
- Before cleaning the toaster oven unplug it and allow it to cool down completely.
- Wash all the attachments with mild, soaped water.
- Using a mild cloth to clean the inner of the oven, clean it regularly.
- Clean the door by using a hot cloth with detergent or soap.
- Do not immerse the unit in the water for cleaning.
- Clean the Crumb Tray. The crumb tray is at the cavity bottom. Pull out the crumb tray directly. Wipe interior of crumb tray with a damp cloth. After cleaning, push the crumb tray into position.
Do not use the dishwasher to clean any accessories.
Do not use any abrasive cleaning products.
- Clean accessories with a soft cloth in hot water with mild detergent or soap.
- Do not wipe the heating elements.
- Do not use any metal pad to clean the surfaces of the oven.
CAUTION
THE TOASTER OVEN MUST BE OPERATED WITH THE CRUMB TRAY IN RIGHT PLACE.
TROUBLESHOOTING GUIDE
| Item | Problem | Solution |
| 1 | Unit smokes during bake function | Initial start up operation may result in minimal smoke and smoke (about 15 min.). This is normal. It is due to the protective substance on heating. Elements which protects them from salt effects during shipping. |
| Smoke in baking functions often means that the baking pan or interior is dirty. | ||
| Smoke almost always appears in baking and it is normal. Cut off excess fat prior to baking to reduce smoke. | ||
| Stop using appliance if smoke source is the power cord. Unplug it. | ||
| 2 | The grilling rack is stuck and oven door does not operate smoothly. | Remove grilling rack and clean inside the rack grooves inside oven chamber. Also clean inside of crumb tray. Check that hooks on oven properly aligned into grilling rack. |
| 3 | Toast black and smoking or too light | Choose a lighter or darker toast time setting |
ENVIRONMENT FRIENDLY DISPOSAL

natural_image
Simple line drawing of a trash bin with no text or symbolsYou can help protect the environment!
Please remember to respect the local regulations: hand in the non-working electrical equipments to an appropriate waste disposal center.
Brand : Ramtons
Model : RM/342
Category : Oven