
CI250 - Washing machine CDA - Free user manual and instructions
Find the device manual for free CI250 CDA in PDF.


| Product Type | Washing Machine |
| Brand | CDA |
| Model | CI250 |
| Dimensions (Width x Depth x Height) | 60 cm x 60 cm x 85 cm |
| Weight | 70 kg |
| Power Supply | 220-240 V, 50 Hz, 2000 W |
| Energy Efficiency Class | A+++ |
| Maximum Spin Speed | 1200 rpm |
| Drum Capacity | 7 kg |
| Number of Programs | 15 |
| Main Functions | Quick Wash, Eco Wash, Delicates, Intensive, Pre-Wash, Rinse+ |
| Display Type | LED Digital |
| Noise Level (Wash/Spin) | 52 dB / 76 dB |
| Child Lock | Yes |
| Overflow Protection | Yes |
| Cleaning and Maintenance | Clean detergent drawer, drum clean program, clean filter regularly |
| Spare Parts Availability | Available through CDA service centers |
| Repairability Index | 7.5/10 |
Frequently Asked Questions - CI250 CDA
User questions about CI250 CDA
0 question about this device. Answer the ones you know or ask your own.
Ask a new question about this device
Download the instructions for your Washing machine in PDF format for free! Find your manual CI250 - CDA and take your electronic device back in hand. On this page are published all the documents necessary for the use of your device. CI250 by CDA.
USER MANUAL CI250 CDA
Printed on Recycled Paper
Cod. 3.77334.00 Ed. 0 - 07 - 2007
|C|DA|
QUICK START UP GUIDE
IMPORTANT

natural_image
Front view of a white washing machine with a circular vent and control panel (no visible text or symbols)Control panel

1) Detergent dispenser
The detergent dispenser has two trays.
1 - Washing powder tray. Pour washing powder into this tray (max 180 gr.)
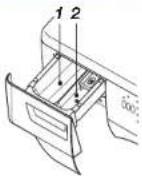
2 - Softener tray. Pour softener Into this tray, in the amount recommended on the bottle (max 80 ml.)
Having loaded the powder and softener (the latter optional), close the dispenser, making sure it's perfectly shut.
WASHING MACHINE
Cl250
1 - Detergent dispenser
2 - On/Off button
3 - Start button
4 - Reset buttons
5 - Display
6 - Mode button
7 - Select button
8 - Child lock option buttons
A) In short, to start a programme
- Load your laundry in the drum and shut the door.
- Switch on the washing machine by pressing On/Off button (2).
- Put detergent and any necessary additives in the relevant compartments.
- Press Mode button (6) to select the desired programme.
- Press button Select button (7) to confirm choice.
- Press the Start button (3).
- At the end of the programme, the machine emits an acoustic signal (10 times) to warn you, wait for the door icon to go off and then take the laundry out of the drum.
- Always switch the washing machine off at the end of each wash, by pressing On/Off button (2).
NB.: before moving the appliance it is important to eliminate any residual water by following the filter cleaning instructions; this will avoid functional problems.
B) In short, to start a manual programme with options
- Load your laundry in the drum and shut the door.
- Switch on the washing machine by pressing On/Off button (2).
- Put detergent and any necessary additives in the relevant compartments.
- Press Mode button (6) to select the desired programme.
- Press Select button (7) to confirm choice.
- Press Mode button (6) repeatedly till you find the desired option.
- Press Select button (7) to confirm choice. Repeat steps 6 and 7 for all the options you want. When setting "Spin, Temperature, Delayed start and Drying time", an extra step is necessary.
- Press Start button (3) to start the programme.
- At the end of the programme, the machine emits an acoustic signal (10 times) to warn you, wait for the door icon to go off and then take the laundry out of the drum.
- Always switch the washing machine off at the end of each wash, by pressing On/Off button (2).
Programmes display

| Cycle icon | Programme | Max. min | Max. revp. | Delay | Quick wash | Device wash | Acpray time | Entire time | Rises HMO | Max. max in Kg | ||
| D | R | |||||||||||
| FULL LOAD | Intensive | max | 60° | ● | ● | ● | ● | ● | ● | / | 8,5 | |
| Eco | max | 40° | ● | ● | ● | ● | ● | ● | / | 9,5 | ||
| Normal | max | 60° | ● | ● | ● | ● | ● | ● | / | 9,5 | ||
| EVERYDAY | Intensive | max | 60° | ● | ● | ● | ● | ● | ● | / | € | |
| Eco | max | 40° | ● | ● | ● | ● | ● | ● | / | € | ||
| Normal | max | 60° | ● | ● | ● | ● | ● | ● | / | € | ||
| SPECIAL PROGRAMMES | Hot Wash | max | 90° | ● | / | / | ● | ● | / | € | ||
| Synthetic / Curtains / Silk | 800 | 40° | ● | / | / | ● | ● | ● | 4 | |||
| Sport and shoes | 800 | 40° | ● | / | / | / | / | / | ● | 4 | ||
| Wool | 800 | 40° | ● | / | / | / | / | / | ● | 3 | ||
| Drain | / | ● | / | / | ● | / | / | |||||
| UTILITY PROGRAMMES | Rinse | max | / | ● | / | / | ● | / | / | |||
| Softener | max | / | ● | / | / | / | / | / | ||||
| Spin | max | / | ● | / | / | / | / | / | ||||
Options table
| Option | Function .... | Commands |
| regulates spin speed | press Mode/P to choose and Select to confirm option press Mode/P to choose and Select to confirm spin speed | |
| regulates the temperature | press Mode/P to choose and Select to confirm option press Mode/P to choose and Select to confirm temperature | |
| delays the start in 30 min steps to 18 h. | press Mode/P to choose and Select to confirm option press Mode/P to choose and Select to confirm delay time | |
| cuts certain cycles by around 30 min. | press Mode/P to choose and Select to confirm option | |
| reduces wash movement in certain cycles | press Mode/P to choose and Select to confirm option | |
| adds more rinse water | press Mode/P to choose and Select to confirm option | |
| adds an extra rinse on top of set number | press Mode/P to choose and Select to confirm option | |
| stops cycle leaving laundry to soak | press Mode/P to choose and Select to confirm option | |
| looks the programme settings | press Mode/P and Select at the same time |
| Problem | Symptoms |
| E01 Irregular heating | If code E01 flashes at the end of the programme, there is a fault with the heating function. NB.: the wash programme finishes as normal. |
| E02 Irregular operation of motor | If code E02 flashes during the set programme the reasons could be either a motor failure or a motor control circuit fault or a laundry overload of the machine if the washing machine has a full load.NB.: the wash programme finishes early after a drain phase. |
| E03 Irregular operation during water supply | If code E03 flashes during the set programme, the water supply is faulty.NB.: the wash programme finishes early after a drain phase. |
| E04 Irregular operation during water draining | If code E04 flashes during the set programme, there are problems in the drain phase. NB.: the wash programme finishes early after a drain phase. |
| E05 Drum door safety anomaly | If code E05 flashes during the programme set, the causes may be:door not shut properly or a failure of the door safety lock system. |
| E06 Electronics panel | If code E06 flashes during the programme set, there is a malfunction in the electronics board. NB.: the wash programme finishes early after a drain phase. |
|C|D|A|
Passionate about style
INSTRUCTION MANUAL

natural_image
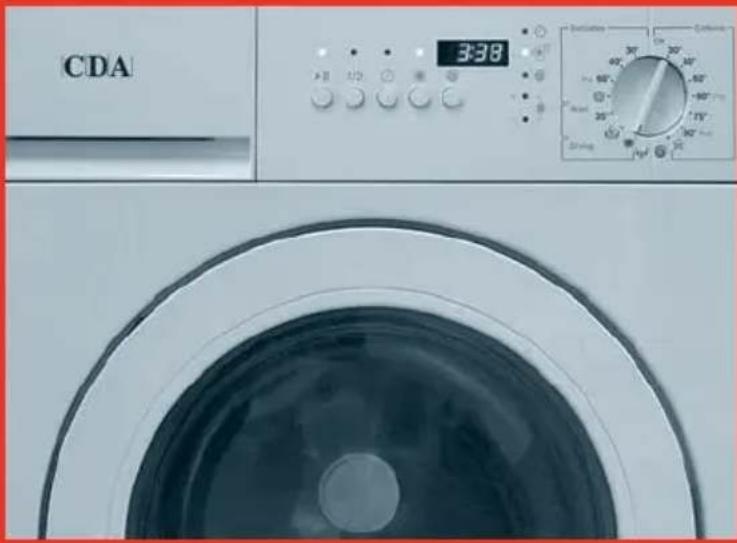
Front view of a CDA washing machine with dual rotary dials and a digital display showing 3:38 (no visible text or symbols on the device itself)WASHING MACHINES
Cl250
Cl350
Cl360
WASHER DRYERS
C1850
C1950
C1960
Thank you
for purchasing this |C|D|A| product
which comes to you with a 5 year guarantee*
Please don't forget to REGISTER THIS APPLIANCE WITHIN 30 DAYS by completing the Registration of Purchase Card enclosed.
Having bought your new appliance, it is important to register the purchase.
This ensures you receive prompt and efficient service in the event that the product requires attention during its guarantee period.
If you have any queries please contact us in one of the following ways:
T:01949 862 012
F:01949 862 003
E:service@cda.eu
Washing machine CI 250
Instruction for use
Contents
Tips for the user 2
General safety 2
Optimizing the load 3
Description of the washing machine 4
Technical characteristics 4
Unpacking 5
Positioning 5
Water connection 6
Electricity connection 6
Table of international symbols 7
Control panel 8-9
Operations 9
Start cycle 9
In short, to start a programme 10
Starting a delayed start programme 10
Start cycle with options 11
In short, to start a manual programme with options ..... 12
Options table 14
Maintenance and cleaning 15
Problems, possible causes 16
Troubleshooting 17-18
Tips for the user
This appliance was designed with the utmost care for environmental safety.
Your supplier or the local authorities will be able to tell you how and where to dispose of old equipment.
Disposal of packaging materials

Don't throw the packaging from your appliance in the rubbish but separate the various materials (eg. polystyrene, plastic bags) according to local regulations on waste disposal and current law. Don't let children play with them as they are potentially dangerous.
Important: When you decide to no longer use an old appliance, it's best to render it inoperative by unplugging it, cutting the power cable and disposing of it together with the plug. It is also advisable to put the door, hinges and lock out of action to prevent children from locking themselves inside the appliance.
Crossed WEEE wheelie-bin

This appliance carries European Directive 2002/96 marking relative to disposal of Waste Electrical and Electronic Equipment (WEEE). The symbol of the crossed-out wheelie-bin means that at the end of its useful life the appliance must not be treated as normal waste but taken to a collection centre where electrical and electronic appliances are sorted or to a retailer on buying a new appliance of a similar sort. Recycling disposal of this appliance helps prevent the negative effects on the environment and people's health that may arise from improper treatment of the product. Disposal must be carried out in accordance with current local environmental regulations. For more detailed information on treatment, disposal and recycling of this product, contact your local waste disposal service or the store where you bought the appliance.
The manufacturer cannot be held responsible for any damage to persons, animal or property arising from failure to comply with the following rules.
Warning! After removing the packaging, make sure the appliance is undamaged. If you are not sure, don't use it and consult a qualified technician or your retailer.
Before using the appliance, carefully read this instruction booklet and in particular the sections on installation, safety, proper use and maintenance. Look after the booklet so you can consult it and eventually pass it on to a new owner.
This appliance must not be used for any purposes other than that for which it was designed.
It must be installed by a professionally qualified person following the manufacturer's instructions.
Before any cleaning or maintenance is carried out, disconnect the appliance from the mains by removing the plug or switching off your mains supply and turning off the water tap.
In cases of failure and/or faulty operation, disconnect it from the mains, turn off the water tap and do not tamper with the appliance. For repairs, contact the CDA Customer Care.
General safety
The washing machine was designed and made to international safety standards.
These warnings must be carefully read. They are provided for safety reasons.
Use of this washing machine, like any other electrical appliance, requires observing a number of basic rules. In particular:
- the appliance must only be used by adults and as explained in this instruction booklet;
- do not touch the appliance if you are barefoot or have wet hands or feet;
- do not remove the plug by pulling the power lead but by pulling the plug itself;
- do not open the detergent unit while the machine is working;
- do not touch the discharge water, as it may be very hot;
- if you need to open the door during a wash programme, discharge the water first (see Operation section);
- do not force the door open under any circumstances as this may damage the safety mechanism;
- in the event of failure, do not touch any internal mechanisms to attempt repair (see: Problems / Possible causes or Troubleshooting)
- do not use the appliance with extension leads in bathrooms or showers;
- do not leave the appliance exposed to open weather (rain, sunshine, etc.)
- during normal operation, the door can get warm;
- before putting laundry in the drum, check there are no extraneous objects in it;
- do not put the machine on rugs or carpeting;
- do not take out the filter while the washing machine is working.
Keep detergents in a dry place out of reach of children.
Before loading laundry into the drum, make sure there is nothing in its pockets (coins, keys, safety pins, etc.).
Optimizing the load
Washing with a full load, as opposed to two smaller loads, reduces consumption of water, detergent and energy. Up to 50% can be saved on energy in this way.
This washing machine does not require pre-washing of laundry. It was designed to wash perfectly without it.
You will find cycles shorter, you will use less detergent and you will save up to 25% compared to traditional programmes involving a pre-wash.
Is a high temperature wash needed?
To avoid washing at high temperatures, treat laundry with an anti-stain agent or soak stubborn stains beforehand. You'll save electricity in this way.
Try to use the energy-saving programme for only slightly dirty laundry, for example, washing at 60^ C instead of 90^ C and at 40^ C instead of 60^ C can save 50% energy.
Dose detergent according to water hardness, dirtiness and quantity of laundry, thus avoiding waste and protecting the environment. Although they might be bio-degradable, detergents contain elements that alter nature's equilibrium.
By using your machine at certain times of the day, eg. outside of peak-hours you will help reduce peak demand for public utilities. The Delay option helps to organise washing in these cases.
If you want to dry laundry in a drier or washer/drier, it is best to do a high-speed spin to reduce residual moisture and save time/energy in the drying programme.
How to remove stains
The most common stains are removed by simple washing. In the case of stubborn stains, leave garments to soak in soap and water beforehand. There are also liquid products to apply directly to stains to help remove them.
On old stains, try a stain-removing agent, being careful not to apply too much agent resulting in excessive lightening of the fabric surrounding the stain.
Common stains
- ink and biro: dab with cotton wool soaked in 90° alcohol;
- tar and lubricants: cover lightly with butter, let it work for a short while, treat with spirits of turpentine and then wash immediately;
- wax: scrape off and heat with a hot iron between two pieces of kitchen tissue; immediately afterwards, wipe with cotton wool soaked in spirit of turpentine or ethyl alcohol;
- chewing gum: treat with nail polish remover and then remove completely with a rag;
- mould: white cotton and linen: put in a solution of 1 part bleach to 5 parts water and 1 part vinegar, wash immediately; other fabrics: treat with hydrogen peroxide (10% solution) and wash immediately;
- nail polish: place the fabric stain-down on a piece of kitchen tissue, apply solvent and shift garment as the tissue colours;
- grass: dab with ethyl alcohol.
NB:
Technical data, product code, service number (78 XXXXX XX XXXXXX) and serial number are to be found on the rating plate on the back of the machine.
The service and serial numbers can also be seen on the inside of the door.
On calling Customer Service, specify: problem, model, service number and serial number.

This machine complies with the following European Directives:
- EC/73/23 - LOW VOLTAGE
- EC/89/336 - EMC
- EC/93/68 - EC marking
Description of washing machine
1 - Detergent dispenser
2 - On/off button
3 - Start button
4 - Reset buttons
5 - Display
6 - Mode button
7 - Select button
8 - Child safety option buttons
9 - Door handle
10 - Plinth
11 - Filter

Technical characteristics
Dimensions: Width 59.5 cm
Depth 56 cm
Height 82 cm
Wash capacity:
Cotton and linen: 1 to 8.5 kg
Synthetic and mixed: 1 to 4 kg
Wool and silk: max. 3 kg
Spin speed: up to 1200 rpm (depending on model)
Power supply voltage/frequency: 230-240 V / 50 Hz
Required water main pressure: min. 0.1 Mpa (1 bar)
max. 1 Mpa (10 bar)
Warning! Look after this manual for future consultation and subsequent users.
natural_image
Technical line drawing of a mechanical housing with mounting base and side panel (no text or symbols)
natural_image
Illustration of two hands holding test probes with a scale, no text or symbols presentUnpacking
UNPACKING INSTRUCTIONS
Important:
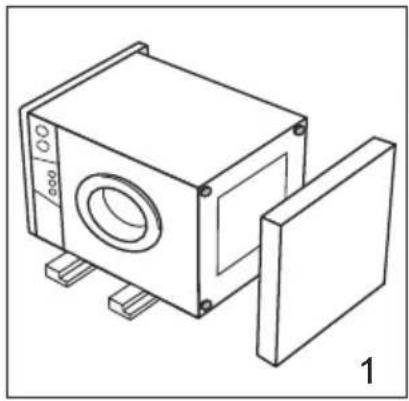
To move the machine with a lifting device, it's advisable to lift it on its left-hand side, as indicated on the packaging plate. Remove the heat-shrink film.
- Open the door and take out the accessories bag. Lay the machine on its left side on some angle bars and remove the packaging base.
- Make sure the two back and front right feet are fully screwed in. Put the machine back in the vertical position.
Adjust the front left foot and close with the lock nut using the spanner provided. - Loosen the three rear drum lock screws with the spanner provided and then take them out.
- Remove the three anchor pins.
- Close the holes with the plugs you will find in the accessories bag. Keep the anchor pins for future handling of the washing machine.

natural_image
Diagram of a hand holding a small object above a device with hoses and cables (no text or symbols)
natural_image
Line drawing of a hand holding a tool near a vertical line, with an arrow indicating motion or force (no text or symbols)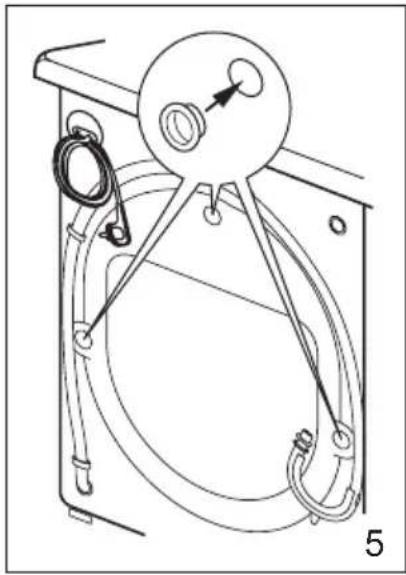
natural_image
Technical line drawing of a mechanical device with hoses and a circular component (no text or symbols)
Positioning
After placing the machine in the desired position, level it by adjusting the front left foot and blocking the lock nut with the spanner provided.
Warning: if not correctly levelled, the machine will be unstable, noisy and likely to suffer damage or break down.
Do not place the machine on carpets or rugs.
Install on a hard floor and do not place against walls, furniture or anything else.
Water connection
Supply:
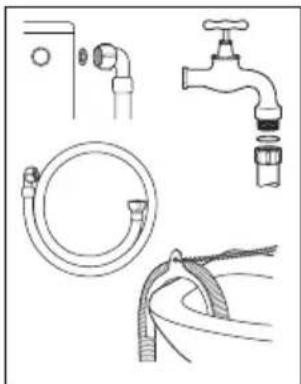
Connect the supply hose to a fresh water tap with a 3/4 inch thread connector using the rubber washer provided and tighten the locking ring fully.
If the tap is new or hasn't been used for a long time, let the water run for a few minutes before making the connection.
Connect the other end of the supply hose to the machine, remembering to fit the rubber washer between the hose and the solenoid valve connector.
Make sure there are no kinks or tight turns in the hose.
Check that the water main pressure values are those in the table of technical characteristics.
If a longer supply hose is needed, contact a specialist dealer or authorised service provider.
Discharge:
insert the discharge hose into a drain duct (minimum inside diameter = 4 cm) or rest it on the sink or bath (tie the support to a tap), making sure there are no kinks or tight turns.
The hose end must be positioned between 70 cm (min) and 100 cm (max) off the floor, as illustrated.
NB.: make sure the end of the hose isn't under water.
natural_image
Line drawings of various household water pumps and fixtures (no text or labels)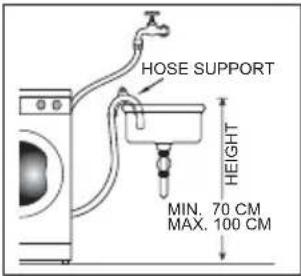
Electricity connection
Before inserting the plug in the socket, make sure that:
- the mains system is suitably sized for the maximum current value indicated on the rating plate on the back of the washing machine;
- the power outlet has an earthing system as required by law.
- the power outlet can take the maximum load indicated on the rating plate;
- the power outlet is compatible with the washing machine plug; if not, call an authorised technician for a replacement;
- the power outlet must be easily accessible after installation of the washing machine;
- if the power lead is damaged it must be replaced with another cable or a special kit available from the manufacturer or technical assistance service;
- do not use extension leads or adapters;
- the lead must not be bent or compressed.
The manufacturer declines any responsibility for damage to persons or property caused by failure to follow these instructions.
How much does laundry weigh?
1 sheet 400 - 500 g
1 pillow case 150 - 200 g
1 tablecloth 400 - 500 g
1 bathrobe 900 -1200 g
1 pair of jeans 400 - 500 g
1 shirt 150 - 200 g
Sorting laundry
Labels with symbols attached to garments help you take good care of your laundry. The table at the bottom of this page explains the international symbols used.
Sort laundry by: type of fabric, type of dirt and wash temperature by referring to the labels on items.
The following types of laundry must be washed separately:
- white and colour-fast items;
- coloured and non colour-fast items;
- delicates (silk, rayon, nylon, etc.)
- wool
New coloured laundry often releases colour, so it's advisable to wash separately the first time, to avoid staining other fabrics.
For very delicate fabrics, lingerie, tights, etc., it's best to use a mesh bag.
When sorting, check that pockets are empty (of coins, etc.) and that no broaches or clips are attached. Check buttons, close zips and do up pillow case buttons.
Tips for special items
Curtains: best to fold, put in a mesh bag and wash separately.
Quilts and anoraks: if they have down padding, they can be washed in the washing machine. Turn inside out and wash in a max. load of 3 - 3.5 kg. It's advisable to run one or more extra rinse cycles, followed by a slow spin.
Tennis shoes: before putting them in the drum, remove any mud. They can be washed with strong garments such as jeans but shouldn't be washed together with whites.
INTERNATIONAL SYMBOLS
Labels on fabrics help take good care of your laundry.
 Normal wash Normal wash |  95° MAX. 95° MAX. |  60° MAX. 60° MAX. |  40° MAX. 40° MAX. |  Don't wash Don't wash | |||
 Delicate wash Delicate wash |  95° MAX. 95° MAX. |  60° MAX. 60° MAX. |  40° MAX. 40° MAX. |  30° MAX. 30° MAX. |  Hand wash Hand wash | ||
 Iron Iron |  Hot Hot |  Warm Warm |  Cool Cool |  Don't iron Don't iron | |||
 Dry cleaning Dry cleaning |  All solvents All solvents |  With benzene With benzene |   With bleach With bleach |  |  Don't dry clean Don't dry clean | ||
 Bleach Bleach |  Bleach Bleach |  Don't bleach Don't bleach | |||||
 Drying Drying |  Normal drying Normal drying |  Delicate drying Delicate drying |  Don't dry in a drier Don't dry in a drier | ||||
Control panel
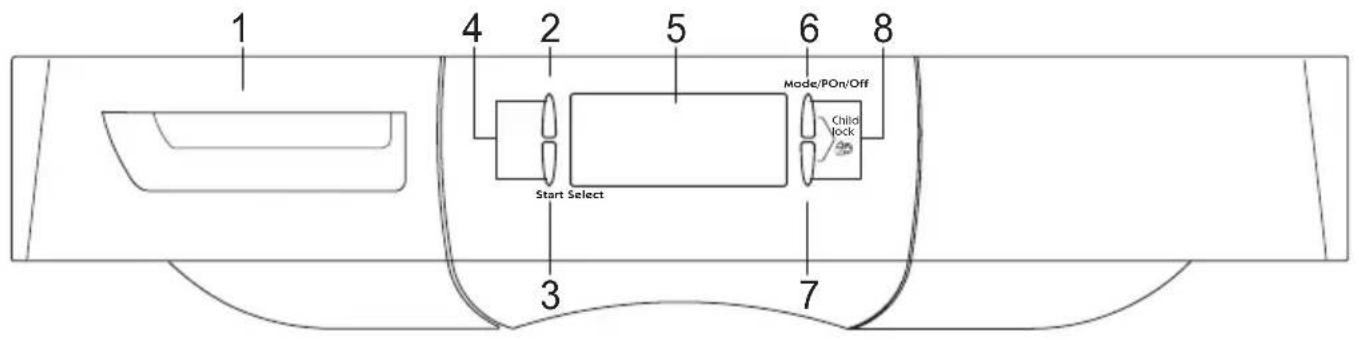
1 - Detergent dispenser
5 - Display
2 - On/off button
6 - Mode button
3 - Start button
7 - Select button
4 - Reset buttons
8 - Child safety option buttons
1) Detergent dispenser
The detergent unit has two compartments.
1 - Detergent compartment.
Pour in detergent (max. 180 g).
2 - Softener compartment.
Pour in softener in the quantity recommended on the packaging (max. 80 ml).
Having loaded the detergent and softener (optional), close the dispenser completely.
It is best to use non-foaming detergents and a water softening agent if your water is very hard.

2) On/off button
This button switches the machine on and off. When pressed, an acoustic signal is emitted and the display lights up.
3) Start button
Pressing this button starts the selected wash cycle.
4) Reset buttons
Pressing these buttons - On/Off (2) and Start (3) - at the same time
a) when setting a cycle, returns to initial display for a new setting;
b) during a cycle, starts the Reset procedure (discharge).
5) Display
The display is used to programme and display all the wash cycles; programme all the possible options, depending on the cycle chosen, regulate spin speed, temperature and delay time; display the duration of the desired cycle with the various stages of advancement; display anomalies (signalled by error codes).
6) Mode button [Mode/P]
This button allows you to choose programmes and options by scrolling the icons from left to right and find the one you want.
7) Select button [Select]
This button is for confirming the desired cycle and options.
Pressing twice (for options only) deselects chosen options and goes back to the initial options display.
8) Child safety buttons

Pressing these two buttons - Mode (6) and Select (7) - at the same time prevents the set programme from being altered, for safety reasons.
Door locked —0
When lit, this icon indicates that the door is locked by a safety device to prevent accidental opening.

natural_image
Simple line drawing of a speaker or speaker with a circular head and arrow indicating rotation (no text or symbols)Door
Use the handle to open the door.
During a wash programme, the door is locked by a special safety device. To open, wait for the cycle to end and the Door locked icon to go off.
NB.: before loading the machine, always check there are no pets or other extraneous objects in the drum.
Operations
IMPORTANT!
Always use the "QUICK START UP GUIDE" provided. Place it over the machine or in any other convenient position where it can be readily consulted.
Start cycle
- Press On-Off button (2). The display lights up in flash mode.

All the cycle icons light up in fixed mode (see figure).
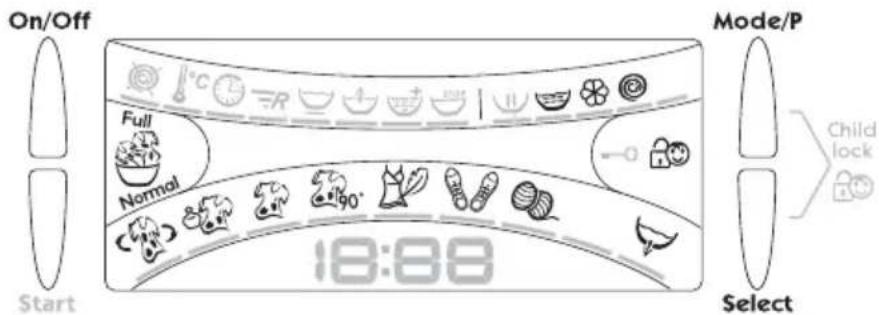
- Press Mode button (6).
The first icon bottom left starts flashing; press again (keeping it pressed speeds up scrolling) to scroll the icons from left to right and select a new programme. Once selected, an icon flashes. If you scroll through all the cycles without choosing/confirming, you automatically return to the first icon.
- Press Select button (7) to confirm the chosen cycle; the icon stays on and all the others go off.
- Press Start button (3).
The selected icon stays on and the set programme starts. The display will also show the time to the end of cycle and the cycle advancement icon.

At the end of the programme, the machine emits an acoustic signal (10 times) to warn you.
In short, to start a programme
1 - Load your laundry in the drum and shut the door.
2 - Switch on the washing machine by pressing On-Off button (2).
3 - Put detergent and any necessary additives in the relevant compartments.
4 - Press Mode button (6) to select the desired programme.
5 - Press Select button (7) to confirm choice.
6 - Press the Start button (3).
7 - At the end of the programme, wait for the door icon to go off and then take the laundry out of the drum.
8 - Always switch the washing machine off at the end of each wash, by pressing On-Off button (2).
Starting a delayed start programme
- Press On-Off button (2).
All the cycle icons will light up in fixed mode.
- Press Mode button (6).
The first icon bottom left starts flashing, keep pressing till you find the desired programme.
- Press Select button (7) to confirm the chosen cycle; its icon stays on and all the others go off.
- Press Mode button (6) repeatedly till you can select the Delay icon, which will start to flash.
- Press Select button (7).
The Delay icon continues to flash together with the central colon in the time at the bottom of the display.
- Press Mode button (6).
Each pressing of the button adds on 30 min. delay time, up to 18 hours.
- Press Select button (7) to confirm choice; the band under the icon lights up.
- Press Start button (3).
The icon of the selected cycle, the Delay icon and the delay time set all stay on.

The displayed time starts to count down and the delay icon, the central colon and all the segments under the cycles and options will flash until the start of the set cycle.
At which point, only the time to end of cycle and the cycle advancement icon will be visible on the display.
Start cycle with options
- Press On-Off button (2). All the cycle icons will light up in fixed mode.
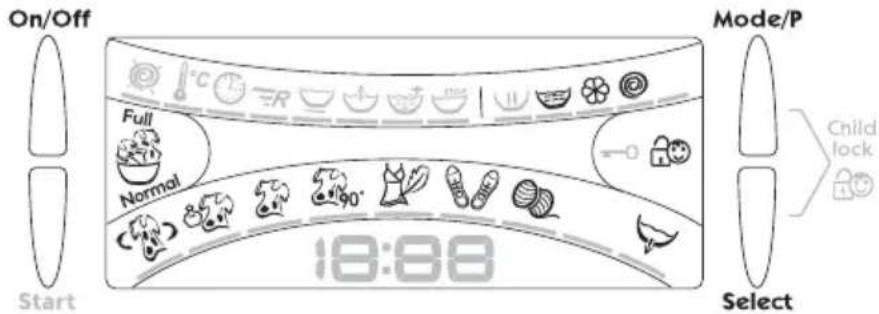
- Press Mode button (6).
The first icon bottom left starts flashing; keep pressing till you find the desired programme.
- Press Select button (7) to confirm choice; its icon stays on and all the others go off.
The icons of the options available for the chosen cycle automatically come on in fixed mode (see fig.).
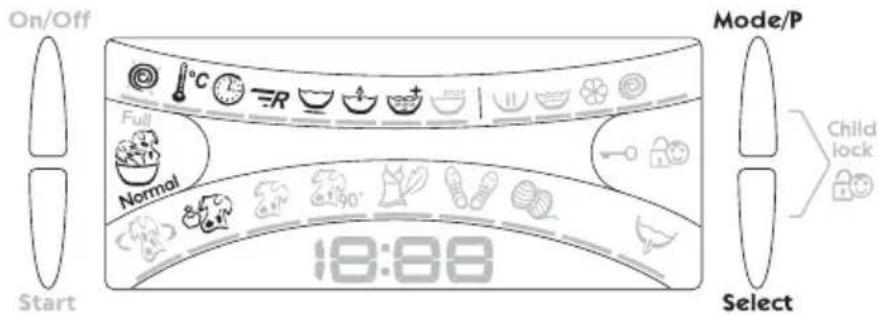
- Press Mode button (6).
The first icon top left starts flashing; keep pressing this button to scroll the flashing icons left to right, till you find the right one.
- Press Select button (7) to confirm choice; the band under the under the icon of the active option will light up. All the options displayed and available for your programme may be selected.
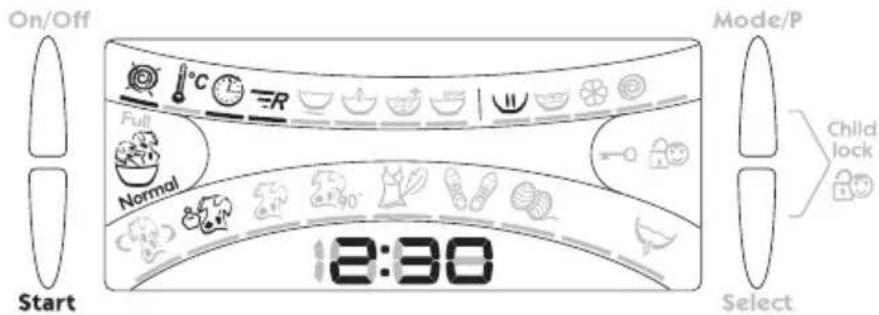
- Press Start button (3).
At the end of this programme setting, the selected cycle icon and the chosen options will remain displayed. The cycle will start, leaving only the time to end of cycle and the cycle advancement icon visible on the display.
N.B. when choosing spin, temperature, delay or drying time, a further step is necessary.
eg.: once a programme has been selected:
- Press Mode button (6). The spin icon starts flashing and the max. spin value appears.
- Press Select button (7). The spin icon continues to flash and the max. spin value is also displayed.
- Press Mode button (6) to reduce speed in 100 rpm steps (at each pressing of the button) till it's excluded.
- Press Select button (7) to confirm choice.
- Press Start button (3). The selected cycle icon and the chosen options with their bands stay on the display.
- When selecting temperature, the temperature for the chosen cycle can be reduced in 10^ C steps with each pressing of Mode button (6).
- For delayed starts, each pressing of Mode button (6) steps up the delay time by 30 min.
Once the delayed start has been set, the display will show the time selected, which will count down till the start of the desired cycle. When the cycle starts, the time to end of cycle will be displayed.
- Child safety (8).
When the two buttons Mode (6) and Select (7) (for 1 s) are pressed at the same time, two acoustic signals will be emitted and the safety device will be activated to prevent the programme setting being changed. Once these two buttons have been pressed, whether during programme setting or during the cycle, no other commands will be accepted.
To disable this safety function press the two buttons again (for 2 s); four acoustic signals will be emitted.
N.B. Remember to disable the safety function at the end of the cycle.
At the end of the cycle, the machine emits an acoustic signal (10 times) to warn you the programme has finished.
In short, to start a manual programme with options
1 - Load your laundry in the drum and shut the door.
2 - Switch on the washing machine by pressing On-Off button (2).
3 - Put detergent and any necessary additives in the relevant compartments.
4 - Press Mode button (6) to select the desired programme.
5 - Press Select button (7) to confirm choice.
6 - Press Mode button (6) repeatedly till you find the desired option.
7 - Press Select button (7) to confirm choice. Repeat steps 6 and 7 for all the options you want. When setting "Spin, Temperature, Delayed start and Drying time", an extra step is necessary.
8 - Press Start button (3) to start the programme.
9 - At the end of the programme, wait for the door icon to go off and then take the laundry out of the drum.
10 - Always switch the washing machine off at the end of each wash, by pressing On-Off button (2).
- Once a programme is started, you can display your settings by pressing Mode button (6).
- To modify the programme (before you've pressed Start), press the two buttons On/Off (2) and Start (3) at the same time. This will display all the programmes so you can set a new one.
- To stop a programme that's been started, press the two buttons On/Off (2) and Start (3) at the same time. The machine will do a forced discharge (2 min.) and the icon and the band under it will come on in fixed mode. After this, "0" will appear and all the programmes will be displayed for a new setting.
- Stop with water
When the Stop with water option is set, the cycle stops with water still in the drum; the relative icon flashes and an acoustic signal is emitted once a minute for 5 minutes till Mode button (6) is pressed; the Spin and Discharge icons continue to flash till one of them is confirmed with Select button (7), after which the cycle will finish as normal.
Notes on the spin function
The machine has an intelligent control device that constantly checks the spin profile. If there is a discrepancy between the intelligent profile set and the one ascertained while the machine is running, the control reacts by stopping the spin (wash phase, rinse phase, softener phase). If the spin is stopped in the rinse phase (final spin), the control system adds one or two rinse phases to make sure the desired result of the final spin is achieved. In the one or two extra rinses the programme loads a smaller quantity of water so as not to seriously affect the cycle's overall consumption.
Options table
| Option Function .... Commands | |||
 | Spin selection | regulates spin speed for the chosen programme. | press Mode/P to choose and Select to confirm optionpress Mode/P to choose and Select to confirm spin speed |
 | Temperature selection | regulates the temperature for the chosen programme. | press Mode/P to choose and Select to confirm optionpress Mode/P to choose and Select to confirm temperature |
 | Delayed start selection | delays the start of the machine in 30 min steps up to 18 hours. | press Mode/P to choose and Select to confirm optionpress Mode/P to choose and Select to confirm delay time |
| ≡R | Quick wash | cuts certain cycles by around 30 min. | press Mode/P to choose and Select to confirm option |
 | Delicate wash | reduces wash movement in certain cycles. | press Mode/P to choose and Select to confirm option |
 | Acqua plus adds more rinse water. | press Mode/P to choose and Select to confirm option | |
 | Extra rinse | adds an extra rinse on top of set number. | press Mode/P to choose and Select to confirm option |
 | Stop with water | stops cycle before water discharge, leaving laundry to soak. | press Mode/P to choose and Select to confirm option |
 | Child safety | stops children, or anyone else, from changing the programme setting. | press Mode/P and Select at the same time |
Programme table
| Max. laundry load in kg | Cycle icon | Programme | Options | Compartments | Description of wash programme | |||||||||
| Max. spin | Max. temp. | Delay | Quick wash | Delicate wash | Acqua plus | Extra rinse | Rinse Hold | Detergent | Softener | |||||
| [GKBC] | 8,5 |  | Intensive | max | 60° | • | • | • | • | • | / | • | (•) | Strong, white, strong coloured, very dirty fabrics. Laundry moves intensively in the drum. For 6 to 8.5 kg of laundry. |
| 8,5 |  | Eco | max | 40° | • | • | • | • | • | / | • | (•) | Strong, white, strong coloured, very dirty fabrics. Ecological programme for energy saving but with excellent results. For 6 to 8.5 kg of laundry. | |
| 8,5 | [47GY] | Normal* | max | 60° | • | • | • | • | • | / | • | (•) | Strong, white, strong coloured, normally dirty fabrics. Laundry moves intensively in the drum. For 6 to 8.5 kg of laundry. | |
| [IMAGE] | 6 |  | Intensive | max | 60° | • | • | • | • | • | / | • | (•) | Strong, white, strong coloured, very dirty fabrics. Laundry moves intensively in the drum. For 1 to 6 kg of laundry. |
| 6 |  | Eco | max | 40° | • | • | • | • | • | / | • | (•) | Strong, white, strong coloured, very dirty fabrics. Ecological programme for energy saving but with excellent results. For 1 to 6 kg of laundry. | |
| 6 |  | Normal | max | 60° | • | • | • | • | • | / | • | (•) | Strong, white, strong coloured, normally dirty fabrics. Laundry moves intensively in the drum. For 1 to 6 kg of laundry. | |
| UTILITY PROGRAMMES SPECIAL PROGRAMMES EVERYDAY FULL LOAD | 6 | [7YZX] | Hot Wash | max | 90° | • | / | / | • | • | / | • | (•) | Strong, white, very dirty fabrics, even with organic stains. Can reach high temperatures. |
| 4 | [TDDS] | Synthetic /Curtains /Silk | 800 | 40° | • | / | / | • | • | • | • | (•) | Delicate fabrics, even coloured. Delicate programme for various types of fabric. | |
| 4 | [CSTD] | Sport andshoes | 800 | 40° | • | / | / | / | / | • | • | (•) | Short programme for tennis shoes, sportswear, jeans, etc. | |
| 3 |  | Wool | 800 | 40° | • | / | / | / | / | • | • | (•) | Very delicate programme for woollen garments. Make sure garments have a label saying “pure wool - machine washable”. | |
| [GWZY] | Drain | / | • | / | / | / | / | / | / | / | Water draining without moving the drum. | |||
| [XTDS] | Rinse | max | / | • | / | / | • | / | / | / | / | Rinsing. | ||
| [HCYT] | Softener | max | / | • | / | / | • | / | / | / | • | Last rinse with softener. | ||
| [6CZY] | Spin | max | / | • | / | / | / | / | / | / | / | Spin. | ||
* EN 60456 Progr. 3 Normal – Full load
NB.: Use of the softener compartment, in brackets, is optional (•).
Important! Always use the "Quick start up Guide" provided.
Maintenance and cleaning
Disconnect the machine at the power outlet and close the water tap while maintenance is being carried out. The washing machine does not require any special maintenance.
Washing machine exterior
Clean the outside parts and rubber parts with a cloth soaked in warm water with liquid soap. Don't use alcohol, solvents or abrasive products (which will irreparably damage the painted and synthetic parts).

natural_image
Simple line drawing of a speaker with an arrow indicating rotation (no text or symbols)Door
At the end of each wash, leave the door open to ventilate the drum and prevent bad odour. Check there is no residual water in the rubber seal and if there is, dry with a cloth.

Cleaning the powder dispenser
Press lever (A) on the siphon cover by the softener symbol and slide the unit out of its housing.
Remove the siphon cover and wash it all under running water.
Put the syphon cover back on, making sure it's perfectly in place.
Now put the whole unit back into its housing.
Water supply hose
At least once a year check that the supply hose does not need replacement because of cracks or slits. High pressure during washing may cause sudden breakage of the hose. Do not use old components.
natural_image
Simple line drawing of a container with liquid and two arrows indicating downward flow (no text or symbols)Filter removal and cleaning
Remember to clean the filter frequently to prevent blockage.
Lay out a cloth at the foot of the washing machine to take up probable spillage.
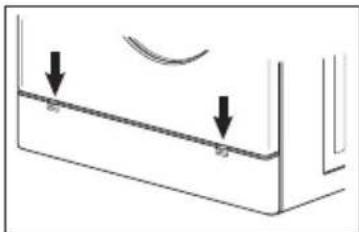
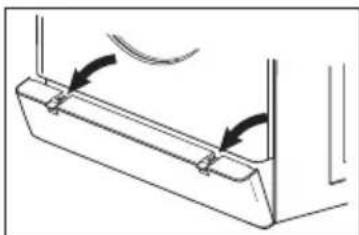
Remove the plastic skirting at the foot of the machine by pressing the two opening mechanisms and pulling outwards.
Place the skirting at the foot of machine to collect any water.
Turn the filter anticlockwise. Remove it slowly, so that the skirting fills gradually, then drain it.
Wash the filter under running water; put it back in its housing and turn clockwise until perfectly shut.
Important: if the filter isn't properly screwed in, leakage of water may occur.
NB.: before moving the appliance it is important to eliminate any residual water by following the filter cleaning instructions; this will avoid functional problems.
natural_image
Technical line drawing of a mechanical component with two curved arrows indicating motion or force direction (no text or symbols)
natural_image
Diagram of a mechanical assembly with a rotating component and mounting base (no text or symbols)Problems, possible causes
In the unlikely event of a malfunction: before calling CDA Customer Care, check there are no problems you can easily solve yourself.
This list may help with solving some of the basic problems.
| Problems | Troubleshooting |
| The washing machine will not switch on. | The plug is not or maybe not sufficiently inserted into the wall outlet in order to make good contact.There is no power in the house.Failure of fuses or automatic circuit breakers. |
| The wash programme will not start. | The door isn't shut properly.The start button hasn't been pressed.The water is shut off or there is no water supply.You have set a delay. |
| The washing machine does not fill with water. | The supply hose isn't connected to the tap / there is a kink in the hose.The water tap is shut.Water supply has failed or is of insufficient pressure.The start button has not been pressed. |
| The washing machine keeps filling and draining water. | The drain hose has not been installed at between 70 and 100 cm from floor level.The end of the discharge hose is submerged under water.The discharge pipe inside the wall is not fitted with an air vent.If you cannot solve the problem after these checks, close the water tap, switch off the machine and call CDA Customer Care.If you are on the top floors of a building, there may be siphoning phenomena causing continual filling/draining. Anti-siphon devices can be purchased to solve the problem. |
| The washing machine does not drain or spin. | The programme set does not include drain (see programme table).The Spin exclusion option is active.Presence of extraneous bodies in the filter.The discharge hose is blocked. / Check that the drainage system is not blocked. |
| The washing machine vibrates excessively when spinning. | Check that unpacking was properly done and that the drum was un-locked on installation.The washing machine may be constrained by a wall and other units.It has not been properly levelled: re-adjust feet. |
| Water leaks from the washing machine. | Check that the water supply hose is properly attached;that the detergent unit is not blocked andthat the drain hose is properly connected. |
| Excessive foam. | The detergent is not suited for your washing machine (check the detergent packaging for the wording “for washing machines” or “for hand or machine washing”).Too much detergent was used. |
ANOMALIES
When you observe an anomaly, the cause may be signalled on the control panel by one or two flashing leds.
| Problem Possible causes and symptoms Checks / Action Signal | |||
| E01 | Irregular heating | If code E01 flashes at the end of the programme, there is a fault with the heating function. Possible causes: faulty heating coil or extreme working conditions (water and/or room too cold). NB.: the wash programme finishes as normal. | Check the next hot wash programme; if the problem persists, call CDA Customer Care. |
| E02 | Irregular operation of motor | If code E02 flashes during the set programme and the washing machine has a full load, there is probably too much laundry. NB.: the wash programme finishes early after a drain phase. | Switch the machine off with the on-off button, reduce the load of laundry and set the wash programme again. If the problem persists, call CDA Customer Care. |
| If code E02 flashes during the set programme, there is a motor or motor control circuit fault. NB.: the wash programme finishes early after a drain phase. | Call CDA Customer Care. | ||
| E03 | Irregular operation during water supply | If code E03 flashes during the set programme, the water supply is faulty. Possible causes: Tap closed or not fully open, one of the valves has failed, the hose is kinked. NB.: the wash programme finishes early after a drain phase. | Check the tap and water feed hose. Switch the machine off with the on-off button and set the wash programme again. If better results aren't obtained after these checks, call CDA Customer Care. |
| E04 | Irregular operation during water draining | If code E04 flashes during the set programme, there are problems in the drain phase. Possible causes: blocked filter, kinks and/or blockages in the drain hoses, or other factors preventing regular draining of water. NB.: the wash programme finishes early after a drain phase. | Check the filter and look for obstructions to water drain from the washing machine. Switch the machine off with the on-off button and set the wash programme again. If better results aren't obtained after these checks, call CDA Customer Care. |
continue
| Problem Possible causes and symptoms Checks / Action Signal | |||
| E05 | Drum door safety anomaly | If code E05 flashes during the programme set, the causes may be:Door not shut properly or a failure of the door safety lock system. | Check that the door is shut properly; if the problem persists, call CDA Customer Care. |
| E06 | Electronics panel | If code E06 flashes during the programme set, there is a malfunction in the electronics board.NB.: the wash programme finishes early after a drain phase. | Call CDA Customer Care. |
|C|D|A|
Passionate about style
The |C|D|A| Group Ltd
A: Harby Road • Langar • Nottingham • NG13 9HY • UK
T:01949 862 012 • F:01949 862 003
E:service@cda.eu • W:www.cda.eu


- |C|DA|
- IMPORTANT
- 1) Detergent dispenser
- WASHING MACHINE
- Cl250
- A) In short, to start a programme
- B) In short, to start a manual programme with options
- |C|D|A|
- INSTRUCTION MANUAL
- WASHING MACHINES
- WASHER DRYERS
- Thank you
- Washing machine CI 250
- Instruction for use
- Contents
- Tips for the user
- Disposal of packaging materials
- Crossed WEEE wheelie-bin
- General safety
- Optimizing the load
- Is a high temperature wash needed?
- How to remove stains
- Common stains
- NB:
- Description of washing machine
- Technical characteristics
- Unpacking
- UNPACKING INSTRUCTIONS
- Important:
- Positioning
- Water connection
- Supply:
- Discharge:
- Electricity connection
- Before inserting the plug in the socket, make sure that:
- How much does laundry weigh?
- Sorting laundry
- Tips for special items
- INTERNATIONAL SYMBOLS
- Control panel
- 2) On/off button
- 3) Start button
- 4) Reset buttons
- 5) Display
- 6) Mode button [Mode/P]
- 7) Select button [Select]
- 8) Child safety buttons
- Door locked —0
- Door
- Operations
- IMPORTANT!
- Start cycle
- In short, to start a programme
- Starting a delayed start programme
- Start cycle with options
- N.B. Remember to disable the safety function at the end of the cycle.
- In short, to start a manual programme with options
- Notes on the spin function
- Options table
- Maintenance and cleaning
- Washing machine exterior
- Cleaning the powder dispenser
- Water supply hose
- Filter removal and cleaning
- Remember to clean the filter frequently to prevent blockage.
- Problems, possible causes
- ANOMALIES
- The |C|D|A| Group Ltd
Brand : CDA
Model : CI250
Category : Washing machine