
CFM6151B - Coffee maker BEKO - Free user manual and instructions
Find the device manual for free CFM6151B BEKO in PDF.


| Brand | Beko |
| Model | CFM6151B |
| Product Type | Filter Coffee Maker |
| Power Supply | 220-240 V~, 50-60 Hz |
| Power Consumption | 840 - 1000 W |
| Max Water Volume | 1.8 L (10 cups) |
| Auto Shut-off | 30 minutes |
| Dimensions (approx.) | 240 x 200 x 350 mm |
| Weight (approx.) | 2.0 kg |
| Color | Black |
| Material | Plastic housing, glass jug |
| Capacity | 10 cups (approx. 1.8 L) |
| Coffee Type | Ground coffee with paper filter |
| Features | Drip-stop, aroma button, warming plate, removable water tank, filter basket, measuring spoon |
| Filter Basket | Removable, dishwasher safe (upper shelf) |
| Descaling | Recommended at least 4 times per year |
| Safety | Auto shut-off, non-slip feet |
| Guarantee | 12 months |
Frequently Asked Questions - CFM6151B BEKO
User questions about CFM6151B BEKO
0 question about this device. Answer the ones you know or ask your own.
Ask a new question about this device
Download the instructions for your Coffee maker in PDF format for free! Find your manual CFM6151B - BEKO and take your electronic device back in hand. On this page are published all the documents necessary for the use of your device. CFM6151B by BEKO.
USER MANUAL CFM6151B BEKO
CFM6151W
CFM6151B
EN
01M-8835693200-4116-03
01M-8835683200-4116-03
beko
Please read this user manual first!
Dear Customers,
Thank you for selecting a Beko product. We hope that you get the best results from your product which has been manufactured with high quality and state-of-the-art technology. Therefore, please read this entire user manual and all other accompanying documents carefully before using the product and keep it as a reference for future use. If you handover the product to someone else, give the user manual as well. Follow all warnings and information in the user manual.
Meanings of the symbols
Following symbols are used in the various section of this manual:
 | Important information and useful hints about usage. |
 | WARNING:Warnings for dangerous situations concerning the safety of life and property. |
 | Materials are intended to be in contact with food. |
 | WARNING:Warning for hot surfaces. |
 | Do not immerse the appliance, power cord or power plug in water or in other liquids. |

This product has been produced in environmentally-friendly, state-of-the-art facilities.
1 Important instructions for safety and environment 4-6
1.1 General safety 4 1.2 Compliance with the WEEE Directive and disposal of waste products 6 1.3 Compliance with RoHS Directive 6 1.4 Package Information 6 1.5 Plug Wiring 6
2 Coffee Maker 7-8
2.1 Overview ......7 2.2 Technical data....8
3 Operation 9
3.1 Preparation 9 3.2 Brewing Coffee....9
4 Information 11
4.1 Cleaning and care 11 4.2 Descaling the appliance.... 11 4.3 Storage....12 4.4 Handling and transportation.... 12
5 Guarantee 12
Important instructions for safety and environment
This section contains safety instructions that will help protect from risk of personal injury or property damage.
Failure to follow these instructions invalidates the granted warranty.
1.1 General safety
• This appliance complies with the international safety standards. - This appliance can be used by children aged from 8 years and above and persons with reduced physical, sensory or mental capabilities or lack of experience and knowledge if they have been given supervision or instruction concerning use of the appliance in a safe way and understand the hazards involved. - Children shall not play with the appliance. Cleaning and user maintenance shall not be made by children unless they are older than 8 and supervised. - Do not use it if the power cable or the appliance itself is damaged. Contact an authorised service.
- This appliance is intended to be used in household and similar applications such as: - staff kitchen areas in shops, offices and other working environments; - farm houses; - by clients in hotels, motels, and other residential type environments; - bed and breakfast type environments.
- The product is not designed for commercial use.
- Your mains power supply should comply with the information supplied on the rating plate of the appliance.
- For additional protection, this appliance should be connected to a household faulty current protection switch with no more than 30 mA.
- Use the appliance with a grounded outlet only.
- Do not use the appliance with an extension cord.
1 Important instructions for safety and environment
- Do not squeeze or bend the power cord and do not rub it on sharp edges in order to prevent any damage.
- Do not touch the appliance or its plug with wet or damp hands when the appliance is plugged in.
- Do not pull the power cable when unplugging the appliance.
- This appliance is intended for private domestic use only and is not suitable for professional-catering purposes.
- Never fill the appliance above the maximum level indicator, boiling water may splash out.
- Do not open the lid while the water is boiling.
- If water does not drip from the filter basket during operation, unplug the appliance and leave it to cool for 10 minutes, then open the filter cover and check it.
- Never operate the appliance without any water inside it. • Always use the appliance on a stable and flat surface.
- Do not attempt to dismantle the appliance.
- Only use the original parts or parts recommended by the manufacturer.
- Unplug the appliance before cleaning. After cleaning, dry the appliance and all parts before connecting it to mains supply.
- Do not immerse the appliance, or power plug in water or any other liquids.
- Never use the appliance in or near to combustible or inflammable places and materials.
- If you keep the packaging materials, store them out of the reach of children.
1
Important instructions for safety and environment
1.2 Compliance with WEEE Directive and Disposing of the Waste Product
This product complies with EU WEEE Directive (2012/19/EU). This product bears a classification symbol for waste electrical and electronic equipment (WEEE). This product has been manufactured with high quality parts and materials which can be reused and are suitable for recycling. Do not dispose of the waste product with normal domestic and other wastes at the end of its service life. Take it to the collection center for the recycling of electrical and electronic equipment. Please consult your local authorities to learn about these collection centers.

1.3 Compliance with RoHS Directive
The product you have purchased complies with EU RoHS Directive (2011/65/EU). It does not contain harmful and prohibited materials specified in the Directive.
1.4 Package Information

Packaging materials of the product are manufactured from recyclable materials in accordance with our National Environment Regulations. Do not dispose of the packaging materials together with the domestic or other wastes. Take them to the packaging material collection points designated by the local authorities.
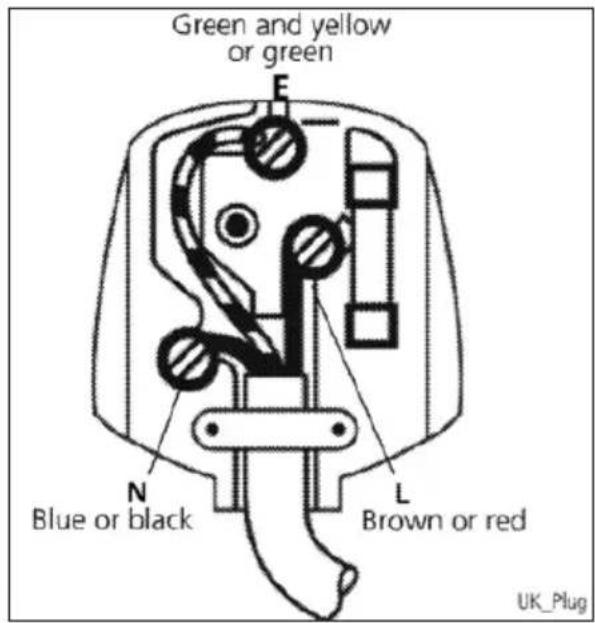
1.5 Plug Wiring
The moulded plug on this appliance incorporates a 13 A fuse. Should the fuse need to be replaced an ASTA approved BS1362 fuse of the same rating must be used. Do not forget to refit the fuse cover. In the event of losing the fuse cover, the plug must not be used until a replacement fuse cover has been fitted. Colour of the replacement fuse cover must be the same colour as that visible on the pin face of the plug Fuse covers are available from any good electrical store.
• Fitting a different plug
As the colours of the wires in the mains lead of this appliance may not correspond with the coloured markings identifying the terminals on your plug, proceed as follows:
- Brown cable = L (Live)
- Blue cable = N (Neutral)
- Green/yellow cable must be connected to ground (E).
With the alternative plugs a 13 A fuse must be fitted either in the plug or adaptor or in the main fuse box. If in doubt contact a qualified electrician.
2 Coffee Maker
2.1 Overview
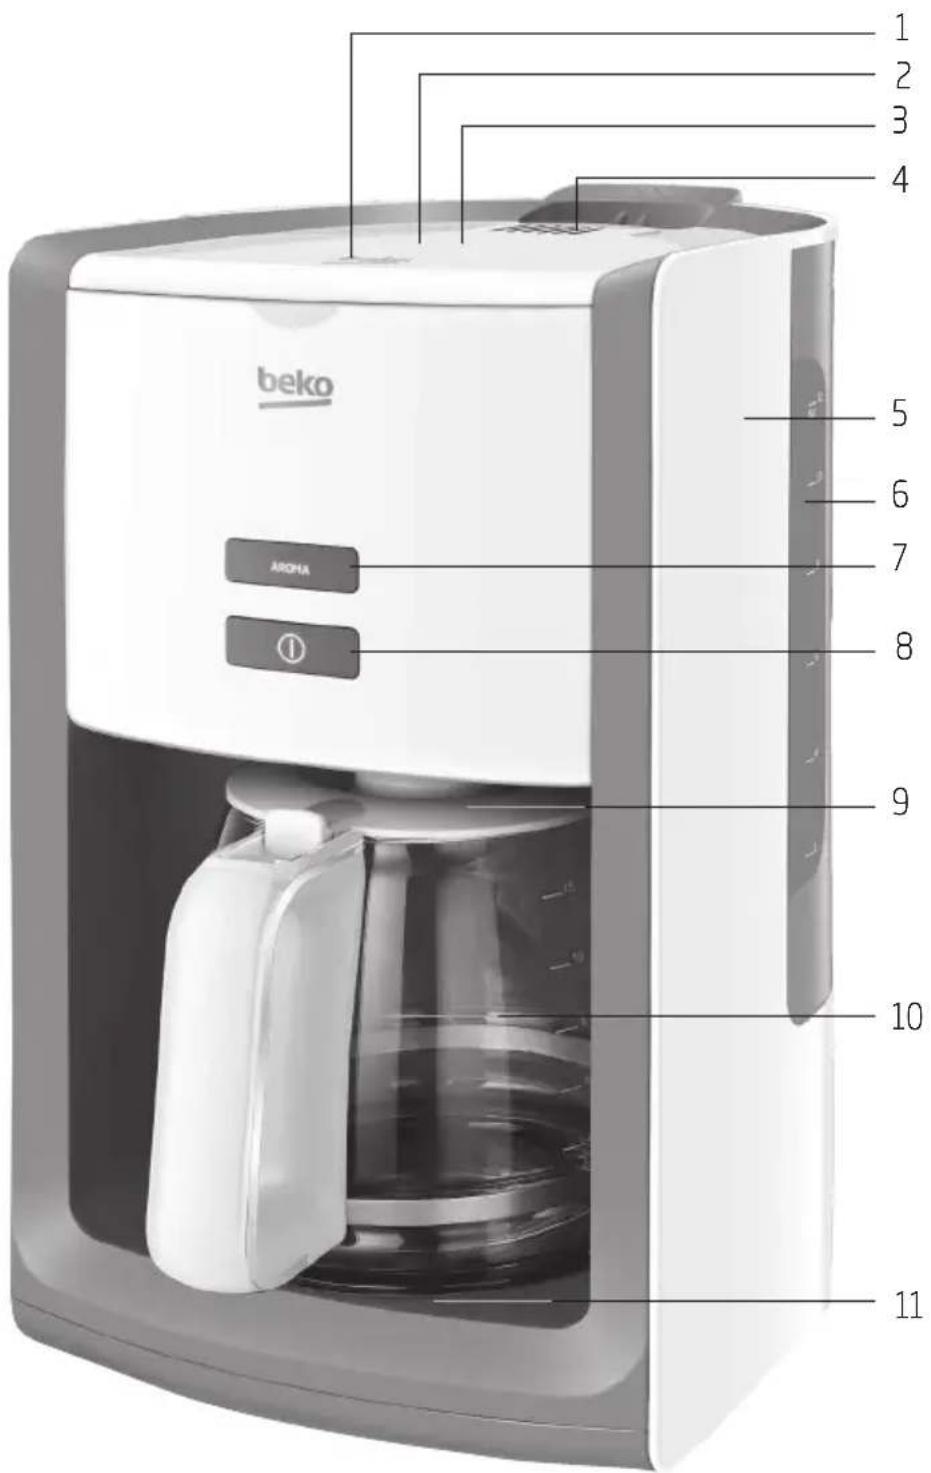
The values which are declared in the markings affixed on your appliance or the other printed documents supplied with it represent the values which were obtained in the laboratories pursuant to the pertinent standards. These values may vary according to the usage of the appliance and ambient conditions.
2 Coffee Maker
- Water tank cover
- Filter basket cover
- Filter basket
- Ventilation slots
- Water level indicator
- Water tank
- Aroma button
- On/Off button
- Drip-stop
- Glass jug
- Warming plate
Accessories
Coffee measuring spoon
2.2 Technical data
Power supply: 220-240 V~, 50-60 Hz
Power: 840 - 1000 W
Max. water volume: 1.8 L
Auto shut off: 30 min
Technical and design modifications reserved.
3 Operation
3.1 Preparation

WARNING: First time use: Run the appliance at least 4 times without adding coffee.

WARNING: Please follow the steps 1 - 2 and 7 - 12 in the "Brewing Coffee" section.
- Remove all packaging and stickers and dispose of them according to applicable legal regulations.
- Before using the appliance for the first time, clean all parts which come into contact with water carefully. Please see full details in the "Cleaning and Care" section.
- Make sure that the appliance is placed in an upright position and on a stable, flat, clean, dry, and non-slip surface.
3.2 Brewing Coffee
- Remove the water tank (6) by holding the moulded handles at the rear of the tank and lifting upwards and fill with the required amount of water, but do not fill past the "10" mark. The brewed amount of coffee will be 10% less than the filled water, because it is absorbed by the coffee grounds and the filter. For the good coffee taste it is suggested to operate the appliance with at least 4 cups coffee serving.

For improved heat retention we recommend that you rinse the pot with hot water before starting the brewing process.

Use only clean, cold, and fresh drinking water.

There is a drip hole on the back of the water reservoir to prevent exceeding the capacity of the coffee maker. If you add too much water, it will drip out from the back of the appliance.
- Close the water tank cover (1) and open the filter basket cover (2).
- Pull out the filter basket (3).
- Take a suitable paper filter (1 x 4) and insert the paper filter into the filter basket (3).

Use only one paper filter at each time. Make sure that the paper filter does not bend or fold.
- Fill the filter with the desired amount of ground coffee. To do this, you may use the supplied measuring spoon.
- Insert the filter basket (3) back into the housing and close the filter basket cover (2).
- Place the glass jug (10) on the warming plate (11).

WARNING: If the filter basket (3) is not closed or the glass jug (10) is not placed accurately, the drip-stop function will not function properly. It could cause hot water or hot coffee to overflow.
- Connect the plug to the wall socket.
- Turn the appliance on by pushing the On/Off button (8).
- The On/Off button (8) illuminates and the brewing process begins.

The brewing process can be stopped at any time by pushing the On/Off button (8) again.
3 Operation

The appliance is equipped with a drip-stop (9) located underneath the filter basket (3) and enables you to briefly remove the glass jug (10) to pour coffee before the water has finished running through the machine.

Ventilation slots allow the steam output. Do not block the ventilation slots with any objects while the appliance is in use.

WARNING: Make sure to place the glass jug (10) on the warming plate (11) quickly (max. 30 seconds). Otherwise the brewed coffee from the filter could overflow. If you want to use the glass jug for more than 30 seconds switch off the appliance.

WARNING: Never pull out the filter basket (3) during the brewing process even if no water is draining from the filter. Extremely hot water or coffee can spill out from the filter basket and cause injury.

WARNING: If water/coffee is not draining from the filter basket (3) after several seconds with the glass jug (10) properly in place (11) immediately unplug the appliance and wait 10 minutes before opening and checking the filter basket (3).

WARNING: When the brewing process ends and the water level indicator with "10" marking (5) is empty, there will still be hot liquid in the filter basket (3). Wait a few minutes for the rest of the liquid to drip into the glass jug (10).
- Remove the glass jug (10) from the warming plate (11) as soon as the brewing process has finished and the glass jug (10) is filled. The coffee is ready.
- To turn the appliance off, push the On/Off button (8).
- Disconnect the appliance from the wall socket.

If you want to continue the brewing process, repeat the procedure from 1 to 12. Let the appliance cool down at least 15 minutes between each brewing process.

For a better aroma, use the aroma button (7) which activates a unique brewing process that enhances the flavour and aroma of your coffee. To reach this rich flavour, the coffee maker advances through several continuous cycles. This special time-release process saturates ground coffee gradually to extract the best flavour and aroma.
Hints and Tips
- Use softened or filtered water to prevent lime build-up.
- Store unused coffee in a cool, dry place. After opening a package of coffee, reseal it tightly to maintain its freshness.
- Do not reuse the coffee sediment in the filter since this will reduce the flavour.
- Reheating coffee is not recommended as coffee is at its peak flavour immediately after brewing.
4.1 Cleaning and care

WARNING: Never use petrol solvents, abrasive cleaners, metal objects or hard brushes to clean the appliance.
4 Information

WARNING: Never put the appliance or power cord in water or any other liquid.
- Turn the appliance off and disconnect it from the wall socket.
- Allow the appliance to cool down.
- Remove the glass jug (10).
- Open the filter basket cover (2).
- Pull out the filter basket (3). Remove the paper filter and dispose of it with the coffee sediment.
- Clean the filter basket (3) by placing under running water and using a small amount of mild cleanser. The filter basket (3) can be cleaned in the upper shelf of the dishwasher or under running water.
- Use a damp soft cloth and some mild cleanser to clean the exterior of the appliance.
- Insert the filter basket (3) back into the housing and close the filter basket cover (2).
- Place the glass jug (10) onto warming plate (11).

Before using the appliance after cleaning, dry all parts carefully with a soft cloth or paper towel.
4.2 Descaling the appliance
Descaling extends the life of your appliance. Descale your coffee maker at least 4 times per year. The period depends on the water hardness in your area. The harder the water is, the more often the appliance has to be descaled.
- Purchase a suitable descaler from a speciality store. Please ask naming the appliance.
- Prior to commencing the descaling process thoroughly read the manufacturer's package insert for the descaler. Should the manufacturer's instructions differ from the ones listed below, then follow the manufacturer's instructions.

You can also use white vinegar and lemon juice instead of a commercially available descaler.
- Fill the water tank to the 10 marking and add descaler. Mixing ratio: 4 parts water to 1 part descaler.
- Turn the appliance on and allow approximately one large coffee cup to run through the appliance.
- Turn the appliance off.
- Let the mixture soak for about 15 minutes.
- Repeat steps 4 - 6.
- Now turn the appliance on and let the entire mixture run through.
- Fill the water tank with cold, fresh drinking water and run all the water through.
- Repeat step 9 four times.
- Now you may brew coffee again.
4.3 Storage
- If you do not plan to use the appliance for a long period of time, please store it carefully. Make sure the appliance is unplugged and completely dry.
- Store the appliance in a cool, dry place. Make sure the appliance is kept out of the reach of children.
4.4 Handling and transportation
- During handling and transportation, carry the appliance in its original packaging. The packaging of the appliance protects it against physical damages.
- Do not place heavy loads on the appliance or the packaging. The appliance may be damaged.
- Dropping the appliance will render it non-operational or cause permanent damage.
Product Guarantee
12 months breakdown and repair guarantee
Guarantor: Beko plc, 1 Greenhill Crescent, Watford, Hertfordshire. WD18 8UF
The guarantee does not in any way diminish your statutory or legal rights.
Your appliance has the benefit of our manufacturer's guarantee which covers the product for 12 months from the date of original purchase.
This gives you reassurance that if within that time, your appliance is proven to be defective because of either workmanship or materials, we will at our discretion either repair or replace your appliance.
The appliance must be correctly installed, located and operated in accordance with the instructions contained in the user manual. The guarantor disclaims any liability for accidental or consequential damage.
The Guarantee is subject to the following conditions:
- Documentary proof of the original purchase date is provided.
- The appliance has been installed and operated correctly and in accordance with our operating and maintenance instructions. The appliance is used only on the electricity supply on the rating plate. The appliance has only been used for normal domestic purposes. The appliance has not been altered, serviced, dismantled or otherwise interfered with by any person. The appliance is used in the United Kingdom or Republic of Ireland.
- Any parts removed during repair work or any product that has been replaced becomes our property. The guarantee is not transferrable if the product is resold.
The Guarantee does not cover:
■ Transit, installation or delivery damage. - Accidental damage. - Misuse or abuse. - Replacement of any consumable item or accessories. These include but are not limited to: plugs, cables, light bulbs, knobs, filters and flaps. - Repairs or replacements required as a result of unauthorised repairs or inexpert installation that fails to meet the requirements contained in the user guide or instruction book. - Repairs to products used in commercial or non-residential household premises.
How to obtain after sales service, help or general advice
Please keep your purchase receipt or other proof of purchase in a safe place as you will need to show us this document if your product requires attention within the guarantee period.
Please also record your product details below, which will allow you to access our services more quickly and help us identify your product. The model number is printed on the front of the user guide and the serial and model number is shown on your product's rating plate.
| Model number | Serial number | Purchased from | Date of purchase |
Please call our UK based Customer Service department if you need help or advice from us:
United Kingdom and Northern Ireland: 0845 600 4911 / 0345 600 4911
Republic of Ireland: 01 862 3411
You can also contact us through our website: www.beko.co.uk

- EN
- PLEASE READ THIS USER MANUAL FIRST
- MEANINGS OF THE SYMBOLS
- IMPORTANT INSTRUCTIONS FOR SAFETY AND ENVIRONMENT
- COFFEE MAKER
- OPERATION
- INFORMATION
- GUARANTEE
- GENERAL SAFETY
- COMPLIANCE WITH WEEE DIRECTIVE AND DISPOSING OF THE WASTE PRODUCT
- COMPLIANCE WITH ROHS DIRECTIVE
- PACKAGE INFORMATION
- PLUG WIRING
- FITTING A DIFFERENT PLUG
- OVERVIEW
- ACCESSORIES
- TECHNICAL DATA
- PREPARATION
- BREWING COFFEE
- HINTS AND TIPS
- CLEANING AND CARE
- DESCALING THE APPLIANCE
- STORAGE
- HANDLING AND TRANSPORTATION
- PRODUCT GUARANTEE
- MONTHS BREAKDOWN AND REPAIR GUARANTEE
- THE GUARANTEE IS SUBJECT TO THE FOLLOWING CONDITIONS
- THE GUARANTEE DOES NOT COVER
- HOW TO OBTAIN AFTER SALES SERVICE, HELP OR GENERAL ADVICE
Brand : BEKO
Model : CFM6151B
Category : Coffee maker