DC-D1223R - Surveillance Camera IDIS - Free user manual and instructions
Find the device manual for free DC-D1223R IDIS in PDF.


| Product Type | Surveillance Camera |
| Brand | IDIS |
| Model | DC-D1223R |
| Camera Type | Dome |
| Sensor | 1/2.8" Progressive Scan CMOS |
| Resolution | 2 Megapixels (1920x1080) |
| Lens | Fixed 2.8mm |
| Field of View | Horizontal: 103° |
| IR Range | Up to 30m |
| Minimum Illumination | 0.01 lux (color), 0 lux with IR |
| Day/Night | Yes (ICR) |
| Video Compression | H.265, H.264, MJPEG |
| Network Interface | 10/100 Base-T Ethernet |
| Power Supply | PoE (802.3af) or 12V DC |
| Power Consumption | Max 7W |
| Operating Temperature | -10°C to 50°C |
| Weatherproof Rating | IP66 |
| Weight | 0.8 kg |
| Dimensions | Ø140 x 100 mm |
| Mounting | Ceiling / Wall mount |
| Motion Detection | Yes |
| Storage | MicroSD slot (up to 128GB) |
| ONVIF Compliance | Yes |
| Security | Password protection, IP filtering |
| Maintenance | Clean lens with soft cloth |
| Spare Parts | Available from IDIS authorized service centers |
| Warranty | 2 years |
Frequently Asked Questions - DC-D1223R IDIS
User questions about DC-D1223R IDIS
0 question about this device. Answer the ones you know or ask your own.
Ask a new question about this device
Download the instructions for your Surveillance Camera in PDF format for free! Find your manual DC-D1223R - IDIS and take your electronic device back in hand. On this page are published all the documents necessary for the use of your device. DC-D1223R by IDIS.
USER MANUAL DC-D1223R IDIS
Important Safeguards
1. Read Instructions
All the safety and operating instructions should be read before the appliance is operated.
2. Retain Instructions
The safety and operating instructions should be retained for future reference.
3. Cleaning
Unplug this equipment from the wall outlet before cleaning it. Do not use liquid aerosol cleaners. Use a damp soft cloth for cleaning.
4. Attachments
Never add any attachments and/or equipment without the approval of the manufacturer as such additions may result in the risk of fire, electric shock or other personal injury.
5. Water and/or Moisture
Do not use this equipment near water or in contact with water.
6. Placing and Accessories
Do not place this equipment on an wall or ceiling that is not strong enough to sustain the camera. The equipment may fall, causing serious injury to a child or adult, and serious damage to the equipment. Wall or shelf mounting should follow the manufacturer's instructions, and should use a mounting kit approved by the manufacturer.

This equipment and cart combination should be moved with care. Quick stops, excessive force, and uneven surfaces may cause the equipment and cart combination to overturn.
Do not place this equipment in an enclosed space. Sufficient ventilation is required to prevent an increase in ambient temperature which can cause malfunction or the risk of fire.
7. Power Sources
This equipment should be operated only from the type of power source indicated on the marking label. If you are not sure of the type of power, please consult your equipment dealer or local power company.
You may want to install a UPS (Uninterruptible Power Supply) system for safe operation in order to prevent damage caused by an unexpected power stoppage. Any questions concerning UPS, consult your UPS retailer.
This equipment should be remain readily operable.
8. Power Cord
Operator or installer must remove power and TNT connections before handling the equipment.
9. Lightning
For added protection for this equipment during a lightning storm, or when it is left unattended and unused for long periods of time, unplug it from the wall outlet and disconnect the antenna or cable system. This will prevent damage to the equipment due to lightning and power-line surges. If thunder or lightning is common where the equipment is installed, use a surge protection device.
10. Overloading
Do not overload wall outlets and extension cords as this can result in the risk of fire or electric shock.
11. Objects and Liquids
Never push objects of any kind through openings of this equipment as they may touch dangerous voltage points or short out parts that could result in a fire or electric shock. Never spill liquid of any kind on the equipment.
12. Servicing
Do not attempt to service this equipment yourself. Refer all servicing to qualified service personnel.
13. Damage requiring Service
Unplug this equipment from the wall outlet and refer servicing to qualified service personnel under the following conditions:
A. When the power-supply cord or the plug has been damaged.
B. If liquid is spilled, or objects have hit the equipment.
C. If the equipment has been exposed to rain or water.
D. If the equipment does not operate normally by following the operating instructions, adjust only those controls that are covered by the operating instructions as an improper adjustment of other controls may result in damage and will often require extensive work by a qualified technician to restore the equipment to its normal operation.
E. If the equipment has been dropped, or the cabinet damaged.
F. When the equipment exhibits a distinct change in performance — this indicates a need for service.
14. Replacement Parts
When replacement parts are required, be sure the service technician has used replacement parts specified by the manufacturer or that have the same characteristics as the original part. Unauthorized substitutions may result in fire, electric shock or other hazards.
15. Safety Check
Upon completion of any service or repairs to this equipment, ask the service technician to perform safety checks to determine that the equipment is in proper operating condition.
16. Field Installation
This installation should be made by a qualified service person and should conform to all local codes.
17. Correct Batteries
Warning: Risk of explosion if battery is replaced by an incorrect type. Replace only with the same or equivalent type. Dispose of used batteries according to the instructions. The battery shall not be exposed to excessive heat such as sunshine, fire or the like.
18. Tmra
A manufacturer's maximum recommended ambient temperature (Tmra) for the equipment must be specified so that the customer and installer may determine a suitable maximum operating environment for the equipment.
FCC Compliance Statement
THIS EQUIPMENT HAS BEEN TESTED AND FOUND TO COMPLY WITH THE LIMITS FOR A CLASS A DIGITAL DEVICE, PURSUANT TO PART 15 OF THE FCC RULES. THESE LIMITS ARE DESIGNED TO PROVIDE REASONABLE PROTECTION AGAINST HARMFUL INTERFERENCE WHEN THE EQUIPMENT IS OPERATED IN A COMMERCIAL ENVIRONMENT. THIS EQUIPMENT GENERATES, USES, AND CAN RADIATE RADIO FREQUENCY ENERGY AND IF NOT INSTALLED AND USED IN ACCORDANCE WITH THE INSTRUCTION MANUAL, MAY CAUSE HARMFUL INTERFERENCE TO RADIO COMMUNICATIONS. OPERATION OF THIS EQUIPMENT IN A RESIDENTIAL AREA IS LIKELY TO CAUSE HARMFUL INTERFERENCE, IN WHICH CASE USERS WILL BE REQUIRED TO CORRECT THE INTERFERENCE AT THEIR OWN EXPENSE.
WARNING: CHANGES OR MODIFICATIONS NOT EXPRESSLY APPROVED BY THE PARTY RESPONSIBLE FOR COMPLIANCE COULD VOID THE USER'S AUTHORITY TO OPERATE THE EQUIPMENT. THIS CLASS OF DIGITAL APPARATUS MEETS ALL REQUIREMENTS OF THE CANADIAN INTERFERENCE CAUSING EQUIPMENT REGULATIONS.
WEEE (Waste Electrical & Electronic Equipment)
Correct Disposal of This Product
(Applicable in the European Union and other European countries with separate collection systems)
This marking shown on the product or its literature, indicates that it should not be disposed with other household wastes at the end of its working life. To prevent possible harm to the environment or human health from uncontrolled waste disposal, please separate this from other types of wastes and recycle it responsibly to promote the sustainable reuse of material resources.
Household users should contact either the retailer where they purchased this product, or their local government office, for details of where and how they can take this item for environmentally safe recycling.
Business users should contact their supplier and check the terms and conditions of the purchase contract. This product should not be mixed with other commercial wastes for disposal.
Safety Symbols
| Symbol Publication Description | ||
| — — — | IEC60417, No.5031 Direct current | |
Copyright
© 2016 IDIS Co., Ltd.
IDIS Co., Ltd. reserves all rights concerning this document.
Use or duplication of this document in part or whole without the prior consent of IDIS Co., Ltd. is strictly prohibited.
Contents of this document are subject to change without prior notice for reasons such as functionality enhancements.
Registered Trademarks
IDIS is a registered trademark of IDIS Co., Ltd.
Other company and product names are registered trademarks of their respective owners.
This product contains software built partially on open-source content. Codes for the corresponding open-source content are available for download. For more information, refer to the software CD (OpenSourceGuide\OpenSourceGuide.pdf) or the open source guide accompanying this document.
Accessories
Upon purchasing the product, check inside the box to make sure all the following accessories are included. Some parts may differ depending on the situation.
| Item |
| Network Camera |
| Ferrite Core |
| Open Source Guide |
| Quick Guide |
| Allen wrench (included with DC-D1022W / DC-D1022WR / DC-D1122V / DC-D1122VR / DC-D1122W / DC-D1122WR / DC-D1123V / DC-D1123VR / DC-D1123W / DC-D1123WR / DC-D1123WHR / DC-D1223V / DC-D1223VR / DC-D1223W / DC-D1223WR / DC-D1223WHR / DC-D1323WR / DC-D1323WHRonly.) |
| Screws (3 ea.) |
| Desiccant and cable access hole rubber(included with DC-D1022W / DC-D1022WR / DC-D1122W / DC-D1122WR / DC-D1123W / DC-D1123WR / DC-D1123WHR / DC-D1223W / DC-D1223WR / DC-D1223WHR / DC-D1323WR / DC-D1323WHRonly.) |

• Product color and design may vary depending on the model.
• For more details on each part name, refer to the manual.
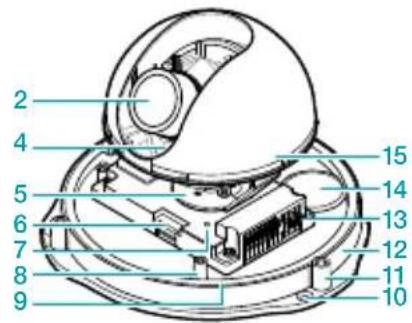
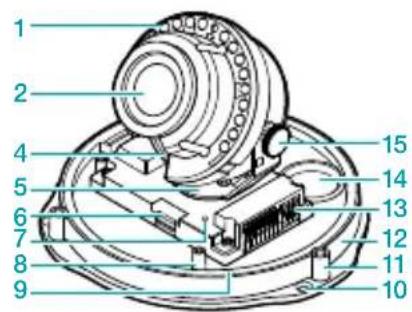
DC-D1123 / DC-D1223
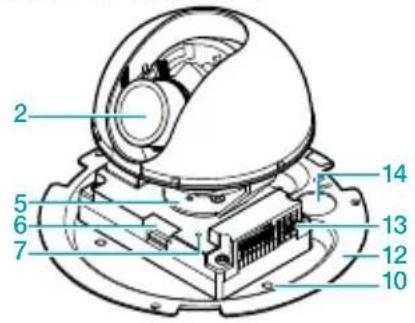
DC-D1123R / DC-D1223R /
DC-D1323R
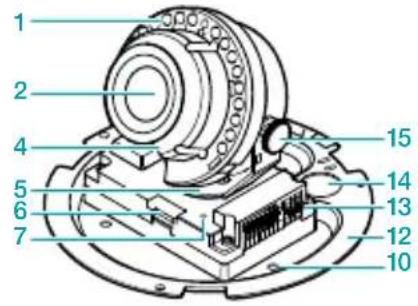
DC-D1123V / DC-D1223V /
DC-D1123W / DC-D1223W
DC-D1123VR / DC-D1223VR /
DC-D1123WR / DC-D1223WR /
DC-D1323WR
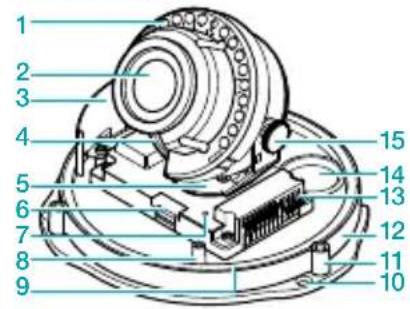
DC-D1123WHR / DC-D1223WHR /
DC-D1323WHR
DC-D1011 / DC-D1111
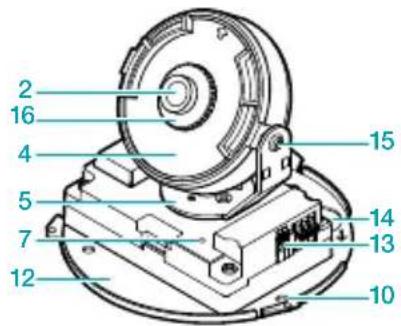
DC-D1122
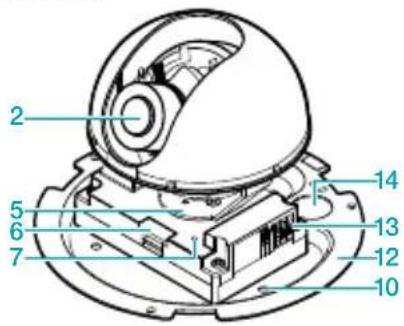
DC-D1122R
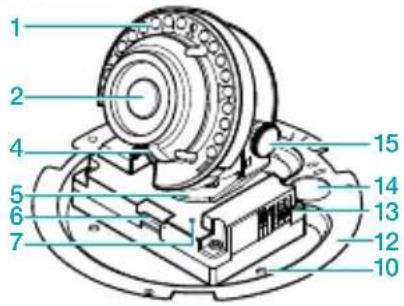
DC-D1122V / DC-D1022W /
DC-D1122W
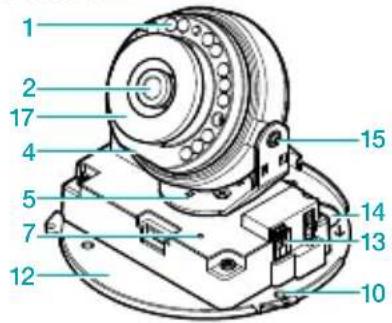
DC-D1122VR / DC-D1022WR /
DC-D1122WR
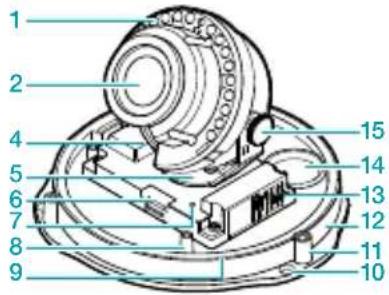
DC-D1212R
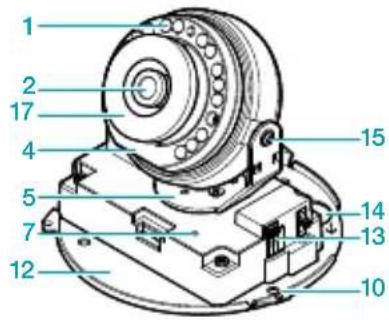
DC-D1212
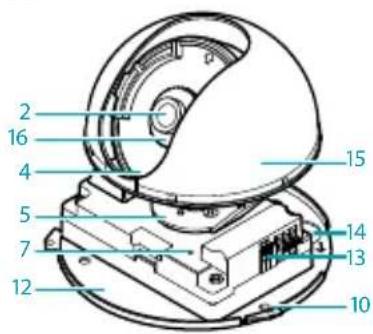
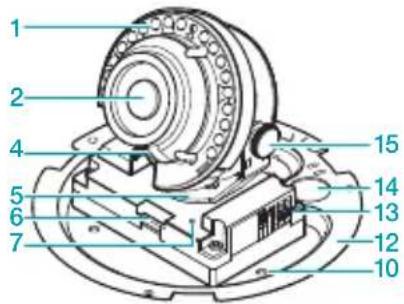
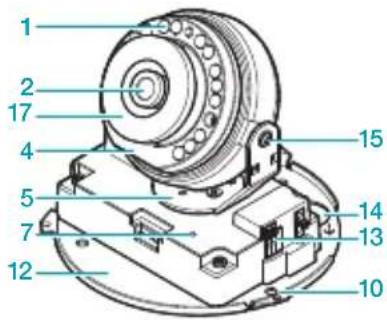
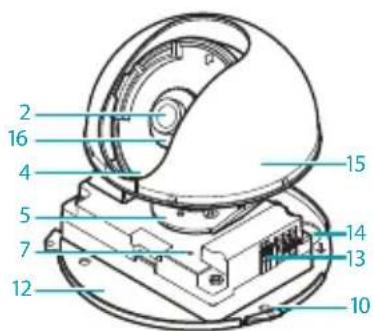
| 1 | IR LED | 10 | Wall/Ceiling Installation Hole |
| 2 | Lens | 11 | Dome Cover Screw Hole |
| 3 | Heater | 12 | Bottom Cover |
| 4 | Lens Rotator | 13 | I/O Device Port |
| 5 | Horizontal Rotator | 14 | Cable Access Hole |
| 6 | SD Memory Card Slot | 15 | Vertical Rotation Adjustment Screw |
| 7 | Factory Reset Switch | 16 | Focus Lock Ring |
| 8 | Safety Wire Screw Hole | 17 | Focus Lock Spring |
| 9 | O-Ring Groove |
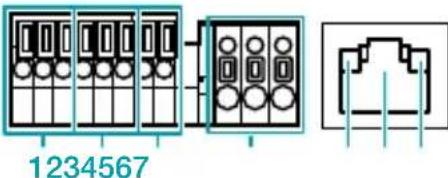
| 1 | Alarm I/O | 5 | Network LED |
| 2 | Audio I/O | 6 | Network Port |
| 3 | Video Out | 7 | Power LED |
| 4 | Power |

Alarm In/Out and Audio In/Out are supported by DC-D1123/DC-D1123R/DC-D1123V/
DC-D1123VR/DC-D1123W/DC-D1123WR/
DC-D1123WHR/DC-D1223/DC-D1223R/
DC-D1223V/DC-D1223VR/DC-D1223W/
DC-D1223WR/DC-D1223WHR/DC-D1323R/
DC-D1323WR / DC-D1323WHR models only.
Camera Installation
DC-D1022W / DC-D1022WR / DC-D1122V /
DC-D1122VR/DC-D1122W/DC-D1122WR/
DC-D1123V / DC-D1123VR / DC-D1123W /
DC-D1123WHR/DC-D1123WR/DC-D1223V/
DC-D1223VR/DC-D1223W/DC-D1223WHR/
DC-D1223WR/DC-D1323WR/DC-D1323WHR

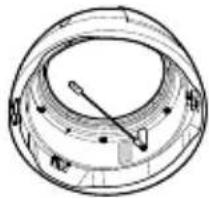
Attach the enclosed desiccant beside the safety wire screw inside the dome cover to prevent moisture. DC-D1022W/DC-D1022WR/DC-D1122W/DC-D1122WR/DC-D1123W/DC-D1123WR/DC-D1123WHR/DC-D1223W/DC-D1223WR/DC-D1223WHR/DC-D1323WR/DC-D1323WHR only.
natural_image
Cross-sectional diagram of a mechanical or optical component with layered structure and central rod (no text or symbols)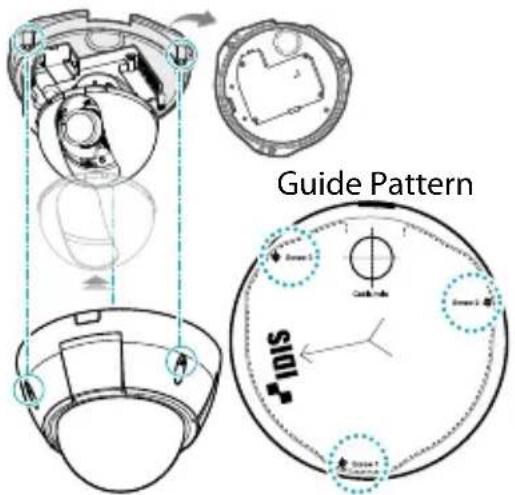
DC-D1122 / DC-D1122R / DC-D1123 /
DC-D1123R/DC-D1223/DC-D1223R/DC-D1323R
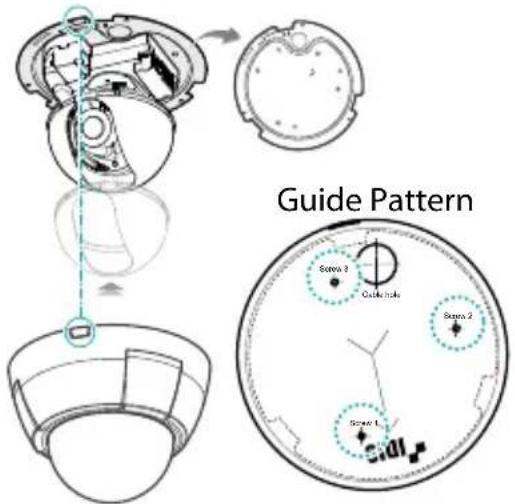
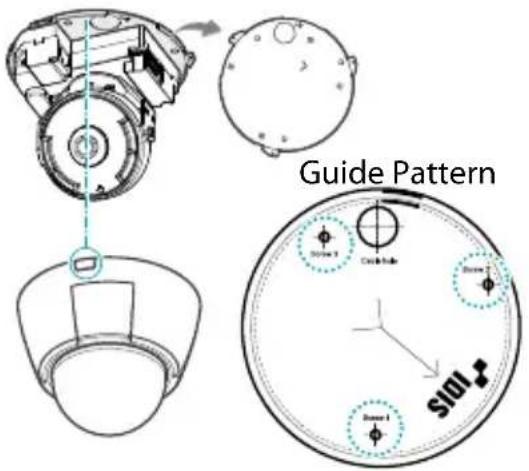
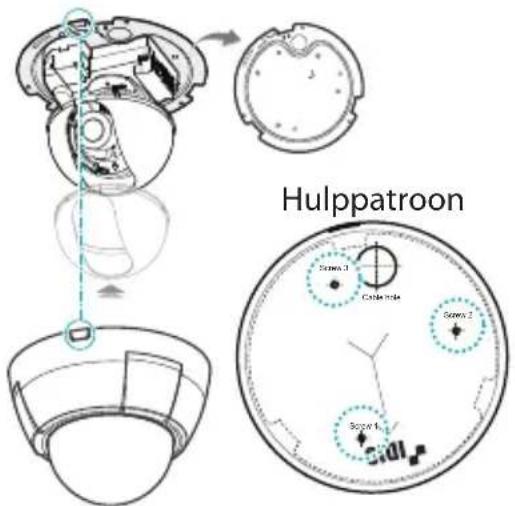
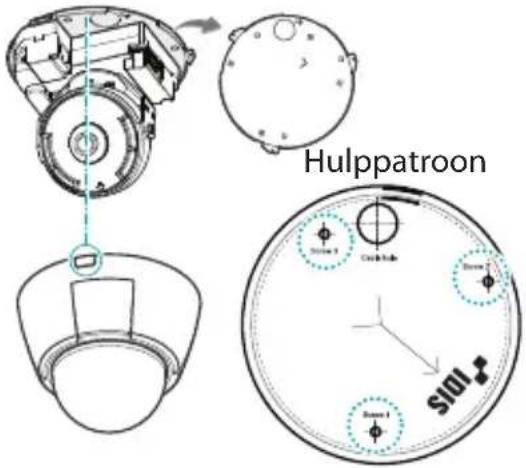
1 Use the screws provided with the camera to secure the bottom cover on a wall or a ceiling.

Use the provided guide pattern to check the distance between the screws.
2 Connect external devices, the network cable, and the power adapter. If the camera is DC-D1022W/DC-D1022WR/DC-D1122W/DC-D1122WR/DC-D1123W/DC-D1123WR/DC-D1123WHR/DC-D1223W/DC-D1223WR/DC-D1223WHR/DC-D1323WR/DC-D1323WHR, block the cable access hole for waterproofing by using the enclosed cable access hole rubber when routing cables and wires. Waterproofing sealing is required by using silicone etc. after blocking the cable access hole. Ask your retailer for details.
3 Adjust the angle of the lens. For more details, refer to Angle Adjustment.
4 Adjust the focus and zoom levers.

DC-D1011/DC-D1111/DC-D1212/DC-D1212R models do not have a zoom feature.
5 Attach the shield case to the vertical rotation adjustment screw and secure it in place. DC-D1022W / DC-D1122 / DC-D1122V / DC-D1122W / DC-D1123 / DC-D1123V / DC-D1123W / DC-D1223 / DC-D1223V / DC-D1223W only
6 Attach the dome cover to the bottom cover.
- DC-D1022W/DC-D1022WR/DC-D1122V/DC-D1122VR/DC-D1122W/DC-D1122WR/DC-D1123V/DC-D1123VR/DC-D1123W/DC-D1123WHR/DC-D1123WR/DC-D1223V/DC-D1223VR/DC-D1223W/DC-D1223WHR/DC-D1223WR/DC-D1323WR/DC-D1323WHR: Use the provided screws to secure the dome cover on to the bottom cover.
- DC-D1011/DC-D1111/DC-D1122/DC-D1122R/DC-D1123/DC-D1123R/DC-D1212/DC-D1212R/DC-D1223/DC-D1223R/DC-D1323R: Align the marking next to the cable access hole on the bottom cover and the side cable access hole on the dome cover together and then turn the dome cover in clockwise direction to lock it in place.
7 Connect the power.

Check the wall or ceiling to see if it needs to be reinforced. The camera may fall off if the wall or ceiling is not strong enough to support its weight.
Angle Adjustment
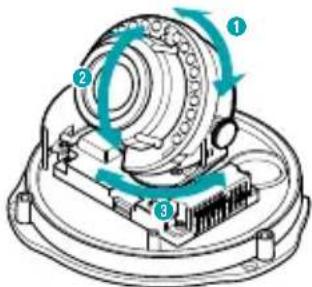
| 1 | Lens Rotation | 3 | Horizontal Rotation |
| 2 | Vertical Rotation |
- DirectIP NVR makes it easy to use cameras without extra network configurations.
Each camera can be controlled via the DirectIP™ NVR setup menu, without any PC. - For detailed camera settings, please see the camera setting pages of DirectIP™ NVR manual.
- To use your camera with non-DirectIP system (e.g. other NVR or VMS), refer to the camera manual and it can be downloaded from our website: www.idisglobal.com.
Specifications
| External Dimensions (∅ x H) | DC-D1022W/DC-D1022WR/DC-D1122/DC-D1122R/DC-D1122V/DC-D1122VR/DC-D1122W/DC-D1122WR/DC-D1123/DC-D1123R/DC-D1123V/DC-D1123VR/DC-D1123W/DC-D1123WR/DC-D1123WHR/DC-D1223/DC-D1223R/DC-D1223V/DC-D1223VR/DC-D1223W/DC-D1223WR/DC-D1223WHR/DC-D1323R/DC-D1323WR/DC-D1323WHR | 160mm x 122mm(6.3" x 4.8") |
| DC-D1011/DC-D1111/DC-D1212/DC-D1212R | 132mm x 103mm(5.2" x 4.06") | |
| Weight (Main Unit) | DC-D1022W/DC-D1022WR/DC-D1122V/DC-D1122VR/DC-D1122W/DC-D1122WR/DC-D1123V/DC-D1123VR/DC-D1123W/DC-D1123WHR/DC-D1123WR/DC-D1223V/DC-D1223VR/DC-D1223W/DC-D1223WHR/DC-D1223WR/DC-D1323WR/DC-D1323WHR | 0.87kg (1.92lb) |
| DC-D1122/DC-D1122R/DC-D1123/DC-D1123R/DC-D1223/DC-D1223R/DC-D1323R | 0.51 kg (1.12lb) | |
| DC-D1011/DC-D1111/DC-D1212/DC-D1212R | 0.35kg (0.77lb) | |
| Boot Up Temperature | DC-D1011/DC-D1022W/DC-D1022WR/DC-D1111/DC-D1122/DC-D1122R/DC-D1122V/DC-D1122VR/DC-D1122W/DC-D1122WR/DC-D1123/DC-D1123R/DC-D1123V/DC-D1123VR/DC-D1123W/DC-D1123WR/DC-D1212/DC-D1212R/DC-D1223/DC-D1223R/DC-D1223V/DC-D1223VR/DC-D1223W/DC-D1223WR/DC-D1323WR/DC-D1323WHR | 0°C ~ 50°C (32°F ~ 122°F) |
| DC-D1123WHR/DC-D1223WHR/DC-D1323R | 0°C ~ 50°C (32°F ~ 122°F)[-20°C ~ 50°C (-4°F ~ 122°F) when the heater is operating] | |
| Working Temperature | DC-D1011/DC-D1022W/DC-D1022WR/DC-D1111/DC-D1122/DC-D1122R/DC-D1122V/DC-D1122VR/DC-D1122W/DC-D1122WR/DC-D1123/DC-D1123R/DC-D1125V/DC-D1123VR/DC-D1123W/DC-D1123WR/DC-D1212/DC-D1212R/DC-D1223/DC-D1223R/DC-D1223V/DC-D1223VR/DC-D1223W/DC-D1223WR/DC-D1323WR/DC-D1223WHR | -10°C ~ 50°C (14°F ~ 122°F) |
| DC-D1123WHR/DC-D1223WHR/DC-D1323R | -10°C ~ 50°C (14°F ~ 122°F)[-40°C ~ 50°C (-40°F ~ 122°F) when the heater is operating] | |
| Operating Humidity 0% ~ 90% | ||
| Power Input* | DC-D1011/DC-D1022W/DC-D1022WR/DC-D1111/DC-D1122/DC-D1122R/DC-D1122V/DC-D1122VR/DC-D1122W/DC-D1122WR/DC-D1123/DC-D1123R/DC-D1123W/DC-D1123VR/DC-D1123W/DC-D1123WHR/DC-D1223/DC-D1223R/DC-D1223V/DC-D1223VR/DC-D1223W/DC-D1223WR/DC-D1223WHR/DC-D1323R/DC-D1323WR/DC-D1323WHR | 12V DC, PoE(IEEE 802.3af, Class2) |
| DC-D1212/DC-D1212R | PoE(IEEE 802.3af, Class 2) | |
| Power Consumption | DC-D1011/DC-D1022W/DC-D1022WR/DC-D1111/DC-D1122/DC-D1122R/DC-D1122V/DC-D1122VR/DC-D1122W/DC-D1122WR/DC-D1123/DC-D1123R/DC-D1123Y/DC-D1123VR/DC-D1123W/DC-D1123WR/DC-D1123WHR/DC-D1212R/DC-D1223/DC-D1223R/DC-D1223V/DC-D1223WR/DC-D1223W/DC-D1223WHR/DC-D1223WHR/DC-D1323R/DC-D1323R/DC-D1323WR/DC-D1323WHR | Max. 4.8W(DC-D1123WHR / DC-D1223WHR / DC-D1323WHR- With heater on: Max. 19.2W) |
| Certifications | FCC, CE, UL**, IP66*** | |
External Storage\*\*\*\* (Optional)

(MicroSD (SDHC) Memory Card (Class 6 or above, up to 32 GB))
* This product is intended to be supplied by a Listed Power Supply Unit marked "Class2" and rated from 12 VDC, min. 3A.
* Overvoltage Category I, Pollution Degree 2
** Applies to DC-D1223R model only.
** CAUTION: Risk of Explosion if Battery is replaced by an Incorrect Type. Dispose of Used Batteries According to the Instructions. This equipment is indoor use and all the communication wiring are limited to inside of the building.
*** Applies to DC-D1022W/DC-D1022WR/DC-D1122W/DC-D1122WR/DC-D1123W/DC-D1123WR/DC-D1123WHR/DC-D1223W/DC-D1223WR/DC-D1223WHR/DC-D1323WR/DC-D1323WHR models only.
**** microSD Logo is a trademark of SD-3C, LLC.
**** An SLC (Single Level Cell) or MLC (Multi Level Cell) card by SanDisk or Transcend is recommended to ensure stable recording performance.
**** An SD memory card is a consumable product with a finite service life. Prolonged use will damage the card's memory sectors and result in data loss or memory card failure. Test the SD memory card regularly and replace it whenever necessary.
WAARSCHUWING
KANS OP ELEKTRISCHE SCHOKKEN NIET OPENMAKEN
WAARSCHUWING: OM DE KANS OP ELEKTRISCHE SCHOKKEN TE BEPERKEN,
MAG U DE BEHUIZING (OF ACHTERKANT) NIET VERWIJDEREN. BINNENIN BEVINDEN ZICH GEEN BRUIKBARE ONDERDELEN VOOR DE GEBRUIKER.
LAAT REPARATIES UITVOEREN DOOR GEKWALIFICEERD ONDERHOUDSPERSONEEL.
WEEE (Waste Electrical & Electronic Equipment)
DC-D1122R
DC-D1122V / DC-D1022W /
DC-D1122W
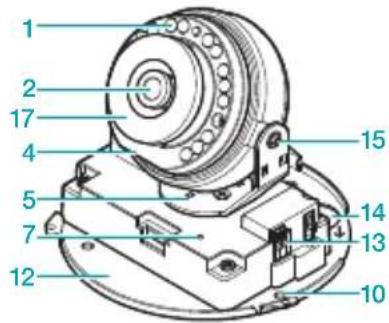
DC-D1122VR / DC-D1022WR /
DC-D1122WR
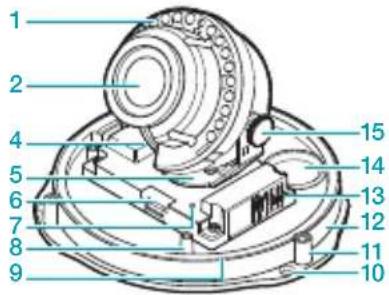
DC-D1212R
DC-D1212
natural_image
Cross-sectional diagram of a mechanical component with internal channels and a central shaft (no text or labels)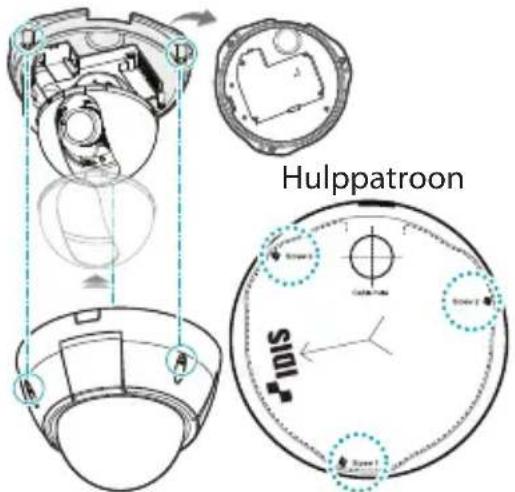
DC-D1122 / DC-D1122R / DC-D1123 / DC-D1123R / DC-D1223 / DC-D1223R / DC-D1323R
* This product is intended to be supplied by a Listed Power Supply Unit marked "Class2" and rated from 12 VDC, min. 3A.
* Overvoltage Category I, Pollution Degree 2
** Alleen van toepassing op de modellen DC-D1223R.
** CAUTION: Risk of Explosion if Battery is replaced by an Incorrect Type. Dispose of Used Batteries According to the Instructions. This equipment is indoor use and all the communication wiring are limited to inside of the building.
*** Alleen van toepassing op de modellen DC-D1022W / DC-D1022WR / DC-D1122W / DC-D1122WR / DC-D1123W / DC-D1123WR / DC-D1123WHR / DC-D1223W / DC-D1223WR / DC-D1223WHR / DC-D1323WR / DC-D1323WHR.
- Important Safeguards
- Read Instructions
- Retain Instructions
- Cleaning
- Attachments
- Water and/or Moisture
- Placing and Accessories
- Power Sources
- Power Cord
- Lightning
- Overloading
- Objects and Liquids
- Servicing
- Damage requiring Service
- Replacement Parts
- Safety Check
- Field Installation
- Correct Batteries
- Tmra
- FCC Compliance Statement
- WEEE (Waste Electrical & Electronic Equipment)
- Correct Disposal of This Product
- Safety Symbols
- Copyright
- Registered Trademarks
- Accessories
- Camera Installation
- Angle Adjustment
- External Storage\*\*\*\* (Optional)
- WAARSCHUWING
- KANS OP ELEKTRISCHE SCHOKKEN NIET OPENMAKEN
Brand : IDIS
Model : DC-D1223R
Category : Surveillance Camera