
LSBIS50 - Surveillance Camera JUNG - Free user manual and instructions
Find the device manual for free LSBIS50 JUNG in PDF.


| Product Type | Fingerprint Access Control System |
| Brand | JUNG |
| Model | LSBIS50 |
| Operating Voltage | 12 V DC SELV |
| Switching Output | 12 V / 1 A (non-floating) |
| Power Consumption | Approx. 150 mA (without door opener) |
| Max Number of User Fingers | 50 |
| Number of Master Fingers | 3 |
| Fingerprint Sensor Type | Line-oriented heated sensor |
| Switching Output ON Time | Adjustable 0.5 – 10 seconds (default 3 s) |
| Indicator LEDs | Red, amber, green |
| Ambient Temperature | -15 °C to +50 °C |
| Storage Temperature | -20 °C to +70 °C |
| Max Wire Cross-Section | 1.5 mm² |
| Safety Class | III (use safety transformer per EN 61558) |
| Installation | Flush-mounting box per DIN 49073 (deep box recommended) |
| Data Retention | Stored fingers retained after power failure |
| Accessories Included | Power supply BIS 50 NT (separate order) |
| Maintenance | Clean sensor surface gently; avoid scratches |
| Repair Service | Send to ALBRECHT JUNG GMBH & CO. KG, Service-Center |
Frequently Asked Questions - LSBIS50 JUNG
User questions about LSBIS50 JUNG
0 question about this device. Answer the ones you know or ask your own.
Ask a new question about this device
Download the instructions for your Surveillance Camera in PDF format for free! Find your manual LSBIS50 - JUNG and take your electronic device back in hand. On this page are published all the documents necessary for the use of your device. LSBIS50 by JUNG.
USER MANUAL LSBIS50 JUNG
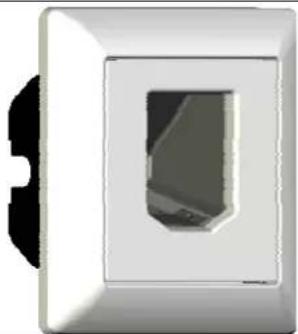
Operating instructions Fingerprint system
natural_image
Close-up of a white rectangular wall with a recessed opening, showing no text or symbols.- Safety Instructions.... 1
- Device layout 2
- Function 2
- Operation....2
4.1. Storing a master finger 4
4.2. Storing user fingers....5
4.3. Deleting the user finger....7
4.4. Deleting all fingers 7
4.5. Changing the switching output ON time 8
- Fitting and electrical connection....9
5.1. Installing the device 9
5.2. Start-up 10
- Appendix....10
6.1. Technical data.... 10
6.2. Control functions – overview.... 10
6.3. Accessories....11
6.4. Guarantee....11
1. Safety Instructions
Electrical equipment must be installed and fitted by qualified electricians only.
Failure to observe the instructions may cause damage to the device and result in fire or other hazards.
Only for indoor use.
The device is not protected against tampering. Do not use in areas critical with regard to safety or in combination with alarm systems.
This device is a safety class III device. Use a safety transformer as per EN 61558 with an output voltage of 12 VDC as power supply. For the installation and for the laying of cables observe the relevant specifications and the standards for SELV voltages.
These operating instructions are part of the product and must be left with the final customer.

2. Device layout

(1) Design cover
(2) Indicator LEDs red, amber, green
(3) Line-oriented sensor
(4) Control button under design cover
3. Function
Designated use
- The device verifies the access authorization of persons by comparison of their fingerprints. For this verification, the person demanding access runs a finger over the sensor surface. If the access authorization is confirmed, the device enables a switching output for a preset time, e.g. to activate the opener of doors inside a building.
- Installation in a flush-mounting box as per DIN 49073. Recommendation: Use the deep mounting box.
Device features
- Storing capability for up to 50 user fingers
• 3 master fingers for administration purposes - Switching output ON time adjustable between 0.5 and 10 seconds
• 3 coloured LEDs as indicators - Stored finger data remain stored even after mains failures
- Separate power supply (accessory part) for device required
① The device uses a heated sensor. A slight temperature increase can be felt when the finger is placed on the sensor. This temperature increase is of no risk to the user.
The necessary operating temperature is reached 30 seconds max. after switching on.
4. Operation
Running the finger correctly over the sensor surface
The sensor in the device works like a line scanner. When a finger is run over the sensor surface, the device builds an image of the fingerprint (Fig. 2) and stores it.

Fig. 2
① In order to obtain an image as precise as possible of the fingerprint it is necessary to run the finger uniformly and with a slight pressure over the sensor surface (Fig. 3). For safe recognition, the stored finger should always be run in the same way over the sensor surface.

natural_image
Illustration of a hand pointing at a checkmark (no text or symbols present)
natural_image
Simple line drawing of a hand holding a coin with two intersecting lines (no text or symbols)Fig. 3: Proper use
In normal operation the amber LED is permanently on. The device is ready for operation.

red amber green
- Place the finger as deeply as possible into the sensor cavity.
- Run the finger uniformly and with a slight pressure over the sensor surface to ensure that the scanned area of the finger is as large as possible (Fig. 3).
The amber LED flashes during the evaluation of the fingerprint.

red amber green
After a brief evaluation period and after recognition of the fingerprint, the green LED is switched on and the switching output is enabled. The amber LED is permanently on.

red amber green
If the finger is repudiated, the red LED is on for a short time in addition to the amber LED.
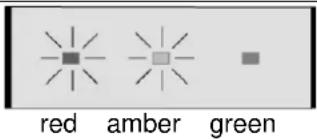
If the finger is run over the sensor surface too fast, the red and the amber LED are activated directly. There is no previous flashing of the amber LED.
A finger may not be recognized by the system for the following reasons:
- no finger data stored.
- finger dirty or injured
- finger run over sensor surface too fast, too slowly or not in the same position as during storage
- stored finger has not enough features suitable for evaluation In this case, it is recommended to store another finger of the same person better suited for evaluation.
4.1. Storing a master finger
flowchart
graph LR
    A["alle LED blinken"] --> B["Masterfinger 1 3 mol"]
    B --> C["alle LED blinken"]
    C --> D["Masterfinger 2 3 mol"]
    D --> E["alle LED blinken"]
    E --> F["Masterfinger 3 3 mol"]
    F --> G["alle LED leuchtten"]
    G --> H["30 s"]
    H --> I["gelbe LED leuchtet"]
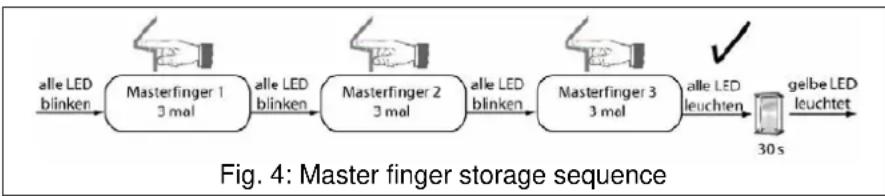
After commissioning or after deletion of all fingers, three master fingers must be stored in the device. For this purpose, each of the three master fingers must be scanned successfully three times. The fingerprint with the highest quality will be stored. If only one person is to handle the device, it is also sufficient to store three fingers of the same person.
The master finger can be used to store and to delete user fingers. The master finger will not be granted the right of access.
If the finger is not recognized well enough during the storage procedure, the red LED flashes and the finger must be run again over the sensor surface.
The device is in the state as delivered. All LED's are flashing.

- Run the first finger over the sensor.
The amber and the green LED are flashing for about 2 seconds. The red LED permanently on. -
As soon as the green LED is permanently on, run the same finger a second time over the sensor surface.
The amber and the green LED flash for about 2 seconds. -
As soon as the green LED is permanently on, run the same finger a third time over the sensor surface.
The green and the amber LED are flashing, the red LED is on. The first master finger has now been stored. For confirmation, the green LED lights up for 3 seconds.
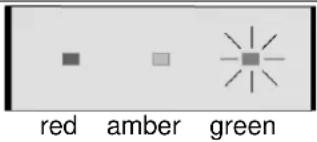
All LEDs are flashing and the device is waiting for the second master finger.
- Store the second and the third master finger in the same way. After storing of the third master finger, the device changes over into the storage mode. All LEDs are on. The first user finger can be stored.
① If no finger is run over the sensor surface during the next 30 seconds, the device switches back to normal operation.
① A pause of more than 10 seconds during the storage will cause abortion of the whole procedure.
① If another finger is to be stored later as master finger, the whole memory must be cleared (all fingers must be deleted).
4.2. Storing user fingers
flowchart
graph LR
    A["gelbe LED leuchtet"] --> B["Masterfinger 2 mal"]
    B --> C["alle LED leuchten"]
    C --> D["Bedienfinger 3 mal"]
    D --> E["grüne LED blinkt, rot und gelb leuchten"]
    E --> F["Masterfinger 1 mal"]
    F --> G["alle LED leuchten"]
    G --> H["30 s"]
    H --> I["gelbe LED leuchtet"]
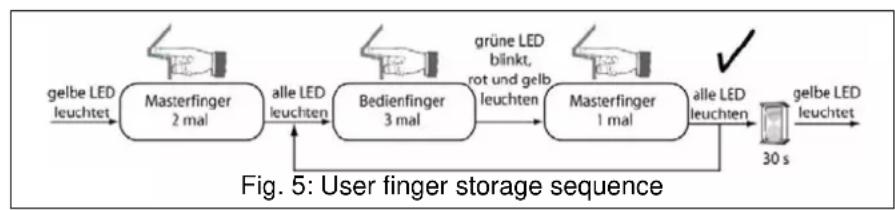
If persons are to be granted access, at least one user finger must have been stored. The device must be in the storage mode and the new user finger must be run three times over the sensor surface. The scan result with the highest quality will be stored.
If the master finger is no longer available, the device can no longer be accessed and must be sent in for rectification.
- Run the master finger over the sensor surface.
The amber LED is on and the red and green ones are flashing.

- Run the master finger once again over the sensor surface.
All LEDs are on. The device is in the storage mode.

red amber green
- Run the new master finger over the sensor surface.
The amber and the green LED flash for about 2 seconds. - As soon as the green LED is permanently on, run the same user finger a second time over the sensor surface.
The amber and the green LED flash for about 2 seconds. - As soon as the green LED is permanently on, run the user finger a third time over the sensor.
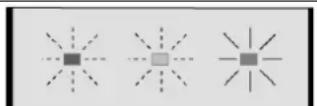
The green LED is flashing, the red and the amber LED are on.

red amber green
- During the next ten seconds, the master finger must be run again over the sensor surface for storing of the user finger.
The user finger has now been stored. For confirmation, the amber and the green LED will flash two times.
The device is still in the storage mode and all LEDs are on. The device is ready for storing the next user finger.
① If no finger is run over the sensor surface within the next 30 seconds, the device switches back to normal operation.
① If a finger is not recognized well enough during the storage procedure, the red LED flashes and the finger must be run again over the sensor surface.
red amber green
① A pause of more than 10 seconds during the storage will cause abortion of the whole procedure.
① The device can handle a maximum number of 50 user fingers. Any attempt to store further fingerprints will be rejected by the device. All LEDs are on.
① For an overview of the memory locations already in use, a list similar to the following table should be drawn up. It can be useful to store a second finger of a person in order to ensure the access to the system in case the first finger is dirty or injured.
4.3. Deleting the user finger
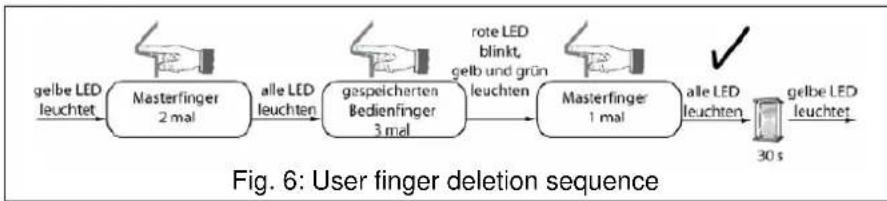
If the right of access is to be withdrawn from a user whose finger has already been stored, the same procedure as that applied for storing is required. Repeated storage of a user finger causes the existing user finger to be deleted.
- Run the master finger over the sensor surface.
The amber LED is on and the red and green ones are flashing. - Run the master finger once again over the sensor surface.
All LEDs are on. The device is in the storage mode. - Run the user finger to be deleted over the sensor surface.
The amber and the green LED flash for about 2 seconds. - As soon as the green LED is permanently on, run the user finger to be deleted another two times over the sensor surface.
The red LED is flashing, the green and the amber ones are on. - Run the master finger over the sensor surface.
The user finger is now deleted. For confirmation, the red and the amber LED will flash twice. The device remains in the storage mode and all LEDs are on
① If the right of access is to be withdrawn from a person who is absent, the whole memory must be cleared (all fingers must be deleted). All fingers of persons who are to retain their right of access must be stored again.
4.4. Deleting all fingers

flowchart
graph LR
    A["gelbe LED leuchtet"] --> B["Masterfinger 2 mal"]
    B --> C["alle LED leuchten"]
    C --> D["Masterfinger 3 mal"]
    D --> E["alle LED blinken"]
    E --> F["✓"]
Deletion of all fingers is necessary, if a new master finger is to be stored, an existing master finger to be deleted or if a user finger to be removed from the system is no longer available. This function restores the device to the state as delivered. Only the ON time of switching output will not be reset.
- Run the master finger over the sensor surface.
The amber LED is on and the red and green ones are flashing. - Run the master finger once again over the sensor surface.
- All LEDs are on. The device is in the storage mode.
- Run the master finger once more over the sensor surface.
The red and green LEDs are briefly off and then permanently on. This is to indicate that the device has recognized a master finger and not a user finger.
Attention: When the red LED has started flashing, the deletion is in progress and can no longer be aborted. All fingers will be deleted.
- Run the master two more times over the sensor surface.
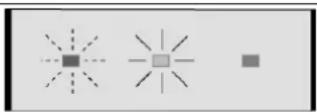
The red LED flashes for 10 seconds, the amber LED is on. All fingers are deleted.
red amber green
The device is restored to the state as delivered. All LED's are flashing.
① A pause of more than 5 seconds during the deletion will cause abortion of the procedure
4.5. Changing the switching output ON time
natural_image
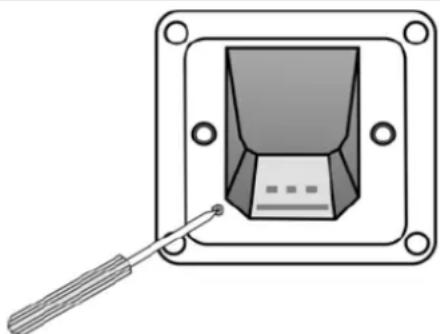
Diagram of a device with a screwdriver inserted into a square frame, showing internal components (no text or symbols)Fig. 8: Control button
The switching output can be used, for instance, for activating a door opener. The time during which the output is active can be adjusted to between 0.5 and 10 seconds. The ON time is factory-adjusted to 3 seconds.
For the adjustment it is necessary that master fingers have been stored beforehand.
- Remove the cover.
- Press the button with a pointed object for as long as the switching output is to be active (Fig. 8). The green LED lights up and the switching output is enabled as long as the button is kept depressed. After releasing the button the new ON time is stored. If the button is pressed for more than 10 seconds, the green LED goes out and the switching output is no longer enabled. The device has stored the maximum ON time of 10 seconds.
Information for qualified electricians
5. Fitting and electrical connection

DANGER!
Electric shock in case of accidental contact with live parts. Electric shocks can be fatal.
Disconnect the power supply before installing the device.
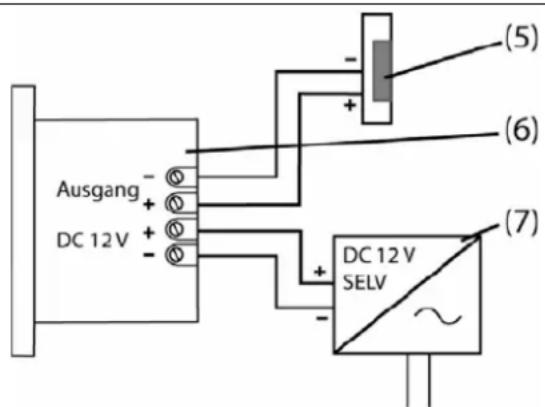
Fig. 9: Wiring
(5) door opener
(6) fingerprint sensor
(7) power supply
5.1. Installing the device
For optimal operation, the device should be installed at a height of approximately 1.35 m.
Recommendation: Use a deep flush-mounting box.
- Install the power supply in a separate flush-mounting box.
- Connect the power supply and the door opener to the fingerprint sensor (Fig. 9)
- Install the device together with the frame in a flush-mounting box. Tighten the retaining screws supplied by hand before installing the cover.
① Do not pull the sensor when removing the device.
① Maximum power consumption of the sensor = 1 A. Exceeding this limit may cause malfunctions with the result that the access is denied.
5.2. Start-up
Putting the device into operation
- Switch on the mains voltage.
After about 2 seconds all LEDs are flashing. After 30 seconds max. the device is ready for operation. - Store the master fingers ("Storing a master finger").
- If desired, adjust the ON time of the switching output. The ON time is factory-adjusted to 3 seconds ("Changing the switching output ON time")
■ Store the user fingers.
6. Appendix
6.1. Technical data
Max. number of user fingers 50
Number of master fingers 3
Operating voltage: 12 VDC SELV
Switching output 12 V / 1 A (non-floating)
Power consumption approx. 150 mA without door opener
Max wire cross-section for terminals: 1.5 mm ^4
Ambient temperature -15^ + 50^
Storage temperature -20°C ... +70°C
6.2. Control functions – overview
Storing a master finger

flowchart
graph TD
    A["alle LED blinken"] --> B["Masterfinger 1 3 mal"]
    B --> C["alle LED blinken"]
    C --> D["Masterfinger 2 3 mal"]
    D --> E["alle LED blinken"]
    E --> F["Masterfinger 3 3 mal"]
    F --> G["alle LED leuchten"]
    G --> H["galbe LED leuchtet"]
    H --> I["30 s"]

    J["gebe LED leuchtet"] --> K["Masterfinger 2 mal"]
    K --> L["alle LED leuchten"]
    L --> M["Bedlenfinger 3 mal"]
    M --> N["grene LED blinkt, rot und gelb leuchten"]
    N --> O["Masterfinger 1 mal"]
    O --> P["alle LED leuchtet"]
    P --> Q["30 s"]

    R["Storing a user finger"] --> S["gebe LED leuchtet"]
    S --> T["Masterfinger 2 mal"]
    T --> U["alle LED leuchten"]
    U --> V["Bedlenfinger 3 mal"]
    V --> W["grene LED blinkt, rot und gelb leuchten"]
    W --> X["Masterfinger 1 mal"]
    X --> Y["alle LED leuchtet"]
    Y --> Z["30 s"]
Deleting a user finger

Deleting all fingers

flowchart
graph LR
    A["gelbe LED leuchtet"] --> B["Masterfinger 2 mal"]
    B --> C["alle LED leuchten"]
    C --> D["Masterfinger 3 mal"]
    D --> E["alle LED blinken"]
    E --> F["✓"]
6.3. Accessories
Power supply BIS 50 NT
6.4. Guarantee
Our products are under guarantee within the scope of the statutory provisions.
Please return the unit postage paid to our central service department giving a brief description of the fault:
ALBRECHT JUNG GMBH & CO. KG
Service-Center
Kupferstr. 17-19
D-44532 Lünen
Service-Line: +(49) 23 55 . 80 65 51
Telefax: +(49) 23 55.80 61 65
CE The CE-Sign is a free trade sign addressed exclusively to the authorities and does not include any warranty of any properties.
- Operating instructions Fingerprint system
- Safety Instructions
- Device layout
- Function
- Designated use
- Device features
- Operation
- Running the finger correctly over the sensor surface
- Storing a master finger
- Storing user fingers
- Deleting the user finger
- Deleting all fingers
- Changing the switching output ON time
- Information for qualified electricians
- Fitting and electrical connection
- DANGER!
- Installing the device
- Start-up
- Putting the device into operation
- Appendix
- Technical data
- Control functions – overview
- Storing a master finger
- Accessories
- Guarantee
- Please return the unit postage paid to our central service department giving a brief description of the fault:
Brand : JUNG
Model : LSBIS50
Category : Surveillance Camera