Pinnacle DPP22W - Surveillance Camera Digimerge - Free user manual and instructions
Find the device manual for free Pinnacle DPP22W Digimerge in PDF.


| Product Type | Surveillance Camera |
| Brand | Digimerge |
| Model | Pinnacle DPP22W |
| Category | Bullet Camera |
| Image Sensor | 1/2.7" CMOS |
| Resolution | 1920 x 1080 (2 MP) |
| Frame Rate | 30 fps |
| Lens | 3.6 mm fixed lens |
| Night Vision | Up to 20 m IR range |
| Day/Night Mode | Mechanical IR cut filter |
| Video Compression | H.265+ / H.264+ |
| Field of View | 90° horizontal |
| Motion Detection | Built-in with alarm output |
| Audio | Two-way audio via built-in microphone and speaker |
| Power Supply | 12V DC, PoE (802.3af) |
| Power Consumption | Max 5W |
| Dimensions (W x H x D) | 70 x 70 x 150 mm |
| Weight | 300 g |
| Housing | IP66 weatherproof rating |
| Operating Temperature | -30°C to 60°C |
| Storage | MicroSD card slot (max 128 GB) |
| Connectivity | RJ45 for 10/100 Base-T Ethernet |
| Mounting | Wall or ceiling mount bracket included |
| Software Support | Compatible with Digimerge NVR and iOS/Android apps |
| Warranty | 2 years limited warranty |
Frequently Asked Questions - Pinnacle DPP22W Digimerge
User questions about Pinnacle DPP22W Digimerge
0 question about this device. Answer the ones you know or ask your own.
Ask a new question about this device
Download the instructions for your Surveillance Camera in PDF format for free! Find your manual Pinnacle DPP22W - Digimerge and take your electronic device back in hand. On this page are published all the documents necessary for the use of your device. Pinnacle DPP22W by Digimerge.
USER MANUAL Pinnacle DPP22W Digimerge
A better way to a secure future
Model : DPP22W
Ultra Resolution WDR Day/Night Camera
Instruction Guide
Powered by PIXIM®
Model : DPP22W Ultra Resolution WDR Day/Night Camera
Printed in KOREA

natural_image
Exterior view of a black DigiMERGE optical camera (no visible text or symbols on body)Digimerge Technologies Inc.


The lightning flash with an arrowhead symbol, within an equilateral triangle is intended to alert the user to the presence of uninsulated dangerous voltage within the product's enclosure that may be of sufficient magnitude to constitute a risk of electric shock to persons.

The exclamation point within an equilateral triangle is intended to alert the user to the presence of important operating and maintenance (servicing) instructions in the literature accompanying the appliance.
INFORMATION - This equipment has been tested and found to comply with limits for a Class A digital device, pursuant to part 15 of the FCC Rules & CE Rules. These limits are designed to provide reasonable protection against harmful interference when the equipment is operated in a commercial environment. This equipment generates, uses, and can radiate radio frequency energy and, if not installed and used in accordance with the instruction manual, may cause harmful interference to radio communications. Operation of this equipment in a residential area is likely to cause harmful interference in which case the user will be required to correct the interference at his own expense.
WARNING - Changes or modifications not expressly approved by the manufacturer could void the user's authority to operate the equipment.
CAUTION: To prevent electric shock and risk of fire hazards:
◆ Do NOT use power sources other than those specified.
◆ Do NOT expose this appliance to rain or moisture.
This installation should be made by a qualified service person and should conform to all local codes.
Contents
Features 2
Warnings and Precautions 3
Components 8
Names and Functions of Parts 9
■ Front 9
Bottom 10
■ Back 11
Installation 12
Lens 12
• Using auto iris
• Using C/CS mount lens
• Using a C-Mount lens
■ Connecting to a monitor 15
■ Connecting to power 15
How to Use the Camera 16
■ Menu 16
Settings 17
- PRESETS 18
- EXPOSURE 19
· WDR 20
- WHITE BALANCE 21
· DAY/NIGHT 23
• IMAGE ADJ. 24
- SPECIAL 25
-CAMERA ID 26
-VIDEO OUT 27
- DZOOM 27
- MOTION 27
-PRIVACY SETUP 28
- RESET 29
- EXIT MENU 29
Troubleshooting 30
Specifications 31
Limited Warranty 32
Features
Warning
High Resolution Color for Crisp, Clear Video
• Progressive image capture
· 690TVL Effective
Motion Detection
Since the camera detects motion without any additional external sensor, you can monitor activity more efficiently.
Wide Dynamic Range (WDR)
The camera delivers high quality pictures, even when backlit, by increasing exposure in dark areas while decreasing it in bright areas;
- 120dB maximum dynamic range
VIDEO / DC Drive Lens
The video drive lens and the DC drive lens can be selected by the touch of a switch.
Day & Night
The camera identifies whether it is day or night and automatically switches to the appropriate mode, depending on its environment. By day, the camera switches to color mode in order to maintain optimal color. At night, it switches to BAW mode so as to obtain better picture definition.
Additional Functions
SYNC (INT/LL), SENS-UP, FLIP(H/V-REV), D-ZOOM, SHARPNESS and PRIVACY functions are provided.
DNR (Digital Noise Reduction)
The amount of low illuminance noise is significantly reduced, and the signal-to-noise ratio (S/N ratio) as well as horizontal resolution, have been improved resulting in a clear and sharp images even in low light.
High Sensitivity for low-light images
The built-in high sensitivity PIXIM SEAWOLF Sensor enables a clear image even at 0.1Lux
The camera requires periodic inspection.
Contact an authorised technician to carry out the inspection.
Do not Install the camera on a surface that can not support it.
If the camera is installed on an inappropriate surface, it may fall and cause injury.
Do not hold plug with wet hands.
It could cause an electric shock.
Do not dis-assemble the camera.
It may result in an electric shock or other hazards.
■ Precautions
Do not install the camera in extreme temperature conditions.

Only use the camera under conditions where temperatures are between -10°C and +50°C. Be especially careful to provide ventilation when operating under high temperatures.
Do not install or use the camera in an environment where the humidity is high.

It can cause the image quality to be poor.
Do not install the camera under unstable lighting conditions.

Severe lighting change or flicker can cause the camera to work improperly.
Do not touch the front lens of the camera.
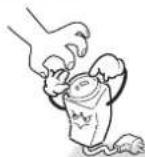
This is one of the most important parts of the camera. Be careful not to leave fingerprints on the lens cover.
Do not drop the camera and protect it from physical shocks.

It can cause malfunctions to occur.
Never keep the camera pointed directly at strong light.

It can damage the CMOS.
Do not expose the camera to rain or spill beverage on it.

If it gets wet, wipe it dry immediately. Liquids can contain minerals that corrode the electronic components.
Do not expose the camera to radioactivity.

If exposed to radioactivity the CMOS will fail.
Note
- Please check the power supply satisfies the normal specification before connecting the camera.
Components
- COLOR BOX CAMERA

- AUTO IRIS LENS CONNECTION PLUG

- L-WRENCH

- C-MOUNT ADAPTOR

- INSTRUCTION GUIDE

Names and Functions of Parts
Front
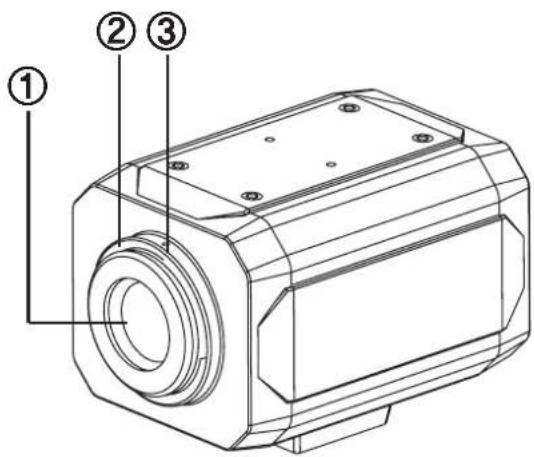
① Lens protection cap
Cover the lens when not using it.
② CS-Mount lens adaptor
Attach the CS-Mount lens here.
③ Back Focus clamp screw
Loosen the clamp screw with a screwdriver before adjusting the Back Focal length.
Names and Functions of Parts
Bottom

natural_image
Technical line drawing of a mechanical component with mounting holes and a numbered callout (no text or symbols present)④ Mountingbracketscrewhole
Usethescrewholewhenfixingthe cameraontothemountingbracket.Pleaseuse theclampscrewasspecifiedinthepicture.
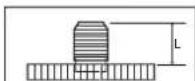
1/4"-20 UNC (20 THREAD)
L:4.5mm±0.2mm (ISO standard),
or 0.197" (ASA standard)
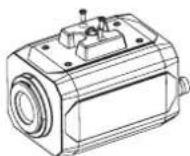
※ Themountingbracketcanbeseparatedand attachedonthetopofthecamera. pleasedonottightenthescrewtoadepthof morethan5mm,otherwiseseriousdamage canoccurtotheinsideofthecamera.
Names and Functions of Parts
Back

⑤ Autoirislensconnector
Thisistheconnectionterminalfortheautoirislens.
⑥ Autoirislensselectionswitch
ChangethemodetoDCorVIDEOdependingonthetypeofautoiris lensbeingused.
⑦ OSDExtra
Connectstotheremotecontroller(option)whenyouwanttoinstallremotely.
⑧ Videoupturterminal
Sendsvideosignalsandconnectstothevideoinputterminalofthe monitor.
⑨ Powerlamp
Lightsupwhenthecorrectpowerissuppliedtothecamera.
10 Settingbutton
- SETbutton :Usedforthemenudisplay.Thisbuttoncanbeusedto confirmsettingsafterchangingthevalueoftheselectedfunctionor currentconditions.
- UP&DOWNbuttons: Usedforselectingitemsbymovingthe cursorupordownonthemenuscreen.
- LEFT&RIGHTbuttons: Usedwhenchangingitemvalues,by movingthecursortotheleftorrightonthemenuscreen.
⑪ Powerinputterminal
Connectstothepowerappropriatetoeachpowerrequirement.
Installation
Lens
Lenses are sold separately. Lenses such as auto iris lens, CS-Mount lens and C-Mount lens can be used.

Note
- Use of the DC auto iris lens is recommended to achieve the best results for operating this product effectively.
- Keep the lens clean.
- Any foreign objects and fingermarks on the lens can cause inferior image quality in low light level conditions.
When using an auto iris lens
- Peel off about 8mm of the outer skin of the auto iris lens cable.

- Peel off about 2mm of the outer skin of the insulated conductor inside the lens cable.

Installation
- Remove the cover of the auto iris lens connection plug and solder the lens cable to the connector pin in the plug.
| Pin No. | LENS | |
| DC VIDEO | ||
| No.1 Pin Damping- Red(power) | ||
| No.2 Pin Damping+ NC | ||
| No.3 Pin Drive+ White(video signal) | ||
| No.4 Pin Dreve- Black(GND) | ||
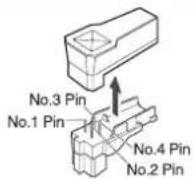

- Replace the auto iris lens connection plug cover and take off the lens protection cap, and then attach the auto iris lens to the camera by screwing it in clockwise.
- Insert the connection plug that is connected to the auto iris lens cable into the auto lens connector, which is located on the back of the camera.

natural_image
Technical line drawing of a mechanical device with no visible text or symbols- Set the lens selection switch, located on the back of the camera, to DC or VIDEO depending on the type of auto iris lens which is being used.

Installation
When using a CS-Mount lens
Take off the lens protection cap and attach the CS-Mount lens to the camera by screwing it in clockwise.
CS-mount adaptor

When using a C-Mount lens
- Take off the lens protection cap and attach the C-mount adaptor.
C-mount adaptor
Lens protection cap
- Attach the C-Mount lens to the camera by screwing it in clockwise.
C-mount adaptor

natural_image
Diagram of two mechanical components with rotating parts and directional arrows indicating motion (no text or symbols)Note
- Use the specified lens connection parts as shown in the picture below.
The use of the wrong sized parts may cause damage to the inside of the camera or result in poor fitting.
- Use of a lens which is too heavy affects the balance of the camera and may cause a malfunction. Please use a lens that weighs less than 450g.
- Select Av mode if possible when adjusting the automatic light control (ALC) of an auto lens. Use of PK mode may cause hunting.
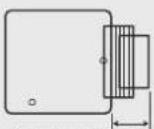
C-mount lens: 10 mm or less
CS-mount lens: 5 mm or less
■ Connecting to a monitor
Connect the video output terminal located on the back of the camera to the monitor.

CCD Camera
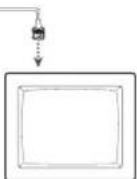
Monitor
- The connection method varies depending on the type of monitor and accessories. Please refer to the user's manual for each instrument.
- Turn off the power when connecting.
■ Connecting to power
Check the standard power requirement before connecting to power.
Dual Power Type
(AC 24V/DC 12V, AC 24V Class2)

DC Power Type (DC 12V, 500mA)

■ How to Use the Camera
Menu
| SETUP menu | |||
| PRESETS | · NORMAL | · INDOOR | · OUTDOOR |
| EXPOSURE | · LENS | · AGC | |
| · DNR | · BLC | ||
| · COLOR ROLL | · SENS-UP | ||
| WDR | · MIDDLE · HIGH · LOW | · HIGH | · USER |
| WHITE BALANCE | · ATW · INDOOR · OUTDOOR · AWB · MANUAL | ||
| DAY/NIGHT | · AUTO · COLOR · BW | ||
| IMAGE ADJ. | · FLIP · SHARPNESS · COLOR GAIN · GAMMA | ||
| SPECIAL | · CAMERA ID · ZOOM · PROVACY SETUP · RESET | · VIDEO OUT · MOTION | |
| EXIT MENU | |||
Settings
Settings can be made using the 5 buttons on the rear of the camera.

- Press the SET button
- Settings can now be accessed. The SETUP menu is displayed on the monitor.
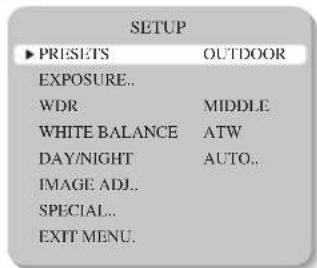
-
Select a menu item from the list available by using the UP and DOWN buttons.
-
Funtions are selected using up and down buttons.
• The selected position is displayed in blue.
■ How to Use the Camera

flowchart
graph LR
    A["Select the function using the UP or DOWN button."] --> B["SETUP"]
    B --> C["PRESETS"]
    B --> D["OUTDOOR"]
    B --> E["EXPOSURE..."]
    B --> F["WDR"]
    B --> G["WHITE BALANCE"]
    B --> H["DAY/NIGHT"]
    B --> I["IMAGE ADJ..."]
    B --> J["SPECIAL..."]
    B --> K["EXIT MENU..."]
    B --> L["Change the status using the LEFT or RIGHT button."]
- Set up a selected item by using the Left and Right buttons.
- To finish and save the settings, select 'EXIT' and press the SET button.

- An item with the "." icon contains a sub-menu. To access a sub-menu, press the SET button.
PRESETS
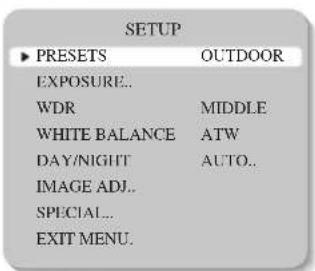
● NORMAL : Normal environment.
● INDOOR : Indoor environment.
● OUTDOOR : Outdoor environment.
EXPOSURE

When the SETUP menu screen is displayed, select 'EXPOSURE' by using the Up and Down buttons so that the arrow indicates 'EXPOSURE'.
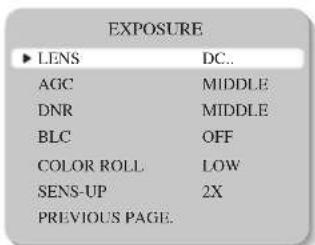
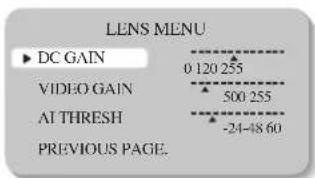
- LENS: Using this function, you can control the screen brightness. - DC / VIDEO / Manual : Select Lens Type
■ How to Use the Camera
- AGC (AUTO GAIN CONTROL) : In low light the higher the gain level, the brighter the screen but the higher the noise level.
- OFF / LOW / MIDDLE / HIGH selectable
● DNR (Digital Noise Reduction): The level of background noise in low light decreases automatically as the level of gain changes. - OFF / LOW / MIDDLE / HIGH selectable
- BLC : To optimize the scene when there is a strong backlight behind the object.
- ON / OFF selectable

- COLOR ROLL : Controls color rolling suppression under fluorescent lighting conditions.
- OFF / LOW / MIDDLE / HIGH selectable
- SENS-UP : When it is night or dark, the camera automatically detects the light level and maintains a clear picture if this mode is activated.
- 2X, 4X, 8X, 16X, 32X, 64X
- OFF : Deactivates the SENS-UP function.
WDR

● WDR : When the image has simultaneous bright and dark areas, the Wide Dynamic Range makes both areas distinct. - LOW / MIDDLE / HIGH / USER selectable

WHITE BALANCE
Use the White Balance function to adjust the screen colors.
- Position the cursor to point to WHITE BAL on the SETUP menu screen, select using the Up and Down buttons.
- Select the desired mode using the Left and Right buttons.

※ Select one of the following 5 modes, as appropriate.
● ATW : The ATW mode continuously monitors.
● INDOOR : Select when the color temperature is between 4000° K and 8500° K
● OUTDOOR : Select when the color temperature is between 2000° K and 11000° K
■ How to Use the Camera
● AWB : To obtain the optimum state under the current luminance levels, direct the camera to point toward a sheet of white paper and press the SET button. If the environment changes, including the light source, the white balance will require re-adjustment.
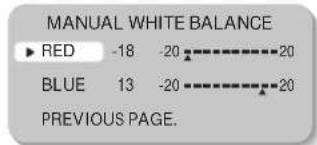
● MANUAL : Select to "fine-tune" the White Balance manually. Set White Balance first using the ATW or AWB mode. Afterwards switch to MANUAL mode, fine-tune the White Balance and then press the SET button.
Note
- Under the following conditions White Balance may not work properly. In such cases, select the AWC mode.
① When the color temperature of the subject environment has a very high temperature range (e.g. clear sky, or sunset)
② When the ambient illumination of the subject is low.
③ If the camera is directed toward a fluorescent light, or is installed in a place where illumination changes dramatically, the White Balance operation may become unstable.
DAY/NIGHT

● AUTO : This camera has an IR Cut-Filter and automatically changes to the appropriate mode according to lighting levels. To set up the switching time and switching speed for the AUTO mode press the SET button.

● COLOR : The picture is displayed in color.
● B/W : The picture is always displayed in black and white.
■ How to Use the Camera
IMAGE ADJ.
When the SETUP menu screen is displayed, select 'IMAGE ADJ.' using the Up and Down buttons.


● FLIP : OFF / HORIZ / VERT / BOTH selectable


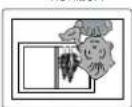
BOTHVERT
● SHARPNESS : The outline of the video image becomes cleaner and more distinctive as the level of SHARPNESS increases. If the level is set too high, it may affect the video image and generate noise.
- The available range is -8 \~ 8
- COLOR GAIN : To control the color level in the video.
- The available range is -8 \~ 8
● GAMMA : Users can change the gamma setting between 25 and 100
SPECIAL
When the SETUP menu screen is displayed, select 'SPECIAL' by using the Up and Down buttons so that the arrow indicates 'SPECIAL'.

■ How to Use the Camera

● CAMERA ID : User can enter a unique name for the respective camera. The maximum length of the ID is ten characters.
- You can choose ON and OFF with the selector. If you select ON, the entered camera ID is displayed at the selected position in the video picture (normal operation).
- Press the setup button while in ON mode.
- Select the desired position with the selector.
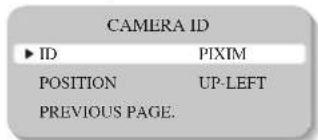
① Move the cursor to the desired letter by using the Set-Up button.
② Select an ID from A,B\~Y,Z, a,b\~y,z, 0,1\~8,9 by using the LEFT and RIGHT buttons.
③ Repeat the above steps until the ID is complete.

① Select the position where the ID is to be displayed by using the LEFT and RIGHT buttons.
● VIDEO OUT : Move the cursor to select the video system
- VIDEO STANDARD : You can select NTSC / PAL, Video level, Sync level, Burst level.

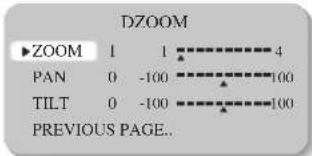
- DZOOM : Digital P/T/Z are used to create a zoom lens effect. Zoom Factor (1X to 4X), Pan(± 100%, center of image can be moved to left and right edges of screen), Tilt(± 100%, center of image can be moved to top and bottom edges of screen)
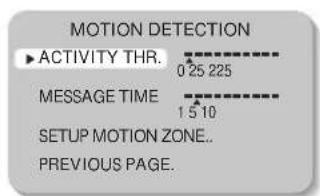
● MOTION : Motion detection feature allows camera to trigger alarm message upon detecting motion based on set parameters. The camera detects an object's movement by sensing disparity of outline, and level of brightness and color.
■ How to Use the Camera

- White : MOTION ZONE Position movement Green : MOTION ZONE Size enlargement Red : MOTION ZONE Size reduction - For MOTION ZONE confirmation, keep SET button pressed for a few seconds
● PRIVACY SETUP : Mask selected area to ensure privacy.


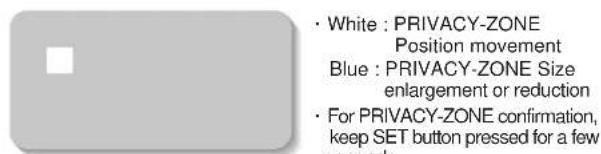
RESET
Resets the camera settings to the factory defaults.
EXIT MENU.
Saves all the setting menus and then exits.
Troubleshooting
If you have trouble operating your camera, refer to the following table. If the guidelines do not enable you to solve the problem, contact an authorized technician.
| Problem | Solution |
| Nothing appears on the screen. | Check the power connections.Check the VIDEO signal line connection. |
| The image on the screen is dim. | Make sure the lens is clean. Clean the lens with a soft clean lint free cloth.Adjust the monitor contrast & brightness controls.Re-position the camera if necessary. |
| The image on the screen is dark. | Adjust the contrast control of the monitor.If you have an intermediate device, set the 75Ω / Hi-z properly. |
| The camera is not working properly, and the surface of the camera is hot. | Check that an appropriate power source is connected to the camera. |
| The Motion Detection function does not work. | Check that MOTION DET in the SPECIAL SETUP is not set to 'OFF'. |
| Color is not correct. | Check the WHITE BAL settings in the SETUP menu. |
| The screen flickers continually. | Check that the camera is not facing toward the sun. |
Specifications
| ITEM | NTSC |
| Power Consumption | AC24V / DC12V |
| 170mA(AC24V) / 250mA(DC12V) | |
| Image Sensor | PIXIM 1/3" High Sensitivity Digital Sensor |
| Effective Pixels | 758(H) x 540(V) |
| Dynamic Range | 120dB(Max) |
| Horizontal Resolution | 690TVL Effective |
| Min. Illumination | 0.1Lux |
| Day & Night | AUTO / COLOR / B/W |
| White Balance | Auto / AWB / Indoor / Outdoor / Manual |
| WB Range | 2000° K~11,000° K |
| Shutter Speed | up to 1/30, 720 sec |
| Sens-up | Auto / Off (Selectable x2 ~ x64) |
| Privacy Masking | 12 Zones |
| AGC | Low / Auto / High / Off |
| Image Flip | Horizontal and Vertical |
| Camera ID | On / Off |
| S/N Ratio | More than 50dB |
| Video Output | Composite video output 75 ohm terminated |
| OSD | Built-in |
| Sync. System | Internal / Line Lock |
| Iris Control | DC / VIDEO |
| Operating Humidity | 30% ~ 90% RH |
| Operating Temp. | -10° C to 50° |
■ Limited Warranty
Digimerge "Pinnacle Series" Cameras. 5 Year Limited Hardware Warranty
Warranty : Subject to the exclusions, limitations and exceptions, Digimerge warrants to the initial end-user purchaser that this hardware product is free from manufacturing defects in material and workmanship under normal use for a period of five (5) years from the date of purchase.
Warranty Details
The five (5) year warranty period consists of :
· One (1) year over-the-counter replacement warranty covering parts and labor
- Four (4) additional years of repair depot warranty covering parts and labor with proof of RA issued by Digimerge tech
- Note: Return Authorization number (RA) must be issued by Digimerge Technical Support to the Dealer prior to product replacement at the Distributor.
Exceptions to the above warranty are
- Camera components including, but not limited to, moving parts, motors, fans, heaters, camera image sensors, IR Cut Filters, DC iris and lens assemblies are warranted for a one (1) year period - Pan Tilt Zoom (PTZ) Cameras and related components including electrical slip ring contacts, and pan/tilt/lens motors are warranted for a one (1) year period.
NOTE : Products are subject to continuous improvement. DIGIMERGE Technologies Inc. and its subsidiaries reserve the right to modify product design, specifications and prices, without notice and without incurring any obligation.
For valid warranty claims made during the warranty period, upon proper proof of purchase (which is defined as a "valid form of a bill of sale or receipt from an authorized retailer or distributor showing the original date of purchase"), defective products will, at the sole discretion of Digimerge, be repaired or replaced with equal or better product in terms of hardware features without charge if all the conditions set forth in this document are met. Any products repaired or replaced within the warranty period, shall be warranted by Digimerge to the initial end-user purchaser for 90 days from the return shipment date, or the remainder of the warranty term, whichever is longer.
Products and parts, at Digimerge's sole discretion, may be replaced with new or refurbished items, and the products and parts replaced become the property of Digimerge. Product returned to Digimerge must be in its original packaging or in packaging which provides the product with protection equivalent to the original packaging, and sent with the postage charges prepaid via a shipping method that provides for tracking of your package, to the address provided at the time the RA (Return Authorization) was requested (see "Warranty Service" for explanation of how to obtain an RA). The customer is responsible for all shipping costs associated with the return of the defective products for warranty service to Digimerge warranty/repair depot facilities. Products will be returned to the end-user freight prepaid.
Exclusions and Limitations: Any of the following will void this warranty:
-
Installation or use of the product other than strictly in accordance with the instructions contained in the product's instruction manual:
-
If the product is subjected to operating conditions (including atmospheric, moisture and humidity conditions) outside of the acceptable conditions specified in the product's instruction manual;
-
If the product is subjected to misuse (not adhering to instructions supplied with the product), negligence, modification (of hardware, firmware or software) or abuse;
-
If the product is subjected to electrical short circuits or transients, accident, fire, flood or Acts of God:
-
Adjustment, maintenance or repair of the product other than in accordance with Digimerge approved procedures; and
-
Use of replacement parts other than those specified by Digimerge.
-
If the products original identification (trademark, serial number, model number) markings have been removed, defaced or altered
DIGIMERGE MAKES NO CLAIMS OR WARRANTIES OF ANY KIND WHATSOEVER REGARDING THE PRODUCT'S ABILITY OR EFFECTIVENESS IN PREVENTING OR REDUCING THE RISK OF, OR DAMAGES RESULTING FROM, LOSS OR THEFT OF PROPERTY OR PERSONAL INJURY. THIS LIMITED WARRANTY IS IN LIEU OF ALL OTHER WARRANTIES, EXPRESS OR IMPLIED, INCLUDING, BUT NOT LIMITED TO, ANY IMPLIED WARRANTY OF MERCHANTABILITY OR FITNESS FOR A PARTICULAR USE OR PURPOSE. REPAIR OR REPLACEMENT AS PROVIDED UNDER THIS LIMITED WARRANTY IS THE EXCLUSIVE REMEDY OF THE PURCHASER. DIGIMERGE SHALL IN NO EVENT BE LIABLE FOR ANY SPECIAL, INDIRECT, INCIDENTAL, PUNITIVE, OR CONSEQUENTIAL DAMAGES OF ANY KIND OR CHARACTER, INCLUDING, WITHOUT LIMITATION, PERSONAL INJURY, LOSS OF REVENUE OR PROFITS, FAILURE TO REALIZE SAVINGS OR OTHER BENEFITS, OR CLAIMS AGAINST THE PURCHASER BY ANY THIRD PERSON, EVEN IF DIGIMERGE HAS BEEN ADVISED OF THE POSSIBILITY OF SUCH DAMAGES.
No claims or statements regarding the product, whether written or verbal, by salespeople, retailers, dealers or distributors, that are not contained in this limited warranty or in the owner's manual are authorized by Digimerge and do not modify or expand this warranty. Some countries, states, or provinces do not allow the exclusion or limitation of implied warranties or the limitation of incidental or consequential damages for certain products supplied to consumers or the limitation of liability for personal injury. To the extent that such restrictions on limitations apply to the products, the above limitations and exclusions may be limited in their application. In that case, when the implied warranties are not allowed to be excluded in their entirety, they will be limited to the duration of the applicable written warranty, and if damages may not be limited then the above limitations on damages apply, but only to the greatest extent permitted by local law.
Warranty Service
Warranty service can be received by contacting your Digimerge dealer (during the warranty period). The dealer is required to first contact Digimerge Technical Support for assistance. In the event the problem cannot be resolved over the phone or via email, Digimerge will advise to return the product, at customer's expense, for repair or replacement. Upon receipt of the defective camera, Digimerge will send a repaired or replacement camera at Digimerge's expense to the customer. Dealer should send product to:
In United States :
Digimerae Returns
Schenker Logistics
2363 F. Perry Boa
2000 E.1. City Road Suite 171, Dock Door 44
Plainfield, IN 46168
In Canada :
Digimerge Technologies Inc.,
Attention: Repair Department
250 Royal Crest Court
Markham, Ontario, Canada
L3B 3S1
Out of warranty service : Please visit our web site (www.digimerge.com) for the name and location of the Digimerge authorized service centers.
MEMO
MEMO
MEMO
- Ultra Resolution WDR Day/Night Camera
- Contents
- Features
- Warning
- High Resolution Color for Crisp, Clear Video
- Motion Detection
- Wide Dynamic Range (WDR)
- VIDEO / DC Drive Lens
- Day & Night
- Additional Functions
- DNR (Digital Noise Reduction)
- High Sensitivity for low-light images
- The camera requires periodic inspection.
- Do not Install the camera on a surface that can not support it.
- Do not hold plug with wet hands.
- Do not dis-assemble the camera.
- ■ Precautions
- Note
- Components
- Names and Functions of Parts
- Installation
- Lens
- When using an auto iris lens
- When using a CS-Mount lens
- When using a C-Mount lens
- ■ Connecting to a monitor
- ■ Connecting to power
- ■ How to Use the Camera
- Settings
- PRESETS
- EXPOSURE
- WDR
- WHITE BALANCE
- DAY/NIGHT
- IMAGE ADJ.
- SPECIAL
- RESET
- EXIT MENU.
- Troubleshooting
- Specifications
- ■ Limited Warranty
- Digimerge "Pinnacle Series" Cameras. 5 Year Limited Hardware Warranty
- Warranty Details
- Warranty Service
Brand : Digimerge
Model : Pinnacle DPP22W
Category : Surveillance Camera