
GX-900RDS - Hi-Fi YAMAHA - Free user manual and instructions
Find the device manual for free GX-900RDS YAMAHA in PDF.


| Product Type | Hi-Fi Stereo Receiver with RDS Tuner |
| Brand | Yamaha |
| Model | GX-900RDS |
| Color | Black / Silver |
| Dimensions (W x H x D) | 435 x 150 x 380 mm |
| Weight | 9.5 kg |
| Power Output (per channel) | 100 W (8 ohms, 20 Hz - 20 kHz, 0.015% THD) |
| Frequency Response | 20 Hz - 20 kHz ±0.5 dB |
| FM Tuning Range | 87.5 - 108 MHz |
| AM Tuning Range | 530 - 1710 kHz |
| RDS (Radio Data System) | Yes |
| Number of Presets | 40 (FM/AM) |
| Audio Inputs | CD, Tape, Tuner, Aux, Phono (MM) |
| Audio Outputs | Speakers (A/B), Headphone, Tape Rec, Pre-out |
| Power Consumption | 280 W |
| Standby Power | 0.5 W |
| Remote Control | Yes (infrared) |
| Cleaning Instructions | Use a soft dry cloth. Avoid solvents. |
| Safety Features | Overload protection, thermal shutdown |
| Repairability / Spare Parts | Serviceable by authorized technicians; some parts available |
Frequently Asked Questions - GX-900RDS YAMAHA
User questions about GX-900RDS YAMAHA
0 question about this device. Answer the ones you know or ask your own.
Ask a new question about this device
Download the instructions for your Hi-Fi in PDF format for free! Find your manual GX-900RDS - YAMAHA and take your electronic device back in hand. On this page are published all the documents necessary for the use of your device. GX-900RDS by YAMAHA.
USER MANUAL GX-900RDS YAMAHA
natural_image
Gray rectangular object with a white circular base and a small logo on the top (no text or symbols visible)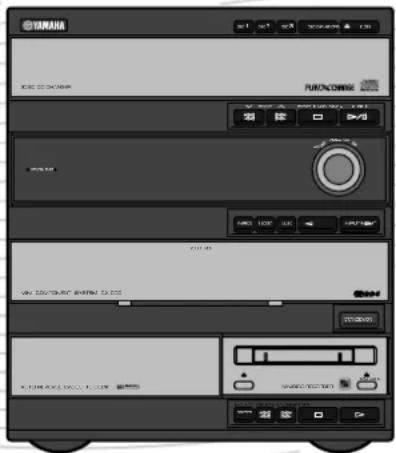
natural_image
Simple gray rectangular object with a white circular base and a small logo on the bottom (no text or symbols)OWNER'S MANUAL
MODE D'EMPLOI
BEDIENUNGSANLEITUNG
BRUKSANVISNING
- Remote control
- Télécommande
- Fernbedienung
• Fjärrkontroll - Telecomando
- Control remoto
- Afstandbediening
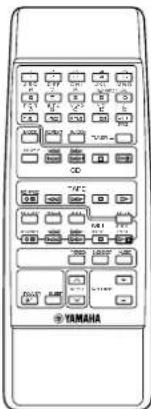
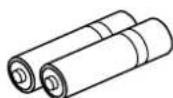
- Batteries (size AA, UM/SUM-3, R6, HP-7)
- Piles (format AA, UM/SUM-3, R6, HP-7)
- Batterien (Größe AA, UM/SUM-3, R6, HP-7)
- Batterier (Storl. AA, UM/SUM-3, R6, HP-7)
- Batterie (dimensioni AA, o UM/SUM-3, o R6, o HP-7)
- Pilas (tamaño AA, tipo UM/SUM-3, R6, HP-7)
- Batterijen (maat AA, UM/SUM-3, R6, HP-7)
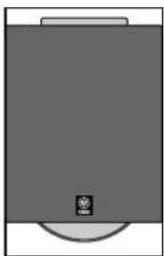
- Speakers
- Enceintes
• Lautsprecher
• Högtalare - Altoparlanti
- Altavoces
- Luidsprekers
natural_image
Simple gray rectangular object with a small circular base and a small logo at the bottom (no text or symbols)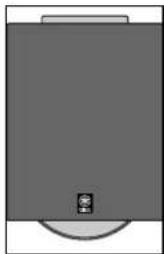
natural_image
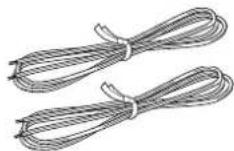
Simple gray rectangular object with a small circular base and a small icon at the bottom (no text or symbols)- Speaker cords
• Câbles d'enceintes
• Lautsprecherkabel
• Högtalarledningar
• Cavi per gli altoparlanti
• Cables de los altavoces - Luidsprekerdraden
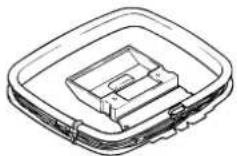
- AM loop antenna
- Antenne-cadre AM
• AM-Rahmenantenne - AM ramantenn
- Antenna ad anello per AM
- Antena de cuadro AM
• AM Iusantenne
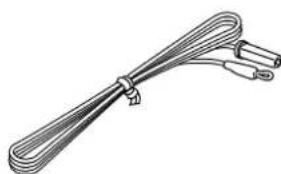
- Indoor FM antenna
- Antenne intérieure FM
- UKW-Innenantenne
• FM inomhusantenn - Antenna FM per interni
- Antena interior de FM
• FM binnenantenne
natural_image
Illustration of a coiled cable with two connectors (no text or symbols)- Setting this system
Set this system allowing enough spaces around and behind the main unit to assure good ventilation. Be sure not to place another unit or any object on top of the main unit to prevent the ventilation holes on the top panel from being obstructed. Otherwise, it may cause fire or damage to the main unit.
Note: When placing the speakers apart from the main unit, be sure to allow a space of at least 20 cm above, behind and on both sides of the main unit. If the main unit is put in a rack, the front of it must be fully opened.
Français
Front panel Frampanelen Voorpaneel
10 ∧/∨ [p. 15, 16] PTY SELECT [p. 20]
11 A/B/C/D/E [p. 16]
12 PRESET/TUNING/BAND [p. 15]
13 VOLUME [p. 44]
14 MUSIC [p. 44]
15 INPUT (◀/▶) [p. 9, 15, 23, 31, 43] TUNER → TAPE → CD → MD ↑-AUX Analog ← AUX Digital↓
16 FREQ PS/PTY/RT/CT [p. 18] HOUR [p. 7, 52]
17 PTY SEEK START [p. 20]
18 PTY SEEK MODE [p. 20] MIN [p. 7, 46]
19 DISPLAY [p. 7, 46]
20 MEMORY [p. 16, 17] TIME ADJ [p. 7]
21 STANDBY/ON [p. 9]
22 AUTO/MANUAL [p. 15] TIMER [p. 46]
CD player Lecteur de disque compact CD-Spieler CD-spelare Lettore CD Compact disc speler
24 DISC (1, 2, 3) [p. 10]
25 DISC CHANGE [p. 10]
26 OPEN/CLOSE [p. 9]
27 (◀◀) / ▶▶ (▶▶) [p. 10]
28 ▷/□□ [p. 9]
29 □ [p. 9]
30 RANDOM [p. 12]
31 TIME [p. 13]
32 REPEAT [p. 12]
Tape deck Platine cassette Kassettendeck Kassettdäck Registratore Platina Tapedeck
33 Tray Plateau Cassettenlade Kassettfack Vano portacassette Bandeja Lade [p. 23]
34 MODE [p. 23]
35 DIRECTION [p. 23]
36 TAPE ≜ [p. 23]
37 ◀◀◀ (◀◀)/▶▶ (▶▶) [p. 24]
38 DOLBY NR [p. 22, 25]
39 □ [p. 23]
40 TAPE REC/PAUSE [p. 25]
41 ▷ [p. 23]
MD recorder Enregistreur de minidisc MD-Recorder MD-spelare Registratore MD MD recorder
46 MD EDIT [p. 39]
47 (◀◀) / ▶◀ (▶◀) [p. 31]
48 □ [p. 31]
DELETE [p. 42]
49 ▷ [p. 31] PAUSE/ENTER [p. 34, 39]
50 RANDOM [p. 33]
51 TIME [p. 32]
52 REPEAT [p. 33]
53 Disc insertion slot
Fente d'insertion du disque
Disc-Einschub
Skivfack
Fessura di caricamento del minidisco
Ranura de inserción de discos
Diskhouder
[p. 31]
54 MD ≅ [p. 31]
43 CHARACTER [p. 42]
44 SET [p. 42]
45 MD REC/PAUSE [p. 34]
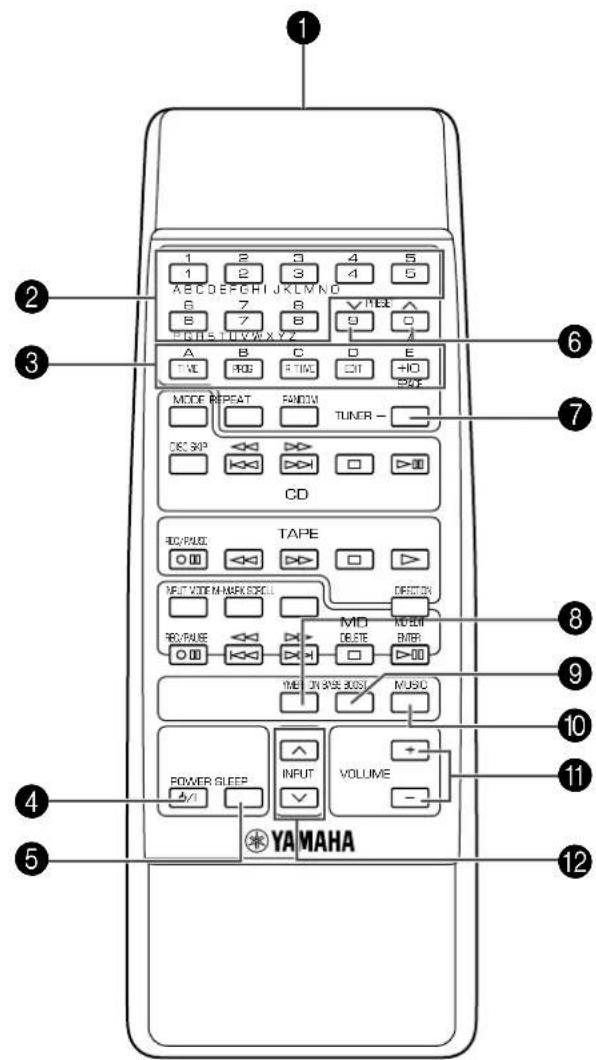
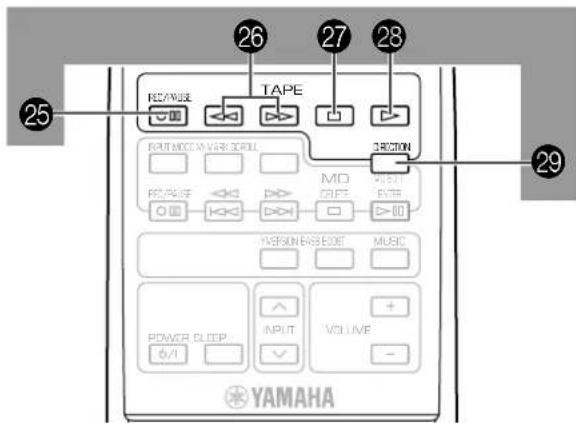
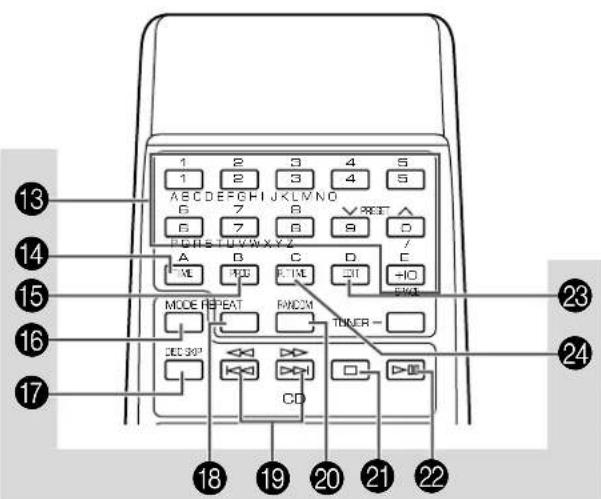
Remote control Fjärrkontrollen Afstandbediening
Telecommande Telecomando
Fernbedienung Control remote
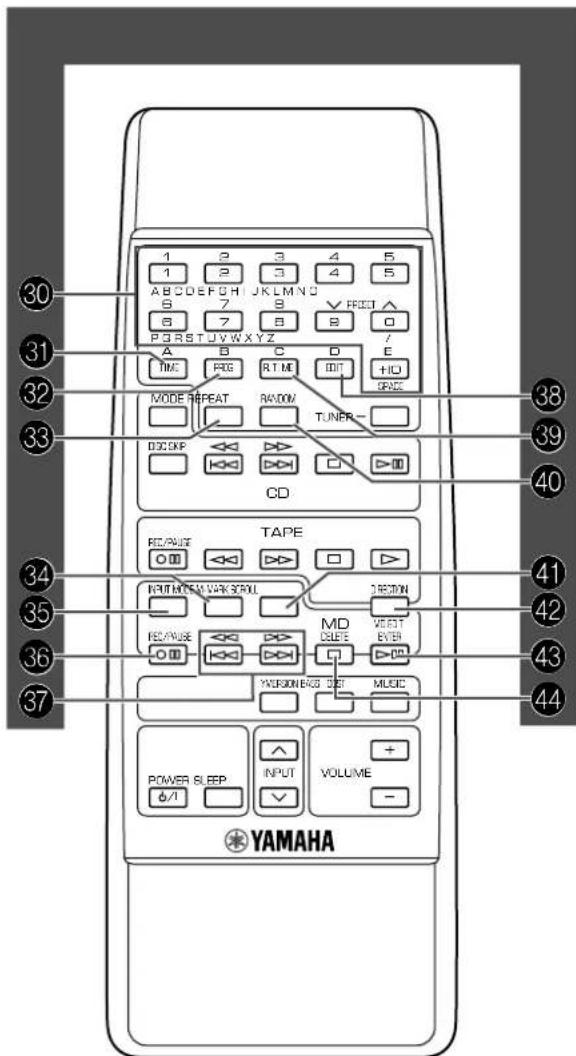
| Amplifier/tunerFörstärkare/tunerVersterker/tuner | Amplificateur/tunerAmplificatore/sintonizzatore | Verstärker/TunerAmplificador/sintonizador |
1 Transmission window Fenêtre de transmission
③ A, B, C, D, E [p. 16]
4 POWER [p. 9]
5 SLEEP [p. 47]
6 PRESET (A) [p. 16]
⑦ TUNER [p. 15]
8 YMERSION [p. 45]
9 BASS BOOST [p. 45]
10 MUSIC [p. 44]
11 VOLUME (+/-) [p. 44]
12 INPUT (∧) √ [p. 9, 15, 23, 31, 43]
TUNER → TAPE → CD → MD ↑AUX Analog ← AUX Digital
35 INPUT MODE [p. 34]
36 REC/PAUSE [p. 34]
37 (◀◀/▶▶(▶▶) [p. 32]
38 EDIT [p. 36]
39 R. TIME [p. 36]
40 RANDOM [p. 33]
41 SCROLL [p. 32]
42 MD EDIT [p. 39]
43 ▷ [p. 31] ENTER [p. 34, 39]
44 □ [p. 31] DELETE [p. 42]
English
Thank you for purchasing this YAMAHA product. We hope it will give you many years of trouble-free enjoyment. For the best performance, read this manual carefully. It will guide you in operating your YAMAHA product.
Contents
Page
Precautions.... 1
Features 3
Preparations and connections...... 4
Installing batteries in the remote control 4
Remote control operation range 4
Connections 5
Setting the clock.... 7
Adjusting brightness of the display 7
Compact disc player operation...... 8
Basic Play 9
To change the disc play mode 9
To select another disc 10
To select the desired track directly 10
To play the desired track (Skip) 10
To advance or reverse play rapidly (Search) ..... 10
To exchange a disc (or discs) while playing (PLAYXCHANGE) 10
Program play 11
Random play 12
Repeat play 12
Switching the time display 13
Tuning operation 14
Automatic tuning 15
Manual tuning 15
Manual preset tuning 16
Automatic preset tuning 17
Receiving RDS stations 18
Playing back a tape 22
General information 22
Basic operation 23
Winding the tape 24
Searching for the beginning of the desired selection 24
Recording to tape.... 25
Basic recording 25
Recording from CDs utilizing the EDIT function..... 27
Page
Playing an MD.... 30
General information 30
Basic play.... 31
To select the desired track directly 31
To play the desired track (Skip) 31
To advance or reverse play rapidly (Search) ...... 31
Switching the display.... 32
Program play 33
Repeat play 33
Random play 33
Recording to MD 34
Basic recording 34
Monaural recording 35
Track-marking 35
Recording from CDs utilizing the EDIT function..... 36
Editing and titling MD 38
Editing an MD 38
Titling an MD or track 42
Operating an external unit connected with this system 43
Various sound control 44
Using the built-in timer 46
Timer play 46
Timer recording 47
Sleep timer operation 47
Appendix.... 48
Troubleshooting 48
MD system limitations 50
Copy protection (SCMS) 50
Display messages for MD recorder 51
Specifications 52
For basic source play, the following illustrations on top of pages will help you to look for the section you need.

..... CD play .....

Tape playback/recording

..... Tuning

/recording
Precautions: Read this before operating your system
■ To assure the finest performance, please read this manual carefully. Keep it in a safe place for future reference.
- Choose the installation location of this system carefully. Avoid placing it in direct sunlight or close to a source of heat. Also avoid locations subject to vibration and excessive dust, heat, cold or moisture. Keep it away from sources of hum such as transformers and electric motors.
■ Do not operate this system upside-down. It may overheat, possibly causing damage.
■ Never open the cabinet. If something drops into the set, contact your dealer.
■ The openings on the main unit cover assure proper ventilation of the main unit. If these openings are obstructed, the temperature inside the unit will rise rapidly. Therefore, avoid placing objects against these openings, and install the main unit in a well-ventilated area to prevent fire and damage.
■ Always set the VOLUME control to minimum before starting an audio source play: increase the volume gradually to an appropriate level after play has started.
■ When not planning to use this system for long periods of time (ie., vacation, etc.), disconnect the AC power plug from the wall outlet.
■ Grounding or polarization – Precautions should be taken so that the grounding or polarization of this system is not defeated.
■ Do not use force on switches, controls or connection wires. When moving the main unit, first disconnect the power plug and the wires connected to other equipment. Never pull the wire itself.
■ If an external appliance (TV, radio, etc.) interferes with this system operation, move the main unit away from such an appliance.
■ Do not attempt to clean this system with chemical solvents; this might damage the finish. Use a clean, dry cloth.
■ Be sure to read the "Troubleshooting" section regarding common operating errors before concluding that this system is faulty.
■ To prevent lightning damage, disconnect the AC power plug and the antenna cable when there is an electrical storm.
■ Do not plug the AC power plug to the wall socket before you finish all connections.
- Never allow metallic items (e.g. screwdrivers, tools, etc.) to come near the tape deck's record/playback head assembly. Doing so may not only scratch or damage the head's mirror-smooth finish, it may change the magnetic characteristics of the heads, causing a deterioration in reproduction performance quality.
Although the tape deck's record/playback heads are high quality heads with outstanding reproduction characteristics, they can become dirty through the use of old tapes or from dust accumulation over time. This can have a serious effect on reproduction quality. Clean the heads regularly with one of the commonly available head cleaners or with cleaning solutions.
■ The voltage to be used must be the same as that specified on this system. Using this system with a higher voltage than specified is dangerous and may result in a fire or other types of accidents causing damage. YAMAHA will not be held responsible for any damage resulting from use of this system with a voltage other than specified.
■ The sound level at a given volume setting depends on speaker location and other factors. Care should be taken to avoid exposure to sudden high levels of sound, which may occur when turning on this system with the volume control setting at high, and to continuous high levels of sound.
■ Sudden temperature changes and storage or operation in an extremely humid environment may cause condensation inside the cabinet. Condensation can cause this system to malfunction.
To eliminate condensation:
• CD pickup/MD pickup
Leave the power on with no disc loaded until normal play becomes possible (about 1 hour).
- Tape head
Leave the power on with no tape loaded until normal playback becomes possible (about 1 hour).
Note
If condensation forms on the tape head, dirt or dust may accumulate during use.
- Remote control
Wipe off condensation on the transmission window with a soft cloth before operating this system.
■ To prevent a malfunction of this system:
- Do not use any non standard shaped compact disc (heart etc.) available on the market, because it may damage this system.
- Do not use a compact disc with tape, seals, or paste on it, because damage to this system may result.
This system is not disconnected from the AC power source as long as it is connected to the wall outlet, even if this system itself is turned off. This state is called the standby mode.
In this state, this system is designed to consume a certain level of power.
Note
Please check the copyright laws in your country to record from records, compact discs, minidiscs, radio, etc. Recording of copyright material may infringe copyright laws.
Precautions: Read this before operating your system
CAUTION FOR CARRYING THE MAIN UNIT
Be sure not to carry or tip the main unit with discs remaining in it.
CAUTION FOR MOVING THE MAIN UNIT
Before moving the main unit, first remove all compact discs from the disc tray and close the tray by pressing the OPEN/CLOSE button. After you confirm that "NO DISC" lights up on the display, turn this system into the standby mode by pressing the STANDBY/ON switch, and then disconnect the power plug from the AC outlet.
For U.K. customers
If the socket outlets in the home are not suitable for the plug supplied with this appliance, it should be cut off and an appropriate 3 pin plug fitted. For details, refer to the instructions described below.
Note: The plug severed from the mains lead must be destroyed, as a plug with bared flexible cord is hazardous if engaged in a live socket outlet.
SPECIAL INSTRUCTIONS FOR U.K. MODEL
IMPORTANT:
THE WIRES IN MAINS LEAD ARE COLOURED IN ACCORDANCE WITH THE FOLLOWING CODE:
Blue: NEUTRAL
Brown: LIVE
As the colours of the wires in the mains lead of this apparatus may not correspond with the coloured markings identifying the terminals in your plug, proceed as follows: The wire which is coloured BLUE must be connected to the terminal which is marked with the letter N or coloured BLACK. The wire which is coloured BROWN must be connected to the terminal which is marked with the letter L or coloured RED. Making sure that neither core is connected to the earth terminal of the three pin plug.
IMPORTANT
Please record the serial number of this system in the space below.
Model:
Serial No.:
The serial number is located on the rear of the main unit. Retain this Owner's Manual in a safe place for future reference.
WARNING
TO REDUCE THE RISK OF FIRE OR ELECTRIC SHOCK, DO NOT EXPOSE THIS APPLIANCE TO RAIN OR MOISTURE.
WARNING
To reduce the risk of fire or electric shock, do not expose this system to rain or moisture.
To avoid electrical shock, do not open the cabinet. Refer servicing to qualified personnel only.
CAUTION
Use of controls or adjustments or performance of procedures other than those specified herein may result in hazardous radiation exposure.
As the laser beam used in this system is harmful to the eyes, do not attempt to disassemble the cabinet. Refer servicing to qualified personnel only.
This system is classified as a CLASS 1 LASER product. The CLASS 1 LASER PRODUCT label is located on the rear exterior.
Laser component in this product is capable of emitting radiation exceeding the limit for Class 1.
Features
General
● High Power Output
80W + 80W (6Ω) RMS, 0.9% THD, 1 kHz
- Multi-use Timer/Sleep Timer
- SUBWOOFER Output for Low Frequency Expansion
- Remote Control Capability
- YMERSION
- BASS BOOST
● 5-Band Spectrum Analyzer
● 3 Preset Graphic Equalizer Modes (ROCK, POPS and JAZZ)
Compact Disc Player
● 3-Disc Carousel Type CD Changer
- PLAYXCHANGE
Disc changing while playing
● 20-Track Random Access Programming
- Repeat Play for Single Track/Entire Disc/All Discs
- Random Sequence Play
Tuner
● 40 Station Preset Tuning
● Automatic Preset Tuning
● Multi-Function RDS Reception
Tape Deck
● Automatic Synchronized Recording with CD or MD
- EDIT Function Useful for Recording CD or MD
- Automatic Reverse
● Dolby B Type Noise Reduction System
Minidisc Recorder
- Random Access Programmable Play
- Random Sequence Play
- Repeat Play
- Sampling Rate Converter
- Editing Features (Erase, Move, Combine, Divide, Title and Undo)
● Optical Digital Input Terminal
● Monaural Recording up to 148 Minutes of Audio onto an MD - EDIT Function Useful for Recording CD(s)
Preparations and connections
Installing batteries in the remote control
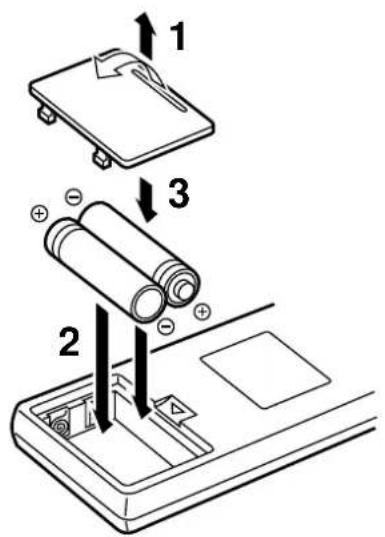
- Turn the remote control over and remove the battery compartment cover by pulling it up while pressing the edge of the cover in the direction of the ▽ mark.
- Insert the batteries (AA, R6, UM-3 type) according to the polarity markings on the inside of the battery compartment.
- Attach the battery compartment cover.
Notes
- Remove the batteries if the remote control is not used for an extended period of time.
- If batteries leak, dispose of them immediately. Avoid touching the leaked material and contact with clothing, etc. Clean the battery compartment thoroughly before installing new batteries.
- Be sure to use the same type of batteries together.
- Do not use a new battery and an old battery together.
Remote control operation range
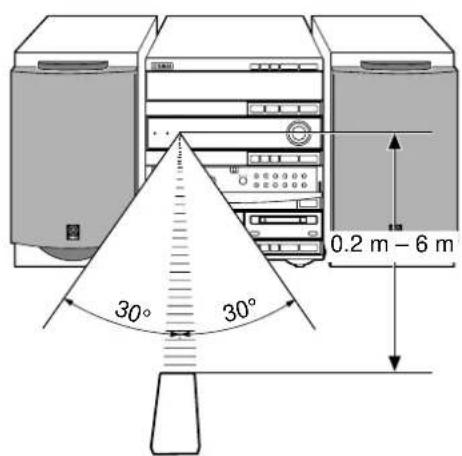
Notes
- The area between the remote control and the main unit must be clear of large obstacles.
- Do not expose the remote control sensor to strong lighting, in particular, an inverter type fluorescent lamp. Otherwise, the remote control may not work properly. If necessary, position the main unit away from direct lighting.
Battery replacement
If you find that the remote control must be used closer to the main unit, the batteries are weak. Replace both batteries with new ones.
Connections
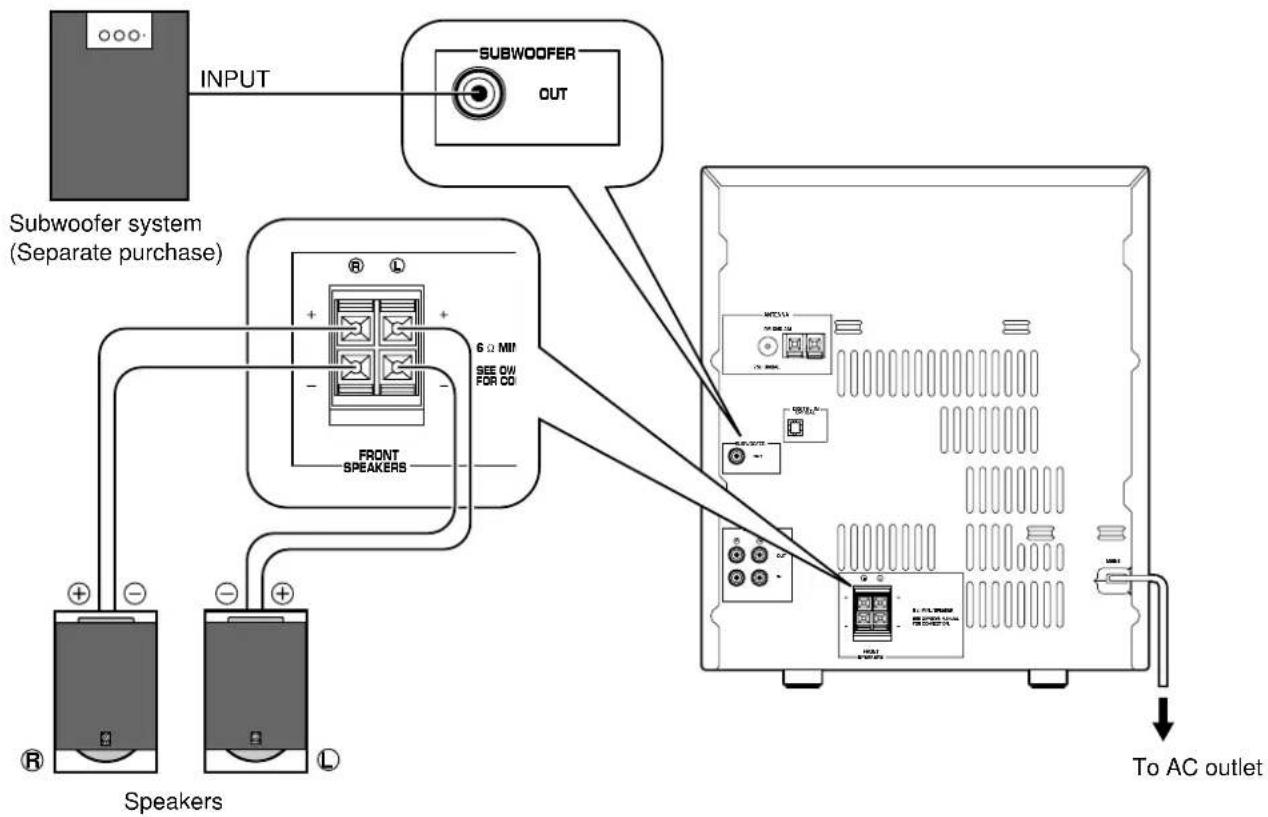
Never plug the AC supply lead of this system into the AC outlet until all connections are completed.
flowchart
graph TD
    A["Input"] --> B["Subwoofer system (Separate purchase)"]
    B --> C[" Speakers"]
    B --> D["FRONT SPEAKERS"]
    D --> E["To AC outlet"]
    E --> F["Device with AC ports and labels"]
    style A fill:#f9f,stroke:#333
    style B fill:#ccf,stroke:#333
    style C fill:#cfc,stroke:#333
    style D fill:#fcc,stroke:#333
    style E fill:#cff,stroke:#333
    style F fill:#ffc,stroke:#333
■ Connecting speakers
Connect the speakers to the corresponding speaker terminals on the rear of the main unit respectively by using the speaker cords. Make sure that the polarity of the speaker cords is correct, that is the + and - markings are observed. If these cords are reversed, the sound will be unnatural and lack bass.
On the speakers
Red: positive (+)
Black: negative (−) ① Press the tab
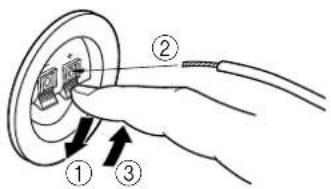
② Insert the bare wire. [Remove approx. 5mm (1/4") insulation from the speaker wires.]
③ Release the tab and secure the wire.
On the main unit
Red: positive (+)
Black: negative (−)
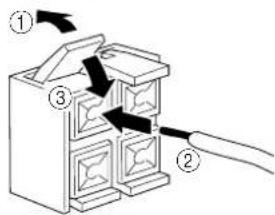
① Press up the tab.
② Insert the bare wire.
[Remove approx. 5mm (1/4") insulation from the speaker wires.]
③ Press down the tab and secure the wire.
Caution
Do not let the bare speaker wires touch each other as this could damage the amplifier and/or speakers.
When connecting a subwoofer (separate purchase)
You may wish to add a subwoofer to reinforce the bass frequencies.
When connecting a subwoofer to this system, connect the SUBWOOFER OUT terminal of this system to the INPUT terminal of the subwoofer.
* Ordinary subwoofers, including the Yamaha Active Servo Processing Subwoofer System, are designed so that the amplifier and subwoofer are in the same unit.
* The SUBWOOFER OUT terminal outputs low frequencies from both left and right channels. (The cut-off frequency of this terminal is 200 Hz.)
(1)
(2)
flowchart
graph TD
    A["DVD player, etc."] --> B["DIGITAL OUT"]
    C["Tape deck, etc."] --> D["INOUT"]
    B --> E["OUTPUT"]
    D --> F["OUTPUT"]
    E --> G["AC/DC"]
    F --> H["AC/DC"]
    G --> I["Power Supply"]
    H --> J["Power Supply"]
    style A fill:#ccc,stroke:#333
    style C fill:#ccc,stroke:#333
    style B fill:#ccc,stroke:#333
    style D fill:#ccc,stroke:#333
    style E fill:#fff,stroke:#333
    style F fill:#fff,stroke:#333
    style G fill:#fff,stroke:#333
    style H fill:#fff,stroke:#333
    style I fill:#fff,stroke:#333
    style J fill:#fff,stroke:#333
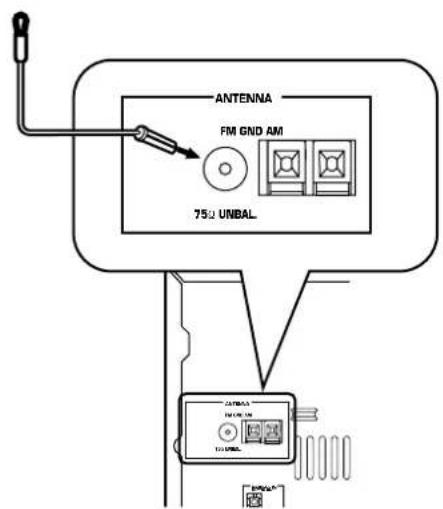
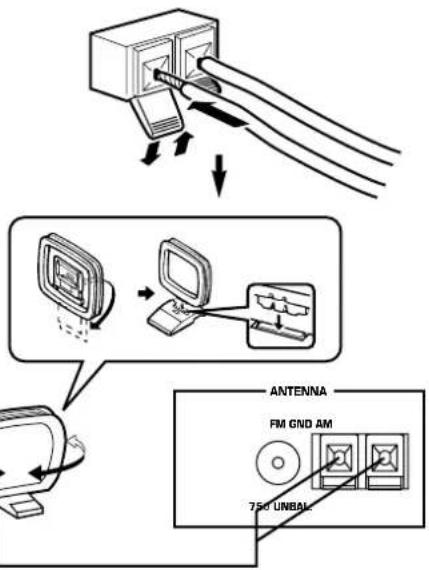
■ Antenna connection
(1) Supplied FM antenna
Connect the FM antenna wire to the corresponding terminal and direct the FM antenna wire to the direction where the strongest signal can be received.
(2) Supplied AM loop antenna
Connect the AM loop antenna wires to the corresponding terminals. Position the AM loop antenna for optimum reception.
Notes
- When static is still heard even after adjusting the position of the AM loop antenna, try reversing the wire connections (from the right terminal to the left one, and vice versa).
- The AM loop antenna should be placed apart from the main unit. The antenna may be hung on a wall.
Using an external antenna
- Use an external FM antenna instead of an indoor FM antenna if you need better reception. Consult your dealer.
- Use an external AM antenna if you need better reception. Consult your dealer.
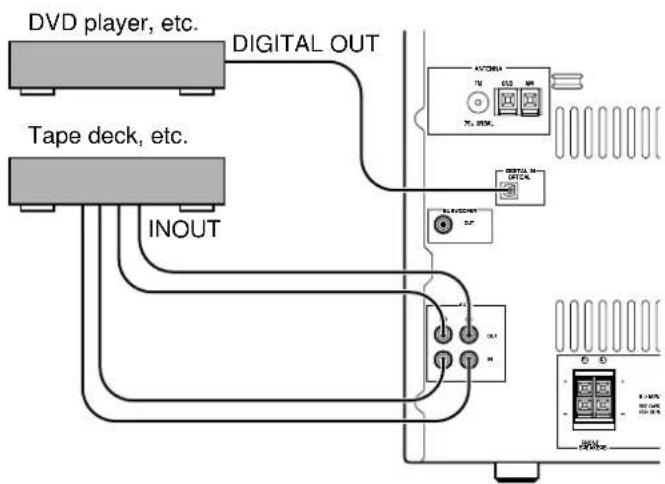
■ Connecting external components
This system can be connected with external audio components.
- Connect an audio component to the AUX terminals on the rear of the main unit by using RCA pin plug connector cables correctly, that is to say L (left) to L and R (right) to R. Also, refer to the owner's manual for the component to be connected to this system.
If a tape deck is connected to the AUX (OUT) terminals, a source played on this system or radio program can be recorded with the tape deck. - A digital-to-digital recording is possible from an external LD (DVD) player, satellite tuner, DAT, etc. connected to the DIGITAL IN (OPTICAL) terminal on the rear of the main unit to the built-in MD recorder.
Setting the clock
1

2
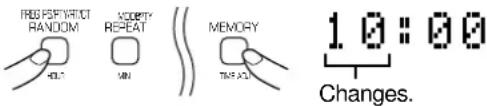
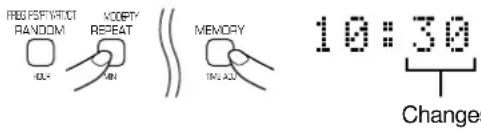
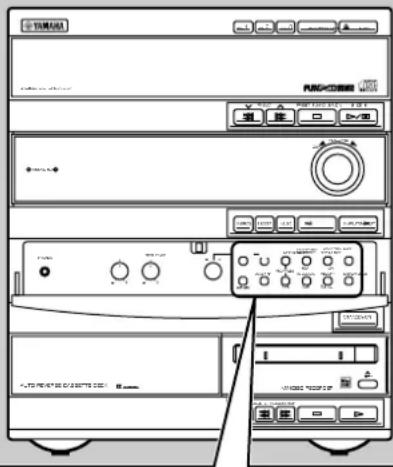
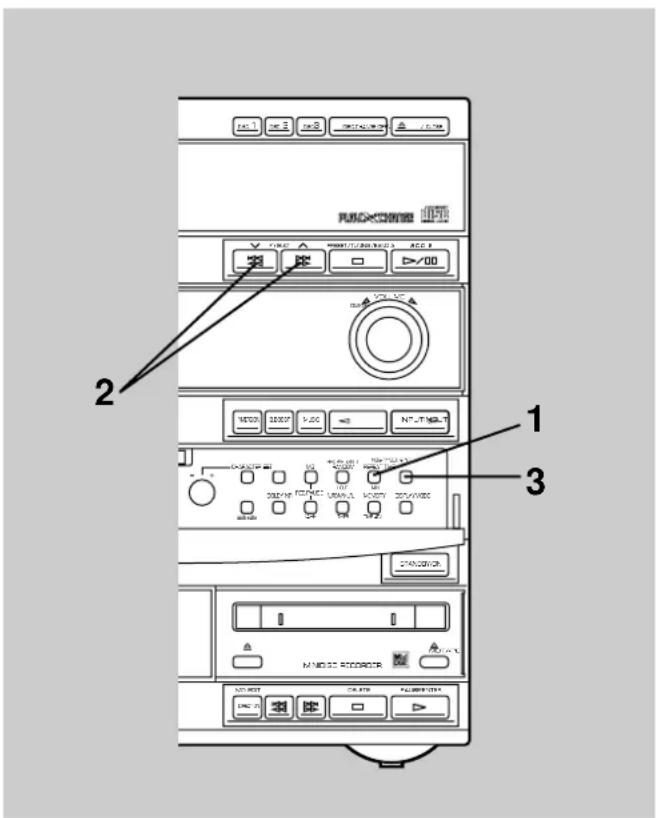
1 While the power is on, press DISPLAY to display the time.
2 While holding TIME ADJ pressed, press HOUR and set the hour.
Press HOUR once to advance the time by 1 hour. Press and hold to advance continuously.
3 While holding TIME ADJ pressed, press MIN and set the minute.
* Press MIN once to advance the time by 1
minute. Press and hold to advance continuously.
* The hour setting will not advance even if minute is advanced from "59" to "00".
Note
In the event of a power failure or when the AC supply lead is disconnected, the time display will go out, however, the clock will function for about 5 minutes without any power supply. Otherwise, the time display will flash on and off to indicate that the time must be reset.
Adjusting brightness of the display
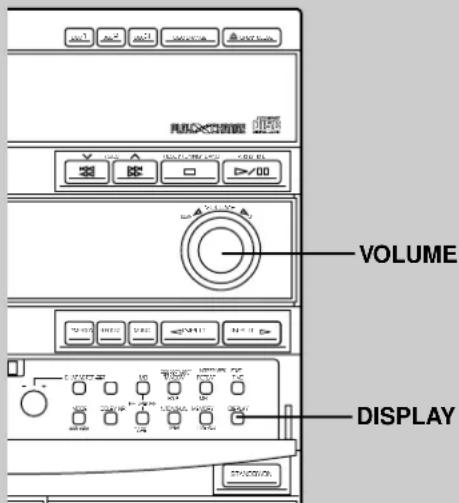
If desired, you can adjust the brightness of the display.
Press and hold DISPLAY for more than 2 seconds so that "DIMMER ±0" appears on the display. While holding DISPLAY pressed, turn VOLUME clockwise to increase or counterclockwise to decrease brightness.
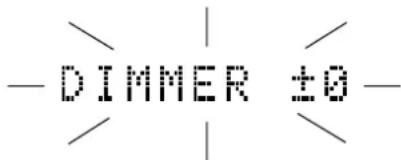
Control range: ±0 to -6 (Preset value: ±0)
Compact disc player operation
Display information
Each indicator mentioned with a number on pages 9–13 corresponds to the indicator with the same number on this page.
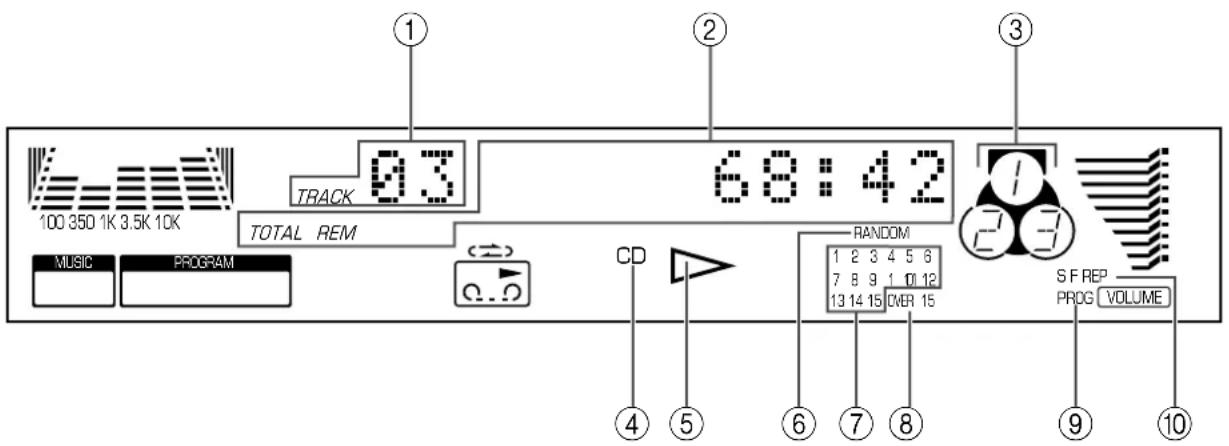
① TRACK (Track number)
② Time display
③ Disc indicator
The disc of the number located on the top of this indicator is now being selected.
④ CD (input source indicator)
⑤ ▷ (play)
⑥ RANDOM
⑦ Music calendar
Track numbers on the currently selected disc will be illuminated (up to the number 15).
⑧ OVER 15
This indicator will be illuminated when the currently selected disc has more than 15 tracks.
⑨ PROG (program)
⑩ (S, F) REP [(single, full) repeat]
Basic play
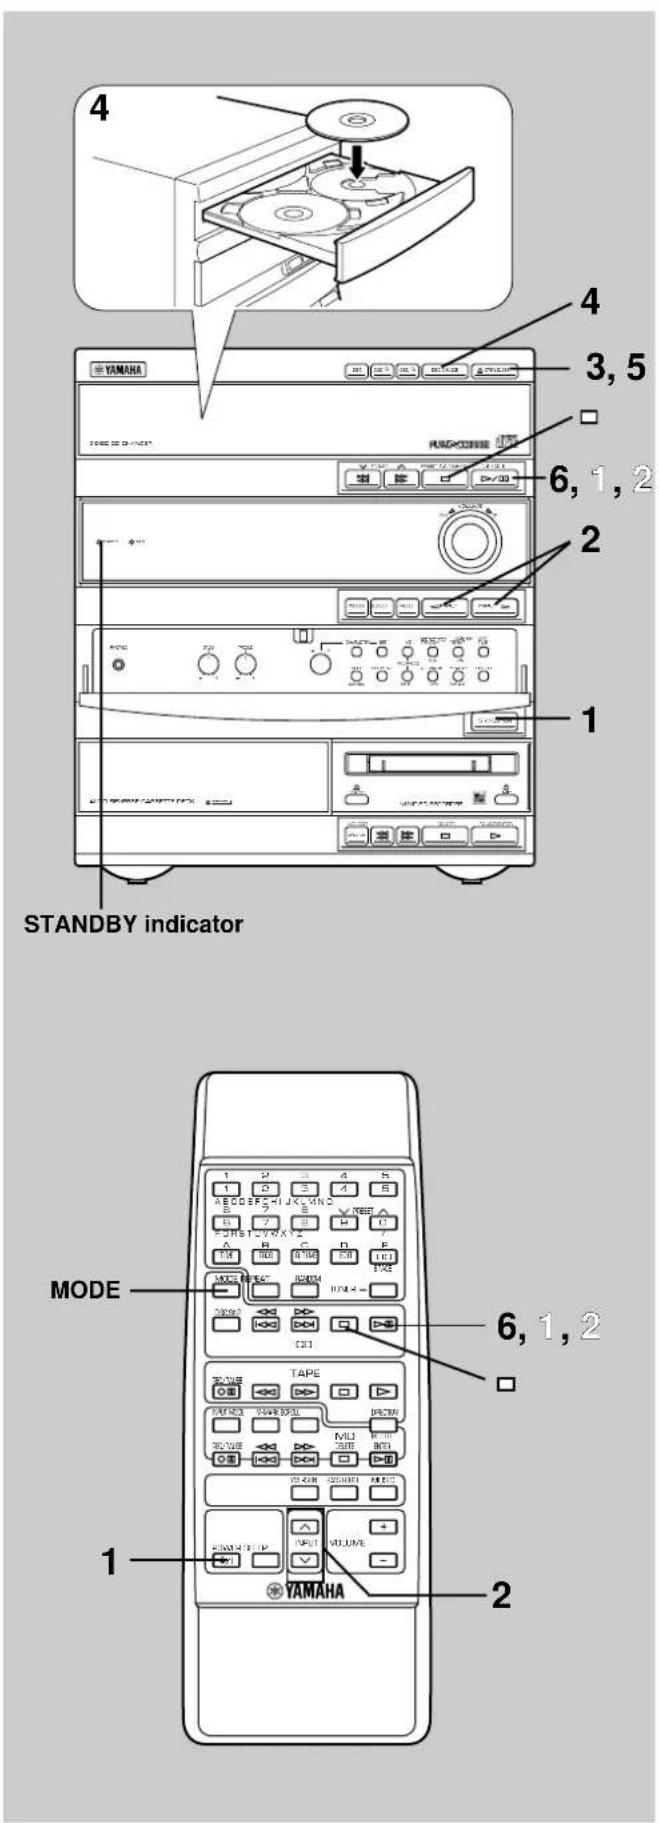
1 Turn on the power.
2 Select the CD player by pressing INPUT ▷ or ◀ until "CD" (②, ④) appears on the display.
3 Press OPEN/CLOSE to open the disc tray.
4 Place discs on the table, label side upward.
* Up to three discs can be loaded on the table.
To load the third disc, rotate the disc table by pressing DISC CHANGE on the front panel.
* 8 cm (3") discs can be played without an adaptor.
* The disc placed on the left side is played first.
5 Press OPEN/CLOSE to close the disc tray.
* The total number of tracks (①) and the total playing time of the disc being selected (②) will be displayed for several seconds.
* If the compact disc contains more than 15 tracks, the "OVER 15" indicator (⑧) will light up.
* If the disc tray is closed by pushing the front edge of the tray, play will begin automatically.
6 Press ▷ to begin play.
To pause
1 Press / 00
* The “ ▷” indicator (⑤) will flash.
2 Press /no resume play from the same point.
To stop play
Press □
To finish using this system Turn this system into the standby mode by pressing STANDBY/ON. (The STANDBY indicator will light up and the display will go out.)
Direct operation DISC (1, 2 or 3) and OPEN/CLOSE on the front panel and ▷ □ on the remote control will work if they are pressed when this system is in the standby mode or another input source is selected.
To change the disc play mode
If necessary, change the disc play mode by pressing MODE on the remote control.
Single disc play mode: Only the designated disc is played.
All disc play mode: All discs on the disc tray are played sequentially.
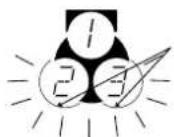
Lights up only when the all disc play mode is selected.
Compact disc player operation
To select another disc
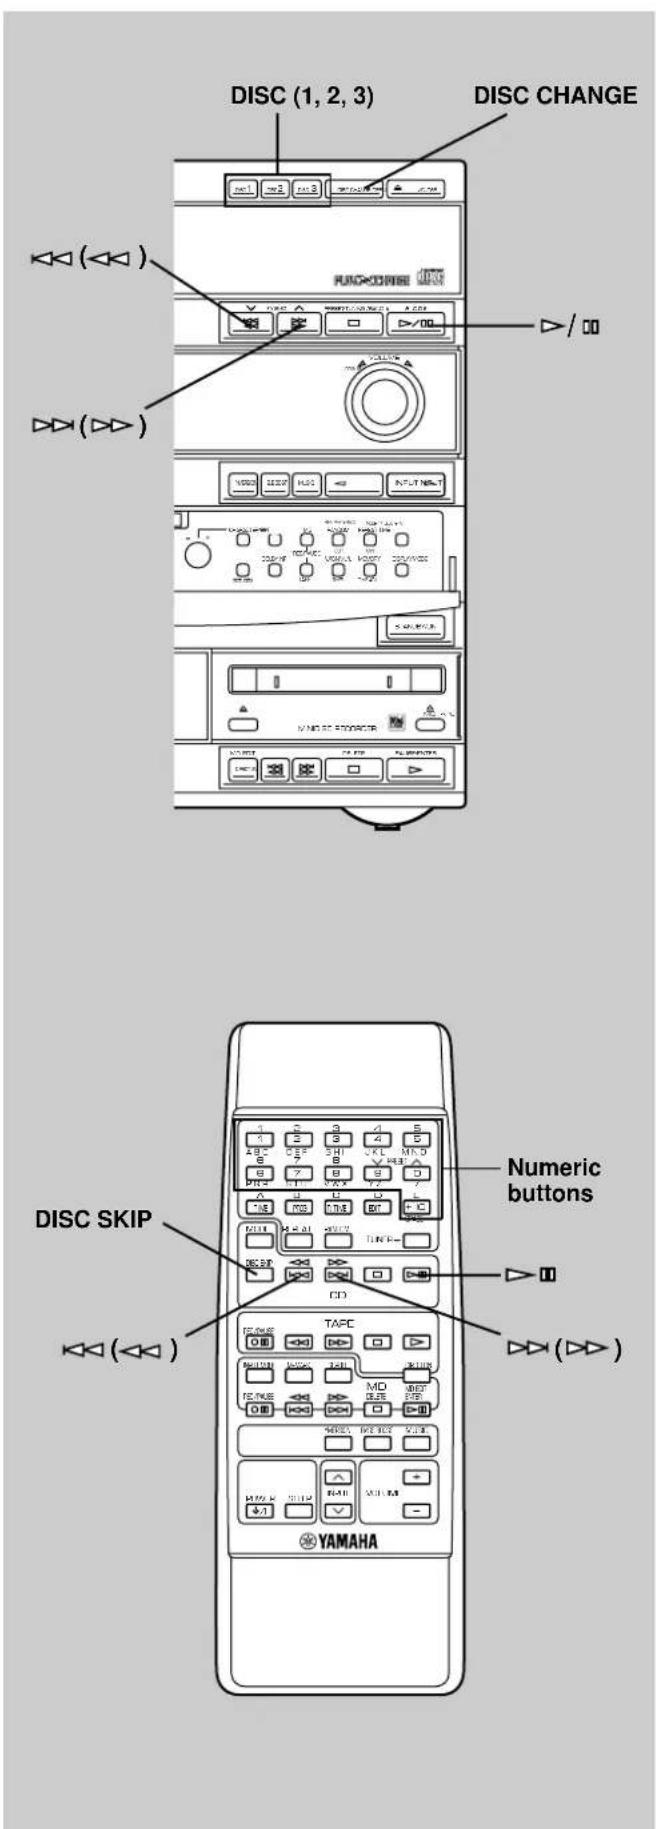
Press DISC SKIP on the remote control once or more (so that the corresponding disc number is located on the top of the disc indicator (③)).
Pressing DISC (1, 2 or 3) will select the disc directly, and play will begin from track 1 automatically.
To select the desired track directly
By using the numeric buttons on the remote control, any track you wish to listen to can be played directly.
Use the numeric buttons to select the desired track number. Play will begin automatically.
A. For example, to choose track 5 Press 5.
B. For example, to choose track 12
(1) Press +10.
(2) Within a few seconds, press 2.
C. For example, to choose track 20
(1) Press +10.
(2) Within a few seconds, press +10 again.
(3) Within a few seconds, press 0.
Note
If you select a track number higher than the number of tracks on the disc, only the last track of the disc may be played.
To play the desired track (Skip)
Press ▶to skip forward or to skip backward. Press once for each track to be skipped.
Note
This function can also be performed while the CD player is stopped. Press ▷/□ when the desired track number appears on the track number display. Play will begin from the beginning of the track.
To advance or reverse play rapidly (Search)
Press and hold ▶to advance play rapidly, and to ◀ reverse play rapidly.
To exchange a disc (or discs) while playing (PLAYXCHANGE)
During play, you can open the disc tray by pressing DISC CHANGE without interrupting play. However, in this case, pressing DISC SKIP or DISC (1, 2 or 3) is invalid.
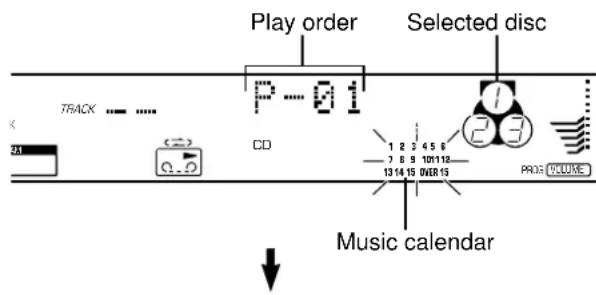
Display information during programming
Program play
You can program up to 20 tracks in any desired order.
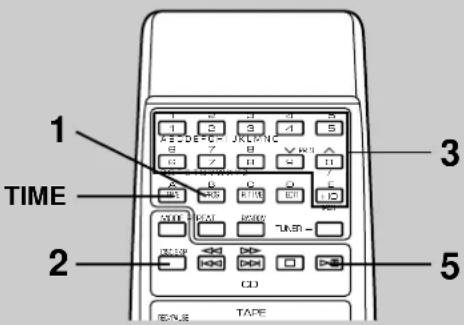
1 When the CD player is stopped, press PROG to prepare for programming.
* "PROG" (⑨) and "P-01" (②) will light up on the display, and all track numbers on the selected disc (⑦) will begin flashing.
2 If necessary, select the desired disc by pressing DISC SKIP.
* Just after you change the disc, the CD player reads the contents of the newly selected disc for a few seconds. During this internal operation, if you go on to the next step, "WAIT" (2) appears on the display and your operation is canceled.
3 Use the numeric buttons to select the desired track number.
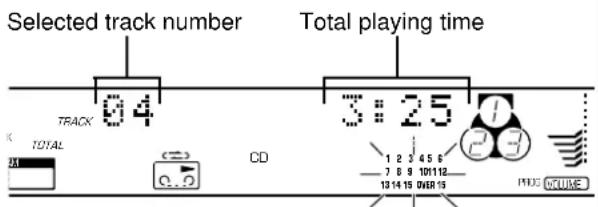
* The selected track number (①) and the total play time of the programmed tracks (②) will light up on the display, and soon it will be replaced by the display of the next play order (②). Programmed track numbers on the selected disc will stop flashing and light up on the music calendar (⑦).
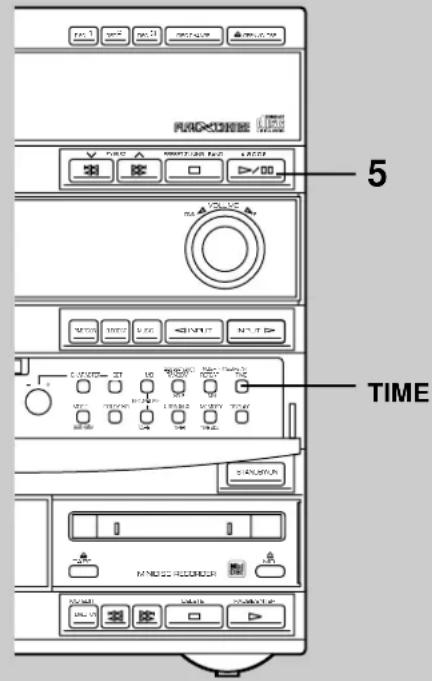
* Pressing TIME displays the total play time of the programmed tracks (②) for about 1 second, and then it is replaced by the display of the next play order (②).
4 Repeat steps 2 and 3 to program other tracks.
5 Press ▷/□ to start the program play.
Notes
- The total time of the programmed tracks will not be displayed, if track number 16 or higher is programmed.
- Skip (/) can be performed during play, but only within the range of the programmed tracks.
- Search (/) can be performed during play to search all tracks, including unprogrammed tracks.
To cancel a programmed sequence
There are several methods as described below.
- Press while the CD player is stopped.
- Open the disc tray.
- Turn this system into the standby mode.
To check (and correct) program data
-
Press PROG when the CD player is stopped.
-
Every time is pressed, the track numbers and sequential order of the programmed tracks can be checked one after another. The display of the track number can be returned (sequentially in reverse order) by pressing .
-
If you want to correct the program data, press a numeric button to select the track to replace the one displayed. The previously programmed track will be cleared from the memory and the new one will be programmed.
To complete the correction, press PROG or ▷/□ once again.
Compact disc player operation
Random play
Tracks on a selected disc or all discs on the disc tray can be played randomly.
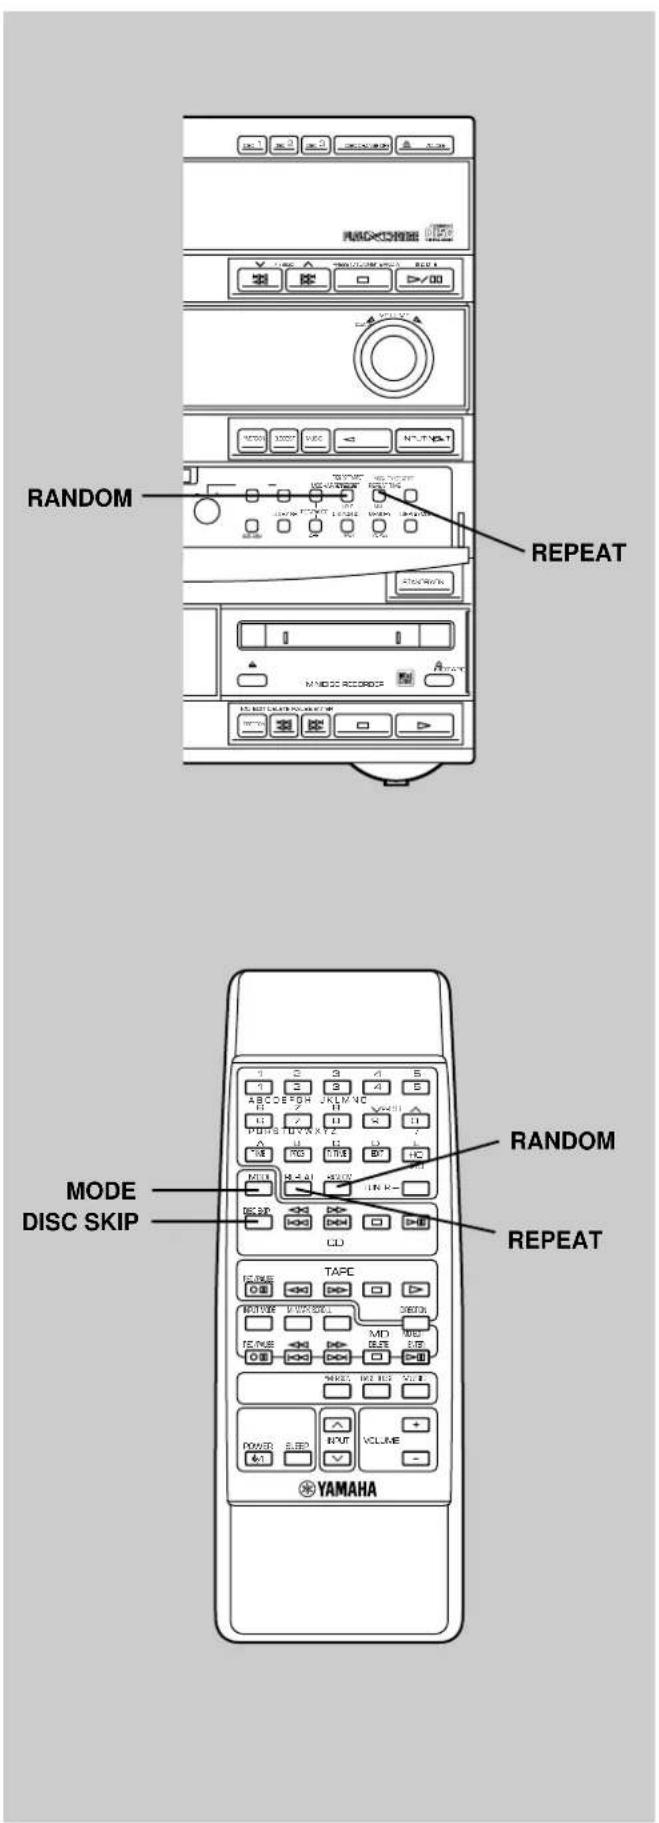
1 If necessary, switch the disc play mode by pressing MODE.
* If the single disc play mode is selected, select the desired disc by pressing DISC SKIP.
2 Press RANDOM to begin random play.
* The "RANDOM" indicator (⑥) will light up.
To cancel the random play
Press □, or press RANDOM so that the "RANDOM" indicator (⑥) will go out.
Note
This feature will not function during programming or program play.
Repeat play
All discs, a disc, a single track or a programmed sequence can be continuously repeated.
Press REPEAT once or more to select the desired repeat play mode so that the S REP or F REP indicator (10) is illuminated.

flowchart
graph TD
    A["(off) S-REP"] --> B["F-REP"]
    B --> C["Return to (off) S-REP"]
SINGLE REPEAT (S REP)
A single track is played repeatedly.
* This is also available in the program play mode and the random play mode. (If the repeat play mode is switched off, the program play mode or the random play mode will be resumed.)
FULL REPEAT (F REP)
When the CD player is in the single disc play mode:
The designated disc is played repeatedly.
* In the random play mode, the selected disc is repeatedly played, but the order of tracks is different every time.
When the CD player is in the all disc play mode:
All discs on the disc tray are played repeatedly.
* In the random play mode, the random play is performed among all discs and repeated with a different order of tracks every time.
Note
In the program play mode, a sequence of programmed tracks is played repeatedly.
To cancel the repeat play
Press REPEAT once or more so that the (S, F) REP indicator (⑩) goes out.
Switching the time display
Every time TIME is pressed, the display will change as described below.
[Example]
When the second track is being played. (Refer to the illustration on the left.)
1 The elapsed play time for the current track will be displayed.
2 The remaining play time for the current track will be displayed.
3 The total play time of the disc will be displayed.
4 The total remaining play time of the disc will be displayed.
![YAMAHA GX-900RDS - [Example] - 1](/content/2026/06/1150181/images/5e53535d51b1cdbba81d830f4fa5b673eec89aa69c791cf9b8b28e542c41120e.jpg)
other
| Stage | Event Type | Value | |-------|------------------|-------| | 1 | TRACK | 0:08 | | 2 | TRACK REM | 0:2 | | 3 | TRACK TOTAL | 0:2 | | 4 | TRACK TOTAL REM | 0:2 |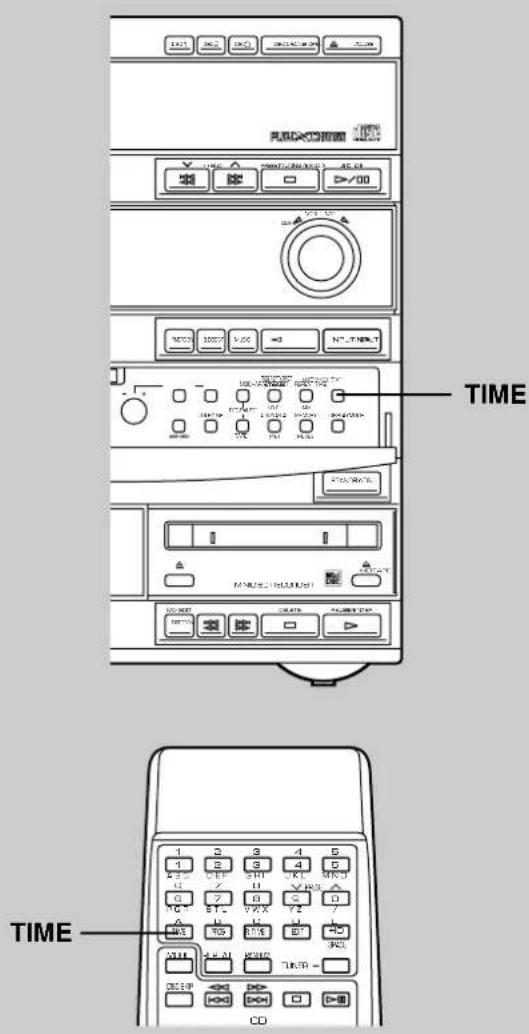
Tuning operation
Display information
Each indicator mentioned with a number on pages 15–21 corresponds to the indicator with the same number on this page.
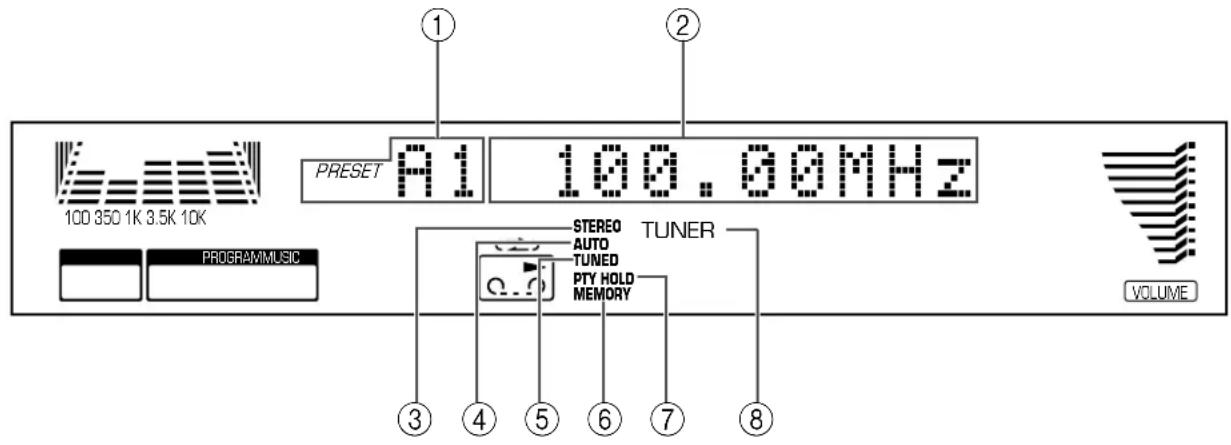
① Preset station group and number indicator
② Multi-information display
③ STEREO
④ AUTO
⑤ TUNED
⑥ MEMORY
⑦ PTY HOLD
⑧ TUNER (input source indicator)
Automatic tuning
1 Turn on the power.
2 Press INPUT or until "TUNER" (②, ⑧) appears on the display, or simply press TUNER on the remote control.
3 Select the reception band (FM or AM) by pressing PRESET/TUNING/BAND confirming it on the display (②). * Do not select the preset tuning mode (in which "PRESET" (①) lights up on the display).
4 Press AUTO/MANUAL so that "AUTO" (④) lights up on the display.
5 Press to tune to a higher frequency, or press to tune to a lower frequency.
(When tuned in to a station, "TUNED" (⑤) will light up on the display.)
6 If the station where tuning search stopped is not the desired one, follow step 5 again.
* If the tuning search does not stop at the desired station, change to the Manual tuning method as described below.
* "STEREO" (③) will light up when an FM stereo broadcast with sufficient signal strength is received.
Direct operation
TUNER on the remote control will work if it is pressed when this system is in the standby mode or another input source is selected.
Manual tuning
Follow steps 1 to 3 of the Automatic tuning method.
2 Press AUTO/MANUAL so that "AUTO" (④) disappears from the display.
③ Press and hold to tune to a higher frequency, or press and hold to tune to a lower frequency.
Release it just before reaching the desired frequency, and then press it repeatedly until the desired frequency appears.
(When tuned in to a station, “TUNED” (⑤) will light up on the display.)
Note
If you tune in to an FM station manually, it is received in monaural to increase the signal quality.
Tuning operation
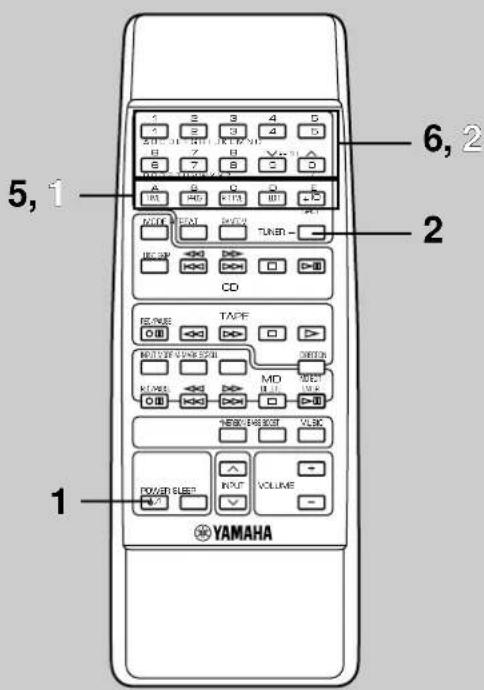
Manual preset tuning
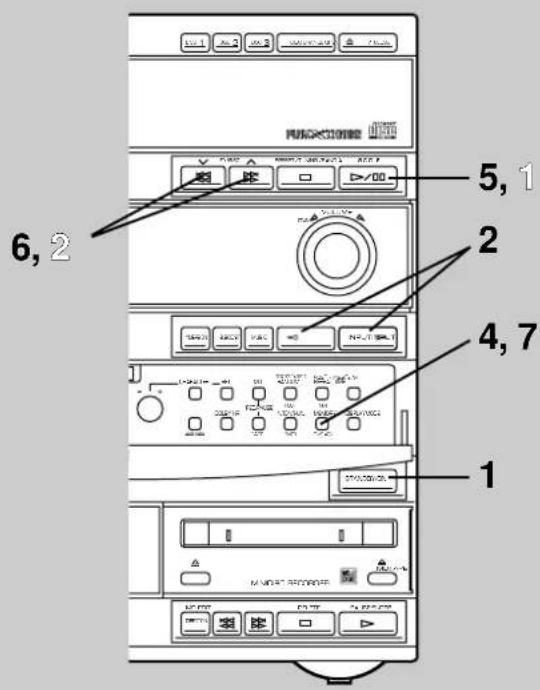
The built-in tuner can store station frequencies selected by tuning operation. With this function, you can select any desired station only by calling the corresponding preset station number. Up to 40 stations (8 stations x 5 groups) can be stored.
■ To store stations
1 Turn on the power.
2 Press INPUT ▷ or ◀ until "TUNER" (②, ⑧) appears on the display, or simply press TUNER on the remote control.
3 Tune in to the desired station.
4 Press MEMORY.
* "MEMORY" (⑥) and "PRESET" (①) will flash on the display for about 5 seconds.
5 Select the desired group (A - E) of preset stations by pressing A/B/C/D/E confirming it on the display, before "MEMORY" (⑥) goes out.
6 Select a preset station number by pressing √ or ∧ repeatedly or pressing a numeric button (1 to 8) before "MEMORY" (⑥) goes out.
7 Within about 5 seconds, press MEMORY again.
■ To recall a preset station
1 Select a group of preset stations by pressing A/B/C/D/E.
2 Select the desired preset station number by pressing √ or ∧ repeatedly or pressing a numeric button (1 to 8).
Notes
- A new setting can be programmed in place of the former one.
- For presets the setting of AUTO/MANUAL is stored along with the station frequency.
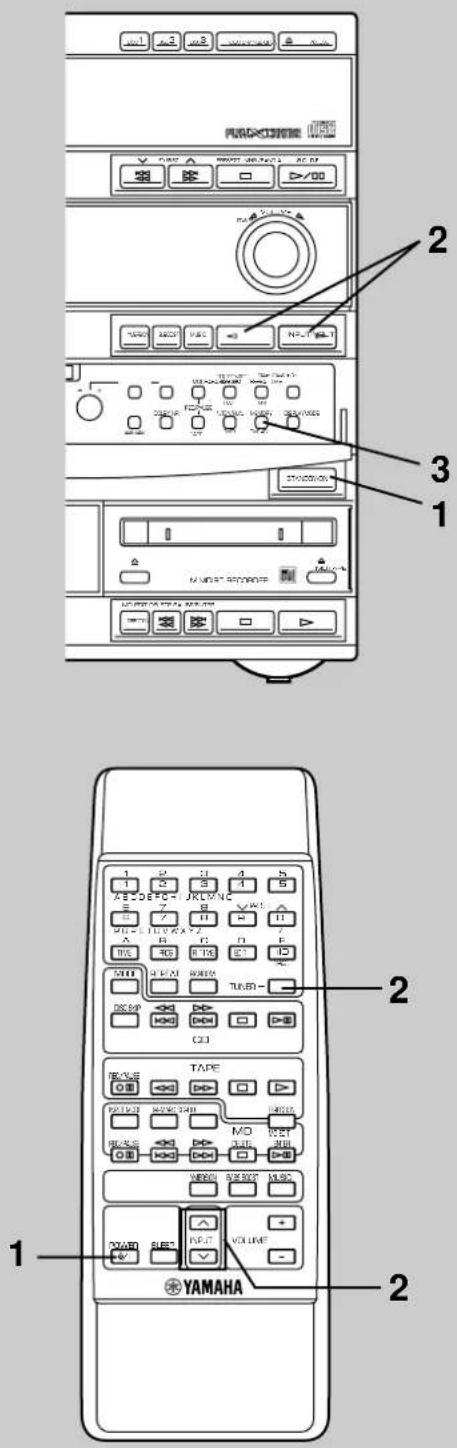
Memory back-up
The memory back-up circuit prevents the programmed data from being lost even if the AC supply lead is disconnected from the AC outlet or the power is cut due to temporary power failure. If, however, the power is cut for more than one week, the memory may be erased. If so, it can be re-programmed by simply following the Preset tuning steps.
Automatic preset tuning
You can make use of an automatic preset tuning function. With this function, the built-in tuner performs automatic tuning. Up to 40 stations are stored automatically.
1 Turn on the power.
2 Press INPUT ▷ or ▶ until "TUNER" (②, ⑧) appears on the display, or simply press TUNER on the remote control.
3 Press and hold MEMORY for more than 2 seconds.
* The "MEMORY" (⑥) and "AUTO" (④) indicators flash.
The tuner performs automatic tuning and searches FM and AM stations in that order. Received stations are programmed to A1, A2 ... A8 sequentially.
When the automatic preset tuning is completed;
The display shows the frequencies of the first preset station (stored to A1).
If you want to check the contents and the number of preset stations, follow the procedure of the section "To recall a preset station" on the previous page.
To recall a preset station
Simply follow the procedure of the section "To recall a preset station" on the previous page.
Notes
- The automatic preset tuning search will be performed through all frequencies until 40 stations are stored. If the number of received stations is less than 40, the search will stop after searching all frequencies.
* Since FM stations are searched for first, there may be a case that 40 preset stations are occupied by FM stations only. - The tuner is originally set to search only RDS stations instead of all FM stations by this operation. (FM stations that employ no RDS network service cannot be programmed.)
However, you can change the setting so that the tuner can program not only RDS stations but also other FM stations. (Refer to page 21 for details.) - With this function, only stations with sufficient signal strength are stored automatically. If the station you want to program is weak in signal strength, tune in to it with the Manual tuning method (in monaural) and program it by following the procedure of the section "To store stations" on the previous page.
- You can replace a preset station with another FM or AM station manually by simply following the procedure of the section "To store stations" on the previous page.
Tuning operation
Receiving RDS stations
RDS (Radio Data System) is a data transmission system employed by FM stations in many countries. Stations using this system transmit an inaudible stream of data in addition to the normal radio signal.
RDS data contains various information, such as PI (Program Identification), PS (Program Service name), PTY (Program Type), RT (Radio Text), CT (Clock Time), etc.
RDS function is carried out among the network stations.
* The built-in tuner utilizes PS, PTY, RT and CT to receive RDS broadcast stations.
■ RDS modes
The built-in tuner uses the following four modes to display RDS data.
PS (Program Service name) mode
PTY (Program Type) mode
There are 15 program types to classify RDS stations as described below.
RT (Radio Text) mode
CT (Clock Time) mode
PTY modes
| NEWS | News | VARIED | Light entertainment |
| AFFAIRS | Current affairs | POP M | Pops |
| INFO | General information | ROCK M | Rock |
| SPORT | Sports | M.O.R. M | Middle of the road music (easy-listening) |
| EDUCATE | Education | LIGHT M | Light classics |
| DRAMA | Drama | CLASSICS | Serious classics |
| CULTURE | Culture | OTHER M | Other music |
| SCIENCE | Science | ||
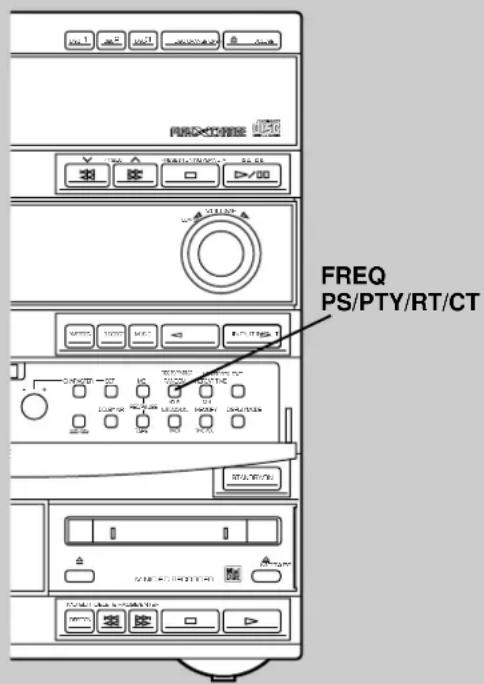
■ Changing the RDS modes
When an RDS station is received, by pressing FREQ PS/PTY/RT/CT once or more, you can change the display mode among the RDS modes employed by the received station in the order shown on the next page. (The RDS mode not employed by the station cannot be selected.)
Notes
- If the received station is not an RDS station, pressing FREQ PS/PTY/RT/CT displays "NO RDS" on the display, and then it returns to the frequency display mode.
- When an RDS station is received, the display is automatically turned into the PS mode. Do not press FREQ PS/PTY/RT/CT until the display is turned into the PS mode. If the button is pressed before the display mode changes, it may occur that "NO PS" appears on the display. This is because the tuner has not received all of the RDS data on the station yet.
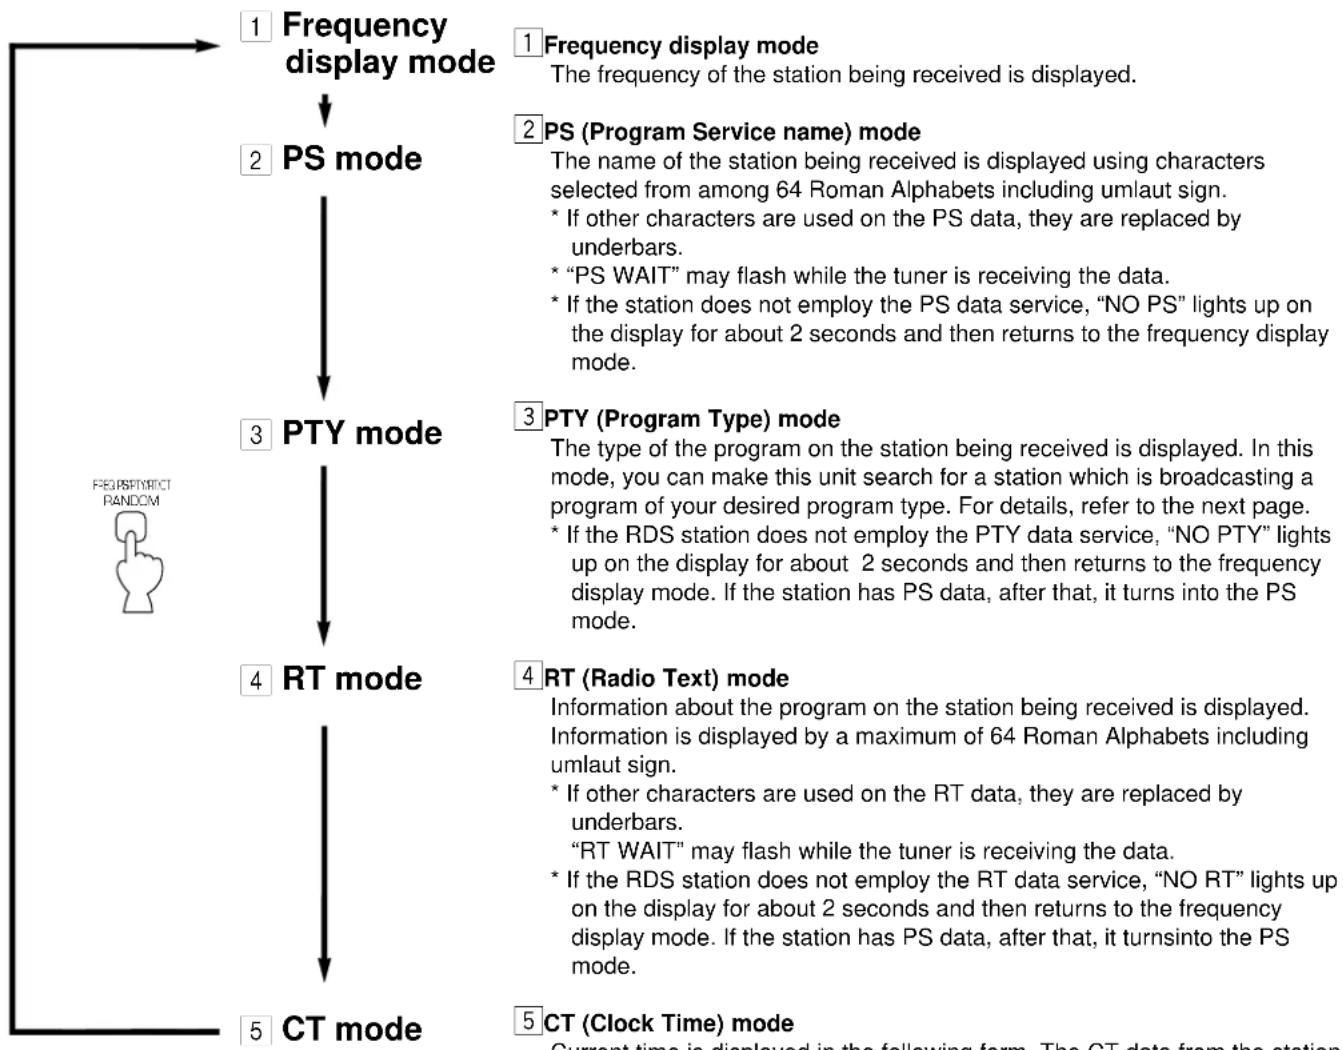
flowchart
graph TD
    A["1 Frequency display mode"] --> B["2 PS mode"]
    B --> C["3 PTY mode"]
    C --> D["4 RT mode"]
    D --> E["5 CT mode"]

    A --> F["1 Frequency display mode\nThe frequency of the station being received is displayed."]
    B --> G["2 PS (Program Service name) mode\nThe name of the station being received is displayed using characters selected from among 64 Roman Alphabets including umlaut sign.\n* If other characters are used on the PS data, they are replaced by underbars.\n* “PS WAIT” may flash while the tuner is receiving the data.\n* If the station does not employ the PS data service, “NO PTY” lights up on the display for about 2 seconds and then returns to the frequency display mode."]
    C --> H["3 PTY (Program Type) mode\nThe type of the program on the station being received is displayed. In this mode, you can make this unit search for a station which is broadcasting a program of your desired program type. For details, refer to the next page.\n* If the RDS station does not employ the PTY data service, “NO PTY” lights up on the display for about 2 seconds and then returns to the frequency display mode. If the station has PS data, after that, it turns into the PS mode."]
    D --> I["4 RT (Radio Text) mode\nInformation about the program on the station being received is displayed. Information is displayed by a maximum of 64 Roman Alphabets including umlaut sign.\n* If other characters are used on the RT data, they are replaced by underbars.\n“RT WAIT” may flash while the tuner is receiving the data.\n* If the RDS station does not employ the RT data service, “NO RT” lights up on the display for about 2 seconds and then returns to the frequency display mode. If the station has PS data, after that, it turns into the PS mode."]
    E --> J["5 CT (Clock Time) mode\nCurrent time is displayed in the following form. The CT data from the station is displayed in the following form."]
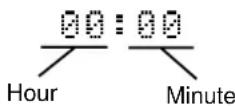
The tuner corrects the time of the built-in clock by synchronizing it with the CT data. (This function can also be canceled, if so desired. Refer to page 21 for details.)
* "CT WAIT" may flash while the tuner is receiving the data. If the data is accidentally cut off, "CT WAIT" may flash and then turn into "NO CT".
* If the RDS station does not employ the CT data service, "NO CT" lights up on the display for about 2 seconds and then returns to the frequency display mode. If the station has PS data, after that, it turns into the PS mode.
Notes
- RDS data service cannot be used if the received signal is not strong enough. Especially, the RT (Radio Text mode) needs much data to be received, so it may occur that RT mode cannot be displayed even if other RDS modes (PS, PTY, etc.) are displayed.
- There may be a case that RDS data reception is not possible due to poor reception conditions. In such a case, press AUTO/MANUAL to make tuning manually. Though the reception mode is changed to monaural by this operation, when you change the display to an RDS mode, RDS data may be displayed.
- If the signal strength gets weakened by external interference during receiving an RDS station, the RDS data service may be cut off suddenly and turn into the frequency display mode.
Tuning operation
■ Calling a program of your desired program type from among preset RDS stations (PTY SEEK)
By designating a program type, the tuner automatically searches all preset FM stations for an RDS station which broadcasts a program of that program type.
* There are 15 program types to classify RDS stations. For details, refer to page 18.
1 Turn the tuner into the PTY SEEK mode by pressing PTY SEEK MODE.
* The name of the program type of the station now being received or "NEWS" flashes on the display.
2 Select the desired program type by using PTY SELECT √ or ↗
* If there is no operation for about 20 seconds, this mode is canceled and turns into the frequency display. If the station has PS data, after that, it turns into the PS mode.
3 Press PTY SEEK START.
The tuner begins searching all preset FM stations.
* "PTY HOLD" (⑦) lights up on the display.
* The name of the program type and "AUTO" (④) flash. The preset station number (①) changes rapidly in sequence.
- If a station which broadcasts a program of the program type is found, the search stops at the station and turns into the frequency display. If the station has PS data, after that, it turns into the PS mode.
- If the called station is not the desired one, press PTY SEEK START once more. The tuner begins searching for another station which broadcasts a program of the same program type.
- If no station is found, "NO PTY" appears and then returns to the frequency display. If the station has PS data, after that, it turns into the PS mode.
* If PTY SEEK START is pressed once more during searching, this mode is canceled ("PTY HOLD" disappears) and turns into the frequency display. If the station has PS data, after that, it turns into the PS mode.
To cancel the PTY SEEK mode
If PTY SEEK MODE is pressed twice, the PTY SEEK mode is canceled and turns into the frequency display. If the station has PS data, after that, it turns into the PS mode.
■ Other functions which make use of RDS data service
The tuner has the following functions which make use of RDS data service. These are originally in operation [ON].
However, you can cancel these functions [OFF], if so desired.
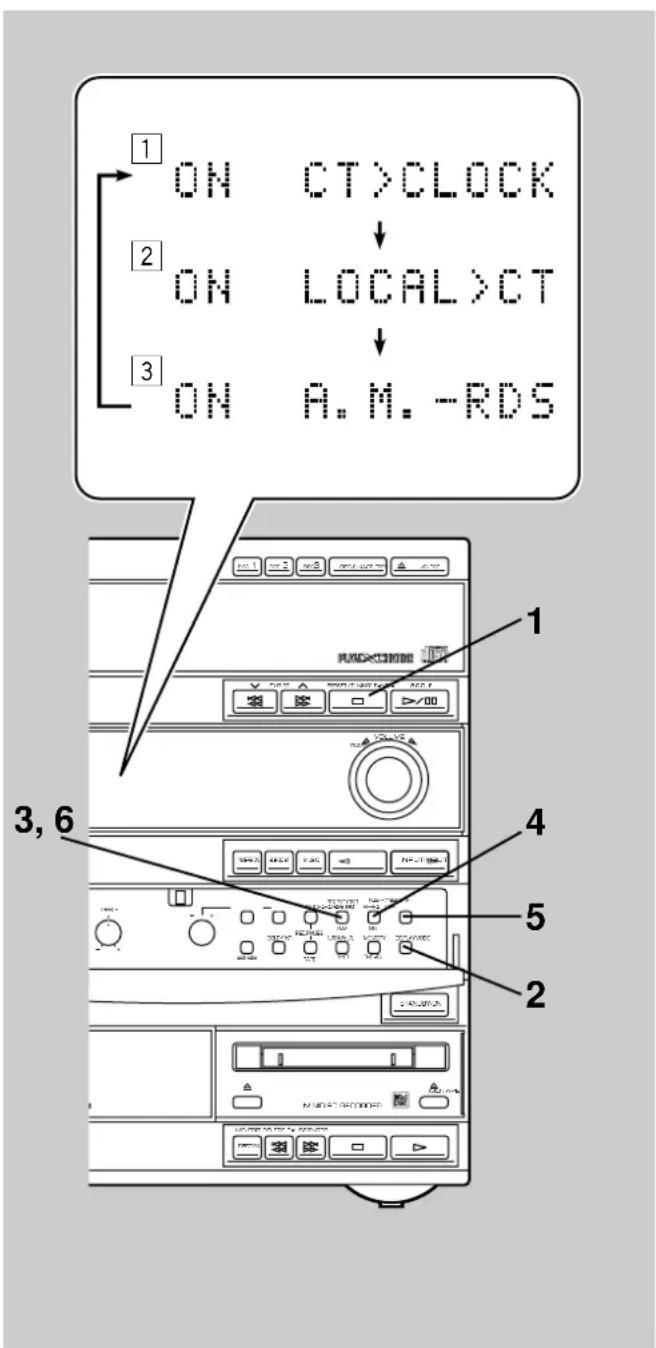
1 ON (OFF) CT > CLOCK
The tuner corrects the time of the built-in clock automatically by synchronizing it with the CT data on the RDS station being received.
* If you receive an RDS station of some other country, the built-in clock is synchronized with the time setting of the country.
* If the built-in clock is not yet set for the current time or reset due to a power failure etc., it will be set for the time of the CT data automatically, whether this setting is ON or OFF.
If the RDS station being received employs the local time (summer time etc.) data service, its time is displayed in the CT mode.
* If the setting of function 1 is "ON", the built-in clock is synchronized with the local time data.
3 ON (OFF) A. M. - RDS (AUTO MEMORY > RDS)
Only RDS stations are searched instead of all FM stations by the automatic preset tuning operation when the setting is ON. (Refer to page 17 for the operating procedure.) If you switch this function OFF, not only RDS stations but also other FM stations are programmed along with AM stations by the automatic preset tuning operation.
To switch these functions on and off
1 Select the FM band by pressing the PRESET/TUNING/BAND, confirming it on the display.
2 Press DISPLAY to display the current time.
3 Press FREQ PS/PTY/RT/CT.
The title of function 1 "ON CT > CLOCK" is displayed.
4 Select the title of function whose setting you want to switch by pressing PTY SEEK MODE once or more.
5 Switch the function ON or OFF by pressing PTY SEEK START, confirming it on the display.
6 Press FREQ PS/PTY/RT/CT again to restore the frequency display mode.
* If the station has PS data, after the frequency display mode returns, it turns into the PS mode.
Notes
- Once the setting is changed, it will be stored until it is changed again by the above operation.
- During the operation, if there is no operation for about 20 seconds, this mode is canceled and turns into the frequency display. If the station has PS data, after that, it turns into the PS mode.
Playing back a tape
Display information
Each indicator mentioned with a number on pages 23–29 corresponds to the indicator with the same number on this page.
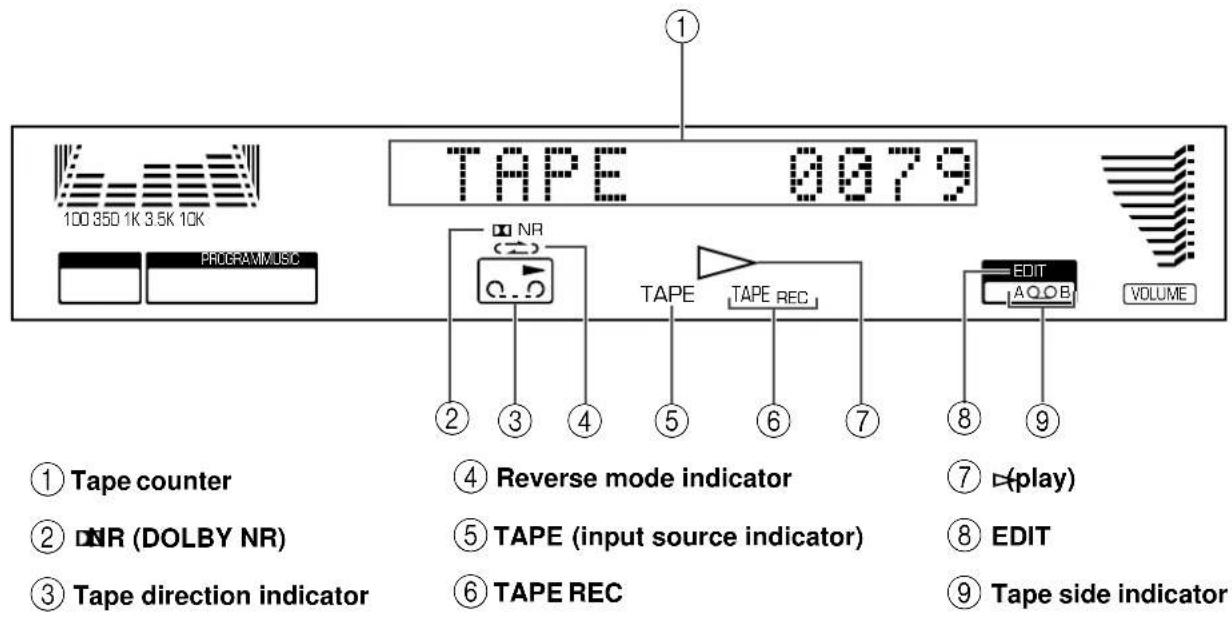
General information
natural_image
Technical line drawings of a cassette tape assembly showing pin, cable, and switch components (no text or labels)Dolby B Type Noise Reduction
Dolby noise reduction is an extremely effective method of reducing undesirable background hiss on tapes. The built-in tape deck incorporates Dolby B type noise reduction system. DOLBY NR is useful to both recording and playback; be sure that the same noise reduction is used on recording and playback.
Dolby noise reduction manufactured under license from Dolby Laboratories Licensing Corporation. "DOLBY" and the double-D symbol □ are trademarks of Dolby Laboratories Licensing Corporation.
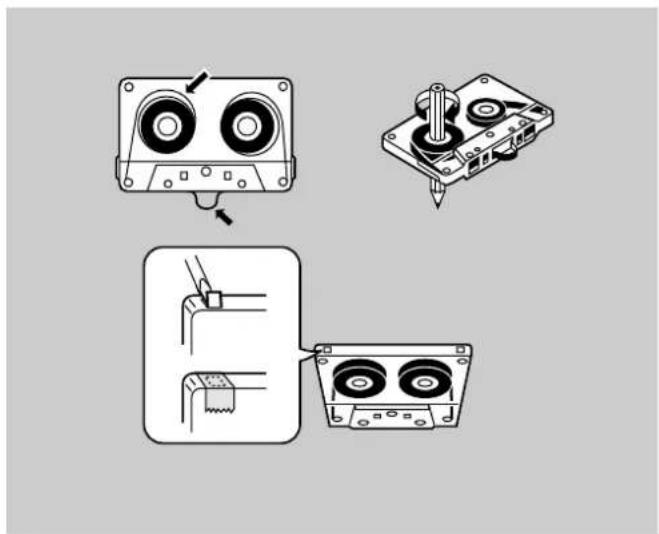
- Do not use C-120 tapes or poor-quality tapes, since they can cause malfunctions.
- Before loading a tape on the tray, tighten the tape slack with a pen or pencil.
- Tapes have removable tabs which prevent accidental recording or erasing from taking place. Removing the tab on the top left protects the side facing you from erasure. Cover the tab holes with adhesive tape to erase or record again.
- The tape deck features an automatic tape selector. Just load the tape, and the tape formula being used will be sensed automatically.
- The tape deck can play back metal tapes as well as normal or chrome tapes, however recording cannot be done on metal tapes with good sound quality.
About the tape counter
The tape deck is equipped with a tape counter that is useful for searching and locating a desired point on the tape. The tape counter is shown on the display.
Pressing □ (stop) when the deck is stopped will reset the tape counter to "0000".

Basic operation
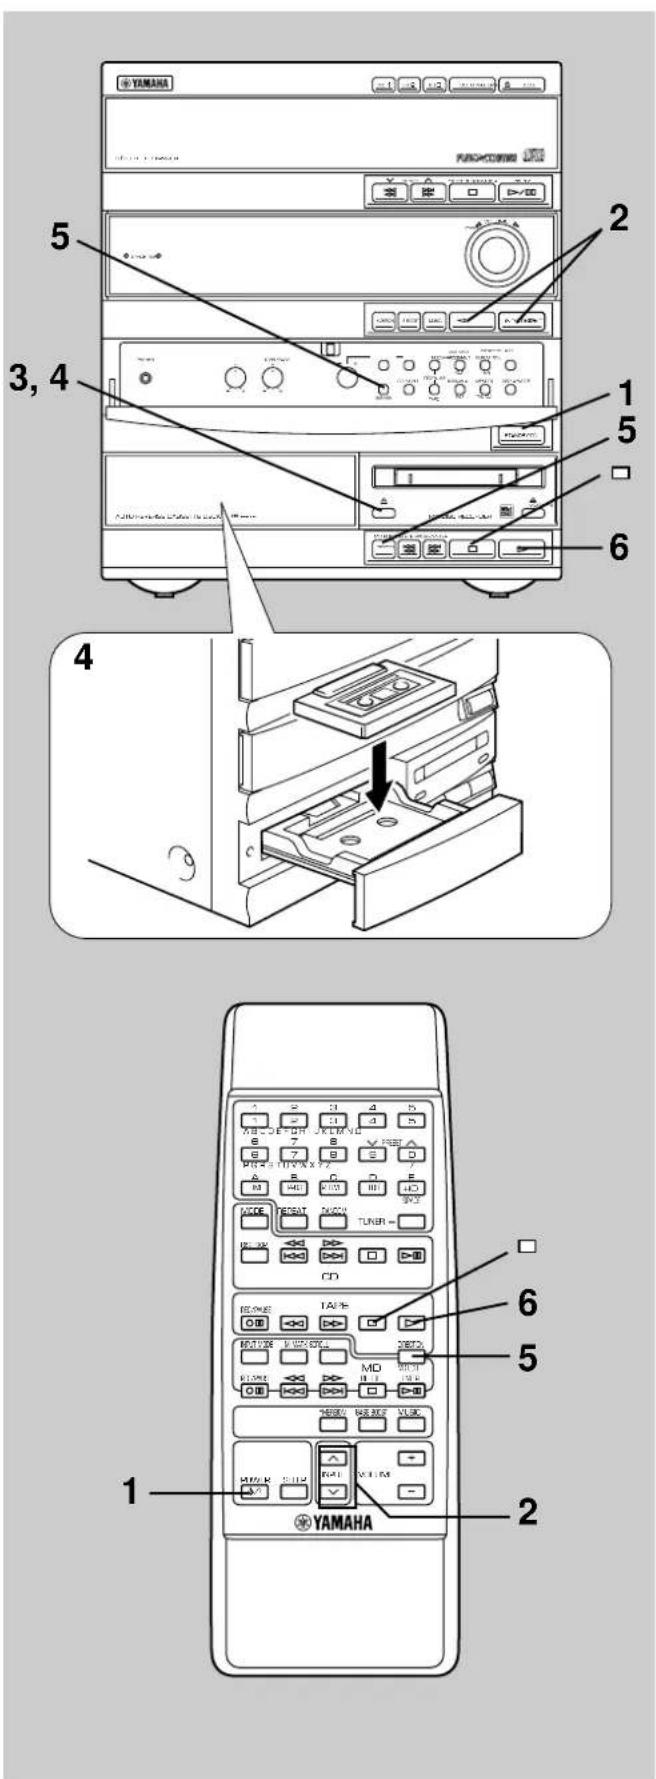
1 Turn on the power.
2 Press INPUT ▷ or ◀ until "TAPE" (①, ⑤) appears on the display.
3 Open the tray by pressing △.
4 Load the tape on the tray with side A upward, and close the tray by pressing or pushing the front edge of the tray gently.
5 Press MODE or DIRECTION to change the current setting if necessary.
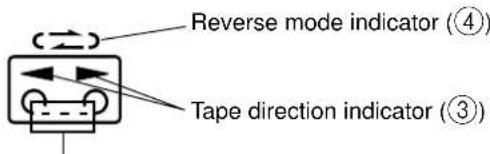
Moves slowly in the current tape running direction during playback.
| MODE DIRECTION | |||
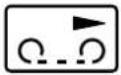 | Side A only | Side A → Side B | Side A → Side B(Repeats 8 times)Starts from side A. |
 | Side B only | Side B only | Side B → Side A(Repeats 8 times)Starts from side B.(Side A is not played at the first time.) |
6 Press ▷. Playback begins.
To stop playback
Press □.
To remove the tape
Open the tray by pressing .
Direct operation
▷ on the remote control or △ will work if either is pressed when this system is in the standby mode.
Playing back a tape
Winding the tape
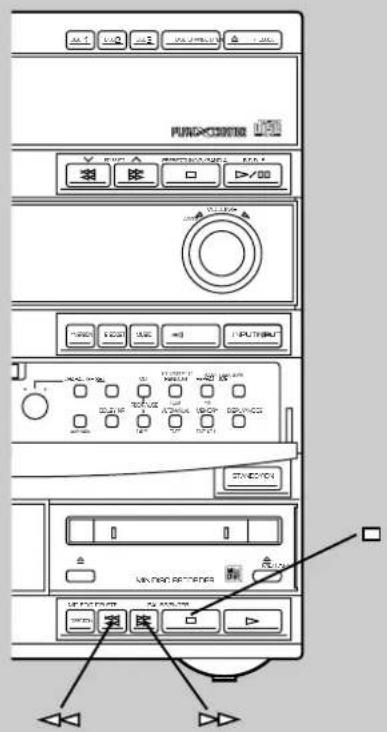
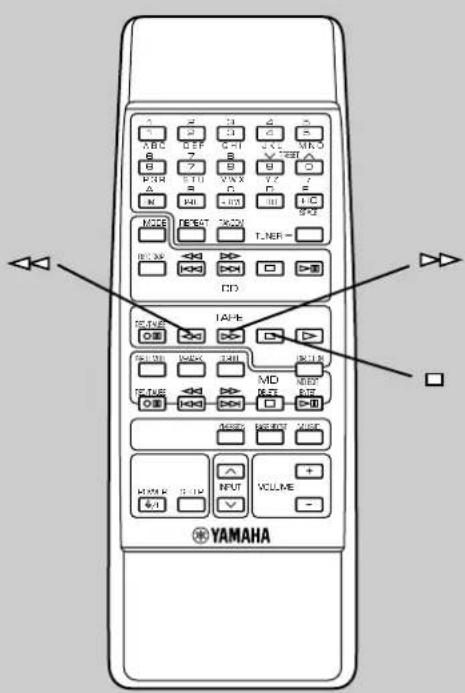
1 Press ◀ to wind the tape.
Moves rapidly in the current tape running direction while winding.
2 Press □ to stop.
Note
When the tape is wound to the end, the tape deck will then function as described below.
: The tape stops at the end.
: If the winding direction is ▶when the tape reaches the end, playback automatically starts from the reverse side.
If the winding direction is ▶, the tape stops at the end.
(二) : When the tape reaches the end, playback automatically starts from the reverse side.
Searching for the beginning of the desired selection
Press or during playback.
To listen to the same selection
Press <if the direction of the current playback is . ► Press ▶▶ if the direction of the current playback is
To listen to the next selection
Press ▶ if the direction of the current playback is ▶ Press ◀◀ if the direction of the current playback is ◀
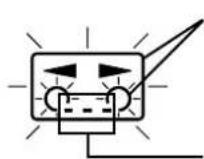
Flashes on and off.
Moves rapidly in the current tape running direction while searching.
Notes
● This function may not work for tapes with
* Material with long pauses or quiet passages.
* Low recording levels or excessive noise.
* Pauses of less than 4 seconds between selections.
- If searching is carried out at the first or the last part of a selection, the desired selection may not be found.
Recording to tape
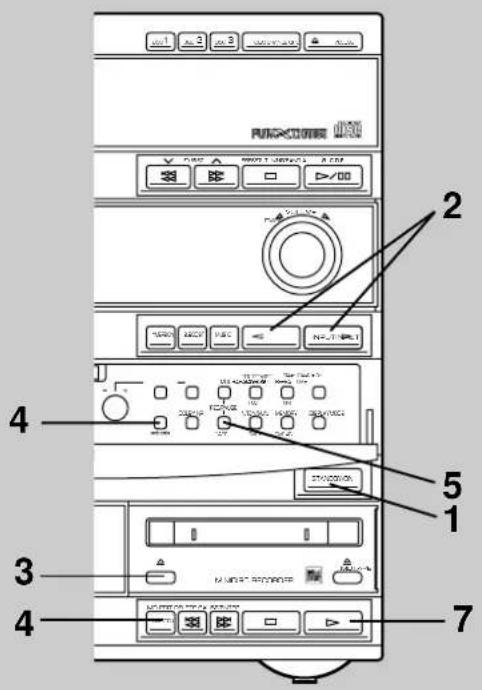
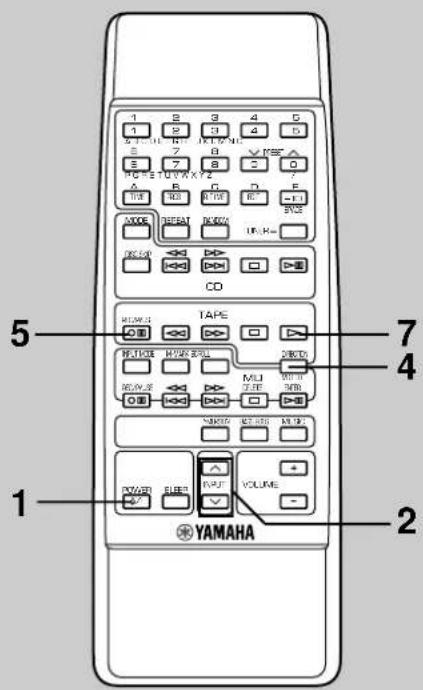
Notes
- Adjusting the VOLUME, BASS and TREBLE controls, YMERSION, B. BOOST and MUSIC buttons have no effect on the recorded sound. The recording level is automatically adjusted.
- If you want to make a recording using Dolby NR, press DOLBY NR so that “☐ NR” (②) lights up on the display. If not, turn “☐ NR” (②) off.
* For details, refer to "Dolby B Type Noise Reduction" on page 22.
Basic recording
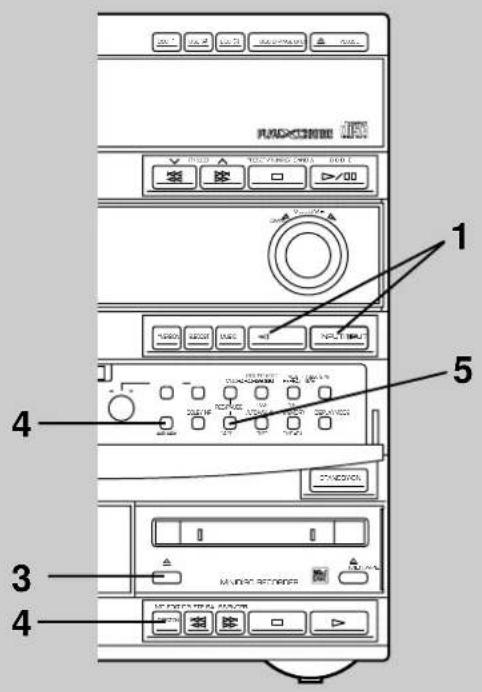
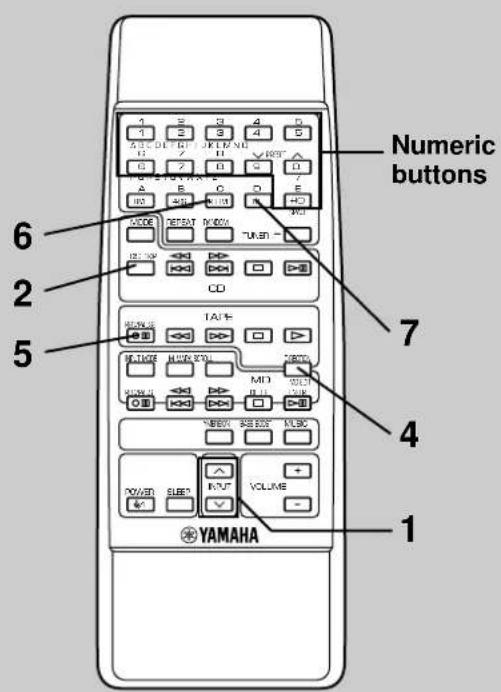
1 Turn on the power.
2 Press INPUT ▷ or ◀ once or more to select the source you want to record.
3 Load a tape on the tray with side A upward.
4 Press DIRECTION or MODE to change the current setting if necessary.
| MODE DIRECTION | ||
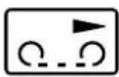 | Side A only | Side A → Side B |
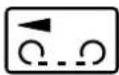 | Side B only | Side B only |
5 Press TAPE REC/PAUSE.
* "TAPE REC" (⑥) lights up on the display.
6 Begin playing the source to be recorded.
* When playing a CD or MD, the recording automatically begins a few seconds before the CD or MD play begins. You do not need to follow step 7.
7 Press ▷ of the tape deck.
Displaying the tape counter
During recording, the information of the playing source is displayed in place of the tape counter (①). Press DISPLAY to change the display to the tape counter. Pressing DISPLAY again will restore the previous display mode.
Recording to both tape and MD
You can record a source to a tape and MD at the same time by pressing both TAPE and MD REC/PAUSE in step 5 (except using the EDIT function).
Recording to tape
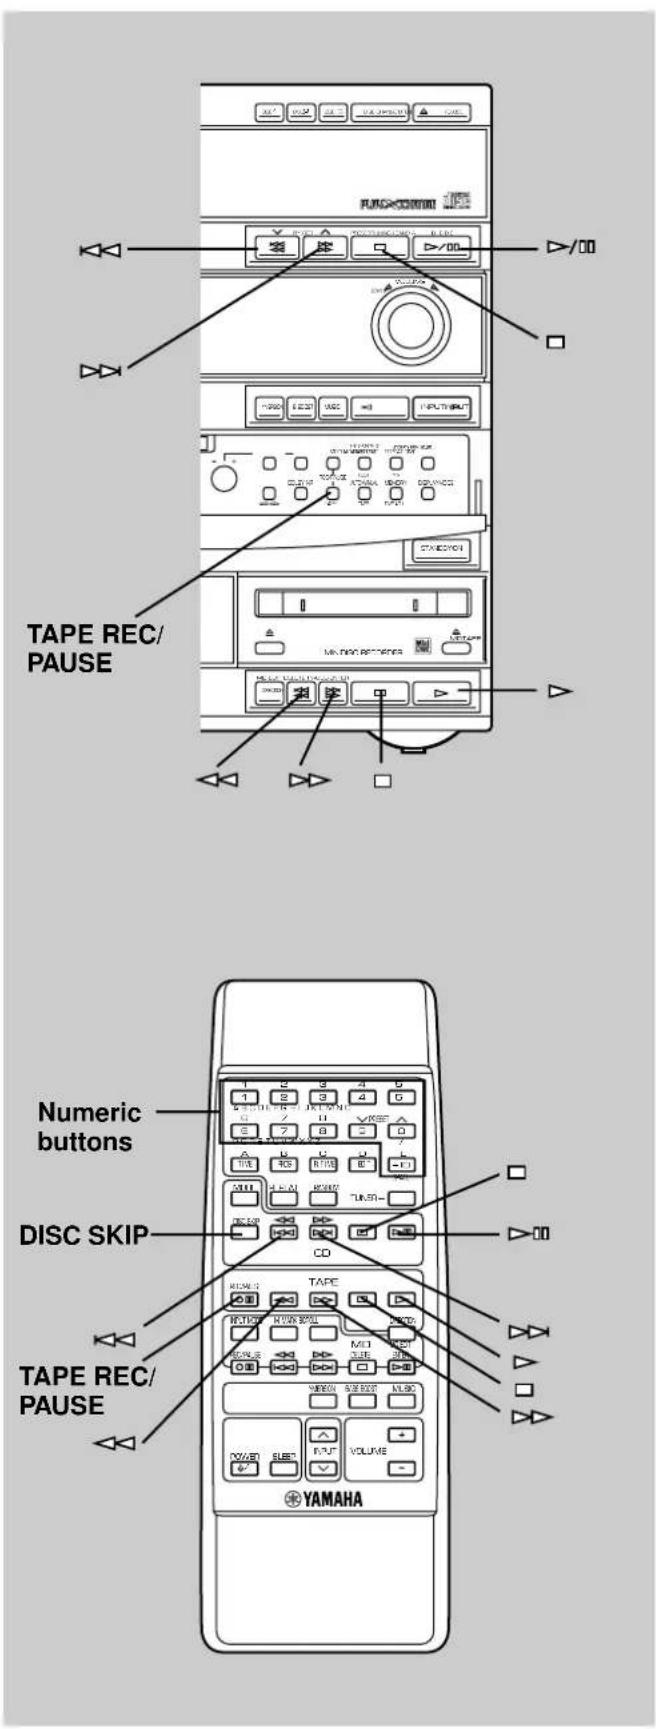
To stop recording temporarily
Press TAPE REC/PAUSE.
* Press ▷ of the tape deck to resume recording.
To stop recording
Press □ of the tape deck.
To change the disc and track when recording from a CD
1 Press □ of the CD player.
* The recording stops temporarily.
2 Select the disc by pressing DISC SKIP if necessary.
3 Choose the track you want to record next by using ▶▶ or ◀◀, and then press ▶/ □ of the CD player to resume recording (or simply press the corresponding numeric button(s) on the remote control).
To change the disc and track during recording from an MD
1 Press □ of the MD recorder.
* The recording stops temporarily.
2 Change the disc if necessary.
3 Choose the track you want to record next by using ▶▶ or ◀◀, and then press ▶ of the MD recorder to resume recording.
Notes
- A sequence of tracks in the program play mode and random play mode of the CD player or MD recorder can be recorded in the same way.
- During recording, by simply pressing ◀ or ▶, you can rewind the tape to the point where the recording started.
Recording from CDs utilizing the EDIT function
The EDIT function performs recording on both sides of the tape.
EDIT recording
1 Press INPUT ▷ or ◀ once or more until "CD" (①, ⑤) appears on the display, and load the disc to be recorded.
2 Select the disc by pressing DISC SKIP.
3 Load a tape on the tray with side A upward.
4 Select “→” (④) by pressing MODE, and “▶” (③) by pressing DIRECTION.
5 Press TAPE REC/PAUSE.
6 Press R. TIME on the remote control to select the length of the tape to be used. Whenever pressed, the display changes as shown below.
$$ \begin{array}{c c c c c c c c}\text {(off)}&\rightarrow&\text {C - 46}&\rightarrow&\text {C - 54}&\rightarrow&\text {C - 60}&\rightarrow&\text {C - 90}\\uparrow&&&&&&&\end{array} $$
When using tapes other than C-46, C-54, C-60 or C-90
After pressing R. TIME, input the tape length by using the numeric buttons on the remote control.
7 Press EDIT. ("EDIT" (⑧) lights up on the display.)
The following operations are carried out automatically.
1) Tracks on the disc are automatically divided into side A and side B. You can check the process by watching the display.
* The tape side indicator (⑨) shows the side currently selected.
2) If the tape is not rewound to the end, it will rewind to the end rapidly.
3) The end part of the tape on which recording cannot be done is wound.
4) Both CD play and recording starts. Recording is carried out on both sides of the tape continuously.
Notes
- When the CD player is in the all disc play mode, if the tape's total possible recording time is longer than the total playing time of the selected disc, tracks on another disc are recorded continuously.
In this case, as many as three discs can be recorded automatically. - The CD player's repeat play mode will be canceled during this recording mode.
Recording to tape
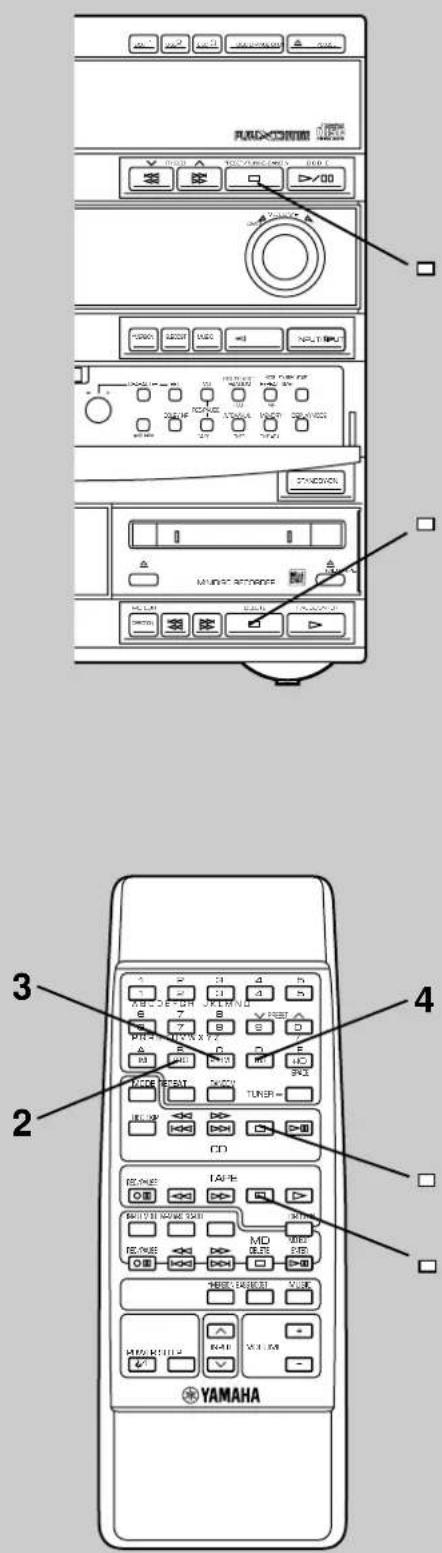
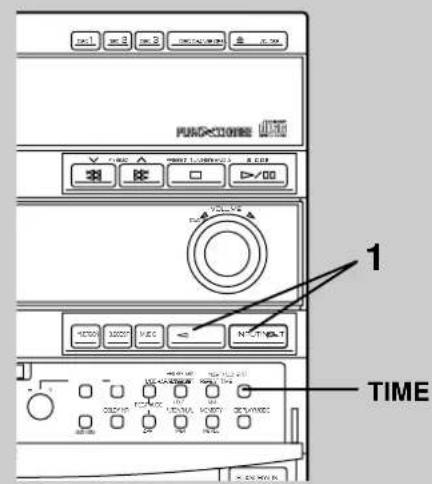
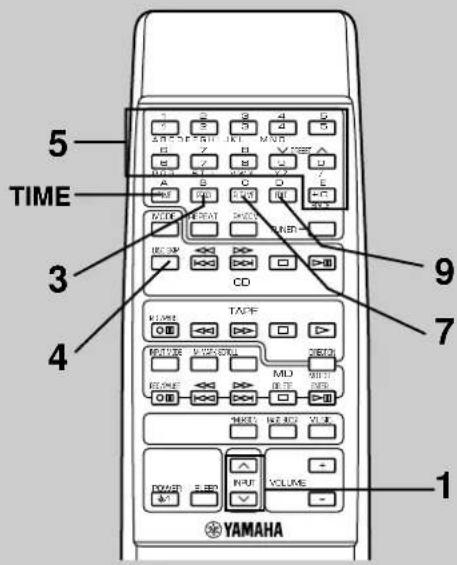
■ Auto-EDIT recording
This recording automatically changes the order of tracks so that the unrecorded space of side A is minimized.
1 Follow steps 1–6 on the previous page.
2 Press PROG.
3 Press R. TIME.
"Auto A >>>" will light up during programming for side A, and "Auto B >>>" will light up during programming for side B.
4 Press EDIT. ("EDIT" (⑧) lights up on the display.) The recording starts.
To cancel the EDIT function
Before recording, press □ of the CD player or the tape deck.
To stop recording
Press □ of the tape deck. (At this time, CD play automatically stops.)
Display information during programming
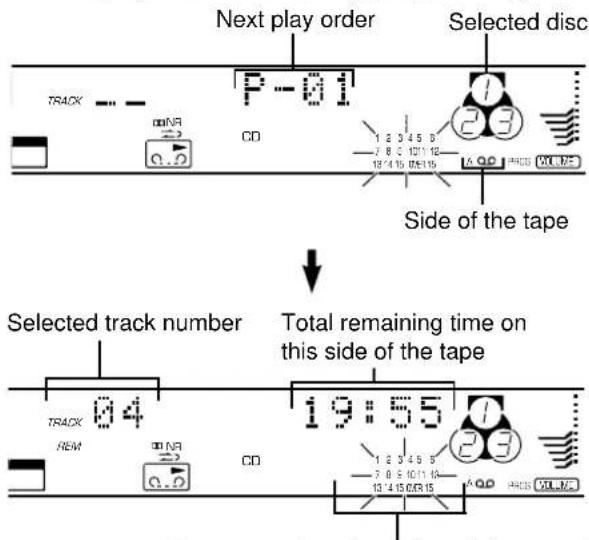
Programmed track numbers light up and only programmable track numbers among unprogrammed ones flash.
■ Manual EDIT recording
You can program tracks manually while watching the remaining time on both sides of the tape.
1 Press INPUT ▷ or ◀ once or more until "CD" (①, ⑤) appears on the display, and load a disc (or discs) on the disc tray.
2 Follow steps 3–6 on page 27.
3 Press PROG.
* "PROG" and "P-01" will light up on the display, and all track numbers on the selected disc will begin flashing.
4 If necessary, select the desired disc by pressing DISC SKIP.
5 Select the desired track number by pressing the numeric buttons.
6 Repeat steps 4 and 5 to program more selections for side A of the tape. You can select the same track again.
* Pressing TIME displays the total remaining time on side A of the tape for about 1 second, and then it is replaced by the display of the next play order.
* If "TM OVER" appears on the display, the track number just selected cannot be programmed because there is not enough time remaining on side A of the tape. However, at this time, if any other track number is flashing continuously on the display, you can program it instead of the unprogrammable one.
7 When the programming for side A is finished, press R. TIME.
* "Side-B" appears on the display. You can begin programming for side B.
* After following this step, you can check the programmed contents for side A and side B alternately by pressing R. TIME at any time before you press EDIT in step 9.
* The tape side indicator (⑨) shows the programming side currently selected.
8 Repeat steps 4 and 5 to program selections for side B of the tape. You can select the same track again.
9 Press EDIT. ("EDIT" (⑧) lights up on the display.) The recording starts.
Notes on recording with the EDIT function
- To check, cancel or correct program data, refer to page 11.
- The maximum number of tracks that can be programmed is 20.
- The track number 16 or higher cannot be programmed by this function.
Playing an MD
Display information
Each indicator mentioned with a number on pages 31–42 corresponds to the indicator with the same number on this page.
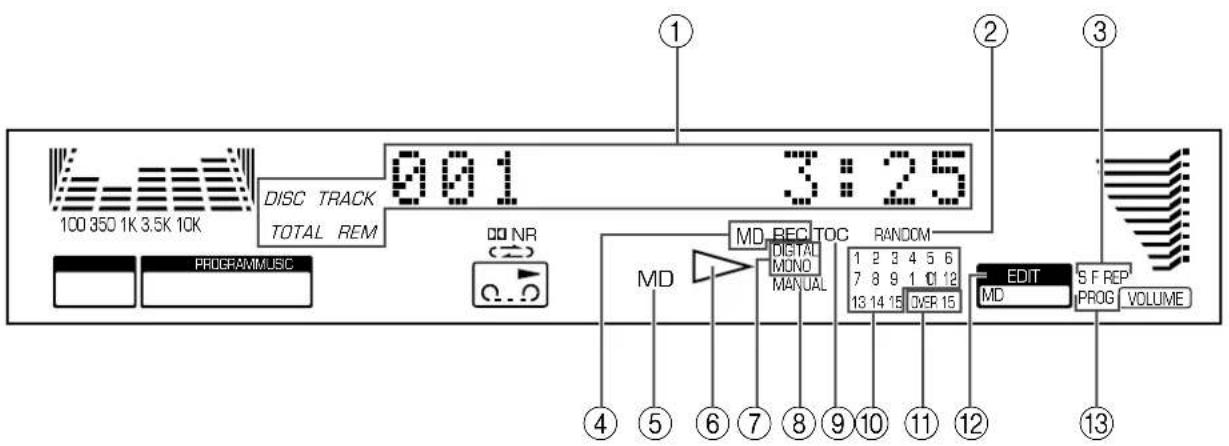
① Multi information display
② RANDOM
③ (S, F) REP [(single, full) repeat]
④ MD REC
⑤ MD (Input source indicator)
⑥ ▷ (play)
⑦ MONO, DIGITAL, DIGITAL MONO (Input mode indicator)
⑧ MANUAL
⑨ TOC (Table Of Contents)
⑩ Music calendar
Track numbers on the currently selected disc will be illuminated (up to the number 15).
⑪ OVER 15 This indicator will be illuminated when the currently selected disc has more than 15 tracks.
⑫ EDIT
⑬ PROG (program)
General information
natural_image
Illustration of two hands holding a small electronic device with a 'X' symbol crossed out (no text or labels)Shutter Cartridge
Protecting a recorded MD
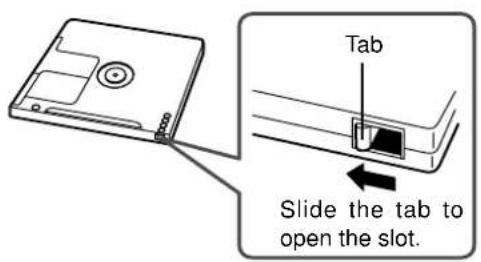
- To protect a recorded MD, slide the tab on the side of the MD to open the slot.
In this position, the MD cannot be used for recording. To record on the MD, slide the tab to close the slot. - If the MD is protected against erasure, "Protected" appears on the display.
Care of MDs
- Do not expose the MD to direct sunlight or heat sources such as hot air ducts, nor leave it in a car parked in direct sunlight as there can be a considerable rise in temperature inside the car.
- Periodically remove dust and debris from the cartridge surface by wiping it with a dry cloth.
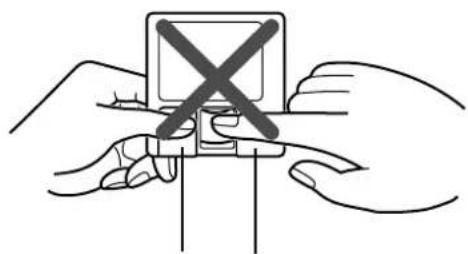
- Because the MD itself is housed in a cartridge, you can handle it normally without being concerned about dirt or fingerprints. However, a malfunction may result if the cartridge itself is dirty or warped.
- Do not open the shutter to expose the MD.
Basic play
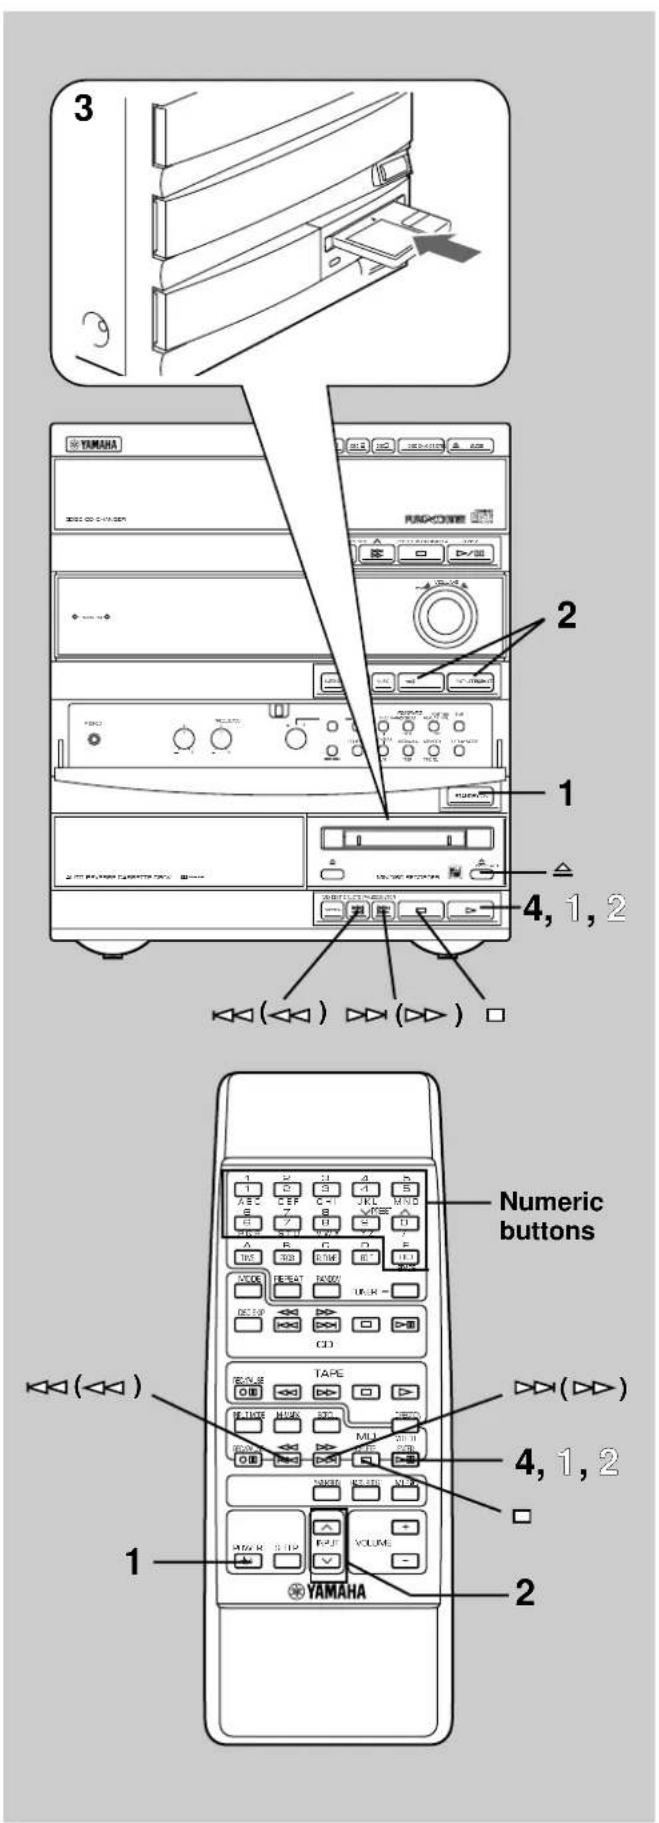
1 Turn on the power.
2 Select the MD recorder by pressing INPUT ▷ or ◀ until "MD" (①, ⑤) appears on the display.
3 Insert an MD into the disc insertion slot in the direction of the arrow printed on the MD.
* The disc title appears on the display, and then it is replaced by the total number of tracks and the total playing time of the disc (1).
* If the disc contains more than 15 tracks, the "OVER 15" indicator (⑪) will light up.
4 Press ▷ (or ▷ on the remote control) to begin play.
To pause
Press ▷ (or ▷ on the remote control).
* The "▷" indicator (⑥) will flash.
2 Press ▷ (or ▷ on the remote control) to resume play from the same point.
To stop play
Press □
To eject the MD
Press △
To select the desired track directly
By using the numeric buttons on the remote control, any track you wish to listen to can be played directly.
Use the numeric buttons to select the desired track number. Play will begin automatically.
For example, to choose track 23
(1) Press +10.
(2) Within a few seconds, press +10 again.
(3) Within a few seconds, press 3.
To play the desired track (Skip)
Press ▶to skip forward or ▶to skip backward.
Press once for each track to be skipped.
Note
This function can also be performed while the MD recorder is stopped. Press ▷ (or ▷ on the remote control) when the desired track number appears on the track number display. Play will begin from the beginning of the track.
To advance or reverse play rapidly (Search)
Press and hold ▶▶ to advance play rapidly, and ◀to reverse play rapidly.
flowchart
graph TD
    A["1: Total number of tracks"] --> B["12"]
    B --> C["71:55"]
    C --> D["2: Remaining recordable time of the disc"]
    D --> E["12"]
    E --> F["3:04"]
    F --> G["3: REM"]
    G --> H["Title of the disc"]
    H --> I["AaBbCc!"]
Switching the display
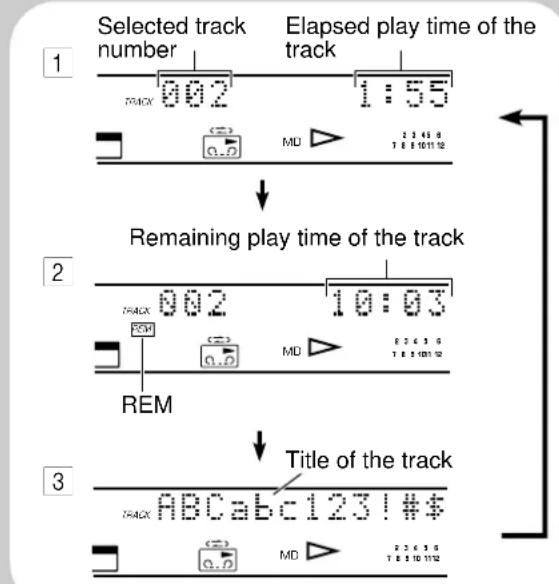
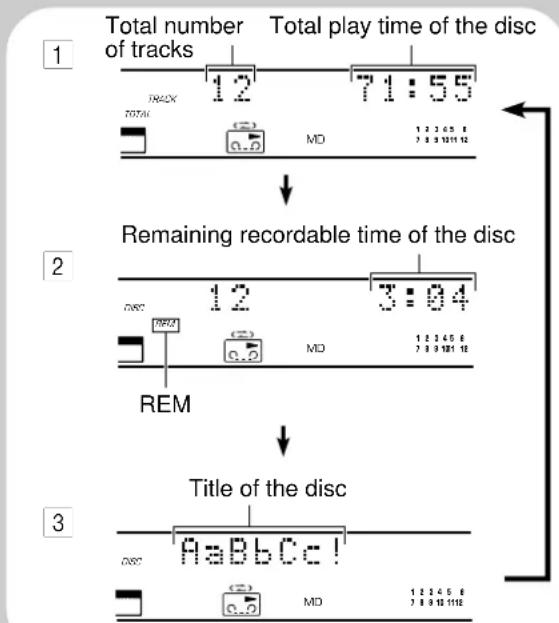
Every time TIME is pressed, the display will change as described below.
During play
[Example]
When the second track is being played. (Refer to the illustration on the left.)
1 The elapsed play time for the current track will be displayed.
2 The remaining play time for the current track will be displayed.
3 The title of track currently played will be displayed. ("No Title" will appear if the track has no title.)
When stopped
1 The total number of tracks and the total play time of the disc will be displayed.
②The total number of tracks and the remaining recordable time of the disc will be displayed (only for recordable discs).
③The disc title will be displayed.
("No Title" will appear if the disc has no title.)
To view the entire disc (track) title
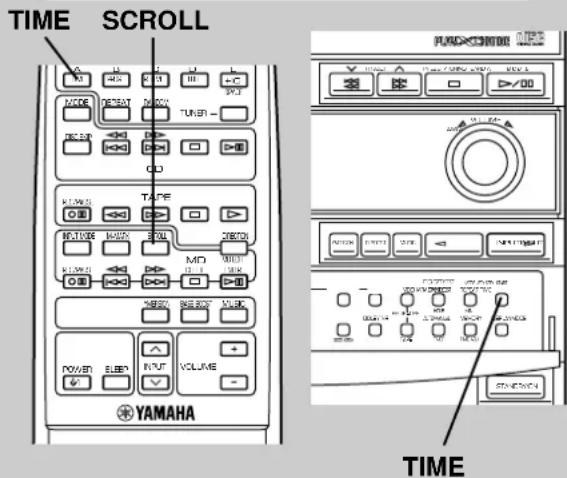
If the disc (track) title is too long to fit in the display, press SCROLL.
Press SCROLL while the title is scrolling to stop the scrolling.
Repeat play
A disc, a single track or a programmed sequence can be continuously repeated.
Press REPEAT once or more to select the desired repeat play mode so that the S REP or F REP indicator (③) is illuminated.
Repeat play modes
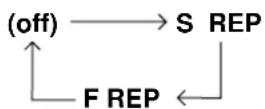
SINGLE REPEAT (S REP)
A single track is played repeatedly.
FULL REPEAT (F REP)
The disc is played repeatedly.
To cancel the repeat play
Press REPEAT once or more so that the (S, F) REP indicator (③) goes out.
Program play
You can program up to 30 tracks in any desired order.
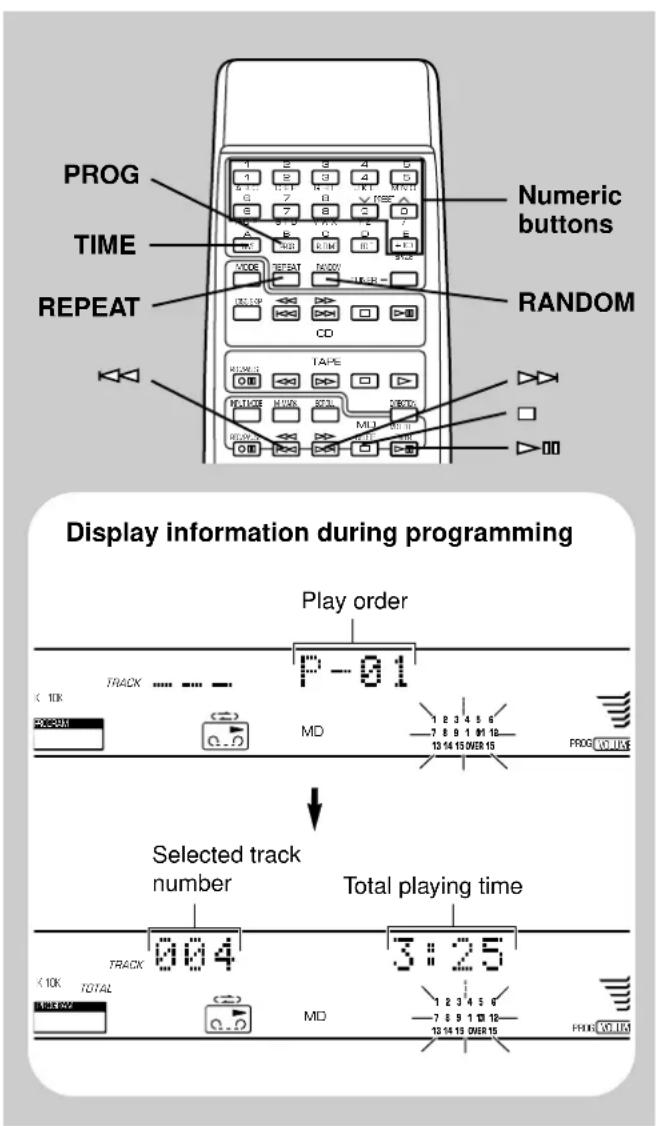
1 When the MD recorder is stopped, press PROG to prepare for programming.
* "PROG" (⑬) and "P-01" (①) will light up on the display, and all track numbers on the disc (⑩) will begin flashing.
2 Program the desired track number by using the numeric buttons.
* The selected track number and the total play time of the programmed tracks (①) will light up on the display, and soon it will be replaced by the display of the next play order. Programmed track numbers on the disc will stop flashing and light up on the music calendar (⑩).
* Pressing TIME displays the total play time of the programmed tracks (①) for about 1 second, and then it is replaced by the display of the next play order.
3 Repeat step 2 to program more tracks. You can select the same track again.
4 Press ▷ to start the program play.
Notes
- Skip (◀◀/ ▶▶) and search can be used during play, but only within the range of the programmed tracks.
- If the total time exceeds 255 minutes, "255mOver" is displayed instead of the total time.
To cancel a programmed sequence
There are several methods as described below.
- Press □ while the MD recorder is stopped.
- Eject the MD.
- Turn this system into the standby mode.
To check (and correct) program data
- Press PROG when the MD recorder is stopped.
- Every time is pressed, the track numbers and sequential order of the programmed tracks can be checked one after another. The display of the track number can be returned (sequentially in reverse order) by pressing .
- If you want to correct the program data, press a numeric button to select the track to replace the one displayed. The previously programmed track will be cleared from the memory and the new one will be programmed. To complete the correction, press PROG or ▷/□ once again.
Random play
All the tracks on a disc can be played randomly.
Press RANDOM to begin random play.
* The "RANDOM" indicator (②) will light up.
To cancel the random play
Press □, or press RANDOM so that the "RANDOM" indicator (②) will go out.
Note
This feature will not function during programming or program play.
Recording to MD
The MD recorder allows you to make recordings from a wide variety of program sources (both analog and digital).
When recording an analog source (such as an LP or tape), the MD recorder converts the analog signals to 44.1 kHz digital signal before recording them onto the MD.
When recording a digital source, the MD recorder converts the digital signals to 44.1 kHz for recording onto the MD. However, If you are recording a 44.1 kHz source signal (such as a CD) there is no conversion. The MD recorder can record 32, 44.1 and 48 kHz digital signals.
Note
Adjusting the VOLUME, BASS and TREBLE controls, YMERSION, B. BOOST and MUSIC buttons have no effect on the recorded sound. The recording level is automatically adjusted.
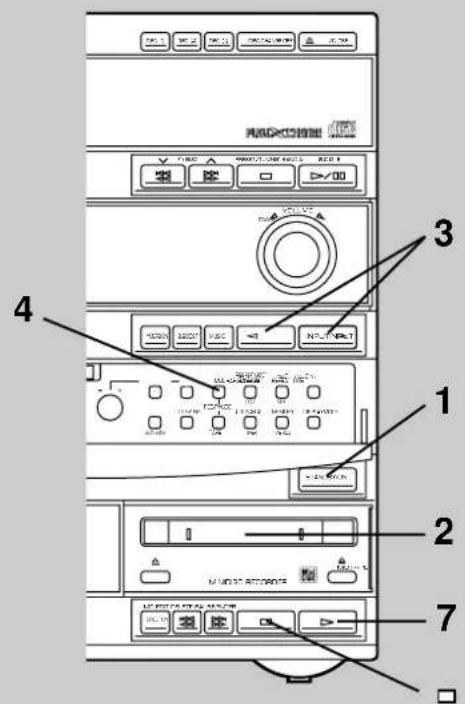
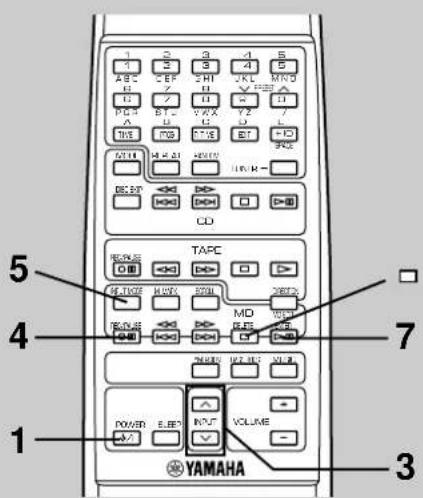
Basic recording
1 Turn on the power.
2 Insert an MD into the disc insertion slot in the direction of the arrow printed on the MD.
3 Select the input source by pressing INPUT ▷ or ◀.
* If necessary, locate the point on the source where you want to start recording and suspend the play at the point.
4 Press MD REC/PAUSE.
* The MD REC (④) indicator lights up.
5 Select the proper input mode by pressing INPUT MODE.
- When recording a CD source or the source connected to the DIGITAL IN terminal on the rear of the main unit.
Select the Digital Stereo mode so that "DIGITAL" (⑦) lights up on the display. - When recording other sources
Select the Analog Stereo mode so that there is no illumination on the input mode indicator (⑦). - For the Digital Mono or Analog Mono input mode, refer to "Monaural recording" on page 35.
6 Start playing the program source to be recorded. * If a CD is played, recording also begins automatically. (CD Synchronized Recording)
7 Press ▷ (or ▷ on the remote control) to start recording. * "TOC" (⑨) lights up. When "TOC" is illuminated, this means that the TOC information has not yet been written to the disc.
To suspend recording
Press MD REC/PAUSE.
Press ▷ again to resume recording.
To stop recording
Press □
Recording to both tape and MD
You can record a source to a tape and MD at the same time by pressing both TAPE and MD REC/PAUSE in step 4 (except using the EDIT function).
Monaural recording
Recording in monaural (mono) allows you to record up to 148 minutes of sound on one 74 minute MD. This may be useful when recording a long interview, debate, or other long time sources on one disc.
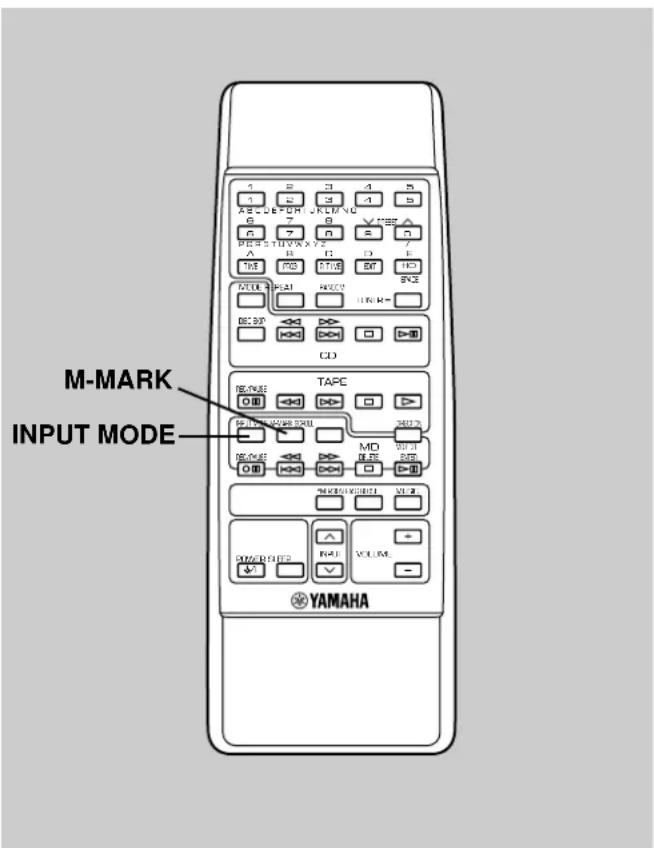
1 Select the proper input mode by pressing INPUT MODE.
When recording a CD source or the source connected to the DIGITAL IN terminal on the rear of the main unit. Select the Digital Mono mode so that "DIGITAL MONO" (⑦) lights up on the display.
When recording other sources
Select the Analog Mono mode so that "MONO" (⑦) lights up on the display.
2 Follow the procedure of "Basic recording" on page 34.
Track-marking
The MD recorder provides both automatic and manual methods for the track number-marking.
• Automatic (default setting)
When making a recording, the track-marking is made automatically.
• Manual
To make the track-marking manually, press M-MARK on the remote control repeatedly until "MANUAL" (8) is illuminated.
When recording analog signals (from tapes, radio programs, etc.)
Automatic:
Track numbers are written in synchronization with the input level of the signal being recorded. During recording, if no sound is detected for more than 1.5 seconds, the recorder interprets this to be a gap between two tracks. When the source signal is detected again, a track number is automatically written.
Manual:
One track number is written automatically when you start recording, but none are written during recording. To mark a track number, press M-MARK at the desired position while recording.
Note
When using the manual method, the marks must be set at least 4 seconds apart.
When recording digital signals (from CDs, etc.)
Track numbers are written in the same positions as the original source (CDs, etc.) with either automatic or manual track-marking method.
To add additional track numbers, select the manual track-marking method and press M-MARK at the desired position while recording.
Notes about TOC
TOC (Table of Contents) is the non-audio data contained on all minidiscs (track numbers, play time, title data, etc.) When you make recording onto an MD, the TOC data is automatically renewed.
When the message “TOC Reading” or “TOC Writing”, etc. is shown on the display, it means that the MD recorder is reading the TOC data on an MD, or recording TOC data onto an MD. During this period, do not make an operation on the MD recorder, do not disconnect the power cord of this system, or do not shake this system to prevent a misoperation of the MD recorder.
To cancel the EDIT function
Before recording, press □ of the CD player or the MD recorder.
To stop recording
Press □ of the MD recorder.
(At this time, CD play automatically stops.)
Recording from CDs utilizing the EDIT function
The EDIT function makes recording operation easier.
■ EDIT recording
Tracks of a CD are recorded onto an MD with the original order unchanged.
If the CD's total play time excesses the total recordable time of the selected MD, all tracks will not be recorded, but recording will not finish in the midst of playing a track.
1 Select the CD player by pressing INPUT ▷ or until "CD" (①, ⑤) appears on the display.
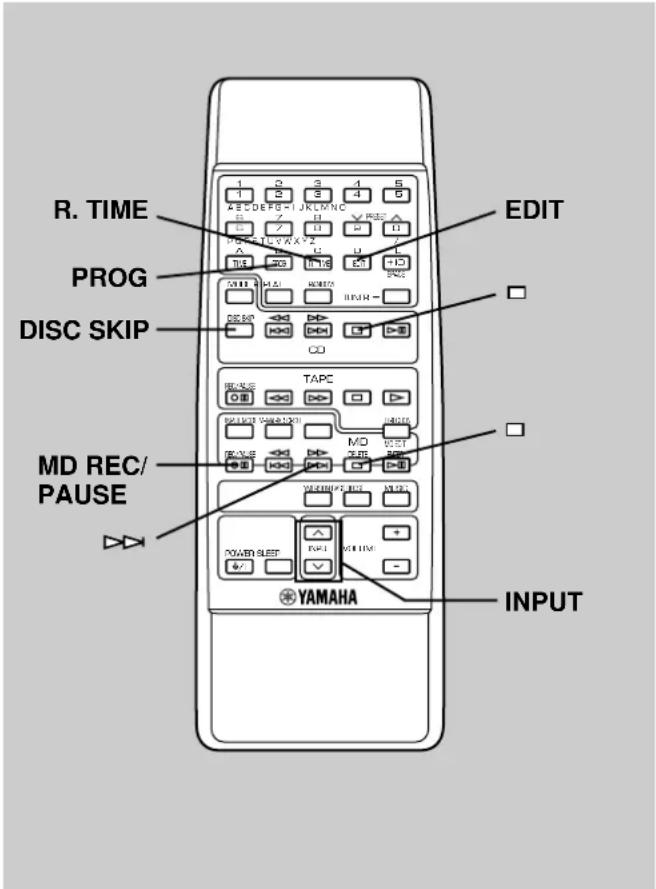
2 Select the disc by pressing DISC SKIP.
3 Insert an MD into the disc insertion slot in the direction of the arrow printed on the MD.
4 Press MD REC/PAUSE.
5 Press R. TIME on the remote control. The (remaining) recordable time of the MD is displayed by minute (as "MD-00").
6 Press EDIT. ("EDIT" (12) lights up on the display.)
The following operations are carried out automatically.
1) Tracks on the CD are automatically programmed for recording. You can check the process by watching the display.
2) Both CD play and recording starts.
Notes
- When the CD player is in the all disc play mode, if the total recordable time of the MD is longer than the total playing time of the selected CD, tracks on another CD are recorded continuously.
In this case, as many as three CDs can be recorded automatically. - The CD player's repeat play mode will be canceled during this recording mode.
■ Auto-EDIT recording
This recording automatically changes the order of tracks so that the unrecorded space of the MD is minimized.
1 Follow steps 1–5 of "EDIT recording" above.
2 Press PROG.
3 Press R. TIME.
Tracks will be automatically programmed.
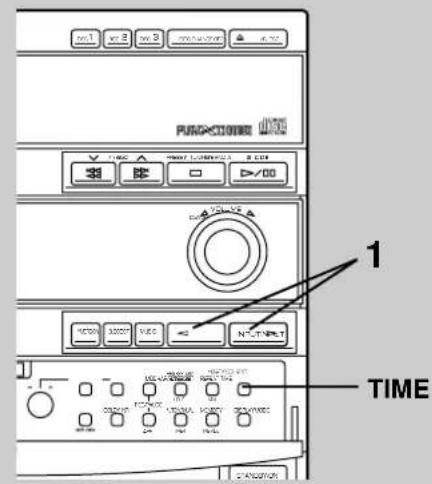
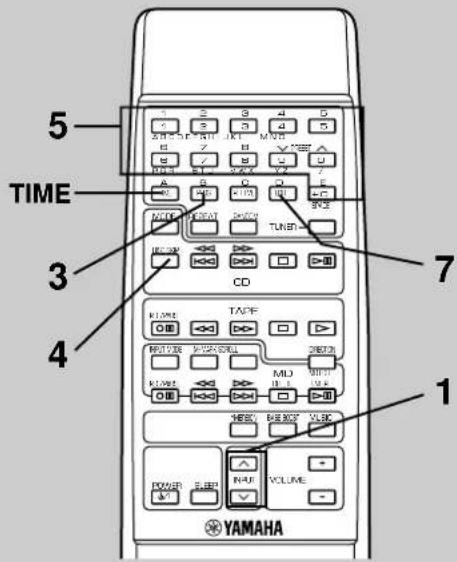
* You can check the programmed contents by pressing ▶▶▶ of the CD player.
4 Press EDIT. ("EDIT" (12) lights up on the display.) The recording starts.
Display information during programming
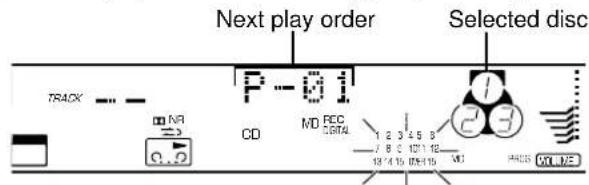

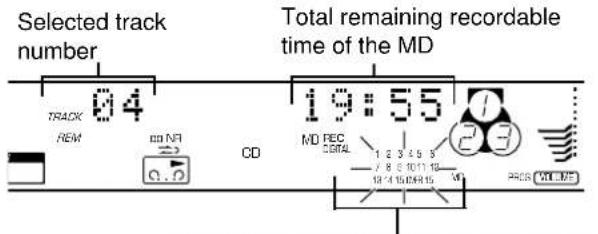
Programmed track numbers light up and only programmable track numbers among unprogrammed ones flash.
■ Manual EDIT recording
You can program tracks manually while watching the remaining time on the MD.
1 Press INPUT ▷ or ◀ once or more until "CD" (①, ⑤) appears on the display, and load a CD (or CDs) on the disc tray.
2 Follow steps 2–5 of "EDIT recording" on page 36.
3 Press PROG.
* "PROG" and "P-01" will light up on the display, and all track numbers on the selected CD will begin flashing.
4 If necessary, select the desired CD by pressing DISC SKIP.
5 Select the desired track number by pressing the numeric buttons.
6 Repeat steps 4 and 5 to program more tracks. You can select the same track again.
* Pressing TIME displays the total remaining time on the MD for about 1 second, and then it is replaced by the display of the next play order.
* If "TM OVER" appears on the display, the track number just selected cannot be programmed because there is not enough time remaining on the MD. However, at this time, if any other track number is flashing continuously on the display, you can program it instead of the unprogrammable one.
7 Press EDIT. ("EDIT" (12) lights up on the display.) The recording starts.
Notes on recording with the EDIT function
- To check, cancel or correct program data, refer to page 11.
- The maximum number of tracks that can be programmed is 20.
- The track number 16 or higher cannot be programmed by this function.
Editing and titling MD
Editing an MD
One of the main advantages of MD is its editing capabilities, you can remove the commercials from a radio broadcast, arrange songs into the order you want, remove songs, combine songs, even remove part of a song.
The MD recorder offers the following editing functions.
- Erase
Lets you erase a track, the entire disc, or part of a track.
You can also erase the title of a disc, or the titles of tracks on a disc.
- Move
Lets you move a track to a different track number.
- Combine
Lets you combine two adjacent tracks.
- Divide
Lets you split a single track into two different tracks.
- TOC Write
Lets you write TOC information to the disc so that changes are saved.
- FRA Check
Lets you recover disc space that may have been lost after repeated editing operations.
- Undo
Lets you undo the previous editing operation if you make a mistake.
Notes on editing
Before editing
Make sure that the MD is not protected against erasure. If the MD is protected, you cannot edit the MD. Slide the tab to close the slot on the side of the MD.
After editing
Use the TOC Write function, or press △ and pull the MD out in order to update the TOC information.
Note
After performing an editing operation, "TOC" (⑨) lights up on the display to show that the TOC information has not yet been written to the disc. Undo is possible only when "TOC" (⑨) is illuminated.
The illustrations below show the locations of buttons used for editing operations described on pages 39–41.
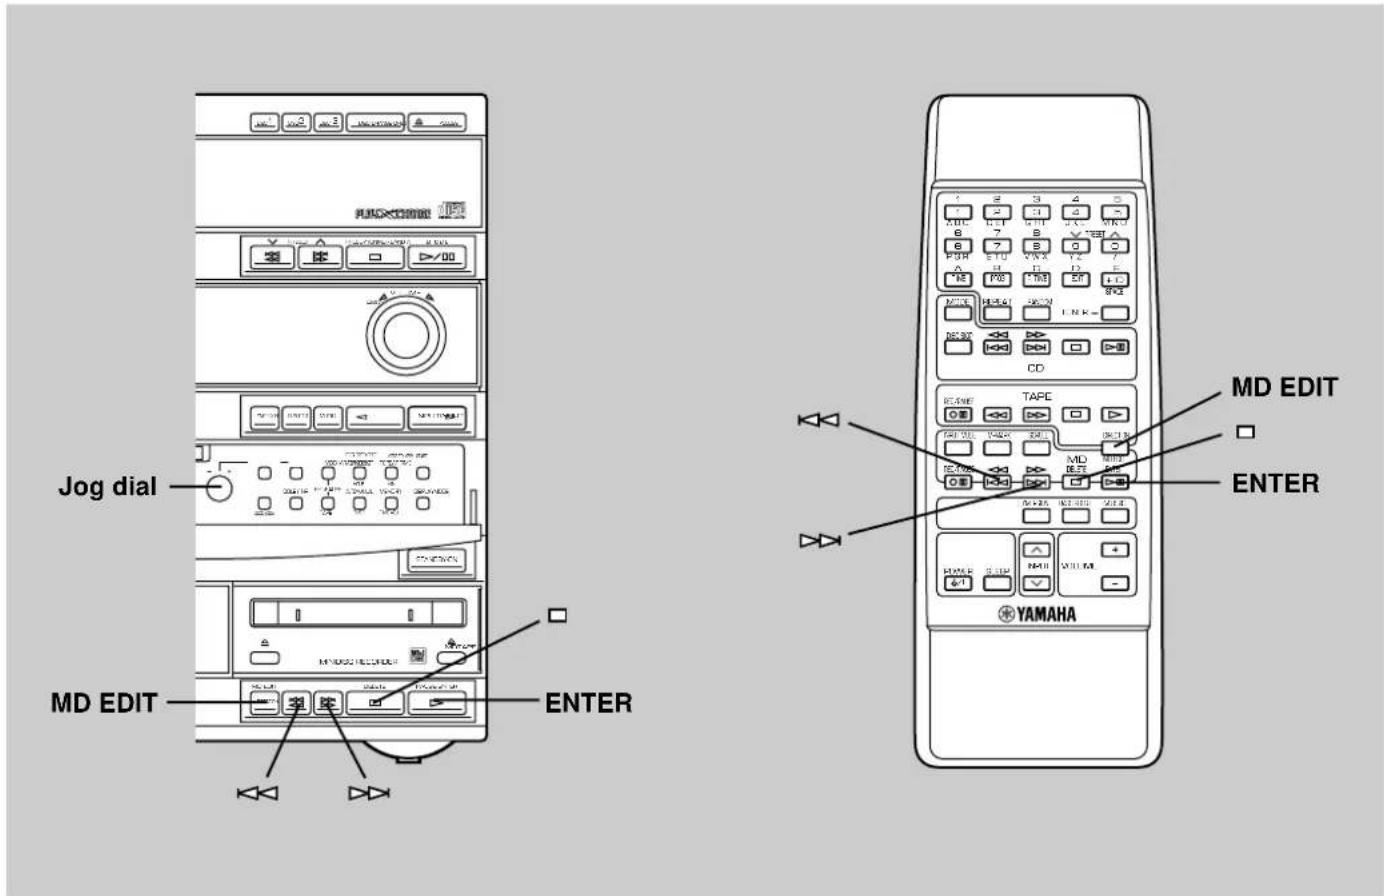
Erase
This function lets you erase the entire disc, a track or part of a track quickly and easily.
You can also erase the title of a disc, or the titles of tracks on a disc.
Please note that once erased, the data can be recovered by using the Undo function.
To clear out the MD
This operation lets you erase all audio and title (character) data to create a blank MD.
1 Press □ to stop the MD recorder.
2 Press MD EDIT repeatedly to display "Disc Erase?", then press ENTER.
* "DiscEraseOK?" appears on the display.
3 Press ENTER again.
* When all audio, name and title data has been erased, "Complete" appears momentarily.
To erase a single track
This operation lets you erase a single track including the corresponding title data. After you erase the track, the total number of tracks decreases by one and all tracks following the erased one are renumbered.
Example: Erasing track 3
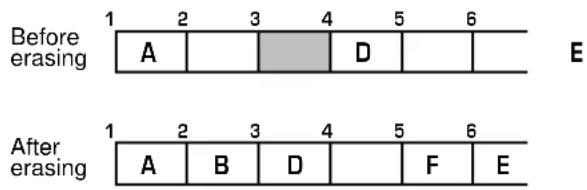
1 Turn the jog dial or press ◀◀/▶▶ to select the track you want to erase.
2 Press MD EDIT repeatedly to display “(track number) Erase ?”, then press ENTER.
* "EraseOK?" appears on the display.
3 Press ENTER again.
* The track is erased and “Complete” appears momentarily.
If you plan to erase two or more tracks
To avoid confusion, you should always erase from higher track numbers to lower track numbers. This prevents accidental renumbering of tracks you plan to erase.
To erase part of a track
1 Play the track containing the part you want to erase.
2 Press MD EDIT repeatedly to display "A-B Erase ?".
3 Press ENTER at the beginning of the part you want to erase (point A).
* Point A is registered and "Erase A-_ " appears on the display.
4 Press ENTER again at the end of the part you want to erase (point B).
* Point B is registered and "Check" appears. Then the part you specified plays repeatedly and "Erase A–B?" appears on the display.
To adjust point B
Turn the jog dial while the "B" of "Erase A–B?" is blinking. Point B can be adjusted up to 2 second in either direction.
5 Press ENTER again.
* The part is erased and "Complete" appears momentarily.
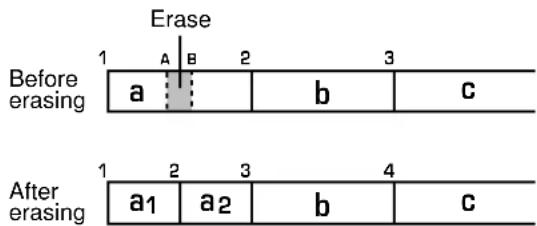
Notes B
C
- After this operation, a new track number is automatically assigned to the section starting after point B.
- Point B cannot be positioned before point A.
When you cannot edit because of the limitations of the MD system, "Can't Edit" appears on the display and the Erase function is canceled.
To erase the title of a disc
1 Press □o stop the MD recorder.
2 Press MD EDIT repeatedly to display "Title Erase?", then press ENTER.
* "Disc Title" and "Erase OK?" appear alternatively on the display.
3 Press ENTER again.
* The disc title is erased and “Complete” appears momentarily.
To erase the title of a track
1 Turn the jog dial or press to select the track whose title you want to erase.
2 Press MD EDIT repeatedly to display "Title Erase?", then press ENTER.
* "Track Titel" and "Erase OK?" appear alternatively on the display.
3 Press ENTER again.
* The track title is erased and "Complete" appears momentarily.
Notes
- When "Title Erase" is appearing on the display, either "DISC" or "TRACK" indicator (①) will be illuminated to show which title is ready to be erased, the disc title or track title.
- To avoid wrong erasing, it is recommended to confirm the title which you are planning to erase by pressing TIME repeatedly until the title appears on the display.
Move
This function lets you change the position of any track. When you move tracks, all the tracks are automatically renumbered.
Example: Moving track 2 to the track number 4
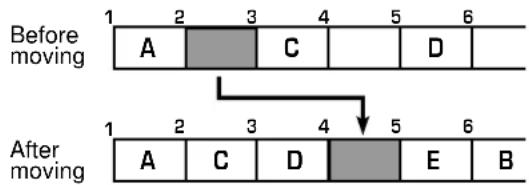
E
1 Turn the jog dial or press ↕ to select the track you want to move.
2 Press MD EDIT repeatedly to display “(track number) Move ?”, then press ENTER.
3 Turn the jog dial or press to select the track's destination (new track number).
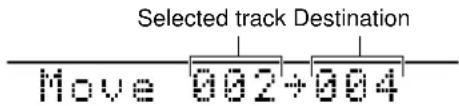
4 Press ENTER.
"Complete" appears momentarily on the display.
■ Combine
This function lets you combine two consecutive tracks into one. After you combine the tracks, the total number of tracks decreases by one and the tracks are automatically renumbered.
Example: Combining tracks 2 and 3
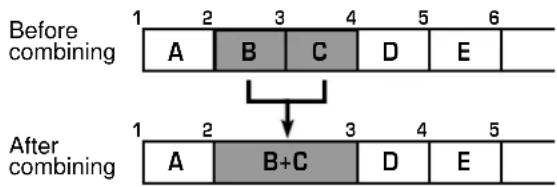
1 Press □ to stop the MD recorder.
2 Turn the jog dial or press ↕ to select the second track of the two you want to combine.
3 Press MD EDIT repeatedly to display “(track number) Combine?”, then press ENTER.
* "Check" appears momentarily, then the MD recorder plays the 4 seconds before and after the point where the tracks will be connected. "(track number) + (track number) OK?" appears on the display.
4 Press ENTER again.
* The tracks are combined and "Complete" appears momentarily.
* If the second track of the two combined had a track title, it is deleted.
Divide
This function lets you divide one track into two separate tracks by adding a new track number to a certain point in the track.
Example: Dividing track 3
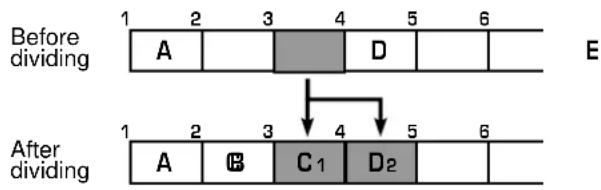
1 Play the track you want to divide.
2 Use ▶ to locate the point where you want to divide the track, then press ▶ (or on-the remote control) to pause at that position.
3 Press MD EDIT repeatedly to display "(track number) Divide?", then press ENTER.
* "Check" appears momentarily, then "Divide OK?" appears and the MD recorder starts repeating the point where the track will be divided.
4 If necessary, use the jog dial to adjust the position of the point where the track will be divided.
* The dividing position can be adjusted up to 2 second in either direction.
5 Press ENTER.
* The track is divided and "Complete" appears momentarily.
* If the divided track originally had a track title, the same title remains on both of the two divided.
■ To undo the editing
The Undo function lets you immediately return to the condition before an editing is made (note; you cannot undo the editing once you press any other button).
1 Press □ to stop the MD recorder.
2 Press MD EDIT repeatedly to display "Undo ^*1 ", then press ENTER.
* "Undo OK ?" appears on the display. To cancel undoing, press □.
3 Press ENTER again to undo.
^*1 : The name of editing you can undo is displayed here.
■ To cancel the editing
Press □
■ Disc Maintenance
The MD recorder features two disc maintenance functions which optimize performance of MDs. The TOC Write function allows you to write the result of editing to the TOC without having to eject the disc. The FRA Check function recovers recordable space on a disc that may have been lost because of repeated editing operations.
B C
TOC Write
When making a recording, the TOC (Table Of Contents) of the MD is written as soon as recording is finished. When making an editing or titling operation, however, the TOC isn't automatically written unless the disc is ejected. If the MD recorder is accidentally turned off before writing the result of editing to the TOC, it is possible that these changes will not be saved. By using this function, you can ensure that the result of your edition is saved on the disc.
1 Press □o stop the MD recorder.
2 Press MD EDIT repeatedly to display "TOC Write?", then press ENTER.
* "TOC WriteOK?" appears on the display.
3 Press ENTER.
* "TOC Writing" flashes on the display momentarily.
Notes
- You cannot undo the result of editing once it has been written to the TOC.
- The TOC Write function can only be selected when the TOC indicator is lit on the display.
FRA Check
When editing operations such as "Move" and "Divide" are performed, recordable space may be lost and "TOC Full" may appear on the display to indicate that no more recording can be performed. When this occurs, it may be possible to recover the FRA (Freely Recordable Area) on the disc that was lost by repeated editing operations so that more recording is possible.
1 Press □ to stop the MD recorder.
2 Press MD EDIT repeatedly to display "FRA Check?", then press ENTER.
* "FRA CheckOK?" appears on the display.
3 Press ENTER.
* "Complete" appears momentarily.
Editing and titling an MD
Titling an MD or track
This function lets you title recorded MDs and individual tracks. Titles may consist of capital and small letters, numbers, and symbols for a maximum of 250 characters for each title.
To title a disc
Make the following titling operation when the MD recorder is stopped.
To title a track
Make the following titling operation during play, pause or recording. The currently selected track or currently recorded track is titled.
If the MD recorder is stopped, use the jog dial or press
◀◀/▶to select the track you want to title.
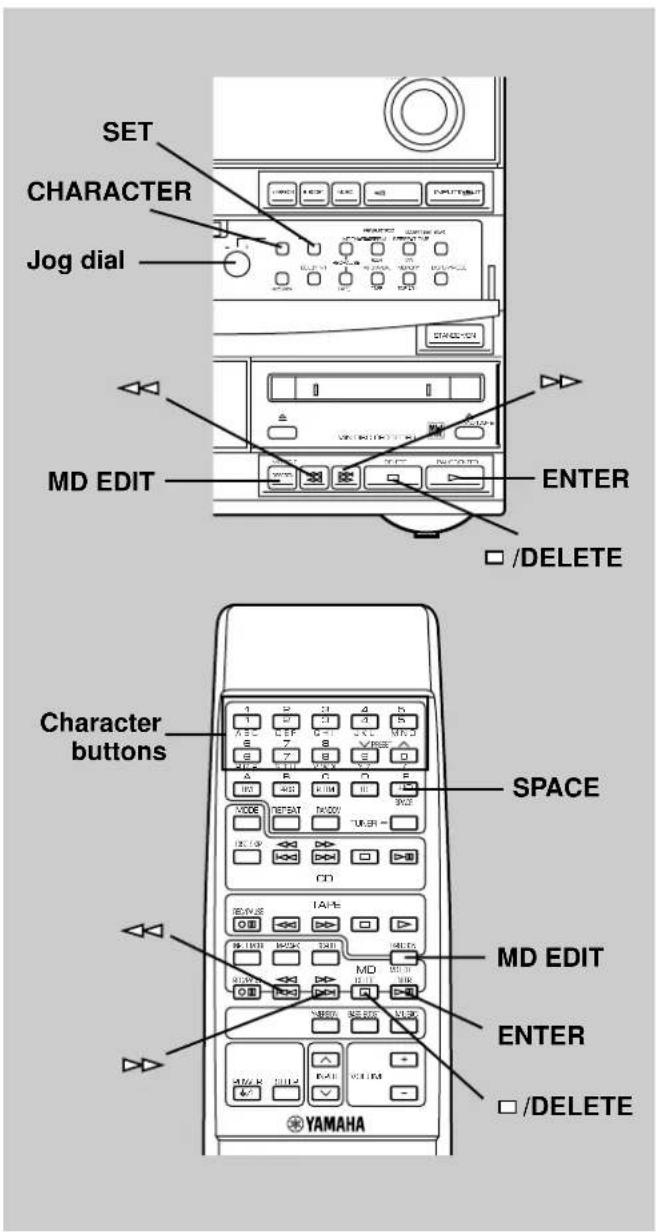
1 Press CHARACTER.
* The cursor appears on the display.
2 Press CHARACTER repeatedly to select the group of capital letters "ABC..", small letters "abc.." or numbers "012.".
* If you need the group of symbols, select "012..".
3 Turn the jog dial or press a character button (on the remote control) to select the desired character.
Examples of using the character buttons on the remote control
• To select "C"
After selecting "ABC.." in step 2, press ABC repeatedly until "C" appears on the display.
• To select "e"
After selecting "abc.." in step 2, press DEF repeatedly until "e" appears on the display.
• To select "7"
After selecting "012.." in step 2, press 7 (STU).
4 Press SET to store the selected character.
* The cursor moves to the next character position.
5 Repeat steps 2 to 4 to complete the titling.
To delete a character (ABCD → ABD)
①Use to move the cursor to the position of the character you want to delete.
②Press DELETE.
To insert a character (ABCD → ABTCD)
① Use to move the cursor to the position where you want to insert the character.
②Use CHACTER and the jog dial to select the new character.
③Press SET to set the character. The character previously in that position automatically moves to the right.
To insert a space (ABCD → AB\_CD)
① Use to move the cursor to the position where you want to insert the space.
②Press SPACE on the remote control.
6 Press ENTER to exit the titling mode.
* If a title consists of more than 12 characters, it will scroll across the display once, and then be displayed in abbreviated form (first 12 characters only).
To undo titling
1 Press to display the total tracks and total playing time on the disc.
2 Press MD EDIT repeatedly to display "Undo Title", then press ENTER.
* "Undo OK ?" appears on the display.
3 Press ENTER again to undo.
7 Store the title(s) you made on the MD by following the procedure of the TOC Write function on page 41 or by ejecting the MD.
Note
When titling a track during play, the current track is repeatedly played while entering the title.
Operating an external unit connected with this system
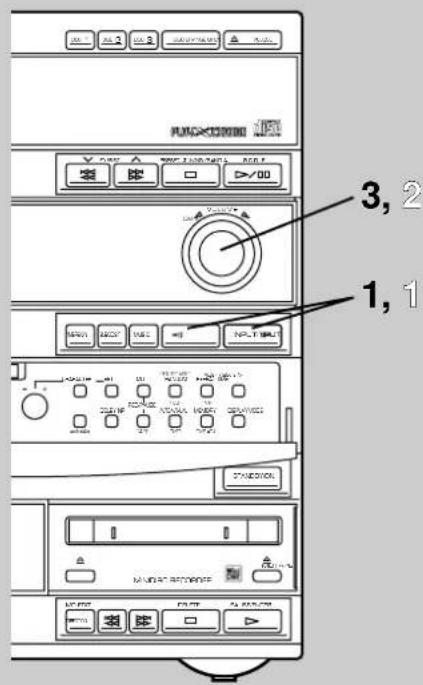
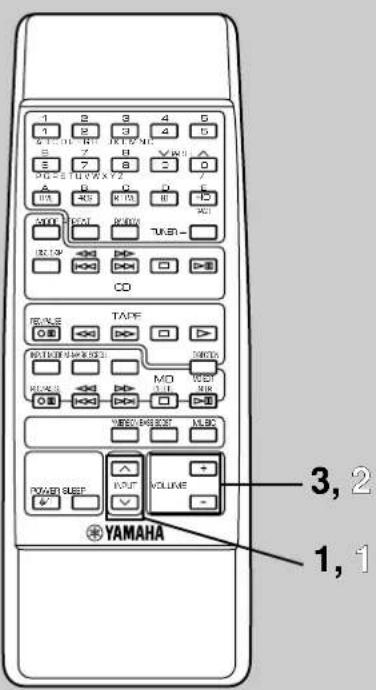
Use the external unit connected to the DIGITAL IN (OPTICAL) or AUX IN terminals on the rear of the main unit.
■ To listen to a source played on the external unit connected with this system
1 Press INPUT ▷ or ◀ until "AUX Digital" or "AUX Analog" appears on the display.
Select "AUX Digital" to use the unit connected to the DIGITAL IN (OPTICAL) terminal, or select "AUX Analog" to use the unit connected to the AUX IN terminals.
2 Play the source.
3 Adjust the volume to the desired level by using VOLUME.
* If you prefer, you can control the sound quality by using the built-in graphic equalizer (MUSIC), BASS, TREBLE, B. BOOST and/or YMERSION. (Refer to pages 44–45 for details.)
■ To record a source played on this system by using the tape deck, etc. connected to this system
If an external tape deck, etc. is connected to the AUX OUT terminals on the rear of the main unit, you can record a source played on the built-in CD player, MD recorder, tape deck or a radio program by the tape deck, etc.
Note
Recording level cannot be adjusted with this unit.
Select the source (CD, MD, TAPE or TUNER) you want to record by using INPUT ▷ or ◀.
② Play the source and then turn VOLUME up to confirm the input source.
③ Begin recording on the tape deck, etc.
Note
A digital-to-digital recording is possible from an LD (DVD) player, satellite tuner, DAT, etc. connected to the DIGITAL IN (OPTICAL) terminal on the rear of the main unit to the built-in MD recorder. Refer to page 34 for details.
Various sound control
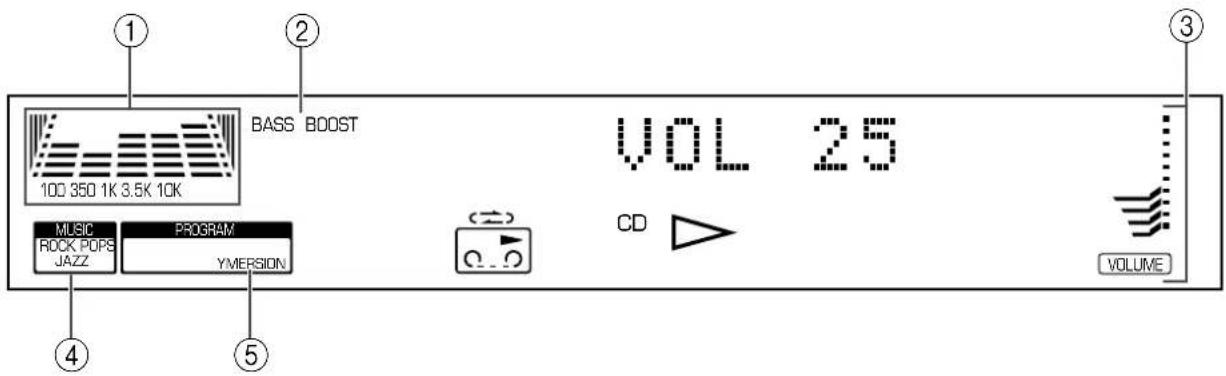
① Spectrum analyzer
The spectrum of the input source which is divided in five bands will be indicated in real time.
② BASS BOOST
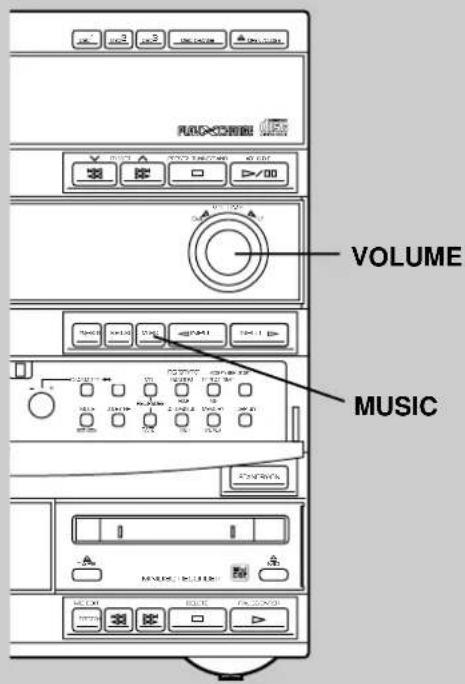
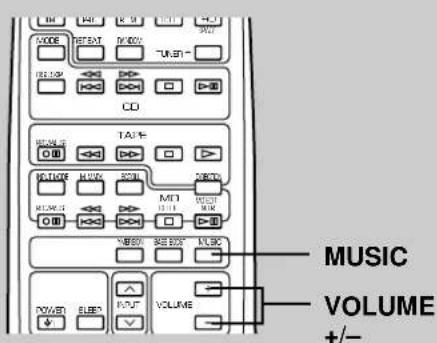
③ VOLUME (volume level meter)
④ MUSIC (preset equalizer mode indicator)
⑤ YMERSION
VOLUME control
Front panel operation
Rotate VOLUME in the "UP" direction to increase the volume, and the "DOWN" direction to decrease the volume.
Remote control operation
Press VOLUME + to increase the volume and VOLUME - to decrease the volume.
* Adjusted volume level is shown by the volume level meter (③) and in figures on the display.
■ Graphic equalizer
The built-in graphic equalizer provides 3 preset equalizer modes as listed below.
Preset graphic equalizer modes
| Mode | Feature |
| ROCK | High and low frequencies are emphasized. This mode is suitable for reproducing dynamic and powerful sounds of rock music, etc. |
| POPS | Vocals are emphasized and whole sound is clear. This mode is suitable for pops. |
| JAZZ | High frequencies for piano, sax, etc. are emphasized. Medium frequencies for vocals are also emphasized moderately. |
Listening to the music with a preset equalizer effect
1 Play back a source.
2 Press MUSIC once or more so that the name of the desired mode appears on the preset equalizer mode indicator (MUSIC) (④).

flowchart
graph LR
    A["ROCK"] --> B["POPS"]
    B --> C["JAZZ"]
    C --> D["OFF"]
    D --> A
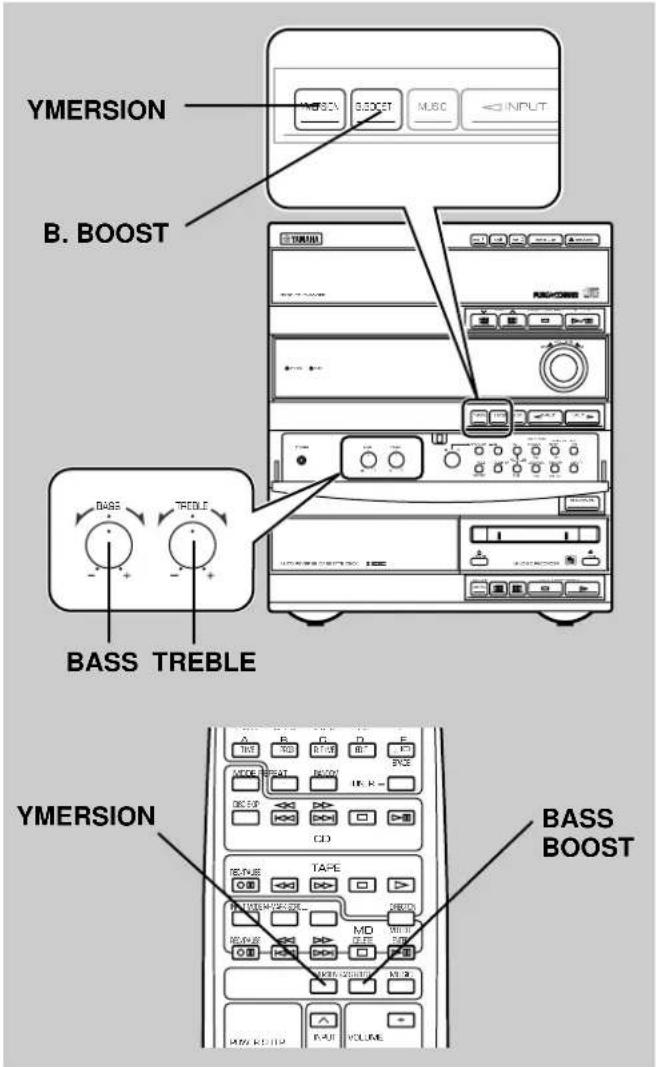
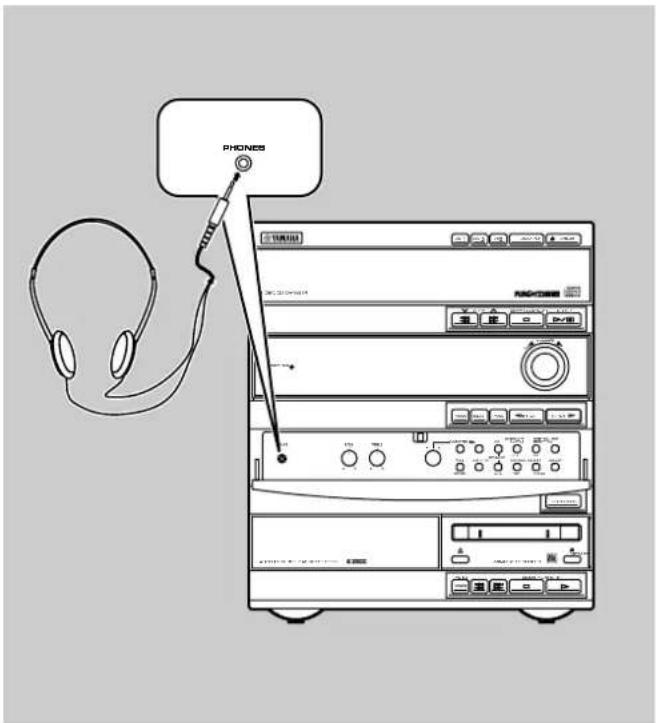
B. (BASS) BOOST button
Press this button so that "BASS BOOST" (②) is illuminated on the display to boost the bass frequency response at the left and right channels while maintaining overall tonal balance. This function is effective for reinforcing the bass frequencies when a subwoofer is not used.
■ BASS and TREBLE controls
BASS : Turn this knob clockwise to increase (or counterclockwise to decrease) the low frequency response.
TREBLE : Turn this knob clockwise to increase (or counterclockwise to decrease) the high frequency response.
■ YMERSION button
Press this button so that "YMERSION" (⑤) is illuminated on the display. YMERSION is Yamaha's proprietary technology that enhances the spread of a normal stereo source play sound, creating three-dimensional acoustics using only two speakers. Press this button again so that "YMERSION" (⑤) goes out from the display to cancel this sound effect.
■ Listening with headphones
- Be sure that your headphones have a 3.5 mm (1/8") diameter plug and between 16 ohms and 50 ohms impedance. Recommended impedance is 32 ohms.
- When you listen with headphones, connect the headphones to the PHONES jack. You can listen to the sound that is normally output from the speakers through headphones. Adjust VOLUME to a comfortable listening level.
Using the built-in timer
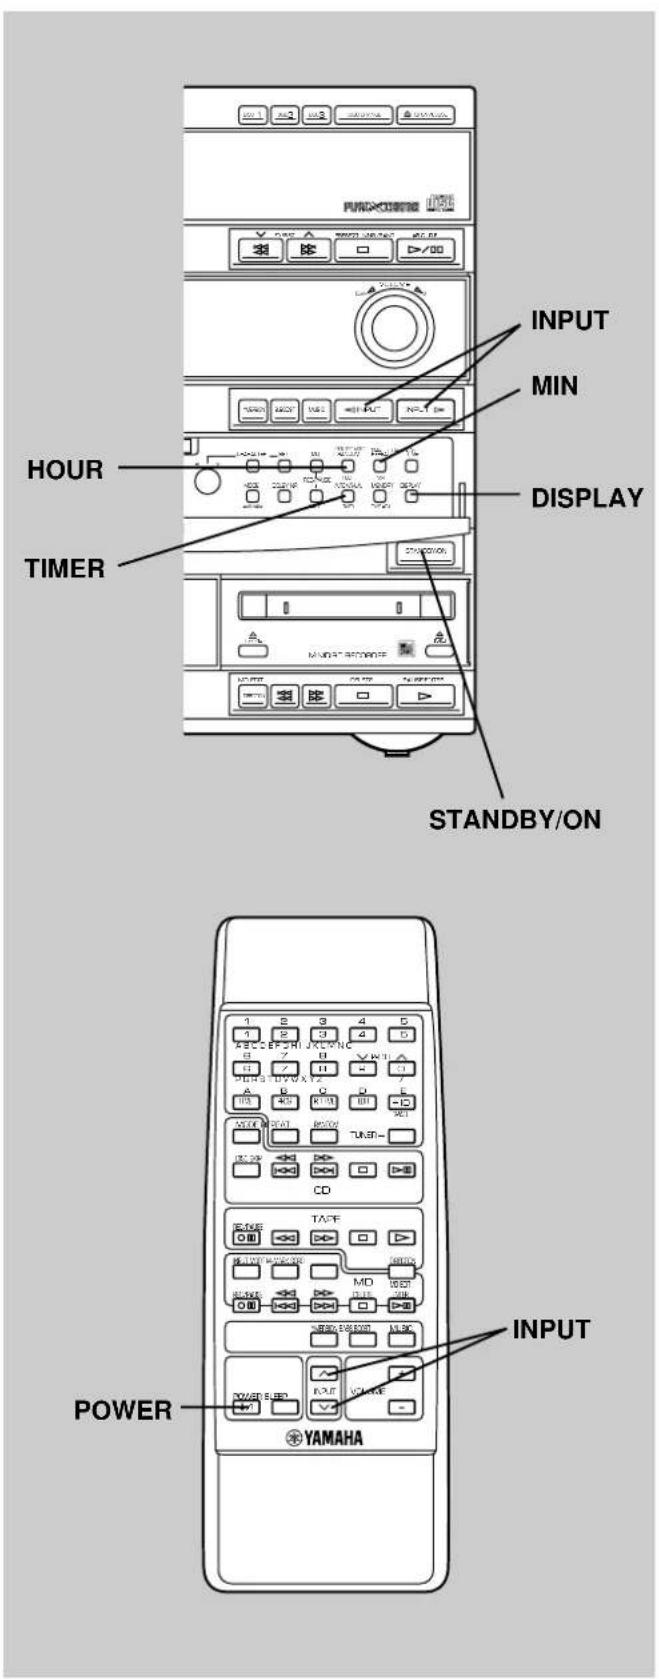
Timer play
By using the built-in timer, you can set the time when this system turns on and a source play begins, and the time when this system will be set to the standby mode automatically.
1 Press DISPLAY.
Whenever DISPLAY is pressed, the display mode changes as follows.
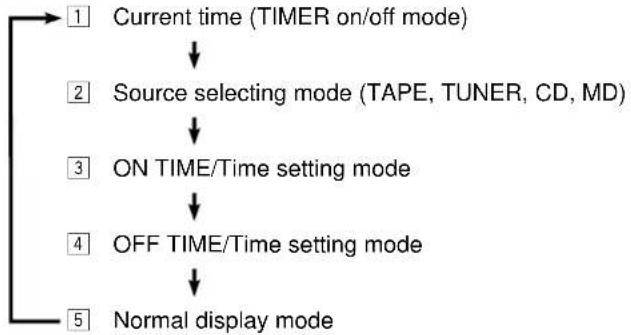
flowchart
graph TD
    A["1 Current time (TIMER on/off mode)"] --> B["2 Source selecting mode (TAPE, TUNER, CD, MD)"]
    B --> C["3 ON TIME/Time setting mode"]
    C --> D["4 OFF TIME/Time setting mode"]
    D --> E["5 Normal display mode"]
Note
The display mode will change in after about 8 seconds. If the mode is changed before the setting is completed, call the mode again by pressing DISPLAY once or more.
1 Current time
Make sure that the current time is correct, and press TIMER so that "TIMER" lights up on the display.
2 Source selecting mode
Select the source to be played with INPUT ▷ or ◀
3 ON TIME/time setting mode
["ON TIME" appears on the display, and soon it is changed to a time setting mode.]
Set the time when you want to begin the timer play.
- Press HOUR and set the hour.
- Press MIN and set the minute.
4 OFF TIME/time setting mode
If necessary, set the time when you want to finish the timer play in the same way as you did in step 3. If you do not set the time, it will be automatically set so that the timer play finishes after 1 hour.
2 Press TIMER to complete the timer play setting.
This system turns into the standby mode.
* The STANDBY and TIMER indicators light up.
If you will continue using this system, press STANDBY/ON to turn on this system.
To cancel the timer play setting
Press DISPLAY, and then press TIMER so that "TIMER" goes out from the display.
* When this system is in the standby mode, press TIMER so that the TIMER indicator goes out.
Note
Unless there is a power failure for more than 5 minutes, the set time will be retained until it is reset.
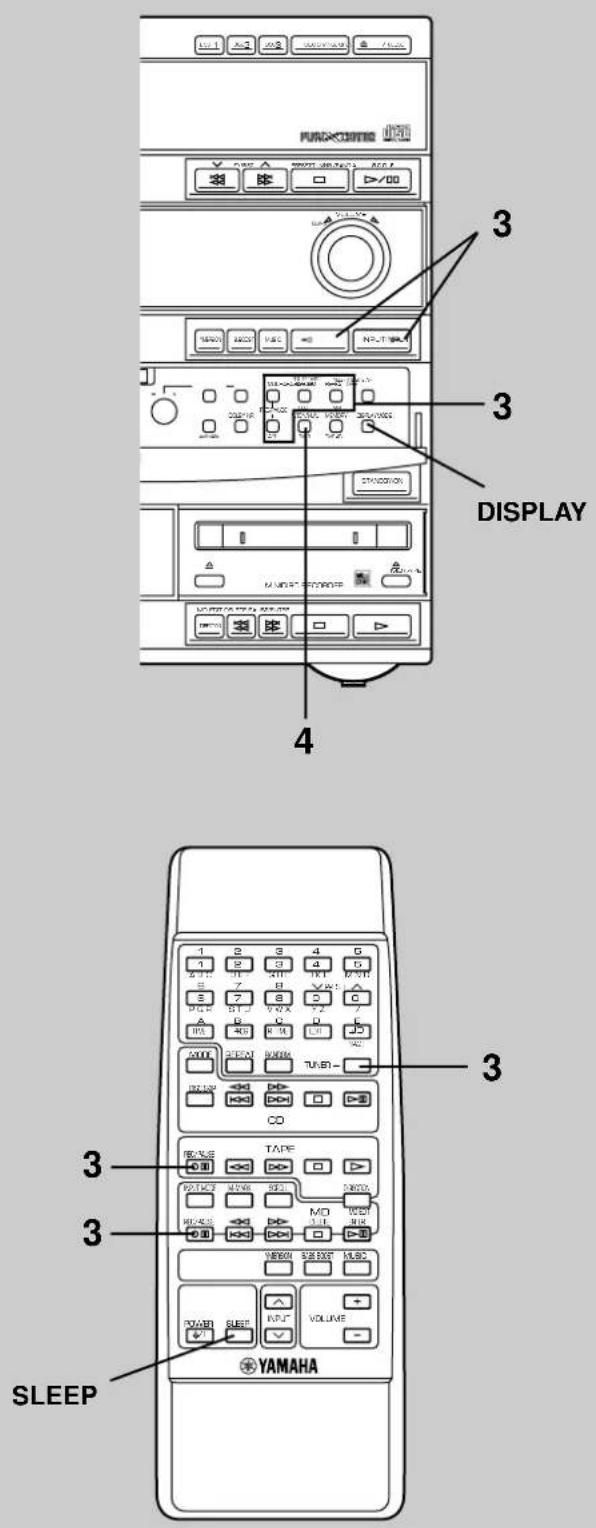
Timer recording
1 To make recording onto a tape, follow steps 3–4 of "Basic recording" on page 25.
To make recording onto an MD, follow steps 2, 3 and 5 of "Basic recording" on page 34.
2 Tune in to the station you want to record.
3 Follow step 1 of "Timer play" on page 46.
- In step 2, select "TUNER", and then press REC/PAUSE.
* Press TAPE REC/PAUSE for making recording onto a tape, or press MD REC/PAUSE for making recording onto an MD. ("REC >TAPE (or MD)" and the frequency will flash alternately on the display.)
* Press both TAPE and MD REC/PAUSE for making recording onto a tape and MD at the same time. ("REC >Dual" and the frequency will flash alternately on the display.)
- In step 3, set the time when you want to begin recording.
- In step 4, set the time when you want to finish recording.
4 Press TIMER.
This system will be set to the standby mode.
* The STANDBY and TIMER indicators light up.
To cancel the setting of timer recording
Press DISPLAY once or more so that "REC >TAPE (or MD)" flashes on the display. While "REC>TAPE (or MD)" is flashing, press TAPE (or MD) REC/PAUSE.
Note
When the timer recording is finished, the timer setting is automatically canceled.
Sleep timer operation
This system will be set to the standby mode automatically when the selected sleep time passes.
1 Play the desired sound source.
2 Press SLEEP repeatedly until the desired sleep time appears on the display. The display will change as described below.
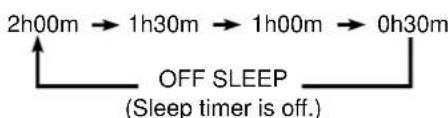
flowchart
graph LR
    A["2h00m"] --> B["1h30m"]
    B --> C["1h00m"]
    C --> D["0h30m"]
    D --> E["OFF SLEEP\n(Sleep timer is off.)"]
* The normal display mode will resume about 4 seconds after the selection is made.
* "SLEEP" will light up on the display.
Appendix
Troubleshooting
Refer to the chart below when this system does not function properly. If the problem you are experiencing is not listed below or if the instruction below does not help, disconnect the power cord and contact your authorized YAMAHA dealer or service center.
| Problem | Cause | What to Do | |
| General | This system does not work normally. | There is an influence of strong external noise (lightning, excessive static electricity, etc.) or the system was operated incorrectly. | Set this system to the standby mode and disconnect the AC power cord from the AC outlet. After about 30 seconds pass, connect the power and operate this system again. |
| The sound suddenly goes off. | The protection circuit was activated because of a short circuit, etc. | Set this system to the standby mode, then turn on to reset the protection circuit. | |
| The SLEEP timer was activated. | Cancel the SLEEP timer function. | ||
| No sound from speakers. | Speaker connections are not secure. | Secure the connections. | |
| No sound from the external unit connected with this system. | Incorrect cord connections. | Connect the cords properly. If the problem persists, the cords may be defective. | |
| Input source selection is not correct. | Make a correct input source selection. | ||
| Timer cannot be set. | Current time is not set. | Set current time. | |
| This system will not operate properly. | The internal microcomputer has been frozen by an external electric shock (lightning, excessive static electricity, etc.) or power supply with low voltage. | Unplug the AC supply lead from the wall AC outlet, then plug in again after about one minute. | |
| The volume level cannot be increased, or sound is distorted. | The component connected to the AUX/MD terminals on the rear of the main unit is turned off. | Turn on the power to the component. | |
| Tuner | Excessive static in FM broadcasts. | Interference from starting motor of nearby car. | Position the FM antenna as high and as far away from nearby roads as possible. Use coaxial cable. |
| Interference from thermostat of nearby electrical appliance. | |||
| Noise increases during stereo broadcasts. | Antenna input is too weak due to obstructions or excessive distance from broadcasting station. | Check antenna connections. | |
| Install a multi-element type FM antenna if possible. | |||
| Stereo broadcasts are noisy and STEREO indicator blinks on and off. | Insufficient antenna input. | Install an antenna appropriate for the electric field strength of your area. | |
| Preset stations cannot be selected. | Preset memory has been erased. | Reprogram memory presettings. | |
| Buzzing or static during AM broadcasts. | Interference from source such as lightning, fluorescent lights, electric motors or thermostat of nearby electrical appliance. | Problem is difficult to eliminate but can be lessened by grounding AM loop antenna. | |
| TV or microprocessor is being used nearby. | Move away from TV or microprocessor. | ||
| AM broadcast sensitivity is poor. | Radio signal is weak or antenna is not properly connected. | Properly connect AM loop antenna. | |
| Change orientation of AM loop antenna. | |||
| Install an external AM antenna. | |||
| CD player | A disc cannot be played back normally, or there is a noise during play. | The disc is not a standard type. | Play another disc. |
| Play will not begin even if disc is loaded. | Disc is upside down. | Load disc label side facing up. | |
| Disc is dirty. | Clean disc. | ||
| No sound. | The input source selection is incorrect. | Select the CD player by pressing INPUT < or button until “CD” is illuminated on the display. | |
| Sound stops suddenly (always at the same spot). | Disc is dirty. | Clean disc. | |
| Volume is set too high. | Lower volume. | ||
| Tape deck | Tape will not move during playback or recording. | Slack tape wrapped around pinch roller. | Take up slack with a pencil before using. |
| Recording is not possible. | Erasure prevention tab is broken off. | Replace tape or cover erasure prevention hole with cellophane tape. | |
| Head is dirty. | Clean heads. | ||
| Sound is distorted or fades out, or stereo balance is poor. | Head is dirty. | Clean heads. | |
| Tape is worn. | Replace tape. | ||
| Poor sound quality. | Tape encoded with Dolby NR is played back with this system's Dolby NR off, and vice versa. | Press the DOLBY NR button to select the appropriate mode. | |
| Head is dirty. | Clean heads. | ||
| Excessive noise. | Head has become magnetized. | Demagnetize heads with head eraser. | |
| Tape travel stops in middle of playback or recording. | Slack tape coming out of cassette shell. | Take up slack by turning reels with a pencil. | |
| Tape is creased or torn. | Replace with new tape. | ||
| Endless tape is being used. | Do not use endless tapes. | ||
| The beginning of desired selections on tape cannot be found. | Silent gaps between selections are too short. | The function of searching for the beginning of desired selections will not operate unless the silent gaps between selections are at least four seconds long. | |
| Excessively soft passages in middle of selections. | |||
| Conversation, etc. is recorded. | |||
| MD recorder | The MD recorder does not respond to operations. | Disc is dirty or damaged. | Replace the current disc with a new one. |
| Disc is damaged ("UTOC ERR appears on the display). | |||
| Play is not possible. | Disc has been loaded incorrectly. | Reload the disc with the label side facing up, and the arrow pointing toward the disc insertion slot. | |
| An unrecorded (blank) disc was loaded ("Blank Disc" appears on the display). | Insert a recorded disc. | ||
| Recording is not possible. | Disc is protected against recording. ("Protected" appears on the display). | Slide the protection tab to the closed position. | |
| A pre-mastered MD is loaded ("PlaybackMD" appears on the display). | Load a recordable disc. | ||
| The input source selection is incorrect. | Press INPUT or repeatedly to select the correct input source. | ||
| There is not enough blank space left on the disc. | Load a recordable disc with fewer recorded tracks, or erase unnecessary tracks from the current disc. | ||
| The MD cannot be removed when partially inserted. | The carriage lock function has worked. | Insert the disc completely, then press do eject it. | |
| Remote control | Remote control does not work. | Batteries are dead. | Replace batteries. |
| Remote control is too far away or tilted too much. | Use within 6 m and 60° radius. | ||
| Direct sunlight or lighting (of an inverter type of fluorescent lamp, etc.) is striking the remote control sensor of the main unit. | Change position of the main unit. | ||
| TV functions strangely when the remote control is used. | Remote control is being used near TV set with a remote control sensor. | Relocate the main unit away from the TV or cover TV's remote control sensor. |
Appendix
MD system limitations
The recording system in your MD recorder is radically different from those used in tape and DAT decks and is characterized by the limitations described below. Note, however, that these limitations are inherent to the MD recording system and are not a result of mechanical trouble.
"Can't REC" is displayed before the maximum recording time (60 or 74 minutes) has been reached
Once 255 tracks have been recorded on one MD, "Can't REC" is displayed regardless of the total recorded time.
"Disc Full" is displayed before the maximum number of tracks (255) have been recorded
During Automatic track-marking, fluctuations in emphasis within songs may be interpreted as song intervals, increasing the total number of tracks and causing "Disc Full" to be displayed.
The remaining recording time does not increase even after erasing numerous short tracks
Tracks under 12 seconds in length are not counted and so erasing them may not lead to an increase in the recording time.
"TOC Reading" is displayed continuously
The "TOC Reading" display lasts longer than normal when a brand new (blank) disc is inserted.
The total recorded time and the remaining time on the MD do not total to the maximum recording time
- Recording is done in minimum units of 2 seconds each, no matter how short the material.
- The MD recorder displays the length of the largest continuous blank area as the remaining time. Therefore, if there are several separate blank spaces, the remaining time will only display a time equivalent to the largest continuous blank space.
Tracks created through editing may exhibit sound dropout during search operations.
Track numbers are not recorded correctly
Incorrect assignment or recording of track numbers may result when CD tracks are divided into several smaller tracks during digital recording.
It is not possible to erase part of a track using the A-B Erase function
The MD recorder organizes the audio data in sound groups and clusters. The minimum size of these units may not consist of less than 10 seconds of stereo sound.
The correct recorded/playing time may not be displayed during playback of MDs recorded in monaural.
Copy protection (SCMS)
As a digital audio component, this MD recorder conforms with the Serial Copy Management System (SCMS) standards. The Serial Copy Management System restricts copies made by recording digital signals to the first-generation copies only. Therefore, an MD recorded from a digital input source cannot be used as a source for making another digital recording.
US and foreign patents licensed from Dolby Laboratories Licensing Corporation.
Display messages for MD recorder
Can't Copy
Digital recording cannot be performed. (See "Copy protection (SCMS)" on page 50.)
Can't Edit
Edit operations are not possible.
Can't Play!
Timer playback is not possible. The loaded disc may be blank, damaged, or an incompatible format.
Can't REC!
Timer recording is not possible. The loaded disc may be protected or there may not be enough blank space remaining on the disc.
Can't REC
Recording is not possible because there is not enough blank space remaining on the disc.
DIGin Unlock
No digital signal is being input to the DIGITAL IN (OPTICAL) terminal.
Disc Full
Recording is not possible because there is no blank space remaining on the disc.
Title Full
Additional characters cannot be input for the current title because the maximum number of characters for a single title (250) have already been input.
UTOC WError
Error occurred when writing to the TOC.
Not Audio
The inserted disc is not an audio MD.
Tr Protected
The selected track cannot be edited because it is protected.
TOC Full
The disc area allotted for TOC data has become full and further editing is not possible.
UTOC ERR L...
Problem involving user's TOC data.
TMP Over!!
The temperature of this system has exceeded the normal operating temperature.
TOC Writing
The TOC data is being written to the disc. Do not move this system or pull out the mains lead.
TOC Reading
The MD recorder is reading the TOC data.
Protected
The record protection on the inserted MD is set to "protect".
Playback MD
The inserted MD is designed for playback only (you cannot record on this disc).
Appendix
Specifications
■ Amplifier section
Minimum RMS Output Power per Channel 6 ohm, 1 kHz, 0.9% THD....80W+80W
Input Sensitivity/Impedance AUX 200 mV/47 k-ohm
Spectrum Analyzer Band.... 5 band (100 Hz, 350 Hz, 1 kHz, 3.5 kHz, 10 kHz)
Tuner section
Tuning Range FM 87.50 to 108.00 MHz AM 531 to 1,611 kHz
Usable Sensitivity (FM) S/N 30 dB, 1 kHz, 100% Mod. 1.8 μV
■ CD player section
Type ....3 disc carousel auto-changer
D/A Converter 1-bit DAC
Filter 8-time oversampling digital filter
Laser Diode Properties
Material: GaAlAs Wavelength: 780 nm Emission Duration: continuous Laser Output: max. 44.6 μW*
* This output is the value measured at a distance of about 200 mm from the objective lens surface on the Optical Pick-up Block.
■ Tape deck section
Type ...... Auto reverse stereo cassette deck
Frequency Response (-20 dB) Type 1 (Normal)....50 to 15,000 Hz Type 2 (High)....50 to 16,000 Hz
Wow and Flutter 0.09%, W.RMS
Signal-to-Noise Ratio....58 dB (Dolby NR OFF) 66 dB (Dolby B NR ON)
Harmonic Distortion 0.8%
MD section
System ...... Minidisc digital audio system
Recording Method...... Magnetic field modulation overwrite
Reading Method ...... Non-contact optical pick up
Coding..... ATRAC (Adaptive TRansform Acoustic Coding)
Laser Diode Properties
Material: GaAlAs Wavelength: 780 nm
Pulse time: Read mode ..... 0.8 mW continuous Write mode..... max. 10 mW 0.5S min. cycle 1.5S Repetition
■ Speaker section
Type .... 3-way bass reflex: 13 cm (5") woofer 5 cm (2") tweeter 2 cm (3/4") super tweeter Magnetic shielding type
Maximum Input.... 240W
Impedance 6 ohm
General
Power Supply.....AC 230V, 50 Hz
Power Consumption 150W (In the standby mode: 2W)
Dimensions (W x H x D) Main unit.... 280 x 320 x 364 mm Speaker.... 200 x 320 x 218 mm
Weight Main unit 11.2 kg Speaker 3.8 kg x 2
Accessories ...... Remote control Batteries Speaker cords AM loop antenna Indoor FM antenna
Specifications are subject to change without notice.
- CAUTION
Use the minidisc recorder only in accordance with the instructions given in this manual and do not attempt to interfere with the interlock switch or make any other adjustments as this may result in exposure to hazardous radiation.
- ATTENTION


- - Setting this system
- Français
- Front panel Frampanelen Voorpaneel
- CD player Lecteur de disque compact CD-Spieler CD-spelare Lettore CD Compact disc speler
- Tape deck Platine cassette Kassettendeck Kassettdäck Registratore Platina Tapedeck
- MD recorder Enregistreur de minidisc MD-Recorder MD-spelare Registratore MD MD recorder
- Remote control Fjärrkontrollen Afstandbediening
- Telecommande Telecomando
- Fernbedienung Control remote
- English
- Contents
- Page
- Precautions.... 1
- Features 3
- Preparations and connections...... 4
- Compact disc player operation...... 8
- Tuning operation 14
- Playing back a tape 22
- Recording to tape.... 25
- Playing an MD.... 30
- Recording to MD 34
- Editing and titling MD 38
- Operating an external unit connected with this system 43
- Various sound control 44
- Using the built-in timer 46
- Appendix.... 48
- Precautions: Read this before operating your system
- Note
- CAUTION FOR CARRYING THE MAIN UNIT
- CAUTION FOR MOVING THE MAIN UNIT
- For U.K. customers
- SPECIAL INSTRUCTIONS FOR U.K. MODEL
- IMPORTANT:
- IMPORTANT
- WARNING
- CAUTION
- Features
- General
- Compact Disc Player
- Tuner
- Tape Deck
- Minidisc Recorder
- Preparations and connections
- Installing batteries in the remote control
- Notes
- Remote control operation range
- Battery replacement
- Connections
- ■ Connecting speakers
- On the speakers
- On the main unit
- When connecting a subwoofer (separate purchase)
- ■ Antenna connection
- Supplied FM antenna
- Supplied AM loop antenna
- Using an external antenna
- ■ Connecting external components
- Setting the clock
- Adjusting brightness of the display
- Compact disc player operation
- Display information
- Basic play
- To pause
- To stop play
- To change the disc play mode
- To select another disc
- To select the desired track directly
- To play the desired track (Skip)
- To advance or reverse play rapidly (Search)
- To exchange a disc (or discs) while playing (PLAYXCHANGE)
- Program play
- To cancel a programmed sequence
- To check (and correct) program data
- Random play
- To cancel the random play
- Repeat play
- SINGLE REPEAT (S REP)
- FULL REPEAT (F REP)
- When the CD player is in the single disc play mode:
- When the CD player is in the all disc play mode:
- To cancel the repeat play
- Switching the time display
- [Example]
- Tuning operation
- Automatic tuning
- Direct operation
- Manual tuning
- Manual preset tuning
- ■ To store stations
- ■ To recall a preset station
- Memory back-up
- Automatic preset tuning
- When the automatic preset tuning is completed;
- To recall a preset station
- Receiving RDS stations
- ■ RDS modes
- PS (Program Service name) mode
- PTY (Program Type) mode
- RT (Radio Text) mode
- CT (Clock Time) mode
- ■ Changing the RDS modes
- ■ Calling a program of your desired program type from among preset RDS stations (PTY SEEK)
- Turn the tuner into the PTY SEEK mode by pressing PTY SEEK MODE.
- Select the desired program type by using PTY SELECT √ or ↗
- Press PTY SEEK START.
- To cancel the PTY SEEK mode
- ■ Other functions which make use of RDS data service
- ON (OFF) CT > CLOCK
- ON (OFF) A. M. - RDS (AUTO MEMORY > RDS)
- To switch these functions on and off
- Playing back a tape
- General information
- Dolby B Type Noise Reduction
- About the tape counter
- Basic operation
- To stop playback
- To remove the tape
- Winding the tape
- Searching for the beginning of the desired selection
- To listen to the same selection
- To listen to the next selection
- Recording to tape
- Basic recording
- Press TAPE REC/PAUSE.
- Begin playing the source to be recorded.
- Press ▷ of the tape deck.
- Displaying the tape counter
- Recording to both tape and MD
- To stop recording temporarily
- To change the disc and track when recording from a CD
- To change the disc and track during recording from an MD
- Recording from CDs utilizing the EDIT function
- EDIT recording
- ■ Auto-EDIT recording
- To cancel the EDIT function
- To stop recording
- ■ Manual EDIT recording
- Notes on recording with the EDIT function
- Playing an MD
- Protecting a recorded MD
- Care of MDs
- To eject the MD
- For example, to choose track 23
- Switching the display
- During play
- When stopped
- To view the entire disc (track) title
- Repeat play modes
- Recording to MD
- To suspend recording
- Monaural recording
- Select the proper input mode by pressing INPUT MODE.
- When recording other sources
- Follow the procedure of "Basic recording" on page 34.
- Track-marking
- • Automatic (default setting)
- • Manual
- When recording analog signals (from tapes, radio programs, etc.)
- Automatic:
- Manual:
- When recording digital signals (from CDs, etc.)
- Notes about TOC
- ■ EDIT recording
- Editing and titling MD
- Editing an MD
- - Erase
- - Move
- - Combine
- - Divide
- - TOC Write
- - FRA Check
- - Undo
- Notes on editing
- Before editing
- After editing
- Erase
- To clear out the MD
- To erase a single track
- If you plan to erase two or more tracks
- To erase part of a track
- To adjust point B
- Notes B
- C
- To erase the title of a disc
- To erase the title of a track
- Move
- ■ Combine
- Divide
- ■ To undo the editing
- ■ To cancel the editing
- ■ Disc Maintenance
- TOC Write
- FRA Check
- Editing and titling an MD
- Titling an MD or track
- To title a disc
- To title a track
- Examples of using the character buttons on the remote control
- To delete a character (ABCD → ABD)
- To insert a character (ABCD → ABTCD)
- To insert a space (ABCD → AB\_CD)
- To undo titling
- Operating an external unit connected with this system
- ■ To listen to a source played on the external unit connected with this system
- ■ To record a source played on this system by using the tape deck, etc. connected to this system
- Various sound control
- VOLUME control
- Front panel operation
- Remote control operation
- ■ Graphic equalizer
- Listening to the music with a preset equalizer effect
- (BASS) BOOST button
- ■ BASS and TREBLE controls
- ■ YMERSION button
- ■ Listening with headphones
- Using the built-in timer
- Timer play
- Press DISPLAY.
- Current time
- Source selecting mode
- ON TIME/time setting mode
- OFF TIME/time setting mode
- Press TIMER to complete the timer play setting.
- To cancel the timer play setting
- Timer recording
- To cancel the setting of timer recording
- Sleep timer operation
- Appendix
- Troubleshooting
- MD system limitations
- "Can't REC" is displayed before the maximum recording time (60 or 74 minutes) has been reached
- "Disc Full" is displayed before the maximum number of tracks (255) have been recorded
- The remaining recording time does not increase even after erasing numerous short tracks
- "TOC Reading" is displayed continuously
- The total recorded time and the remaining time on the MD do not total to the maximum recording time
- Tracks created through editing may exhibit sound dropout during search operations.
- Track numbers are not recorded correctly
- It is not possible to erase part of a track using the A-B Erase function
- Copy protection (SCMS)
- Display messages for MD recorder
- Can't Copy
- Can't Edit
- Can't Play!
- Can't REC!
- Can't REC
- DIGin Unlock
- Disc Full
- Title Full
- UTOC WError
- Not Audio
- Tr Protected
- TOC Full
- UTOC ERR L...
- TMP Over!!
- TOC Writing
- TOC Reading
- Protected
- Playback MD
- Specifications
- ■ Amplifier section
- Tuner section
- ■ CD player section
- Laser Diode Properties
- ■ Tape deck section
- MD section
- ■ Speaker section
- - CAUTION
- - ATTENTION
Brand : YAMAHA
Model : GX-900RDS
Category : Hi-Fi