3HZ538000 - Uncategorized BALAY - Free user manual and instructions
Find the device manual for free 3HZ538000 BALAY in PDF.


| Product Type | Built-in Oven |
| Brand | Balay |
| Model | 3HZ538000 |
| Energy Source | Electric |
| Power Supply | 220-240 V, 50-60 Hz |
| Total Connected Load | 3.0 kW (estimated) |
| Dimensions (H x W x D) | 595 x 595 x 550 mm (estimated) |
| Net Weight | 35 kg (estimated) |
| Oven Capacity | 71 L (estimated) |
| Energy Efficiency Class | A+ (estimated) |
| Cleaning Systems | EcoClean Direct, Pyrolytic Self-Cleaning |
| Number of Shelf Levels | 5 (estimated) |
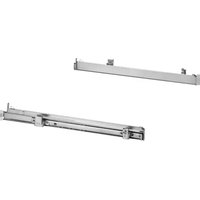
| Pull-Out Rails Included | No (sold separately) |
| Pull-Out Rails Compatible | Yes |
| Microwave Function | Not supported |
| Installation Type | Built-in |
| Door Type | Drop-down (estimated) |
| Display | Digital (estimated) |
| Control Type | Retractable knobs (estimated) |
| Safety Features | Child lock, automatic shut-off (estimated) |
| Spare Parts Available | Pull-out rails, shelf supports, etc. |
| Repairability Index | 8.0/10 (based on user rating) |
| User Manual | Free download in PDF (12 pages) |
Frequently Asked Questions - 3HZ538000 BALAY
User questions about 3HZ538000 BALAY
0 question about this device. Answer the ones you know or ask your own.
Ask a new question about this device
Download the instructions for your Uncategorized in PDF format for free! Find your manual 3HZ538000 - BALAY and take your electronic device back in hand. On this page are published all the documents necessary for the use of your device. 3HZ538000 by BALAY.
USER MANUAL 3HZ538000 BALAY
Installation instructions
natural_image
Diagram of a mechanical assembly with a blue arrow indicating direction (no text or symbols present)
natural_image
Technical illustration showing two mechanical assembly steps: one with a blue arrow indicating direction, the other with a blue bracket and cable (no text or symbols)


natural_image
Technical illustration showing a metal bracket assembly with a blue arrow indicating direction, alongside a close-up of a mechanical clamp (no text or symbols present)
natural_image
Diagram of a mechanical assembly with a blue arrow indicating direction (no text or symbols present)de
Fitting and removing the pull-out rails
The pull-out rails are not compatible with all appliances. When purchasing, always quote the exact product number (E appliance.
On appliance models with shelf supports, you must change the basic settings to "Telescopic rails: Yes". For more information to the "Basic settings" section in the instruction manual.
If necessary, you can use pull-out rails on all levels.
If your appliance features the EcoClean Direct cleaning function, you will need to take the entire shelf supports out of the cooking compartment in order to fit and remove the pull-out rails.
Otherwise, the EcoClean Direct coating may be damaged.
If your appliance features the pyrolytic self-cleaning function, you will need to take the pull-out rails out of the cooking compartment before running the cleaning function. The pull-out rails are not suitable for pyrolytic self-cleaning.
Notes
■ The pull-out rails are not suitable for appliances with a microwave function.
■ Only use the pull-out rails in conjunction with the universal pan, baking tray, wire rack and accessories that are placed on the wire rack. All other accessories are unsuitable.
Fitting the pull-out rails
The rails are designed to fit on either the right- or the (not both). Make sure when you fit them that you can p towards you.
- The rail must sit between the two bars. (Fig. 1)
- Push the retainer at the back in between the lower a bar. (Fig. 2)
-
Push on the "PUSH" tab and swing the rail in so th ends up between the two bars. (Fig. 3)
-
Release the "PUSH" tab; the retainer will hook into place. (Fig. 4) Then pull the rail out as far as it will go and slide it back in.
Removing the pull-out rails
- Push on the tab marked "PUSH" behind the end of the rail, and push the rail away from you. (Fig. 5)
- Keep the "PUSH" tab pushed back and swing the rail out. (Fig. 6)
- Pull the rail out towards you until the retainer at the back unhooks. (Fig. 7)
- Remove the pull-out rail. (Fig. 8)
Stah einfüh-

Brand : BALAY
Model : 3HZ538000
Category : Uncategorized