HD8116 - Uncategorized Emerson - Free user manual and instructions
Find the device manual for free HD8116 Emerson in PDF.


| Product Type | Personal CD Player with AM/FM Radio |
| Power Source | 2 x AA batteries (not included) or optional AC adapter (4.5V DC, 500 mA) |
| Battery Type | Alkaline recommended for longest life |
| CD Compatibility | CD, CD-R, CD-RW |
| Playback Modes | Normal, Repeat 1, Repeat All, Intro Scan, Shuffle, Programmed (up to 20 tracks) |
| Anti-Skip Protection | 60-second electronic buffer memory |
| Radio Bands | AM and FM stereo |
| Bass Boost | BBS switch (On/Off) for enhanced bass |
| Headphone Output | Stereo 3.5mm jack |
| Hold Switch | Disables all controls to prevent accidental operation |
| Auto Power Off | After approximately 30 seconds of inactivity |
| Display | Multifunction LCD showing track number, elapsed time, frequency, battery level, and mode indicators |
| Safety Classification | Class 1 Laser Product |
| Warranty | 90 days limited warranty |
| Cleaning | Lens: use cotton swab gently; Disc: wipe from center out; Cabinet: soft cloth with mild detergent |
| Accessories Included | Stereo headphones, owner's manual |
Frequently Asked Questions - HD8116 Emerson
User questions about HD8116 Emerson
0 question about this device. Answer the ones you know or ask your own.
Ask a new question about this device
Download the instructions for your Uncategorized in PDF format for free! Find your manual HD8116 - Emerson and take your electronic device back in hand. On this page are published all the documents necessary for the use of your device. HD8116 by Emerson.
USER MANUAL HD8116 Emerson
Personal CD-R/RW Player with 60 Second Electronic Anti-Skip Protection, and Stereo AM/FM Radio
OWNER'S MANUAL
HD8116
Visit our web site at www.emersonradio.com



Thank you......
For purchasing this Emerson Personal CD Player with AM/FM Radio. The CD player has a 20 track programmable memory so you can listen to the songs on your favorite CD's in any order you choose. Or you can use the Random playback feature and let the player select the playback order for you. Use the 3-way Repeat feature to repeat a single track, the entire disc, or a programmed sequence of tracks, indefinitely. We've also included 60 second Electronic Anti-Skip Protection which makes this player virtually skip-free during most active uses. There's also a Bass Boost Control that increases and enhances the bass response.
Please read this instruction manual completely and carefully to make sure you understand the proper operation of this product, and get the maximum enjoyment out of all the features of this state-of-the-art CD player.
Once again, thanks for purchasing this Emerson product.
IMPORTANT NOTES
WARNING: TO PREVENT FIRE OR SHOCK HAZARD, DO NOT EXPOSE THIS UNIT TO RAIN OR MOISTURE.
Avoid installing the unit in locations described below:
- Places exposed to direct sunlight or close to heat radiating appliances such as electric heaters.
- Dusty places.
- Places subject to constant vibration.
• Humid or moist places.
CLASS 1 LASER PRODUCT
CLASS 1 LASER PRODUCT APPAREIL À LASER DE CLASSE 1 PRODUCTO LASER DE CLASE 1
CAUTION INVISIBLE LASER RADIATION WHEN OPEN AND INTERLOCKS DEFEATED. AVOID EXPOSURE TO BEAM

This product contains a low power Laser Device.
CAUTION
THIS LASER COMPACT DISC PLAYER FUNCTIONS BY HELP OF INVISIBLE LASER LIGHT AND IS EQUIPPED WITH SAFETY SWITCHES TO AVOID EXPOSURE WHEN DOOR IS OPEN AND SAFETY INTERLOCKS ARE DEFEATED. IT IS DANGEROUS TO DEFEAT OR BYPASS SAFETY SWITCHES.

DANGEROUS VOLTAGE
Uninsulated Dangerous Voltage, that may be of sufficient magnitude to constitute a risk of electric shock to persons is present within this product's enclosure.

ATTENTION
The Owner's Manual contains important operating and maintenance instructions.
For your safety, it is necessary to refer to the manual.
This device complies with part 15 of the FCC rules. Operation is subject to the condition that this device does not cause harmful interference.
PREPARATION FOR USE
Remove The Transit Card
This personal CD player is shipped with a dummy CD 'transit card' inside the CD compartment. The purpose of this card is to prevent the laser from moving during shipment of the product. This card must be removed before using the CD player.
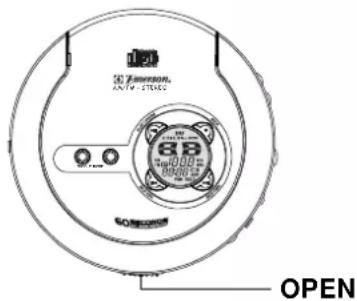
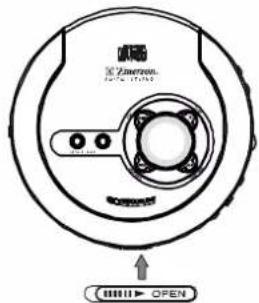
Slide the OPEN switch to the right to unlock the CD door. Remove the 'transit card' from the player and discard it.
Power Sources
This personal CD player is designed to operate on two “AA” batteries, not included. Use a well known brand of alkaline batteries for longest life and best performance.
This player can also be operated by an optional AC/DC converter/adapter, not included. If you decide to purchase an optional AC/DC adapter the specification must be as follows:
Input: 120V 60Hz AC
Output: 4.5V DC, 500 mA.
Plug: Female Type with Positive Center, "UL" Listed.
Positive (+) —●— Negative (−)
You may also purchase a “Universal” type AC/DC adapter which allows you to select the required output voltage and plug polarity, and normally includes multiple plug sizes to fit most brands of equipment. Always look for the “UL” listing mark when you purchase an adapter.



Connecting The Optional AC Adapter (Not Included)
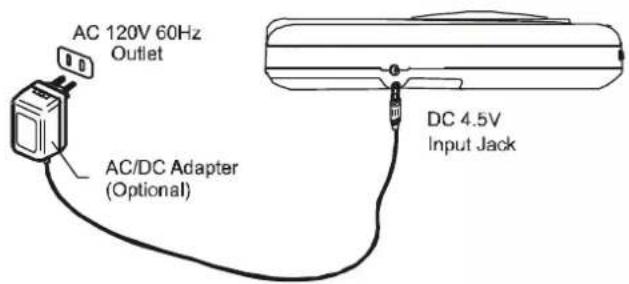
1.) Connect the small female plug of the optional AC adapter to the DC 4.5V jack on the left side of the CD player.
2.) Connect the adapter housing to your 120V AC 60Hz outlet.
NOTES:
- Never connect or disconnect the adapter from the AC outlet while your hands are wet.
- The housing of the AC adapter may become warm during operation. This is normal.
- The female plug of the AC adapter must be completely disconnected from the CD player in order to operate the player on batteries.

Installing The Batteries
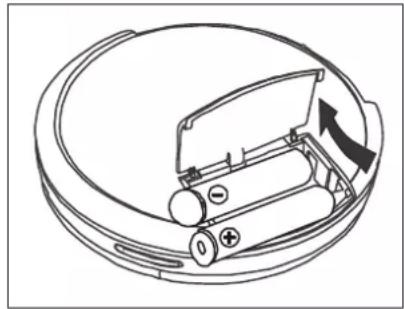
1.) Open the battery compartment door on the bottom cabinet by sliding it in the direction of the arrow and then lifting it open. To prevent loss, the door cannot be removed from the unit.
2.) Insert 2 "AA" batteries (not included) into the compartment. Use alkaline batteries for longest life. Follow the polarity markings inside the compartment. If the batteries are inserted incorrectly the unit will not work.
3.) Close the battery door.
natural_image
Diagram of a circular device with battery and housing, showing internal components and an arrow indicating rotation (no text or symbols)NOTE: In order to operate the player on batteries the optional AC adapter must be disconnected from the DC 4.5V jack.
Battery Replacement
When the batteries become too weak the battery level indicator ▶ flashes and operation may become erratic. When this occurs replace the batteries immediately. If the display remains blank when you press the PLAY/PAUSE ▶ button, the batteries are completely dead. Replace them immediately. If dead batteries are left inside the battery compartment for a long period of time they may leak and cause damage to the unit, and such damage or corrosion from leaking batteries is not covered by your warranty.
Battery Precautions
- Replacement of batteries must be done by an adult.
- Do not mix old and new batteries.
- Do not mix alkaline, standard (carbon-zinc) or rechargeable (nickel-cadmium) batteries.
- The supply terminals are not to be short-circuited.
• Non-rechargeable batteries are not to be recharged. - Exhausted batteries are to be removed.
- Only batteries of the equivalent type are to be used.
- Batteries are to be inserted with the correct polarity.
- Dispose of batteries properly. Do not dispose of batteries in fire. The batteries may explode or leak.
Connecting The Stereo Headphones
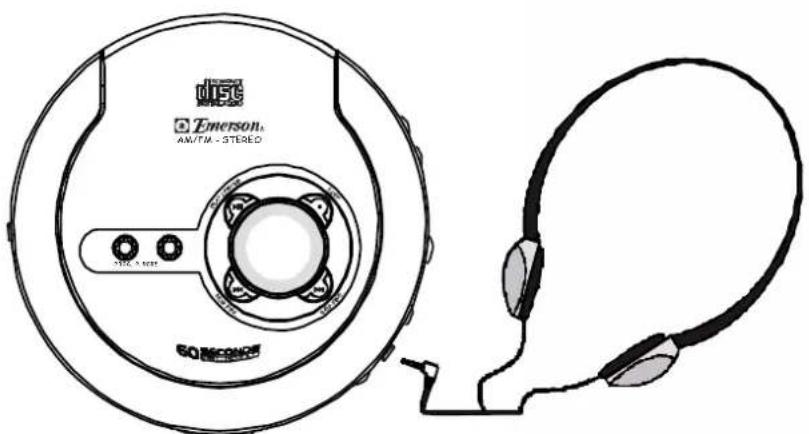
Connect the plug of the supplied stereo headphones to the headphone jack on the right side of the cabinet.
NOTE: Make sure the headphone plug is inserted into the headphone jack as far as it will go. If the plug is not fully inserted, you may only hear sound from one side of the headphones.
Headphone Jack
IMPORTANT!
Always set the VOLUME control to a 'low level' before you put the headphones on and begin playing a CD. Then start playback and gradually increase the volume to a comfortable listening level.
Do not play the CD at loud volume levels that might prevent you from hearing warning sounds such as car horns, etc.
LOCATION OF CONTROLS AND INDICATORS
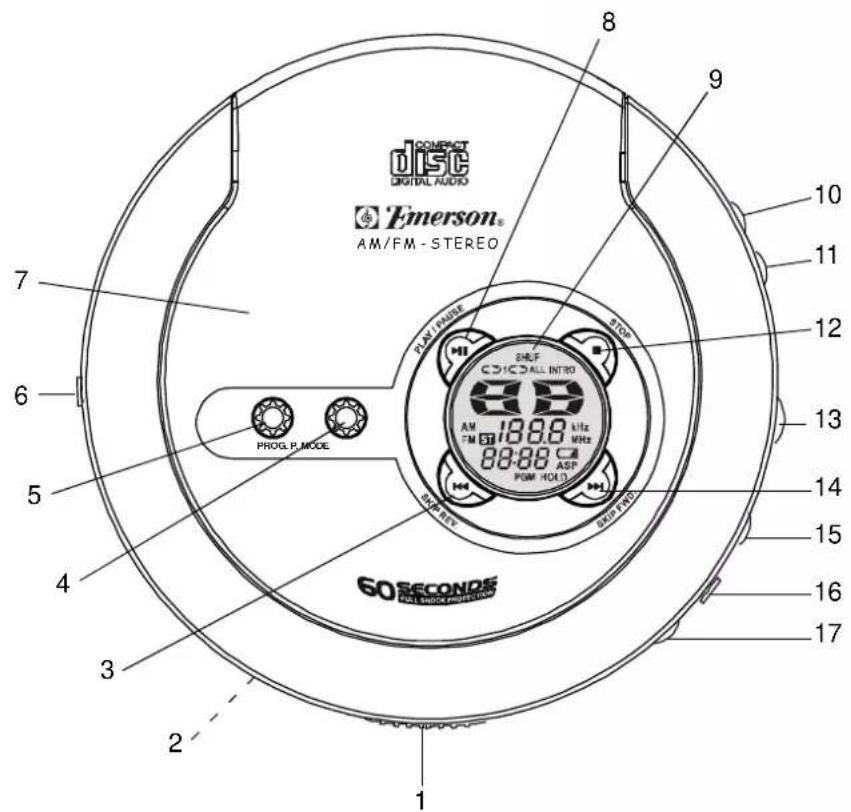
1.) ▶ OPEN Switch – Slide to the right to unlock and open the CD door.
2.) Battery Compartment (on bottom cabinet).
3.) SKIP REV. ◀◀ Button.
4.) P. MODE Button – Selects the playback mode: Repeat 1/All, Shuffle, or Intro.
5.) PROG. (Program) Button.
6.) DC 4.5V Input Jack – Connect an AC adapter (not included) to this jack to use 120V 60Hz house current.
7.) CD Door.
8.) PLAY/PAUSE ▶Button.
9.) Multifunction LCD Display.
10.) CD-AM-FM Selector Switch.
11.) HOLD → 'On/Off' Selector Switch.
12.) STOP ■ Button.
13.) TUNING Control.
14.) SKIP FWD. ▶▶Button.
15.) VOLUME Control – Raises or lowers the volume.
16.) Headphone 📋 Jack – Connect stereo headphones, included, to this jack.
17.) BBS → 'On/Off' Switch - Slide to the right to increase bass response.
LCD DISPLAY INDICATORS
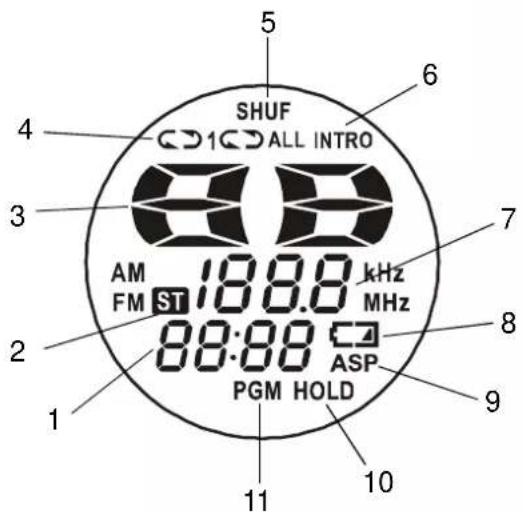
1.) Time Display – Shows elapsed time and total playing time on the CD.
2.) ST (Stereo) Indicator – Appears when tuned in FM Stereo station.
3.) Track Number Display – Shows the track which is being played, and the total tracks on the CD.
4.) Repeat 1/ALL Indicators – Appears when the Repeat playback mode is selected.
5.) SHUF (Shuffle) Indicator – Appears when Random playback mode is selected.
6.) INTRO Indicator – Appears when Intro playback mode is selected.
7.) Frequency Display – Shows the AM / FM tuned in frequencies.
8.) ☐ Battery Level Indicator – Flashes when batteries need to be replaced.
9.) ASP Indicator – Indicates Anti-Skip Protection is activated.
10.) HOLD Indicator – Appears when HOLD switch is set to 'On'.
11.) PGM (Program) Indicator – Appears when programming tracks or playing programmed tracks.
OPERATING INSTRUCTIONS
HOLD Switch
The HOLD switch (on the right side cabinet) must be in the 'Off' (left) position to start the CD player.
If you plan to carry the CD player in a handbag, briefcase, school bag, back pack, etc, slide the HOLD switch to the 'On' (right) position.
While the HOLD switch is 'On' all of the controls on the CD door are disabled. This prevents the player from starting accidentally by something pressing against the PLAY/PAUSE ▶ button.
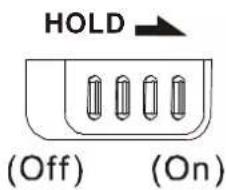
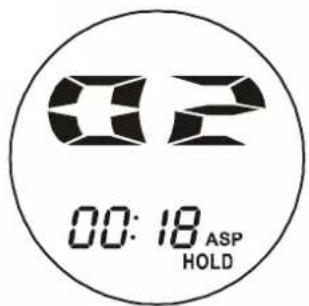
After you begin CD playback you may also slide the HOLD switch to the 'On' (right) position to disable all the controls on the CD door.
You can then place the player in a handbag, backpack, etc, and do not have to worry that the player will be accidentally turned off by something pressing against the STOP ■ button or Track Skip buttons.
Electronic Anti-Skip Protection
This CD player is equipped with automatic 60 second Electronic Anti-Skip Protection and that will eliminate virtually all skipping during most active uses.
When you press the PLAY/PAUSE ▶ button to begin playback, the player immediately begins to store 60 seconds of music in a solid state memory that is impervious to shock. The player is always reading the disc 60 seconds ahead of the music you are hearing and storing that information in the memory.
If the player is subjected to shock or bumps of less than 60 seconds duration you will not notice them at all.
If the bumps last longer than 60 seconds the anti-skip memory may be depleted and the player may skip or stop.
When playback begins the ASP indicator begins 'flashing' in the display.
When the ASP indicator remains 'On', the Anti-Skip memory is 'Full' and contains 60 seconds of music.
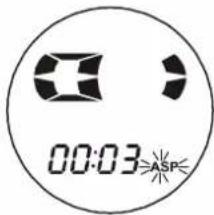
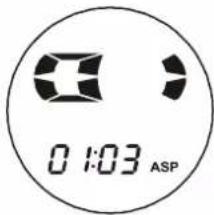
If the player is bumped or shaken the ASP indicator will flash again as the memory is depleted. The player may skip if the bumps continue.
When the bumps stop the memory starts to fill up again and the ASP indicator remains 'On'.
Normal CD Playback
• Make sure you have installed the batteries.
- Make sure the HOLD switch is set to the 'Off' (left) position.
- Make sure to set the VOLUME control to a low setting before you put on the headphones.
IMPORTANT:
This CD player can play normal CDs plus CD Recordable (CD-R) and CD ReWritable (CD-RW) discs. However the playability of CD-R/RW discs may be affected by the type of software that was used in 'ripping' the tracks from the original discs and 'burning' the tracks onto the blank media. Playability may also be affected by the quality and condition of the blank media you use for recording. 100% compatibility cannot be guaranteed. This is not an indication of any problems with your player.
1.) Slide the CD-AM-FM function selector to CD position.
2.) Slide the CD door OPEN switch to the right to unlock and open the CD door.
3.) Place your CD on the center spindle with the printed label side facing up. Press downward on the disc near the center hole until the disc is fully seated on the spindle.
4.) Close the CD door and connect the headphones to the Headphone jack by pushing the headphone plug into the Headphone jack until a 'click' sound is heard.
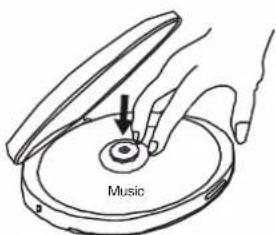
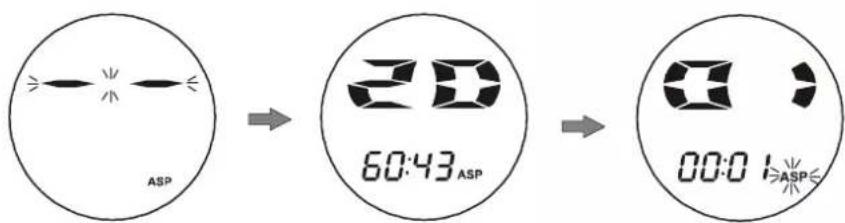
5.) Press the PLAY/PAUSE ▶ button to begin playback. The display will briefly show two flashing dashes “--” as the player reads the disc.
The total tracks and playing time will appear briefly in the display and then the playback will begin on track "01".
The display will show the elapsed playing time of the track being played.
6.) Adjust the VOLUME control to your listening preference.
If you prefer more bass, slide the BBS switch to 'On' position.
7.) Playback will continue until the end of the disc, then the player will stop automatically and the display will again show the total tracks and playing time on the disc.
After approximately 30 seconds the power switches 'Off' automatically to conserve the batteries and the display goes blank.
To stop playback before the disc ends press the STOP ■ button at any time.
Press the STOP ■ button after the disc has stopped to shut the power 'Off' completely.
Pause Control
To pause momentarily during playback press the PLAY/PAUSE button again. The sound stops but the disc continues to spin. The display flashes.
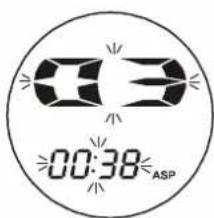
Press the PLAY/PAUSE ▶ button once more to cancel Pause mode and resume normal playback. The display stops flashing.



Skip/Search (▶) Controls
Press the SKIP FWD. ▶ or SKIP REV. ◀ buttons repeatedly during playback to skip to higher or lower numbered tracks. Playback will begin on the selected track.
To search within a track at high speed to locate a specific musical passage depress and hold either the SKIP FWD. ▶ or SKIP REV. ◀ controls.
The player moves forward or reverse at high speed. When you reach the desired point in the track, release the buttons and normal playback resumes.

P. MODE Button
Pressing the P. MODE button during CD playback cycles the player through the following four special playback modes:
Repeat 1 → Repeat ALL → INTRO → SHUF (Shuffle) Playback.
Repeat Playback
The player can be programmed to continuously repeat a single track or the entire disc automatically.
One Track Repeat
During playback press the ▶or buttons to select the track to be repeated, then press the P. MODE button once.
The 1 indicator appears in the display and the selected track will be repeated continuously.
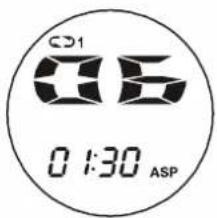
Press the STOP ■ button to cancel One Track Repeat playback.
All Tracks Repeat
Press the PLAY/PAUSE ▶ button to begin playback, then press the P. MODE button twice.
The ⬆ ALL indicator will appear in the display and the entire disc will be repeated continuously.
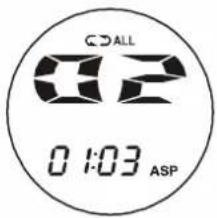
Press the STOP ■ button to cancel All Tracks Repeat playback.
INTRO (Intro Scan) Playback
The Intro Scan feature plays only the first 10 seconds of each track on the disc. This feature is useful when you are trying to find a particular song but you cannot remember the title.
1.) Load your disc in the player as usual and press the PLAY/PAUSE ▶ button to begin playback.
2.) When playback begins press the P. MODE button three times.
The INTRO indicator flashes.
3.) Press the PLAY/PAUSE ▶ button once more. The INTRO indicator stops flashing and remains 'On'.
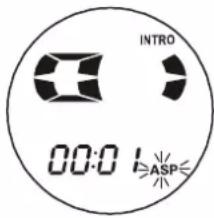
The player backs up to the beginning of track "01", plays the first 10 seconds of each track on the disc, and then stops.
To cancel Intro Scan playback press the STOP ■ button.
SHUFFLE (Random) Playback
When Shuffle playback is selected all the tracks on the disc will be played back in random order.
1.) Load your disc in the player as usual and press the PLAY/PAUSE ▶ button to begin playback.
2.) When playback begins press the P. MODE button four times.
The SHUF indicator flashes.
3.) Press the PLAY/PAUSE ▶ button once more. The SHUF indicator stops flashing and remains 'On'.
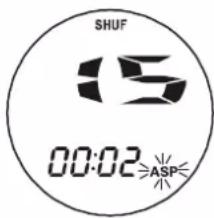
The player randomly selects a track for playback. After each track has played once the player stops.
To cancel Shuffle playback press the STOP ■ button.
Programmed Playback
You can program up to 20 tracks on a disc to play in any desired order.
Note: You can program a disc either during Playback or in Stop mode.
1.) Press the PROG. button once. The Program Number "01" appears. The PGM indicator and the track number "00" flash.
2.) Press the ▶ or ◀ button to select the first track to be programmed.
Example: Track "07".
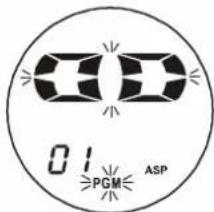
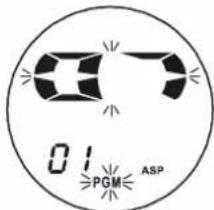
3.) When the desired track number is flashing in the display, press the PROG. button again to enter the desired track number in Program Number "01".
The track number returns to "00" and the Program Number advances to "02".
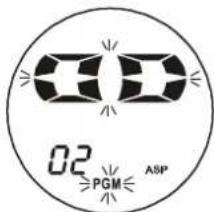
4.) Repeat Steps 2 and 3 to program additional tracks up to a maximum of 20.
5.) Press the PLAY/PAUSE ▶ button to begin programmed playback. The PGM indicator remains in the display.
- Playback begins with the first track you programmed and continues until all programmed tracks have been played, and then the player stops.
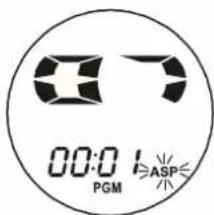
The programmed sequence will remain in the memory until the power shuts 'Off' (approximately 30 seconds) or until the CD door is opened.
- If you press the PROG. and PLAY/PAUSE ▶ button again before the power shuts off, the programmed sequence will play again.
Listening To The Radio
Tuner Information
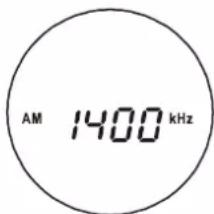
This system features a normal AM/FM analog tuning system. Unlike a digital tuner it does not automatically lock in on the exact frequency of a station. However instead of a dial scale and a moving dial pointer we have included a digital frequency display to help you tune more accurately.
Do not be concerned if you cannot easily tune the display to the exact frequency of your favorite stations, especially on the AM band. Slowly rotate the TUNING control until the display approaches the frequency of the desired station and stop when get the strongest, noise free reception - even if the display is not indicating the exact frequency of desired station.
1.) Slide the CD-AM-FM function selector to FM or AM position as desired.
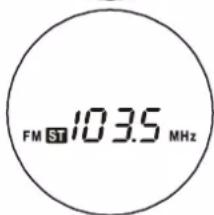
2.) Rotate the TUNING control until the exact frequency of the desired station appears on the display, or until you are receiving the strongest, clearest signal.
If you have tuned to an FM Stereo station the ST indicator will appear in the display.
3.) Adjust the VOLUME control to your listening preference.
4.) If you prefer more bass, slide the BBS switch to 'On' position.
5.) To turn off the radio, slide the CD-AM-FM function switch to CD position to shut power 'Off'.
Antenna Information
FM
The stereo headphone cable serves as the FM antenna when listening to FM stations. Make sure that the headphone cable is unwound completely in order to provide the best reception.
AM
The AM antenna is located inside the cabinet of the CD player. If AM reception is weak, try changing the position of the CD player itself until the internal antenna is pointing in the general direction of the radio transmitter. This should provide improved reception.
CARE AND MAINTENANCE
Cleaning the Cabinet
Wipe with a soft cloth. If the cabinet is very dirty, dampen the cloth with a weak solution of neutral detergent and water, and then wipe clean.
Cleaning the Lens
A dirty lens will cause sound skipping and, if the lens is very dirty, the CD may not work. Open the disc cover and clean the lens as follows:
Dust or Dry Particles
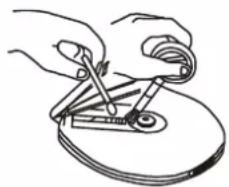
Using a camera lens brush/blower, blow on the lens several times, then wipe it lightly with the brush to remove dust. Then, blow on the lens once more.
natural_image
Illustration of hands using a tool to adjust or install a circular component (no text or symbols visible)Fingerprints
To remove fingerprints from the lens, use a cotton swab starting in the middle and working to the outside edge. Use only very light pressure on the lens to avoid forcing it out of alignment.

natural_image
Illustration of two hands performing a circular motion or manipulation task (no text or symbols)Cleaning the Disc
When a disc becomes dirty, clean it with a cleaning cloth. Wipe the disc from the center out.
TROUBLESHOOTING GUIDE
If you experience a problem with this unit, check the chart below before calling for service.
| SYMPTOM | CAUSE | SOLUTION |
| Unit will not turn on. | Weak or dead batteries. | Replace batteries. |
| CD compartment not closed. | Close CD compartment. | |
| Disc will not play. | Disc inserted incorrectly. | Reinsert disc correctly. |
| Dirty or defective disc. | Try another disc. | |
| Moisture or condensation on disc or lens. | Disc: wipe with soft cloth. Lens: see page 19. 'Care and Maintenance' | |
| No sound from headphones. | Headphone plug not inserted correctly. | Reinsert headphone plug correctly. |
| VOLUME controls set to minimum. | Raise volume control. | |
| Weak batteries. | Replace batteries. | |
| Erratic playback. | Defective disc. | Try another disc. |
| Dirty or defective disc. | Clean or replace disc. | |
| AM/FM no sound | Function switch is not set to AM or FM position. | Set Function switch to AM or FM position as desired. |
| Radio reception is noisy or weak. | FM: Headphone cord is not extended. | Extend headphone cord fully. |
| AM: Unit is not positioned correctly. | Rotate unit until best reception is obtained. |

Emerson®
SERVICE
FOR ADDITIONAL SET-UP OR OPERATING ASSISTANCE
PLEASE CALL:
1-800-898-9020
FOR CUSTOMER SERVICE, PLEASE WRITE TO:
Emerson Radio Corp.
Consumer Affairs Dept.,
5101 Statesman Drive,
Irving, TX 75063.
LIMITED WARRANTY
Emerson Radio Corp. warrants manufacturing defects in original material, including original parts and workmanship, under normal use and conditions, for a period of ninety (90) days from the date of original purchase in the U.S. With your dated proof of purchase, we will provide repair service at no charge for labor and parts at an authorized Depot Repair Facility, or replace the product in our discretion. For repair or replacement, pack your unit in a padded box, enclose your check or money order payable to Emerson Radio Corp. in the amount of \$9.00 (not required by California residents) to cover shipping and handling costs, and enclose a copy of your proof of purchase. Send your unit to:
Emerson Radio Corp., 5101 Statesman Drive, Irving, TX 75063.
This warranty does not cover damage from negligence, misuse, abuse, accident, failure to follow operating instructions, commercial use, rental, repairs by an unauthorized facility, or products purchased, used, serviced or damaged outside of the United States.
THIS WARRANTY GIVES YOU SPECIFIC LEGAL RIGHTS, AND YOU MAY ALSO HAVE OTHER RIGHTS WHICH VARY FROM STATE TO STATE.
AU898M
The serial number of your CD player can be found on the bottom cabinet. We suggest that you record the serial number of your unit in the space below for future reference.
Model Number: HD8116
Serial Number:

natural_image
Color palette bar with grayscale shades and a crosshair for selection (no text or symbols)

EMERSON
Part No. 16-2986B
510-01
Printed in China
HD8116_B100305.p65 4/10/2005, 15:2822

- Thank you......
- IMPORTANT NOTES
- Avoid installing the unit in locations described below:
- CLASS 1 LASER PRODUCT
- CAUTION
- DANGEROUS VOLTAGE
- ATTENTION
- PREPARATION FOR USE
- Remove The Transit Card
- Power Sources
- Connecting The Optional AC Adapter (Not Included)
- NOTES:
- Installing The Batteries
- Battery Replacement
- Battery Precautions
- Connecting The Stereo Headphones
- IMPORTANT!
- LCD DISPLAY INDICATORS
- OPERATING INSTRUCTIONS
- HOLD Switch
- Electronic Anti-Skip Protection
- Normal CD Playback
- IMPORTANT:
- Pause Control
- Skip/Search (▶) Controls
- MODE Button
- Repeat Playback
- One Track Repeat
- All Tracks Repeat
- INTRO (Intro Scan) Playback
- SHUFFLE (Random) Playback
- Programmed Playback
- Listening To The Radio
- Tuner Information
- Antenna Information
- FM
- AM
- CARE AND MAINTENANCE
- Cleaning the Cabinet
- Cleaning the Lens
- Dust or Dry Particles
- Fingerprints
- Cleaning the Disc
- TROUBLESHOOTING GUIDE
- Emerson®
- LIMITED WARRANTY
Brand : Emerson
Model : HD8116
Category : Uncategorized