Thanos A-1 - Effects machine Froggy's Fog - Free user manual and instructions
Find the device manual for free Thanos A-1 Froggy's Fog in PDF.


| Product Type | Rechargeable High-Speed Fog Blaster |
| Brand | Froggy's Fog |
| Model | Thanos A-1 |
| Net Weight (Blaster Body) | 13.75 kg |
| Gross Weight (with flight case) | 20.1 kg |
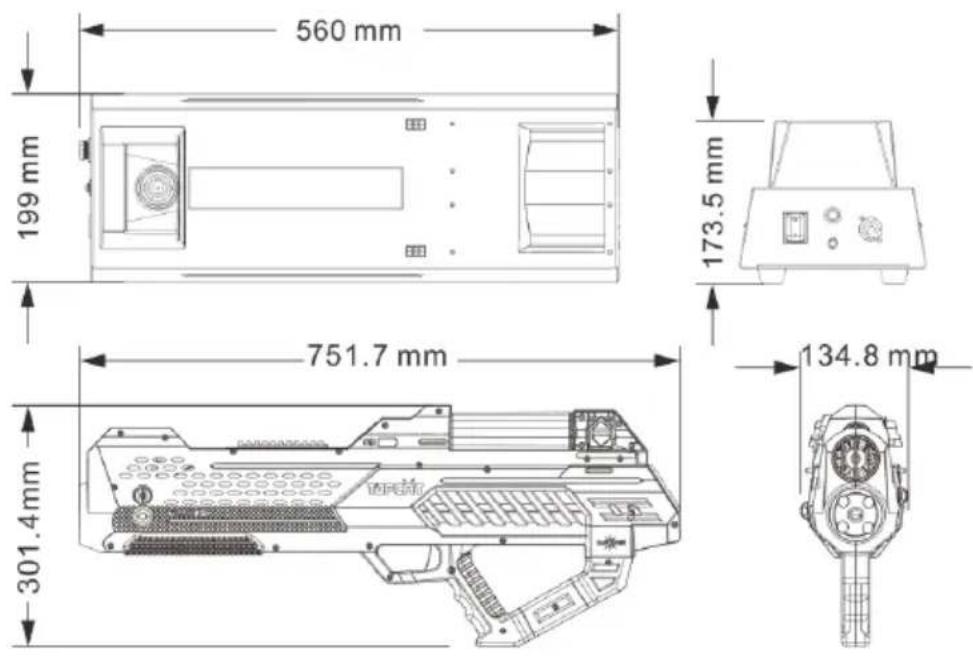
| Blaster Body Dimensions (L x W x H) | 751.7 x 301.4 x 134.8 mm |
| Charging Base Dimensions (L x W x H) | 560 x 199 x 173.5 mm |
| Flight Case Dimensions (L x W x H) | 828 x 618 x 310 mm |
| AC Power Input | 220-240 V, 50/60 Hz (120 V variant also mentioned) |
| Total Power Consumption | 1,200 W |
| Heat-Up Time | Approx. 10 minutes |
| Fluid Tank Capacity | 330 ml |
| Max Fog Output Volume | Approx. 100 ml/min |
| Max Output Distance | Approx. 8 m |
| Continuous Full Burst Duration | Up to 30 seconds |
| LED Lighting | RGBW (Nozzle and Body) |
| Battery | Rechargeable, 2 included |
| Control | On-device LCD display with buttons |
| Included Accessories | Charging base, power cord, flight case, 2 fluid containers, 2 batteries, strap |
| Compatible Fluid | Froggy's Fog Water-Based Fog Fluids |
| Maintenance Interval | Every 40 hours of use |
| Safety Features | Grounded circuit, overheat protection, low fluid sensor |
| Spare Parts & Repairability | No user-serviceable parts; contact dealer for service |
Frequently Asked Questions - Thanos A-1 Froggy's Fog
User questions about Thanos A-1 Froggy's Fog
0 question about this device. Answer the ones you know or ask your own.
Ask a new question about this device
Download the instructions for your Effects machine in PDF format for free! Find your manual Thanos A-1 - Froggy's Fog and take your electronic device back in hand. On this page are published all the documents necessary for the use of your device. Thanos A-1 by Froggy's Fog.
USER MANUAL Thanos A-1 Froggy's Fog
natural_image
Technical line drawing of a futuristic weapon system with internal components and no visible text or symbolsThanos A-1
Fog Blaster
USER MANUAL
Table of Contents
1 BEFORE YOU BEGIN.... 3
1.1 What Is Included ....3
1.2 Unpacking Instructions....3
1.3 Symbols 3
1.4 Disclaimer .... 3
1.5 Safety Notes....3
1.5.1 Personal Safety 3
1.5.2 Mounting and Rigging 3
1.5.3 Power and Wiring 4
1.5.4 Operation 4
2 INTRODUCTION....4
2.1 Description....4
2.2 Features 4
2.3 Product Overview....4
2.4 Product Dimensions....5
3 TECHNICAL SPECIFICATIONS....5
4 SETUP 6
4.1 AC Power 6
5 OPERATION....6
5.1 Fluid Tank Installation 6
5.2 Battery Installation and Removal....7
5.4 How to Heat the Fog Blaster 8
5.5 How to Charge Battery 8
6 Control Mode & Operation....9
6.1 Device Control....9
6.2 Menu Map 9
7 TECHNICAL INFORMATION .... 10
7.1 Maintenance....10
7.2 Storage....10
7.2.1 Machine Storage 10
7.3 Troubleshooting....11
8 Warranty 11
1 BEFORE YOU BEGIN
1.1 What Is Included
A-1 Fog Blaster × 1
Charging Base × 1
Power cord × 1
Flight Case × 1
Fluid Container x 2
Battery × 2
Strap× 1
1.2 Unpacking Instructions
Carefully unpack the product immediately and check the container to make sure all the parts are in the package and are in good condition. If the box or the contents (the product and included accessories) appear damaged from shipping, or show signs of mishandling, notify the carrier or dealer/seller immediately. In addition, keep the box and contents for inspection.
1.3 Symbols
| Symbol | Meaning |
 | CautionCritical installation, configuration, or operation information. Not following these instructions may make the product not work, cause damage to the product, or cause harm to the operator. |
 | ImportantImportant installation or configuration information. Failure to comply with this information may keep the product from working correctly. |
 | InformationUseful information. |
1.4 Disclaimer
The information and specifications contained in this User Manual are subject to change without notice. FROGGY'S FOG assumes no responsibility or liability for any errors or omissions and reserves the right to revise this manual at any time. Copyright © 2023 FROGGY'S FOG. All rights reserved.
1.5 Safety Notes
Please read the following Safety Notes carefully before working with the product. The notes include important safety information about installation, usage, and maintenance.
1.5.1 Personal Safety
• Always connect the product to a grounded circuit to avoid the risk of electrocution.
• Make sure that children, unauthorized people and animals do not obtain access to the machine.
1.5.2 Mounting and Rigging
• To prevent risk of fire or shock, do not expose the blaster or base station to rain or moisture.
- CAUTION: When transferring product from extreme temperature environments, (e.g. cold truck to warm humid ballroom) condensation may form on the internal electronics of the product. To avoid causing a failure, allow product to fully acclimate to the surrounding environment before connecting it to power.
• Do not mount the product on a flammable surface (linoleum, carpet, wood, paper, carton, plastic, etc.).
- Do not use in a confined space. Always install the product in a location with adequate ventilation, at least 20 in (50 cm) from adjacent surfaces.
- Be sure that no ventilation slots on the product's housing are blocked.
1.5.3 Power and Wiring
• Always make sure that the voltage of the outlet to which you are connecting the product is within the range stated on the decal or rear panel of the product.
• Make sure the power cord is not crimped or damaged.
• Do not connect the machine to the dimming controller or rheostat.
• Never disconnect the product from power by pulling or tugging on the cord itself. Use the plug body.
• To eliminate unnecessary wear and improve its lifespan, during periods of non-use completely disconnect the product from power via breaker or by unplugging it.
1.5.4 Operation
- Do not operate this product if you see damage to the housing or cables. Have the damaged parts replaced by an authorized technician at once.
• Make sure there are no flammable materials close to this product while it is operating.
• Do not cover or plug the output nozzle during operation.
• Do not cover or restrict any thermal vents.
• Never carry the product by the power cord or any moving part. Always use the handles.
• Empty or remove the fluid container before storing the blaster.
• The maximum ambient temperature (Ta) is 104 °F (40 °C). Do not operate the product at higher temperatures.
• Always disconnect the product from the power source before cleaning.
• This product contains no user-serviceable parts. Any reference to servicing in this User Manual will only apply to properly trained, certified technicians. Do not open the housing or attempt any repairs which can lead to damage or malfunction.
• In the event of a serious operating problem, stop using the product immediately and contact the manufacturer.
2 INTRODUCTION
2.1 Description
Froggy's Fog Thanos A-1 is the world's first rechargeable high-speed Fog Blaster. It is very easy to use by consuming fog fluid instead of connecting to gas cylinder to create awesome effects. Different from the traditional CO2 devices used in entertainment venues, consuming carbon dioxide, inconvenient and costly to use, the A-1 fog blaster is fully electric provides a full continuous burst for 30 sec. The rechargeable battery inside the blaster makes it portable to use without the limitation of power cable any more. The output strength and speed are enhanced by a high-speed small fan which can also be controlled independently to create strong wind to interact with audiences for fun.
2.2 Features
• Designed with high-speed fan to help enhance fog output
• Continuous full burst up to 30s
• Specially designed bullet-shape fluid tank, easy to replace / refill
• Two charging slots in Charging Base for battery charging;
- Quick-change function for the rechargeable battery.
2.3 Product Overview
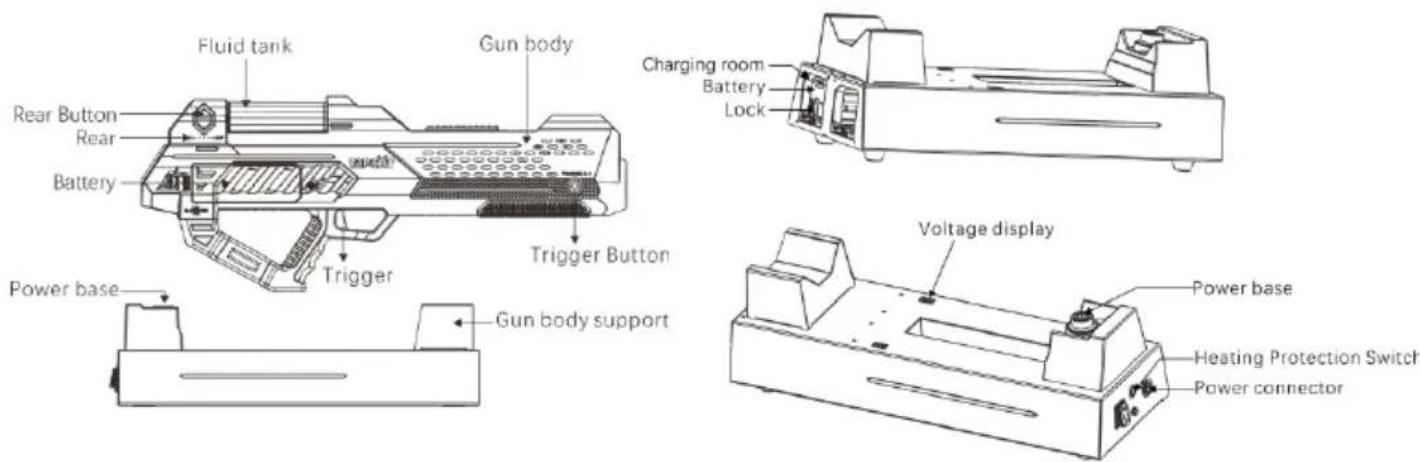
2.4 Product Dimensions
3 TECHNICAL SPECIFICATIONS
| AC Power | Input Voltage & Rate | AC 220-240 V, 50/60 Hz | |
| Current Limiter Type | Breaker | ||
| Current Limiter Specifications | 15A, 250V | ||
| Total Power Consumption | 1,200 W | ||
| Heating | Heat Up Time | Appr. 10 min | |
| Light Source | LED Color | Nozzle LED: RGBW | Blaster Body LED: RGBW |
| Power per LED | Nozzle LED: 9 W | Blaster Body LED: 0.5W | |
| Total LED Power | Nozzle LED: 36 W | Blaster Body LED: 33 W | |
| Capacity | Fluid Tank Capacity | 330 ml | |
| Output | Adjustable Output | × | |
| Max Fog Output Volume | Appr. 100 ml/min | ||
| Maximum Continuous Duration (100% Output) | Appr. 20,000 cfm | ||
| Max Output Distance | Appr. 8m | ||
| Fluid Consumption (100% Output) | Appr. 30s | ||
| Placement & Mounting | Horizontal | √ | |
| Inclined | × | ||
| Sidelong | × | ||
| Hang Upside Down | × | ||
| Rigging & Trussing | √ | ||
| Control | On-device Manual Control | LCD | |
| Wireless Control | × | ||
| Wired Control | × | ||
| DMX512 | × | ||
| Consumable | Consumable | Froggy's Fog Bog Fog Machine Fluid | |
| Weight & Dimensions | Net Weight | 13.75 kg | |
| Gross Weight | 20.1 kg | ||
| Blaster Body Dimension | 751.7 × 301.4 × 134.8 mm | ||
| Charging Base Dimension | 560 × 199 × 173.5 mm | ||
| Flightcase Dimension | 828 × 618 × 310 mm | ||
4 SETUP
4.1 AC Power
The machine has a fixed voltage power supply and can work with an input voltage of AC 120 V, 50/60 Hz. To determine the product's power requirements (circuit breaker, power outlet, and wiring), use the current value listed on the label affixed to the product's back panel, or refer to the product's specifications chart. The listed current rating indicates the product's average current draw under normal conditions.


Always connect the product to a protected circuit (circuit breaker or fuse). Make sure the product has an appropriate electrical ground to avoid the risk of electrocution or fire.
Never connect the product to a rheostat (variable resistor) or dimmer circuit, even if the rheostat or dimmer channel serves only as a 0 to 100% switch.
5 OPERATION
Before using the product, read and follow the safety recommendations indicated in the Safety Notes.
5.1 Fluid Tank Installation
As shown in below Figure 1, hold the left and right Rear Buttons, slide the Rear backward. Tilt the fluid tank and install it into the groove.
As shown in below Figure 2, after installation, push the Rear forward and fix the fluid tank.
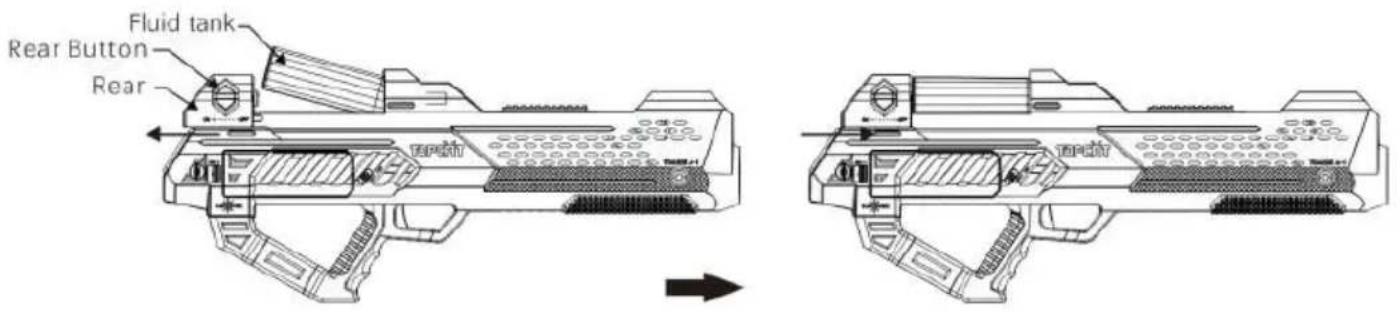
Figure 1 Figure 2
5.2 Battery Installation and Removal
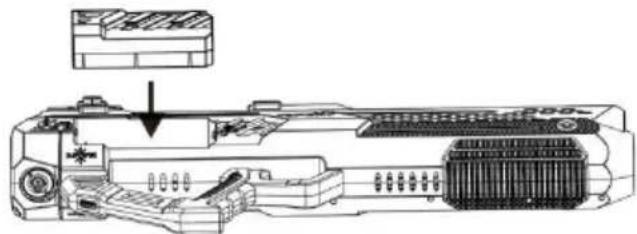
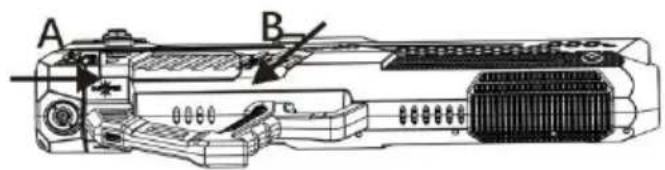
As shown in below figures, insert the battery into the cabinet until it is locked firmly by quick Lock# A and B.
natural_image
Technical line drawing of a mechanical device with internal components and an arrow indicating assembly (no text or symbols present)F
F
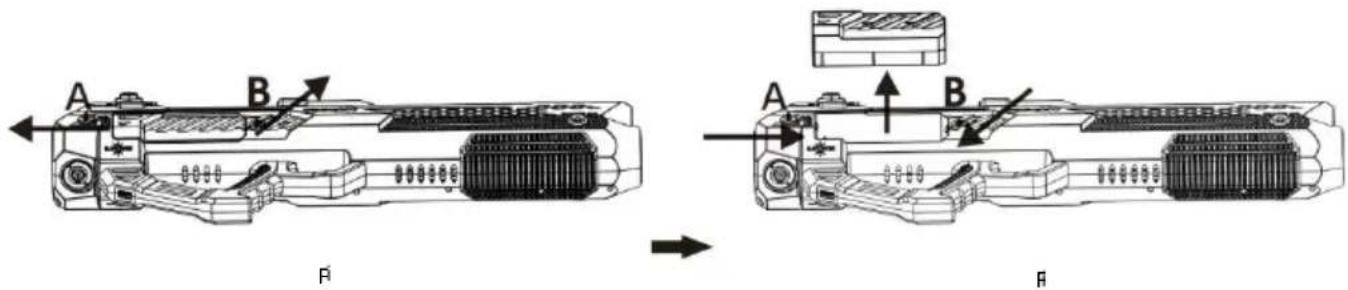
As show in the below figure 1, push up Lock B and pull back Lock A together to unlock the battery. After the battery pops up, Lock A and Lock B will reset automatically as shown in the below figure 2.

Precautions:
- Keep the battery away from flammable materials.
- Do not charge with a current greater than 5C. Make sure someone is present when charging.
- Do not store the battery on unused machines for a long time.
- Do not disassemble or incinerate the battery.
- For environmental protection, properly dispose of used batteries.
5.4 How to Heat the Fog Blaster
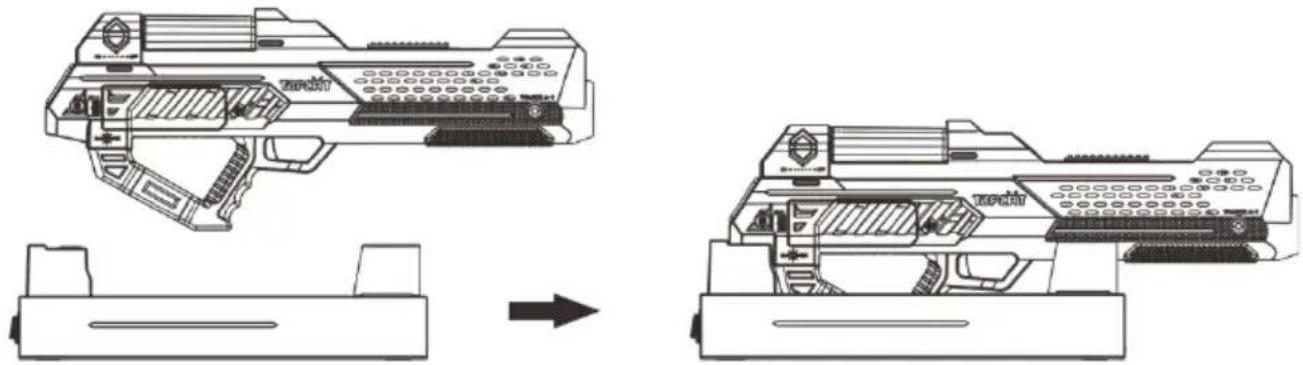
Place the A-1 fog blaster on the Power Base, ensure it is correctly engaged. Power on the Charging Base to heat the fog blaster.
natural_image
Technical line drawing of a futuristic spaceship with control panels and a base panel, showing assembly or design transformation (no text or symbols)During heating, the LCD display shows "Heating up", the LEDs at the Nozzle Trigger Buttons will blink. When the heating is finished, the LEDs turn blue and LCD display shows the fog duration.
After the fog blaster has sufficiently heated up on the Power Base, 60 secs later it will enter power saving mode with the LED display and blaster body LEDs illumination paused.
The LCD display and LED strips will resume when removing the fog blaster from the base or pressing any buttons on the LCD display or triggering fog.
Note: In the power saving mode, heating up is still in process if the blaster's temp has not reached the required temperature.

Introduction to Power Base:
Connect the power cable to a power outlet (AC 120V), power on the Charging Base. The LED strips on the Charging Base will cycle through the color options. After placing the A-1 fog blaster on the power base, the unit begins heating to its optimal temperature. When the blaster body is attached to Power Base for 3 hours, heating protection becomes activated. LED strips on the based shows RED and keeps blinking, meanwhile the Heating Protection Switch shows blue and LED flashes. To release the protection, simply press Heating Protection Switch.
5.5 How to Charge Battery
The Charging Base provides two charging slots.
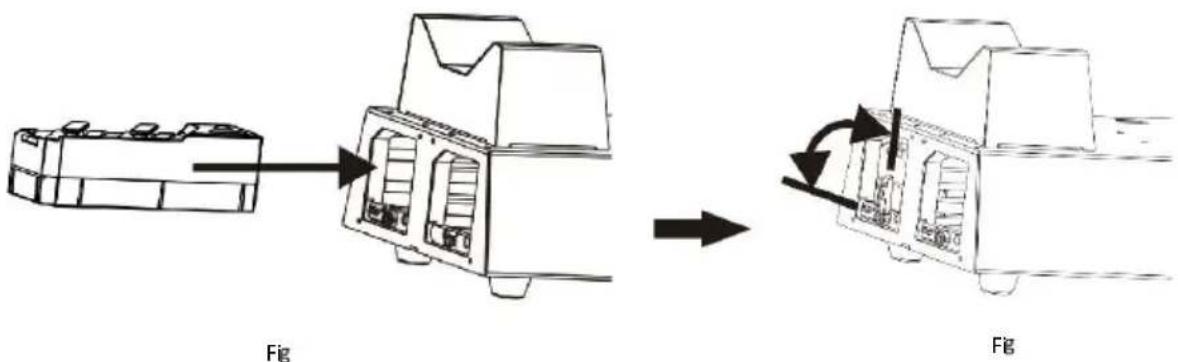
Remove the battery from the Blaster Body and insert it into the charging slot as show in below, then secure the battery by rotating the latch.
natural_image
Diagram showing a mechanical assembly transformation from a base to a final component, with no visible text or symbols.Switch on the power to the Charging Base to start charging. After fully charged, release the base battery latch to eject the battery. Make sure the Charging Base is powered on during battery charging. The digital display above the charging area shows the battery voltage. "FUL" means the battery is fully charged.

Note:
- Please remove the battery from the charging slot in case the Charging Base is powered off. Do not leave the batteries inside the base for a long time.
6 Control Mode & Operation
6.1 Device Control
To access the control panel functions, use the four buttons located underneath the LCD display.
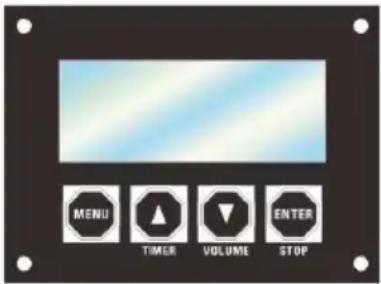
| Button | Function |
| Switch menu pages to select a function | |
| Increases the numeric value of current function | |
| Decreases the numeric value of current function | |
| Save settings |
6.2 Menu Map
| Display | Description | Options | |
| Welcome Page | Thanos A-1 Fog Gun | Start Up Page | |
| Status Page | Heating Up Battery: 100% | The unit is heating up and the current battery level is displayed | |
| Status Page | Heating Stopped Battery: 100% | The unit has stopped heating prematurely and the current battery level is displayedThe Blaster requires placement on the base station to continue the heating process. | |
| Standby Page | Fog Output 30S Battery: 100% | Heating is finished. Current Fog output duration (secs.) and battery level is displayed | |
| Settings | Strong Wind ON | Press ▲ or ▼ to switch the front nozzle booster fan on or off. | ON OFF |
| Fog Color OFF | Press ▲ or ▼ to select the color of the LEDs of the nozzle during fog output | OFF SCROLL WHITE PINK PURPLE SKY BLUE ORANGE YELLOW BLUE GREEN RED | |
| Gun Body Color OFF | Press ▲ or ▼ to select the color of the LEDs of the blaster body and fluid tank | OFF SCROLL WHITE PINK PURPLE SKY BLUE ORANGE YELLOW BLUE GREEN RED | |
| Trigger 1 | Press ▲ or ▼ to select the trigger option.1: Trigger press outputs fog2: Trigger press plus pressing either of illuminated front nozzle buttons is required for fog output. In this mode, the booster fan will engage without fog if enabled when only the trigger is pressed. | 12 | |
| Fluid Sensor ON | Press ▲ or ▼ to switch the low fluid sensor on or off. | ON OFF | |
7 TECHNICAL INFORMATION
7.1 Maintenance
- Please use FROGGY'S FOG Water-Based Fog Fluids to ensure the best performance and effect.
- Any reference to servicing in this user manual will only apply to properly trained, certified technicians. Do not open the housing or attempt any repairs which can lead to damage or malfunction.
- Excessive dust, fluid residue, and dirt will degrade performance and cause overheating. Remove dust from air vents with an air compressor, vacuum, or soft brush. The casing may be cleaned with a damp cloth.
- Do not allow the blaster to become clogged due to residue buildup of fog fluid. Cleaning and preventative maintenance are necessary to keep your machine running issue free. Please follow these instructions for safely cleaning of your Thanos Blaster if output become noticeably decreased. Typical service intervals are every 40 hrs. of machine use. High quality fluid is recommended by the manufacturer to lengthen the amount of time between periods of maintenance as described below.
Tools: Clean lint free cloth, coffee filter or similar fine mesh filter cloth, plastic, or glass container larger than the reservoir size (do not use metal), distilled water and Froggys Fog fluid.
a) Add DISTILLED water to the fog fluid reservoir and install in the machine.
b) Run the machine for 6 x 30 sec bursts. Do not allow the bottle to become empty.
c) Fog will come out the initially, followed by distilled water steam.
d) Remove the reservoir, empty the distilled water, and replace with fresh fog fluid.
e) Trigger the fog output for a single 30 sec cycle.
f) The fog fluid in the internal plumbing of the machine acts as lubricant for the fog pump's plastic and rubber components during storage.
g) Wipe machine clean with clean lint free cloth.
h) Remove the fluid reservoir for storage. Store the blaster once the machine is cool to the touch.
i) Store the machine in a cool, dry place when not in use. Avoid freezing temperatures and high heat above 120 degrees F. Above 120 degrees and humid/damp locations can cause control board electrical issues.
j) If possible, remove from storage after 6 months and operate the machine for 2-3 cycles, then repeat step G & H.
7.2 Storage
7.2.1 Machine Storage
Before storing the machine, wipe machine shell with a soft cloth and empty the fluid tank.
7.3 Troubleshooting
| Errors | Symptom | Potential Cause | Solution |
| No Fluid | Refer to “MENU MAP” chapter to for more information | No Fluid in the Tank | Refill the fluid |
| Pump Problem | Contact Dealer for Service | ||
| Heating Failure | Refer to “MENU MAP” chapter to for more information | Heater Issue | Contact Dealer for Service |
| E11 | Charging Base Display shows E11 and alarms | Battery Test Issue | Remove the battery and reseat it or move to a different charging slot. |
8 Warranty
Save these instructions. 2 Year Limited Warranty: Valid from the date of purchase. Warranty covers manufacturing defects only and does not cover misuse or abuse of the machine. Serial number, place of purchase with dated valid receipt must be submitted at time of service. Warranty is only valid with-in the United States (Lower 48). Buyer may be responsible for shipping fees associated with repairs.
- Table of Contents
- BEFORE YOU BEGIN.... 3
- INTRODUCTION....4
- TECHNICAL SPECIFICATIONS....5
- SETUP 6
- OPERATION....6
- Control Mode & Operation....9
- TECHNICAL INFORMATION .... 10
- Warranty 11
- BEFORE YOU BEGIN
- What Is Included
- Unpacking Instructions
- Symbols
- Disclaimer
- Safety Notes
- Personal Safety
- Mounting and Rigging
- Power and Wiring
- Operation
- INTRODUCTION
- Description
- Features
- Product Overview
- Product Dimensions
- TECHNICAL SPECIFICATIONS
- SETUP
- AC Power
- OPERATION
- Fluid Tank Installation
- Battery Installation and Removal
- Precautions:
- How to Heat the Fog Blaster
- How to Charge Battery
- Control Mode & Operation
- Device Control
- Menu Map
- TECHNICAL INFORMATION
- Maintenance
- Storage
- Machine Storage
- Troubleshooting
- Warranty
Brand : Froggy's Fog
Model : Thanos A-1
Category : Effects machine