
50FX20B - Television HITACHI - Free user manual and instructions
Find the device manual for free 50FX20B HITACHI in PDF.


| Product Type | Television |
| Brand | Hitachi |
| Model | 50FX20B |
| Dimensions (H x W x D) | 51 5/8 in x 43 1/4 in x 23 7/16 in (131.1 cm x 109.9 cm x 59.5 cm) |
| Weight | 219 lbs (99.3 kg) |
| Power Supply | AC 120V, 60Hz |
| Power Consumption | Refer to rear panel (typical for large projection TV) |
| Antenna Input Impedance | 75 Ohm |
| Channel Coverage | 181 channels (VHF 2-13, UHF 14-69, CATV Mid to Ultra bands) |
| Video Inputs | 4 composite video (RCA), 2 S-Video, 1 Component Y/Pb/Pr |
| Audio Inputs | Stereo RCA (L/R) for each video input, S-Video carries audio separately |
| Monitor Output | Composite video and stereo audio (fixed level) |
| Audio to Hi-Fi Output | Variable stereo audio for external amplifier |
| Rear Speaker Terminals | 8 Ohm impedance for surround speakers |
| Remote Control | CLU-4311UG with VCR/DVD/CBL/SAT control |
| Perfect Picture System | Automatic contrast, color, and noise reduction adjustment |
| Digital Convergence (Digital Array) | 9-point convergence adjustment for red and blue |
| Picture-in-Picture | Dual tuner, PIP with Freeze, Swap, Move, and Cursor position |
| Special Features | Auto Link, Closed Caption, Family Favorites, Parental Control, 4 Event Program, Theater Modes |
| Horizontal Resolution | 850 lines |
Frequently Asked Questions - 50FX20B HITACHI
User questions about 50FX20B HITACHI
0 question about this device. Answer the ones you know or ask your own.
Ask a new question about this device
Download the instructions for your Television in PDF format for free! Find your manual 50FX20B - HITACHI and take your electronic device back in hand. On this page are published all the documents necessary for the use of your device. 50FX20B by HITACHI.
USER MANUAL 50FX20B HITACHI
IMPORTANT SAFETY INSTRUCTIONS 2-3
FIRST TIME USE 4-16
THE REMOTE CONTROL 17-28

ULTRATEC BIT-MAP ON-SCREEN DISPLAY 29-54
USEFUL INFORMATION INDEX 55-60
SAFETY POINTS YOU SHOULD KNOW ABOUT YOUR HITACHI TELEVISION
Our reputation has been built on the quality, performance, and ease of service of HITACHI televisions.
Safety is also foremost in our minds in the design of these units. To help you operate these products properly, this section illustrates safety tips which will be of benefit to you. Please read it carefully and apply the knowledge you obtain from it to the proper operation of your HITACHI television.
Please fill out your warranty card and mail it to HITACHI. This will enable HITACHI to notify you promptly in the improbable event that a safety problem should be discovered in your product model.
Follow all warnings and instructions marked on this color television.

CAUTION
RISK OF ELECTRIC SHOCK DO NOT OPEN

CAUTION: TO REDUCE THE RISK OF ELECTRIC SHOCK, DO NOT REMOVE COVER (OR BACK).
NO USER SERVICEABLE PARTS INSIDE.
REFER SERVICING TO QUALIFIED SERVICE PERSONNEL.

The lightning flash with arrowhead symbol, within an equilateral triangle, is intended to alert the user to the presence of uninsulated "dangerous voltage" within the product's enclosure that may be of a sufficient magnitude to constitute a risk of electric shock to persons.

The exclamation point within an equilateral triangle, is intended to alert the user to the presence of important operating and maintenance (servicing) instructions in the literature accompanying the appliance.
WARNING:
TO PREVENT FIRE OR SHOCK HAZARD, DO NOT EXPOSE THIS TELEVISION TO RAIN OR MOISTURE.
NOTE: • There are no user serviceable parts inside the color television.
- Model and serial numbers are indicated on back side of the television.
- This television is not intended for use in a computer room.
CAUTION: Adjust only those controls that are covered in the instructions, as improper changes or modifications not expressly approved by HITACHI could void the user's authority to operate the television.
MODIFICATIONS: The FCC requires the user to be notified that any changes or modifications made to this device that are not expressly approved by Hitachi America, Ltd. Home Electronics Division may void the user's authority to operate the equipment.
POWER SOURCE
THIS TELEVISION IS DESIGNED TO OPERATE ON 120 VOLTS 60Hz, AC CURRENT. INSERT THE POWER CORD INTO A 120 VOLT 60Hz OUTLET.
TO PREVENT ELECTRIC SHOCK, DO NOT USE THE COLOR TELEVISION'S (POLARIZED) PLUG WITH AN EXTENSION CORD, RECEPTACLE, OR OTHER OUTLET UNLESS THE BLADES AND GROUND TERMINAL CAN BE FULLY INSERTED TO PREVENT BLADE EXPOSURE.
NEVER CONNECT THE COLOR TELEVISION TO 50HZ, DIRECT CURRENT, OR ANYTHING OTHER THAN THE SPECIFIED VOLTAGE.
NOTE: This television receiver will display television closed captioning, (cc or □), in accordance with paragraph 15.119 of the FCC rules.

CAUTION: Never remove the back cover of the television as this can expose you to very high voltages and other hazards. If the television does not operate properly, unplug the television and call your authorized dealer or service center.
Read before operating equipment
Follow all warnings and instructions marked on this television.
- Read these instructions.
- Keep these instructions.
- Heed all warnings.
- Follow all instructions.
- Do not use this apparatus near water.
-
Clean only with a dry cloth.
-
Do not block any ventilation openings. Install in accordance with the manufacturer's instructions.
-
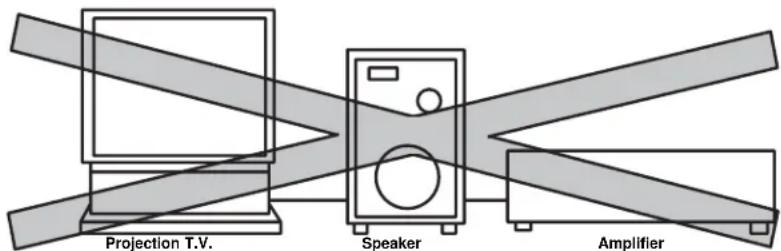
Do not install near any heat sources such as radiators, heat registers, stoves, or other apparatus (including amplifiers) that produce heat.
-
Do not defeat the safety purpose of the polarized or grounding-type plug. A polarized plug has two blades with one wider than the other. A grounding type plug has two blades and a third grounding prong. The wide blade or the third prong are provided for your safety. If the provided plug does not fit into your outlet, consult an electrician for replacement of the obsolete outlet.
-
Protect the power cord from being walked on or pinched particularly at plugs, convenience receptacles, and the point where they exit from the apparatus.
-
Only use the attachments/accessories specified by the manufacturer.
-
Use only with the cart, stand, tripod,

bracket, or table specified by the manufacturer, or sold with the apparatus. When a cart is used, use caution when moving the cart/apparatus combination to avoid injury from tip-over.
-
Unplug this apparatus during lightning storms or when unused for long periods of time.
-
Refer all servicing to qualified service personnel. Servicing is required when the apparatus has been damaged in any way, such as power-supply cord or plug is damaged, liquid has been spilled or objects have fallen into apparatus, the apparatus has been exposed to rain or moisture, does not operate normally, or has been dropped.
Do not place any objects on the top of the television which may fall or cause a child to climb to retrieve the objects.
- Televisions are designed to comply with the recommended safety standards for tilt and stability.
Do not apply excessive pulling force to the front, or top, of the cabinet which could cause the product to overturn resulting in product damage and/or personal injury. - Follow instructions for wall, shelf or ceiling mounting as recommended by the manufacturer.
- An outdoor antenna should not be located in the vicinity of overhead power lines or other electrical circuits.
- If an outside antenna is connected to the receiver be sure the antenna system is grounded so as to provide some protection against voltage surges and built up static charges. Section 810 of the National Electric Code, ANSI/NFPA No. 70-1984, provides information with respect to proper grounding for the mast and supporting structure, grounding of the lead-in wire to an antenna discharge unit, size of grounding connectors, location of antenna-discharge unit, connection to grounding electrodes and requirements for the grounding electrode.
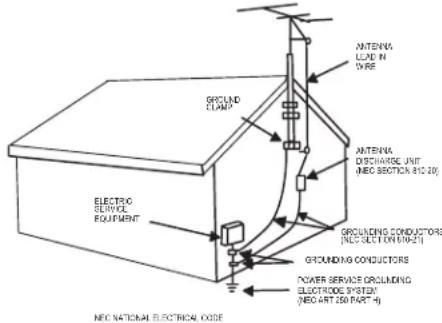
Note to the CATV system installer: This reminder is provided to call the CATV system installer's attention to Article 820-40 of the NEC that provides guidelines for proper grounding and, in particular, specifies that the cable ground shall be connected to the grounding system of the building, as close to the point of cable entry as practical.
Disposal of this product may require specific instructions pertaining to your resident state. For disposal or recycling information, please contact your local authorities or the Electronic Industries Alliance: www.eiae.org.
PREVENTION OF PATTERN BURN
Continuous on-screen displays such as video games, stock market quotations, computer generated graphics, and other fixed (non-moving) patterns can cause permanent damage to television receivers. Such "PATTERN BURNS" constitute misuse and are NOT COVERED by your HITACHI Factory Warranty. When using the Picture-in-Picture function, the sub-picture should not be left permanently in one corner of the screen or a "PATTERN BURN" may develop over a long period of time.
PUBLIC VIEWING OF COPYRIGHTED MATERIAL
Public viewing of programs broadcast by TV stations and cable companies, as well as programs from other sources, may require prior authorization from the broadcaster or owner of the video program material.
Check to make sure you have the following accessories before disposing of the packing material.
| PART NAME | PART NO. | ILLUSTRATION | |
| CLU-4311UGREMOTE CONTROL | HL01651 | 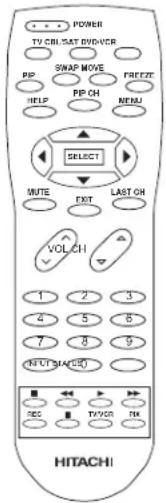 | 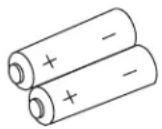 |
| 1. | 2. | ||
- Remote Control Unit CLU-4311UG (Part No. HL01651).
- Two "AA" size, 1.5V batteries (For Remote Control Unit).
REMOTE CONTROL BATTERY INSTALLATION AND REPLACEMENT
- Open the battery cover of the remote control by pushing the notched part of the cover with your fingers and pulling the cover off.
- Insert two new "AA" size batteries for the remote control. When replacing old batteries, push them towards the springs and lift them out.
- Match the batteries to the (+) and (-) marks in the battery compartment.
- Replace the cover.
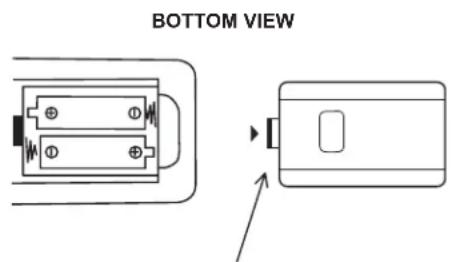
Push in and lift up on tab to remove back cover.

CAUTION: Danger of explosion if battery is incorrectly replaced. Replace only with the same or equivalent type.
ANTENNA
Unless your TV is connected to a cable TV system or to a centralized antenna system, a good outdoor color TV antenna is recommended for best performance. However, if you are located in an exceptionally good signal area that is free from interference and multiple image ghosts, an indoor antenna may be sufficient.
LOCATION
Select an area where sunlight or bright indoor illumination will not fall directly on the picture screen. Also, be sure that the location selected allows a free flow of air to and from the perforated back cover of the set.
To avoid cabinet warping, cabinet color changes, and increased chance of set failure, do not place the TV where temperatures can become excessively hot, for example, in direct sunlight or near a heating appliance, etc.
VIEWING
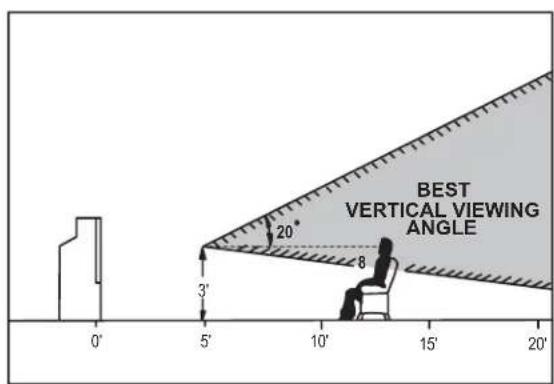
The major benefit of the HITACHI Projection Television is its large viewing screen. To see this large screen at its best, test various locations in the room to find the optimum spot for viewing.
The best picture is seen by sitting directly in front of the TV and about 10 to 18 feet from the screen. Picture brightness decreases as the viewer moves to the left and right of the receiver.
During daylight hours, reflections from outside light may appear on the screen. If so, drapes or screens can be used to reduce the reflection or the TV can be located in a different section of the room.
If the TV's audio output will be connected to a Hi-Fi system's external speakers, the best audio performance will be obtained by placing the speakers equidistant from each side of the receiver cabinet and as close as possible to the height of the picture screen center. For best stereo separation, place the external speakers at least four feet from the side of the TV, place the surround speakers to the side or behind the viewing area. Differences in room sizes and acoustical environments will require some experimentation with speaker placement for best performance.
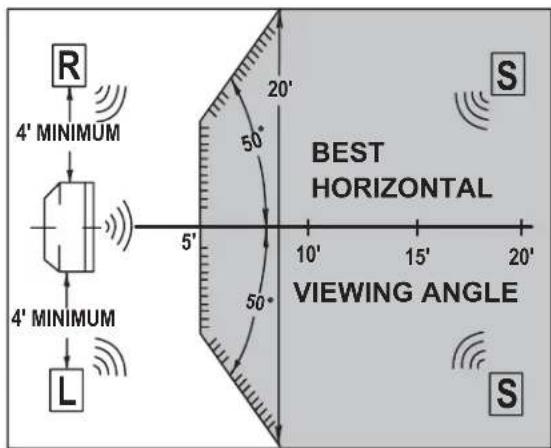

CAUTION: Magnetic fields, such as those of external speakers, may cause the picture to distort if they are placed too close to the television. Move the magnetic field source away from the television until there is no picture distortion.
Most video/audio connections between components can be made with shielded video and audio cables that have phono connectors. For best performance, video cables should use 75-Ohm coaxial shielded wire. Cables can be purchased from most stores that sell audio/video products. Below are illustrations and names of common connectors. Before purchasing any cables, be sure of the output and input connector types required by the various components and the length of each cable.
natural_image
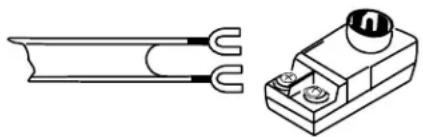
Technical line drawing of a U-shaped conductor and its corresponding electrical terminal block (no text or symbols)300-Ohm Twin Lead Connector
This outdoor antenna cable must be connected to an antenna adapter (300-Ohm to 75-Ohm).

"F" Type 75-Ohm Coaxial Antenna Connector
For connecting RF signals (antenna or cable TV) to the antenna terminal on the television.

Phono Connector
Used on all standard video and audio cables which connect to inputs and outputs located on the television's rear jack panel and front control panel.

S-VIDEO (Super Video) Connector
This connector is used on camcorders, VCRs, and laserdisc players with an S-VIDEO feature in place of the standard video cable to produce a high quality picture.
ANTENNA CONNECTIONS TO REAR JACK PANEL
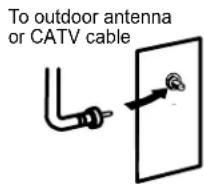
VHF (75-Ohm) antenna/CATV (Cable TV)
When using a 75-Ohm coaxial cable system, connect the outdoor antenna or CATV coaxial cable to UHF/VHF (75-Ohm) terminal.
VHF (300-Ohm) antenna/UHF antenna
When using a 300-Ohm twin lead from an outdoor antenna, connect the VHF or UHF antenna leads to screws of the VHF or UHF adapter. Plug the adapter into the antenna terminal on the TV.
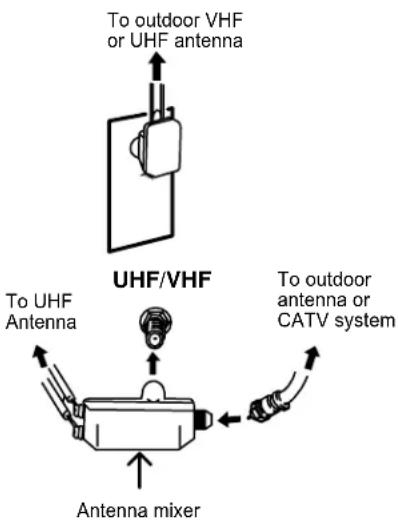
When both VHF and UHF antennas are connected
Attach an optional antenna cable mixer to the TV antenna terminal, and connect the cables to the antenna mixer. Consult your dealer or service store for the antenna mixer.
FRONT VIEW
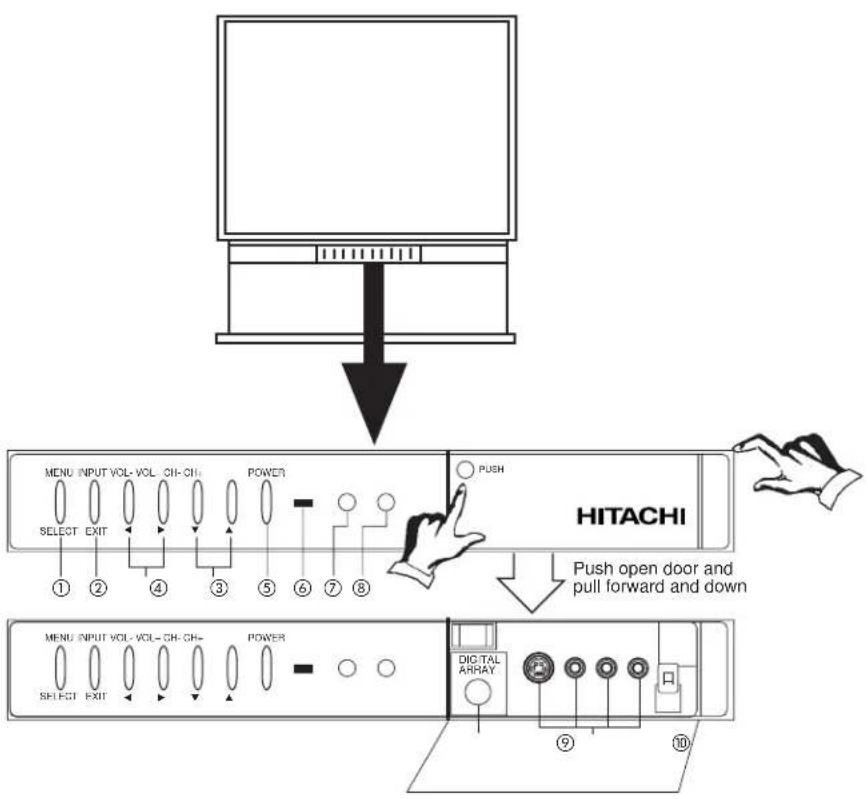
flowchart
graph TD
    A["Computer"] --> B["Menu Input Vol - Vol - OH - CH"]
    B --> C["SELECT EXIT"]
    C --> D["MENU INPUT VOL - VOL - OH - CH"]
    D --> E["POWER"]
    E --> F["PUSH"]
    F --> G["HITACHI"]
    G --> H["Push open door and pull forward and down"]
    H --> I["MENU INPUT VOL - VOL - OH - CH"]
    I --> J["POWER"]
    J --> K["DIO TAL ARRAY"]
    K --> L["⑨"]
    L --> M["⑩"]
① MENU/SELECT button
This button allows you to enter the MENU, making it possible to set TV features to your preference without using the remote. This button also serves as the SELECT button when in MENU mode.
② INPUT/EXIT button
Press this button to select antenna sources, VIDEO: 1, 2, 3 or 4. Your selection is shown in the top right corner of the screen. This button also serves as the EXIT button when in MENU mode.
③ CHANNEL selector
Press these buttons until the desired channel icon appears in the top right corner of the TV screen. These buttons also serve as the cursor down (▼) and up (▲) buttons when in MENU mode.
④ VOLUME level
Press these buttons for your desired sound level. The volume level will be displayed on the TV screen. These buttons also serve as the cursor left (◀) and right (▶) buttons when in MENU mode.
⑤ POWER button
Press this button to turn the TV on or off.
NOTE: Your HITACHI Projection TV will appear to be turned OFF if there is no video input when VIDEO: 1, 2, 3 or 4 is selected. Check the POWER Light to make sure the TV is turned off when not in use. To see an auto-demonstration of the on-screen displays with HELP text displayed, press and hold the POWER button on the TV set for approximately five seconds. Press the EXIT button to end the auto-demonstration.
⑥ POWER light
You will see a red light when the TV is turned on.
⑦ PERFECT PICTURE sensor
The PERFECT PICTURE sensor will make automatic picture adjustments depending on the amount of light in the room to give the best picture. (see page 51)
⑧ REMOTE CONTROL sensor
Point your remote at this area when selecting channels, adjusting volume, etc.
⑨ DIGITAL ARRAY
Use this button to enter DIGITAL ARRAY mode. This will allow you to adjust your picture quality to optimum performance. (see page 37)
⑩ FRONT INPUT JACKS (for VIDEO: 3)
Use these audio/video jacks for a quick hook-up from a camcorder or VCR to instantly view your favorite show or new recording. Press the INPUT button until VIDEO: 3 appears in the top right corner of the TV screen. If you have mono sound, insert the audio cable into the left audio jack.
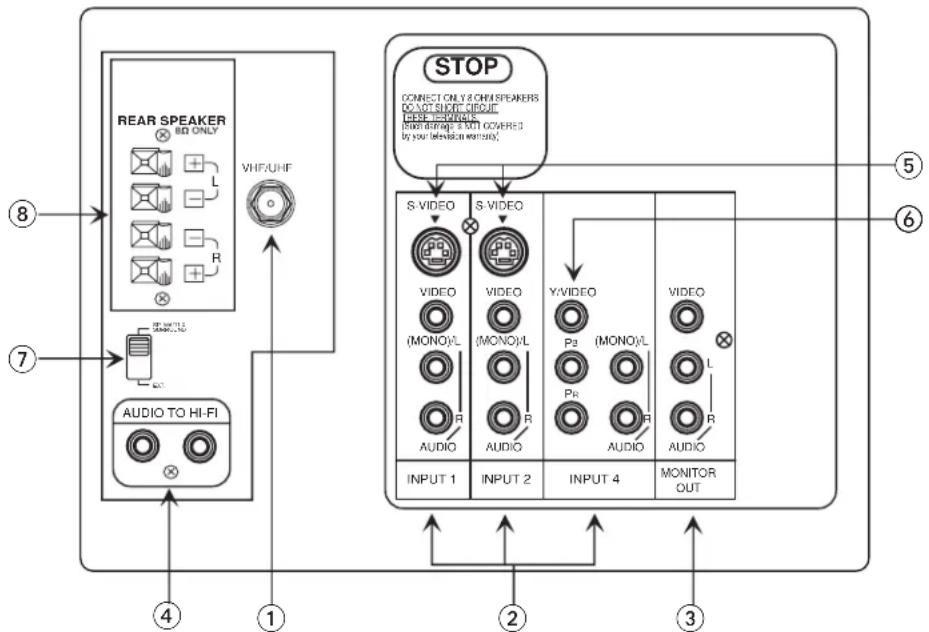
flowchart
graph TD
    A["REAR SPEAKER"] --> B["VHF/UHF"]
    B --> C["OUTPUT"]
    C --> D["AUDIO TO HI-FI"]
    D --> E["OUTPUT 1"]
    E --> F["INPUT 2"]
    F --> G["INPUT 4"]
    G --> H["MONITOR OUT"]
    I["STOP"] --> J["S-VIDEO"]
    J --> K["VIDEO (MONO)L"]
    K --> L["VIDEO (MONO)L"]
    L --> M["Y-VIDEO"]
    M --> N["Ps (MONO)L"]
    N --> O["Pr (MONO)L"]
    O --> P["AUDIO"]
    P --> Q["MONITOR OUT"]
    R["CONNECT ONLY & CHA SPEAKERS DO NOT SWITCH COPY"] --> J
    S["INFORMATION FROM COVERED BY YOUR MENSIVE WIDTH"] --> J
    T["OUTPUT"] --> U["OUTPUT 4"]
    V["OUTPUT"] --> W["OUTPUT 2"]
    X["OUTPUT"] --> Y["OUTPUT 1"]
① ANTENNA INPUT
Use an "F" type coaxial cable to connect an antenna or cable TV (CATV) output to this rear jack.
② AUDIO/VIDEO INPUTS 1, 2, 4
The INPUT button will step through each video source and antenna source input each time it is pressed. Use the audio and video inputs to connect external devices, such as VCRs, camcorders, laserdisc players, DVD players etc. (If you have mono sound, insert the audio cable into the left audio jack.)
NOTE: You may use VIDEO or S-VIDEO inputs to connect to INPUT 1 or 2, but note that only one of these may be used at a time.
③ MONITOR OUT
These jacks provide fixed audio and video signals which are used for recording.
④ AUDIO TO HI-FI
These jacks provide variable audio output to a separate stereo amplifier. With this connection, the audio to the stereo can be controlled by the television's main volume.
⑤ S-VIDEO INPUTS 1 and 2
INPUTS 1 and 2 provides S-VIDEO (Super Video) jacks for connecting equipment with S-VIDEO output capability.
⑥ COMPONENT VIDEO: Y-P B P R INPUT 4
INPUT 4 provides Y- P_BP_R jacks for connecting equipment with this capability, such as a DVD player.
NOTE: Your component outputs may be labeled Y, B-Y, and R-Y. In this case, connect the components B-Y output to the TV's P_B input and the components R-Y output to the TV's P_R input.
Your component outputs may be labeled Y - C_B C_R . In this case, connect the components C_B output to the TV's P_B input and the components C_R output to the TV's P_R input.
It may be necessary to adjust TINT or turn AUTO COLOR-ON to obtain optimum picture quality when using the Y-P B P R inputs.
To ensure no copyright infringement, the MONITOR OUT output will be abnormal, when using the Y-P B P R jacks.
Y-P_BP_R can only receive 480i signals.
Input 4 (Y/VIDEO) can be used for standard video input.
Use this switch to choose between the surround and external speaker features. See page 16 for AUDIO SYSTEM SETUP. The TV's Internal Speakers will be switched off when "EXT." is selected.
⑧ REAR SPEAKER Terminals
These terminals are used to connect external speakers, which are used for the surround sound feature. The volume level is controlled by the remote control main volume buttons. Use speakers with 8 Ohm impedance only.
flowchart
graph TD
    A["Outside antenna or cable TV coaxial cable"] --> B["Cable TV Box"]
    B --> C["2-Way signal splitter"]
    C --> D["STOP"]
    D --> E["Output"]
    D --> F["DVD Player, Laserdisc player, etc."]
    D --> G["VCR #1"]
    D --> H["VCR #2"]
    D --> I["Optional, see tips on page 11"]
    I --> J["ANT IN S-VHS OUTPUT"]
    J --> K["Audio TO HF R"]
    K --> L["REAR SPEAKER VHF-LHF"]
    L --> M["L R INPUT"]
    M --> N["S stereo System Amplifier"]
    N --> O["OUTPUT INPUT 1"]
    N --> P["OUTPUT INPUT 2"]
    N --> Q["OUTPUT INPUT 4"]
    N --> R["OUTPUT INPUT 5"]
    N --> S["OUTPUT INPUT 6"]
    N --> T["OUTPUT INPUT 7"]
    N --> U["OUTPUT INPUT 8"]
    N --> V["OUTPUT INPUT 9"]
    N --> W["OUTPUT INPUT 10"]
    style A fill:#f9f,stroke:#333
    style B fill:#ccf,stroke:#333
    style C fill:#cfc,stroke:#333
    style D fill:#fcc,stroke:#333
    style E fill:#cff,stroke:#333
    style F fill:#ffc,stroke:#333
    style G fill:#cfc,stroke:#333
    style H fill:#cfc,stroke:#333
    style I fill:#fcc,stroke:#333
    style J fill:#ffc,stroke:#333
    style K fill:#cfc,stroke:#333
    style L fill:#cfc,stroke:#333
    style M fill:#cfc,stroke:#333
    style N fill:#cfc,stroke:#333
    style O fill:#cfc,stroke:#333
    style P fill:#cfc,stroke:#333
    style Q fill:#cfc,stroke:#333
    style R fill:#cfc,stroke:#333
    style S fill:#cfc,stroke:#333
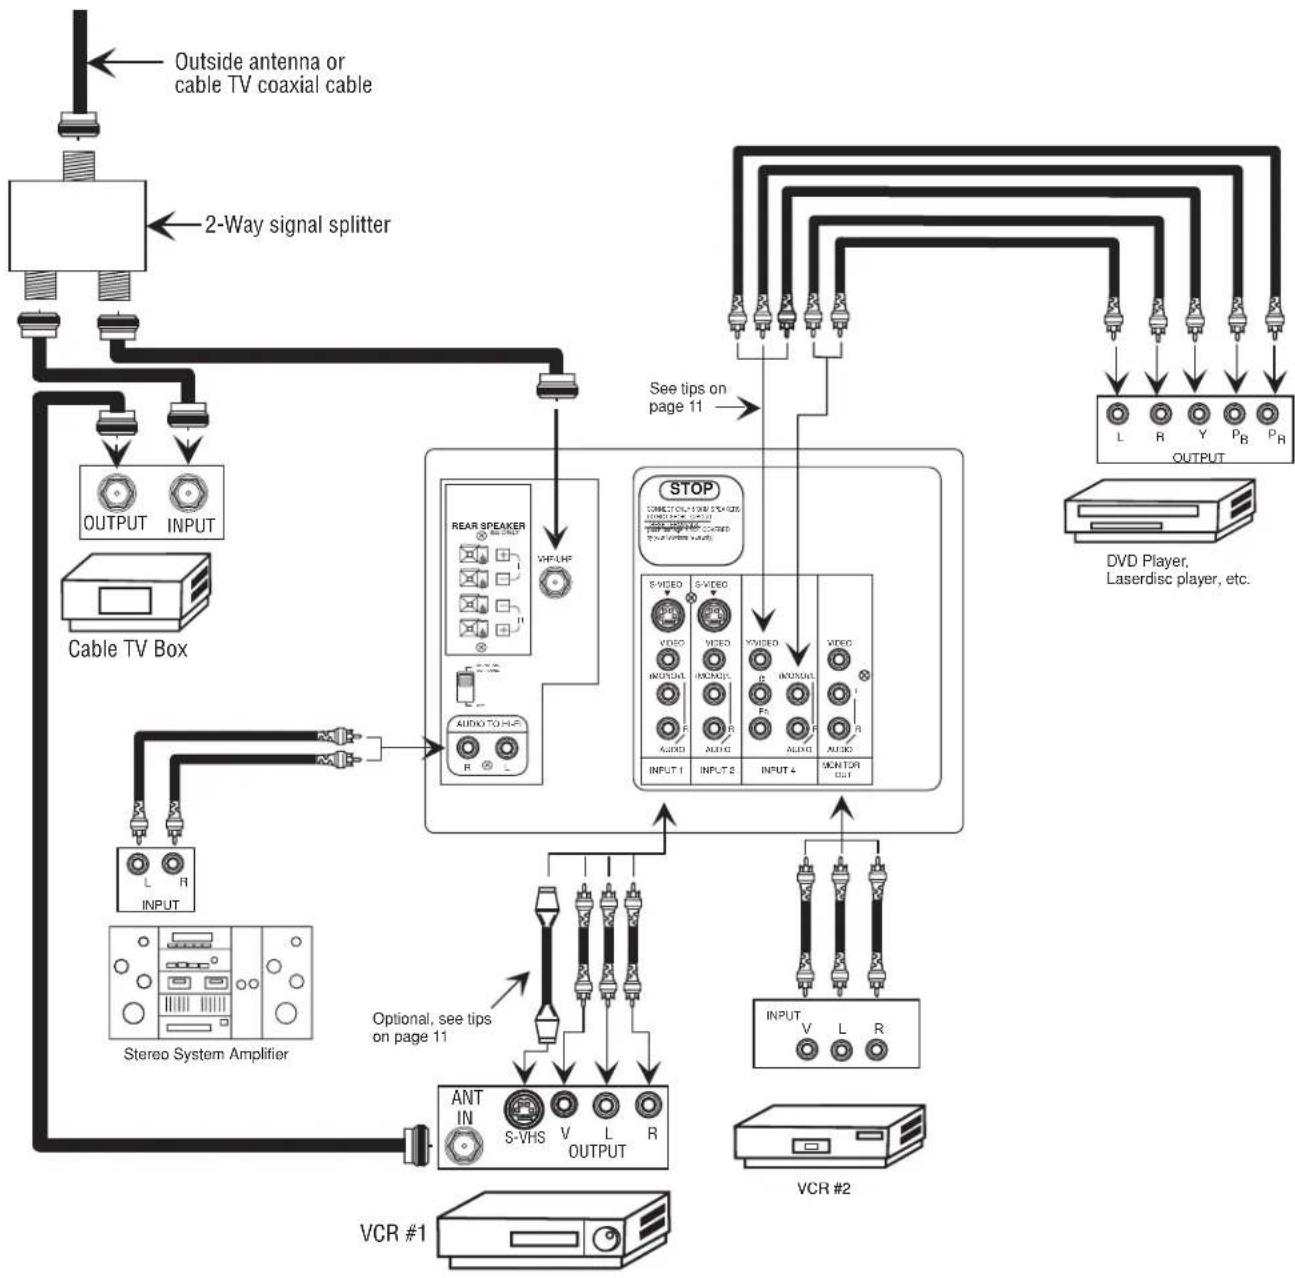
Typical full feature setup. Follow connections that pertain to your personal entertainment system.
CONNECT AFTER TURNING THE POWER OF THE TV OFF.
Press the Right Speaker red button and insert the positive (+) lead wire into the hole next to the button. Once the wire is in place, pull the red button back to original position and the wire is locked into place. In the same manner, press the Right Speaker black button and insert the negative (-) lead wire. Repeat this procedure for the Left Speaker.

CAUTION: Do not short speaker terminal, (do not connect a wire directly across any two terminals). This could cause damage to your audio outputs or other damage to your TV.
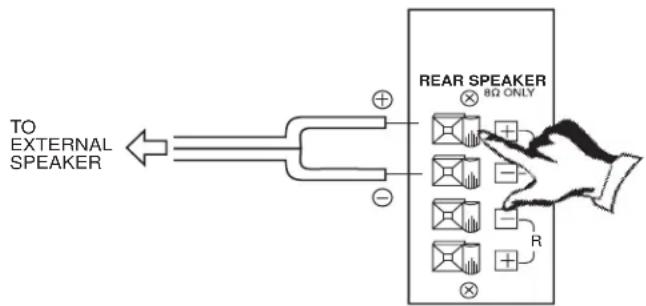

CAUTION: Do not connect speakers simultaneously to the REAR SPEAKER terminal of the Projection TV and an external amplifier. This could damage both the TV and the speakers. Your TV was designed to use 8-Ohm speakers only. Any other type may degrade the audio performance of your entertainment system.
TIPS ON REAR PANEL CONNECTIONS
S-VIDEO connections are provided for high performance laserdisc players, VCRs etc. that have this feature. Use these connections in place of the standard video connection if your device has this feature.
If your device has only one audio output (mono sound), connect it to the left audio jack on the television.
Refer to the operating guide of your other electronic equipment for additional information on connecting your hook-up cables.
A single VCR can be used for VCR#1 and VCR#2, but note that a VCR cannot record its own video or line output. (INPUT 1 in example on page 10). Refer to your VCR operating guide for more information on line input-output connection.
You may use VIDEO or S-VIDEO inputs to connect to INPUT 1 and 2, but note that only one of these may be used at a time.
Connect only 1 component to each input jack.
COMPONENT VIDEO: Y-P B P R connections are provided for high performance components, such as DVD players. Use these connections in place of the standard video connection if your device has this feature.
Your component outputs may be labeled Y, B-Y, and R-Y. In this case, connect the components B-Y output to the TV's P_B input and the components R-Y output to the TV's P_R input.
Your component outputs may be labeled Y-C B C R . In this case, connect the components C B output to the TV's P B input and the components C R output to the TV's P R input.
It may be necessary to adjust TINT or turn AUTO COLOR-ON to obtain optimum picture quality when using the Y-PBPR inputs. (see pages 50 and 51)
To ensure no copyright infringement, the MONITOR OUT output will be abnormal, when using the Y-P B P R jacks.
CONNECTING EXTERNAL AUDIO AMPLIFIER
To control the audio level of an external audio amplifier with the remote control, connect the system as shown below.
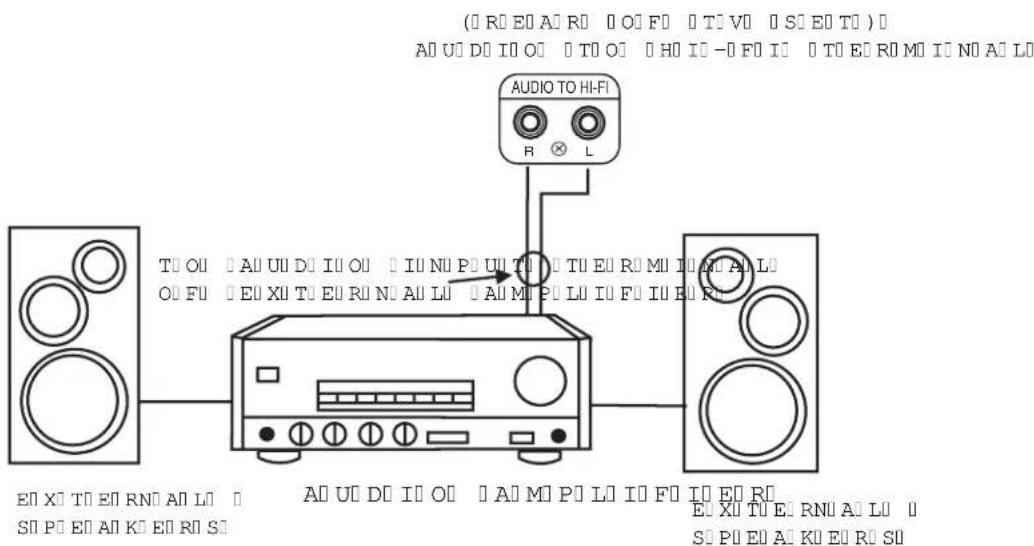
NOTE: To prevent damage to the speaker and distorted sound, set the volume control of the audio amplifier lower and adjust the sound using the remote control of the TV set.
The exact arrangement you use to connect the VCR, camcorder, laserdisc player, and DVD player to your TV set is dependent on the model and features of each component. Check the owner's manual of each component for the location of video and audio inputs and outputs.
The following connection diagrams are offered as suggestions. However, you may need to modify them to accommodate your particular assortment of components and features. For best performance, video and audio cables should be made from coaxial shielded wire.
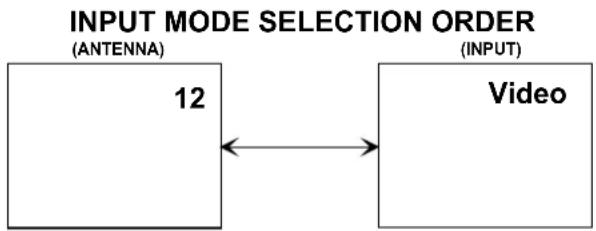
Before Operating External Video Source
The input mode is changed every time the INPUT button is pressed as shown below. Connect an external source to the INPUT terminal, then press the INPUT button as necessary to view the input source. (see page 20)
flowchart
graph LR
    A["12"] --> B["Video"]
    style A fill:#fff,stroke:#000
    style B fill:#fff,stroke:#000
NOTE: When the TV is set to VIDEO and a video signal is not received from the VIDEO INPUT jack on the jack panel of the TV (i.e., VCR/laserdisc player, etc. is not connected or the video device is OFF), the set will appear to be OFF.
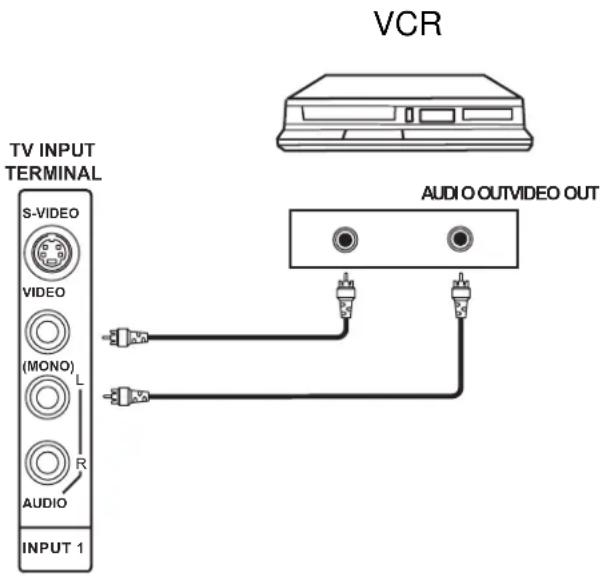
CONNECTING A MONAURAL AUDIO VCR OR LASERDISC PLAYER
- Connect the cable from the VIDEO OUT of the VCR or the laserdisc player to the INPUT (VIDEO) jack on the TV set below.
- Connect the cable from the AUDIO OUT of the VCR or the laserdisc player to the INPUT L/(MONO) AUDIO jack.
- Press the INPUT button to view the program from the VCR or the laserdisc player. The VIDEO icon disappears automatically after approximately eight seconds.
- Press the INPUT button to return to the previous channel.
CONNECTING A STEREO VCR OR STEREO LASERDISC PLAYER
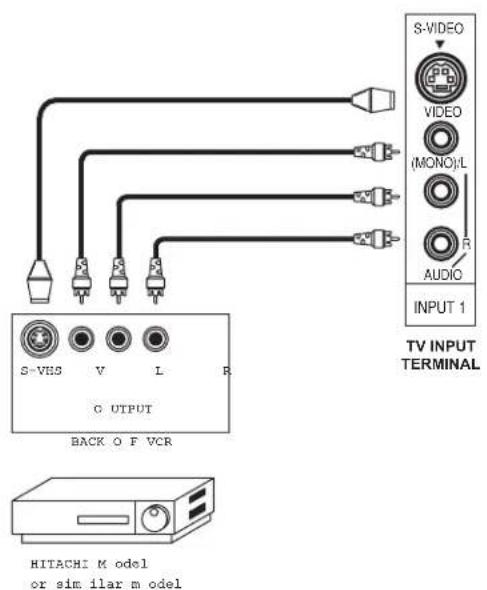
- Connect the cable from the VIDEO OUT of the VCR or the laserdisc player to the INPUT (VIDEO) jack on the TV set below.
- Connect the cable from the AUDIO OUT R of the VCR or the laserdisc player to the INPUT(AUDIO/R) jack.
- Connect the cable from the AUDIO OUT L of the VCR or the laserdisc player to the INPUT(AUDIO/L) jack.
- Press the INPUT button to view the program from the VCR or laserdisc player. The VIDEO icon disappears automatically after approximately eight seconds.
- Press the INPUT button to return to the previous channel.
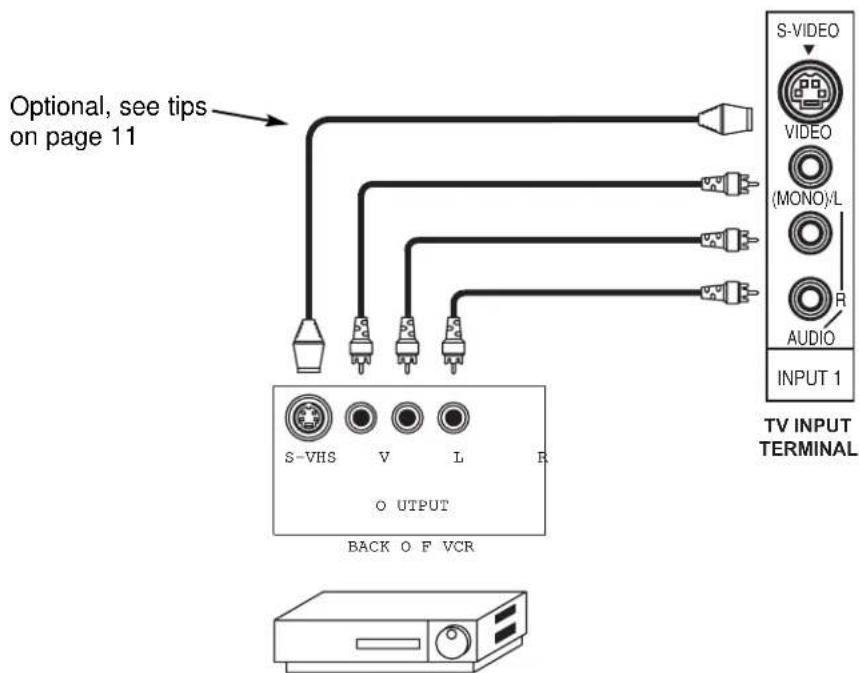
HITACHI M odel or sim ilar m odel
NOTE: Completely insert the connection cord plugs when connecting to rear panel jacks. The picture that is played back will be abnormal if the connection is loose.
If you have an S-VHS VCR, use the S-INPUT cable in place of the standard video cable.
A single VCR can be used for VCR #1 and VCR #2, but note that a VCR cannot record its own video or line output. (INPUT 1 in example on page 10) Refer to your VCR operating guide for more information on line input-output connections.
CONNECTING A STEREO LASERDISC PLAYER OR DVD PLAYER TO INPUT 4.
- Connect the cable from the Y OUT of the Laserdisc or the DVD player to the INPUT 4 (Y) jack as shown on the TV set below.
- Connect the cable from the P_B OUT, C_B OUT or B-Y OUT of the Laserdisc or the DVD player to the INPUT 4 ( P_B ) jack, as shown on the TV set below.
- Connect the cable from the P_R OUT, C_R OUT or R-Y OUT of the Laserdisc or the DVD player to the INPUT 4 ( P_R ) jack, as shown on the TV set below.
- Connect the cable from the AUDIO OUT R of the Laserdisc or DVD player to the INPUT 4 (AUDIO/R) jack.
- Connect the cable from the AUDIO OUT L of the Laserdisc or DVD player to the INPUT 4 (AUDIO/L) jack.
- Press the INPUT button until Y-PbPr:4 appears, to view the program from the Laserdisc or DVD player. The Y-PbPr:4 icon disappears automatically after approximately eight seconds.
- Press the INPUT button to return to the previous channel.
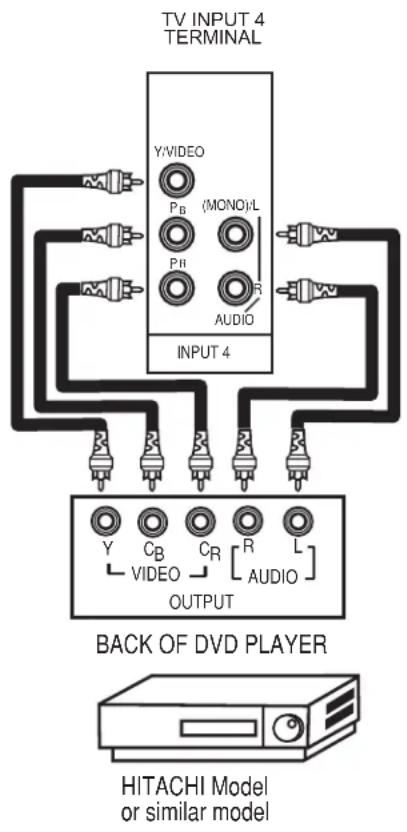
NOTES: Completely insert the connection cord plugs when connecting to rear panel jacks. The picture that is played back will be abnormal if the connection is loose.
See page 11 for tips on REAR PANEL CONNECTIONS.
Match the numbers below to the diagram for speaker placement and refer to the table for the different surround sound requirements.
① The television's internal speakers.
② These speakers are connected to a separate audio amplifier. Use the "AUDIO TO HI-FI" output on the TV.
③ These speakers are connected to the REAR SPEAKER 8 Ohm output on the TV.
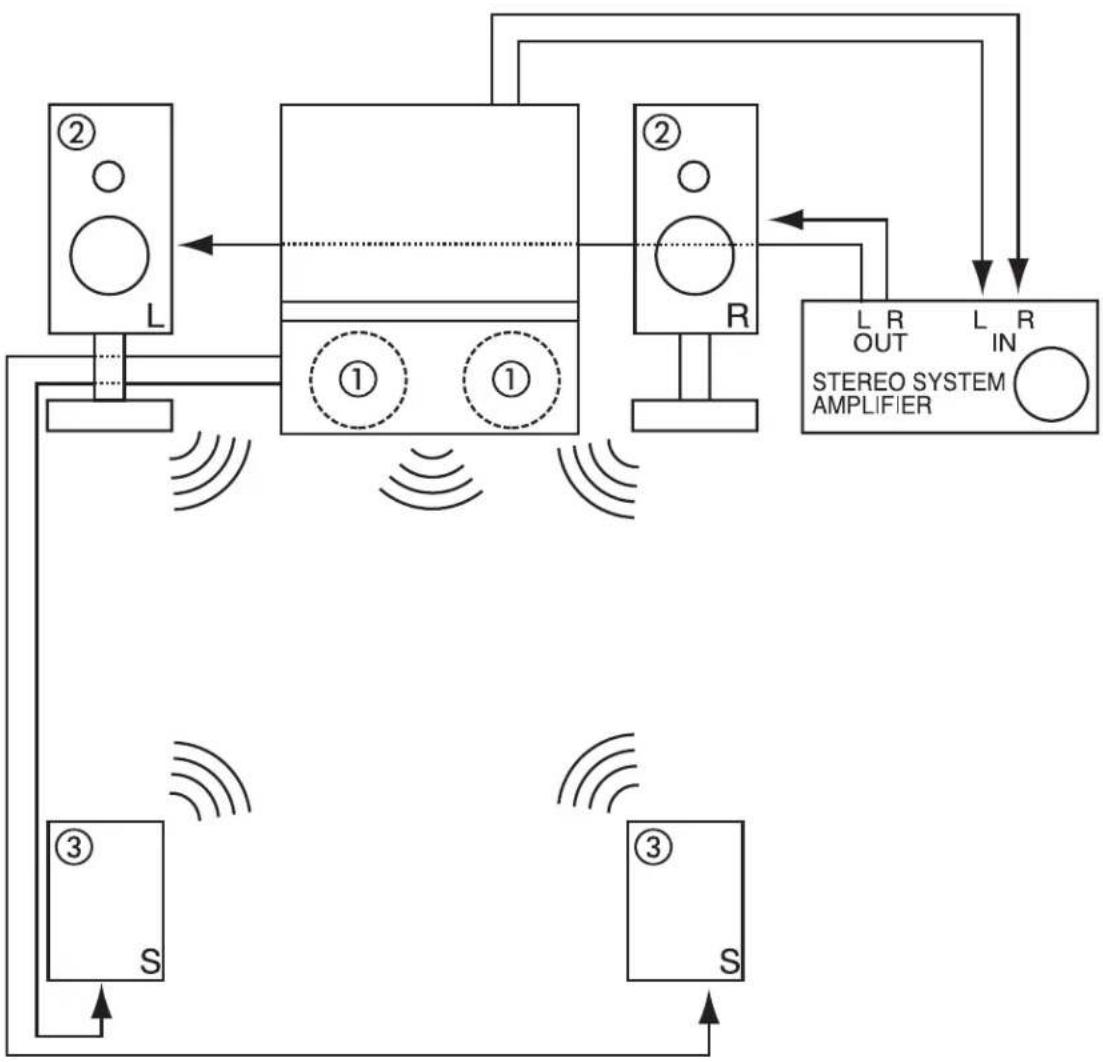
flowchart
graph TD
    A["Speaker ②"] --> B["Speaker ①"]
    B --> C["Speaker ②"]
    C --> D["Speaker ②"]
    D --> E["STEREO SYSTEM AMPLIFIER"]
    E --> F["L OUT"]
    E --> G["L IN"]
    H["Speaker ③"] --> I["S"]
    J["Speaker ③"] --> K["S"]
    style A fill:#f9f,stroke:#333
    style B fill:#ccf,stroke:#333
    style C fill:#cfc,stroke:#333
    style D fill:#fcc,stroke:#333
    style E fill:#ffc,stroke:#333
    style F fill:#cff,stroke:#333
    style G fill:#ffc,stroke:#333
    style H fill:#cfc,stroke:#333
    style I fill:#fcc,stroke:#333
    style J fill:#cfc,stroke:#333
    style K fill:#fcc,stroke:#333
| SURROUND FEATURE | SURROUND REQUIRE SWITCH* | ED OPTIONAL EFFECT CONNECTION | CONNECTION | |
| OFF | SP. SURROUND | MATRIX 1 2 | Receive Mono and Stereo sound | |
| MATRIX | SP.MATRIX SURROUND | 1 3 | 2 | Receive Movie Theater-like sound |
| EXTERNAL SPEAKERS | EXT. | 2 | 3 | This feature turns off the TV's internal speakers. |
* See page 9 for location of SP. MATRIX SURROUND Switch.
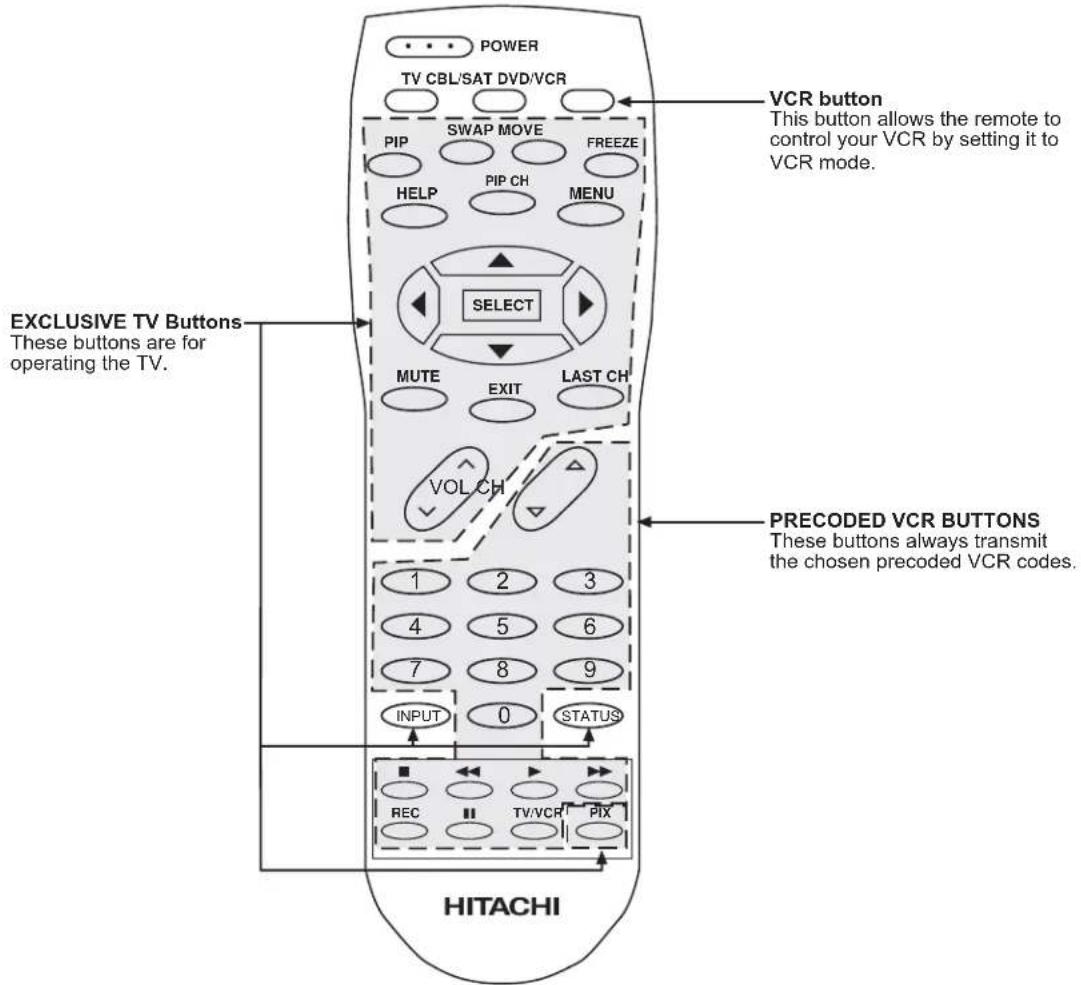
In addition to controlling all the functions on your HITACHI Color TV, the new remote control is designed to operate different types of VCRs, DVD, CBL (Cable TV), and satellite converters with one touch. Basic operation keys are grouped together in one area.
To operate your TV, point the remote control at the remote sensor of the TV and press the TV button. The remote will now control your television.
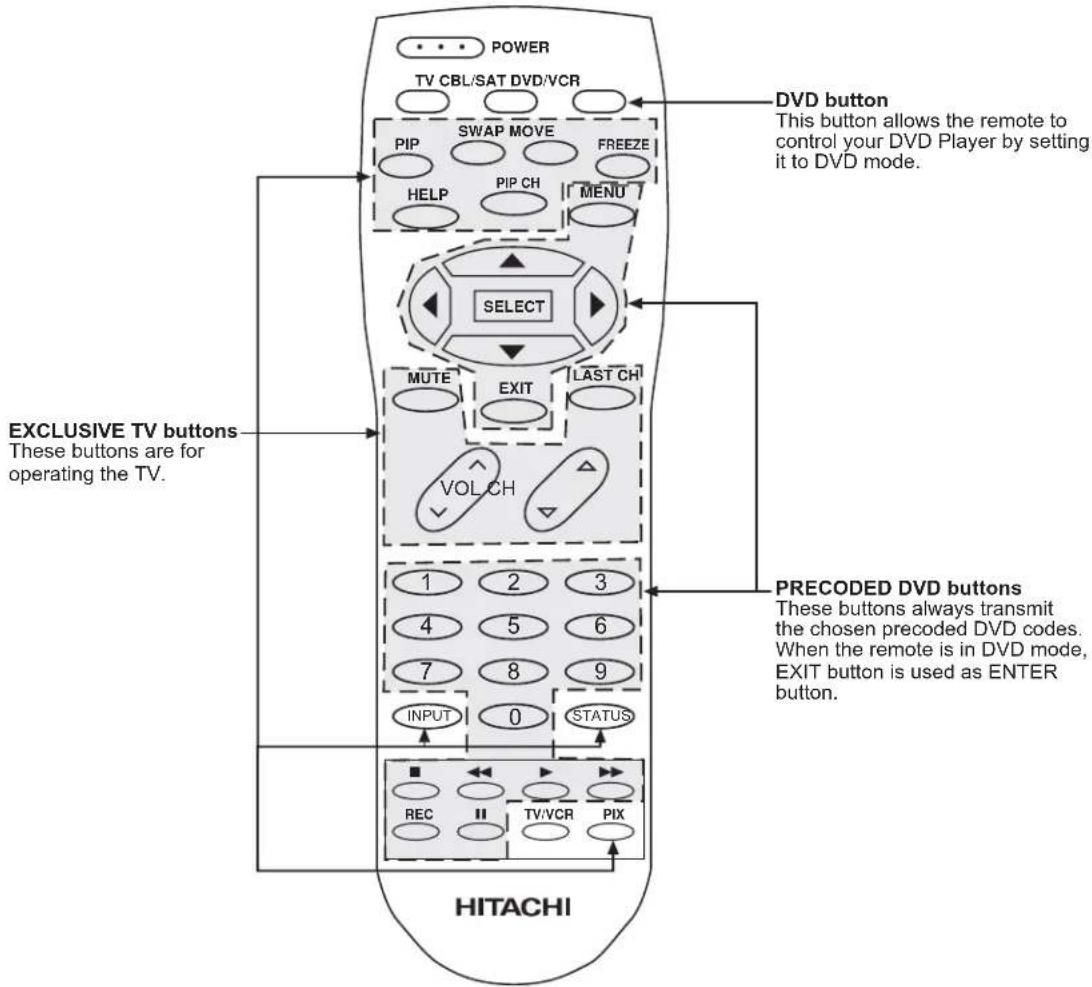
To operate your DVD or VCR, point the remote at the remote sensor of the DVD or VCR and press the DVD/VCR button. The remote will now control your DVD or VCR. (See page 25 and 26 for instructions on how to program the remote to control your DVD or VCR.)
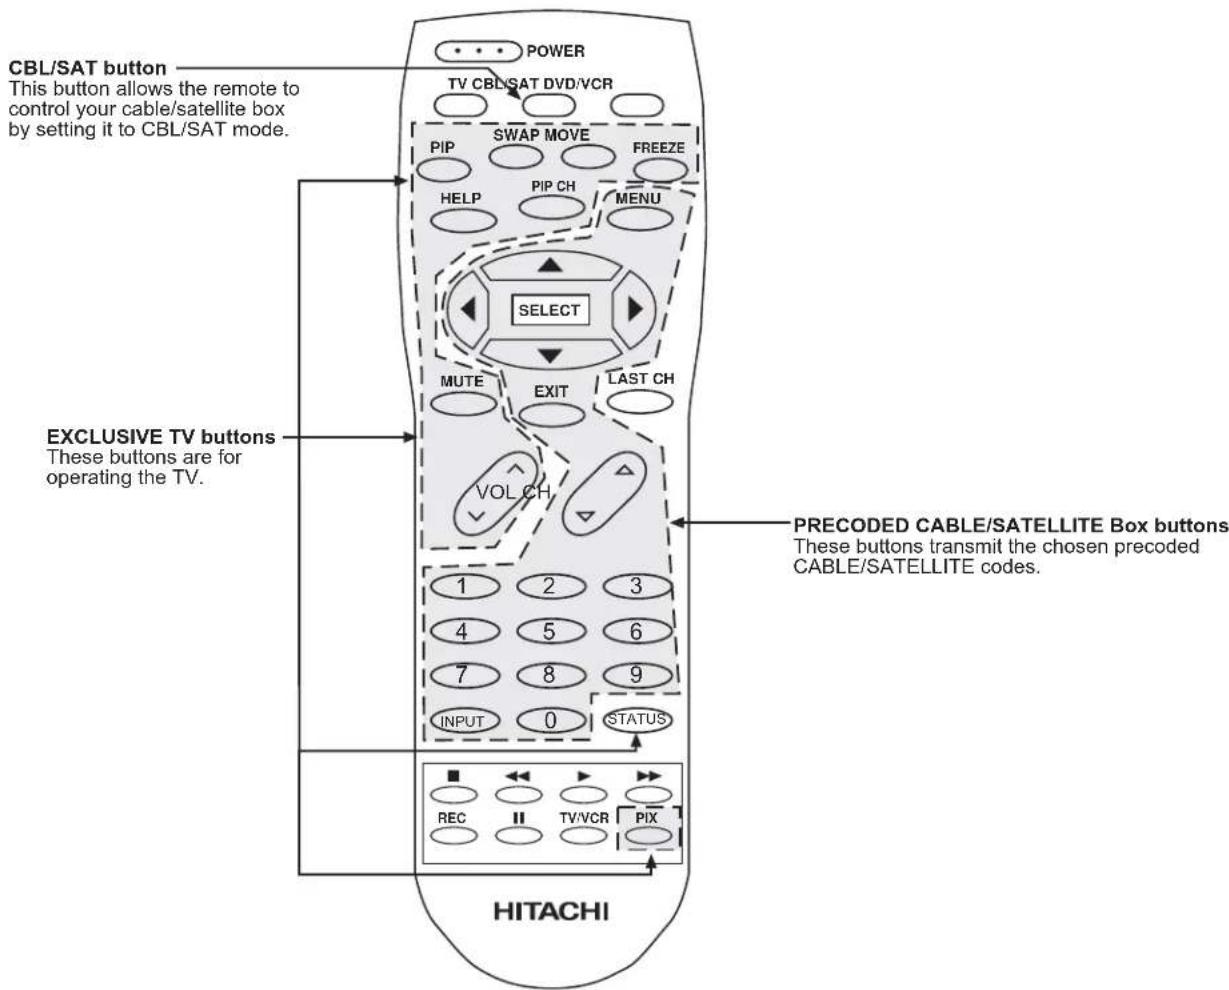
To operate your cable/satellite box, point the remote at the remote sensor of the cable/satellite box and press the CBL/SAT button. The remote will now control your cable/satellite box. (See page 27 for instructions on how to program the remote to control your cable/satellite box.)
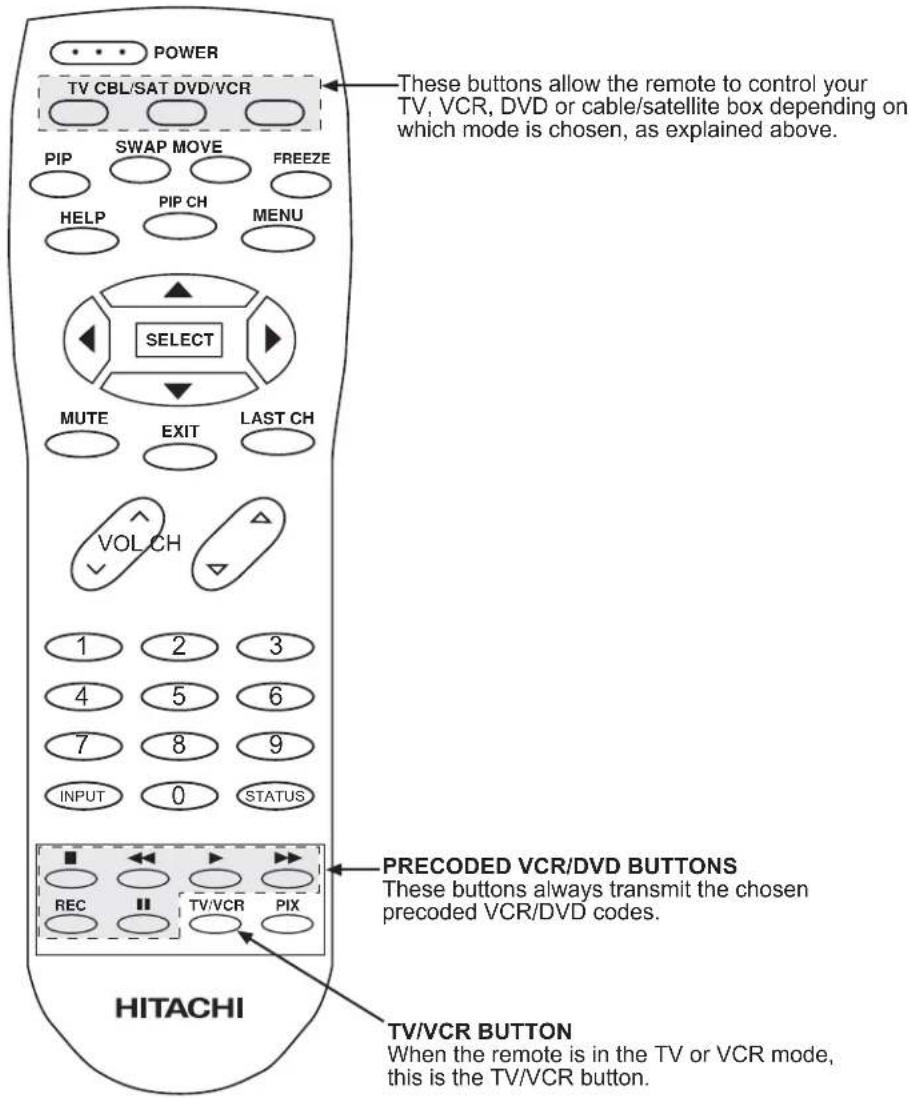
A detailed explanation of the circled numbers follows on pages 19 to 21.
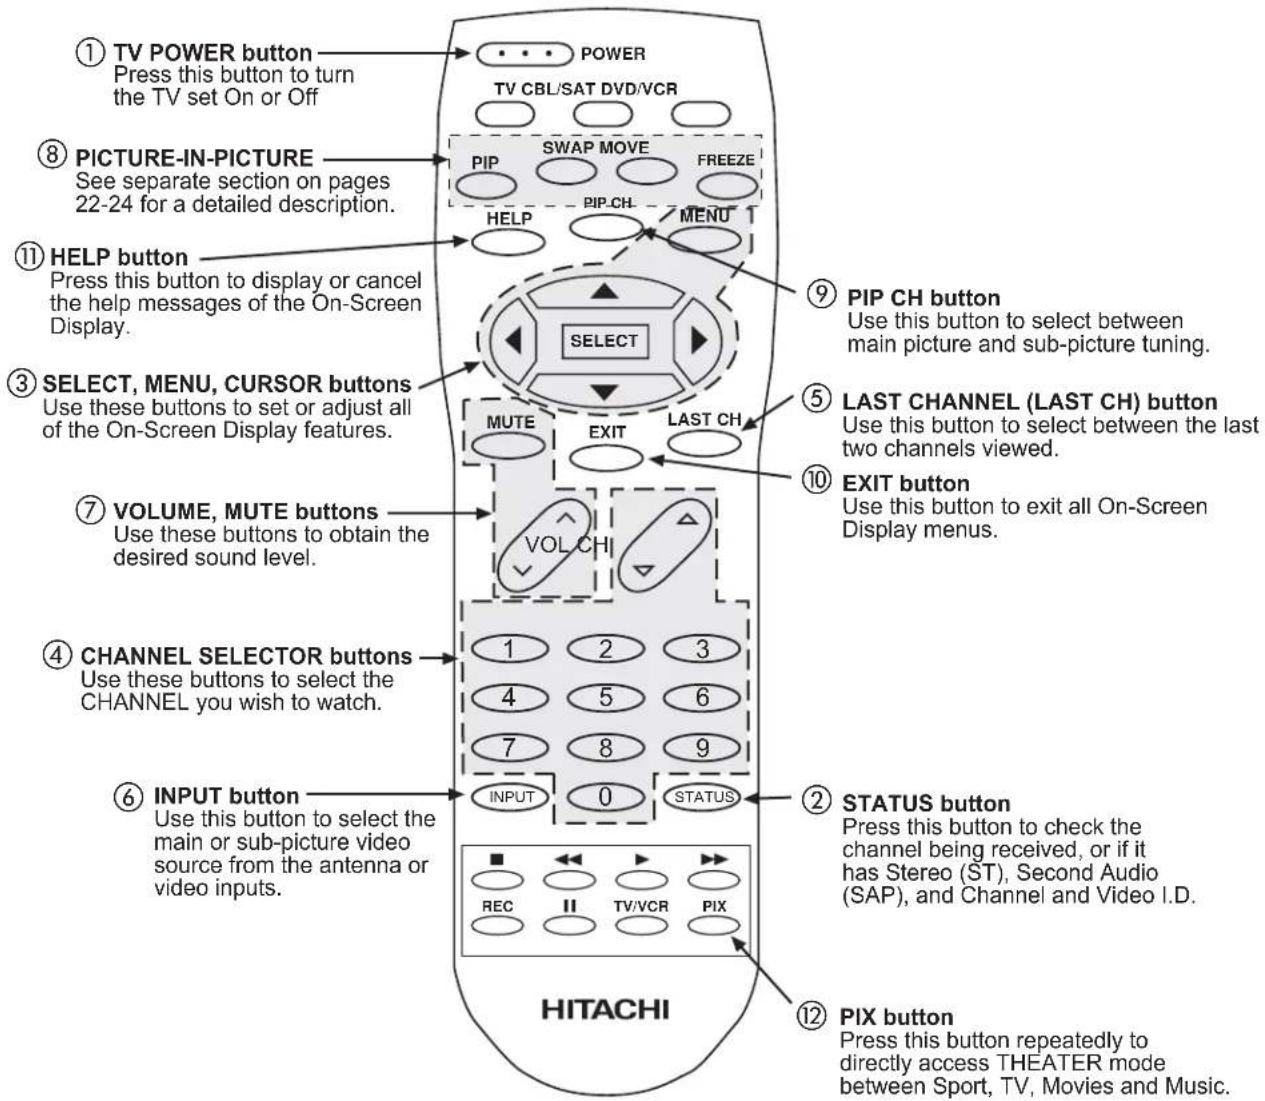
① TV POWER button
Press this button to turn the TV set on or off.
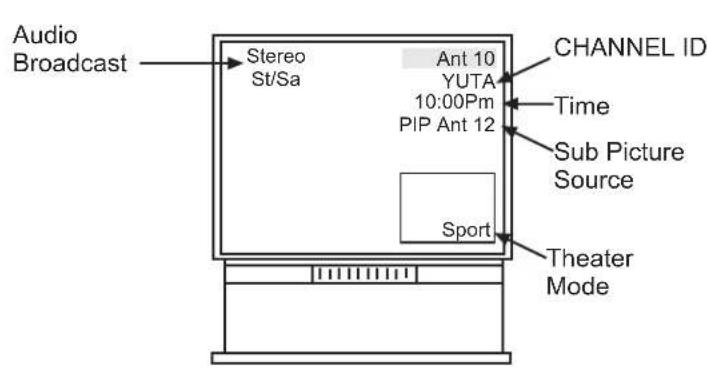
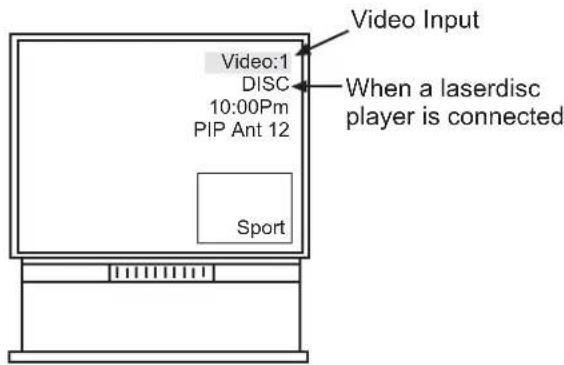
② STATUS button
Use the STATUS function to check the channel being received, or if it has stereo (ST) or second audio (SAP).
③ MENU, SELECT, CURSOR buttons
All On-Screen Display features can be set or adjusted by using these buttons.
The MENU button will start the On-Screen Display.
The SELECT button will select different features when MENU is pressed.
The CURSOR buttons will highlight functions or adjust different features when MENU is pressed.
The CURSOR button will move PIP position when PIP is on.
CURSOR buttons will also give you acces to FAMILY FAVORITES On-Screen Display.
④ CHANNEL SELECTOR buttons
Enter two or three numbers to select channels. Enter "0" first for channels 1 to 9. For channels 100 and above, press the "1" button and wait for two seconds before pressing the last two digits of the channel.
Channel selection may also be performed by pressing CH up (▲) or down (▼).
You may also use these buttons for channel scanning. Press and hold the CH up (▲) or down (▼) buttons and the TV will start quickly scanning through the channels. Release the CH up (▲) or down (▼) buttons when the TV scans to the channel you wish to watch and the TV will tune to that channel.
NOTE: The TV may not receive some channels if you are not in the correct SIGNAL SOURCE mode. (see page 32)
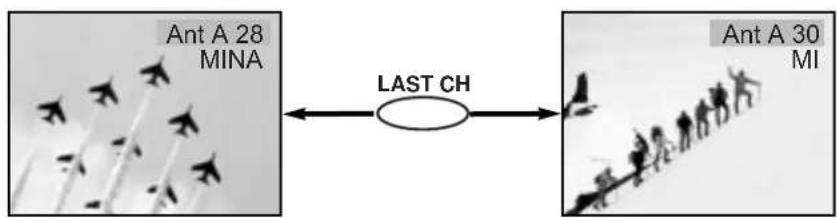
⑤ LAST CHANNEL button
Use this button to select between the last two channels viewed. (Good for watching two sporting events, etc.)
flowchart
graph LR
    A["Ant A 28 MINA"] --> B["Last CH"]
    B --> C["Ant A 30 MI"]
⑥ INPUT button
The INPUT button will select between the antenna signal and the video inputs. If the Sub-picture is on, and the main picture is chosen with the PIP CH button, the main picture will alternate between the video inputs and antenna source by every press of the INPUT button. If the Sub-Picture is chosen with the PIP CH button, the Sub-Picture will alternate between the video inputs and Antenna source by every press of the input button.
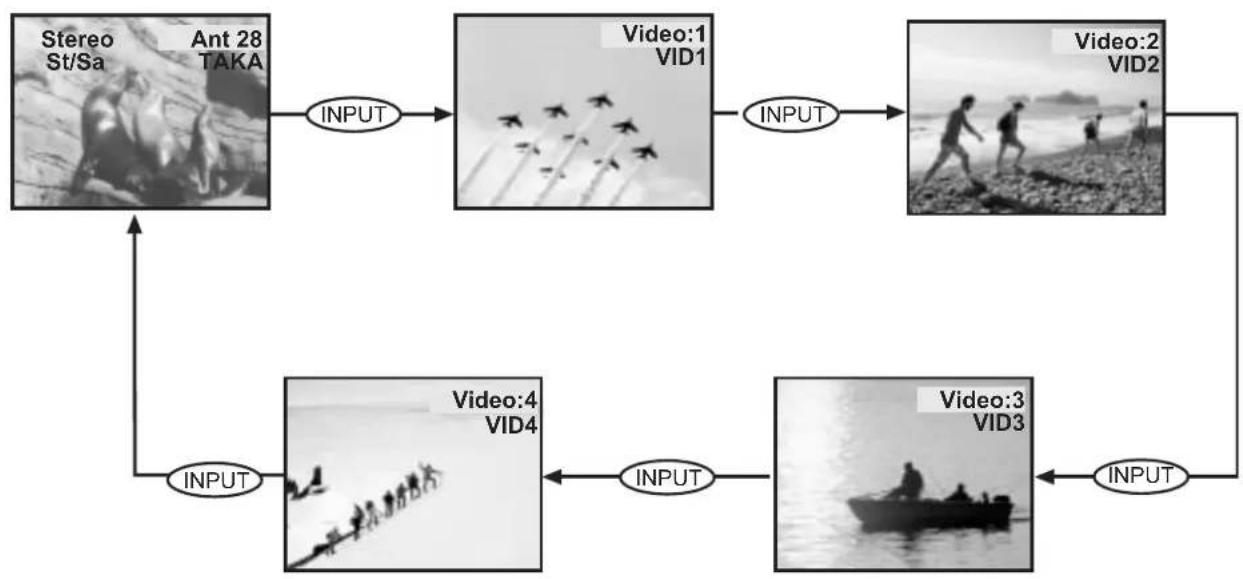
flowchart
graph TD
    A["Stereo St/Sa Ant 28 TAKA"] -->|INPUT| B["Video:1 VID1"]
    B -->|INPUT| C["Video:2 VID2"]
    C --> D["Video:3 VID3"]
    D -->|INPUT| E["Video:4 VID4"]
    E -->|INPUT| A
NOTE: Signals priority:
-Super Video Signal; Has a higher priority than the normal video signal in VIDEO 1, 2 and 3 mode.
⑦ VOLUME, MUTE buttons
Press the VOLUME up (▲) or down (▼) button until you obtain the desired sound level.
To reduce the sound to one half of normal volume (SOFT MUTE) to answer the telephone, etc., press the MUTE button. Press the MUTE button again to turn the sound off completely (MUTE). To restore the sound, press the MUTE button one more time, or press the VOLUME up (▲) button.

flowchart
graph LR
    A["Volume 8"] --> B["MUTE"]
    B --> C["Softmute 8"]
    C --> D["MUTE"]
    D --> E["Mute 8"]
⑧ PICTURE-IN-PICTURE
See separate section on pages 22-24 for a description.
⑨ PIP CH buton
Use the PIP CH button to select between main picture and sub-picture tuning. The gray background on the channel number will indicate which channel is being controlled.
⑩ EXIT button
When in MENU mode, this button will exit On-Screen Displays.
⑪ HELP button
Press this button if help is needed to change menu setting, and our context sensitive help system will provide explanations and/or directions for whatever function your cursor is on at that time. Press this button again to cancel the help messages.
⑫ PIX button
Press this button to directly access the four THEATER modes (TV, MOVIES, MUSIC and SPORT).
Your HITACHI Projection TV incorporates Dual Tuner technology designed for improved viewing enjoyment. This Dual Tuner feature allows you to view the antenna input on both the main picture and sub-picture simultaneously, with separate tuning control for each. The Dual Tuner can operate with only one ANTENNA input.
ANTENNA input can be viewed as both the main picture and the sub-picture simultaneously. To select between main picture and PIP sub-picture tuning, press the PIP CH button on the remote. Every press of the PIP CH will highlight the main or sub-picture source. The top channel display is the main picture and the bottom display is the sub-picture.
The Picture-in-Picture feature is convenient when you want to watch more than one program at the same time. You can watch a TV program while viewing other programs from the ANTENNA source or any of the video inputs.
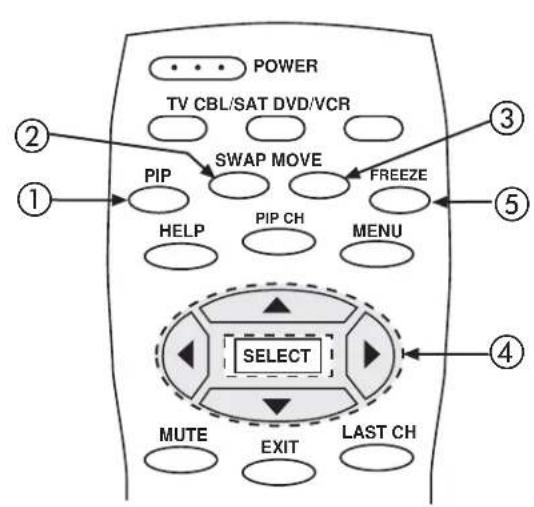
① PIP button
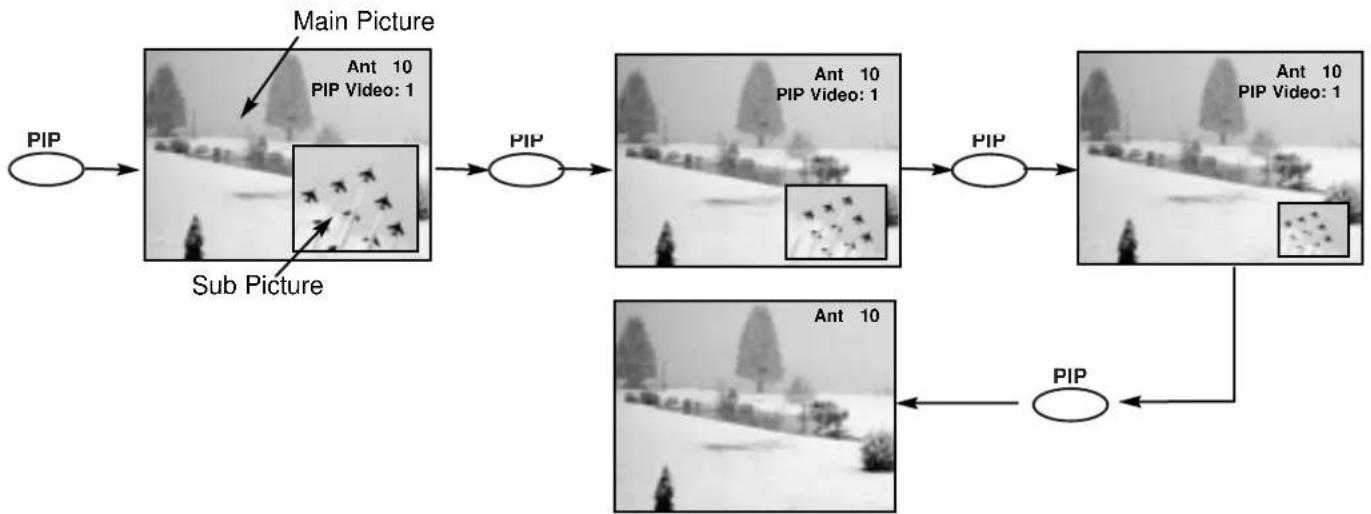
Press the PIP button and a sub-picture appears in one corner of the screen. Press the button again to reduce the size of the sub-picture. Press the PIP button the fourth time to remove the sub-picture from the screen. Use the PIP CH button to select between main and sub-picture tuning control (indicated by highlight). Press the INPUT button when sub-picture channel tuning is being controlled, to change between VIDEO: 1, VIDEO: 2, VIDEO: 3, VIDEO: 4 and ANTENNA sources.
flowchart
graph LR
    A["PIP"] --> B["Main Picture"]
    B --> C["Sub Picture"]
    C --> D["PIP"]
    D --> E["Ant 10 PIP Video: 1"]
    E --> F["PIP"]
    F --> G["Ant 10 PIP Video: 1"]
    G --> H["PIP"]
    H --> I["Ant 10"]
    I --> J["PIP"]
    J --> K["Feedback Loop"]
② SWAP button
If you wish to switch what is being shown on the main picture to the Sub-Picture, press the SWAP button.

flowchart
graph LR
    A["Image"] -->|Gray background, Green color| B["Image"]
    B --> C["SWAP"]
    C --> D["Final Image"]
③ MOVE button
To move the sub-picture to another corner, press the MOVE button. The sub-picture moves one step counterclockwise every time the MOVE button is pressed. (Example below illustrates the MOVE operation).
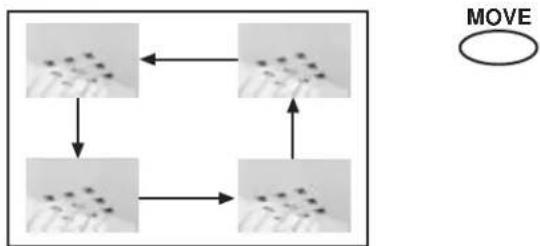
flowchart
graph TD
    A["Top Node"] --> B["Bottom Node"]
    B --> C["Top Node"]
    C --> D["Bottom Node"]
    D --> E["Top Node"]
    E --> F["Top Node"]
    F --> G["Top Node"]
    G --> H["Top Node"]
    H --> I["Top Node"]
    I --> J["Top Node"]
    J --> K["Top Node"]
    K --> L["Top Node"]
    L --> M["Top Node"]
    M --> N["Top Node"]
    N --> O["Top Node"]
    O --> P["Top Node"]
    P --> Q["Top Node"]
    Q --> R["Top Node"]
    R --> S["Top Node"]
    S --> T["Top Node"]
    T --> U["Top Node"]
    U --> V["Top Node"]
    V --> W["Top Node"]
    W --> X["Top Node"]
    X --> Y["Top Node"]
    Y --> Z["Top Node"]
    Z --> AA["Top Node"]
    AA --> AB["Top Node"]
    AB --> AC["Top Node"]
    AC --> AD["Top Node"]
    AD --> AE["Top Node"]
    AE --> AF["Top Node"]
    AF --> AG["Top Node"]
    AG --> AH["Top Node"]
    AH --> AI["Top Node"]
    AI --> AJ["Top Node"]
④ CURSOR buttons
The cursor button will move the PIP position to any of the four corners depending on which CURSOR button is pressed. The PIP will move according to the direction of the CURSOR button.
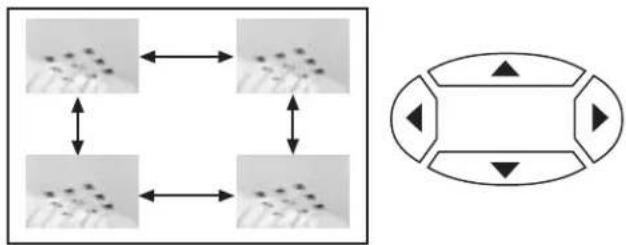
flowchart
graph TD
    A["Input Node 1"] <--> B["Output Node 1"]
    C["Input Node 2"] <--> D["Output Node 2"]
    E["Input Node 3"] <--> F["Output Node 3"]
    G["Output Node 4"] --> H["Output Node 4"]
    style A fill:#f9f,stroke:#333
    style C fill:#f9f,stroke:#333
    style E fill:#f9f,stroke:#333
    style G fill:#f9f,stroke:#333
⑤ FREEZE button
If you wish to freeze the Sub-Picture, press the FREEZE button. This is convenient when trying to write down the address for a mail order company, recording statistics for a sporting event, etc. To return the picture to motion, press the FREEZE button again.
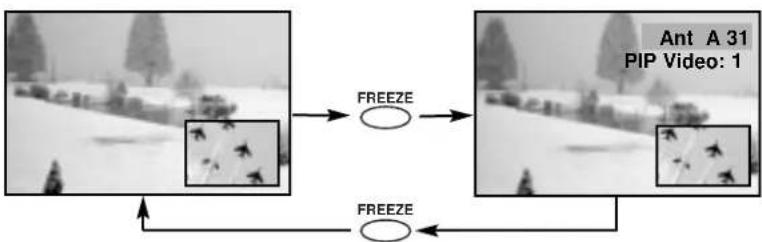
flowchart
graph TD
    A["Input Image 1"] --> B["FREEZE"]
    C["Input Image 2"] --> D["FREEZE"]
    B --> E["Output Image 1"]
    D --> E
    style A fill:#f9f,stroke:#333
    style C fill:#f9f,stroke:#333
    style E fill:#ccf,stroke:#333
Quick FREEZE button
Press this button without a Sub-Picture to freeze the picture you are currently viewing. Press this button again to return to normal viewing.
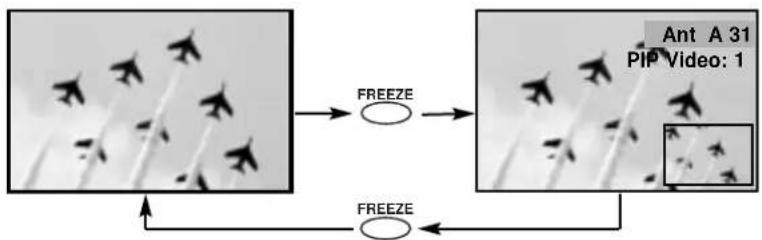
flowchart
graph TD
    A["Image"] --> B["FREEZE"]
    B --> C["Image"]
    C --> D["Ant A 31\nPIP Video: 1"]
    D --> E["FREEZE"]
    E --> A

CAUTION: A pattern burn may develop if the Sub-Picture is left in the same corner permanently. If the PIP feature is used frequently, occasionally shift the Sub-Picture to a different corner. You may also vary its position using the CURSOR ▲, ▼, ▶, ◀ buttons.
Operating the precoded function for your VCR.
This remote is designed to operate different types of VCRs. You must first program the remote to match the remote system of your VCR. (refer to page 28)
- Turn ON your VCR.
- Aim the remote control at the front of your VCR.
- Press the DVD/VCR button to switch to the VCR pre-coded mode.
- Hold down the DVD/VCR button on the remote, enter the two digit preset code that matches your VCR as shown on page 28. The remote will turn off your VCR when the correct two digit preset code is entered. When this occurs, the remote control is programmed for your VCR. If the VCR does not turn off after five seconds, try a different two digit preset code.
- The remote will now control your VCR.
NOTES:
- If your VCR cannot be operated after performing the above procedures, your VCR's code has not been precoded into the remote.
- In the unlikely event that your VCR cannot be operated after performing the above procedures, please consult your VCR operating guide.
- The remote control will remember the codes you have programmed until the batteries are removed from the remote control. After replacing the batteries repeat the entire programming procedure as stated above.
- The INPUT button will act as your VCR '100' button if required.
NOTE: Refer to instruction manual of the VCR for operation of the buttons exclusively for the VCR.
Operating the precoded function for your DVD Player.
This remote is designed to operate different types of DVD Players. You must first program the remote to match the remote system of your DVD Player. (refer to page 28)
- Turn ON your DVD Player.
- Aim the remote control at the front of your DVD Player.
- Press the DVD/VCR button to switch to the DVD Player pre-coded mode.
- Hold down the DVD/VCR button on the remote, enter the two digit preset code that matches your DVD Player as shown on page 28. The remote will turn off your DVD Player when the correct two digit preset code is entered. When this occurs, the remote control is programmed for your DVD Player. If the DVD Player does not turn off after five seconds, try a different two digit preset code.
- The remote will now control your DVD Player.
NOTES:
- If your DVD Player cannot be operated after performing the above procedures, your DVD Player's code has not been pre-coded into the remote.
- In the unlikely event that your DVD Player cannot be operated after performing the above procedures, please consult your DVD Player operating guide.
- The remote control will remember the codes you have programmed until the batteries are removed from the remote control. After replacing the batteries repeat the entire programming procedure as stated above.
NOTE: Refer to instruction manual of the DVD Player for operation of the buttons exclusively for the DVD Player.
Operating the precoded function for your cable/satellite box.
This remote is designed to operate different types of cable boxes and satellite systems. You must first program the remote to match the remote system of your cable/satellite box. (refer to page 28)
- Turn ON your cable/satellite box.
- Aim the remote control at the front of your cable/satellite box.
- Press the CBL/SAT button to switch to the cable/satellite box pre-coded mode.
- Hold down the CBL/SAT button on the remote, enter the two digit preset code that matches your cable/satellite box as shown on page 28. The remote will turn off your cable/satellite box when the correct two digit preset code is entered. When this occurs, the remote control is programmed for your cable/satellite box. If the cable/satellite box does not turn off after five seconds, try a different two digit preset code.
- The remote will now control your cable/satellite box.
NOTES:
- If your cable/satellite box cannot be operated after performing the above procedures, your cable/satellite box's code has not been precoded into the remote.
- In the unlikely event that your cable/satellite box cannot be operated after performing the above procedures, please consult your cable/satellite box's operating guide.
- The remote control will remember the codes you have programmed until the batteries are removed from the remote control. After replacing the batteries repeat the entire programming procedure as stated above.
CABLE BRAND CODE
| General Instrument | 17 |
| Hamlin | 22,23,24,25 |
| Jerrold | 00,01,02,03,04,05,06,07,21 |
| Oak | 26,27,28 |
| Panasonic | 18,19,20 |
| Pioneer | 13,14 |
| Scientific Atlanta | 08,09,10 |
| Tocom | 15,16 |
| Zenith | 11,12 |
SATELLITE BRAND CODE
| Ecostar | 32 |
| Hitachi | 29 |
| Hughes | 33 |
| Panasonic | 34 |
| RCA | 30, 35 |
| Samsung | 36 |
| Sony | 31 |
VCR BRAND CODE
| Aiwa | 48 |
| Daewoo | 45 |
| Emerson | 20,21,22,23,24 |
| Fisher | 34,37,38,39 |
| Funai | 52 |
| General Electric | 33 |
| Goldstar | 36 |
| Hitachi | .00,01,02,03,04,05,06 |
| JVC | 18,49,50,51 |
| Magnavox | 12,13,14 |
| Mitsubishi | 27,28,29,30 |
| NEC | 40,41 |
| Panasonic | 10,11 |
| Philips | 14 |
| Samsung | 17,25,26 |
| Scott | 16 |
| Sharp | 31,32 |
| Shintom | 19 |
| Sony | .07,08,09 |
| Symphonic | 42 |
| Teknica | 46 |
| Toshiba | 15 |
DVD BRAND CODE
| Hitachi | 53 |
| Panasonic | 55 |
| Pioneer | 56 |
| RCA | 57 |
| Samsung | 59 |
| Sony | 54 |
| Toshiba | 58 |
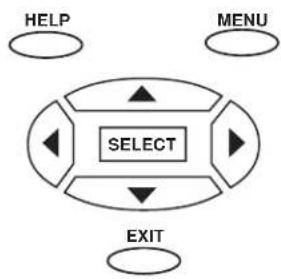
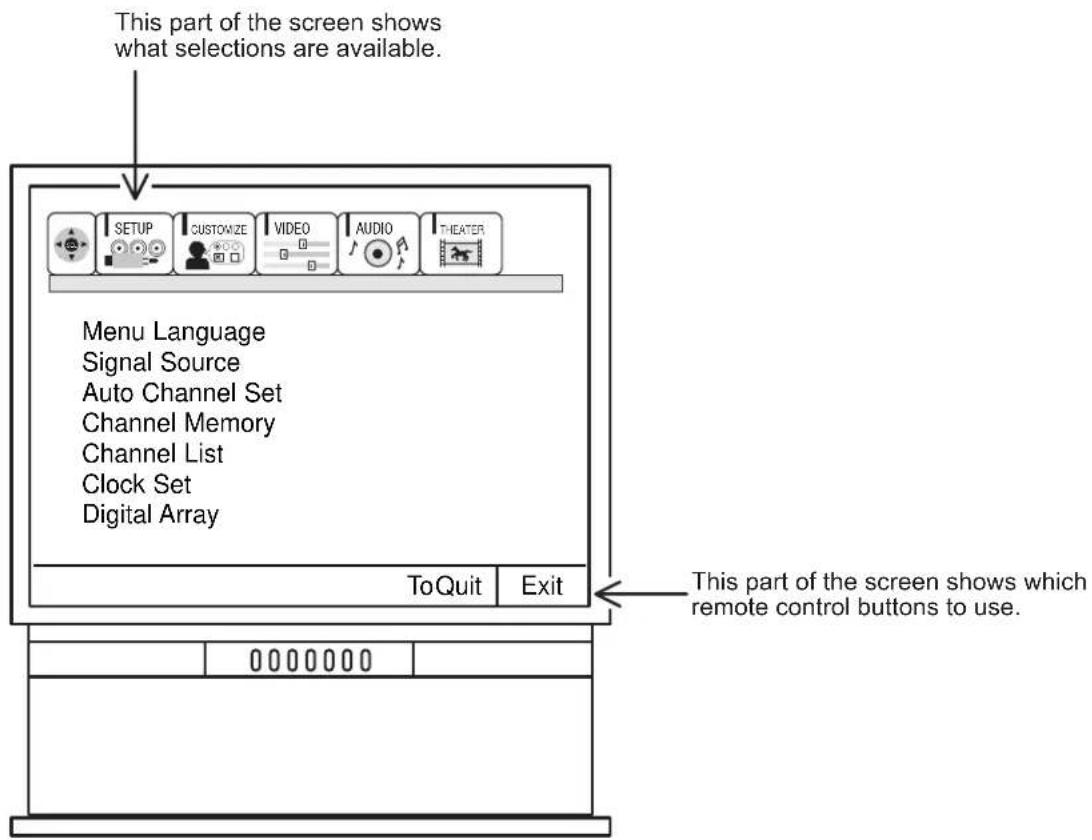
- Press MENU on the remote control to display the different features on your HITACHI Projection TV.
- Press the CURSOR buttons to highlight a different feature.
- Press EXIT on the remote control to quickly exit from a menu.
- Press HELP on the remote control when a menu is displayed, and text will appear giving a description of that menu.
flowchart
graph TD
    A["HELP"] --> B["SELECT"]
    C["MENU"] --> B
    D["EXIT"] --> B
    B --> E["->"]
    B --> F["->"]
flowchart
graph LR
    A["CUSTOMIZE"] --> B["Channel Id. Label channels PAY1, ABC, etc."]
    B --> C["Video Id. Label video inputs VCR1, DVD1, etc."]
    C --> D["Family Favorites Allows you to set and view favorite channels."]
    D --> E["Parental Control Block channel picture and sound."]
    E --> F["4 Event Program Turn TV on and off once, daily, or weekly."]
    F --> G["Auto Link Automatically turn TV on with VIDEO:4 input."]
    G --> H["Closed Caption Feature to display dialogue/text."]
    H --> I["Menu Background Select from two types of backgrounds."]
flowchart
graph LR
    A["VIDEO"] --> B["Contrast"]
    A --> C["Brightness"]
    A --> D["Color"]
    A --> E["Tint"]
    A --> F["Sharpness"]
    A --> G["Reset"]
    A --> H["Advanced Settings"]
    B --> I["Adjust contrast."]
    B --> J["Adjust brightness."]
    B --> K["Adjust color."]
    B --> L["Adjust tint."]
    B --> M["Adjust sharpness."]
    B --> N["Set VIDEO settings to factory preset."]
    B --> O["Improve picture performance."]

flowchart
graph LR
    A["AUDIO"] --> B["Bass"]
    A --> C["Treble"]
    A --> D["Balance"]
    A --> E["Reset"]
    A --> F["Advanced Settings"]
    B --> G["Adjust bass."]
    C --> H["Adjust treble."]
    D --> I["Adjust balance."]
    E --> J["Set AUDIO settings to factory preset."]
    F --> K["Improve sound performance."]

flowchart
graph LR
    A["THEATER"] --> B["Theater Modes"]
    B --> C["Picture and sound are automatically set."]
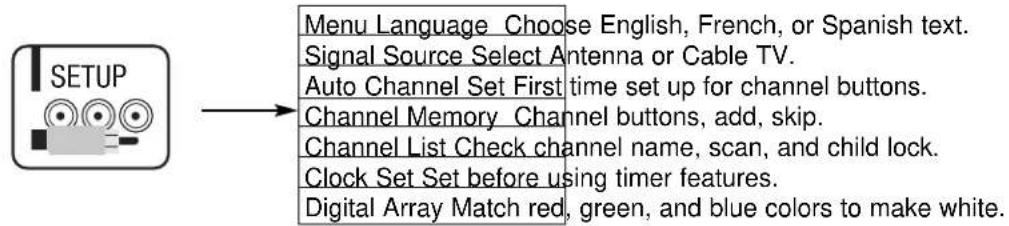
Select SETUP when setting your TV up for the first time. Use the CURSOR ▲ or ▼ on the remote to highlight the function desired.
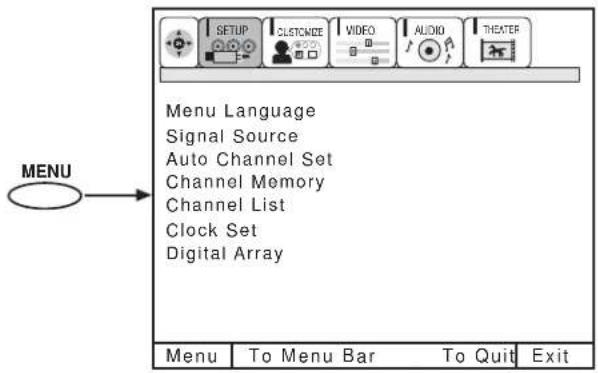
NOTE: To see an auto-demonstration of the on-screen displays with HELP text displayed, press and hold the POWER button on the TV set for approximately five seconds. Press the EXIT button to end the auto-demonstration.
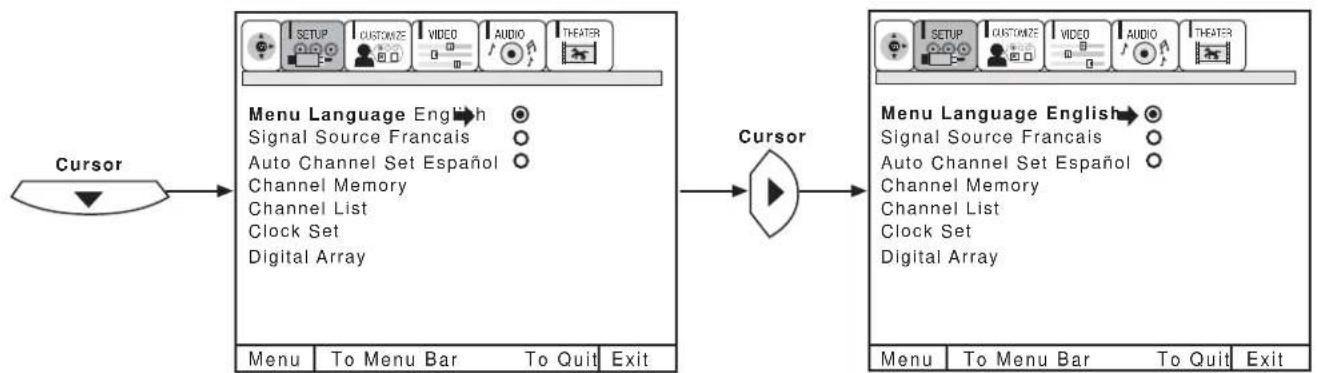
This feature will allow you to select any one of three different languages for all on-screen displays.
flowchart
graph LR
    A["Cursor"] --> B["Menu Language English"]
    B --> C["Signal Source Francais"]
    B --> D["Auto Channel Set Español"]
    B --> E["Channel Memory"]
    B --> F["Channel List"]
    B --> G["Clock Set"]
    B --> H["Digital Array"]
    I["Cursor"] --> J["Menu Language English"]
    J --> K["Signal Source Francais"]
    J --> L["Auto Channel Set Español"]
    J --> M["Channel Memory"]
    J --> N["Channel List"]
    J --> O["Clock Set"]
    J --> P["Digital Array"]
    Q["Menu"] --> R["To Menu Bar To Quit Exit"]
Use CURSOR ▲ or ▼ to select the MENU LANGUAGE of your choice.
Press SELECT button to select the language of your choice.
Press EXIT to quit menu or CURSOR ◀ to return to previous menu.
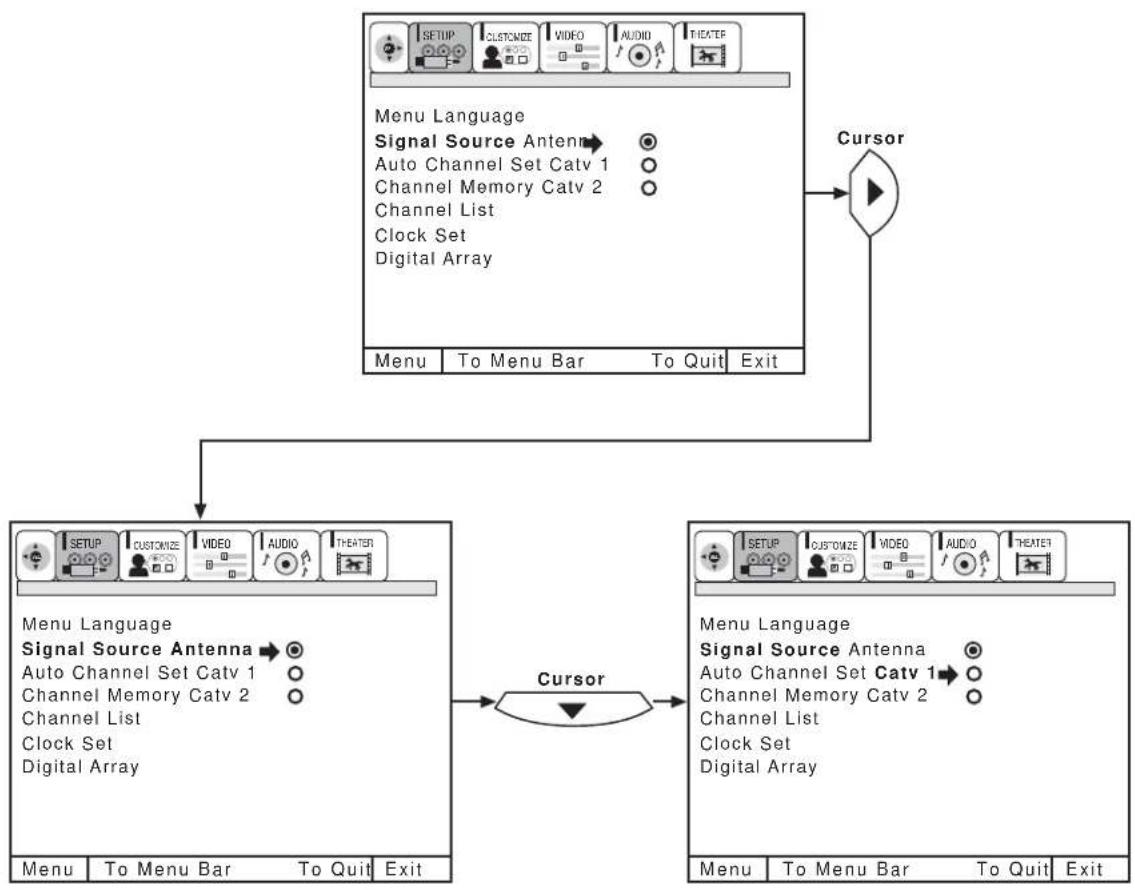
SIGNAL SOURCE
Select ANTENNA if you are using an indoor or outdoor antenna. Select CATV if you have cable TV.
flowchart
graph TD
    A["Menu Language"] --> B["Signal Source Antenna"]
    B --> C["Auto Channel Set Catv 1"]
    B --> D["Channel Memory Catv 2"]
    B --> E["Channel List"]
    B --> F["Clock Set"]
    B --> G["Digital Array"]
    H["Cursor"] --> I["Output"]
    I --> J["Menu"]
    J --> K["To Menu Bar"]
    J --> L["To Quit"]
    J --> M["Exit"]
    N["Menu Language"] --> O["Signal Source Antenna"]
    O --> P["Auto Channel Set Catv 1"]
    O --> Q["Channel Memory Catv 2"]
    O --> R["Channel List"]
    O --> S["Clock Set"]
    O --> T["Digital Array"]
    U["Cursor"] --> V["Output"]
    V --> W["Menu"]
    W --> X["To Menu Bar"]
    W --> Y["To Quit"]
    W --> Z["Exit"]
Press CURSOR ▲ or ▼ to highlight the signal source and press SELECT button to select the correct SIGNAL SOURCE mode. Press EXIT to quit MENU or CURSOR ◀ to return to previous menu.
| RECEPTION BAND | ||
| AIR | CATV 1 OR CATV 2 | |
| CATV CHANNEL | Indicated on the screen | |
| VHF 2 ~ 13chUHF 14 ~ 69ch | VHF 2~13 | 2 ~ 13 |
| Mid band A~1A-5 ~ A-1 | 14 ~ 2295 ~ 99 | |
| Super band J~W | 23 ~ 36 | |
| Hyper bandW + 1 ~ W + 28 | 37 ~ 64 | |
| UltrabandW + 29 ~ W + 84 | 65 ~ 125 | |
Reception channels for each mode are shown at the left.
Refer to your cable or TV guide for channel identification standards.
If certain CATV channels are poor or not possible in CATV1 mode, set SIGNAL SOURCE to CATV2.
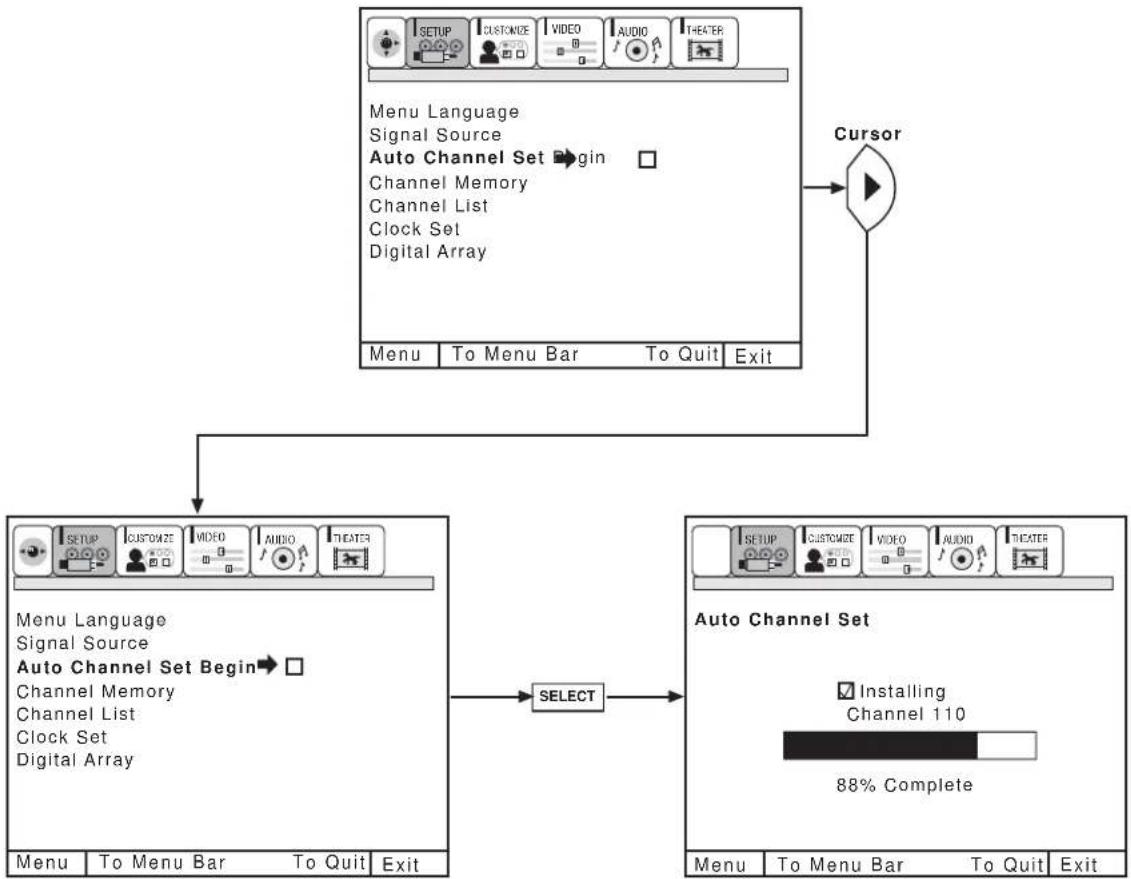
AUTO CHANNEL SET
This feature will automatically store active TV channels in CHANNEL MEMORY. This will allow you to skip unused channels when using CHANNEL UP (▲) or DOWN (▼).
flowchart
graph TD
    A["Menu Language\nSignal Source\nAuto Channel Set"] --> B["Menu\nTo Menu Bar\nTo Quit\nExit"]
    B --> C["Select"]
    C --> D["Auto Channel Set\nInstalling\nChannel 110\n88% Complete"]
    D --> E["Cursor"]
    E --> F["Menu\nTo Menu Bar\nTo Quit\nExit"]
If the EXIT button is pressed while the AUTO CHANNEL SET function is engaged, programming will stop.
Remember to select the correct SIGNAL SOURCE mode before using AUTO CHANNEL SET.
See CHANNEL MEMORY to add or erase additional channels.
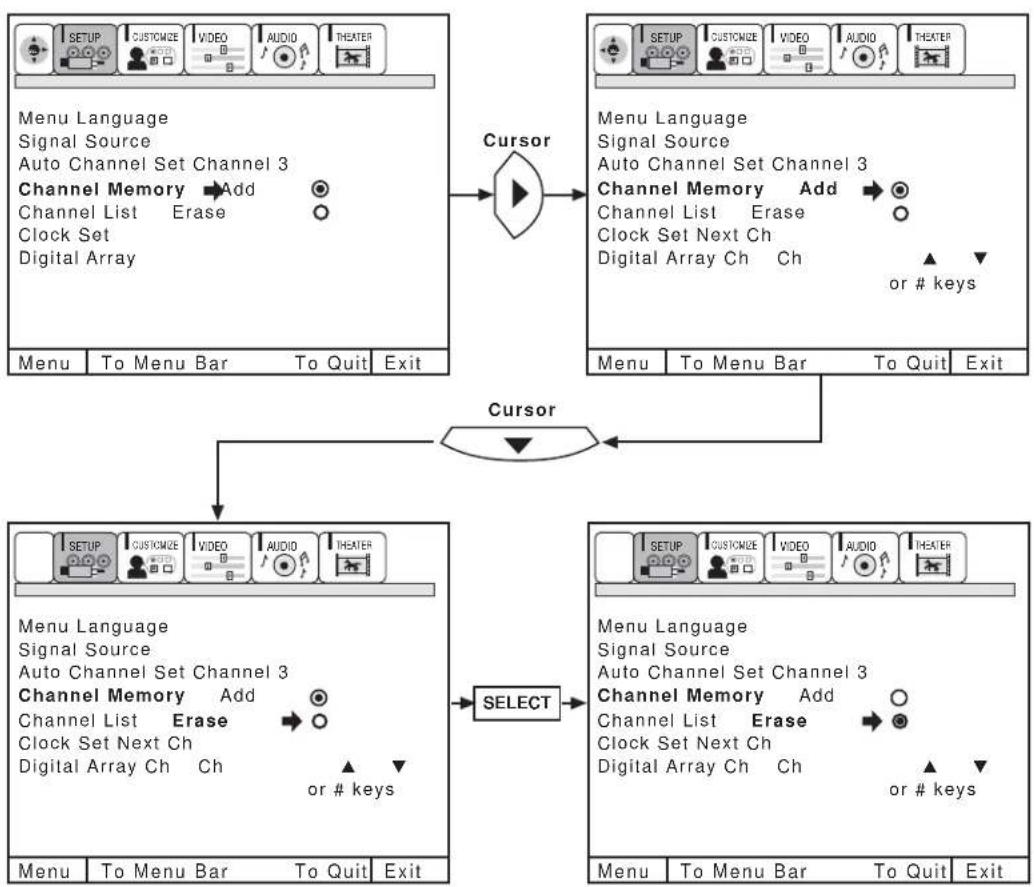
CHANNEL MEMORY
Use this function after AUTO CHANNEL SET to add or erase additional channels to the remote control CHANNEL ▲ or ▼ buttons.
flowchart
graph TD
    A["Menu Language\nSignal Source\nAuto Channel Set Channel 3\nChannel Memory"] --> B["Add Channel List\nErase"]
    B --> C["Digital Array"]
    D["Menu To Menu Bar"] --> E["To Quit Exit"]
    F["Menu To Menu Bar"] --> G["To Quit Exit"]
    H["Menu To Menu Bar"] --> I["To Quit Exit"]
    J["Menu To Menu Bar"] --> K["To Quit Exit"]
    L["Menu To Menu Bar"] --> M["To Quit Exit"]
    N["Menu To Menu Bar"] --> O["To Quit Exit"]
    P["Menu To Menu Bar"] --> Q["To Quit Exit"]
    R["Menu To Menu Bar"] --> S["To Quit Exit"]
    T["Menu To Menu Bar"] --> U["To Quit Exit"]
    V["Menu To Menu Bar"] --> W["To Quit Exit"]
    X["Menu To Menu Bar"] --> Y["To Quit Exit"]
    Z["Menu To Menu Bar"] --> AA["To Quit Exit"]
    AB["Menu To Menu Bar"] --> AC["To Quit Exit"]
    AD["Menu To Menu Bar"] --> AE["To Quit Exit"]
    AF["Menu To Menu Bar"] --> AG["To Quit Exit"]
    AH["Menu To Menu Bar"] --> AI["To Quit Exit"]
    AJ["Menu To Menu Bar"] --> AK["To Quit Exit"]
    AL["Menu To Menu Bar"] --> AM["To Quit Exit"]
    AN["Menu To Menu Bar"] --> AO["To Quit Exit"]
    AP["Menu To Menu Bar"] --> AQ["To Quit Exit"]
    AR["Menu To Menu Bar"] --> AS["To Quit Exit"]
    AT["Menu To Menu Bar"] --> AU["To Quit Exit"]
    AV["Menu To Menu Bar"] --> AW["To Quit Exit"]
    AX["Menu To Menu Bar"] --> AY["To Quit Exit"]
    AZ["Menu To Menu Bar"] --> BA["To Quit Exit"]
    BB["Menu To Menu Bar"] --> BC["To Quit Exit"]
    BD["Menu To Menu Bar"] --> BE["To Quit Exit"]
    BF["Menu To Menu Bar"] --> BG["To Quit Exit"]
    BH["Menu To Menu Bar"] --> BI["To Quit Exit"]
    BJ["Menu To Menu Bar"] --> BK["To Quit Exit"]
    BL["Menu To Menu Bar"] --> BM["To Quit Exit"]
    BN["Menu To Menu Bar"] --> BO["To Quit Exit"]
    BP["Menu To Menu Bar"] --> BQ["To Quit Exit"]
    BR["Menu To Menu Bar"] --> BS["To Quit Exit"]
    BT["Menu To Menu Bar"] --> BU["To Quit Exit"]
    BV["Menu To Menu Bar"] --> BW["To Quit Exit"]
    BX["Menu To Menu Bar"] --> BY["To Quit Exit"]
    BZ["Menu To Menu Bar"] --> CA["To Quit Exit"]
    CBZ["Menu To Menu Bar"] --> DA["To Quit Exit"]
    DBZ["Menu To Menu Bar"] --> DBX["To Quit Exit"]
    DCZ["Menu To Menu Bar"] --> DCY["To Quit Exit"]
    DX["Menu To Menu Bar"] --> DXY["To Quit Exit"]
    DBY["Menu To Menu Bar"] --> DBZX["To Quit Exit"]
    DBX --> DBZX
    DBZX --> DBZX
To add or erase additional channels while still in CHANNEL MEMORY use CHANNEL ▲ or ▼, or the number buttons to change the channel.
Press EXIT to quit menu or CURSOR ◀ to return to previous menu.
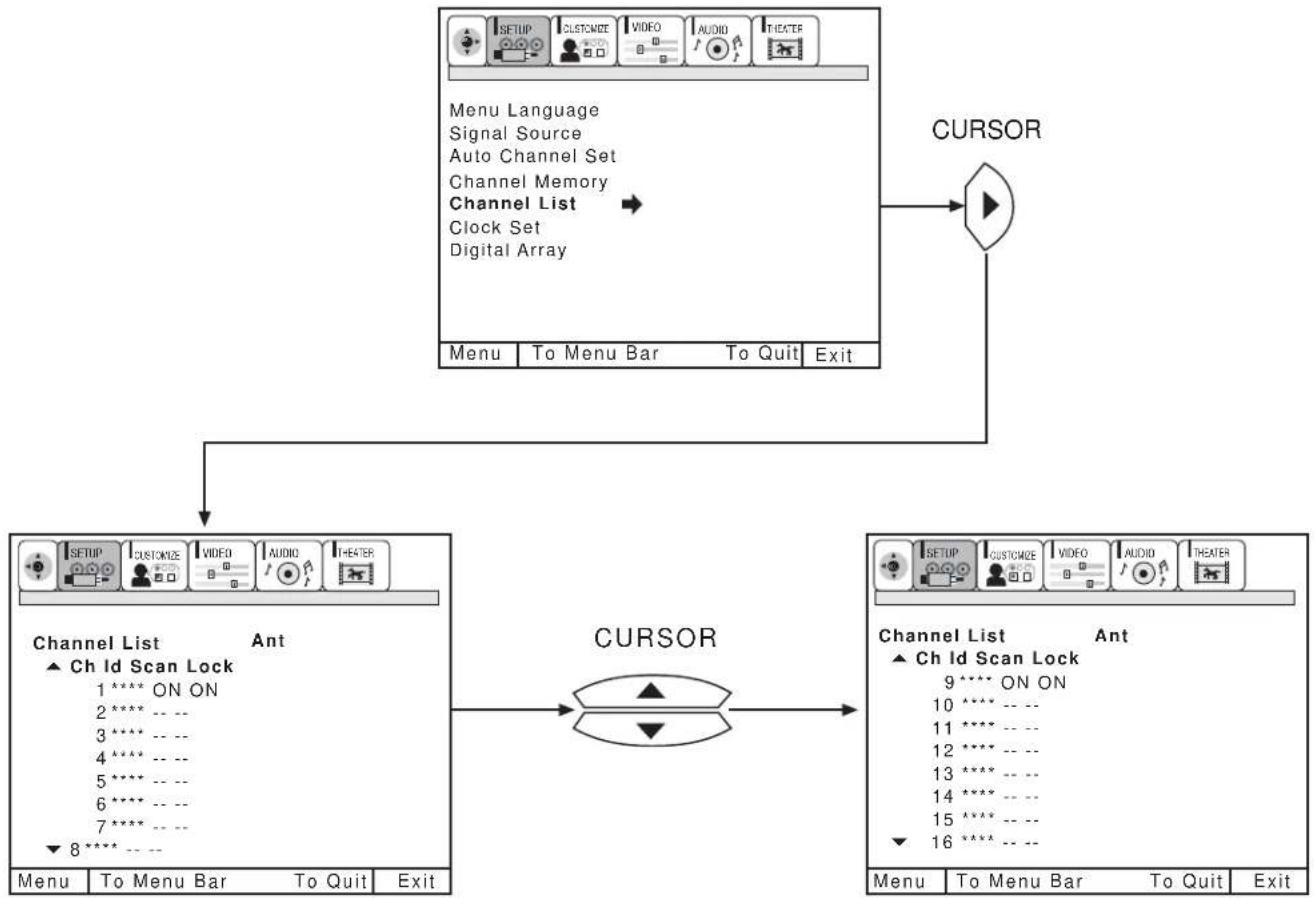
CHANNEL LIST
This function allows you to review which channels are labeled in CHANNEL ID (ID.), which have been added to CHANNEL MEMORY (SCAN), and which are protected by PARENTAL CONTROL (LOCK).
flowchart
graph TD
    A["Menu Language\nSignal Source\nAuto Channel Set\nChannel Memory\nChannel List\nClock Set\nDigital Array"] --> B["CURSOR"]
    B --> C["ANCH LIST\nCh Id Scan Lock\n1 **** ON ON\n2 **** -- --\n3 **** -- --\n4 **** -- --\n5 **** -- --\n6 **** -- --\n7 **** -- --\n8 **** -- --"]
    C --> D["ANCH LIST\nCh Id Scan Lock\n9 **** ON ON\n10 **** -- --\n11 **** -- --\n12 **** -- --\n13 **** -- --\n14 **** -- --\n15 **** -- --\n16 **** -- --"]
    D --> E["ANCH LIST\nCh Id Scan Lock\nAnt\n9 **** ON ON\n10 **** -- --\n11 **** -- --\n12 **** -- --\n13 **** -- --\n14 **** -- --\n15 **** -- --\n16 **** -- --"]
Press CURSOR ▲ or ▼ to review more channels.
Press EXIT to quit menu or CURSOR ◀ to return to previous menu.
NOTE: Each touch of CURSOR ▲ or ▼ will display the next eight channels.
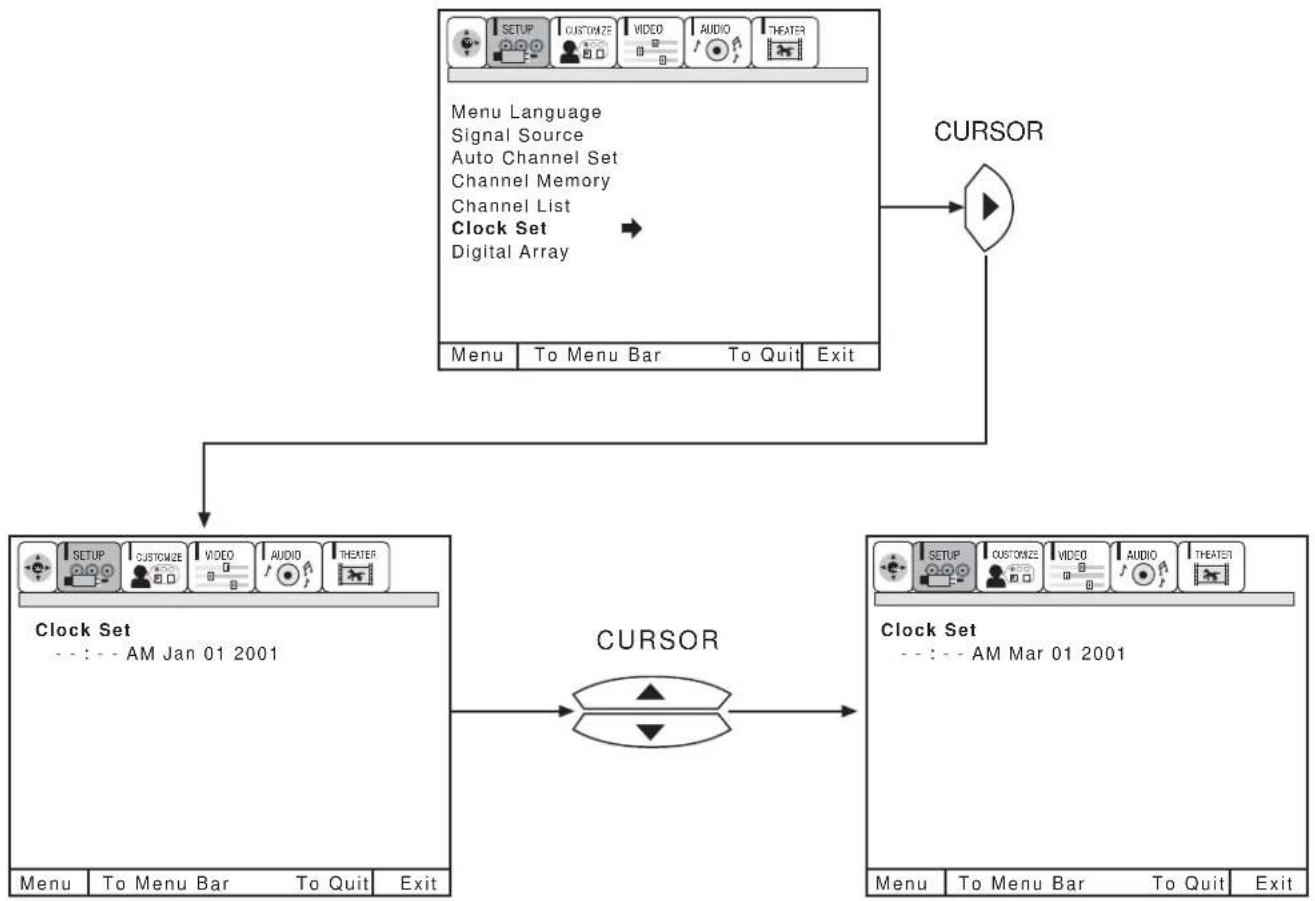
CLOCK SET
The time must be set before you can use the 4 EVENT PROGRAM or TV TIME OUT.
flowchart
graph TD
    A["Menu Language\nSignal Source\nAuto Channel Set\nChannel Memory\nChannel List\nClock Set\nDigital Array"] --> B["CURSOR"]
    B --> C["Clock Set\n-- : -- AM Jan 01 2001"]
    C --> D["CURSOR"]
    D --> E["Clock Set\n-- : -- AM Mar 01 2001"]
    E --> F["Menu\nTo Menu Bar\nTo Quit\nExit"]
Use CURSOR ▲ or ▼ to set the time, date, and year.
Press CURSOR ◀ or ▶ to change position.
Press EXIT to quit menu or CURSOR ◀ to return to previous menu when the CURSOR is in the first position.
DIGITAL ARRAY
Your HITACHI Projection TV has three color projection tubes: one for red, one for green, one for blue. When mixed together in the proper proportion, the output of these three color tubes can produce any color. To produce these colors, however, the beams must be precisely aligned over each other so that the colors can be mixed. The process of aligning these picture beams is called “convergence”.
Over a period of time, the picture tubes can drift out of alignment due to normal bumps and vibrations or moving the TV. If you move your TV, or if, after a time, you notice color rings or halos around objects in the picture, you may want to converge (align) the colors.
Properly converged, the lines appear white, which is actually a combination of the outputs of the three color tubes. The output of the green tube is stationary. The outputs of the red and blue tubes can be adjusted. When properly aligned, the outputs of all three tubes should be directly over each other to produce the white lines.
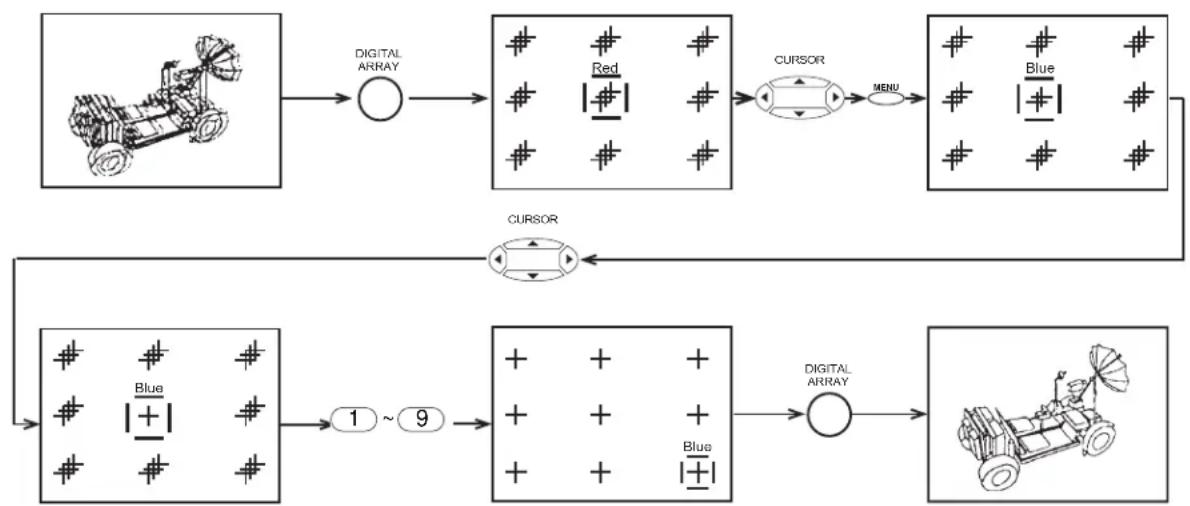
To simplify convergence, HITACHI incorporates a feature to allow you to display a test pattern of horizontal and vertical lines at 9 different locations on the screen. Simply use the remote control to adjust the red and blue colors to match the green. When properly aligned, the outputs of all three tubes should be directly over each other to produce the white lines.
To enter this adjustment mode, you may also select DIGITAL ARRAY from the Set Up menu. However, this will display a message prompting you to press the front panel DIGITAL ARRAY button.
flowchart
graph TD
    A["Robot Vehicle"] --> B["○"]
    B --> C["Red Box 1"]
    C --> D["CurSOR Window"]
    D --> E["Menu Box 2"]
    E --> F["Blue Box 3"]
    F --> G["CurSOR Window"]
    G --> H["Blue Box 4"]
    H --> I["Digital Array 5"]
    I --> J["Output Robot"]

    subgraph Input
        K["Robot Car Icon"]
        L["Blue Box 1 + 9 Box 1 + 9 Box 1 + 9 Box 1 + 9 Box 1 + 9 Box 1 + 9 Box 1 + 9 Box 1 + 9 Box 1 + 9 Box 1 + 9 Box 1 + 9 Box 1 + 9 Box 1 + 9 Box 1 + 9 Box 1 + 9 Box 1 + 9 Box 1 + 9 Box 1"]
    end

    subgraph Output
        J[Blue Box 1 + 9 Box 1 + 9 Box 1 + 9 Box 1 + 9 Box 1 + 9 Box 1 + 9 Box 1 + 9 Box 1 + 9 Box 1 + 9 Box 1 + 9 Box 1 + 9 Box 1 + 9 Box 1 + 9 Box 1 + 9 Box 1 + 9 Box 1 + 9 Box
    end
Use the number buttons to select which point to adjust: 1 - Upper Left, 2 - Upper Middle, 3 - Upper Right, 4 - Center Left, 5 - Center, 6 - Center Right, 7 - Bottom Left, 8 - Bottom Middle, 9 - Bottom Right.
Press the CURSOR buttons to move the displayed color up, down, left, or right.
Press MENU to change the color you want to adjust.
Press the front panel DIGITAL ARRAY button or the remote control MOVE button when adjustment is done. This will save your adjustment into memory.
NOTE:
To save your adjustment data into memory, press the front panel DIGITAL ARRAY button or the remote control MOVE Button. If you do NOT wish to save your adjustment data into memory, turn the TV OFF or press the remote control PIP button. When the TV is turned ON again, your old convergence data will be restored.
When adjusting convergence, always start at the center of the screen.
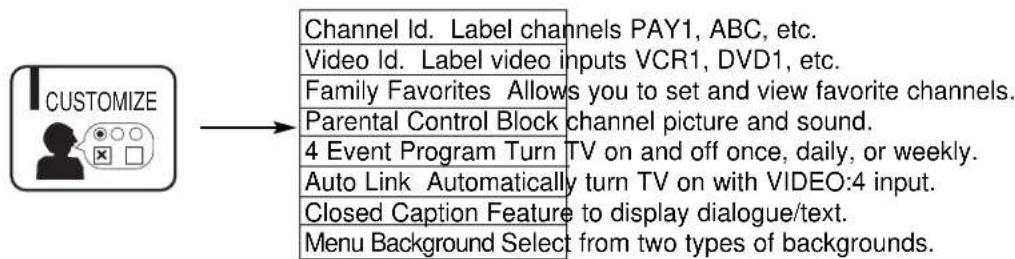
This selection contains advanced features which will make TV viewing easier and more enjoyable.
Use this feature to give up to 20 channels a name when ANTENNA signal source is selected and up to 60 channels a name when CATV1 signal source is selected.
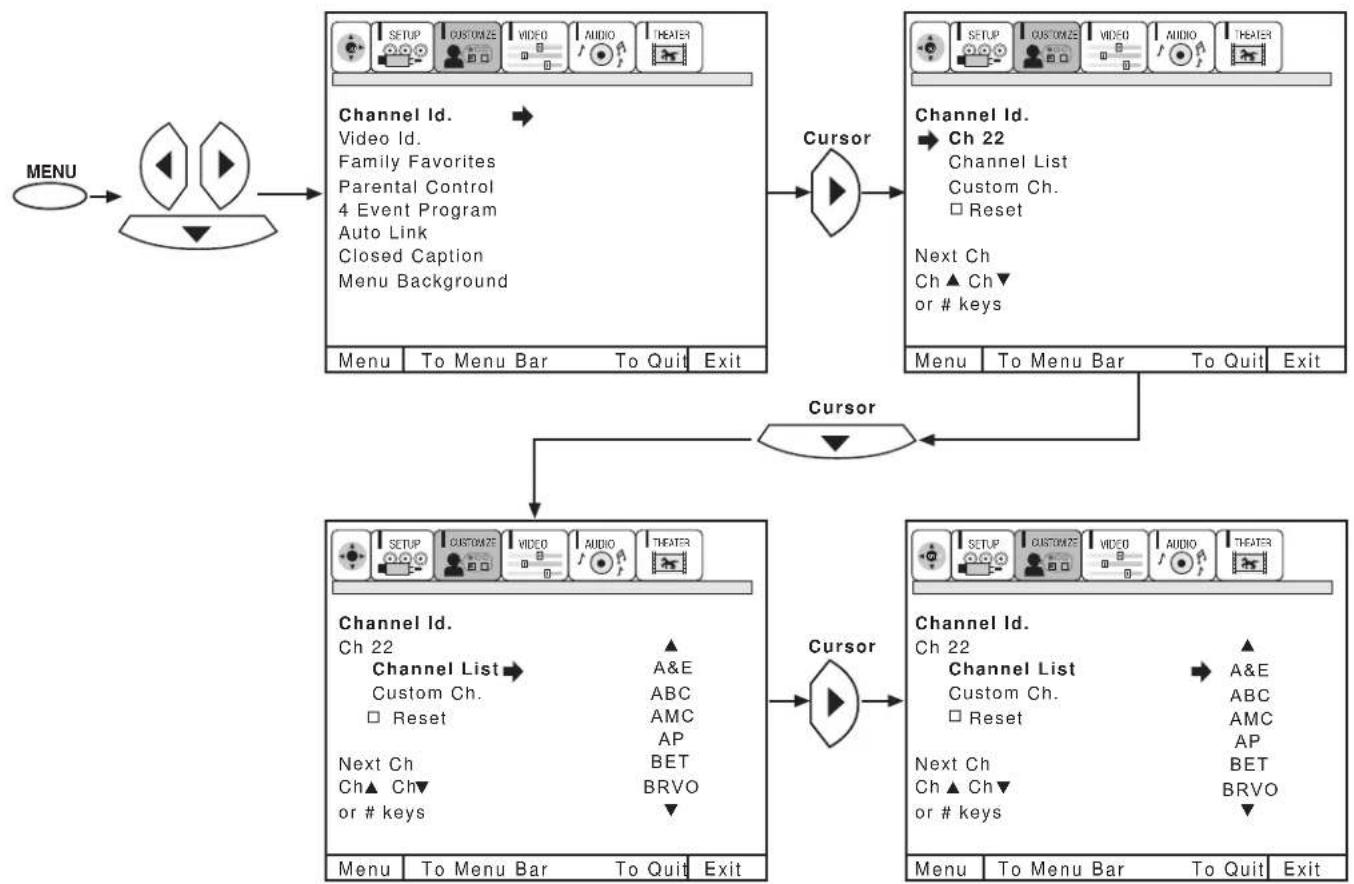
flowchart
graph TD
    A["MENU"] --> B["Channel Id."]
    B --> C["Cursor"]
    C --> D["Channel Id."]
    D --> E["Cursor"]
    E --> F["Channel Id."]
    F --> G["Cursor"]
    G --> H["Channel Id."]
    H --> I["Cursor"]
    I --> J["Channel Id."]
    J --> K["Cursor"]
    K --> L["Channel Id."]
    L --> M["Cursor"]
    M --> N["Channel Id."]
    N --> O["Cursor"]
    O --> P["Channel Id."]
    P --> Q["Cursor"]
    Q --> R["Channel Id."]
    R --> S["Cursor"]
Press CURSOR ▼ to select CHANNEL LIST.
Press CURSOR ▶ to select preset CHANNEL LIST.
Press CURSOR ▼ to scroll through the preset CHANNEL LIST.
Press SELECT to select desired CHANNEL ID.
Tocustomize CHANNEL ID, select CUSTOM CH.
Press CURSOR ▲ or ▼ to select letter.
Press CURSOR ◀ or ▶ to change character position.
(*) represents a blank space.
Press CHANNEL ▲ or ▼ and the number buttons to label additional channels.
Select ERASE to erase a CHANNEL ID.
Press EXIT to quit menu or CURSOR ◀ to return to previous menu when the CURSOR is in the first position.
VIDEO ID.
Use this feature to give a name to any of the four video inputs.
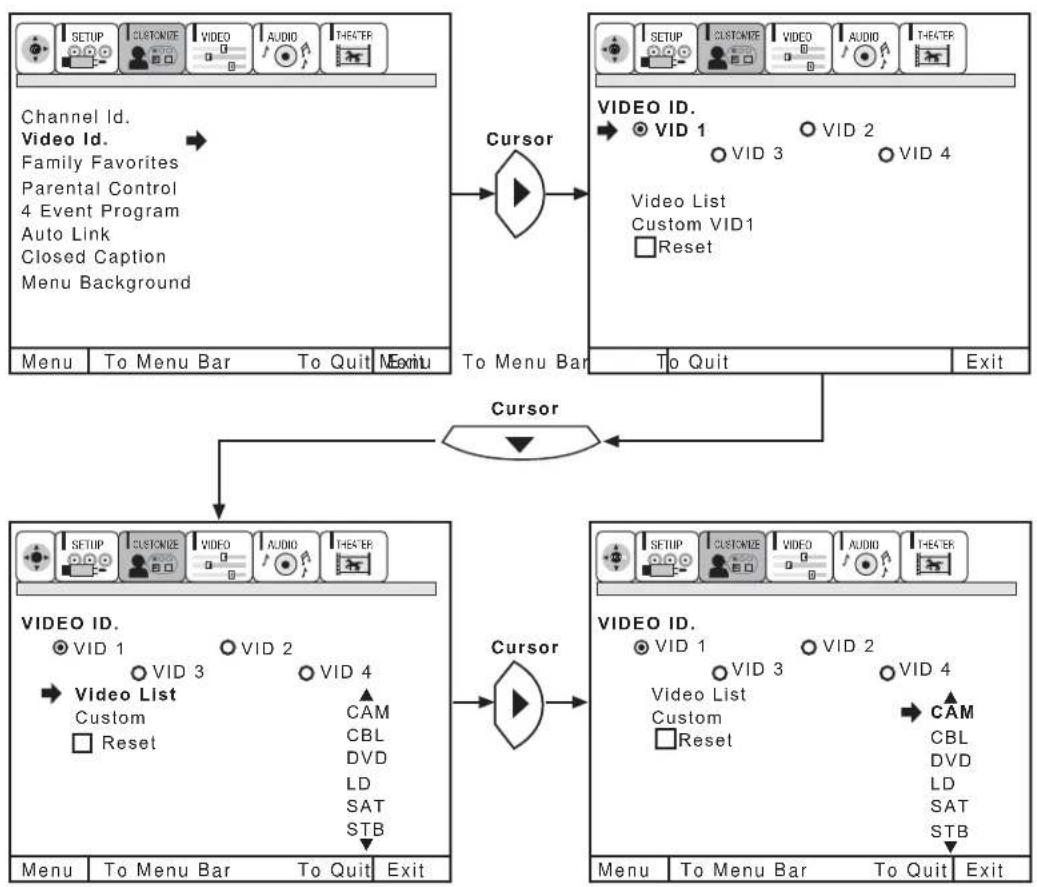
flowchart
graph TD
    A["Channel Id.<br>Video Id.<br>Family Favorites<br>Parental Control<br>4 Event Program<br>Auto Link<br>Closed Caption<br>Menu Background"] --> B["Cursor"]
    B --> C["To Menu Bar"]
    C --> D["To Quit"]
    D --> E["Menu"]
    F["VIDEO ID.<br>VID 1<br>VID 2<br>VID 3<br>VID 4<br>Video List<br>Custom VID1<br>Reset"] --> G["Cursor"]
    G --> H["To Quit"]
    H --> I["Exit"]
    J["VIDEO ID.<br>VID 1<br>VID 2<br>Video List<br>Custom<br>CAM<br>CBL<br>DVD<br>LD<br>SAT<br>STB"] --> K["Cursor"]
    K --> L["To Quit"]
    L --> M["Exit"]
Press CURSOR ▼ to select VIDEO LIST.
Press CURSOR ▶ to select preset VIDEO LIST.
Press CURSOR ▲ or ▼ to scroll through the preset VIDEO LIST.
Press SELECT to select desired VIDEO ID.
Tocustomize VIDEO ID, select CUSTOM.
Press CURSOR ▲ or ▼ to select letters.
Press CURSOR ▶ or ◀ to change position.
Press EXIT to quit menu or CURSOR ◀ to return to previous menu when the CURSOR is in the first position.
(*) represents a blank space.
Select RESET to set VIDEO ID to original condition.
NOTE: VIDEO ID will be displayed only when VIDEO input is displayed as main picture.
FAMILY FAVORITES (MENU)
This function allows you to group your favorite channels into six personalized categories that you can rename. A total of 24 channels can be stored in the FAMILY FAVORITES function.
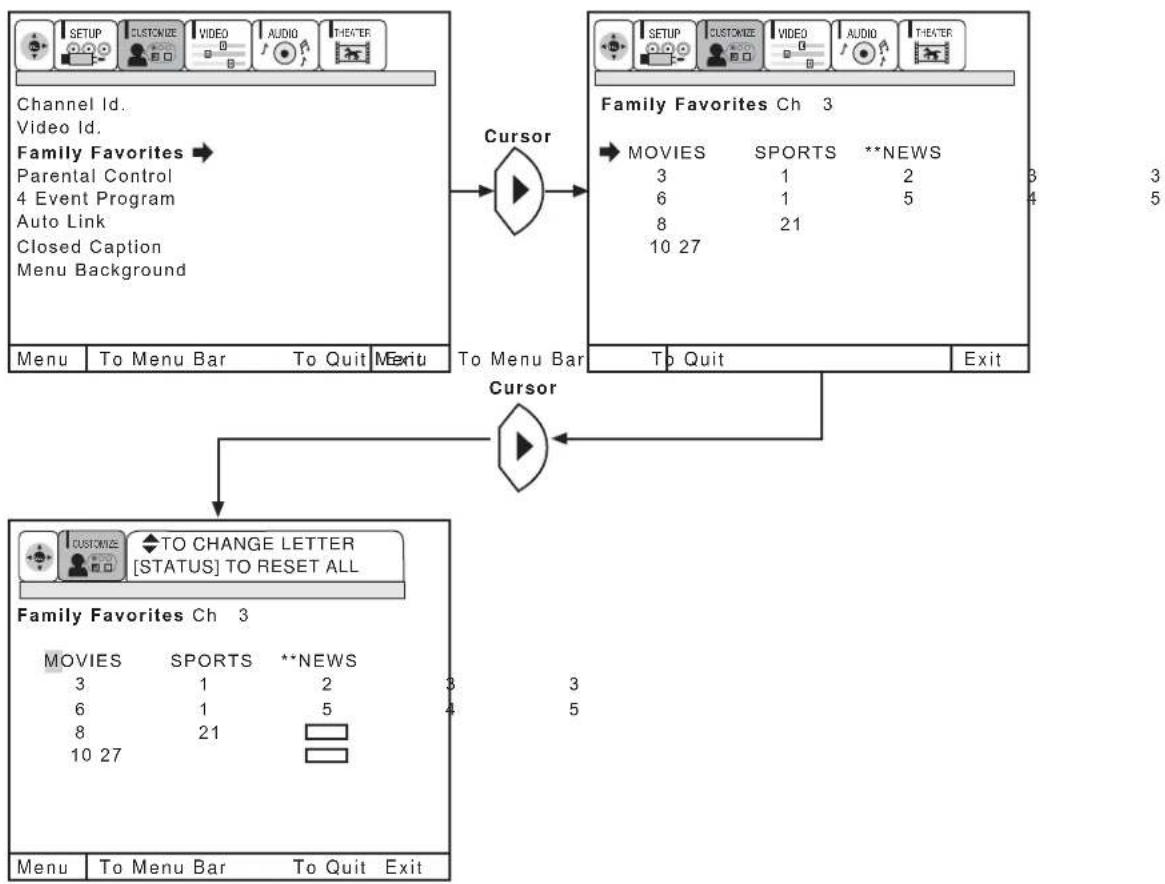
flowchart
graph TD
    A["Channel Id.<br>Video Id.<br>Family Favorites"] --> B["Cursor"]
    B --> C["Family Favorites Ch 3"]
    C --> D["MOVIES"]
    C --> E["SPORTS"]
    C --> F["**NEWS"]
    C --> G["3"]
    C --> H["1"]
    C --> I["2"]
    C --> J["6"]
    C --> K["1"]
    C --> L["5"]
    C --> M["8"]
    C --> N["21"]
    C --> O["10 27"]
    P["Menu"] --> Q["To Menu Bar"]
    P --> R["To Quit"]
    P --> S["Exit"]
    T["Cursor"] --> U["To Menu Bar"]
    T --> V["To Quit"]
    T --> W["Exit"]
    X["TO CHANGE LETTER<br>[STATUS"] TO RESET ALL] --> Y["Cursor"]
    Y --> Z["Menu"]
    Y --> AA["To Menu Bar"]
    Y --> AB["To Quit"]
    Y --> AC["Exit"]
To rename the categories, use the CURSOR buttons to highlight the category you would like to rename. Use CURSOR ▲ or ▼ to change a letter and CURSOR ▶ to select the next character to change.
Toenter a channel into a category, highlight the channel location to be stored.
Press CHANNEL ▲ or ▼ or the number buttons to enter the desired channel. Repeat until category has been set with your favorite channels. The channel to be added is displayed in the top right corner of the screen. Enter channel 00 to erase a favorite channel.
To reset categories and channels back to original factory preset, press STATUS while you are renaming a category.
FAMILY FAVORITES (OPERATION)
Use this function to display FAMILY FAVORITES selection to tune the main picture to a desired favorite channel.
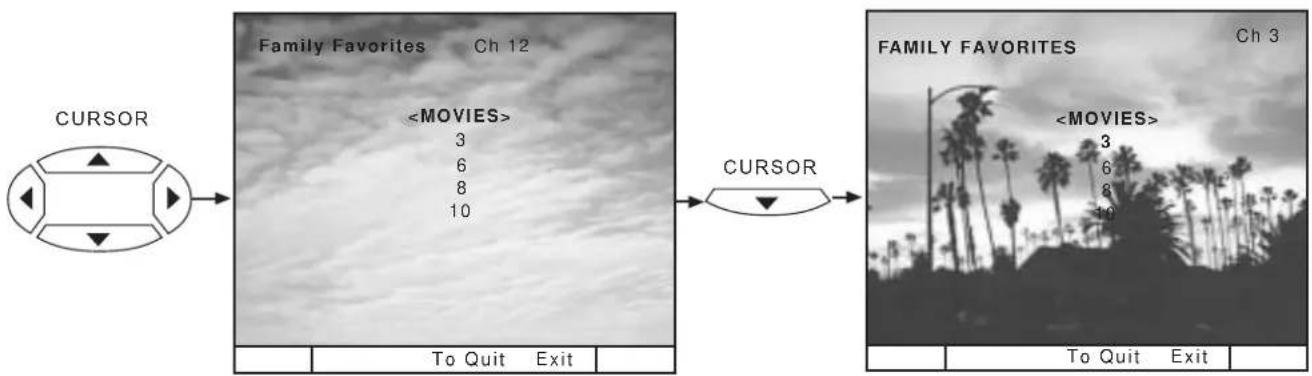
flowchart
graph LR
    A["CURSOR"] --> B["Family Favorites Ch 12"]
    B --> C["<MOVIES> 3, 6, 8, 10"]
    C --> D["CURSOR"]
    D --> E["Family Favorites Ch 3"]
    E --> F["<MOVIES> 3, 6, 8, 10"]
    F --> G["To Quit Exit"]
Select a category using CURSOR ◀ or ▶ buttons.
Use CURSOR ◀, ▶, ▲ or ▼ buttons to highlight a favorite channel and the TV will automatically tune to that channel.
Press EXIT to remove FAMILY FAVORITES OSD from the screen.
PARENTAL CONTROL
This function will block out the picture and sound of the selected channel or video input.
It can also be used to keep the TV from being viewed for a scheduled amount of time that you set.
The code to enter PARENTAL CONTROL is a four digit secret code number. The factory preset code is 0000.
Use the number buttons to select secret code.
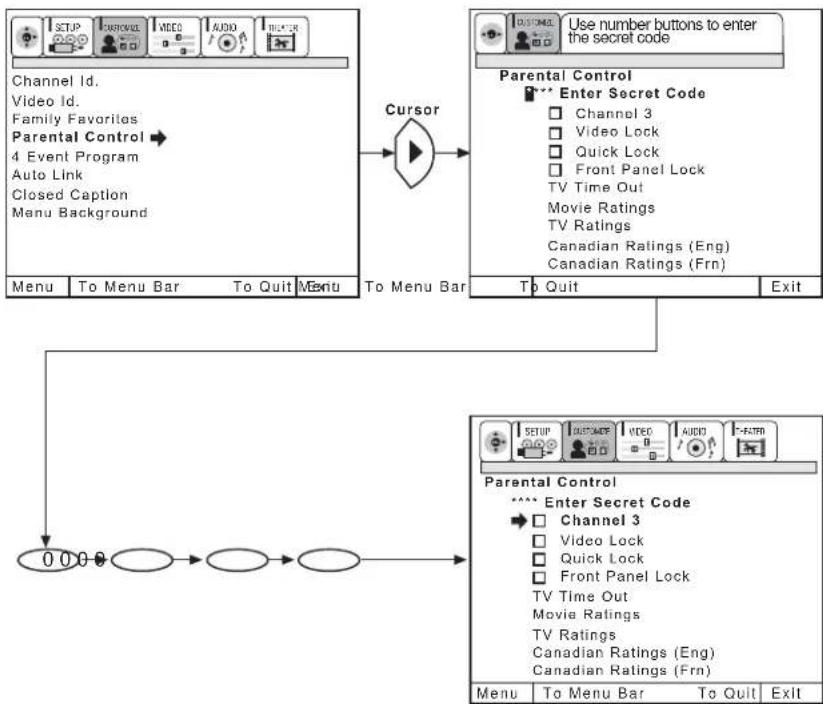
flowchart
graph TD
    A["Channel Id.<br>Video Id.<br>Family Favorites<br>Parental Control"] --> B["Cursor"]
    B --> C["To Menu Bar"]
    C --> D["0 0 0 0"]
    D --> E["To Quit Menu"]
    E --> F["Menu To Menu Bar To Quit Menu"]
    G["Use number buttons to enter the secret code"] --> H["Parental Control<br>Enter Secret Code<br>Channel 3<br>Video Lock<br>Quick Lock<br>Front Panel Lock<br>TV Time Out<br>Movie Ratings<br>TV Ratings<br>Canadian Ratings (Eng)<br>Canadian Ratings (Fm)"]
    H --> I["To Quit Exit"]
    I --> J["Parental Control<br>Enter Secret Code<br>Channel 3<br>Video Lock<br>Quick Lock<br>Front Panel Lock<br>TV Time Out<br>Movie Ratings<br>TV Ratings<br>Canadian Ratings (Eng)<br>Canadian Ratings (Fm)"]
    J --> K["Menu To Menu Bar To Quit Exit"]
Use CURSOR ▲ or ▼ to highlight function and then press SELECT button to set ON or OFF.
When CHANNEL is turned on, the picture and sound for the chosen channel will be blocked out.
When VIDEO LOCK is turned on, the picture and sound for all video inputs will be blocked out. To lock the video inputs, you must be tuned to any video input.
When QUICK LOCK is turned on, the picture and sound for channels 3, 4 and all video inputs will be blocked out.
When FRONT PANEL LOCK is turned on, all buttons on the Front Panel will be deactivated, except the Power button.
When TV TIME OUT is turned on, you can set the BEGIN and END times and the TV cannot be viewed during that time period. (Set clock first.) Use CURSOR ▲ or ▼ to highlight ONCE (TV will time out one time only), DAILY (TV will time out every day), WEEKLY (TV will time out one time a week) or OFF (to disable this function) and then press SELECT to select your choice.
When MOVIE RATINGS is selected, you can block various types of movies and video tapes based on motion picture ratings. Picture-in-Picture will also be blocked automatically.
When TV RATING is selected, various types of television programming based on a parental guide ratings will be blocked. Picture-in Picture will also be blocked automatically.
Use CANADIAN RATINGS to block various types of movies and television programs based on the two rating systems used in Canada that you feel may be inappropriate due to its content.
To change the secret code number, select CHANGE SECRET CODE. Enter a new four digit key number you prefer.
If you forget your secret code, use the factory code 7777 to erase your key number. This will reset the secret code number back to the factory preset 0000.
Press EXIT to quit menu or CURSOR ◀ to return to previous menu.
NOTE: When using TV TIME OUT make sure the clock is set (see page 36).
MOVIE RATINGS
Use MOVIE RATINGS to eliminate from viewing, any movie that you feel may be inappropriate due to its content.
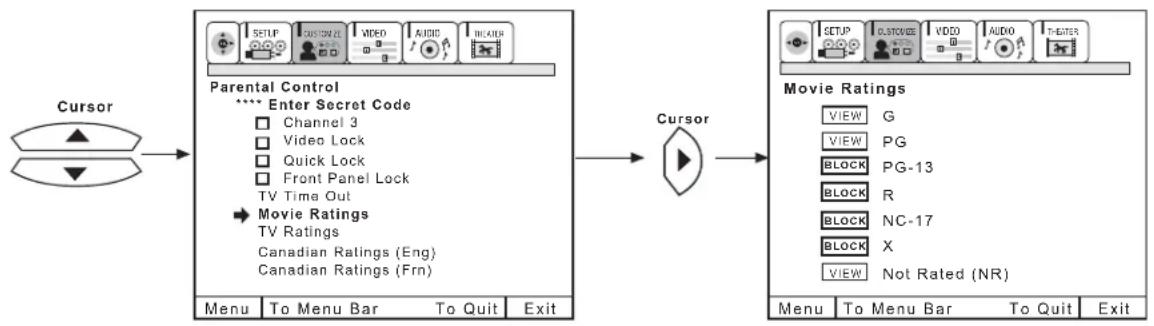
flowchart
graph LR
    A["Cursor"] --> B["Parental Control\n**** Enter Secret Code\n□ Channel 3\n□ Video Lock\n□ Quick Lock\n□ Front Panel Lock\nTV Time Out\n→ Movie Ratings\nTV Ratings\nCanadian Ratings (Eng)\nCanadian Ratings (Fm)\nMenu To Menu Bar To Quit Exit"]
    B --> C["Cursor"]
    C --> D["Movie Ratings\nVIEW G\nVIEW PG\nBLOCK PG-13\nBLOCK R\nBLOCK NC-17\nBLOCK X\nVIEW Not Rated (NR)\nMenu To Menu Bar To Quit Exit"]
Use CURSOR ▲ or ▼ to select the MOVIE RATING category that you want to block.
Press SELECT to block the MOVIE RATING that you have selected. Once rating is selected, for example PG-13, all movies rated PG-13 and higher (R, NC-17, and X) will be blocked.
Press EXIT to quit menu or CURSOR ◀ to return to the previous menu.
NOTE:
VIEW Means rating is viewable, BLOCK means rating is selected.
MOTION PICTURE RATING CHART
| G | General audiences. All ages admitted. |
| PG | Parental guidance suggested. Some material may not be suitable for children. |
| PG-13 | Parents strongly cautioned. Some material may be inappropriate for children under 13. |
| R | Restricted. Under 17 requires accompanying parent or adult guardian. |
| NC-17 | No one 17 and under admitted. |
| X | Adults only |
| NOT RATED (NR) | Contains no rating. Not Rated (NR) and Not Applicable (NA) programs. Movie has not been rated or ratings do not apply. |
TV RATINGS
Use TV RATINGS to eliminate from viewing any TV program that you feel may be inappropriate due to its content.
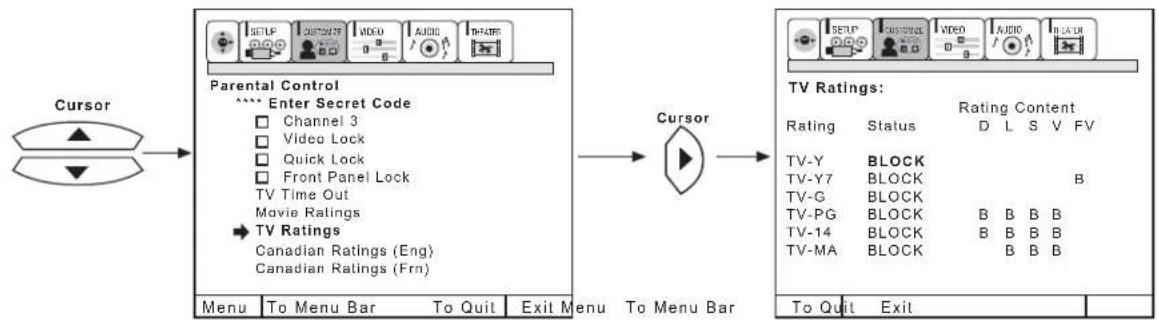
flowchart
graph LR
    A["Cursor"] --> B["Parental Control<br>**** Enter Secret Code<br>□ Channel 3<br>□ Video Lock<br>□ Quick Lock<br>□ Front Panel Lock<br>TV Time Out<br>Movie Ratings<br>→ TV Ratings<br>Canadian Ratings (Eng)<br>Canadian Ratings (Frn)"]
    B --> C["Cursor"]
    C --> D["TV Ratings:<br>Rating Content<br>Rating Status D L S V FV<br>TV-Y BLOCK<br>TV-Y7 BLOCK B<br>TV-G BLOCK<br>TV-PG BLOCK B B B B<br>TV-14 BLOCK B B B B<br>TV-MA BLOCK B B B B"]
    D --> E["To Quit Exit"]
Use CURSOR ▲ or ▼ to highlight the category that you want to block. Press SELECT to block the TV RATING that you have selected. Press EXIT to quit menu or CURSOR ◀ to return to the previous menu.
NOTE: "V" is to view. "B" is to block.
TV PARENTAL GUIDE RATING CHART
| NR | Not rated. See Customer Caution. |
| TV-Y | All children. The themes and elements in this program are specifically designed for a very young audience, including children from ages 2-6. |
| TV-Y7 | Directed to older children. Themes and elements in this program may include mild physical or comedic violence, or may frighten children under the age of 7. |
| TV-G | General audience. It contains little or no violence, no strong language, and little or no sexual dialogue or situations. |
| TV-PG | Parental guidance suggested. The program may contain infrequent coarse language, limited violence, some suggestive sexual dialogue and situations. |
| TV-14 | Parents strongly cautioned. This program may contain sophisticated themes, intense sexual situation, more intense violence and intensely suggestive dialogue. |
| TV-MA | Mature audiences only. This program may contain mature themes, indecent language, graphic violence, and explicit sexual content. |
| FV | Fantasy Violence |
| V | Violence |
| S | Sexual Situation |
| L | Adult Language |
| D | Sexually Suggestive Dialogue. |
CUSTOMER CAUTION
The TV Rating system that is used in this set is capable of blocking "NR" programs (non-rated, not applicable and none) per FCC Rules Section 15.120(e)(2). If the option of blocking "NR" programs is chosen "unexpected and possibly confusing results may occur, and you may not receive emergency bulletins or any of the following types of programming."
Emergency Bulletins (Such as EAS messages, weather warnings and others)
- Locally originated programming
News
. Political
• Public Service Announcements
Religious
. Sports
Weather
NOTE:
If you Block TV-14D, you will still permit TV MA programs; If you block TV-14DV, you will automatically block TV-MAV programs, but you will still permit TV-MALS programs. This means that the TV will block violence in TV-14 and higher (TV-MA), but not language and sex.
CANADIAN RATINGS (ENG)
Use CANADIAN RATINGS (ENG) to block various types of movies and television programs used in Canada that you feel may be inappropriate due to its content.
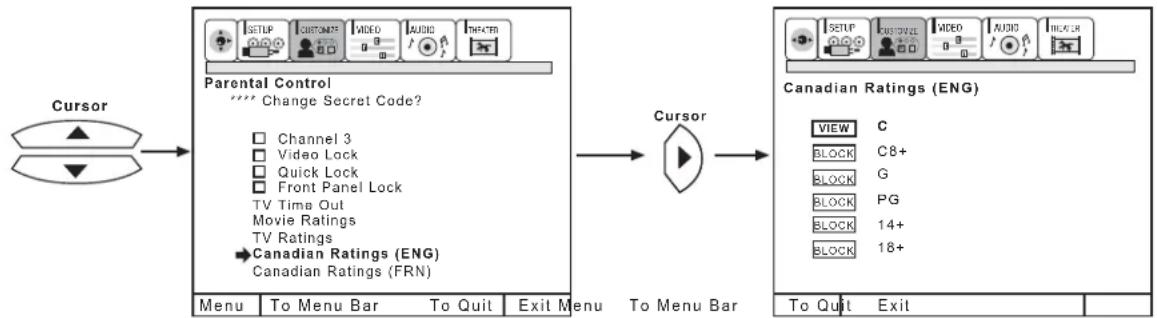
flowchart
graph LR
    A["Cursor"] --> B["Parental Control\n**** Change Secret Code?\n□ Channel 3\n□ Video Lock\n□ Quick Lock\n□ Front Panel Lock\nTV Time Out\nMovie Ratings\nTV Ratings\n→ Canadian Ratings (ENG)\nCanadian Ratings (FRN)"]
    B --> C["Cursor"]
    C --> D["Canadian Ratings (ENG)\nVIEW C\nBLOCK C8+ \nBLOCK G\nBLOCK PG\nBLOCK 14+ \nBLOCK 18+"]
    D --> E["To Quit Exit"]
Use CURSOR ▲ or ▼ to select the CANADIAN RATINGS (ENG) category that you want to block.
Press SELECT to set the CANADIAN RATINGS (ENG) that you have selected. Once rating is selected, for example C8+, all movies and television programs rated C8+ and higher (G, PG, 14+ and 18+) will be blocked automatically.
Press EXIT to quit menu or CURSOR ◀ to return to the previous menu.
NOTE:
VIEW Means rating is viewable, BLOCK means rating is selected.
CANADIAN ENGLISH RATINGS CHART
| C | Programming intended for children under age 8 - Violence Guidelines; Careful attention is paid to themes, which could threaten children's sense of security and well-being. There will be no realistic scenes of violence. Depictions of aggressive behaviour will be infrequent and limited to portrayals that are clearly imaginary, comedic or unrealistic in nature. Other Content Guidelines: There will be no offensive language, nudity or sexual content. |
| C8+ | Programming generally considered acceptable for children 8 years and over to watch on their own - Violence Guidelines: Violence will not be portrayed as the preferred, acceptable, or only way to resolve conflict; or encourage children to imitate dangerous acts which they may see on television. Any realistic depictions of violence will be infrequent, discreet, of low intensity and will show the consequences of the acts. Other Content Guidelines: There will be no profanity, nudity or sexual content. |
| G | General Audience - Violence Guidelines: Will contain very little violence, either physical or verbal or emotional. Will be sensitive to themes which could frighten a younger child, will not depict realistic scenes of violence which minimize or gloss over the effects of violent acts. Other Content Guidelines: There may be some inoffensive slang, no profanity and no nudity. |
| PG | Parental Guidance - Programming intended for a general audience but which may not be suitable for younger children. Parents may consider some content inappropriate for unsupervised viewing by children ages 8-13. Violence Guidelines: Depictions of conflict and/or aggression will be limited and moderate; may include physical, fantasy, or supernatural violence. Other Content Guidelines: May contain infrequent mild profanity, or mildly suggestive language. Could also contain brief scenes of nudity. |
| 14+ | Programming contains themes or content which may not be suitable for viewers under the age of 14 - Parents are strongly cautioned to exercise discretion in permitting viewing by pre-teens and early teens. Violence Guidelines: May contain intense scenes of violence. Could deal with mature themes and societal issues in a realistic fashion. Other Content Guidelines: May contain scenes of nudity and/or sexual activity. There could be frequent use of profanity. |
| 18+ | Adult - Violence Guidelines: May contain violence integral to the development of the plot, character or theme, intended for adult audiences. Other Content Guidelines: May contain graphic language and explicit portrayals of nudity and/or sex. |
CANADIAN RATINGS (FRN)
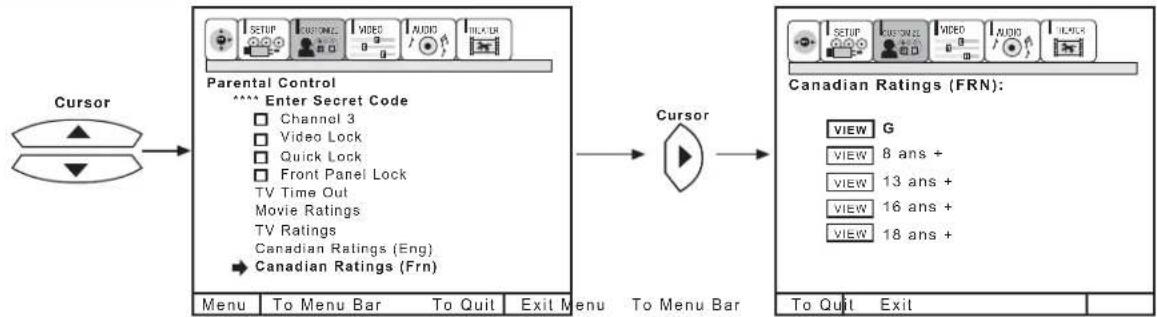
Use CANADIAN RATINGS (FRN) to block Canadian French programs according to various program ratings that you feel may be inappropriate due to its content.
flowchart
graph LR
    A["Cursor"] --> B["Parental Control"]
    B --> C["Cursor"]
    C --> D["Canadian Ratings (FRN):"]
    D --> E["To Quit"]
    D --> F["Exit"]
    B --> G["Menu: Channel 3, Video Lock, Quick Lock, Front Panel Lock, TV Time Out, Movie Ratings, TV Ratings, Canadian Ratings (Eng), Canadian Ratings (Fm)"]
    D --> H["To Menu Bar: View G, View 8 ans+, View 13 ans+, View 16 ans+, View 18 ans+"]
Use CURSOR ▲ or ▼ to highlight the category that you want to block.
Press SELECT to set the CANADIAN RATINGS (FRN) that you have selected.
Press EXIT to quit menu or select CURSOR ◀ to return to the previous menu.
CANADIAN FRENCH RATINGS CHART
| G | General - Programming intended for audiences of all ages. Contains no violence, or the violence content is minimal or is depicted appropriately with humor or caricature or in an unrealistic manner. |
| 8 ans + | 8 + General - Not recommended for young children - Programming intended for a broad audience but contains light or occasional violence that could disturb young children. Viewing with an adult is therefore recommended for young children (under the age of 8) who cannot differentiate between real and imaginary portrayals. |
| 13 ans + | Programming may not be suitable for children under the age of 13 - Contains either a few violent scenes or one or more sufficiently violent scenes to affect them. Viewing with an adult is therefore strongly recommended for children under 13. |
| 16 ans + | Programming is not suitable for children under the age of 16 - Contains frequent scenes of violence or intense violence. |
| 18 ans + | Programming restricted to adults - Contains constant violence or scenes of extreme violence. |
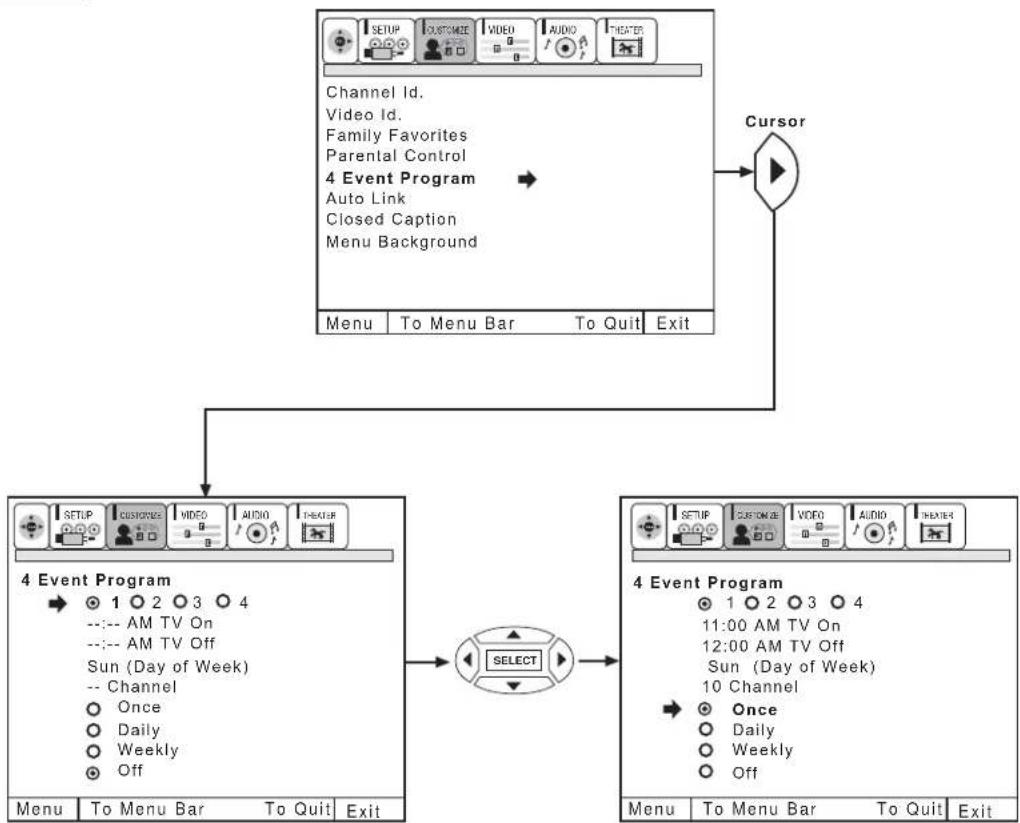
4 EVENT PROG.
This function will automatically turn the TV on and off, one time only, every day or once a week.
flowchart
graph TD
    A["4 Event Program"] --> B["Select"]
    B --> C["Menu To Menu Bar To Quit Exit"]
    D["Cursor"] --> E["4 Event Program"]
    E --> F["1 2 3 4 AM TV On Day of Week"]
    E --> G["Once Daily Weekly Off"]
    H["Menu"] --> I["To Menu Bar To Quit Exit"]
    J["Time"] --> K["To Quit Exit"]
    L["Video"] --> M["AM TV Off"]
    N["Audio"] --> O["AM TV Off"]
    P["Video"] --> Q["AM TV Off"]
    R["Audio"] --> S["AM TV Off"]
    T["Video"] --> U["AM TV Off"]
    V["Audio"] --> W["AM TV Off"]
    X["Video"] --> Y["AM TV Off"]
    Z["Audio"] --> AA["AM TV Off"]
    AB["Video"] --> AC["AM TV Off"]
    AD["Audio"] --> AE["AM TV Off"]
    AF["Video"] --> AG["AM TV Off"]
    AH["Audio"] --> AI["AM TV Off"]
    AJ["Video"] --> AK["AM TV Off"]
    AL["Audio"] --> AM["AM TV Off"]
    AN["Video"] --> AO["AM TV Off"]
    AP["Audio"] --> AQ["AM TV Off"]
    AR["Video"] --> AS["AM TV Off"]
    AT["Audio"] --> AU["AM TV Off"]
    AV["Video"] --> AW["AM TV Off"]
    AX["Audio"] --> AY["AM TV Off"]
    AZ["Video"] --> BA["AM TV Off"]
    BB["Audio"] --> BC["AM TV Off"]
    BD["Video"] --> BE["AM TV Off"]
    BF["Audio"] --> BG["AM TV Off"]
    BH["Video"] --> BI["AM TV Off"]
    BJ["Audio"] --> BK["AM TV Off"]
    BL["Video"] --> BM["AM TV Off"]
    BN["Audio"] --> BO["AM TV Off"]
    BP["Video"] --> BP["AM TV Off"]
    BQ["Select"] --> BR["To Quit Exit"]
Press CURSOR ▶ then press SELECT to select PROGRAM 1, 2, 3, or 4.
Press CURSOR ▲ or ▼ to select the time the TV will turn on and off.
Use CURSOR ▶ to change position.
Press CURSOR ▲ or ▼ to highlight then press SELECT to select MODE: ONCE (TV will turn on/off one time only) or MODE: DAILY (TV will turn on/off at the same time every day), or MODE: WEEKLY (TV will turn on/off at same time every week) and MODE: OFF (to disable this function).
Press CURSOR ▲ or ▼, CHANNEL (▲) or (▼), or number buttons to set the channel the TV will tune to when it automatically turns on.
Press EXIT to quit menu or cursor ◀ to return to previous menu.
If the clock is not set, you can not use this function and the screen below will appear.
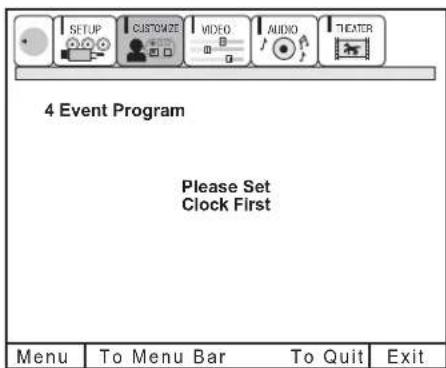
NOTE: If no remote control button is pressed after ON Timer is activated, the TV will automatically turn off after three hours.

CAUTION: Do not use your TV as a deterrent when away from home by using the ON and OFF TIMERS. For safety, the TV should be turned off when you are away from home.
AUTO LINK
Use this function to automatically turn the TV on and tune to VIDEO: 4 when it detects a VIDEO input.
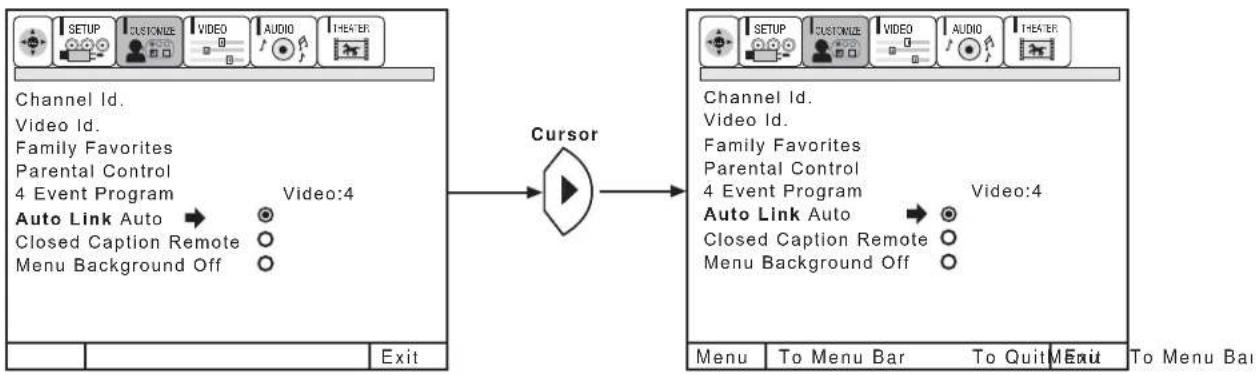
flowchart
graph LR
    A["Channel Id.<br>Video Id.<br>Family Favorites<br>Parental Control<br>4 Event Program"] --> B["Auto Link Auto"]
    B --> C["Closed Caption Remote"]
    B --> D["Menu Background Off"]
    E["Cursor"] --> F["Menu"]
    F --> G["To Menu Bar"]
    F --> H["To Quit"]
    F --> I["Exit"]
    J["Menu"] --> K["To Menu Bar"]
    J --> L["To Quit"]
    J --> M["Exit"]
Use CURSOR ▲ or ▼, then press SELECT, to change AUTO LINK setting.
When AUTO is selected, the TV will turn on and tune to VIDEO: 4 automatically, when the VIDEO: 4 input device is turned on. This is convenient when you want to watch a movie with your VCR, laserdisc player, or DVD player.
When REMOTE is selected, the TV will turn on and tune to VIDEO: 4 automatically, when the VIDEO: 4 input device is turned on and the VCR, laserdisc, or DVD play button on your remote control is pressed. This is convenient when you want to record a movie with your VCR and watch it later.
Select OFF to disable this function.
Press EXIT to quit menu or CURSOR ◀ to return to previous menu.
NOTE: 1. Auto Link will only work with Video: 4 input.
- Once the TV has been turned on using the AUTO LINK feature, it must be reset before AUTO LINK is used again. To do this, turn your VCR, laserdisc, or DVD player OFF. This feature is now reset and will turn on your TV as described above.
- When using REMOTE mode, any remote control button will substitute for your video input device play button. However, intended operation is for use with your VCR, laserdisc, or DVD play button.
- If no remote control button is pressed after the TV is turned on by AUTO LINK for three hours, the TV will automatically turn itself off.
CLOSED CAPTION
Closed Captions are the dialogue, narration, and/or sound effects of a television program or home video which are displayed on the TV screen. Your local TV program guide denotes these programs as cc or

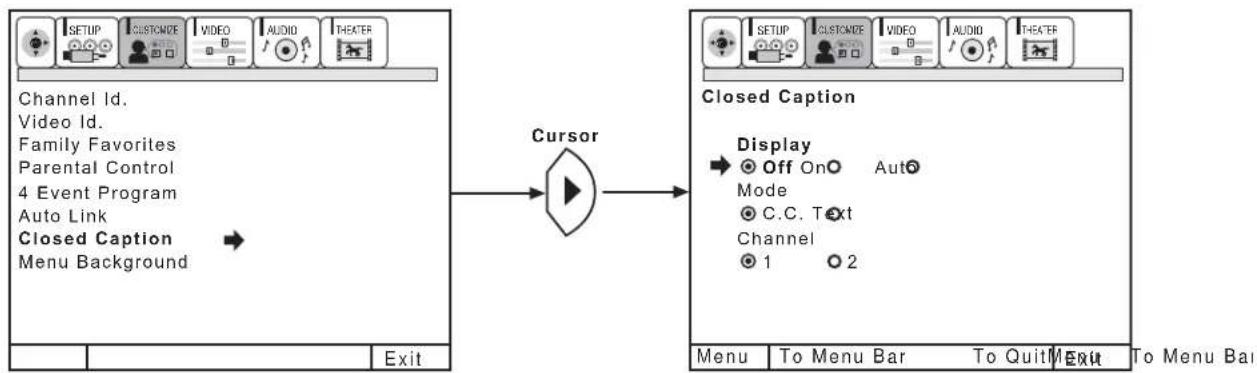
flowchart
graph LR
    A["Channel Id.<br>Video Id.<br>Family Favorites<br>Parental Control<br>4 Event Program<br>Auto Link<br>Closed Caption<br>Menu Background"] --> B["Cursor"]
    B --> C["Closed Caption"]
    C --> D["Display<br>Off On Auto<br>Mode<br>C.C. Text<br>Channel<br>1 2"]
    D --> E["Menu To Menu Bar To Quit Menu To Menu Bar"]
DISPLAY: ON/OFF will turn the display arc or off.
AUTO will display closed captions when audio is muted.
MODE: C.C. (Closed Caption) is for the program you are viewing.
TEXT is for additional information such as news reports or a TV program guide. This information covers the entire screen and viewing the TV program is not possible. TEXT may not be available with every logram.
CHANNEL: 1 is used for the primary language (usually English).
2 is sometimes used for a second language (may vary by region).
Use CURSOR ▲ or ▼ to highlight the function to change then press SELECT to change the function.
Press EXIT to quit menu or CURSOR ◀ to return to previous menu.
MENU BACKGROUND
This function allows you to choose from two menu backgrounds.
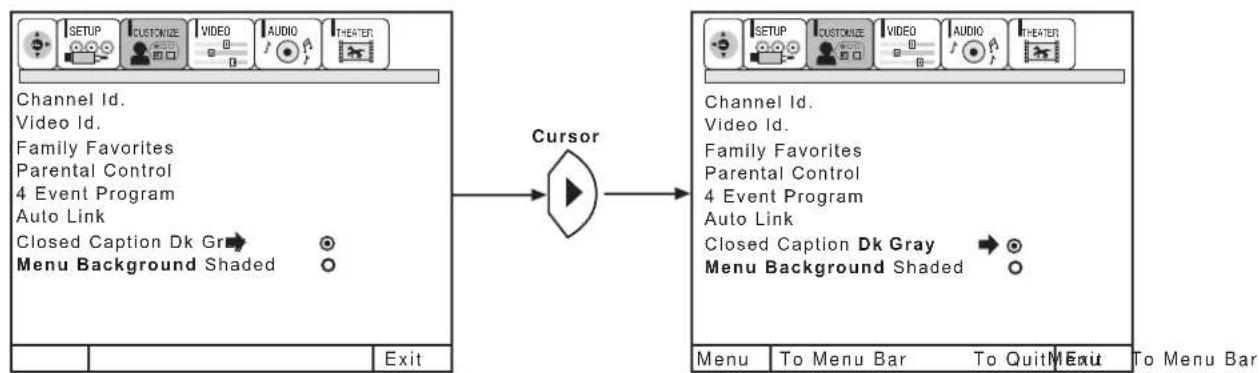
flowchart
graph LR
    A["Channel Id.<br>Video Id.<br>Family Favorites<br>Parental Control<br>4 Event Program<br>Auto Link<br>Closed Caption Dk Gr"] --> B["Cursor"]
    C["Menu Background Shaded"] --> B
    B --> D["Menu"]
    D --> E["To Menu Bar"]
    D --> F["To Quit"]
    D --> G["Exit"]
Use CURSOR ▲ or ▼ to highlight MENU BACKGROUND and press SELECT to change menu background.
Press EXIT to quit menu or CURSOR ◀ to return to previous menu.
Select dark GRAY and a gray background is visible (no picture can be seen behind menu screen), select SHADED and a light background is visible.
Select VIDEO to adjust picture settings and improve picture quality.
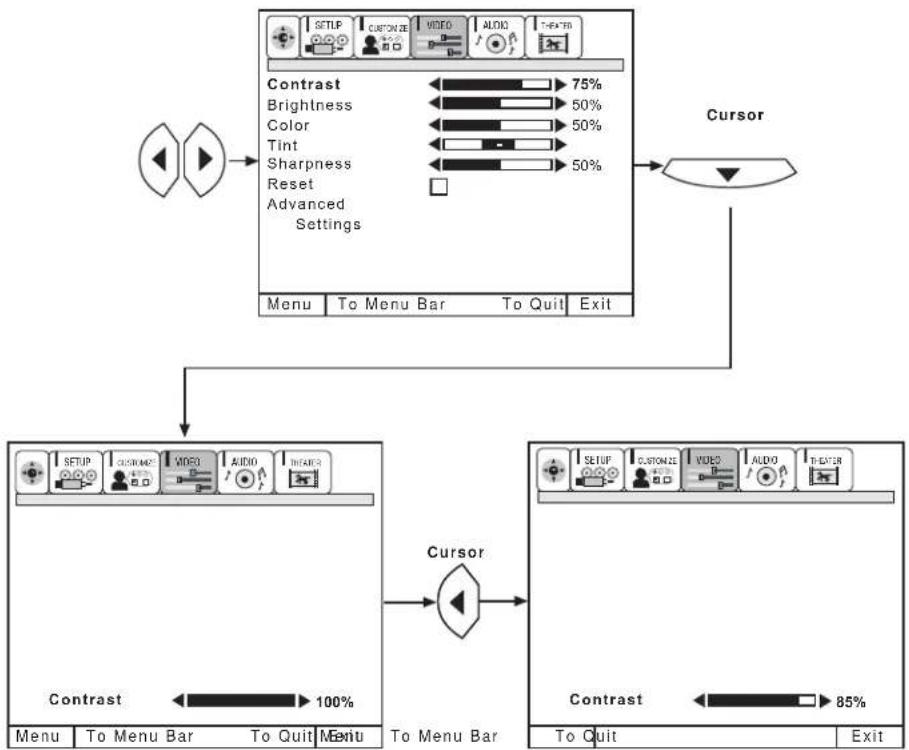
flowchart
graph TD
    A["User"] --> B["Contrast"]
    B --> C["Brightness"]
    C --> D["Color"]
    D --> E["Tint"]
    E --> F["Sharpness"]
    F --> G["Reset"]
    G --> H["Advanced Settings"]
    H --> I["Menu To Menu Bar To Quit Exit"]
    I --> J["Cursor"]
    J --> K["To Menu Bar"]
    K --> L["Contrast"]
    L --> M["To Quit"]
    M --> N["Exit"]
    N --> O["Cursor"]
    O --> P["To Quit"]
    P --> Q["Exit"]
Use the CURSOR ▲ or ▼ buttons to highlight the function to be adjusted.
Press the CURSOR ◀ or ▶ buttons to adjust the function.
Press EXIT to quit menu.
NOTE:
- If CONTRAST is selected, you are adjusting CONTRAST. The additional menu items BRIGHTNESS, COLOR, TINT, and SHARPNESS can be selected and adjusted in the same manner.
- Contrast and Brightness adjustments will affect only the main picture. These adjustments will not affect the sub-picture.
CONTRAST
Use this function to change the contrast between black and white levels in the picture. This adjustment will only affect the picture when ADVANCED SETTINGS PERFECT PICTURE is OFF. (see page 51)
BRIGHTNESS
Use this function to adjust overall picture brightness.
COLOR
Use this function to adjust the level of color in the picture.
TINT
Use this function to adjust flesh tones so they appear natural. (It may be necessary to adjust TINT to obtain optimum picture quality when using the COMPONENT VIDEO: Y-PBPR INPUT 4 jacks).
SHARPNESS
Use this function to adjust the amount of fine detail in the picture.
RESET
When RESET is selected, press SELECT button to return video adjustments to factory preset conditions.
ADVANCED SETTINGS
Your HITACHI Projection TV has a PERFECT PICTURE function which will automatically adjust picture settings to produce the highest quality picture possible.
When PERFECT PICTURE is highlighted, press SELECT to turn the PERFECT PICTURE on or off.
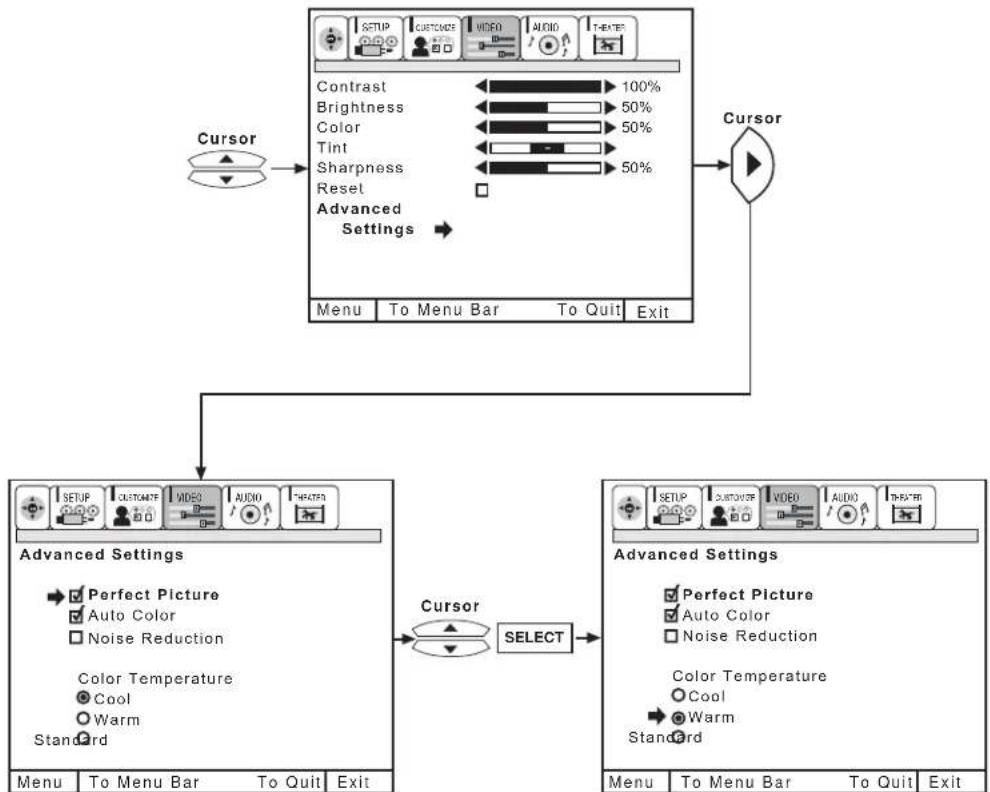
flowchart
graph TD
    A["Cursor"] --> B["Menu"]
    B --> C["To Menu Bar"]
    C --> D["To Quit"]
    D --> E["Exit"]
    F["Cursor"] --> G["Menu"]
    G --> H["To Menu Bar"]
    H --> I["To Quit"]
    I --> J["Exit"]
    K["Advanced Settings"] --> L["Menu"]
    K --> M["To Quit"]
    M --> N["To Quit"]
    N --> O["Exit"]
    P["Cursor"] --> Q["Menu"]
    P --> R["To Quit"]
    R --> S["To Quit"]
    S --> T["Exit"]
    U["Advanced Settings"] --> V["Menu"]
    U --> W["To Quit"]
    W --> X["To Quit"]
    X --> Y["Exit"]
Use CURSOR ▲ or ▼ to select function.
Press SELECT button to change the function setting. When the function has an "√" in the box, it is ON.
Press EXIT to quit menu or CURSOR ◀ to return to previous menu.
PERFECT PICTURE
When the Perfect Picture function is on, the TVs' internal computer will perform the following:
- Automatically monitor and adjust contrast depending on room lighting (sensor is located in the front panel) to produce a more natural picture.
- Automatically monitor and adjust color levels and maintain natural flesh tones.
- Automatically compensate for weak or strong TV signals to produce a clear picture.
Turn the Perfect Picture function off to control other VIDEO SETTINGS.
AUTO COLOR
The AUTO COLOR function automatically monitors and adjusts the color to maintain constant color levels even after a program or channel changes. It also maintains natural flesh tones while preserving fidelity of background colors. (This function will automatically set to on and cannot be turned off when the PERFECT PICTURE function is ON.)
NOTE: It may be necessary to set AUTO COLOR-ON to obtain optimum picture quality when using the COMPONENT VIDEO: Y-P B P R INPUT 4 jacks.
NOISE REDUCTION
The NOISE REDUCTION function automatically reduces conspicuous noise in the picture without degrading picture quality. (This function will automatically set to on and cannot be turned off when the PERFECT PICTURE function is ON.)
COLOR TEMPERATURE
Set this to WARM for hotter colors with more red, or set to COOL for less intense colors with more blue, or STANDARD for standard color.
Select AUDIO SETTINGS to adjust the TV to your preference and to improve the sound quality.
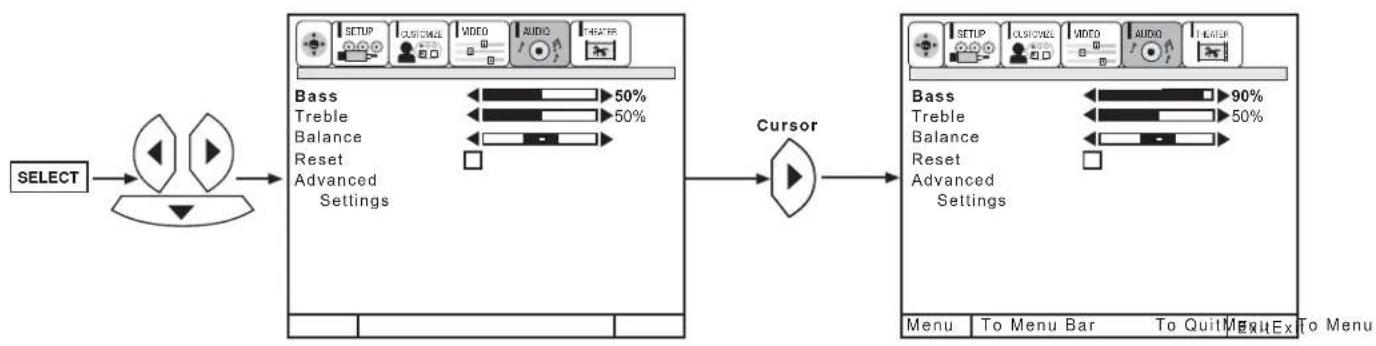
flowchart
graph LR
    A["SELECT"] --> B["User Interface"]
    B --> C["Bass<br>Treble<br>Balance<br>Reset<br>Advanced Settings"]
    C --> D["Cursor"]
    D --> E["User Interface"]
    E --> F["Bass<br>Treble<br>Balance<br>Reset<br>Advanced Settings"]
    F --> G["User Interface"]
Use CURSOR ▲ or ▼ to highlight the function to be adjusted.
Press CURSOR ◀ or ▶ to adjust the function.
Press EXIT to quit MENU.
NOTE: If BASS is selected you are adjusting BASS. The additional menu items TREBLE and BALANCE can be selected and adjusted in the same manner.
BASS
This function controls the low frequency audio to all speakers.
TREBLE
This function controls the high frequency audio to all speakers.
BALANCE
This function will control the left to right balance of the TV internal speakers and the AUDIO TO HI FI output.
RESET
When RESET is selected, press SELECT to return audio adjustments to factory preset conditions.
ADVANCED SETTINGS
Use ADVANCED SETTINGS to improve the sound performance of your TV, depending on listening conditions.
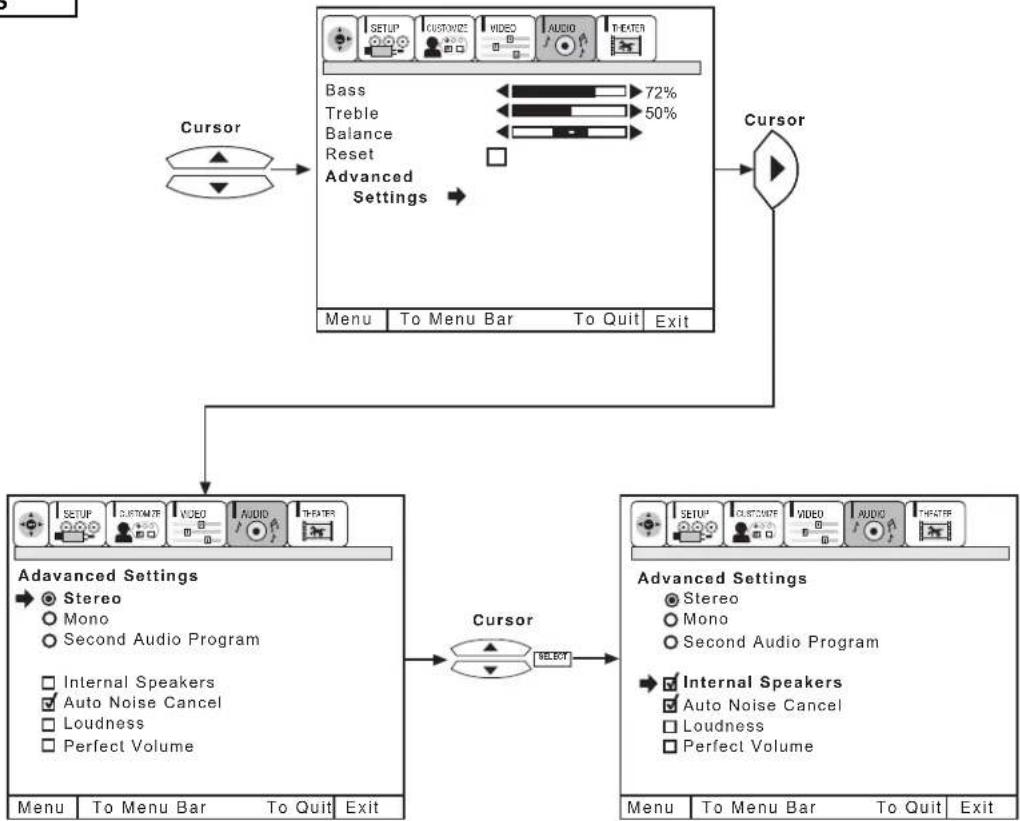
flowchart
graph TD
    A["Cursor"] --> B["Menu"]
    B --> C["To Menu Bar"]
    C --> D["To Quit"]
    D --> E["Exit"]
    F["Advanced Settings"] --> G["Menu"]
    F --> H["To Menu Bar"]
    H --> I["To Quit"]
    I --> J["Exit"]
    K["Cursor"] --> L["Menu"]
    K --> M["To Menu Bar"]
    M --> N["To Quit"]
    N --> O["Exit"]
    P["Bass 72%"] --> Q["Intermediate Video"]
    R["Treble 50%"] --> S["Intermediate Audio"]
    T["Balance"] --> U["Intermediate Audio"]
    V["Reset"] --> W["Intermediate Audio"]
    X["Advanced Settings"] --> Y["Menu"]
    Y --> Z["To Menu Bar"]
    Z --> AA["To Quit"]
    AA --> AB["Exit"]
    AC["Advanced Settings"] --> AD["Menu"]
    AD --> AE["To Menu Bar"]
    AE --> AF["To Quit"]
    AF --> AG["Exit"]
    AH["Stereo"] --> AI["Mono"]
    AI --> AJ["Second Audio Program"]
    AK["Internal Speakers"] --> AL["Auto Noise Cancel"]
    AM["Loudness"] --> AN["Perfect Volume"]
    AO["Internal Speakers"] --> AP["Auto Noise Cancel"]
    AQ["Loudness"] --> AR["Perfect Volume"]
Press CURSOR ▲ or ▼ to highlight a function. Press SELECT to change the function setting. When the function has an “√” in the box, it is ON.
MTS MODE
Multi-Channel Television Sound will allow you to select STEREO (a stereo broadcast), MONO (monaural sound) used when receiving a weak stereo broadcast or SAP (second audio program) which may be a secondary language, weather report, etc.
The sources received will be displayed at the top center edge of the TV. The source you select will be displayed above the sources received. See example below for each selection when both stereo and second audio are received (monaural is always received).
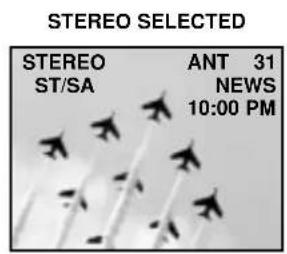
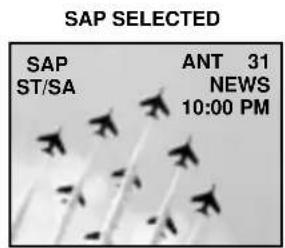
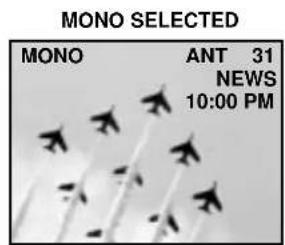
INTERNAL SPEAKERS
This function is useful when first setting up the external speakers, or if you prefer to use only speakers from a separate stereo system.
AUTO NOISE CANCEL
This function eliminates the noise between stations. If a channel is tuned and is noisy, this function will automatically eliminate the audio for that channel.
LOUDNESS
This function will improve the quality of both low and high frequency sounds when listening at low volume levels.
PERFECT VOLUME
This function will automatically adjust volume so each channel has the same average volume level.
Use this function to choose picture and audio settings for a true home THEATER experience.
Use this function to choose from automatic picture and audio settings to optimize your TV's performance.
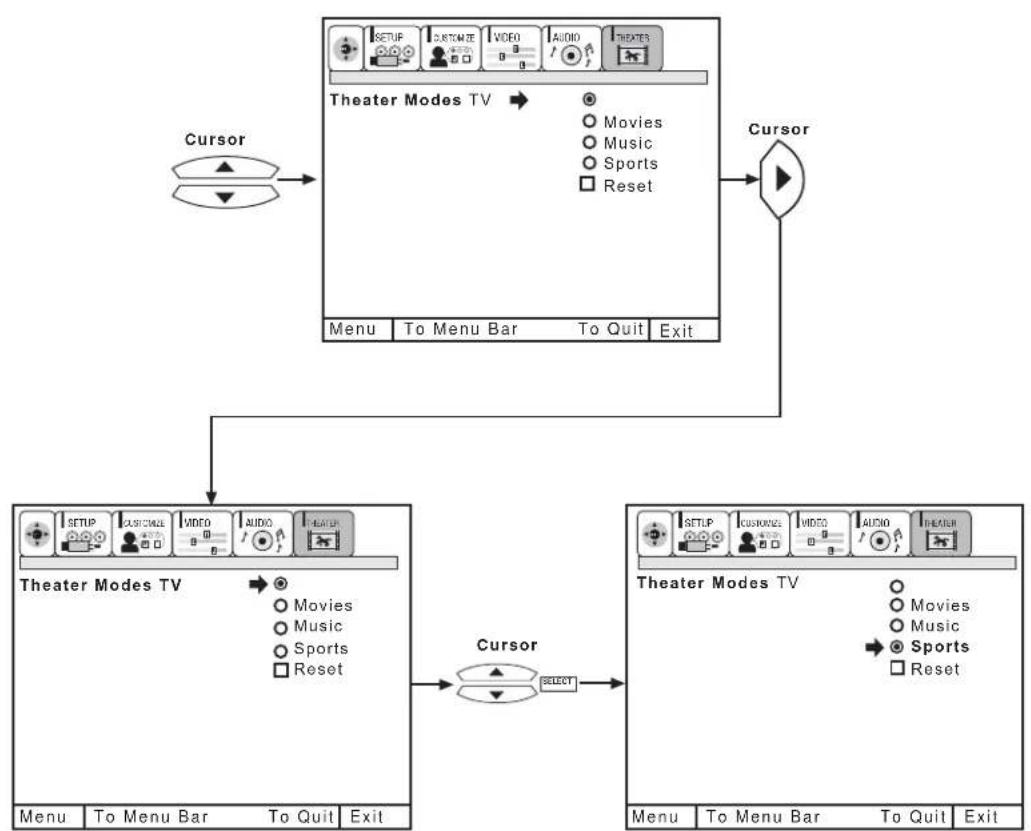
flowchart
graph TD
    A["Cursor"] --> B["Theater Modes TV"]
    B --> C["Menu To Menu Bar To Quit Exit"]
    C --> D["To Quit"]
    D --> E["Exit"]
    E --> F["Cursor"]
    F --> G["Theater Modes TV"]
    G --> H["Menu To Menu Bar To Quit Exit"]
    H --> I["To Quit"]
    I --> J["Exit"]
    J --> K["To Quit"]
    K --> L["Exit"]
    L --> M["To Quit"]
    M --> N["Exit"]
    N --> O["To Quit"]
    O --> P["Exit"]
    P --> Q["To Quit"]
    Q --> R["Exit"]
    R --> S["To Quit"]
    S --> T["Exit"]
    T --> U["To Quit"]
    U --> V["Exit"]
    V --> W["To Quit"]
    W --> X["Exit"]
    X --> Y["To Quit"]
    Y --> Z["Exit"]
Use CURSOR ▲ or ▼ to highlight THEATER MODES function.
Press SELECT to change THEATER MODES function.
When TV mode is chosen, the following are automatically set:
CONTRAST-74%, AUTO COLOR-ON, COLOR TEMP.-WARM, LOUDNESS-ON, PERFECT VOLUME-ON.
When MOVIE mode is chosen, the following are automatically set:
CONTRAST-60%, AUTO COLOR-ON, COLOR TEMP.-STANDARD, LOUDNESS-OFF, PERFECT VOLUME-OFF, BASS-63%, TREBLE-50%.
When MUSIC mode is chosen, the following are automatically set:
CONTRAST-74%, AUTO COLOR-ON, COLOR TEMP.-COOL, LOUDNESS-OFF, PERFECT VOLUME-OFF.
When SPORTS mode is chosen, the following are automatically set:
CONTRAST-Maximum, AUTO COLOR-ON, COLOR TEMP.-COOL, LOUDNESS-OFF, PERFECT VOLUME-OFF, BASS-63%.
You can customize each of the above modes (TV, MOVIE, MUSIC, and SPORTS) to your preference to increase viewing performance and pleasure, depending upon the video program being viewed. However, if RESET is selected, all modes will reset to the initial conditions as explained above.
When RESET is selected, it will take approximately two seconds to return to factory conditions (SPORTS mode).
Press EXIT to quit menu or CURSOR ◀ to return to previous menu.
DO
Dust the screen and cabinet with a soft cloth.
Clean the screen with a dry cloth.
Place your television away from extreme heat, humidity, and extremely dusty places.
Remove the plug from the wall outlet if your television will not be used for a long period of time, for instances, when you go on vacation.
DO NOT
Do not clean your screen or cabinet with strong cleaners, polishes or a chemically treated cloth.
Do not place rubber or vinyl products or cellophane tape on your television.
Do not touch the screen too often.
Do not subject the remote control to shocks such as dropping it on the floor, etc. Physical damage to the precision parts may result.
Avoid placing the remote control in a high humidity place or getting it wet. Do not leave it on or near a heater. Excessive heat or moisture may cause the unit to cease operation.
When the batteries run down, remote control operation will become erratic or possibly stop altogether. Replace the old batteries with two new "AA" size batteries.
Exposure of the viewing screen to prolonged direct sunlight or heat may cause the screen to permanently warp, resulting in a distorted picture.
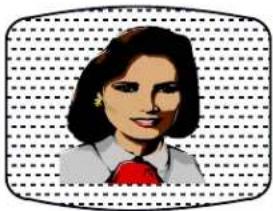 | • IGNITION NOISE:Black spots or horizontal streaks may appear, picture may flutter or drift.Usually caused by interference from automobile ignition systems, neon lamps, electrical drills, and other electrical appliances. |
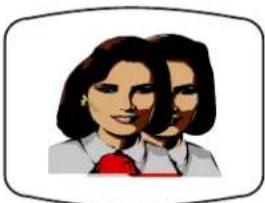 | • GHOSTS:Ghosts are caused by the television signal following two paths. One is the direct path and the other is reflected from tall buildings, hills or some other objects. Changing the direction or position of the antenna may improve reception. Ghosting may also be caused by defects in the antenna system such as unshielded leads or connecting several sets to the same antenna without using multiple antenna couplers. |
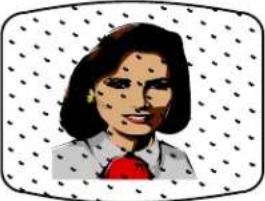 | • SNOW:If your receiver is located in the fringe area of a television station where the signal is weak, your picture may be marred by the appearance of small dots. When the signal is extremely weak, it may be necessary to install a special antenna to improve the picture. |
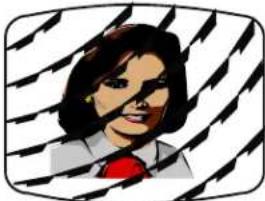 | • RADIO FREQUENCY INTERFERENCE:The interference produces moving ripples or diagonal streaks, and in some cases, causes loss of contrast in the picture. |
NOTE: The TV set can generate sound distortion in external devices such as a radio. Please separate radio equipment from the TV set to a considerable distance.
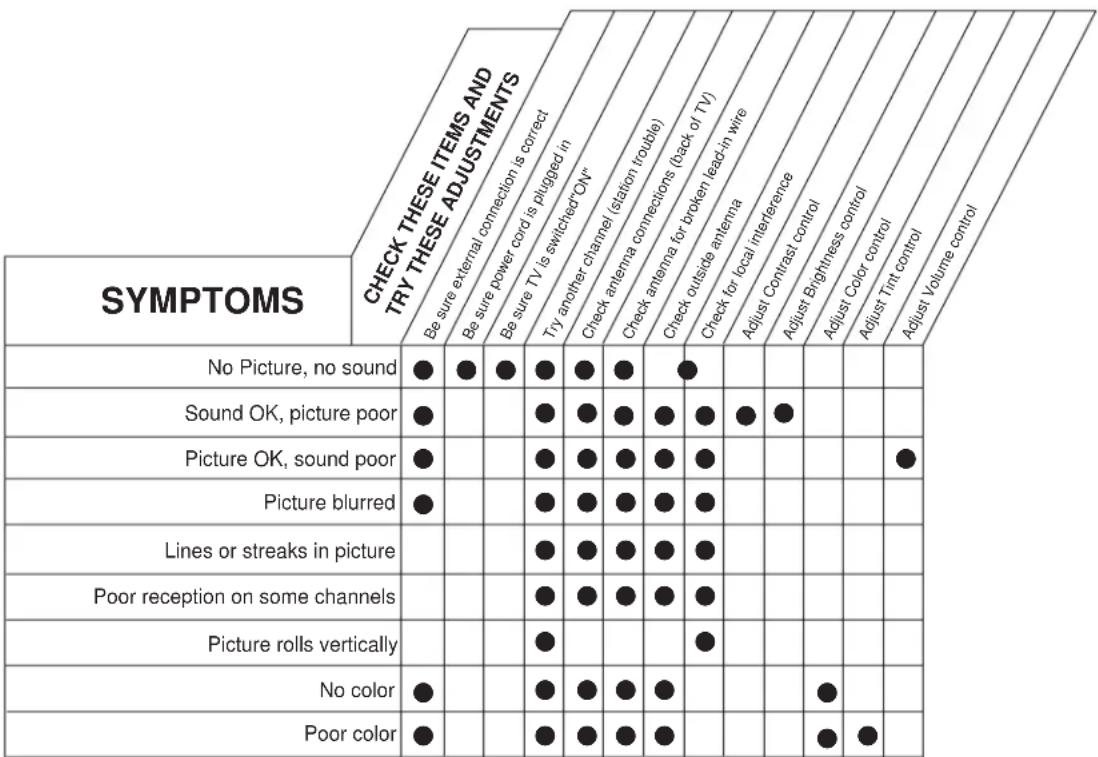
HITACHI Projection Television incorporates advanced power surge protection technology designed to protect against component or circuit damage due to external or internal voltage power surges.
IF YOUR TELEVISION SHOULD APPEAR TO HAVE A LOSS OF POWER, PLEASE FOLLOW THIS PROCEDURE:
-
Press the power switch (ON/OFF switch) once.
-
If there is still no power, wait 30 seconds and press the power switch again.
-
If there is still no power, unplug the power cord from the wall. Wait 30 seconds and plug the power cord back in. Press the power switch again.
This protective technology should provide for years of lasting entertainment from your HITACHI Projection Television.
Features:
• Superfine Picture Quality
850 Line Horizontal Resolution
• Pure Green and Red Filter Lenses
• PERFECT PICTURE System
• High Definition On-Screen Display (UltraTEC BIT-MAP)
• Full Set of Input Jacks, including S-Video
• COMPONENT VIDEO: Y/P B/P R Input Jacks
- Closed Caption Decoder
• High Resolution Picture-In-Picture with Freeze
• T uned Port Bass Reflex Speakers
- Auto Link
• Digital Convergence (Digital Array)
- Energy Star ^ Compliant
- Remote (Controls many DVD/VCR brands, cable boxes, and satellite boxes.)
Inputs:
• Power Input .....AC 120V, 60Hz
• Power Consumption
-Refer to rear panel at the back of the TV
- Antenna input impedance ....75 Ohm
- Channel coverage .....181ch.
VHF-Band .....2 \~ 13
UHF-Band .....14 \~ 69
CATV Mid Band .....A-5 \~ A-1
.....A-I
Super Band . . . . . . . . . . . . . . . . . . . . . . . . . . . . . . . . . . . . . . . . . . . . . . . . . J-W
Hyper Band . . . . . . . . . . . . . . . . . . . . . . . . . . . . . . . . . . . . . . . . . . . W+1 - W+28
Ultra Band . . . . . . . . . . . . . . . . . . . . . . . . . . . . . . . . . . . . . . . . . . . . . . . . . W+29 - W+84
• V ideo .....1.0Vp-p, 75 Ohm
• S-Video
Luminance (Y) .....1.0Vp-p, 75 Ohm
Chrominance (C) .....0.286Vp-p, 75 Ohm
• Audio input Impedance .....47k Ohm
• A verage input level .....470mVrms
- Component Video
Luminance (Y) .....1.0Vp-p, 75 Ohm
Chrominance (Cb,Cr) .....0.7Vp-p, 75 Ohm
Outputs:
• V ideo ....1.0Vp-p. 75Ohm
• Audio (Fixed) .....470mVrms, 1k Ohm
Dimensions:
| 50DX20B | 50FX20B | 60FX20B | |
| • Height (in.) | 51 5/8 | 51 5/8 | 60 1/4 |
| • Width (in.) | 43 1/4 | 43 1/4 | 51 3/8 |
| • Depth (in.) | 23 7/16 | 23 7/16 | 27 1/4 |
| • Weight (lbs.) | 219 | 219 | 280 |
NOTE: Due to improvements, specifications in this operating guide are subject to change without notice.
HITACHI

To locate an authorized HITACHI service facility in the continental U.S.A. and Canada,
DIAL TOLL FREE
7 days a week, 24 hours a day
800 HITACHI
(1-800-448-2244)
Hitachi America, LTD. Home Electronics Division
Hitachi has made every effort to assure you hours of trouble free operation from your unit. However, should you require service, a network of Hitachi Authorized Service Facilities has been established in all 50 states and Puerto Rico. Each facility will provide you with convenient and expedient assistance. Our service hotline operator will direct you to the Hitachi Authorized Service Facility nearest you. Just present proof of purchase and/or delivery receipts to the Hitachi Authorized Service Facility, and service will be rendered in accordance with the terms of the limited warranty as stated on your warranty card or operating guide.
Should you have any questions regarding warranty, service, operation, or technical assistance, please contact:
Hitachi America, LTD.
Home Electronics Division
1855 Dornoch Court
San Diego, CA 92154
Hitachi Canada, LTD. Digital Media Division
Should you have any questions regarding warranty, service, operation, or technical assistance, please contact:
In Canada:
1-800-HITACHI
(1-800-448-2244)
Monday - Friday EST 9:00am - 7:00pm
Saturday EST 9:00am - 5:00pm
Look for your French Manual on the outside of the box. If the manual is missing, call
1-800-HITACHI
(1-800-448-2244)
for a copy.
Lundi - Vendredi L'EST 9:00am - 7:00pm
Samedi L'EST 9:00am - 5:00pm
- SAFETY POINTS YOU SHOULD KNOW ABOUT YOUR HITACHI TELEVISION
- CAUTION
- WARNING:
- POWER SOURCE
- Read before operating equipment
- PREVENTION OF PATTERN BURN
- PUBLIC VIEWING OF COPYRIGHTED MATERIAL
- REMOTE CONTROL BATTERY INSTALLATION AND REPLACEMENT
- ANTENNA
- LOCATION
- VIEWING
- 300-Ohm Twin Lead Connector
- "F" Type 75-Ohm Coaxial Antenna Connector
- Phono Connector
- S-VIDEO (Super Video) Connector
- ANTENNA CONNECTIONS TO REAR JACK PANEL
- VHF (75-Ohm) antenna/CATV (Cable TV)
- VHF (300-Ohm) antenna/UHF antenna
- When both VHF and UHF antennas are connected
- FRONT VIEW
- ① MENU/SELECT button
- ② INPUT/EXIT button
- ③ CHANNEL selector
- ④ VOLUME level
- ⑤ POWER button
- ⑥ POWER light
- ⑦ PERFECT PICTURE sensor
- ⑧ REMOTE CONTROL sensor
- ⑨ DIGITAL ARRAY
- ⑩ FRONT INPUT JACKS (for VIDEO: 3)
- CONNECT AFTER TURNING THE POWER OF THE TV OFF.
- TIPS ON REAR PANEL CONNECTIONS
- CONNECTING EXTERNAL AUDIO AMPLIFIER
- Before Operating External Video Source
- CONNECTING A MONAURAL AUDIO VCR OR LASERDISC PLAYER
- CONNECTING A STEREO VCR OR STEREO LASERDISC PLAYER
- CONNECTING A STEREO LASERDISC PLAYER OR DVD PLAYER TO INPUT 4.
- ① TV POWER button
- ② STATUS button
- ③ MENU, SELECT, CURSOR buttons
- ④ CHANNEL SELECTOR buttons
- ⑤ LAST CHANNEL button
- ⑥ INPUT button
- ⑦ VOLUME, MUTE buttons
- ⑧ PICTURE-IN-PICTURE
- ⑨ PIP CH buton
- ⑩ EXIT button
- ⑪ HELP button
- ⑫ PIX button
- ① PIP button
- ② SWAP button
- ③ MOVE button
- ④ CURSOR buttons
- ⑤ FREEZE button
- Quick FREEZE button
- Operating the precoded function for your VCR.
- NOTES:
- Operating the precoded function for your DVD Player.
- Operating the precoded function for your cable/satellite box.
- SIGNAL SOURCE
- AUTO CHANNEL SET
- CHANNEL MEMORY
- CHANNEL LIST
- CLOCK SET
- DIGITAL ARRAY
- NOTE:
- VIDEO ID.
- FAMILY FAVORITES (MENU)
- FAMILY FAVORITES (OPERATION)
- PARENTAL CONTROL
- MOVIE RATINGS
- TV RATINGS
- CUSTOMER CAUTION
- CANADIAN RATINGS (ENG)
- CANADIAN RATINGS (FRN)
- CANADIAN FRENCH RATINGS CHART
- EVENT PROG.
- AUTO LINK
- NOTE: 1. Auto Link will only work with Video: 4 input.
- CLOSED CAPTION
- MENU BACKGROUND
- CONTRAST
- BRIGHTNESS
- COLOR
- TINT
- SHARPNESS
- RESET
- ADVANCED SETTINGS
- PERFECT PICTURE
- AUTO COLOR
- NOISE REDUCTION
- COLOR TEMPERATURE
- BASS
- TREBLE
- BALANCE
- MTS MODE
- INTERNAL SPEAKERS
- AUTO NOISE CANCEL
- LOUDNESS
- PERFECT VOLUME
- DO
- DO NOT
- Features:
- Inputs:
- Outputs:
- HITACHI
- DIAL TOLL FREE
- HITACHI
- Hitachi America, LTD. Home Electronics Division
- Hitachi Canada, LTD. Digital Media Division
Brand : HITACHI
Model : 50FX20B
Category : Television