LCC30HC - Uncategorized Black Box - Free user manual and instructions
Find the device manual for free LCC30HC Black Box in PDF.


| Product Type | Mobile Storage and Charging Cart |
| Brand | Black Box |
| Model | LCC30HC |
| Device Capacity | 30 devices (3 shelves x 10 slots) |
| Compatible Devices | iPad, Chromebook, Tablet, Laptop, Netbook |
| External Dimensions (H x W x D) | 40.75 x 25.03 x 21.63 in (103.5 x 63.6 x 55 cm) |
| Weight | 122 lb (55 kg) with solid steel door |
| Power Input | 110–120 V AC, 15 A |
| Power Strips Included | 3 x 12-outlet, 15 A each |
| Power Distribution Unit | LCCCM (non-intelligent) |
| Casters | 2 locking swivel, 2 non-locking fixed (installed) |
| Door Type | Locking solid steel doors |
| Handle | Included, install on side with swivel casters |
| Assembly Required | No (assembled; handle installation required) |
| Slot Dimensions (per device) | Height: 10" (25.4 cm), Width: 1.4" (3.56 cm), Depth: 14" (35.56 cm) |
| Maximum Device Size | 10" H x 1.4" W x 14" D |
| Safety Features | Tip-over warning, electrical safety ground, locking casters |
| Intelligent Charging | Not included (use with optional SDILCU4) |
| Timer | Not included |
| Warranty | Refer to manufacturer; misuse voids warranty |
| Maintenance | Wipe with dry cloth; no liquids |
| Repairability | Electrical components must be repaired by qualified electrician |
| Included Accessories | Handle kit, keys (2 sets), user manual |
Frequently Asked Questions - LCC30HC Black Box
User questions about LCC30HC Black Box
0 question about this device. Answer the ones you know or ask your own.
Ask a new question about this device
Download the instructions for your Uncategorized in PDF format for free! Find your manual LCC30HC - Black Box and take your electronic device back in hand. On this page are published all the documents necessary for the use of your device. LCC30HC by Black Box.
USER MANUAL LCC30HC Black Box
30-Device iPad ^® , Chromebook ^™ , Tablet, and Laptop Cart
User Manual
Mobile, secure, and powered storage for up to 30 computing devices.
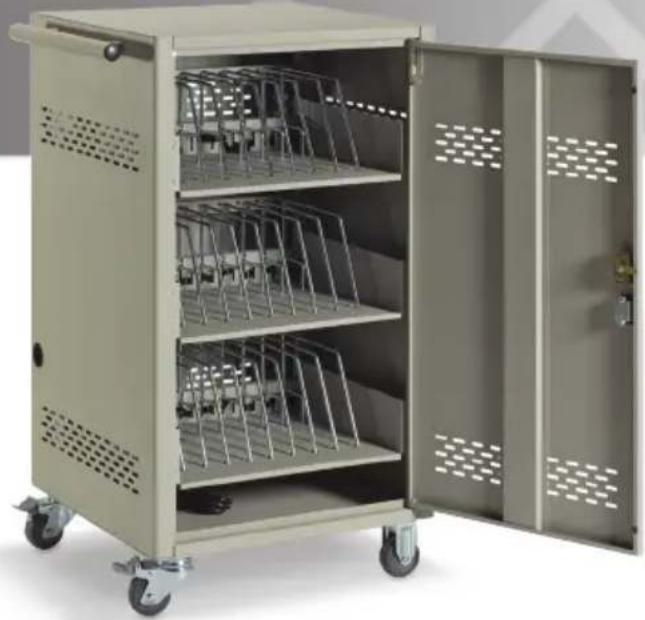
natural_image
Exterior view of a large industrial machine with multiple metal grilles and wheels (no visible text or symbols)Trademarks Used In This Manual
Black Box and the Double Diamond logo are registered trademarks of BB Technologies, Inc.
Any other trademarks mentioned in this manual are acknowledged to be the property of the trademark owners.
Table of Contents
Important Safety Information .... 4
Electrical Precautions 4
- Specifications 6
- Overview....9
2.1 Introduction....9
2.2 What's Included 9
2.3 Hardware Description .... 11
- Configuration and Setup 12
3.1 Installing the Handle 12
3.2 Fastening the Power Bricks and Routing the Cable.... 13
3.3 HASP Lock Option 14
3.4 Using the Intelligent Charging System (SDILCU4).... 14
3.5 Basket Distribution System.... 18
- Using Your iPad, Chromebook, Tablet, and Laptop Cart.... 19
4.1 Charging Your Computers 19
4.2 Moving Your iPad, Chromebook, Tablet, and Laptop Cart ...... 19
4.3 Timer Instructions 20
Important Safety Information
WARNING! Death or serious injury may occur when children climb on the Cart. The cart can tip over onto the child.
WARNING! Avoid uneven loading of equipment onto the cart. Uneven weight distribution could cause the cart to tip when the cart is moving. Ensure devices are distributed evenly within the cart. Excess weight on sides of cart could cause the cart to tip while in motion.
- Only adults should move the cart.
- Do not leave the cart unattended in areas where children have access.
- Do not block the air vent openings.
- The Cart can be very heavy when fully loaded with laptops and should be moved about by persons physically able to do so.
- The Cart should only be used for the storage and transport of tablets, laptops, and other similar devices.
- Misuse, incorrect operation, or inadequate repair of the Cart will void the warranty.
Electrical Precautions
DANGER! Failure to observe the following electrical safety precautions can result in fire or death by electric shock.
- The power switch must be in the "OFF" position before plugging the Cart into a wall receptacle.
- The Cart must ONLY be connected to a 110–120-volt AC, 15-amp power supply.
- The Cart must only be used by adults or with adult supervision.
- Never pull the Cart by the power cord.
- Do not plug the Cart in if the switch, receptacle(s), or power cord has been damaged. All electrical components on this product must be repaired by a qualified electrician.
-
Do not use an extension cord in conjunction with the Cart.
-
Do not use liquids in or around the Cart environment.
- Inadequate repair or modifications can create significant hazards to users and is not covered by warranty.
- For your safety, we recommend that a qualified electrician test the circuit you will be plugging the Cart into. The circuit should be checked for ground integrity and appropriate branch circuit protection.
- The Cart ground prong must be present for safe operation. If the plug is damaged or if the ground prong has been removed, it should be replaced by a qualified electrician.
- The use of the Cart, including plugging or unplugging laptops, plugging or unplugging the Cart, operating the control switch, and engaging or releasing the directional and locked casters, must be done with adult supervision.
1. Specifications
Table 1-1. Cart Specifications.
| Part Number LCC30H-A,LCC30H-AT,LCC30H-AT2,LCC30H,LCC30HT,LCC30HT2,LCC30H-A-HASP,LCC30H-AT-HASP | LCC30H-ACLCC30H-ACT,LCC30H-ACT2,LCC30HC, LCC30HCT,LCC30HCT2,LCC30H-AC-HASP,LCC30H-AC-ILC | LCC36H-ACT-BIN1 | LCC36H-ACOT-BIN1 |
| Slot Dimensions on Shelf Maximum Device Size | |||
| Height (in.) | 10" | 9" | 8" |
| Height (cm) | 25.4 cm | 22.9 cm | 20.3 cm |
| Width (in.) | 1.4" | 1.4" | 1" |
| Width (cm) | 3.56 cm | 3.56 cm | 2.5 cm |
| Depth (in.) | 14" | 14" | 9" |
| Depth (cm) | 35.56 cm | 35.56 cm | 22.8 cm |
| Basket Dimensions(UCCBIN1KIT) | |||
| Height (in.) | — | — | 5" |
| Height (cm) | — | — | 12.7 |
| Width (in.) | — | — | 8.25" |
| Width (cm) | — | — | 20.9 cm |
| Depth (in.) | — | — | 10.875" |
| Depth (cm) | — | — | 27.6 |
| Device Capacity | |||
| Number of Devices | 30 | 30 | 36 |
| Number of Shelves | 3 | 3 | 3 |
| Number of Slots per Shelf | 10 | 10 — — | |
| Number of Baskets per Shelf | — | — 2 2 | |
| Number of Slots per Basket | — | — 6 6 | |
| Part Number LCC30H-A,LCC30H-AT,LCC30H-AT2,LCC30H,LCC30HT,LCC30HT2,LCC30H-A-HASP,LCC30H-AT-HASP | LCC30H-AC,LCC30H-ACT,LCC30H-ACT2,LCC30HC, LCC30HCT,LCC30H-AC-HASP,LCC30H-AC-ILC | LCC36H-ACT-BIN1 | LCC36H-ACOT-BIN1 |
| External Dimensions (Including Handle) | |||
| Height (in.) 40.75" 40.75" 40.75" 40.75" | |||
| Height (cm) 103.5 cm 103.5 cm 103.5 cm 103.5 cm | |||
| Width (in.) 25.03" 25.03" 25.03" | 25.03" | ||
| Width (cm) 63.6 cm | 63.6 cm | 63.6 cm | 63.6 cm |
| Depth (in.) 21.63" 21.63" 21.63" 21.63" | |||
| Depth (cm) 55 cm | 55 cm | 55 cm | 55 cm |
| Weight (Cart with Solid Steel Door) | |||
| WeightCapacity onTop Shelf | 50 lb. (22.7 kg) | 50 lb. (22.7 kg) | 50 lb. (22.7 kg) |
| Weight (lb.) | 122 lb. | 122 lb. | 122 lb. |
| Weight (kg) | 55 kg | 55 kg | 55 kg |
| MaximumBasketWeightLoaded | — | — | 25 lb. (11.4 kg) |
Table 1-2. UCCBIN2KIT Specifications
| Part Number | Description | Specs |
| UCCBIN1KIT | 6-Device Charging Cart Basket Kit for Deluxe, Basic, and 30-Device Standard Carts | Measures 5"H x 8.25"W x 10.875"D (12.7 x 20.9 x 27.6 cm) |
Table 1-3. Additional Specifications
| Part Number Included Power Strips Automated | Front Cable Management Bars | ||
| Power Distribution Unit or Intelligent Charging Unit | |||
| LCC30H-A (3) 12-outlet, 15 A max. N/A Not included | |||
| LCC30H-A-HASP (3) 12-outlet, 15 A max. N/A | Not included | ||
| LCC30H-AT | (3) 12-outlet, 15 A max. | CARTTIMER1 | Not included |
| LCC30H-AT-HASP | (3) 12-outlet, 15 A max. | CARTTIMER1 | Not included |
| LCC30H-AC | (3) 12-outlet, 15 A max. | N/A | LCCCM |
| LCC30H-AC-HASP | (3) 12-outlet, 15 A max. | N/A | LCCCM |
| LCC30H-ACT | (3) 12-outlet, 15 A max. | CARTTIMER1 | LCCCM |
| LCC30H-AT2 | (3) 12-outlet, 15 A max. | CARTTIMER1 | Not included |
| LCC30H-ACT2 | (3) 12-outlet, 15 A max. | CARTTIMER1 | LCCCM |
| LCC30H | (3) 12-outlet, 15 A max. | Not included | Not included |
| LCC30HT | (3) 12-outlet, 15 A max. | CARTTIMER1 | Not included |
| LCC30HC | (3) 12-outlet, 15 A max. | N/A | LCCCM |
| LCC30HCT | (3) 12-outlet, 15 A max. | CARTTIMER1 | LCCCM |
| LCC30HT2 | (3) 12-outlet, 15 A max. | CARTTIMER1 | Not included |
| LCC30HCT2 | (3) 12-outlet, 15 A max. | CARTTIMER1 | LCCCM |
| LCC30H-AC-ILC | (3) 12-outlet, 15 A max | SDILCU4 | LCCCM |
Automated Power Distribution Unit: Every 15 minutes, CARTTIMER1 cycles between 4 banks (each bank is one outlet). In one hour, each bank is on and charging for 15 minutes.
Intelligent Charging Unit: You can set the Intelligent Charging System (SDILCU4) to automatically start up in manage mode when the system is plugged in. In manage mode, the devices will be charged automatically as they are connected to the charging system without having to press the charge button.
2. Overview
2.1 Introduction
The 30-Device iPad, Chromebook, Tablet, and Laptop Cart with Steel Top, Fixed Shelves, and Hinged Doors is designed to store, charge, and transport tablets, e-readers, laptops, netbooks, and other similar devices. The Cart has 30 storage slots (3 shelves with 10 storage slots on each shelf). Each unit plugs into a typical 120-volt 15-amp outlet. The cart has locking solid-steel doors.
Please read these operating instructions carefully. They contain important advice concerning the use and safety of your cart. This Cart must only be used for its intended purpose in accordance with these operating instructions.
2.2 What's Included
LCC30H-A:
- iPad, Chromebook, Tablet, and Laptop Cart with 30--device capacity; assembled
• (4) casters (installed), including: (2) locking swivel casters and (2) non-locking fixed casters
• (3) 12-outlet, 15 A max. power strips (installed) - Cart handle with mounting hardware (to be installed by user)
- This user's manual
• (2) sets of keys
NOTE: A HASP Lock option is also available (part number LCC30H-A-HASP, LCC30H-AC-HASP, AND LCC30H-AT-HASP).
LCC30H:
- iPad, Chromebook, Tablet, and Laptop Cart with 30-device capacity; unassembled
• (4) casters (not installed), including: (2) locking swivel casters and (2) non-locking fixed casters
• (3) 12-outlet, 15 A max. power strips (not installed) - Cart handle with mounting hardware (to be installed by user)
• (2) sets of keys - Assembly hardware
NOTE: For details on how to build the unassembled carts (part numbers LCC30H, LCC30HT, LCC30HC, LCC30HCT, LCC30HT2, and LCC30HCT2), refer to the LCC30H Assembly manual. See the instructions for downloading the manuals below.
This user manual/installation guide, as well as the assembly manual for the unassembled carts, can be downloaded from the Black Box Web site.
To download from the Web site:
- Go to www.blackbox.com
- Enter the part number (for example, LCC30H-A or LCC30H) in the search box:
- Click on the "Resources" tab on the product page, and select the document you wish to download.
If you have any trouble accessing the Black Box site to download the manual, you can contact our Technical Support at 724-746-5500 or info@blackbox.com.
2.3 Hardware Description
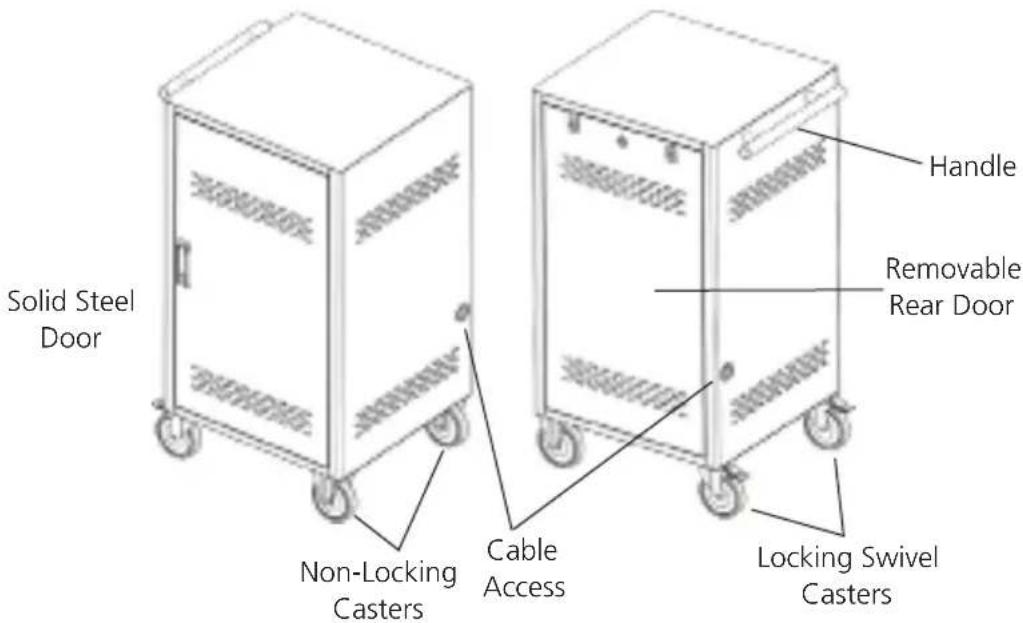
Figure 2-1. Front and back of cart.
3. Configuration and Setup
Remove and discard all packaging materials and then lock the lockable casters.
Open and inspect the Cart to verify all doors, locks, and casters are working properly.
Do not plug the Cart into a wall outlet until all configurations and setup are complete.
3.1 Installing the Handle
The handle installs on the side of the cart with the locking swivel casters.
NOTE: The casters swivel on one side of the Cart and are fixed on the other. Consider manueverability options before installing the handle.
Step 1: Locate the side of the Cart with the locking swivel casters.
Step 2: Place the handle so that the holes in the brackets are aligned with the threaded holes in the side panels.
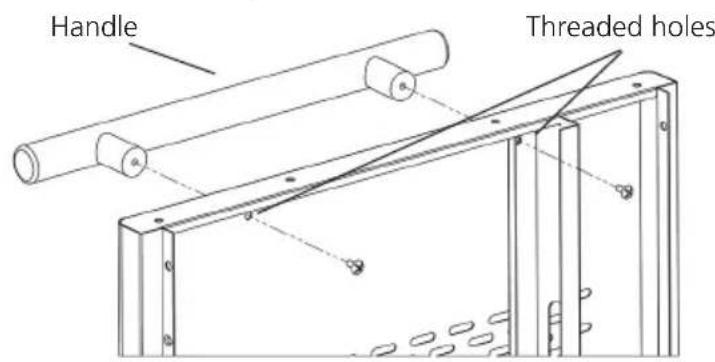
Figure 3-1. Installing handle.
Step 3. Using a Phillips-head screwdriver, tighten two of the Phillips screws into the threaded holes.
3.2 Fastening the Power Bricks at the Back of the Cart
- Attach the wrapped cord and power brick to the back of the shelf using the hook and loop strap. Keep some extra cable unwrapped to plug into the power strip. (See Figure 3-2.)
- Loosen the two screws on the cable manager, pull up on the top section of the cable manager, and place the device side of the charging cable into one of the slots.
- Replace the top section of the cable manager and tighten the screws.
- Route the device side of the charging cable to the front of the cart and repeat step 2 for the front cable manager.
- Plug the charger power plug into the power strip located below the shelf.
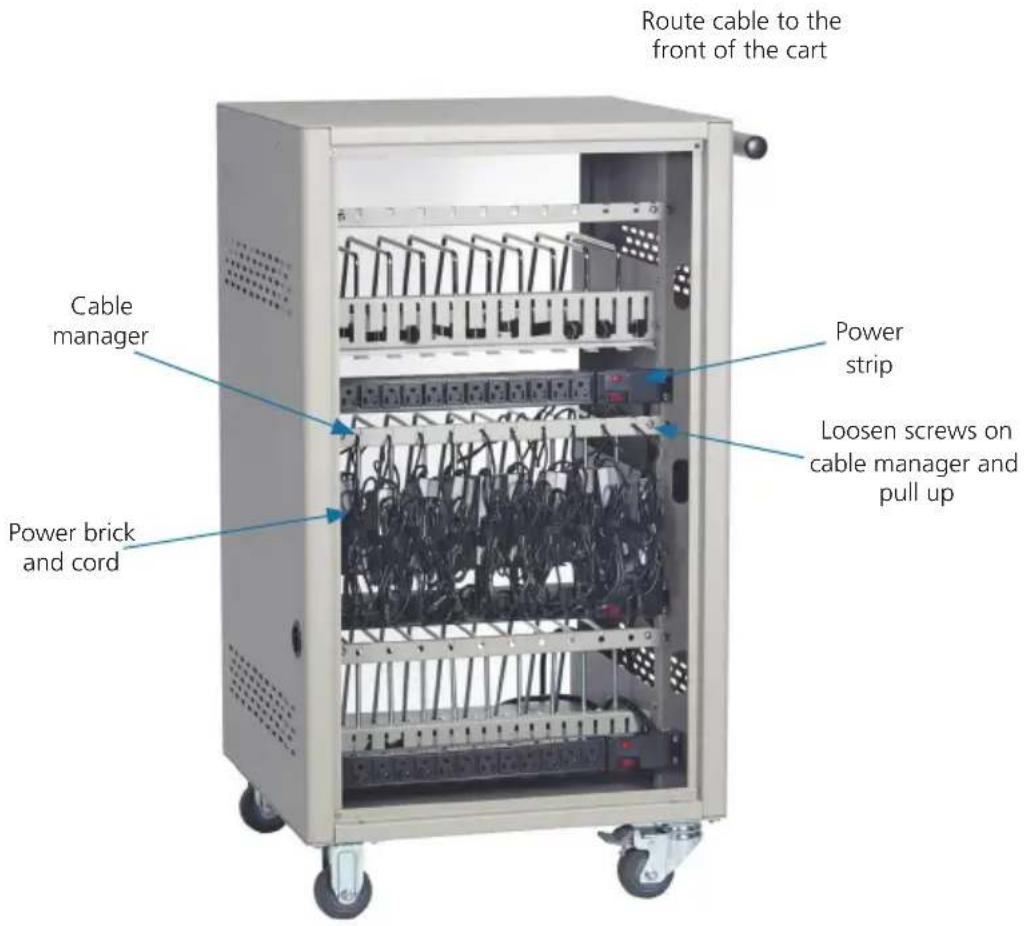
Figure 3-2. Fastening the power brick and routing the cable.
3.3 HASP Option (LCC30H-A-HASP, LCC30H-AC-HASP, LCC30H-AT-HASP) A HASP lock option is available on the cart.
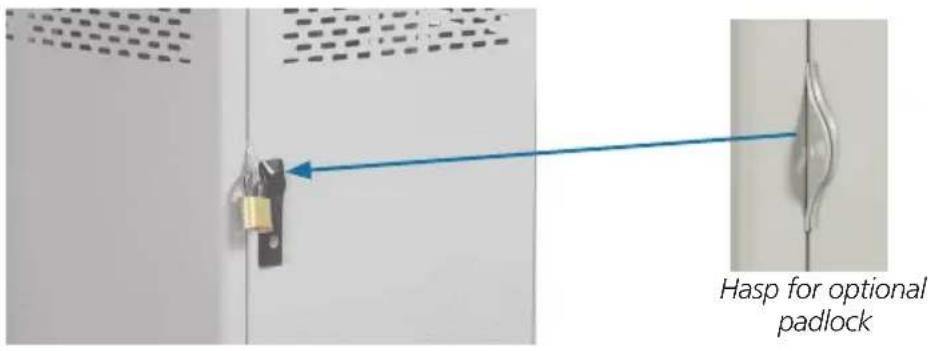
Figure 3-3. HASP lock option.
3.4 Using the Intelligent Charging System (SDILCU4)
The Intelligent Charging System Module arrives installed in your LCC30H-ILC cabinet.
Display Tour
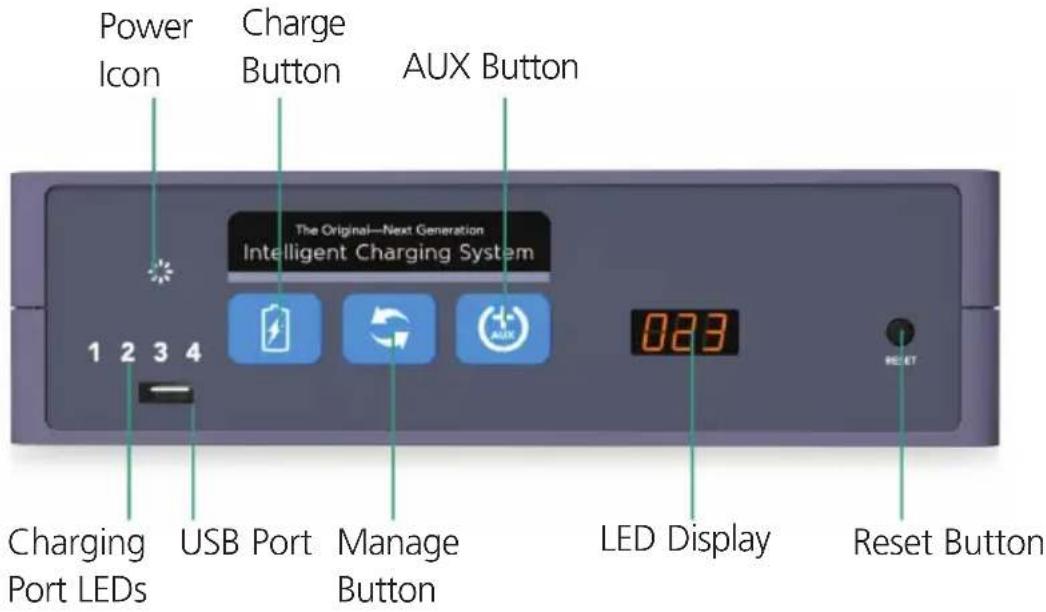
Figure 3-4. Front of SDILCU4.
Back
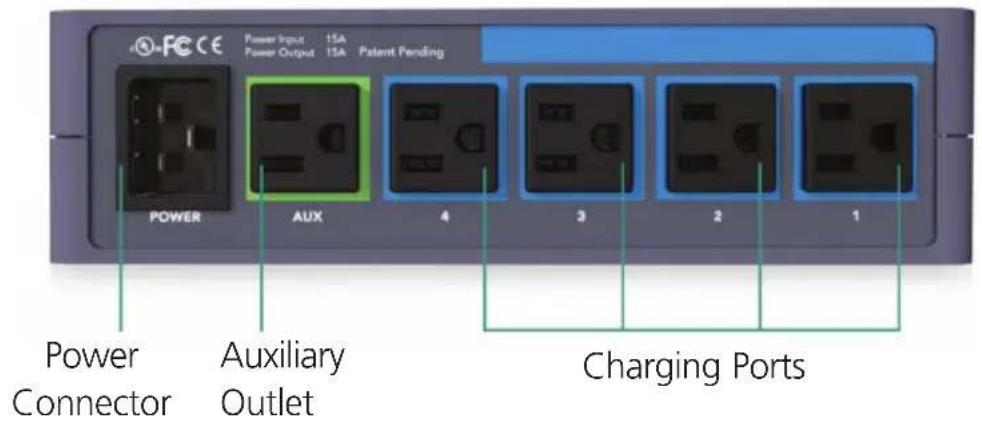
Figure 3-5. Back of SDILCU4.
To Begin Charging
- Connect to Power
- Select Charging Mode (Choose from Charge Mode or Manage Mode.)
natural_image
Blue rounded rectangle icon with a white battery symbol containing a lightning bolt (no text or numbers)CHARGE MODE: Best used if all devices are powered off and connected at the same time. Power is discontinued when batteries reach full charge to conserve energy.

natural_image
Blue rounded square icon with two white curved arrows forming a circular motion (no text or symbols)MANAGE MODE: Best used if all or some devices are left on or are returned at different times. Charging continues until it is manually stopped.
NOTE: The charging system should always be in MANAGE mode in order to charge iPads and devices that remain in sleep mode.
Basic Functions
natural_image
Blue rounded rectangle icon with a white battery symbol containing a lightning bolt (no text or numbers)Charge Button
Pressing the CHARGE button will start charge mode. This is best used when all devices are powered down and returned to the cart at the same time. Charging will automatically stop when all batteries are 100% charged. You can also stop charging at any time by pressing the CHARGE button a second time.

natural_image
Blue square icon with a white circular arrow symbol (no text or numbers)Manage Button
Pressing MANAGE button will start manage mode and turn on the auxiliary power. This mode will continuously monitor and distribute power until manually stopped. This mode is best used if some of the devices may be left on when connected or if devices are connected at different times. Press the button again to stop manage mode.

natural_image
Blue square icon with white plus and minus symbol (no text or numbers)Auxiliary Power Button
Controls power to any peripherals that are plugged into the AUX power strip in the back of the cart. If the AUX devices must be operational during charging then the system must be in manage mode. Be aware that this may lengthen charging time.
bar
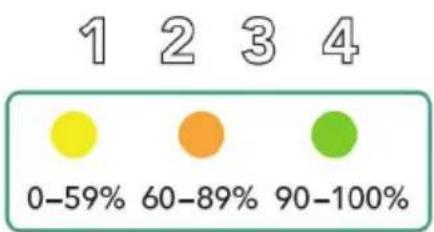
| Category | Value (%) | |---|---| | 1 | 0-59 | | 2 | 60-89 | | 3 | 90-100 | | 4 | (unlabeled) |Charging Port LEDs
Indicates which sections of the cart are active. The charging unit controls this automatically, ensuring that all devices inside are charged in the fastest, most efficient way possible. When all four quadrant LEDs are solid green, charging is complete.

Power Icon
Indicates when the cart is connected to power and is ready.
Reset Button
The Intelligent Charging System is protected with its own circuit breaker. If it encounters misuse such as plugging in unsupported devices or if there is a power surge, the circuit will trip and the reset button will pop out. To reset the cart simply press it back in. Please first ensure that everything is plugged in properly and that only supported devices are connected before resetting.
3.5 Basket Distribution System
LCC carts with baskets (UCCBIN1KIT) instead of slots include:
- LCC36H-ACT-BIN1
- LCC36H-AC0T-BIN1
The baskets can also be ordered separately:
- UCCBIN1KIT
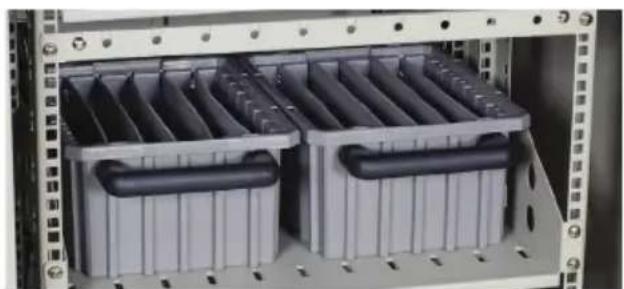
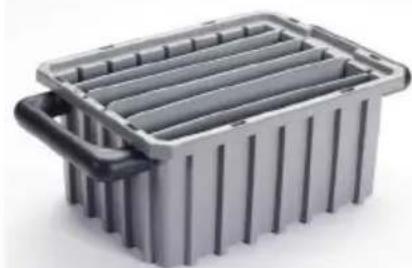
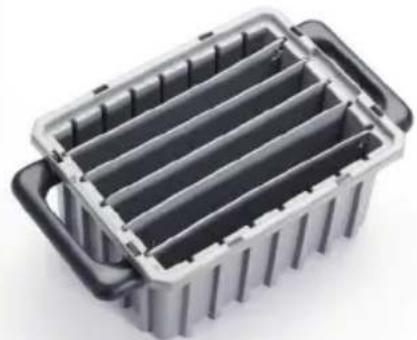
The figures below show the UCCBIN1KIT basket. It contains 6 slots that each hold one 9"H x 1"W x 9"D (22.8 x 2.5 x 22.3 cm) device.
natural_image
Interior view of a server rack with two stacked battery compartments (no visible text or labels)UCCBIN1KIT Baskets installed in cart.
natural_image
3D rendering of a gray plastic container with black handles, no text or symbols visibleUCCBIN1KIT Basket, side view.
natural_image
3D rendering of a gray plastic container with black handles, showing internal compartments (no text or symbols)UCCBIN1KIT Basket, top view.
- Using Your iPad, Chromebook, Tablet, and Laptop Cart
4.1 Charging Your Computers
- After the devices have been loaded into the Cart, plug the power cord of the Cart into a suitable receptacle.
- Locate the internal power switches on the timer and power strips of the Cart and push the switches to the ON position.
4.2 Moving Your iPad, Chromebook, Tablet, and Laptop Cart
- Turn the timer power switch to the off position.
- Remove the Cart plug from the wall receptacle and wrap the cord around the cord wrap or handle.
- Close and secure sliding or solid-steel doors.
- Your Cart comes equipped with two fixed casters and two locking swivel casters. Unlock the casters before moving the Cart to a new location.
- When you reach your desired destination, lock the casters to prevent the cart from moving and plug the Cart into a wall receptacle.
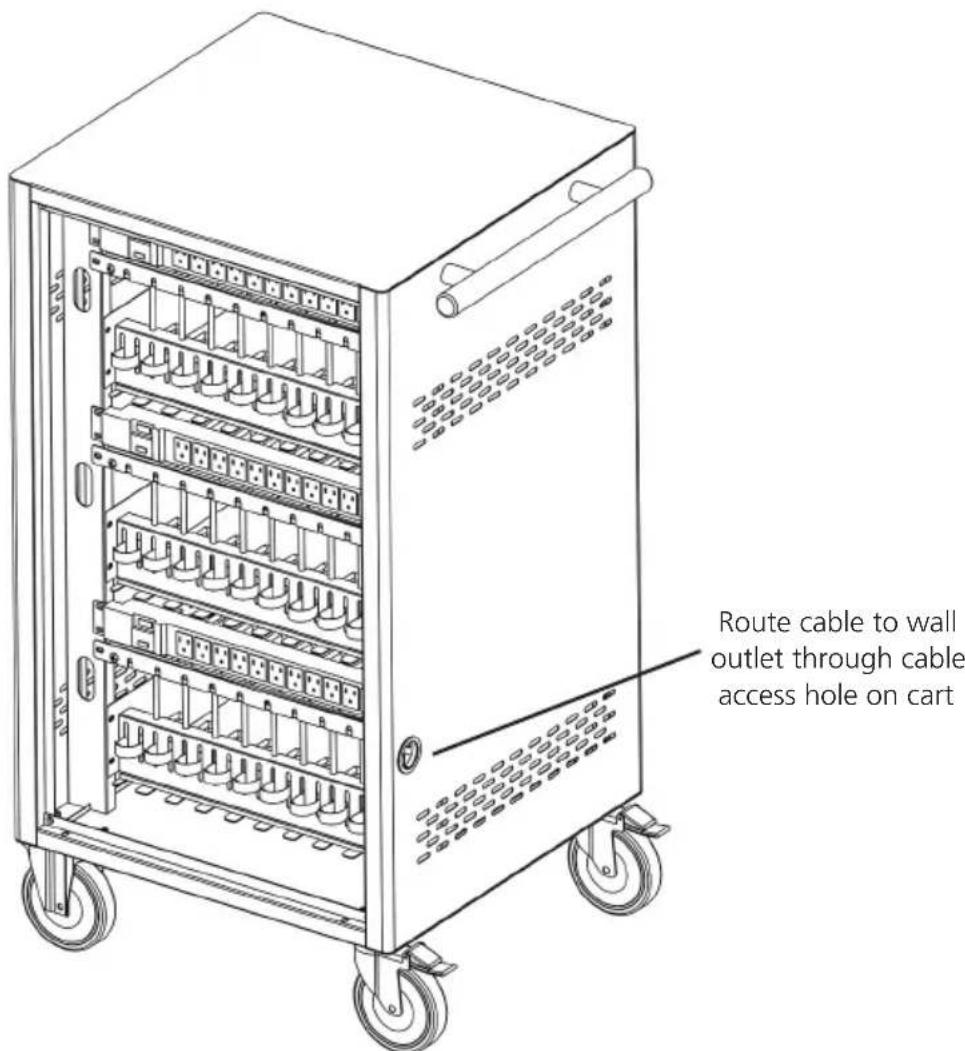
Figure 4-1. Plug the cart into the wall.
4.3 Timer Instructions
Before using your timer:
- For your safety, we recommend that a qualified electrician test the circuit you will plug the cart into. The circuit should be checked for ground integrity and appropriate branch circuit protection.
- The cart's ground prong must be present for safe operation. If the plug is damaged or if the ground prong has been removed, the plug should be replaced by a qualified electrician.
- Using the cart, including plugging it in or unplugging it, plugging in or unplugging the laptop(s) or other electrical equipment, or operating the control switch must be done with adult supervision.
The timer comes preset from the factory to alternate power between the power strips at 15-minute intervals.
All power strips cannot charge simultaneously.
By plugging the cart power cord into an approved outlet and turning on the red switches located on the timer and power strips, the cart will begin charging.
To end charging, turn the red switch on the timer off and unplug the cart from the wall outlet.
NOTE: The switches on the power strips can be left on.
NOTE: A user manual for the CARTTIMER1 is available on the Black Box Web site. To download this manual, follow the instructions below.
To download from the Web site:
- Go to www.blackbox.com
- Enter the part number (CARTTIMER1) in the search box:

- Click on the "Resources" tab on the product page, and select the document you wish to download.
If you have any trouble accessing the Black Box site to download the manual, you can contact our Technical Support at 877-877-2269 or info@blackbox.com.
FEDERAL COMMUNICATIONS COMMISSION AND INDUSTRY CANADA RADIO FREQUENCY INTERFERENCE STATEMENTS
This equipment generates, uses, and can radiate radio-frequency energy, and if not installed and used properly, that is, in strict accordance with the manufacturer's instructions, may cause interference to radio communication. It has been tested and found to comply with the limits for a Class A computing device in accordance with the specifications in Subpart B of Part 15 of FCC rules, which are designed to provide reasonable protection against such interference when the equipment is operated in a commercial environment. Operation of this equipment in a residential area is likely to cause interference, in which case the user at his own expense will be required to take whatever measures may be necessary to correct the interference.
Changes or modifications not expressly approved by the party responsible for compliance could void the user's authority to operate the equipment.
This digital apparatus does not exceed the Class A limits for radio noise emission from digital apparatus set out in the Radio Interference Regulation of Industry Canada.
Black Box Tech Support: FREE! Live. 24/7.
Tech support the way it should be.

natural_image
Close-up portrait of a smiling man with short hair, holding a small object (no text or symbols visible)Great tech support is just 60 seconds away at 724-746-5500 or blackbox.com.

BLACK BOX®
About Black Box
Black Box Network Services is your source for an extensive range of networking and infrastructure products. You'll find everything from cabinets and racks and power and surge protection products to media converters and Ethernet switches all supported by free, live 24/7 Tech support available in 60 seconds or less.
© Copyright 2016. Black Box Corporation. All rights reserved.
LCC30H-A user manual, version 4
- 30-Device iPad ® , Chromebook ™ , Tablet, and Laptop Cart
- User Manual
- Trademarks Used In This Manual
- Table of Contents
- Important Safety Information
- Electrical Precautions
- Specifications
- Overview
- Introduction
- What's Included
- LCC30H-A:
- LCC30H:
- To download from the Web site:
- Hardware Description
- Configuration and Setup
- Installing the Handle
- Fastening the Power Bricks at the Back of the Cart
- Using the Intelligent Charging System (SDILCU4)
- Display Tour
- To Begin Charging
- Basic Functions
- Charge Button
- Manage Button
- Auxiliary Power Button
- Charging Port LEDs
- Power Icon
- Reset Button
- Basket Distribution System
- Timer Instructions
- FEDERAL COMMUNICATIONS COMMISSION AND INDUSTRY CANADA RADIO FREQUENCY INTERFERENCE STATEMENTS
- BLACK BOX®
- About Black Box
Brand : Black Box
Model : LCC30HC
Category : Uncategorized