15 AMP 5 Ton - Log splitter Snow Joe - Free user manual and instructions
Find the device manual for free 15 AMP 5 Ton Snow Joe in PDF.

| Type of Product | Log Splitter |
| Brand | Snow Joe |
| Model | 15 AMP 5 Ton |
| Power Source | Electric (15 Amp, 120V AC) |
| Splitting Force | 5 Tons (10,000 lbs) |
| Motor | 15 Amp, 2 HP (peak) electric motor |
| Log Capacity | Up to 20 inches (50.8 cm) in length |
| Cycle Time | Approximately 14 seconds (auto return) |
| Ram Travel | Approximately 20 inches (50.8 cm) |
| Oil Capacity | 1.5 quarts (1.4 liters) of hydraulic oil |
| Weight | Approximately 100 lbs (45.4 kg) |
| Dimensions (L x W x H) | 60 x 24 x 36 inches (152 x 61 x 91 cm) |
| Wheel Size | 10 inches (25.4 cm) pneumatic wheels |
| Safety Features | Two-hand operation, safety shield, lock pin |
| Maintenance | Check hydraulic oil level, clean air filter, inspect hoses |
| Warranty | 2-year limited warranty (Snow Joe) |
Frequently Asked Questions - 15 AMP 5 Ton Snow Joe
User questions about 15 AMP 5 Ton Snow Joe
0 question about this device. Answer the ones you know or ask your own.
Ask a new question about this device
Download the instructions for your Log splitter in PDF format for free! Find your manual 15 AMP 5 Ton - Snow Joe and take your electronic device back in hand. On this page are published all the documents necessary for the use of your device. 15 AMP 5 Ton by Snow Joe.
USER MANUAL 15 AMP 5 Ton Snow Joe
IMPORTANT! Safety Instructions
All Operators Must Read These Instructions Before Use
Always follow these safety guidelines. Failure to do so may result in serious bodily injury or death.
General Safety Warnings!
When using the log splitter, basic safety precautions should always be followed to reduce the risk of fire, electric shock, and personal injury, including the following:

WARNING! The use of any other accessory or
chment might increase the risk of injury.
TRAINING
Before using the log splitter, take the time to familiarize yourself with the controls, especially how to stop the log splitter in an emergency. Only individuals who have read these instructions and have a thorough understanding of these instructions shall operate the log splitter. Never allow children, under the age of 18, to operate the log splitter.
Retain this manual for future reference and reread it at the start of each log splitting season.
- Read, understand, and follow all instructions on the log splitter and in the manual(s) before attempting to assemble and operate. Save this manual for reference and ordering replacement parts.
- Never allow children under 18 years old to operate this machine. Children 18 years old and over should be trained and supervised by an adult who understands the operation of the log splitter.
- Never allow an untrained individual to operate the log splitter.
- Understand the function of all the controls and their proper operation. Know how to stop the machine in case of emergency.
PREPARATION
Work Area
- Plan your log splitting pattern to avoid discharge of material toward people, pets, and property. Thrown objects can cause serious personal injury.
-
Always inspect the area where the log splitter is to be used. Ensure the surface the machine is on is 60 – 75 cm (23.62" – 29.50") high, stable, level and free from overhanging items such as limbs, wires etc.
-
All visitors: children, adults, and pets, should be kept at a distance from working area, at least 5 m (16.5 ft.) from the log splitter while it is in operation. Stop the log splitter if people or pets enter the discharge area.
- Always observe the surface conditions to avoid slipping, falling, and unexpected objects.
- Avoid Dangerous Environments – Don't use appliances in damp or wet locations. Do not operate the log splitter in the rain or wet conditions.
- Operation of the log splitter where temperatures are below 5°C (41°F) or above 40°C (104°F), at a high altitude and/or high humidity may result in a malfunction of the machine. Do not use the log splitter in poor environmental conditions.
- Ensure electrical conditions meet requirements (see ElectricSafety).
- Do not use the machine where gasoline, natural gas or other flammable vapors are present. The electric motor may spark and cause an explosion or fire.
Protective Clothing
- Thrown objects can cause serious injury to the eyes and exposed body. Always wear safety glasses or eye shields during operation and while performing an adjustment or repair. Always use face or dust mask if operation is dusty.
- Use of rubber gloves and substantial footwear is recommended when working outdoors. Wear protective hair covering to contain long hair.
- Always operate wearing adequate protective garments. Dress Properly – Do not wear jewelry or other loose clothing, which could become entangled in moving parts. Wear footwear that provides protection for the feet and ensures sure footing.
- Always use ear protection if the noise level exceeds 85 dB. Observe any noise prevention regulations and laws.
- Inspect the log splitter for worn, missing or damaged parts and safety labels. See maintenance section for detailed instructions.
- Use the Right Appliance – Do not use this appliance for any job except that for which it is intended.
Wood Condition
- Do not split oversize logs (max. log diameter: 10", max log length: 20"). Do not attempt to split "hard" wood that requires more than 5 seconds to split.
- Ensure the log is free from items that may be projected or cause damage to the machine (ie.: nails, wire).
- Ensure the end of the log is cut square and all branches have been cut flush.
SAVE THESE INSTRUCTIONS
ELECTRICAL SAFETY
- Always check that the power supply corresponds to the voltage on the rating plate.
- Do not operate in an area where there is a possibility of body contact with grounded items (i.e.: pipes, metal structures). Avoid contact with metal objects.
- Do not pull/yank the power cord. Keep the power cord away from hot surfaces and sharp objects.
- Always use a grounded three-wire extension cord and receptacle that are made of rubber and intended for outdoor use. The machine is designed to operate on 120 Volt AC household current. The log splitter power cord has a grounding prong. To avoid the possibility of shock it must always be used with a properly grounded three-prong receptacle protected with a 20A fuse. Never remove the ground prong from the plug.
Grounding methods

text_image
Grounding Pin (A) Metal Screw Cover of Grounded Outlet Box (B) Adapter (C) AA210 Grounding Means Grounding Pin (D)NOTE: If necessary, the machine can be switched to a single-phase network (120V/60Hz). Connect the main leads to a standard 120V/60Hz electrical supply which has protection devices of under-voltage, over-voltage, over-current as well as a residual current device (RCD) with a maximum residual current rated at 30mA. Only a qualified electrician should only do this.
- Do not operate the machine where water is present (i.e.: rain, sprinkler, puddles).
- Do not touch electrical plugs with wet hands.
- Keep the extension cord away from the moving parts and hot motor housing.
- Immediately replace and dispose of damaged wires and plugs.
- Do not open the switch box on the motor. If service is necessary take the machine to a qualified electrician.
- Ground Fault Circuit Interrupter (GFCI) protection should be provided on the circuit(s) or outlet(s) to be used for the gardening appliance. Receptacles are
available having built-in GFCI protection and may be used for this measure of safety.
- Warning – To reduce the risk of electric shock, use only with an extension cord intended for outdoor use, such as an extension cord of cord type SW-A, SOW-A, STW-A, STOW-A, SJW-A, SJOW-A, SJTW-A, or SJTOW-A.
EXCEPTION: Types SW, SOW, STW, STOW, SJW, SJOW, SJTW, and SJTOW are alternative designations to Types SW-A, SOW-A, STW-A, STOW-A, SJW-A, SJOW-A, SJTW-A, and SJTOW-A, respectfully.
- Extension Cord – Make sure your extension cord is in good condition. When using an extension cord, be sure to use one heavy enough to carry the current your product will draw. An undersized extension cord will cause a drop in line voltage resulting in loss of power and overheating. Table 1 shows the correct size to use depending on cord length and nameplate ampere rating. If in doubt, use the next heavier gage. The smaller the gage number, the heavier the cord. To reduce the risk of disconnection of appliance cord from the extension cord during operating:
Minimum Gauge For Extension Cords
| Volts | Total length of cord in feet | |||
| 120V | 25 | 50 | 100 | 150 |
| Ampere Rating More than Not more than | AWG | |||
| 0 – 6 | 18 | 16 | 16 | 14 |
| 6 – 10 | 18 | 16 | 14 | 12 |
| 10 – 12 | 16 | 14 | Not Recommended | |
| 12 – 16 | 16 | 12 | Not Recommended | |
| NOTE – Only the applicable parts of the Table need to be included. For instance, a 120-volt product need not include the 240-volt heading. | ||||
Table 1
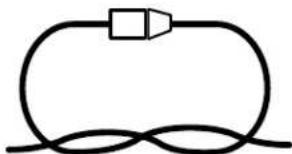
i) Make a knot as shown in Figure 1 or
ii) Use one of the plug-receptacle retaining straps
Method of securing extension cord

text_image
Cord set Appliance cord(A) Tie cord as shown
natural_image
Simple line drawing of a resistor connected in series with a loop (no text or symbols)(B) Connect plug and receptacle
Figure 1
or connectors described in this manual.
-
Avoid Unintentional Starting - Don't carry plugged-in appliance with finger on switch. Be sure switch is off when plugging in.
-
Don't Abuse Cord – Never carry appliance by cord or yank it to disconnect from receptacle. Keep cord from heat, oil, and sharp edges.
-
Don't Force Appliance – It will do the job better and with less likelihood of a risk of injury at the rate for which it was designed.
-
Don't Overreach – Keep proper footing and balance at all times.
-
Stay Alert – Watch what you are doing. Use common sense. Do not operate appliance when you are tired.
-
Disconnect Appliance – Disconnect the appliance from the power supply when not in use, before servicing, and when changing accessories.
-
Store Idle Appliances Indoors – When not in use, appliances should be stored indoors in dry, and high or locked-up place – out of reach of children.
-
Maintain Appliance With Care – Keep cutting edge sharp and clean for best performance and to reduce the risk of injury. Follow instructions for lubricating and changing accessories. Inspect extension cords periodically and replace if damaged, have it repaired by an authorized service facility. Keep handles dry, clean, and free from oil and grease.
-
Check Damaged Parts – Before further use of the appliance, a guard or other part that is damaged should be carefully checked to determine that it will operate properly and perform its intended function. Check for alignment of moving parts, binding of moving parts, breakage of parts, mounting, and any other condition that may affect its operation. A guard or other part that is damaged should be properly repaired or replaced by an authorized service center unless indicated elsewhere in this manual.
OPERATION
Operator Requirements
-
Only one person shall operate the log splitter. All other individuals and animals shall maintain a safe distance during operation (see safety warning in Preparation).
-
Always operate the machine in a standing position and in a location that is not in the path of projected debris. The location of the machine should provide safe footing and balance for the operator.
-
Do not operate the machine while under the influence of alcohol, drugs or physically, mentally fatigued. Always be alert and watch what you are doing!
-
Contact with the moving parts can amputate body parts.
Do not put any part of your body near moving parts.
Workload Requirements
- Never exceed the operating capacity of the log splitter.
- Always split the log in the direction of the grain. Do not place a log across the log splitter.
- Never spilt more than one log at a time.
- Do not load a log when the ram is moving.
Log Splitting
- Remove any keys and adjusting wrenches before turning the machine ON.
- Do not use accessories or attachments that are not recommended in this manual.
- Place the log on the log retention brackets. Do not hold or secure the log with your hands.
- Do not split wood that takes more than 5 seconds to split. Doing so will apply excessive pressure on the ram cylinder and damage the machine.
- Do not push/force the log onto blade. Always let the blade initiate splitting the log.
- If the log moves during operation, stop and reset.
- If a log is jammed do not request assistance of a second person. Ensure the machine power is disconnected and built up pressure released before attempting to release log.
- Ensure the machine is turned OFF when not in use. If the machine is left unattended then disconnect power to the machine.
MAINTENANCE AND STORAGE
- Maintain or replace safety and instruction labels. Ensure safety guards are in place.
- Disconnect the power and ensure built up pressure has been released from the tool before cleaning, repairing, or inspecting the log splitter.
- For best operation keep the blade sharp, moving parts lubricated and the machine cleaned.
- Always check for damaged or worn parts, alignment of moving parts, and tightness of bolts and screws before each use.
- Replace oil as specified in the Maintenance section. Follow all local regulations and laws concerning disposal of waste oil.
- Qualified mechanics and electricians must carry out repairs.
- When not in use, always store the machine in a secure location that children cannot access. Store the machine in a dry environment. The machine can be transported or stored in the ambient temperature between 25^ C – 55^ C ( 77^ F – 131^ F).
Safety Symbols
WARNING! Standard graphic symbols are used on all machines in order to ensure complete safety of all parts of the log splitter. As these symbols are very important, read the information below attentively.
| Symbols | Descriptions |
 | It is obligatory to read the machine's use and maintenance manual in full before using the machine. |
 | It is obligatory at all times to wear gloves to protect the hands against chips and splinters which may be produced during work. |
 | It is obligatory to wear safety footwear at all times to provide protection against the risk of logs accidentally falling on feet. |
 | It is obligatory at all times to wear goggles or a visor to protect the eyes and face against chips and splinters which may be produced during work. |
 | It is forbidden to remove or tamper with the protection devices and safety devices. |
 | It is forbidden to stand in the range of action of the machine, apart from the operator, no other person or animal may be present within a radius of 5 meter (16.5 ft.) from the machine. |
 | WARNING! Always be aware of the movement of the log pusher. |
 | WARNING! Never remove a log trapped in the wedge with your hands. |
 | WARNING! Disconnect plug before conducting maintenance. |
 | WARNING! Voltage Hazard. Refer to rating plate for information. |
 | To reduce risk of electric shock, do not expose unit to water or operated unit on wet ground. |
 | Always dispose of used oil according to the laws of the local where the machine is operated in. |
 | Danger of cutting or crushing of the hand: NEVER touch hazardous areas while the wedge is moving. |
Know Your Log Splitter

text_image
Figure 1Part List Legends
- Wedge
- Oil Box
- Carrying Handle
- Motor w/push switch & circuit breaker
- Rubber feet
- Rolling wheel
- ZHB hydraulic control lever
- Safety guard for hydraulic control lever
- Log pusher
- Log retention brackets
Technical Specifications
- Model LJ601E
- Voltage 120V
- Frequency 60Hz
- Power 15A
• Max. splitting force 5 Tons
• Max. log diameter 10"
• Max. log length 20"
Assembly
⚠ WARNING! Do not connect the log splitter to a power source until the machine is completely assembled. If any parts are missing do not operate the machine until they are replaced.
Follow these steps to assemble:
- Remove log splitter from the carton. Keep the packaging material until you are satisfied the log splitter
is not damaged, all the parts are included and the log splitter operates properly.
- Bolt the Support Leg to the log splitter. Place the log splitter on a level work surface that is at least 60 cm (23.62") high.
- Check that all the parts are included.
- Before the initial operation the Bleed Screw should be adjusted to allow air to go in and out of the oil tank. (loosen three to four turns) Airflow should be detectable during operation. To avoid leaking oil close the Bleed Screw when moving the machine.
Important! Failure to open the Bleed Screw during operation will result in permanent damage to the log splitter. Fig. 2 (13)

text_image
Figure 2 12 13- Dip stick Fig. 2 (12) Always check oil level before use.
⚠ WARNING! Do not adjust the Max. Pressure Limiting Screw. This was set at the factory so the log splitter works under the maximum pressure limit of 5 tons. Tampering with the screw will result in hydraulic pump failure. Only a professional mechanic shall adjust the Max. Pressure Limiting Screw.
Fig. 3 (14)

text_image
Use your left hand for the Hydraulic Control 14Figure 3
How to Fill the Hydraulic Oil
WARNING! Frequently check the hydraulic oil. Fill the hydraulic oil in the following manner. You must use the appointed type specified hydraulic oil # HL-68 from Mobile, Shell, or etc.
- Put your machine on a vertical position. (Fig. 4)
- Fit a cushion block (wood, brick, etc) which can support the log splitter weight. The machine must be perpendicular to the ground and stable.

text_image
Figure 4 Wood, brick, or etc- Use an allen wrench to loose the screw plug on the plate. (Fig. 5)
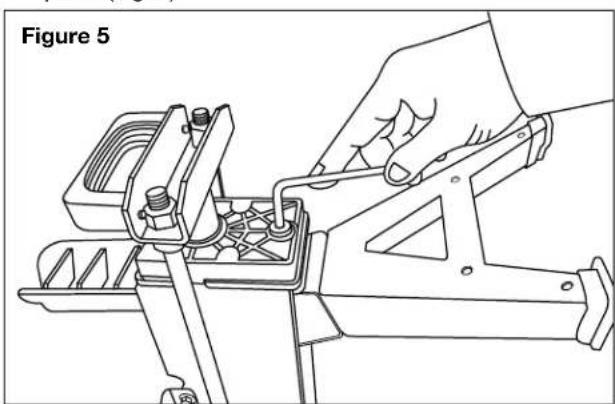
natural_image
Line drawing of a hand using a tool to adjust or install a mechanical component, labeled 'Figure 5' (no text or symbols on the diagram itself)- Check the oil level by the oil indicator on the screw oil stick. Ensure the oil level falls between the two lines. (Fig. 6)
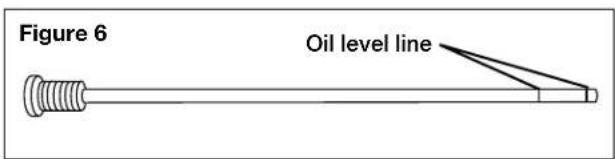
text_image
Figure 6 Oil level line- Use a funnel to fill the hydraulic oil slowly as shown. (Fig. 7) NOTE: Check the oil often by using a dipstick level indicator to prevent oil from being overfilled.

natural_image
Line drawing of a manual machine tool with a hand pouring liquid from a cup into a funnel (no text or symbols)- After filling, recheck that the oil level falls between the two lines, then assemble the screw plug using the allen wrench and tigten it. (Fig. 8)
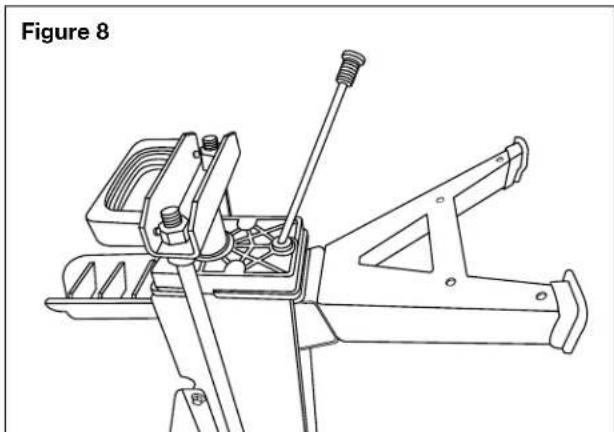
natural_image
Technical line drawing of a mechanical clamp or bracket assembly (no text or symbols)- Place the machine level and check to make sure there are no leaks. (Fig. 9)
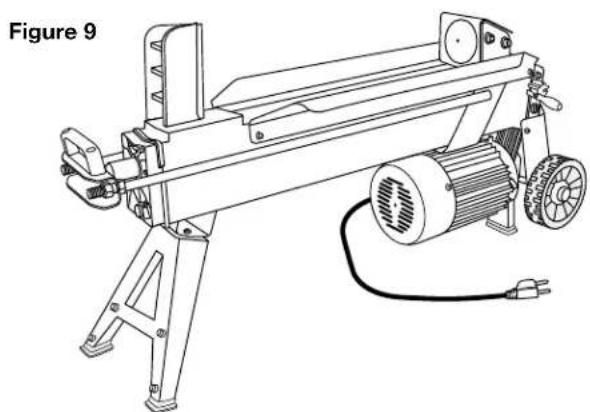
natural_image
Line drawing of a mechanical device labeled 'Figure 9' with no visible text or symbols on the device itself.Operation
⚠ WARNING! Operators must read, understand, and follow all instructions on the log splitter and in the manual(s) before operating the machine. Never allow an untrained individual to operate the log splitter. The operator must understand the function of all the controls, their proper operation and know how to stop the machine in case of emergency. Never allow children under 18 years old to operate this machine. Children 18 years old and over should be trained and supervised by an adult who understands the operation of the log splitter.
Follow these instructions to operate the log splitter:
- Ensure all logs meet size requirements (max. log diameter: 10", max log length: 20"). (Fig. 10)

text_image
20 inches 2-10 inchesFigure 10
IMPORTANT! Logs vary in hardness and structure. Small logs with knots or harder wood may be more difficult to split. Larger logs with less hardness may not be difficult to split. Do not force the log splitter if the log fails to split on the first attempt.
-
Check that Bleed Screw is open.
-
Place a log in the Log Retention Brackets. Check to make sure the log will not twist, rock, or slip during splitting.
IMPORTANT! Follow all safety warnings (see Safety/Operation: Workload Requirements, Log Splitting).
- Engage the Log Pusher with the ZHB control system. Use your left hand for the Hydraulic Control (Fig. 3) and your right hand for the Push Button Switch (Fig. 11). The system requires both controls be engaged simultaneously.
IMPORTANT! Do not engage the Log Pusher for more the 5 seconds.

text_image
Figure 11 Use your left hand for the Hydraulic Control Use right hand for the Push Button Switch-
Split the log.
-
Release both your hands from the controls to return the Log Pusher.
NOTE: The release of one hand from either control will STOP the Log Pusher.
Removing a Jammed Log
WARNING! Do not attempt to remove the jammed log with your hands or knock it off. Doing so may cause serious injury or damage to the machine.
-
Release both controls.
-
After the Log Pusher moved back and is completely stopped, insert a wood wedge under the jammed log. (Fig. 12)
Figure 12

natural_image
Technical line drawing of a mechanical device with a cylindrical component and motor (no text or symbols)- Start the Log Pusher and push the wood wedge completely under the jammed log.
- Insert a second wood wedge under the log and repeat step 3. (Fig. 13)
Figure 13

natural_image
Line drawing of a mechanical device with a cylindrical roller and motor, labeled Figure 13 (no text or symbols on the diagram itself)- Repeat steps 3 and 4 until the jammed log releases from the wedge. (Fig. 14)

natural_image
Line drawing of a mechanical device with wood grain and motor (no text or symbols)Always set logs firmly on the log retaining plates and worktable. Make sure logs will not twist, rock, or slip while being split. Do not force the blade by splitting the
log on the upper part. This will break the blade or damage the machine. (Fig. 15)

natural_image
Line drawing of a mechanical device with a cylindrical roller and motor, labeled 'Figure 15' (no text or symbols on the diagram itself)Do not attempt to split 2 pieces of logs at simultaneously. One of them may fly up and cause injury. (Fig. 16)
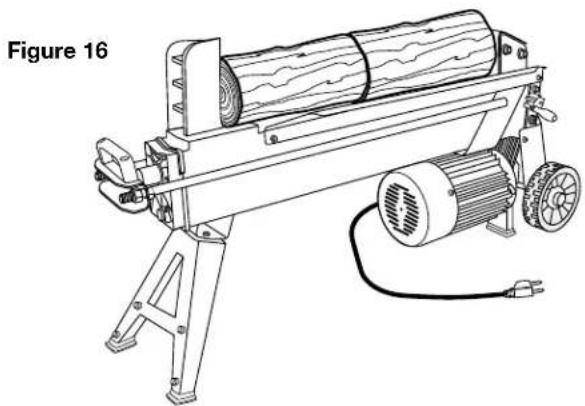
natural_image
Line drawing of a mechanical device labeled 'Figure 16' showing a cylindrical component mounted on a stand with a motor and power outlet (no text or symbols on the device itself)Do not try to knock the jammed log off. Doing so will damage the machine or may launch the log and cause an accident. (Fig. 17)
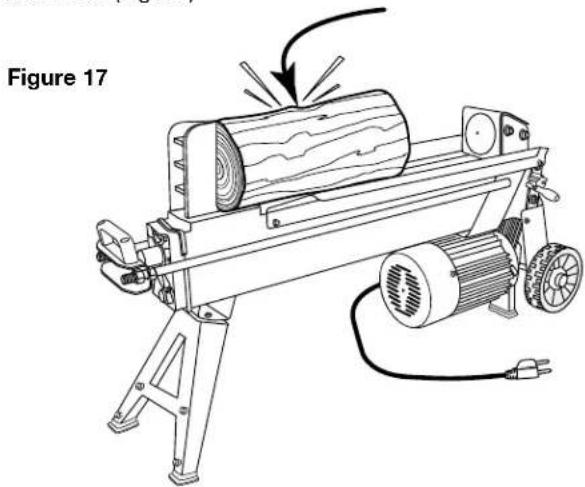
natural_image
Technical line drawing of a mechanical machine with a wooden log being cut, labeled as Figure 17 (no text or symbols on the diagram itself)Troubleshooting
| Problem | Cause | Suggested Remedy |
| Motor won’t start | Overload protection device disengaged to protect the log splitter from being damaged | Let motor cool down, and push the button of the overload protection device to restart the motor |
| Fails to split logs | Extension cord is too long, causing the low voltage | Do not use extension cord longer than 50 feet. Use the extension cord as manual recommended. (See pg. 2) |
| Log is improperly positioned | Refer to “Log splitter operation” section for perfect log loading | |
| The sizes or hardness of the log exceeds the capacity of the machine | Reduce the log size before splitting it on the log splitter | |
| Oil leaks | Locate leak(s) and contact the dealer | |
| Unauthorized adjustment was made on Max. Pressure Limiting Screw. Lower max pressure rating was set. | Contact the dealer | |
| The log pusher moves jerkily, making unfamiliar noise or vibrating a lot | Lack of hydraulic oil and excessive air in the hydraulic system | Check oil level for possible oil refilling. Contact the dealer. |
| Oil leaks around cylinder ram or from other points | Air sealed in hydraulic system while operating | Loosen bleed screw by some rotations before operating the log splitter |
| Bleed screw is not tightened before moving the log splitter | Tight the bleed screw up before moving the log splitter | |
| Oil drain bolt with dipstick is not tight. | Tighten the oil drain bolt with dipstick | |
| Hydraulic control valve assembly and/or seal(s) worn. | Contact the dealer |
Maintenance
WARNING! Always disconnect the power and ensure built up pressure has been released from the tool before cleaning, repairing, or inspecting the log splitter.
Before every use:
- Clean the machine.
- Check safety labels and guards are in place.
- Check for damaged or worn parts, alignment of moving parts, and tightness of bolts and screws.
Every 150 hours of use:
- Replace the hydraulic oil. Follow these steps:
a. Place container to capture drained oil on flat, stable surface. The container must hold a minimum of 3 liters (0.8 gallons).
b. Unscrew the oil drain bolt.
c. Turn the machine over on the motor side and drain the oil.
d. Return the machine to the upright, operating position.
e. Refresh the hydraulic oil. Recommended oils: Shell Tellus T22, Aral Vitam GF22, SP Energol HCP22, Mobile DTE 11 or equivalent. Do not use other grade oils.
Periodically:
- Sharpen the wedge. Use a fine tooth file, take off burrs and smooth rough sections of the cutting edge.
- Keep moving parts lubricated.
Storage
When not in use, always store the machine in a secure location that children cannot access. Store the machine in a dry environment. The machine can be transported or stored in the ambient temperature between 25^ C – 55^ C ( 77^ F – 131^ F).
Service and Support
If your Sun Joe Electric Log Splitter requires service or maintenance, please call 1-866-766-9563 for assistance.
Model and Serial Numbers
When contacting the company or reordering parts, you will need to provide the model and serial numbers of the product, which is found on the rear of your log splitter. Copy these numbers into the space provided below.WARNING! Do not tamper or remove any of the protection/safety devices.

text_image
Record the following numbers from the housing or handle of your new product: Model #: |L |J |6 |0 |1 |E | Serial #:NOTES

text_image
SNOWJOEA Two-Year Full Warranty for residential use in the United States and Canada

text_image
SUNJOEGeneral Conditions:
Snow Joe, LLC warrants this product to the original purchaser for two years against defects in material or workmanship when used for normal residential purposes. Snow Joe, LLC will repair any defect in material or workmanship, and repair or replace any defective part, subject to the conditions, limitations, and exclusions set forth herein. Such repair or parts replacement will be free from charge to the original purchaser except noted below.
The duration of the warranty applies only if the product is put to personal use around the household or residence. If the product is put to any business use, commercial or industrial, then the duration of this warranty is 90 days from the date of original purchase. If any product is rented or leased, the duration of the warranty is 90 days from the date of original purchase.
It is the owner's responsibility to perform correctly all maintenance, and minor adjustments explained in the owner's manual.
Electric Products:
To obtain a replacement electric powered unit or repair the existing electric powered unit, you must return the complete unit and postage prepaid to: Snow Joe Return Center, 86 Executive Avenue, Edison, NJ 08817.
Gasoline / Battery Products:
Limitations
- Batteries are warranted only for the period of 12 months after the date of purchase on a prorated basis. Rechargeable batteries will be replaced free from charge during the first 90 days. After the initial 90 days, batteries will be replaced at prorated cost to the customer
- Idlers, cables, and electrical components are warranted to the original purchaser for use at household or residence for a period of two years
Exclusions
- Snow Joe brand engines are covered under this warranty. All other engines and engine accessories are covered only by the engine manufacturer's warranty and are not covered by this warranty
- Parts used that are not genuine Snow Joe parts are not covered by this warranty
- Damages resulting from misuse, alteration, improper assembly, improper adjustment, neglect, or accident which requires repair is not covered under this warranty
- Belts, augers, and tines are not covered under warranty – belts, augers, and tines wear out and can be purchased at www.snowjoe.com or by calling 1-866-766-9563
Snow Joe, LLC may from time to time change the design of its products. Nothing contained in this warranty shall be construed as obligating Snow Joe, LLC to incorporate such design changes into previously manufactured products, nor shall such changes be construed as an admission that previous designs were defective.
This warranty is intended to cover product defects only. Snow Joe, LLC is not liable for indirect, incidental, or consequential damages in connection with the use of the Snow Joe Products covered by this warranty. This warranty does not cover any cost or expense incurred by the purchaser in providing substitute equipment or service during reasonable periods of malfunction or non-use of this product, while waiting for completion of repairs under this warranty. Some states do not allow exclusions of incidental or consequential damages, so the above exclusions may not apply in all states. This warranty may gives you specific legal rights in your state.
If you wish to contact Snow Joe, please direct inquiries to the:
Customer Service Department
Snow Joe Center
86 Executive Avenue
Edison, NJ 08817
Customers who have purchased Snow Joe products exported from the United States and Canada should contact their Snow Joe Distributor (Dealer) to obtain information applicable for your country, province, or state. If for any reason, you are not satisfied with the distributor's service, or if you have difficulty obtaining warranty information, contact your Snow Joe seller. If in the event your efforts are unsatisfactory, please write to the Snow Joe Center at the above address.
If you have any questions about your product warranty, please call 1-866-SNOW-JOE or visit us online at www.snowjoe.com.