
BV9356 - Gps BOSS - Free user manual and instructions
Find the device manual for free BV9356 BOSS in PDF.


| Product Type | DVD/MP3/CD AM/FM Receiver with Motorized 6.2" Widescreen Touchscreen TFT Monitor |
| Display Size | 6.2 inches (157mm) widescreen touchscreen |
| Power Supply | DC 12V (10.8-16.0V) |
| Max Current Consumption | 15A |
| Ground System | Negative ground |
| Power Output | 80 Watts x 4 Channels |
| FM Tuner Frequency Range | US: 87.5-107.9 MHz / EU: 87.5-108 MHz |
| AM Tuner Frequency Range | US: 530-1710 KHz / EU: 522-1620 KHz |
| DVD Player S/N Ratio | 70dB |
| DVD Frequency Response | 20Hz-20KHz |
| Disc Compatibility | DVD, VCD, CD, MP3, WMA, JPEG, MPEG4 |
| USB Ports | Dual (front and rear) - use only one at a time |
| SD Card Slot | Yes |
| AUX Input | Yes |
| Remote Control | Included (with battery) |
| Wiring Connector | ISO standard |
| Touch Calibration | Yes (via remote code 2008) |
| Rear View Camera Input | Yes (backup camera trigger) |
| RDS Function | AF/TA/PTY (if unit supports RDS) |
| DVD Parental Control | Yes (password 0000) |
| Safety Warning | Do not watch video while driving; engage parking brake for video playback |
Frequently Asked Questions - BV9356 BOSS
User questions about BV9356 BOSS
0 question about this device. Answer the ones you know or ask your own.
Ask a new question about this device
Download the instructions for your Gps in PDF format for free! Find your manual BV9356 - BOSS and take your electronic device back in hand. On this page are published all the documents necessary for the use of your device. BV9356 by BOSS.
USER MANUAL BV9356 BOSS
www.bossaudio.com | 800.999.1236
tech support: www.bossaudio.com/support


0114
registered in the U.S. and other countries
BOSS Audio Systems is net affiliated with Apple Inc.
USER'S MANUAL
BV9356
DVD/MP3/CD AM/FM RECEIVER
FEATURING MOTORIZED 6.2 (157mm) WIDESCREEN TOUCHSCREEN DIGITAL TFT MONITOR
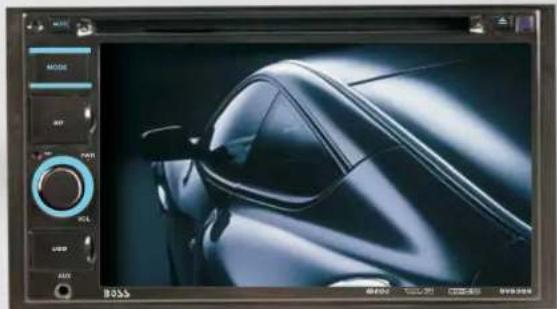
natural_image
Close-up of a car's front wheel and dashboard in a digital interface (no visible text or symbols on the car itself)


BOSS®
AUDIO SYSTEMS
INSTRUCTIONS
CONTENTS
Panel Introduction 02
Basic Function 03
Remote Control Operation 04
Turn on/off 06
Access main interface 06
USB/SD Card Operation 06
Radio Operation 07
Disc Operation 08
Play/Eject Disc 08
DVD/VCD Disc Playback 08
CD Disc Playback 08
MP3/WMA Format Disc Playback 08
Touch Menu 08
ST. Wheel setting 10
External input operation 10
Other Operation 11
Rear view function 11
Access setup interface 12
General setting 12
Time setting 12
Language setting 12
Audio setting 13
Video setting 13
Radio setting 13
Touch calibration 13
Wiring Diagram 15
Trouble shooting 15
Specifications 16
Accessory 17
DVD Parental control function 17
Warning: To ensure safety while driving and to comply with laws, drivers should not watch video or operate the video device while driving.
INSTRUCTIONS
INSTRUCTIONS
ACCESSORY
| Accessory | Quantity |
| Wire | 1PC |
| Remote Controller 1PC | |
| Warranty card | 2PCS |
| Disassemble Key | 2PCS |
DVD Parental control function
DVD Parental control function
★ DVD Parental control function: The default set for DVD is #8 adult, which means all grades of DVD can be read without entering password. To change the default grade, you need to follow the below procedure: Press SETUP button on the remote, display will show the system set up menu and the submenu, select password and enter 0000, you will be able to choose the DVD grade as default.
PANEL INTRODUCTION
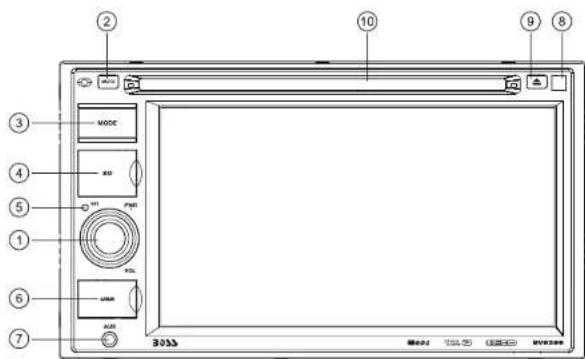
-
PWR/VOL button
-
MUTE button
-
MODE button
-
SD slot
-
RST
-
USB slot
-
AUX slot
-
IR

- Disk load slot
BASIC FUNCTION
INSTRUCTIONS
1. PWR/VOL button
Press this button will turn on power, during working longer press this button will turn off power, on any mode, shortly press will return main menu, rotate this button will adjust volume level.
2. MUTE button
Press this button to shut off sound output, repress this button to resume sound output; Press this button longer to turn on/off TFT LCD display.
3. MODE button
When the unit is power on, Repeat press this button can switch to different function mode as following picture.
Note: When the device without connecting to USB、SD or DVD no disc inside, the system will automatically skip these related working mode.

4. SD slot
Insert SD card, the unit will play the files automatically.
5. RST
Press this button and this unit will be restored to the initial state.
6. Dual (front and rear) USB
Insert USB removable device so as to read audio/video files.
⚠ Warning: You can only use either front or rear USB at a time. Never connect both front and rear USB at the same time! This could cause malfunctions.
7. Dual (front and rear) AUX
To input external audio.
▲ Warning: You can only use either front or rear AUX at a time. Never connect both front and rear AUX at the same time.
8. IR
To receive infrared signal from the remote control.

Press this button can eject the disc.
10. Disk load slot
Opening for disks to enter or retreat.
SPECIFICATIONS
Power supply DC 12V
Power range 10.8-16.0V DC
Max Current Consumption 15A
Ground system - Negative ground
Power Output 80 WattsX4 Channels
FM tuner
US frequency range 87.5-107.9MHz
European frequency range 87.5-108MHz
Signal / Noise ratio---- 55dB
Stereo separation 30dB
Search station volt 20-30dBuv
AM tuner
US frequency range---- 530-1710KHz
European frequency range 522-1620KHz
Limit noise sensitivity 32dB
DVD player
S/N Ratio 70dB
Frequency response 20Hz-20KHz
This unit is with switchable frequency.
You can switch from USA frequency to Europe frequency by following the below steps:
Step1. In main menu, press setup icon to enter the setup interface.
Step2. Press the Radio icon, and insert password 123456, then press "OK",
the menu from which you can select the radio frequency will show.
Step3. Press "Radio region" and select the desired frequency by pressing the "up"
and "down" arrow, then press it and setting is finished.
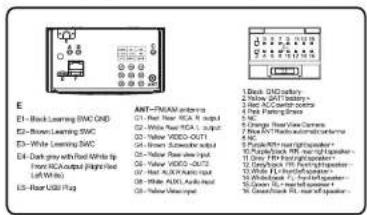
WIRING DIAGRAM
This player is equipped with ISO standard connector, please follow below instruction:
● Red - ACC ON (+12V)
● Grey/Grey black - Right front speaker (+/-)
● Yellow – 12 V Constant
● White/White black - Left front speaker (+/-)
- Black – Ground wire
● Purple/Purple black - Right rear speaker (+/-)
● Blue - Power Antenna / Remote Amp Turn On
● Green/Green black - Left rear speaker (+/-)
- Orange – Back-Up Camera Trigger (+)
- Parking Brake (-)
TROUBLE SHOOTING
PROBLEM
CAUSE SOLUTION
| Cannot power on | Check fuse | Change fuse same as the old one |
| Some factors cause MPU wrong operation | Press RES button on the panel by penpoint, then, power on | |
| After ignition switch off, setting information all lose | Change battery or fuse | Reset information and save |
| Poor performance of radio station | Weak signal | Move the car to another place, then research |
| Cannot load disk | There is a disk inside | Remove disc before inserting another one |
| Cannot play disc | Disc is scratched | Change new disc |
| Put wrong side of disc into the unit | Insert in the disk with sign side up | |
| Lens is dirty | Clean lens by lens clean disc | |
| Cannot switch language/subtitle | There is only one language/ subtitle in disc | If disc is not with multi-language/subtitle, it cannot switch language/subtitle |
| No image | Other factors cause MPU wrong operation | Press RES button on the panel by penpoint, then, power on |
| Cannot watch image during driving | It's not allowed to watch image during driving | Park the car in a safe place, put the car stall in “P” postion, pull up the hand brake, parking brake wire must be grounded |
Remote Control Operation
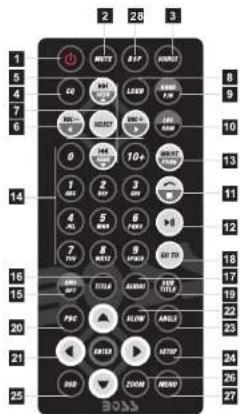
| 1 | POWER ON/OFF | 15 | AMS / RPT |
| 2 | MUTE | 16 | TITLE |
| 3 | SOURCE | 17 | AUDIO |
| 4 | EQ | 18 | GO TO |
| 5 | SEEK+ / SEEK- | 19 | SUBTITLE |
| 6 | VOL+ / VOL- | 20 | PBC |
| 7 | SEL | 21 | UP / DOWN |
| 8 | LOUD | 22 | SLOW |
| 9 | BAND / P / N | 23 | ANGLE |
| 10 | LOC / RDM | 24 | SETUP |
| 11 | STOP | 25 | OSD |
| 12 | PLAY / PAUSE | 26 | ZOOM |
| 13 | ST / PROG | 27 | MENU |
| 14 | 0-10+ | 28 | DSP |
1. POWER Button
Press once to switch on, press again to switch off.
2. MUTE Button
Press once to turn off audio output, press again to resume volume level.
3. SOURCE Button
Press this button to change mode.
4. EQ Button
Press this button to choose POP、ROCK、CLASSIC、EQ off.
5. SEEK+ (▶) / SEEK- (◀) Button
In normal playback MP3、USB、SD songs, Press this button to previous song or next song.
6. VOL+ (▶) / VOL- (◀)
Press this button to increase or decrease volume level.
7. SEL Button
Press this button to choose sound feature.
8. LOUD Button
Press this button to startup LOUD function.
9. BAND-P/N Button
In radio mode, press this button to choose band.
In VCD、DVD mode, press this button to choose RALoANTSC system.
10. LOC / RDM Button
In radio mode, press this button to switch between local and direction.
In VCD、CD mode, press this key to randomly play.
11. STOP Button
Press this button to stop playing.
12. PLAY / PAUSE Button
Press this button to switch between play and pause.
In stop mode, press this button to play.
13. ST / PROG Button
In radio mode, press this button to choose stereo or mono station.
In audio mode, it can help STOP button to programmed play.
INSTRUCTIONS
Touch screen Calibration
14. 0-10+ Button
Press this button to choose desired song, section, preset stations. Decimal numbers, for example the 19th song, press 10+ and 9 button.
15. AMS / RPT Button
In radio mode, press this button to browse stored stations. In audio mode, press this button to play repeatedly.
16. TITLE Button
In DVD mode, press this button to play back to the top menu of disc.
17. AUDIO Button
In DVD mode, press this button to switch language of dialogue. In VCD mode, press this button to choose left track, right track and stereo.
18. GO TO Button
In DVD mode, press this button, you can define playing time.
19. SUBTITLE Button
In DVD mode, press this button to switch language of subtitle.
20. PBC Button
In VCD mode, press this button to display all song menus, work with number button to choose songs.
When playing MP3、USB、SD returns to song menu, up、down selections can be up / "●" button or down / "●" key to select up and down, select and press "●" key to confirm. The selected tracks can be played. Press the left or right arrow keys to "●" or "●" key, can be on the next page function operation.
22. SLOW Button
In audio mode, press this button to slow backward and slow forward.
23. ANGLE Button
In DVD mode, press this button to change play angle.
24. SETUP Button
In audio mode, press this button to choose different set items.
25. OSD Display
Press this button to display the title chapter and the left time.
26. ZOOM Button
In DVD/VCD mode, press this button to ZOOM in.
27. MENU Button
Press button to back to the main menu.
28. DSP
Press this button to show the time.
BATTERY CHANGE
When control distance of remote control becomes shorter or no function, please change battery. Please confirm polarity before change.
One hand press stopper, then pull out battery.
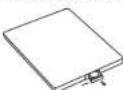
Put battery into controller.
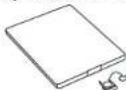
Insert battery holder into controller.
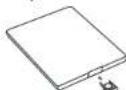
+ Please follow the below instructions to calibrate when there is no touch or touch is not accurate.
Step 1: Press the mode button in the unit to switch to DVD mode.
Step 2: Insert a DVD disc, after DVD is loaded, press the stop button "💡" as show in picture (1). in the remote short, the unit will display as show in picture (2).
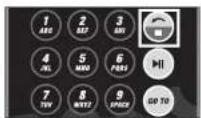
Picture (1) Picture (2)
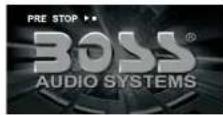
Step 3: Press "2008" in the remote as show in picture (3), the unit will display as show in picture (4).
Picture (3) Picture (4)
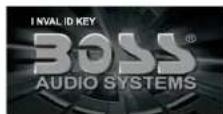
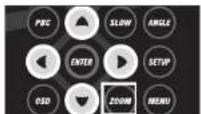
Step 4: Press "▲" button in the remote and then quickly press "▼" button as show in picture (5) and you will enter the touch calibration interface as show in picture (6).
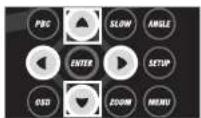
Picture (5) Picture (6)

Step 5: Use the touch pen to touch top left corner, top right corner, down right corner, down left corner, when the cross cursor stop at each corner, touch the center of the cursor. Then the panel will display OK and leave the calibration interface and the unit regained touch as show in picture (7).

natural_image
Five identical gray rectangular panels with white plus signs and arrows, labeled 'Picture (7)' below (no text or symbols on panels)INSTRUCTIONS
Turn on/off
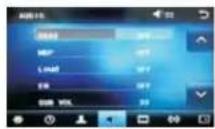
Audio setting
Click icon on setup interface to access audio setting interface, as shown in right (PIC 1) diagram: You can turn on or turn off the existing functions on audio setting interface and adjust the rearview volume.
PIC 1
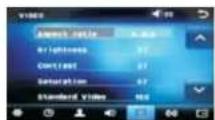
Video setting
Click icon on setup interface to access video setting interface, as shown in right (PIC 2) diagram: At video setting interface, you can adjust brightness, contrast, saturation and hue of the video.
PIC 2
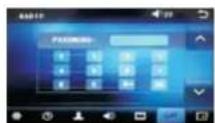
Radio setting
Click on in setting interface, input password [123456] to enter as shown in right (PIC 3) diagram: Touch [America 1] icon in the radio interface, icon will popup, click on it to choose radio region
PIC 3
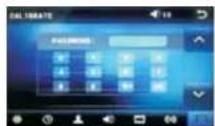
Touch calibration
If touch calibration error occurs, you can adjust the touch coordinate by "Touch calibration".
Click icon on setup interface, input password [888888] to confirm to access touch calibration interface, as shown in right (PIC 4) diagram:
PIC 4
Touching methods
Use touch pen to click the center of "+" icon, and move along with center of "+" icon so as to calibrate the screen. It shall automatically save data and exit after screen calibration. Please accurately click all positions on screen, or the accuracy of touch calibration shall be affected.
When the ignition switch is put in ACC or ON position, Press [☐] button on the front panel to turn on the unit. After the host starts, hold [☐] button for 3 seconds, the host will turn off.
Access main interface
Turned on, the interface to return the icon to switch to the main interface. As shown below:
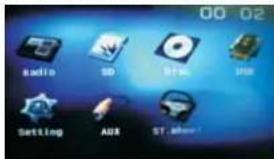
Touch the function icons so as to access the corresponding function operations.
USB/SD Card Operation
When there is a USB device/SD card connected, the unit can conduct the playback of audio/video/image files in the USB device/SD card.
Insert/Eject USB storage device
- Connect a U disc recorded with media information to the unit by a USB connecting cable.
- When there is a need to eject the USB device, exit the USB device playback screen first, and then take out the device.
Insert/eject SD card
- Insert a SD card recorded with media information into the SD card slot in the unit correctly until it is locked.
- When pulling out the SD card, exit SD card playing state first, then press the SD card and it shall pop up after unlocking.
Enter/exit
Insert a USB storage device or SD card to automatically play data contained in it. If the unit has connected with a USB device or SD card, touch [USB] icon in the multimedia interface to enter into the external storage playback interface; Touch [SD] icon to enter into the SD card playback interface. During playback, touch the top center area of the screen to pop up the touch menu, operate touch menu to perform various playback controls.
Play
After SD card/USB removable device being read out, the operation methods are similar to disk operation methods.
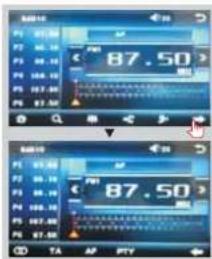
Radio Operation Access setup interface
1. Enter/exit
Touch [Radio] icon in the main interface to enter into the radio interface.
Touch 📋 icon to return to main interface, and then touch other function icons so as to exit radio mode.
2. Band selection
Click icon so as to switch among FM1, FM2, FM3, AM1, AM2 bands.
3. Search/Save radio stations
Short press 🔒 icon to browse the stored radio stations. FM band can save 18 radio stations (Six stations for FM1/FM2/FM3), AM band can save 12 radio stations (Six stations for AM1/AM2).
4. Sound setting
Click icon to access sound setting interface.
5. Turn on/off the Long/Short-range
Click icon, the search pattern in the local search (LOC) and remote search (DX) switch between.
LOC feature is turned on after the signal is strong enough only to listen to those in good condition and receiving radio station; DX enabled, you can receive remote weak radio signals.
Note: This function is available only when FM band is selected.
6. Loudness on/off
Click icon so as to turn on/off loudness function.
7. Stereo on/off
When receiving stereo signals, click 📄 icon to turn on/off stereo.
8. TA (Receive traffic information)
ON: When the traffic station is turned on, the radio will automatically search for traffic stations. After a station is searched, screen displays "TP". Only when traffic information is broadcasted can it be received, after traffic information is completed, the radio will automatically switch to the previous mode.
OFF: Repress [TA] button to close TA function. In other modes, traffic announcement will automatically switch to radio mode, after the traffic announcement is completed, it will automatically switch to the previous mode.
9. AF
Touch the button to turn the AF function on/off. AF function is turned on, When the received station signals become weak, the radio will automatically fine-tune to other frequencies. When receiving an emergency announcing, the screen will display warning message.
10. PTY
Touch the button the screen displays program types, users can search station according to program type.
Note: If the unit does not have RDS function, it has no AF/TA/PTY function.
Click [Setting] icon on main interface to access setup interface.
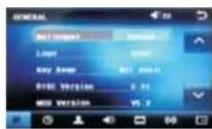
General setting
Click icon on setup interface to access general setting interface, as shown in below PIC 1 diagram:
In general setting interface, you can select to turn on or turn off the existing functions. You can set wallpaper and opening picture you like and check version number of DISC/MCU/TFT, click icon to browse up/down.
Wallpaper selection
Click [scene1] icon on wallpaper bar [Wallpaper scene1], direction icon shall pop up, click it to select wallpaper.
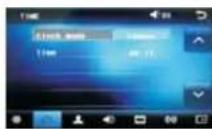
Time setting
Click icon on setup interface to access time setting interface, 12h/24h can interchangeable, as shown in below PIC 2 diagram:
Click [00:11] icon on time bar [Time 00:11] time setting interface shall display, as shown in below PIC 3 diagram:
Click ↑ icon beside hour and minute to separately set hour and minute.
PIC 1 PIC 2
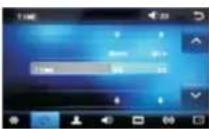
PIC 3
Language setting
During use, you can select your familiar language to display menu by language setup.
Click 📁 icon on setup interface to access language setting interface, as shown in right (PIC 4) diagram:
Click the corresponding [English] icon on the language bar desired to be set so as to switch the language type, when there are more than 3 languages, direction icon shall pop up, click it to select your familiar language.
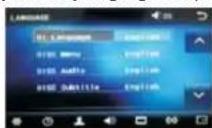
PIC 4
Other Operation
Disc Operation
Rear view function
In any running state, the video signal can switch to reverse video state when reversing the car, and the system shall return to its initial running state after reversing the car.
Warning
Do not rely on CCD system completely, please make sure you use direct eyesight while driving. Back rearview system only assists in driving. As the distance range of rearview system is limited, completely relying on the rearview system during driving may cause accidents.
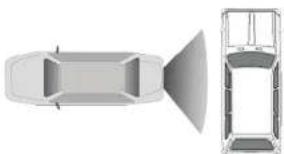
natural_image
Top-down architectural rendering of a car showing front and side views (no text or symbols)Reverse field simulation
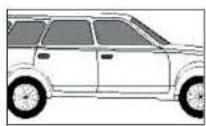
Rearview backup image
1. Play/eject disc
Play disc
Insert the disc into the disc slot with the printing surface up, system will detect the disc and automatically take it in to read and play.
Eject disc
(1) Click【▲】button on the panel to eject the disc.
(2) If a disc has not been took away 15 seconds after it is ejected, system will automatically take in the disc but not play.
Do not insert two discs or more.
2. DVD/VCD disc playback
During playback of disc, touch the middle lower area of the screen to pop up the touch menu, operate the touch menu to perform various playback controls. (PIC 1)
3. CD Disc Playback
After a CD is inserted, system shall access disk reading state immediately.
When there is a disk in the device, click [Disk] at the main interface so as to access disk reading state.
After the disk being read out, system shall automatically play in sequence.
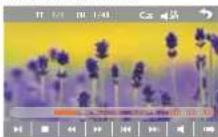
PIC 1
4. MP3/JPEG/MPEG4 disk playing
When the disk contains readable files, such as MP3/JPEG/MPEG4 files, it shall be automatically read out and played after slipping into DVD player.
During playing, touch the screen area and the touch menu shall pop up. Operate the touch menu for various playing.
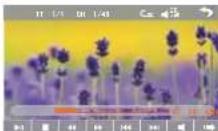
5. Touch Menu Function Description

Play/pause
Touch the button to pause, retouch it to continue to play.

Stop
Touch the button to enter into pre stop status.

Fast forward/backward
Consecutively touch this button to select the speed of fast-forward/fast-backward.

The previous/next song
Touch the button to select the previous/next song.

Volume adjustment button
Touch this button and volume adjustment modulation shall pop up, touch◀▶ button to adjust the volume.

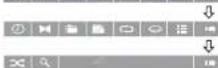
Access next menu
Touch it to access the next menu interface.
INSTRUCTIONS
ST. Wheel setting

Time setting
Touch this button to access time setting interface.

Stereo on/off
Touch it so as to turn on/off stereo.

Return to root menu
Touch this icon, it shall return to root menu of disk in DVD state and access PBC menu playing in VCD state. All chapters in the disk shall be displayed on the interface, touch the chapter icon directly for playing.

Access title menu
Press this button to return to title menu of the disk. Directly click menu bar at title menu interface for playing.

Repeat play
In playing state, touch this button to start repeat play function:
Chapter repeat → Title repeat → Repeat All → Off
During VCD playing, this function only works when PBC is off.

Language selection
Touch this button to select language.

Digit keyboard
Touch this button and digit keyboard shall appear, click number buttons directly to select tracks for playing.

Switch play order
Touch this button to switch the play order.

Zoom in/Zoom out image
Touch this button to zoom in /zoom out the image.
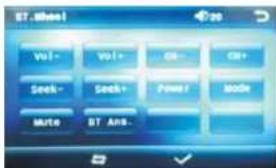
- Click on the [ST. Wheel] icon in the main interface into the ST. Wheel settings interface.
- The original vehicle to the control line positive, negative with the machine control line in the positive and negative connection.
- Click the ST. Wheel buttons will appear corresponding operating tips, and fundamental operation prompts the ST. Wheel feature set.
- Set function to save the settings and click the Confirm icon to confirm.
Note: To modify function settings, repeat procedures 3\~4.
To reset functions, click Reset icon, all the settings set before shall be cleared, repeat procedures 3\~4 for resetting.
External input operation
Connect the video input plug with external video input jack, and connect the audio input plug with external audio input jack.
Touch [AUX] icon on main interface to access external AUX interface.
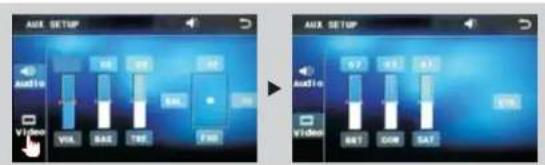
Audio → You can adjust the volume, bass, pitch for input audio. You can adjust the speaker volume by adjusting the front and back, left and right column.
Video → You can adjust the brightness, contrast, saturation and hue for input video.
You can also choose the video standard mode.
- USER'S MANUAL
- INSTRUCTIONS
- CONTENTS
- DVD Parental control function
- BASIC FUNCTION
- PWR/VOL button
- MUTE button
- MODE button
- SD slot
- RST
- Dual (front and rear) USB
- Dual (front and rear) AUX
- IR
- Disk load slot
- SPECIFICATIONS
- FM tuner
- AM tuner
- DVD player
- WIRING DIAGRAM
- Remote Control Operation
- POWER Button
- SOURCE Button
- EQ Button
- SEEK+ (▶) / SEEK- (◀) Button
- VOL+ (▶) / VOL- (◀)
- SEL Button
- LOUD Button
- BAND-P/N Button
- LOC / RDM Button
- STOP Button
- PLAY / PAUSE Button
- ST / PROG Button
- Touch screen Calibration
- 0-10+ Button
- AMS / RPT Button
- TITLE Button
- AUDIO Button
- GO TO Button
- SUBTITLE Button
- PBC Button
- SLOW Button
- ANGLE Button
- SETUP Button
- OSD Display
- ZOOM Button
- MENU Button
- DSP
- BATTERY CHANGE
- Turn on/off
- Audio setting
- Video setting
- Radio setting
- Touch calibration
- Touching methods
- Access main interface
- USB/SD Card Operation
- Insert/Eject USB storage device
- Insert/eject SD card
- Enter/exit
- Play
- Radio Operation Access setup interface
- Enter/exit
- Band selection
- Search/Save radio stations
- Sound setting
- Turn on/off the Long/Short-range
- Loudness on/off
- Stereo on/off
- TA (Receive traffic information)
- AF
- PTY
- General setting
- Wallpaper selection
- Time setting
- Language setting
- Other Operation
- Disc Operation
- Rear view function
- Warning
- Play/eject disc
- DVD/VCD disc playback
- CD Disc Playback
- MP3/JPEG/MPEG4 disk playing
- Touch Menu Function Description
- Play/pause
- Stop
- Fast forward/backward
- The previous/next song
- Volume adjustment button
- Access next menu
- Wheel setting
- Stereo on/off
- Return to root menu
- Access title menu
- Repeat play
- Language selection
- Digit keyboard
- Switch play order
- Zoom in/Zoom out image
- External input operation
Brand : BOSS
Model : BV9356
Category : Gps