Covo 779/90 - Range hood Elba - Free user manual and instructions
Find the device manual for free Covo 779/90 Elba in PDF.


| Product Type | Range Hood (Designer Hood) |
| Model | Covo 779/90 |
| Brand | Elba |
| Rated Voltage | 220-240 V ~ 50 Hz |
| LED Lighting | 2 x 2 W |
| Suction Power | 1000 m³/h (typical) |
| Motor Power | 250 W (typical) |
| Speed Levels | 6 (touch control and slide display) |
| Control Type | Touch controls with LED display |
| Delay Timer | Up to 9 minutes (touch C) |
| Filter Type | Metal grease filter (washable) + optional charcoal filter |
| Charcoal Filter | Supplied with unit, for recirculation mode |
| Installation Height | 650-700 mm between hob and lower edge of hood |
| Exhaust Duct | Optional for recirculation; duct must not connect to combustion gas ducts |
| Cleaning | Damp cloth, hot water, mild detergent; do not use abrasive cleaners |
| Oil Cup Cleaning | Clean when more than half filled to avoid spillage |
| Filter Cleaning | Wash in hot soapy water, dry, and refit |
| LED Lamp Replacement | 2 W lamp, use flat-head screwdriver to access, replace with same type |
| Safety Features | Automatic shut-off after 60 seconds (touch A twice), child safety advisory |
| Warranty | Refer to warranty certificate for terms |
Frequently Asked Questions - Covo 779/90 Elba
User questions about Covo 779/90 Elba
0 question about this device. Answer the ones you know or ask your own.
Ask a new question about this device
Download the instructions for your Range hood in PDF format for free! Find your manual Covo 779/90 - Elba and take your electronic device back in hand. On this page are published all the documents necessary for the use of your device. Covo 779/90 by Elba.
USER MANUAL Covo 779/90 Elba
natural_image
Line drawing of a kitchen air conditioner unit with a chimney and ventilation duct (no text or symbols)ELBA
DESIGNER HOOD
MODEL: COVO 669/90GP
COVO 668/90
CASA 679/90
COVO 779/90
Please read this manual carefully before operating your set.
Retain it for future reference.
Record model number and serial number of the set.
See the label attached on the set and quote this information to your dealer.
For The Warranty Terms & Conditions, Please Refer To Warranty Certificate
*Product image is for illustration purpose only. Actual product may vary depending on the model.
ELBA
Please read this instruction carefully. It is advisable to keep this instruction manual in a safe place for future reference.
SAFETY PRECAUTIONS
- Keep electrical appliances out of reach from children. Do not let them to operate the appliances without supervision.
- To protect against the risk of electrical shock, do not immerse the product, cord or plug into water or any other liquid.
- This product is for household and indoor use only.
- This product is not intended for use by person (including children) with reduced physical, sensory or mental capabilities unless they have been given supervision or instruction concerning use of the appliance by a person responsible for their safety.
- If the power cord or plug has damaged, it must be replaced by the service centre or a qualified service technician to avoid hazard.
- Before installation, check if the mains supply voltage is matched with the voltage stated on the rating plate of the hood.
- There must be adequate air ventilation of the room when the cooker hood is used with the cooking appliances with burning gas or other fuels.
- Ensure that the installation of ducting complies with the standard of local building, gas and electrical authorities.
- Do not ignite flames in the pans.
- There is a risk of fire if cleaning is not carried out in accordance with this instruction.
NOTICE
This product must not be disposed together with domestic waste. It has to be disposed at an authorized place for recycling of electrical and electronic appliances. By collecting and recycling waste, you help to save natural resources and make sure the product is disposed in an environmental friendly and healthy way.
CLEANING AND MAINTENANCE
• The hood must always be disconnected from the electricity supply before carrying out the maintenance.
- Clean the hood with damp cloth, hot water and mild detergent. Do not use chemical, steel, wooden or abrasive cleaners to clean the hood.
- Clean the oil cups when they are more than half filled to avoid the oil from spilling.
- Remove the filter, wash in hot soapy water, dry and fit back into the hood. Do not use the hood without the filter installed.
MAIN SPECIFICATION
Rated Voltage : 220-240V/50Hz
LED Light : 2 x 2W
Suction Power : 1,000m³/hr □
1,400m³/hr □
Motor Power : 250W □
200W □
Product Dimension:
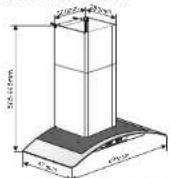
Covo 668/90 & Covo 669/90GP
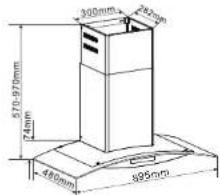
Covo 779/90
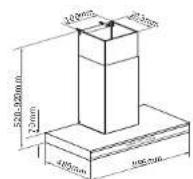
Casa 679/90
VETRINO EH-D9160SL(BK)
- Do not install the cooker hood where there are many doors or windows in order to avoid affecting the exhaust efficiency of the cooker hood caused by air convection. (Fig. 1)
- Install the cooker hood right above the hob. The recommended distance between the hob and the lower edge of the cooker hood is minimum 300mm and maximum 350mm (Or minimum 650mm and maximum 700mm). (Fig 2)
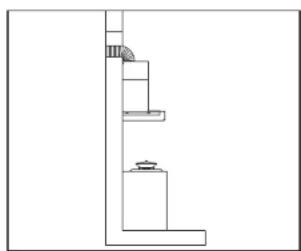
- In order to get the optimum performance, do not elongate the exhaust pipe too long, and try to make the bend of the exhaust pipe less and biggest, ensure the connection is airproof. (Fig. 3)
- After hanging the unit on the wall, ensure the hood is level and vertical (Fig. 4).
- The air outlet must not be connected to chimney flues or combustion gas ducts. The air outlet must under no circumstances be connected to ventilation ducts for room in which fuel-burning appliances are installed.
- The installation of the exhaust duct is optional when the charcoal filter is installed for recirculation purpose. Installation of the charcoal filter will gradually reduce the suction power and reduced the suction performance of the unit.
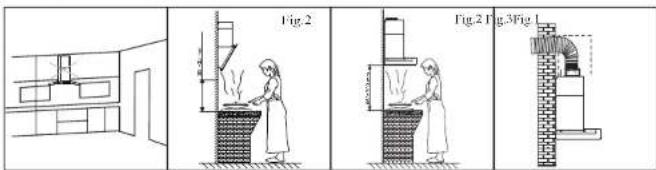
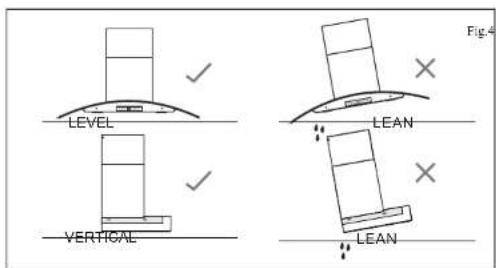
2
ASSEMBLY INSTRUCTIONS
Please check the following before installation:
• Installation of hood must be carried out by an authorized or qualified technician.
- The inside of the hood may have sharp edges. Before installing, removing or cleaning, please wear protective gloves to avoid injury.
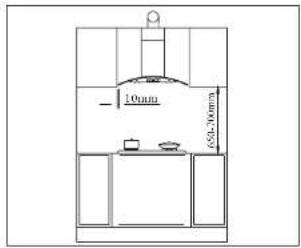
1) Fix the position of the cooker hood in accordance with the recommended height between 650mm to 700mm from the hob and the lower edge of the hood.
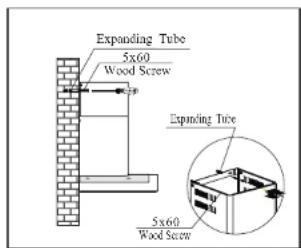
2) According to the space between the holes A and B, drill 2 holes in level on the wall with 8mm diameter and 60-70mm depth. Press the two expanding tubes provided into the holes.
3) Tighten the two metal screws of 5x60mm provided to the expanding tube and make sure it is fixed and cannot be moved.
4) Hang the cooker hood on the 2 metal screws and make sure it is in level and stable.
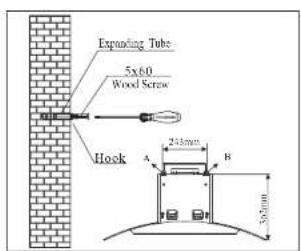
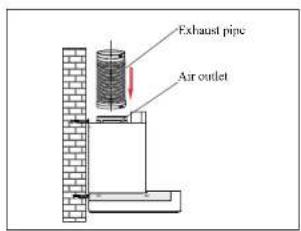
5) Take out the exhaust pipe and connect to the air outlet which has installed on the cooker hood. Make sure it is connected to the air outlet tightly.
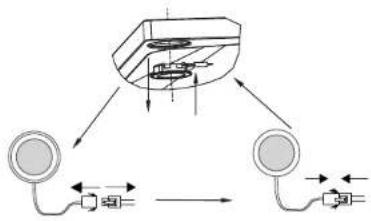
REPLACING THE LED LAMP
Caution: Lamp unit might be hot after cooking. Wait until it is cool before carrying out repair and replacement. Always use the same type of light bulb.
Make sure all control switches are turned off and the cooker hood is unplugged from the electrical mains. Follow below instruction to carry out replacement:
- Use a flat head screwdriver to pop out the lamp subassembly.
- Disconnect the lamp from the internal wires.
- Remove the screws using cross head screwdriver.
- Remove the lamp cover and take out the lamp bulb.
- Replace with a new 2W lamp bulb and make sure the bulb is connected into the light socket.
- Replace the lamp cover and fix it gently with screws.
- Connect the lamp subassembly with internal wires and push the lamp into the hood.
flowchart
graph TD
    A["Component 1"] --> B["Component 2"]
    B --> C["Output"]
    A --> D["External Connection"]
    B --> E["External Connection"]
    D --> F["Current Source"]
    E --> G["Current Source"]
A: Touch "A" once then enter in standby mode, you can start operation. If touch
“A” when the motor is running, then machine will be Automatic off after 60 seconds. Or you can touch “A” twice, to stop all operations immediately.
B: In standby mode, touch "B" and the cooker hood will starting at the High speed, press again to change the speed level, form high speed to low speed, total have 6 different speed level. If you touch it for the sixth time, the fan function will be turned off.
Display screen: In standby mode, finger slide the display screen can also adjusting the speed(from left to right are low speed to high speed, total it has 6 different speed).
C: Only when the motor is running, touch "C" once, to enter in time delay mode.
Under time delay mode, keep touching "C" to request delay, your every touch can add 3 mins (MAX 9mins delay).
Note: Please make sure operation in 1 min after enter in time delay mode or the machine will exit the delay status.
D: Touch "D" to turn on or off the LED lamp.
natural_image
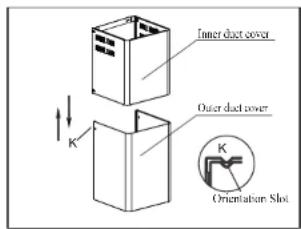
Pure architectural floor plan lines without any text, numbers, or symbols6) Take out the inner and outer duct cover from the carton box and insert the inner duct cover into the outer duct cover.
7) Make sure the inner duct cover is fixed into the orientation slot (K) on the outer duct cover.
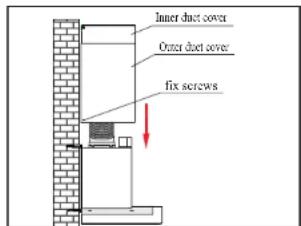
8) Place the inner and outer duct cover on the cooker hood body and use two M4x10 screws to fix the outer duct cover to the unit body.
9) Take out the ducting bracket from the carton box. Position the inner duct cover to a suitable height and mark the wall with a pen.
10) Put down the inner duct cover gently. Drill the keyholes in 60-70mm depth in level using 8mm drill. Using the expanding tube, install the bracket with the wood screws provided.
11) Fix the inner duct cover to the ducting bracket using M4 screws.
12) Extend the air outlet of the exhaust pipe out of the kitchen. Try to make the bend of the exhaust pipe more than 120^ .
METAL GREASE FILTER INSTALLATION
-
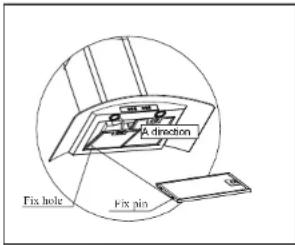
Match the fix pin to the fix hole and push the metal grease filter gently as the direction A shown.
-
To remove the metal grease filter for cleaning purpose, gently push the clip to eject and use both hand to remove the filter carefully.
CHARCOAL FILTER INSTALLATION
FOR COVO 668/90, COVO 669/90GP, COVO 779/90, CASA 679/90 & VETRINO EH-D9160SL(BK)
-
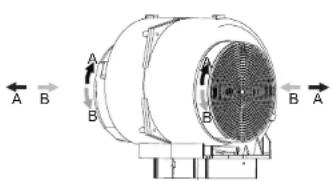
The charcoal filters are supplied together with the unit. Follow the direction of B and fix on the designer hood motor assembly.
-
To remove the charcoal filter, follow the direction A and remove accordingly.
OPERATING INSTRUCTIONS
FOR COVO 668/90, COVO 669/90GP, CASA 679/90
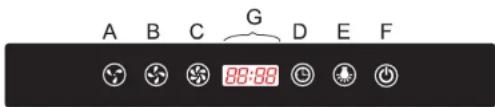
A: Low Speed – Press once to operate at low speed. Press again to turn off.
B: Medium Speed – Press once to operate at medium speed. Press again to turn off.
C: High Speed – Press once to operate at high speed. Press again to turn off.
D: Timer – When the hood is operating, press D to control the working time of the hood. Each interval is equal to one minute and the maximum time is one hour.
E: LED Lamp – Press once to illuminate the LED lamp. Press again to turn off.
F: ON/OFF Button – Press to turn on/off the unit.
To set the time – When the hood is not operating and power is connected, press and hold D for 3 seconds. Press C and E to adjust the hours and minutes respectively. The display G will show the time set.
FOR COVO 779/90
![[ ] [ ] 88:88 [ ] Timer/Clock Timer When the hood is operating, touch this button once to set timer. Each interval is one minute and the longest time is 60 minutes. Clock When the hood is not operating, touch and hold this button for 3 seconds. It shows "##" on the digital display. You can use "○" to set hour and "☆" to set minute to operate as a clock. Fan Touch this button to adjust the fa peed (High, Medium, and Low). Touch again the button again to turn off the fan. Light Touch this button once to illuminate the LED lamp. Touch again to turn off. Motor On/Off 1. When the hood is operating, touch this button once to prolong the operating time to one minute. 2. Touch again to turn off the unit immediately.](/content/2026/06/1146494/images/0025cdd8a6e81cd85141fce1916ea8ac9a7d70a0fddbe7c8bfe0d397980e1cae.jpg)
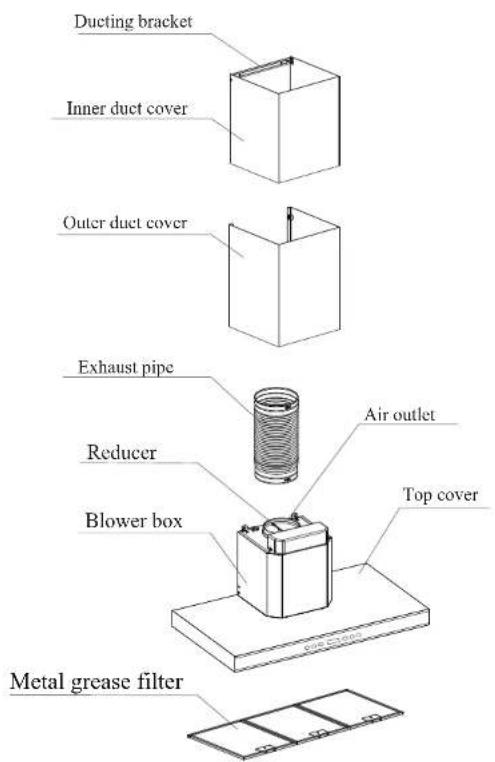
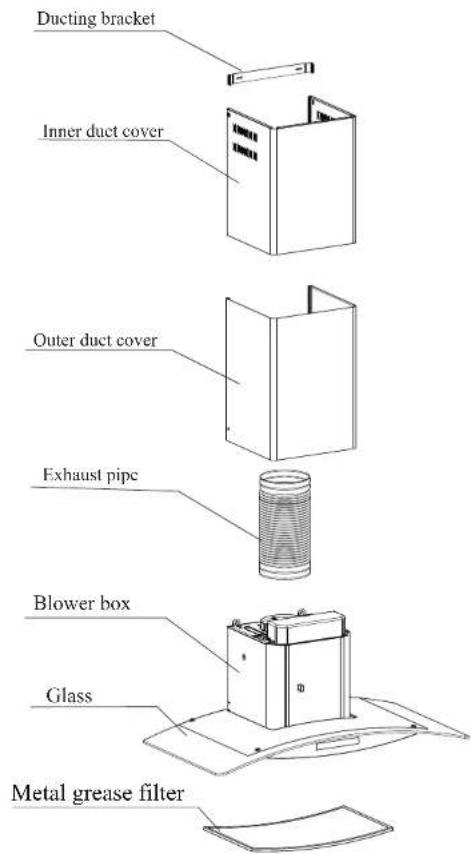
PRODUCT DESCRIPTION
Covo 668/90 & Covo 669/90GP
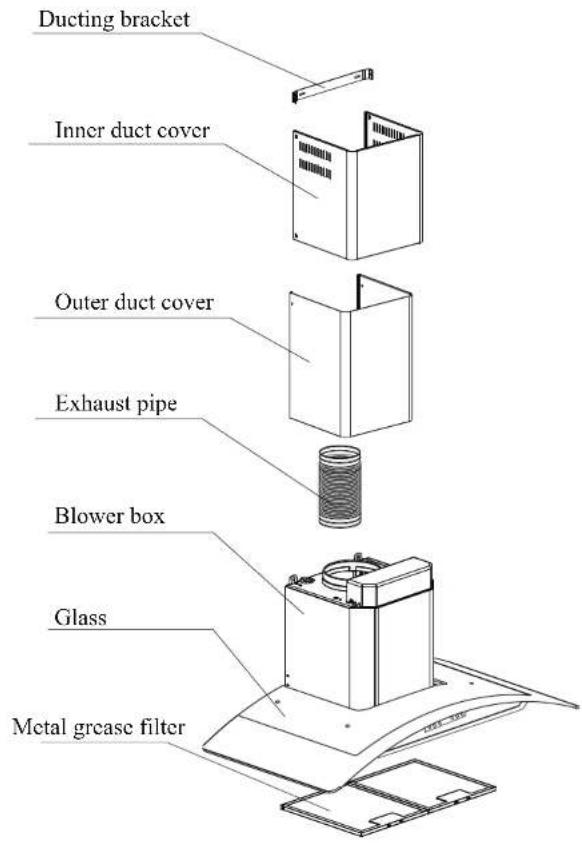
Casa 679/90
VETRINO EH-D9160SL(BK)
Remarks: Screws are provided (4×expanding tubes, 4×wood screws, 4×M4 screws, 2×M4×10 screws)
Covo 779/90
Brand : Elba
Model : Covo 779/90
Category : Range hood