
LE42T506 - Television HITACHI - Free user manual and instructions
Find the device manual for free LE42T506 HITACHI in PDF.


| Product Type | 42-inch Class LCD Television (42.02" diagonal) |
| Resolution | 1920 x 1080 (Full HD) |
| Dimensions (without stand) | Approx. 38.5" x 23.5" x 4" (WxHxD) |
| Weight (without stand) | Approx. 24 lbs (10.9 kg) |
| Power Supply | 120V AC, 60Hz |
| Power Consumption | ≤ 140W (Home mode, ENERGY STAR compliant) |
| Inputs | 4x HDMI (1 with ARC, 1 with MHL), 1x Component/AV, 1x RGB (VGA), 1x USB, 1x RF (AIR/CABLE) |
| Outputs | 1x Digital Optical Audio, 1x Analog Audio (3.5mm), 1x Headphone |
| Audio | 2x 10W speakers, Sound modes: Standard, Movie, Music, News, Custom, Equalizer |
| Video Features | Reel120 Motion (24p Film, High, Mid, Low), Dynamic Gamma, Noise Reduction, Color Temperature, Aspect Ratio (Auto, Normal, Wide, Zoom, Cinema) |
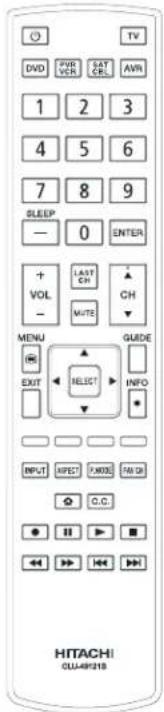
| Remote Control | Model CLU-49121S, operates TV and compatible devices (DVD, VCR, Cable, Satellite, AVR) |
| Accessories Included | Remote control, 2 AAA batteries, Owner's Guide, Quick Start Guide, Stand Base, 4 Stand Screws, Hinge Cover, Power Cord |
| Wall Mount Compatibility | VESA 400x200 (for 42"), M6 screws, max tilt 45°, use UL listed mount |
| Energy Saving | Home mode saves energy; Retail mode for showroom (changes not saved) |
| Safety | Anti-tip strap, do not block ventilation, keep 4" from sides/back, 12" from top, use only dry cloth for cleaning |
| Certifications | ENERGY STAR, FCC Class B, Canada ICES-003, UL/CSA listed wall mount required |
| Warranty | Limited warranty (see owner's guide for details) |
Frequently Asked Questions - LE42T506 HITACHI
User questions about LE42T506 HITACHI
0 question about this device. Answer the ones you know or ask your own.
Ask a new question about this device
Download the instructions for your Television in PDF format for free! Find your manual LE42T506 - HITACHI and take your electronic device back in hand. On this page are published all the documents necessary for the use of your device. LE42T506 by HITACHI.
USER MANUAL LE42T506 HITACHI
55" Class (54.64" Diagonal)
LE46S606 / LE46T506
46" Class (45.99" Diagonal)
LE42S606 / LE42T506
42" Class (42.02" Diagonal)
natural_image
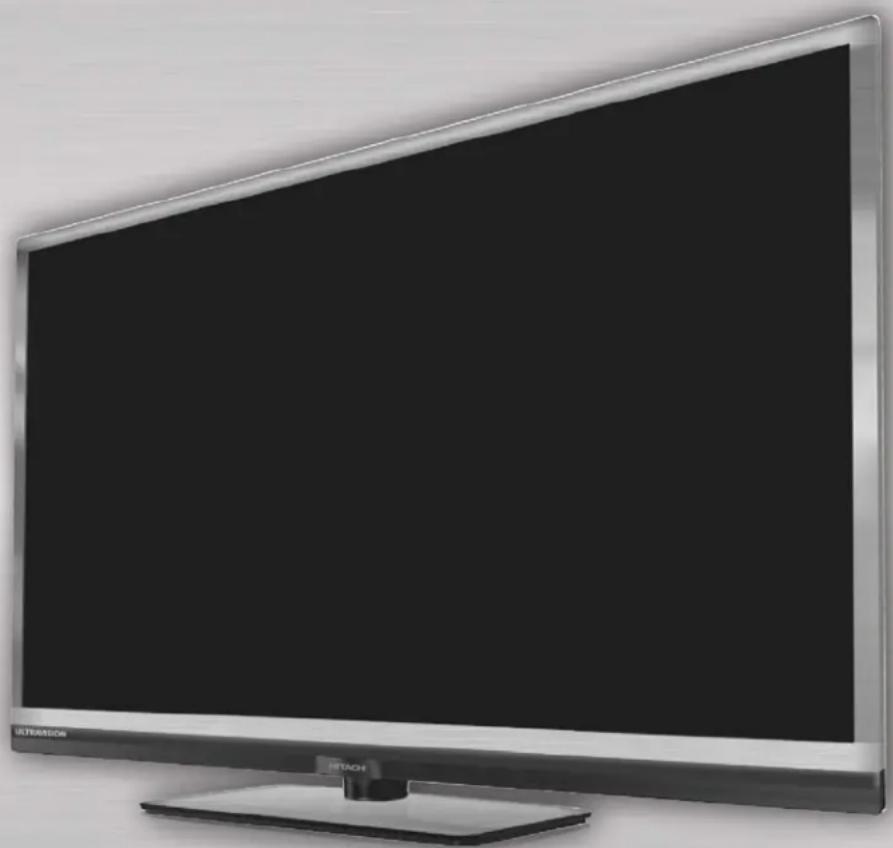
Exterior view of a modern flat-screen television displaying (no visible text or symbols on the screen)Owner's Guide
Simulated image.
Image may differ from actual product.
Thank you for purchasing this Hitachi product. Please read these instructions carefully.
For additional assistance please call 800.HITACHI (800.448.2244) or visit our website at www.hitachi.us/tv.
Keep this owner's guide for future reference.
Record the model name and serial number of your LCD Television for future reference.
This information is located on the back side of the television.
MODEL NAME. ____ SERIAL NO. ____
TABLE OF CONTENTS
IMPORTANT SAFETY INSTRUCTIONS 2-5
FIRST TIME USE....6-19
THE REMOTE CONTROL....20-29
ON-SCREEN DISPLAY 30-42
USEFUL INFORMATION....43-50
LIMITED WARRANTY....51
END USER LICENSE AGREEMENT FOR HITACHI DTV SOFTWARE....52-56
APPENDIXES....57
INDEX....58
SAFETY POINTS YOU SHOULD KNOW ABOUT YOUR HITACHI LCD TELEVISION
Our reputation has been built on the quality, performance, and ease of service of Hitachi LCD televisions.
Safety is also foremost in our minds in the design of these units. To help you operate these products properly, this section illustrates safety tips which will be of benefit to you. Please read it carefully and apply the knowledge you obtain from it to the proper operation of your Hitachi LCD television.
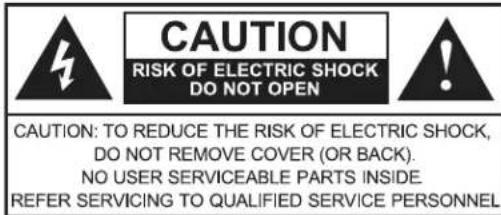

The lightning flash with arrowhead symbol, within an equilateral triangle, is intended to alert the user to the presence of uninsulated "dangerous voltage" within the product's enclosure that may be of a sufficient magnitude to constitute a risk of electric shock to a person.

The exclamation point within an equilateral triangle, is intended to alert the user to the presence of important operating and maintenance (servicing) instructions in the literature accompanying the appliance.
READ BEFORE OPERATING EQUIPMENT
Follow all warnings and instructions marked on this LC2D. television.
- Read these instructions.
- Keep these instructions.
- Heed all warnings.
- Follow all instructions.
- Do not use this apparatus near water.
-
Clean only with dry cloth.
-
Do not block any ventilation openings. Install in accordance with the manufacturer's instructions.
-
Do not install near any heat sources such as radiators, heat registers, stoves, or other apparatus (including amplifiers) that produce heat.
-
Do not defeat the safety purpose of the polarized or grounding-type plug. A polarized plug has two blades with one wider than the other. A grounding type plug has two blades and a third grounding prong. The wide blade or the third prong are provided for your safety. If the provided plug does not fit into your outlet, consult an electrician for replacement of the obsolete outlet.
-
Protect the power cord from being walked on or pinched particularly at plugs, convenience receptacles, and the point where they exit from the apparatus.
-
Only use attachments/accessories specified by the manufacturer.
-
Use only with the cart, stand, tripod, bracket, or table specified by the manufacturer, or sold with the apparatus. When a cart is used, use

caution when moving the cart/apparatus combination to avoid injury from tip-over.
Unplug this apparatus during lightning storms or when unused for long periods of time.
- Refer all servicing to qualified service personnel. Servicing is required when the apparatus has been damaged in any way, such as power-supply cord or plug is damaged, liquid has been spilled or objects have fallen into the apparatus, the apparatus has been exposed to rain or moisture, does not operate normally, or has been dropped.
- Televisions are designed to comply with the recommended safety standards for tilt and stability. Do not apply excessive pulling force to the front, or top, of the cabinet which could cause the product to overturn resulting in product damage and/or personal injury.
- Follow instructions for wall, shelf or ceiling mounting as recommended by the manufacturer.
- An outdoor antenna should not be located in the vicinity of overhead power lines or other electrical circuits.
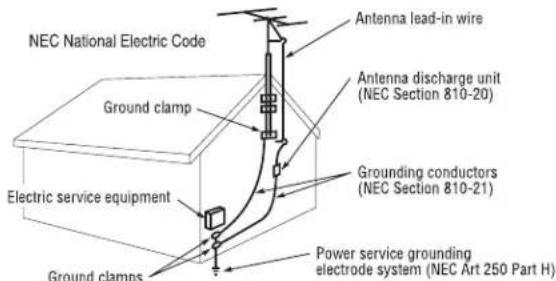
- If an outside antenna is connected to the receiver be sure the antenna system is grounded so as to provide some protection against voltage surges and built up static charges. Section 810 of the National Electric Code, ANSI/NFPA No. 70-1984, provides information with respect to proper grounding for the mast and supporting structure, grounding of the lead-in wire to an antenna discharge unit, size of grounding connectors, location of antenna discharge unit, connection to grounding electrodes and requirements for the grounding electrode.
-
Wall Mount Bracket – For use only with UL Listed Wall Mount Bracket with minimum weight/load: Please see pages 8, 47 \~ 49 for further details.
-
The equipment shall be used at maximum ambient temperature of 95°F.
NOTE
To the CATV system installer: This remin provided to call the CATV system installer's
attention to Article 820-44 of the N C that provides guidelines for proper grounding and, in particular, specifies that the cable ground shall be connected to the grounding system of the building, as close to the point of cable entry as practical.
POWER SOURCE
This LCD television is designed to operate on 120 volts 60 Hz, AC current. Insert the power cord into a 120 volts 60 Hz outlet. The mains plug is used as the disconnect device and shall remain readily operable.
To prevent electric shock, do not use the LCD television's (polarized) plug with an extension cord, receptacle, or other outlet unless the blades can be fully inserted to prevent blade exposure.
Never connect the LCD television to 50 Hz, direct current, or anything other than the specified voltage.
This television's factory default settings as shipped meet ENERGY STAR requirements.
Please see the Energy Options section of this owner's guide for more energy saving tips.

CAUTION
- Ad(ust only those controls that are covered in the instructions, as improper changes or modifications re)pressly approved by Hitachi could void the user's +arranty.
WARNING

• To reduce the ris, of fire or electric shoc., do not e)pose this apparatus to rain or moisture.
- The -C. television should not be e)posed to dripping or splashing and no ob(ects filled +ith liquids, such as vases, should be placed on the television.
- This apparatus shall be connected to a mains soc, et outlet +ith a protective earthing connection.
PUBLIC VIEWING OF COPYRIGHTED MATERIAL
Public viewing of programs broadcast by TV stations and cable companies, as well as programs from other sources may require prior authorization from the broadcaster or owner of the video program material.
This product incorporates copyright protection technology that is protected by U.S. patents and other intellectual property rights. Use of this copyright protection technology must be authorized, and is intended for home and other limited paper-view uses only unless otherwise authorized. LE Reverse engineering or disassembly is prohibited.
FEDERAL COMMUNICATIONS COMMISSION NOTICE
This equipment has been tested and found to comply with the limits for a Class B digital device, pursuant to Part of the FCC Rules. These limits are designed to provide reasonable protection against harmful interference in a residential installation. This equipment generates, uses and can radiate radio frequency energy and if not installed and used in accordance with the instructions, may cause harmful interference to radio communications. However, there is no guarantee that interference will not occur in a particular installation. If this equipment does cause harmful interference to radio or television reception, which can be determined by turning the equipment off and on, the user is encouraged to try to correct the interference by one or more of the following measures:
- Reorient or relocate the receiving antenna.
- Increase the separation between the equipment and the receiver.
- Connect the equipment into an outlet on a circuit different from that to which the receiver is connected.
- Consult the dealer or an experienced radio/television technician for help.
MODIFICATIONS
The FCC requires the user to be notified that any changes or modifications made to this device that are not expressly approved by Hitachi America, Ltd. may void the user's authority to operate the equipment.
CABLES
Connections to this device must be made with shielded cables with metallic RFI/EMI connector hoods to maintain compliance with FCC Rules and Regulations.
Any cables or power code supplied with the system must be replaced with identical parts in order to assure compliance with FCC rules.
You may order those replacement parts from Hitachi.
This television receiver provides display of television closed captioning (cc or □) in accordance +ith FCC rules.
DECLARATION OF CONFORMITY
This device complies with part 15 of the FCC Rules. Operation is subject to the following two conditions :
(1) This device may not cause harmful interference and
(2) This device must accept any interference received, including interference that may cause undesired operation.
qu stions r garding t(is d )laration, )onta)t:
Hita)(i Am ri)a, Ltd.
/00 Hita)(i Wa1
C(ula Vista, CA /2/2343556
T I. 700.337.22338700.HITACHI9
ATTN: Custom r R lations
LEAD NOTICE
This product contains lead. Dispose of this product in accordance with applicable environmental laws. For product recycling and disposal information, contact your local government agency or www.eRecycle.org (in California), the
Electronic Industries Alliance at www.eiae.org (in the U.S.) or the Electronic Product Stewardship Canada at www.epsc.ca (in Canada). For more information, call 700.HITACHI.
CANADA STANDARD ICES4003
This Class-B digital apparatus complies with Canadian ICES-003.
It Makes A Difference How and Where
You Use Your Flat Panel Display
Congratulations on your purchase!
As you enjoy your new product, please keep these safety tips on mind:
natural_image
Black-and-white circular photo showing a basketball on the floor next to a large screen, with no visible text or symbols.HITACHI CARES!
- The consumer electronics industry is committed to making home entertainment enjoyable and safe.
- Please note the American Academy of Pediatrics discourages television viewing for children younger than two years of age.
- The home theater entertainment experience is a growing trend and larger flat displays are popular purchases. However, flat panel displays are not always supported on the proper stands or installed according to the manufacturer's recommendations.
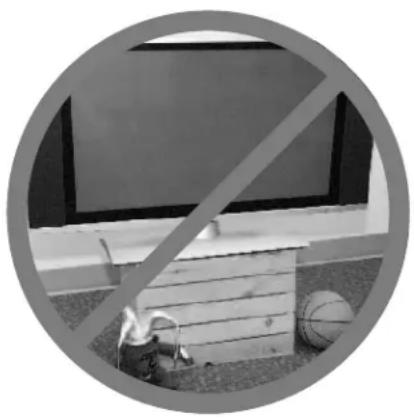
- Flat Panel displays that are inappropriately situated on dresser, bookcases, shelves, desks, speakers, chest or carts may fall over and cause injury.
TUNE INTO SAFETY
- One size does NOT fit all. Follow the manufacturer's recommendations for the safe installation and use of your flat panel display.
- Carefully read and understand all enclosed instructions for proper use of this product.
- Don't allow children to climb on or play with furniture and television sets.
- Don't place flat panel displays on furniture that can easily be used as steps, such as a chest of drawers.
- Remember that children can become excited while watching a program, especially on a “larger than life” flat panel display. Care should be taken to place or install the display where it cannot be pushed, pulled over, or knocked down.
- Care should be taken to route all cords and cables connected to the flat panel display so that they cannot be pulled or grabbed by curious children.
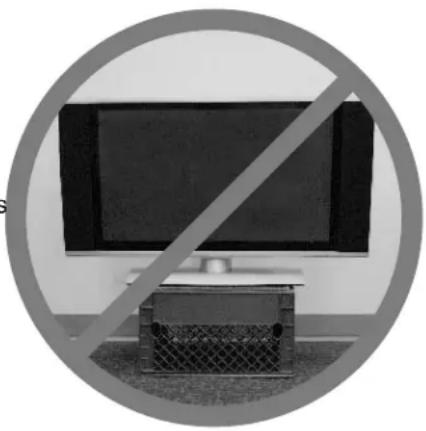
natural_image
Black-and-white photo of a computer monitor with a diagonal line crossing below, next to a metal crate (no text or symbols visible)WA MOUNTING: IF YOU DECIDE TO WALL MOUNT YOUR FLAT PANEL DISPLAY, ALWAYS:
- Use a mount that has been recommended by the display manufacturer and/or listed by an independent laboratory (such as UL, CSA, ETL).
- Follow all instructions supplied by the display and wall mount manufacturers.
- If you have any doubts about your ability to safely install your flat panel display, contact your retailer about professional installation.
- Make sure that the wall where you are mounting the display is appropriate. Some wall mounts are not designed to be mounted to walls with steel studs or old cinder block construction. If you are unsure, contact a professional installer.
- A minimum of two people are required for installation. Flat panel displays can be heavy.
CEA ^®
Consumer Electronics Association
www.CE.org/safety

Do not place the unit on uneven surfaces, this may drop or damage the unit, it may also cause personal injury.
Unplug immediately if any foreign materials falls into the TV or if the TV fell down.
Do not cover or block any vents and openings of the TV. Inadequate ventilation may shorten the life of the display unit and cause overheating.
Unplug immediately if there is a malfunction on the TV like no picture, no video/audio or if there is smoke and bad odor coming from the TV.
Do not open the TV cabinet. Avoid direct sunlight, dusty, high humidity and smokey locations.
Do not throw any objects inside the TV like metals, coins or any other flammable materials.
Remember to unplug the power cord from the AC outlet before cleaning. Do not use liquid cleaners or aerosol cleaners to clean the display.
Do not place the TV near water, such as a bathtub, shower rooms, kitchen sink, laundry tub or swimming pool. Avoid liquid containers on top of the unit.
Do not place the TV in confined spaces or inside a box when the TV is operating.
Make sure to unplug the TV when not in use for a long period of time (days).
Do not pick up or handle the TV from where the TV connects to the stand. Injury may occur if the TV is picked up or handled from this area.
4 inch
" # ) ; - " \$ " *
Avoid dropping the unit.
Avoid liquids on it.
Avoid aerosol cleaners.
Check to make sure you have the following accessories before disposing of the packing material.
① Remote Control Unit CLU-49121S (Part No.: HL02569)
② "AAA" Size Batteries (2)
③ Owner's Guide
④ Quick Start Guide
⑤ Stand Screws (4)

42": M4x12, Part No.: 0M1G1740 12225 CR3
46", 55": M6x16, Part No.: 0M1G1760 16 47 CR3
⑥ Stand Base
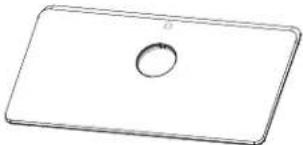
natural_image
Simple line drawing of a rectangular plate with a circular hole in the center (no text or symbols)42": Part No.: P34T1145AFL01L0100 & P15T141210400000LH
46", 55": Part No.: P34T1132XAL01L0100 & X15T828130100000BL
⑦ Hinge cover for wall mount
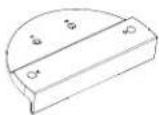
42": Part No.: P34T10160GM01X0100
46", 55": Part No.: P34T10320GM01X0100
⑧ Power Cord
Part No.: 389G202A15NJRB
For optional accessories, please access our web site at: www.hitachi.us/tv
REMOTE CONTROL BATTERY INSTALLATION AND REPLACEMENT
The remote control operates on 2 "AAA" batteries.
- Open the battery cover of the remote control by pushing and pulling it in the direction of the arrow.
- Insert two new "AAA" size batteries for the remote control. When replacing old batteries, push them towards the springs and lift them out.
- Match the batteries to the (+) and (-) marks in the battery compartment.
- Insert the bottom of the battery, the (-) side, into the battery compartment first, push towards the springs and insert the top of the battery, the (+) side, into place. Do not force the battery into the battery compartment.
- Close the battery cover, and make sure the tabs rest in the corresponding holes and push down the cover until it clicks shut.

- Do not insert batteries with '+' and '-' polarities reversed as this may cause the batteries to swell or rupture resulting in leakage.
- Never mix used and new batteries in the device.
- Replace all the batteries in the device at the same time.
- Remove the batteries if the remote control is not going to be used for an extended period of time.
- The batteries (batteries installed) shall not be exposed to excessive heat such as sunshine, fire, etc.
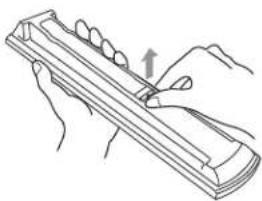
natural_image
Line drawing of hands holding a cylindrical object with a pointer arrow (no text or symbols)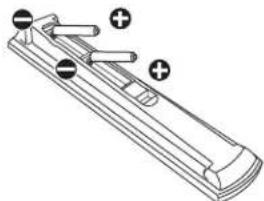
natural_image
Diagram of a mechanical or electrical component with no visible text, numbers, or symbols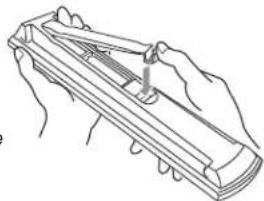
natural_image
Line drawing of hands holding a folding fan or tray device (no text or symbols)Take the following precautions to prevent the LCD Television from tipping over and possibly causing injury. It is important to mount the unit on a stable and flat surface.
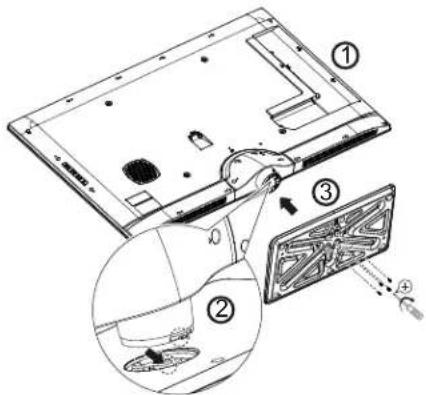
ASSEMBLE THE BASE
IMPORTANT:
The base of the LCD TV must be assembled prior to use.
- Carefully place the TV screen face-down on a cushioned, clean surface to protect it from damages or scratches.
- Carefully align and insert the base to the stand until the latch locks the base into position.
- Insert the screws included with the accessories to the bottom of the base and tighten them to the stand with a screw driver.
CAUTION WHEN MOVING THE MAIN UNIT
natural_image
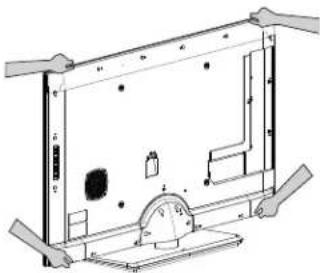
Technical line drawing of a mechanical assembly with no visible text or symbolsAs this product is heavy, whenever it is moved, at least two people are required to transport it safely. Whenever the unit is moved, it should be lifted forward using the top and bottom on both sides of the Television for stability.
When moving the Television, lift from the corners, then support the top frame as shown below.
Please use caution when handling the left and right bottom corners of the TV, as these areas protrude slightly from the TV's frame. Handle this area with care to avoid damaging the unit and the possibility of personal injury.
LOCATION
Select an area where sunlight or bright indoor illumination will not fall directly on the picture screen. If so, drapes or screens can be used to reduce the reflection.
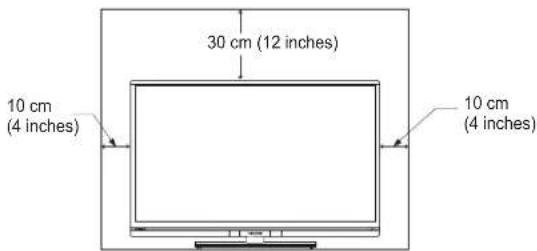
Also, be sure that the location selected allows a free flow of air to and from the perforated back cover of the set. In order to prevent an internal temperature increase,
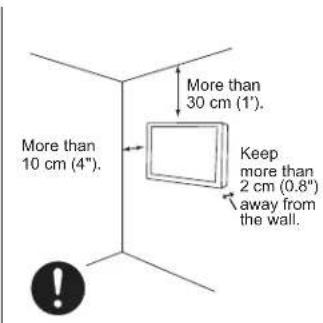
maintain a space of 10 cm (4 inches) from the sides/back of the Television, and 30 cm (12 inches) from the top of the
television to the ceiling. To avoid cabinet warping, cabinet color changes, and increased chance of set failure, do not place the TV where temperatures can become excessively hot, for example, in direct sunlight or near a heating appliance, etc.
NOTES
- .o not bloc, the ventilation holes of the -C. Television. Bloc, ing the ventilation holes might cause overheating and damage.
• In case of an abnormal symptom, unplug the po+er cord and contact 800.HITACHI. - If you purchased a +all mount brac,et, it is recommended that you as, for professional installation.
- Install the unit at a proper area +here it does not e)pose anyone to any danger of hitting themselves (For e)ample: their hands, head or face, etc.) against the edge of the unit that could cause personal in(ury.

SECURING TO A WALL
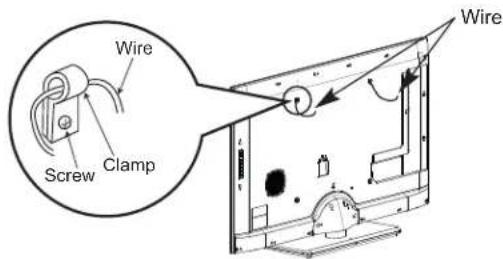
- Use a metallic wire (two locations) to fasten the set to the clamping screw on the rear of the LCD TV as shown below.
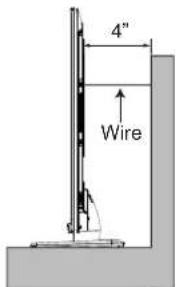
- Keep the LCD television 4 inches away from the wall, except when mounted using the wall mount bracket, and secure to the wall as shown below:
WALL MOUNTING SETUP
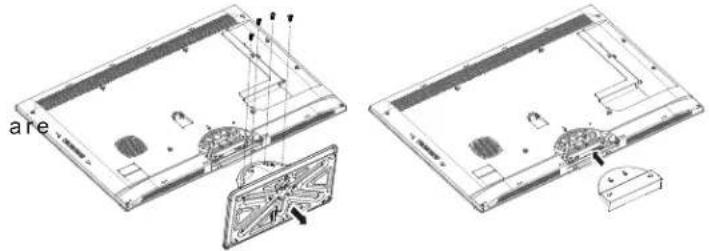
STEP (1) : REMOVE THE STAND BASE FROM THE LCD TELEVISION
In order to remove the stand from the TV safely, please put the TV set on a soft and flat surface (blanket, foam, cloth, etc.) to prevent any damage; then remove the screws to separate the STAND from the TV. Useful dimensions for the WALL MOUNT assembly illustrated on page 47 \~ 49.
Use the screws removed from separating the STAND to secure the hinge cover.
natural_image
Technical line drawing of two views of a laptop chassis with internal components and labeled parts (no text or symbols present)STEP (2) : INSTALL THE WALL MOUNT BRACKETS ON THE LCD TELEVISION USING 4 SCREWS.
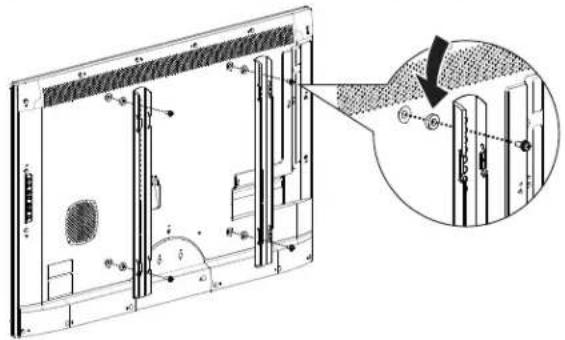
- DO NOT reuse the original screws that were in these screw mounting holes or the screws removed in STEP(1) above, as such screws are not long enough to properly secure the TV to the wall bracket. Please refer to example at right and caution below to determine proper screw length.
- For proper Wall Mount assembly on both 42" and 46" model, a washer of more than 3mm thick added in between the screw hole and the VESA holder is recommended.
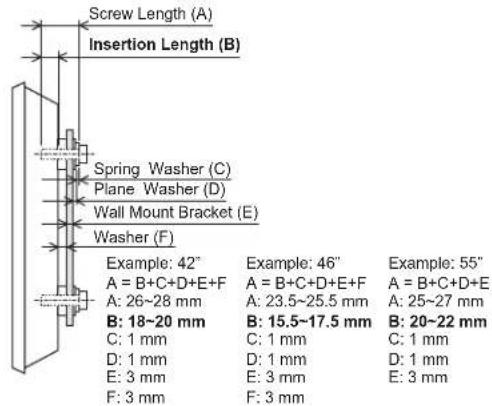
- The screw type: Thread ISO M6 (Metric type, do not use Standard type).

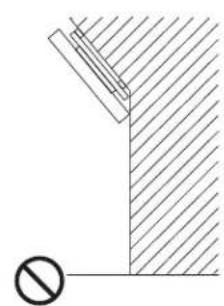
- Ceiling mounting is not recommended. Mounting the panel on the ceiling does not provide adequate ventilation for the electronics or proper support for the front panel.
• This -C. television product is designed for a ma)imum tilting angle of 45 degrees from vertical. - Insertion length (B) of the scre+s must be +ithin (i)18\~20 mm for 42", or (ii)15.7\~17.5 mm for 46", or (iii)20\~22 mm for 55". If the length is less than specified, the TV's +eight cannot be maintained. If the length is more than specified, a space is created bet+een the Wall Mount Brac,et and the -C. Television. This insertion length is very important.
STEP (3) : TIPS TO CONSIDER FOR THE LOCATION OF THE LCD TELEVISION.
natural_image
Pure technical diagram showing a Y-shaped structure with hatched fill and a prohibition symbol below (no text or labels)
- .o not bloc, the ventilation holes. In addition please ,eep a certain distance around the TV and ma,e sure not to obstruct ventilation. Bloc, ing the ventilat may cause fire or defect.
- If you purchased a Wall Mount brac,et, it is recommended that you as, for professional installation.
- This -C. unit features an advanced ventilation system configured for vertical installation. A ,no+ledgeable and e)perienced professional technician can perform other mounting or installation orientations (e.g., horizontal, tilted) provided that you specifically inform the technician of the unit's specialized ventilation needs. Call 800.HITACHI for additional info and guidance.

Although this -C..isplay Panel can be installed using a variety of third party +all mounting brac,ets/devices, such third party brac,ets/devices have not been tested or approved by Hitachi for use or compatibility +ith this -C..isplay Panel. Accordingly, Hitachi accepts no responsibility or liability for any in(uries or property damage resulting from the use of such third party brac,ets/devices. Hitachi strongly advises that any installation of this -C..isplay Panel using +all mounting brac,ets/devices be performed only by a qualified and e)perienced television installation technician +ho has completed a thorough evaluation of: a) the +eight-bearing strength and stability of the intended +all mount surface; and b) the +eight-bearing strength and compatibility of the intended +all mount brac,ets/device.
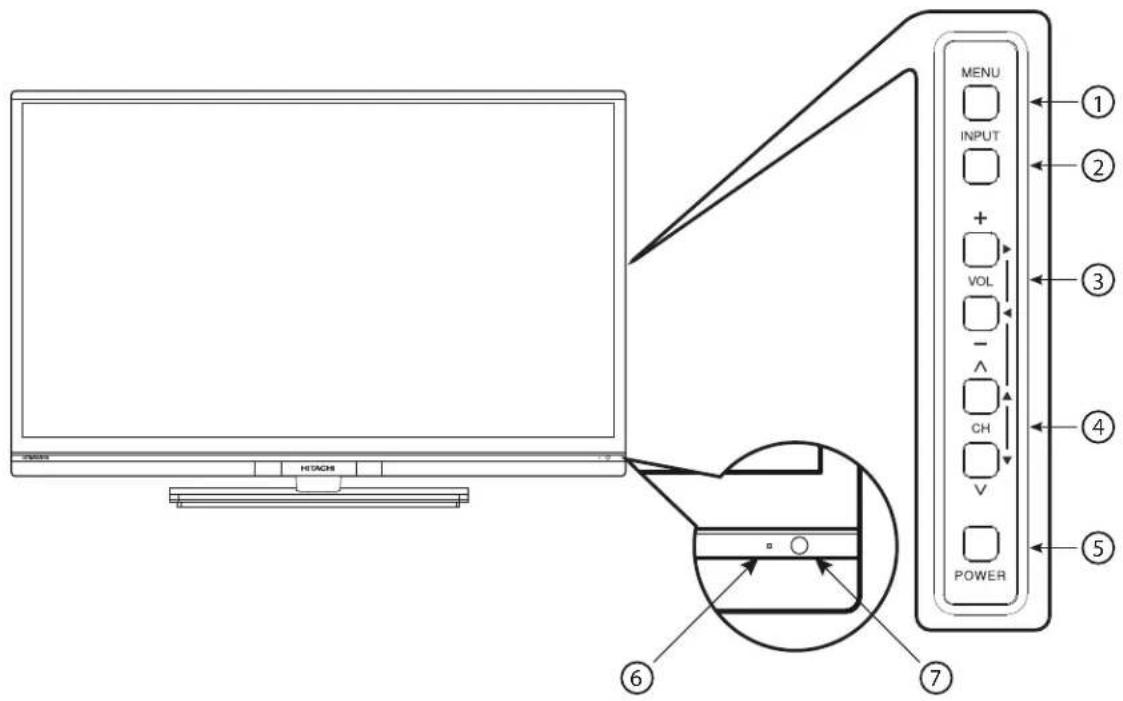
① MENU Button
This button allows you to enter the MENU, making it possible to set TV features to your preference without using the remote control. This button also serves as the Return button when in the MENU system.
② INPUT Button
Press this button to access the INPUT menu. This button also serves as SELECT when in the MENU system.
③ VOLUME 84/+9 L v I
Press these buttons to adjust the sound level. The volume level will be displayed on the TV screen. These buttons also serve as the CURSOR left (◀) and right (▶) buttons when in the MENU system.
④ CHANNEL S I)tor
Press these buttons until the desired channel appears in the top right corner of the TV screen. These buttons also serve as the CURSOR down (▼ and up ( ) buttons when in the MENU system.
⑤ POWER Button
This button is for turning ON the LCD TV, in order to turn the TV On, the standby indicator must be lit red. If the indicator is off, plug the power cord into the AC outlet.
⑥ POWER Lig(t Indi)ator
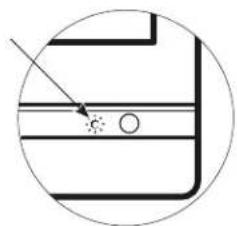
To turn the TV ON, press the POWER button (⑤). A blue indicator lamp located on the lower right corner of the front bezel illuminates to indicate the TV power is ON.
⑦ REMOTE CONTROL Sensor
Point your remote control at this area when selecting channels, adjusting volume, etc.
| Indi)ating Lamp | Pow r Status | Op rating |
| Lights Red | OFF(Stand-by) | When the LCD TV is plugged to the AC outlet. |
| Lights Blue ON | TV Power is ON; picture is shown. | |
| Quickly Blinking Red | ON | The TV is powering OFF.It will soon be in the Off(Stand-by) state. |
NOTES
- Your Hitachi -C. TV +ill not sho+ any picture if there is no video input +h AV, Component, VGA, or H.MI 1\~4 is selected. Instead, a message +ill indicate "No Signal", and the Power -igh remain Blue until the TV is turned off or in Stand-by mode (lights red) +hen not in use.
- The remote control can turn the TV On/Off as +ell as control various devices and any compatible H.MI C C devices.
- Please do not put anything around the remote control sensor.
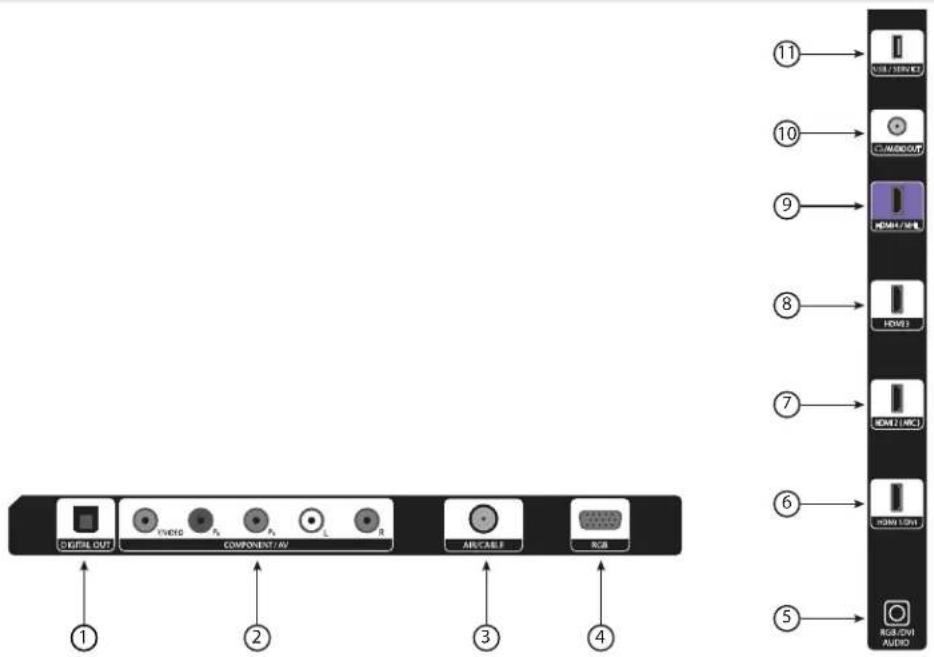
① DIGITAL OUT 8Opti)al Digital Audio9
This jack provides digital audio output for your audio device that is RAW and PCM compatible, such as an audio amplifier.
NOTE
- The .igital Output option +ill gray out +ith all input sources, e)cept for H.MI input and .TV +ith a digital program channel on the AIR/CAB- input source.
② COMPONENT / AV: Y4PbPr Vid o and Audio L/R Inputs
These jacks provide Y-PbPr and Audio jacks for connecting device with this capability, such as a DVD player or set top box.
NOTES
- Your component outputs may be labeled Y, B-Y, and R-Y. In this case, connect the components B-Y output to the input and the components R-Y output to the TV's Pr input.
- Your component outputs may be labeled Y-CbCr. In this case, connect the component Cb output to the TV's Pb input and the component Cr output to the TV's Pr input.
- It may be necessary to adjust Tint to obtain optimum picture quality +hen using the Y-PbPr inputs (See page 32).
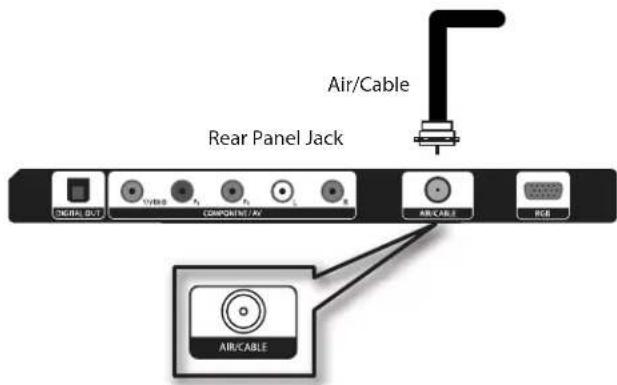
③ AIR/CABLE
To switch between Cable and Air, go to the Channels Menu option to change the signal source for Cable or Air (See page 36).
④ RGB
This RGB input provides PC video connection.
⑤ RGB/DVI AUDIO
This RGB/DVI AUDIO input provides PC and DVI audio connection.
⑥ HDMI 2 / DVI
Use this HDMI input for AV connection such as set top boxes or DVD players equipped with an HDMI output. (See page 15 for reference)
⑦ HDMI 2 8ARC9
Besides the regular HDMI connection, this jack also provides ARC (Audio Return Channel) feature. (See page 16 for reference)
⑧ HDMI 3
Use this HDMI input for AV connection such as set top boxes or DVD players equipped with an HDMI output.
V's (See page 15 for reference)
⑨ HDMI 3 / MHL
Besides the regular HDMI connection, this jack also provides a MHL (Mobile High-Definition Link) connection from your SmartPhone.
10 AUDIO OUT
This jack provides stereo audio output from your TV to your headphone, or to audio device, such as audio amplifier.
⑪ USB / SERVICE
This USB slot is for use with the photo browser feature and future software upgrades. (See page 42 for reference)
Quick Reference Remote Control Buttons And Functions
In addition to controlling all of the functions on your Hitachi LCD TV, the new remote control is designed to operate different types of devices, such as, DVD Players, cable boxes (CBL), set top boxes, satellite receivers (SAT), VCRs and compatible HDMI CEC DVD Players. The remote control must be programmed to control the chosen device. Please see pages 20 \~ 29 for a complete description of all features and programming of the remote control.
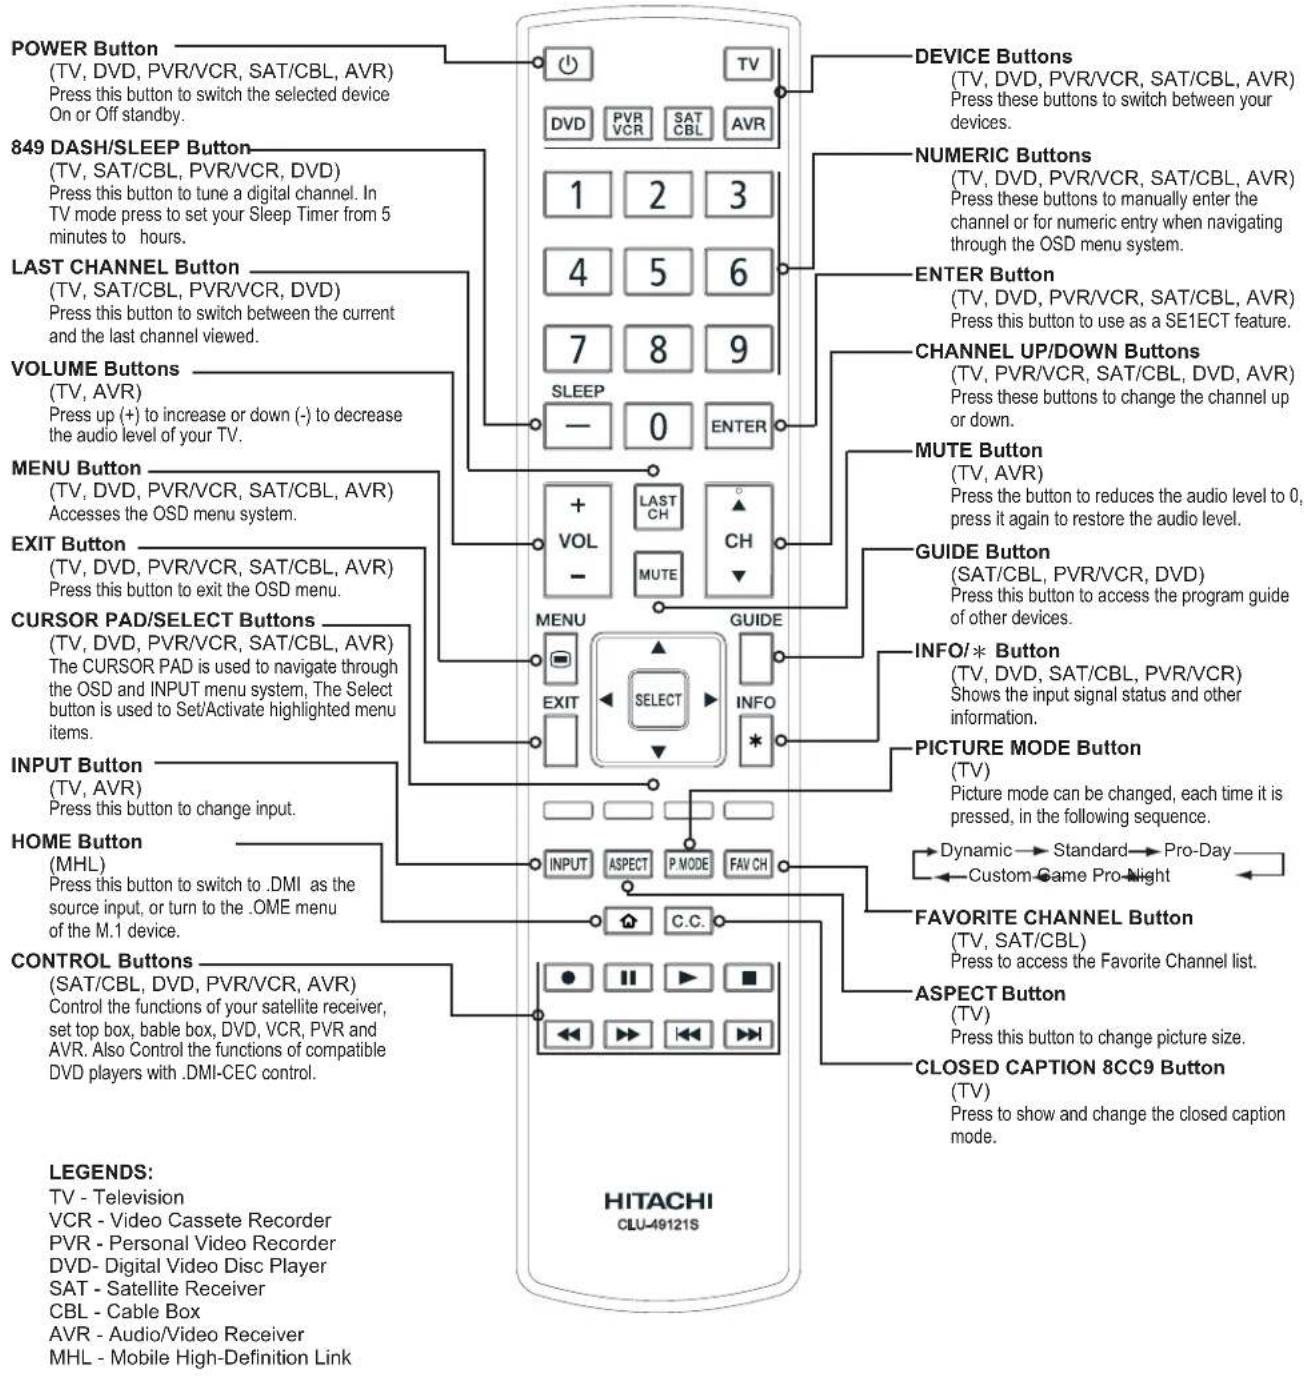
NOTES
- The TV's remote control sensor is located at the right bottom corner of the TV frame. To control TV functions, please point the remote control directly at the sensor for best controlling.
- For H.MI C C details, please see page 40.
Perform the following steps to quickly setup your new Hitachi LCD Television Set.
2. ANTENNA CONNECTION
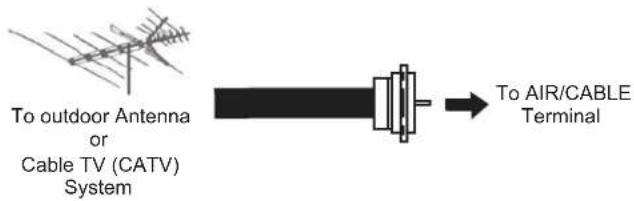
Unless your LCD Television is connected to a cable TV system or to a centralized antenna system, a good outdoor color TV antenna is recommended for best performance. However, if you are located in an exceptionally good signal area that is free from interference and multiple image ghosts, an indoor antenna may be sufficient.
VHF 8:54O(m9 ant nna/CATV 8Cabl TV9
When using a 75-Ohm coaxial cable system, connect the CATV coaxial cable to the AIR/CABLE (75-Ohm) terminal. Or if you have an antenna, connect the coaxial cable to the same AIR/CABLE terminal.
- POWER ON/OFF YOUR NEW HITACHI LCD TV Press the POWER button on the remote control or the POWER button on the Side Control Panel to power on/off the LCD TV.
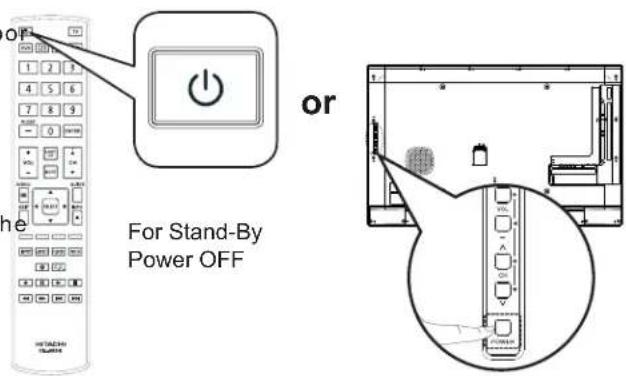
NOTE
- If the Indicating lamp is off, the POWR button on the remote control +ill not operate. Please ma,e sure that the po+er cord is plugged to the AC outlet.
- FOLLOW THE TV SETUP WIZARD INSTRUCTIONS ON NEXT PAGE
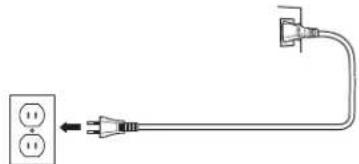
2. CONNECT YOUR NEW HITACHI LCD TV TO THE POWER SOURCE
a). Connect the power cord to the AC outlet.
natural_image
Pure electrical circuit lines without any symbolsb). The Indicating Lamp will light red (Standby mode).
natural_image
Simple line drawing of a container with a handle and two circular elements inside, enclosed in a circle (no text or symbols)For the first time after powering on your Hitachi LCD TV, the following illustration of Setup Wizard appears on the TV screen, and will guide you through the initial setup step-by-step.
The first step of the initial setup is the energy saving mode. Here you can select either Home or Retail mode.
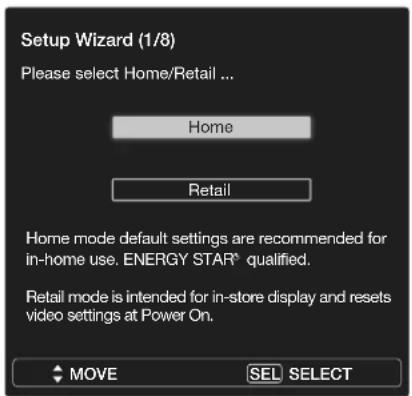
The Home mode is intended for home use, and will save much energy, compared to the showroom Retail mode which sets the TV to a more energy consumptive mode.
If later you want to change the mode, you can change it via the Home/Retail selection under Energy Options on the Setup menu (See page 41).
NOTE
- Any menu or control change in R TAI-mode +ill not be saved +hen the TV is turned off.
The second step is to set the language used for the TV On-Screen-Display Menu.
Press the CURSOR PAD ▲ or ▼ on your remote control to select your language. Press the SELECT button to confirm.
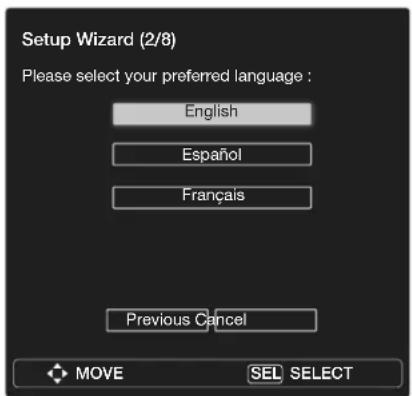
The third and fourth steps are to set the date and time. There are two options; one for automatic time setting in which you will be able to select only the time zone of your area, and another for manual setup.
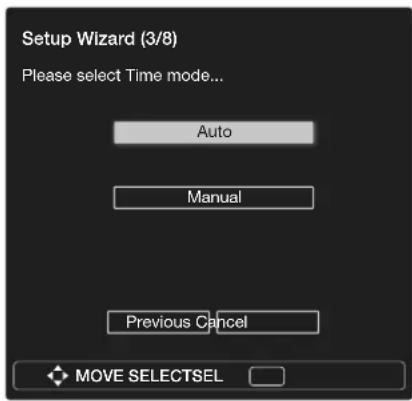
Press the CURSOR PAD ▲ or ▼ on your remote control to select Auto for automatic setting. At the following step, you will need to select only the time zone of your area.
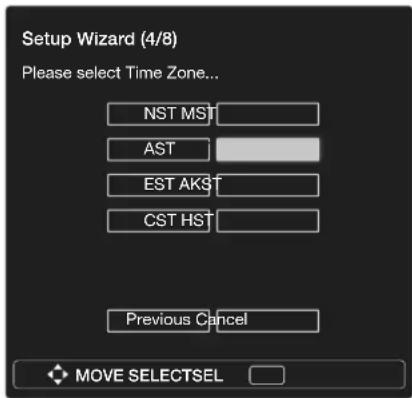
If you select Manual for manual setting, you can set up your local time in detail at the following step.
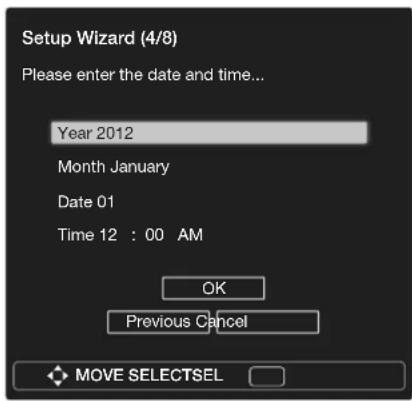
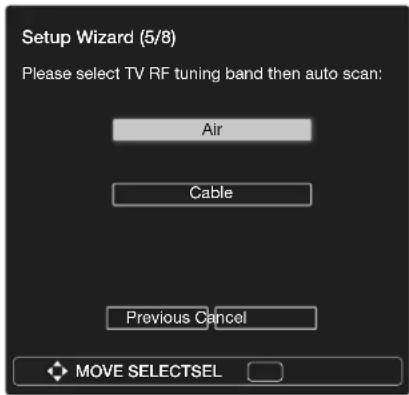
The fifth step is to select broadcasting or cable channels. There are two options: Air for an external antenna, and Cable for a cable system provider in your area. Use the CURSOR PAD ▲ or ▼ to select, and press SELECT button to confirm.
NOTES
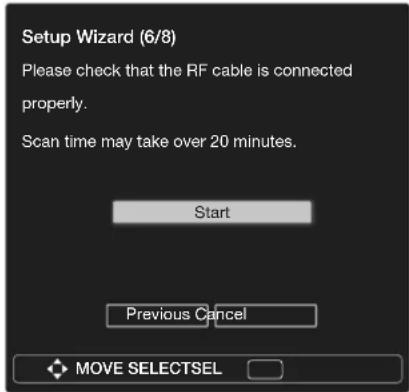
The sixth step will start the scanning feature to find the channels available on the antenna or cable system. Press SELECT button to start the channel scan.
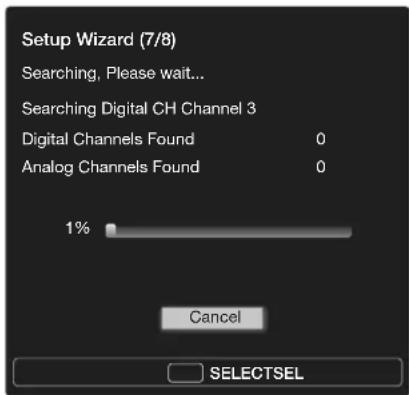
The seventh step is the channel scanning process. The Setup Wizard shows the scanning process of channels first, and then the analog channels next. The scanning process will show how many channels in total have been found. Please wait while the scanning process is searching for the available channels in your area.
To cancel the process, press SELECT button on the remote control.
- Once you cancel the Setup Wizard, it +ill not be sho+n again.
- .uring the scanning process, if you find not connecting antenna cable to TV, turn off the TV, unplug the po+er cord, and connect the antenna cable to the Antenna Connection in the "First Time Use" section of this O+ner's Guide.
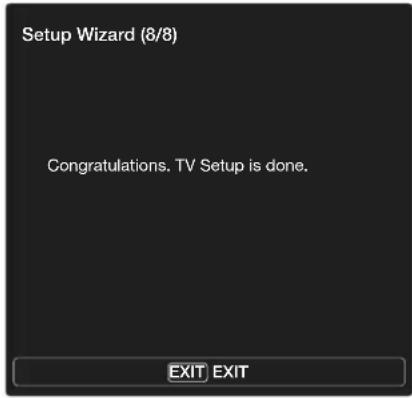
The final step is the completion of process. The TV screen shows a brief message that the setup is done. This final message will be shown for only a few seconds and then the first detected channel will be tuned in.
You may press EXIT button on the remote control to tune to the first detected channel right away.
NOTE
- The Setup Wizard +ill not appear once you have completed. For updating and adding channels, refer to the Add dChannels dto List feature on page 36.
The following connection diagrams are offered as suggestions. However, you may need to modify them to accommodate your particular assortment of devices and features. For best performance, video and audio cables should be made from coaxial shielded wire.
Your Hitachi LCD TV provides an easy connection of audio and video sources. Locate the input at the back of the TV connect as the illustration shown here.
NOTES
• Cables are not included.
• Completely insert connection cord plugs, other+ise, the picture and/or sound may be abnormal.
- Cable plugs are often color-coded. Match colors of plugs and (ac,s, i.e. connect red to red, +hite to +hite, etc.
B for Op rating Ext rnal Vid o D vi) s
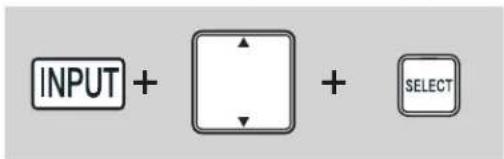
Connect an external device to one of the input jacks, then press the INPUT button to show the Inputs List. Use the CURSORS (▲ and ▼) to select the input of your choice. Then press the SELECT button to confirm your choice (See page 21).
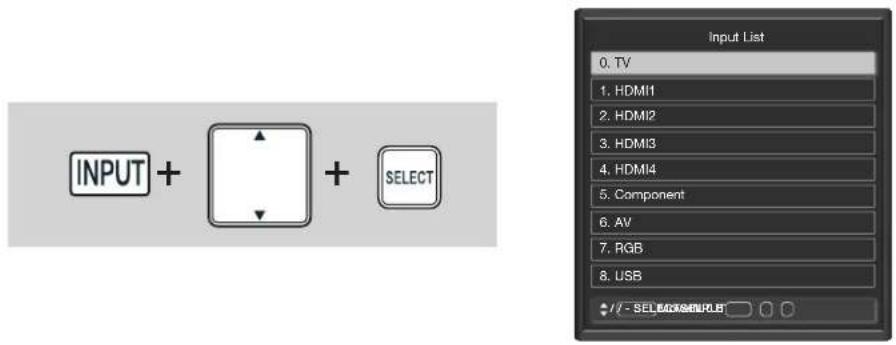
Example: Highlight 0. TV to select TV (AIR/CABLE) input.
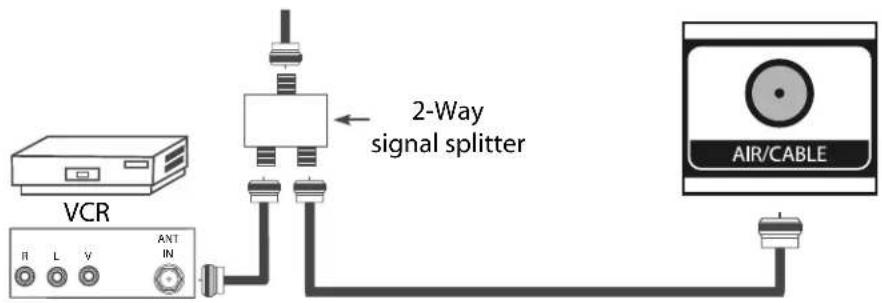
ANTENNA CONNECTION
Roof antenna
or
Cable TV coaxial cable
HDMI CONNECTION
There are four HDMI jacks provided as a convenience to allow easily connecting HDMI or DVI signals from a DVD, set top box, or Video Game console as shown in the following examples (A separate audio device would be needed for a DVI-to-HDMI connection.)
- Connect with HDMI cable from your HDMI device to the TV HDMI 3 input.
- Press the INPUT button on the remote control and select 3. HDMI 3 input source.
![[HDMI] [HDMI]](/content/2026/06/1146477/images/d7083f5807cb2bbe09c82e7484ecdd7284b31e9e2f7261da22dc5990bdf5622f.jpg)
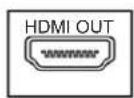
HDMI DIGITAL
OUTPUT CAPABILITY
DVD Player/ Recorder
Conn)ting to xt rnal audio amplifi r wit( on HDMI )abl :
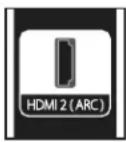
Besides the normal HDMI connection, the HDMI 2 (ARC) input also provides ARC feature to send audio of all your video sources out to your stereo amplifier for high-fidelity audio reproduction.
- Connect with HDMI cable to your audio amplifier from the TV HDMI 2 (ARC) input.
NOTE
- The ARC (Audio Return Channel) feature at this input enables your Hitachi TV to send audio data "upstream" to your A/V receiver or surround audio controller via a single H.MI cable, increasing user fle)ibility and eliminating the need for any separate S/P.IF audio connection.
![[HDMI][HDMI] OUT ARC](/content/2026/06/1146477/images/681bcbe72ea6832835c81f380546c04bb3665e2edcca5a71fb52abd0ce10e7d9.jpg)
STEREO SYSTEM
AMPLIFIER
The DVI connection to the HDMI input is only available through the HDMI 1/DVI input.
- Connect with a DVI-to-HDMI cable from your DVI device to the TV HDMI 1/DVI input.
- Press the INPUT button on the remote control and select 1. HDMI 1 input source.
- Connect with a separate audio cable from your DVI device to the RGB/DVI AUDIO input.
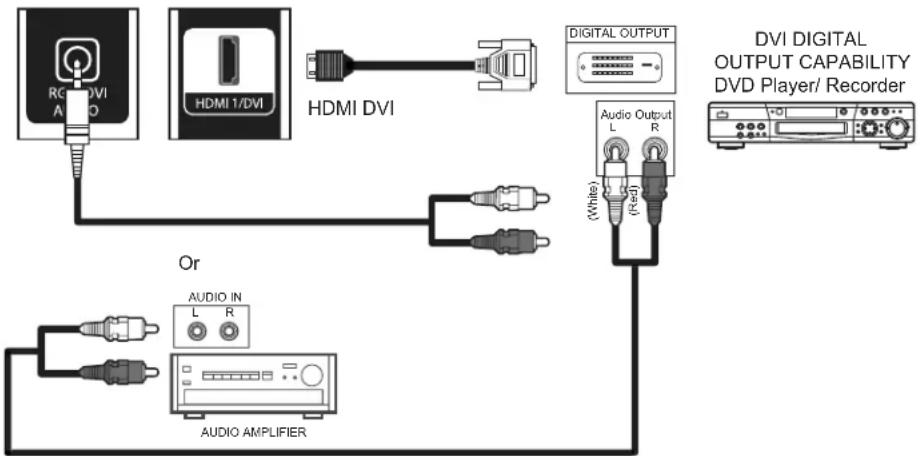
flowchart
graph TD
    A["Re: HDMI DVI"] --> B["HDMI 1/DVI"]
    B --> C["HDMI DVI"]
    C --> D["Digital Output"]
    D --> E["Audio Output L (White)"]
    D --> F["Audio Output R (Red)"]
    G["Audio Amplifier"] --> H["AUDIO IN L"]
    G --> I["AUDIO IN R"]
Note : An e)ternal Audio amplifier can be used for the same purpose.
Tips on HDMI )onn )tions:
- When using an HDMI input from a set top box, it is recommended to use a 1080p, 1080i or 720p input signal.
- When the HDMI input is a 1080p signal, it is recommended that the length of the cable should be less than 5 meters.
COMPONENT/AV CONNECTION
- Connect with Y-PbPr video cable from the video output of your AV device to the TV COMPONENT/AV Y-PbPr input.
- Connect with L/R audio cable from the audio output of your AV device to the TV COMPONENT/AV L/R input.
- Press the INPUT button on the remote control and select 5. Component input source.
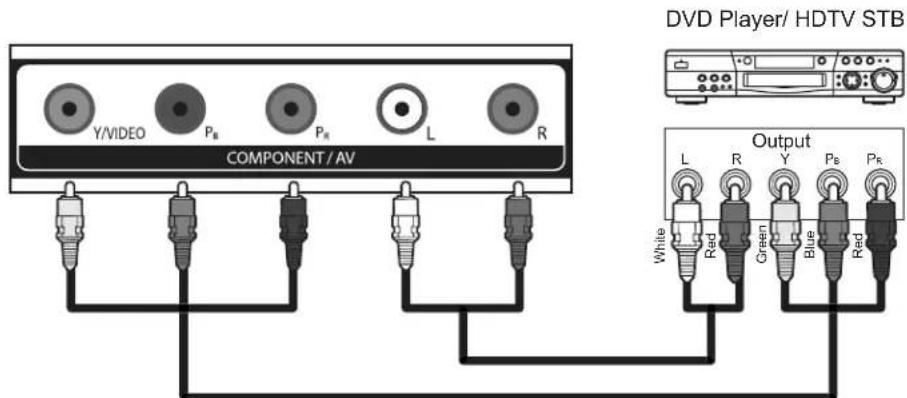
Tips on COMPONENT )onn )tions:
- The COMPONENT Y-PbPr connection is provided for high performance DVD players, VCRs etc. that have this feature. Use these connections in place of the standard video connection if your device has this feature.
- For additional information on connecting your other electronic devices, please refer to the device's owner's guide.
- Your component outputs may be labeled Y, B-Y, and R-Y. In this case, connect the components B-Y output to the TV's Pb input and the components R-Y output to the TV's Pr input.
- Your component outputs may be labeled Y-CbCr. In this case, connect the devices Cb output to the TV's Pb input and the devices Cr output to the TV's Pr input.
• It may be necessary to adjust TINT to obtain optimum picture quality when using the Y-PbPr inputs. (See page 32).
Conn)ting AV d vi):
- Connect with AV video cable from the video output of your AV device to the TV COMPONENT/AV Y/VIDEO input.
- Connect with L/R audio cable from the audio output of your AV device to the TV Component/AV L/R input.
- Press the INPUT button on the remote control and select 6. AV input source.
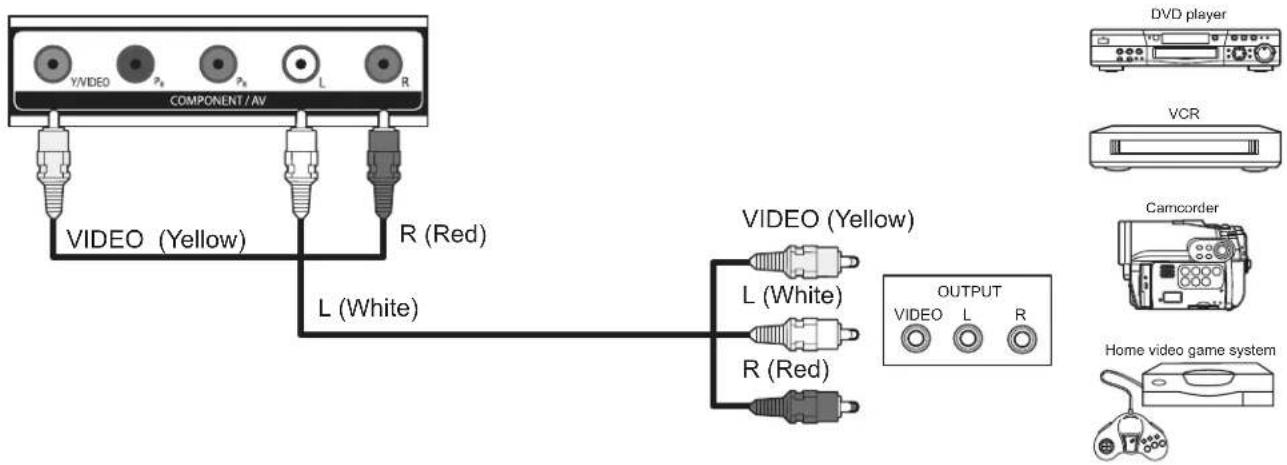
flowchart
graph TD
    A["COMPONENT / AV"] --> B["VIDEO (Yellow)"]
    A --> C["R (Red)"]
    A --> D["L (White)"]
    A --> E["VIDEO (Yellow)"]
    E --> F["L (White)"]
    E --> G["R (Red)"]
    E --> H["OUTPUT"]
    H --> I["VIDEO L R"]
    J["DVD player"] --> K["VCR"]
    K --> L["Camcorder"]
    L --> M["Home video game system"]
PERSONAL COMPUTER CONNECTION
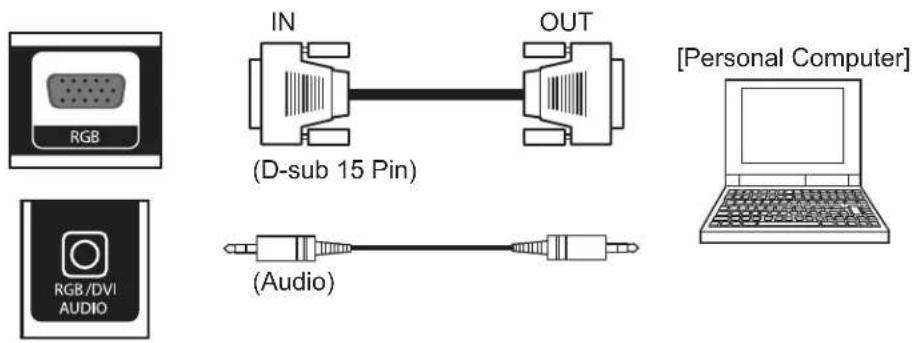
- Connect with RGB (D-sub 15 Pin) video cable from the RGB output of your PC to the TV RGB input.
- Connect with an analog audio cable from the audio output of your PC to the TV RGB/DVI AUDIO input.
- Press the INPUT button on the remote control and select 7. RGB input source.
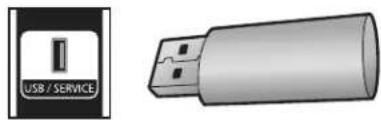
USB DISK CONNECTION
Your Hitachi LCD TV features a Photo Browser that allows watching digital still pictures from your USB disk plugged to the USB slot at the side panel. See page 42 for details.
natural_image
Illustration of a USB / SERVICE device and a cylindrical device (no text or symbols on the devices themselves)ANALOG/DIGITAL AUDIO OUTPUT CONNECTION
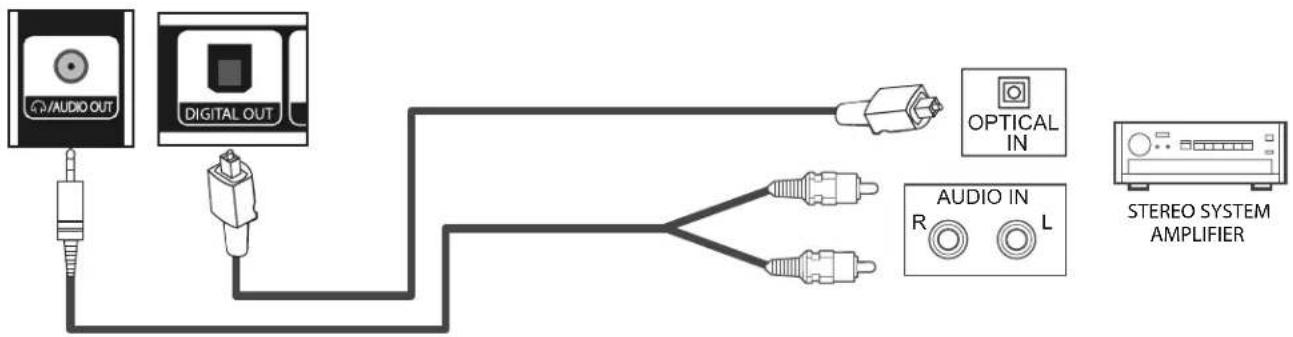
Connect with an analog audio cable from the AUDIO OUT jack to your analog stereo audio amplifier. Connect with an optical fiber cable from the DIGITAL OUT jack to your digital stereo audio amplifier.
flowchart
graph LR
    A["DAUDIO OUT"] --> B["DIGITAL OUT"]
    B --> C["OPTICAL IN"]
    B --> D["AUDIO IN R L"]
    D --> E["STEREO SYSTEM AMPLIFIER"]
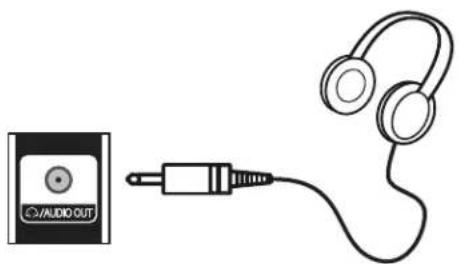
HEADPHONE CONNECTION
Connect your stereo headphone to this output.
natural_image
Diagram showing audio jack connected to headphones (no text or symbols)NOTES
- Turn the TV volume do+n before connecting headphones.
• The audio from the TV spea,ers +ill be muted after connecting to headphones.
CONNECTING A MHL4ENABLED DEVICE:
You can connect a MHL-enabled device, such as a SmartPhone or Roku Streaming Stick™, and show its screen image on your TV.
- Connect a MHL cable (not provided) to the micro USB port on the device, then connect the other end of the cable to the HDMI 4/MHL jack on the side of your TV.
- Press the INPUT button on the remote control and select 4. HDMI 4 input source.
![[Micro USB][HDMI]](/content/2026/06/1146477/images/61d9f09678e2afaf49a69bff07455de29144b82d5bd0c5471f5eb28d8dd61fc2.jpg)
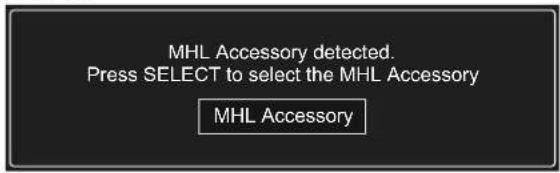
- Connect a MHL-enabled device to your TV. The following message is displayed. Press the SELECT button on the remote control to access your MHL-enabled device.
- Your device's menu opens. You can use CURSOR left (◀), right (▶), down (▼), or up (▲) buttons to navigate on your device, and press the SELECT button on the remote control to access its menu.
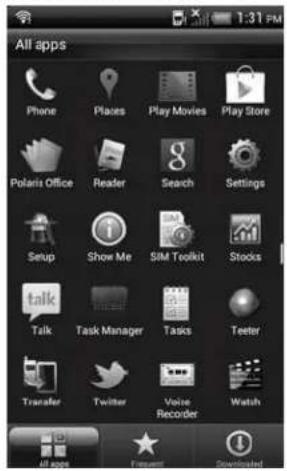
NOTE
- Your device's menu varies +ith the device and the apps you have loaded.
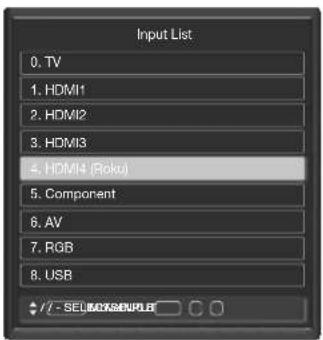
- To switch to a MHL-device that is already connected, you can press the INPUT button on the remote control and select 4. HDMI4 (Roku) input source.
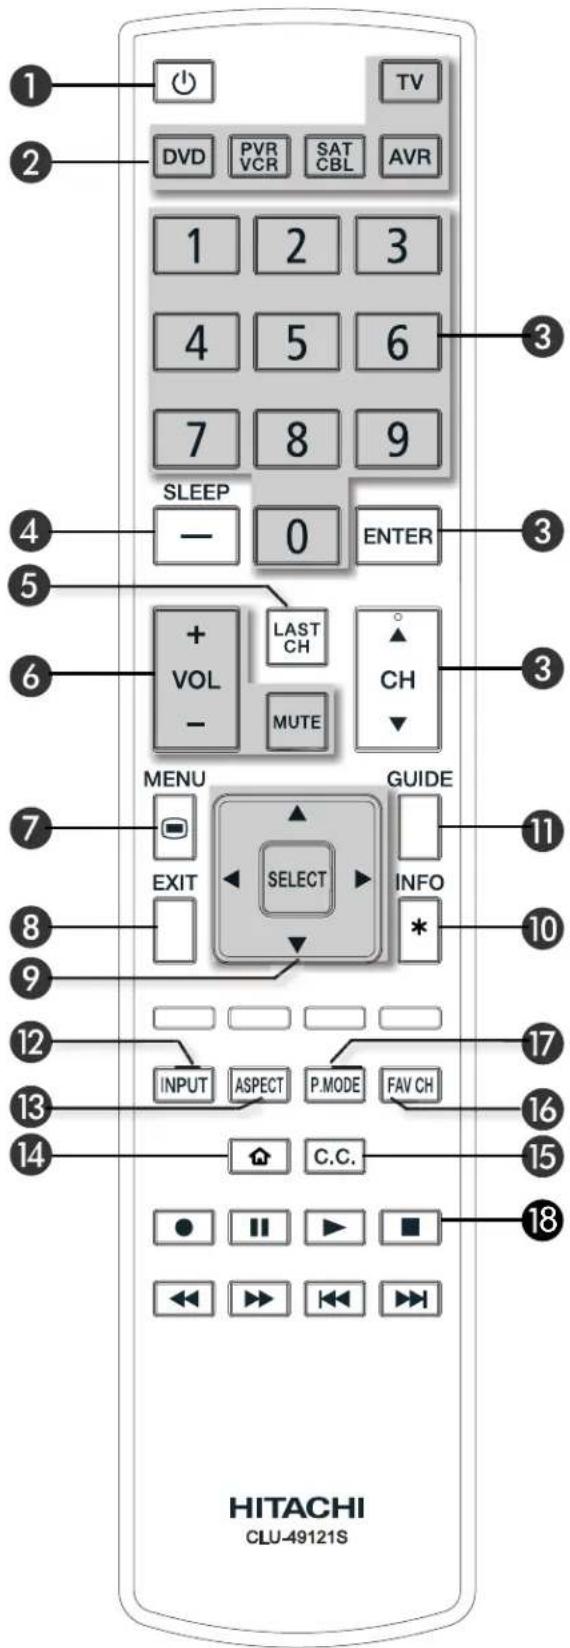
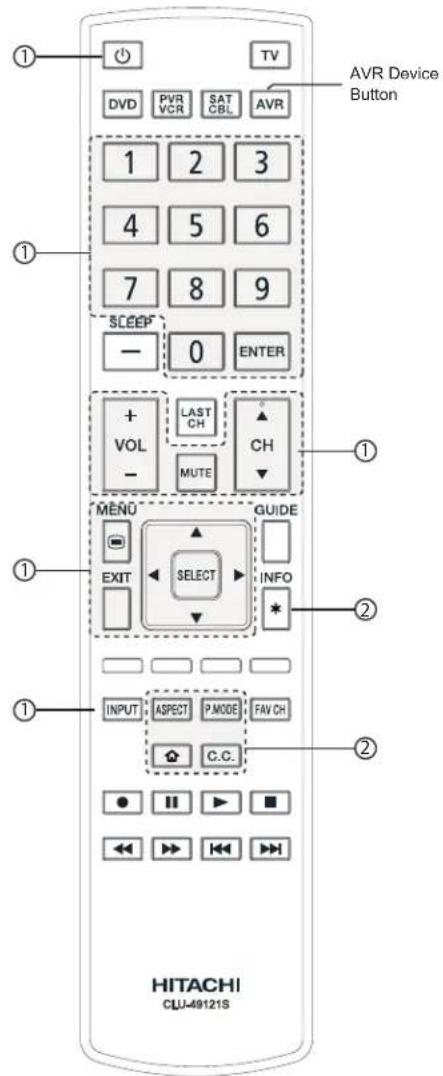
1 POWER Button
Press this button to turn the TV set on or off.
2 DEVICE Buttons
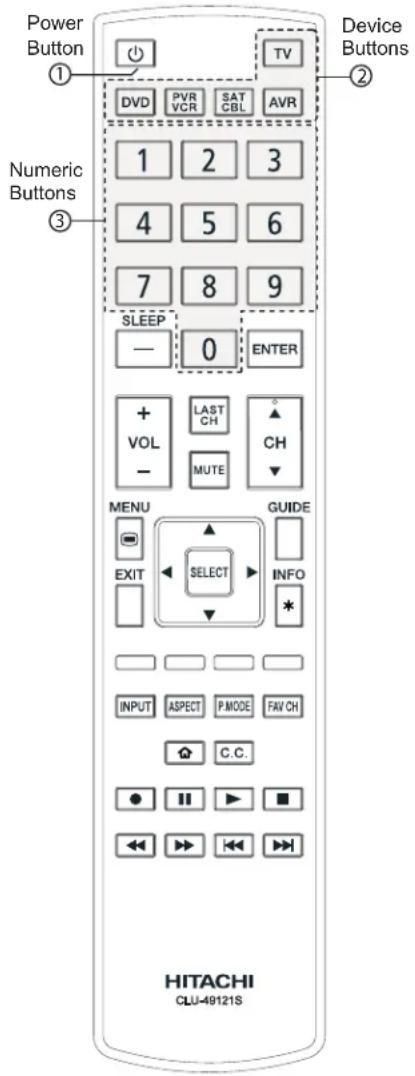
In addition to controlling all the functions on your Hitachi LCD TV, the new remote control is designed to operate different types of VCRs, cable boxes, set top boxes, satellite receivers, DVD players, and other audio/video device with one touch. Basic operation buttons are grouped together in one area.
To operate your LCD TV, select TV by pressing the TV button on the remote control. The TV mode indicator will blink, indicating that the remote control will now control your television.
Repeat the same procedure for other devices. Press the DVD button for DVD players, press the PVR/VCR button for personal video recorders, press the SAT/CBL button for satellite/cable boxes, and press the AVR button for audio video receivers.
See pages 24 \~ 27 for instructions on how to program the remote control to control your device.
3 CHANNEL SELECTOR/ENTER Buttons
The CHANNEL SELECTOR buttons are used to select channels, lock access code, etc. Use the CHANNEL SELECTOR buttons to enter one, two, or three numbers to select channels. Enter 0 first for channels 1 to 9, or simply press the single digit channel you wish to tune, then press the ENTER button for the TV to tune. Channel selection may also be performed by CHANNEL (CH) UP (▲) or CHANNEL (CH) DOWN (▼).
4 849 DASH/SLEEP Button
Use the (-) DASH button with the CHANNEL SELECTOR buttons to enter Digital Channels that have subchannel numbers indicated by (-) DASH (For example: 15-1). Also press to Set the Sleep Timer from 5 minutes to 4 hours.
5 LAST CHANNEL 8LAST CH9 Button
Press this button to toggle between the current and the last channel viewed.
6 VOLUME 8VOL9, MUTE Button
Press the VOLUME button (+ or -) until you obtain the desired sound level.
Press the MUTE button to turn the sound off completely (Mute) or half the normal level (Soft Mute). To restore the sound, press the MUTE button again for Mute Off, or press the VOL UP (+) button directly.
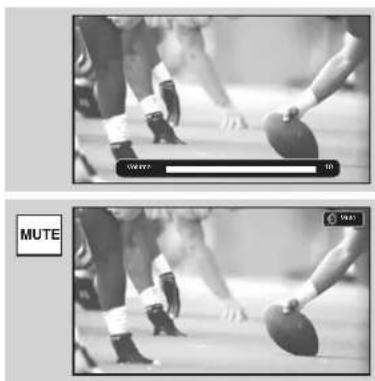
natural_image
Two black-and-white photos showing a table tennis player in action, with no visible text or symbols.How To Use The Remote Control To Control Your TV
Closed Captioning will display automatically when MUTE is on and Closed Caption is set to With Mute (See page 39).
When the TV power is turned off at a volume level 21 or greater, the volume level will default to 20 when the TV is turned on. However, if it is set to a level 20 or less, the volume level will be at the level it was set when the TV was turned off.
7 MENU Button
The MENU button will start the On-Screen Display.
8 EXIT Button
This button will exit all On-Screen Displays.
9 CURSOR PAD/SELECT Button
All the On-Screen Display features can be set or adjusted by using the CURSOR PAD and the SELECT button, except for numeric entries. Press the CURSOR PAD toward desired direction and press the SELECT button to select.
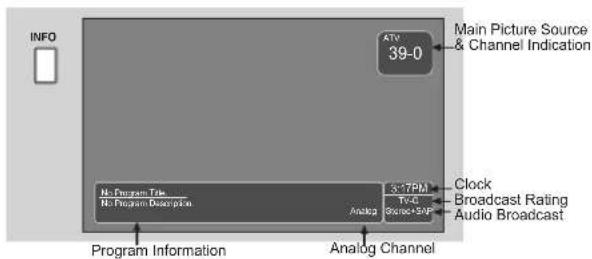
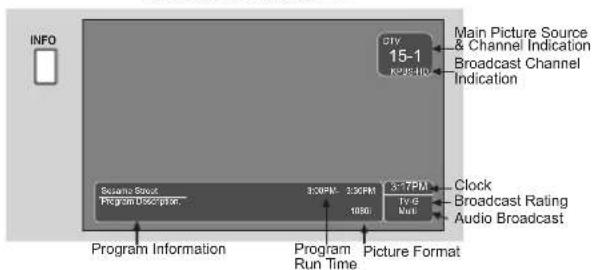
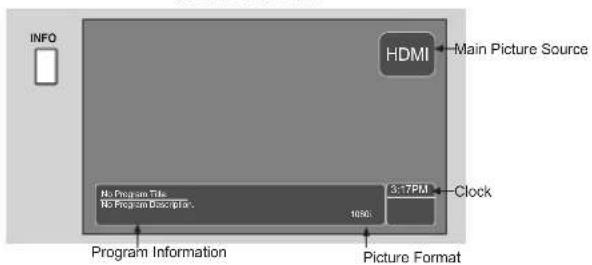
10 INFO/\* Button
Press this button when you want to check the channel being received, the picture source, if the channel has stereo (ST) or second audio program (SAP), the time, and CHANNEL ID.
ANALOG CHANNELS
DIGITAL CHANNELS
VIDEO INPUTS
NOTES
- Press the INFO button again or the XIT button to return to normal vie+ing.
- The Aspect INFO +ill not be sho+n +hen the INFO button is pressed.
11 GUIDE Button
Press this button to access the Channel Guide of your satellite receiver, set top box or cable box while in SAT/CBL mode.
12 INPUT Button
Press this button to access the Input List. Use the CURSOR and SELECT buttons to select the desired input. Pressing the INPUT button repeatedly will also cycle through the inputs that are available. Then press the SELECT button or wait 4 seconds to automatically select the highlighted input.
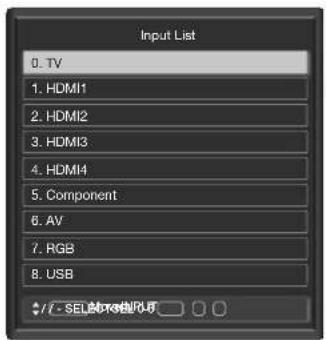
-
TV Watch TV from an Air or Cable signal.
-
HDMI1 Select to choose HDMI1 Input.
- HDMI2 Select to choose HDMI2 or ARC Input.
- HDMI3 Select to choose HDMI3 Input.
- HDMI4 Select to choose HDMI4 or MHL Input.
- Component Select to choose Component Input.
- AV Select to choose AV Input.
- RGB Select to choose PC input.
- USB Select to choose USB input.
NOTE
- .epending on the device, it may be required to turn on the device for the TV to recognize if it is available. You can access these inputs by using the cursor or number buttons on the remote control.
How To Use The Remote Control To Control Your TV
13 ASPECT Button
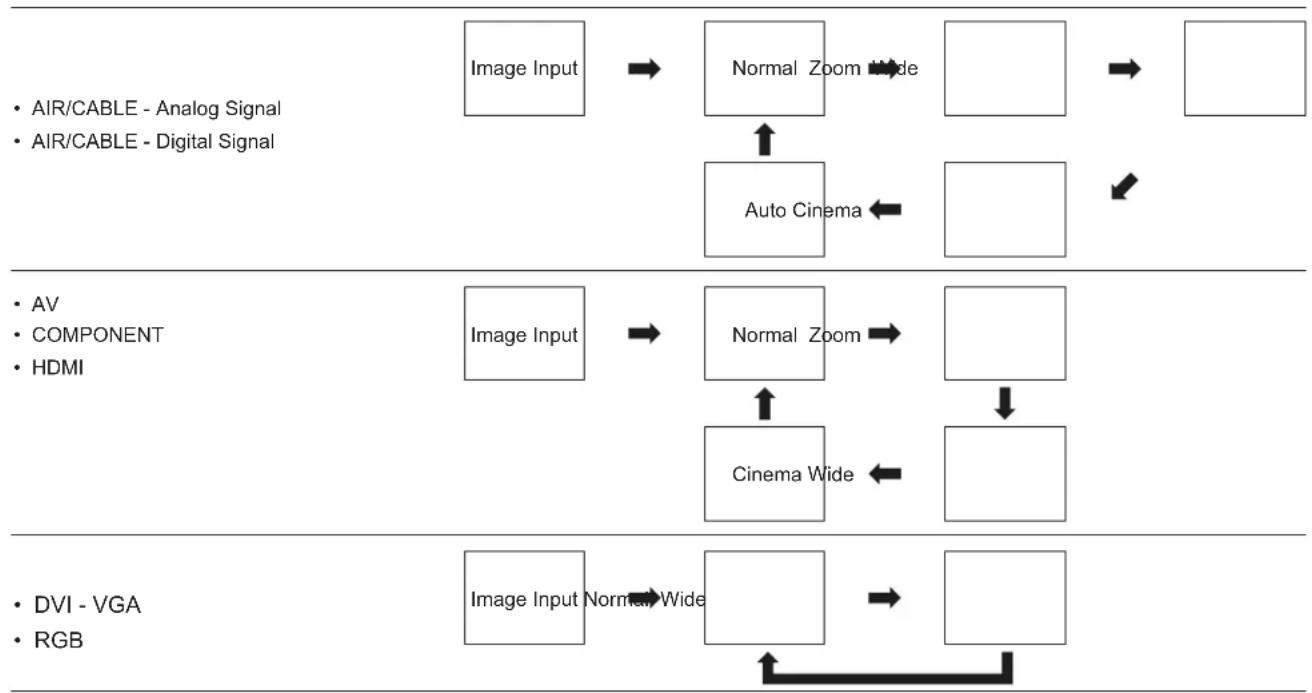
Press this button to quickly change the picture format ASPECT ratio. Depending on the picture format, ASPECT allows you to adjust the image through the following options.
Auto
Use this aspect mode to have the aspect mode change automatically by signal detector.
Normal
Use this aspect mode to display conventional (4:3) images. Side panels (black areas) are placed to the left and right of the image to preserve the original aspect ratio of the source.
Wid
Use this aspect mode to display 16:9 sources like HDTV and DVD's preserving the original 16:9 aspect ratio showing 95% for SD / 97.5% for HD of the size.
Cin ma
Use this aspect mode to fill the screen with very widescreen movies.
Zoom
Use this aspect mode to zoom in and to reduce the black bars.
NOTES
- ach input has memory for the Aspect setting. Changing the aspect on one input +ill not affect the aspect settings on other inputs.
• See page 57 for Aspect availability according to signal format in use.
flowchart
graph TD
    A["AIR/CABLE - Analog Signal"] --> B["Image Input"]
    C["AIR/CABLE - Digital Signal"] --> D["Normal Zoom"]
    D --> E["Auto Cinema"]
    E --> F["Normal Zoom"]
    F --> G["Cinema Wide"]
    G --> H["Normal Wide"]
    H --> I["DVI - VGA"]
    J["AV COMPONENT"] --> K["Image Input"]
    L["HDMI"] --> M["Normal Zoom"]
    M --> N["Cinema Wide"]
    N --> O["Normal Wide"]
    O --> P["DVI - VGA"]
    Q["RGB"] --> R["Image Input"]
    S["Image Input"] --> T["Normal Zoom"]
    T --> U["Cinema Wide"]
    U --> V["Normal Wide"]
    V --> W["DVI - VGA"]
    X["-->"] --> Y["-->"] --> Z["-->"] --> AA["-->"] --> AB["-->"] --> AC["-->"] --> AD["-->"] --> AE["-->"] --> AF["-->"] --> AG["-->"] --> AH["-->"] --> AI["-->"] --> AJ["-->"] --> AK["-->"] --> AL["-->"] --> AM["-->"] --> AN["-->"] --> AO["-->"] --> AP["-->"] --> AQ["-->"] --> AR["-->"] --> AS["-->"] --> AT["-->"] --> AU["-->"] --> AV["-->"] --> AW["-->"] --> AX["-->"] --> AY["-->"] --> AZ["-->"] --> BA["-->"] --> BB["-->"] --> BC["-->"] --> BD["-->"] --> BE["-->"] --> BF["-->"] --> BG["-->"] --> BH["-->"] --> BI["-->"] --> BJ["-->"] --> BK["-->"] --> BL["-->"] --> BM["-->"] --> BN["-->"] --> BO["-->"] --> BP["-->"] --> BQ["-->"] --> BR["-->"] --> BS["-->"] --> BT["-->"] --> BU["-->"] --> BV["-->"] --> BW["-->"] --> BX["-->"] --> BY["-->"] --> BZ["-->"] --> CA["-->"] --> CB["-->"] --> CC["-->"] --> CD["-->"] --> CE["-->"] --> CF["-->"] --> CG["-->"] --> CH["-->"] --> CI["-->"] --> CJ["-->"] --> CK["-->"] --> CR["-->"] --> CS["-->"] --> CT["-->"] --> CU["-->"] --> CV["-->"] --> CW["-->"] --> CX["-->"] --> CY["-->"] --> CZ["-->"] --> DA["-->"] --> DB["-->"] --> DC["-->"] --> DV["-->"] --> DV1["-->"] --> DV2["-->"] --> DV3["-->"] --> DV4["-->"] --> DV5["-->"] --> DV6["-->"] --> DV7["-->"] --> DV8["-->"] --> DV9["-->"] --> DV10["-->"] --> DV101["-->"] --> DV102["-->"] --> DV103["-->"] --> DV104["-->"] --> DV105["-->"] --> DV106["-->"] --> DV107["-->"] --> DV108["-->"] --> DV109["-->"] --> DV10A
14 HOME Button
If you are not in the HDMI4 input, pressing this button will automatically switch to the HDMI4 input.
If HDMI4 is your current input, pressing this button will activate the HOME menu of the MHL device connect to the HDMI3/MHL port.
15 CLOSED CAPTIONS 8C.C.9 Button
Use this button to display the dialogue, narration, and/or sound effects of a television program or home video which are displayed on the TV screen when available. Your local TV program guide denotes these programs as cc or □.
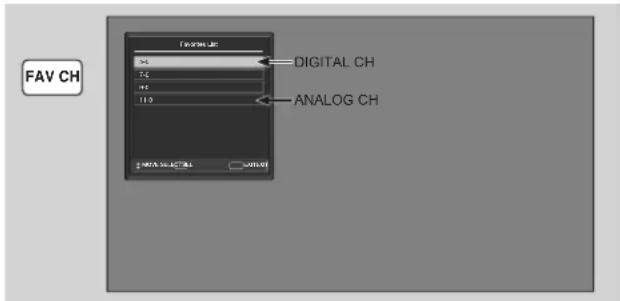
16 FAVORITE CHANNEL 8FAV CH9 Button
Press the FAV CH button to display the Favorite CH List. You have to first setup the Favorite Channels in the Channels Menu in order to display the list. Press the FAV CH button on the remote control to display the list and select the desired channel using the CURSOR PAD and then press SELECT button to view.
17 PICTURE MODE 8P.MODE9 Button
Press this button to toggle among Dynamic, Standard, Pro-Day, Pro-Night, Game, and Custom picture mode settings. Select Dynamic mode for automatic brightness and contrast adjustment. Select Standard mode for day time viewing with more brightness and contrast to compete with room light. Select Custom mode for viewing with your own brightness and contrast picture settings. Game mode is for automatic brightness and contrast adjustment when playing video games.
18 DEVICE CONTROL Buttons
These buttons can control external devices (i.e. PVR/VCR, DVD, etc.) directly depending on the device mode set on the remote control. Also, these buttons are for controlling devices with Consumer Electronics Control (CEC) through the HDMI connection like Blu-Ray or DVD players, PVR, or Set Top Boxes while in TV mode.
NOTE
- For some devices, these buttons are not available to control through the TV and H.MI connection; please refer to the device's o+ner's guide for more information.
OPERATING THE PRECODED FUNCTIONS FOR YOUR AV DEVICE.
The new remote control is designed to operate different types of VCRs, cable boxes, set top boxes, satellite receivers, DVD players, and other audio/video device. You must first program the remote control to match the remote control system of your AV device (refer to pages 28 \~ 29 for a preprogrammed code number).
AV DEVICE CONTROL SETUP PROCEDURE
- Turn on your AV Device.
- elect the desired mode: DVD, PVR/VCR, SAT/CBL or AVR by pressing the corresponding button.
- Hold down the device button (DVD, PVR/VCR, SAT/CBL or AVR) on the remote control and enter the four digit preset code that matches your device as shown on pages 28 \~ 29.
- Release the device button.
- If done correctly, the device LED indicator will blink 3 times to confirm proper setup.
- The remote control will now control the desired device.
SETUP EXAMPLE 8HITACHI CABLE BOX WITH PRECODE 00039
- Turn ON your cable box.
- Select cable mode by using your SAT/CBL button to position the LED indicator on SAT/CBL.
- Hold down the SAT/CBL button on the remote control and press the numbers 0, 0, 0 and 3.
- Release the SAT/CBL button.
- The indicator light will flash 3 times if the code was accepted.
-
Aim the remote control at the cable box and press the POWER button. The remote control will turn off your cable box when the correct four digit preset code is entered. When this occurs, the remote control is programmed for your cable box. If the cable box does not turn off, try a different four digit preset code.
-
The remote control will now control your cable box. Repeat the same procedure for your set top box or satellite receiver (select SAT/CBL), your DVD (select DVD), your VCR/PVR(select VCR/PVR), or your AVR (select AVR).
NOTES
- If your AV device cannot be operated after performing the above procedures, your AV device code has not been preprogrammed into the remote control.
- In the unli,ely event that your AV device cannot be operated after performing the above procedures, please consult your AV device o+ner's guide.
- The remote control +ill remember the codes you have programmed even after the batteries are removed from the remote control. To reset all programmed codes to factory default place remote control in TV mode, then press and hold TV mode button and enter "9", "8", "1" in sequence.
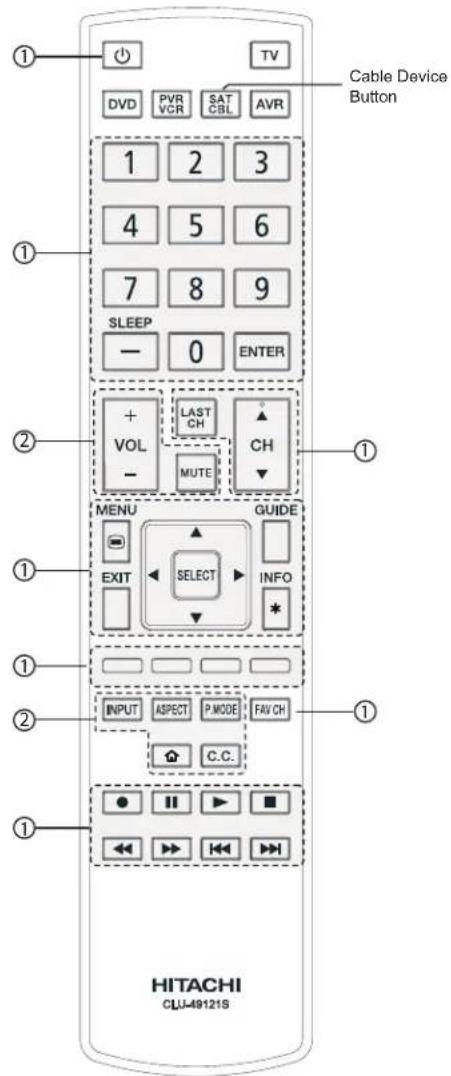
MY CAB E BOX CODE IS:
NOTE
- Refer to the instruction manual of the cable bo) for operation of the buttons e)clusively for the cable bo).
① PRECODED CABLE BOX Buttons
These buttons transmit the chosen precoded cable codes:
-Power -Cursor & Select
-Number PAD
-Menu -Info
-Enter
-Exit -Channel Up & Down
-Dash (-)
-Guide -Last CH
-Fav CH
-Play, Stop, Pause, RWD, FWD, Skip FWD,
-Color Buttons
Skip RWD, Record.
② EXCLUSIVE TV Buttons
These buttons are for operating the TV :
-P. Mode
-CC
-Input
-Aspect
-Vol Up & Down
-Mute
-Home
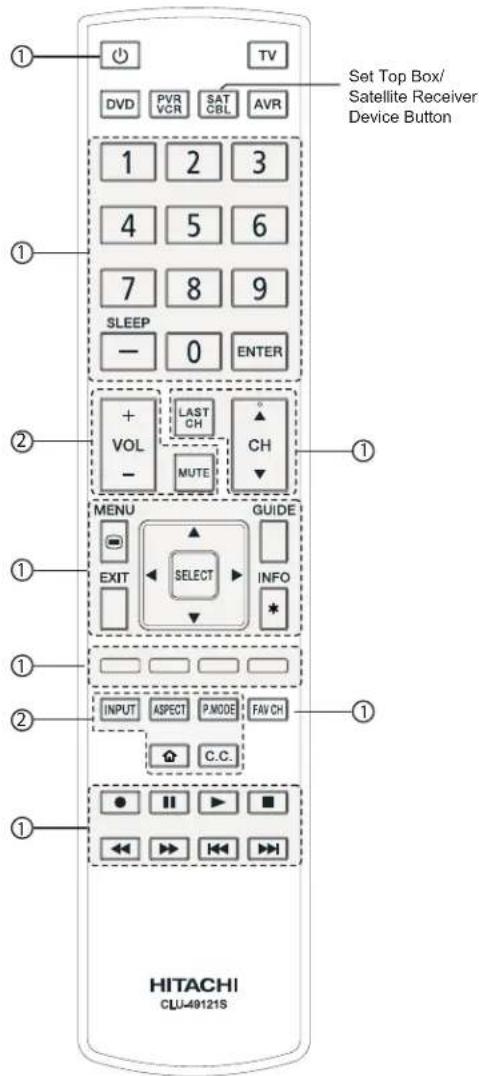
MY SET TOP BOX/SATE ITE RECEIVER CODE IS:
NOTE
- Refer to the instruction manual of the set top bo)/satellite receiver for operation of the buttons e)clusively for the set top bo)/satellite receiver.
① PRECODED SET TOP BOX/SATELLITE Buttons
These buttons transmit the chosen precoded set top bo)/satellite receiver codes:
-Power -Cursor & Select -Number PAD
-Menu -Info -Enter
-Exit -Channel Up & Down
-Dash (-)
-Guide
-Last CH
-Fav CH
-Play, Stop, Pause, RWD, FWD, Skip FWD,
-Color Buttons
Skip RWD, Record.
② EXCLUSIVE TV Buttons
These buttons are for operating the TV :
-P. Mode
-CC
-Input
-Aspect
-Vol Up & Down
-Mute
-Home
How To Use The Remote Control To Control Your AV Device
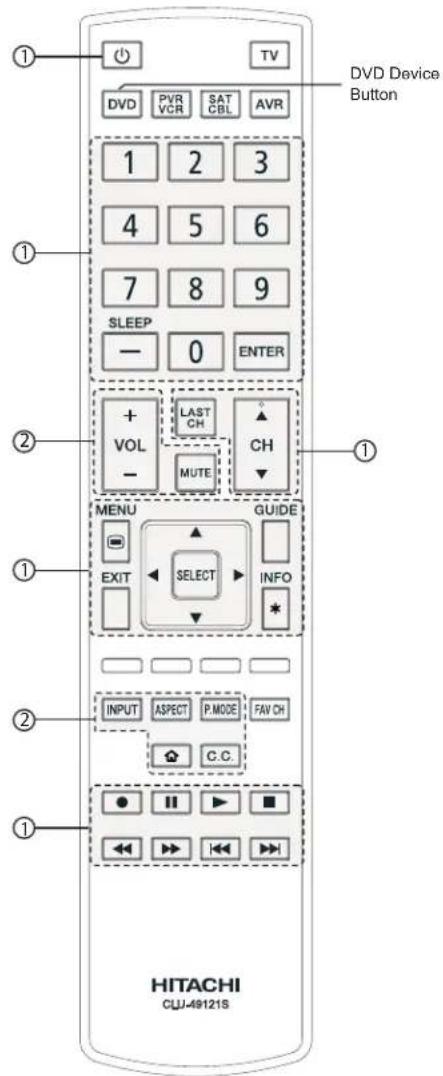
- Refer to the instruction manual of the .V. Player for operation of the buttons e)clusively for the .V. Player.
① PRECODED DVD Buttons
These buttons transmit the chosen precoded DVD codes:
-Power -Number PAD
- Play, Stop, Pause,
-Menu -Info
RWD, FWD, Skip
- Cursor & -Channel Up & Down
FWD, Skip FWD
Select -Exit
-Record
-Dash -Enter
-Guide
② EXCLUSIVE TV Buttons
These buttons are for operating the TV:
-P. Mode -CC
-Input
-Aspect
-Vol Up & Down
-Mute
-Home
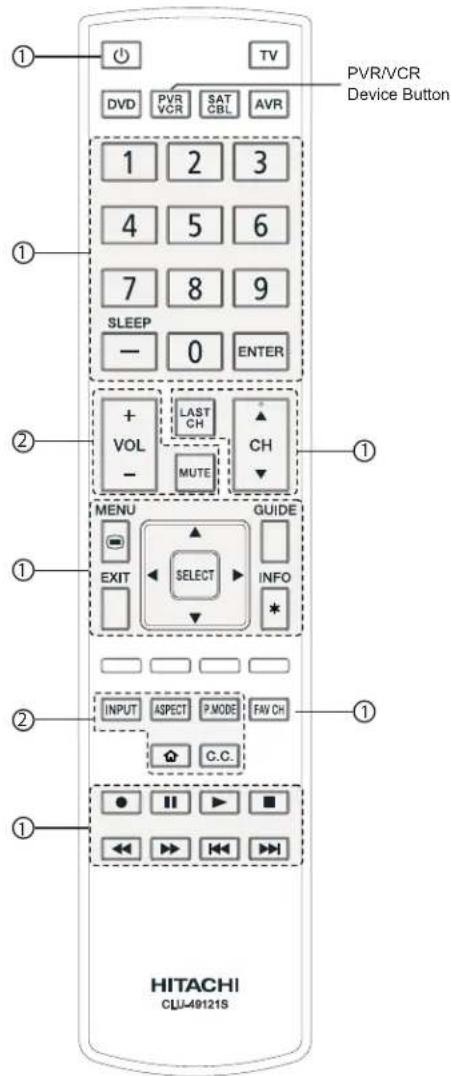
MY VCR/PVR CODE IS:
NOTE
- Refer to the instruction manual of the PVR/VCR for operation of the buttons e)clusively for the PVR/VCR.
① PRECODED VCR/PVR Buttons
These buttons transmit the chosen precoded set top box/satellite receiver codes :
-Power -Cursor & Select -Enter
-Menu -Channel Up & Down -Dash(-)
-Exit -Number PAD
- Play, Pause,
-Info -Last CH
Stop, FWD, Skip
-Record -RWD, Skip RWD
FWD
-FAV CH (Only for VCR)
② EXCLUSIVE TV Buttons
These buttons are for operating the TV :
-P. Mode -CC
-Input
-Aspect
-Vol Up & Down
-Mute
-Home
MY AUDIO/VIDEO RECEIVER (AVR)
IS:
NOTE
• Refer to the instruction manual of the AVR for operation of the buttons e)clusively for the AVR.
① PRECODED AVR Buttons
These buttons transmit the chosen precoded AVR codes:
-Power -Cursor & Select -Vol Up & Down
-Menu -Channel Up & Down -Mute
-Exit -Number PAD
-Input -Record
- Play, Pause, Stop, RWD, Skip RWD, FWD, Skip FWD,
-Enter
② EXCLUSIVE TV Buttons
These buttons are for operating the TV:
-P. Mode -CC
-Aspect
-Home
CABLE Brand CODES
| A-MARK 0008, 0144 | |
| ABC 0237, 0003, 0008 | |
| ACCUPHASE 0003 | |
| ACORN 0237 | |
| ACTION 0237 | |
| ACTIVE 0237 | |
| ADB 2092, 2586 | |
| ARCHER 0237 | |
| BCC 0276 | |
| BRITISH TELECOM 0003 | |
| CENTURY 0008 | |
| DIGEO 1187, 2187 | |
| DIGI 0637 | |
| DIRECTOR 0476 | |
| DUMONT 0637 | |
| FOSGATE 0276 | |
| GE 0144 | |
| GENERAL | 0476, 0810, 0276, 0003 |
| INSTRUMENT | |
| GIBRALTER | 0003 |
| GOLDSTAR | 0144 |
| HITACHI 0003, 0008 | |
| INSIGHT | 0476, 0810 |
| JERROLD 0476, 0810, 0276, 0003 | |
| MEMOREX | 0000 |
| MITSUBISHI | 0003 |
| MOTOROLA | 1376, 0476, 0810, 0276, 1187, 1254, 1106 |
| NOVA VISION | 0008 |
| NOVAPLEX | 0008 |
| NSC 0637 | |
| PACE | 1877, 0877, 0237, 0008 |
| PANASONIC | 0000, 0008, 0144 |
| PANTHER 0637 | |
| PARAGON | 0000, 0008, 0525 |
| PENNEY | 0000, 0637 |
| PHILIPS | 1305, 0317 |
| PIONEER | 1877, 0877, 0144, 0533 |
| PULSAR | 0000 |
| QUASAR 0000 | |
| REGAL | 0276 |
| RUNCO | 0000 |
| SAMSUNG | 0003, 0144 |
| SASKTEL | 1737 |
| SCIENTIFIC ATLANTA | 1877, 0877, 0477, 0237, 0003, 0000, 0008 |
| SONY | 1006 |
| SPRUCER | 0144 |
| STARCOM | 0003 |
| STORM 0637 | |
| SUPERCABLE | 0276 |
| TORX | 0003 |
| TOSHIBA 0000 | |
| UNITED CABLE | 0276, 0003 |
| US ELECTRONICS | 0276, 0003, 0008 |
| VIDEOWAY | 0000 |
| ZENITH 0000, 0525 | |
CABLE/PVR COMBO CODES
| DIGEO 1187, 2187 | |
| GENERAL | 0810 |
| INSTRUMENTS | |
| JERROLD 0810 | |
| MOTOROLA | 1376, 0810, 1187, 1106 |
| PACE | 1877, 0237 |
| PIONEER | 1877, 0877 |
| SASKTEL | 1737 |
| SCIENTIFIC ATLANTA | 1877, 0877 |
| SONY | 1006 |
| SUPERCABLE | 0276 |
SATELLITE BRAND CODES
| BELL EXPRESSVU | 0775, 1170 |
| CHAPARRAL | 0216 |
| COOLSAT 1806, 2147 | |
| CROSSDIGITAL | 1109 |
| DIRECTV | 1377, 0392, 0566, 0639, 1639, 1142, 0247, 0749, 1749, 0819, 1556, 1075, 1108, 0099, 1109, 1392, 1414, 1442 1443, 1609, 1640 |
| DISH NETWORK SYS-TEM | 1505, 1005, 0775, 1170, 1775 |
| DISHPRO | 1505, 1005, 0775, 1775 |
| ECHOSTAR | 1505, 1005, 0775 1170, 1775 |
| EXPRESSVU | 0775, 1775 |
| FORTEC STAR | 1821 |
| FUNAI | 1377 |
| GE | 0392, 0566 |
| GENERAL INSTRU-MENTS | 0869 |
| GOI | 0775, 1775 |
| HITACHI | 0749, 0819, 1250 |
| HOUSTON | 0775 |
| HTS 0775, 1775 | |
| HUGHES NETWORK | 1142, 0749, 1749, 1442, 1443 |
| SYSTEMS | |
| INNOVA 0099 | |
| JERROLD | 0669 |
| JVC | 0775, 1170, 1775 |
| LG | 1414 |
| MAGNAVOX | 0722 |
| MCINTOSH | 0869 |
| MITSUBISHI | 0749 |
| MOTOROLA | 0869, 0856 |
| NETSAT | 0098 |
| NEXT LEVEL | 0869 |
| PANASONIC 0247, 0701 | |
| PANSAT | 1807 |
| PHILIPS | 1142, 0749, 1749, 0775, 0819, 1076, 0722, 0099, 1442 |
| PIONEER | 1142, 1442 |
| PRIMESTAR 0869 | |
| PROSCAN 0392, 0566 | |
| RADIOSHACK | 0556, 0775, 0869 |
| RCA | 0392, 0566, 1142, 0775, 0855, 0143, 1392, 1442 |
| SAMSUNG | 1377, 1142, 1276, 1108, 1109, 1442, 1609 |
| SKY 0856, 0089 | |
| SONY | 0639, 1639, 1640 |
| STAR CHOICE 0859 | |
| STAR TRAK | 0669 |
| THOMSON | 0392, 0566 |
| TIVO | 1142, 1442, 1443 |
| TOSHIBA | 0749, 1749, 0790 |
| ULTIMATE TV | 1392, 1640 |
| ULTRASAT | 1806 |
| UNIDEN | 0722 |
| VOOM | 0869 |
| ZENITH | 0856, 1856, 1810 |
SAT/PVR COMBO CODES
| BELL EXPRESSVU | 0775, 1170 |
| DIRECT TV 1377, 0392, | 0639, 1142,1076, 0098, 1392, 1442,1443, 1640 |
| DISH NETWORK SYSTEM | 1505, 0775 |
| DISH PRO | 1505, 0775 |
| ECHOSTAR | 1505, 0775, 1170 |
| EXPRESSVU | 0775 |
| HUGHES NETWORK SYSTEMS | 1142, 1442, 1443 |
| JVC | 1170 |
| MOTOROLA | 0869 |
| PHILIPS | 1142, 1442 |
| PROSCAN 0392 | |
| RCA | 1392 |
| SAMSUNG | 1442 |
| SONY | 0639, 1640 |
| STAR CHOICE 0888 | |
| TIVO | 1142, 1442, 1443 |
| ZENITH | 1810 |
VCR Brand CODES
| A-MARK | 0037, 0240, 0000, 0278, 0046 |
| ABS 1972 | |
| ACCURIAN 0000 | |
| ADMIRAL 0000, 0048, 0039, 0047, 0104, 0209, 0065, 0479 | |
| ADVENTURA | 0037, 0240, 0000 |
| ADYSON | 0072 |
| AIKO | 0278 |
| AIWA | 0037, 0000, 0124 |
| AKAI | 0041, 0175 |
| ALBA | 0209, 0072, 0278 |
| ALIENWARE | 1972 |
| ALLEGRO | 0039 |
| AMERICA ACTION | 0278 |
| AMERICAN HIGH | 0035, 0081 |
| AMSTRAD | 0000 |
| ASHA | 0240 |
| ASTRA | 0035, 0081 |
| AUDIOVOX 0000 | |
| AVIS | 0000, 0072 |
| BEAUMARK | 0240 |
| BELL & HOWELL | 0035, 0048, 0039, 0000, 0104, 0046, 0479 |
| BROKSONIC | 0184, 0121, 0209, 0002, 0479 |
| CALIX | 0037 |
| CANDLE | 0037, 0030 |
| CANÓN | 0035 |
| CAPEHART | 0002 |
| CARRERA | 0240 |
| CARVER 0035, 0081 | |
| CCE | 0072, 0278 |
| CINERAL 0278 | |
| CITIZEN | 0035, 0037, 0240, 0000, 0209, 0278, 0479 |
| CLASSIC | 0037 |
| COLORTYME | 0060,0035, 0045, 0278 |
| COLT 0000, 0072 | |
| CRAIG | 0037, 0047, 0240, 0072 |
| CRITERIÓN | 0000, 0072 |
| CROSLEY 0035, 0081, 0000 | |
| CROWN | 0072, 0278 |
| CURTIS MATHES | 0060, 0035, 0162, 0240, 0000, 0041, 0278, 0432 |
| CYBERNEX | 0240 |
| CYBERPOWER | 1972 |
| DAEWOO | 0037, 0046, 0278, 0046 |
| DAYTRON | 0037, 0278 |
| DELL | 1972 |
| DENON | 0081, 0042 |
| DERWENT | 0041 |
| DIRECTV | 0739 |
| DUAL 0000 | |
| DURABRAND | 0039, 0038 |
| DYNATECH 0240, 0000 | |
| ELECTROHOME | 0060, 0037, 0240, 0000, 0043, 0209 |
| ELECTROPHONIC | 0037 |
| EMERALD | 0184, 0121 |
| EMEREX | 0032 |
| EMERSON | 0037, 0184, 0240, 0000, 0121, 0043, 0209, 0002, 0278, 0479, 1593 |
| FISHER | 0038, 0047, 0000, 0104, 0046 |
| FUJI | 0035, 0033 |
| FUJITSU | 0000 |
| FUNAI | 0037, 0000, 0072, 0278, 1593 |
| GARRARD | 0000 |
| GATEWAY | 1972 |
| GE | 0060, 0035, 0048, 0240, 0000, 0065 |
| GEMINI | 0060 |
| GENEXXA | 0037, 0000, 0278 |
| GO VIDEO 0240, 0432, 0526, 0614 | |
| GOLDSTAR 0035, 0037, 0039, 0000, 0278, 0038 | |
| GOODMANS | 0037, 0081, 0000, 0072, 0278 |
| GRADIENTE | 0000 |
| GRANADA 0081, 0042 | |
| GRUNDIG | 0081 |
| HARLEY DAVISON | 0000 |
| HARMANKARDON | 0081, 0038 |
| HARVARD | 0072 |
| HARWOOD | 0072 |
| HEADQUARTER | 0046 |
| HEWLETT PACKARD | 1972 |
| HI-Q | 0035, 0047, 0000 |
| HITACHI | 0035, 0037, 0045, 0000, 0042, 0041, 0065, 0105 |
| HOWARD COMPUTERS | 1972 |
| HP | 1972 |
| HUGHES NETWORK SYSTEMS | 0042, 0739 |
| HUMAX | 0739, 1797, 1988 |
| HUSH | 1972 |
| HYTEK | 0047, 0000, 0072 |
| IBUYPOWER | 1972 |
| INSTANT REPLAY | 0035 |
| ITT NOKIA | 0240, 0041 |
| JANEIL | 0240 |
| JENSEN | 0067, 0041 |
| JVC | 0067, 0041, 1162 |
| KEC | 0037, 0278 |
| KENWOOD 0067, 0041, 0038, 0046 | |
| KLH | 0072 |
| KODAK | 0035, 0037 |
| KTV | 0000 |
| LG | 0037, 0240, 0038, 1037 |
| LINKSYS | 1972 |
| LLOYD'S 0240, 0000, 0072, 0038 | |
| LOEWE | 0081 |
| LOGIK | 0240, 0000, 0072 |
| LUMATRON | 0278 |
| LUXOR | 0046 |
| LXI | 0037, 0000, 0042, 0067 |
| M ELECTRONIC | 0240 |
| MAGNASONIC | 0037, 0240, 0000, 0072, 0278 |
| MAGNAVOX | 0035, 0037, 0048, 0039, 0081, 0240, 0000, 0563, 0618, 1583 |
| MAGNIN | 0240 |
| MARANTZ | 0035, 0081, 0038 |
| MARTA | 0037 |
| MATSUI | 0037, 0209 |
| MATSUSHITA | 0035, 0162, 0081, 1162 |
| MEDIA CENTER PC | 1972 |
| MEI | 0035 |
| MEMOREX | 0035, 0162, 0037, 0048, 0039, 0047, 0240, 0000, 0104, 0209, 0072, 0278, 0046, 0479, 1037, 1162 |
| METZ | 0037 |
| MGA | 0060, 0240, 0043 |
| MGN TECHNOLOGY 0240 | |
| MICROSOFT | 1972 |
| MIDLAND | 0240 |
| MIND | 1972 |
| MINOLTA 0042, 0105 | |
| MITSUBISHI | 0060, 0048, 0047, 0000, 0042, 0067, 0043, 0041 |
| MOTOROLA | 0035, 0048 |
| MOVIE WALKER | 0072 |
| MTC | 0240, 0000, 0072 |
| MTX | 0000 |
| MULTITECH | 0039, 0000, 0072 |
| NAD | 0240, 0104 |
| NEC | 0104, 0067, 0041, 0038 |
| NEW TECH | 0072 |
| NIKKO | 0037, 0278 |
| NIKKODO | 0037, 0278 |
| NISHI 0240 | |
| NIVEUS MEDIA | 1972 |
| NOBLEX | 0240 |
| NORTHGATE | 1972 |
| OLYMPUS | 0035, 0162, 0104 |
| ONYKO | 0222 |
| OPTIMUS | 1062, 0035, 0162, 0037, 0048, 0047, 0240, 0000, 0104, 0432, 1048, 1162 |
| ORION | 0184, 0240, 0000, 0104, 0121, 0209, 0002, 0278, 0479 |
| PANAMA 0035 | |
| PANASONIC 1062, 0039, 0162, 0000,0225, 0614, 0616, 1162 | |
| PENNEY | 0035, 0162, 0037, 0047,0081, 0240, 0000, 0042,0067, 0038 |
| PENTAX | 0042, 0065, 0105 |
| PHILCO | 0035, 0081, 0000, 0209,0479 |
| PHILIPS | 0035, 0162, 0048, 0081,0045, 0000, 0209, 0616,0618, 0739, 1081, 1181 |
| PILOT | 0037 |
| PIONEER | 0162, 0081, 0042, 0067,1337 |
| POLK AUDIO | 0081 |
| PORTLAND | 0278 |
| PRESIDIAN 1593 | |
| PROFITRONIC | 0240 |
| PROSCAN 0060 | |
| PROTEC 0000, 0072 | |
| PROTECH | 0072 |
| PULSAR | 0039, 0240, 0278 |
| PULSER | 0240 |
| QUARTER | 0046 |
| QUARTZ | 0035, 0047, 0046 |
| QUASAR | 0035, 0162, 0002, 1162 |
| RADIOSHACK | 0035, 0162, 0037, 0048,0047, 0240, 0000, 0104,0046, 1037, 1162 |
| RADIX | 0037 |
| RANDEX 0037 | |
| RCA | 0060, 0035, 0048, 0240,0045, 0000, 0042, 0065,0105, 0880 |
| REALISTIC | 0035, 0162, 0037, 0048,0047, 0240, 0000, 0104,0121, 0278, 0046, 0065,1162 |
| REPLAY TV 0614, 0616 | |
| RICAVISION | 1972 |
| RUNCO | 0039 |
| SAMSUNG | 0060, 0240, 0045, 0000,0038, 0432, 0739 |
| SAMTRON | 0240 |
| SANKY | 0048, 0038 |
| SANSUI | 0240, 0000, 0067, 0209,0041, 0072, 0002, 0479 |
| SANYO | 0047, 0240, 0000, 0104,0046, 0159, 0479 |
| SCOTT | 0184, 0045, 0121, 0043 |
| SEARS | 0060, 0035, 0162, 0037,0048, 0039, 0047, 0033,0045, 0000, 0042, 0104,0067, 0043, 0209, 0041,0072, 0046, 0065, 0105 |
| SHARP | 0048, 0047, 0032, 0000,0065, 0848 |
| SHINTOM | 0039, 0240, 0000, 0072 |
| SHOGUN | 0240 |
| SIEMENS | 0037, 0104 |
| SIGNATURE 0060, 0035, 0037, 0048,0000, 0046, 0065, 0479 | |
| SINGER | 0037, 0240, 0072 |
| SONIC BLUE | 0614, 0616 |
| SONOGRAPHIE | 0046 |
| SONY | 0035, 0047, 0032, 0033,0000, 0067, 0046, 0636,1032, 1972 |
| SOUNDMASTER | 0000 |
| STACK 9 | 1972 |
| STS | 0042, 0105 |
| SV2000 | 0000, 0072 |
| SVA | 0000 |
| SYLVANIA 0035, 0081, 0000, 0043,1593 | |
| SYMPHONIC | 0240, 0000, 0002, 1593 |
| SYSTEMAX | 1972 |
| TAGAR SYSTEMS | 1972 |
| TANDY | 0000, 0104 |
| TASHIKO 0037 | |
| TATUNG | 0048, 0081, 0000, 0067,0041 |
| TEAC 0000, 0067, 0041 | |
| TECHNICS | 0035, 0162, 0037, 0000 |
| TEKNIKA | 0035, 0037, 0000 |
| TELECORDER | 0240 |
| TELEFUNKEN | 0041 |
| TEVION | 0479 |
| THOMAS | 0000, 0002 |
| THOMSON | 0060, 0041 |
| TISONIC | 0278 |
| TIVO | 0618, 0636, 0739, 1337 |
| TMK | 0240, 0000 |
| TNIX | 0037 |
| TOCOM | 0240 |
| TOSHIBA | 0240, 0045, 0000, 0043,0209, 0041, 1008, 1972,1988 |
| TOSONIC | 0278 |
| TOTEVISION | 0037, 0240 |
| TOUCH | 1972 |
| TRIX | 0037 |
| ULTRA | 0045, 0278 |
| UNITECH 0240 | |
| VECTOR 0045 | |
| VECTOR RESEARCH | 0184, 0038 |
| VEXTRA | 0072 |
| VICTOR 0067, 0041 | |
| VIDEO CONCEPTS | 0045 |
| VIDEO MAGIC | 0037 |
| VIDEOSONIC | 0240, 0000, 0072 |
Remote Control Codes
VIEWSONIC 1972
| VILLAIN 0000 | |
| VOODOO 1972 | |
| WARDS 0050, 0035, 0037, 0048,0047, 0081, 0033, 0240,0045, 0000, 0042, 0043,0041, 0072, 0038, 0479,0065, 0046 | |
| WHITE WESTING-HOUSE | 0000, 0209, 0072, 0278,0479 |
| WORLD 0209, 0002, 0479 | |
| XR-100 0035, 0240, 0000, 0072 | |
| YAMAHA 0041, 0038 | |
| ZENITH 0037, 0039, 0033, 0000,0209, 0041, 0278, 0479,1139 | |
ZT GROUP 1972
PVR Brand CODES
| ABS 1972 | |
| ALIENWARE 1972 | |
| CYBERPOWER 1972 | |
| DELL 1972 | |
| DIRECTV 0739 | |
| GATEWAY 1972 | |
| GO VIDEO | 0614 |
| HEWLETT PACKARD | 1972 |
| HOWARD COMPUTERS | 1972 |
| HIP | 1972 |
| HUGHES NETWORK SYSTEMS | 0739 |
| HUMAX | 0739, 1797, 1988 |
| HUSH | 1972 |
| IBUYPOWER | 192 |
| LINKSYS | 1972 |
| MEDIA CENTER PC | 1972 |
| MICROSOFT | 1972 |
| MIND | 1972 |
| NIVEUS MEDIA | 1972 |
| NORTHGATE | 1972 |
| PANASONIC 0614, 0616 | |
| PHILIPS | 0618, 0739 |
| PIONEER 1337 | |
| RCA | 0880 |
| REPLAY TV | 0614, 0616 |
| SAMSUNG | 0739 |
| SONIC BLUE | 0614, 0616 |
| SONY | 0636, 1972 |
| STACK 9 | 1972 |
| SYSTEMAX | 1972 |
| TAGAR SYSTEMS | 1972 |
| TIVO | 0618, 0636, 0739, 1337 |
| TOSHIBA 1008, 1972, 1988 | |
| TOUCH | 1972 |
| VIEWSONIC 1972 | |
| VOODOO 1972 | |
| ZT GROUP 1972 | |
DBS/PVR COMBO CODES
| DIRECTV 0739 | |
| HUGHES NETWORK SYSTEMS | 0739 |
| PHILIPS | 0739 |
| SAMSUNG | 0739 |
| TIVO | 0739 |
DVD/PVR COMBO CODES
| HUMAX 1797, 1988 | |
| PIONEER 1337 | |
| RCA | 0680 |
| SYLVANIA 0000 | |
| TIVO | 1337 |
| TOSHIBA 1008, 1988 | |
DVD Brand CODES
| 3D LAB | 0503, 0539 |
| ACCURIAN | 0675, 1416 |
| ACOUSTIC SOLUTIONS | 0730 |
| ADCOM 1094 | |
| AFREEY | 0698 |
| AIWA | 0841 |
| AKAI | 0695, 0705, 0770, 1089 |
| ALBA | 0672 |
| ALCO | 0790 |
| ALLEGRO | 0669 |
| AMPHION MEDIA WORKS | 0872 |
| AMW | 0672 |
| APEX DIGITAL | 0533, 0572, 1020 1056, 1061 |
| ARRGO | 1023 |
| ASPIRE DIGITAL | 1168 |
| AUDIOVOX | 0790 |
| AWA | 0730 |
| B & K | 0655, 0662 |
| BBK 1224 | |
| BEL CANTO DESIGN | 1571 |
| BLUE PARADE | 0571 |
| BLUE SKY | 0685 |
| BROKSONIC | 0695 |
| CALIFORNIA AUDIO LABS | 0490 |
| CELESTIAL | 1020 |
| CENTREX 0672 | |
| CINEA | 0831 |
| CINEVISION 0676, 0833, 0869 | |
| CITIZEN | 1003, 0695, 1277, 1587, 2116 |
CLAIRTONE 0571
| COSY | 0778, 0852, 1077, 1090, 1107, 1165, 1177, 1351 |
| CRAIG | 0831 |
| CREATIVE | 0503, 0539 |
| CURTIS MATHES | 1067 |
| CYBERHOME | 0816, 0874, 1023, 1024, 1129, 1502, 1537 |
| CYTRON | 0705 |
| DAEWOO | 0764, 0705, 0770, 0833, 0869, 1169, 1172, 1234, 1242 |
| DANSAI 0770 | |
| DAYTEK | 0872 |
| DECCA | 0770 |
| DENON 0490, 0634 | |
| DENVER 0778 | |
| DIGITREX | 0672 |
| DISNEY 0675, 1270 | |
| DI VIDO 0705 | |
| DUAL | 0675 |
| DURABRAND | 1127 |
| DVD2000 | 0521 |
| EMERSON | 1003, 2116 |
| ENTERPRISE | 0581, 0675 |
| ENTIVO 0503, 0539 | |
| ENZER 0770 | |
| FISHER | 1919 |
| FUNAI | 0675 |
| GATEWAY 1073, 1077, 1158 | |
| GE | 0522, 0815 |
| GO VIDEO | 0573, 0744, 0715, 0741, 0783, 0833, 0869, 1044, 1075, 1099, 1144, 1158, 1304, 1730 |
| GOLDSTAR | 0741, 0869 |
| GOODMANS | 0790 |
| CPX | 0769 |
| GRADIENTE | 0490 |
| GRUNDIG | 0539, 0705 |
| HARMANIKARDON | 0582, 0702 |
| HELLO KITTY | 0831 |
| HITACHI | 0573, 0664, 1919 |
| HITEKER | 0672 |
| INSIGNIA 2095 | |
| INTEGRA | 0571, 0527 |
| IRT | 0783 |
| JBL | 0702 |
| JMB 0695 | |
| JSI | 1423 |
| JVC | 0558, 0623, 0867, 1164 |
| JWIN | 1049, 1051 |
| KAWASAKI | 0790 |
| KENWOOD | 0490, 0534 |
| KLH | 0790, 1020, 1149 |
| KLOSS | 0533 |
| KONKA | 0711, 0721 |
| KOSS | 0769, 1061, 1423 |
| LASONIC 0627 | |
| LECSON 1533 | |
| LENOXX | 1127 |
| LG | 0591, 0741, 0869 |
| LITEON 1058, 1158, 1416, 1440 | |
| LOEWE 0741 | |
| LOGIX | 0783 |
| MAGNASONIC | 0675 |
| MAGNAVOX | 0503, 0539, 0646, 0675, 1354, 1506 |
| MALATA | 1159 |
| MARANTZ 0503, 0539, 0646, 0675, 1354, 1506 | |
| MCINTOSH | 1533, 1273 |
| MEMOREX | 0695, 0831, 1270, 2213 |
| MICROSOFT | 0522, 2083 |
| MINATÓ 0752 | |
| MITSUBISHI 1521, 0521 | |
| MUSTEK 0730 | |
| MYRAD 0594 | |
| NAD | 0741 |
| NAIKO | 0770 |
| NEC | 0785, 0869 |
| NEXXTECH | 1402 |
| NINTAUS | 1051 |
| NORCENT | 1003, 0872, 1107, 1265 |
| ONKYO 0503, 0627, 1769 | |
| OPPO | 0575, 1224, 1525, 2165 |
| OPTIMUS | 0571 |
| PALSONIC | 0672, 0852 |
| PANASONIC 0503, 0490, 0571, 0703, 1641, 1762 | |
| PHILCO 0675 | |
| PHILIPS | 0503, 0539, 0646, 0675, 1267, 1340, 1354, 2056, 2084 |
| PIANODISC | 1024 |
| PIONEER 0525, 0571, 0142, 0631, 1571 | |
| POLAROID 1020, 1061, 1066 | |
| POLK AUDIO | 0539 |
| PORTLAND | 0770 |
| PRESIDIAN | 0675 |
| PRIMA | 2126, 2127 |
| PROCEED | 0672 |
| PROSCAN | 0522 |
| PROVISION | 0778 |
| RADIONETTE | 0741 |
| RADIOSHACK | 0571 |
| RCA | 0522, 0571, 0790, 0822, 1769 |
| REALISTIC 0571 | |
| REOC | 0752 |
| RIO | 0869 |
| RJTECH | 1360 |
| ROTEL | 0623, 1178 |
| SAMPO 0698, 0752 | |
| SAMSUNG | 0490, 0573, 0744, 0199, 0820, 1044, 1075, 2069 |
| SANSUI 0695 | |
| SANYO | 0675,0695, 0873, 1919 |
| SCHNEIDER 0783 | |
| SCHWAIGER | 0752 |
| SENSORY SCIENCE | 1158 |
| SHARP | 0630, 0675, 0752, 1256 |
| SHERWOOD | 0633, 0770, 1043, 1077 |
| SHINSONIC | 0533 |
| SLIM ART | 0784 |
| SM ELECTRONIC | 0730 |
| SONIC BLUE | 0573, 0715, 0763, 0869, 1099 |
| SONY | 0533, 1533, 0864, 1033, 1070, 1431, 1516, 1536 |
| SYLVANIA 0675 | |
| SYMPHONIC | 0675 |
| TAG MCLAREN | 0894 |
| TATUNG | 0770 |
| TEAC | 0571, 0790 |
| TECHNICS | 0490, 0703 |
| TECHNIKA | 0770 |
| TECHSONIC 0730 | |
| THETA DIGITAL 0571 | |
| THOMSON | 0522 |
| TIVO | 1503 |
| TOSHIBA 0503, 0573, 0539, 0685, 1154, 1503, 1608, 1769 | |
| TREDEX | 0600, 0803 |
| UNIMAX | 0770 |
| UNITED 0730 | |
| UNIVERSUM | 0591 |
| URBAN CONCEPTS | 0503, 0539 |
| V | 1064, 1226 |
| VENTURER | 0790 |
| VIZIO | 1064, 1226 |
| VOCOPRO | 1360 |
| XBOX | 0522, 2083 |
| YAMAHA | 0490, 0539, 0545, 0497 |
| YAMAKAWA | 0872 |
| ZENITH 0503, 0591, 0741, 0869 | |
| ZEUS | 0784 |
| ZOECE | 1265 |
| BLU4RAY DISC | CODES |
| LG | 0741 |
| PANASONIC 1641 | |
| PHILIPS | 2064 |
| PIONEER 0142 | |
| SAMSUNG | 0199 |
| SONY | 1516 |
| DVD/PVR COMBO | CODES |
| GO VIDEO | 1730 |
| PANASONIC 0480 | |
| PHILIPS | 1340 |
| PIONEER 0631 | |
| RCA | 0522 |
| SHARP | 1256 |
| SONY | 1033, 1070, 1536 |
| SYLVANIA 0675 | |
| TOSHIBA 1503 |
| HD4DVD | CODES |
| LG | 0741 |
| MICROSOFT | 2083 |
| ONKYO 1769 | |
| RCA | 1769 |
| TOSHIBA 1769 | |
| XBOX | 2083 |
| AUDIO RECEIVER Brand | CODES |
| AIWA | 1405, 0189, 0121, 1243, 1368, 1641 |
| ALCO | 1390 |
| ANAM | 1609 |
| APEX DIGITAL | 1774 |
| ARCAM 1189 | |
| AUDIOTRONIC | 1169 |
| AUDIOVOX | 1390 |
| B & K | 0820, 0840 |
| BOSE | 0839, 1253, 1933 |
| BRIX | 1602 |
| CAIRN | 0169 |
| CARVER 1189, 0189, 0121 | |
| CURTIS MATHES | 0014 |
| DELPHII 1414 | |
| DENON 1360, 0121, 1142, 1306 | |
| ELECTROHOME | 2026 |
| GRUNDIG | 0189 |
| HARMAN/KARDON | 0169, 0091, 1304, 1306 |
| HITACHI 0228 | |
| INSIGNIA 1030, 2169 | |
| INTEGRA | 0642, 1296, 1320, 1605 |
| JBL | 1306 |
| JVC | 1058, 1374, 1495, 1811 |
| KAWASAKI | 1390 |
| KENWOOD | 1570, 1569 |
| KLH | 1390, 1428 |
| KOSS | 1497 |
| LG | 2197 |
| LINN | 0189 |
| LIQUID VIDEO | 1487 |
| MAGNAVOX | 1189, 1269, 0189, 1266, 1514 |
| MARANTZ 1189, 1269, 0189, 0891 | |
| MICROMEGA | 1189, 0189 |
| MITSUBISHI 1393 | |
| MYRAD 1188 | |
| NAKAMICHI | 0097, 1555 |
| ONKYO 0842, 1298, 1320, 1805 | |
| OPTIMUS | 1023, 0014, 0121, 0670 |
| ORITRON | 1497 |
| PANASONIC 1308, 1518, 1288, 1316, 1548, 1633, 1763, 1764, 2067 | |
| PHILIPS | 1189, 1269, 0189, 0891, 1266 |
| PIONEER 1023, 0014, 0630, 1384, 1935 | |
| POLK AUDIO | 0189, 1414 |
| RADIO SHACK | 1609 |
| RCA | 1023, 1609, 1390 |
| REALISTIC 1609, 0121 | |
| REVOX | 0189 |
| SAMSUNG | 1304, 1500, 1868 |
| SANGEAN 2165 | |
| SANSUI 1189, 0189 | |
| SHERWOOD | 1913 |
| SIRIUS | 1602, 1811 |
| SONY | 1058, 1441, 1258, 1759, 1622, 1406, 1558, 1658, 1758, 1858 |
| SOUNDESIGN | 0670 |
| STEREOPTIONNICS | 1023 |
| TEAC | 1390 |
| TECHNICS | 1308, 1518, 1633 |
| THORENS | 1189 |
| TOSHIBA 0642, 1758 | |
| VENTURER | 1380 |
| WARDS 0188, 0014 | |
| XM | 1406, 1414 |
| YAMAHA | 1023, 0176, 1176, 1276, 1331, 1815, 2061 |
| AUDIO AMPLIFIER | CODES |
| Brand | |
| ADCOM 0577, 1100 | |
| BOSE | 0674 |
| CARVER 0892 | |
| CARY AUDIO DESIGN | 1879 |
| CLASSE | 1461 |
| FLEXTRONICS | 1879 |
| HALCRO 1934 | |
| HARMANKARDON | 0892 |
| KRELL | 1837 |
| LEFT COAST | 0892 |
| LEXICON 1145, 1802 | |
| MARANTZ 0892 | |
| MARK LEVINSON | 1483 |
| PARASOUND | 1934 |
| PHILIPS | 0892 |
| POLK AUDIO | 0892 |
| PRIMARE | 1395 |
| YAMAHA | 0354 |
- Press MENU button on the remote control to display the different features on your Hitachi LCD TV.
- Use the CURSOR PAD (▲, ▼) to highlight a feature of the On-Screen Display menu. Press the SELECT button to select.
- Press EXIT button on the remote control to quickly exit from any menu.
This part of the screen shows which selections are available.
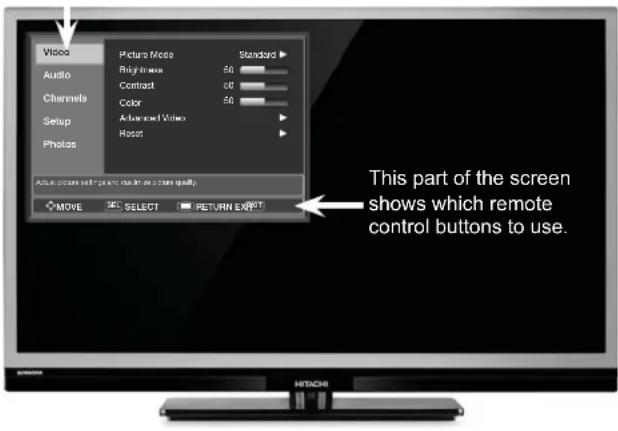
MENU
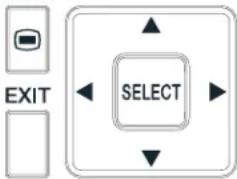
NOTE
- The On Screen .isplay (OS.) for the different submenus sho+n in the follo+ing pages are for illustration purposes only, there may be slight differences from the actual appearance of the OS. of your Hitachi -C. TV.
Video
| Pi)tur Mod | Select among different picture modes. |
| Brig(tn ss | Adjust picture brightness. |
| Contrast | Adjust picture contrast. |
| Color | Adjust color. |
| Advan) d Vid o | Adjust advanced video feature to fine tune the picture. |
| R l220 ® Motion | Adjust the smoothness of motion in movies. |
| Color T mp ratur | Set to High for less intense color with more blue, set to Medium for natural color and set to Standard for warm colors. |
| Nois R du)tion | Reduce noise in the picture. |
| Tint | Adjust the overall color tone to appear natural. |
| S(arpn ss | Adjust the fine detail in the picture. |
| D1nami) Gamma | Automatically adjust picture detail and brightness. |
| Asp )t Ratio | Select the preferred picture's aspect ratio. |
| Ov rs)an | When connecting a computer, turn off to show the full image on the TV. |
| Ba)klig(t | Adjust to increase or decrease the brightness of backlight. |
| W(it Balan) | Adjust the shadow color (Cutoff) and white color (Drive) to achieve natural whites and neutral grey shadow |
| Lo)k S ttings | Select On to lock your favorite settings. |
| R s t | Choose to Reset Video Settings to factory settings. |
Audio
| • Sound Mod | Selects 6 audio presets (Standard, Movie, Music, News, Custom, Equalizer). |
| • Balan) | Adjust the balance. |
| Advan) d Audio | Adjust additional audio features. |
| • Bass | Adjust the intensity of low frequencies. |
| • Tr bl | Adjust the intensity of high frequencies. |
On-Screen Display
| • Equaliz r Fine tune the audio frequenciesseperately at 130Hz, 400Hz, 1.2kHz,4kHz, and 9.5kHz. | |
| • Int rnalSp ak rs | Turn On/Off internal speakers. |
| • Digital Output | Select Optical Output options(Available for digital channel andHDMI). |
| • Audio Sour) | Select between three Audio Sources(Stereo, Mono, SAP) (Available foranalog channel). |
| • AudioLanguag | Select Language options if available(Available for digital channel). |
| • P rf )t Volum | Adjust volume to be closer in levelbetween channels. |
| • R s t Resets all | Audio settings the originalcondition. |
Channels
| • Sour) Select the signal Source for the TV. | |
| • Auto C(ann I S)an | Search for active channels and store them to the channel list. |
| • Signal Str ngt( | Access Signal Strength meter (Available for digital channel). |
| • Add/Skip C(ann Is | Set changes to Channel List. |
| • Favorit C(ann Is | Manage your Favorite Channels. |
| • C(ann I Lab Is | Assign names to any of the channels. |
| • Audio Onl1 Play the audio with the picture turned off. | |
| • Auto Asp )t | Automatically adjust aspect ratio based on TV size and TV program. |
Setup
| • M nu Language | Choose English, Spanish, or French for OSD Language. |
| • Par ntal Controls | Ratings system to block various types of programs. |
| • Clos d Captions | Feature to turn On/Off closed captions. |
| • Tim Set Clock Settings. | |
| • Input Lab Is Assign name to any of avaliable inputs excluding the TV input. | |
| • HDMI 4 CEC Set to On, this feature will enable simplified operation of compatible HDMI CEC devices. | |
| • RGB Options | Adjust Horizontal Position, Vertical Position, Clock, Phase and Reset. |
| • S1st m Info | Dsiplay information about your TV. |
| • En rg1 Options | Select Power Consumption Savings options. |
| • Lig(t Control | Turn On or Off the Accent Light on the front of your TV. |
| • D mo Mod | Turn the Demo Mode On or Off. |
| • R s t AV & S tup | Resets all Audio, Video and Setup settings to the original condition. |
Photos
| • P(otos | View digital still pictures from USB Drives. |
NOTES
- If there are any options grayed out, this is an indication that the option is not available for that specific input or mode.
- Changing of any Video/Audio settings, other than the Standard/.efault settings, may not meet the N RGY STAR requirements.
VIDEO MENU
Select Video to adjust picture settings and improve picture quality. You can independently customize each of the video inputs, including Analog channels separately from Digital Channels (under TV Mode). The adjustments will be applied to Custom settings.

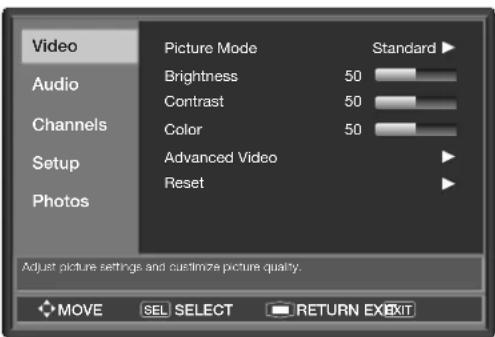
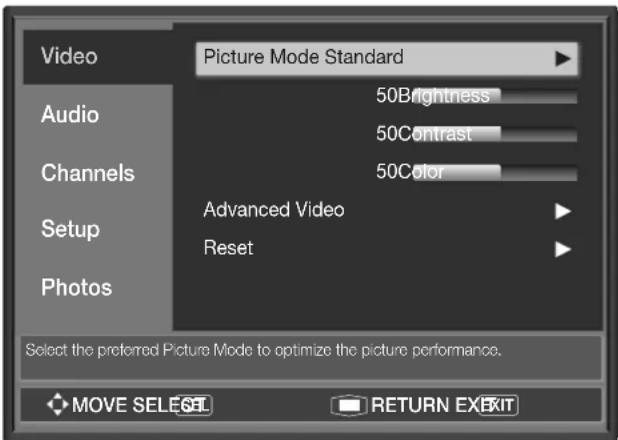
Picture Mode
Use this function to choose from preset picture settings to optimize your TV's performance.
- Use the CURSOR PAD ▶ to select Picture Mode settings.
- Then press the CURSOR PAD◀ to return to the Video menu or press the EXIT button to quit menu.
- There are six Picture Modes available: Dynamic, Standard, Pro-Day, Pro-Night, Game, and Custom Mode. Standard mode is the factory preset mode for your TV. The only mode that can be directly changed by adjusting any Video setting to your desired conditions is the Custom mode. The other modes, with the exception of the Pro-Day and Pro-Night, are preset. Game mode is for automatic brightness and contrast adjustment when playing video games. Any changes made to these modes will be applied to Custom mode.
NOTES
- For the PC input, there are only t+o Picture modes available: Standard and Custom. In this case, only the Custom mode can be changed to your desired conditions.
- Video setting can be set to the user's preference in Game mode (Similar to Custom mode) +ith the e)ception of the "Reel120 Motion" setting.
- If you change any of the ad(ustments in the Dynamic, and Standard modes, the name of the Custom option +ill change. For e)ample, the changes on Dynamic +ill rename the option as "Custom-Dyn.". This means that the original picture mode is not affected by the changes; the only thing affected is that Custom mode +ill ta,e the video ad(ustments of the mode +here the change +as made.
- For Input Mode, CAB- and AIR share the same Video ad(ustment settings. Also, each of the video inputs have their o+n independent video ad(ustment settings.
Brightness
Use this function to change the overall brightness of the dark areas of the picture.
Contrast
Use this function to change the contrast between black and white levels in the picture.
Color
Use this function to adjust the level of color in the picture.
Advanced Video Settings
Press the SELECT button or the CURSOR PAD to enter the function settings.
Reel120® Motion
Hitachi's advanced video processor can display movies at 120 frames per second. The following settings are available to smooth the motion of movie sources. Please note that the effect may not be immediately noticeable and the effect depends on the content of the movie.
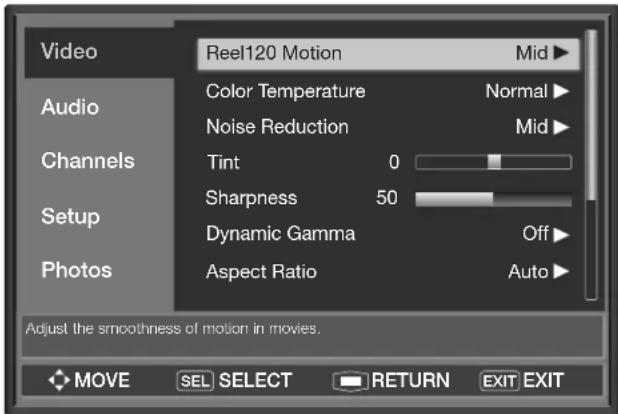
Video
- Use the CURSOR PAD▲ or ▼ to highlight Reel120 Motion function.
- Press the CURSOR PAD ▶ to select:
24p Film Mode: Select for a smooth and clear motion from film based video.
High: Select for the maximum smooth motion effect.
Mid: d Select for a moderate smooth motion effect.
Low: Select for a mild smooth motion effect.
Off: d Select this setting if there is noise with the High, Medium or Low settings.
Color Temperature
Set to High for cooler color with more blue, set to Medium for a more natural color or set to Standard for accurate color.
Noise Reduction
The Noise Reduction function automatically reduces conspicuous noise in the picture without degrading picture quality. Set Noise Reduction to Off if you see individual blocks in the picture.
Tint
Use this function to adjust flesh tones so they appear natural.
Sharpness
Use this function to adjust the amount of fine detail in the picture.
Dynamic Gamma
The Dynamic Gamma feature produces greater picture detail in dark or bright scene area.
Aspect Ratio
Use this function to select the Picture Format Aspect Ratio.
Auto Aspect: Automatically adjust the Aspect Ratio depending on the input signal.
Aspect Modes: Manually select the Aspect Ratio. There are different aspect ratios available according to the signal in use. See page 57.
| Input Signal Display Screen | Display Aspect Recommended | To display suitable screen as follows: | |
| W( n Wat)(ing Standard D finition Pi)tur s: | |||
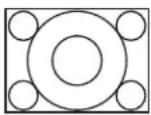 (4:3 Signal) (4:3 Signal) | 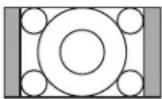 | Normal | Displays 4:3 programs in there original aspect ratio with bars to the left and right of the image. |
 | Wide | Expands a 4:3 aspect ratio program to fill the widescreen 16:9 screen | |
 (Vista) (Vista) |  | Zoom | Use this aspect mode to expand letterbox movies to fill the screen.Note that some of the image may not be visible. |
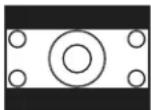 (Cinema) (Cinema) | 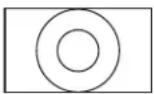 | Cinema | Use this aspect mode to fill the screen with very widescreen movies.Note that some of the image may not be viewable in this mode. |
| W( n Wat)(ing Hig(D finition Pi)tur s: | |||
  | Wide | Plays a 16:9 image faithfully showing 95% for SD / 97.5% for HD of the size. | |
Overscan
When connecting a computer, turn off to show the full image on the TV.
Backlight
Adjust the brightness of the Backlight for maximum visibility. It changes the intensity of the backlight. Increase for bright rooms and decrease for darker rooms to make the dark areas of the picture black.
White Balance
Use this function to adjust the dark end (Cutoff) and bright end (Drive) of the White background.
ock Settings
Select On to lock your favorite settings
NOTE
- This function is available only for Pro-Day and Pro-Night modes.
Reset
This function allows you to reset the Video Menu Settings of the present input source and return it to the Standard video mode.
- Use the CURSOR PAD ▲ or ▼ to highlight this function.
- Press the SELECT button or the CURSOR PAD ▶ to select Yes or No.
- Press the SELECT button on the Yes option to execute the reset of the Video settings.
Depending on the video program being viewed, you can customize each video input to your preference to increase viewing performance and pleasure.
NOTES
- If you run this Reset function, only the present input source +ill reset to its initial condition. For example, if the Reset function has been selected and done for H.MI 1 input source, only the H.MI 1 settings +ill return to its factory default.
- If "Lock Settings" is turned on (refer to page 34) running the Reset function +ill not effect your Pro-Day and Pro-Night Mode settings.
Audio
AUDIO MENU
Select Audio to adjust the sound to your preference.
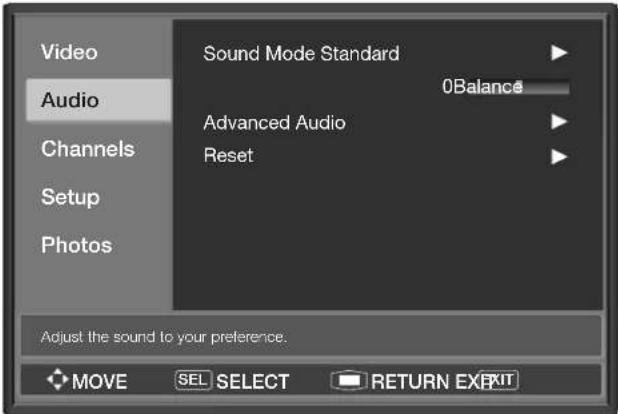
Sound Mode
Select the sound mode you like.
- dStandard: Normal audio conditions.
- dMovie: Enhanced treble and bass for watching movies.
• dMusic: Good for music listening.
• dNews: Clear for watching news programs. - dCustom: Manually adjust for your preference.
- dEqualizer: Allows you to adjust separately at the spectrum 130Hz, 400Hz, 1.2kHz, 4kHz, and 9.5kHz.
The only mode that can be directly changed by adjusting any audio setting to your desired conditions is the Custom mode. The other modes are preset and any changes made to these modes will be applied to Custom mode.
Balance
This function controls the left to right audio balance of both the internal speakers and headphone jack.
Advanced Audio
Press the CURSOR PAD ▶ to enter its sub-menu.
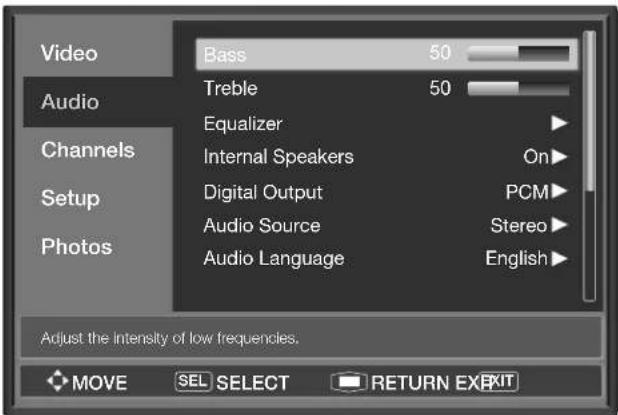
Bass
This function controls the low frequency audio to the speakers.
Treble
This function controls the high frequency audio to the speakers.
Equalizer
After selecting Equalizer as your sound mode, you can adjust the audio spectrum each at 130Hz, 400Hz, 1.2kHz, 4kHz, and 9.5kHz.
Internal Speakers
This function is useful when using external speakers. Select On if using the internal speakers only. Select Off if you prefer to use the speakers from a separate stereo system.
Digital Output
This function allows you to select between RAW and PCM. This setting changes the format of the Digital Optical Output.
- dPCM: Select this feature if the TV is connected to an amplifier/receiver with a PCM only decoder; it will provide two independent soundtrack channels through the optical audio output jack (Digital Audio).
- dRAW: Select this feature to allow the original audio bit stream to be passed through to the audio receiver.
Audio Source
Multi-Channel Television Sound will allow you to select Stereo (a stereo broadcast), Mono (monaural sound) used when receiving a weak stereo broadcast or SAP(Second Audio Program) which may be a secondary language, weather report, etc. This setting is only for analog channels.
Audio language
Some programs transmit more than one DTV language option. Most will have English as a default Ian The language function will allow you to select up to 10 language options (if available). Please try all available options.
Perfect Volume
This function will automatically adjust volume so each channel and input has the same average volume level.
Reset
This function allows you to reset the Audio Menu Settings of the present input source and return it to the Standard mode and default settings.
CHANNELS MENU
Select Channels to set your signal source options, run New Channel Scan, check Signal Meter and set Channel List (Add channels to List, Channel/Labels and Favorite Channels).
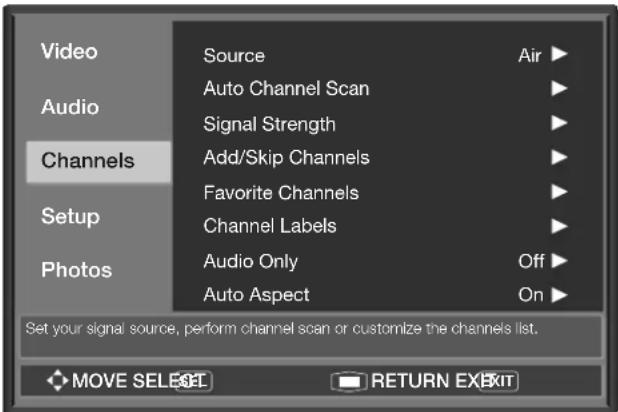
- Press the CURSOR PAD ▲ or ▼ highlight functions.
- Press the SELECT button or the CURSOR PAD enter the next sub-menu.
- Press the CURSOR PAD ▲ or ▼ to select.
Source
Select the signal Source for the TV. Select Air for using an indoor or outdoor antenna. Select Cable for using a cab system.
Auto Channel Scan
This feature will automatically store active Analog and Digital channels to the Channel list. This scan will erase all channels previously stored in the list.
Signal Strength
Select Signal Strength when using an indoor or outdoor antenna. This feature will show the signal strength of the antenna signal to help you adjust your antenna to optimize signal reception. Use the MENU or the EXIT button to return.
NOTE
- The Signal Strength meter +ill not be available (grayed out) +hen +atching analog channels.
Add/Skip Channels
This function allows you to add channels to the channel memory.
Favorite Channels
This function allows you to manage your favorite channels.
- Use the CURSOR PAD ▲ or ▼ to navigate the Channels.
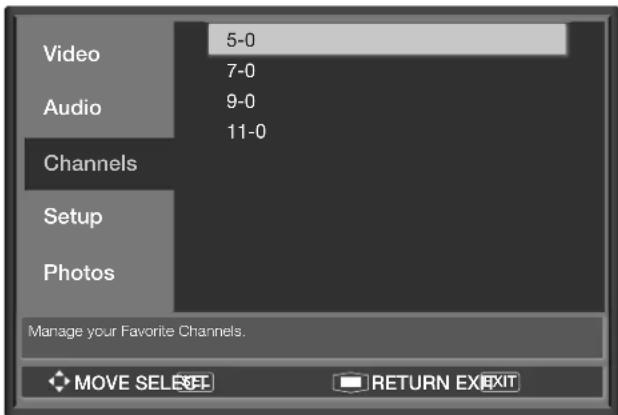
- Press the SELECT button or the CURSOR PAD ▶ to check mark the channel and make it a Favorite channel. Select all desired channels.
- Press the EXIT button to return to normal viewing.
- To view all the Favorite channels that you have chosen, press the FAV CH button on the remote control.
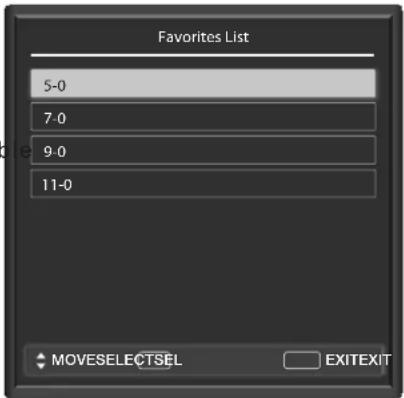
Channel abels
Use this feature to give a name to any of the channels.
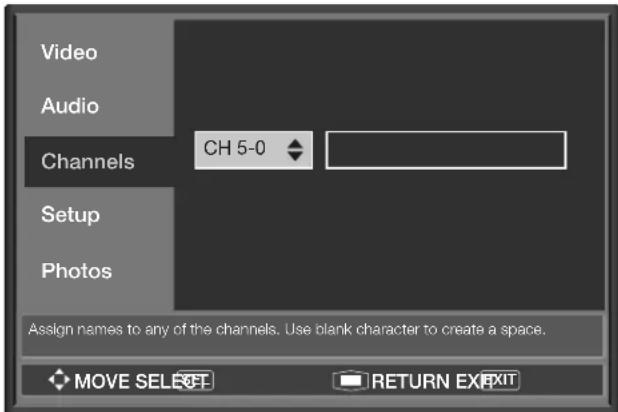
Audio Only
Play the audio with the picture turned off.
Auto Aspect
Automatically adjust aspect ratio based on TV size and TV program.
Setup
SETUP MENU
Select Setup when setting up your TV for the first time.
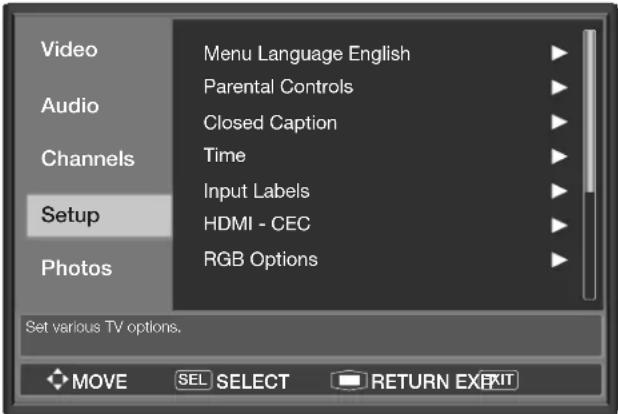
- Use the CURSOR PAD ▲ or ▼ to select the Setup menu.
- Use the CURSOR PAD ▶ to enter the option of your choice and make the changes that you need.
- Press the MENU button to return.
Menu language
Sets the Language of the Menu OSD. This feature will allow you to select any one of three different languages for the on-screen displays.
- Use the CURSOR PAD ▶ to select the language of your choice.
- Press the EXIT button to quit the menu or the MENU button to return to the previous menu.
Parental Controls
This function will block out the picture and sound selected rating levels.
The password to enter the Locks feature is a 4 digit number. The factory preset password is 0000. Use the NUMERIC buttons to enter the password.
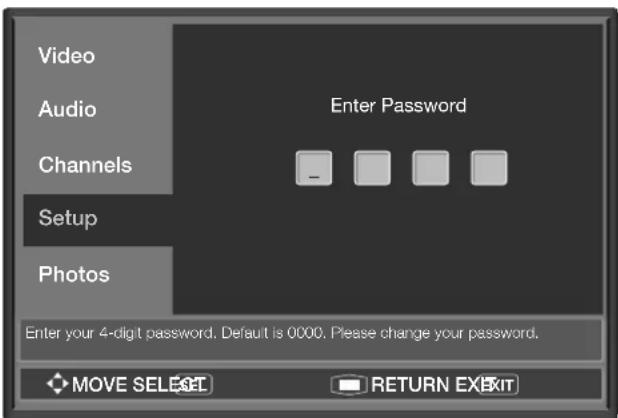
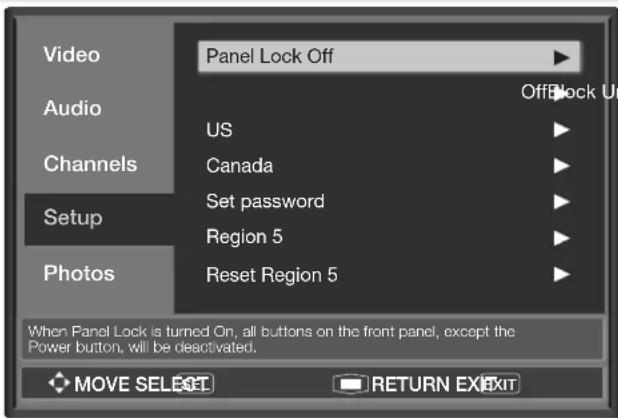
Panel ock
When Panel Lock is turned On, all buttons on the front panel, except the POWER button, will be deactivated.
Block Unrated TV
When this feature is turned On, programs without ratings will be blocked.
US
This option will block TV and Movie Ratings in the USA to prevent viewing of any content that you feel may be inappropriate (See page 37).
Canada
This option will block TV and Movie Ratings in Canada to prevent viewing of any content that you feel may be inappropriate due to its content (See page 38).
U.S. Motion Pi)tur Ratings Tabl
| NOT RATED he | Contains no rating. Not Rated (NR) and Applicable (NA) programs. Movie has not rated or ratings do not apply. |
| G | General audiences. All ages admitted. |
| PG | Parental guidance suggested. Some material may not be suitable for children. |
| PG-13 Parents strongly cautioned. Some material may be inappropriate for children under 13. | |
| R | Restricted. Under 17 requires accompanying parent or adult guardian. |
| NC-17 | No one 17 and under admitted. |
| X | Adults only |
NOTES
- If the movie does not carry a rating, the TV +ill not bloc, it.
- Bloc,ing NOT RAT. programs may bloc, emergency programming, sports, ne+s, public service announcements, religious programs and +eather.
Setup
U.S. TV Parntal Guid Ratings Tabl
| TV-Y All children. The themes and elements in this program are specifically designed for a very young audience, including children from ages 2-6. |
| TV-Y7 Directed to older children. Themes and elements in this program may include mild physical or comedic violence, or may frighten children under the age of 7. |
| TV-G General audience. It contains little or no violence, no strong language, and little or no sexual dialogue or situations. |
| TV-PG Parental guidance suggested. The program may contain infrequent coarse language, limited violence, some suggestive sexual dialogue and situations. |
| TV-14 Parents strongly cautioned. This program may contain sophisticated themes, intense sexual situation, more intense violence and intensely suggestive dialogue. |
| TV-MA Mature audiences only. This program may contain mature themes, indecent language, graphic violence, and explicit sexual content. |
| FV: Fantasy/Cartoon Violence V: Violence S: Sexual SituationL: Adult Language D: Sexually Suggestive Dialogue |
| G | General Audience - Violence Guidelines: Will contain very little violence, either physical or verbal or emotional. Will be sensitive to themes which could frighten a younger child, will not depict realistic scenes of violence which minimize or gloss over the effects of violent acts. Other Content Guidelines: There may be some inoffensive slang, no profanity and no nudity. |
| PG | Parental Guidance - Programming intended for a general audience but which may not be suitable for younger children. Parents may consider some content inappropriate for unsupervised viewing by children ages 8-13. Violence Guidelines: Depictions of conflict and/or aggression will be limited and moderate; may include physical, fantasy, or supernatural violence. Other Content Guidelines: May contain infrequent mild profanity, or mildly suggestive language. Could also contain brief scenes of nudity. |
| 14+ | Programming contains themes or content which may not be suitable for viewers under the age of 14 - Parents are strongly cautioned to exercise discretion in permitting viewing by pre-teens and early teens. Violence Guidelines: May contain intense scenes of violence. Could deal with mature themes and societal issues in a realistic fashion. Other Content Guidelines: May contain scenes of nudity and/or sexual activity. There could be frequent use of profanity. |
| 18+4 V, higher | Adult - Violence Guidelines: May contain violence integral to the development of the plot, character or theme, intended for adult audiences. Other Content Guidelines: May contain graphic language and explicit portrayals of nudity and/or sex. |
NOTES
- If you Bloc, TV-14., you +ill still permit TV-MA programs; If you bloc, TV 18+4V , you +ill automatically bloc, TV-MAV programs, but you +ill still permit TV-MA-S programs. This means that the TV +ill bloc, violence in TV-14 and higher (TV-MA), but not language and se).
- TV program ratings are dependent on the broadcaster. If the program is not rated, the TV +ill not bloc, it.
Canadian Ratings Fr n)( Tabl
Canadian Ratings Englis( Tabl
| C | Programming intended for children under age 8 - Violence Guidelines; Careful attention is paid to themes, which could threaten children's sense of security and well-being. There will be no realistic scenes of violence. Depictions of aggressive behavior will be infrequent and limited to portrayals that are clearly imaginary, comedic or unrealistic in nature. Other Content Guidelines: There will be no offensive language, nudity or sexual content. |
| C8+ | Programming generally considered acceptable for children 8 years and over to watch on their own - Violence Guidelines: Violence will not be portrayed as the preferred, acceptable, or only way to resolve conflict; or encourage children to imitate dangerous acts which they may see on television. Any realistic depictions of violence will be infrequent, discreet, of low intensity and will show the consequences of the acts. Other Content Guidelines: There will be no profanity, nudity or sexual content. |
| G | General - Programming intended for audiences of all ages. Contains no violence, or the violence content is minimal or is depicted appropriately with humor or caricature or in an unrealistic manner. |
| 8 ans+ | 8 + General - Not recommended for young children - Programming intended for a broad audience but contains light or occasional violence that could disturb young children. Viewing with an adult is therefore recommended for young children (under the age of 8) who cannot differentiate between real and imaginary portrayals. |
| 13 ans+ | Programming may not be suitable for children under the age of 13 - Contains either a few violent scenes or one or more sufficiently violent scenes to affect them. Viewing with an adult is therefore strongly recommended for children under 13. |
| 16 ans+ | Programming is not suitable for children under the age of 16 - Contains frequent scenes of violence or intense violence. |
| 18 ans+ | Programming restricted to adults - Contains constant violence or scenes of extreme violence. |
Set password
- To change the password, select Set the Password option to change the factory preset password (0000) to your preference. If you forget your password, use the factory password 7777 to change your password.
- Enter a new four digit number.
- Press the EXIT button to quit the menu.
Region 5
Use Region 5 to block various types of movies and television programs based on ratings systems used in the U.S. that you feel may be inappropriate due to its content. The Region 5 option will operate for Digital Channels (ATSC) only.
Reset Region 5
Clear the downloaded Region 5 rating information and restore to the factory default setytings.
Ratings Pro) dur
- Use the CURSOR PAD ◀ or ▶ to select the Rating category (MPAA, TV Rating, etc.) that you want to block.
- Press the SELECT button to block the Rating that you have selected.
- Press the EXIT button to quit the menu.
R gion 5 Alt rnat Ratings 8Exempl Onl19
| G General audiences. All ages admitted. |
| PG Parental guidance suggested. Some material may not be suitable for children. |
| PG-13 Parents strongly cautioned. Some material may be inappropriate for children under 13. |
| R Restricted. Under 17 requires accompanying parent or adult guardian. |
| NC-17 No one 17 and under admitted. |
| X Adults only. |
| Y Adults only. |
NOTES
- In order to set the Region 5 Ratings the ATSC .igital channel received must include Region 5 Ratings data. To see if the channel has Region 5 Ratings, press the INFO button on the remote control.
- Once the TV has received Region 5 Ratings data, the Region 5 option in the Parental Controls menu +ill become available and display the data.
Closed Caption
Closed Caption is the dialogue, narration, and/or sound effects of a television program or home video which are displayed on the TV screen. Your local TV program guide denotes these programs as cc or □.
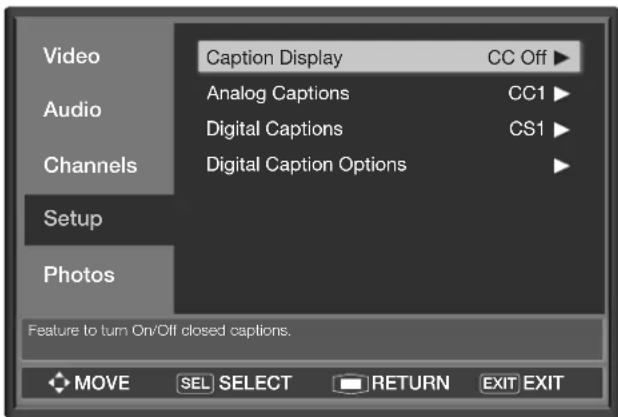
- Use the CURSOR PAD ▲, ▼ and ▶ to highlight and select the function to change.
CC On / CC Off
Turn the display cc on or off.
CC With Mute
Turn the display cc on when Mute is on.
- Press the EXIT button to quit menu or press MENU to return to the Main MENU.
Analog Captions
Set captions for analog programs. This function will help choose and set available mode and channel.
CC1 \~ CC4
These are for the program you are viewing.
TEXT1 \~ TEXT4
These are for additional information such as news reports or a TV program guide. This information covers the entire screen and viewing the TV program is not possible. Text may not be available with every CC program.
Digital Captions
Set captions for digital programs and set available language.
Digital Caption Options
This function will help choose and set font, size, color and background style of digital captions.
NOTES
- The .igital Closed Captions feature only +or,s +hen using the "TV" input of this television.
- Caption .isplay +ill not +or, +hen vie+ing a 480i, 480p, 720p, 1080i or 1080p input via the COMPONENT: Y-PbPr or H.MI inputs.
- Analog and digital Closed Captions availability and content depends on the broadcaster. .igital Closed Caption are available + then the Closed Caption icon is displayed on the info banner.
- .igital Captions language +ill not be available (grayed out) +hen using analog channels.
Date/Time
Use this option to set the Clock, Date and Time Zone for your LCD TV.
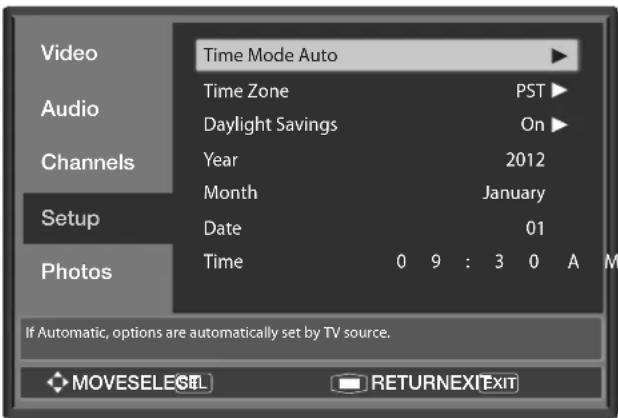
- Use the CURSOR PAD ▲, ▼ and ▶ to highlight and setup the Time settings.
- If you observe daylight savings, use the CURSOR PAD to highlight Daylight Savings and press the CURSOR PAD ▶ to activate it. This can only be changed if the Time Mode is set to Auto.
- Use the CURSOR PAD to highlight and adjust the Current Time (hour and minute), AM or PM, Month, Day and Year.
- Press the SELECT button to set the Time.
- Press the EXIT button to quit the menu or the MENU to return to the previous menu.
NOTES
- When Auto is set, .aylight Savings can be set, the TV +ill automatically calculate the cloc, ad(ustment for .aylight Saving. Set this setting according to the current .ST status.
- The TV counts electrical pulses for regulating the timers. When the power cord is unplugged quickly, the cloc, +ill reset to factory default setting.
- The Year, Month, .ate, and Time setup can be changed only if the Time Mode is set to Manual.
Sleep Timer
Select this feature to set your Sleep Timer from 5 minutes to 240 minutes.
Input abels
Use this feature to give a name to any of the video inputs excluding the TV input.
- Press the CURSOR PAD ▲ or ▼ to highlight Inputs Labels.
- Press the CURSOR PAD ▶ to select your choices.
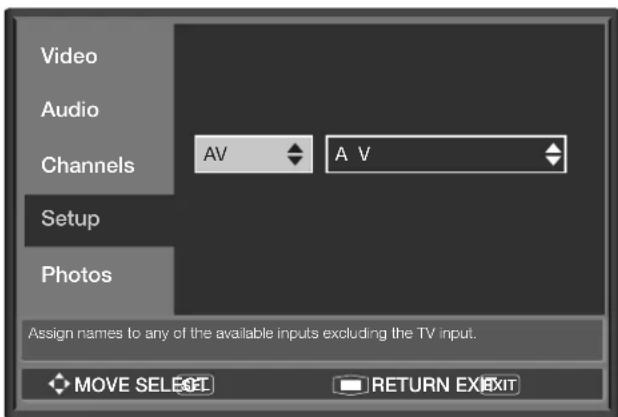
HDMI - CEC
Set to On and this feature will enable the HDMI-CEC signal bus to allow your Hitachi LCD TV to discover and communicate automatically with other compatible HDMI-interfaced Audio/Video device.
The CEC signal bus makes global controls possible, based on "plug & play" automation, to minimize the number of IR remotes and key-presses required for basic operation of your AV device. Select Off to disable this option.
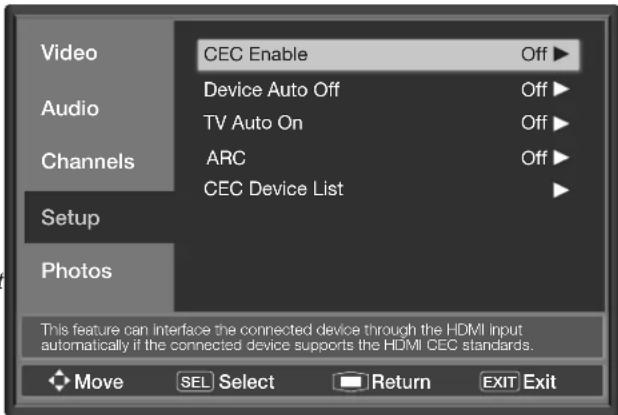
With the "HDMI - CEC" feature, you can interface the connected device through the HDMI jack automatically if the connected device meets the "HDMI CEC (Consumer Electronics Control)" industry standard. Please check if the connected device supports HDMI CEC before using this feature.
For example, here are three common functions after setting item "CEC Enable" to "On".
| Feature | Description |
| One-Touch Play (TV Auto On) | Pushing the “Play” button on the CEC enabled device will command the device to play, turn the TV on, and the HDMI input, that the device is connected to, will become the active input device for the TV. |
| System Standby (Device Auto Off) | When the user turns off the TV, all active CEC enabled devices on the HDMI input will go to Standby. |
Setup
| Feature Description | |
| Playback Control | The user can operate the CEC enabled device's deck control functions (i.e. Play, Stop, Fast Forward and Rewind) by the TV's remote control's transport keys (ie. ▶, ■ ◄d ). ▶ |
NOTE
- Not all devices +ith an H.MI connection have the C C feature. Consult the instruction manuals for the device you are trying to control to confirm +hether or not C C is available.
RGB Options
This function is to adjust the RGB input to match your PC or laptop output with your LCD Television.
- Press the CURSOR PAD ▲ or ▼ to highlight RGB Options.
- Press the CURSOR PAD ▶ to select your choices.
There are six options for the RGB input: Auto Adjust, H-Position, V-Position, Clock, Phase, and Reset.
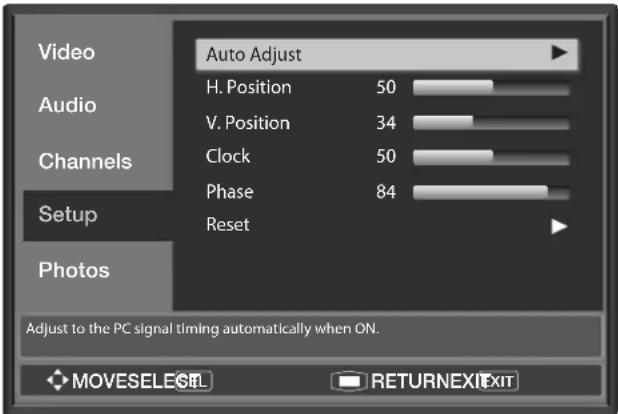
Auto Adjust
Adjusts Horizontal Position, Vertical Position, Clock, and Phase automatically.
H-Position
Adjusts the display position horizontally.
V-Position
Adjusts the display position vertically.
Clock
Minimizes vertical stripes on the screen.
Phase
Minimizes the blurring of letters and stripes on horizontal row.
Reset
Each item in RGB Options Menu will be restored to the factory setting by selecting Yes.
System Info
Dsiplay information about your TV.
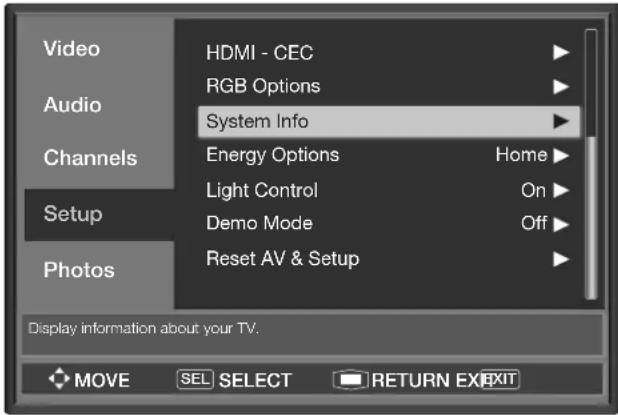
Energy Options
Select Power Consumption Savings options.
Home/Retail
You can change the initial setting to either Home or Retail mode quickly through this menu option, without running the TV Setup Wizard again (See page 13).
NOTE
- Retail mode is intended for sho+room use only. Any menu or control changes in this mode +ill not be saved +hen the TV is turned off.
ight Control
This feature allows you to save electric energy consumption by turning Off the Accent Light on the front of your TV.
Demo Mode
Turn the demo mode On or Off.
A TV feature introduction will be popped up at the upper right screen corner.
Reset AV & Setup
This feature restores all Audio, Video and Setup settings to the factory default values.
NOTE
- If "Lock Settings" is turned on (refer to page 34) running the Reset function +ill not effect your Pro-Day and Pro-Night Mode settings.
PHOTOS MENU
Your Hitachi LCD TV allows watching digital still pictures from your USB disk plugged to the USB slot at the side panel.
With your USB disk plugged to the TV, you can browse your photos at anytime.
- Press MENU button on the remote control to enter the On-Screen Display.
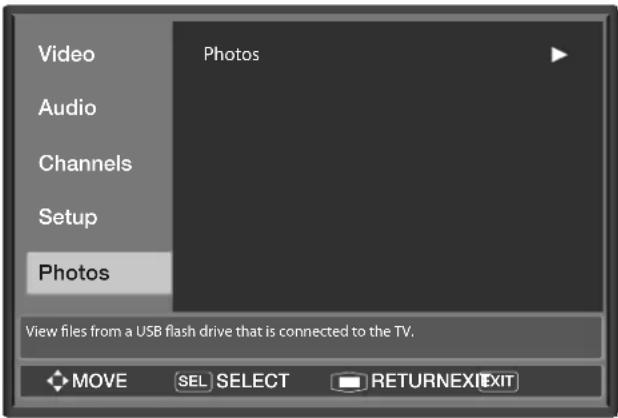
- Use the CURSOR PAD ▲ or to highlight Photos and use the CURSOR PAD▶ to select and enter its sub-menu.
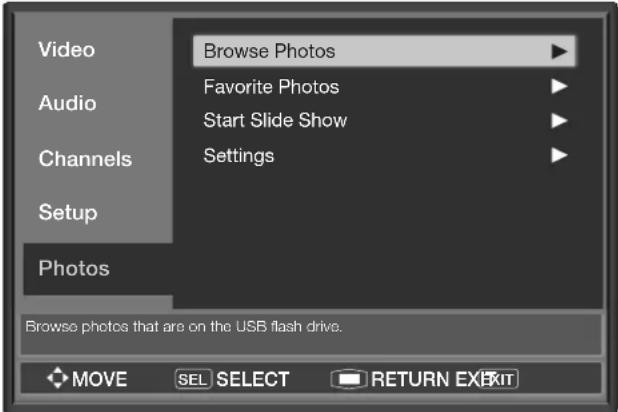
Browse Photos
Press the CURSOR PAD ▶ button to enter the file folder that contains photos you want to browse.
Favorite Photos
Browse only the selected photos. To do so, you will have to press FAV CH button to check on the photo as one of your favorite photos while in the Browse Photos menu.
NOTE
- This function is available only +hen selected 8. USB as the input source.
Start Slide Show
Press to browse your photos in a slideshow manner.
Settings
Customize the slideshow settings: Repeat, Shuffle, Speed, and Transition.
- R p at: Repeats the slideshow when it reaches the end.
- S(uffl : Displays the slideshow photos in random order.
- Sp d: Sets the amount of time a photo is displayed before the slideshow moves to the next photo. The options are 4 Sec, 6 Sec, or 8 Sec.
• Transition: Selects the way photos transition when moving to the next file in the slideshow. You can select:
• Non : No transition effect.
- Fad to Bla)k: Fades the screen to black between photos.
- V rti)al Wip : Wipes the screen from top to bottom between photos.
- Horizontal Wip : Wipes the screen from left to right between photos.
- Random: Randomly selects a transition effect.
Equipment Care And Troubleshooting
DO
- Dust the screen and cabinet with a soft cloth.
- Clean the screen with a soft cloth moistened in warm water and dry with a soft cloth. A mild soap may be used if the screen is extremely dirty.
- Place your LCD Television away from extreme heat, humidity and extremely dusty places.
- Remove the plug from the wall outlet if your LCD Television will not be used for a long period of time, for instance, when you go on vacation.
DO NOT
- Do not clean your screen with strong cleaners, polishes or a chemically treated cloth.
- Do not place rubber or vinyl products or tape on your LCD Television.
- Avoid repeatedly touching the screen.
- Do not drop or hit the remote control. This may cause internal damages.
- Avoid placing the remote control in a high humidity place or getting it wet. Do not leave it on or near a heater. Excessive heat or moisture may cause the unit to fail.
- When the batteries run down, remote control operation will become erratic or become unresponsive. Replace the old batteries with two new "AAA" size batteries. Do not use an old battery with a new battery.
- Exposing the screen to direct sunlight for a long period of time or heat may cause damage to the LCD screen.
- Do not spray any cleaners directly onto screen.
Troubles are sometimes caused by simple "faults" that you can correct without the help of a service technician. If you experience any difficulty with your TV, check a few basic remedies before calling your service technician.
TV will not turn ON
- Press the POWER button (ON/OFF button) once.
- If there is still no power, wait 30 seconds and press the POWER button again.
- If there is still no power, unplug the power cord from the wall. Wait 30 seconds and plug the power cord back in. Press the POWER button again.
W( n t( Following M ssag s App ar on t( S)r n
| M ssag Condition / A)tion | ||
| No Signal | The unit cannot detect any signals from any input jacks of channel does not show picture.Check if the cable is connected correctly and firmly.Check if the power of any external device is ON.Check if the input selection matches the connection jack.This message will be displayed for 15 minutes then the TV will turn off. | the TV |
S1mptom and C( )klist
| SYMPTOM CHECKLIST PAGES | ||
| No picture - no sound | Check the indicating lamp status (Off, Red, Blue).Check the connection of the power cord and/or other cables.Check if the power of the unit or external device is ON.Check if the correct Video input is selected.Check if the unit is in “Standby mode”.Adjust the values in “Video menu” and “Audio menu”. | 9, 1215~1912219, 1232~35 |
| Multiple images-normal sound | Check the connections to external device. | 15~19 |
| Intermittent interference | Check if the source of interference is shielded correctly.Move these kinds of electrical devices away from the unit. | 45 |
| Normal picture, but no sound | Check the volume level.Check if the MUTE button has been pressed or not.Check the connections to external device.Try next/other Audio Language. | 9, 202015~1935 |
SYMPTOM CHECKLIST PAGES
| No picture - normal sound | Check the value level of “Brightness” and “Contrast” in “Video Menu”. | 32 |
| The remote control does not work. | Check if the batteries are installed correctly.The batteries might be exhausted. Replace them with new ones.Remove all obstructions from in front of the sensor window on the unit.Check if the buttons on the control panel are working. | 6, 9 |
| The buttons on both the remote control and control panel do not work. | Unplug and connect the power cord again. 12, 43 | |
| Normal picture but no color-normal sound | Check the connections to external device. 15~19 | |
| No pictureThe Indicating lamp → Off | Check if the power cord is plugged into the socket securely. 12 | |
| No pictureThe indicating lamp → Blue | Check if the signal cable is connected correctly and securely.Adjust the level of Brightness and Contrast lower. | 15~1932 |
| Some screen display aspects cannot be switched in. | Check the signal status by pressing the INFO button on the remote control. The available screen display aspect is different depending on the current signal status. | 11, 22, 57 |
| No power | Check the power cord is connected to the AC outlet. 9, 12 | |
| Turns Off by itself | Check or ensure Sleep Timer settings are not activated. 11, 20, 40 | |
| Turns On by itself | Check if the HDMI-CEC feature is activated. 40 | |
| Picture may “block” or freeze when watching a digital channel. | Check signal strength under “Signal Strength”. 36 |
HDMI Issu s
| SYMPTOM | CHECKLIST | PAGES |
| No picture - no sound | Make sure you have selected the correct HDMI input. Toggle through them while HDMI device is ON or during playback.Unplug and re-plug HDMI connection while TV and HDMI source device are powered on.Turn TV and HDMI device off. Turn TV on first and then HDMI device second. | 15, 16, 21 |
| Error notice comes to screen | Try pressing “exit” on HDMI device remote control and then on TV remote control to find source of the error OSD. If error persist or comes back even after pressing exit, try alternate HDMI input on TV.Unplug and re-plug HDMI connection while TV and HDMI source device are powered on.Turn TV and HDMI device off. Turn TV on first and then HDMI device second. | 9, 11, 15 |
| No sound from TV Optical Out when using HDMI devices | Change Digital Output selection.As an option, use audio optical output from HDMI source device directly to separate Audio Amplifier. | 18 |
| Picture flickers during channel change w/ using HDMI set top boxes | This is normal operation from the source switching delay itself. It's not an indicator of a TV malfunction. | |
| Picture is blurry or fuzzy | If HDMI source is HD capable, ensure it's output is set to 1080p, 1080i or 720p under HDMI device menu (of the HDMI source device). | |
| Pixelization noise or loss connection (“No Signal” message display) | Check HDMI input picture format, if use 1080p format confirm cable length it is recommended that the length of the cable should be less than 5 meters, or change HDMI input picture format to 1080i. |
If the problem cannot be solved with the suggested procedures, contact 800.HITACHI. For your safety, never try to repair the product yourself.
Reception Problems
natural_image
Black-and-white photo of three people posing together (no visible text or symbols)IGNITION NOISE:
Black spots or horizontal streaks may appear, picture may flutter or drift. Usually caused by interference from automobile ignition systems, neon lamps, electrical drills, and other electrical appliances.
natural_image
Black-and-white photo of three people outdoors, including an elderly woman and a young child (no text or symbols visible)GHOSTS:
Ghosts are caused by the television signal following two paths. One is the direct path and the other is reflected from tall buildings, hills or some other objects. Changing the direction or position of the antenna may improve reception. Ghosting may also be caused by defects in the antenna system such as unshielded leads or connecting several sets to the same antenna without using multiple antenna couplers.
natural_image
Black-and-white photo of three people: an adult, a child, and an elderly man (no text or symbols visible)SNOW:
If your receiver is located in the fringe area of a television station where the signal is weak, your picture may be marred by the appearance of small dots. When the signal is extremely weak, it may be necessary to install a special antenna to improve the picture.
natural_image
Abstract pattern of diagonal striped lines with a faint circular highlight (no text or symbols)RADIO FREQUENCY INTERFERENCE:
The interference produces moving ripples or diagonal streaks, and in some cases, causes loss of contrast in the picture.
PREVENTION OF AN OBSTACLE TO RADIO RECEIVERS
This television has been designed pursuant to the FCC class B Rules. This is to prevent a problem to Radio receivers. If this television causes a problem to Radio receivers, then take the following steps:
- Keep the television away from Radio.
- Adjust Radio antennas in order for the television not to receive interference.
• The antenna cable of Radio should be kept away from the television. - Use a coaxial cable for antenna.
You can check if this television influences Radio receivers by turning off all other device other than the television. If you find a problem receiving Radio when using the television, check the instructions mentioned above.
natural_image
Black-and-white photo of three people outdoors, no visible text or symbolsBLOCK NOISE or FREEZE 8DIGITAL INPUT9:
Fuzzy blocks may appear in some area or the whole area of the screen. This is usually caused by interference from automobile ignition systems, neon lamps, electrical drills, ghosting of the image and lost or weak receiving signals.

natural_image
Completely black image with no visible content or text.BLACK SCREEN:
When using an antenna, weak signals will display a black screen. It may be necessary to upgrade your antenna.
NOTE
- The TV set can generate sound distortion in e)ternal devices such as a radio. Please separate radio device from the TV set to a considerable distance.
Picture Performance:
• 120Hz 1080p Perfected (1920 x 1080)
- Reel120 ^® Motion Correction
- HDMI ^® Key Features
- InstaPort
- CEC(Consumer Electronics Control)
- ARC(Audio Return Channel)
- 1080p/60/24
• MHL (Mobile High-Definition Link)
• 3D Y/C Comb Filter
• 3 Preset Color Temperatures
- Custom White Balance
- Game Mode
Convenience Features:
- Picture Modes:
Dynamic/Standard/Game/Custom/Pro-Day/Pro-Night PRO-Mode Lockable Day/Night Memories Picture Memory by Input - Screen Aspect Modes: (Normal/Cinema/Zoom/Wide/Auto) ^1
• V-Chip Parental Control - Lighting LOGO
Audio Performance Features:
- 6 Sound Modes (Custom, Standard, Movie, Music, News, Equalizer)
• Rated Output Power: 10W+10W (L/R)
Inputs:
• Power Input ...... AC 120V, 60Hz
• Power Consumption
Maximum Power (42") 110 W, 0.92A
Maximum Power (46") 140 W, 1.17A
Maximum Power (55") 175 W, 1.46A
- Antenna Input Impedance 75 Ohm
- Channel Coverage 191ch.
VHF-Band 2\~13
UHF-Band 14\~69
CATV Mid Band ......A5\~A1, A\~I
Super Band J\~W
Hyper Band W+1\~W+28
Ultra Band W+29\~W+94
- Television System .... NTSC Standard
ATSC Standard (8VSB)
.Cable Standard (64-QAM, 256-QAM)
• Video 1.0Vp-p, 75 Ohm
- Component Video
Luminance (Y) 1.0Vp-p, 75 Ohm
Chrominance (Pb/Pr) 0.7Vp-p, 75 Ohm
- Audio Input Impedance ....>10k Ohm
• Audio Input Sensitivity ....500mVrms
• HDMI (19 PIN)
Supplied Accessories:
- Remote Control
- Batteries (AAA)
- Owner's Guide
- Easy Graphic Guide
- Stand Base
- Stand Screws
• Hinge cover for wall mount - Power Cord
Inputs/Outputs:
• (4) HDMI ®
• (1) MHL (Shared HDMI 4)
• (1) Component Y, Pb, Pr / Composite Video Input
• (1) RGB Video Input
• (1) RGB/DVI Audio Input (3.5mm Stereo)
• (1) USB Multimedia/Service Input
• (1) Antenna (RF) Input
• (1) Digital Audio Output (Optical)
• (1) Headphone/Lineout Output (3.5mm Stereo)
Specifications:
- FCC class ...... B for Consumer Use
• Power Requirements 108-132VAC, 60Hz
^1 Screen mode availability varies by input format.
VGA and XGA are trademarks of International Business Machines Corporation.
VESA is a registered trademark of the Video Electronics Standard Association.
HDTV Televisions display HDTV only when an HDTV source is available.
All specifications, weights, and dimensions are subject to change without prior notice. Please access www.hitachi.us/tv for detailed specifications and dimensions for custom installations.

HIGH-DEFINITION MULTIMEDIA INTERFACE
HDMI, the HDMI logo and High-Definition Multimedia Interface are trademarks or registered trademarks of HDMI Licensing LLC in the United States and other countries.

DOLBY. DIGITAL
Manufactured under license from Dolby Laboratories. Dolby and the double-D symbol are trademarks of Dolby Laboratories.

Mobile High-Definition Link
MHL, Mobile High-Definition Link and the MHL Logo are trademarks or registered trademarks of the MHL, LLC.
42" model (Includes Table Top Stand) Weight (lbs./kg): 30.9/14.0
Units : Inches (mm)
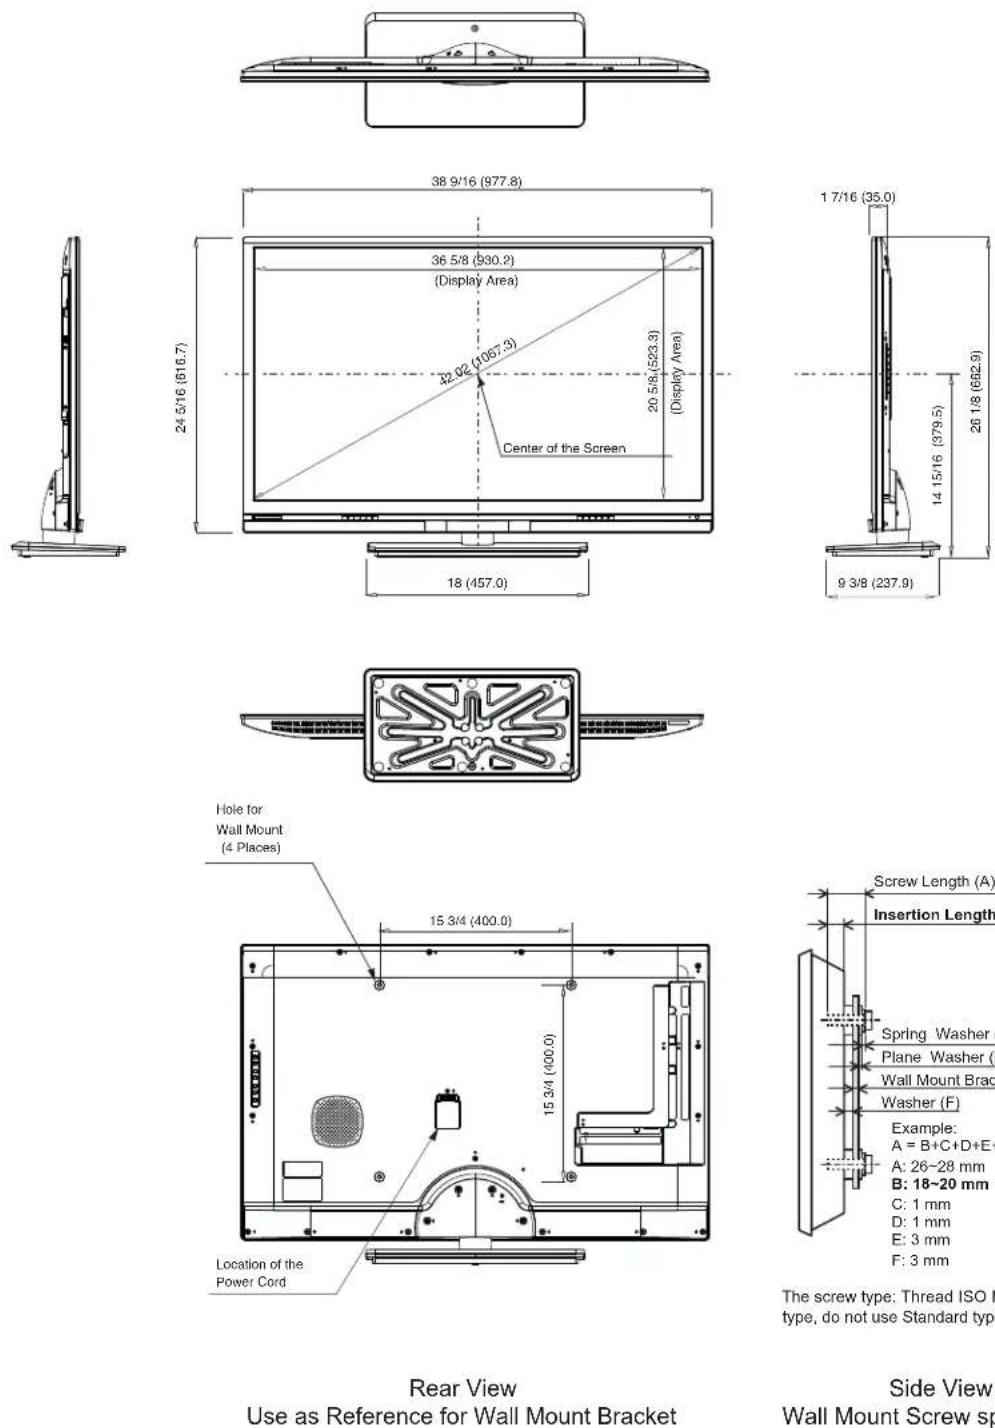
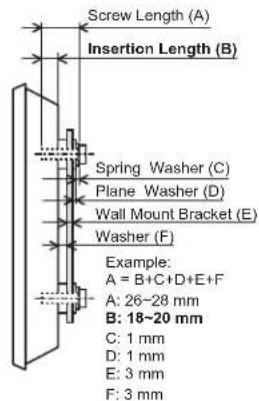
The screw type: Thread ISO M6 (Metric type, do not use Standard type).
Side View
Wall Mount Screw specification
46" model (Includes Table Top Stand) Weight (lbs./kg): 39.5/17.9
Units : Inches (mm)
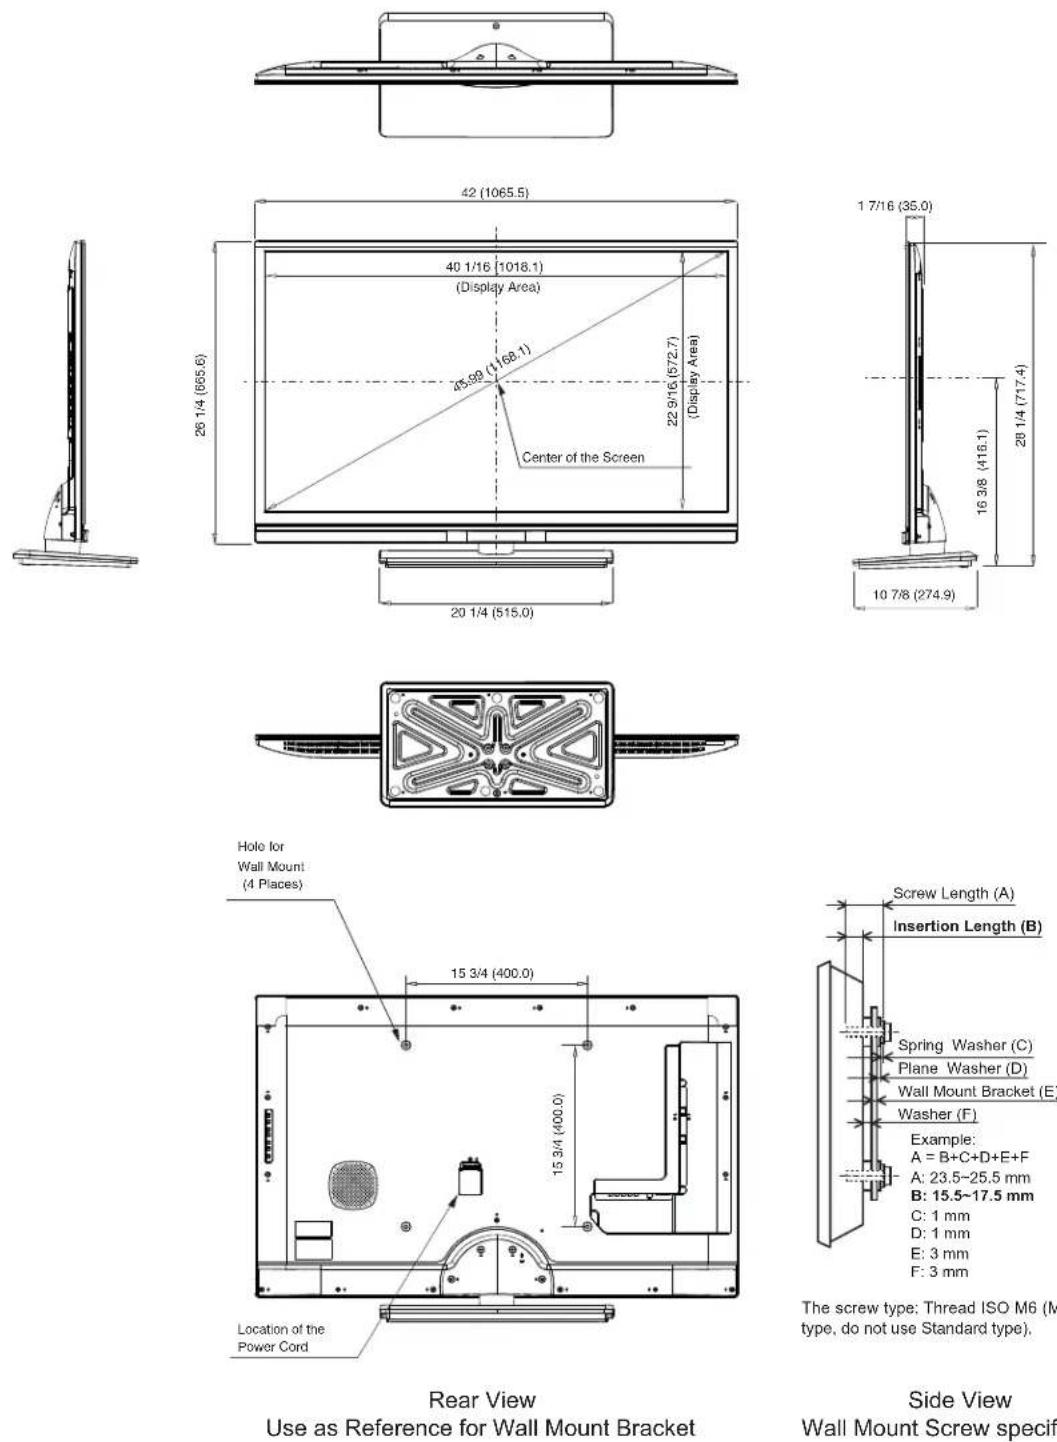
The screw type: Thread ISO M6 (Metric type, do not use Standard type).
Side View
Wall Mount Screw specification
55" mod I 8In)lud s Tabl Top Stand9 W ig(t 8lbs./kg9: 56.5/25.6
Units : Inches (mm)
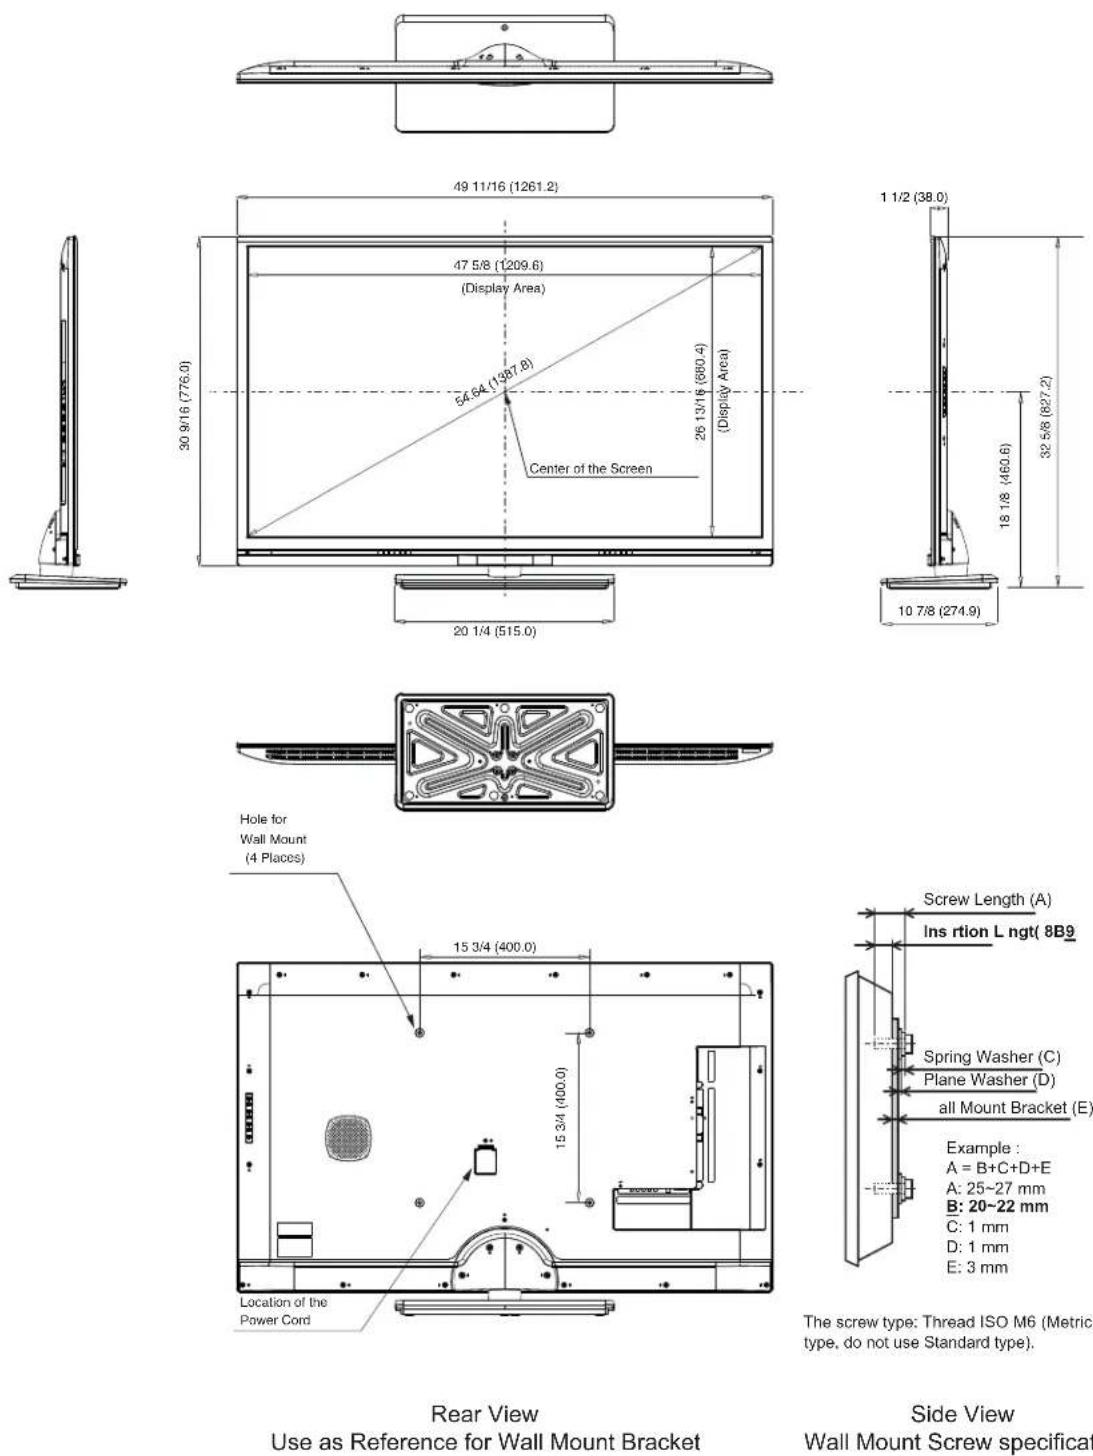
Side View
Wall Mount Screw specification
700.HITACHI
8700.337.22339
Monda1 \~ Frida1
7:00 am 4 ::00 pm CST
www.(ita)(i.us/t v

Sincere - Prompt - Efficient
HITACHI
Inspire the Next
HITACHI has made every effort to assure you hours of trouble free operation from your Hitachi product. Should you require service assistance with OPERATIONAL, HOOK UP, TECHNICAL ASSISTANCE OR WARRANTY SERVICE SUPPORT, pl as )onta)t on of our knowl dg abl Custom r S rvi) R pr s ntativ s at 700.HITACHI 8700.337.22339.
Our Customer Service Representatives will provide you with the assistance you need and if necessary coordinate the repair process with a local Authorized Service Facility in your area. Please be prepared to submit proof of purchase and/or delivery receipts to your 800.HITACHI Customer Service Representative. Warranty coverage will be provided in accordance with the provisions of your Limited Warranty (see the Limited Warranty page in this owner's guide).
The MODEL NAME and SERIAL NUMBER of this product is located on the backcover and also on the RIGHT SIDE of the set. Please follow the next steps to find this information and then record it in the space provided below for use in case you call 800. HITACHI, they will require this information in order to give you the proper support.
① Look on the right side of the set.
② Locate the label where it shows the information related to MODEL NAME and SERIAL #.
3 800.HITACHI will require this information in order to give you the proper support regarding your questions.
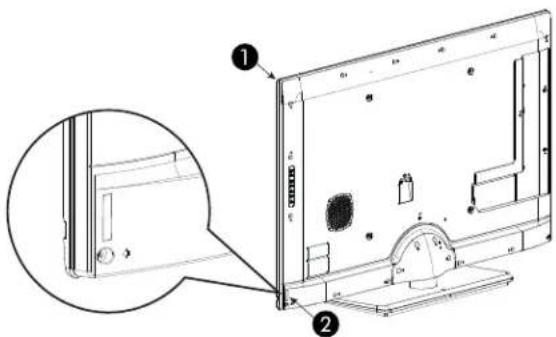
Model Name
Serial Number
Congratulations on your purchase of a new Hitachi display product.
| LIMITED WARRANTYHitachi America, Ltd. warrants this product in accordance with the terms and conditions applicable to the products identified below: | Conditions of Hita)(i Limit d Warrant1This Hitachi display product (the “Product”) is warranted to be free from defects in materials and workmanship beginning on the date of purchase by the original owner and continuing for the duration of the applicable time periods specified below. If the Product is found to be defective, Hitachi will repair or replace (at Hitachi’s option) defective parts at no charge, subject to the conditions of this Limited Warranty. If the original owner rejects, refuses or otherwise does not accept Hitachi’s offer to repair or replace such defective parts under this Limited Warranty, this Limited Warranty shall be void and of no further force or effect. This Limited Warranty extends to the original owner only and is not transferable, and such owner must provide a dated sales receipt for the Product to qualify for parts or service under this Limited Warranty. The original owner must notify Hitachi of a defect claim b1 )alling 700.HITACHI during the applicable Limited Warranty period for this Limited Warranty to be effective. This Limited Warranty is valid only in the U.S.A. and Puerto Rico. |
| Hitachi Product :LCD Flat Panel Televisions | PARTS: The Limited Warranty period for parts is 1 year from the date of original purchase. During the Limited Warranty period for parts, Hitachi will replace defective parts with new or rebuilt parts (at Hitachi’s option) at no charge for such parts. Any replacement part will be warranted for the remainder of the original warranty period applicable to the part replaced.LABOR: The Limited Warranty period for labor is 1 year from the date of original purchase. During the Limited Warranty period for labor, Hitachi will repair or replace (at Hitachi’s option) defective parts without charge for labor.SERVICE LOCATION: In-home warranty service, which includes either in-home repair or free pick-up and delivery (at Hitachi’s option), applies to all Hitachi products except: (i) 32-inch and smaller LCD Flat Panel Televisions; (ii) Products located outside the U.S.A. or Puerto Rico; (iii) Products located more than seventy-five (75) driving miles from Hitachi’s nearest Authorized Service Facility. If the foregoing clauses (i), (ii), (iii)apply, then the Product owner will be responsible for bringing/delivering the Product to a Hitachi Authorized Service Facility and, following warranty service, retrieving the Product from such Authorized Service Facility. |

CERTIFIED
SERVICE
CENTER
Hita)(i is a proud support r of t( C rtifi d S rvi) C nt r program. Busin ss w(o displa1 t( CSC ) rtifi)ation mark (av d monstrat d t(at t( 1 op rat in a))ordan) wit(t( ig( standards of prof ssionalism pr s)rib d b1 t( Consortium for C rtifi d S rvi) C nt rs.
IMPORTANT:
Before using or installing your Product, please complete this form and attach your sales receipt and retain them for your records. This will help facilitate proper warranty coverage.
700.HITACHI 8700.337.22339
Please call 800.HITACHI (800.448.2244) for operational, hook up or warranty service support.
Visit our w bsit at www.(ita)(i.us/tv :
Hitachi's website features a wealth of information on Hitachi products and technologies, as well as downloadable owner's guides and other useful information.
MODEL NAME SERIAL NO.
DEALER NAME DATE OF PURCHASE
DEALER ADDRESS
CITY STATE
Warranty Limitations
This Hitachi Limited Warranty does not cover:
A. Any Product that has been modified or repaired in a manner not previously authorized by .itachi in writing.
B. Any Product whose serial number has been removed, altered, replaced, defaced or rendered illegible.
C. Any defect, malfunction, or failure caused by or resulting from improper or unauthorized service, maintenance or repair.
D. Damage resulting from abuse, misuse, mishandling, neglect or damage caused by exposure to hostile operating environments such as areas containing dust and/or smoke.
E. Damage caused by power surges, accidents, natural disasters or any other events or circumstances outside .itachi's control.
F. Any Product used in any manner inconsistent with the acceptable set-up, usage, safety or installation configurations identified in the Product's Owner's Guide.
G. Any Product used for purposes or applications, or subjected to operating conditions, other than those identified as acceptable in the Product's Owner's Guide.
.. Product repairs (including any product whose case has been opened), or part replacements provided or installed, by any person other than an Authorized .itachi Service Facility Representative.
- Improper uncrating, set-up or installation or any misadjustments caused by user-operated controls.
J. Any labor or costs associated with removing the Product from a custom cabinet or other specialized product installation that impedes direct and immediate removal of the Product from the owner's premises (must be arranged and paid by the owner).
K. Product cabinets, cabinet parts, knobs, batteries or accessories.
- Product screens that have been cleaned by any method other than as specified in the Product's Owner's Guide.
M. Normal usage, degraded brightness caused by backlight aging and/or cell defects or ordinary wear and tear, including, without limitation, scratches or marks on the Product's screen, cabinet or the appearance of bright or dark screen pixels.
N. Any Product returned for service that is damaged due to improper packaging, mishandling or shipping. (IMPORTANT: When shipping any Product to a .itachi Authorized Service Facility, Product owner must package it securely in the original shipping container or its equivalent to prevent damage. The Product must be returned with the shipping charges prepaid and proof of purchases included in the shipping container. Failure to properly package such product during such shipment will void all warranties.)
O. Any Product purchased or serviced outside the United States of America and Puerto Rico.
P. Any Product that has been used for commercial purposes.
NO PERSON, AGENT, DISTRIBUTOR, DEA1ER, SERVICE FACILITY, OR COMPANY IS AUTHORIZED TO C.ANGE, MODIFY OR AMEND T.E TERMS OF T.IS 1 LIMITED WARRANTY IN ANY MANNER W.ATSOEVER. EXCEPT AS PROVIDED IN T.IS 1 LIMITED WARRANTY. ITAC.I MAKES NO EXPRESS WARRANTY REGARDING T.IS. ITAC.I PRODUCT. FURT.ER, A11 IMP1IED WARRANTIES RE1ATING TO ANY PORTION OF T.IS PRODUCT, INCLUDING ANY WARRANTY OF MERC.ANTABILITY OR FITNESS FOR A PARTICUAR PURPOSE, ARE 1 LIMITED TO T.E DURATION SPECIFIED UNDER T.IS 1 LIMITED WARRANTY. ITAC.I S.A11 NOT BE 1A1B1E TO T.E PURC.ASER OR TO ANY OT.ER PERSON FOR ANY INCIDENTA1 OR CONSEQUENTIAL DAMAGES OR 1OSS OF PROFIT OR PRODUCT RESULTING FROM ANY DEFECT IN OR MA1FUNCTION OR FAIIURE OF, T.IS .ITAC.I PRODUCT. BECAUSE SOME STATES DO NOT A11OW 1IMITATIONS ON .OW 1ONG AN IMP1IED WARRANTY 1ASTS, OR T.E EXC1USION OF INCIDENTA1 OR CONSEQUENTIAL DAMAGES, T.E ABOVE 1IMITATIONS MAY NOT APPLY TO YOU. T.IS 1 LIMITED WARRANTY CONFERS SPECIFIC 1EGA1 RIG.TS, INCLUDING CERTAIN OT.ER RIG.TS T.AT MAY VARY DEPENDING ON YOUR JURISDICTION.
END USER LICENSE AGREEMENT FOR HITACHI DTV SOFTWARE
IMPORTANT – READ CAREFULLY: This End User License Agreement for HITACHI DTV Software (this "Agreement") is a legal agreement between you ("you" or "your"), in your capacity as the owner of a HITACHI brand digital television (the "DTV"), and HITACHI America, Ltd., Home Electronics Division ("HITACHI"). By using the DTV or the digital television software installed on the DTV (the "DTV Software") or any Upgrade (as defined below, and together with the DTV Software, the "Software"), you agree to be bound by the terms and conditions of this Agreement. IF YOU DO NOT AGREE TO BE BOUND BY THIS LICENSE AGREEMENT, DO NOT USE THE DTV OR THE SOFTWARE.
- LICENSE GRANT. HITACHI grants to you, for the life of the DTV, a non-exclusive, non-transferable, revocable license to install and use one copy of the Software on the DTV, subject to the following limitations and restrictions:
a. You may not share, duplicate, republish or redistribute the Software;
b. You may not resell, rent, lease, sublicense, gift, loan, as sign or otherwise transfer the Software or any of your rights under this Agreement;
c. You may not modify, adapt, translate, reverse engineer, decompile, disassemble or make derivative works from the Software or use the Software in combination with any non-Hitachi software; and
d. You may not use the Software for any commercial purpose.
-
VIOLATIONS; INDEMNITY. You understand and agree that your use of the Software in any manner except as permitted under this Agreement could constitute a serious crime and could subject you to damages and an award to HITACHI of attorneys' fees in connection with your violation of this Agreement. You further understand that you may be held legally responsible for any copyright infringement or other violation of intellectual property rights caused or facilitated by your failure to abide by the terms of this Agreement. You agree to defend, indemnify and hold HITACHI and its parent and affiliate companies harmless from and against any and all liability resulting from any breach by you of this Agreement.
-
INTELLECTUAL PROPERTY. The Software is protected by federal copyright laws, international copyright treaties and other intellectual property laws and treaties. The Software is licensed, not sold, to you. All right, title and interest in and to the Software and any intellectual property associated therewith, including any accompanying printed materials, shall belong to HITACHI and its licensors and suppliers. Except as expressly provided herein, neither HITACHI nor any of its licensors or suppliers grants to you under this Agreement any express or implied right in or to any patents, copyrights, trademarks, trade secrets or other intellectual property. All right, title and interest in and to the intellectual property rights associated with any content that is accessible through use of the Software shall belong to the applicable content owners and may be protected by copyright or other intellectual property laws and treaties. This Agreement grants you no rights to use such content. Any rights of HITACHI not expressly granted to you hereunder are reserved expressly by Hitachi.
-
SOFTWARE UPGRADES. In the future, HITACHI may release or make available one or more upgrades to the DTV Software (each, an "Upgrade"). You understand and agree that if you decide to install or use any Upgrade, your installation and use of such Upgrade and/or any other software or intellectual property HITACHI may provide in connection therewith shall be governed by the terms and conditions of this Agreement, except to the extent that HITACHI provides different or supplementary license terms or conditions that accompany such Upgrade or other software or intellectual property. In the event HITACHI provides you with a "flash card" or other media to effect or facilitate an Upgrade, you understand and acknowledge that your failure to return such flash card or other media to HITACHI as HITACHI may require could result in HITACHI placing your name and your DTV's serial number on a "No Further Upgrades" list, which will prohibit you from receiving any subsequent Upgrades HITACHI may later release or make available. IF YOU DO NOT AGREE WITH ALL THE TERMS AND CONDITIONS OF THIS AGREEMENT OR ALL THE TERMS AND CONDITIONS OF ANY DIFFERENT OR SUPPLEMENTARY LICENSE THAT MAY ACCOMPANY SUCH
UPGRADE, (A) DO NOT USE ANY HITACHI-PROVIDED FLASH CARD OR OTHER MEDIA, (B) DO NOT PERFORM INSTALL ANY HITACHI-PROVIDED UPGRADE SOFTWARE ON YOUR DTV, AND (C) PROMPTLY RETURN SUCH FLASH CARD OR OTHER MEDIA TO HITACHI.
-
EXPORT RESTRICTIONS. HITACHI is licensing the Software for use within North America only. You agree that you will not export or re-export the Software. You specifically agree not to export or reexport the Software: (i) to any country to which the U.S. has embargoed or restricted the export of goods or services, which currently include, but are not necessarily limited to Cuba, Iran, Libya, North Korea, Sudan and Syria, or to any national of any such country, wherever located, who intends to transmit or transport the Software back to such country; (ii) to any person or entity who you know or have reason to know will utilize the Software in the design, development, or production of nuclear, chemical, or biological weapons; or (iii) to any person or entity who has been prohibited from participating in U.S. export transactions by any federal agency of the U.S. government. You warrant and represent that neither the U.S. Bureau of Industry and Security nor any other U.S. federal Agency has suspended, revoked, or denied your export privileges.
-
NO WARRANTIES. The software is provided to you in "as is" condition and HITACHI makes no warranties of any kind whatsoever regarding the software and, to the maximum extent permitted by law, hereby expressly disclaims all warranties of any kind whatsoever, express or implied, with respect to the software. All implied warranties, including without limitation, the implied warranties of non-infringement, merchantability and fitness for a particular purpose are hereby expressly disclaimed by HITACHI to the maximum extent permitted by law.
: LIMITATION OF LIABILITY. To the maximum extent permitted by applicable law, HITACHI, its licensors, suppliers, parent companies, affiliates, subsidiaries, employees and agents shall not under any circumstances be liable to you or any third parties for any damages of any nature arising in any way from this agreement, your use of the software or otherwise, whether indirect, special, incidental, consequential or otherwise, including, without limitation, any claims for lost profits, lost good will, lost data, business interruption, procurement of substitute goods or services, or expenditures made or committed for in reliance on the continuation of this agreement, even if advised in advance of the possibility of such damages.
- NO FAILURE OF ESSENTIAL PURPOSE. You agree that neither HITACHI'S breach of this agreement nor its failure to repair a defect, error or bug in the software shall constitute a failure of the essential purpose of this agreement.
I. CRYPTOGRAPHIC SOFTWARE. The software contains software developed by the OpenSSL Project, including cryptographic software written by Eric Young (the "cryptographic software"). The cryptographic software is provided by the OpenSSL Project in "as is" condition and any express or implied warranties, including but not limited to, the implied warranties of merchantability and fitness for a particular purpose are hereby expressly disclaimed to the maximum extent permitted by law. In no event shall the OpenSSL Project, its contributors, HITACHI or any of its parent or affiliate companies be liable for any direct, indirect, incidental, special, exemplary, or consequential damages (including, but not limited to, procurement of substitute goods or services; loss of use, data, or profits; or business interruption) however caused and on any theory of liability, whether in contract, strict liability, or tort (including negligence or otherwise) arising in any way out of the use of the software or the cryptographic software, even if advised in advance of the possibility of such damages.
-
TERMINATION. HITACHI may terminate this Agreement immediately at any time by providing notice to you.
-
GOVERNING LAW; SEVERABILITY. This Agreement will be governed by the laws of the State of New York, and you consent to the exclusive jurisdiction and venue in the federal courts sitting in the Southern District of New York, unless no federal subject matter jurisdiction exists, in which case you consent to the exclusive jurisdiction and venue in the Borough of Manhattan, New York, USA.
OPEN SOURCE SOFTWARE LICENSE INFORMATION
This Hitachi TV incorporates open source software modules distributed under certain licenses, including the GNU General Public License Version 3 (as defined by the Free Software Foundation, Inc.).
This Hitachi TV incorporates software based in part on the work of the Independent JPEG Group.
| Softwar Modul | Librar1 Nam | Link | Appli)abl Li) ns |
| AC3 decoder liba52.c www.liba52. | sourceforge.net | GNU General Public License Version 3 | |
| JPEG decoder jpeglib.h http://www.ijg.org/ Free | |||
THESE SOFTWARE MODULES AND THE SOURCE CODE MODIFICATIONS THERETO ARE PROVIDED "AS IS" AND BOTH THE LICENSORS AND HITACHI DISCLAIM ANY AND ALL WARRANTIES OF ANY KIND, INCLUDING THE IMPLIED WARRANTY OF MERCHANTABILITY AND OF FITNESS FOR A PARTICULAR PURPOSE.
S abov links and t( GNU G n ral Publi) Li) ns t(at app ars on t( following pag s of t(is Own r's Guid for additional t rms and )onditions.
If 1ou would lik to Iarn mor about t( Fr Softwar Foundation, In). or t( GNU softwar proj )t, pl as visit http://www.fsf.org. If 1ou would lik to r qu st a )op1 of t( Sour) Cod Modifi)ations, pl as s nd an mail to t( following addr ss: tvsoftwaresupport@hal.hitachi.com
TERMS AND CONDITIONS
0. D finitions.
"This 1icense" refers to version 3 of the GNU General Public 1icense.
"Copyright" also means copyright-like laws that apply to other kinds of works, such as semiconductor masks.
"The Program" refers to any copyrightable work licensed under this license. Each licensee is addressed as "you". "Licensees" and "recipients" may be individuals or organizations.
To “modify” a work means to copy from or adapt all or part of the work in a fashion requiring copyright permission, other than the making of an exact copy. The resulting work is called a “modified version” of the earlier work or a work “based on” the earlier work.
A "covered work" means either the unmodified Program or a work based on the Program.
To “propagate” a work means to do anything with it that, without permission, would make you directly or secondarily liable for infringement under applicable copyright law, except executing it on a computer or modifying a private copy. Propagation includes copying, distribution (with or without modification), making available to the public, and in some countries other activities as well.
To “convey” a work means any kind of propagation that enables other parties to make or receive copies. Mere interaction with a user through a computer network, with no transfer of a copy, is not conveying.
An interactive user interface displays "Appropriate 1legal Notices" to the extent that it includes a convenient and prominently visible feature that (1) displays an appropriate copyright notice, and (2) tells the user that there is no warranty for the work (except to the extent that warranties are provided), that licensees may convey the work under this 1license, and how to view a copy of this 1license. If the interface presents a list of user commands or options, such as a menu, a prominent item in the list meets this criterion.
2. Sour) Cod.
The “source code” for a work means the preferred form of the work for making modifications to it. “Object code” means any non-source form of a work.
A “Standard Interface” means an interface that either is an official standard defined by a recognized standards body, or, in the case of interfaces specified for a particular programming language, one that is widely used among developers working in that language.
The "System libraries" of an executable work include anything, other than the work as a whole, that (a) is included in the normal form of packaging a Major Component, but which is not part of that Major Component, and (b) serves only to enable use of the work with that Major Component, or to implement a Standard Interface for which an implementation is available to the public in source code form. A "Major Component", in this context, means a major essential component (kernel, window system, and so on) of the specific operating system (if any) on which the executable work runs, or a compiler used to produce the work, or an object code interpreter used to run it.
The "Corresponding Source" for a work in object code form means all the source code needed to generate, install, and (for an executable work) run the object code and to modify the work, including scripts to control those activities. However, it does not include the work's System 1 libraries, or general-purpose tools or generally available free programs which are used unmodified in performing those activities but which are not part of the work. For example, Corresponding Source includes interface definition files associated with source files for the work, and the source code for shared libraries and dynamically linked subprograms that the work is specifically designed to require, such as by intimate data communication or control flow between those subprograms and other parts of the work.
The Corresponding Source need not include anything that users can regenerate automatically from other parts of the Corresponding Source.
The Corresponding Source for a work in source code form is that same work.
2. Basi) P rmissions.
All rights granted under this 1icense are granted for the term of copyright on the Program, and are irrevocable provided the stated conditions are met. This 1icense explicitly affirms your unlimited permission to run the unmodified Program. The output from running a covered work is covered by this 1icense only if the output, given its content, constitutes a covered work. This 1icense acknowledges your rights of fair use or other equivalent, as provided by copyright law.
You may make, run and propagate covered works that you do not convey, without conditions so long as your license otherwise remains in force. You may convey covered works to others for the sole purpose of having them make modifications exclusively for you, or provide you with facilities for running those works, provided that you comply with the terms of this license in conveying all
material for which you do not control copyright. Those thus making or running the covered works for you must do so exclusively on your behalf, under your direction and control, on terms that prohibit them from making any copies of your copyrighted material outside their relationship with you.
Conveying under any other circumstances is permitted solely under the conditions stated below. Sublicensing is not allowed; section 10 makes it unnecessary.
3. Prot)ting Us rs' L gal Rig(ts From Anti4Cir)umv ntion Law.
No covered work shall be deemed part of an effective technological measure under any applicable law fulfilling obligations under article 11 of the WIPO copyright treaty adopted on 20 December 1996, or similar laws prohibiting or restricting circumvention of such measures.
When you convey a covered work, you waive any legal power to forbid circumvention of technological measures to the extent such circumvention is effected by exercising rights under this 1 license with respect to the covered work, and you disclaim any intention to limit operation or modification of the work as a means of enforcing, against the work's users, your or third parties' legal rights to forbid circumvention of technological measures.
3. Conv 1ing V rbatim Copi s.
You may convey verbatim copies of the Program's source code as you receive it, in any medium, provided that you conspicuously and appropriately publish on each copy an appropriate copyright notice; keep intact all notices stating that this 1icense and any non-permissive terms added in accord with section 7 apply to the code; keep intact all notices of the absence of any warranty; and give all recipients a copy of this 1icense along with the Program.
You may charge any price or no price for each copy that you convey, and you may offer support or warranty protection for a fee.
5. Conv 1ing Modifi d Sour) V rsions.
You may convey a work based on the Program, or the modifications to produce it from the Program, in the form of source code under the terms of section , provided that you also meet all of these conditions:
- a) The work must carry prominent notices stating that you modified it, and giving a relevant date.
- b) The work must carry prominent notices stating that it is released under this license and any conditions added under section 7. This requirement modifies the requirement in section to "keep intact all notices".
• c) You must license the entire work, as a whole, under this 1 license to anyone who comes into possession of a copy. This 1 license will therefore apply, along with any applicable section 7 additional terms, to the whole of the work, and all its parts, regardless of how they are packaged. This 1 license gives no permission to license the work in any other way, but it does not invalidate such permission if you have separately received it. - d) If the work has interactive user interfaces, each must display Appropriate 1legal Notices; however, if the Program has interactive interfaces that do not display Appropriate 1legal Notices, your work need not make them do so.
A compilation of a covered work with other separate and independent works, which are not by their nature extensions of the covered work, and which are not combined with it such as to form a larger program, in or on a volume of a storage or distribution medium, is called an “aggregate” if the compilation and its resulting copyright are not used to limit the access or legal rights of the compilation’s users beyond what the individual works permit. Inclusion of a covered work in an aggregate does not cause this license to apply to the other parts of the aggregate.
6. Conv 1ing Non4Sour) Forms.
You may convey a covered work in object code form under the terms of sections and 5, provided that you also convey the machine-readable Corresponding Source under the terms of this license, in one of these ways:
- a) Convey the object code in, or embodied in, a physical product (including a physical distribution medium), accompanied by the Corresponding Source fixed on a durable physical medium customarily used for software interchange.
- b) Convey the object code in, or embodied in, a physical product (including a physical distribution medium), accompanied by a written offer, valid for at least three years and valid for as long as you offer spare parts or customer support for that product model, to give anyone who possesses the object code either (1) a copy of the Corresponding Source for all the software in the product that is covered by this 1icense, on a durable physical medium customarily used for software interchange, for a price no more than your reasonable cost of physically performing this conveying of
source, or (2) access to copy the Corresponding Source from a network server at no charge.
- c) Convey individual copies of the object code with a copy of the written offer to provide the Corresponding Source. This alternative is allowed only occasionally and noncommercially, and only if you received the object code with such an offer, in accord with subsection 6b.
- d) Convey the object code by offering access from a designated place (gratis or for a charge), and offer equivalent access to the Corresponding Source in the same way through the same place at no further charge. You need not require recipients to copy the Corresponding Source along with the object code. If the place to copy the object code is a network server, the Corresponding Source may be on a different server (operated by you or a third party) that supports equivalent copying facilities, provided you maintain clear directions next to the object code saying where to find the Corresponding Source. Regardless of what server hosts the Corresponding Source, you remain obligated to ensure that it is available for as long as needed to satisfy these requirements.
- e) Convey the object code using peer-to-peer transmission, provided you inform other peers where the object code and Corresponding Source of the work are being offered to the general public at no charge under subsection 6d.
A separable portion of the object code, whose source code is excluded from the Corresponding Source as a System 1 library, need not be included in conveying the object code work.
- A "User Product" is either (1) a "consumer product", which means any tangible personal property which is normally used for personal, family, or household purposes, or (2) anything designed or sold for incorporation into a dwelling. In determining whether a product is a consumer product, doubtful cases shall be resolved in favor of coverage. For a particular product received by a particular user, "normally used" refers to a typical or common use of that class of product, regardless of the status of the particular user or of the way in which the particular user actually uses, or expects or is expected to use, the product. A product is a consumer product regardless of whether the product has substantial commercial, industrial or non-consumer uses, unless such uses represent the only significant mode of use of the product.
“Installation Information” for a User Product means any methods, procedures, authorization keys, or other information required to install and execute modified versions of a covered work in that User Product from a modified version of its Corresponding Source. The information must suffice to ensure that the continued functioning of the modified object code is in no case prevented or interfered with solely because modification has been made.
If you convey an object code work under this section in, or with, or specifically for use in, a User Product, and the conveying occurs as part of a transaction in which the right of possession and use of the User Product is transferred to the recipient in perpetuity or for a fixed term (regardless of how the transaction is characterized), the Corresponding Source conveyed under this section must be accompanied by the Installation Information. But this requirement does not apply if neither you nor any third party retains the ability to install modified object code on the User Product (for example, the work has been installed in ROM).
The requirement to provide Installation Information does not include a requirement to continue to provide support service, warranty, or updates for a work that has been modified or installed by the recipient, or for the User Product in which it has been modified or installed. Access to a network may be denied when the modification itself materially and adversely affects the operation of the network or violates the rules and protocols for communication across the network.
Corresponding Source conveyed, and Installation Information provided, in accord with this section must be in a format that is publicly documented (and with an implementation available to the public in source code form), and must require no special password or key for unpacking, reading or copying.
:. Additional T rms.
“Additional permissions” are terms that supplement the terms of this 1icense by making exceptions from one or more of its conditions. Additional permissions that are applicable to the entire Program shall be treated as though they were included in this 1icense, to the extent that they are valid under applicable law. If additional permissions apply only to part of the Program, that part may be used separately under those permissions, but the entire Program remains governed by this 1icense without regard to the additional permissions.
When you convey a copy of a covered work, you may at your option remove any additional permissions from that copy, or from any part of it. (Additional permissions may be written to require their own removal in certain cases when you modify the work.) You may place additional permissions on material, added by you to a covered work, for which you have or can give appropriate copyright permission.
Notwithstanding any other provision of this 1icense, for material you add to a covered work, you may (if authorized by the copyright holders of that material) supplement the terms of this 1icense with terms:
- a) Disclaiming warranty or limiting liability differently from the terms of sections 15 and 16 of this license; or
- b) Requiring preservation of specified reasonable legal notices or author attributions in that material or in the Appropriate 1legal Notices displayed by works containing it; or
• c) Prohibiting misrepresentation of the origin of that material, or requiring that modified versions of such material be marked in reasonable ways as different from the original version; or
• d) limiting the use for publicity purposes of names of licensors or authors of the material; or
• e) Declining to grant rights under trademark law for use of some trade names, trademarks, or service marks; or - f) Requiring indemnification of licensors and authors of that material by anyone who conveys the material (or modified versions of it) with contractual assumptions of liability to the recipient, for any liability that these contractual assumptions directly impose on those licensors and authors.
All other non-permissive additional terms are considered "further restrictions" within the meaning of section 10. If the Program as you received it, or any part of it, contains a notice stating that it is governed by this 1icense along with a term that is a further restriction, you may remove that term. If a license document contains a further restriction but permits relicensing or conveying under this 1icense, you may add to a covered work material governed by the terms of that license document, provided that the further restriction does not survive such relicensing or conveying.
If you add terms to a covered work in accord with this section, you must place, in the relevant source files, a statement of the additional terms that apply to those files, or a notice indicating where to find the applicable terms.
Additional terms, permissive or non-permissive, may be stated in the form of a separately written license, or stated as exceptions; the above requirements apply either way.
7. Termination.
You may not propagate or modify a covered work except as expressly provided under this 1icense. Any attempt otherwise to propagate or modify it is void, and will automatically terminate your rights under this 1icense (including any patent licenses granted under the third paragraph of section 11).
.owever, if you cease all violation of this license, then your license from a particular copyright holder is reinstated (a) provisionally, unless and until the copyright holder explicitly and finally terminates your license, and (b) permanently, if the copyright holder fails to notify you of the violation by some reasonable means prior to 60 days after the cessation.
Moreover, your license from a particular copyright holder is reinstated permanently if the copyright holder notifies you of the violation by some reasonable means, this is the first time you have received notice of violation of this 1 license (for any work) from that copyright holder, and you cure the violation prior to 30 days after your receipt of the notice.
Termination of your rights under this section does not terminate the licenses of parties who have received copies or rights from you under this license. If your rights have been terminated and not permanently reinstated, you do not qualify to receive new licenses for the same material under section 10.
You are not required to accept this 1icense in order to receive or run a copy of the Program. Ancillary propagation of a covered work occurring solely as a consequence of using peer-to-peer transmission to receive a copy likewise does not require acceptance. .however, nothing other than this 1icense grants you permission to propagate or modify any covered work. These actions infringe copyright if you do not accept this 1icense. Therefore, by modifying or propagating a covered work, you indicate your acceptance of this 1icense to do so.
20. Automati) Li) nsing of Downstr am R)ipi nts.
Each time you convey a covered work, the recipient automatically receives a license from the original licensors, to run, modify and propagate that work, subject to this 1icense. You are not responsible for enforcing compliance by third parties with this 1icense.
An “entity transaction” is a transaction transferring control of an organization, or substantially all assets of one, or subdividing an organization, or merging organizations. If propagation of a covered work results from an entity transaction, each party to that transaction who receives a copy of the work also receives whatever licenses to the work the party’s predecessor in interest had or could give under the previous paragraph, plus a right to possession of the Corresponding
Source of the work from the predecessor in interest, if the predecessor has it or can get it with reasonable efforts.
You may not impose any further restrictions on the exercise of the rights granted or affirmed under this 1 license. For example, you may not impose a license fee, royalty, or other charge for exercise of rights granted under this 1 license, and you may not initiate litigation (including a cross-claim or counterclaim in a lawsuit) alleging that any patent claim is infringed by making, using, selling, offering for sale, or importing the Program or any portion of it.
22. Pat nts.
A "contributor" is a copyright holder who authorizes use under this license of the Program or a work on which the Program is based. The work thus licensed is called the contributor's "contributor version".
A contributor's "essential patent claims" are all patent claims owned or controlled by the contributor, whether already acquired or hereafter acquired, that would be infringed by some manner, permitted by this 1icense, of making, using, or selling its contributor version, but do not include claims that would be infringed only as a consequence of further modification of the contributor version. For purposes of this definition, "control" includes the right to grant patent sublicenses in a manner consistent with the requirements of this 1icense.
Each contributor grants you a non-exclusive, worldwide, royalty-free patent license under the contributor's essential patent claims, to make, use, sell, offer for sale, import and otherwise run, modify and propagate the contents of its contributor version.
In the following three paragraphs, a “patent license” is any express agreement or commitment, however denominated, not to enforce a patent (such as an express permission to practice a patent or covenant not to sue for patent infringement). To “grant” such a patent license to a party means to make such an agreement or commitment not to enforce a patent against the party.
If you convey a covered work, knowingly relying on a patent license, and the Corresponding Source of the work is not available for anyone to copy, free of charge and under the terms of this 1icense, through a publicly available network server or other readily accessible means, then you must either (1) cause the Corresponding Source to be so available, or (2) arrange to deprive yourself of the benefit of the patent license for this particular work, or (3) arrange, in a manner consistent with the requirements of this 1icense, to extend the patent license to downstream recipients. "Knowingly relying" means you have actual knowledge that, but for the patent license, your conveying the covered work in a country, or your recipient's use of the covered work in a country, would infringe one or more identifiable patents in that country that you have reason to believe are valid.
If, pursuant to or in connection with a single transaction or arrangement, you convey, or propagate by procuring conveyance of, a covered work, and grant a patent license to some of the parties receiving the covered work authorizing them to use, propagate, modify or convey a specific copy of the covered work, then the patent license you grant is automatically extended to all recipients of the covered work and works based on it.
A patent license is “discriminatory” if it does not include within the scope of its coverage, prohibits the exercise of, or is conditioned on the non-exercise of one or more of the rights that are specifically granted under this 1 license. You may not convey a covered work if you are a party to an arrangement with a third party that is in the business of distributing software, under which you make payment to the third party based on the extent of your activity of conveying the work, and under which the third party grants, to any of the parties who would receive the covered work from you, a discriminatory patent license (a) in connection with copies of the covered work conveyed by you (or copies made from those copies), or (b) primarily for and in connection with specific products or compilations that contain the covered work, unless you entered into that arrangement, or that patent license was granted, prior to 28 March 2007.
Nothing in this 1 license shall be construed as excluding or limiting any implied license or other defenses to infringement that may otherwise be available to you under applicable patent law.
22. No Surr nd r of Ot( rs' Fr dom.
If conditions are imposed on you (whether by court order, agreement or otherwise) that contradict the conditions of this 1icense, they do not excuse you from the conditions of this 1icense. If you cannot convey a covered work so as to satisfy simultaneously your obligations under this 1icense and any other pertinent obligations, then as a consequence you may not convey it at all. For example, if you agree to terms that obligate you to collect a royalty for further conveying from those to whom you convey the Program, the only way you could satisfy both those terms and this 1icense would be to refrain entirely from conveying the Program.
23. Us wit( t( GNU Aff ro G n ral Publi) Li) ns .
Notwithstanding any other provision of this 1icense, you have permission to link or combine any covered work with a work licensed under version 3 of the GNU Affero General Public 1icense into a single combined work, and to convey the
resulting work. The terms of this 1icense will continue to apply to the part which is the covered work, but the special requirements of the GNU Affero General Public 1icense, section 13, concerning interaction through a network will apply to the combination as such.
23. R vis d V rsions of t(is Li) ns .
The Free Software Foundation may publish revised and/or new versions of the GNU General Public license from time to time. Such new versions will be similar in spirit to the present version, but may differ in detail to address new problems or concerns.
Each version is given a distinguishing version number. If the Program specifies that a certain numbered version of the GNU General Public 1icense "or any later version" applies to it, you have the option of following the terms and conditions either of that numbered version or of any later version published by the Free Software Foundation. If the Program does not specify a version number of the GNU General Public 1icense, you may choose any version ever published by the Free Software Foundation.
If the Program specifies that a proxy can decide which future versions of the GNU General Public license can be used, that proxy's public statement of acceptance of a version permanently authorizes you to choose that version for the Program.
1ater license versions may give you additional or different permissions. .however, no additional obligations are imposed on any author or copyright holder as a result of your choosing to follow a later version.
25. Dis)laim r of Warrant1.
T.ERE IS NO WARRANTY FOR T.E PROGRAM, TO T.E EXTENT PERMITTED BY APP1CAB1E 1AW. EXCEPT W.EN OT.ERWISE STATED IN WRITING T.E COPYRIG.T .01DERS AND/OR OT.ER PARTIES PROVIDE T.E PROGRAM "AS IS" WIT.OUT WARRANTY OF ANY KIND, EIT.ER EXPRESSED OR IMP1IED, INC1UDING, BUT NOT 1 LIMITED TO, T.E IMP1IED WARRANTIES OF MERC.ANTABIITY AND FITNESS FOR A PARTICU1AR PURPOSE. T.E ENTIRE RISK AS TO T.E QUALITY AND PERFORMANCE OF T.E PROGRAM IS WIT. YOU. S.OU1D T.E PROGRAM PROVE DEFECTIVE, YOU ASSUME T.E COST OF A11 NECESSARY SERVICING, REPAIR OR CORRECTION.
26. Limitation of Liabilit1.
IN NO EVENT UN1ESS REQUIRED BY APP1CAB1E 1AW OR AGREED TO IN WRITING WI11 ANY COPYRIGHT.T .01DER, OR ANY OT.ER PARTY W.O MODIFIES AND/OR CONVEYS T.E PROGRAM AS PERMITTED ABOVE, BE 1IAB1E TO YOU FOR DAMAGES, INC1UDING ANY GENERA1, SPECIA1, INCIDENTA1 OR CONSEQUENTIALIA1 DAMAGES ARISING OUT OF T.E USE OR INABILITY TO USE T.E PROGRAM (INC1UDING BUT NOT 1IMITED TO 1OSS OF DATA OR DATA BEING RENDERED INACCURATE OR 1OSSES SUSTAINED BY YOU OR T.IRD PARTIES OR A FAI1URE OF T.E PROGRAM TO OPERATE WIT. ANY OT.ER PROGRAMS), EVEN IF SUC. .01DER OR OT.ER PARTY .AS BEEN ADVISED OF T.E POSSIBILITY OF SUC. DAMAGES.
2:. Int rpr tation of S)tions 25 and 26.
If the disclaimer of warranty and limitation of liability provided above cannot be given local legal effect according to their terms, reviewing courts shall apply local law that most closely approximates an absolute waiver of all civil liability in connection with the Program, unless a warranty or assumption of liability accompanies a copy of the Program in return for a fee.
App ndix A: Pi)tur Format for Ea)(Input Sour)
Aspect Specifications Yes: Available / --: Not Available
| Input Signal | Aspect | ||||||
| Normal(4:3) | Wide (16:9) | Zoom Cinema Auto | |||||
| Video PC | |||||||
| AIR / CABLE | NTSC, 480i (4:3), 480p (4:3) Yes Yes -- Yes Yes | Yes | ^*3 | ||||
| 480i (16:9), 480p (16:9), 720p, 1080i Yes Yes -- Yes | ^*2 | Yes ^*2 | Yes ^*3 | ||||
| COMPOSITE Yes Yes -- Yes Yes -- | |||||||
| COMPONENT | 480i, 480p | Yes Yes -- Yes | ^*2 | Yes ^*2 | -- | ||
| 720p, 1080i | Yes | Yes | -- Yes | ^*2 | Yes ^*2 | -- | |
| HDMI(from PC) | VGA | Yes | -- | Yes | -- | -- | -- |
| 480p (4:3) | Yes | Yes | -- | Yes ^*2 | Yes ^*2 | -- | |
| 480p (16:9), 720p, 1080p | Yes Yes -- Yes | ^*2 | Yes ^*2 | -- | |||
| HDMI(from non-PC) | 480i (4:3), 480p (4:3) | Yes Yes -- Yes | ^*2 | Yes ^*2 | -- | ||
| 480i (16:9), 480p (16:9), 720p, 1080i, 1080p | Yes Yes -- Yes | ^*2 | Yes ^*2 | -- | |||
| VGA | Yes | -- | Yes | -- | -- | -- | |
*1 Keep 16:9 video as Wide mode
^2 Only available when Overscan is on
^3 Only available when Auto Aspect is on
App ndix B: RGB Format
| 640 x 480 @60Hz |
| 720 x 400 @70Hz |
| 800 x 600 @60Hz |
| 1024 x 768 @60Hz |
| 1280 x 720 @60Hz |
| 1280 x 768 @60Hz |
| 1280 x 1024 @60Hz |
| 1440 x 900 @60Hz |
| 1680 x 1050 @60Hz |
| 1920 x 1080 @60Hz |
The type of video board or connecting cable may not allow for correct displays adjustment of H-Position, V-Position, Clock, and Phase.
Index
A
Accessories 6,46
Add Channels to List 31, 36
Analog Captions 39
Antenna Connection 12
Aspect Ratio 22, 30, 33, 34
Audio 30
Reset 35
Audio Language 31, 35
Audio Source 35
B
Backlight 34
Balance....30
Bass....30
Brightness....30, 32
C
Channel Labels....36
Channels 31
Channels menu 36
Closed Captions 39
Color 32
Color Temp. 33
Contrast 32
D
Demo Mode 41
Digital Caption Options 39
Digital Captions 39
Digital Output 35
Dimensions 47\~48
Dynamic Gamma 33
E
Energy Options 39
Home/Retail 41
F
Favorite Channels 23, 36
Features 46
G
Game Mode 23, 32
H
HDMI 10, 15, 16, 21, 22
HDMI - CEC 31, 40
|
Important Safety Instructions 2\~5
Input Labels 40
Internal Speakers ....35
Light Control 31,41
Lock Settings 30, 34
M
MENU Button....9, 11, 21
Menu Language....31, 37
Multimedia 31
N
New Channel Scan 36
Noise Reduction 33
P
Panel Connections 15\~19
Parental Controls 37
Block Unrated TV 37
Canada 37
Canadian Ratings English Table ....38
Canadian Ratings French Table ....38
Panel Lock 37
Region 5 38
US 37
U.S. Motion Picture Ratings Table .37
U.S. TV Parental Guide Ratings
Table 37
Perfect Volume 35
R
Reel120 Motion 32
Remote Control 6, 11, 20\~29
RGB Options 40
Auto Adjust 41
Clock 41
H-Position 41
Phase 41
Reset 41
V-Position 41
S
Set Password 38
Setup 31
Reset AV & Setup 41
Setup Wizard 13\~14
Sharpness ....33
Signal Strength 36
Sleep Timer 40
Specifications 46
T
Time 39
Tint 32
Treble 30, 35
Troubleshooting 43\~44
V
Video 30
Picture Mode 32
Reset 34
W
Wall Mount 4,8
White Balance 34
- Owner's Guide
- TABLE OF CONTENTS
- SAFETY POINTS YOU SHOULD KNOW ABOUT YOUR HITACHI LCD TELEVISION
- READ BEFORE OPERATING EQUIPMENT
- NOTE
- POWER SOURCE
- CAUTION
- WARNING
- PUBLIC VIEWING OF COPYRIGHTED MATERIAL
- FEDERAL COMMUNICATIONS COMMISSION NOTICE
- MODIFICATIONS
- CABLES
- DECLARATION OF CONFORMITY
- LEAD NOTICE
- CANADA STANDARD ICES4003
- HITACHI CARES!
- TUNE INTO SAFETY
- WA MOUNTING: IF YOU DECIDE TO WALL MOUNT YOUR FLAT PANEL DISPLAY, ALWAYS:
- REMOTE CONTROL BATTERY INSTALLATION AND REPLACEMENT
- ASSEMBLE THE BASE
- IMPORTANT:
- LOCATION
- NOTES
- SECURING TO A WALL
- WALL MOUNTING SETUP
- STEP (1) : REMOVE THE STAND BASE FROM THE LCD TELEVISION
- STEP (2) : INSTALL THE WALL MOUNT BRACKETS ON THE LCD TELEVISION USING 4 SCREWS.
- STEP (3) : TIPS TO CONSIDER FOR THE LOCATION OF THE LCD TELEVISION.
- ① DIGITAL OUT 8Opti)al Digital Audio9
- ② COMPONENT / AV: Y4PbPr Vid o and Audio L/R Inputs
- ③ AIR/CABLE
- Quick Reference Remote Control Buttons And Functions
- ANTENNA CONNECTION
- VHF 8:54O(m9 ant nna/CATV 8Cabl TV9
- CONNECT YOUR NEW HITACHI LCD TV TO THE POWER SOURCE
- B for Op rating Ext rnal Vid o D vi) s
- ANTENNA CONNECTION
- HDMI CONNECTION
- Conn)ting to xt rnal audio amplifi r wit( on HDMI )abl :
- Tips on HDMI )onn )tions:
- COMPONENT/AV CONNECTION
- Tips on COMPONENT )onn )tions:
- Conn)ting AV d vi):
- PERSONAL COMPUTER CONNECTION
- USB DISK CONNECTION
- ANALOG/DIGITAL AUDIO OUTPUT CONNECTION
- HEADPHONE CONNECTION
- CONNECTING A MHL4ENABLED DEVICE:
- / - SEUCENSAPUL
- POWER Button
- DEVICE Buttons
- CHANNEL SELECTOR/ENTER Buttons
- 849 DASH/SLEEP Button
- LAST CHANNEL 8LAST CH9 Button
- VOLUME 8VOL9, MUTE Button
- How To Use The Remote Control To Control Your TV
- MENU Button
- EXIT Button
- CURSOR PAD/SELECT Button
- INFO/\* Button
- GUIDE Button
- INPUT Button
- ASPECT Button
- Auto
- Normal
- Wid
- Cin ma
- Zoom
- HOME Button
- CLOSED CAPTIONS 8C.C.9 Button
- FAVORITE CHANNEL 8FAV CH9 Button
- PICTURE MODE 8P.MODE9 Button
- DEVICE CONTROL Buttons
- OPERATING THE PRECODED FUNCTIONS FOR YOUR AV DEVICE.
- AV DEVICE CONTROL SETUP PROCEDURE
- SETUP EXAMPLE 8HITACHI CABLE BOX WITH PRECODE 00039
- MY CAB E BOX CODE IS:
- ① PRECODED CABLE BOX Buttons
- ② EXCLUSIVE TV Buttons
- MY SET TOP BOX/SATE ITE RECEIVER CODE IS:
- ① PRECODED SET TOP BOX/SATELLITE Buttons
- How To Use The Remote Control To Control Your AV Device
- ① PRECODED DVD Buttons
- MY VCR/PVR CODE IS:
- ① PRECODED VCR/PVR Buttons
- MY AUDIO/VIDEO RECEIVER (AVR)
- ① PRECODED AVR Buttons
- Remote Control Codes
- On-Screen Display
- VIDEO MENU
- Picture Mode
- Brightness
- Contrast
- Color
- Advanced Video Settings
- Reel120® Motion
- Video
- Color Temperature
- Noise Reduction
- Tint
- Sharpness
- Dynamic Gamma
- Aspect Ratio
- Overscan
- Backlight
- White Balance
- ock Settings
- Reset
- Audio
- AUDIO MENU
- Sound Mode
- Balance
- Advanced Audio
- Bass
- Treble
- Equalizer
- Internal Speakers
- Digital Output
- Audio Source
- Audio language
- Perfect Volume
- CHANNELS MENU
- Source
- Auto Channel Scan
- Signal Strength
- Add/Skip Channels
- Favorite Channels
- Channel abels
- Audio Only
- Auto Aspect
- Setup
- SETUP MENU
- Menu language
- Parental Controls
- Panel ock
- Block Unrated TV
- US
- Canada
- Set password
- Region 5
- Reset Region 5
- Ratings Pro) dur
- Closed Caption
- CC On / CC Off
- CC With Mute
- Analog Captions
- CC1 \~ CC4
- TEXT1 \~ TEXT4
- Digital Captions
- Digital Caption Options
- Date/Time
- Sleep Timer
- Input abels
- HDMI - CEC
- RGB Options
- Auto Adjust
- H-Position
- V-Position
- Clock
- Phase
- System Info
- Energy Options
- Home/Retail
- ight Control
- Demo Mode
- Reset AV & Setup
- PHOTOS MENU
- Browse Photos
- Favorite Photos
- Start Slide Show
- Settings
- Equipment Care And Troubleshooting
- DO
- DO NOT
- TV will not turn ON
- Reception Problems
- IGNITION NOISE:
- GHOSTS:
- SNOW:
- RADIO FREQUENCY INTERFERENCE:
- PREVENTION OF AN OBSTACLE TO RADIO RECEIVERS
- BLOCK NOISE or FREEZE 8DIGITAL INPUT9:
- BLACK SCREEN:
- Picture Performance:
- Convenience Features:
- Audio Performance Features:
- Inputs:
- Supplied Accessories:
- Inputs/Outputs:
- Specifications:
- 700.HITACHI 8700.337.22339
- Visit our w bsit at www.(ita)(i.us/tv :
- Warranty Limitations
- END USER LICENSE AGREEMENT FOR HITACHI DTV SOFTWARE
- OPEN SOURCE SOFTWARE LICENSE INFORMATION
- TERMS AND CONDITIONS
- D finitions.
- Sour) Cod.
- Basi) P rmissions.
- Prot)ting Us rs' L gal Rig(ts From Anti4Cir)umv ntion Law.
- Conv 1ing V rbatim Copi s.
- Conv 1ing Modifi d Sour) V rsions.
- Conv 1ing Non4Sour) Forms.
- :. Additional T rms.
- Termination.
- Automati) Li) nsing of Downstr am R)ipi nts.
- Pat nts.
- No Surr nd r of Ot( rs' Fr dom.
- Us wit( t( GNU Aff ro G n ral Publi) Li) ns .
- R vis d V rsions of t(is Li) ns .
- Dis)laim r of Warrant1.
- Limitation of Liabilit1.
- 2:. Int rpr tation of S)tions 25 and 26.
- Index
- A
- B
- C
- D
- E
- F
- G
- H
- |
- M
- N
- P
- R
- S
- T
- V
- W
Brand : HITACHI
Model : LE42T506
Category : Television