
DWU8330 - Dishwasher MAYTAG - Free user manual and instructions
Find the device manual for free DWU8330 MAYTAG in PDF.


| Product Type | Built-in Dishwasher |
| Width | 23.9 inches |
| Height | 34.5 inches (adjustable) |
| Depth | 24.5 inches |
| Weight | 85 lb (38.5 kg) |
| Power Supply | 120 V ~ 60 Hz, 9.5 A |
| Water Consumption | 6.5 gallons per cycle (typical) |
| Capacity | 14 place settings |
| Noise Level | 50 dBA |
| Wash Cycles | Normal, Heavy, Light, Quick Rinse, Rinse Only |
| Options | Heated Dry, Delay Start, Control Lock |
| Interior Tub | Stainless Steel |
| Filter Type | Self-cleaning hard food disposer |
| Energy Star Certified | Yes |
| Annual Energy Use | 270 kWh/year (est.) |
| Annual Water Use | 4,000 gallons/year (est.) |
| Maintenance | Clean filter monthly; use rinse aid; wipe door gasket |
| Safety | Child lock feature; auto shut-off on door open |
| Spare Parts Available | Yes (racks, spray arms, filters, etc.) |
| Repairability | Modular design; rated 7/10 by service technicians |
Frequently Asked Questions - DWU8330 MAYTAG
Recommended brand: Jet-Dry.
User questions about DWU8330 MAYTAG
0 question about this device. Answer the ones you know or ask your own.
Ask a new question about this device
Download the instructions for your Dishwasher in PDF format for free! Find your manual DWU8330 - MAYTAG and take your electronic device back in hand. On this page are published all the documents necessary for the use of your device. DWU8330 by MAYTAG.
USER MANUAL DWU8330 MAYTAG
AUTOMATIC DISHWASHER MODEL DWU8330/DWC8330
USER'S GUIDE
MAYTAG
natural_image
Abstract geometric logo design with three white curved shapes on a dark textured background (no text or symbols)
natural_image
Illustration of a kitchen interior with appliances and a refrigerator (no text or symbols)
natural_image
Pure architectural or mechanical diagram showing two rectangular components with internal square cutouts, no text or symbols present.
natural_image
Illustration of two washing machines side by side, one open and one closed, with no visible text or symbols.
natural_image
Illustration of a vintage refrigerator with open lid and frontrest (no text or symbols)FOR FUTURE REFERENCE
Congratulations on your choice of a Maytag Jetclean™ dishwasher. As you use your new dishwasher we know you will appreciate the many features that provide unsurpassed cleaning and capacity along with energy efficiency and dependability.
On the following pages you will find a wealth of information regarding all aspects of your beautiful new dishwasher. By following these instructions carefully, you will be able to achieve excellent results with your dishwasher. Should you have any questions about using your Maytag dishwasher, contact us. Be sure to provide the model number of your dishwasher.
MAYTAG
CONSUMER EDUCATION
ONE DEPENDABILITY SQUARE
NEWTON, IOWA 50208
(515) 791-8911
(Mon.-Fri., 8 am-5 pm CST)
For future reference we suggest you retain this manual after recording the model number and serial number of this dishwasher in the spaces provided. This information can be found on the data plate located on the upper left corner of the tub opening.
Model Number
Serial Number
WARNING - Check with installer to make sure appliance has been grounded to avoid possible electrical shock. Be sure you read the IMPORTANT PERSONAL SAFETY INSTRUCTIONS on page 2 before you start to use this dishwasher.
CONSUMER PUBLICATIONS
For additional information order the following booklets from Maytag at the prices indicated. Send your name, address, booklet title, form number and payment to: Consumer Education Dept., Maytag, One Dependability Square, Newton, IA 50208. Allow 6-8 weeks for delivery.
Innovative Ideas for Today's Kitchens — 22PR....\$1.00
Before You Call (Appliance Servicing Tips) — 206YG ....50c
Appliance Buying Guides....50¢ EACH
Washer — 211YG
Dryer — 212YG
Dishwasher — 213YG
Electric Range — 214YG
Gas Range - - 215YG
Refrigerator — 276YG
USING YOUR DISHWASHER
Hot Water is Essential
For good cleaning and drying results, hot water is necessary. The water should be 120°-140°F. If, for any reason, the temperature of the water being delivered by the water heater is below 120°F, select the Temp Boost Sensor option to have your dishwasher heat the water.
To check water temperature, turn on the hot water faucet nearest the dishwasher. Let water run into a glass in the sink until it is as hot as possible, then check with a candy or meat thermometer. If the temperature at the faucet is below 120°F (49°C), have a qualified person raise the water heater thermostat setting.
Before starting the dishwasher turn on the hot water faucet and let it run until the water is hot.
Preparing Dishes
- It is not necessary to rinse dishes before placing them in your Maytag dishwasher. Simply scrape off bones and large pieces of food. The food disposer in your dishwasher can handle a variety of items such as pits, fruit seeds, popcorn and toothpicks. These items will be chopped into small pieces during drain and removed with the drain water. If hard items get into the dishwasher module, you may hear chopping noises during drain. These sounds are normal.
- Foods that have been burned onto cooking utensils will need to be scraped or soaked.
- Certain foods, such as mustard, mayonnaise, lemon juice, vinegar, salt or dressings may cause stainless steel flatware to rust and pit if allowed to remain in contact with the surface for a period of time. Therefore, it is best to rinse these food soils off stainless steel flatware unless the dishwasher is to be operated soon after loading.
- If your dishwasher drains into a food waste disposer, make certain the disposer is completely empty before starting the dishwasher to provide for proper draining.
Loading Your Dishwasher
Seldom will households have identical dishes; the number and type of articles used will vary daily. Your dishwasher is designed to be flexible and accommodate a wide variety of dishes and utensils. The following instructions and pictures will help you become familiar with your dishwasher. With experience, you will learn the best arrangement for your particular needs.
General Recommendations
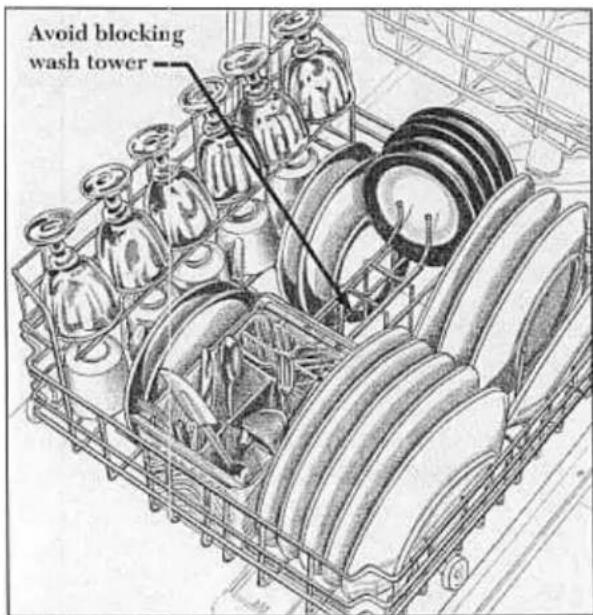
- Place all items on racks so they are separated and face the center to insure the water spray will reach the soiled surfaces. Do not allow items to extend out of the racks.
• Make sure the movement of the upper and lower spray arms is not blocked by items hanging below the lower rack or tall articles in the upper rack. - Insure the free flow of water to the detergent cup by not blocking it with large items.
- Larger, flat, lightweight items (such as plastic covers) may be wedged next to the silverware basket or along the sides and back of the racks.
- The wash tower rises through the center of the lower rack during the cycle. For the best cleaning results, avoid blocking it or loading tall articles next to it.
Rinse Aid
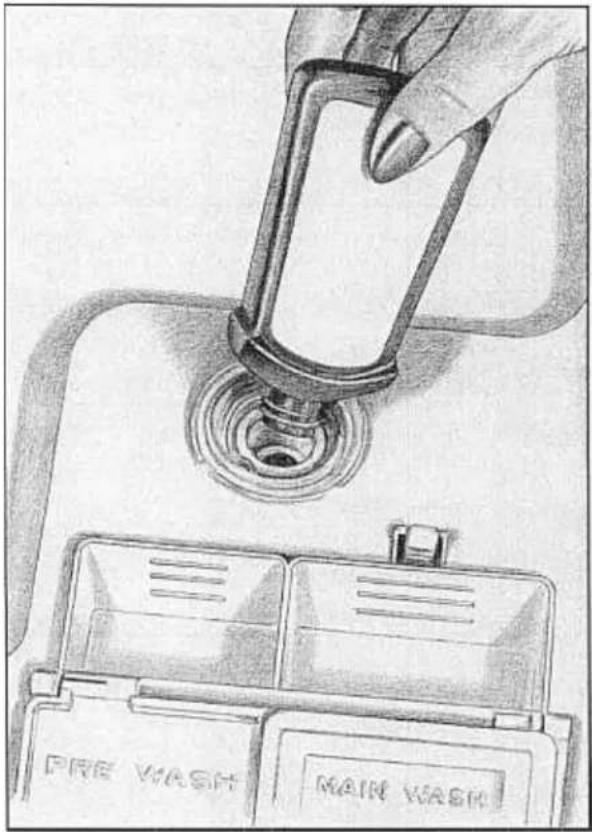
Your Maytag dishwasher features an automatic rinse aid dispenser, located near the detergent dispenser on the door interior. Using a rinse aid improves drying results and reduces spotting and filming.
To fill, turn dispenser cap counterclockwise to open. Remove cap and pour liquid rinse additive into the opening. Replace cap and turn clockwise to close.
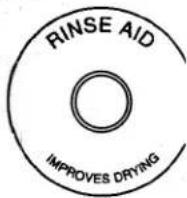
The clear indicator in the center of the cap changes from dark to light when the reservoir is nearly empty. This indicates that it is time to refill the dispenser.
Connecting a Convertible Dishwasher
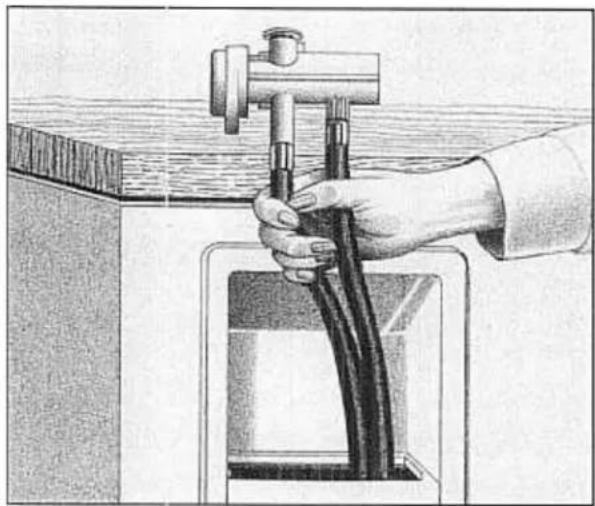
Turn on the hot water faucet and allow water to run until water coming from the faucet is hot. Shut off.
Pull faucet connector from recess in back of dishwasher as shown.
natural_image
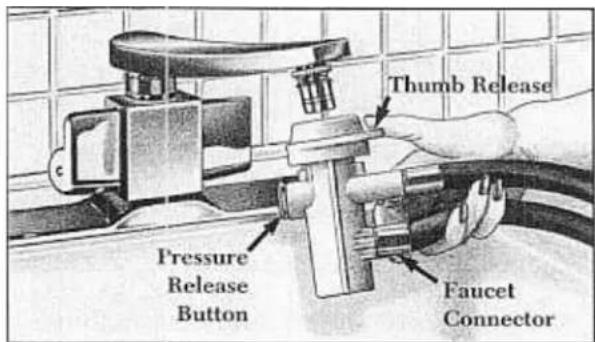
Illustration of a hand holding a flexible hose connected to a mechanical device (no text or symbols visible)Press down on thumb release. Lift connector up on to faucet and remove pressure from thumb release to hold connector firmly in place.
Turn on hot water faucet full force.
Be sure the sink drain is open so that water from the dishwasher will properly drain.
Pull electric cord from recess and plug into a properly grounded electrical outlet.
Caring for the Wood Top
Before using a convertible dishwasher for the first time, wipe the wood top with a damp cloth to remove surface dust and then dry. Saturate cloth with mineral oil and apply a heavy coat to the wood top. Let stand overnight. The next day apply a thin coat of mineral oil and rub with a soft dry cloth. Repeat every few months to maintain the appearance of the wood top.
Options:
Temp Boost Sensor:
If for any reason the incoming water temperature is below 120°F, press the On button to assure the water is heated to proper temperature for best cleaning and drying results. The dial will pause at the ⚙ to extend the main wash and the Heating Delay light will turn on.
Press the Off button to cancel the Temp Boost Sensor.
Fan Dry Options:
Press the Heat button to turn the heating element on during the fan dry period. This option provides faster drying.
Press the Air button to turn the heating element off during the fan dry period.
To Start Dishwasher:
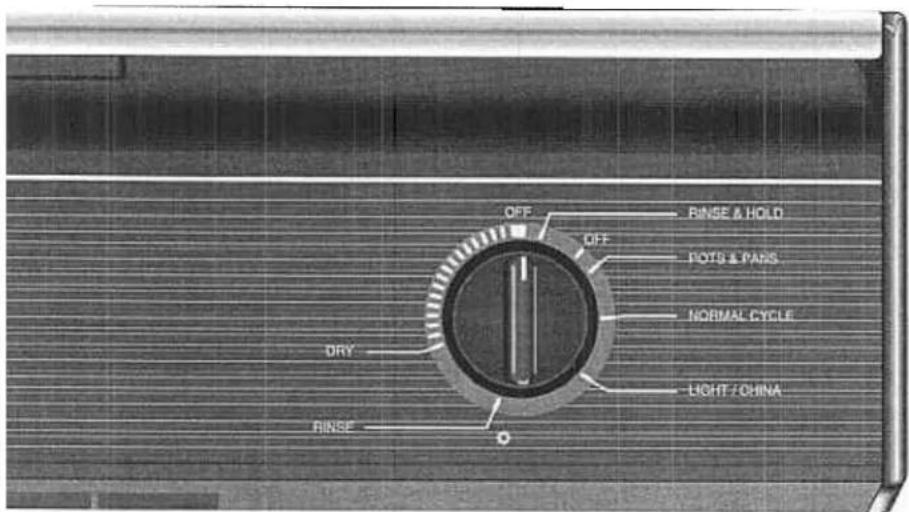
After loading set the dial to the desired cycle. Press button for desired options.
NOTE: Run the water from the hot water tap to clear the line of cold water before starting.
Press the door until it latches. The cycle will begin with a drain prior to fill.
Indicator Light:
The Heating Delay light indicates that the main wash is being extended to heat the water to proper temperature.
Adding a Forgotten Item:
For best cleaning, the forgotten item should be added early in the cycle.
- Unlatch the door and wait until the sound of circulating water stops.
- Open the door and add the item
- Pause before latching the door. The cycle will continue at the point it was interrupted.
- Soft Water Etching
If the cloudy film is not removed after soaking in vinegar (previous procedure), then the condition is etching. This permanent film occurs in unusual conditions under which the surface of the glass is pitted or eroded. It is permanent.
In the beginning stages, etching may be identified by a "rainbow" look—shades of blue, purple, brown or pink may be seen when the glass is held at an angle to the light. In advanced stages the surface of the glassware appears frosted, spotted or cloudy.
Certain types of glassware will etch in any dishwasher with the combination of soft water (especially mechanically softened), an excessive amount of detergent, heat and prerinsing. There is no relationship to the cost or quality of the glass.
To prevent:

- Adjust the amount of detergent to the degree of water hardness (see page 6).
- Lower the water temperature (see page 3).
- Avoid using the Heat Dry drying option.
- Do not manually prerinse dishes before loading in dishwasher. Prerinsing prior to loading to remove all food soil aggravates etching.
- Rust
Sometimes the dishes or the interior of the dishwasher may turn a brown, red or black color if iron or manganese is in the water. To remove discoloration from dishwasher interior, dishes and glassware (no metal items):
- Select a rust removing compound, such as RoVer Rust Remover. It is available from
Maytag Parts Distributors by using Part No. 57961.
- Start empty dishwasher on Rinse & Hold or rinse portion of the cycle. During fill, open the door and add 1/2 cup RoVer Rust Remover to the water. Allow the dishwasher to complete the cycle.
- Follow with a detergent wash.
The only permanent solution is to install special filters which can remove iron and
Energy Saving Tips
You can help save energy if you:
- Wash full loads. Running a half-filled dishwasher uses the same amount of electricity and hot water as a fully loaded machine.
- Do not pre-rinse normally soiled dishes. Select the correct cycle for the load and use the recommended amount of detergent for good washing results without hand rinsing.
- Load correctly for best washing results. Incorrect loading may cause poor washing and the need to prewash all or part of the load.
- Use the Light/China cycle when dishes are lightly soiled. It uses less hot water and energy than other cycles.
- Fan dry dishes (without heat) when you don't need a rapid drying cycle. Allow longer drying times (overnight).
- Use your dishwasher during off-peak hours. Local utilities recommend this to avoid heavy usage of energy at certain times of day. Check with your utility company to see if off-peak rates exist.
Caring For Dishwasher
The interior is normally self-cleaning.
Occasionally check the bottom of the dishwasher tub and clean out pieces of food which may collect there.
Periodically clean the bottom edge of the dishwasher door liner. Food and liquids drip onto this area when the dishwasher is loaded.
If you notice an odor in your dishwasher, it may be due to a strong "chemical" or chlorine odor from the dishwasher detergent. Using a different detergent, especially a lemon scented one, will probably eliminate the odor. In some instances the smell of the rinse additive may be strong. Purchase a fresh package and see if it is better. Lastly, if the dishwasher is run only every couple of days, an odor may develop. Use the Rinse & Hold feature daily to remove any food soil that may cause an odor.
To remove an odor, try one of the following:
- Place baking soda in both sides of the detergent dispenser. Select Light/China and let the water circulate for about 10 minutes. Stop the dishwasher by unlatching the door and let stand overnight. Then, restart the dishwasher by latching the door and let it complete the cycle.
- Select the Light/China cycle and let the dishwasher fill with water. Then open the door and pour one cup of chlorine bleach into the bottom of the dishwasher. Latch the door and let the dishwasher complete the cycle.
Clean the control panel and front panel with a soft damp cloth and liquid spray cleaner. Do not use any abrasive powders or cleaning pads.
Changing Panels
Your Maytag dishwasher comes with reversible panel inserts which are pre-assembled at the factory. This enables you to select the color you want before your dishwasher is installed or choose another color at a later date.
To Change Panels:
A. Remove three screws holding the metal trim strip on one side of the door. Take note of how the trim comes off.
B. Grasping the lower part of the door panels, bow panels out carefully at the bottom while sliding panels far enough to clear the flange on the trim strip which was not removed and remove panels.
C. Arrange panels so the desired color is facing out.
D. Place door panels (notched side up) behind the metal trim at the bottom of the door. Bow the panels so they fit behind the control panel at the top.
E. Slide the panels under the side metal trim which was not removed. To do this, it will be necessary to compress the backing behind the colored panels.
F. Reinstall the metal trim which was removed earlier. To do this, start by inserting the tip end of the trim strip behind the control panel. Align the holes and replace the three screws.
G. The lower access panel is held by four screws (two above the panel and two below). With these removed, the panel may be removed to make it easy to change panel colors.
H. With the lower access panel removed, remove the four screws along the bottom of panel and remove the trim which holds the panels. Once the desired panel is facing out, replace the trim, and reinstall the panel to the dishwasher.
Use care when changing panels to be certain you are not injured on sharp edges and that the panels are not damaged. If you have any questions concerning changing panels, contact your local Maytag Dealer.
BEFORE YOU CALL FOR SERVICE
(continued)
Seems noisy
• Water circulation noise is normal.
• Humming during drain is normal.
- Dishes may not be loaded properly. Dishes should not be touching one another.
- Wash arm may be hitting an item when rotating. Load items so nothing blocks the wash arm.
- Chopping or grinding noise may be heard during drain when the internal food disposer is chopping hard items such as fruit seeds, nuts, etc.
- Detergent cup lid hits door liner when dishwasher door is opened at end of cycle and is normal.
• Installation (location, flooring, cabinetry, etc.) can affect noise level.
• Water valve hiss during fill is normal.
Does not run properly/Won't fill
- Be sure door is tightly closed and latched.
- Check to see that water is turned on.
- The cycle is not properly selected. Be sure the dial is turned far enough or the cycle pad is completely depressed.
• Cycle will start with drain. - Check your home's circuit breaker or fuse box.
- Inlet hose may be kinked.
• Water inlet valve may be clogged with sediment and in need of cleaning.
Does not drain properly
- Check to see that the cycle has been completed.
- The dishwasher may be at a pause between cycles which is normal.
- Drain hose may be kinked.
- Check your home's circuit breaker or fuse box. Reset if necessary.
- Food is backing up in the pipes at the sink. If hooked up to a food waste disposer, be sure to run the disposer regularly.
- Some water is normal and keeps seals from drying.
Detergent cup did not empty completely
- Check to see that the cycle has been completed.
- Be sure dispenser is not blocked from wash action.
- Be sure dispenser is not wet when detergent is added.
• Make sure large items placed in the front right corner of upper rack are not blocking the detergent cup. - Use fresh detergent. Store in dry, cool place.
Leaks
- Check to see that the dishwasher is level as described in the Installation Instructions.
- Suds can cause the unit to overflow so measure detergent carefully. Try another brand of detergent. Use only detergents designed for automatic dishwashers.
• Make sure you follow directions on how to add a forgotten item.
Has an odor
- Soiled dishes held too long in the dishwasher can create an odor, therefore we recommend using the Rinse & Hold cycle if available.
- Dishwashers will have a "new" smell when first installed.
- Dishwasher not draining properly. (See "Does not drain properly")
Chips dishware
- Be sure dishes are loaded according to the instructions so they do not strike together from the wash action.
• We do not recommend washing fine antique china and crystal in the dishwasher. - Do not load glasses over rack tines, or allow to touch each other.
- Do not overload.
For further assistance contact your Maytag dealer or call Maytag Customer Service:
U.S. 1-800-688-9900
CANADA 1-800-688-2002
NOTES:
- USER'S GUIDE
- FOR FUTURE REFERENCE
- CONSUMER PUBLICATIONS
- USING YOUR DISHWASHER
- Hot Water is Essential
- Preparing Dishes
- Loading Your Dishwasher
- General Recommendations
- Rinse Aid
- Connecting a Convertible Dishwasher
- Caring for the Wood Top
- Options:
- Temp Boost Sensor:
- Fan Dry Options:
- To Start Dishwasher:
- Indicator Light:
- Adding a Forgotten Item:
- Energy Saving Tips
- Caring For Dishwasher
- Changing Panels
- To Change Panels:
- BEFORE YOU CALL FOR SERVICE
- Seems noisy
- Does not run properly/Won't fill
- Does not drain properly
- Detergent cup did not empty completely
- Leaks
- Has an odor
- Chips dishware
Brand : MAYTAG
Model : DWU8330
Category : Dishwasher