Y704D - Wristwatch Lorus - Free user manual and instructions
Find the device manual for free Y704D Lorus in PDF.


| Product type | Digital watch |
| Brand | Lorus |
| Model | Y704D |
| Display type | Digital with electroluminescent backlight |
| Time display format | 12-hour with AM/PM or 24-hour |
| Calendar | Automatic (year, month, date, day of week, adjusts for leap years) |
| Alarm | Daily alarm, 24-hour basis, 1 minute duration |
| Stopwatch | Up to 9h 59m 59s in 1/100 sec increments; standard, accumulated, lap (up to 5 laps); memory recall |
| Power source | One CR2032 lithium battery (approx. 3 years life) |
| Water resistance | Not indicated on dial/case back; treat as not water resistant |
| Operating temperature | 0°C to 50°C |
| Cleaning | Use soft cloth and clean water; avoid chemicals and soap |
| Care instructions | Keep away from strong magnetic fields, static electricity, severe impacts; do not operate buttons when wet; rinse saltwater and dry |
| Battery replacement | Recommended at local watch repair shop; use CR2032 |
| Service | See enclosed warranty/guarantee for repair/service |
| Warning | Do not expose battery to fire or recharge; keep away from children |
Frequently Asked Questions - Y704D Lorus
User questions about Y704D Lorus
0 question about this device. Answer the ones you know or ask your own.
Ask a new question about this device
Download the instructions for your Wristwatch in PDF format for free! Find your manual Y704D - Lorus and take your electronic device back in hand. On this page are published all the documents necessary for the use of your device. Y704D by Lorus.
USER MANUAL Y704D Lorus
Hour, minute, second, year, month, date and the day of the week.
• Automatic Calendar Function
Calendar adjusts automatically for odd and even months including February of leap years.
• Time Display Format
Choice of time display format, either 12-hour display with AM/PM Indicators or 24-hour display, is available.
2. DAILY ALARM
The alarm can be set to sound on a 24-hour basis.
3. STOPWATCH
The stopwatch can measure up to 9 hours 59 minutes and 59 seconds in 1/100 second increment. The stopwatch features the following functions;
• Standard Measurement
• Accumulated Elapsed Time Measurement
• Lap Time Measurement
Up to 5 lap times can be measured and recorded.
• Memory Recall Function
Each recorded lap time and the fastest and slowest lap times can be recalled after measurement.
4. ILLUMINATING LIGHT
The built-in electroluminescent backlight illuminates the display for easy viewing in darkness.
■BUTTONS AND DISPLAY

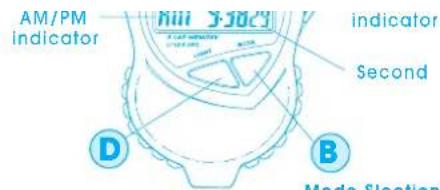
Mode SlectionIlluminating light
Press button B to select display mode. Display mode changes over in the following order by each press of the button.
Time/Calendar Mode

flowchart
graph TD
    A["Stopwatch Mode Alarm Mode"] --> B["0:05'08'38"]
    B --> C["8AM 9:38:29"]
    C --> D["8AM 7:30:1"]
    D --> E["B"]
    E --> F["B"]
■HOW TO SET THE TIME/CALENDAR

- Press button B to go to the Time/Calendar Mode.
- Press and hold button B for 2 seconds, the display changes to the Time/Calendar Setting Mode. The second numeral starts flashing.
- Press button A to select an Item to be adjusted. Items change over in the following order.
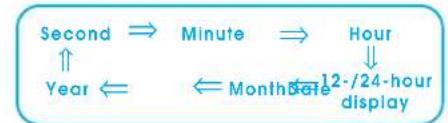
When an item is selected for adjustment, it starts flashing.
- Use button C to adjust each item.
For the second setting, while the second numeral is flashing, press button C in accordance with a time signal. The second numeral is reset to "00" and starts counting immediately.
For the choice of time display format, each press of button C selects alternately 12-hour display or 24-hour display.
For the minute, hour, month, date and year settings, each press of button C advances the displayed numeral by one. Keep button C pressed to advance the numeral quickly.
- Press button A to confirm the adjustment of the selected item and move on to the next item.
- Upon completion of all necessary adjustments, press button B to return to the Time/Calendar Mode.
Under 12-hour display, an "AM" indicator in the morning and a "PM" indicator from the afternoon are displayed.
Once year, month and date are set, the day of the week is automatically set accordingly.
How to check the calendar
Keep button C pressed while in the Time/ Calendar Mode. While the button is kept pressed, the day of the week, month and date are displayed.
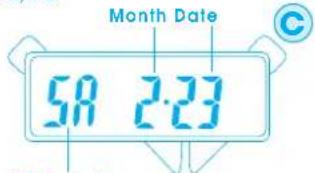
Day of the week
■HOW TO SET THE ALARM

■HOW TO SET THE ALARM
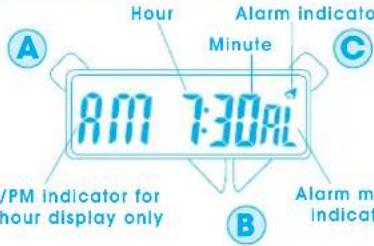
- Press button B to go to the Alarm Mode. Alarm Mode Indicator "AL" appears.
- Press and hold button B for 2 seconds to change the display to the Alarm Setting Mode. The hour numeral starts flashing.
- Use button C to set the hour.
◆Each press of button C advances the displayed numeral by one. Keep button C pressed to advance the numeral quickly.
- Press button A to confirm the hour setting and move on to the minute setting. The minute numeral starts flashing.
- Use button C to set the minute.
◆Each press of button C advances the displayed numeral by one. Keep button C pressed to advance the numeral quickly.
- Press button B to complete the alarm setting.
- Press button C to engage the alarm. The alarm indicator appears.
- Upon completion of all necessary adjustments, press button B to return to the Time/Calendar Mode.
Alarm engagement/disengagement
Press button C in the Alarm Mode. Each press of button C alternately engages or disengages the alarm. When the alarm is engaged, the alarm indicator appears at the upper-right corner of the display regardless of the display mode.
| Alarm engaged | |
| Alarm disengaged |
How to stop the alarm while sounding
The alarm sounds for one minute at the designated time. To stop it manually while sounding, press any button in any display mode.
How to check the alarm time
Keep button A pressed in the Time/Calendar Mode. While the button is kept pressed, the set alarm time is displayed.
■HOW TO USE THE STOPWATCH
- The stopwatch can measure up to 9 hours, 59 minutes and 59 seconds in 1/100-second increment. When the measurement is over 9 hours 59 minutes 99, the stopwatch will be reset to "0:00'00"00" and start counting again.
Stopwatch operation
Press button B to go to the Stopwatch Mode.

- Even if the display is changed from the Stopwatch Mode to another while measurement is in progress, the stopwatch continues timing properly. However, after measurement is finished, be sure to reset the stopwatch in order to avoid wasting its battery energy.

◆Press button A to reset the stopwatch after measurement.
Standard Measurement
- Press button C to start and stop the stopwatch.
- Use button A to reset the stopwatch.

Accumulated Elapsed Time Measurement
- Press button C to start, stop and restart the stopwatch as many times as required.
- Use button A to reset the stopwatch.

Lap Time Measurement
Up to 5 lap times can be displayed and recorded during measurement. In order to recall the recorded lap times after measurement, use Memory Recall Function before resetting the stopwatch.
- Press button C to start the stopwatch.
- Press button A to check lap time. The lap time is displayed and recorded while the measurement of total running time is still in progress.
- Press button C to stop the measurement.
- Press button A to reset

flowchart
graph LR
    A["Start"] --> B["A"]
    B --> C["Lap1"]
    C --> D["Lap2"]
    D --> E["Lap3"]
    E --> F["Up to Lap 5"]
    F --> G["Stop"]
    G --> H["Reset"]
With each press of button A, the display shows the lap time for 5 seconds and automatically return to the display of total running time.
Memory Recall Function
- When the lap time measurement is finished, press button B to go to the Memory Recall Display.

-
Press button A to read each recorded lap time. The fastest and the slowest lap times as well as each recorded lap time are displayed in the following order.
-
Press button A to read each recorded lap time. The fastest and the slowest lap times as well as each recorded lap time are displayed in the following order.

flowchart
graph TD
    A["FAST 3"] --> B["0:03'02"08"]
    B --> C["Slowest lap number"]
    C --> D["0:06'82"02"]
    D --> E["LAP 1"]
    E --> F["0:06'82"02"]
    F --> G["LAP 2"]
    G --> H["0:05'28"00"]
    H --> I["LAP 3"]
    I --> J["0:03'02"08"]

    style A fill:#f9f,stroke:#333
    style J fill:#f9f,stroke:#333

    note1["Fastest lap number"] -.-> A
    note2["Fastest lap time"] -.-> B
    note3["Slowest lap number"] -.-> C
    note4["Slowest lap time"] -.-> D
    note5["Lap number 1"] -.-> E
    note6["Lap time for Lap 1"] -.-> F
    note7["Lap number 2"] -.-> G
    note8["Lap time for Lap 2"] -.-> H
    note9["Lap number 3"] -.-> I
    note10["Lap time for Lap 3"] -.-> J
    note11["Up to Lap number 5"] -.-> K
Use button C to display the lap times in the reverse order.
- Press button B to return to the Time/Calendar Mode.
ILLUMINATING LIGHT
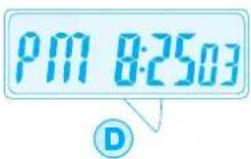
Press and hold button D. The light illuminates the display with 3 seconds delay.
BATTERY CHANGE
The miniature lithium battery Maxell CR2032, which powers your watch, should last approximately 3 years. However, because it is inserted at the factory, the actual life of the battery once in your possession may be less than 3 years. Be sure to replace the battery to prevent any possible malfunction as soon as it runs down. To replace the battery, we recommend taking the watch to a local watch repair shop.
Note: If the illuminating light is used for longer than 2 seconds per day, the battery life may be shorter than the above specified period.
■ CARE OF YOUR LORUS WATCH
This watch contains precise electronic components. Never attempt to open the case or remove the back cover.
• BATTERY

CAUTION
Do not expose the old battery to fire or recharge it. Keep it at a place beyond the reach of children. If a child swallows it, consult a doctor immediately.
• WATER RESISTANT
* If your watch is 200 M/20 BAR, 100 M/10 BAR or 50 M/5 BAR water resistant, it is so indicated on the dial/case back.
| Condition of useIndication | Accidental contact with water, such as | Swimming and taking a shower | Skin diving | Scuba diving |
If your watch is 200 M/20 BAR, 100 M/10 BAR or 50 M/5 BAR water resistant, it is so indicated on the dial/case back.
| Indicationon the dial/case back\Condition of use | Accidental contact with water, such as splashes and rain | Swimming and taking a shower | Skin diving | Scuba diving |
| No Indication | NO | NO | NO | NO |
| WATER RESISTANT | YES | NO NO | NO | |
| WATER RESISTANT(50M/5 BAR) | YES | YES NO | NO | |
| WATER RESISTANT(100M/10 BAR or above) | YES | YES YES | NO |
- Do not operate the buttons when the watch is wet.
- If the watch is exposed to salt water, rinse it in fresh water and then wipe it thoroughly dry.
- Should you find any water or condensation inside the watch, immediately have it checked. Water can corrode electric parts inside the case.
Caution:
Leather straps are not water resistant except so indicated, even if the watch head is water resistant.
• ALLERGIC REACTION
Because the case and band touch the skin directly, it is important to clean them regularly. If not, shirt sleeves may be stained and those with delicate skin may develop a rash. Please wear the watch with some play to avoid any possible allergic reaction. If you develop a rash on your wrist, stop wearing and consult a physician.
• MAGNETISM/STATIC ELECTRICITY
Your watch will not be affected by magnetism generated by household electric appliances but keep your watch away from a place where the watch is subject to strong electric field and static electricity.
• SHOCKS AND VIBRATIONS
Your watch may be worn for normal sports activities. However, be careful not to drop it or hit it on hard surfaces and avoid any severe impacts.
• TEMPERATURE
Your watch works with stable accuracy within a temperature range between 0°C and 50°C. Do not expose the watch to a place exceeding this temperature range.
- CLEANING
Use only a soft cloth and clean water for cleaning your watch. Never use chemicals, especially soap.
SERVICE
When your LORUS watch requires repair or sevicing, please see the enclosed WARRANTY/GUARANTEE.
Printed In China
- DAILY ALARM
- STOPWATCH
- ILLUMINATING LIGHT
- ■BUTTONS AND DISPLAY
- How to check the calendar
- ■HOW TO SET THE ALARM
- Alarm engagement/disengagement
- How to stop the alarm while sounding
- How to check the alarm time
- ■HOW TO USE THE STOPWATCH
- Stopwatch operation
- Standard Measurement
- Accumulated Elapsed Time Measurement
- Lap Time Measurement
- Memory Recall Function
- ILLUMINATING LIGHT
- BATTERY CHANGE
- ■ CARE OF YOUR LORUS WATCH
- • BATTERY
- CAUTION
- • WATER RESISTANT
- Caution:
- • ALLERGIC REACTION
- • MAGNETISM/STATIC ELECTRICITY
- • SHOCKS AND VIBRATIONS
- • TEMPERATURE
- - CLEANING
- SERVICE
Brand : Lorus
Model : Y704D
Category : Wristwatch