USER MANUAL 20DV693R PHILIPS
Philips representatives are ready to help you with any questions about your new product. We can guide you through Connections, First-time Setup, or any of the Features. We want you to start enjoying your new product right away!
Important! Return your Warranty Registration Card within 10 days. See why inside.
CALL US BEFORE YOU CONSIDER RETURNING THE PRODUCT.
1-800-531-0039
or
Visit us on the web at
www.philips.com
Let's make things better.

PHILIPS
Return your Warranty Registration card today to ensure you receive all the benefits you're entitled to.
Once your PHILIPS purchase is registered, you're eligible to receive all the privileges of owning a PHILIPS product. So complete and return the Warranty Registration Card enclosed with your purchase at once. And take advantage of these important benefits.
Warranty Verification
Registering your product within 10 days confirms your right to maximum protection under the terms and conditions of your PHILIPS warranty.
Owner Confirmation
Your completed Warranty Registration Card serves as verification of ownership in the event of product theft or loss.
Model Registration
Returning your Warranty Registration Card right away guarantees you'll receive all the information and special offers which you qualify for as the owner of your model.
Congratulations on your purchase, and welcome to the "family!"
PHILIPS

Dear PHILIPS product owner:
Thank you for your confidence in PHILIPS. You've selected one of the best-built, best-backed products available today. And we'll do everything in our power to keep you happy with your purchase for many years to come.
As a member of the PHILIPS “family,” you’re entitled to protection by one of the most comprehensive warranties and outstanding service networks in the industry.
What's more, your purchase guarantees you'll receive all the information and special offers for which you qualify, plus easy access to accessories from our convenient home shopping network.
And most importantly you can count on our uncompromising commitment to your total satisfaction.
All of this is our way of saying welcome—and thanks for investing in a PHILIPS product.
Sincerely,
Lawrence J Blanford
Lawrence J. Blanford
President and Chief Executive Officer
P.S. Remember, to get the most from your PHILIPS product, you must return your Warranty Registration Card within 10 days. So please mail it to us right now!
Know these
safety symbols

CAUTION
RISK OF ELECTRIC SHOCK
DO NOT OPEN
CAUTION: TO REDUCE THE RISK OF ELECTRIC SHOCK, DO NOT REMOVE COVER (OR BACK). NO USER-SERVICEABLE PARTS INSIDE. REFER SERVICING TO QUALIFIED SERVICE PERSONNEL

This "bolt of lightning" indicates uninsulated material within your unit may cause an electrical shock. For the safety of everyone in your household, please do not remove product covering.
The "exclamation point" calls attention to features for which you should read the enclosed literature closely to prevent operating and maintenance problems.
WARNING: TO PREVENT FIRE OR SHOCK HAZARD, DO NOT EXPOSE THIS EQUIPMENT TO RAIN OR MOISTURE.
CAUTION: To prevent electric shock, match wide blade of plug to wide slot, and fully insert.
IMPORTANT SAFETY INSTRUCTIONS
Read before operating equipment
- Read these instructions.
- Keep these instructions.
- Heed all warnings.
- Follow all instructions.
- Do not use this apparatus near water.
- Clean only with a dry cloth.
- Do not block any of the ventilation openings. Install in accordance with the manufacturer's instructions.
- Do not install near any heat sources such as radiators, heat registers, stoves, or other apparatus (including amplifiers) that produce heat.
- Do not defeat the safety purpose of the polarized or grounding-type plug. A polarized plug has two blades with one wider than the other. A grounding type plug has two blades and a third grounding prong. The wide blade or the third prong are provided for your safety. When the provided plug does not fit into your outlet, consult an electrician for replacement of the obsolete outlet.
- Protect the power cord from being walked on or pinched particularly at plugs, convenience receptacles, and the point where they exit from the apparatus.
- Only use attachments/accessories specified by the manufacturer.
- Use only with a cart, stand, tripod, bracket, or table specified by the manufacturer, or sold with the apparatus. When a cart is used, use caution when moving the cart/apparatus combination to avoid injury from tip-over.
- Unplug this apparatus during lightning storms or when unused for long periods of time.
- Refer all servicing to qualified service personnel. Servicing is required when the apparatus has been damaged in any way, such as power-supply cord or plug is damaged, liquid has been spilled or objects have fallen into apparatus, the apparatus has been exposed to rain or moisture, does not operate normally, or has been dropped.
- This product may contain lead and mercury. Disposal of these materials may be regulated due to environmental considerations. For disposal or recycling information, please contact your local authorities or the Electronic Industries Alliance: www.eiae.org
- Damage Requiring Service - The appliance should be serviced by qualified service personnel when:
A. The power supply cord or the plug has been damaged; or
B. Objects have fallen, or liquid has been spilled into the appliance; or
C. The appliance has been exposed to rain; or
D. The appliance does not appear to operate normally or exhibits a marked change in performance; or
E. The appliance has been dropped, or the enclosure damaged.
- Tilt/Stability - All televisions must comply with recommended international global safety standards for tilt and stability properties of its cabinet design.
- Do not compromise these design standards by applying excessive pull force to the front, or top, of the cabinet which could ultimately overturn the product.
- Also, do not endanger yourself, or children, by placing electronic equipment/toys on the top of the cabinet. Such items could unsuspectingly fall from the top of the set and cause product damage and/or personal injury.
- Wall or Ceiling Mounting - The appliance should be mounted to a wall or ceiling only as recommended by the manufacturer.
- Power Lines - An outdoor antenna should be located away from power lines.
- Outdoor Antenna Grounding - If an outside antenna is connected to the receiver, be sure the antenna system is grounded so as to provide some protection against voltage surges and built up static charges.
Section 810 of the National Electric Code, ANSI/NFPA No. 70-1984, provides information with respect to proper grounding of the mast and supporting structure, grounding of the lead-in wire to an antenna discharge unit, size of grounding connectors, location of antenna-discharge unit, connection to grounding electrodes, and requirements for the grounding electrode. See Figure below.
- Object and Liquid Entry - Care should be taken so that objects do not fall and liquids are not spilled into the enclosure through openings.
- Battery Usage CAUTION - To prevent battery leakage that may result in bodily injury, property damage, or damage to the unit:
- Install all batteries correctly, with + and - aligned as marked on the unit.
- Do not mix batteries (old and new or carbon and alkaline, etc.).
- Remove batteries when the unit is not used for a long time.
Note to the CATV system installer: This reminder is provided to call the CATV system installer's attention to Article 820-40 of the NEC that provides guidelines for proper grounding and, in particular, specifies that the cable ground shall be connected to the grounding system of the building, as close to the point of cable entry as practical.
Example of Antenna Grounding as per NEC - National Electric Code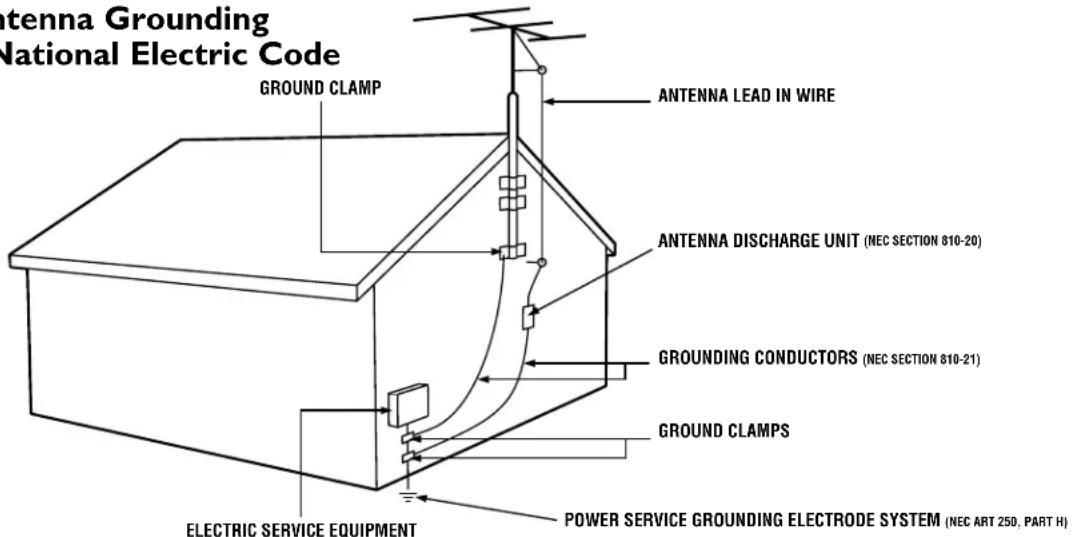
SAFETY INSTRUCTIONS - Read before operating equipment
Safety Precautions
Warning: To prevent fire or shock hazard, do not expose this equipment to rain or moisture.
Federal Communications Commission (FCC) Warning: Any unauthorized changes or modifications to this equipment void the user's authority to operate it.
Laser Safety
This unit employs a laser. Only a qualified service person should remove the cover or attempt to service this device, due to possible eye injury.
CAUTION: USE OF CONTROLS OR ADJUSTMENTS OR PERFORMANCE OF PROCEDURES OTHER THAN THOSE SPECIFIED HEREIN MAY RESULT IN
HAZARDOUS RADIATION EXPOSURE.
CAUTION: VISIBLE AND INVISIBLE LASER RADIATION
WHEN OPEN AND INTERLOCK DEFEATED. DO NOT
STARE INTO BEAM. THE BEAM IS LOCATED INSIDE,
NEAR THE DECK MECHANISM.
This digital apparatus does not exceed the Class B limits for radio noise emissions from digital apparatus as set out in the Radio Interference Regulations of the Canadian Department of Communications.
Radio/TV Interference
This equipment has been tested and found to comply with the limits for a Class B digital device, pursuant to Part 15 of the FCC Rules. These limits are designed to provide reasonable protection against harmful interference in a residential installation. This equipment generates, uses, and can radiate radio frequency energy and, if not installed and used in accordance with the instructions, may cause harmful interference to radio communications. However, there is no guarantee that interference will not occur in a particular installation. If this equipment does cause harmful interference to radio or television reception, which can be determined by turning the equipment off and on, the user is
encouraged to try to correct the interference by one or more of the following measures:
1) Reorient or relocate the receiving antenna. 2) Increase the separation between the equipment and the receiver. 3) Connect the equipment into an outlet on a circuit different from that to which the receiver is connected. 4) Consult the dealer or an experienced radio/TV technician for help.
WARNING
To reduce the risk of fire or electric shock, do not expose this appliance to rain or moisture.
CAUTION
Use of controls or adjustments or performance of procedures other than herein may result in hazardous radiation exposure.
The set complies with the FCC-Rules, Part 15 and with 21 CFR 1040.10.
Copyright Protection
Unauthorized copying, broadcasting, public performance and lending of Discs are prohibited.
This product incorporates copyright protection technology that is protected by method claims of certain U.S. patents and other intellectual property rights owned by Macrovision Corporation and other rights owners.
Use of this copyright protection technology must be authorized by Macrovision Corporation and is intended for home and other limited viewing uses only unless otherwise authorized by Macrovision Corporation. Reverse engineering or disassembly is prohibited.
Declaration of Conformity
Trade Name: Philips
Responsible Party: Philips Consumer Electronics North America
P.O. Box 14810
Knoxville, TN 37914-1810
(865) 521-4316


LASER SAFETY
This unit employs a laser. Due to possible eye injury, only a qualified service person should remove the cover or attempt to service this device.
USE OF CONTROLS OR ADJUSTMENTS OR PERFORMANCE OF PROCEDURES OTHER THAN THOSE SPECIFIED HEREIN MAY RESULT IN HAZARDOUS RADIATION EXPOSURE.
LASER
Type InGaIp/AlGaAs
Wave length 650 nm (DVD)
790 nm (VCD/CD)
Output Power 7 mW (DVD)
7 mW (VCD/CD)
Beam divergence 28° (DVD) 32° (VCD/CD)


The region code for this set is ALL or 1. DVDs must be labeled
for ALL regions or for Region 1 in order to play on this TV/DVD Player. You cannot play discs that are labeled for other regions. Look for the symbols above on your DVDs. If these region symbols do not appear on your DVDs, you cannot play the DVD in this TV/DVD Player.

NOTE: PICTURES SHOWN MAY BE DIFFERENT BETWEEN COUNTRIES.
NEVER MAKE OR CHANGE CONNECTIONS WITH THE POWER SWITCHED ON.
CAUTION
VISIBLE AND INVISIBLE LASER RADIATION WHEN OPEN. AVOID EXPOSURE TO BEAM. (WARNING LOCATION: INSIDE ON LASER COVER SHIELD OR THE BACKPLATE OF SET)
This product incorporates copyright protection technology that is protected by method claims of certain U.S. patents and other intellectual property rights owned by Macrovision Corporation and other rights owners. Use of this copyright protection technology must be authorized by Macrovision Corporation, and is intended for home and other limited viewing uses only unless otherwise authorized by Macrovision Corporation. Reverse engineering or disassembly is prohibited.
CONTENTS
Introduction
Welcome/Registration of Your TV 2
Safety Instructions ....3-4
Table of Contents 5
Features 6
Disc Types and Disc Cleaning 6

How to use the Language Control .....7
How to use the Tuner Mode Control ....8
How to Automatically Program Channels .....9
How to Add or Delete Channels .....10

How to use the Picture Adjustment Controls .....11

How to Use the Sound Adjustment Controls .....12

How to Use the Timer Controls .....13
Using the Format Control .....14
Understanding the AutoLock™ Controls .....15
Setting up the AutoLock™ Access Code .....16
How to Block Channels .....17
How to Clear All Blocked Channels at the Same Time ....18
How to Block All Channels at the Same Time .....19
Blocking Programming Based on Movie Ratings .....20
Blocking Programming Based on TV Ratings .....21
Other AutoLock™ Blocking Options .....22
How to Use the Active Control .....23

Remote Control Use
Setting the Sleptimer Control .....24
How to use the Closed Captioning Control .....25
Setting the SmartPicture™ Control .....26
Setting the SmartSound™ Control .....27
Using the QuadraSurf™ Buttons (Alternate Channel) . . .28-29
Remote Use with Accessory Devices (Direct Method) .....28

Operating the DVD Player
Operating the DVD Player - Basic Operation .....30
Operating the DVD Player - Menu Bar Operation .....31
User Preference Settings - Picture ....32
User Preference Settings - Sound .....33
User Preference Settings - Language .....34
User Preference Settings - Features .....35
User Preference Settings - Access Code .....36
Playing a Disc - Authorizing/Deauthorizing a Disc .....37
Playing a Disc - Playing a DVD or a Video CD .....38
General Features - Moving to Another Title or Track .....39
General Features - Moving to Another Chapter or Index .....39
General Features - Search Forward or Reverse .....40
General Features - Still Picture/Picture by Picture Playback .....40
General Features - Repeat/Repeat A-B .....41
General Features - Time Search .....42
General Features - Enlarge Picture (Zoom) .....42
General Features - Favorite Track Selection - Video .....43
General Features - Erasing a Favorite Track Selection .....44
Special Features - Title/Chapter/Disc Menus .....45
Special Features - Camera Angle .....45
Special Features - Audio Language .....46
Special Features - Subtitles .....46
Special Video CD Feature - Playback Control (PBC) .....47
Playing Audio CDs 47-48

Troubleshooting Tips ....49
Cleaning and Care ....49
Glossary of Terms ....50
Index 50
Factory Service Location ....51
Warranty 52
NOTE: It is possible that this owner's manual may be used with several different television models. Not all features (and drawings) discussed in this manual will necessarily match those found with your television system. This is normal and does not require you contacting your dealer or requesting service.
FEATURES
Active Control™ continuously measures and corrects all incoming signals to help provide the best picture quality. This feature monitors and corrects both the sharpness control and noise reduction control.
Audio/Video Jack Panel allows direct connections with accessory devices, providing quality TV picture and sound playback.
Audio Volume Leveler (AVL) Control keeps the TV sound at an even level. Peaks and valleys in volume that occur during program changes or commercial breaks are reduced, making for a more consistent, comfortable sound.
AutoLock™ allows you to block the viewing of certain channels or programs with certain ratings if you do not want your children to view inappropriate materials.
Auto Programming scans (when activated) for all available channels from regular antenna or cable signals and stores only active broadcast stations in the TV's memory.
AutoPicture™ allows you to change the picture settings (color, tint, contrast, etc.) for various types of programming, such as sports, movies, multimedia (games), or weak signals with the push of one button.
AutoSound™ allows you to select from three factory-set controls and a personal control that you set according to your own preferences through the on-screen Sound menu. The three factory-set controls (Voice, Music, and Theatre) enable you to tailor the TV sound so as to enhance the particular programming you are watching.
Channel Edit allows you to add or delete channels from the list stored in the TV's memory. Channel Edit makes it easy to limit or expand the number of channels that are available to you when you press the Channel (+) or (−) buttons on your remote control.
Closed Captioning allows the viewer to read TV program dialogue or voice conversations as on-screen text.
Contrast + helps you sharpen the picture quality by making dark portions of the picture darker and light portions brighter.
Infrared Remote Control controls your TV and the built-in DVD player.
On-screen Menu shows helpful messages and instructions for setting TV feature controls (can be viewed in English, French, or Spanish).
Sleep Timer automatically turns the TV OFF after a set amount of time that you choose.
Standard Broadcast (VHF/UHF) or Cable TV (CATV) channel capability allows for viewing by antenna or cable.
Stereo capability, including a built-in audio amplifier and twin-speaker system, allows for the reception of TV programs broadcast in stereo sound.
Surf Button allows you to easily switch among only the channels that are of interest to you (the ones that you have programmed into the TV's Surf control through the on-screen menu).
Timer allows you to set your TV to turn itself ON and OFF once or daily like an alarm clock.
DVD Player plays DVD discs, Video CDs, Audio CDs, etc. Create Favorite Track Programs and store them in the TV/DVD Player's memory.
Playable Disc Types
This DVD Player will play Digital Video Discs (DVDs), Audio CDs, CD-Rs and CD-RW discs. In order to play a DVD or Audio CD on this DVD Player, make sure the disc meets the requirements for the Region Code as described on page 4.
The discs should contain the logos shown below and meet the standards listed for each.
| Disc Type | Logo | Contents | Disc Size | Maximum Playback Time | Disc Segments |
| Digital Video Disc | | Sound and Pictures | 12 cm | Approx. 4 hours (single-sided) Approx. 8 hours (double-sided) | DVDs are divided into Titles, which are divided into Chapters. Titles and Chapters are numbered. |
 |
| 8 cm | Approx. 80 minutes (single-sided) Approx. 160 minutes (double-sided) |
| Audio CD |  | Sound | 12 cm | 74 minutes | Audio CDs are divided into numbered Tracks, i.e., a track may be one song. |
| 8 cm (singles) | 20 minutes |
| Video CD |  | Sound and Pictures | | | Video CDs are divided into Tracks. |
| Compact Disc Recordable |  | Sound and Pictures | 12 cm | 74 minutes | |
| 8 cm (singles) | 20 minutes |
| Compact Disc Rewritable |  | Sound and Pictures | 12 cm 74 | minutes |
Cleaning Discs
Some problems occur because the disc inside the player is dirty. To avoid these problems, clean your discs regularly in the following way:
- When a disc becomes dirty, clean it with a CD cleaning cloth. Wipe the disc from the center out.
Caution: Do not use solvents such as benzine, thinner, commercially available cleaners, or anti-static spray intended for analog discs.
End-of-Life Disposal
Your new television and its packaging contain materials that can be recycled and reused. Specialized companies can recycle your product to increase the amount of reusable materials and minimize the amounts that need to be properly disposed.
Your product also uses batteries that should not be thrown away when depleted, but should be handed in and disposed of as small chemical waste.
When you replace your existing equipment, please find out about the local regulations regarding disposal of your old television, batteries, and packaging materials.
Auto Lock, Auto Picture, Auto Sound, Active Control, QuadraSurf are all registered trademarks of Philips Consumer Electronics Company. Copyright © 2002 All rights reserved.
How to Use the Language Control

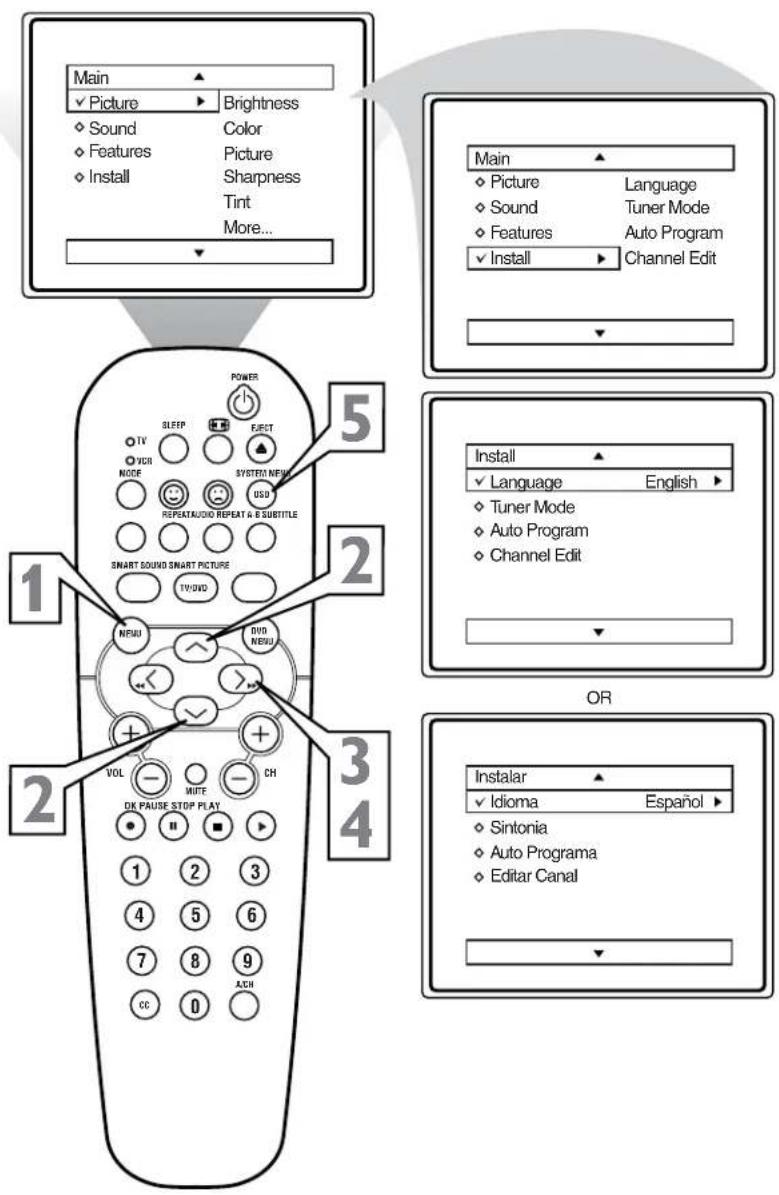
For our Spanish speaking TV owners an on-screen LANGUAGE option is present. With the LANGUAGE control you can set the TV's on-screen menu to be shown in either English or Spanish.
Press the MENU button on the remote to show the on-screen menu. 2 Press the CURSOR UP or DOWN buttons to scroll through the on-screen menu until the word INSTALL is highlighted. 3 Press the CURSOR RIGHT button to display the INSTALL menu features. LANGUAGE will be highlighted. 4 Press the CURSOR RIGHT button repeatedly to select ENGLISH or ESPAÑOL (Spanish). 5 When finished, press the SYSTEM MENU (OSD) button to remove the menu from the TV's screen.
HELPFUL HINT
The Language control only makes the TV's on-screen MENU items appear in English or Spanish text.
It does not change the other on-screen text features such as Closed Caption (CC) TV shows.

How to Use the Tuner Mode Control
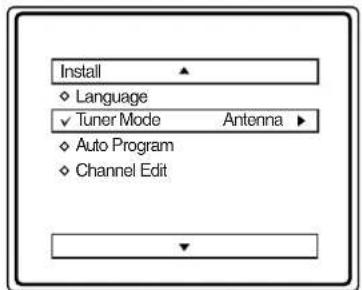
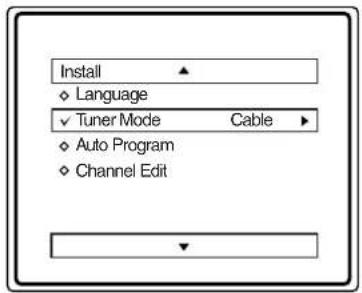
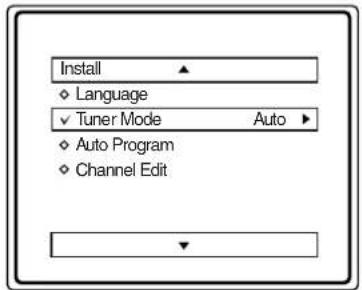
The TUNER MODE control allows you to change the TV's signal input to either ANTENNA, CABLE or AUTO mode. It's important for the TV to know what type of signal to look for. (From a Cable TV signal or a normal Antenna signal.) In the AUTO mode, when the AUTO PROGRAM feature is activated, the TV will automatically choose the correct mode.
Press the MENU button on the remote to show the on-screen menu. 2 Press the CURSOR UP or DOWN buttons to scroll through the on-screen menu until the word INSTALL is highlighted. 3 Press the CURSOR RIGHT button to display the INSTALL menu features. 4 Press CURSOR UP or DOWN buttons to scroll the Install features until the words TUNER MODE is highlighted. 5 Press the CURSOR RIGHT button to select either ANTENNA, CABLE, or AUTO mode. 6 When finished, press the SYSTEM MENU (OSD) button to remove the on-screen menu from the TV's screen.
HELPFUL HINT
When CABLE is selected, channels 1-125 are available.
When ANTENNA is selected, channels 2-69 are available.
When AUTO is selected, the TV will automatically set itself to the correct mode based on the type of signal it detects when the AUTO PROGRAM feature is activated.
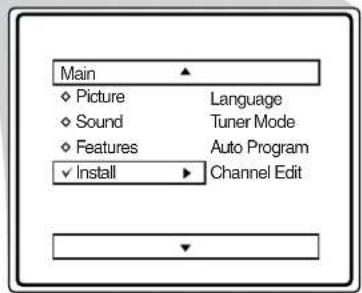
OR
OR
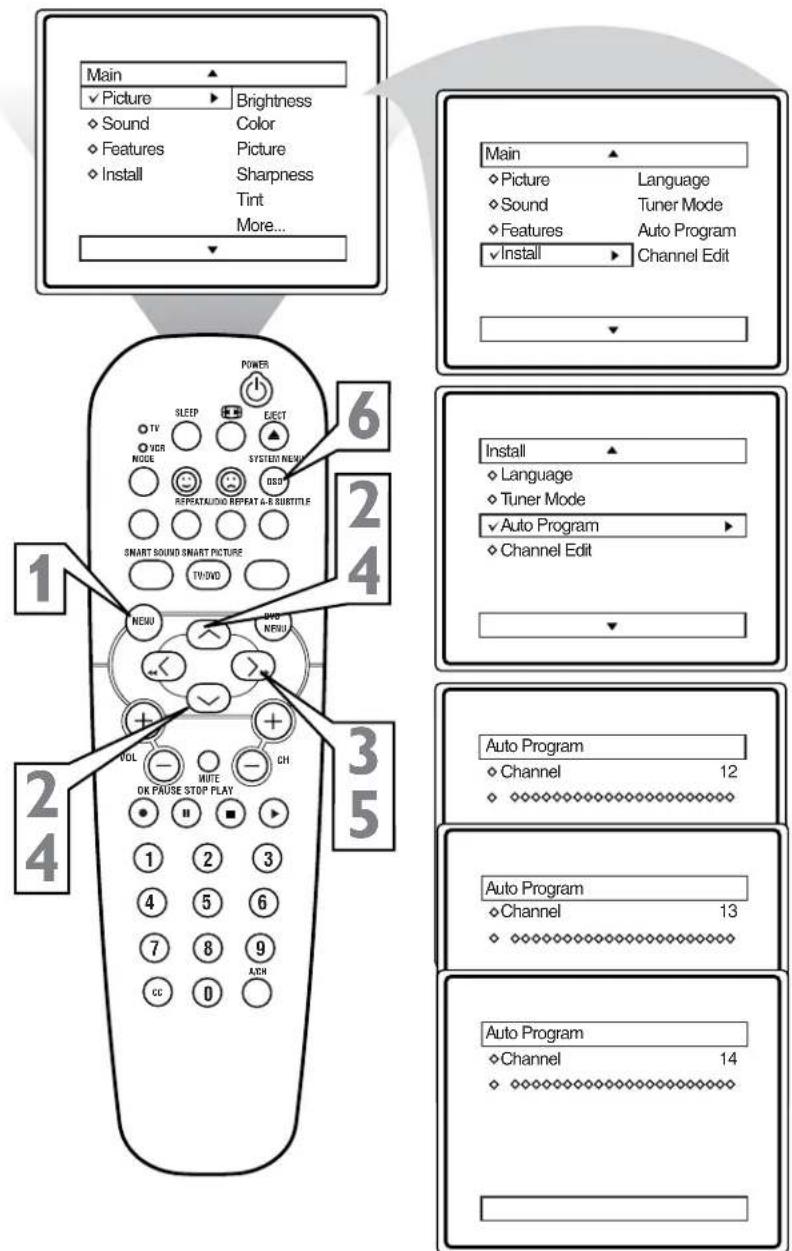
How to Automatically Program CHANNELS

Your TV can automatically set itself for local area (or Cable TV) channels. This makes it easy for you to select only the TV stations in your area when the CHANNEL (+) or (-) buttons are pressed.
Note: Make sure the antenna or cable signal connection has been completed before AUTO PROGRAM is activated.
1. Press the MENU button on the remote to show the on-screen menu. 2. Press the CURSOR UP or DOWN buttons to scroll through the on-screen menu until the word INSTALL is highlighted. 3. Press the CURSOR RIGHT button to display the INSTALL menu features. 4. Press CURSOR UP or DOWN buttons to scroll the Install features until the words AUTO PROGRAM are highlighted. 5. Press the CURSOR RIGHT button to start the Auto Program scanning of channels. Auto Programming will store all available channels in the TV's memory then tune to the lowest available channel when done. 6. When finished, press the SYSTEM MENU (OSD) button to remove the menu from the TV's screen.
HELPFUL HINT
When CABLE is selected, channels 1-125 are available.
When ANTENNA is selected, channels 2-69 are available.
When AUTO is selected, the TV will automatically set itself to the correct mode based on the type of signal it detects when the AUTO PROGRAM feature is activated.

How to Add or Delete CHANNELS
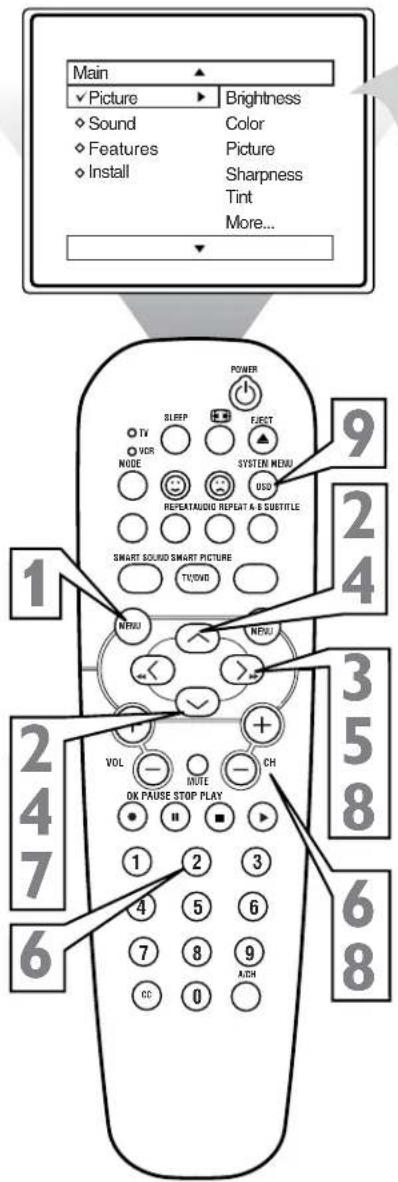
Channel Edit makes it easy for you to ADD or DELETE channels from the list of channels stored in the TV's memory.
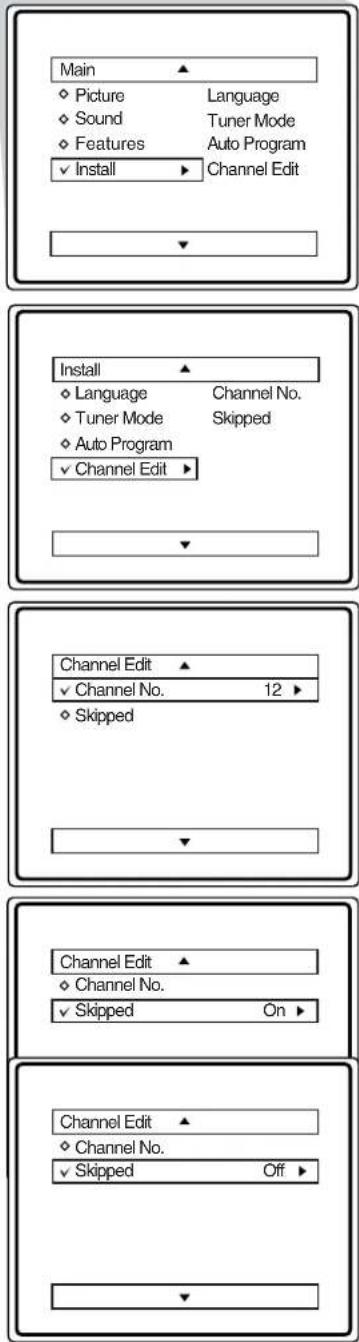
1. Press the MENU button on the remote to show the on-screen menu. 2. Press the CURSOR UP or DOWN buttons to scroll through the on-screen menu until the word INSTALL is highlighted. 3. Press the CURSOR RIGHT button to display the INSTALL menu features. 4. Press the CURSOR UP or DOWN buttons to scroll the Install features until the words CHANNEL EDIT are highlighted. 5. Press the CURSOR RIGHT button to display the CHANNEL EDIT options. 6. With the CHANNEL EDIT options displayed, and CHANNEL NO. highlighted; enter the channel number (with the NUMBERED or the CH + or - buttons) you wish to add (Skipped OFF), or delete (Skipped ON) from the TV's memory. 7. Using the CURSOR DOWN button, scroll the menu to highlight the word SKIPPED. 8. Now use the CURSOR RIGHT button to toggle between ON or OFF. If ON is selected the channel is skipped when scrolling channels with the CH + or - buttons. If OFF is selected the channel is not skipped when scrolling channels with the CH + or - buttons. 9. When finished, press the SYSTEM MENU (OSD) button to remove the menu from the TV's screen.
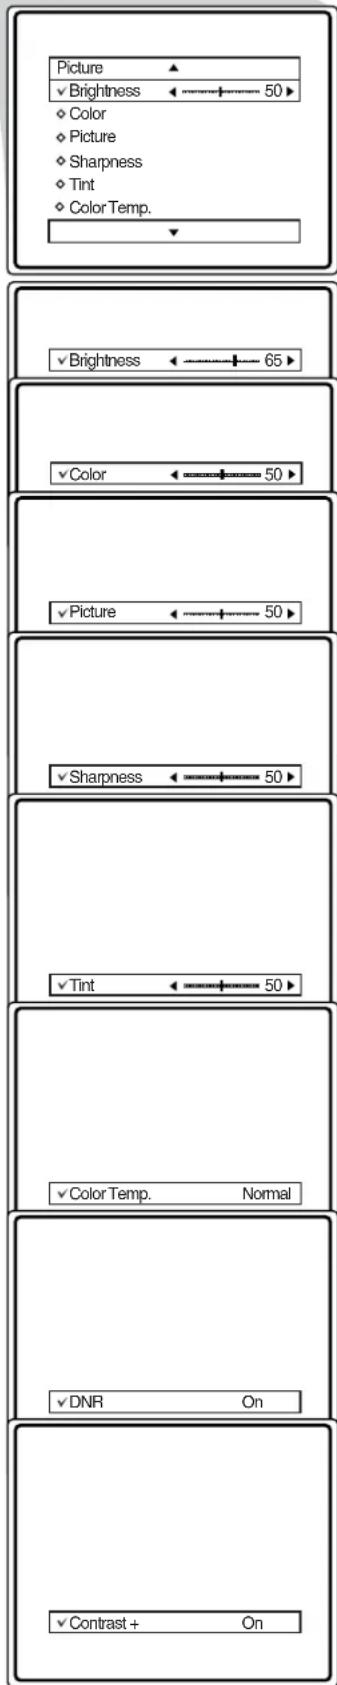
How to Use the Picture Adjustment Controls

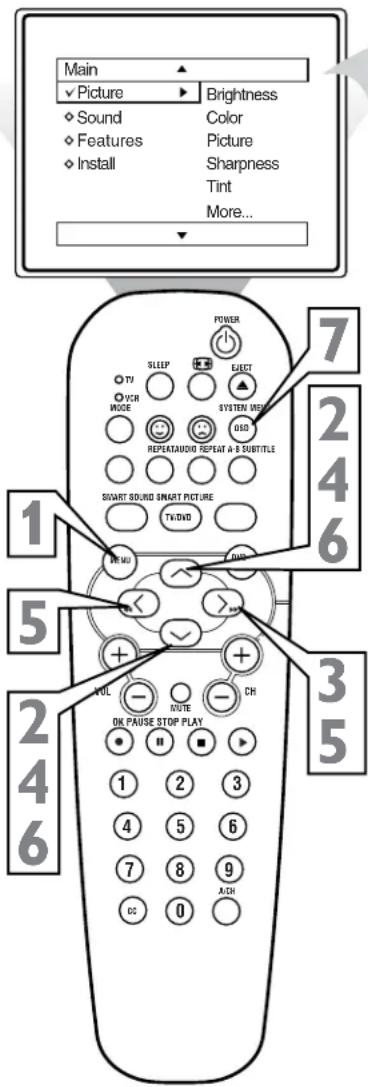
To adjust your TV picture controls, select a channel and follow the steps shown below:
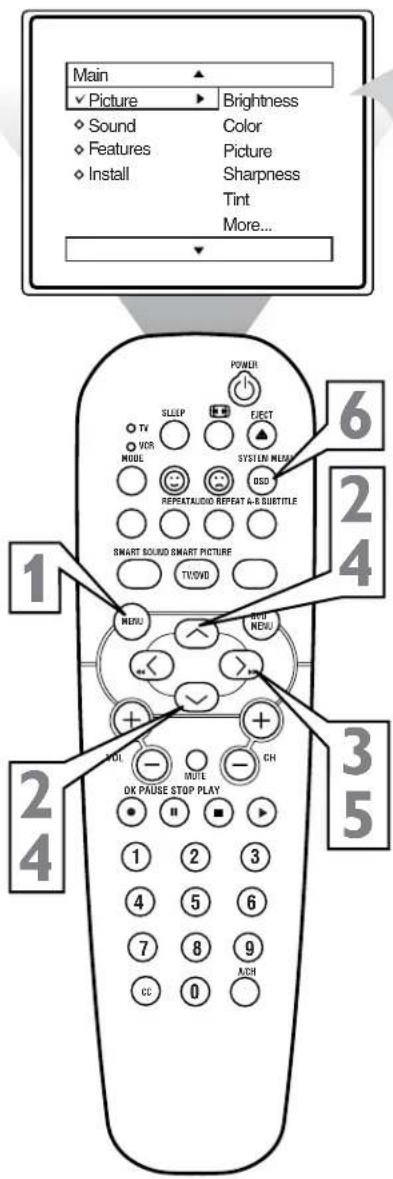
Press the MENU button on the remote to display the on-screen menu. 2 Press the CURSOR UP or DOWN buttons until the word PICTURE is highlighted. 3 Press the CURSOR RIGHT button to display the PICTURE menu features. 4 Press CURSOR UP or DOWN buttons to scroll the Picture features and highlight the control you wish to adjust (Brightness, Color, Picture, Sharpness, Tint, Color Temp., DNR, or Contrast +). 5 Press the CURSOR RIGHT or the CURSOR LEFT buttons to adjust the selected control or to make selections for the chosen control. 6 Press the CURSOR UP or DOWN buttons to select and adjust other Picture Menu controls. 7 When finished, press the SYSTEM MENU (OSD) button to remove the menu from the TV's screen.
HELPFUL HINT
BRIGHTNESS: Press the Cursor Right or Left buttons until darkest parts of the picture are as bright as you prefer.
COLOR: Press the Cursor Right or Left buttons to add or eliminate color.
PICTURE: Press the Cursor Right or Left buttons until lightest parts of the picture show good detail.
SHARPNESS: Press the Cursor Right or Left buttons to improve detail in the picture.
TINT: Press the Cursor Right or Left buttons to obtain natural skin tones.
COLOR TEMP: Press the Cursor Right or Left buttons to select NORMAL, COOL, or WARM picture preferences. (NORMAL will keep the whites, white; COOL will make the whites, bluish; and WARM will make the whites, reddish.)
DNR: Press the Cursor Right or Left buttons to turn DNR ON or OFF. Dynamic Noise Reduction helps to eliminate “noise” from the picture.
CONTRAST +: Press the Cursor Right or Left buttons to turn Contrast + ON or OFF. When ON, this control will optimize the picture contrast for improved picture clarity.
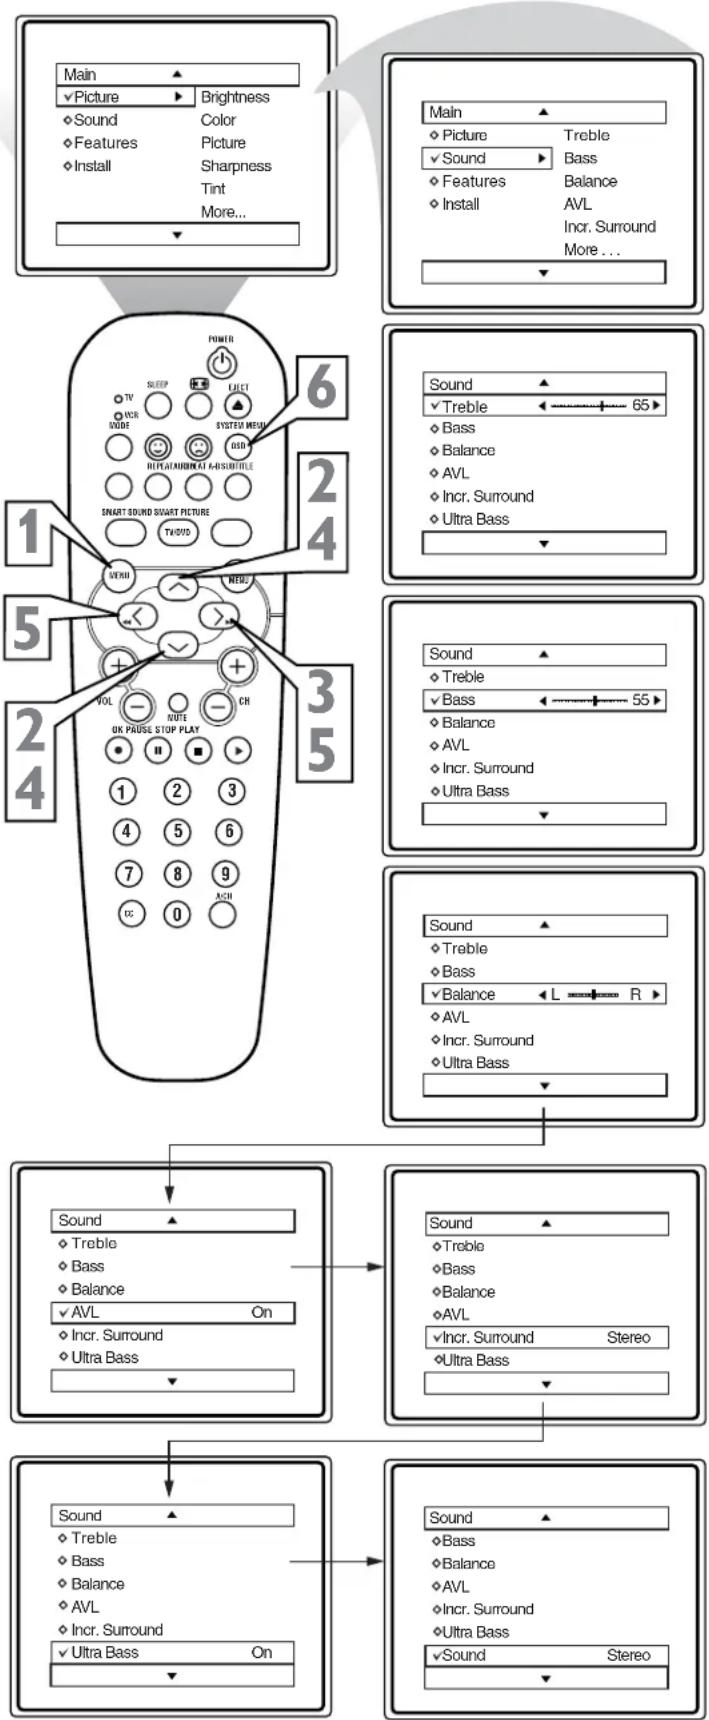
Besides the normal volume level control, your TV also has Treble, Bass, Balance, AVL (automatic volume leveler), Incr. Surround, Ultra Bass, and Sound (Stereo/Mono) controls.
Press the MENU button on the remote to display the on-screen menu. 2 Press the CURSOR UP or CURSOR DOWN button until the word SOUND is highlighted. 3 Press the CURSOR RIGHT button to display the SOUND menu features. 4 Press the CURSOR UP or CURSOR DOWN button to scroll the Sound menu features until the control you wish to change is highlighted (Treble, Bass, Balance, AVL, Incr. Surround, Ultra Bass, or Sound). 5 Press the CURSOR RIGHT or LEFT button to turn the adjust or turn the control On or Off. 6 When finished, press the SYSTEM MENU (OSD) button to remove the menu from the TV's screen.
HELPFUL HINT
TREBLE: Press the Cursor Right or Left buttons to adjust the control. The control will enhance the high frequency sounds.
BASS: Press the Cursor Right or Left buttons to adjust the control. The control will enhance the low frequency sounds.
BALANCE: Press the Cursor Right or Left buttons to adjust the level of sound coming from the left and right speakers.
AVL: (Auto Volume Leveler) Press the Cursor Right or Left buttons to turn the control On or Off. When On, AVL will level out the sound being heard when sudden changes in volume occur during commercial breaks or channel changes.
INCR. SURROUND: Press the Cursor Right or Left buttons to select between Incr. Surround or Stereo settings (If Stereo), or select Spatial or Mono (If Mono).
ULTRA BASS: Press the Cursor Right or Left buttons to turn Ultra Bass On or Off. Ultra Bass will enhance the low frequency sound.
SOUND: Press the Cursor Right or Left buttons to select between Stereo or Mono settings. Note: If Stereo is not present on a selected show and the TV is placed in the Stereo mode, the sound coming from the TV will remain in the Mono mode.
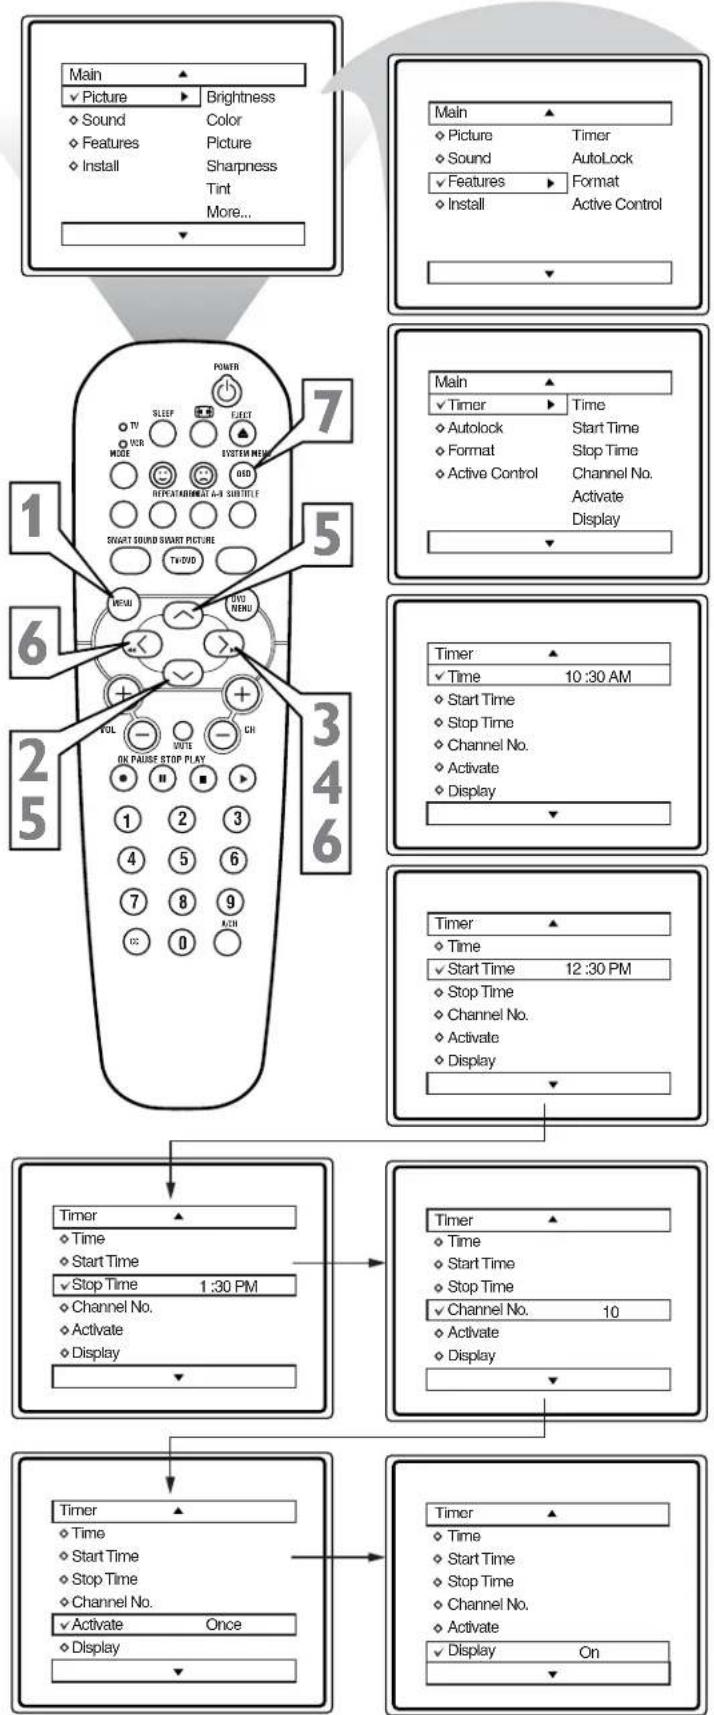
How to Use the Timer Controls

The Timer controls allow you to use your TV as an alarm clock if set to turn itself on and off at a specific time. It also can be set to tune to a specific channel at a specific time.
Press the MENU button on the remote to display the on-screen menu. 2 Press the CURSOR DOWN button until the word FEATURES is highlighted. 3 Press the CURSOR RIGHT button to display the FEATURES menu options. TIMER will be highlighted. 4 Press the CURSOR RIGHT button to shift the menu to the left and enter the TIMER control options. 5 Press the CURSOR UP or DOWN button to select and highlight one of the TIMER Controls. Choose from TIME, START TIME, STOP TIME, CHANNEL, ACTIVATE, or DISPLAY. 6 Press the CURSOR LEFT or RIGHT button to start the control adjustments. Use the buttons described in the definitions below to finish the adjustment.
TIME: Enter the current time with the numbered buttons. Use the Cursor Right button to move to the AM/PM area and use the Cursor Left or Right buttons to toggle AM or PM.
START TIME: Use the numbered buttons to enter a start-up time for the TV to turn on or to tune a specific channel.
STOP TIME: Use the numbered buttons to enter a time for the TV to shut itself off.
CHANNEL: Use the Numbered buttons or the CH + or - buttons to select a specific channel for the TV to tune to at the specific Start Time.
ACTIVATE: Set the Timer to perform its function ONCE or DAILY.
DISPLAY: Set to ON or OFF. When ON, the time will be displayed ALL the time the TV is ON. When OFF, the time will only appear when the SYSTEM MENU (OSD) button is pressed.
7 When finished, press the SYSTEM MENU (OSD) button to remove the menu from the TV's screen
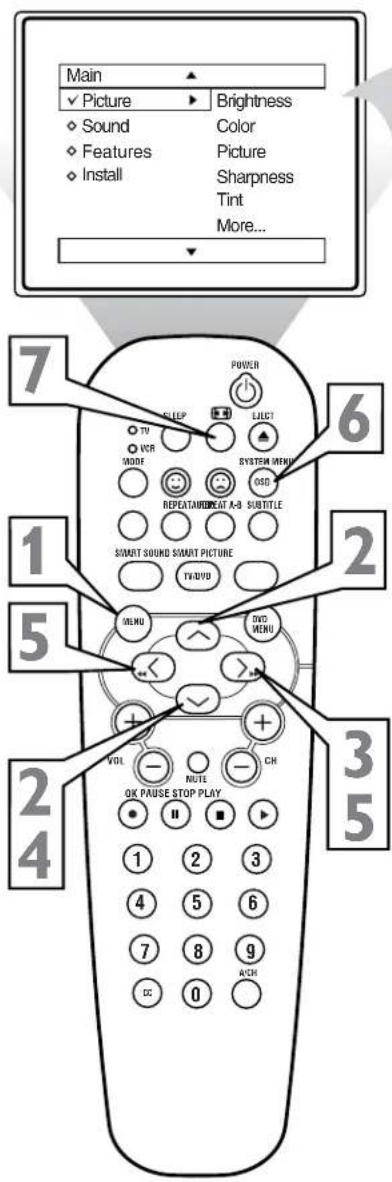
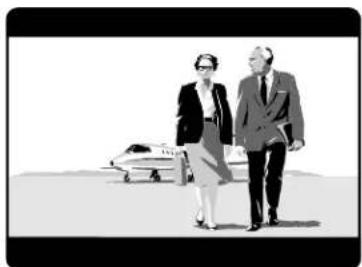
Many times while watching movies from a DVD player the image is shown in "letter box" format. This is the format that is shown in movie theaters. When shown on a TV screen, the image will have areas of black on top and bottom of the screen. The FORMAT Control can help to display the image as close as possible to its original aspect ratio.
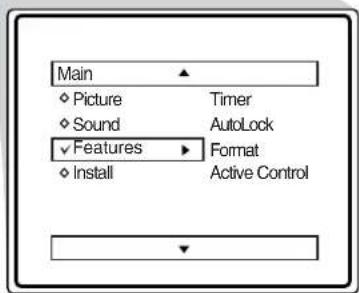
Press the MENU button on the remote to display the on-screen menu. 2 Press the CURSOR DOWN button until the word FEATURES is highlighted. 3 Press the CURSOR RIGHT button to display the FEATURES menu options (Timer, AutoLock, Format, or Active Control).
4 Press the CURSOR DOWN button until the word FORMAT is highlighted.
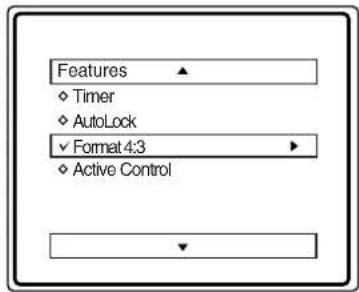
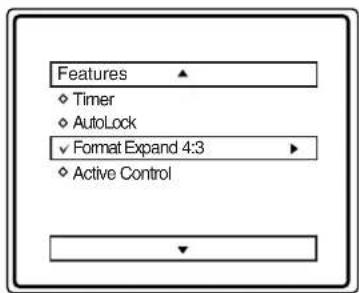
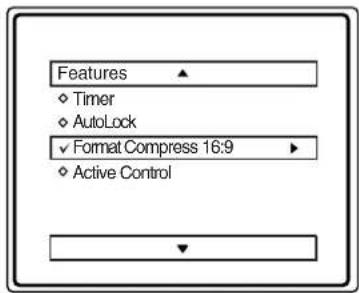
5 Press the CURSOR RIGHT or CURSOR LEFT buttons to select one of the three options 4:3, Expand 4:3, or Compress 16:9.
4:3 - Standard format for the TV.
Expand 4:3 - Enlarges the picture to fill out the entire screen area, eliminating the "letter box" effect.
Compress 16:9 - Allows for viewing of movies in their full width (also known as letter-box style).
6 When finished, press the SYSTEM MENU (OSD) button to remove the menu from the TV's screen.
7 The Expand 4:3 format can also be activated using the FORMAT button when the on-screen menu is not being displayed. Pressing this button will toggle the standard 4:3 format, the Expand 4:3 format, or Compress 16:9 format.
OR
OR

4:3

Expand 4:3
Compress 16:9
The AutoLock™ feature is an integrated circuit that receives and processes data sent by broadcasters, or other program providers, that contain program content advisories. When programmed by the viewer, a TV with AutoLock™ can respond to the content advisories and block program content that may be found objectionable (such as offensive language, violence, sexual situations, etc.). This is a great feature to censor the type of viewing children may watch.
Over the next few pages you'll learn how to block channels and certain rated programming. Below is a brief explanation of some terms and ratings you will find in the AutoLock feature.
AutoLock™ offers various BLOCKING controls from which to choose:
Access Code: An Access Code must be set to prevent children from unblocking questionable programming.
Channel Block: Individual channels including the A/V inputs can be blocked.
Clear All: Allows you to clear all channels being blocked from your viewing set with the Channel Block Control.
Block All: Allows you to block ALL channels and A/V inputs at one time.
Movie Ratings: Block programming based on ratings patterned by the Motion Picture Association of America.
TV Ratings: Block programming based on standard TV ratings set by TV broadcasters.
To learn more about the Motion Picture Ratings and the TV Ratings, refer to the definitions listed in the columns to the right.
Press the SYSTEM MENU (OSD) button twice to display the AutoLock review screen. This screen shows what is activated within the AutoLock settings.

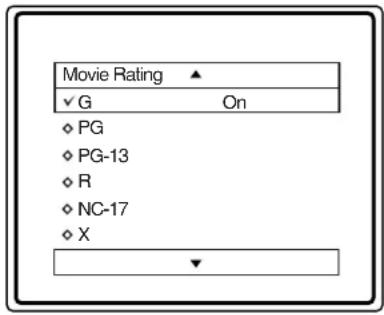
MOVIE RATINGS (MOTION PICTURE ASSOCIATION OF AMERICA)
G: General Audience - All ages admitted. Most parents would find this program suitable for all ages. This type of programming contains little or no violence, no strong language, and little or no sexual dialogue or situations.
PG: Parental Guidance Suggested - This programming contains material that parents may find unsuitable for younger children. It may contain one or more of the following: moderate violence, some sexual situations, infrequent coarse language, or some suggestive dialogue.
PG-13: Parents Strongly Cautioned - This programming contains material that parents may find unsuitable for children under the age of 13. It contains one or more of the following: violence, sexual situations, coarse language, or suggestive dialogue.
R: Restricted - This programming is specifically designed for adults. Anyone under the age of 17 should only view this programming with an accompanying parent or adult guardian. It contains one or more of the following: intense violence, intense sexual situations, strong coarse language, or intensely suggestive dialogue.
NC-17: No one under the age of 17 will be admitted. - This type of programming should be viewed by adults only. It contains graphic violence, explicit sex, or crude indecent language.
X: Adults Only - This type of programming contains one or more of the following: very graphic violence, very graphic and explicit or indecent sexual acts, very coarse and intensely suggestive language.
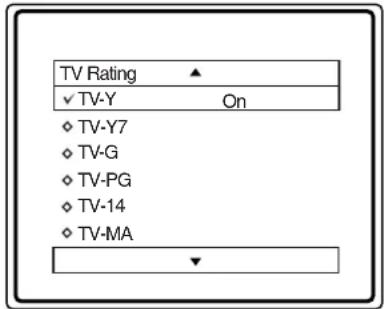
TV PARENTAL GUIDELINES (TV BROADCASTERS)
TV-Y - (All children -- This program is designed to be appropriate for all children.) Designed for a very young audience, including children ages 2-6. This type of programming is not expected to frighten younger children.
TV-Y7 - (Directed to Older Children -- This program is designed for children age 7 and above.) It may be more appropriate for children who have acquired the development skills needed to distinguish between make-believe and reality. This programming may include mild fantasy and comic violence (FV).
TV-G - (General Audience -- Most parents would find this program suitable for all ages.) This type of programming contains little or no violence, no strong language, and little or no sexual dialogue or situations.
TV-PG - (Parental Guidance Suggested -- This program contains material that parents may find unsuitable for younger children.) This type of programming contains one or more of the following: Moderate violence (V), some sexual situations (S), infrequent coarse language (L), or some suggestive dialogue (D).
TV-14 - (Parents Strongly Cautioned -- This program contains some material that many parents would find unsuitable for children under 14 years of age.) This type of programming contains one or more of the following: intense violence (V), intense sexual situations (S), strong coarse language (L), or intensely suggestive dialogue (D).
TV-MA - (Mature Audience Only -- This program is specifically designed to be viewed by adults and therefore may be unsuitable for children under 17.) This type of programming contains one or more of the following: graphic violence (V), explicit sexual situations (S), or crude indecent language (L).
Over the next few pages you'll learn how to block channels and get a better understanding of the rating terms for certain programming.
First, let's start by learning how to set a personal access code:
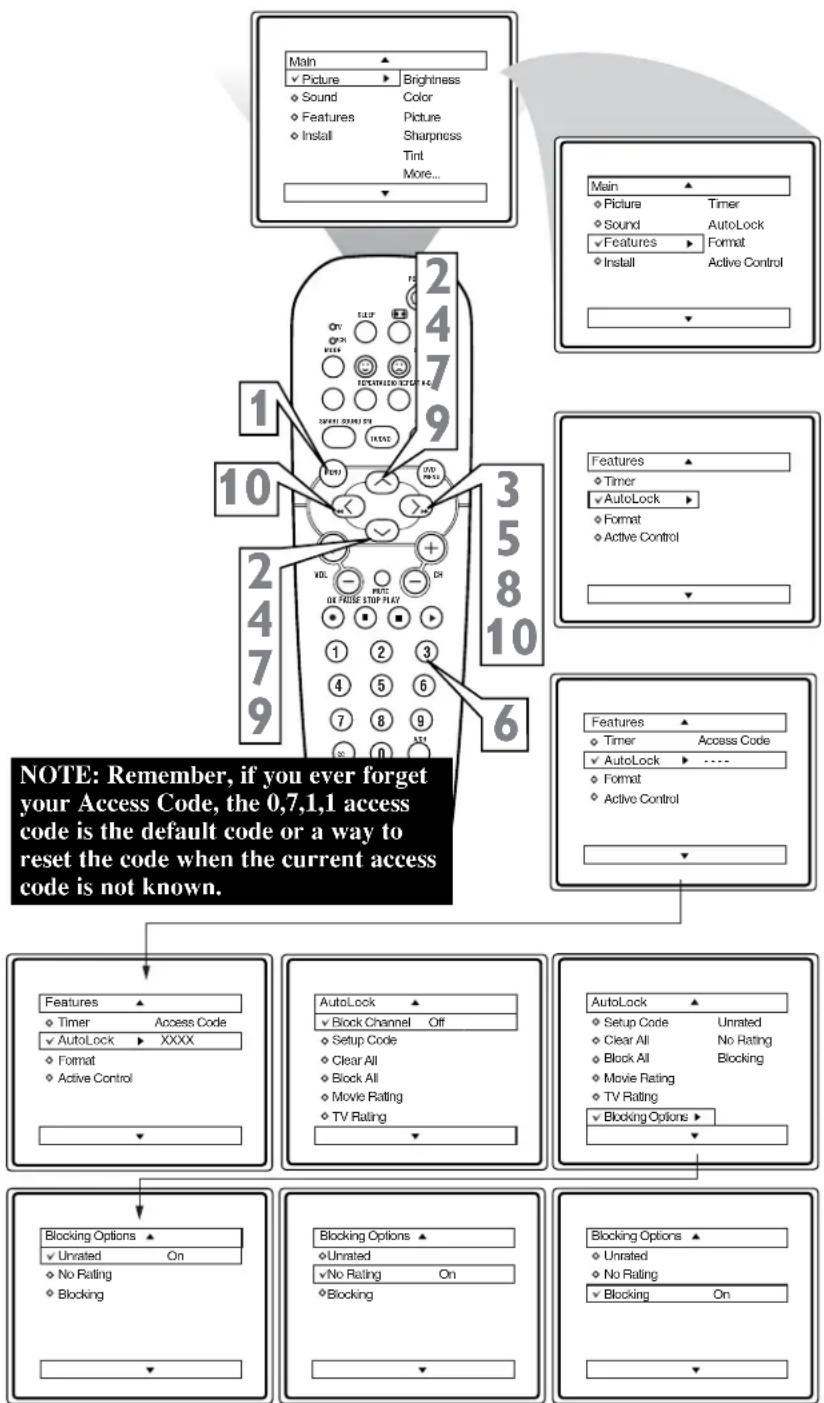
Press the MENU button on the remote to display the on-screen menu. 2 Press the CURSOR UP or DOWN button until the word FEATURES is highlighted. 3 Press the CURSOR RIGHT button to display the FEATURES menu options. 4 Press the CURSOR UP or DOWN button until the words AUTOLOCK are highlighted. 5 Press the CURSOR RIGHT button. The screen will read, "ACCESS CODE - - - ." 6 Using the NUMBERED buttons, enter 0, 7, 1, 1. "XXXX" appears on the Access Code screen as you press the numbered buttons. "INCORRECT CODE" will appear on the screen, and you will need to enter 0, 7, 1, 1 again. 7 The screen will ask you to enter a "New Code." Enter a "new" 4 digit code using the NUMBERED buttons. The screen will then ask you to CONFIRM the code you just entered. Enter your new code again. "XXXX" will appear when you enter your new code and then display the AutoLock menu options.
Proceed to the next page to learn more...
HELPFUL HINT
Parents - it isn't possible for your child to unblock a channel without knowing your access code or changing it to a new one. If your code changes, and you didn't change it, then you know it's been altered by someone else and blocked channels have been viewed.
![graph TD A["Main"] --> B["Picture"] B --> C["Brightness"] C --> D["Sound"] C --> E["Color"] C --> F["Features"] C --> G["Picture"] C --> H["Install"] C --> I["Sharpness"] C --> J["Tint"] C --> K["More..."] A --> L["Main"] L --> M["Picture"] M --> N["Timer"] M --> O["Sound"] M --> P["AutoLock"] M -->…](/content/2026/06/1146317/images/153511b147813722645f2fd88ed9b12ccca1e6f6d1604929243cceb0e66515f7.jpg)
After your personal access code has been set (see previous page), you are now ready to select the channels you want to block out or censor.
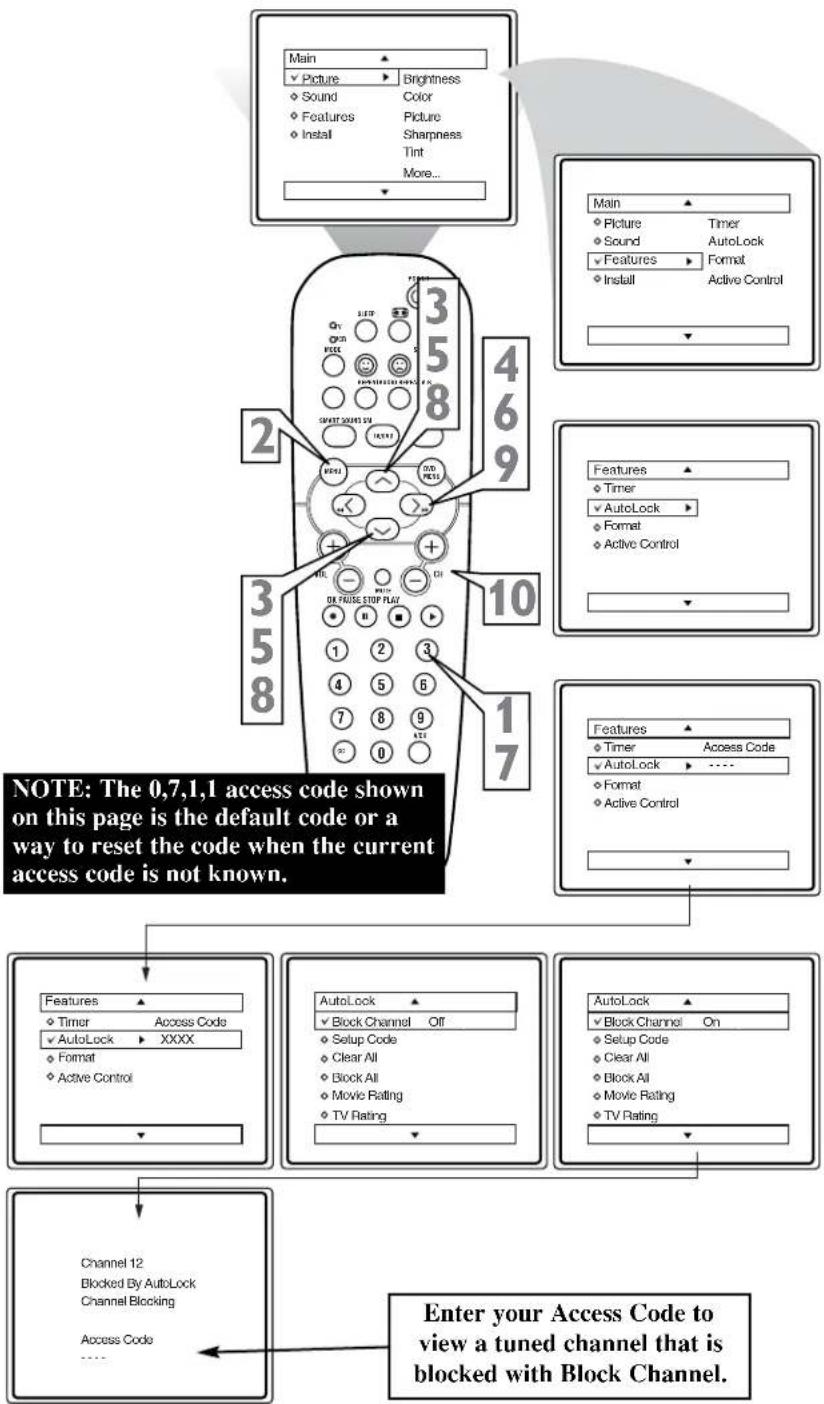
1. Press the NUMBERED (or CH +, -) buttons to tune the channel you wish to block or censor. 2. Press the MENU button on the remote to show the on-screen menu. 3. Press the CURSOR UP or DOWN button until the word FEATURES is highlighted. 4. Press the CURSOR RIGHT button to display the FEATURES menu options. 5. Press the CURSOR UP or DOWN button until the words AutoLock are highlighted. 6. Press the CURSOR RIGHT button. "ACCESS CODE" will appear on the screen. 7. Enter the correct access code number. "XXXX" shows on the Access Code display as you press the NUMBERED buttons. AutoLock menu options will be displayed. 8. Press the CURSOR UP or DOWN buttons until the words BLOCK CHANNELS are highlighted. 9. Press the CURSOR RIGHT button to turn blocking ON or OFF for that channel. When ON is selected the channel will be blocked. 10. Press the CH + or - button to select other channels you wish to block. Repeat step 9 to block the new channel.
HELPFUL HINT
If you tune to a blocked channel and enter your Access Code to view the channel, ALL blocked channels will be viewable until the TV has been turned off. When the TV is powered back ON, the previously blocked channels will be blocked again.

How to Clear All Blocked Channels at the Same Time
After blocking specific channels there may come a time when you want to clear all the channels so they can be viewed. The following steps explain how to CLEAR ALL blocked channels.
1. Press the MENU button on the remote to show the on-screen menu. 2. Press the CURSOR UP or DOWN button until the word FEATURES is highlighted. 3. Press the CURSOR RIGHT button to display the FEATURES menu options. 4. Press the CURSOR UP or DOWN button until the words AutoLock are highlighted. 5. Press the CURSOR RIGHT button. 6. Enter the correct access code number. "XXXX" shows on the Access Code display as you press the NUMBERED buttons. AutoLock menu options will be displayed. 7. Press the CURSOR UP or DOWN button until the words CLEAR ALL are highlighted. 8. Press the CURSOR RIGHT button to clear all blocked channels. The Clear All option will read, "Cleared." 9. When finished, press the SYSTEM MENU (OSD) button to remove the menu from the TV's screen.
HELPFUL HINT
If you tune to a blocked channel and enter your Access Code to view the channel, ALL blocked channels will be viewable until the TV is powered OFF and then turned back ON. When the TV is powered back ON, the previously blocked channels will be blocked again.
CLEAR ALL will not work with the Movie and TV Ratings. These options must be reset individually.
![graph TD A["Main"] --> B["Picture"] B --> C["Brightness"] C --> D["Sound"] C --> E["Color"] C --> F["Features"] C --> G["Feature"] C --> H["Feature"] C --> I["Feature"] A --> J["Main"] J --> K["Picture"] K --> L["Timer"] K --> M["Sound"] K --> N["AutoLock"] K --> O["Features"] K --> P["Feature"] K -…](/content/2026/06/1146317/images/59a82bc492fd97dbd5b594c169e99a61806d456ff09d85e368c9c93d7150a0fe.jpg)
There may come a time when you want to block all the television's channels. Maybe you don't want your children to watch TV for a given time. With the Block All control, ALL available channels (including the A/V Inputs) can be set to block at the same time.
Press the MENU button on the remote to show the on-screen menu. 2. Press the CURSOR UP or DOWN button until the word FEATURES is highlighted. 3. Press the CURSOR RIGHT button to display the FEATURES menu options. 4. Press the CURSOR UP or DOWN button until the words AutoLock are highlighted. 5. Press the CURSOR RIGHT button. 6. Enter the correct access code number. "XXXX" shows on the Access Code display as you press the NUMBERED buttons. AutoLock menu options will be displayed. 7. Press the CURSOR UP or DOWN button until the words BLOCK ALL are highlighted. 8. Press the CURSOR RIGHT button to turn Block All ON or OFF. When ON is selected, ALL available channels will be blocked. 9. When finished, press the SYSTEM MENU (OSD) button to remove the menu from the screen.
HELPFUL HINT
If you tune to a blocked channel and enter your Access Code to view the channel, ALL blocked channels will be viewable until the TV has been turned off. When the TV is powered back ON, the previously blocked channels will be blocked again.
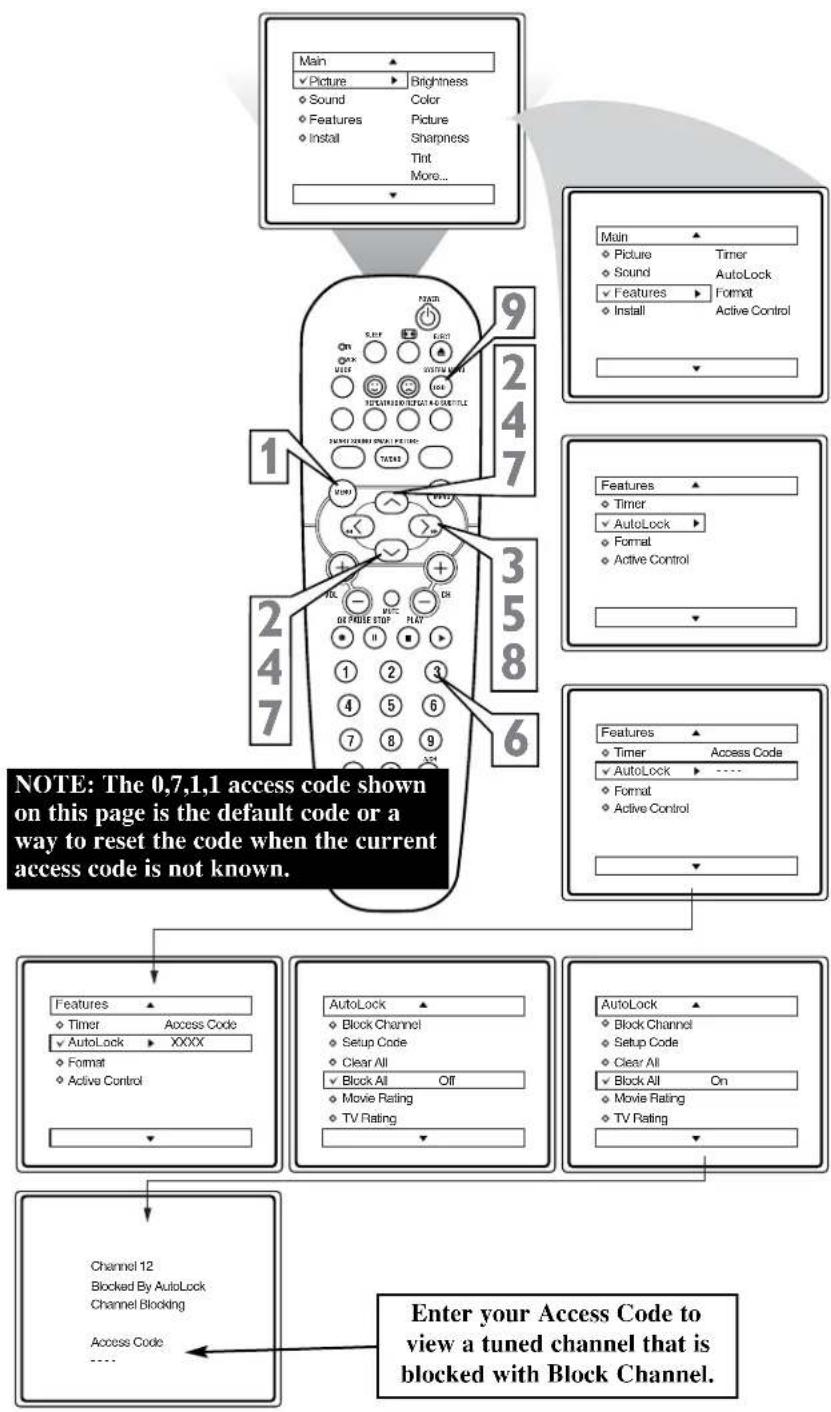
There are two types of program ratings within the AutoLock™ feature. One is based on the Movie Industry ratings while the other is based on the TV Industry ratings. Both can be used to block or censor programming that has been rated in either manner.
Let's first look at the Movie Rating options of AutoLock™:
Press the MENU button on the remote to display the on-screen menu. 2. Press the CURSOR UP or DOWN button until the word FEATURES is highlighted. 3. Press the CURSOR RIGHT button to display the FEATURES menu options. 4. Press the CURSOR UP or DOWN button until AutoLock is highlighted. 5. Press the CURSOR RIGHT button. The screen will prompt you for your Access Code. 6. Using the NUMBERED buttons on the remote, enter your 4 digit Access Code. The AutoLock menu options will be displayed. 7. Press the CURSOR UP or DOWN button to highlight the words MOVIE RATING. 8. Press the CURSOR RIGHT button to display the MOVIE RATING options (G, PG, PG-13, R, NC17, or X). 9. Press the CURSOR UP or DOWN button to highlight any of the Movie Rating options. When highlighted, all these options can be turned ON (which will allow blocking) or OFF (which will allow viewing). 10. Use the CURSOR RIGHT button on the remote to turn the rating option ON or OFF.
HELPFUL HINT
When a rating is set to block, all higher ratings will be automatically blocked as well. (Example: If the PG-13 rating is set to block, the R, NC-17, and X ratings will also be blocked.)
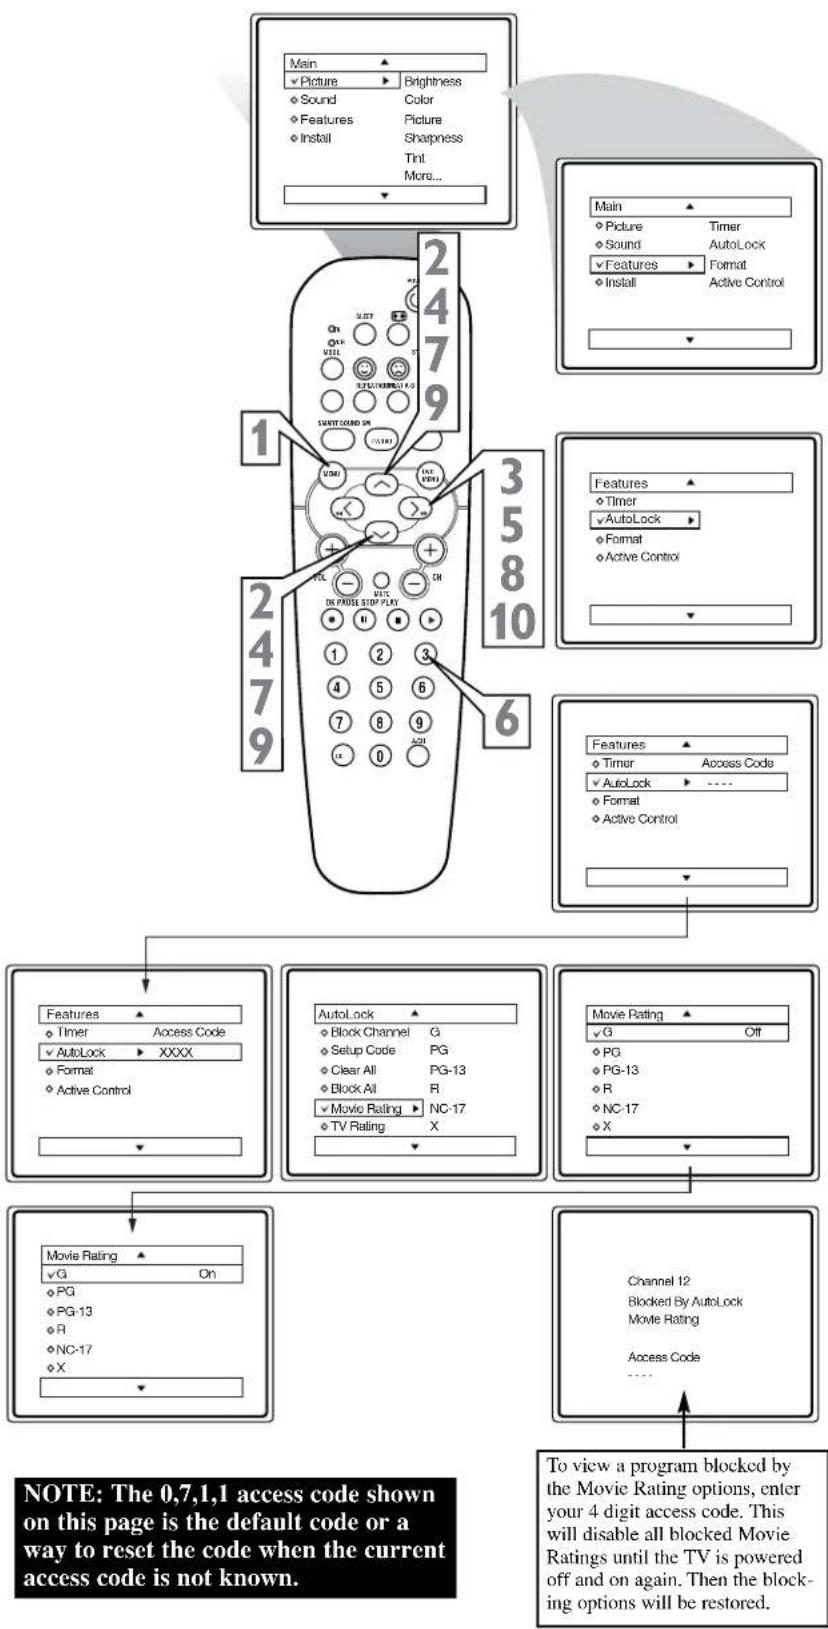
This portion of the AutoLock™ features cover program ratings based on the TV Industry rating system. This is known as TV Rating within AutoLock™.
After selecting the AutoLock™ feature and entering your personal access code, the AutoLock™ options screen appears;
Scroll the menu using the CURSOR UP or DOWN buttons until the words TV RATING are highlighted.
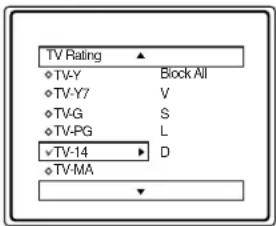
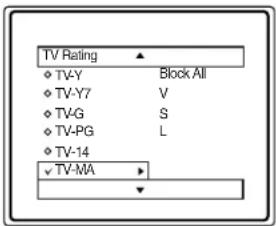
2 Press the CURSOR RIGHT button to display the TV Ratings (TV-Y, TV-Y7, TV-G, TV-PG, TV-14, or TV-MA).
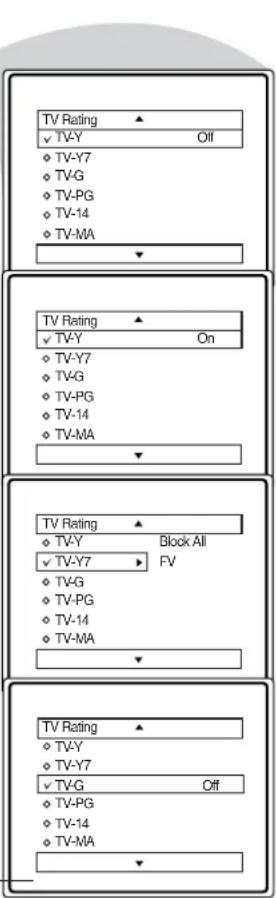
When highlighted, the TV-Y and TV-G can be turned ON (which will allow blocking) or OFF (which will allow viewing), of these rated programs.
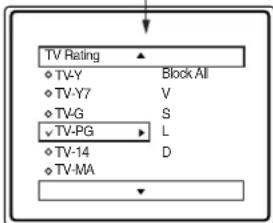
The ratings of TV-Y7, TV-PG, TV-14, TV-MA can be customized to block V (violence), FV (fantasy violence), S (sexual situations), L (coarse language), or D (suggestive dialogue).
3 Press the CURSOR UP or DOWN button to highlight the desired rating. 4 Press the CURSOR RIGHT button on the remote to turn the TV-Y or TV-G rating ON or OFF. Or, press the CURSOR RIGHT button to enter the sub-menus for the TV-Y7, TV-PG, TV-14 or TV-MA ratings. 5 If the TV-Y7, TV-PG, TV-14 or TV-MA sub-menu is accessed, press the CURSOR UP or CURSOR DOWN button to select one of the options (Block All, V, S, L, D, or FV). 6 Press the CURSOR RIGHT button on the remote to turn the option ON or OFF.
To view a program blocked by the TV Rating options, enter your 4 digit access code. This will disable all blocked TV Ratings until the TV is powered off and on again. Then the blocking options will be restored.
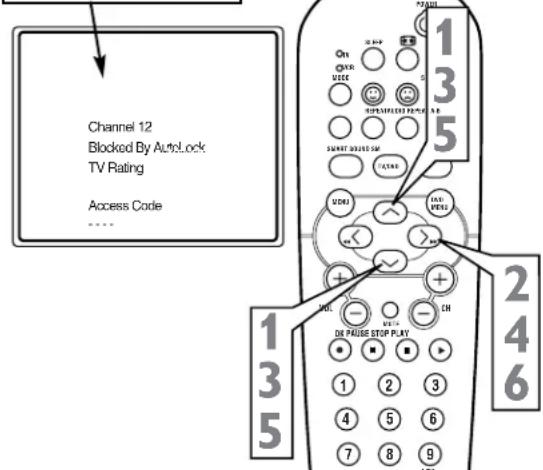
NOTE: The 0,7,1,1 access code shown on this page is the default code or a way to reset the code when the current access code is not known.
TV Ratings and
Rating Sub-Menus
When a TV Rating is selected to block, ALL higher ratings will be blocked also.
TV-Y - (All children -- This program is designed to be appropriate for all children.) Designed for a very young audience, including children ages 2-6. This type of programming is not expected to frighten younger children. TV-Y7 - (Directed to Older Children -- This program is designed for children age 7 and above.) It may be more appropriate for children who have acquired the developmental skills needed to distinguish between make-believe and reality. This programming may include mild fantasy and comic violence (FV). TV-G - (General Audience -- Most parents would find this program suitable for all ages.) This type of programming contains little or no violence, no strong language, and little or no sexual dialogue or situations. TV-PG - (Parental Guidance Suggested -- This program contains material that parents may find unsuitable for younger children.) This type of programming contains one or more of the following: some suggestive dialogue (D), infrequent coarse language (L), some sexual situations (S), or moderate violence (V). TV-14 - (Parents Strongly Cautioned -- This program contains some material that many parents would find unsuitable for children under 14 years of age.) This type of programming contains one or more of the following: intensely suggestive dialogue (D), strong coarse language (L), intense sexual situations (S), or intense violence (V). TV-MA - (Mature Audience Only -- This program is specifically designed to be viewed by adults and therefore may be unsuitable for children under 17.) This type of programming contains one or more of the following: crude indecent language (L), explicit sexual situations (S), or graphic violence (V).
AutoLock™ offers the viewer other blocking features as well. With these Blocking Options, the censoring can be turned ON or OFF.
Press the MENU button on the remote to show the on-screen menu. 2. Press the CURSOR UP or DOWN button until the word FEATURES is highlighted. 3. Press the CURSOR RIGHT button to display the FEATURES menu options. 4. Press the CURSOR UP or DOWN button until the words AutoLock are highlighted. 5. Press the CURSOR RIGHT button. 6. Enter the correct access code number. "XXXX" shows on the Access Code display as you press the NUMBERED buttons. AutoLock menu options will be displayed. 7. Press the CURSOR UP or DOWN buttons until the words BLOCKING OPTIONS are highlighted. 8. Press the CURSOR RIGHT button to display the Blocking Options (BLOCKING, UNRATED, or NO RATING) menu. 9. Press the CURSOR UP or DOWN buttons to highlight the desired feature. 10. When highlighted, each feature can be turned ON or OFF using the CURSOR RIGHT or LEFT buttons on the remote.
BLOCKING OPTIONS:
BLOCKING: This is what might be called the "master switch" for AutoLock™. When in the ON position, ALL blocking/censoring will take place. When in the OFF position, ALL blocking is disabled.
UNRATED: All unrated programs based on the Movie Ratings or Parental (TV) Guidelines can be blocked if this feature is set to ON and the BLOCKING feature is set to OFF.
NO RATING: All programming with NO content advisory data can be blocked if this feature is set to ON and the BLOCKING feature is set to OFF.
The Active Control monitors and adjusts incoming video signals to help provide the best picture quality.
When you choose to turn the Active Control ON, the Brightness, Picture, Sharpness, Contrast + and DNR (dynamic noise reduction) features are controlled automatically. Active Control adjusts these picture settings continuously and automatically.
Press the MENU button on the remote to show the on-screen menu. 2 Press the CURSOR UP or DOWN button until the word FEATURES is highlighted. 3 Press the CURSOR RIGHT button to display the FEATURES menu options. 4 Press the CURSOR UP or DOWN button until the words Active Control are highlighted.
5 Press the CURSOR RIGHT button to set the Active Control to Off, On, or Display ON.
Display On - When selected, an Active Control monitoring screen will be shown for a few seconds whenever a channel change is made. Within this menu, you can actually see the controls changing to give the best possible picture quality.
On - When selected, the Active Control will work to give the viewer the best possible picture, but will not display the monitoring screen when channels are changed.
Off - the Active control will not be activated.
6 When finished, press the SYSTEM MENU (OSD) button to remove the menu from the TV's screen.
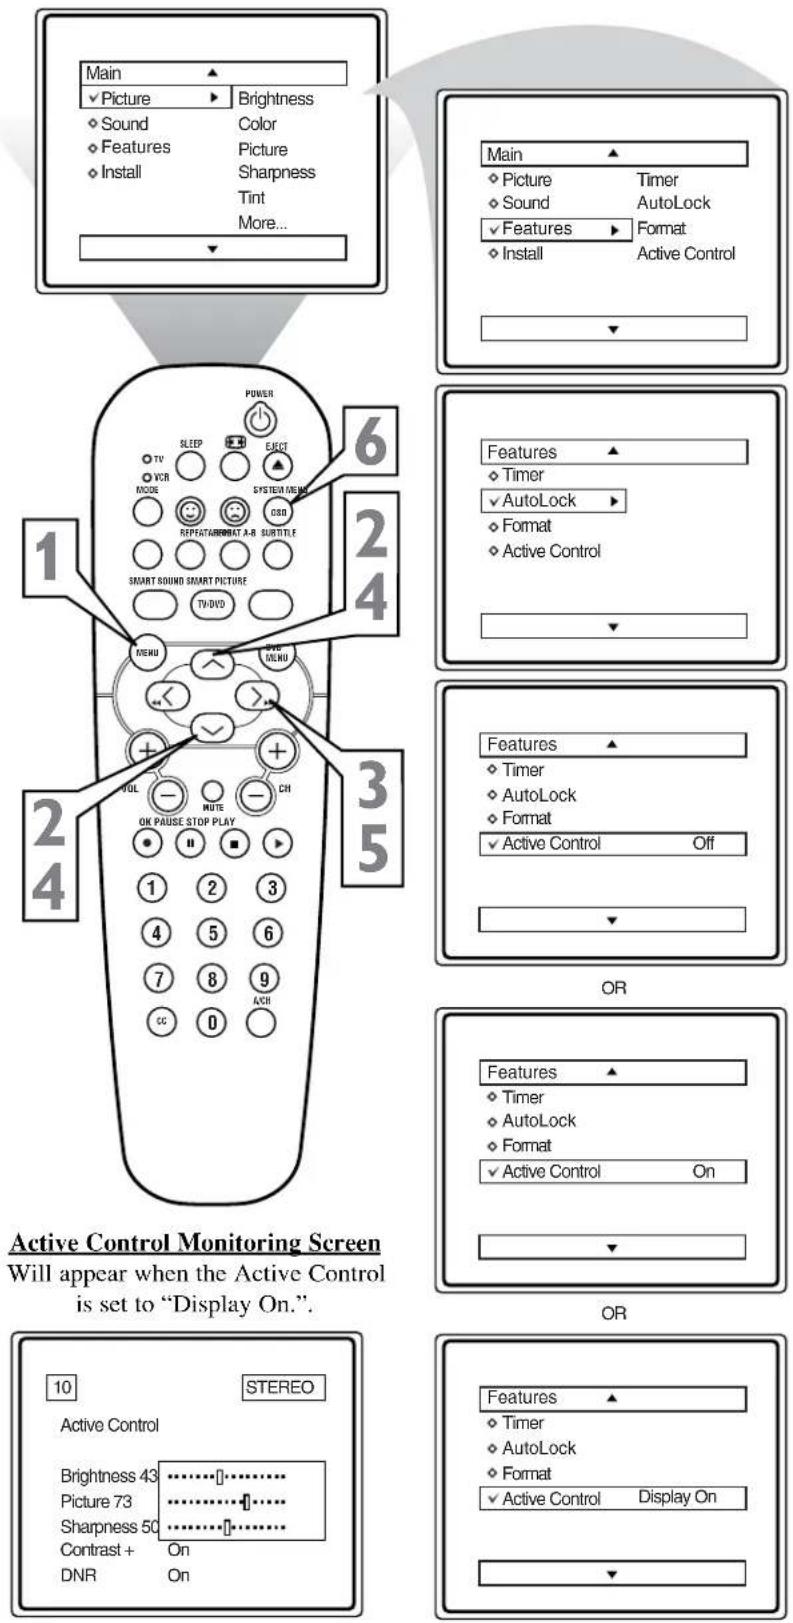
Will appear when the Active Control is set to "Display On.".
Have you ever fallen asleep in front of the TV only to have it wake you up at two in the morning with a test pattern screeching in your ears? Well, your TV can save you all that trouble by automatically turning itself off.
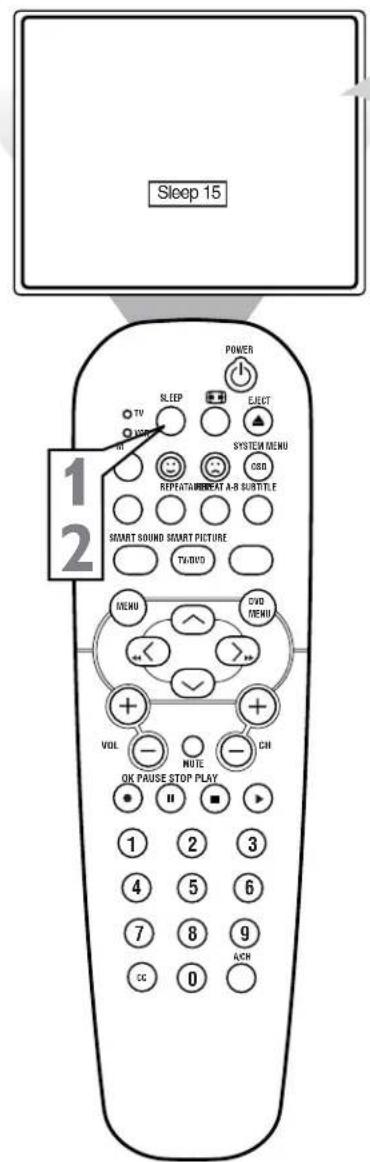
Press the SLEEP button on the remote control and the SLEEP timer display will appear on the screen.
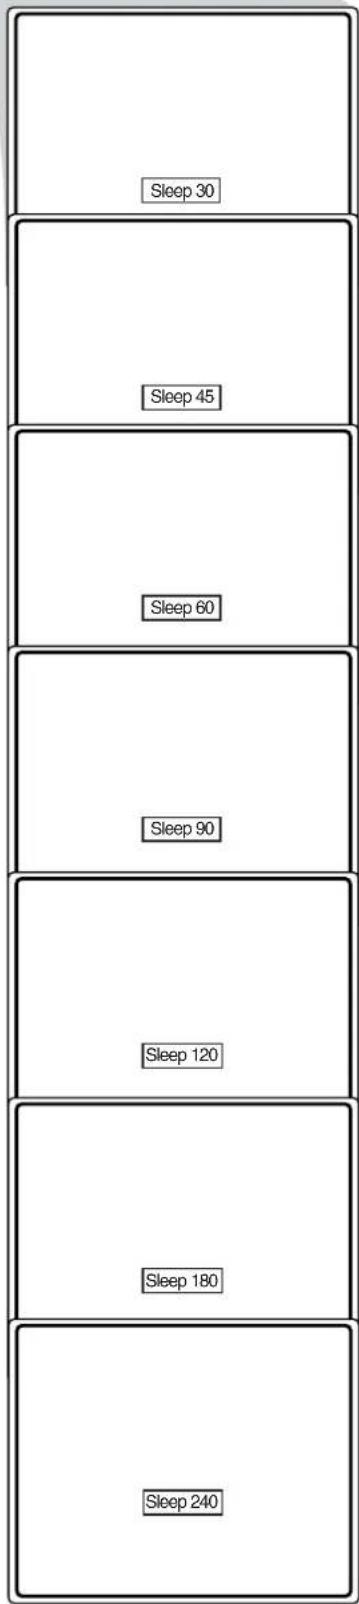
2 Press the SLEEP button repeatedly to pick the amount of time (15, 30, 45, 60, 90, 120, 180 or 240 minutes) before the TV will turn itself off.
An on-screen count down will appear during the last minute before the TV shuts itself off.
HELPFUL HINT
The on-screen menu will time out and disappear from the screen when you finish, or you can press the SYSTEM MENU (OSD) button to clear the menu from the screen.
![graph TD A["During the last minute of a Sleeptimer setting, an on-screen count down will be displayed. Pressing any button during the last minute will cancel the Sleeptimer."] --> B["Sleep 59 Sleep 9"]](/content/2026/06/1146317/images/c006975b056e822ae9f39f12a30fac16b99ef100b37594865469bd53e0ef2cef.jpg)
![graph TD A["Good Bye"] --> B["On-Sleep Timer Setting"] B --> C["Read GOOD BYE."] style A fill:#f9f,stroke:#333 style B fill:#ccf,stroke:#333 style C fill:#cfc,stroke:#333](/content/2026/06/1146317/images/4ffa116c5836d9cf29df4a4e3b84ec0e5ab9c0d19af8e29fbebe5096f0f56ec4.jpg)
How to use the Closed Captioning Control

Closed Captioning (CC) allows you to read the voice content of television programs on the TV screen. Designed to help the hearing impaired, this feature uses on-screen "text boxes" to show dialogue and conversations while the TV program is in progress.
Press the CC button on the remote to display the current Closed Caption setting. 2 Press the CC button repeatedly to choose from the four Closed Caption options (CC Off, CC 1, CC 2, CC Mute). Dialogue (and descriptions) for the action on the captioned TV program will appear on-screen if the tuned program is broadcasting CC information. 3 When finished, press the SYSTEM MENU (OSD) button to remove the menu from the TV's screen or let the option time out and disappear from the TV screen.
HELPFUL HINT
Not all TV programs and product commercials are made with Closed Caption (CC) information included. Neither are all Closed Caption modes (CC1, or CC2) necessarily being used during the transmission of a closed caption program. Refer to your area's TV program listings for the stations and times of Closed Caption shows.

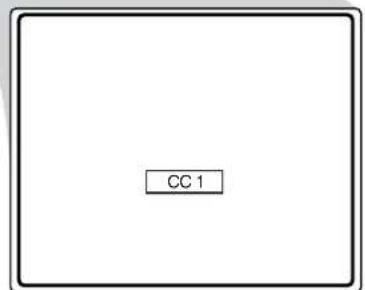

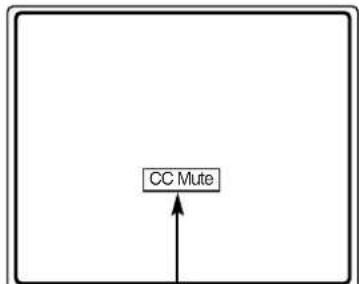
NOTE: The CC MUTE option can be used to set the TV to turn the Closed Caption mode "ON" whenever the MUTE button on the remote is pressed. This activates the CC1 option.
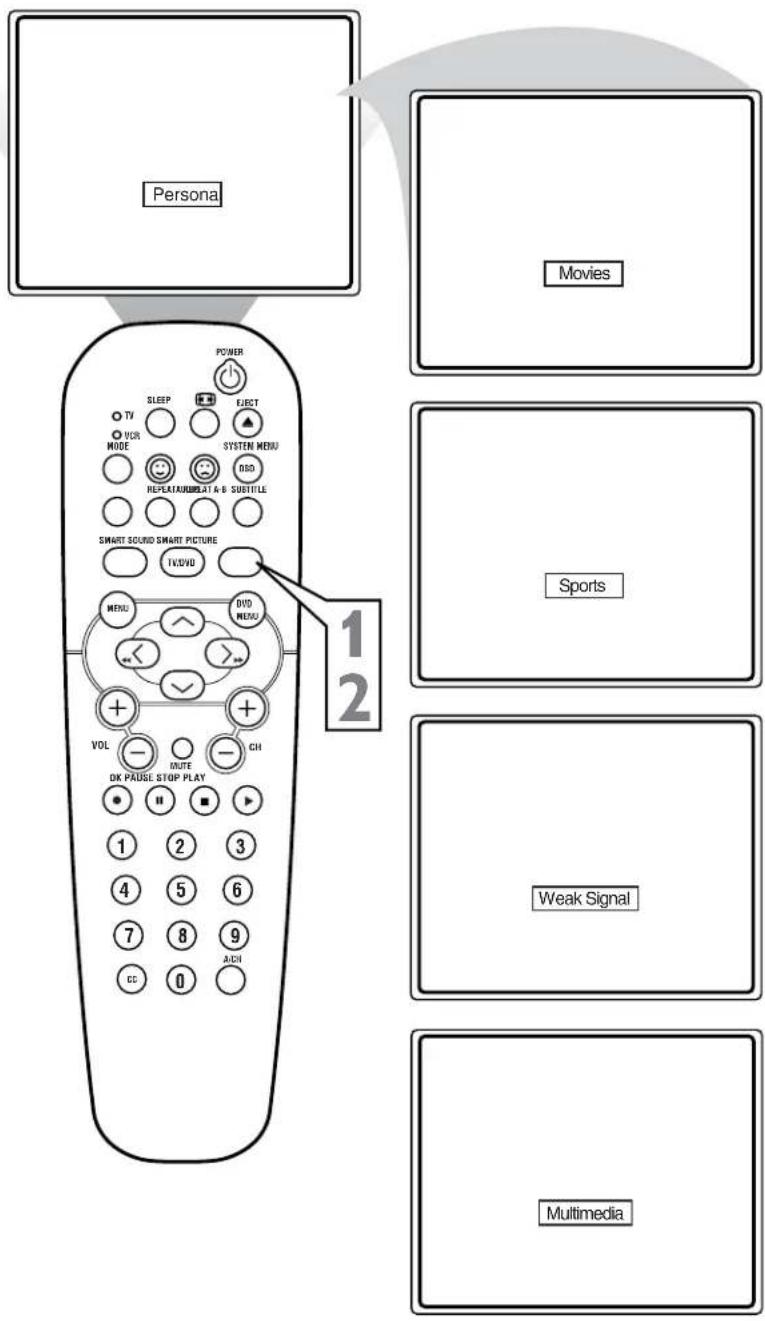
Whether you're watching a movie or a sporting event, your TV has automatic video control settings matched for your current program source or content. The SmartPicture™ feature quickly resets your TV's video controls for a number of different types of programs and viewing conditions you may have in your home. Each SmartPicture™ setting is preset at the factory to automatically adjust the TV's Brightness, Color, Picture, Sharpness, Tint, Color Temperature, DNR and Contrast+ levels.
Press the SMART PICTURE button on the remote control. The current Auto Picture setting will appear in the middle of the screen.
2 Press the SMART PICTURE button repeatedly to select either PERSONAL, MOVIES, SPORTS, WEAK SIGNAL, or MULTIMEDIA picture settings.
Note: The PERSONAL setting is the setting that you setup using the PICTURE options within the on-screen menu. This is the only Smart Picture setting that can be changed. All other settings are setup at the factory during the time of production.
MOVIES - Preset picture options for watching Video Tapes, or DVDs.
SPORTS - Preset picture options for watching sporting events.
WEAK SIGNAL - Preset picture options for watching programs where the reception is not at its best.
MULTIMEDIA - Preset picture options for use with video gaming.
SETTING THE SMARTSOUND™ CONTROL

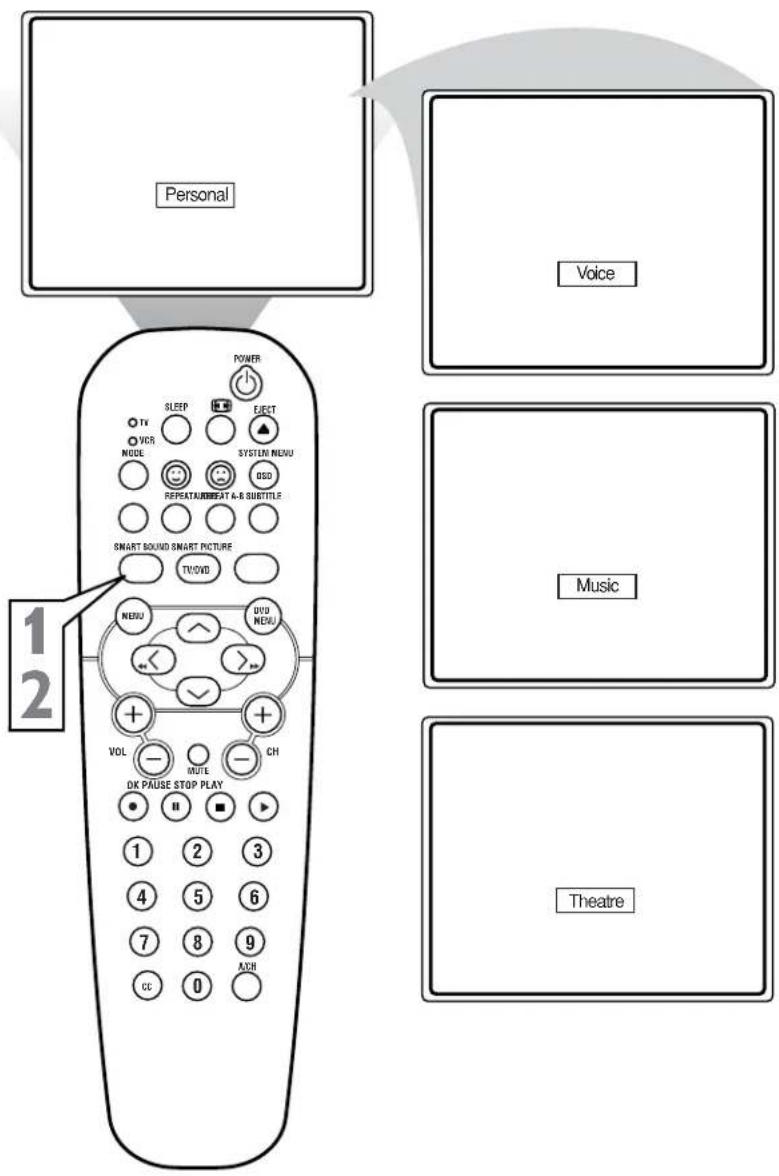
The SmartSound™ feature allows the listener to select between four different factory set sound options. Personal (which can be set by the user), Theatre (for movie viewing), Music (for musical type programming) and Voice (when the program is mainly dialogue). These settings affect the Sound menu's Bass, Treble, AVL, and Incredible Surround controls.
To select any of the options, follow the directions below.
Press the SMART SOUND button on the remote control. The current Smart Sound setting will appear in the middle of the screen.
2. Press the SMART SOUND button repeatedly to toggle between the four settings.
Note: Only the PERSONAL control can be changed by the viewer. This changes the settings in the main on-screen menu's sound controls.
THEATRE - Preset sound options for watching movies.
MUSIC - Preset sound options for musical programming where there is little dialogue.
VOICE - Preset sound options for programming where heavy dialogue is present.
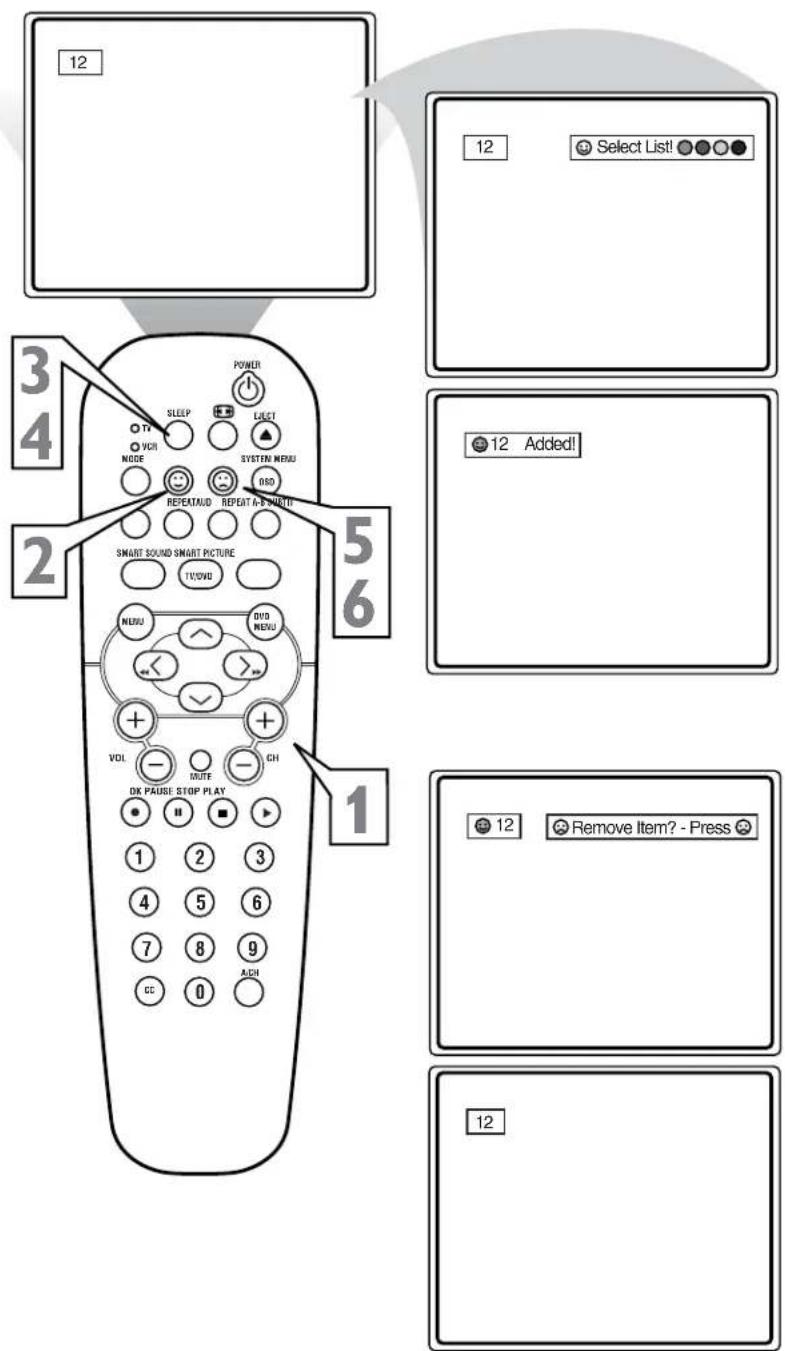
A "list" or series of previously viewed channels can be selected with the QuadraSurf™ (colored) buttons on your remote control. With this feature you can easily switch between different TV programs that currently interest you. The QuadraSurf™ control allows you to set up four different personal Surf lists using the colored buttons (on the remote control), each holding up to ten channels in its quick viewing "list."
1. Press the CHANNEL (+) or (−) buttons (or the NUMBER buttons) to select a channel to add to one of the SURF lists. 2. Press the SMILEY button on the remote control to ADD the channel to one of the SURF lists. 3. Press the corresponding COLORED (Red, Green, Yellow or Blue) button to add the channel to that button's Surf list. (Up to ten channels per button can be stored.)
Repeat steps 1 through 3 to add additional channels (up to 10) to each of the SURF lists.
To remove a channel from one of the SURF lists:
4. Press the COLORED QuadraSurf™ button until the desired channel appears. The screen will display the channel number with a colored "Smiley" face to indicate the Colored button it relates to. 5. While the "Smiley" face channel indicator is displayed, press the FROWNIE 😊 face button. The screen will read, "Remove item? - Press 😊." 6. Press the FROWNIE 😊 face button again to confirm your decision to remove the channel from the Surf list.
Repeat steps 4-6 to remove other channels from Surf lists.
ALTERNATE CHANNEL
Your remote also has an A/CH (Alternate Channel) button. Pressing this button will toggle between the current and one previously selected channel.
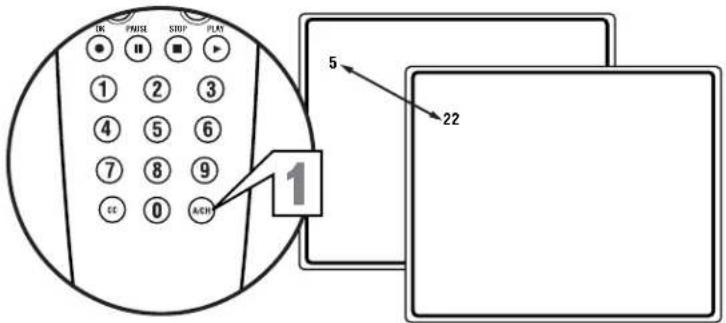

The QuadraSurf™ buttons on your remote control allow you to store up to 10 channels per button (40 total). This is a great feature if you want to store all your favorite Sports channels, Movie channels, or News channels in one surf list. Family members can have their own favorite list of channels. You can even program the external A/V Input jacks (Front channel) for one of the buttons making it a "source" button for your external accessory devices.
Assuming channels have now been added to the four QuadraSurf™ lists (the four colored buttons on the remote, see the previous page), let's review how the feature works.
Press one of the pre-programmed COLORED buttons on the remote (Red, Green, Yellow or Blue). The screen will display a smiley face with the first programmed channel for that surf list.
2 While the colored "smiley" face still appears on the screen, press the same COLORED button on the remote to tune the second channel programmed for that specific surf list.
3 Repeatedly pressing the same COLORED button while the "smiley" face appears will tune all the programmed channels for that specific surf list. After the last channel is tuned, pressing the COLORED button again will return you to the first channel in the list.
If the "smiley" face disappears from the screen and the same COLORED button is pressed, the surf channels will be displayed starting with the FIRST programmed channel again.
4 Repeat steps 1-3 for the other three COLORED buttons (Surf lists) if desired.
5 Any time the "smiley" face appears with the channel number, pressing the "frownie" face button will allow you to remove it from the list (see the previous page for more details).
![graph TD A["12"] --> B["5"] C["18"] --> B D["22"] --> B E["28"] --> B F["35"] --> B G["39"] --> B H["41"] --> B I["56"] --> B J["99"] --> B K["12"] --> L["Remove Item? - Press"] M["5"] --> N["OK PAUSE STOP PLAY"] O["1"] --> P["VOL"] Q["2"] --> R["NOT"] S["3"] --> T["CH"] U["4"] --> V["×"] W["5"] -->…](/content/2026/06/1146317/images/3fc09c2fd1bf92e1f50589d1b04c6ea23f7a15c52914aaab6f8323aef37f50b8.jpg)
This section of the Directions for Use manual begins to explain the operating procedures of the DVD Player portion of this television.
Let's learn the simple operation of the TV's built-in DVD Player. Unless otherwise stated, all operations can be performed by using the remote control.
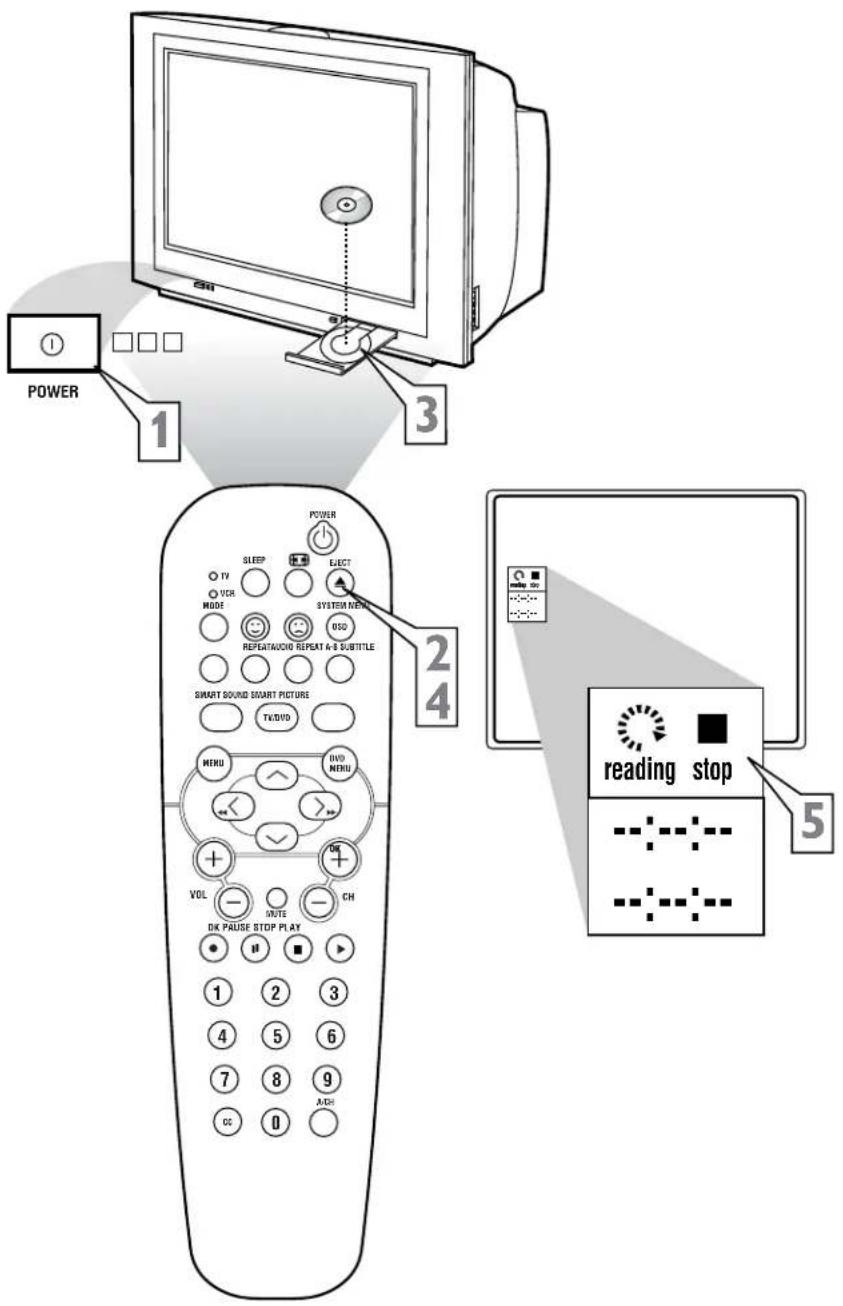
Press the POWER button on the remote control (or the TV) to turn the television ON.
2 Press the EJECT button on the remote control to place the TV/DVD in DVD mode. Press the OPEN/CLOSE button again to open the disc tray.
3 Place your chosen disc in the tray. Be sure that the disc label is facing up and the disc is centered in the tray.
4 Press the EJECT button on the remote control (or the EJECT button on the TV) to close the disc tray.
5 The on-screen display will indicate that the DVD Player is reading the disc. Then playback of the disc will begin automatically.
Note: If the "Child Lock" option is set to ON within the User Preference Settings section, the 4-digit access code must be entered or the disc must be authorized. (See the "Access Control" section within this manual.)
A default screen is displayed when the DVD Player is in STOP mode. It may contain a "Status Window" and a "Temporary Feedback Field." This screen gives information concerning prohibited actions, playback, modes, available angles, etc.
This manual gives the basic instructions for operating this DVD Player. Some DVDs require specific operation or allow only limited operation during playback. In these cases, the player may not respond to all operating commands. When this occurs, please refer to the instructions contained with the DVD (disc). When the symbol appears on the TV screen, the operation is not permitted by the player or the disc.
Unless otherwise stated, all operations can be performed using the remote control.
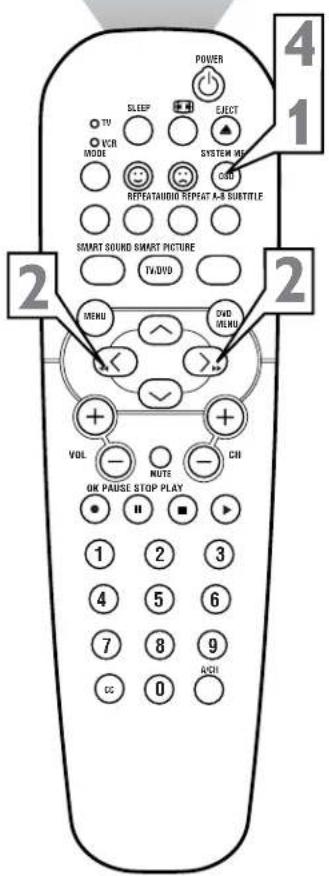
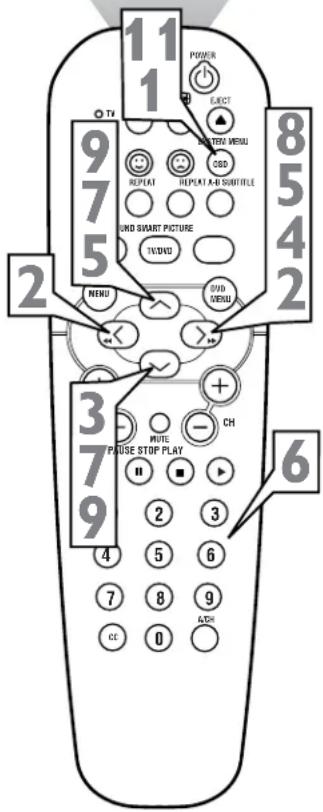
Press the SYSTEM MENU (OSD) button to display the DVD Player's on-screen menu. 2 Press the CURSOR RIGHT or LEFT button to highlight and select Menu Bar options: User Preference Setting, Current Subtitle Language, Current Audio Language, Sound mode, Frame by Frame, Slow Motion, Scan Speeds, Enlarge Picture, Title, Chapter, Angle, Time Search, or Favorite Track Selection. See option icons at lower right of this page. 3 Some of these options, along with a few others, can also be selected directly from the remote control through dedicated function buttons. 4 Repeatedly pressing the SYSTEM MENU (OSD) button while the on-screen menu is displayed will remove
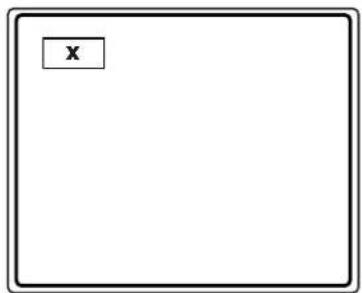
When the "X" icon appears on the TV screen, it means the function cannot be performed or is not an available option for that disc.
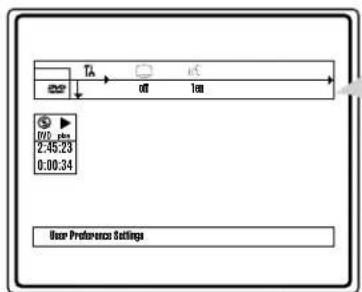

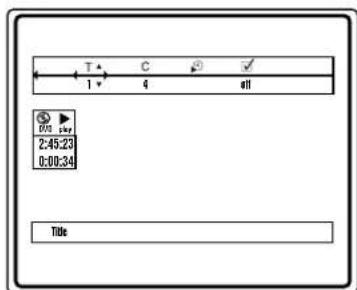
User Preference Settings Current Subtitle Language Current Audio Language Frame by Frame ▶ Slow Motion ▶▶ Scan Speeds ∠ Angle + Enlarge Picture (Zoom) T Title C Chapter Time Search √ Favorite Track Selection
PICTURE

Many of the DVD Player's features can be set to suit your personal preference. Let's start by looking at the PICTURE features.
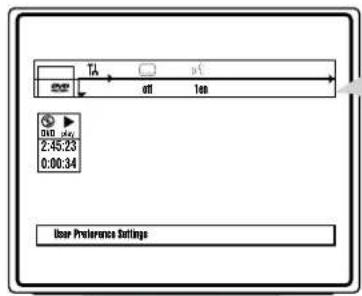
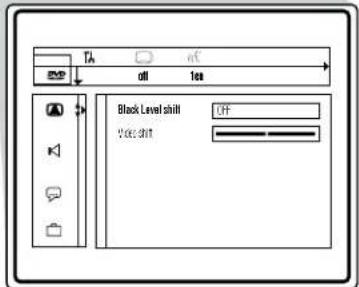
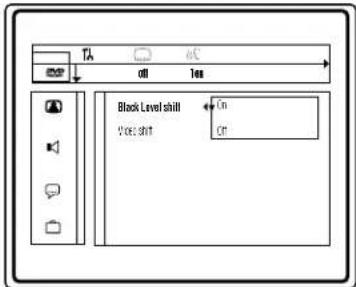
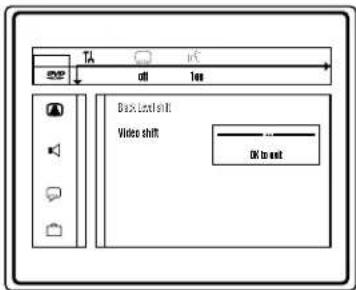
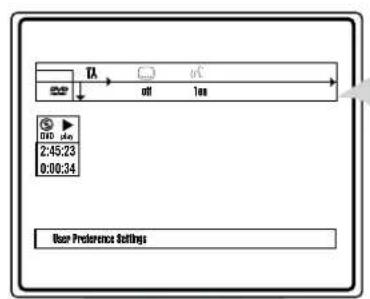
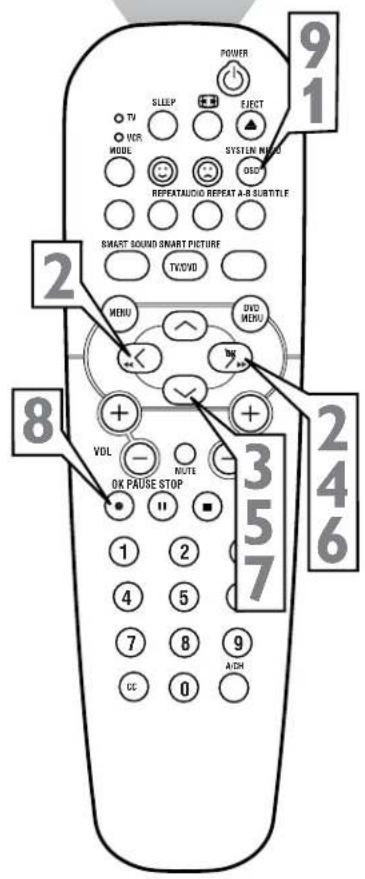
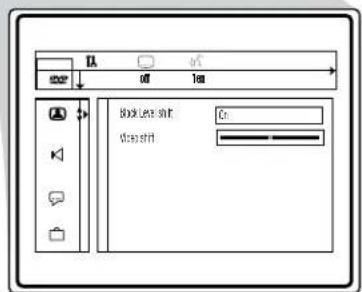
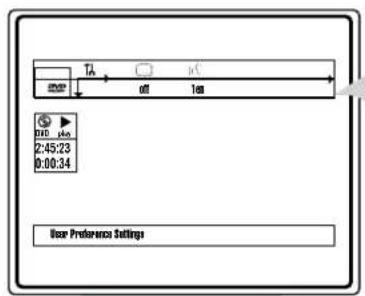
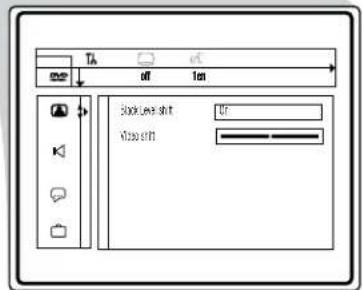
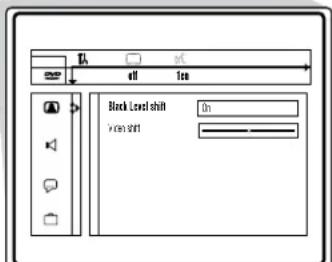
Press the SYSTEM MENU (OSD) button on the remote control to display the on-screen menu. 2. Press the CURSOR LEFT or RIGHT until the User Preference Settings Icon is highlighted. 3. Press the CURSOR DOWN button to highlight the Picture Icon. 4. Press the CURSOR RIGHT button to highlight the first Picture feature option "Black level shift". 5. Press the CURSOR UP or DOWN button to select and highlight the feature you wish to change. Choose Black level shift, or Video shift. 6. Press the CURSOR RIGHT button to display the options for the selected Picture feature.
Black level shift: Select ON or OFF. When ON, richer color contrasts are obtained.
Video shift: The factory centers the video picture on the TV's screen. Video Shift will let you position the picture by pressing the Cursor Right or Left. Press OK when finished.
7. Press the CURSOR UP or DOWN buttons to scroll and highlight the options of the selected feature. 8. Press the OK button to select or activate the chosen option. 9. Press the SYSTEM MENU (OSD) button to clear the on-screen menu from the TV screen.

OPERATING THE DVD PLAYER - USER PREFERENCE SETTINGS

Sound
The Personal Preference area of the menu has various SOUND features to customize and compliment your viewing and listening pleasure.
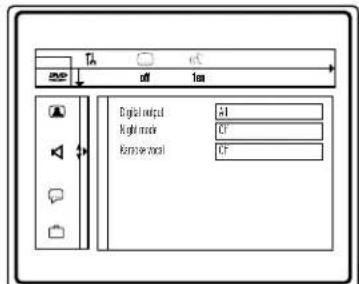
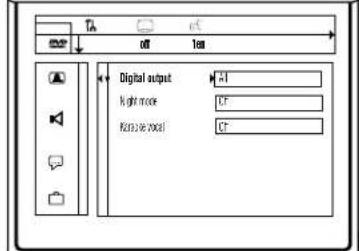
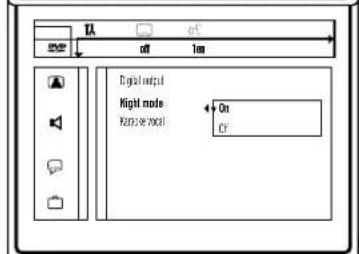
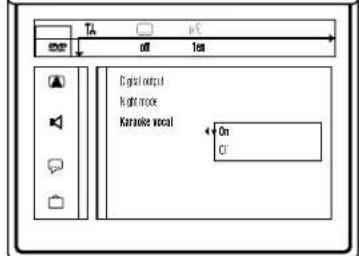
Press the SYSTEM MENU (OSD) button on the remote control to display the on-screen menu. 2. Press the CURSOR LEFT or RIGHT until the User Preference Settings Icon is highlighted. 3. Press the CURSOR DOWN button to highlight the Sound Icon. 4. Press the CURSOR RIGHT button to highlight the first Sound feature option "Digital output". 5. Press the CURSOR UP or DOWN button to select and highlight the feature you wish to change. Choose Digital output, Night mode, or Karaoke vocal. 6. Press the CURSOR RIGHT button to display the options for the selected Sound feature.
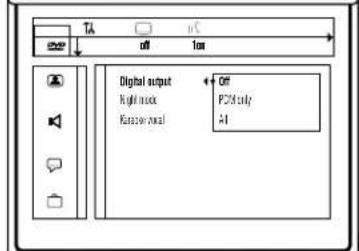
Digital output: Select Off (If using none of the digital outputs), PCM only (If your external equipment does not include a digital multi-channel decoder), or All (If using a digital multi-channel decoder, both coaxial and optical outputs are switched on.).
Night mode: Select On (Optimizes the dynamics of the sound with low volume playback), or Off.
Karaoke vocal: Select On (Set to on only when using a multi-channel karaoke DVD), or Off.
7. Press the CURSOR UP or DOWN buttons to scroll and highlight the options of the selected feature. 8. Press the OK button to select or activate the chosen option. 9. Press the SYSTEM MENU (OSD) button to clear the on-screen menu from the TV screen.
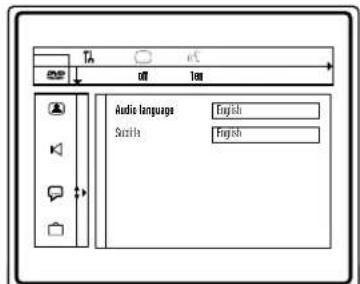
LANGUAGE

Many DVDs are capable of multi-lingual settings. The Language feature within the Personal Preference area of the DVD on-screen menu will let the user set the Audio and Subtitle language.
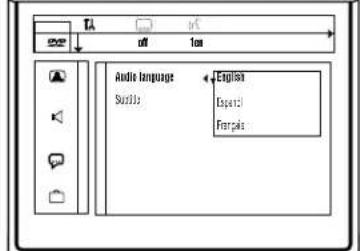
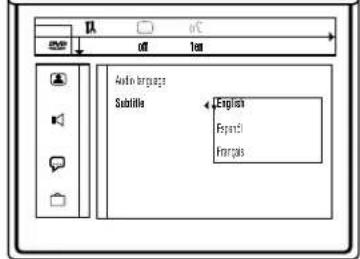
Press the SYSTEM MENU (OSD) button on the remote control to display the on-screen menu. 2 Press the CURSOR LEFT or RIGHT until the User Preference Settings Icon is highlighted. 3 Press the CURSOR DOWN button to highlight the Language Icon. 4 Press the CURSOR RIGHT button to highlight the first Language feature option "Audio language." 5 Press the CURSOR UP or DOWN button to select and highlight the feature you wish to change. Choose Audio language or Subtitle. 6 Press the CURSOR RIGHT button to display the options for the selected feature.
Audio language: Choose from a list including; English, Español, Français, Português, Italiano, Russian, Deutsch, Greek, Japanese, Korean, Chinese, Quechua, Guaraní, Aymará, or Inupiaq. Subtitle: Select from the same list of languages listed under Audio language. Will change the subtitle text only. NOTE: Audio language and Subtitle options are available only if the DVD being used has these capabilities.
7 Press the CURSOR UP or DOWN buttons to scroll and highlight the options of the selected feature. 8 Press the OK button to select or activate the chosen option. 9 Press the SYSTEM MENU (OSD) button to clear the on-screen menu from the TV screen.


OPERATING THE DVD PLAYER - USER PREFERENCE SETTINGS

FEATURES

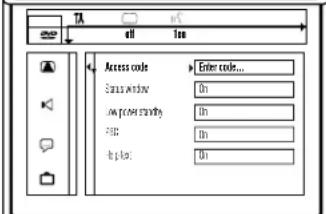
The Features section of the Personal Preference options contain an area where an Access Code and Parental censoring can be set. There also are features that can be turned On or Off (Access Control, Status Window, Low Power Standby, PBC - Playback Control, and Help text).
Press the SYSTEM MENU (OSD) button on the remote control to display the on-screen menu. 2 Press the CURSOR LEFT or RIGHT until the User Preference Settings Icon is highlighted. 3 Press the CURSOR DOWN button to highlight the Features Icon. 4 Press the CURSOR RIGHT button to highlight the first Features option "Access code." 5 Press the CURSOR UP or DOWN button to select and highlight the feature you wish to change. Choose Access control, Status window, Low power standby, PBC or Help text. 6 Press the CURSOR RIGHT button to display the options for the selected feature.
Access control: Requires a four digit code to enter. Select Child Lock (locked or unlocked), Parental level (Rating 1 to 8 for scenes not suitable for children), Change Country, or Change Code.
Status window: Select On or Off.
Low power standby: Select On (will put the set into the lower power standby mode), or Off.
PBC (Playback Control): Select On to allow viewing of main screen when playing a PBC featured Video CD, or Off for playback without use of the main screen.
Help text: Select On to display a bar of text describing selected icons in the Main menu bar.
7 Press the CURSOR UP or DOWN buttons to scroll and highlight the options of the selected feature. 8 Press the OK button to select or activate the chosen option. 9 Press the SYSTEM MENU (OSD) button to clear the on-screen menu from the TV screen.



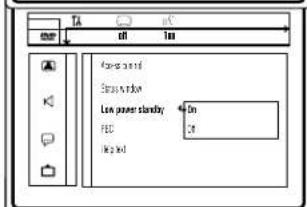
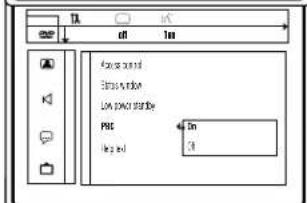
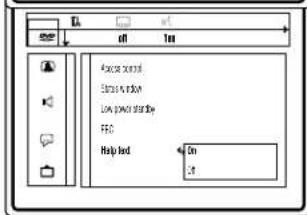
ACCESS CODE

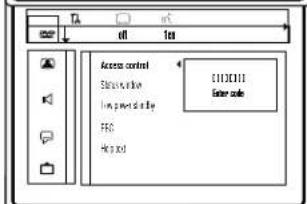
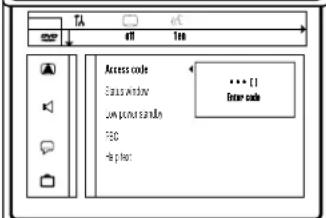
When using and making changes within the Access Control option of the Features submenu, an ACCESS CODE will have to be entered before any new settings can be made. This page discusses how to set the Access Code to allow changes to this section of the on-screen menu.
Press the SYSTEM MENU (OSD) button on the remote control to display the on-screen menu. 2 Press the CURSOR LEFT or RIGHT until the User Preference Settings Icon ☑ is highlighted. 3 Press the CURSOR DOWN button to highlight the Features Icon ☐. 4 Press the CURSOR RIGHT button to highlight the first Features option "Access code." 5 Press the CURSOR RIGHT button, the screen will read, “[ ] [ ] [ ] Enter code.” 6 Choose a four digit code and enter it by pressing the NUMBERED buttons on the remote control. The on-screen menu will ask to "Confirm code." Re-enter your chosen four digit access code. The on-screen menu will display the Child lock, Parental level, Change country, and Change code options.
NOTE: 0, 7, 7, 1 is the default code.
7 Press the CURSOR UP or DOWN button to select and highlight the option you wish to change. 8 Press the CURSOR RIGHT button to enter the highlighted option choices. 9 Press the CURSOR UP or DOWN button to choose one of the choices. 10 Press the OK button to select or activate the chosen option. Press the SYSTEM MENU (OSD) button to clear the on-screen menu from the TV screen.
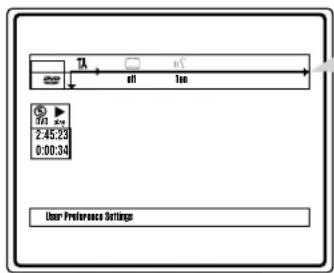

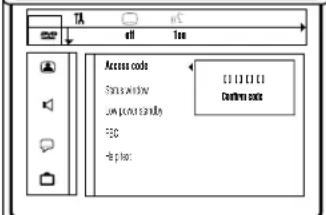
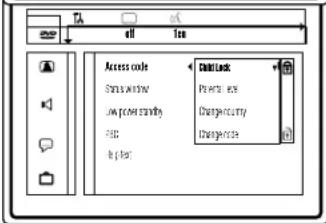
Parental Level: (Ratings 1 to 8)
The disc contains scenes not suitable for children. If you set a rating for the player, all scenes with the same rating or lower will be played. Higher rated scenes will not be played unless an alternative is available on the disc. The alternative must have the same rating or a lower one. If no suitable alternative is found, playback will stop and the 4-digit code has to be entered.
Parental Control Disclaimer:
This DVD player features the Parental Control system which is intended to activate when playing DVD discs furnished with certain software coding. This is according to technical standards adopted by the set maker and disc content industries. Please note that the Parental Control system will not operate a DVD disc which is not furnished with the appropriate software coding. Also note that at the time of release of this TV/DVD Player, certain aspects of the technical standards had not been settled between the set maker and the disc industries.
On this basis Philips Consumer Electronics cannot guarantee functioning of the Parental Control system and denies any liability with unintended watching of disc content.
If in doubt, please make sure the disc plays according to your parental Control settings before you allow children access.
When the Child Lock or Parental Level controls are on and a disc containing material that will be blocked is inserted, the disc must first be authorized before playback can occur.
With the TV/DVD Player turned on, press the EJECT button on the remote control or TV. 2 Place the disc in the disc tray and press the EJECT button on the remote control or TV. 3 If the disc has a rating equal to or higher than the level allowed, the child protect "Access control" dialog box will appear. Press the CURSOR UP or DOWN button to select Play once or Play always.
Play once: The disc can be played as long as it is in the player and the player is ON.
Play always: The disc will become child safe (or authorized) and can be played, even if the Child Lock control is set to ON.
4 Press the NUMBERED buttons on the remote to enter your four digit Access Code. The Disc will begin to play or bring you to a "disc menu" where you might have to select play.
DEAUTHORIZING A DISC:
5 Place the disc in the disc tray and press the EJECT button. Playback will begin automatically. 6 Press the STOP ■ button on the remote control while the smiley face is visible. The frownie face will appear and the disc is then deauthorized.
![POWER 1 2 5 1 3 POWER SLEEP SELECT TV VCR MODE SYSTEM MENU 000 REPEAT AUDIO REPEAT A-B SUBTITLE SOUND SMART PICTURE TV/DVD MENU DVD/MENU 6 VOL NOTE PAUSE STOP PLAY 1 2 3 4 5 6 7 8 9 CC 0 ACH 4 I OK OK Access Control Play once [ I I I I I ] Play always [ I I I I I ] Choose "Play always" to insert the…](/content/2026/06/1146317/images/e63c5636ef90ba267e349f50961d68d429748a1a14b172aad905a7a77f506a38.jpg)
PLAYING A DVD OR VIDEO CD
After inserting a DVD or Video CD and closing the tray, playback will start automatically and the Status Window will show the type of disc loaded and the discs playing time. You may be asked to select an item from a menu on the disc itself. Use the CURSOR buttons to navigate the disc menu and press the OK button to activate your selection.
Press the PLAY ▶ button to start the playback of a DVD or Video CD. (Will generally start up to the Disc Menu. this menu will be different for every disc. Select the play movie option.) 2 Press the STOP ■ button on the remote control to stop the playback of a DVD or Video CD and return to the Status Window. 3 Press the PAUSE II button on the remote control to temporarily suspend playback. Additional pressing of the PAUSE II button will advance the playback one picture at a time. 4 Press the PLAY▶ button on the remote control to continue normal playback of the disc. 5 When finished, press the STOP ■ button to stop playback of the disc and return to the Status Window.
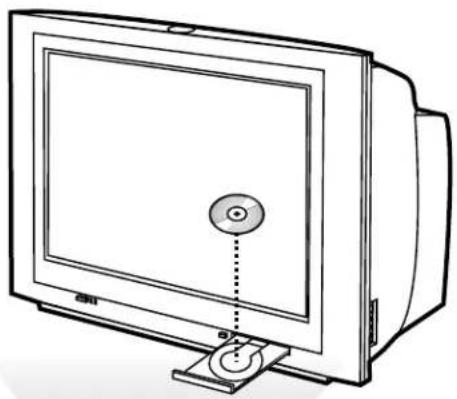
DVD Player will read the disc.
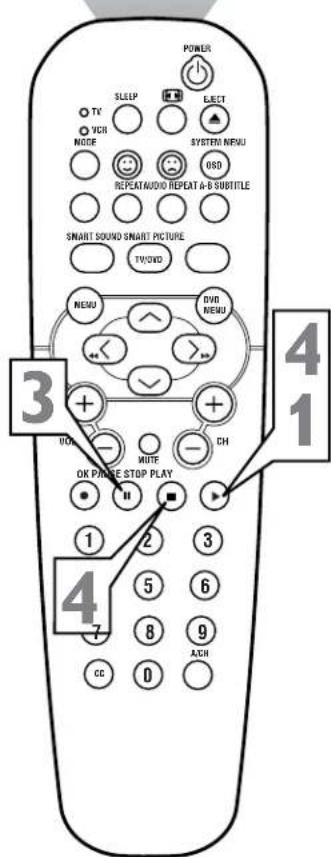
![graph TD A["User"] --> B["reading"] B --> C["stop"] C --> D["..."] C --> E["..."]](/content/2026/06/1146317/images/6dc06327c478dcb410ad067a95a9268c44c7801754be6653e8362c576e2ca05f.jpg)

Playback of disc will start automatically.
OPERATING THE DVD P LAYER - GENERAL FEATURES

MOVING TO ANOTHER TITLE OR TRACK
When a disc has more than one Title or Track you can move to another Title or Track by the following steps:
With a disc in the tray:
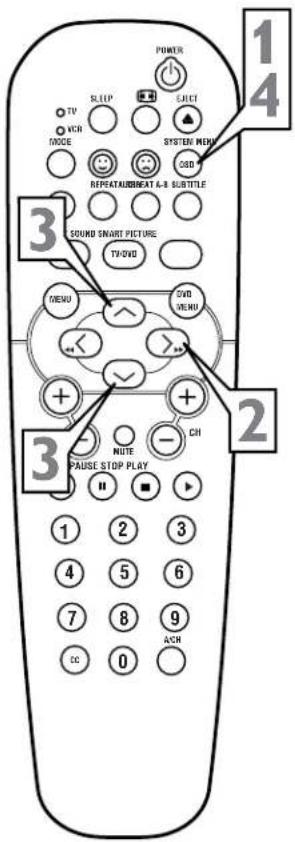
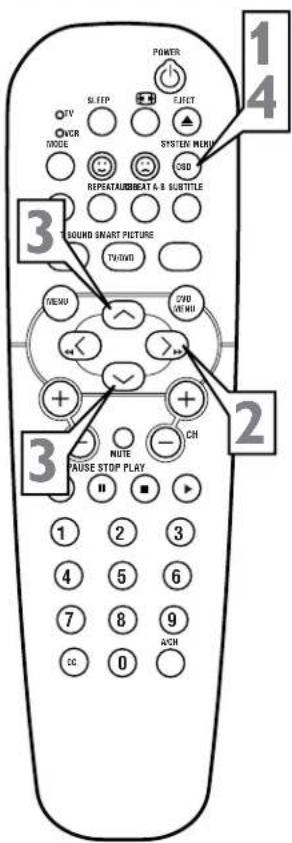
Press the SYSTEM MENU (OSD) button to display the DVD Player's on-screen menu. 2 Press the CURSOR RIGHT button until the "T" is highlighted. 3 Press the CURSOR UP or DOWN button to select any other available Titles or Tracks. 4 Press the SYSTEM MENU (OSD) button to clear the menu from the screen.

MOVING TO ANOTHER CHAPTER OR INDEX
When a disc has more than one Chapter or a track has more than one Index, you can move to another Chapter or Index by the following steps:
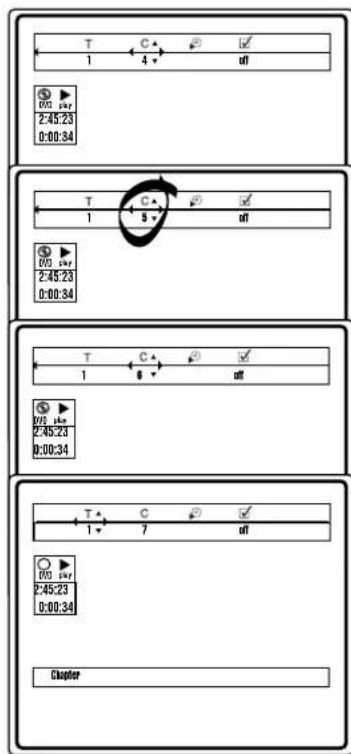
Press the SYSTEM MENU (OSD) button to display the DVD Player's on-screen menu. 2 Press the CURSOR RIGHT button until the "C" is highlighted. 3 Press the CURSOR UP or DOWN button to select any other available Chapters or Index. 4 Press the SYSTEM MENU (OSD) button to clear the menu from the screen.
STILL PICTURE/PICTURE BY PICTURE PLAYBACK
When a disc has more than one Title or Track you can move to another Title or Track by the following steps:
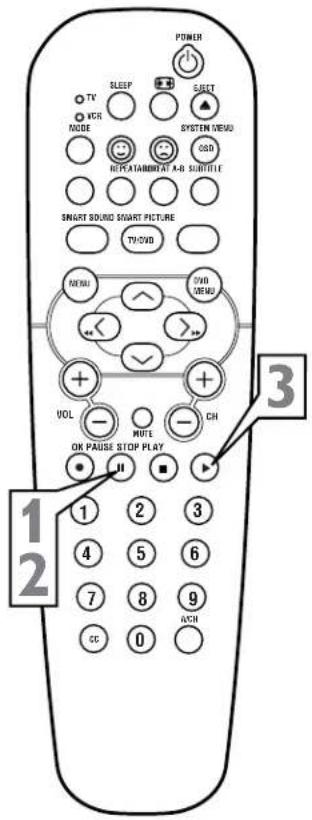
With the disc playing, press the PAUSE button. The playback will freeze the picture on the screen. 2 Press the PAUSE button repeatedly to advance the playback of the disc "picture by picture." 3 Press the PLAY button to resume normal disc playback.

SEARCH FORWARD OR REVERSE
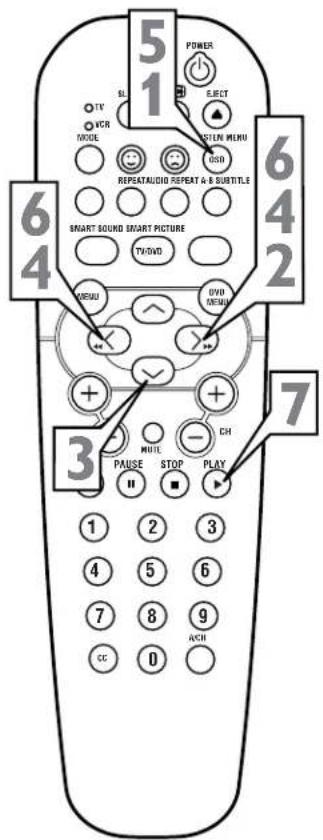
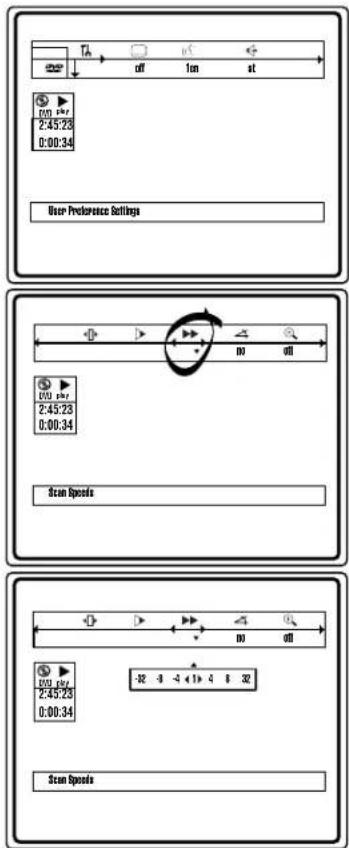
Press the SYSTEM MENU (OSD) button to display the on-screen menu bar. 2 Press the CURSOR RIGHT button to select ▶ (Fast Motion) in the on-screen menu bar. 3 Press the CURSOR DOWN button to display the Fast Motion options. 4 Press the CURSOR RIGHT or LEFT buttons to select one of the Fast Motion options (-32, -8, -4 reverse or +4, +8, +32 forward). Select 1 for normal viewing speed. 5 Press the SYSTEM MENU (OSD) button to remove the on-screen menu bar from the TV screen. 6 Press the FORWARD or REVERSE buttons to search through the disc at the speed you set. 7 Press the PLAY button to resume normal playback of the disc.
NOTE: Pressing the ▶▶ or the ◀◀ buttons repeatedly will toggle the search OFF, x4, or x32.
REPEAT REPEAT A-B
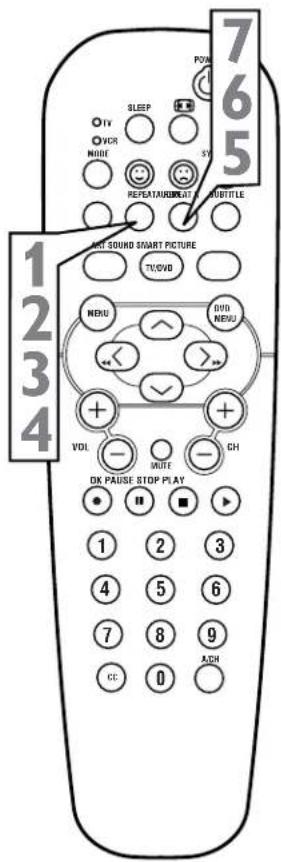
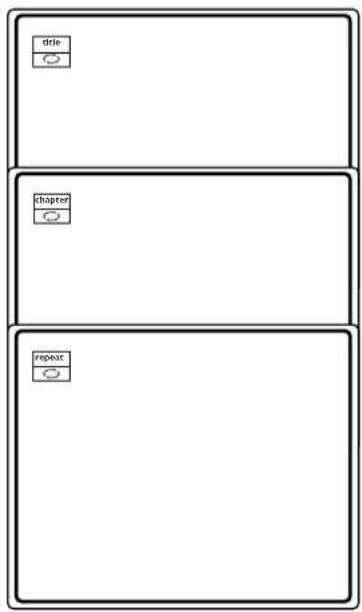
Repeat chapter/Title/Index on DVD Video discs, or repeat Tracks or the disc on Video CDs.
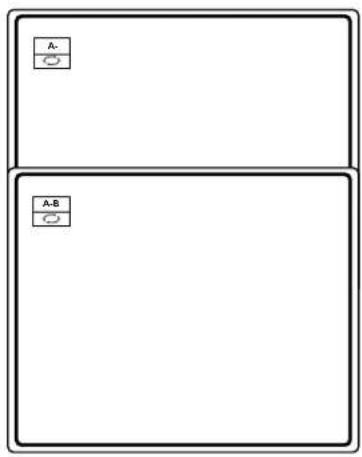
Press the REPEAT button once to repeat the playback of the current chapter. 2 Press the REPEAT button twice to repeat playback of the current title. 3 Press the REPEAT button a third time to repeat the entire disc. 4 Press the REPEAT button a fourth time to exit the Repeat mode. 5 Press the REPEAT A-B button at your chosen starting point. A- will appear briefly on the screen. 6 Press the REPEAT A-B button again at your chosen ending point. A-B will appear briefly on the display and the chosen length of playback will be repeated. 7 To exit the repeating sequence, press the REPEAT A-B button again.
TIME SEARCH
The Time Search control allows you to start the playback at any chosen time on the disc
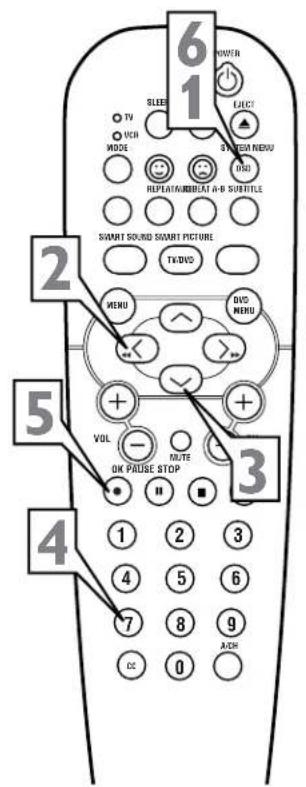
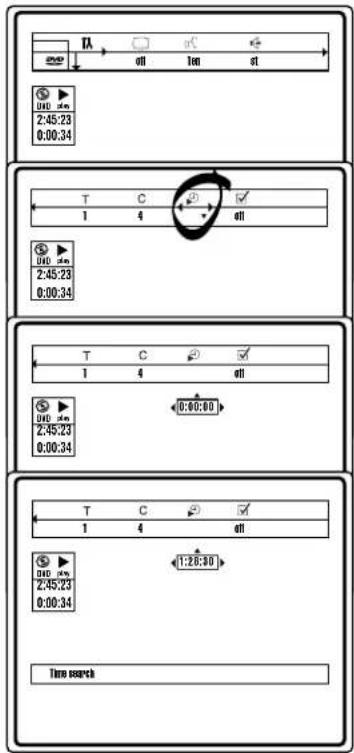
Press the SYSTEM MENU (OSD) button to display the on-screen menu bar. 2 Press the CURSOR RIGHT button until the Time Search icon is highlighted. 3 Press the CURSOR DOWN button to display the "time edit" box. The player will pause the playback of the disc. 4 Press the NUMBERED buttons to enter a specific time (hour/minutes/seconds). 5 Press the OK button to confirm the time and begin playback at that moment on the disc. 6 Press the SYSTEM MENU (OSD) button to remove the on-screen menu bar from the TV screen.
ENLARGE PICTURE (ZOOM)
The Enlarge Picture (Zoom) control allows you to enlarge the video image and pan through the enlarged image.
Press the SYSTEM MENU (OSD) button to display the on-screen menu bar. 2 Press the CURSOR RIGHT button until the Zoom icon is highlighted. 3 Press the CURSOR UP or DOWN buttons to select the desired zoom factor (1.33, 2 or 4). The player will pause the disc and the selected zoom factor will be displayed below the Zoom icon in the menu bar. The picture will reformat itself according to the selected zoom factor. 4 Press the OK button to confirm the selection. The "panning" icon will appear on the screen. 5 Use the CURSOR UP, DOWN, RIGHT or LEFT buttons to pan the image. 6 Press the PLAY button to resume normal playback of the disc. 7 Press the SYSTEM MENU (OSD) button to remove the on-screen menu bar from the TV screen.
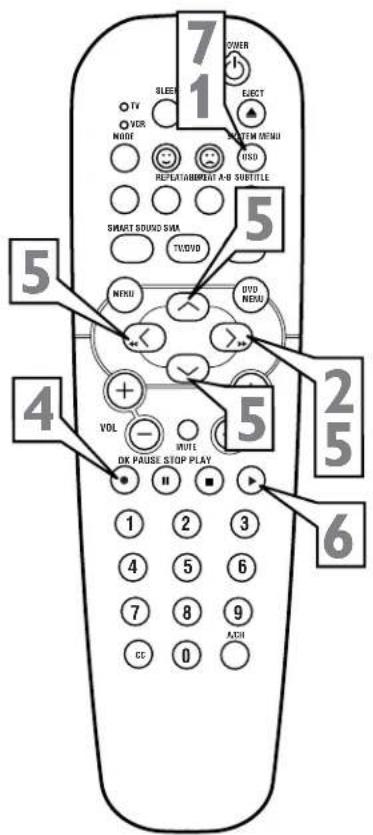
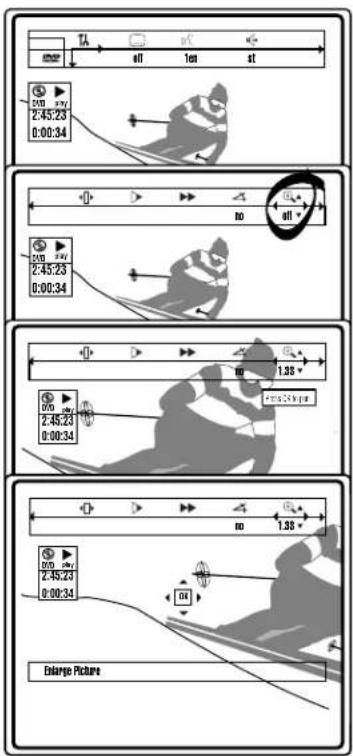
OPERATING THE DVD PLAYER - GENERAL FEATURES

FAVORITE TRACK SELECTION - VIDEO
The FTS-Video control allows you to store your favorite titles/chapters (DVD) and favorite tracks/indexes (Video CD) for a particular disc in the player's memory.
Storing a FTS-Video Program:
Press the SYSTEM MENU (OSD) button on the remote control to display the on-screen menu. 2 Press the CURSOR RIGHT button until the Video FTS icon is highlighted. 3 Press the CURSOR DOWN button to highlight the FTS portion of the Favorite Track Selection dialogue box. 4 Press the CURSOR RIGHT or LEFT button to turn the FTS control ON or OFF.
Storing Titles/Chapters:
5 Press the CURSOR DOWN button to select Titles. 6 Press the CURSOR RIGHT or LEFT buttons to select the desired title number. 7 Press the OK button if you wish to store the entire title. The title number will be added to the list of selections.
Storing Chapters:
8 Press the CURSOR DOWN button on the selected title number. 9 Press the CURSOR RIGHT or LEFT button to select the desired chapter number. 10 Press the OK button to select or activate the chosen option. Press the SYSTEM MENU (OSD) button to clear the on-screen menu from the TV screen.
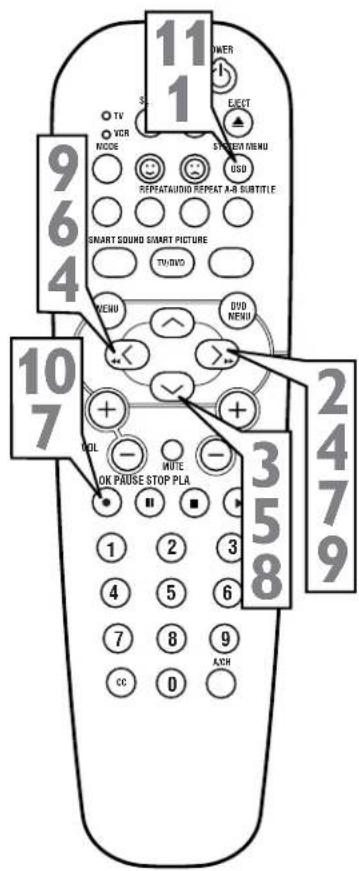
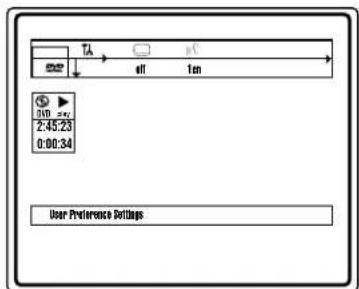
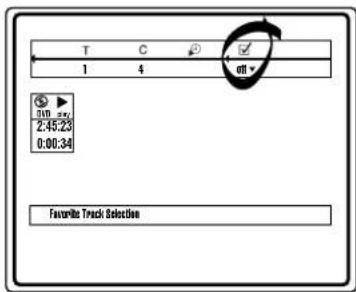
![T C ✓ 1 4 off FTS On Off Favorite Track Selection The 1 2 3 Chapter Program [ ] Clear all](/content/2026/06/1146317/images/f4447bf1d94a31e617eebcafbc5049d61401acc10bd9e6971cc1a6ac380f9175.jpg)

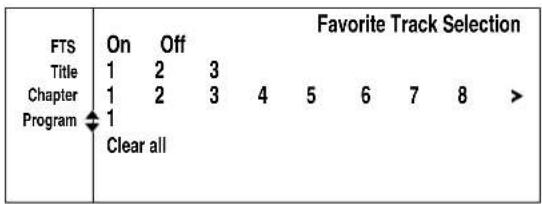
The Favorite Track Selection feature can be turned ON or OFF. Choose Titles or Chapters to be added to the Program List in the order you want them to appear (Up to 20 selections per program).
ERASING A FAVORITE TRACK SELECTION
The FTS-Video control also allows you to customize or erase programming set up in the Favorite Track Selection memory of the TV/DVD Player.
Erasing a FTS-Video Program:
Press the SYSTEM MENU (OSD) button on the remote control to display the on-screen menu. 2. Press the CURSOR RIGHT button until the Video FTS ☑ icon is highlighted. 3. Press the CURSOR DOWN button to select "Program." 4. Press the CURSOR RIGHT or LEFT button to select the number you wish to erase from the program. 5. Press the OK button to erase the selection. 6. Press the SYSTEM MENU (OSD) button to remove the menu bar from the TV screen.
Erasing All Selections from a FTS-Video Program:
7. Press the SYSTEM MENU (OSD) button to display the on-screen menu bar. 8. Press the CURSOR RIGHT button to select the Video FTS ☑ icon in the menu bar. 9. Press the CURSOR DOWN button to select "Clear All". 10. Press the OK button to select or activate the chosen option. Press the SYSTEM MENU (OSD) button to clear the on-screen menu from the TV screen.
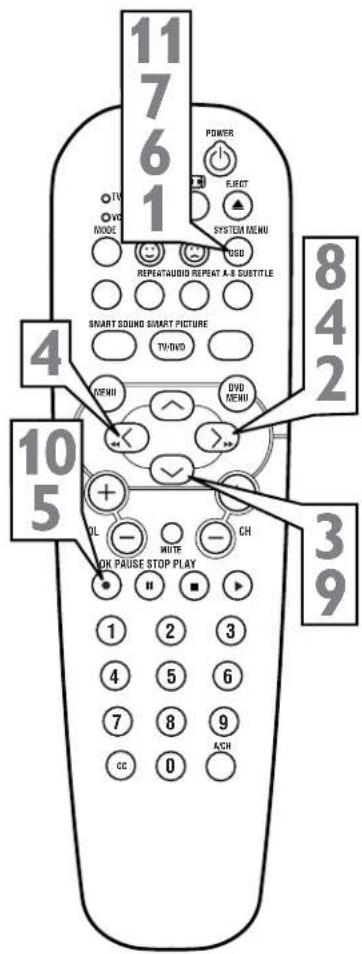

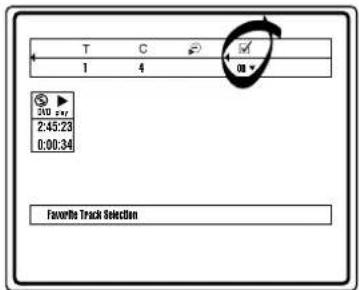
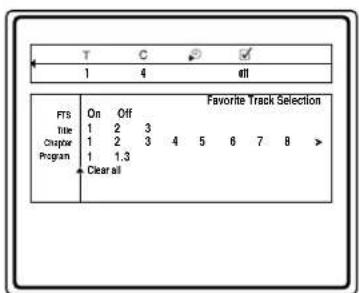
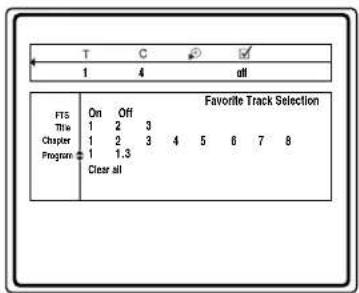
![T C √ 1 4 all FTS On Off Favorite Track Selection Title 1 2 3 Chapter 1 ▶ 2 3 4 5 6 7 8 Program [] Clear all](/content/2026/06/1146317/images/727a4b2b3733c039ec2649f5fc5bf2455db0e75fbf9a58126da0d9130cf52a65.jpg)
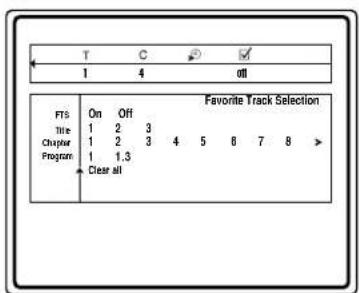
For titles and chapters, selection menus may be included on the disc. The DVD's menu feature allows you to make selections from these menus. Press the appropriate numerical buttons or use the CURSOR UP/DOWN, RIGHT/LEFT buttons to highlight your selection, then press the OK button to confirm.
With the disc playing, press the DVD MENU button to display the Disc menu.
The Title/Chapter/Disc Menu can list various features such as Camera Angles, Spoken Language, Subtitle Options, Chapter lists, or any Bonus Material specific to each disc.
2. Press the DVD MENU button again to resume playback.
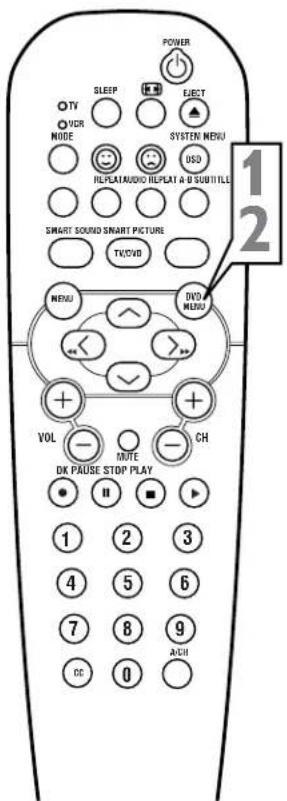


Disc Menus are specific to each disc. The features available are determined by the disc manufacturer. The features could vary widely from disc to disc. Use the CURSOR UP, DOWN, RIGHT, or LEFT to move to any listed feature, then press the OK button to select and activate that feature.
CAMERA ANGLE
If the disc contains sequences recorded from different camera angles, the angle icon appears, showing the number of available angles and the angle being shown currently. You can then change the camera angle. (Not all discs contain this type of information, so this feature may not be available on the disc you are using.)
Press the SYSTEM MENU (OSD) button on the remote control to display the on-screen menu.
2. Press the CURSOR RIGHT button until the Angle Symbol is highlighted.
3. If the disc has different angles, the icon will be selectable. Press the CURSOR UP or DOWN button to select the desired camera angle.
4 Press the SYSTEM MENU (OSD) button to clear the on-screen menu from the TV screen.
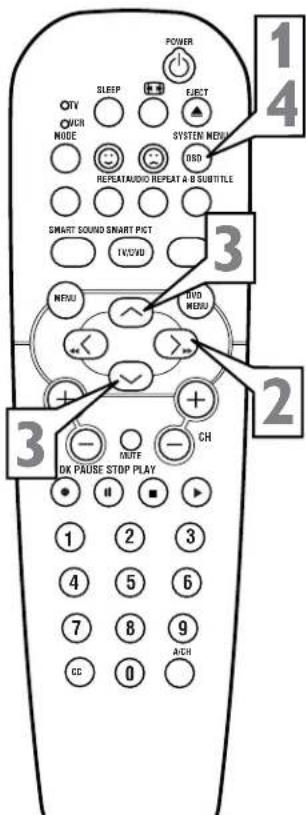
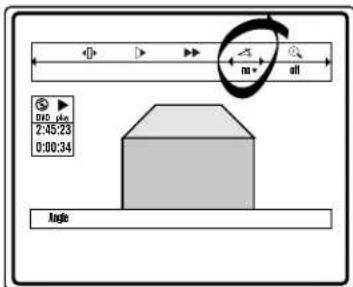
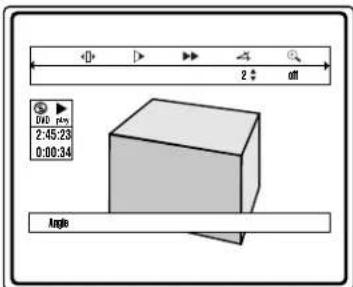
NOTE: The Camera Angle feature may not be available on the DVD or Video CD you are using. If it is not, the X icon will appear on the screen when the ANGLE button is pressed.
AUDIO LANGUAGE
The following steps describe how to change the Audio Language control.
Press the AUDIO button. The on-screen menu will be displayed with the Audio Language icon highlighted. 2 Press the CURSOR UP or DOWN button repeatedly to scroll and select the available language options. 3 Press the SYSTEM MENU (OSD) button to clear the on-screen menu from the TV screen.
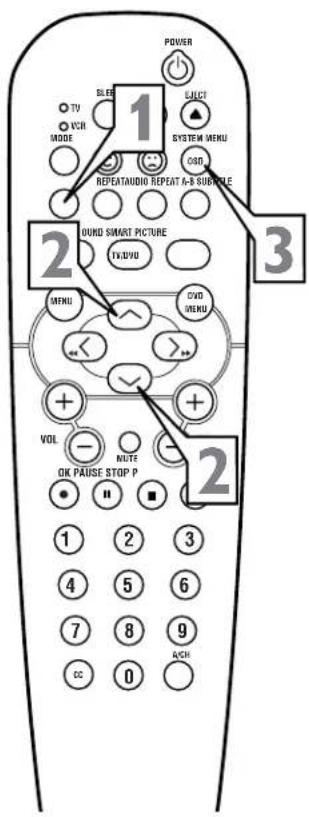

SUBTITLES
The following steps describe how to change the Subtitle Language control.
Press the SUBTITLE button on the remote control to display the on-screen menu bar with the Subtitle icon highlighted. 2 Press the CURSOR UP or DOWN button repeatedly to scroll and select the available Subtitle options. Subtitles will automatically appear at the bottom of the screen. Or, choose OFF. 3 Press the SYSTEM MENU (OSD) button to clear the on-screen menu from the TV screen.

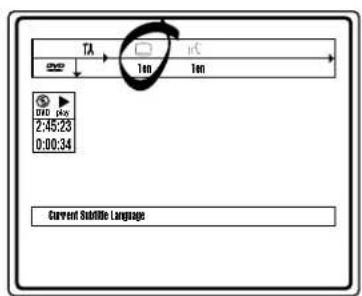
Some Video CDs contain information that allow you to control the playback of the disc through a special playback menu.
Load a Video CD with Playback control and press the PLAY button to start the disc.
Go through the menu with the buttons indicated on the TV screen until your chosen passage starts to play. If a PBC menu consists of a list of titles, you can select a title directly.
Enter your choice with the NUMBERED buttons (0-9).
Press RETURN to go back to the previous menu.
PBC can be set to OFF within the Personal Preference menu.

When an Audio CD is inserted into the DVD Player, playback will start automatically. The AUDIO CD dialogue box will appear on the screen giving information such as current track, time, total tracks, etc. Press the PLAY button to begin playback of an audio disc that has been paused or stopped. 2 Press the STOP button at any time to suspend playback. 3 Press the PAUSE button to temporarily suspend playback. Press again to resume playback. 4 Press the FORWARD or REVERSE buttons to search the disc content in either direction. 5 Press the REPEAT button to repeat the playback of a track or the entire disc. 6 Press the REPEAT A-B button at any point on the disc. Press again at any ending point on the disc. The chosen sequence will be repeated. Press a third time to exit the repeating sequence.
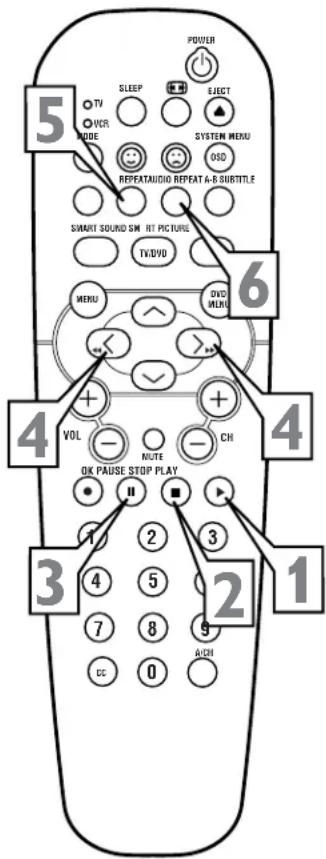

FAVORITE TRACK SELECTION - AUDIO CD
FTS allows you to store your favorite tracks for a particular disc in the TV/DVD Player memory. Each FTS program can contain up to 20 tracks.
Storing an FTS Program:
Load an audio CD and press the STOP button. 2 Press the CURSOR DOWN button to highlight the list of available tracks. 3 Press the CURSOR RIGHT or LEFT button to highlight a specific track. 4 Or, press the NUMBERED buttons (0-9) to go directly to any track. 5 With the track number highlighted, press the OK button to store the track. Repeat for other tracks.
Switching FTS ON or OFF:
6 Within the Audio CD dialogue box, press the CURSOR UP or DOWN button to highlight the ON/OFF area.
7 Press the CURSOR RIGHT or LEFT button to select ON or OFF.
Erasing a Track from an FTS Program:
8 Within the Audio CD dialogue box, press the CURSOR UP or DOWN button to highlight "program".
9 Press the CURSOR RIGHT or LEFT button to select a specific track listed in the FTS Program.
Press the OK button to remove it.
Erasing a Complete FTS Program:
10 Within the Audio CD dialogue box, press the CURSOR DOWN button until "Clear All" is highlighted.
Press the OK button to erase the entire FTS Program.
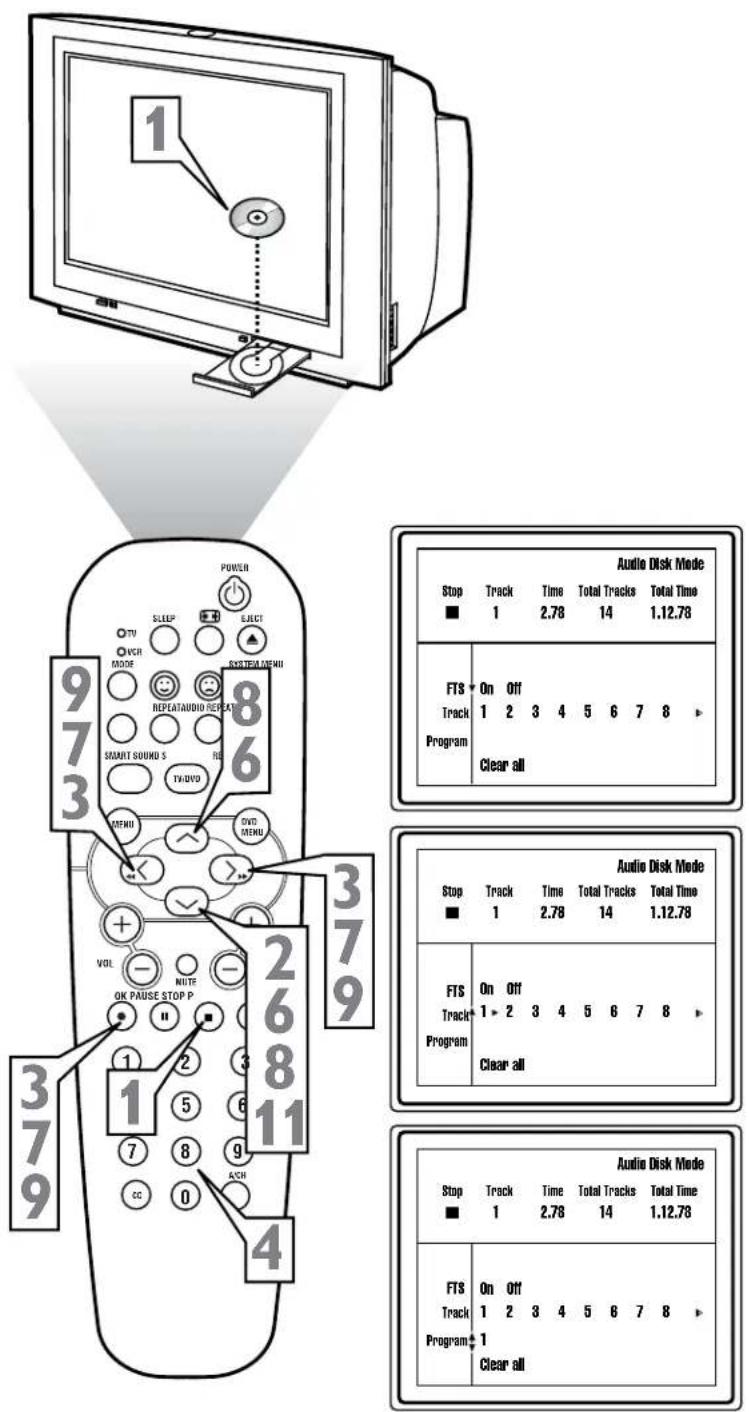
TROUBLESHOOTING

No Power
- Check the TV power cord. Unplug the TV, wait 10 seconds, then reinsert the plug into the outlet and push the POWER button again.
- Check that the outlet is not on a wall switch.
- Be sure the fuse is not blown on the AC power strip, if one is being used.
No Picture
- Check antenna connections. Are they properly secured to the TV's ANT 75Ω plug?
- Check the TUNER MODE control for the correct tuner setting.
- Try running the Auto Program feature to find all available channels.
No Sound
- Check the VOLUME buttons.
- Check the MUTE button on the remote control.
- Check the SPEAKER on-screen control. If it is in the OFF position, sound at the set will be eliminated.
- If you're attempting to hook up auxiliary equipment, check the audio jack connections.
- (If applicable) Check the audio receiver for the correct operating mode.
Remote Does Not Work
- Check the batteries. If necessary, replace them with AA Heavy Duty (Zinc Chloride) or Alkaline batteries.
- Clean the remote control and the remote control sensor window on the TV.
- Check the TV power cord. Unplug the TV, wait 10 seconds, then reinsert the plug into the outlet and push the POWER button again.
- Be sure the fuse is not blown on the AC power strip, if one is being used.
- Check to be sure the TV outlet is not on a wall switch.
TV Displays Wrong Channel or No Channels Above 13
- Repeat channel selection.
- Add the desired channel numbers (using the CHANNEL EDIT control) into the TV's memory.
- Check to be sure the TUNER MODES are set to the CABLE option and run the Auto Program feature to find all available channels.
Cleaning and Care
- To avoid possible shock hazard, be sure the TV is unplugged from the electrical outlet before cleaning.
- When you are cleaning the TV, take care not to scratch or damage the screen surface (avoid wearing jewelry or using anything abrasive). Wipe the front screen with a clean cloth dampened with water. Use even, easy, vertical strokes when cleaning.
- Gently wipe the cabinet surfaces with a clean cloth or sponge dampened in a solution of cool, clear water. Use a clean, dry cloth to dry the wiped surfaces.
- Never use thinners, insecticide sprays, or other chemicals on or near the cabinet, as they might cause permanent marring of the cabinet finish.

CARE AND CLEANING
WARNING Concerning Stationary Images on the TV Screen:
Do not leave stationary or letterbox images on screen for extended periods of time. This can cause uneven picture-tube aging.
Normal use of the TV should involve the showing of pictures that contain constantly moving and changing images that fill the screen. Be careful not to leave nonmoving images on screen for extended periods of time, or to display the same images on screen too frequently, because subtle ghost images can be left on the picture tubes. Sources of stationary images may be DVD disks, laser disks, video games, CD-i disks, videotapes, digital television boxes, broadcast channels, cable channels, satellite channels, and others.
Here are some examples of stationary images (this is not an all-inclusive list; you may encounter others in your viewing):
• DVD menus—listings of DVD disk content - Letterbox black bars—shown at the top and bottom of the TV screen when a wide screen (16:9) movie is viewed on a TV with standard (4:3) aspect ratio. • Video-game images and scoreboards - Television station logos—present a problem if they are bright and stationary; moving or low-contrast graphics are less likely to cause uneven aging of the picture tube • Stock-market tickers—presented at the bottom of the TV screen - Shopping channel logos and pricing displays—bright and shown constantly or repeatedly in the same location on the TV screen.
PLACEMENT OF THE TV
- To avoid cabinet warping, cabinet color changes, and increased chance of set failure, do not place the TV where temperatures can become excessively hot; for example, in direct sunlight or near a heating appliance.
- Be sure to allow a free flow of air to and from the perforated back cover of the set.
CLEANING
- To avoid possible shock hazard, be sure the TV is unplugged from the electrical outlet before cleaning.
- Regularly dust the TV with a dry, nonscratching duster to keep the TV clean.
- When cleaning the TV, take care not to scratch or damage the screen surface. Avoid wearing jewelry or using anything abrasive. Do not use household cleaners. Wipe the front screen with a clean cloth dampened with water. Use even, easy, vertical strokes when cleaning.
- Gently wipe the cabinet surfaces with a clean cloth or sponge dampened in a solution of cool, clear water and a mild soap or detergent. Use a clean, dry cloth to dry the wiped surfaces.
- Occasionally vacuum the ventilation holes or slots in the back cover of the set.
- Never use thinners, insecticide sprays, or other chemicals on or near the cabinet, as they might cause permanent marring of the cabinet finish.

GLOSSARY OF TERMS
Auto Programming • The procedure of adding or deleting channel numbers into the Television's memory circuits. In this way the Television “remembers” only the locally available or desired channel numbers and skips over any unwanted channel numbers.
Closed Caption • Broadcast standard which allows you to read the voice content of television programs on the TV screen. Designed to help the hearing impaired this feature uses on-screen "text boxes" to show dialogue and conversations while the TV program is in progress.
Coaxial Cable • A single solid antenna wire normally matched with a metal plug (F-type) end connector that screws (or pushes) directly onto a 75 Ohm input found on the Television or VCR.
Menu • An on-screen listing of feature controls shown on the Television screen that are made available for user adjustments.
On Screen Displays (OSD) • Refers to the wording or messages generated by the television (or VCR) to help the user with specific feature controls (color adjustment, programming, etc.).
Quadra Surf • The feature that allows the programming of four separate Surf lists holding up to 10 channels each.
Remote Sensor Window • A window or opening found on the Television control panel through which infrared remote control command signals are received.
Side Audio/Video Inputs • Located on the side of the TV these connectors (phono type plug) are used for the input of audio and video signals. Designed for easy use with VCRs or cameras.
Surf • The action of scanning specific channel in a limited channel list.
System Menu (OSD) • Allows the user to quickly confirm what channel number is currently being viewed. Status can also be used to clear the Television of on screen displays or information (rather than waiting for the displays to “time out” or automatically disappear from the screen).
Tuner Mode • Feature control settings made by the TV. Designed for first time set up and use. Settings for signal connections (antenna or cable TV), plus channel program memory are held in the TV's memory (even if the set is unplugged and moved to a new location.)
Twin Lead Wire • The more commonly used name for the two strand 300 Ohm antenna wire used with many indoor and outdoor antenna systems. In many cases this type of antenna wire requires an additional adapter (or balun) in order to connect to the 75 Ohm Input terminals designed into the more recent Televisions and VCRs.

INDEX
Active Control 23
Alternate Channel .....28
AutoLock™
Access Code 16
Block All Control .....19
Block Channels Control 17
Blocking Options 22
Clear All Control 18
Explanation of Auto Lock 15
Movie Rating Control 20
TV Rating Control ....21
AutoPicture™ Control 26
AutoProgram™ Control 9
AutoSound™ Control 27
AVL Control 12
Balance Control 12
Bass Boost Control 12
Brightness Control ....11
Care and Cleaning 49
Channel Edit Control (Add and Delete Channels) .....10
Closed Caption Control 25
Color Control ....11
Color Temperature Control....11
Contents 5
Contrast + Control 11
DVD Player Operation
Access Code Settings 36
Audio CD Playing 47-48
Audio Language 46
Authorizing/Deauthorizing Discs .....37
Basic Operation 30
Camera Angle 45
Enlarge Picture (Zoom) 42
Erasing a Favorite Track Selection .....44
Favorite Track Selection - Video .....43
Features Settings 35
Language settings 34
Menu Bar Operation ....31
Moving to Another Chapter or Index ....39
Moving to Another Title or Track ....39
Picture Settings 32
Playing a Disc - DVD or Video CD .....38
Repeat/Repeat A-B 41
Search Forward or Reverse .....40
Sound Settings ....33
Still Picture/Picture by Picture Playback ....40
Subtitles 46
Time Search 42
Title/Chapter/Disc Menus .....45
Video CD - Playback control (PBC) .....47
Dynamic Noise Reduction (DNR) Control .....11
Factory Service Information....51
Format Control 14
Glossary of Terms ....50
Index 50
Language Control 7
Picture Controls ....11
Remote Control Buttons 6
Safety Instructions ....3
Sharpness Control....11
Sleeptimer Control 24
Surf/Quadra Surf Controls .....28-29
Timer Controls ....13
Tint Control 11
Treble Boost Control 12
Troubleshooting Tips 49
Tuner Mode Control 8
Warranty 52
Welcome/Registration Information 2
FACTORY SERVICE LOCATIONS

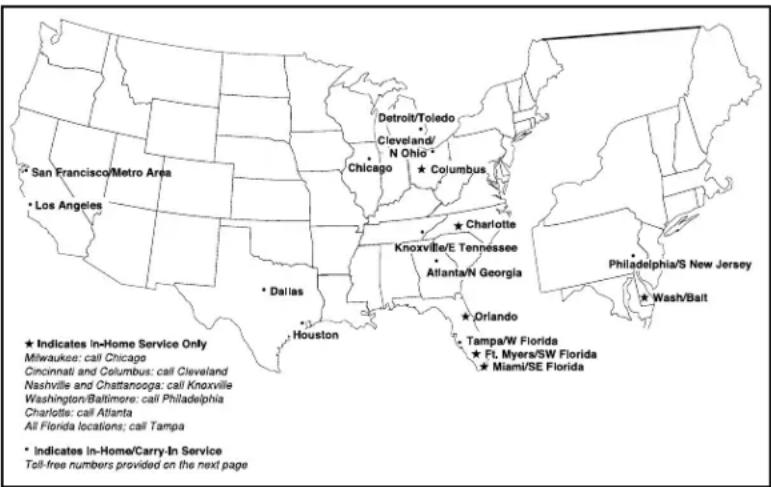
NOTE: If you reside in one of our Philips Factory Service Branch areas, you can contact the nearest Service Branch to obtain efficient and expedient repair for your product. If your product is In-Warranty, you should have proof-of-purchase to ensure No Charge Service. For Out-of-Warranty service, call the location nearest you.
How you can obtain efficient and expedient carry-in, mail-in, or in-home service for your product
Please contact Philips at 1-800-661-6162 (French speaking)
1-800-531-0039 (English or Spanish speaking)
In Canada
Philips Factory Service
550 Franklin Road., Suite F
Marietta, GA 30067
800-273-1501
TAMPA
Philips Factory Service
1911 US Highway 301 North, Suite 100
Tampa, FL 33619
800-442-2027
SAN FRANCISCO
Philips Factory Service
681 East Brokaw Rd.
San Jose, CA 95112
800-300-9013
HOUSTON
Philips Factory Service
1110 N. Post Oak Rd., Suite 100
Houston, TX 77055
800-952-3254
CLEVELAND
Philips Factory Service
950 Keynote Circle
Brooklyn Heights, OH 44131
800-331-7037
DETROIT
Philips Factory Service
25173 Dequindre
Madison Heights, MI 48071
800-438-1398
DALLAS
Philips Factory Service
415 N. Main Street, #107
Euless, TX 76040
800-952-3254
LOS ANGELES
Philips Factory Service
20930 Bonita, Ste. V
Carson, CA 90746
800-300-9013
CHICAGO
Philips Factory Service
1279 W. Hamilton Pkwy.
Itasca, IL 60143
800-531-2922
KNOXVILLE
Philips Factory Service
One Philips Drive
Knoxville, TN 37914
800-821-1767
PHILADELPHIA
Philips Factory Service
352 Dunks Ferry Rd.
Bensalem, PA 19020
800-847-9320
COLOR TELEVISION
90 Days Free Labor
One Year Free Replacement of Parts (Two Years Free Replacement on Color Picture Tube)
This product can be repaired in home.
WHO IS COVERED?
You must have proof of purchase to receive warranty service. A sales receipt or other document showing that you purchased the product is considered proof of purchase.
WHAT IS COVERED?
Warranty coverage begins the day you buy your product. For 90 days thereafter, all parts will be repaired or replaced free, and labor is free. From 90 days to one year from the day of purchase, all parts will be repaired or replaced free, but you pay for all labor charges. From one to two years from the day of purchase, you pay for the replacement or repair of all parts except the picture tube, and for all labor charges. After two years from the day of purchase, you pay for the replacement or repair of all parts, and for all labor charges.
All parts, including repaired and replaced parts, are covered only for the original warranty period. When the warranty on the product expires, the warranty on all replaced and repaired parts also expires.
WHAT IS EXCLUDED?
Your warranty does not cover:
- labor charges for installation or setup of the product, adjustment of customer controls on the product, and installation or repair of antenna systems outside of the product.
- product repair and/or part replacement because of misuse, accident, unauthorized repair or other cause not within the control of Philips Consumer Electronics Company.
- reception problems caused by signal conditions or cable or antenna systems outside the unit.
- a product that requires modification or adaptation to enable it to operate in any country other than the country for which it was designed, manufactured, approved and/or authorized, or repair of products damaged by these modifications.
- incidental or consequential damages resulting from the product. (Some states do not allow the exclusion of incidental or consequential damages, so the above exclusion may not apply to you. This includes, but is not limited to, prerecorded material, whether copyrighted or not copyrighted.)
- a product used for commercial or institutional purposes.
WHERE IS SERVICE AVAILABLE?
Warranty service is available in all countries where the product is officially distributed by Philips Consumer Electronics Company. In countries where Philips Consumer Electronics Company does not distribute the product, the local Philips service organization will attempt to provide service (although there may be a delay if the appropriate spare parts and technical manual(s) are not readily available).
MAKE SURE YOU KEEP...
Please keep your sales receipt or other document showing proof of purchase. Attach it to this owner's manual and keep both nearby. Also keep the original box and packing material in case you need to return your product.
BEFORE REQUESTING SERVICE...
Please check your owner's manual before requesting service. Adjustments of the controls discussed there may save you a service call.
TO GET WARRANTY SERVICE IN U.S.A., PUERTO RICO OR U.S. VIRGIN ISLANDS...
Contact a Philips factory service center (see enclosed list) or authorized service center to arrange repair.
(In U.S.A., Puerto Rico and U.S. Virgin Islands, all implied warranties, including implied warranties of merchantability and fitness for a particular purpose, are limited in duration to the duration of this express warranty. But, because some states do not allow limitations on how long an implied warranty may last, this limitation may not apply to you.)
TO GET WARRANTY SERVICE IN CANADA...
Please contact Philips at:
I-800-661-6162 if calling from Canada (French speaking)
I-800-531-0039 (English or Spanish speaking)
(In Canada, this warranty is given in lieu of all other warranties. No other warranties are expressed or implied, including any implied warranties of merchantability or fitness for a particular purpose. Philips is not liable under any circumstances for any direct, indirect, special, incidental or consequential damages, howsoever incurred, even if notified of the possibility of such damages.)
REMEMBER...
Please record the model and serial numbers found on the product below. Also, please fill out and mail your warranty registration card promptly. It will be easier for us to notify you if necessary.
MODEL #
SERIAL #
This warranty gives you specific legal rights. You may have other rights which vary from state/province to state/province.
Philips, P.O. Box 520890, Miami, FL 33152, (402) 536-4171