
PT-1143-IR10 - Touchscreen SONY - Free user manual and instructions
Find the device manual for free PT-1143-IR10 SONY in PDF.


| Product Type | Touch Overlay (Interactive Display Overlay) |
| Brand | Sony |
| Model | PT-1143-IR10 |
| Compatible Monitor | Sony FWL-55W805C / FW-55X8570C |
| Screen Size (Diagonal) | 55 inches |
| Outer Dimensions (Touch Frame) | 1295 x 768 mm |
| Thickness (Without Back Cover) | 78 mm |
| Thickness (With Back Cover) | 110 mm |
| Glass Thickness | 6 mm |
| Weight (55" Overlay) | 20 kg |
| Interface | USB 2.0 (HID compliant) |
| Power Supply | Bus-powered via USB (no external power required) |
| Touch Technology | Infrared (IR) |
| Touch Points | Single touch (Windows XP/2000/Vista); Multi-touch (Windows 7/8/10, Linux kernel 3.5+) |
| Supported Gestures | Multi-touch gestures on Windows 7/8/10 |
| Operating Systems | Windows XP/Vista/7/8/10, Linux, Mac OSX, Android (with kernel patches) |
| Calibration | Via Windows Tablet PC Settings or Touch Service software |
| Installation Method | Mounting brackets (included) – two-person recommended |
| Included Accessories | Touch overlay, 3 brackets, 13 Phillips screws |
| Cleaning Instructions | Lint-free cloth with household glass cleaner; do not spray directly on screen |
| Safety Notes | Ensure monitor stand is stable for combined weight; use two people for installation |
| Product Material | Metal frame with glass |
Frequently Asked Questions - PT-1143-IR10 SONY
User questions about PT-1143-IR10 SONY
0 question about this device. Answer the ones you know or ask your own.
Ask a new question about this device
Download the instructions for your Touchscreen in PDF format for free! Find your manual PT-1143-IR10 - SONY and take your electronic device back in hand. On this page are published all the documents necessary for the use of your device. PT-1143-IR10 by SONY.
USER MANUAL PT-1143-IR10 SONY
1 x Touch overlay
3 x Brackets
13 x Phillips screws

natural_image
Black-framed rectangular frame with white space, no text or symbols visibleTable of Contents
Introduction 2
Capabilities 3
Unpacking the Unit 4
Installation Instructions 5 - 6
USB Installation 7
Operating the Touch Screen 8
Cleaning the Touch Screen 9
Troubleshooting 9 -11
Specifications 12
Terminology
Monitor: refers to the Sony FWL-55W805C / FW-55X8570C LCD screen.
Sometimes referred to as "display screen."
Touch overlay: refers to the PresTop overlay that fits onto the monitor and provides the touch functionality.
Touch screen: refers to the combined unit—the monitor and the touch overlay.
Introduction
Congratulations on your purchase of a PresTop PT Touch Overlay. This product turns a Sony FWL-55W805C / FW-55X8570C large-format display, into an interactive display. You can control a computer application simply by touching the screen.
The PT Touch Overlay can be connected to the computer via USB cable, thus providing maximum versatility. The USB is HID compliant, providing true plug-and-play operation, just like a USB mouse.
The standard PT Touch Overlay is powered via the USB interface from the computer and hence does not require a separate power supply.
The main steps to install the PT Touch Overlay are as follows:
- Unpack the PT Touch Overlay.
- Unpack the screen.
- Fit the touch overlay to the display screen.
- Connect all the cables.
Touch service Software Suite
For USB communications, you do not need to install any software. However, an optional USB Configuration program that allows you to change various default settings is available in the Touch service software suite.
Touch service software can be downloaded from http://prestopproducts.com/support/.
Once installed, this program is available from the Start / Programs / Touchservice.
Capabilities
The following table shows the touch functionality provided by a PresTop PT touch overlay with different operating systems.
| XP/2000/Vista | Windows 7 | Windows 81) | Windows 101) | Linux | Mac OSX | Android | ||
| StarterHomeBasic | HomePremiumProfessional | |||||||
| Single touch | Yes | Yes | Yes | Yes | Yes | Yes | Yes | Yes4) |
| multi-touch | No | No | Yes | Yes | Yes | Yes2) | No3) | Yes4) |
1) Windows must be non OEM version.
2) Kernal 3.0+, csn support multitouch by adding patch.
Kernal 3.5+, HID compliance support multitouch.
3) Gesture support on request.
4) Kernal 2.6.32+, we can provide patch
Kernal 3.5+, HID compliance support Multi-touch
Multi-Touch and Gestures on Windows 7, 8, 10
The latest operating systems from Microsoft and other vendors support multi-touch features such as two-touch gestures. The PresTop PT touch overlay is multi-touch capable and supports gestures.
Unpacking the Unit
Unpack the unit, taking care not to damage the surfaces. Check the product for any signs of damage in transit.
Installation Requirements
Once you have unpacked the unit, make sure you have the following:
- The display monitor that you are going to mount the touch overlay onto.
- The computer that runs your software application, including the cable that connects the computer to the display screen.
Safety Notes
- The touch overlay contains glass that can add significant weight, especially for large-format displays. It is essential that the monitor's stand is strong and stable enough to support the combined weight of the touch overlay and monitor.
- For a large screen, you need two people to install the touch overlay safely.
Parts of the Touch Overlay
The PresTop PT Touch Overlay consists of metal frame, in this frame is the touch and glass.
The overlay is secured with brackets on the monitor, which are screwed in the frame.

natural_image
Front view of a black-framed rectangular projector with a white screen and cable at the bottom (no text or symbols visible)PRESTOP
TRADING
YOUR INTERACTIVE EXPERIENCE
Installation Instructions
Depending on the size the installation normally requires two people.
Preparation
- After unpacking and checking for any damage, place the touch overlay face down on a clean, soft surface, such as a clean carpet.
- Make sure the back surface of the glass is clean. (See for instructions page 9).
- Unpack the monitor.
- Make sure that the monitor is clean.
Installing on the monitor
- Unpack the touch overlay and place this, face down, on a flat and clean soft surface.

natural_image
Empty rectangular frame with light blue border and corner cutouts (no text or symbols)-
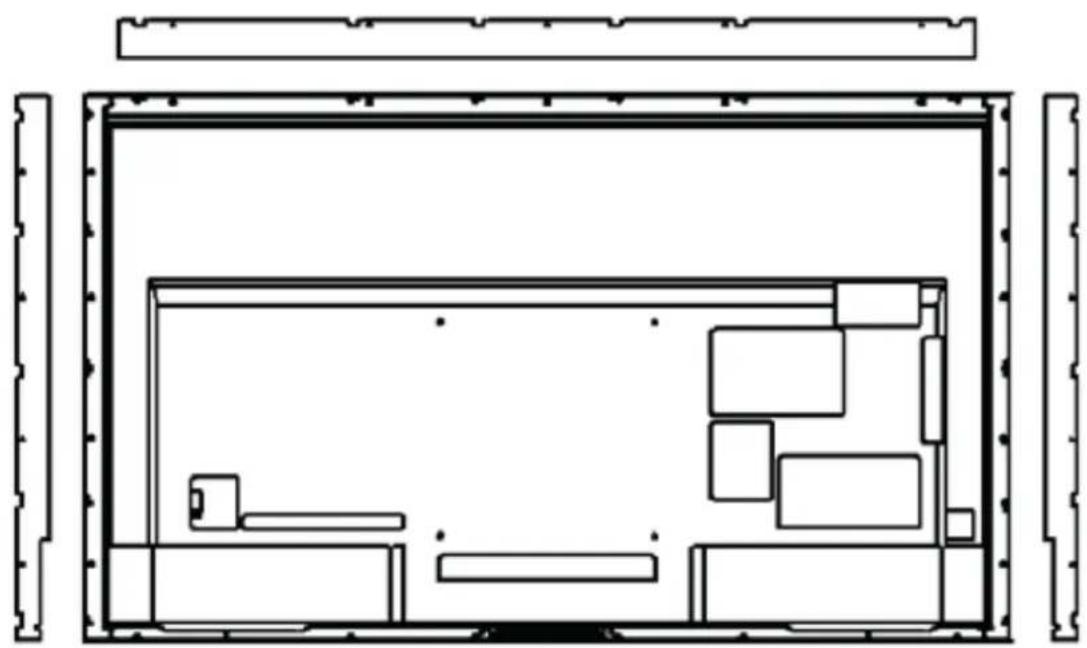
Remove the indicated Philips screws, so the three brackets will come loose, and take these brackets of the overlay.
-
Place the monitor gently in the touch overlay with 2 persons.
-
Attach the brackets that hold the monitor in place to the touch overlay with the Philips screws.
natural_image
Architectural floor plan showing room layout with furniture placement (no text or labels)Connecting Cables and Switching On
Connect the cables and switch on power in the following order:
-
Connect the video cable from the computer to the monitor.
-
Connect power to the monitor and switch on.
-
Connect power to the computer and switch on.
USB Installation
USB installations require no special software; the touch overlay communicates directly with the computer's operating system via the USB interface, just like a USB mouse.
Connect the USB cable from the touch overlay to the computer.
Once the cable is connected, the computer automatically detects the USB device (the touch overlay). This takes a few seconds.

(Note: the computer only displays the above message the first time you plug in the USB cable. The next time you plug in the cable, the computer will be already configured for the device.)
For USB communications, you do not need to install any software. However, an optional USB Configuration program is available that allows you to change the default operating parameters if required.
USB Calibration
- Click Start and then Control Panel, and next Hardware and Sound.
- Under Tablet PC Settings, tap Calibrate.
- Follow the on-screen instruction to calibrate your touch screen.
There is also a calibration option in the touch service software.
Calibration notes
- When removing your finger, lift it straight off the screen, making sure you don't drag it across the screen.
- You can exit calibration mode by pressing the calibrate button again or by pressing the [Scroll Lock] key twice.
- Test the calibration by moving the mouse pointer around the screen checking that it closely follows your finger. If the calibration is not satisfactory, you can re-calibrate.
Operating the Touch Screen
Mouse actions
PresTop PT Touch Overlay provides full mouse functionality—click, drag, double-click and right-click.
- Single click is performed by tapping you finger once on the screen.
- Double click is performed by tapping your finger twice on the screen in quick succession.
- Drag is performed by touching and moving your finger across the screen without lifting off.
- Right click is performed by touching and holding your finger in one position for a short time.
Operating notes
The touch screen does not require pressure to sense a touch.
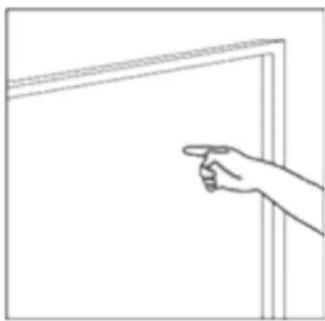
For best results, point at roughly right angles to the screen and keep the rest of your hand clear of the glass.
When removing your finger, lift it straight off the screen, making sure you don't drag it across the screen.
natural_image
Line drawing of a hand pointing at a blank whiteboard (no text or symbols)PRESTOP
TRADING
YOUR INTERACTIVE EXPERIENCE
Cleaning the Touch Screen
To clean the touch screen, use a lint-free, soft cloth dampened with standard, household glass cleaning solution as follows:
- Spray a small amount of glass cleaner onto the cloth.
- Wipe the glass of the touch screen to remove any dirt, dust, or finger marks.
- Wipe the clear surfaces around the edges of the screen.
- Remove any residual glass cleaner with a dry, soft, lint-free cloth.
WARNING:
Do not spray the cleaner directly onto the touch screen as this could leave residue on the infrared surfaces.
Do not use an abrasive cleaner or rough cloth as this could damage the infrared.
Troubleshooting
This section provides some solutions to possible problems that might occur with the touch screen.
If the problem persists, contact your PresTop product support provider for further advice.
Touch screen does not respond to touches
Make sure the communications cable (USB) is connected to the computer.
Make sure the touch screen is connected to a USB port that provides enough power for it (some peripherals, such as keyboards, include USB ports that do not provide sufficient power for certain devices). Try connecting the touch screen to a different USB port on the computer.
Cursor does not accurately follow your finger
This can occur if the touch overlay has not been calibrated correctly. To fix the problem, re-calibrate the touch overlay—see the relevant sections on calibration in this manual.
Unable to calibrate the touch overlay
If you have a problem with calibrating the touch overlay, contact your PresTop support provider for assistance.
The cursor moves erratically
Make sure there is nothing blocking the optics of the touch screen.
Clean the glass and edges of the screen. For instructions, see Cleaning the Touch Screen on page 7.
"USB not recognized" message appears on screen
To remedy, unplug the USB cable, then plug in the USB cable again. If this does not fix the problem, you may need to uninstall and reinstall the USB device. See the next section.
Some types of USB extenders and/or USB (booster) extension cables can course problems.
Connect the overlay without any extensions to the pc.
Sun and/or spot-light can affect the working of the touch.
Shield the screen from the sun and/or spot-light.
Uninstalling and Reinstalling the USB Device
1. From the Start menu on Win 7, select:
Settings / Control Panel / System / Device Manager/Universal Serial Bus Controllers

- Right click on [USB Composite Device] and choose [Properties].

-
On the Properties screen, verify that the location refers to the touch screen.
-
Close the Properties screen.
-
With USB Composite Device selected in the Device Manager list, press [Delete] on your keyboard.
The computer displays the following dialog.
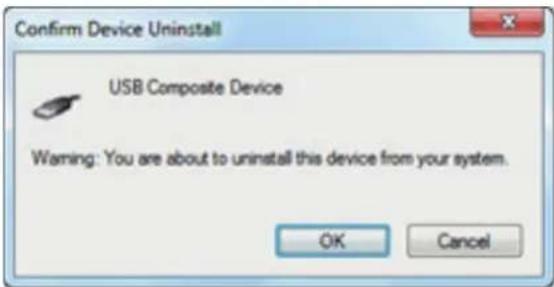
- Click [OK] to confirm.
This will remove the touch screen from the Hardware Device list. To reinstall the USB device, follow the instructions given in "USB Installation" on page 7.
PRESTOP
TRADING
YOUR INTERACTIVE EXPERIENCE
Specifications:
Weight screen:
55" IR overlay:
Thickness glass:
Outside sizes touch frame: 1295 x 768 mm
Thickness screen incl. IR touch frame: 78 mm
Thickness screen incl. IR touch frame
and back cover: 110 mm
20 kg
22kg
6 mm
natural_image
Close-up of a dark, glossy black panel corner with a small rectangular cutout (no text or symbols visible)Address: De Dintel 29-35
5684 PS Best
The Netherlands
Tel: +31(0)499 367 606
Fax: +31(0)499 367 003
sales@prestop.nl
www.prestopproducts.com
- Table of Contents
- Terminology
- Introduction
- Touch service Software Suite
- Capabilities
- Multi-Touch and Gestures on Windows 7, 8, 10
- Unpacking the Unit
- Installation Requirements
- Safety Notes
- Parts of the Touch Overlay
- Installation Instructions
- Preparation
- Installing on the monitor
- Connecting Cables and Switching On
- USB Installation
- USB Calibration
- Calibration notes
- Operating the Touch Screen
- Mouse actions
- Operating notes
- Cleaning the Touch Screen
- WARNING:
- Troubleshooting
- Touch screen does not respond to touches
- Cursor does not accurately follow your finger
- Unable to calibrate the touch overlay
- The cursor moves erratically
- "USB not recognized" message appears on screen
- Some types of USB extenders and/or USB (booster) extension cables can course problems.
- Sun and/or spot-light can affect the working of the touch.
- Uninstalling and Reinstalling the USB Device
- From the Start menu on Win 7, select:
- Specifications:
Brand : SONY
Model : PT-1143-IR10
Category : Touchscreen