W240 - Wristwatch Lorus - Free user manual and instructions
Find the device manual for free W240 Lorus in PDF.


| Brand | Lorus |
| Model | W240 |
| Product Type | Analog Quartz Watch |
| Movement | Japanese Quartz |
| Case Diameter | Approx. 40 mm |
| Case Thickness | Approx. 10 mm |
| Weight | Approx. 50 g |
| Case Material | Stainless Steel or Alloy |
| Band Material | Stainless Steel or Leather |
| Band Width | 20 mm |
| Clasp Type | Fold-over Buckle or Pin Buckle |
| Crystal | Mineral Glass |
| Water Resistance | 3 ATM (Splash Resistant) |
| Power Source | Battery (SR626SW or equivalent) |
| Battery Life | Approx. 2-3 years |
| Functions | Time, Date Display |
| Date Window | At 3 o'clock position |
| Accuracy | ±20 seconds per month |
| Care and Cleaning | Wipe with a soft, dry cloth. Avoid chemicals. |
| Safety | Keep away from magnets and extreme temperatures. |
| Spare Parts | Batteries, straps, and crystals available through service centers. |
| Repairability | Battery replacement by professional recommended. |
| General Information | Lorus is a subsidiary of Seiko, known for reliable and affordable watches. |
Frequently Asked Questions - W240 Lorus
User questions about W240 Lorus
0 question about this device. Answer the ones you know or ask your own.
Ask a new question about this device
Download the instructions for your Wristwatch in PDF format for free! Find your manual W240 - Lorus and take your electronic device back in hand. On this page are published all the documents necessary for the use of your device. W240 by Lorus.
USER MANUAL W240 Lorus
• Hour, minutes, seconds, month, date and day
of the week
• Fully automatic calendar: Calendar ad-
justs automatically for odd and even months
including February of leap years from the year 1954 up to the end of 2017.
*Time indication: Changes over between 12
and 24-hour indications is possible
- Stopwatch: Measures up to 10 hours with
1/100-second readout.
-8 lap memory: Up to 8 lso times can be
stored in memory
- Stroke function:
• The stroke per minute, for example pulse
rate, can be calculated and displayed.
- Countdown timer:
- Preset timer: Nine different lengths of time
(3, 5, 10, 15, 20, 30, 35, 40 and 45 minutes)
have been preset for the timer.
-Adjustable timer: Up to 9 hours and 58
minutes can be set in minutes.
*Auto repeat function: After the set time is
up, the times counts down the set time again
as many times as necessary.
- Daily alarm: The alarm can be set to ring on
a 24 hour basis. At a designated time, the dis
play is illuminated as the alarm rings.
• Hourly time signal: can be set to ring
every hour on the hour with a single been.
- Illuminating light: The light evenly illumi
nates the display in the dark,
■ BUTTONS AND DISPLAYS
[Cal. W240]

[Cal. W620]

The selection of the display can be made in the following order with each depression of button "A".

If the stopwatch is not reset to "00" and button "A" is depressed to change the mode from the stopwatch, the timer display will appear, skipping the stroke display.
* When the display is changed by depressing button, "A", a confirmation sound beeps.
* A flashing display mark indicates that the corresponding function is in use.
■ HOW TO SET THE TIME/CALENDAR

-
Depress button "A" to show the time/calendar display.
-
Depress button "II" for 2 in 3 seconds to show the time/calendar setting display. The second digits start flashing.
-
Selection of the digits to be adjusted (flashing)
is made in the
g order by depressing
Seconds Minutes Date
· Hour ·
12- or 24-hour
Year
indication
-
Depress button "D" to set the flashing digits. One digit is advanced with each depression of button "D". Digits except seconds move quickly by keeping button "D" depressed.
-
After all the adjustments are completed, depress human "B" to return to the time/calendar display.
Seconds setting
Depress button "D" in accordance with a time signal. The seconds are reset to "00" and start immediately.
When the seconds count any number from "30" to "59" and button "D" is depressed, one minute is added and the seconds are reset to "80".
(1) 2014年
-
When setting the hour digits in the 12-hour indication, check that "A"(AM)/"P"(PM) mark is properly set. In the 24-hour indication, there is no indication.
-
Once the year, month and date have been set,
the day of the week is set automatically.
- If the watch is left untouched in the time/calendar setting display with the digits flashing, it will automatically return to the time/calendar display in 2 to 3 minutes.
■ HOW TO USE THE STOPWATCH
- The stopwatch can measure up to 9 hours, 59 minutes, 59 seconds and 99 in 1/100 seconds. * Even if the stopwatch display is changed to another while the measurement is in progress, it continues counting properly. After the stopwatch is used, however, be sure to reset it as the battery energy is consumed enormously to shoot out the battery life. * While the stopwatch is measuring, the graphic display turns on and off repeatedly

Stopwatch operation
Depress button "A" to show the stopwatch display.
Accumulated elapsed time measurement

flowchart
graph TD
    A["Start"] --> B["Stop"]
    B --> C["Restart"]
    C --> D["Reset"]
    D --> E["Stop"]
** Accumulate repeatedly by depressing button
Lap time measurement
- "Lap time" refers to an elapsed time required to cover a given section of the whole distance.

flowchart
graph TD
    A["Start"] --> B["Lap 1"]
    B --> C["Lap 2"]
    C --> D["Reset"]
    D --> E["Stop"]
* Lap time measured and lap number remain displayed for 10 seconds, and then the measurement in progress and the current time appear.
* After the measurement is stopped by depressing button "C", the current time and total time will be displayed in the upper and lower rows, respectively, in 10 seconds.
Can repeat by depressing button "D".
Notes: 1. The lap number counts up to "99". After "99", the number is displayed in two digits such as "00" for 100, "01" for 101, and so on.
- Up to 8 lap times can be stored in memory. If more than 8 lap times are measured, the measurements over 8 will not be stored in memory.
Memory function
- Up to 8 lap times are automatically stored in memory, and they can be recalled either during or after the measurement.

[Memory recall after measurement]
-
Depress button "B" to show the memory recall display. The oldest measurement stored in memory is displayed.
-
With each depression of button "D", the stored data are recalled successively from the oldest to the newest.
[Memory recall during measurement]
-
Depress button "B" in show the memory recall display. The newest measurement stored in memory is displayed.
-
With each depression of button "D", the stored data are recalled successively from the oldest to the newest.
Note: Even if the digits are reset to "00" in the shipwatch measurement, stored data is not erased and can be recalled unless a new measurement is started.
■ HOW TO USE THE STROKE FUNCTION
- The stroke per minute, for example pulse rate, is automatically calculated by measuring the time required to make three strokes.
• The time required to make each stroke is measured
• The measurable number of strokes per minute is between 18 and 240.
Note: The stroke and stopwatch functions cannot be used simultaneously.

Stroke display mark
Stroke measurement
-
Depress button "A" to show the stroke display.
-
Depress button "C" to start the measurement.
- When the third stroke is made, depress button "C" to stop the measurement. The number of strokes per minute will be displayed.


Notes:
- The measurable number of strokes per minute is between 18 and 240. If the measurement is stopped within 0.75 seconds after it is started by depressing button "C", "—" is displayed if the measurement is not stopped after more than 10 seconds have elapsed, "Err" will automatically appear.
When the measure-ment is stopped within 0.75 seconds [When the measure-ment exceeds more than 10 seconds]
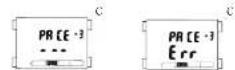
- Even if ^ □ □ ^ or “Err” is shown on the display, the measurement can be started by depressing button “C”.
■ HOW TO USE THE TIMER
- Two types of timers (adjustable timer and preset timer) are available.
- After the set time is up, the timer counts down the set time repeatedly. After the timer is used, therefore, be sure to reset it as the battery energy is consumed enormously to shorten the battery life.
1. How to Use the Preset Timer
- Nine different lengths of time (3, 5, 10, 15, 20, 30, 35, 40 and 45 minutes) have been preset for the timer.

Selection of the preset time
- Depress button "A" to show the timer display.
- Depress button "D" to select the desired preset time. Selection of the preset time is made in the following order by depressing button "D". 3 min. 5 min. 10 min. 15 min. 20 min.
i
* The preset time does not include 25 minutes. To set 25 minutes for the timer, use the adjustable timer.
Preset timer operation
Depress buttons in the following order

A warning sound beeps for 5 seconds when the set time is up. To stop it manually, depress button "A", "B", "C", "D" or "E".
Notes: 1. After the countdown is repeated 99 times, the number of times the countdown is repeated is displayed in two digits such as "06" for 100, "01" for 101, and so on.
- Once the timer is set, the set time is retained and can be used repeatedly unless it is readjusted.
2. How to Use the Adjustable Timer
- The adjustable timer can be set for up to 9 hours and 59 minutes in minutes.
Adjustable timer setting
-
Depress button "A" to show the timer display.
-
Depress button "B" for 2 to 3 seconds to show the adjustable timer setting display. The minute digits start flashing. * To facilitate the adjustable timer setting procedure, depress hurtan "D" to select a preset time closest to the time you wish to set, and then, depress hurtan "B" to show the adjustable timer setting display.
-
Selection of the digits to be adjusted (flashing) is made in the following order by depressing button "C".
$$ \begin{array}{c}\text {Minutes} \rightarrow \text {Hour}\\uparrow\end{array} $$
-
Depress button "D" to set the digits. One digit is advanced with each depression of the button. The digits move quickly by keeping the button depressed.
-
After all the adjustments are completed, depress button "B" to return to the timer display. The time you have set remains displayed.
* If button "D" is depressed while the time you have set is displayed, the set time will be canceled and the preset time 3 minutes will be shown.
Note: If the watch is left untouched in the adjustable timer setting display with the digits flashing, it will automatically return to the timer display in 2 to 3 minutes.
Adjustable timer operation
Refer to "Preset liner operation" above.
■ HOW TO SET THE ALARM
- The alarm can be set to ring on a 24-hour basis. At the designated time, the display is illuminated as the alarm rings.
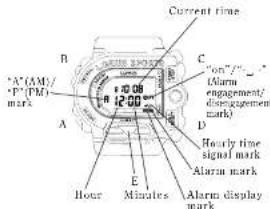
- Depress button "A" to show the alarm display.
-
Depress button "B" for 2 to 3 seconds to show the alarm setting display. The alarm mark and "on"/- " mark disappear and the hour digits (and "A"/- " mark if the time is set in the 12-hour indication) start flashing.
-
Depress button "C" to select the digits to be adjusted (flashing).
$$ \begin{array}{c}\text { Hour } \rightarrow \text { Minutes }\\hline\end{array} $$
-
Depress button "D" to set the digits. One digit is advanced with each depression of the button. The digits move quickly by keeping the button depressed.
-
After all the adjustments are completed, depress button "B" to return to the alarm display. The alarm mark and "un" mark are automatically displayed.
Notes: 1. When the time function is displayed in the 24-hour indication, the alarm is also displayed in the 24-hour indication.
-
When setting the hour digits in the 12-hour indication, check that "A"(AM)/"P"(PM) mark is properly set. In the 24-hour indication, there is no indication.
-
If the watch is left untouched in the alarm setting display with the digits flashing, it will automatically return to the alarm display in 2 to 3 minutes.
Engagement/disengagement of the alarm
- With each depression of button "C" in the alarm display, the alarm is engaged and disengaged alternately.
| Alarm engaged | |
| Alarm disengaged |
- At the designated time, the alarm rings and the display is illuminated alternately for 20 seconds and stop. To stop it manually, depress button "A", "B", "C", "D" or "E".
Turning on/off of the hourly time signal and confirmation sound; and alarm test
- With each depression of button "C" in the time/calendar display, the hourly time signal and confirmation sound for the button operation are turned on and off alternately.
| Hourly time signal and confirmation sound turned on | |
| Hourly time signal and confirmation sound turned off |
- The alarm can be tested by keeping buttons "C" and "D" depressed in the time/calendar display. * After the alarm sound is tested, he sure to check turning on/off of the hourly time signal and confirmation sound, as they are turned on and off alternately by depressing button "C".
■ NOTE ON UNUSUAL DISPLAY
While in the time/calendar setting display, the display as shown below will appear if both buttons "C" and "D" are depressed at the same time. This is not a malfunction. Depress button "A", "B", "C", "D" or "E" to return to the time/calendar display, and then set the time/calendar again.

[All the segments lighting up]
■ LUMIBRITE WATCH
(dial, hands, buttons, case, bezel, strap, etc.)
LORUS LUMIBRITE
☆ If your watch is a LORUS LUMIBRITE watch, it has following features.
LORUS LUMIBRITE watches absorb and store light energy from natural and artificial light sources and emit light in the dark. They are made of environmentally friendly material, and therefore, are harmless to human beings and the environment.
- With a full charge, LORUS LUMIBRITE watches glow in the dark hours longer than conventional luminous watches of this type. If exposed to a light of more than 500 lux (e.g., the brightness of a typical office) for approximately 10 minutes, or direct sunlight for 2 minutes, they will glow for hours.
- Since LORUS LUMIRRITE watches emit the light they slure, the brightness will decrease gradually over time. The length of time they will glow may also differ slightly depending on such factors as the brightness of and distance from the light source used to charge the watch.
■ LORUS LITE
LORUS LITE
When button "E" is depressed and released in the time/calendar, stopwatch, stroke, timer or alarm display, the electroluminescent light evenly illuminates the display for 3 seconds for easy viewing in the dark.

Notes:
-
LORUS LITE watches work with one battery. When the electroluminescent light begins to lose its luminance, this is an indication that the battery is depleted. We recommend that you change the battery before the watch itself stops.
-
If the electroluminescent light is used continuously for a long time, the battery life may be less than the specified period.
■ BATTERY CHANGE
The miniature lithium battery Matsushita CR1620 (for Cal. W240)/SEIKO CR2023, SONY CR2026 or Matsushita CR2027, (for Cal. W620), which powers your watch should last approximately 2 years. However, because it is inserted at the factory, the actual life of the battery once in your possession may be less than 2 years. He sure to replace the battery to prevent any possible malfunction as soon as it runs down. To replace the battery, we recommend taking the watch to a local watch repair shop.
- If the stopwatch and timer are used simultaneously for more than 16 hours a day, a alarm for more than 20 hours a day, a delay of 420/50 seconds (for Cal. We20) a day, the illuminating right more than 2 times (for Cal. We19/3 times (for Cal. We20) a day sad/or the confirmation sound more than 50 times a day, the battery life may be less than the specified period.
- After the alarm was made new one, he sure to depress buttons "A", "B", "C" and "D" at the same time for 2 to 3 seconds. The display becomes blank; and when the buttons are released, the time/calendar of "A 12:00am SA I-1" is diguaded.
- In hand, with the direct time/calendar and alarm time (see "HOW TO SET THE TIME/CALNDAR" and "HOW TO SET THE ALARM")
■ CARE OF YOUR LORUS WATCH
• BATTERY
| CAUTION |
| Do not expose the old battery to fire or recharge it. Keep it at a place beyond the reach of children. If a child swallows it, consult a doctor immediately. |
• WATER RESISTANT
| Condition | |||
| Indic-tion to the cast block | Anticipational contact with others such as opacities and ranks | Sodium ing. and tanging a shower | Skin dining |
| No indication | NO | NO NO NO | |
| WATER RESISTANT | YES NO NO NO | ||
| WATER RESISTANT OF NO BOX? | YES | YES NO NO | |
| WATER RESISTANT OF NO (10 BAR) above | YES YES YES NO | ||
* If your watch is 200 M/20 BAR, 100 M/10 BAR or 50 M/5 BAR water resistant, it is so indicated on the dial/case back.
- Do not operate the buttons when the watch is wet.
- If the watch is exposed to salt water, rinse it in fresh water and then wipe it thoroughly dry. Caution:
Leather straps are not water resistant except so indicated, even if the watch head is water resistant.
• ALLERGIC REACTION
Because the case and band touch the skin directly, it is important to clean them regularly. If not, shirt sleeves may be stained and those with delicate skin may develop a rash. Please wear the watch with some play to avoid any possible allergic reaction. If you develop a rash on your wrist, stop wearing and consult a physician.
• MAGNETISM
Your watch will not be affected by magnetism generated by household electric appliances.
• SHOCKS AND VIBRATIONS
Your watch may be worn for normal sports activities, but be careful not to drop it or hit it on hard surfaces.
• TEMPERATURE
Your watch is preadjusted so that constant accuracy may be insured at normal temperature.
■ SERVICE
When your LORUS watch requires repair or servicing, please see the enclosed WARRANTY/ GUARANTEE.
Printed in Hong Kong
- ■ BUTTONS AND DISPLAYS
- Seconds setting
- ■ HOW TO USE THE STOPWATCH
- Stopwatch operation
- Memory function
- [Memory recall after measurement]
- [Memory recall during measurement]
- ■ HOW TO USE THE STROKE FUNCTION
- Stroke measurement
- Notes:
- ■ HOW TO USE THE TIMER
- How to Use the Preset Timer
- Selection of the preset time
- Preset timer operation
- How to Use the Adjustable Timer
- Adjustable timer setting
- Adjustable timer operation
- ■ HOW TO SET THE ALARM
- Engagement/disengagement of the alarm
- Turning on/off of the hourly time signal and confirmation sound; and alarm test
- ■ NOTE ON UNUSUAL DISPLAY
- ■ LUMIBRITE WATCH
- LORUS LUMIBRITE
- ■ LORUS LITE
- LORUS LITE
- ■ BATTERY CHANGE
- ■ CARE OF YOUR LORUS WATCH
- • BATTERY
- • ALLERGIC REACTION
- • MAGNETISM
- • SHOCKS AND VIBRATIONS
- • TEMPERATURE
- ■ SERVICE
Brand : Lorus
Model : W240
Category : Wristwatch