
A2211 - Frying Pan Ariston Thermo - Free user manual and instructions
Find the device manual for free A2211 Ariston Thermo in PDF.


| Product Type | Electric ventilated oven |
| Brand | Ariston Thermo |
| Model | A2211 |
| Inner Dimensions (W x D x H) | 40.5 cm x 39 cm x 32.5 cm |
| Inner Volume | 51 liters |
| Power Supply | 230-240 V ~ 50 Hz, 2100-2200 W |
| Energy Consumption (to reach 200°C) | 0.5 kWh |
| Energy Consumption (maintain 200°C for 1 hour) | 1.0 kWh |
| Total Energy Consumption | 1.5 kWh |
| Cooking Functions | Conventional cooking, Grill, Double Grill, Forced Air Ventilation |
| Control Type | Knobs for cooking features and variable grill; Electronic programmer on select models |
| Oven Light | Yes, indicates heating and illuminates interior |
| Cooling Fan | Yes, forced air ventilation for external temperature reduction |
| Timer | Yes, mechanical timer and electronic programmer timer (select models) |
| Oven Racks | Yes, with guides for sliding |
| Drip Pan | Yes |
| Lamp Specification | 25W, 230/240V, E14 socket, high-temperature (300°C) |
| Self-Cleaning Panels | Optional on some models |
| Optional 3rd Oven Glass Kit | Yes, code 053413 |
| Installation Type | Built-in |
| Safety Features | Earthing required, automatic power-off when door open, child safety considerations |
| Compliance | 73/23/EEC, 89/336/EEC, 93/68/EEC |
Frequently Asked Questions - A2211 Ariston Thermo
User questions about A2211 Ariston Thermo
0 question about this device. Answer the ones you know or ask your own.
Ask a new question about this device
Download the instructions for your Frying Pan in PDF format for free! Find your manual A2211 - Ariston Thermo and take your electronic device back in hand. On this page are published all the documents necessary for the use of your device. A2211 by Ariston Thermo.
USER MANUAL A2211 Ariston Thermo
GB Electric ventilated oven
Instructions for installation and use
Congratulations on choosing an Ariston appliance, which you will find is dependable and easy to use. We recommend that you read this manual for best performance and to extend the life of your appliance. Thank you.
Close-up View
A. Control Panel
B. Knob for selecting the cooking features
C. Variable Grill Knob
D. Electronic Programmer (only on a few models) - This feature allows you to set the length and end cooking time for any of the cooking features. It also has a timer feature.
D₁.Country Style Clock and Timer (only on a few models).
E. Oven Light (only on certain models) - When the light is on, it indicates that the oven is heating. It will turn off when the temperature setting has been reached.
F.Drip pan
G. Oven Racks
H. Guides for sliding the racks or drip pan in and out
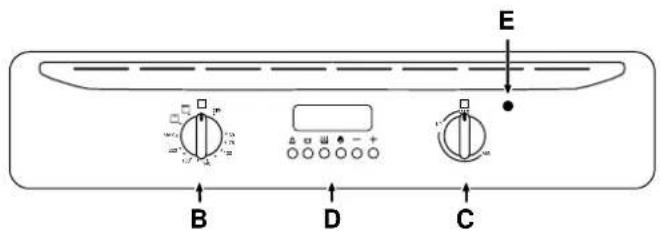

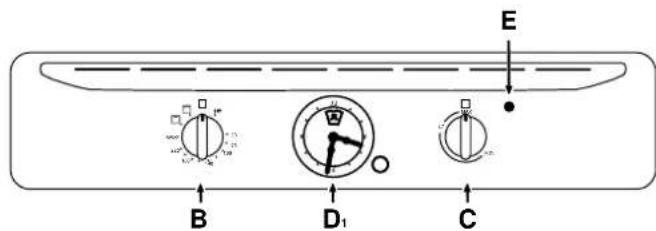
How To Use Your Appliance
The various cooking fetures offered by your oven can be selected using the "B" setting knob and variable grill knob (C) located on the control panel.
Attention: The first time you use the oven we recommend that you set the thermostat on the highest setting and leave the oven on for about a half of an hour with nothing in it. Then, open the oven door and let the room air. The odour that is often detected during this initial use is due to the evaporation of substances used to protect the oven during storage and until it is installed.
N.B.: Should the appliance be equipped with an electronic programmer, to use the electric oven, just press button (the symbol will appear on the display) before selecting the desired cooking function.
Using the oven
When the oven control knob (B) is turned in a clockwise direction to the symbol fan and oven light will come on to assist in the defrosting of frozen food. Rotating further to the complete range of temperatures shown on the dial you can choose which is most suitable for the food you are going to cook. The temperature is reached automatically and controlled by the oven thermostat (from 50°C to 240°C).
Note: Whilst using tag oven for conventional cooking knob (C) must be set with "MAX" in line with the reference mark on the control panel.
Grill
The top centre heating element will come on and the rotisserie motor (if present) will be activated. On this setting, food is cooked by the thermal radiation given off in the downward direction by the electric heating element. The very high temperature and direct heat of the grill make it possible to brown meats on the surface while locking in the juices to keep them tender.
Double Grill

Both of the top heating elements turn on and the rotisserie motor (if present) is activated.
This over-sized grill has a completely new design, which is the reason why cooking efficiency has increased by 50%. In addition, the double grill eliminates heat gaps in the corners of the oven.
Oven Light
The light comes on when the "B" knob is turned to the ⚙️|★ setting. The light illuminates the oven and remains on when any of the heating elements is turned on.
Forced Air Ventilation
In order to reduce the external temperature of the oven, some models have been equipped with a cooling fan which comes on when the "B" knob is turned to a cooking setting. The fan remains on during the cooking process and a flow of air can be heard exiting between the oven door and the control panel.
After you have finished cooking, it a good idea to keep the fan on for a few minutes by setting the thermostat knob to "-" in order to allow the oven to cool down rapidly.
3rd Oven Glass
This appliance conforms to all relevant European Standards regarding surface temperatures, however, in order to further decrease the temperature of the oven door and reduce energy consumption, a supplementary kit has been made available as an optional extra. The fitting of this kit should be considered, if energy saving is desirable or if young children may be present. To purchase the supplementary kit code 053413 contact your nearest Merloni Service Centre.
Warning
Only use the bottom shelf of the oven when using the rotisserie to cook (where present). For all other types of cooking, never use the bottom shelf and never place anything on the bottom of the oven when it is in operation because this could damage the enamel. Always place your cookware (dishes, aluminium foil, etc. etc.) on the grate provided with the appliance inserted especially along the oven guides.
Country Style Clock and Timer

How to Set the Current Time
The oven must be connected to the power supply.
Pull and turn the knob in the clockwise direction to set the time.
N.B.: The clock is electric. Therefore, in the event of a power outage, the clock will stop for the entire time the oven remains without power. When the power comes back on, the clock must be reset to the current time
Timer Feature
The timer operates by counting down a given period of time. This feature does not, however, turn the oven on or off. It merely emits an acoustical alarm when the time has run out.
How to Set the Timer
Turn the knob until the indicator is set on the length of time desired (using the inside numbers). The time is clearly visible through the transparent window on the indicator itself.
The timer will begin to count down immediately.
The sound will stop automatically after approximately 2 minutes and the timer will be set to the symbol (clock function).
To turn off the buzzer, or to use only the clock, set the indicator on the symbol.
Electronic Cooking Programmer
The programmer makes it possible to preset the oven and the grill in terms of:
- delay start with a preset length of time for cooking;
- immediate start with a preset length of time for cooking;
- timer.
Button functions:
☐ : Timer with hour and minutes;
☐ : Length of cooking time;
: End cooking time;
: Manual change;
☐ : Change time (backwards);
+ : Change time (forwards).
How to Reset the Digital Clock
After the appliance has been connected to the power source or following a power outage, the clock display will begin to blink and read: 0:00
- Press the and buttons at the same time. Then use (within 4 seconds) the and buttons to set the exact time.
Use the button to move the time forwards. Use the button to move the time backwards.
Manual Operation Mode for the Oven
After the time has been set, the programmer is automatically set to manual mode.
Note: Press the button to return the oven to manual mode after every "Automatic" cooking session.
Delayed Start Time with Preset Cooking Length
The length and the end cooking times must be set. Let us suppose that the display shows 10:00.
-
Turn the oven control knob to the cooking setting and temperature desired (example: convection oven at 200°C).
-
Press the and the use (within 4 seconds) the and buttons to set the length of the cooking time. Let us suppose that 30 minutes was set for the length of the cooking time. In this case, the display will show:
0·30
Release the button, and within 4 seconds, the current time will reappear with the symbol and "auto."
- Press the 📄 button, and then use the and + buttons to set the end cooking time. Let us suppose that it is 13:00
13·00
- Release the button and the display will show the current time within 4 seconds:
10·00
When "auto" is lighted, it indicates that the length and end cooking time have been preset to operate in automatic mode. At this point, the oven will turn on automatically at 12:30 in order to finish the cooking session within 30 minutes. When the oven is on, the symbol (cooking pot) will appear on the display for the entire length of the cooking process. The button can be pressed at any time to display the setting for the length of the cooking time, while the button can be pressed to display the end cooking time.
At the end of the cooking time, an acoustic signal will sound. Press any button it turn it off (except the ☐ and ☐ buttons).
Immediate Start Time with Preset Cooking Length
When only the length of the cooking time is set (points 1 and 2 of the paragraph entitled, "Delayed Start Time with Preset Cooking Length"), the cooking session starts immediately.
Cancelling a Preset Cooking Time
Press the button, and use the button to set the time to:
0.00
Then press the manual cooking mode button 🤘
Timer Feature
The timer can be used to count down from a given length of time. This feature does not control when the oven comes on or turns off, but, rather, it only emits an acoustic signal when the preset time has run out.
Press the Button, and the display will read:
0·00
Then use the and buttons to set the desired time. Release the button, and the timer will start at that second. The display will show the current time.
10:00
At the end of the preset time, an acoustic signal will sound, which can be turned off by pressing any button (except the + and buttons), and the symbol will turn off.
Changing and Cancelling Settings
- The settings can be changed at any time by pressing the corresponding button and using the ☐ button.
- When the length setting for the cooking time is cancelled, the end cooking time setting is also cancelled, and vice versa.
- When in automatic cooking mode, the appliance will not accept end cooking times prior to the start cooking time proposed by the appliance itself.
How to Keep Your Oven in Shape
Before cleaning your oven, or performing maintenance, disconnect it from the power supply.
To extend the life of your oven, it must be cleaned frequently, keeping in mind that:
- The self-cleaning panels (if present) and the enameled parts should be washed with warm water - abrasive powders and corrosive substances should be avoided;
- The inside of the oven should be cleaned immediately after use with warm water and soap; the soap should be rinsed away and the interior dried thoroughly;
- Stainless steel can be stained if it remains in contact with aggressive detergents (containing phosphorus) or water with a high lime content. We recommend that you rinse these parts thoroughly and dry them well after cleaning. It is also a good idea to dry any water spills;
- Never line the bottom of the oven with aluminium foil because the buildup of heat will not only impede the cooking process, but could also damage the enamel.
Replacing the Lamp in the Oven
- Cutoff the supply of power to the oven by turning off the omni-polar switch connecting it to the mains, or by removing the plug if it is accessible;
- Unscrew the glass cover attached to the lamp holder;
-
Unscrew the lamp and replace it with another high-temperature lamp (300°C) with the following characteristics:
-
Voltage: 230/240 V
- Wattage: 25W
- Socket: E14
- Remount the glass cover and reconnect the appliance to the power supply.

natural_image
Diagram of a ceiling-mounted device with a circular component and directional arrows indicating motion (no text or symbols)Practical Cooking Advice
When using the oven, only one rack or drip pan should be used at a time. The rack or pan should be inserted into the bottom or top guides depending on whether the food needs more heat from the top or bottom.
Preheating
If the oven must be preheated (this is generally required for leavened foods), we recommend using the "conventional" oven feature which makes it possible to reach the temperature desired in a very short time. After the oven has been preheated, the red indicator light (E) will turn off. At this point, you can select the most suitable setting to cook the dish.
Cooking Fish and Meat
Meat must weigh at least 1 Kg in order to prevent it from drying out. When cooking white meat, fowl and fish, use low temperature settings ( 150^ C- 175^ C). For red meat that should be well done on the outside while tender and juicy in the inside, it is a good idea to start with a high temperature setting ( 200^ C- 220^ C) for a short time, then turn the oven down afterwards. In general, the larger the roast, the lower the temperature setting. Place the meat on the centre of the rack and place the drip pan beneath it to catch the fat.
Make sure that the rack is inserted so that it is in the centre of the oven. If you would like to increase the amount of heat from below, use the low rack heights. For savory roasts (especially duck and wild game), dress the meat with lard or bacon on the top.
Cooking Pastries
Always preheat the oven when cooking pastries. Do not open the door in order to prevent the pastry from dropping. The batter or dough should not be too liquidy so that the cooking time is not excessive. In general:
| Pastry is too dry |
| Increase the temperature by 10°C and reduce the cooking time. |
| Pastry dropped |
| Use less liquid or lower the temperature by 10°C. |
| Pastry is too dark on top |
| Place it on a lower rack, lower the temperature, and increase the cooking time. |
| Cooked well on the inside but sticky on the outside |
| Use less liquid, lower the temperature, and increase the cooking time. |
| The pastry sticks to the pan |
| Grease the pan well and sprinkle it with a dusting of flour. |
| I used more than one level and they are not all at the same cooking point |
| Use a lower temperature setting. It is not necessary to remove the food from all the racks at the same time. |
Using the Grill
Grilling may be carried out with a two stage heating element situated in the top of the oven chamber. The centre, or the complete area of the grill can be selected by turning the oven control knob (B) in a clockwise direction
to align the symbols (☐ for the centre, ☐ for the complete area) with the mark on the control panel. The variable temperature control (C) is positioned to right of the oven knob. This knob will provide varying grill temperatures when rotated from "max" to "min" and may be adjusted to vary the level of heat at any time during the grilling operation.
To operate the grill
- Turn the oven control knob (B) clockwise until the required grilling symbol is in line with the mark on the control panel. The element is now "on".
- The variable grill control (C) can now be operated to select the required heat.
When utilizing the grill, place the rack at the lower levels (see cooking table). To catch grease or fat and prevent smoke, place a drip pan at the bottom rack level.
Grilling must be done with the door partially open to avoid increasing the grilling time.
| Food to be cooked Wt. | (wt) | Cooking position of shelves from bottom | Temperature (°C) | Variable grill | Pre-heating time (min) | Cooking time (min.) |
| Pasta | ||||||
| Lasagne 2.5 3 210 - 75-80 | ||||||
| Cannelloni 2.5 3 210 MAX - 75-80 | ||||||
| Oven-baked noodles 2.5 3 210 - 75-80 | ||||||
| Meat | ||||||
| Veal | 1.7 3 230 - 85-90 | |||||
| Chicken | 1.5 | 3 220 - | 110-115 | |||
| Turkey | 3.0 | 3 | MAX | MAX | - | 95-100 |
| Duck | 1.8 | 3 230 - | 120/125 | |||
| Rabbit | 2 | 3 230 - | 105/110 | |||
| Pork | 2.1 | 3 230 - | 100/110 | |||
| Lamb | 1.8 | 3 230 - 90-95 | ||||
| Fish | ||||||
| Mackerel | 1.1 | 3 | 210-230 | - | 55-60 | |
| Dentex | 1.5 | 3 | 210-230 | MAX | - | 60-65 |
| Trout baked in paper | 1.0 | 3 | 210-230 | - | 40-45 | |
| Pizza | ||||||
| Napolitan | 1.0 | 3 | MAX | MAX | 15 | 30-35 |
| Cake | ||||||
| Biscuits | 0.5 3 | 180 | 15 30-35 | |||
| Tarts | 1.1 | 3 | 180 | MAX | 15 | 30-35 |
| Chocolate cake | 1 | 3 200 | 15 45-50 | |||
| Raised Cakes | 1 | 3 | 200 | 15 | 50/55 | |
| Grill cooking | ||||||
| Toast | n.° 4 | 4 | 10 | |||
| Pork chops | 1.5 | 4 | MAX-MIN | 30 | ||
| Mackerel | 1.1 | 4 | 35 |
Note: cooking times are approximate and may vary according to personal taste.
Safety Is A Good Habit To Get Into
To maintain the EFFICIENCY and SAFETY of this appliance, we recommend:
- use only the MANUFACTURER Service
-
use only ORIGINAL Spare Parts
-
This appliance is designed for non-professional, household use and its functions must not be changed.
- These instructions are only valid for the countries whose symbols appear on the manual and the serial number plate.
- The electrical system of this appliance may be used safely only when it is correctly connected to an efficient earthing system in compliance with the safety standards currently in effect.
The following items are potentially dangerous, and, therefore, appropriate measures must be taken to prevent children and the disabled from coming into contact with them:
- Controls and the appliance in general;
- Packaging (bags, polystyrene, nails, etc.);
- The appliance immediately after use of the oven or grill due to the heat generated;
- The appliance when no longer in use (potentially dangerous parts must be made safe).
Avoid the following:
- Touching the appliance with wet parts of the body;
- Using the appliance when barefoot;
- Pulling on the appliance or the supply cord to unplug it from the electrical outlet;
- Obstructing the ventilation or heat dissipation slots;
- Allowing power supply cords for small appliances to come into contact with the hot parts of the appliance;
- Exposing the appliance to atmospheric agents (rain, sun);
- Using the oven for storage purposes;
- Using flammable liquids near the appliance;
- Using adaptors, multiple sockets and/or extension cords;
- Attempting to install or repair the appliance without the assistance of qualified personnel.
Qualified personnel must be contacted in the following cases:
- Installation (following the manufacturer's instructions);
- When in doubt about operating the appliance;
- Replacing the electrical outlet when it is not compatible with the plug for the appliance.
Service Centres authorized by the manufacturer must be contacted in the following cases:
- If in doubt about the soundness of the appliance after removing it from the packaging;
- If the power supply cord has been damaged or needs to be replaced;
- If the appliance breaks down or functions poorly; ask for original spare parts.
It is a good idea to do the following:
- Only use the appliance to cook food, nothing else;
- Check the soundness of the appliance after it has been unpacked;
- disconnect the appliance from the electrical mains if it is not functioning properly and before cleaning or performing maintenance;
- When the appliance is not used for an extended period of time, cut off the supply of power and close the gas cock (if present);
- Use cooking gloves to place cookware in the oven or when removing it;
- Always grasp the oven door in the centre because the ends may be hot due to the escape of hot air;
- Make sure that the control knobs are on the “•”/“o” setting when the appliance is not in use;
- Cut the power supply chord after disconnecting it from the mains when you decide not to use the appliance any longer.
- The manufacturer will not be held liable for any damages that might arise out of incorrect installation or improper, incorrect or unreasonable use of the appliance.
Installation
Important: The power supply to the appliance must be cut off before any adjustments or maintenance work is done on it.
Installation of Built-in Ovens
In order to insure that the built-in appliance functions properly, the cabinet containing it must be appropriate. The figure below gives the dimensions of the cutout for installation under the counter or in a cabinet wall unit.

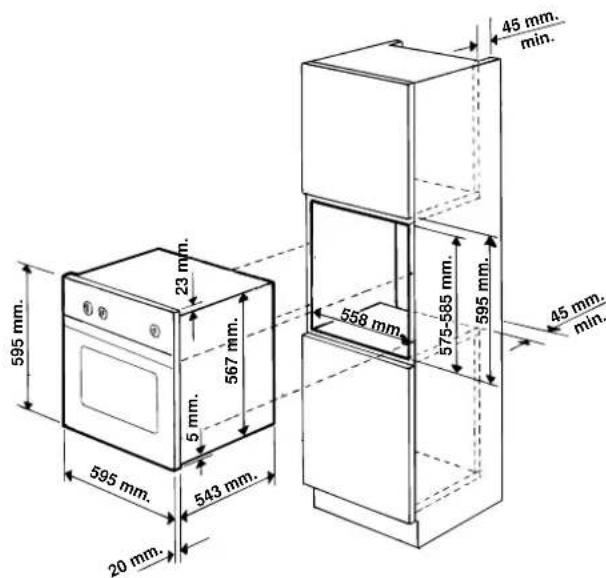
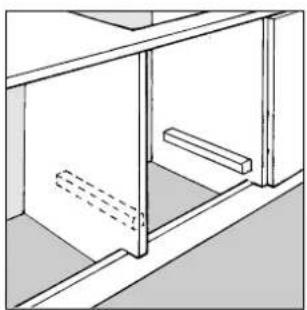
In order to ensure adequate ventilation, the back panel of the cabinet must be removed. Installing the oven so that it rests on two strips of wood is preferable. In the case where the oven rests on a continuous, flat surface, there must be an aperture of at least 45 x 560 mm.
natural_image
Technical line drawing of a mechanical assembly with no visible text or symbols
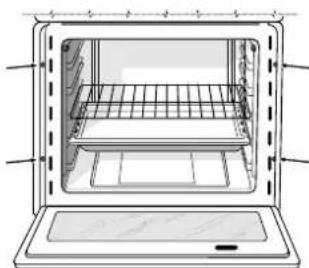
To fasten the oven to the cabinet, open the door of the oven and fasten it by inserting the 4 wood screws into the 4 holes locate on the perimeter of the frame.
natural_image
Line drawing of an open oven with internal grating and lid (no text or symbols)The panels of the adjacent cabinets must be made of heat resistant material. In particular, cabinets with a veneer exterior must be assembled with glues able to withstand temperatures of up to 100^ C.
In compliance with current safety standards, contact with the electrical parts of the oven must not be possible once it has been installed.
All parts which ensure safe operation of the appliance must not be able to be removed without the use of a tool.
Electrical connection
Ovens with a three-pole power supply cable are designed to operate with alternated current at the supply frequency and voltage indicated on the data plate or "technical specifications" (located on the appliance). The earthing conductor of the cable is the yellow-green conductor.
Two types of connection are provided:
Connection n° 1
Connecting the power supply cable to the mains.
Fit a normalized plug to the cable, which corresponds to the load indicated on the data plate; if the cooker is connected directly to the mains, an omnipolar circuit-breaker with a minimum opening of 3 mm between the contacts, suitable for the load indicated and complying with current directives, must be installed between the appliance and the mains (the earthing wire must not be interrupted by the circuit-breaker). The power supply cable must be positioned so that it does not exceed room temperature by 50°C at any point of its length. Before making the connection check that:
- the circuit breakers or fuses of the home system can support appliance load (see data plate);
- the power supply system has an efficient earthing connection which complies with the provisions of current regulations and the law;
- there is easy access to the socket or the omnipolar circuit-breaker once the cooker has been installed.
N.B.: do not use reducers, adapters or shunts as these could cause heating or burning.
Connection n° 2
Disposing of the plug.
WARNING: THIS APPLIANCE MUST BE EARTHED.
Ensure that before disposing of the plug itself, you make the pins unusable so that it cannot be accidentally inserted into a socket. Instructions for connecting cable to an alternative plug:
Important: the wires in the mains lead are coloured in accordance with the following code:
Green & Yellow -Earth
Blue -Neutral
Brown -Live
If the colours of the wires in the mains lead do not correspond with the coloured markings identifying the terminals in your plug, proceed as follows.
Connect Green & Yellow wire to terminal marked "E" or ± or coloured Green or Green & Yellow.
Connect Brown wire to terminal marked "L" or coloured Red. Connect Blue wire to terminal marked "N" or coloured Black. If a 13 amp plug (BS 1363) is used it must be fitted with a 13 amp fuse.
A 15 amp plug must be protected by a 15 amp fuse, either in the plug or adaptor or at the distribution board. If you are in any doubt about the electrical supply to your machine, consult a qualified electrician before use.
How to connect an alternative plug
The wires in this mains lead are coloured in accordance with the following code:
BLUE "NEUTRAL" (N)
BROWN "LIVE" (L)
GREEN AND YELLOW "EARTH" (E)

Disposing of the appliance
When disposing of the appliance please remove the plug by cutting the mains cable as close as possible to the plug body and dispose of it as described above.
Technical Specifications
Inner Dimensions of the Oven:
Width: 40.5 cm
Depth: 39 cm
Height: 32.5 cm
Inner Volume of the Oven:
51 Liters
Energy Consumption:
To reach 200°C: 0.5 kWh
To maintain the temp. at 200°C for 1 hour: 1.0 kWh
Total: 1.5 kWh
Voltage and Frequency of Power Supply:
230-240 V \~ / 50 Hz / 2100-2200 W

This appliance conforms with the following European Economic Community directives:
- 73/23/EEC of 19/02/73 (Low Voltage) and subsequent modifications;
- 89/336/EEC of 03/05/89 (Electromagnetic Compatibility) and subsequent modifications;
- 93/68/EEC of 22/07/93 and subsequent modifications.
- Close-up View
- How To Use Your Appliance
- Using the oven
- Grill
- Double Grill
- Oven Light
- Forced Air Ventilation
- 3rd Oven Glass
- Warning
- Country Style Clock and Timer
- How to Set the Current Time
- Timer Feature
- How to Set the Timer
- Electronic Cooking Programmer
- How to Reset the Digital Clock
- Manual Operation Mode for the Oven
- Delayed Start Time with Preset Cooking Length
- Immediate Start Time with Preset Cooking Length
- Cancelling a Preset Cooking Time
- Changing and Cancelling Settings
- How to Keep Your Oven in Shape
- Before cleaning your oven, or performing maintenance, disconnect it from the power supply.
- Replacing the Lamp in the Oven
- Practical Cooking Advice
- Preheating
- Cooking Fish and Meat
- Cooking Pastries
- Using the Grill
- To operate the grill
- Safety Is A Good Habit To Get Into
- The following items are potentially dangerous, and, therefore, appropriate measures must be taken to prevent children and the disabled from coming into contact with them:
- Avoid the following:
- Qualified personnel must be contacted in the following cases:
- Service Centres authorized by the manufacturer must be contacted in the following cases:
- It is a good idea to do the following:
- Installation
- Installation of Built-in Ovens
- Electrical connection
- Two types of connection are provided:
- Connection n° 1
- Connecting the power supply cable to the mains.
- Connection n° 2
- WARNING: THIS APPLIANCE MUST BE EARTHED.
- Green & Yellow -Earth
- Blue -Neutral
- How to connect an alternative plug
- BLUE "NEUTRAL" (N)
- BROWN "LIVE" (L)
- GREEN AND YELLOW "EARTH" (E)
- Disposing of the appliance
- Technical Specifications
- This appliance conforms with the following European Economic Community directives:
Brand : Ariston Thermo
Model : A2211
Category : Frying Pan