
SCD2350 - CD Player Soundmaster - Free user manual and instructions
Find the device manual for free SCD2350 Soundmaster in PDF.

| Product Type | CD Player |
| Brand | Soundmaster |
| Model | SCD2350 |
| Power Supply | AC 230V, 50Hz |
| Power Consumption | 12W |
| Disc Compatibility | CD, CD-R, CD-RW |
| Playback Modes | Program, Repeat, Random |
| Audio Output | RCA stereo |
| Headphone Output | 3.5mm jack |
| Dimensions (W x H x D) | 200 x 100 x 220 mm |
| Weight | 1.2 kg |
| Functions | Play, Pause, Stop, Skip, Program, Repeat, Random |
| Display | LCD with track number and time |
| Remote Control | Included |
| Maintenance | Clean exterior with soft dry cloth; do not use liquids |
| Safety | Keep away from water, heat sources; do not disassemble |
| Spare Parts & Repairability | Contact Soundmaster service center for parts |
| General Information | This manual is available in multiple languages |
Frequently Asked Questions - SCD2350 Soundmaster
User questions about SCD2350 Soundmaster
0 question about this device. Answer the ones you know or ask your own.
Ask a new question about this device
Download the instructions for your CD Player in PDF format for free! Find your manual SCD2350 - Soundmaster and take your electronic device back in hand. On this page are published all the documents necessary for the use of your device. SCD2350 by Soundmaster.
USER MANUAL SCD2350 Soundmaster
natural_image
Black and silver portable radio with digital display and speaker grille (no visible text or symbols)DEUTSCH
ENGLISH
FRANÇAIS
NEDERLANDS
E S P A Ñ O L
PORTUGU
R O
L A
LIETUVOS
E E
ENVIRONMENTAL PROTECTION
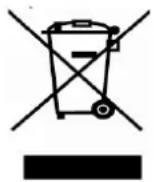
Do not dispose of this product with the normal household waste at the end of its life cycle. Return it to a collection point for the recycling of electrical and electronic devices. This is indicated by the symbol on the product, user manual or packaging.
The materials are reusable according to their markings. By reusing, recycling or other forms of utilization of old devices you make an important contribution to the protection of our environment.
Please contact your local authorities for details about collection points.
CLASS 1 LASER PRODUCT KLASSE 1 LASER PRODUKT LUOKAN 1 LASER LAITE KLASS 1 LASER APPARAT PRODUCTO LASER CLASE 1
CAUTION - INVISIBLE LASER RADIATION WHEN OPENING THE COVER OR PRESSING THE SAFETY INTERLOCK. AVOID EXPOSURE TO THE LASER BEAM.

WARNING
Risk of electric shock Do not open!

Caution: To reduce the risk of electric shock, do not remove the cover (or back). There are no user serviceable parts inside. Refer servicing to qualified service personnel.

This symbol indicates the presence of dangerous voltage inside the enclosure, sufficient enough to cause electric shock.

This symbol indicates the presence of important operating and maintenance instructions for the device.
Safety, Environmental and Setup Instructions
- Use the device in dry indoor environments only.
- Protect the device from humidity.
• Do not open the device. RISK OF ELECTRIC SHOCK! Refer opening and servicing to qualified personnel. - Connect this device to a properly installed and earthed wall outlet only. Make sure the mains voltage corresponds with the specifications on the rating plate.
• Make sure the mains cable stays dry during operation. Do not pinch or damage the mains cable in any way. - A damaged mains cable or plug must immediately be replaced by an authorized service center.
• In case of lightning, immediately disconnect the device from the mains supply. - Children should be supervised by parents when using the device.
- Clean the device with a dry cloth only.
Do NOT use CLEANING AGENTS or ABRASIVE CLOTHS!
- Do not expose the device to direct sunlight or other heat sources.
• Install the device at a location with sufficient ventilation in order to prevent heat accumulation. - Do not cover the ventilation openings!
• Install the device at a safe and vibration-free location. - Install the device as far away as possible from computers and microwave units; otherwise radio reception may be disturbed.
- Do not open or repair the enclosure. It is not safe to do so and will void your warranty. Repairs only by authorized service/ customer center.
- The device is equipped with a "Class 1 Laser". Avoid exposure to the laser beam as this could cause eye injuries.
- Only use mercury and cadmium-free batteries.
- Used batteries are hazardous waste and NOT to be disposed of with the household waste!!! Return the batteries to your dealer or to collection points in your community.
- Keep batteries away from children. Children might swallow batteries. Contact a physician immediately if a battery was swallowed.
- Check your batteries regularly to avoid battery leakage.
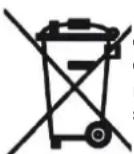
Used batteries are hazardous waste and NOT to be disposed of with the household waste! As a consumer you are legally obligated to return all batteries for environmentally responsible recycling – no matter whether or not the batteries contain harmful substances*).
Return batteries free of charge to public collection points in your community or to shops selling batteries of the respective kind.
Only return fully discharged batteries.
*) marked Cd = cadmium, Hg = mercury, Pb = lead
CONTROL ELEMENTS
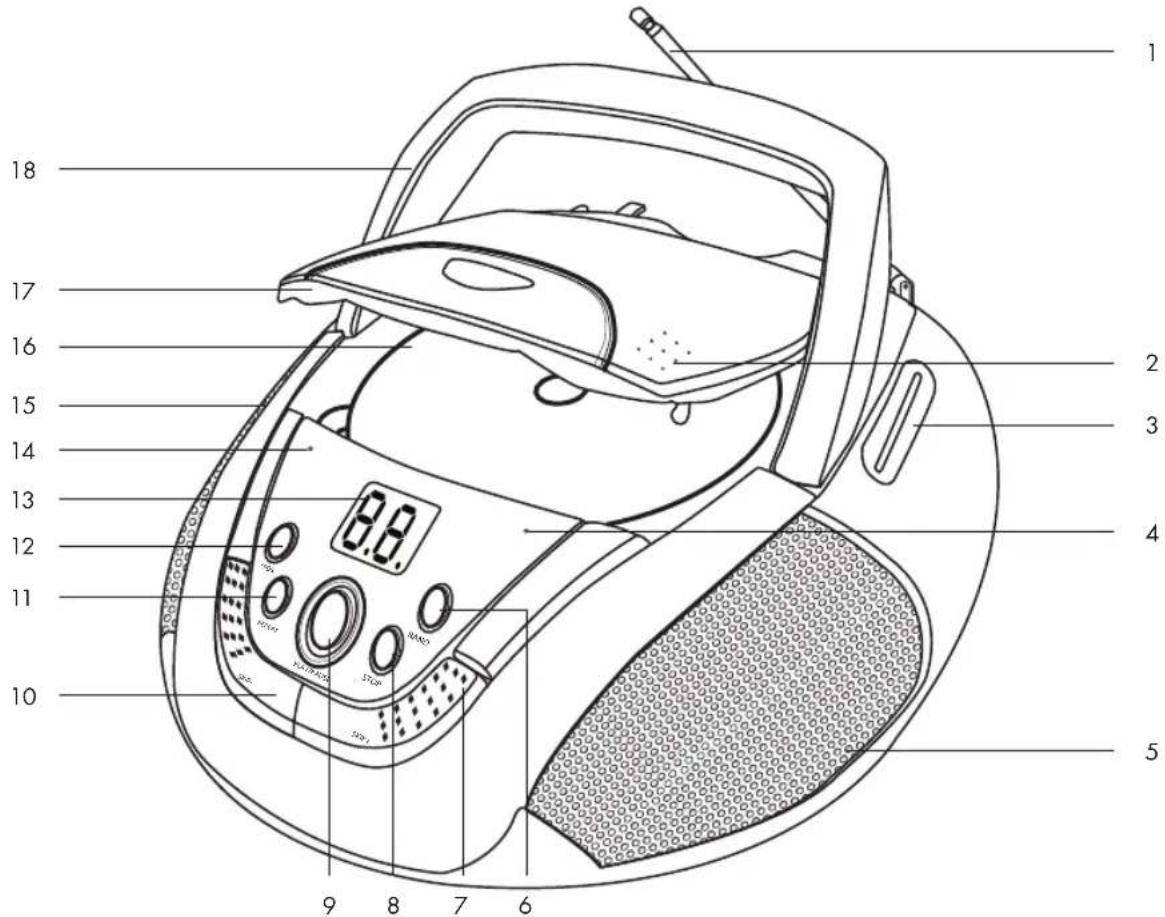
- Telescopic antenna
- Disc compartment lock OPEN/CLOSE
- Frequency scale
- FM ST. LED
- Right loudspeaker
- RAND key
- SKIP+ key
- STOP key
- PLAY/PAUSE key
-
SKIP-key
-
REPEAT key
- PROG. key
- LED display
- Power indicator
- Left loudspeaker
- Disc compartment
- Disc compartment lid
- Carrying handle
- FM ST. • FM • AM
band switch
- OFF · RADIO · CD
function switch
- MAX · MIN volume control
- Power cable socket
220-240V \~ 50Hz
- Battery compartment
- TUNING control
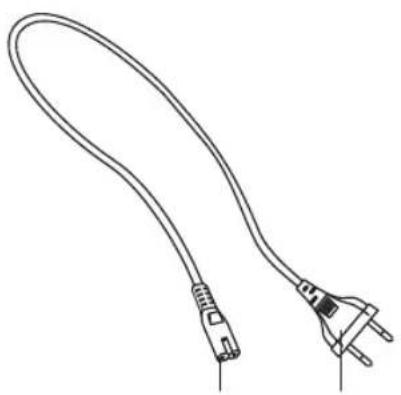
Accessories:
- Power cable with plug
- Connection plug
natural_image
Line drawing of a flexible electrical plug with terminal connectors (no text or symbols)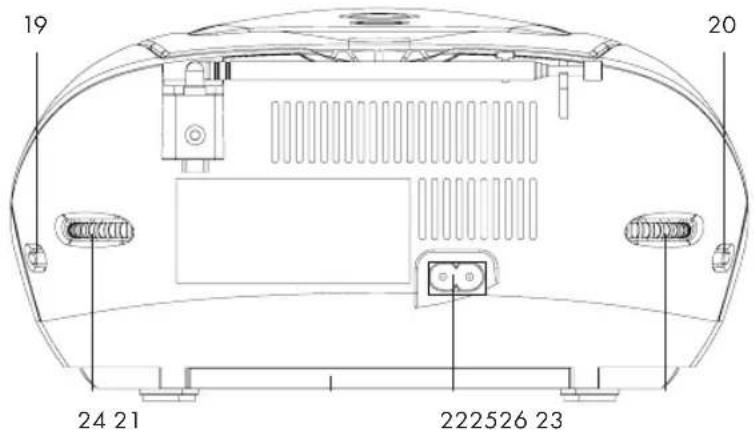
BEFORE FIRST USE
Unpacking the appliance
■ Remove all packaging.
Check for the presence of all parts and transport damage. In case of damage or incomplete delivery, please contact your dealer (Guarantee).
■ Please keep the packaging for storing the appliance when not in use for longer periods of time.
Place the appliance on a level, stable, clean and dry surface.
■ Open the disc compartment (16) and remove the transport protection.
Mains power operation
■ Make sure that the function switch (20) is set to OFF.
■ Remove the batteries from the battery compartment (23).
Plug the connection plug (26) into the appliance's power cable socket (22). Connect the power plug (25) to a suitable wall outlet. Make sure that the voltage corresponds to the voltage of the appliance. The appliance is now ready for use.
Battery operation
■ Disconnect the appliance from the wall outlet.
To operate the appliance with batteries, you need 6 x 1.5V batteries of type "C"/R14/LR14 (preferably alkaline batteries). The batteries are not included.
■ Open the battery compartment (23) underneath the appliance. Insert the batteries according to the polarity markings in the battery compartment.
Use only high-quality batteries. Lower quality batteries can leak and cause damage to the appliance. Do not use old and new batteries together. Close the battery compartment (23) after the batteries have been inserted.
Note: Remove the batteries, if you do not use the appliance for an extended period of time. Otherwise the appliance may be damaged by leaking batteries. If the power is low, replace the batteries.
BASIC FUNCTIONS
Switching the appliance on and off
■ Set the function switch (20) to RADIO or CD to switch on the appliance.
■ The power indicator (14) lights up red.
To switch off the appliance, set the function switch (20) to OFF. Pull the plug (25) from the wall outlet or remove the batteries from the battery compartment (23), if you will not use the appliance for a longer period of time.
Volume
■ Adjust the volume using MAX · MIN (21):
| Volume level Setting | |
| Mute sound Turn control fully towards front (in MIN direction) | |
| Increase volume Turn control towards back (in MAX direction) | |
| Decrease volume Turn control towards front (in MIN direction) | |
RADIO
Antenna
The appliance is equipped with a telescopic antenna (1) for reception of the FM band. For best reception, pull the telescopic antenna all out and turn it (ill. ①)
The built-in ferrite antenna can be used for receiving the AM band. For best reception, move the appliance around to find the optimum position (ill. ①)
natural_image
Line drawing of a portable air conditioner with a pointer and control panel (no text or symbols)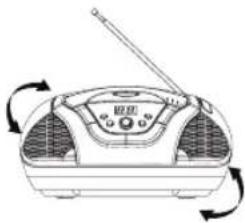
natural_image
Line drawing of a portable radio with a speaker and antenna, showing rotational arrows (no text or symbols)Switching the radio on and off
■ Set the function switch (20) to RADIO to switch on the radio. The power indicator (14) lights up red.
■ Set the function switch (20) to OFF to switch the radio off. The power indicator (14) goes off.
Selecting a band
■ Set the desired band with the band switch (19):
| Switch position Band | |
| FM ST. FM Stereo (Frequency modulation with stereo reception)Note: FM ST. LED (4) lights when the stereo signal of a station is received. | |
| FM FM (Frequency modulation) | |
| AM AM (Amplitude modulation) | |
Selecting a station
■ Set the desired station with TUNING (24).
Read the selected frequency position on the frequency scale (3).
CD OPERATION
This appliance supports the Audio CD format. Other formats are not supported by the appliance.
For CD-R discs the quality may be influenced by the quality of the burned disc.
Inserting and removing a disc
Set the function switch (20) to CD. The power indicator (14) lights up red. flashes in the LED display (13) for a short time. If no disc is inserted, No appears on the LED display (ill. ①
③

■ Open the disc compartment lid (17) with the disc compartment lock (2). Appears on the LED display (13). Insert a disc with the cover facing up into the disc compartment (16).
Note: Flip the carrying handle (18) back, before opening the disc compartment lid (17).
Playing a disc
■ Close the disc compartment lid (17).
If a supported disc is inserted in the disc compartment (16) the total number of tracks, e.g. 15, appears once the disc has been loaded.
■ Press PLAY/PAUSE (9) to start playback. Playback starts with the first track (ill. ①)
■ Press PLAY/PAUSE (9) to pause playback. The title number flashes (ill. ①)
■ Press PLAY/PAUSE (9) again to resume playback.
■ Press STOP (8) to stop the playback. The total number of tracks on the disc is displayed.
④
⑤
Searching a track
During playback press SKIP+ (7) to get to the beginning of the next track. For each press you will skip one more track forwards.
During playback press SKIP- (10) to get to the beginning of the current track. For each press you will skip one track backwards.
To find a particular position within a track, press and hold SKIP- (10) or SKIP+ (7). Release the key, when you reach the desired position. Playback will now continue from this position.
In stop mode: You can also select a certain track in stop mode. Press SKIP- (10) or SKIP+ (7) to select the desired track.
In stop mode you cannot select a certain position within a track.
Programming tracks
■ Up to 20 tracks can be programmed in any desired order.
In stop mode press PROG. (12). The first storage number 01. flashes on the LED display (13).
■ Press SKIP- (10) or SKIP+ (7) to select the desired track (ill. ①)
⑥
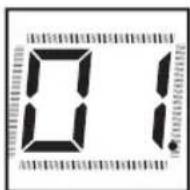
■ Press PROG. (12) again. The track is stored and the next storage number 02. is displayed.
■ Repeat these steps until all desired tracks have been programmed. When the memory is full, the appliance will count up for 20 seconds and then load the program.
Programmed playback
Press PLAY/PAUSE (9) to play the program. The keys PLAY/PAUSE (9), SKIP- (10) or SKIP+ (7) have the same function in program mode as in playback mode. When pressing SKIP- (10) or SKIP+ (7), only the programmed tracks but not the entire content of the disc will be used.
■ Press STOP (8) to stop the program playback. The total number of tracks on the disc, e.g. 15 is displayed. Press PLAY/PAUSE (9) to play the program again.
The flashing dot indicates that the program has not been deleted yet (ill. ①
⑦

■ Press STOP (8) twice to delete the program. The total number of tracks on the disc is shown. The program is also deleted, if you open the disc compartment cover (17), set the function switch (20) to OFF or RADIO, or disconnect the plug (25) from the wall outlet.
Repeating a track
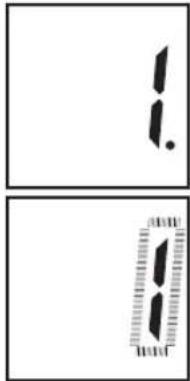
The repeat function allows repeated playback of a track or the entire content of a disc. Press REPEAT (11) to activate one of the following functions:
| Key action LED display Function | ||
| 1x |  | Repeat a track. |
| 2x | 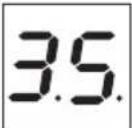 | Repeat the entire disc. |
| 3x |  | Repeat off. |
The repeat function can be combined with playing a program, or with random play.
Random play
The random play function allows playback of tracks in a random sequence.
■ Press RAND (6) to start random play. Stop random play by pressing RAND (6) again.
The random play function can be combined with the repeat function.
TROUBLESHOOTING
| Problem Possible | cause Solution | |
| The appliance cannot be switched on. | The power cable (25) is not properly connected.The batteries are not correctly inserted or the batteries are not charged. | Check that the power cable (25) is properly connected.Check that the batteries are properly inserted or replace discharged batteries. |
| No sound or sound interference. | The volume is set too low.The inserted disc is dirty or scratched. | Set the volume higher.Clean the disc with a soft cloth or insert another disc. |
| Poor FM reception, or no stereo. | The FM antenna is covered.The band switch (19) is not set to FM ST.The band switch (19) is set to FM ST. | Set up the antenna to improve reception.Set the band switch (19) to FM ST.Set the band switch (19) to FM. to decrease noise. |
| Skipping of tracks during playback. | The inserted disc is dirty or scratched.Playback in program mode. | Clean the disc with a soft cloth or insert another disc.Stop the program mode. |
CLEANING AND CARE
General
■ Disconnect the power plug (25) from the wall outlet prior to each cleaning.
■ Clean the casing with a slightly damp cloth.
Do not, under any circumstances, use chemicals, alcohol or other harsh agents to clean the casing.
Handling CD's

A small amount of dust or scratches will usually not have an impact on the quality of a disc. The discs should, however, be treated with care.
■ Protect your compact discs from dust and scratches.
■ Store your compact discs in their covers when not in use.
To maintain the original quality of sound, you should occasionally wipe your compact discs with a soft cloth, from the centre to the edge (not with circular movements). Never use gasoline or other solvents.
■ Only hold a compact disc by its edges!
Audio-Compact Disc

■ Only use compact discs with this logo.
Notes:
■ Never place any foreign objects in the disc compartment (16) as this may destroy the mechanics.
Do not let the disc compartment lid (17) be open longer than necessary to avoid dirt.
■ Never touch the lens in the disc compartment (16).
If the compact disc is very dirty or has very clear fingerprints on it, it may not be possible to play it (delayed playback, "jumping").
The information on the compact disc is read by a laser through an optical lens (do not touch). If you take the appliance from a cold to a warm room, moisture may condense on the lens, and the playback may be hampered. In this case leave the appliance for one hour at room temperature before use. Take the disc out of the appliance. Should the problem persist, have the appliance checked by qualified personnel.
TECHNICAL DATA
Power supply
Mains power operation: 220-240V \~ 50Hz
Battery operation: 9V 6 x 1.5V, battery type="€"/R14/LR14
Power consumption: 10W
Loudspeakers - power: 2 x 1W (RMS)
Loudspeakers - impedance: 8Ω
Radio
Frequency range: FM 88 - 108MHz
AM 540 -1600KHz
Antennas: FM: Telescopic antenna
AM: Ferrite antenna
Laser class: Class II
Dimensions (W x H x D): approx. 240 x 128x 232 mm
Weight: approx. 1.4kg
Subject to changes!


- ENVIRONMENTAL PROTECTION
- CAUTION - INVISIBLE LASER RADIATION WHEN OPENING THE COVER OR PRESSING THE SAFETY INTERLOCK. AVOID EXPOSURE TO THE LASER BEAM.
- WARNING
- Safety, Environmental and Setup Instructions
- Accessories:
- BEFORE FIRST USE
- Unpacking the appliance
- Mains power operation
- Battery operation
- BASIC FUNCTIONS
- Switching the appliance on and off
- Volume
- RADIO
- Antenna
- Switching the radio on and off
- Selecting a band
- Selecting a station
- CD OPERATION
- Inserting and removing a disc
- Playing a disc
- Searching a track
- Programming tracks
- Programmed playback
- Repeating a track
- Random play
- TROUBLESHOOTING
- CLEANING AND CARE
- General
- Handling CD's
- Audio-Compact Disc
- Notes:
- TECHNICAL DATA
Brand : Soundmaster
Model : SCD2350
Category : CD Player