
SWV2152W - Coaxial cable PHILIPS - Free user manual and instructions
Find the device manual for free SWV2152W PHILIPS in PDF.


| Product Type | Coaxial Cable |
| Brand | Philips |
| Model | SWV2152W |
| Length | 1.5 m |
| Connector Type | F-type male on both ends |
| Impedance | 75 ohms |
| Shielding | Double shielding with foil and braid |
| Conductor Material | Copper clad steel |
| Dielectric Material | Polyethylene foam |
| Outer Diameter | 6.8 mm |
| Color | Black |
| Weight | 95 g |
| Operating Temperature | -20°C to 60°C |
| Application | TV, satellite, cable modem, antenna |
| Warranty | 2 years |
| Package Contents | 1 coaxial cable |
| Maintenance | Clean with a dry cloth; avoid bending sharply |
| Safety | Do not expose to extreme temperatures or moisture |
Frequently Asked Questions - SWV2152W PHILIPS
User questions about SWV2152W PHILIPS
0 question about this device. Answer the ones you know or ask your own.
Ask a new question about this device
Download the instructions for your Coaxial cable in PDF format for free! Find your manual SWV2152W - PHILIPS and take your electronic device back in hand. On this page are published all the documents necessary for the use of your device. SWV2152W by PHILIPS.
USER MANUAL SWV2152W PHILIPS
natural_image
Black Philips 3D studio webcam with white base and camera lens (no text or symbols on device body)What's in the box?
EN
Please check that the following items are packed in the Philips SPC520NC/SPC525NC box. They are provided to help you set up and use your Philips SPC520NC/SPC525NC.

natural_image
Illustration of a webcam with a cable, no text or symbols present

natural_image
Headset microphone with earbuds and earplifier (no text or symbols visible)Philips SPC520NCI Installation CD-ROM Headset with SPC525NC WebCam including manual headphone and
microphone
(SPC525NC only)

I Digital microphone
For adding voice and sound when video chatting and video recording.
2 Focus ring
For manually adjusting the focus of the image.
3 Clamp with rubber rims
For attaching the WebCam to your PC monitor or laptop screen.
4 USB connector
For connecting the WebCam to the USB port of the laptop or desktop PC.
The WebCam will derive its power from the laptop or desktop PC when a USB connection is made.
5 Rotating foot
For manually changing the vertical angle of the WebCam.
6 Snapshot button
Enables you to take photos without using your mouse.
7 Power LED
Lights up red when the WebCam is in use.
8 Headset with headphone and microphone
(SPC525NC only)
For talking and listening to your meeting partner during video chatting.
9 Audio cable (SPC525NC only)
Black headphone plug (💡) - for connecting to the microphone socket of the PC sound card.
Grey microphone plug (!) - for connecting to the headphone or green socket of the PC sound card.
Contents
EN
3 What's in the box?
4 Legend of functions
5 Contents
6 Welcome
7 Things you should know
7 Safety precautions
7 Copyright
8 Installation
8 Installing the WebCam software
10 Connecting the WebCam to your PC / laptop
II WebCam settings
II General settings
12 Video settings
15 Audio settings
16 Features settings
17 Operating the WebCam
17 Selecting your WebCam
18 Capturing images / making video recordings
19 Instant messaging and Internet calling (video chatting, video calling and VOIP)
20 Technical specifications
21 Important information
21 Disclaimer
21 FCC compliance
22 Environmental information
22 System requirements
22 Disclaimer of warranty
22 Limitations of damages
The Philips SPC520NC/SPC525NC WebCam you have just purchased is manufactured to the highest standards and will give you years of trouble-free use. Brilliant images and blazing colors, that's what you get with the SPC520NC/SPC525NC WebCam.
After installation, the new WebCam can be used for all sorts of applications, such as:
- Video: use the Philips SPC520NC/SPC525NC WebCam for video chatting and video calling. The WebCam works with Skype, Windows® Live Messenger, Yahoo! Messenger, AOL Messenger, QQ and other free instant messaging and VoIP (Voice over Internet Protocol) services;
- Video e-mail / Video capture: create your own video presentations, video mail, product demonstrations, training videos, Internet clips etc.;
- Snapshot images: use images in presentations, create postcards, or send them via e-mail.
- Editing and special effects: after recording the images you want with the Philips SPC520NC/SPC525NC WebCam, the images can be easily edited using image or video editing programs.
The following sections in this manual give a step-by-step description of the installation process and explain how to use the Philips SPC520NC/SPC525NC WebCam.
Things you should know
EN
Please read the following instructions carefully, and retain them for future reference. It may be helpful to have the instructions for use for the PC at hand for reference.
Safety precautions
Observe the following guidelines to ensure that the WebCam will operate safely and to prevent defects.
- Do not use your WebCam in environments outside the following range: temperature: 0^ to 40^ , relative humidity: 45% 85% .
- Do not use or store your WebCam in/under:
– direct sunlight exposure;
– very humid and dusty environment;
- near any kind of heat sources.
- If your WebCam gets wet, dry it with soft cloth as soon as possible.
- If the lens is dirty, Do NOT touch the lens with your fingers.
- Clean the outside of the WebCam with a soft cloth.
- Do NOT use cleaning fluids based on alcohol, methylated spirit, ammonia, etc.
- Do NOT attempt to disassemble or repair your WebCam by yourself. Do not open the WebCam. In the event of technical difficulties return it to your Philips retailer.
- Do NOT use your WebCam in the water.
- Protect the WebCam from oil, vapour, steam, moisture, and dust.
- Never point the WebCam lens at the sun.
Copyright
Copyright© 2003 by Philips Consumer Electronics B.V. All rights reserved. No part of this publication may be reproduced, transmitted, transcribed, stored in a retrieval system or translated into any language or computer language, in any form or by any means, electronic, mechanical, magnetic, optical, chemical, manual or otherwise, without prior written permission from Philips.
Brands and product names are trademarks or registered trademarks of their respective companies.
Installing the WebCam software
The software supplied only works on PCs with the operating systems Microsoft® Windows®, XP and Vista.
Notes!
- Unplug all your USB devices (except USB keyboard and USB mouse) before you start.
- Do not plug in your WebCam yet. Run the Installation CD-ROM first.
- Have your Windows® CD-ROM at hand.

natural_image
Illustration of a hand placing a circular object onto a device (no text or symbols visible)I Place the installation CD-ROM in your PC's / laptop's CD-ROM / DVD drive.
After a couple of seconds the 'Language selection' screen appears.
Note!
If the 'Language selection' screen does not appear automatically, open the Microsoft® Windows® Explorer and double click on the 'Set-up.exe' icon in the CD-ROM directory.

2 Select your language.
Installation continues automatically.

The 'Welcome' screen appears.
3 Click 'Next' to continue.

The 'Manual' screen appears.
4 Select the first option if you wish to read the user manual before continuing installation. You can print out the manual so you will have it at hand during the rest of the installation process.
After you read or printed the user manual, continue installation by selecting the second option.
Installation
EN
Or:
Select the second option if you wish to continue installation.
Click 'Next' to continue.
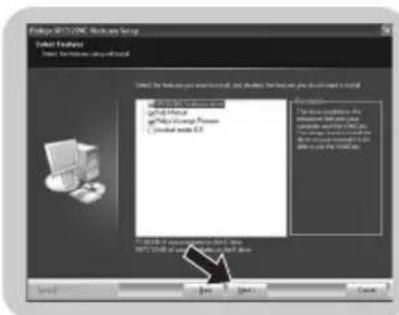
The 'Installation' screen appears. The items that can be installed are shown on the left side of the screen. An explanation of each item is given on the right side. All items are already selected for installation.
5 Click the 'Next' button if you wish to install all items.
Or:
If there are certain items you do not wish to install, check the boxes before these items.
Select at least 'SPC520NC WebCam Driver' and 'Philips VLounge' for SPC520NC WebCam as well as for SPC525NC WebCam (software is the same for both WebCams). Click the 'Next' button.

The following software license agreement appears.
6 Click on 'Yes' to continue the installation.

The following screen appears when the installation was successful.
7 Select the user manual.
Or:
Click 'Next' to continue.

The 'Reboot' screen appears.
8 Select 'Yes' to restart your PC / laptop.
V(ideo)-Lounge desktop shortcut '!' will be installed after installation. Via VLounge you have access to all camera-related software. See 'Operating the WebCam'.
9 You can now connect your WebCam.
Connecting the WebCam to your PC / laptop

natural_image
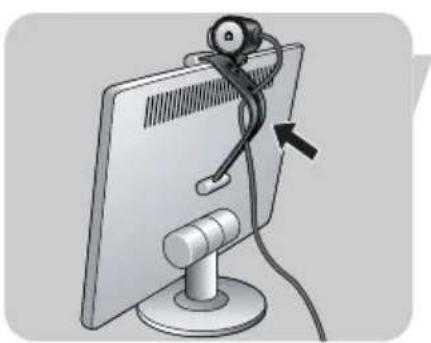
Illustration of a computer monitor with a cable and a head-mounted connector, no text or symbols present1 Be sure to run the installation CD first, before connecting the WebCam to the PC / laptop.
2 Turn on the PC / laptop.
3 Connect the USB connector of the USB cable to the USB port of the PC / laptop.
The WebCam will now derive its power from the PC / laptop.
4 Aim the webcam as required.
5 Push the USB cable into the cable management slot.
6 Use the clamp and the two rubber rims to attach the WebCam to your PC monitor or laptop screen.
7 Connect the headset audio cable (SPC525NC only) to the sound card of your PC / laptop.
- Connect the black headphone plug ( ) to the headphone socket of the PC sound card.
- Connect the grey microphone plug (!) to the microphone or green socket of the sound card.
WebCam settings
EN
The Philips SPC520NC/SPC525NC video properties can be changed:
- from within an application;
- by clicking the VProperty icon "GT" in the Windows taskbar; bottom right of your screen;
- by selecting 'PC Camera Settings' under 'Preferences' in the VLounge selection screen;
- by clicking the 'icon in the VLounge selection screen.
General settings

① Flickerless image
The Flickerless image option should only be used under flickering light conditions (e.g. fluorescent or neon lamps) to prevent flickering or strangely colored video images. If this option is used under normal lighting conditions the video image may be overexposed.
② Region
If you are using the Philips SPC520NC/SPC525NC in Europe, select '50 Hz' and if you are using the Philips SPC520NC/SPC525NC in North America, select '60 Hz'. For Asia this setting is dependent on the local mains output. E.g. for China, select '50 Hz' and for Taiwan, select '60 Hz'. For Japan the setting is region dependent.
Please check your local mains output to find the correct 'Region' setting.
Video settings

③ Full automatic control: on/off
This full automatic control mode provides a very easy way to get the best out of your Philips SPC520NC/SPC525NC WebCam.
Or you can choose to have maximum manual control over the WebCam settings by switching the full automatic control mode off. Full automatic control 'on' is the preferred setting for normal use.
Techniques active within full automatic control mode are:
- Automatic exposure control and automatic white balance control, to provide the best video source signal possible;
- Automatic frame rate selection for improved WebCam sensitivity in low light conditions.
④ Frame rate
You can use the scroll open menu to set the frame rate of the video you wish to capture. E.g. 30 fps means that the WebCam will capture video at 30 frames per second.
⑤ Auto Exposure
The exposure is the amount of light received by the sensor and is determined by how long the sensor is exposed to capture a snapshot or video frame. The result depends on the sensitivity of the sensor. The WebCam will find the optimal setting if you select the automatic exposure option.
Shutter speed
The shutter speed determines how long the camera shutter remains open as a picture is taken. The slower the shutter speed, the longer the exposure time. The shutter speed controls the total amount of light reaching the sensor.
Use the slider to set the desired shutter speed.
Gain
In video, gain is the amount of white in a video picture. Use the slider to set the desired gain level.
⑥ Reset
Press this button if you would like to reset the WebCam settings to the default factory settings.
⑦ Restore
Press this button if you would like to restore your personal preferred settings.
⑧ Save
Press this button if you would like to save your personal preferred settings.
⑨ Auto White Balance
Most light sources are not 100% pure white but have a certain ‘color temperature’. Normally our eyes compensate for lighting conditions with different color temperatures. If the automatic white balance is selected, the WebCam will look for a reference point which represents white. It will then calculate all other colors based on this white point and compensate the other colors accordingly, just like the human eye.
You can also select fixed settings for 'Indoor', 'Outdoor' and 'Fluorescence' conditions or use the 'Red' and 'Blue' sliders if you would like to set the WebCam according to your personal color temperature preferences.
⑩ Brightness
Brightness enables you to adjust the brightness of the displayed image or video to suit your own preference.
Use the slider to find your preferred setting.
⑪ Contrast
Contrast enables you to control the ratio between dark and light according to your own preference.
Use the slider to find your preferred setting.
⑫ Gamma
Gamma enables you to brighten dark areas within the displayed image or video and visualize more details without over-exposing already light areas.
Use the slider to find your preferred setting.
⑬ Saturation
Saturation enables you to set the color reproduction from black and white to a full color image or video according to your own preference.
Use the slider to find your preferred setting.
⑭ Black and white
The 'Black and white' checkbox is used to switch from color images to black and white and back.
⑮ Backlight compensation
Turn on the backlight compensation to improve the image quality when you have a scene where the background has a high illumination level (for instance when you are sitting in front of a bright light).
⑯ Mirror
Clicking the 'Mirror Image' checkbox flips the image horizontally. You can use this feature when you want to use the Philips SPC520NC/SPC525NC and monitor as a mirror, or to take pictures of mirrored images.
WebCam settings
EN
Audio settings
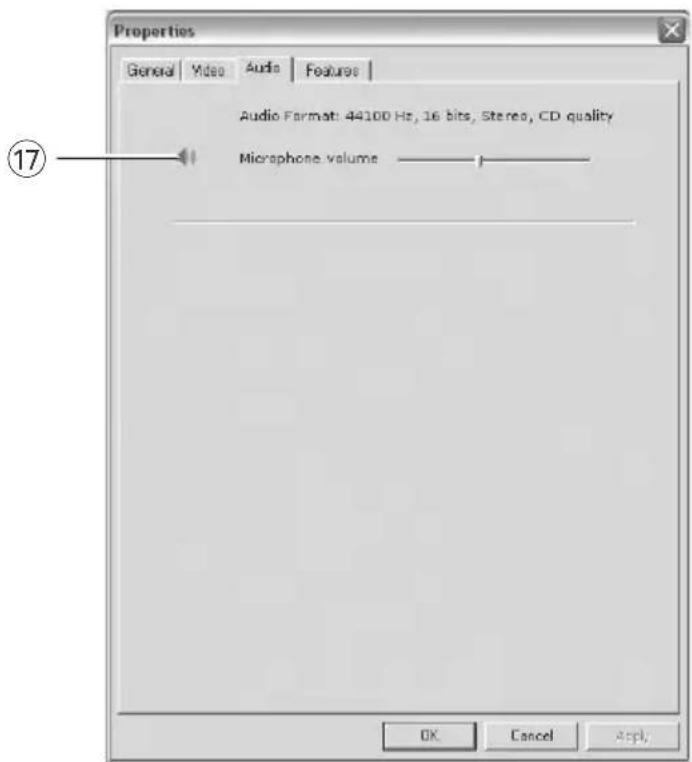
⑰ Volume slider
This slider provides manual control over the microphone.
Features settings

⑱ Face tracking
If you enable the face tracking option the WebCam will track your face. This will give your more convenience while video chatting, because you don't need to sit still during your video conversation.
⑲ Digital zoom
Use the digital zoom option to get an object closer.
Digital zoom magnifies the pixels but not the actual image.
It degrades image quality.
Use the slider to set the desired volume level.
Operating the WebCam
EN
VLounge
All applications can be accessed via the Philips V(ideo)-Lounge application.VLounge is the central application for easy access to your Philips WebCam.
- Start VLounge:
- through the Windows QuickLaunch menu in your taskbar;
- via the program group 'SPC520NC WebCam';
- by clicking the VLounge icon 'on the desktop.
The VLounge application will now be initiated and the VLounge selection screen appears.
Selecting your WebCam
When more than one WebCam is installed and connected to your PC / laptop, you can select the WebCam you wish to operate.

1 Open the 'Preferences' menu.
2 Select 'Video Device'.
All WebCams connected are shown.
3 Select the WebCam you wish to operate.
4 Click the 'OK' button.
The VLounge-selection screen for the selected WebCam appears.
Capturing images / making video recordings
In the 'Capture' menu you can capture images and make video recordings and transfer, preview, edit, e-mail, print and organise your photos and video recordings.

- Click the 'Capture' tab to open the Capture menu.
The camera starts operating immediately.
- Click 'IMAGE' to capture an image.
- Click 'VIDEO' to start a video recording. Click 'VIDEO' again to stop recording.
- Click ' to maximize the lower part of the screen and display the camera preview.
- Click 'to maximize the upper part of the screen and display your captured images and video recordings.
- Move your cursor onto a button to see a brief explanation of the button function.
- If you need assistance select 'Application Help' in the 'Help' menu.
Operating the WebCam
EN
Instant messaging and Internet calling (video chatting, video calling and VoIP)
The Philips SPC520NC/SPC525NC WebCam works with all free instant messaging and VoIP (Voice over Internet Protocol) applications such as Skype, Windows® Live Messenger, Yahoo! Messenger, AOL Messenger and QQ.

1 Click the 'Communicate' tab to open the Communicate menu.
The available applications are shown by their icons.
2 Click the appropriate 'Install' button to download and install an application.
3 Follow the on-screen instructions during downloading and installing.
4 After installing an application, make the required WebCam settings within the application in order to be able to properly use the WebCam via the application.
5 Click the appropriate 'Launch' button to start an application.
Technical specifications
Sensor.....VGA CMOS
Real video resolution (Max.)....640 x 480
Real still image resolution (Max.)....640 x 480
Interpolated still image resolution (Max.)....1.3 MP
Frames per second....30 fps
F-number....2.6
Lens view angle ....52 degrees
Minimum subject illumination....< 10 lux
Data format....I420, IYUV
Interfacing......UVC
USB cable length....1.5 m
Microphone ....- Digital built-in - Multimedia headset supplied (SPC525NC)
Power.....Supplied via USB cable
Voltage requirements....5V (-), 0.5A
Important information
EN
Disclaimer
Philips makes no warranty of any kind with regard to this material, including, but not limited to, the implied warranties of merchantability and fitness for a particular purpose.
Philips assumes no responsibility for any error that may appear in this document. Philips makes no commitment to update nor to keep current the information contained in this document.
FCC compliance
This device complies with Part 15 of the FCC Rules.
Operation is subject to the following two conditions:
I this device may not cause harmful interference, and
2 this device must accept any interference received, including interference that may cause undesired operation.
Note!
This equipment has been tested and found to comply with the limits for a Class B digital device, pursuant to Part 15 of the FCC Rules. These limits are designed to provide reasonable protection against harmful interference in a residential installation. This equipment generates, uses and can radiate radio frequency energy and, if not installed and used in accordance with the instructions, may cause harmful interference to radio communications. However, there is no guarantee that interference will not occur in a particular installation. If this equipment does cause harmful interference to radio or television reception, which can be determined by turning the equipment off and on, the user is encouraged to try to correct the interference by one or more of the following measures:
- Reorient or relocate the receiving antenna.
- Increase the separation between the equipment and receiver.
- Connect the equipment to an outlet on a circuit different from that to which the receiver is connected.
- Consult the dealer or an experienced radio/TV technician for help.
Any unauthorized modification to this equipment could result in the revocation of the authorization to operate the equipment.
Environmental information
Disposal of your old product
Your product is designed and manufactured with high quality materials and components, which can be recycled and reused.

natural_image
Symbol of a trash bin crossed with no text or numbers, representing waste sorting or disposal (no text present)When this crossed-out wheeled bin symbol is attached to a product it means the product is covered by the European Directive 2002/96/EC
Please inform yourself about the local separate collection system for electrical and electronic products.
Please act according to your local rules and do not dispose of your old products with your normal household waste. The correct disposal of your old product will help prevent potential negative consequences for the environment and human health.
WARNING
Plastic bags can be dangerous. To avoid danger of suffocation, keep this bag away from babies and small children.
System requirements
- Microsoft® Windows® XP or Vista;
- Pentium ^ III, 500 Mhz or equivalent;
• 128MB RAM and 100 MB free hard disk space; - One free USB port and CD-ROM or DVD drive.
Disclaimer of warranty
The software on the CD-ROM supplied is sold ‘as is’ and without warranties whether expressed or implied. Because of the various software and hardware environments into which this program may be put, no warranty of fitness for a particular purpose is offered.
Limitations of damages
The vendor will not be liable for any indirect, special, incidental or consequential damages (including damages for loss of business, loss of profits, or the like), whether based on breach of contract, tort (including negligence), product liability or otherwise, even if the vendor or its representatives have been advised of the possibility of such damages and even if a remedy set forth herein is found to have failed its essential purpose.
Where to go for information and support?
Please visit our website: www.philips.com for the latest product information.
Go to: www.philips.com/support for the latest version of drivers and for troubleshooting tips.
Specifications are subject to change without notice.
Trademarks are the property of Koninklijke Philips Electronics N.V. or their respective owners.
2005 © Koninklijke Philips Electronics N.V. All rights reserved.
www.philips.com
- What's in the box?
- I Digital microphone
- Focus ring
- Clamp with rubber rims
- USB connector
- Rotating foot
- Snapshot button
- Power LED
- Headset with headphone and microphone
- Audio cable (SPC525NC only)
- Contents
- Things you should know
- Safety precautions
- Copyright
- Installing the WebCam software
- Notes!
- I Place the installation CD-ROM in your PC's / laptop's CD-ROM / DVD drive.
- Note!
- Select your language.
- Click 'Next' to continue.
- Installation
- Or:
- Click 'Next' to continue.
- Connecting the WebCam to your PC / laptop
- WebCam settings
- General settings
- ① Flickerless image
- ② Region
- Video settings
- ③ Full automatic control: on/off
- ④ Frame rate
- ⑤ Auto Exposure
- Shutter speed
- Gain
- ⑥ Reset
- ⑦ Restore
- ⑧ Save
- ⑨ Auto White Balance
- ⑩ Brightness
- ⑪ Contrast
- ⑫ Gamma
- ⑬ Saturation
- ⑭ Black and white
- ⑮ Backlight compensation
- ⑯ Mirror
- Audio settings
- ⑰ Volume slider
- Features settings
- ⑱ Face tracking
- ⑲ Digital zoom
- Operating the WebCam
- VLounge
- - Start VLounge:
- Selecting your WebCam
- Capturing images / making video recordings
- Instant messaging and Internet calling (video chatting, video calling and VoIP)
- Technical specifications
- Important information
- Disclaimer
- FCC compliance
- Environmental information
- Disposal of your old product
- WARNING
- System requirements
- Disclaimer of warranty
- Limitations of damages
Brand : PHILIPS
Model : SWV2152W
Category : Coaxial cable