
DSC112BL - Camera PHILIPS - Free user manual and instructions
Find the device manual for free DSC112BL PHILIPS in PDF.


| Product Type | Digital Camera |
| Brand | Philips |
| Model | DSC112BL |
| Resolution | 16 megapixels (4608 x 3456) |
| Optical Zoom | 5x |
| Digital Zoom | 5x (up to 25x combined) |
| LCD Monitor | 2.7-inch color LCD |
| Internal Memory | 128 MB (approx. 95.5 MB usable) |
| External Memory Support | SD (up to 4GB), SDHC (up to 32GB), SDXC (up to 64GB) |
| Battery Type | Rechargeable Lithium-ion battery |
| Dimensions (W x H x D) | 98.2 x 59.9 x 22.2 mm |
| Weight | 110 g (without battery) |
| Image File Format | JPEG (EXIF 2.2) |
| Video File Format | AVI (MJPEG) |
| Audio File Format | WAV |
| Maximum Video Resolution | 1280 x 720 (HD) |
| Flash Modes | Auto, Red-eye Reduction, Forced On, Slow Sync, Forced Off |
| Scene Modes | 35 modes including Auto, Portrait, Landscape, Sports, etc. |
| ISO Sensitivity | Auto, 100, 200, 400, 800, 1600, 3200, 6400 |
| White Balance | Auto, Daylight, Cloudy, Tungsten, Fluorescent 1, Fluorescent 2, Custom |
| Shutter Speed | Auto: 1 - 1/2000 sec; Manual: 15 - 1/2000 sec |
| Interfaces | USB 2.0, AV out (3-in-1 cable) |
| Connectivity | PictBridge compatible |
| Power Saving | Yes (auto sleep and LCD save) |
| Image Stabilization | Yes (Stabilizer function) |
| Face Detection | Yes (Face Tracking, Smile Capture, Blink Detection) |
Frequently Asked Questions - DSC112BL PHILIPS
User questions about DSC112BL PHILIPS
0 question about this device. Answer the ones you know or ask your own.
Ask a new question about this device
Download the instructions for your Camera in PDF format for free! Find your manual DSC112BL - PHILIPS and take your electronic device back in hand. On this page are published all the documents necessary for the use of your device. DSC112BL by PHILIPS.
USER MANUAL DSC112BL PHILIPS
Safety and Handling Precautions.... 3
Using this Menu 4
Introduction 5
System Requirements 5
Main Features 5
Package Contents....6
Camera Views 7
Camera Buttons 8
Navigation Control....9
Camera Memory.... 10
Getting Started....10
Attach the Camera Strap.... 10
Inserting the Battery 10
Inserting an SD/SDHC/SDXC Memory Card 11
Charging the Battery by USB 11
Turning the Power On and Off 12
Initial Settings.... 12
Modes 12
Using the LCD monitor 13
LCD Monitor Layout 13
Changing the LCD Monitor Display 18
Recording Images, Videos and Voices.... 18
Taking Images 18
Setting the Zoom Control 19
Using Flash.... 20
Setting the Focus Mode 20
Using the Function Menu 21
Using the Record Menu.... 25
Using Voices Recording 36
Recording Videos.... 40
Playback 42
Viewing in Single Navigation.... 42
Viewing Thumbnails 42
Zooming images.... 43
Playing Videos.... 43
Playing Voice Recording 44
Playing Voice Memo 44
Deleting an Image/Video/Audio 45
Playback Menu 45
Using the Setup Menu 54
Setting Sounds.... 54
Setting Power Save.... 54
Setting LCD Save.... 55
Setting Date & Time 55
Setting Language 55
Setting File Numbering 55
Setting TV Out 56
Setting LCD Brightness 56
Setting Memory Kit 56
Reset All 56
Making Connections 57
Connecting the Camera to a TV.... 57
Connecting the Camera to a PC 57
Connecting the Camera to a Printer 58
Setting the Print Mode Menu 59
Appendix....60
About Folder and File Names....60
Troubleshooting 60
Specifications 61
Preface
About this Manual
This manual is designed to assist you in using your new digital camera. All information presented is as accurate as possible but is subject to change without notice.
Copyright
This manual contains proprietary information protected by copyright. All rights are reserved. No part of this manual may be reproduced by any mechanical, electronic or other means, in any form, without prior written permission of the manufacturer.
© Copyright 2011
Federal Communications Commission (FCC) Compliance
This equipment has been tested and found to comply with the limits for a Class B digital device, pursuant to Part 15 of the FCC Rules. These limits are designed to provide reasonable protection against harmful interference in a residential installation. This equipment generates, uses, and can radiate radio frequency energy and, if not installed and used in accordance with the instructions, may cause harmful interference to radio communications. However, there is no guarantee that interference will not occur in a particular installation. If this equipment does cause harmful interference to radio or television reception, which can be determined by turning the equipment off and on, the user is encouraged to try to correct the interference by one or more of the following measures:
- Reorient or relocate the receiving antenna.
- Increase the distance between the equipment and the receiver.
- Connect the equipment to an outlet on a circuit different from that to which the receiver is connected.
- Consult the dealer or an experienced radio/TV technician for help.
Warning: A shielded-type power cord is required in order to meet FCC emission limits and to prevent interference to radio and television reception. Use only shielded cable to connect I/O devices to this equipment. Any changes or modifications not expressly approved by the manufacturer may void your warranty and service agreement.
Declaration of Conformity
This device complies with Part 15 of the FCC rules. Operation is subject to the following conditions:
• This device may not cause harmful interference.
- This device must accept any interference received, including interference that may cause undesired operation.
Trademark Recognition
Windows 2000/XP/Vista/Win7 are registered trademarks of Microsoft Corporation in the United States and/or other countries. Windows is an abbreviated term referring to the Microsoft Windows Operation System. All other companies or product names are trademarks or registered trademarks of their respective companies.
Safety and Handling Precautions
Camera Information
- Do not take apart or attempt to service the camera yourself.
- Do not expose the camera to moisture, or extreme temperatures.
- Allow the camera to warm up when moving from cold to warm temperatures.
- Do not touch the camera lens.
- Do not expose the lens to direct sunlight for extended periods.
- Do not use abrasive chemicals, cleaning solvents or strong detergents to clean the product. Wipe the product with a slightly damp soft cloth.
Battery Information
- Turn off the camera before installing or removing the battery.
- Use only the provided batteries or type of battery and charger that came with your camera. Using other types of battery or charger may damage the equipment and invalidate the warranty.
- When using Li-ion battery in this product, ensure that they are inserted correctly. Inserting the battery upside down can cause damage to the product and possibly cause an explosion.
- When the camera is used for an extended period of time, it is normal for the camera body to feel warm.
- Download all pictures and remove the battery from the camera if you are going to store the camera for a long period of time.
- The type of battery and the battery power level may cause the lens to be stuck up. Ensure you use the correct battery type and use a fully charged battery.
- Risk of explosion if battery is replaced by an incorrect type. Dispose of used batteries according to the instructions.
Using this Menu
Symbols used in this manual are explained below:
 | This indicates useful information when using your camera. |
 | This indicates important message that should be read before using the function. |
Introduction
Congratulations on your purchase of the new digital camera.
Capturing high-quality digital images is fast and easy with this state-of-the-art smart camera.
System Requirements
In order to get the most out of your camera, your computer must meet the following system requirements:
For Windows:
• Windows 2000/XP/Vista/Win7
- Processor: Pentium II 450MHz or above
• Memory: 512MB or above
• HDD space: 200MB or above
• 16bit color display monitor
• Microsoft DirectX 9.0C
• USB port and CD-ROM drive
For Macintosh:
• Power Mac G3 or later
• Mac OS 10.3.X (X=0\~9) \~ 10.6.6 or later
• Memory: 512MB or above
• Q.Time player ver. 6.0.3 or above
• USB port and CD-ROM drive
Main Features
• 16 mega pixels resolution
- Up to 5x optical zoom and 5x digital zoom
• 2.7 inch color LCD monitor
• 128 MB internal flash memory with optional external SD/SDHC/SDXC card
• Supports up to 4GB of SD card, and up to 32GB of SDHC card and to 64GB of SDXC card
- Easy-to-use button interface
• DCF, DPOF, PictBridge compatibility
- Slideshow to review still images
• A/V output to view your images, videos and audio on your TV
- USB port to transfer images, videos and audio to your PC
Package Contents
Please check the contents of your camera package. It should contain:

natural_image
Line drawing of a digital camera with no text or symbolsDigital camera
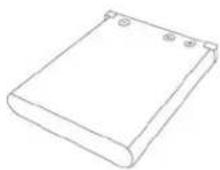
Rechargeable battery x 1 pcs

Battery charger (optional)

Wrist strap

USB adapter

USB cable

AV cable (optional)

CD-Rom

Quick Start Guide/
User Manual (optional)

natural_image
Line drawing of a closed bag or pouch (no text or symbols)Camera pouch (optional)
Camera Views
Front View

- Flash
- Self-timer LED
- Lens
- Microphone
Back View
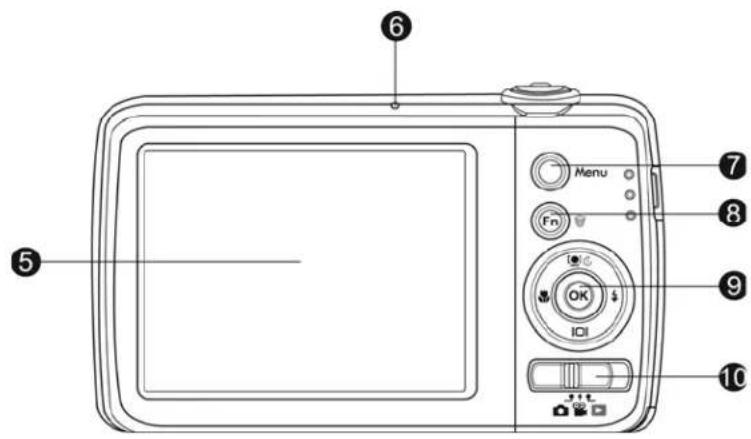
- LCD monitor
- LED indicator
- Menu button
- Function/Delete button
- OK button/4-way navigation control
- Mode Switch
Photo mode
Movie mode
Playback mode
Top View

- Power button
- Zoom dial
- Shutter button
Bottom View

- Battery/Memory card compartment
- Tripod screw hole
- Speaker
Left/Right View

-
USB/TV Out
-
Strap ring
Camera Buttons
Your camera is equipped with different buttons for ease of use.
| Button Description | |
| Power Press the | Power button to turn the power on/off. |
| Shutter | Press to capture an image or start/stop recording video or audio clip. |
| Zoom dial | In photo and movie mode, spin the zoom dial to left to zoom out, right to zoom in.In Playback mode, spin to zoom in to magnify image or zoom out enter 9-image/calendar thumbnails. |
| Menu Press to enter or exit menu/submenu. | |
| Function/Delete | In Photo and Movie mode, press to enter function menu.In Playback mode, press to delete an image, video or audio clip. |
Navigation Control
The 4-way Navigation Control and the OK button allow you to access the various menus available from the On Screen Display (OSD). You can configure a wide range of settings to ensure maximum results from your images and videos. Further functions of these buttons are as follows:

| No. | Description |
| 1 | Face Tracking/Rotate Button |
| 2 | Macro Button |
| 3 | Display Button |
| 4 | Flash Button |
| 5 | OK Button |
| Button Description | |
| OK | 1. Confirm a selection when using the OSD menus.2. In Playback Movie/Audio mode, press to Start video or audio playback. |
| Flash/Right | 1. In Photo Mode, press to scroll through the flash mode options. (Auto, Red-eye Reduction, Forced On, Slow Sync and Forced Off)2. In Playback mode, press to view the next image, video or audio clip.3. In playback Movie mode, press to Forward video playback.4. In Menu, press to enter the submenu or to navigate through the menu selections. |
| Macro/Left | 1. In Photo Mode, press to scroll through Macro options. (Super Macro, Pan Focus, Infinity and normal)2. In Playback mode, press to view the previous image, video or audio clip.3. In Playback movie mode, press to Rewind video playback.4. In Menu, press to exit a submenu or to navigate through the menu selections. |
| Up/Face Tracking/Rotate | 1. In Photo Mode, press to turn the face tracking function on and off.2. Playing Video/Audio file, press to Pause/Start video or audio playback.3. In Playback photo mode, press to rotate the image clockwise 90 degrees by each press of the button. This feature is applicable for still images only.4. In Menu, press to navigate through the menu and submenu selections. |
| Display/Down | 1. The LCD monitor can be changed into 5 different types such as Basic, Full, None, Guideline and Help screen.2. Playing Video/Audio file, press to stop video/audio playback.3. In Menu, press to navigate through the menu and submenu selections. |
Camera Memory
Internal memory
Your camera is equipped with 128MB of internal memory. Users can store files up to 95.5MB. If there is no memory card inserted in the memory card slot, all images, videos and audio clips recorded are automatically stored in the internal memory.
External storage
Your camera supports SD cards of up to 4GB in size. It also supports SDHC cards with a maximum capacity of 32GB. Then also supports SDXC cards with a maximum capacity of 64GB. If there is a storage card inserted in the memory slot, the camera automatically saves all images, videos and audio clips in the external storage card. The icon 📋 indicates the camera is using SD card.

Not all cards may be compatible with your camera. When purchasing a card, please check the card's specifications and take the camera with you.
Getting Started
Attach the Camera Strap

natural_image
Diagram of a device with cable and plug, showing internal components and directional arrows (no text or symbols)Inserting the Battery
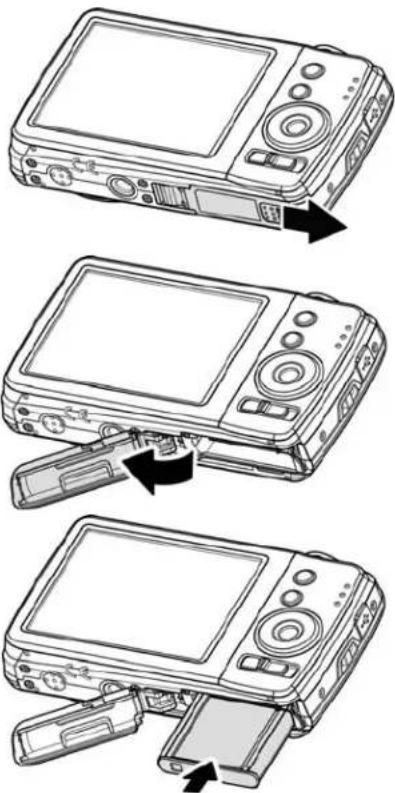
Follow these instructions to insert the rechargeable battery into the battery/memory card compartment. Please read "Battery Information" on page 4 before inserting/removing batteries.
-
Make sure the power is off before inserting the battery.
-
Unlock and open the battery/memory card compartment at the bottom of the camera.
-
Insert the battery into the compartment with the terminal facing inside the camera with correct orientation as shown.
natural_image
Three-step line drawing of a digital camera with an open lid, showing the device's internal components and status (no text or symbols present)- Close and lock the battery/memory card compartment.

natural_image
Line drawing of two views of a digital camera module showing internal components and adjustment arrows (no text or symbols)Inserting an SD/ SDHC/ SDXC Memory Card
Expand your camera's storage by using SD, SDHC or SDXC memory cards.
- Unlock and open the Battery/memory card compartment at the bottom of the camera.
- Insert the SD/SDHC/SDXC card into the memory card slot with the metallic part facing the back side of the camera.
- Push the SD/SDHC/SDXC card into the memory slot until it clicks into place.
- Close and lock the Battery/memory card compartment.
To remove the SD/SDHC/SDXC card
- Unlock and open the battery/memory card compartment.
- Gently push the card until it pops out.
- Pull out the card carefully.

natural_image
Line drawing of a digital camera with an open lid and scroll wheel (no text or symbols)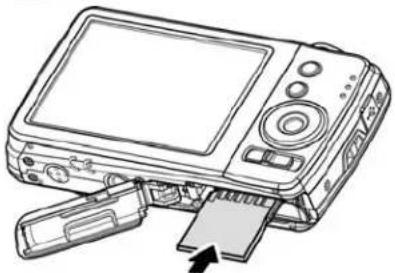
natural_image
Line drawing of a digital camera with an open lid and cable inserted (no text or symbols)
Windows 2000/XP are not support SDXC card (exFAT format). But in Windows XP (Service Pack 2 or 3), you can download exFAT patch update to support SDXC card.
Charging the Battery by USB
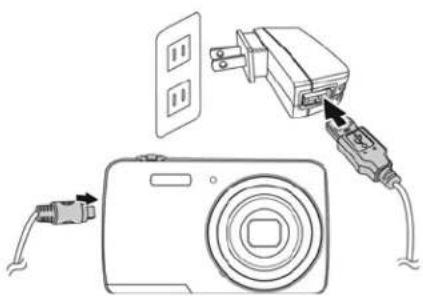
In other way charging the battery, you can use the USB cable to connect the camera with PC or USB adapter.
- Connect the camera with the USB cable as shown.
- Connect the other end with the USB adapter and plug it into a power outlet or with the USB port of PC directly for charging.
- When the battery is charging, the LED indicator lights up.
- When the battery is fully charged, the LED indicator goes off.
- When the battery is unusual charged, the LED indicator flashes rapidly.
- When the camera charges without the battery inside, the LED indicator goes off.
natural_image
Diagram showing a digital camera connected to an electrical outlet with plug connectors (no text or symbols)
It's recommended not operating the camera when charging.
Turning the Power On and Off
There are two ways to turn on the camera:
- The startup image displays briefly and the startup sound plays if enabled. The zoom lens extends and the camera is turned on in Record mode.
- The camera is turned on in Playback mode. The zoom lens is not extended.
To turn off the camera, press the Power button.
See "Modes" on page 12 to know more about Record and Playback mode.
Initial Settings
When you turn on your camera for the first time, you will be asked to do the initial settings of your camera. First is the setup of language menu. Specify in which language menus and messages are to be displayed on the LCD monitor.
Setting the Language
- Press ▲, ▼, ◀ or ▶ to move through the selection.
- Select a language, and then press OK to apply.
Setting the Date & Time
- Press ◀ or ▶ to move through the selection.
- Press ▲ or ▼ keys to change the value for the date and time.
-
Press OK to apply.
-
If necessary, press ☐Menu to close the menu. Now, you are ready to start taking images and videos.

Holding down ▲ or ▼ keys to change the values continuously.
Modes
Your camera has three modes:
Photo Mode
- Slide the mode switch to [ ] to capture images.
You can record audio clips by selecting Voice REC from scene mode in this mode.
Movie Mode
- Slide the mode switch to [icon] to record videos.
Playback Mode
- Slide the mode switch to [▶] to view and edit captured images or playback videos and audio clips. The recording of voice memo attached to images is available in this mode.
Using the LCD monitor
The LCD monitor shows all important information regarding camera settings as well as the visual image of your image or video. The display on the LCD monitor is called the On Screen Display or OSD.
LCD Monitor Layout
Photo Mode Screen Layout

| No. | Item | Description |
| 1 | Record Mode | Indicates the current mode. |
| 2 | Flash | Indicates flash settings. |
| 3 | Self-timer/Burst | Indicates drive mode settings. |
| 4 | Zoom indicator | Displays zoom. |
| 5 | Shots remaining | Indicates the remaining shots available. |
| 6 | Battery | Indicates battery level. |
| 7 | Storage media Indicates current storage media in use. | |
| 8 | Date stamp | Indicates date stamp is enabled. |
| 9 | AEB | Indicates AEB function is enabled |
| 10 | Stabilizer | Indicates stabilizer function is enabled. |
| 11 | Saturation | Displays saturation settings. |
| 12 | Contrast | Displays contrast settings. |
| 13 | Histogram | Graphic display of Brightness. |
| 14 | ISO | Displays ISO settings. |
| 15 | Focus area | Indicates focus area. |
| 16 | Shutter speed | Displays shutter speed settings. |
| 17 | Aperture value | Displays aperture settings. |
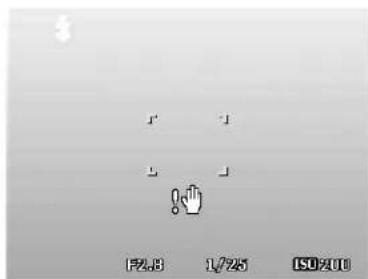
| 18 | Shake warning | Indicates that the camera is shaking. |
| 19 | Focus | Indicates focus is enabled. |
| 20 | Exposure | Displays exposure settings. |
| 21 | Face tracking | Indicates face tracking is enabled. |
| 22 | White balance | Displays white balance settings. |
| 23 | Metering | Displays metering settings. |
| 24 | Sharpness | Displays sharpness settings. |
| 25 | Quality | Displays quality settings. |
| 26 | Photo size | Displays photo size settings. |
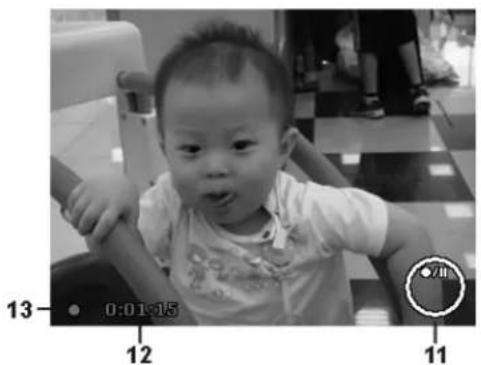
Movie Mode Screen Layout

Standby layout
natural_image
Black-and-white photo of a baby sitting in a chair, with no visible text or symbols on the image itself.Recording Layout
| No. | Item | Description |
| 1 | Record Mode Indicates the current mode. | |
| 2 | Zoom indicator Displays zoom. | |
| 3 | Time remaining | Indicates the remaining time of video available. |
| 4 | Battery Indicates battery level. | |
| 5 | Storage media Indicates current storage media in use. | |
| 6 | Focus area Indicates focus area. | |
| 7 | Focus Indicates focus is enabled. | |
| 8 | White balance Displays white balance settings. | |
| 9 | Metering Displays metering settings. | |
| 10 | Movie size | Displays movie size settings. |
| 11 | Key indicator | Displays the commands on 4-way Navigation Control button |
| 12 | Recorded time Displays recorded time. | |
| 13 | Recording status | Indicates recording status. |
| 14 | Pre-record | Indicates pre-record is enable |

The Pre-Record icon appears on the screen in red color as the same position as zoom indicator.
Playback Mode Screen Layout
The Playback mode display varies depending on the type of image being viewed.
Playback mode display of still images:

| No. | Item | Description |
| 1 | Playback mode | Indicates playback mode. |
| 2 | Protect | Indicates file is protected. |
| 3 | Voice memo | Indicates voice memo is attached. |
| 4 | Button intro | Indicates the button to press on the camera to play a video or audio file. |
| 5 | File no./Total no. | Indicates the file number over the total number of files in the storage card. |
| 6 Battery Indicates battery level. | ||
| 7 | Storage media | Indicates used storage memory. |
| 8 | Recording information | Displays recording information of the file. |
| 9 | DPOF | Indicates the file is marked for printing. |
| 10 | Image Size | Displays the image size settings. |
Playback mode of videos:


| No. | Item | Description |
| 1 | Playback mode | Indicates playback mode. |
| 2 | Protect Indicates file is protected. | |
| 3 | Video clip | Indicates the file is a video. |
| 4 | Button intro | Indicates the button to press on the camera to play a video or audio file. |
| 5 | File no./Total no. | Indicates the file number over the total number of files in the storage card. |
| 6 | Battery Indicates battery level. | |
| 7 | Storage media | Indicates used storage memory. |
| 8 | Recording date & time | Displays the date and time of the video clip. |
| 9 | Video size | Indicates the size of the video clip. |
| 10 | Volume Indicates the volume while playing. | |
| 11 | Video length | Display the total length of the video clip. |
| 12 | Played time Indicates the played time of the video. | |
| 13 | Playing status Displays playing status. | |
| 14 | Capture image Capture the screenshot and save. |
Playback mode of audio clips:
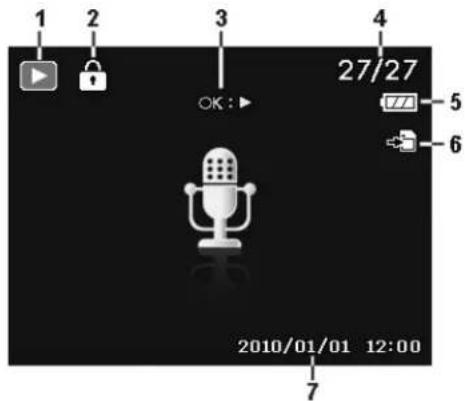

| No. | Item | Description |
| 1 | Playback mode | Indicates playback mode. |
| 2 | Protect | Indicates file is protected. |
| 3 | Button intro | Indicates the button to press on the camera to play a video or audio file. |
| 4 | File no./Total no. | Indicates the file number over the total number of files in the storage card. |
| 5 | Battery Indicates battery level. | |
| 6 | Storage media | Indicates used storage memory. |
| 7 | Recording information | Displays recording information of the file. |
| 8 | Volume | Indicates volume settings. |
| 9 | Audio length | Display the total length of the audio clip. |
| 10 | Played time Indicates played time. | |
| 11 | Playing status | Displays playing status. |
Changing the LCD Monitor Display
The type of information displayed on the LCD monitor can be changed using the ▼ button. Press the ▼ button repeatedly to change the LCD display from one type to another. In Photo/Movie Mode, the LCD display can be changed into any of the following:
- Basic
• Full - None
• Guideline - Help screen

- The OSD information may vary depending on the record mode type.
- The following icons, if enabled, are still displayed on the LCD even when OSD off or Guide lines on: AEB, Face tracking, Drive mode, and Focus.
- Use the "Guide lines" to properly set image for capture.
In Playback mode, the LCD display can be changed into any of the following:
- Basic
• Full - None
- Help screen

LCD display cannot be changed in the following situations:
- Adjusting Aperture value/Shutter speed under Manual exposure mode.
- Adjusting Aperture value under Aperture Priority mode.
- Adjusting Shutter speed under Shutter Priority mode.
• Recording video or audio clips - Playing video or audio clips
- Playing slideshow
Recording Images, Videos and Voices
Taking Images
Now that you are familiar with your camera, you are now ready to take your images. Taking images with your camera is very simple.
-
Turn on the camera by pressing the Power button.
-
Slide the Mode switch to Photo mode

-
Frame the shot using the focus bracket on the LCD monitor. See illustration on the right.
-
Pressing the Shutter button down halfway automatically focuses and adjusts the exposure, and pressing the Shutter button down fully captures the images.
When the shake warning icon 📁 appears, hold the camera steadily, with your arms at your side or use a tripod to stabilize the camera to prevent blurred images.

Setting the Zoom Control
Using a combination of 5 times optical zoom and 5 times digital zoom permits zoom photography at up to 25 times magnification. While the digital zoom can be a useful feature, the more an image is enlarged (zoomed), the more pixelated (grainier) the image will appear. Please refer to "Setting the Digital Zoom" on page 39 on how to setup digital zoom.
To adjusts the optical zoom:
- Spin the Zoom dial to zoom in or zoom out an image.
- The zoom indicator appears on the LCD monitor. W□T
Zoom dial
- Spin the dial clockwise (right) to zoom in.
- Spin the dial counterclockwise (left) to zoom out.


To adjusts the digital zoom:
- Activate digital zoom. See "Setting the Digital Zoom" on page 39.
- Spin the Zoom dial clockwise/counterclockwise optically zooms in/out to the maximum until it stops.
- Release the Zoom dial.
Optical zoom 1X to 5X Digital zoom 1X to 5X


Digital zoom is not activated in recording videos
Using Flash
When taking pictures in difficult lighting conditions, use the Flash/Right button to get correct exposure. This function cannot be activated in recording videos or continuous shooting.
To activate Flash:
- Press the Flash/ Right button on your camera repeatedly until your desired flash mode is displayed on the LCD monitor.
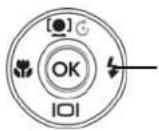
Flash/ Right button
Your camera is equipped with five flash modes:

AUTO. The flash fires automatically whenever extra g is needed.

Red-eye reduction. The flash fires twice to reduce the e effect.

Forced on. The flash fires whenever you press the other button regardless of lighting conditions.

Slow sync. The flash fires with a slow shutter speed.
Auto flash is enabled
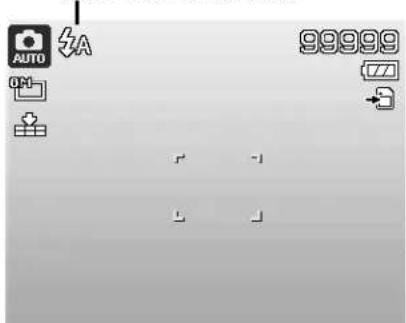

Forced off. The flash is turned off.

- Flash function is only available in shooting still images but not available in Burst and AEB modes.
- Do not charge the flash while spinning the Zoom dial. Charge the flash after releasing the zoom dial if necessary.
Setting the Focus Mode
This function allows users to define the type focus when recording a still image or a video clip.
To set the Focus mode
- Press the Macro/ Left button repeatedly until the desired focus mode icon is displayed on the lower left corner of the LCD monitor.
Macro/ Left button

Your camera supports the four focus modes:
Normal. With normal focus, the focus range starts from 0.1m. When the camera is set to Normal mode, there is no icon displayed on the screen.

Super Macro. This mode is designed for close-up photography. When Super Macro is set, the focus cannot be adjusted until Super Macro is canceled.

Pan Focus. The focus of this mode is in the maximum Depth of Field (DOF), not designing for close-up photography.

Infinity. When Infinity is set, the camera focuses on distant objects.
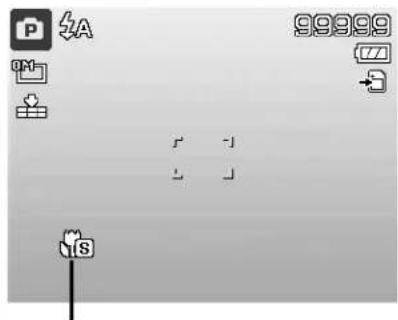
Focus enabled
Using the Function Menu
The Function Menu is used to adjust capture settings in Photo Mode. It contains My Mode, Photo Size, Quality, EV Compensation, White Balance, ISO, Metering, and Color Mode.

Press the FUNC button of your camera to launch the Function Menu. Press the FUNC button again to close the menu.
Menu Options
- The Menu bar displays the current status of your camera settings. Only the available functions for the settings are shown as icon on the menu bar.
- The available options for each item on the menu bar are shown in the Menu options.
- Use the ◀ or ▶ key to move through the menu selections then press the OK button to save and apply changes.
Menu bar

My Mode
- The My Mode function displays the 5 most recent modes used in order. When you move through the different modes in the menu options, the items on the menu bar changes synchronously to the corresponding available settings.
- Auto mode is fixed in the first of Menu options.

Photo Size
The Photo Size function is used to set the resolution before you capture the image. Changing the Photo Size affects the number of images that can be stored in your memory card. The higher the resolution, the more memory space is required.

The table below shows the Photo Size values for still images.
| Icon | Pixel Size | Printing Size Suggestion |
| 16M | 4608 x 3456 | A2 Size |
| 3:2 | 4608 x 3072 | Standard print paper |
| 8M | 3264 x 2448 | A3 Size |
| 5M | 2592 x 1944 | A4 Size |
| Icon | Pixel Size | Printing Size Suggestion |
| 3M | 2048 x 1536 | 4" x 6" |
| 16:9 | 1920 x 1080 | HDTV |
| VGA | 640 x 480 E-mail | |
Quality
The Quality sets the quality (compression) at which the image is captured. The quality determines the amount of compression applied to your images. Fine quality would give you the best images with sharper details and less compression. However, the higher the quality, the more memory space is required in your memory card.

EV Compensation
Images can be captured with the overall scene intentionally made brighter or darker. These settings are used when a suitable brightness (exposure) cannot otherwise be obtained in circumstances where the difference in brightness between the subject and the background (the contrast) is large, or when the subject that you wish to capture is very small within the scene. Available for still images only.
- To adjust EV settings, press the ◀ or ▶ keys to increase/decrease the value. As you adjust the settings, the LCD monitor synchronously displays the image applying the EV settings. Press the OK button to save and apply changes.

White Balance
This sets the white balance for a variety of lighting conditions and permits images to be captured that approach the conditions that are seen by the human eye.
- As you move through the selection, you can see the preview on the LCD monitor synchronously.
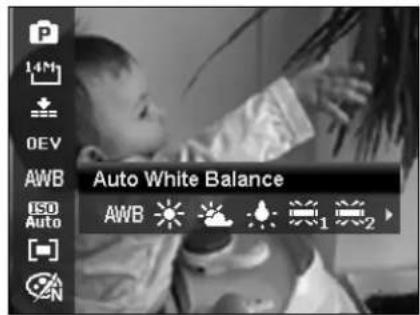
| Icon | Item | Description |
 | Auto White Balance | The camera automatically adjusts the white balance. |
 | Daylight Ideally used for bright sunny conditions. | |
 | Cloudy Ideally used for cloudy conditions. | |
 | Tungsten | Ideally used for indoor images with tungsten or halogen lighting without a flash. |
 | Fluorescent 1 Ideally used for indoor images with bluish fluorescent lighting conditions. | |
 | Fluorescent 2 Ideally used for indoor images with reddish fluorescent lighting conditions. | |
 | Custom | Used when light source cannot be specified.Press the Shutter button for the camera to automatically adjust the appropriate white balance setting according to the environment. |
ISO
This sets the sensitivity for capturing images. When the sensitivity is raised (and the ISO figure is increased), photography will become possible even in dark locations, but the more pixelated (grainier) the image will appear.
- Use a higher ISO setting in dim conditions and a lower ISO setting in brighter conditions.


If the Stabilizer is enabled, ISO is automatically set to Auto and cannot be adjusted.
To adjust ISO disable Stabilizer first.
Metering
This sets the metering method for calculating the exposure.
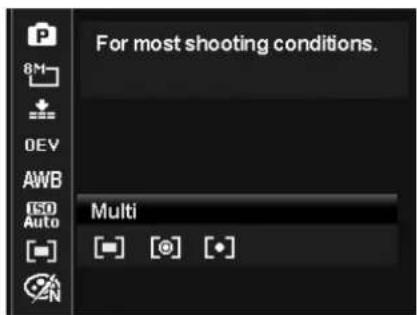
| Icon | Item | Description |
| [zzc8] | Multi The entire area of the screen is measured, and the exposure is calculated. | |
| [G6wc] | Center | Averages the light metered from the entire frame, but gives greater weight to the subject matter at the center. |
| [w86w] | Spot | A very small portion of the center of the screen is measured, and the exposure is calculated. |
Color Mode
The Color Mode function applies different colors or tones for a more artistic effect on the still images or videos.
- As you move through the selection, the preview on the LCD monitor changes synchronously.
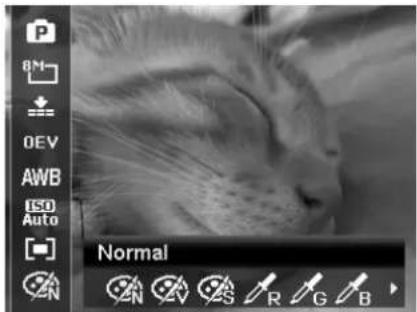
| Icon | Item | Description |
 | Normal The camera records normally. | |
 | Vivid | The camera captures the image with more contrast and saturation emphasizing on the bold colors. |
 | Sepia Images are captured in sepia tones. | |
 | Color Accent (Red) Retains red tone while the rest of the scene becomes black and white. | |
 | Color Accent (Green) | Retains green tone while the rest of the scene becomes black and white. |
 | Color Accent (Blue) Retains blue tone while the rest of the scene becomes black and white. | |
 | B&W Images are captured in black and white. | |
 | Vivid Red | Captured image becomes reddish. Ideally used to record images like flowers and cars to make them more vivid. |
 | Vivid Green | Captured image becomes greenish. Ideally used to record images like mountains and lawns to make them more vivid |
 | Vivid Blue | Captured image becomes bluish. Ideally used to record images like the sky and the ocean to make them look more vivid. |
Using the Record Menu
If you are in Photo Mode, you can access the Record menu simply by pressing the MENU button on your camera.
When the menu is displayed, use the 4-way navigation control and the OK button to move through menu selections and apply your desired settings. To close the menu anytime, press the menu button again.
Record Menu
The Record menu allows you to change modes, and setup other capture settings.
To go to Record Menu:
Set the mode switch Photo Mode [☐].

to launch the Record Menu.
2. Use the ▲ or ▼ keys to move through the menu
3. To select an item, press ▶ or OK button.
4. Change the submenu settings using the 4-way navigation control.
5. Press the OK button to save and apply settings.

Setting the Scene Mode
By simply selecting one of the following 35 modes, you can capture the image or record the audio with the most appropriate settings.
- From the Record Menu, press to select Scene Mode.
- Use the navigation controls to move through the selection.
- Press the OK button to save and activate the selected scene mode.

The table below shows the available scene mode settings.
| Icon | Item | Description |
 | Auto | The simplest way to shoot basic images. Settings are adjusted automatically. |
 | Program | The camera automatically adjusts suitable shooting settings like shutter speed and aperture values. |
 | Intelligent Scene | The camera detects the shooting conditions and automatically switches to the appropriate scene mode. |
 | Portrait | Focus on portraits and soften the background to give the image a sense of depth. Enhance natural skin tones. |
 | Landscape This feature is used to emphasize wide scenic views. | |
 | Sunset This feature enhances the red hue for recording sunset images. | |
 | Backlight | This feature is used to capture the image of a backlight object by changing the metering. |
 | Kids This feature is used to capture still images of moving kids. | |
 | Night Scene This feature is used to capture images with night scenery background. | |
 | LOMO This feature is used to capture images with over-saturated colors, off-kilter exposure or blurring. | |
 | Fireworks For shooting firework displays in vivid colors. It's recommended to use a tripod. | |
 | Snow This feature is used for beach and snow scenes. | |
 | Sports This feature captures still images in high speed motions. | |
 | Party This feature is used for wedding or indoor party settings. | |
 | Candlelight This feature is used to capture warm candle light effects. | |
 | Night Portrait This feature is used to capture portrait pictures with night or dark background. | |
 | Soft Skin This feature enhances skin tone thus facial skin appears smooth. | |
 | Flowing Water This feature enhances smooth effects like water or silk. | |
 | Food This feature is used to capture food images. The increased saturation in this mode makes the captured image more enticing. | |
 | Building This feature enhances the edges of captured images. | |
 | Text This feature enhances the black and white contrast normally used when capturing text images. | |
 | Foliage This feature boosts the saturation of greens to give a rich color to foliage. | |
 | Auction This feature combines up to 4 shots into a single image and provides 4 patterns to select for usage of auction. | |
 | Smile Capture This feature uses face tracking to auto detect faces to capture. When smiles are detected, it continuously captures the image. | |
 | Blink Detection This feature detects if the subject blinked an eye when the image is captured and gives the user an option whether to save it or not. | |
 | Pre-composition This feature captures an image temporarily as a reference. Full press shutter after referring the subject to the reference point. | |
 | Love Portrait This feature uses face tracking to auto detect faces to capture portraits images without the help of others. When over two faces are detected, AF is automatically activated. The camera starts count down and captures a picture in two seconds. | |
 | Self Portrait | This feature set zoom to wide end. When one face is detected, AF automatically activated and plays the sound (Bi) for notice. Then camera starts count down and captures a picture in two seconds. |
 | D-Lighting This feature enhances the shadow and highlight details of an image. | |
 | Fisheye Lens This feature capture images with fisheye lens effects. | |
 | Photo Stitch This feature combines a panoramic photo from multiple shots. | |
 | Aperture Priority | This feature lets users to adjust the aperture value and the camera automatically selects the shutter speed to match the brightness. |
 | Shutter Priority | This feature lets users to adjust the shutter speed and the camera automatically selects the aperture value to match the brightness. |
 | Manual Exposure | This feature lets users to adjust the shutter speed and aperture value to correctly expose your images. |
 | Voice REC This mode is used to record audio clips. |
After selecting the scene mode, the selected mode, except Voice Rec, will be added to the forefront in My Mode of Function Menu. In the Menu Options, the Auto mode is fixed and the other 5 items can display the most recent used modes. See "Using the Function Menu" on page 21.
Using Intelligent Scene
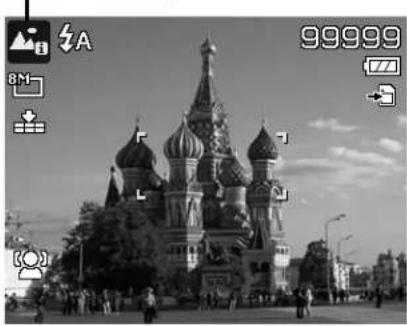
This feature is most useful for novice users to capture great images even without basic knowledge of photography. Simply frame the shot with the help of Intelligent Scene Mode, the camera automatically recognizes 11 kinds of scenes - Portrait, Landscape, Sunset, Macro, Text, Snow, Backlight, Backlight Portrait, Night Scene, Night Portrait and Foliage - and selects the ideal settings.
Intelligent scene icon. After the camera detects the shooting conditions, this icon changes to show the detected scene mode.

natural_image
Black-and-white exterior view of Saint Basil's Cathedral in Moscow, showing its iconic onion domes and surrounding urban street (no signage or text overlays)To activate Intelligent Scene
- Select from the Scene Mode submenu.
- Focus the camera on the subject to capture.
- The camera detects the shooting conditions and switches to an appropriate scene mode.
- Half press the Shutter button to focus the subject. The frame turns green to indicate focus is set.
- Press the Shutter button to take the shot.
The camera changed to Landscape mode automatically.
natural_image
Black-and-white exterior view of St. Peter's Basilica in Moscow, showing its iconic onion domes and surrounding urban street (no signage or text overlays)Using Kids Mode
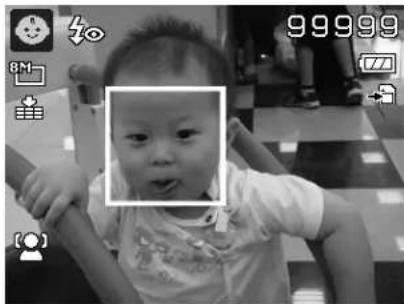
Tactically, kids are the most difficult to photograph. They tend to be highly animated and can be a real challenge to make them pay attention for more than just a second or two. To capture a great moment for your kids, just keep the camera in kid mode. The mode provides higher shutter speed and always focuses on moving subject.
natural_image
Black-and-white photo of a baby in a wheelchair, no visible text or symbols on the image itselfUsing Sports Mode
When you need a series of sports motion images, such as a golf swing, or try to capture the images of a flying hummingbird/butterfly, be sure to switch the scene mode to sports mode. This mode provides shutter in Burst speed (Keep shooting images long as the Shutter button is pressed) which allows you to capture a sequence of pictures that are frames apart clearly.

Make sure you have plenty of memory in your memory card as you will need it when you start shooting.
Using Party Mode
Let the Party mode on! It can be difficult to get everyone on a party. While you have the whole gang together, take a group or family portrait. Party mode features on Red-eye reduction flash and face tracking. You'll miss fewer shots, and have more time to focus on enjoying the party.
Using Soft Skin mode
When the soft skin mode is activated, it makes wrinkles and lines look less conspicuous, while preserving resolution in areas of the picture outside of the skin. The camera detects skin color area, such as the face and processes the image to make the skin appear smooth.
Using Food Mode
How to share your dining experiences and comments of interesting widgets on your blog by close-up images? Just get the camera and set the scene with food mode. This mode features on macro focus and auto flash designed for close-up photography.

natural_image
Plated food dish with sandwich, bread, and dipping sauce (no visible text or symbols)Macro focus and Auto Flash are enabled by using Food mode.
Using Foliage Mode
A scenic image, such as a garden or forest scene, that full of dull green colors is boring. In foliage mode, the greens, blues, are brilliantly enhanced making scenic pictures pop out with bright color.
Using LOMO Mode
The LOMO mode applies the following effects on the photo:
- Over-saturated colors
- Off-kilter exposure
- Blurring
- Darkening around the edges of photo

natural_image
Two people joyfully carrying a fan with a yellow flower and red scarf against a blue sky (no text or symbols visible)Original

natural_image
Two people joyfully celebrating under a blue sky with a yellow flower, no visible text or symbolsLOMO
Using Auction Mode
It's hard and wastes a lot of time to combine several images by software. Select Auction mode and choose a pattern, then take a few shots from different angle. The camera composes a combined image in lower resolution suited to online posting.
- Select Auction mode from Scene mode menu.
- Use ◀ or ▶ keys to choose a pattern.
- Press the OK button to start shooting.

- Frame the subject and press the Shutter button to take the first shot.

natural_image
Black-and-white photo of a knitted elephant toy with visible ribs and body structure (no text or symbols)- Press OK button to continue the second shot.
- Or, press Menu button to go back the first shot.

natural_image
Black-and-white image of a teddy bear toy in four quadrants with no visible text or symbols- Repeat step 4 to 6, until the pattern is filled in images.
- Press OK button to save the composed image.
- Or, press Menu button to go back last shot.

natural_image
Four-panel black-and-white photo collage showing knitted sheep, a sleeping dog, and a striped fabric (no text or symbols)- The camera save the image to memory.
- Use USB cable or memory card reader (Please refer to "Connecting the Camera to a PC" on page 57) to transfer the image to PC and upload it to website.
Auction mode provides 4 kinds of pattern as follow

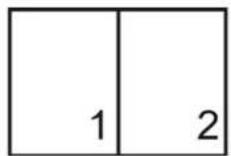


The image is set to low quality and VGA (640x480) size only.
Using Smile Capture Mode
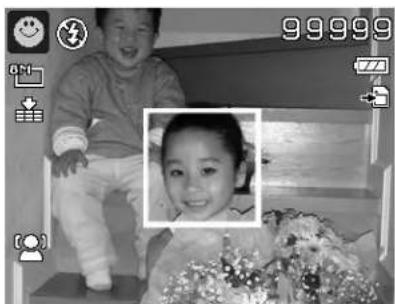
When facing camera, especially kids, smiles are always short and hard to seize by manual shutter. Smile capture mode detects every smile all the time and performs Automatic Focus (AF) to capture an image without pressing Shutter button.
Follow the instructions to get a Happy image by Smile Capture Mode:
- Select Smile capture mode from scene menu.
- Focus the camera on the subject to capture.
- When a smile is detected, the white focus frame turns green to denote camera shutter and take a shot automatically.
natural_image
Black-and-white photo of a smiling child sitting on a couch with flowers, no visible text or symbolsUsing Blink Detection Mode
Nothing ruins a great picture more than having your subjects' eyes closed. Blink Detection provides you with extra assurance when capturing once-in-a-lifetime moments like holding a trophy with teammates after winning a basketball game.
If closed eyes are detected, a saving confirmation menu appears on the screen, allowing you to re-take the shot before your subject or subjects move on.
To activate Blink Detection
- Select Blink Detection Mode from Scene Mode submenu.
- Half press the Shutter button to focus the subject. The frame turns green to indicate focus is set.
- Press the Shutter button to capture the image and automatically save the Image.
- If the camera detects subject blinked eye, a "Save image" or "Cancel" option appears on the screen.
- Select Save image to save or Cancel to disregard

Using Pre-composition Mode
When asking someone else to take images for you, but the images always don't come up right?
Pre-composition helps you get the background you want, even if you need to ask someone else to record the image for you.
Basically, Pre-composition is a two-step process.
-
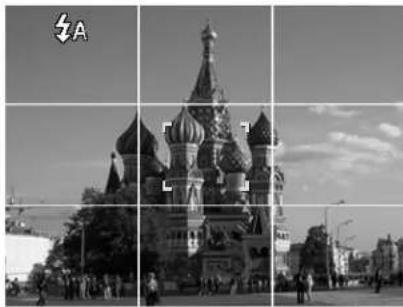
Compose the background you want and press the Shutter button (full press), which causes 1/3 of semi-transparent image of the background to remain on the LCD monitor. Press Menu button to cancel the semi-transparent temporarily image.
-
Ask someone else to record a shot of you against your original pre-composed background, telling him/her to compose the image by using the 1/3 semi-transparent screen image as a guide.
natural_image
Black-and-white exterior view of St. Basil's Cathedral in Moscow, showing its iconic onion domes and surrounding urban street (no signage or text visible)
natural_image
Black-and-white exterior view of Saint Basil's Cathedral in Moscow, featuring twin onion domes and surrounding buildings (no signage visible)-
Move your position until photographer confirm your whole or half body in the frame and in the right place.
-
Press the Shutter button. Camera stores the image produced by this step only.

natural_image
Black-and-white photo of St. Basil's Cathedral in Moscow, featuring the iconic onion domes and surrounding urban street (no visible text or signage)Using Love Portrait
Want to take a good image when there are just two of you? All you have to do is hold the camera and show your smiles together.
If over two faces had been recognized, the camera performs 2-second countdown with a beep notice then take a shot without pressing the Shutter button.
Using Self Portrait
When you are the one taking the picture for yourself, then self portrait mode is necessary besides the tripod. With your long arm's help, the camera begin face tracking in self portrait mode. If a face had been recognized, the camera performs 2-second countdown with a beep notice then take a shot without pressing the Shutter button.
Tips to make a great shape by self portrait photography:
- Lean in towards the camera to reduce double chin.
• Angle your body and bend your arms to look slimmer. - Keep your shoulders back.
Using D-Lighting Mode
Active D-Lighting mode preserves details in highlights and shadows, creating photos with natural contrast. Use for high contrast scenes, for example, when photographing brightly light outdoor scenery through a door/window, or taking pictures of shaded subjects on a sunny day. With this feature, the adjustment of contrast is accomplished in-camera and requires no additional post-processing for the bulk of images.
Using Fisheye Lens Mode
For shooting fisheye photos with more creative and fun.

natural_image
Two people joyfully carrying a kite together against a blue sky (no text or symbols visible)Original

natural_image
Two women joyfully carrying a child on their shoulders against a blue sky (no text or symbols visible)Fisheye Lens
Using Photo Stitch Mode
Use this feature to create a panoramic photo from multiple shots. You can combine up to 2 or 3 shots into one single image quickly and easily.

To stitch the still image
-
Enter Photo Stitch mode and press the UP key to select the direction how shots will be stitched. Then, press the Shutter button to take the first shot.
-
A guidance bar appears after taking the first shot. Follow the direction displayed on LCD screen to pan the camera. Or, press the Menu button to restart shooting.

natural_image
Black-and-white landscape photo of a rural village with snow-covered houses and bare trees, mountains in background (no visible text or symbols)
natural_image
Black-and-white photo of a snowy village with houses and bare trees, no visible text or symbols-
Once the icon overlaps the yellow block, you can get another shot without pressing the shutter button.
-
After taking the second shot, the yellow block moves to the end of the guidance bar, and the OK button appears as well. You can press the OK button to stitch the first two shots, or the Menu button to restart shooting.

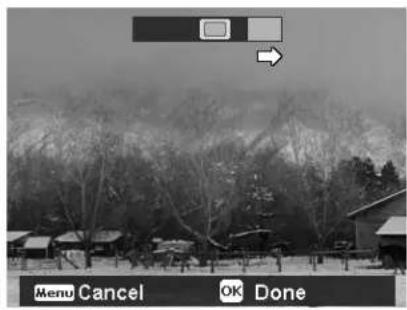
- Same as step 3, moves the icon to overlap the yellow block, and then you can get the third shot and the combined image is generated automatically. Now, you finish this set of stitch shooting.


The following settings are fixed in Photo Stitch mode:
- Flash: Forced Off
- Drive mode: Off
• Focus mode Auto focus - AF Area: Wide
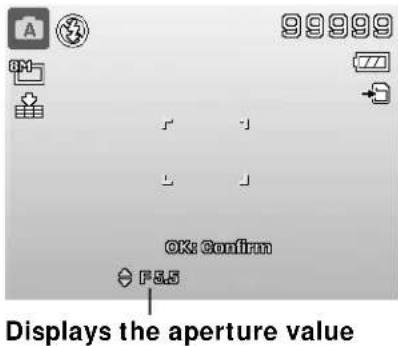
Using Aperture Priority Mode
This mode is designed for control the aperture value by user and let camera decide the shatter speed.
The main impact that aperture had on images was with regards to Depth of Field. (DOF)
- Choose lager aperture, only one subject in focus but the background nice and blurred. (Shallow DOF)
- Choose smaller aperture, an image with everything in focus. (Great DOF)
To set Aperture values
-
Select Aperture Priority Mode from the Scene Mode submenu.
-
Press OK button to enter the adjust mode.
-
Use the ▲ or ▼ keys to select the aperture value options.
-
Press the Shutter button to capture the image.
Using Shutter Priority Mode
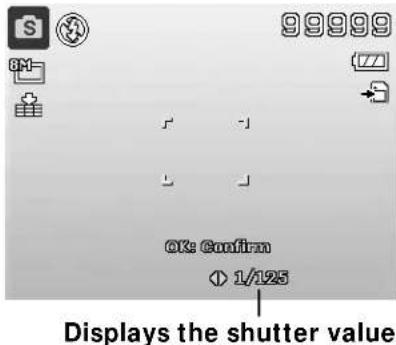
This mode is designed for capturing moving subjects. A faster shutter speed is required to freeze a motion (flying birds), while the slower shutter speed creates a sense of motion (water flowing).
To set Shutter values
-
Select Shutter Priority Mode from the Scene Mode submenu.
-
Press OK button to enter the adjust mode.
-
Use the ◀ or ▶ keys to select the shutter value options.
-
Press the Shutter button to capture the image.
Using Manual Exposure
When the camera is in the manual exposure mode, you can change either aperture or shutter speed, or both.
To activate Manual Exposure
- Select from the Scene Mode submenu.
- Press OK button to enter the adjust mode.
- Use the ◀ or ▶ keys to select the shutter speed.
- Or, use the ▲ or ▼ keys to select the aperture value.
- Use the OK button to switch between aperture and shutter speed adjustment and vice versa.
- Press the Shutter button to capture the image.

Displays the aperture and
shutter speed value
Using Voices Recording
- From the Scene menu, select Voice REC. The Voice Recording screen layout is displayed on the LCD monitor.
- Press the Shutter button to start recording.
- Press the Shutter button again to stop recording.

natural_image
Black-and-white photo of a microphone icon with control buttons and time display (no readable text or symbols)Setting the Drive Mode
Your camera features a Self-timer and Burst which can be set in the Drive mode function in the Record Menu. The Self-timer allows you to take images after a pre-defined delay. While burst lets you take consecutive shots. This function is only available in recording still images. The Drive mode setting is automatically set to off when you turn off the camera.
To set the Drive Mode
- From the Record menu, select Drive Mode.
- Use the ▲ or ▼ keys to go through the selection.
- Press the OK button to save and apply changes.

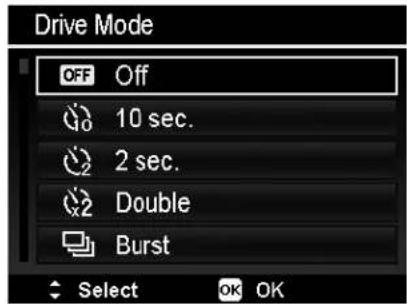
The table below shows the available Drive mode settings.
| Icon | Item | Description |
 | Off Captures an image without time delay. | |
 | 10 Sec. Sets a 10-second delay to capture image after pressing the Shutter button. | |
 | 2 Sec. Sets a 2-second delay to capture image after pressing the Shutter button. | |
 | Double | Performs delay and capture twice:Performs a 10-second delay, then captures the image.Performs another 2-second delay then captures the image again. |
 | Burst | Performs continuous shooting when the Shutter button is pressed.Stops shooting when the shutter button is released. |
 | Speedy Burst | Captures 30 images in a shot when the Shutter button is pressed.Auto set Image size to VGA only. |
Setting the AEB
AEB stands for Automatic Exposure Bracketing. It permits 3 consecutive images in the order of standard exposure, under exposure and overexposure compensation.
To set AEB
- From the Record menu, select AEB.
- Use the ▼ or ▲ keys to go through the selection.
- Press the OK button to save and apply changes.

Setting the AF Area
AF stands for Automatic Focus. This feature determines the area on which the camera focuses.
To set AF Area
- From the Record menu, select AF Area.
- Use the ▲ or ▼ keys to go through the selection.
- Press the OK button to save and apply changes.
The table below shows the available AF area settings.

| Icon | Item | Description |
| Wide | The camera automatically selects focus area within the wide frame. | |
| Center The focus area is fixed on the center. | ||
Setting Sharpness
This function allows you to enhance or soften finer details of your images.
To set Sharpness
- From the Record menu, select Sharpness.
- Use the ▲ or ▼ keys to go through the selection.
- Press the OK button to save and apply changes.
The table below shows the available Sharpness settings.
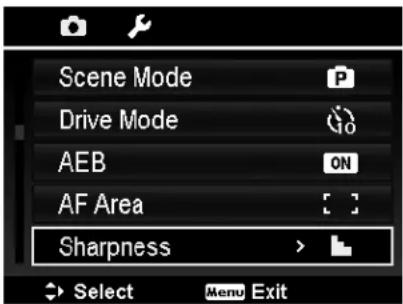
| Icon | Item | Description |
 | High Sharpens the image. | |
 | Normal Normal sharpness. | |
| [AECE] | Low Softens the image. | |
Setting Saturation
The Saturation function lets you adjust the color saturation in your images. Use a higher saturation setting for rich colors and a lower saturation setting for more natural tones.
To set Saturation
- From the Record menu, select Saturation.
- Use the ▲ or ▼ keys to go through the selection.
- Press the OK button to save and apply changes.
The table below shows the available Saturation settings.

| Icon | Item | Description |
| High Enhance the saturation. | ||
| Normal Normal saturation. | ||
| Low Reduce the saturation. | ||
Setting Contrast
This function allows you to adjust the contrast of your images.
To set Contrast
- From the Record menu, select Contrast.
- Use the ▲ or ▼ keys to go through the selection.
- Press the OK button to save and apply changes.
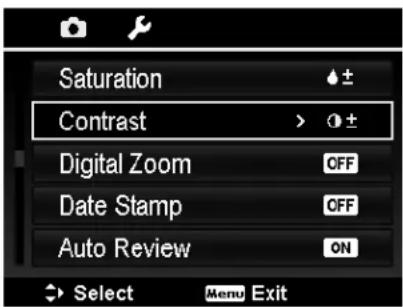
| I con | I tem | Description |
 | High Enhance the contrast | |
 | Normal Normal contrast | |
 | Low Reduce the contrast | |
Setting the Digital Zoom
This feature controls the digital zoom mode of your camera. Your camera enlarges an image using the optical zoom first. When the zoom scale exceeds 5X, the camera uses digital zoom.
To set Digital Zoom
- From the Record menu, select Digital Zoom.
- Use the ▲ or ▼ keys to go through the selection.
- Press the OK button to save and apply changes.
The table below shows the available Digital Zoom settings.

| Icon | Item | Description |
 | Intelligent Zoom | Enlarges the image digitally with almost no distortion. This feature is available for still images only. |
 | Standard Zoom | Enlarges all image sizes up to a maximum of 5x in preview, but the image quality deteriorates. |
 | Off Uses the optical zoom only. |

- Digital Zoom is not available in Face tracking on, Movie, and Voice Recording modes.
- The maximum Intellect zoom scale varies depending on the image type and resolution.
Setting the Date Stamp
The date of recording can be printed directly on the still images. This function must be activated before the image is captured. Once date and time are stamped on an image, they can no longer be edited or deleted.
Limitations of Date Stamp functions are as follows:
• Available for still images only.
- May slow down AEB/ Burst mode when Date Stamp is enabled in AEB/ Burst mode.
- In vertical or rotated images, the date and time on your images still appear horizontally.
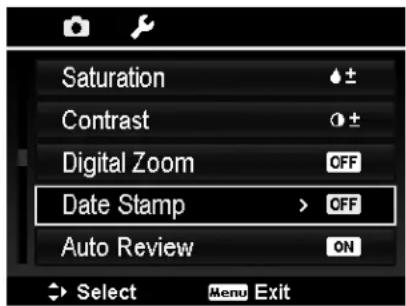
To set Date Stamp
- From the Record menu, select Date Stamp.
- Use the ▲ or ▼ keys to go through the selection.
- Press the OK button to save and apply changes.
Setting Auto Review
The Auto Review function lets you view the captured image right after shooting it.
If Auto review is On, the camera will display the captured image for 1 second on the LCD monitor.
To set Auto Review
- From the Record menu, select Auto Review.
- Use the ▲ or ▼ keys to go through the selection.
- Press the OK button to save and apply changes.

Setting Stabilizer
This function allows you to prevent blurred images caused by shaking.
- Enable the Stabilizer under the Record Menu.
- Use the ▲ or ▼ keys to go through the selection.
- Press the OK button to save and apply changes.

Recording Videos
You can record videos with the camera, the available recording time depends on the capacity of the memory card. Videos can be recorded until the maximum memory capacity has been reached. However the length of a single video may be limited (the limitation depends on the camera model).
- Slide the Mode switch to Movie mode.
- Focus your camera on the subject that you want to take.
- Press the Shutter button to start recording.
- Use the Zoom dial to zoom in and zoom out an image.
- To pause recording, press the key
- To continue recording, press the key ▲ again.
- To stop recording, press the Shutter button.


natural_image
Black-and-white photo of a baby sitting on a checkered floor, holding an object (no visible text or symbols)
- When the camera stop recording due to reaching maximum capacity (4GB) for a single video, simply press the Shutter button again to continue recording.
- The camera will automatically stop recording when the memory capacity is full.
- Digital zoom is not available while recording a video.
• Sound cannot be recorded while using zooms (Spinning the Zoom dial.) - Power save mode is not available in video recording or pause recording.
Settings of Recording Videos
Press Function button to enable video setting menu before recording a video.
Movie Size
The Movie Size function appears only in Movie mode. Use this function to adjust the resolution and quality of movie clips.

The table below shows the available size and corresponding image quality settings.
| Icon | Item | Description |
 | 1280 X 720 | HDTV (Support SDHC_Class(6))The length of a single video recording is up to 29 minutes. It will automatically stop recording if time is over. |
 | 640 X 480 High Quality | |
 | 320 X 240 Normal | |
 | Web For Internet, see "Internet Mode" on page 41 below. | |
Internet Mode
The Internet Mode allows you to record videos with predefined video settings for easy upload to the Internet website.
Therefore when you record using the Internet Mode, the following standards are followed:
- Recorded videos are set to Internet standard resolution of 640 X 480.
- Recording automatically stops when the file reaches 1 GB.
• Available recording time for Internet Mode is up to 10 minutes.

For uploading videos to Youtube, you can follow the instructions below to install Youtube uploader:
- Connect your camera to PC. Go to "My Computer", and you will see a Youtube uploader folder.
• After installing the program in the folder, you can easily upload video to Youtube now.
White Balance, Metering, Color Mode
To set above settings, please refer to "Using the Function Menu" on page 21.
Pre-Record
You can catch the first three seconds of action you would have potentially missed. Once enable this function, the camera starts recording video automatically before pressing Shutter button. As soon as the Shutter button is hit, the most recent three seconds of video is added to the beginning of the clip.
Display the icon in red while turning Pre-Record on.


Pre-Record will be canceled in the following situation:
- Switch to Photo mode or Playback mode.
- Turn the unit off.
- Enter USB mode.
Playback
You can playback the still images, video and audio clips on the LCD monitor.
Viewing in Single Navigation
The Single navigation mode displays the image one by one on the LCD monitor. To view images/videos/audio clips, follow the steps below.
- Slide the Mode switch to Playback mode

- The LCD monitor displays an image. To understand the icons and other information on the screen, please see "Photo Mode Screen Layout" on page 13.
Still Image Video Audio Clip

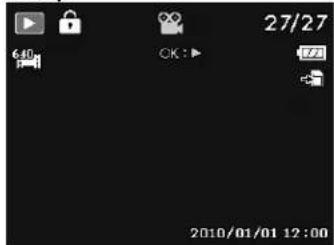
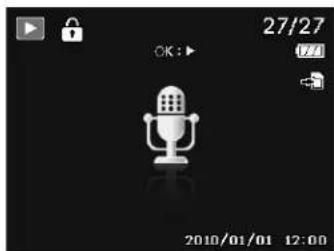
-
Use the ◀ or ▶ keys to view next/previous image/video/audio.
-
To play a video or audio clip, press the OK button. See "Playing Videos" on page 43 and "Playing Voice Recording" on page 44 for more details.
Viewing Thumbnails
This function allows you to view 9-thumbnail images or by calendar mode on the LCD monitor at the same time. Searching numerous of images is much easier then single view navigation.
To set 9-images mode
- Set the camera to Playback mode ▶.
- Spin the Zoom dial counterclockwise (left) once to enter 9-images mode.
- Use the navigation controls to move through the items.
- Press the OK button to select the image and view it normally.
Scroll bar.
If scroll bars appear, it indicates that the screen can be scrolled.

natural_image
Grid of black-and-white photo collage showing children, a landscape, a microphone icon, and a question mark (no text or symbols in the image itself)Thumbnail
To set calendar mode
- Set the camera to Playback mode ▶.
- Spin the Zoom dial counterclockwise (left) twice to view thumbnails in calendar mode.
- Use the navigation controls to move through the items.
- Press the OK button to select an image and view it normally.


In calendar mode:
- The first file (Including image, video, audio and error file) recorded on each date appears on the screen.
- Spin the Zoom dial clockwise (right) would back to 9-images mode.
Thumbnail icons:
When you view the thumbnails, some images may contain icons. These icons indicate the type of file or recording.
| Icon | Type | Description |
| Voice Record Indicates a voice recording file. | ||
| File Error Indicates an error file. |
Zooming images
The zoom view function works with still images only.
- In normal view, spin the Zoom dial clockwise (right) repeatedly until the desired zoom view.
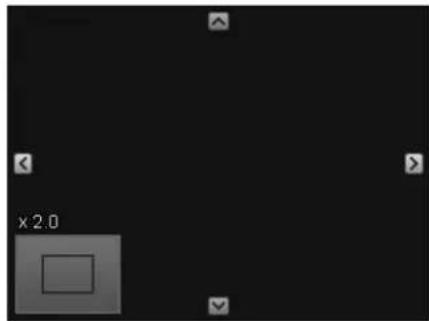
- The 4 arrows on the LCD monitor indicate that the image is zoomed in.
- You can zoom to view an image of up to 12X.
- Use the navigation controls to view the zoomed image
- Press the Menu button to close zoom view.
natural_image
Pure graphical interface element with no text, numbers, or symbols visible
For 320 x 240 resolution images, you can only zoom in up to 6X.
Playing Videos
- Set the camera to Playback mode
- Use the navigation controls to scroll through the saved images. A video clip has a video icon displayed on screen.
- Press the OK button to play the video.
- During playback, press and hold the ◀ or ▶ keys to fast forward or rewind the video. The camera supports forward and rewind speed of up to 4x.
- During playback, use the Zoom dial to control volume. Spin clockwise (right) to increase volume/Spin counterclockwise (left) to decrease volume.
- Press the ▲ key to pause playback. Press the key ▲ again to resume. When paused, the play info will remain on screen except WT
- To forward or rewind the video frame by frame, press the key ▲ to pause playback, then press the ◀ or ▶ keys.
- Press the ▼ key to stop the playback. The LCD monitor displays the video frame image in Single navigation mode.


natural_image
Black-and-white photo of a baby sitting on a chair, no visible text or symbols in the image content
- The play info, except the icon WT, will be displayed when the video is paused, during REW/FF or frame by frame modes
• Volume cannot be adjusted when paused or during REW/FF modes.
To capture screenshot image from a video clip
-
During playback of video, press the key ▲ to pause playback on your desired video frame to capture.
-
Press the Shutter button to capture a screenshot.
-
The camera stop playback. The LCD monitor displays the captured image in Single navigation mode.


This feature does not function when pressing shutter key and PV displays memory full or the folder cannot be created msg.
Playing Voice Recording
- Set the camera to Playback mode
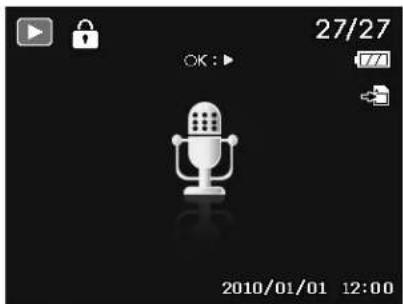
- Use the navigation controls to scroll through the saved images. When viewing a voice recording file, the LCD monitor displays the screen layout of Audio clips. See picture on the right.
- Press the OK button to play the voice recording.
- During playback, use the Zoom dial to control volume. Spin clockwise (right) to increase volume/Spin counterclockwise (left) to decrease volume.
- Press the ▲ key to pause playback. Press the ▲ key again to resume. When paused, the play info will remain on screen except WT
- Press the ▼ key to stop the playback. The LCD monitor displays the image in Single navigation mode.


Volume cannot be adjusted during Pause mode.
Playing Voice Memo
Voice memo is separately recorded and attached to a captured image. See "Voice Memo" on page 49 on how to record voice memo.
- Set the camera to Playback mode
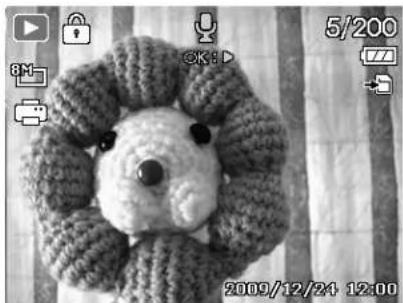
- Use the navigation controls to scroll through the saved images. An image file with voice memo has a voice memo icon located on the top center of the LCD monitor. See picture on the right.
- Press the OK button to play the voice recording.
- During playback, use the Zoom dial to control volume. Spin clockwise (right) to increase volume/Spin counterclockwise (left) to decrease volume.
- Press the key ▲ to pause playback. Press the key ▲ again to resume. When paused, the play info will remain on screen except WT
- Press the key ▼ to stop the playback. The LCD monitor displays the image in Single navigation mode.

natural_image
Black-and-white photo of a knitted teddy bear with a round head, surrounded by camera icons and time stamp (no readable text or symbols)
Volume cannot be adjusted when you pause the voice memo.
Deleting an Image/ Video/ Audio
There are two ways to delete an image/video/audio:
• Using the Delete button.
• Using Playback Menu Delete settings. See "Delete" on page 45.
Using the Delete Button

Use the Fn/ Delete button on your camera to delete an image/video/audio clip.
- Set the camera to Playback mode
- View images/videos/audio clips in Single navigation mode.
- Use the ◀ or ▶ keys to scroll the display.
- When the desired image/video/audio clip is displayed on the LCD monitor, press the Fn/ Delete button.
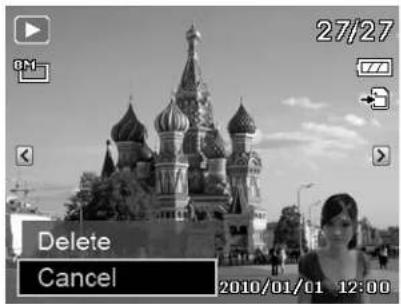
- A confirmation selection appears on screen.
- Select Delete
- Press the OK button to delete.
- The next image is displayed on the LCD monitor. To delete another file, use the ◀ or ▶ keys to scroll through the images/videos/audio clips. Then, repeat steps 6 to 7.
- To close the Delete function and go back to the single navigation mode, select Cancel.


Locked files cannot be deleted at any time. When you try to delete a locked file, the camera displays "File Locked" message on the LCD monitor.
Playback Menu
The Playback menu allows you to edit images, record voice memo, and setup playback settings.
To go to Playback Menu:
- Slide the mode switch to Playback mode
- Press Menu button to launch the Playback Menu.
- Use the ▲ or ▼ keys to move through the menu selections.
- To select a menu, press ▶ or the OK button.
- Change the submenu settings using the 4-way navigation control.
- Press the OK button to save and apply settings.

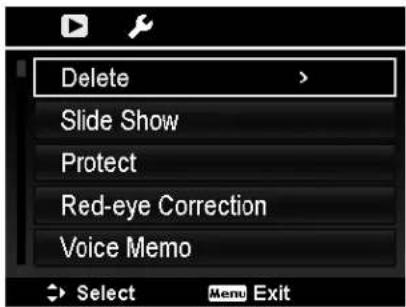
Delete
The Delete function allows to remove unwanted files in the internal memory or on the memory card. Protected files cannot be erased, to delete, unprotect the file first. See "Protect" on page 47.
To delete an image/video/audio clip:
- From the Playback menu, select Delete.
- The Delete submenu is displayed on the LCD monitor. Available select settings:
- Single. Select one file to delete.
- Voice Only. Delete only the attached voice memo, not voice clips. The image is still retained in the memory.
- Multi. Select multiple files to delete at the same time.
- All. Delete all files.

To delete a single file:
- Select Single in the Delete submenu, the images are displayed on the LCD monitor in single navigation mode.
- Use the ◀ or ▶ keys to scroll the display.
- When the desired image/video/audio clip is displayed on the LCD monitor, select Delete.
- Press the OK button to delete.
- The next image is displayed on the LCD monitor. To delete another file, use the ◀ or ▶ keys to scroll through the images/videos/audio clips. Repeat steps 3 to 4.
- To close the Delete function and go back Playback menu, select Cancel.
To delete attached voice memo:
- Set the camera to Playback mode ▶
- View images/videos/audio clips in Single navigation mode.
- Use the ◀ or ▶ keys to scroll until the desired image with voice memo is displayed on the screen.
- Press Menu button to launch the Playback Menu.
- Use the ▲ or ▼ keys to move through the Playback menu selections then select Delete.
- From the Delete submenu, select Voice only.
- A confirmation selection appears, select Yes.
- Press the OK button to delete the attached voice memo and go back to Playback mode.

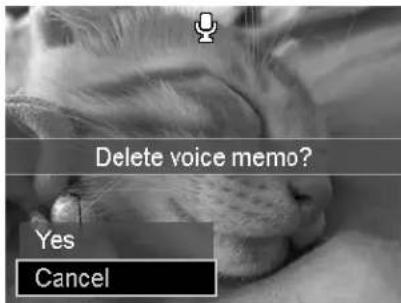

The Voice Only submenu is disabled if the current image displayed, at the time you access the Delete menu, does not have any attached voice memo.
To delete multiple files:
- Select Multi in the Delete submenu, the images are displayed in thumbnail view on the LCD monitor.
- Use the navigation control to move through the files.
- When the desired image/video/audio clip is highlighted, press the OK button to mark image/video/audio clip for deletion.
- Repeat step 3 until all desired images for deletion are marked.
- Press the MENU button. A confirmation selection appears.
- Select Yes to confirm.
- Press the OK button to delete marked files.
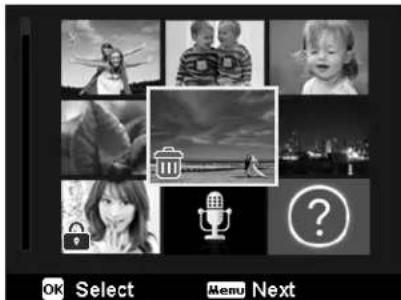

To delete all files:
- Select All in the Delete submenu. A confirmation message appears.
- Select Yes.
- Press the OK button to delete all files.

Slide Show
The slide show function enables you to playback your still images automatically in order one image at a time.
To view slideshow:
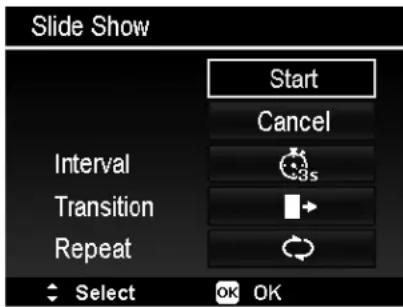
- From the Playback menu, select Slide Show. The Slideshow menu appears.
- Set the slide show settings.
- Select Start, then press the OK button to start the slide show.
- During slideshow, press the OK button to pause slide show.
- Use the ▲ or ▼ keys to move through the options. Select whether to Continue or Exit the slide show.
- Press the OK button to apply selected option.
To change slide show settings:
- From the Slide show menu, use the ▲ or ▼ keys t to move through the selections.
- Select Interval setting. Press the ◀ or ▶ keys to adjust. Choose among the available interval settings: 1 sec., 3 sec., 5 sec., and 10 sec.
- Select Transition setting. Press the ◀ or ▶ keys to adjust. Choose among the available transition settings:

- Select Repeat setting. Press the ◀ or ▶ keys to adjust. Available settings are: Yes, No.
Protect
Set the data to read-only to prevent images from being erased by mistake.
A protected file has a lock icon ☐ when viewed on Playback mode.
To protect files:
- From the Playback menu, select Protect.
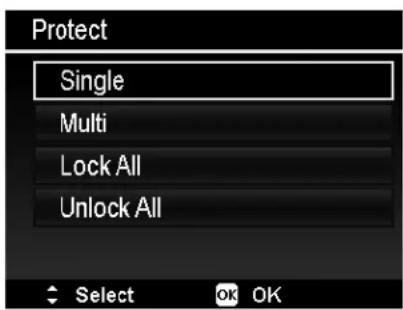
- The Protect submenu is displayed on the LCD monitor. Available select settings:
- Single. Select one file to lock/unlock.
- Multi. Select multiple files from the thumbnail view to lock/unlock.
- Lock All. Lock all files
- Unlock All. Unlock all files.
To protect/unprotect a single file:
-
Select Single in the Protect submenu, the images are displayed on the LCD monitor in single navigation mode.
-
Use ◀ or ▶ keys to scroll the display.
-
When the desired file is displayed on the LCD monitor, press the OK button to select Lock/Unlock.
-
To close the protect/unprotect function and go back Playback menu, select Exit.

To protect/unprotect multiple files:
- Select Multi in the Protect submenu, the images are displayed in thumbnail view on the LCD monitor.
- Use the navigation control to move through the files.
- When the desired file is highlighted, press the OK button to mark/unmark the file clip for protection.
- Repeat step 3 until all desired files to protect are marked.
- Press the MENU button. A confirmation selection appears.
- Select Yes.
- Press the OK button to lock files and go back to Playback mode.
To protect all files:
- Select Lock all in the Protect submenu. A confirmation message appears.
- Select Yes.
- Press the OK button to lock all files.
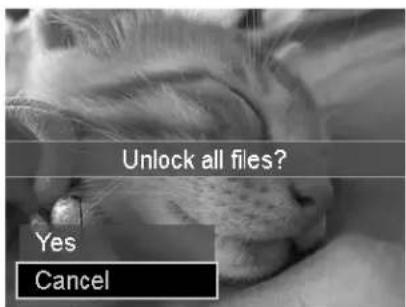
To unlock all files:
- Select Unlock all in the Protect submenu. A confirmation message appears.
- Select Yes.
- Press the OK button to unlock all protected files.


Red-eye Correction
The Red-eye Correction function is used to reduce red eye in captured images. This function is only available for still images. Red-eye correction can be applied to an image several times, but the quality may gradually deteriorate.
To activate Red-eye Correction:
- Set the camera to Playback mode
- Press the ◀ or ▶ keys to scroll and select an image.
- Press the MENU button to launch the Playback menu.
- Select Red-eye Correction.
- Select Start.
- Press the OK button to start correction.
- After completing Red-eye correction, a menu selection appears. Select whether to:
• Overwrite. Save and replace old file with a new one. - Save As. Save the new file as a new one.
- Cancel. Cancel red-eye correction.
- Press the OK button to save/cancel changes.


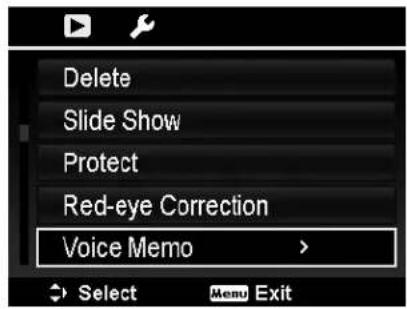
Voice Memo
A maximum of 30 seconds of audio can be recorded as a memo for captured still images.
To record voice memo:
- Set the camera to Playback mode
- Press the ◀ or ▶ keys to scroll and select an image to attach voice memo to.
- Press the MENU button to launch the Playback menu.
- Select Voice Memo.
- Select Start, then press the OK button to start recording.
- Press the OK button again to stop recording.


Time left (n seconds) for recording.

When you record voice memo to an image with an existing voice memo, the old recording file would be replaced by the new one.
Color Mode
The Color Mode function lets you adjust edit still images to apply different colors or tones for a more artistic effect. Edited images in this function are saved as a new file.
To activate Color Mode:
- Set the camera to Playback mode
- Press the ◀ or ▶ keys to scroll and select an image to edit.
- Press the MENU button to launch the Playback menu.
- Select Color Mode. The Color Mode submenu appears.

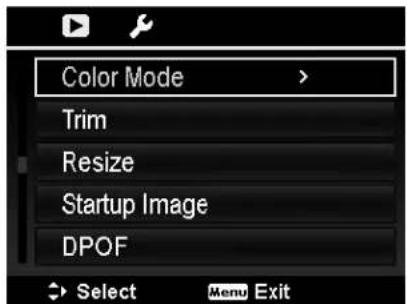

- Press the ◀ or ▶ keys to scroll and select an option. As you move through the selection, the preview on the LCD monitor changes synchronously.
The succeeding table shows the available settings.
| Icon | Item | Description |
| Normal | No effect is added to the image. | |
| Sepia Image is saved with a sepia tone. | ||
| B&W Image is saved in black and white. | ||
| Negative Image appears to be the opposite of the original image. | ||
| Mosaic Image is saved with mosaic tiles. | ||
| Vivid Red Image is saved with reddish tint. | ||
| Vivid Green Image is saved with greenish tint. | ||
| Vivid Blue Image is saved with bluish tint. |
Trim
The Trim function allows you to trim an image to another image size. This function is only available for still images.
To trim an image:
- Set the camera to Playback mode
- Use the ◀ or ▶ keys to scroll and select an image to trim.
- Press the MENU button to launch the Playback menu.
- Select Trim. The Trim screen layout is displayed on the LCD monitor.
- Use the Zoom dial to change size as zoom in/out.

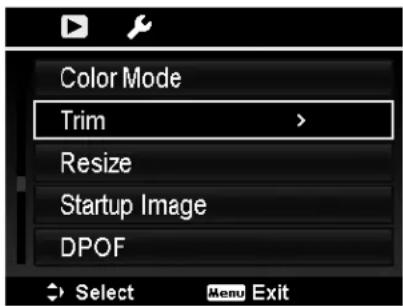
| No. Description | |
| 1 | Enlarged image |
| 2 | 4-way indicator |
| 3 | Trimmed size |
| 4 The approx. location of the trimmed area | |
| 5 | Image area |

- Use the navigation controls to move the image.
- Press the OK button to apply changes. A menu selection appears.
- Select whether to:
• Overwrite. Save and replace the old file with the new one. - Save As. Save the new file as a new one.
-
Cancel. Cancel Trim.
-
Press the OK button to save/cancel changes.

- Trim function is not available for images with image size set to VGA.
- All images will be trimmed in 4:3 ratio regardless of its original image ratio.
Resize
Resizes a previously saved image and only resizing to a smaller size is available.
To resize an image:
- Set the camera to Playback mode
- Use the ◀ or ▶ keys to scroll and select an image to resize.
- Press the MENU button to launch the Playback menu.
- Select Resize. The Resize submenu is displayed on the LCD monitor.
- Select size among: 8M, 5M, 3M, and VGA. Available size settings may vary depending on original image size. Unavailable settings appear as gray icons in Resize submenu.

- After selecting size, a menu selection appears. Select whether to:
• Overwrite. Save and replace old file with a new one.
- Save As. Save the new file as a new one.
- Cancel. Cancel resize.
- Press the OK button to save/cancel changes.


Resize function is not available for images with image size set to VGA.
Startup Image
You can specify the startup image from the captured images for camera.
- Press the MENU button to launch the Playback menu.
- Select Startup Image. The menu selection appears.
- Select options:
- System. Use camera default image.
- My Photo. Use the ◀ or ▶ keys to scroll and select desired image.
-
Off. Disable the startup image.
-
Press the OK button to apply changes.
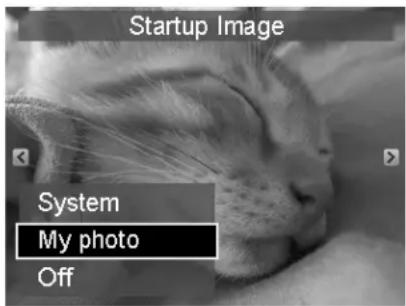

The startup image will still be displayed startup even if the selected image was deleted.
DPOF
DPOF is the abbreviation for Digital Print Order Format, which allows you to embed printing information on your memory card. You can select the images to be printed and how many prints to make with the DPOF menu in the camera and insert the memory card to the card compatible printer. When the printer starts printing, it will read the embedded information on the memory card and print the specified images.
To set DPOF:
- Press the MENU button to launch the Playback menu.
-
Select DPOF. The submenu appears. Available settings are as follows:
-
Single. Select a single image to mark.
• All. Mark all images in the memory card. - Reset. Reset all DPOF settings to initial default settings.
To set DPOF on a single image/all images:
- Select Single or All on the DPOF submenu.
- For single image, use the ◀ or ▶ keys to scroll and select an image to mark for printing.
- Specify the number of copies. Use the ▼ or ▲ to increase/decrease number.
- Press the Function/ Delete button to toggle between turning on/off the date stamp.
- Press the OK button to save DPOF settings.
To reset DPOF:
- Select Reset on the DPOF submenu. A confirmation message appears.
- Select Yes.
- Press the OK button to reset DPOF settings.

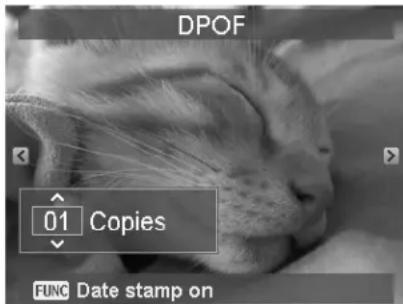

Radial Blur
The Radial Blur is an effect creates blurs around a point.
To set Radial blur for an image:
- Use the ▼ or ▲ keys to specify the level of blurs.
The adjusting result on preview synchronously while selecting the level. - Press the OK button to proceed save options.
- Available settings are as follow:
• Overwrite. Save and replace the old file with a new one.
- Save As. Save the new file as a new one.
- Cancel. Cancel Radial blur.
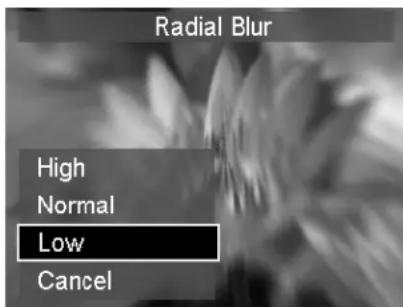
Using the Setup Menu
You can access the Setup menu whether you are in Record or Playback mode.
The Setup menu allows to configure general camera settings.
To go to Setup Menu:
- Press Menu button to launch the Record/Playback Menu.
- Use the ◀ or ▶ keys to switch the menu tab to Setup menu.
- Use the ▼ or ▲ keys to move through the menu selections.
- To select an item, press the OK button or ▶ key.
- Change the submenu settings using the 4-way navigation control.
- Press the OK button to save and apply settings.

Setting Sounds
Use the Sound menu functions to control the sounds produced by the camera.
- From the Setup menu, select Sounds.
- Adjusts sound settings.
- Press the OK button to apply changes.

| Item | Available Settings | Description |
| Startup | Sound 1, Sound 2, Sound 3, Off | Selects the startup sound when camera is turned on. |
| Shutter On | Off | Enables or disables shutter sound when Shutter button is pressed. Shutter sound is not available when recording videos or voice clips. |
| Beep volume | 0-4 Adjusts volume. |
Setting Power Save
The Power Save function allows you to set an idle time after which the camera automatically sets to sleep mode to save power. After a minute of being in sleep mode, the camera eventually turns off power.
This function is not available in the following instances:
• Recording a video or audio file
- Playing a slideshow/video/audio file
• Using the USB connector
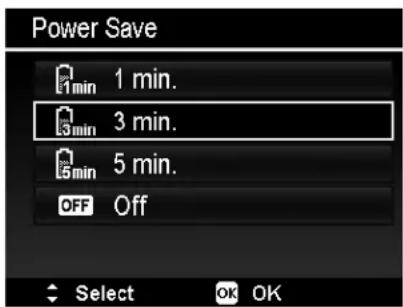
Setting LCD Save
Enable the LCD Save function to automatically decrease the LCD brightness to conserve battery power. When the camera is idle for 20 seconds, the LCD darkens. Press any button to resume to normal brightness.
- The camera is idle when no buttons are pressed. LCD Save, though enabled, does not function during video playback, slideshow and video recording.
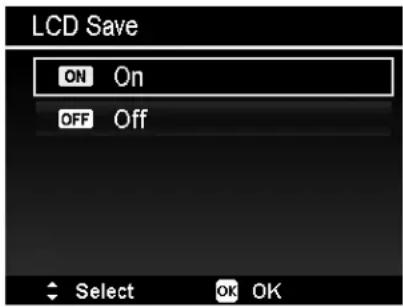
Setting Date & Time
Use the Date & Time function to set the date and time of your camera. This function is useful in attaching date stamps on captured images. Your camera uses a 24-hour time format.
-
Press the navigation controls to adjust date and time value. By holding down the or keys, the numeric values changes continuously.
-
Press the OK button to apply changes.
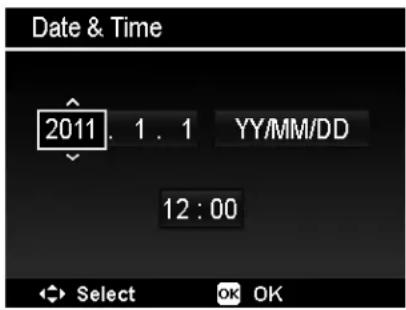
Setting Language
Specify in which language menus and messages are to be displayed on the LCD monitor.
-
Use the navigation control to scroll through the list and select the desired language.
-
Press the OK button to confirm and apply settings.

Setting File Numbering
This function allows you to select the method in which to assign file numbers to images.
Available settings are:
- Series. Assigns number to files in sequence even if the folder is changed.
- Reset. The file numbering will start from 0001 each time the folder is changed and "Format" is processed.
To understand folder and file structure of your camera, see "About Folder and File Names" on page 60.

Setting TV Out
Use the TV Out function to adjust video output signal to accommodate different regional settings. If TV out is not set correctly, the image may not display properly on TV.
Available settings are:
- NTSC. Applicable in Japan, USA, Canada, Taiwan and others.
• PAL. Applicable in Europe, Asia (excluding Taiwan), Oceania and others.

Setting LCD Brightness
Select a brightness level for the LCD monitor.
Available settings are:
• Auto. Auto detects the LCD brightness.
• Bright. Enhance the LCD brightness.
• Normal. Normal LCD brightness.

Setting Memory Kit
This utility formats the internal memory (or memory card) and erases all stored images and data.
Available settings are:
- Format. Select to format currently used memory.
- Copy to Card. Select to copy all files stored in the internal memory to the memory card.


- If the images were saved in the internal memory when inserting memory card into the camera. You can use Copy to Card function in order to copy all images from the internal memory into memory card.
- If there is no memory card or the internal memory is empty or plug in lock card, the Copy to Card function is disabled.
Reset All
Use this function to reset the camera to its factory settings. However, the following settings are exceptions and not affected by Reset.
- Date & Time
- Language
• TV Out - Custom White Balance data
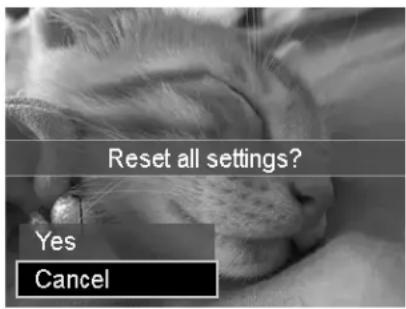
Making Connections
You can connect your camera to: TV, computer, or a printer.
Connecting the Camera to a TV
You can play back your images on a TV screen. Before connecting to any video devices, make sure to select NTSC/PAL to match the broadcast standard of the video equipment you are going to connect to the camera.
To connect your camera to a TV:
- Turn on the camera.
- Set the TV out to match the TV's video out format. See "Setting TV Out" on page 56.
- Connect the USB/AV 3-in-1 cable to the USB port on the bottom of your camera.
- Connect the other end of the cable to the TV's AV input port.
- The LCD monitor turns black and all images and video clips are displayed on the TV.

Connecting the Camera to a PC
You can transfer images, videos and audio files to your PC.
- Connect one end of the USB cable to an available USB port on your computer
- Connect the other end of the USB cable to the USB terminal on the camera.
- Turn on the camera.

natural_image
Line drawing of a desktop computer connected to a tower, showing cable and device (no text or symbols)- The USB mode menu appears on the screen. Select Computer by using the ▲ or ▼ key and press the OK button.
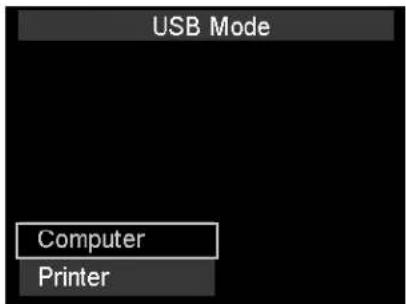
- The PC starts to detect the connection while the LCD monitor appears Connecting...
Connecting...
-
Connection established after PC MODE appeared on the LCD monitor
-
Access the files in the camera by your PC.
PC Mode

- The camera's internal memory and memory card would display as removable drives in PC.
• After the connection, no image is displayed on the LCD monitor.
Connecting the Camera to a Printer
You can print your images directly using a PictBridge compatible printer.
- Turn on your Printer. Check that the printer is turned on, there is paper in the printer, and there are no printer error messages.
- Connect one end of the USB cable to the printer while the other end to USB terminal on the camera.
- The USB mode menu appears on the screen. Select Printer by using the ▲ or ▼ key and press the OK button.
- Enter the print mode and print the selected images.
For details on the following page "Setting the Print Mode Menu".
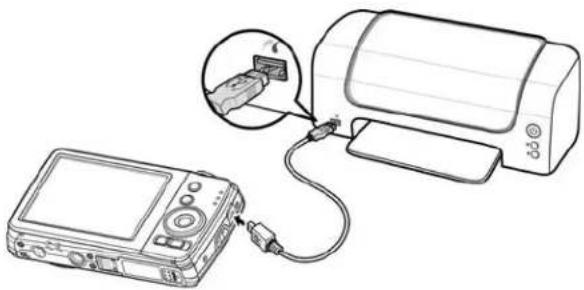
natural_image
Line drawing of a printer connected to a digital camera via cable, with an inset showing a close-up of the device (no text or symbols present)USB Mode
Computer
Printer
Setting the Print Mode Menu
Print Mode menu appears on the screen after the connection between a printer and your camera is established.
Print Mode includes three major settings:
- Print Select. An image can then be selected to print.
- Print All. Prints all images.
• Print Index. Prints all images as thumbnails.
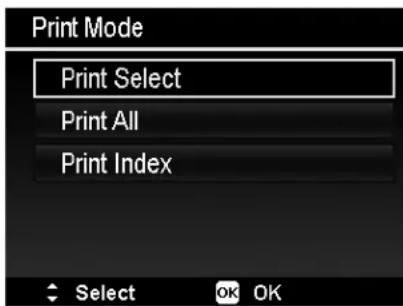
To set Print Select
- Use the ◀ or ▶ keys to scroll and select an image for printing.
- Specify the number of copies. Use the ▼ or ▲key to increase/decrease number.
- Press the Function/ Delete button to toggle between turning on/ off the date stamp.
- Press the OK button to enter printer settings.
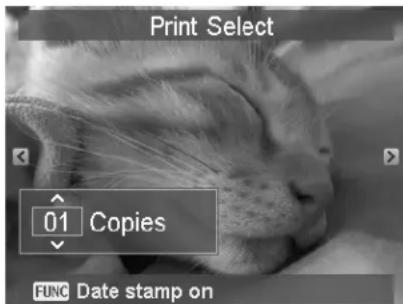
To set Print All and Print Index
Repeat the same steps 2 to 4, then enter printer settings.
To set Printer Settings
- Use the ▼ or ▲ key to specify a print option.
- Modify paper size and quality by the ◀ or ▶ keys.
Available setting:
• Paper size: Default / A4 / 4"x6"
• Quality: Default / Fine / Normal - Select Print on the screen for printing.
Or Cancel to go back Print Mode.

Start Printing
• LCD monitor appears "Now printing...".
- Or press Menu button to stop printing anytime.

Appendix
About Folder and File Names
Your camera automatically creates specific directory of folder in the internal memory cards to organize captured images, videos and audio files.
File Naming
File names begin with "DSCI" and followed by a 4-digit number that increases in sequence. File numbering starts from 0001 when a new folder is created.
If the highest folder number is 999 and the highest file number exceeds 9999, the camera will display the warning message "Folder cannot be created". When this happens, try one of the following ways:
- Reset the file number. See "Setting File Numbering" on page 55.

Do not change the folder and file names in the memory card using your PC. It may be unable to playback the data using the camera.
Troubleshooting
| Problem Cause and/ or Action | |
| Camera does not turn on. | The batteries may be exhausted. Charge or replace the batteries. |
| Camera turns off automatically. | Press Power button to turn on the camera. |
| LCD turns dark. | Press any button except the Power button to turn on the LCD. |
| Empty battery icon is displayed on the LCD, then the camera turns off. | Batteries are exhausted, please replace or recharge. |
| LCD monitor displays "No image". | There is no image file in the memory card. Image file format may not be supported. |
| LCD monitor displays "Not available for this file". | Function is only available for specific file types. File format is not supported. |
| LCD monitor displays "Memory full". | Memory card is full. Replace the memory card with a new one or delete unnecessary images. |
| LCD monitor displays "File locked" | This file is locked. Unlock the file. See "Protect" on page 47. |
| LCD monitor displays "Card locked". | The memory card is protected. Remove the card and slide the write-protect switch to its unlock position. |
| LCD monitor displays "Format error". | The card may be damaged. You can either change the card or wipe to clean the connected points. |
| LCD monitor displays "Copy error". | The memory card is protected. Remove the card and slide the write-protect switch to its unlock position.The memory card is full. Replace card or delete unnecessary files. |
| No image displays on the TV screen. | Incorrect TV-out type was selected. Set the correct TV-out type to match your TV system. |
| The lens got stuck up. | Do not force the lens to go back.The type of the battery used may be incorrect or the battery power level is too low. Change the battery or charge the battery before using the camera. |
Specifications
| Sensor Panasonic | 16M 1/2.3-type |
| Lens | Focal Length: 4.9 (W) ~ 24.5 (T) mm5X optical zoom, 5x digital zoom |
| LCD monitor 2.7" Color LCD | |
| Focusing Range | Normal: Wide: 10 cm ~ infinityTele: 60 cm ~ infinitySuper Macro: 5 cm (@zoom01) ~ 100 cm |
| Aperture 2.4 ~ 6.1 | |
| Shutter | Shutter Speed:Auto: 1 - 1/2,000 sec.Manual: 15 - 1/2,000 sec.Night: 15 - 1/2,000 sec.Fireworks: 2 sec. |
| File Format | Still Image: EXIF 2.2 compatible format (JPEG compression)Video: AVI (MJPEG)Audio: WAV |
| Resolution (Photo) | 16M (4608 x 3456), 3:2 (4608 x 3072), 8M (3264 x 2448), 5M (2592 x 1944), 3M (2048 x 1536), 16:9 (1920 x 1080), VGA (640 x 480) |
| Resolution (Movie) | • 1280 x 720 (16:9) (Support SDHC_Class(6))• 640 x 480• 320 x 240• 640 x 480 (Web) |
| Scene Mode | Auto, Program, Intelligent Scene, Portrait, Landscape, Sunset, Backlight, Kids, Night Scene, LOMO, Fireworks, Snow, Sports, Party, Candlelight, Night Portrait, Soft Skin, Flowing Water, Food, Building, Text, Foliage, Auction, Smile Capture, Blink Detection, Pre-Composition, Love Portrait, Self Portrait, D-Lighting, Fisheye Lens, Photo Stitch, Aperture Priority, Shutter Priority, Manual Exposure, Voice Recording. |
| ISO Equivalent | Auto, 100, 200, 400, 800, 1600, 3200 (3M, 16:9 <2M>, VGA), 6400 (3M, 16:9 <2M>, VGA) |
| White Balance | Auto White Balance, Daylight, Cloudy, Tungsten, Fluorescent 1, Fluorescent 2, Custom |
| Exposure Control | +2.0EV / +1.7EV / +1.3EV / +1.0EV / +0.7EV / +0.3EV / 0EV / -0.3EV / -0.7EV/-1.0EV / -1.3EV / -1.7EV / -2.0EV |
| Metering Multi, Center, Spot | |
| Drive Mode Off, 10 | sec., 2 sec., Double, Burst, Speedy Burst |
| Flash | Auto, Red-eye Reduction, Forced On, Slow Sync, Forced Off |
| Color Mode (Preview) | Normal, LOMO (Only support Movie mode), Vivid, Sepia, Color Accent (Red), Color Accent (Green), Color Accent (Blue), B&W, Vivid Red, Vivid Green, Vivid Blue |
| Color Mode | Normal, Sepia, B&W, Negative, Mosaic, Vivid Red, Vivid Green, Vivid Blue |
| Storage | Internal memory: 128MB flash memoryExternal memory: SD (up to 4GB), SDHC card (up to 32GB guaranteed), SDXC card (up to 64GB guaranteed) |
| OSD Language | English, Français, Español, Deutsch, Italiano, Русский, Português, Português BR, Nederlands, Türkçe, Polski, Magyar, Rumänisch, Čestina, Български, Croatian, Slovensky, Slovenščina, Еллнікá, Svenska, Norsk, Suomi, Danish, عَرَبِي, Indonesia, Malay, іншу, 日本語, 한국어, 简体中文, 繁體中文 |
| Interface USB/AV OUT | |
| TV system NTSC/PAL (selected by Setup MENU) | |
| Battery Lithium ion battery | |
| Operating Temperature 0°C - 40°C | |
| Operating Humidity 0% - 90% | |
| Microphone Built-in | |
| Speaker Built-in | |
| Dimensions 98.2 x 59.9 x 22.2 mm | |
| Weight 110g (no battery) | |
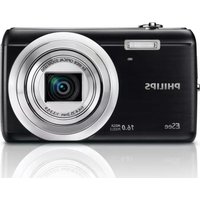
- Preface
- About this Manual
- Copyright
- Federal Communications Commission (FCC) Compliance
- Declaration of Conformity
- Trademark Recognition
- Safety and Handling Precautions
- Camera Information
- Battery Information
- Using this Menu
- Introduction
- System Requirements
- For Windows:
- For Macintosh:
- Main Features
- Package Contents
- Camera Views
- Left/Right View
- Camera Buttons
- Navigation Control
- Camera Memory
- Internal memory
- External storage
- Getting Started
- Attach the Camera Strap
- Inserting the Battery
- Inserting an SD/ SDHC/ SDXC Memory Card
- Charging the Battery by USB
- Turning the Power On and Off
- Initial Settings
- Setting the Language
- Setting the Date & Time
- Modes
- Photo Mode
- Movie Mode
- Playback Mode
- Using the LCD monitor
- LCD Monitor Layout
- Playback Mode Screen Layout
- Changing the LCD Monitor Display
- Recording Images, Videos and Voices
- Taking Images
- Setting the Zoom Control
- Zoom dial
- Using Flash
- To activate Flash:
- Setting the Focus Mode
- To set the Focus mode
- Macro/ Left button
- Using the Function Menu
- My Mode
- Photo Size
- Quality
- EV Compensation
- White Balance
- ISO
- Metering
- Color Mode
- Using the Record Menu
- Record Menu
- Setting the Scene Mode
- Using Intelligent Scene
- To activate Intelligent Scene
- Using Kids Mode
- Using Sports Mode
- Using Party Mode
- Using Soft Skin mode
- Using Food Mode
- Using Foliage Mode
- Using LOMO Mode
- Using Auction Mode
- Auction mode provides 4 kinds of pattern as follow
- Using Smile Capture Mode
- Using Blink Detection Mode
- Using Pre-composition Mode
- Using Love Portrait
- Using Self Portrait
- Using D-Lighting Mode
- Using Fisheye Lens Mode
- Using Photo Stitch Mode
- To stitch the still image
- Using Aperture Priority Mode
- To set Aperture values
- Using Shutter Priority Mode
- To set Shutter values
- Using Manual Exposure
- To activate Manual Exposure
- Displays the aperture and
- shutter speed value
- Using Voices Recording
- Setting the Drive Mode
- To set the Drive Mode
- Setting the AEB
- To set AEB
- Setting the AF Area
- To set AF Area
- Setting Sharpness
- To set Sharpness
- Setting Saturation
- To set Saturation
- Setting Contrast
- To set Contrast
- Setting the Digital Zoom
- To set Digital Zoom
- Setting the Date Stamp
- To set Date Stamp
- Setting Auto Review
- Setting Stabilizer
- Recording Videos
- Settings of Recording Videos
- Movie Size
- Internet Mode
- White Balance, Metering, Color Mode
- Pre-Record
- Playback
- Viewing in Single Navigation
- Viewing Thumbnails
- To set 9-images mode
- Scroll bar.
- To set calendar mode
- In calendar mode:
- Thumbnail icons:
- Zooming images
- Playing Videos
- Playing Voice Recording
- Playing Voice Memo
- Deleting an Image/ Video/ Audio
- Using the Delete Button
- Playback Menu
- To go to Playback Menu:
- Delete
- To delete an image/video/audio clip:
- To delete a single file:
- To delete attached voice memo:
- To delete multiple files:
- To delete all files:
- Slide Show
- To view slideshow:
- To change slide show settings:
- Protect
- To protect files:
- To protect/unprotect a single file:
- To protect/unprotect multiple files:
- To protect all files:
- To unlock all files:
- Red-eye Correction
- To activate Red-eye Correction:
- Voice Memo
- To record voice memo:
- To activate Color Mode:
- Trim
- To trim an image:
- Resize
- To resize an image:
- Startup Image
- DPOF
- To set DPOF:
- To reset DPOF:
- Radial Blur
- To set Radial blur for an image:
- Using the Setup Menu
- To go to Setup Menu:
- Setting Sounds
- Setting Power Save
- Setting LCD Save
- Setting Date & Time
- Setting Language
- Setting File Numbering
- Setting TV Out
- Setting LCD Brightness
- Setting Memory Kit
- Reset All
- Making Connections
- Connecting the Camera to a TV
- Connecting the Camera to a PC
- Connecting the Camera to a Printer
- Setting the Print Mode Menu
- To set Print Select
- To set Print All and Print Index
- To set Printer Settings
- Start Printing
- Appendix
- About Folder and File Names
- File Naming
Brand : PHILIPS
Model : DSC112BL
Category : Camera