
RPA313 - Intercom Chief - Free user manual and instructions
Find the device manual for free RPA313 Chief in PDF.


| Product Type | Wired Intercom System |
| Brand | Chief |
| Model | RPA313 |
| Dimensions (Approx.) | 160 x 100 x 30 mm (main unit) |
| Weight (Approx.) | 0.5 kg (main unit) |
| Power Supply | 12V DC via AC adapter (included) |
| Audio Type | Full-duplex hands-free |
| Number of Stations | Up to 2 indoor stations and 1 outdoor station |
| Outdoor Station | Weather-resistant with camera (optional) |
| Indoor Station Features | Volume control, call button, talk/listen button |
| Connection Type | 2-wire or 4-wire cable (manual specific) |
| Operating Temperature | 0°C to 40°C |
| Storage Temperature | -20°C to 60°C |
| Manual Languages | English (8 pages PDF) |
| Certifications | CE, FCC (estimated) |
| Cleaning Instructions | Wipe with dry cloth; do not use solvents |
| Maintenance | Check connections periodically; avoid moisture |
| Safety Precautions | Do not disassemble; use only supplied power adapter |
| Spare Parts / Repairability | Contact Chief support for replacement units; not user serviceable |
Frequently Asked Questions - RPA313 Chief
User questions about RPA313 Chief
0 question about this device. Answer the ones you know or ask your own.
Ask a new question about this device
Download the instructions for your Intercom in PDF format for free! Find your manual RPA313 - Chief and take your electronic device back in hand. On this page are published all the documents necessary for the use of your device. RPA313 by Chief.
USER MANUAL RPA313 Chief
INSTALLATION INSTRUCTIONS
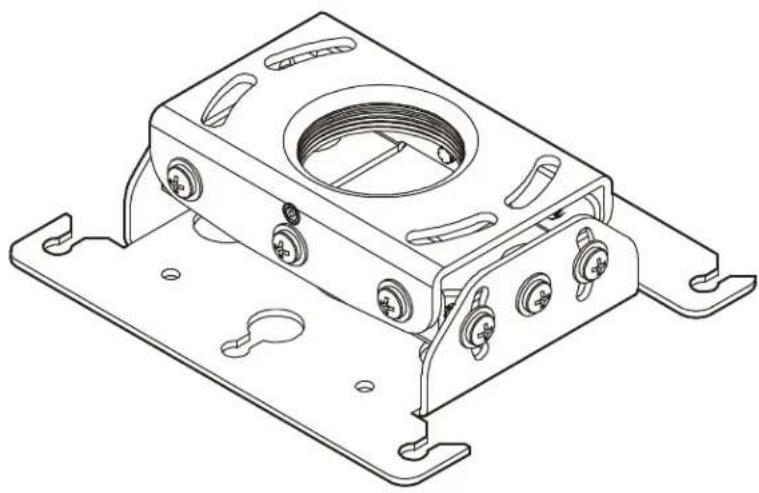
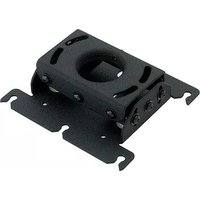
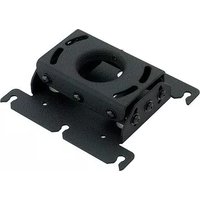
Projector Mount
DISCLAIMER
Milestone AV Technologies and its affiliated corporations and subsidiaries (collectively "Milestone"), intend to make this manual accurate and complete. However, Milestone makes no claim that the information contained herein covers all details, conditions or variations, nor does it provide for every possible contingency in connection with the installation or use of this product. The information contained in this document is subject to change without notice or obligation of any kind. Milestone makes no representation of warranty, expressed or implied, regarding the information contained herein. Milestone assumes no responsibility for accuracy, completeness or sufficiency of the information contained in this document.
Chief® is a registered trademark of Milestone AV Technologies. All rights reserved.

IMPORTANT SAFETY INSTRUCTIONS

WARNING: A WARNING alerts you to the possibility of serious injury or death if you do not follow the instructions.

CAUTION: A CAUTION alerts you to the possibility of damage or destruction of equipment if you do not follow the corresponding instructions.

WARNING: Failure to read, thoroughly understand, and follow all instructions can result in serious personal injury, damage to equipment, or voiding of factory warranty! It is the installer's responsibility to make sure all components are properly assembled and installed using the instructions provided.

WARNING: Failure to provide adequate structural strength for this component can result in serious personal injury or damage to equipment! It is the installer's responsibility to make sure the structure to which this component is attached can support five times the combined weight of all equipment. Reinforce the structure as required before installing the component.

WARNING: Exceeding the weight capacity can result in serious personal injury or damage to equipment! It is the installer's responsibility to make sure the combined weight of all components attached to the RPA does not exceed 50 lbs (22.7 kg).
- The weight capacity of the RPA may be LIMITED to the lowest weight capacity of any other components located between the RPA and the supporting structure!

WARNING: Use this mounting system only for its intended use as described in these instructions. Do not use attachments not recommended by the manufacturer.

WARNING: Never operate this mounting system if it is damaged. Return the mounting system to a service center for examination and repair.

WARNING: Do not use this product outdoors.
IMPORTANT ! : The RPA mounts are designed to be:
- mounted to a 1-1/2" NPT or NPSM following ANSI/ASME B1.20.1 (Schedule 40, 0.154" minimum thickness steel or aluminum - ASTM B221) threaded extension column (not included); or
- mounted to a double 2" x 4" wood joist with a maximum drywall covering of 5/8"; or
- suspended from four 1/4-20 Grade ASTM A307 or better threaded rods (not included) which are secured to unistrut by 1/4-20 Grade 2 or better channel nuts (not included), or to angle or channel assembly overhead structural members (trusses or l-beams) by 1/4-20 Grade 2 or better jam nuts (not included).
NOTE: RPA Series may be used with UL Listed models WM210S, WM220S, WM230S, WM240S, WM210SI, WM220SI, WM230SI and WM240SI (not included).
--SAVE THESE INSTRUCTIONS--
DIMENSIONS

DIMENSIONS: INCHES


NOTE: CUSTOM INTERFACE BRACKET
NOT SHOWN. THE CUSTOM INTERFACE
BRACKET NEEDED FOR YOUR PROJECTOR
WILL ADD DEPTH TO INSTALLATION AND
WILL AFFECT LOCATION OF PROJECTOR ON MOUNT.
SEE SLB-XXXX DRAWING ALSO.
LEGEND

Tighten Fastener
Phillips Screwdriver
Destornillador Phillips
Hardware required - not included
(dependent on installation method)
1. Install to threaded extension column
- 1-1/2" NPT or NPSM following ANSI/ASME B1.20.1 (Schedule 40, 0.154" minimum thickness steel or aluminum - ASTM B221) threaded extension column (not included)
2. Install to wood ceiling joists (Qty. of 4 each)
- 1/4" x 2" (minimum length) Grade 2 lag bolts
- 1/4" Grade 2 nuts
• 1/4" Grade 2 washers
3. Install to threaded rod
• 1/4-20 steel threaded rods (Qty. 4)
• 1/4-20 Grade 2 channel nuts (Qty. 4)
• 1/4-20 Grade 2 jam nuts (Qty. 8)
• 1/4" Grade 2 washers (Qty. 8)


[Example of SLB bracket]
PREPARATION
Locate Mounting Site

WARNING: IMPROPER INSTALLATION MAY LEAD TO PROJECTOR MOUNT FALLING CAUSING SEVERE PERSONAL INJURY OR DAMAGE TO EQUIPMENT! It is the installers responsibility to make certain the structure to which the projector mount is being mounted is capable of supporting five times the weight of the projector mount and all attached equipment. Reinforce the structure as required before installing the projector mount.
- Determine required position of the RPA projector mount.
- Determine required distance of the projector mount from the screen using the lens-to-screen distance information.
NOTE: Proceed to Installing to 1-1/2" Threaded Extension Column, Installing to Wood Framework (Joists), or Installing to Threaded Rod section, as appropriate.
INSTALLATION
Installing to 1-1/2" Threaded Extension Column
- Install 1-1/2" NPT or NPSM following ANSI/ASME B1.20.1 (Schedule 40, 0.154" minimum thickness steel or aluminum - ASTM B221) threaded extension column (not included) into threaded collar until tight, with a minimum of four threads engaged.
- Thread RPA projector mount (A) onto the threaded extension column (not included) until hand tight, with a minimum of four threads engaged.
- Turn RPA clockwise or counter-clockwise until front of mount is facing target.
IMPORTANT ! : When RPA is properly positioned, the set screw access hole should be pointing directly at target, or 180° AWAY from target.
- Secure RPA to pipe by turning set screw until tight. (See Figure 1)

CAUTION: DO NOT OVERTIGHTEN! Overtightening of set screw can damage threads on pipe.

Figure 1
- Proceed to Installing Projector with Interface Bracket section.
Installing to Wood Framework (Joists)
- Using the RPA as a guide, mark four mounting hole locations. (See Figure 2)
- Drill four 1/8" x 1-1/2" deep (minimum depth) pilot holes. (See Figure 2)

Figure 2
- Align four mounting holes in RPA with four pilot holes.
IMPORTANT ! : When RPA is properly positioned, the set screw access hole should be pointing directly at target, or 180° AWAY from target.
- Secure RPA to structure using four 1/4" x 2" minimum length lag bolts (not included) and four 1/4" flat washers (not included). (See Figure 3)
NOTE: If the wood framework structure allows, the hardware may be installed from above the RPA projector mount.
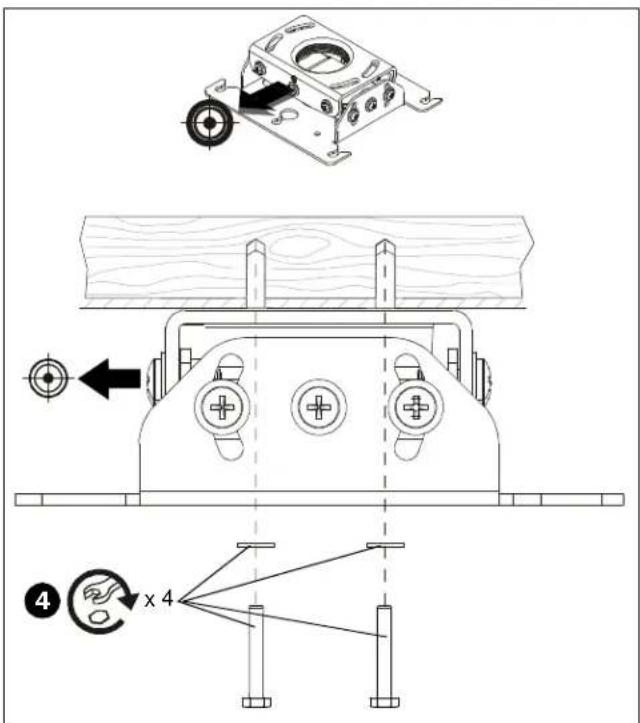
Figure 3
- Proceed to Installing Projector with Interface Bracket section.
Installing to Threaded Rod
NOTE: The RPA projector mount may be suspended from four 1/4-20 steel threaded rods (not included) which are secured to unistrut by 1/4-20 Grade 2 or better channel nuts (not included), or to angle or channel assembly overhead structural members (trusses or I-beams) by 1/4-20 Grade 2 or better jam nuts (not included). Threaded rods must have 16 threads per square inch.
-
Secure one end of each of the four threaded rods (not included) to the structural member.
-
Install one 1/4-20 jam nut (not included) and one 1/4" washer (not included) onto each threaded rod.
-
Install RPA onto threaded rods, inserting the rods into the four slots on top of the RPA.
NOTE: Hole in the RPA allows socket wrench access without unit disassembly.
- Secure the threaded rods to the RPA with one 1/4-20 jam nut (not included) and one 1/4" washer (not included) on each threaded rod. (See Figure 4)

Figure 4
- Proceed to Installing Projector with Interface Bracket section.
PROJECTOR INSTALLATION
IMPORTANT ! : Model RPA uses optional Chief "SLB" Series interface brackets. See Parts drawing.
- Attach projector to interface bracket (B) using installation instructions and hardware included with the interface bracket.
NOTE: Security screws can be substituted when mounting interface bracket to projector by using the hardware and installation instructions in the All-Points Security Kit (included with interface bracket).
Installing Projector with Interface Bracket
- Orient projector with interface bracket.
- Loosen (but do not remove) thumb nuts on the interface bracket. (See Figure 5)
- Raise projector with attached interface bracket to RPA projector mount (A). (See Figure 5)

Figure 5
- Align the thumb nuts on the interface bracket with the locating slots on the RPA projector mount. (See Figure 6)
- Slide the interface bracket with attached projector to the limit of the locating slots. (See Figure 6)

WARNING: IMPROPER INSTALLATION CAN LEAD TO PROJECTOR FALLING RESULTING IN SERIOUS PERSONAL INJURY OR DAMAGE TO EQUIPMENT. Make certain mounting slots in RPA projector mount base slide under thumb screws and that screws are seated in the back of locating slots.
- Tighten thumb nuts to secure projector in place.

Figure 6
- Route all cables as required.
ADJUSTMENTS
The RPA projector mount can be adjusted for pitch (vertical elevation), roll (horizontal tilt), and yaw (rotation).

WARNING: OVER-LOOSENING OR REMOVAL OF HARDWARE MAY RESULT IN PERSONAL INJURY OR SERIOUS DAMAGE TO EQUIPMENT! RPA projector mount and hardware is to be loosened only enough to allow for necessary movement.
Pitch (Vertical Elevation)
Adjust pitch using the two pitch adjustment screws located on each end of the RPA.
- Loosen two pitch adjustment screws located on each end of the RPA.
- Adjust projector angle to desired pitch. (See Figure 7)
- Tighten two pitch adjustment screws located on each end of the RPA.

Figure 7
Roll (Horizontal Tilt)
Adjust roll using the four roll adjustment screws, two on front and two on the back of the RPA.
- Loosen two roll adjustment screws on each side of the RPA.
- Adjust projector to desired position. (See Figure 8)
- Tighten two roll adjustment screws on each side of the RPA.
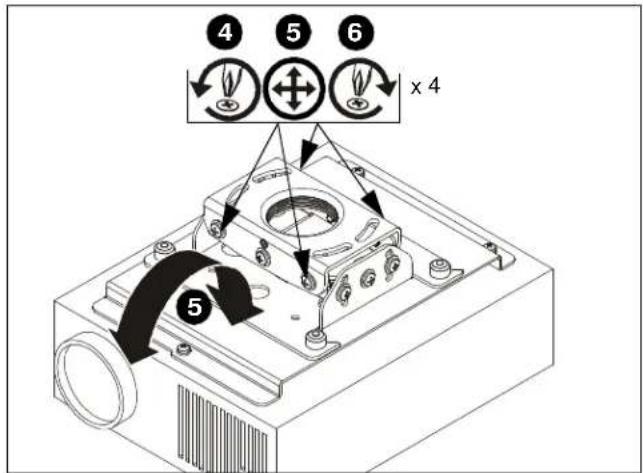
Figure 8
Yaw (Rotation)
Adjust yaw by threading or unthreading the RPA projector mount on the threaded extension column (not included).
- Loosen set screw. (See Figure 9)

WARNING: IMPROPER ADJUSTMENT CAN LEAD TO PROJECTOR FALLING RESULTING IN SERIOUS PERSONAL INJURY OR DAMAGE TO EQUIPMENT. Do NOT unthread RPA to the end of pipe threads!
- Adjust projector by turning RPA projector mount on the extension column to the desired yaw position.
- Tighten set screw.

Figure 9
RPA Series
Installation Instructions


- INSTALLATION INSTRUCTIONS
- DISCLAIMER
- IMPORTANT SAFETY INSTRUCTIONS
- SAVE THESE INSTRUCTIONS
- DIMENSIONS
- LEGEND
- TIGHTEN FASTENER
- PHILLIPS SCREWDRIVER
- HARDWARE REQUIRED - NOT INCLUDED
- (DEPENDENT ON INSTALLATION METHOD)
- INSTALL TO THREADED EXTENSION COLUMN
- INSTALL TO WOOD CEILING JOISTS (QTY. OF 4 EACH)
- INSTALL TO THREADED ROD
- PREPARATION
- LOCATE MOUNTING SITE
- INSTALLATION
- INSTALLING TO 1-1/2" THREADED EXTENSION COLUMN
- INSTALLING TO WOOD FRAMEWORK (JOISTS)
- INSTALLING TO THREADED ROD
- PROJECTOR INSTALLATION
- INSTALLING PROJECTOR WITH INTERFACE BRACKET
- ADJUSTMENTS
- PITCH (VERTICAL ELEVATION)
- ROLL (HORIZONTAL TILT)
- YAW (ROTATION)
Brand : Chief
Model : RPA313
Category : Intercom