
Navman M315 - Gps MIO - Free user manual and instructions
Find the device manual for free Navman M315 MIO in PDF.


| Product Type | Portable GPS Navigation Device |
| Model | Navman M315 (Part of Moov M300/M400 Series) |
| Power Supply | Internal non-replaceable lithium-ion polymer battery; charges via in-car charger, USB cable, or optional home charger |
| Battery Life | Up to 3 hours of operation when fully charged |
| Display | Touchscreen LCD |
| Navigation Features | Street-level maps, address search, Points of Interest (POI), multi-stop trip planner, back-on-track automatic rerouting, route preview/demonstration |
| Traffic Information | Optional TMC accessory for real-time traffic; subscription-free |
| GPS Receiver | Internal GPS antenna with WAAS/EGNOS support; up to 12 satellites |
| Connectivity | Mini-USB 2.0 for data transfer and charging |
| Memory | Internal flash memory for maps and data; expandable via optional SD card (not specified, but typical) |
| Voice Guidance | Turn-by-turn spoken instructions in multiple languages |
| NavPix™ | Geotagged photo navigation (select models) |
| Safety Camera Alerts | Optional subscription-based safety camera POI database |
| Mounting | Windshield suction cup mount or dashboard disc (alternative provided); do not obstruct driver's view |
| Operating Temperature | 0°C to 40°C (32°F to 104°F) for charging; avoid prolonged direct sunlight |
| Care & Cleaning | Use soft, lint-free cloth; do not use paper towels; power off before cleaning |
| Safety | Do not operate while driving; mount away from airbags; follow local laws for windshield mounting |
| Repairability | Non-user-serviceable internal battery; do not disassemble; contact authorized service center for repairs |
| Software | Compatible with MioMore Desktop for map updates, POI management, backup/restore |
| Warranty | Limited warranty; modifications or disassembly voids warranty |
Frequently Asked Questions - Navman M315 MIO
User questions about Navman M315 MIO
0 question about this device. Answer the ones you know or ask your own.
Ask a new question about this device
Download the instructions for your Gps in PDF format for free! Find your manual Navman M315 - MIO and take your electronic device back in hand. On this page are published all the documents necessary for the use of your device. Navman M315 by MIO.
USER MANUAL Navman M315 MIO
Moov M300/M400-Series
User Manual
Important safety information
PLEASE READ CAREFULLY BEFORE INSTALLING PRODUCT IN VEHICLE
 | This is the safety alert symbol. It is used to alert you to potential personal injury hazards. Obey all safety messages that follow this symbol to avoid possible injury or death. |
| WARNING indicates a potentially hazardous situation which, if not avoided, could result in death or serious injury. | |
 | CAUTION indicates a potentially hazardous situation which, if not avoided, may result in minor or moderate injury. |
 | CAUTION used without the safety alert symbol indicates a potentially hazardous situation which, if not avoided, may result in property damage. |
WARNING
Removing original equipment, adding accessories or modifying your vehicle could affect the vehicle's safety or make it illegal to operate in some jurisdictions.
Follow all product instructions and all instructions in your vehicle owner's manual regarding accessories or modifications.
Consult your country's and/or state's laws regarding operation of a vehicle with any accessories or modifications.
It is your sole responsibility to place, secure and use your Mio in a manner that will not cause accidents, personal injury or property damage. Always observe safe driving practices.
Do not mount your Mio in a way that may interfere with the safe operation of the vehicle, the deployment of air bags or other safety equipment.
Do not operate your Mio while driving.
Before you use your Mio for the first time, familiarize yourself with your device and its operation.
On main roads, the distance to an exit calculated by the Mio may be further than the distance shown on road signs. Road signs show the distance to the start of an exit while the Mio shows the distance to the next intersection, i.e., the end of the exit ramp or road. To prepare to exit a road, always follow distance information on road signs.
The use of information regarding safety or speed camera locations may be subject to local laws in the country of use. You are responsible for checking that you can legally use the information in your country or in the country where the information will be used.
CAUTION
Do not handle the Mio while it is hot. Let the product cool, out of direct sunlight.
CAUTION
Do not expose the Mio to direct sunlight in an unattended vehicle for prolonged periods. Overheating may damage the unit.
Note: To discourage theft, do not leave the Mio, mounting bracket or any cables in plain view in an unattended vehicle.
Home Charger-specific safety information
WARNING
To charge your Mio from the mains power, use the home charger supplied by Mio as an accessory (may be sold separately). Using other home chargers with your Mio could result in serious injury or property damage.
Never use the charger if the plug or cord is damaged.
Do not expose the charger to moisture or water. Do not use the charger in a high moisture environment. Exposure to water may cause electrical sparks or fires.
Never touch the charger when your hands or feet are wet.
Allow adequate ventilation around the charger when using it to operate your Mio or charge the Mio internal battery. Do not cover the charger with paper or other objects that will reduce ventilation. Do not use the charger while it is inside a carrying case or other container.
Ensure that the charger is connected to a power source with the correct fitting and voltage requirements. The voltage requirements can be found on the home charger casing and/or packaging.
Do not attempt to service the charger as this could result in personal injury. Replace the charger if it is damaged or exposed to excess moisture.
Internal battery-specific safety information
WARNING
The Mio contains a non-replaceable internal lithium-ion polymer battery. The battery may burst or explode if mishandled, releasing hazardous chemicals. To reduce the risk of fire or burns, do not disassemble, crush or puncture the battery.
Recycle or dispose of the battery safely and properly according to local laws and regulations. Do not dispose of the battery in fire or water.
CAUTION
Only use the correct home charger (sold separately) or in-car charger supplied by Mio to charge the Mio internal battery. Only use the Mio internal battery with the Mio unit.
The Mio battery will stop charging when the ambient temperature is less than 0^ C ( 32^ F) or more than 40^ C ( 104^ F).
Failure to adhere to these warnings and cautions may lead to death, serious injury or property damage. Mio disclaims all liability for installation or use of the Mio that causes or contributes to death, injury or property damage or that violates any law.
Warning Notice to Drivers in the United States
State law may prohibit drivers in states such as Arizona, California and Minnesota from mounting objects on their windshields while driving. Please make sure you research and follow your most current State laws. An alternative mounting option is provided in the box with your product, also, stores offer additional mounting alternatives. Mio does not take any responsibility for any fines, penalties, or damages that may be incurred as a result of disregarding this notice.
Caring for your Mio
Taking good care of your Mio will ensure trouble-free operation and reduce the risk of damage to your Mio.
- Keep your Mio away from excessive moisture and extreme temperatures.
■ Avoid exposing your Mio to direct sunlight or strong ultraviolet light for extended periods of time.
■ Do not place anything on top of your Mio or drop objects on your Mio.
■ Do not drop your Mio or subject it to severe shock. - Do not subject your Mio to sudden and severe temperature changes. This could cause moisture condensation inside the unit, which could damage your Mio. In the event of moisture condensation, allow the Mio to dry out completely before use.
The screen surface can easily be scratched. Avoid touching it with sharp objects. Non-adhesive generic screen protectors designed specifically for use on portable devices with LCD panels may be used to help protect the screen from minor scratches. - Never clean your Mio with it powered on. Use a soft, lint-free cloth to wipe the screen and the exterior of your Mio.
■ Do not use paper towels to clean the screen. - Never attempt to disassemble, repair or make any modifications to your Mio. Disassembly, modification or any attempt at repair could cause damage to your Mio and even bodily injury or property damage and will void any warranty.
- Do not store or carry flammable liquids, gases or explosive materials in the same compartment as your Mio, its parts or accessories.
Contents
Important safety information 2
Home Charger-specific safety information 3
Internal battery-specific safety information 3
Warning Notice to Drivers in the United States 3
Caring for your Mio 4
Welcome....9
Important information for using the manual....9
How do I install my Mio? 10
Receiving TMC information ....11
Getting to know your Mio 12
Turning on and off 14
Shutdown and hardware reset 14
How do I monitor the battery status?....14
How do I charge the battery? 14
Charging the battery via the USB cable.... 15
Navigating on the screen 16
How do I adjust the volume? 16
How do I get started? 17
How do I turn my Mio on for the first time? 17
What are the main screens I will use? 19
Main Menu screen 19
Map screens 19
How do I navigate with GPS? 21
How does my Mio receive GPS signals? 21
How do I view my GPS status? 21
How do I go from A to B? 22
What if I miss a turn? 22
How do I search for an address? 23
Case Study: How do I search for an address? 23
Using the Keyboard screen....25
Using the Destination Search screen....25
How do I create a trip with multiple stops? 27
Case Study: How do I navigate to multiple addresses? 27
How do I skip a waypoint during a multi-stop trip? 30
How do I search for a Point of Interest (POI)? 31
Case Study: How do I search for a Point of Interest? 31
How do I save Favourites and My Home? 34
Can I save a NavPix ^TM to a Favourite?......34
How do I save a Favourite or My Home? 34
How do I navigate to a Favourite? 35
How do I navigate to My Home? 35
Option 1 - Via the Main Menu ....35
Option 2 - Via the Favourite Destinations screen....35
How do I edit the name of a Favourite? 36
How do I delete a Favourite? 37
How do I navigate to a recent location? 38
How do I view my route? 39
3D Map screen....39
2D Map screen....41
Traffic Overview screen (selected models only)....43
Route Overview screen....45
Turn-by-Turn screen....47
How do I use the Map Menu?......49
Displaying the Map Menu 49
Map Menu options....49
How do I avoid an area? 50
How do I add an Avoid Area? 50
How do I delete an Avoid Area? 50
How do I delete all Avoid Areas? 50
How do I preview a route? 51
How do I view my route statistics? 52
How do I view statistics on my current route? 52
How do I view statistics of my trips to date? 53
How do I view my trip logs? 54
How do I use NavPix ^TM ? 55
How do I manage my NavPix™? 55
Album management....55
NavPix ^TM management....56
How do I view a NavPix ^TM in full-screen? 57
How do I navigate to a NavPix™? 59
How do I save a NavPix ^TM to a favourite?......60
How do I save a NavPix ^TM to a POI? 61
What is Mio Connect (Local Search)?......62
How do I search for a POI using Mio Connect?......62
How do I receive current traffic information? (Select models only) 63
How does my Mio receive traffic information?......63
Traffic status....63
How will I know when a Traffic Event occurs? 64
How do I view a list of all events on my route? 65
How do I view traffic details?......66
How do I know if a detour is recommended? 67
How do I avoid an event on my route? 67
How do I cancel a detour around an event on my route? 67
How do I automatically avoid all traffic and clearance events on my route? 67
Traffic Messages....68
Detour Not Available messages....68
Detour recommended messages....68
What can I customise? 69
Route Options....70
Route Calculation 1/5....70
Road Types 2/5....71
Road Types 3/5....72
Driver Alerts 4/5 73
Data Recording 5/5....74
Map Display....75
Map Display 1/3....75
Map Display 2/3 76
Select Map 3/3 77
Map POIs....78
Volume 79
Screen 80
POI Alerts 81
GPS....82
GPS Status....82
Resetting your GPS fix 82
Setting your GPS mode....83
Language 84
Traffic85
Traffic System Status 85
Traffic Event Notification....86
Select event sorting type....87
Power 88
Keyboard 89
How does predictive text (abc, def...) work? 89
Units....90
Units 1/2 90
Units 2/2....91
Start-up 92
Saved Info 93
Tutorial....94
About 95
Shop Demo 95
What is MioMore Desktop?......96
Can I use MioMore Desktop with my computer?......96
How do I install a map for the first time? 96
How do I install MioMore Desktop onto my computer?......97
MioMore Desktop features....98
How do I keep MioMore Desktop up-to-date? 99
How do I update MioMore Desktop? 99
MioMore Desktop Preferences 99
Mio Online 99
Mio Connect 100
How do I search for a POI using Mio Connect?......100
How do I install POIs from my computer to my Mio? 101
How do I delete a POI from my Mio? 101
My Maps....102
How do I install maps onto my Mio? 102
How do I install maps from DVD?....103
How do I remove maps from my Mio? 104
How do I know which map contains a particular city or town? 105
How do I download maps to my computer? 105
What is a Major Road Network map? 106
My Subscriptions....107
Alerts....107
How do I install Safety Camera information? 107
How do I know which Safety Camera information is available? 107
Purchase a Subscription....107
Activate your Subscription....108
How do I update Safety Camera information on my Mio? 108
Image Search....109
How do I download NavPix™ from the internet?......109
How do I import NavPix ^TM to Photo Album?......109
Photo Album....110
Toolbar 110
How do I copy NavPix™ or albums from my Mio to Photo Album? 111
How do I transfer pictures from Photo Album to my Mio? 111
How can I view and edit pictures or albums on my computer? 112
Photo Album Preferences.... 113
Custom POIs 114
How do I install custom Points of Interest? 114
How do I delete a Custom POI File from my Mio? 115
Mileage Reporter 116
How do I input my trip data? 116
How do I export a mileage report? 116
How do I delete travel logs from my Mio?......117
Mileage Reporter preferences....117
Voice Transfer 118
How do I install a voice file? 118
How do I remove a voice file? 118
How do I backup my Mio? 119
How do I Backup my Mio? 119
How do I Restore a Backup to my Mio?......119
How do I Delete a Backup? 119
Reference 120
Troubleshooting....120
Point of Interest categories.... 121
Branded Points of Interest....122
Point of Interest categories by Mio....122
Point of Interest categories by subscription 122
Traffic and other TMC Events....122
Safety Camera POIs 124
Disclaimer 124
Compliance....124
Copyright 125
For more information....126
Welcome
Thank you for purchasing this Mio. This manual has been prepared to guide you through the operation of your Mio from first set-up through to continuous use. Please read this manual carefully before using your Mio for the first time. Keep this manual in a safe place and use as your first point of reference.
Important information for using the manual
It is important to understand the terms and typographical conventions used in this manual.
Formatting
The following formatting in the text identifies special information:
| Convention Type of Information | |
| Bold | Mio components or items displayed on screen, including buttons, headings, field names and options. |
| Italics Indicates the name of a screen. | |
Terms
The following terms are used throughout this manual to describe user actions.
| Term Description |
| Tap Press and release an item displayed on the touch screen. |
| Tap and hold Tap and hold an item displayed on the touch screen for 2-3 seconds. |
| Select Tap an item in a list or tap a command from a menu. |
How do I install my Mio?
CAUTION:
- Select an appropriate location for mounting the Mio in a vehicle. Never place your Mio where the driver's field of vision is blocked.
- If the car's windscreen is tinted with a reflective coating, it may be athermic and impact the GPS reception. In this instance, please mount your Mio where there is a "clear area."
- To protect your Mio against sudden surges in current, connect the car charger only after the car engine has been started.
Moov M300-Series Installation
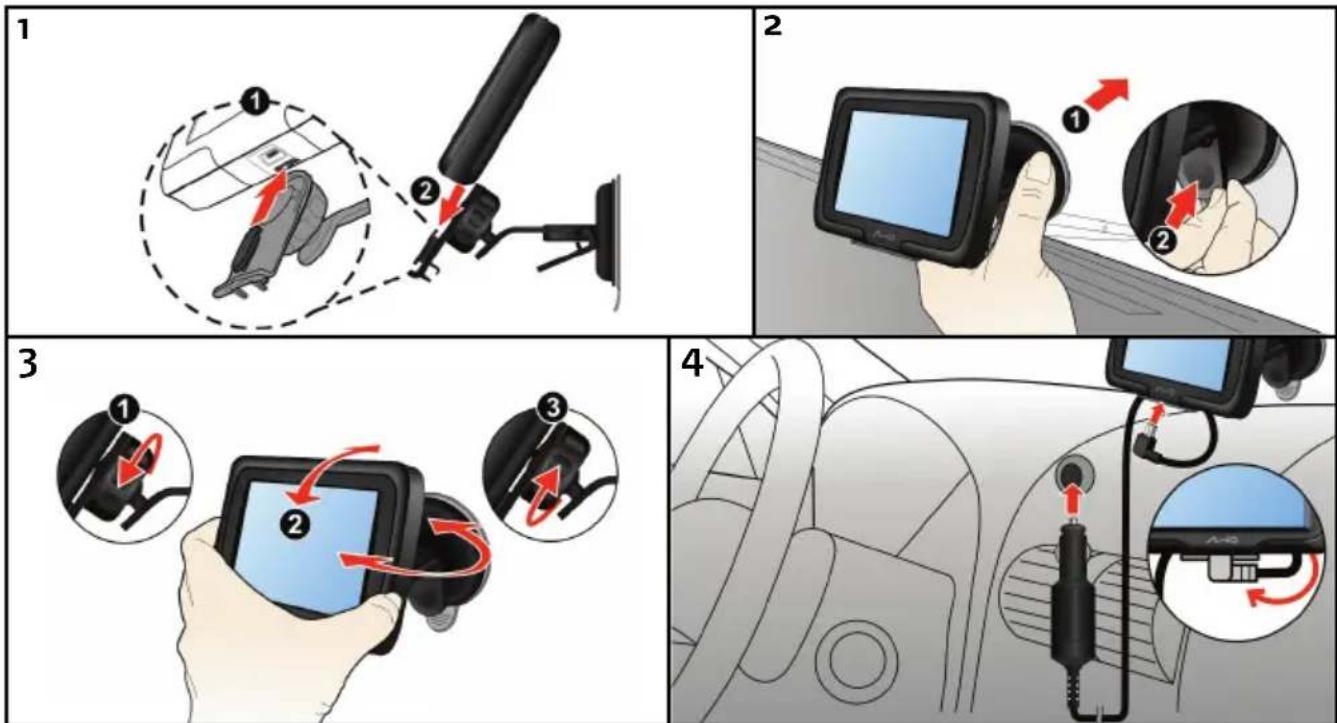
Moov M400-Series Installation
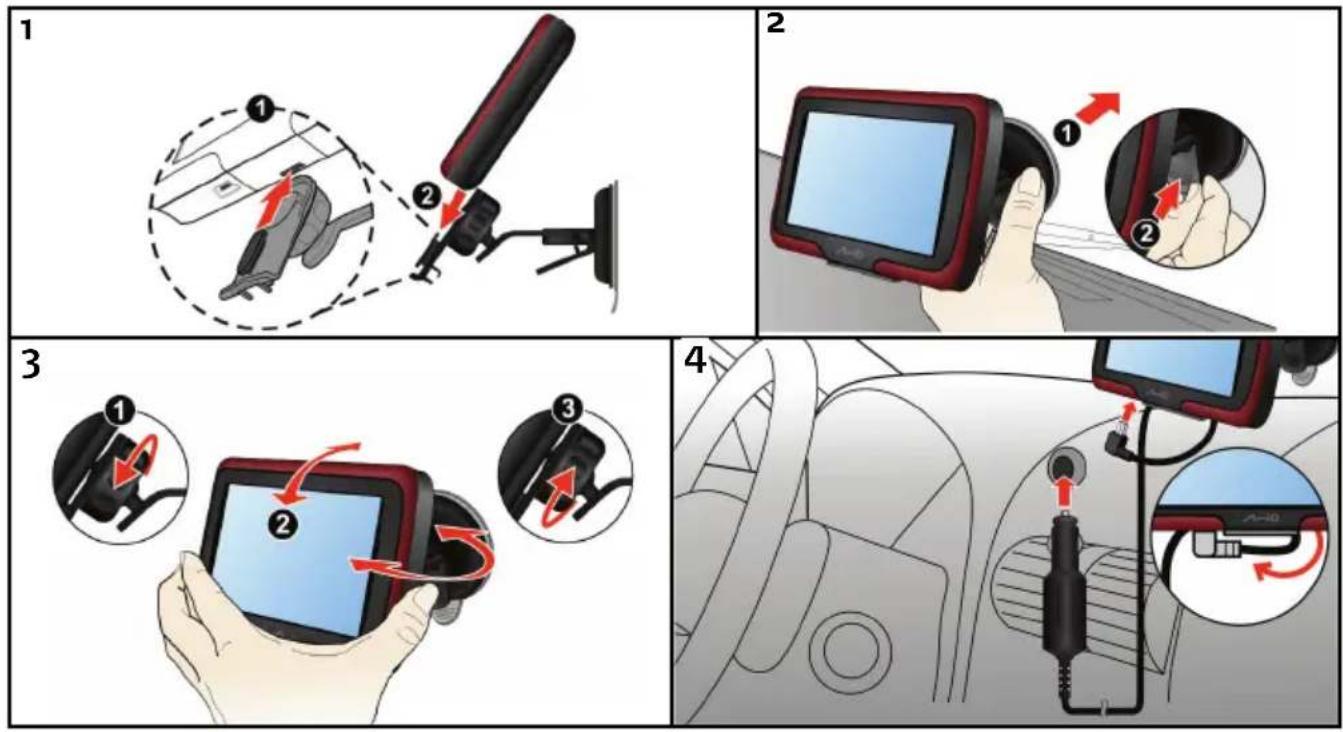
Receiving TMC information
Note: Not available on all models.
You can receive current traffic information on your Mio via an optional TMC accessory kit. To receive traffic information, you must connect your Mio to the in-car charger.
TMC information is monitored by the navigation software. Once the information is received, you can view it on your device and traffic icons will appear in the map view. Certain roads with reported traffic will be highlighted and you can choose to avoid those roads and an alternate route will be automatically calculated. For more information, see "How does my Mio receive traffic information?" on page 63.
Getting to know your Mio
Moov M300-Series
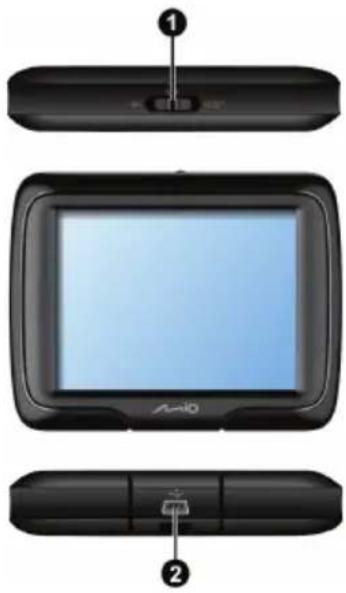
1 Power Switch
② Socket for in-car charger, USB cable, home charger (may be sold separately) and TMC accessory kit (may be sold separately)
③ Speaker
4 Cradle Socket
Moov M400-Series
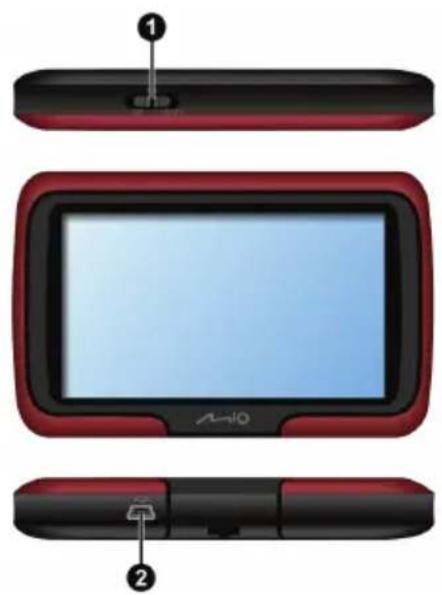
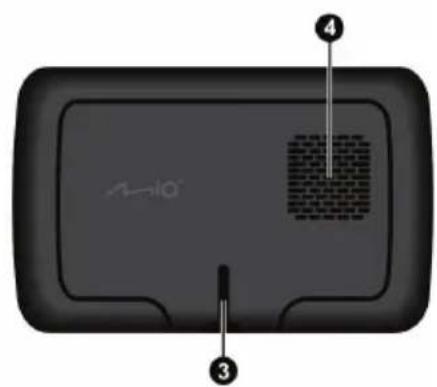
1 Power Switch
② Socket for in-car charger, USB cable, home charger (may be sold separately) and TMC accessory kit (may be sold separately)
③ Cradle Socket
4 Speaker
Turning on and off
For normal operation, turn off your Mio by sliding the power switch to the OFF position. Your Mio enters a suspended state. To use it again, slide the power switch to the ON position. Your Mio will be back to where you left off.
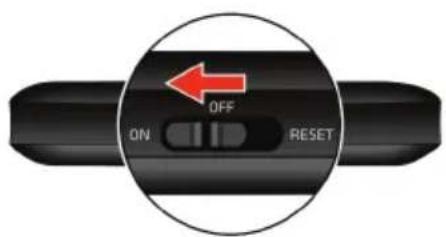
Moov M300-Series
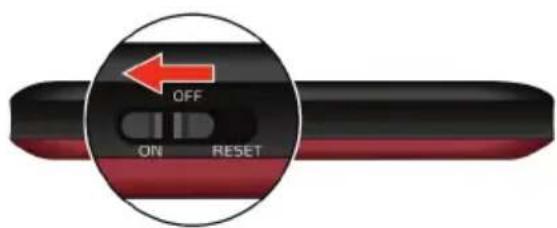
Moov M400-Series
Shutdown and hardware reset
Occasionally, you may need to perform a hardware reset when your Mio stops responding; or appears to be "frozen" or "locked-up."
You can perform a hardware reset by shutting down your Mio and then turning it back on. To shut down your Mio, slide the power switch to the RESET position. To turn on your Mio after shutting it down, slide the power switch to the ON position.
NOTE: Switching to the Reset position turns the battery off. It is recommended you move the switch to this position if you are planning to store your Mio for any length of time.
How do I monitor the battery status?
Your Mio has an internal battery that when fully charged, should provide power for up to 3 hours.
You can monitor battery power status on the Power screen.
Note: The battery may not be fully charged when you use your Mio for the first time.
To access the Power screen, tap

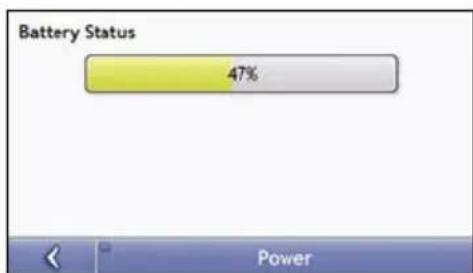
bar
Battery Status | Category | Value (%) | |---|---| | Battery Status | 47 | PowerHow do I charge the battery?
The Battery Status bar displays External Power while the battery is charging; when the battery is fully charged, the Battery Status bar will display at 100%.
- To charge your Mio in a vehicle, plug the in-vehicle charger to the bottom of your Mio and the other end into the vehicle power socket, as shown in the" How do I install my Mio?" section.
■ To charge your Mio using your computer, see later section for details. - To charge your Mio using a mains power socket, plug the mains power charger cable to the bottom of your Mio and the mains power charger pack into the mains power socket.
Note: The mains power charger is not included with all models and may be purchased separately.
Charging the battery via the USB cable
If you intend to charge your Mio in this way, turn off your Mio so that it takes less time to charge the battery.
-
Turn on the computer.
-
Connect the mini-USB end of the USB cable to the port on your computer.
bottom of your Mio and the other end to a USB
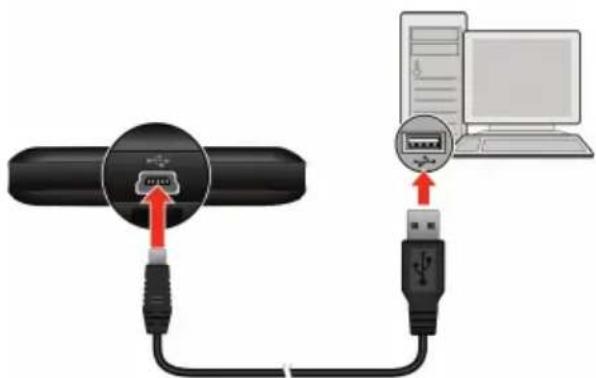
Moov M300-Series
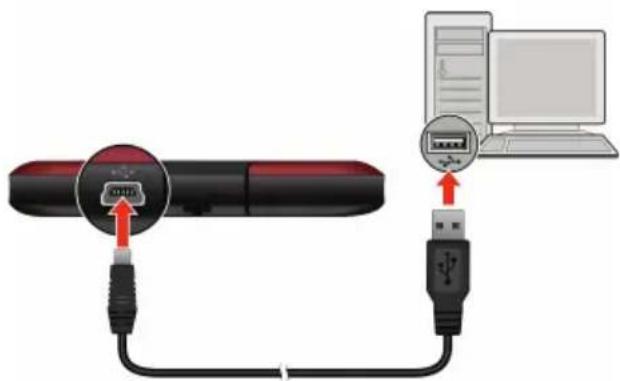
Moov M400-Series
Note: If your Mio is on when connected to a computer, a screen appears to prevent you from using your Mio.
Note: When the Mio is connected to a computer, it is recognized as an external mass storage device. Do not delete any files pre-installed in the Mio. Deleting files of which the function is unknown can cause programs or features to malfunction.
CAUTION: For optimal performance of the lithium battery:
- Do not charge the battery where the temperature is high (e.g. in direct sunlight).
There is no need to fully discharge the battery before charging. You can charge the battery before it is discharged. - When storing the product for a long period of time, be sure to fully charge the battery at least once every two weeks. Over discharge of the battery can affect the charging performance.
Navigating on the screen
To operate your Mio, touch the screen with your fingertip. You can perform the following actions:
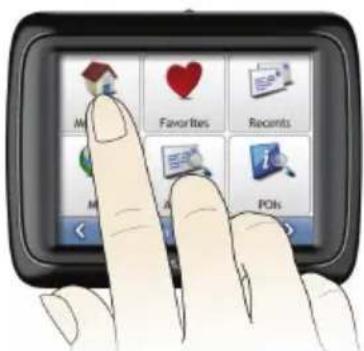
Moov M300-Series
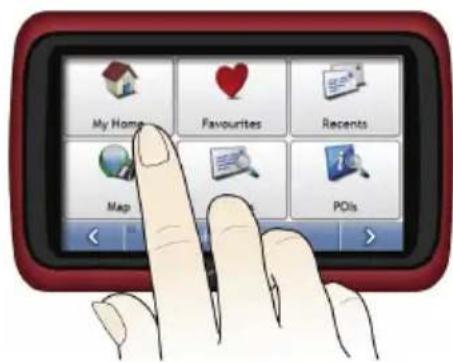
Moov M400-Series
Tap
Touch the screen once with your fingertip to open items or select onscreen buttons or options.
- Drag
Hold your fingertip on the screen and drag up/down/left/right or across the screen. (This is not supported by all applications.)
■ Tap and hold
Tap and hold your fingertip until an action is complete, or a result or menu is shown. (This is not supported by all applications.)
How do I adjust the volume?
The volume on your Mio can be adjusted by the volume control on the Volume preference screen.
To mute the volume from the map screens, tap 📄 and then tap . Tap and hold a bit longer allows you to shortcut directly to the volume screen.
For more information on how to adjust the volume on your Mio, see "Volume" on page 79.
How do I get started?
Note: The first time you use your Mio, it may take several minutes to establish a GPS connection. For more information about GPS, refer to the GPS Frequently Asked Questions guide on the enclosed DVD.
How do I turn my Mio on for the first time?
To get started for the first time, complete the following steps:
-
Read the Important Safety Information on page 2.
-
Position your Mio
Follow the instructions on page 10.
Note: Ensure that your Mio does not obstruct the driver's view, or interfere with the operation of the vehicle airbags and safety devices.
- Turn your Mio on
Your Mio will turn on and display the Language screen.
- Select your preferred language
From the Select Language screen, tap your preferred language.
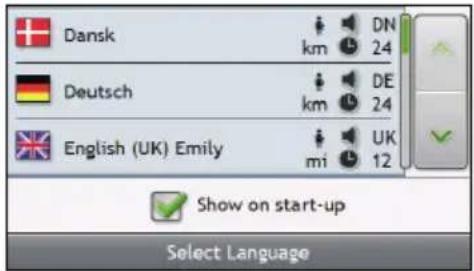
-
To prevent the Select Language screen from displaying on each start-up, clear the Show on start-up check box.
■ You can change your preferred language while using your Mio, see "Language" on page 84. -
Read the warning message
a) The Safety Agreement screen will display after you have selected your preferred language. Read the Safety Agreement message.
b) To confirm that you have read and understood the message, tap Accept. The Tutorial will display.
- View the Tutorial
When you have accepted the Safety Agreement, the first Tutorial screen will display.
- To prevent the Tutorial from displaying again on start-up, clear the "Show tutorial on start-up" check box.
- To move forward through the Tutorial screens, tap >.
To view the previous screen, tap <.
■ To view the Tutorial again while using your Mio, see "Tutorial" on page 94.
Note: If you have maps installed from multiple continents, you may be prompted to select the maps you require. To use maps from a different continent at a later time, you can select a different map via the Select Map screen in the Select Map 3/3 preferences; refer to page 77.
When you have finished the Tutorial, the 3D Map screen will display. If you have a GPS fix, your current location will be displayed on the map.
What are the main screens I will use?
Main Menu screen
The Main Menu screen is your starting point for searching for a destination. The Main Menu screens also allow you to enter an address for your destination and customise preferences.
The Main Menu can be accessed from the map screens by tapping or by tapping the status bar at the bottom of any screen.
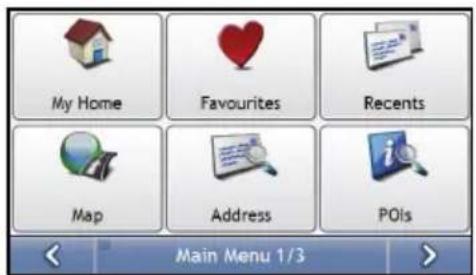
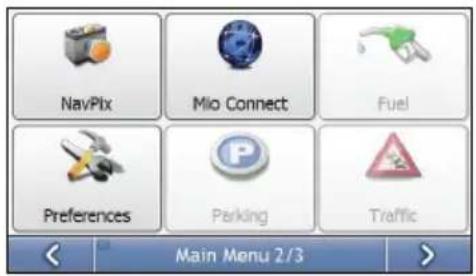
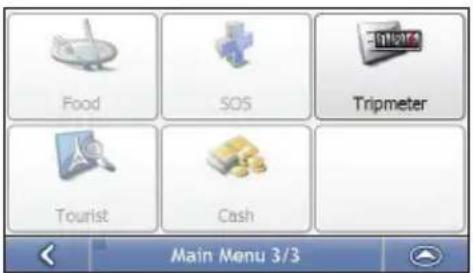
Note: The Main Menu screens may differ from those displayed above, depending on your Mio model.
Map screens
There are five map screens used to view the route to your destination:
■ 3D Map
■ 2D Map
■ Traffic Overview (Not available on all models)
■ Route Overview
■ Turn-by-Turn™
The Map screens can be accessed from the Main Menu screen by tapping

You can cycle through the different map screens by tapping 📄 on any map screen (the name of the map screen will display briefly as your cycle through).
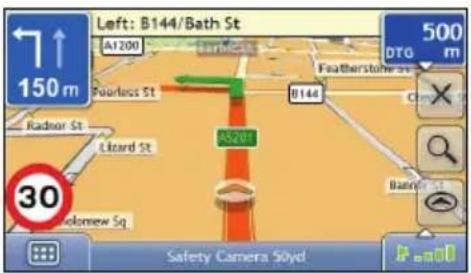
For more information on the map screens, see "How do I view my route?" on page 39.
- For information on using the Map menu from the 3D Map and 2D Map screens, see "How do I use the Map Menu?" on page 49.
How do I navigate with GPS?
The Global Positioning System (GPS) is available at any time, free of charge, and is accurate to within 5m (15ft). GPS navigation is made possible by a network of satellites that orbit the Earth at around 20,200km (12,552mi). Each satellite transmits a range of signals which are utilised by GPS receivers, such as your Mio, to determine an exact location. Although a GPS receiver can detect signals from up to 12 satellites at any time, only four signals are required to provide a position or “GPS fix” (latitude and longitude), for vehicle navigation systems.
How does my Mio receive GPS signals?
Your Mio receives GPS signals via the internal GPS antenna. To guarantee the optimum GPS signal strength, ensure your Mio is outdoors, or in a vehicle outdoors, and has an unobstructed view of the sky. GPS reception is not usually affected by weather, however, very heavy rain or snow may have a negative effect on your reception.
How do I view my GPS status?
You can view your GPS status at any time from the map screens or the Viewfinder screen. ▶ _■■ displays green when a GPS fix is established and red when a GPS fix is unavailable. To indicate the reception strength of a GPS fix, ▶ _■■ displays between one and four green vertical bars.
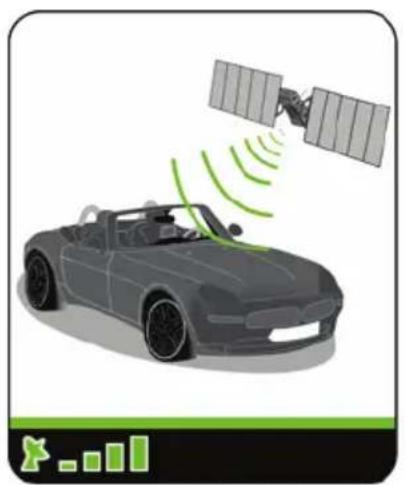
natural_image
Illustration of a car with signal waves projecting onto a satellite (no text or symbols)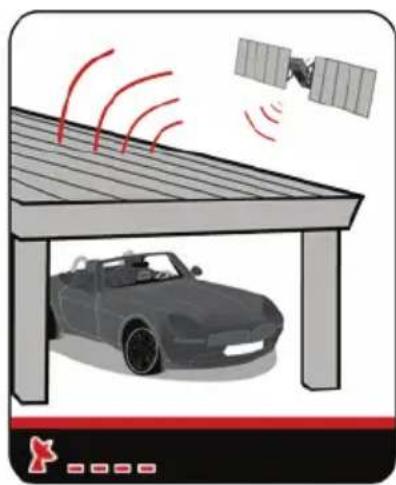
natural_image
Illustration of a car parked under a covered parking garage with signal waves and a satellite in the background (no text or symbols)■ To view your GPS status in more detail, see "GPS Status" on page 82.
■ To set your GPS mode, see "Setting your GPS mode" on page 83.
- For more information about GPS, refer to the GPS Navigation - Frequently Asked Questions guide on the MioMore Desktop DVD.
How do I go from A to B?
Your Mio is equipped with maps that provide street-level detail for door-to-door navigation, including Points of Interest (POIs) such as accommodation, parking areas, petrol stations, railway stations and airports.
| When you ... Then ... | |
| know the address of your destination | use the address-entry wizard to enter the address “How do I search for an address?” on page 23. |
| want to make multiple stops | use the Multi-stop Trip Planner screen to enter multiple waypoints “How do I create a trip with multiple stops?” on page 27. |
| need to find a named site, feature, landmark or public venue | search for a Point of Interest "How do I search for a Point of Interest (POI)?" on page 31. |
| search for live POI information | search for a POI using Mio Connect “How do I search for a POI using Mio Connect?” on page 62. |
| want to navigate to a NavpixTM location | use the Go To NavPix screen to navigate to a preinstalled NavpixTM “How do I navigate to a NavPixTM?” on page 59. |
WARNING: For your safety, enter destination information before you start a journey. Do not enter a destination while driving.
What if I miss a turn?
Back-On-Track™ Automatic Rerouting
You will be redirected if you make a wrong turn. A message informing you that your route is being re-calculated will display at the top of the screen.
To cancel a route re-calculation tap ☒. A warning will display, asking you to confirm the cancellation. If confirmed, both the re-calculation and your current route will be cancelled.
How do I search for an address?
Enter a destination using the Destination Search, Keyboard and Preview screens, which used together form an address-entry wizard.
This section provides a case study to help guide you through setting your destination.
Note: In some countries, you can search for your destination by postcode or zip code. If you are in the United Kingdom, and you know the postcode of your destination, you can search for it from the Destination Search screen by tapping Postcode, then entering a postcode of up to eight characters.
Quick Steps
- Open the Destination Search screen
- Select the country
- Search for the city/area
- Search for the street
-
Search for the house number
-
Tap
Case Study: How do I search for an address?
This case study will show you how to enter an address and how to navigate to it.
The address used in this example is
1 Cheyne Walk Street Horley Surrey AB1 2CD, United Kingdom.
Note: The above address is fictitious and used as an example only.
Tip: Before you enter your destination address, ensure that you have set your route preferences. For more information, see "Route Options" on page 70.
1. Open the Destination Search screen
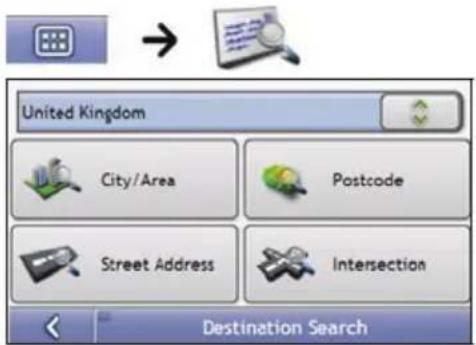
The Destination Search screen will display.
Note: If this is the first time you are setting your destination and you have maps from more than one country installed, then the Select a map screen will display instead of the Destination Search screen. Go directly to step 2b. The next time you perform this procedure, the Destination Search screen will open as expected.
2. Select the country
Note: If you only have the maps of one country installed and selected, that country is selected for your destination by default and cannot be changed. Go to step 3.
a) From the Destination Search screen, tap The Select a map screen will display.
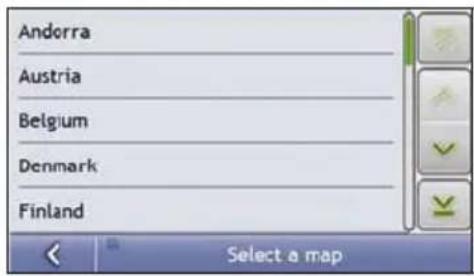
b) Select United Kingdom from the list. The Destination Search screen will display.
3. Search for the City/Area
a) From the Destination Search screen, tap City/Area. The Keyboard screen will display.
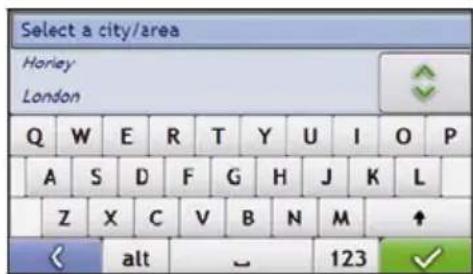
b) Use the Keyboard screen to search for Horley as the city or area of your destination, then tap the search result. The Destination Search screen will display.
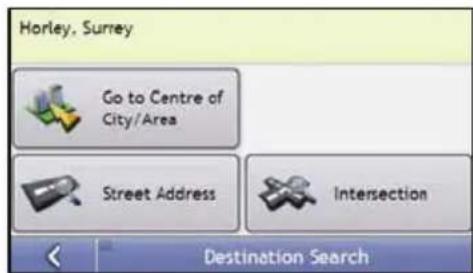
4. Search for the street name and house number
a) From the Destination Search screen, tap Street Address. The Keyboard screen will display.
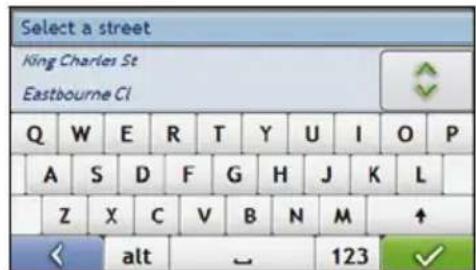
Using the Keyboard screen
The Keyboard screen will display when you are required to enter text, such as when searching for a street name. Search results will be listed in matching order, with the closest matches appearing at the top of the list. A maximum of 99 results will display.
The Keyboard screen can display with various layouts depending on the information you need to enter, including alphabet, number, alternate characters and combinations of these.
You can also choose the type of keyboard you prefer from alphabetic, QWERTY and keypad. For more information, see "Keyboard" on page 89.
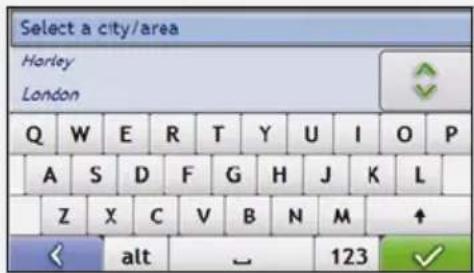
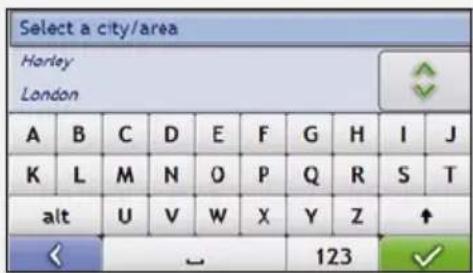
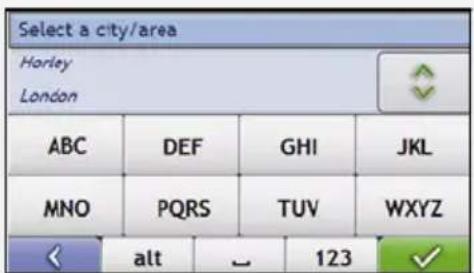
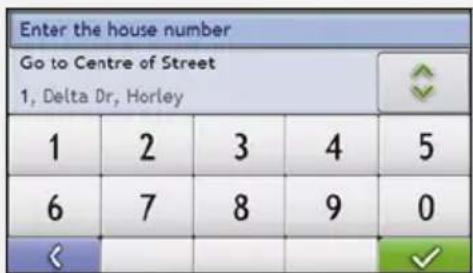
As you select each character, the first two results will display. Tap 📋, then scroll to see more search results.
● To select a character or a search result, tap the character or search result.
• To delete a character, tap
● To display more characters, tap 123, alt or abc, if available.
Using the Destination Search screen
The Destination Search screen is used to select your destination by area, street, postal or ZIP code, Points of Interest, intersection, city, area, state or country.
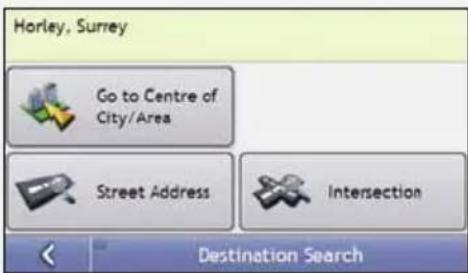
As you specify each part of the address, it will display at the top of the screen.
The available options will change to reflect the parts of the address still to be completed.
b) Use the Keyboard screen to enter Cheyne Walk as the street name of your destination, then tap the search result.
Note: There may be multiple matches for a particular street name. Long streets that run through several neighbouring areas, and common street names will produce search results ordered by their city or area name.
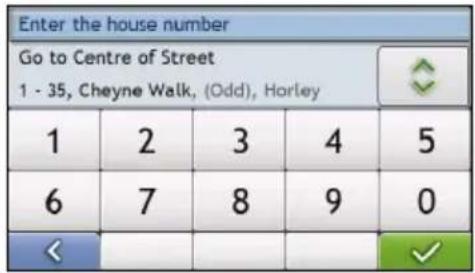
c) Use the Keyboard screen to enter 1 as the house number of your destination, then tap the search result. The Preview screen will display.
Note: If house numbers are available, but not the one that you require, you may have to choose the same street in a neighbouring area. Tap ◀ and select another search result. If house numbers are not available for your selected section of the street the Preview screen will display.
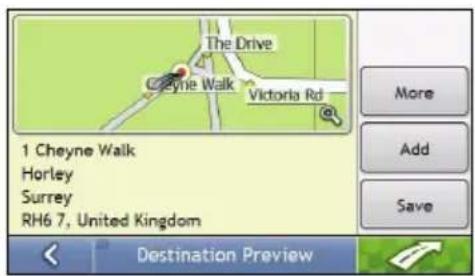
d) Complete the following:
| If you want to ... Then ... | |
| navigate to your selected destination | tap  Your route is calculated; the 3D Map screen will display. Your route is calculated; the 3D Map screen will display. |
| view the position on the map screen | tap the map to display the position on the 2D Map screen. |
| view more information about your destination | tap More.The Destination Details screen will display. |
| add the destination to a multi-stop trip tap | tap Add.The Multi-stop Trip Planner screen will display. The address is listed as a waypoint on the multi-stop trip. See “How do I create a trip with multiple stops?” on page 27. |
| save the destination as My Home tap Save. | The New Favourite screen will display.tap Save as My Home. |
| save the destination as a favourite tap Save. | The New Favourite screen will display.tap Save as Favourite. |
How do I create a trip with multiple stops?
You can use the Multi-stop Trip Planner screen to set multiple stops or waypoints for your trip. Your route will be calculated to go via each of these points in the specified order.
Waypoints can be added via the Multi-stop Trip Planner screen or by selecting Location, then Add to Trip from the pop-up Map menu on the 2D Map or 3D Map screen. You can save up to 198 multi-stop trips, each with up to 14 waypoints.
Note: Waypoints added, updated or deleted after a multi-stop trip has commenced will not affect the current route.
Quick Steps
- Start your Multi-stop trip
- Select the country
- Search for the city/area
- Search for the street and house number
-
Add additional waypoints
-
Tap
Case Study: How do I navigate to multiple addresses?
This case study will show you how to set a multi-stop trip by entering multiple waypoints.
The address used in this example is:
1 Cheyne Walk Street Horley Surrey AB1 2CD, United Kingdom.
Note: The above address is fictitious and used as an example only.
Tip: Before you enter your destination address, ensure that you have set your route preferences. For more information, see "Route Options" on page 70.
- Open your Multi-stop Trip screen

The Multi-stop Trip Planner screen will display.
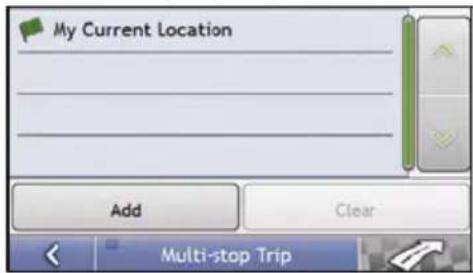
a) Tap Add.
The Add to Trip Menu will display.
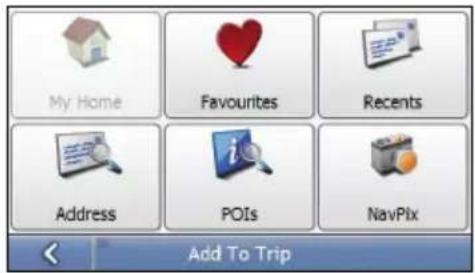
b) Tap Address.
The Destination Search screen will open.
Note: You can also add waypoints using favourites, recent destinations, POI locations and Navpix™.
2. Select the country
Note: If you only have the maps of one country installed and selected, that country is selected for your destination by default and cannot be changed. Go to step 3.
a) From the Destination Search screen, tap The Select a map screen will display.
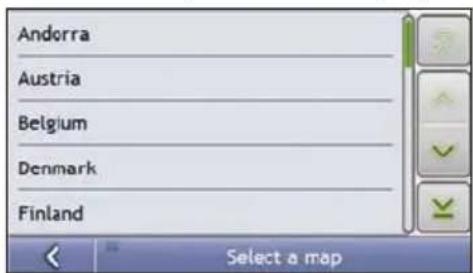
b) Select United Kingdom from the list. The Destination Search screen will display.
3. Search for the City/Area
a) From the Destination Search screen, tap City/Area. The Keyboard screen will display.
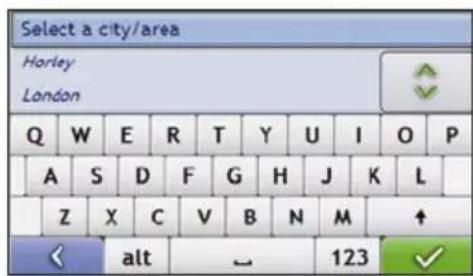
b) Use the Keyboard screen to search for Horley as the city or area of your destination, then tap the search result. The Destination Search screen will display.
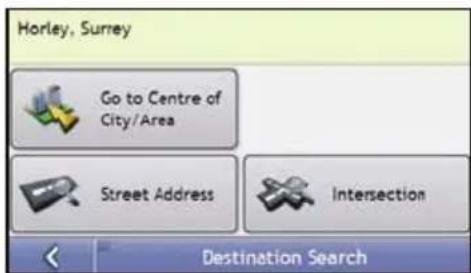
4. Search for the street name and house number
a) From the Destination Search screen, tap Street Address. The Keyboard screen will display.
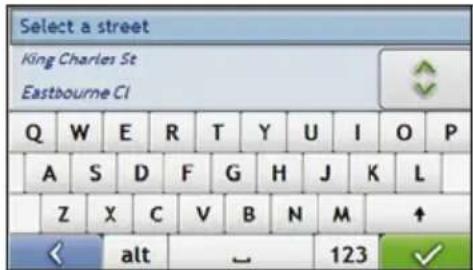
b) Use the Keyboard screen to enter Mio Street as the street name of your destination, then tap the search result.
Note: There may be multiple matches for a particular street name. Long streets that run through several neighbouring areas, and common street names will produce search results ordered by their city or area name.
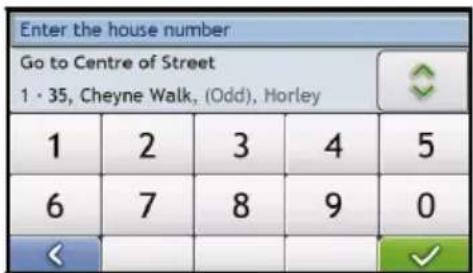
c) Use the Keyboard screen to enter 1 as the house number of your destination. The Preview screen will display.
Note: If house numbers are available, but not that you require, you may have to choose the same street in a neighbouring area. If house numbers are not available for your selected section of the street the Destination Preview screen will display.
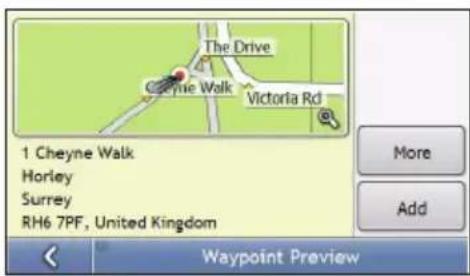
d) Tap Add. The waypoint is automatically saved and the Multi-stop-Trip screen will display.
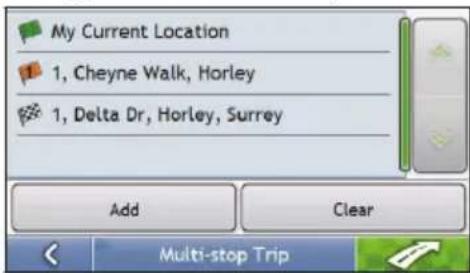
e) Complete the following:
| If you want to ... Then ... | |
| add another waypoint tap Add.Note: Waypoints added after a multi-stop trip has commenced will not be included in the current route. | The Add To Trip Menu will display.return to step 1a. |
| navigate to your selected destination | tap  The Preview screen will display.tap The Preview screen will display.tap  The 3D Map screen will display the calculated route. The 3D Map screen will display the calculated route. |
| change the order of your waypoints tap a destination point to move.The Preview screen will display.tap Up or Down.The Multi-stop Trip Planner screen will redisplay. | |
| delete all waypoints tap Clear. | |
| delete one waypoint tap a destination point to delete. | The Preview screen will display.tap Delete.The Multi-stop Trip Planner screen will redisplay. |
How do I skip a waypoint during a multi-stop trip?
To skip a waypoint during a multi-stop trip, complete the following:
- Tap the map.
The Map Menu will display.
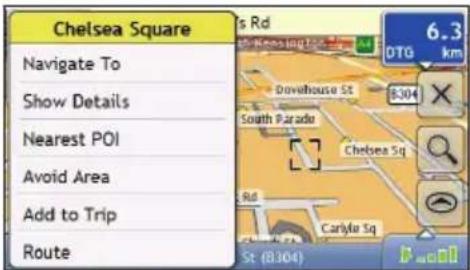
- Tap Route, then Skip Waypoint.
The next waypoint will be skipped and the route recalculated to the following waypoint.
How do I search for a Point of Interest (POI)?
A POI is a named site, feature, landmark or public venue which can be displayed as an icon on the map. POIs are grouped by type, such as petrol stations, parking, beaches and museums.
Select a POI using the Destination Search, Keyboard and Preview screens, which used together to form a POI-entry wizard.
Tip: You can also quickly search for certain POIs based upon your current location via the Main Menu screen.
This section provides a case study to help guide you through finding or setting your POI as a destination.
Quick Steps
-
Open the Destination Search screen
-
Select a country
-
Search for the City/Area
-
Search for a POI
-
Tap

Case Study: How do I search for a Point of Interest?
This case study will show you how to enter an address and navigate to it.
The address used in this example is:
Waterloo Railway Station Road (A301), Waterloo London SE1 8UD United Kingdom.
Note: The above address is fictitious and used as an example only.
1. Open the Destination Search screen

The Destination Search screen will display.
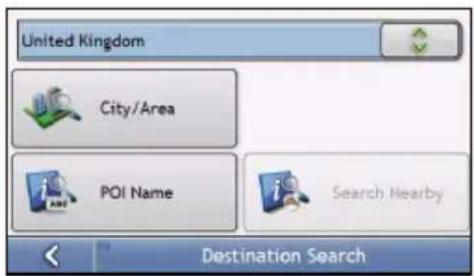
Note: If this is the first time you are setting your destination and you have maps from more than one country installed, then the Select a map screen will display instead of the Destination Search screen. Go directly to step 2b. The next time you perform this procedure, the Destination Search screen will open as expected.
2. Select the country
Note: If you only have the maps of one country installed and selected, that country is selected for your destination by default and cannot be changed. Go to step 3.
a) From the Destination Search screen, tap The Select a map screen will display.
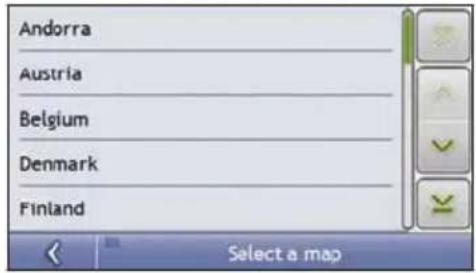
b) Select United Kingdom from the list. The Destination Search screen will display.
3. Search for the city/area
a) From the Destination Search screen, tap City/Area. The Keyboard screen will display.
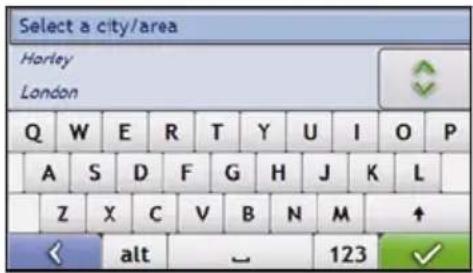
b) Use the Keyboard screen to search for London as the city or area of your destination, then tap the search result. The Select POI Category screen will display.
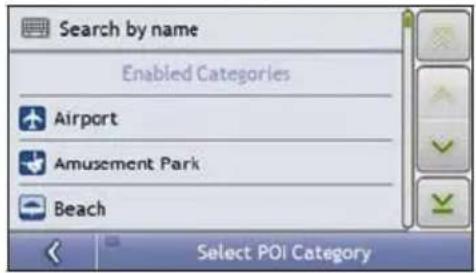
Tip: The list of categories is divided into Enabled Categories which are set to display an icon on the map screens, and Other POI Categories which will not display an icon.
4. Search for a POI
a) Either tap Search by name to search in all POI categories, or select a category from the list. The Keyboard screen will display.
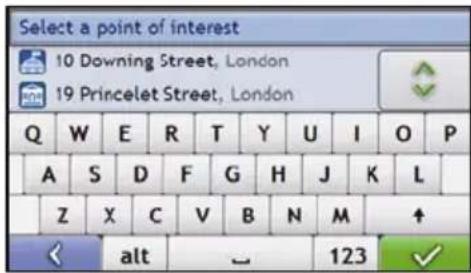
b) Use the Keyboard screen to search for Waterloo Railway Station as your destination, then tap the search result. The Preview screen will display.
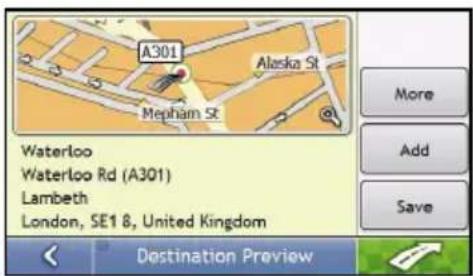
c) Complete the following:
| If you want to ... Then ... | |
| navigate to your selected destination | tap  Your route is calculated and displayed on the 3D Map screen. Your route is calculated and displayed on the 3D Map screen. |
| view your position on the map screen | tap the map to display the position on the 2D Map screen. |
| view more information about your destination | tap More.The Destination Details screen will display. |
| add the destination to a multi stop trip | tap Add.The Multi-stop Trip Planner screen will display. The address is listed as a waypoint on the multi-stop trip. See “How do I create a trip with multiple stops?” on page 27. |
| save the destination as My Home tap Save. | The New Favourite screen will display.tap Save as My Home. |
| save the destination as a favourite tap Save. | The New Favourite screen will display.tap Save as Favourite. |
How do I save Favourites and My Home?
You can save up to 200 destinations as favourites, one of which can be saved as My Home.
You can save a favourite from the Preview screen after searching for an address, or from the Map Menu on the 3D or 2D Map screens. For more information, see "How do I use the Map Menu?" on page 49.
Can I save a NavPix™ to a Favourite?
You can save a NavPix™ to any of your existing favourites. For more information, see "How do I save a NavPixTM to a favourite?" on page 60.
How do I save a Favourite or My Home?
-
Search for an address until the Preview screen is displayed.
-
Tap Save. The New Favourite screen will display.
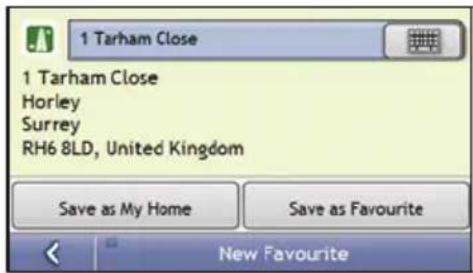
- To change the name of the favourite, tap The Keyboard screen will display.
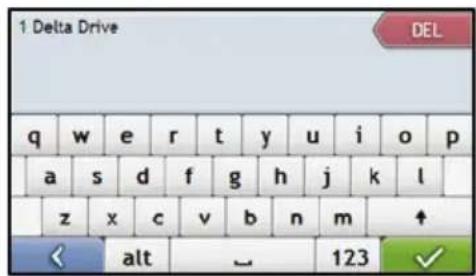
- After you have entered a name for the favourite, tap The New Favourite screen will display.
- Complete the following:
| If you want to ... Then ... | |
| save as a Favourite tap | Save as Favourite.The favourite is saved. The Favourite Preview screen will display. See “How do I navigate to a Favourite?” on page 35. |
| save as My Home tap | Save as My Home.The favourite is saved as My Home. The My Home Preview screen will display. See “How do I navigate to My Home?” on page 35. |
How do I navigate to a Favourite?

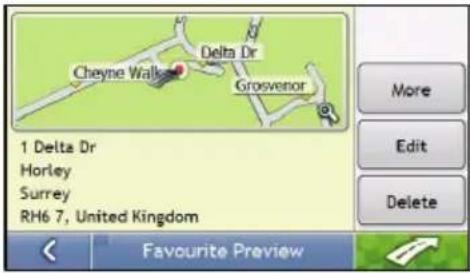
- Tap the Favourite destination you want to travel to.
The Favourite Preview screen will display.
- Tap
Your Mio will calculate the route from your current location. The 3D Map screen will display.
How do I navigate to My Home?
If you have not set an address as My Home, the first time you try to navigate to My Home you will be prompted to search for an address using the address-entry wizard.
Option 1 - Via the Main Menu
Your Mio will calculate the route from your current location. The 3D Map screen will display.
Option 2 - Via the Favourite Destinations screen

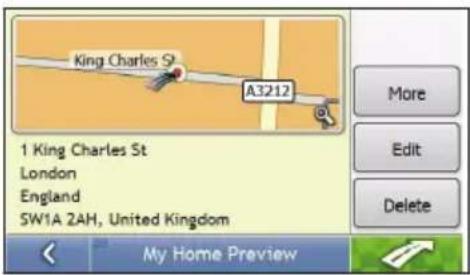
- From the Favourite Destinations screen, select My Home. The My Home Preview screen will display.
- Tap
Your Mio will calculate the route from your current location. The 3D Map screen will display.
How do I edit the name of a Favourite?

- From the Favourite Destinations screen, select a favourite to edit.
The Favourite Preview screen will display.
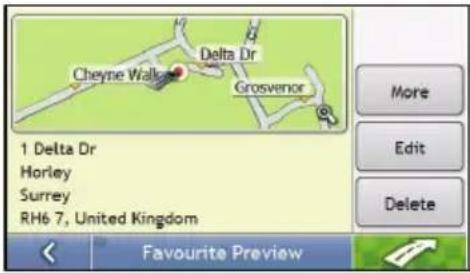
- Tap Edit.
The Edit Name screen will display.
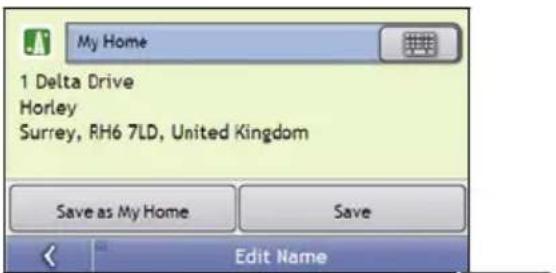
- To edit the name of the favourite, tap
- After you have edited the favourite name, tap
The Edit Name screen will display as shown in point 2.
- Complete the following:
| If you want to ... Then ... | |
| rename the Favourite tap | Save.The favourite is saved. The Favourite Preview screen will display. |
| save as My Home tap | Save as My Home.The favourite is saved as My Home. The My Home Preview screen will display. |
How do I delete a Favourite?

- From the Favourite Destinations screen, select a favourite to delete. The Favourite Preview screen will display.
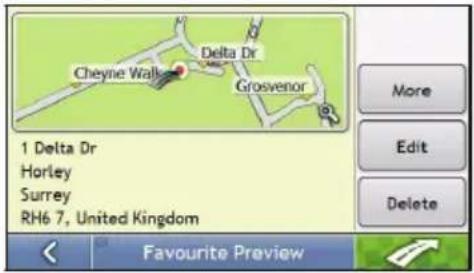
- Tap Delete. When the Caution dialog-box opens, tap Yes to confirm. The favourite is deleted. The Favourite Destinations screen will display.
How do I navigate to a recent location?
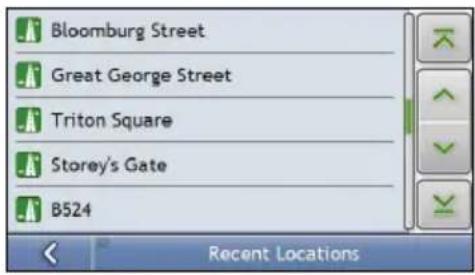
To make navigating to an address easier, your Mio will automatically save all your start locations and destinations in a list of recent locations.
1. Tap a recent location.
The Recent Location screen will display.
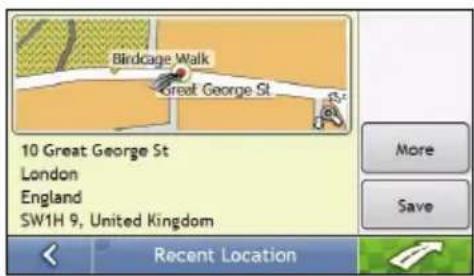
2. Complete the following:
| If you want to ... Then ... | |
| calculate the route and open the 3D Map screen | TapThe 3D Map screen will display. |
| view the full address details of the recent location | tap More.The Recent Destination Details screen will display. |
| save the recent location as My Home | tap Save.The New Favourite screen will display.tap Save as My Home. |
| save the recent location as a favourite tap Save. | The New Favourite screen will display.tap Save as Favourite. |
How do I view my route?
When a route has been calculated, the 3D Map screen will display. You will be directed to your destination by spoken and visual instructions.

The Map button cycles through the 3D Map, 2D Map, Traffic Overview (if available on your model), Route View and Turn-by-Turn™ screens.
3D Map screen
The 3D Map screen displays your current position and follows your direction of travel.
■ Tap and drag the screen, to move across the map.
Tap the map to view the Map Menu (see "How do I use the Map Menu?" on page 49).
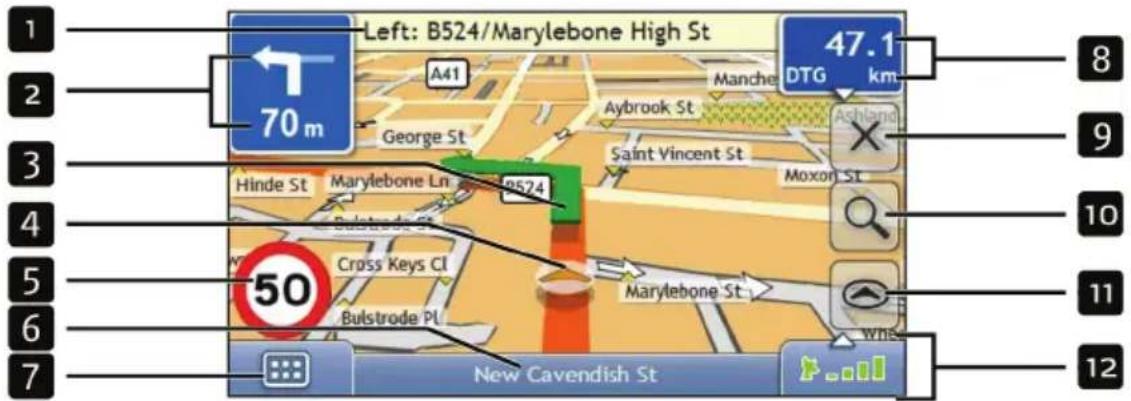
Note: Depending on the country you are travelling in, the colour of the direction and distance buttons may differ from the above example.
| Item Description | ||
| 1 | Next instruction The direction and name of the street to turn in to. | |
| 2 | Direction and distance of next turn | The direction and distance to your next turn.Note: To repeat the spoken prompt of your next turn, tap the turn arrow. |
| 3 | Route Your current route is highlighted. | |
| 4 | Current position | Your current position is marked with [IMAGE]. |
| 5 | Speed indicator | Displays when you exceed your set speed limit. For more information, see “Driver Alerts 4/5” on page 73. |
| 6 | Status bar Displays one of the following:The name of the street you are located onSpeed warningsActive POIs.Tap to display the Main Menu screen.Note: The Status Bar is replaced by current Traffic events, when Traffic is enabled. For more information, see “Traffic” on page 85. | |
| 7 | Main Menu | The Main Menu button allows you to enter an address for your destination and customise preferences. |
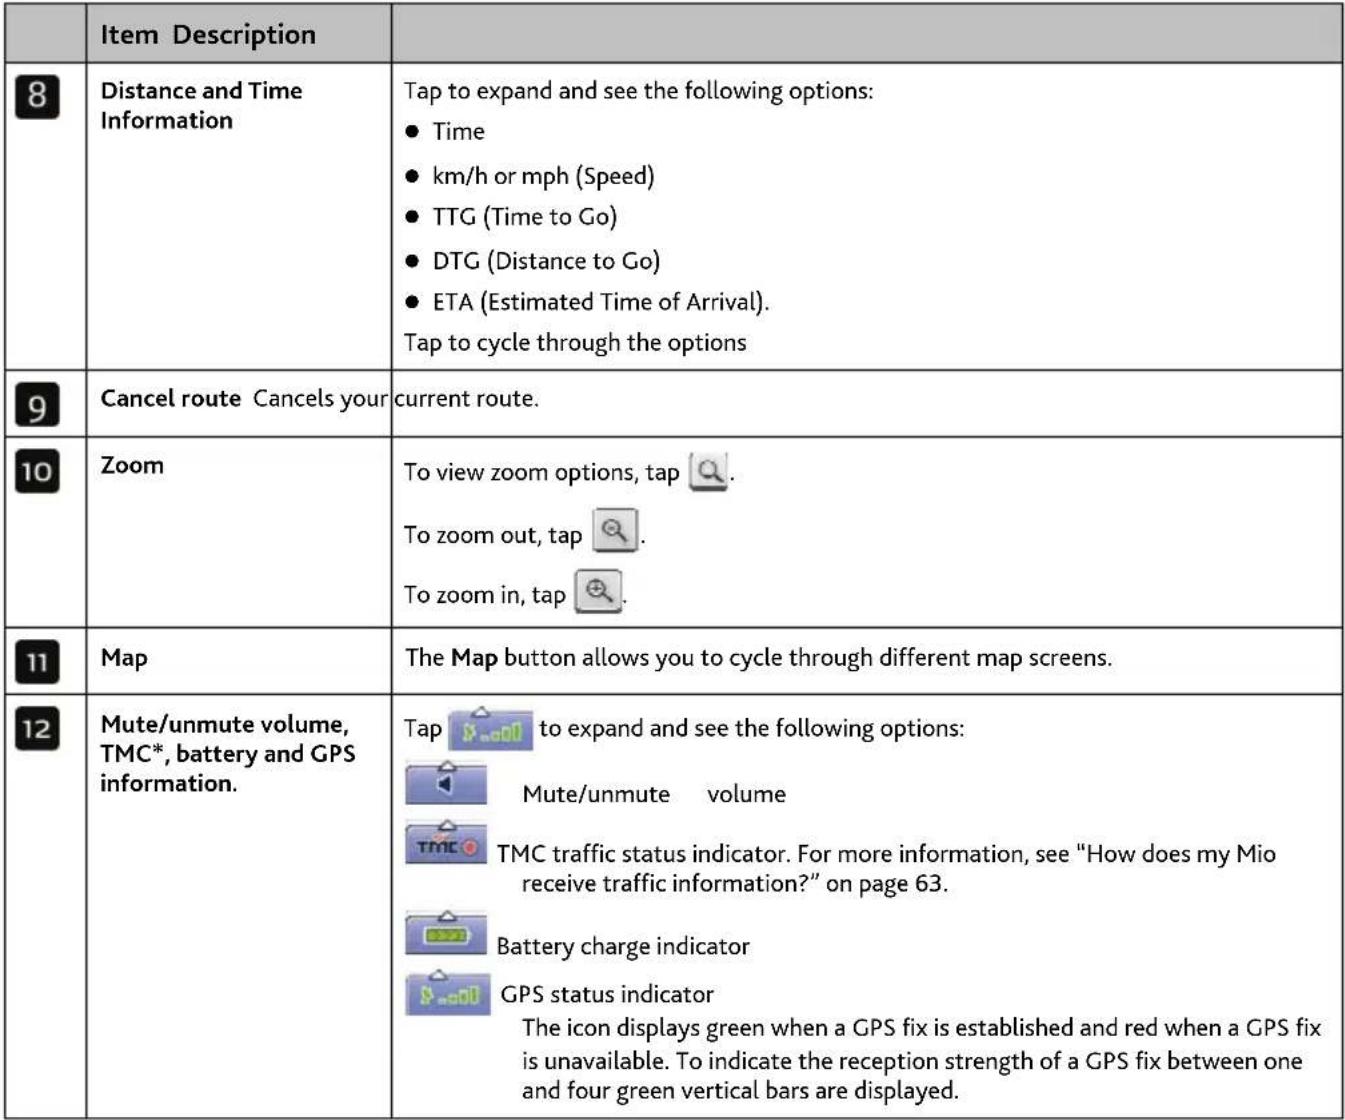 |
* TMC feature is not available on all models.
2D Map screen
The 2D Map screen shows your current position (if a GPS fix is active) and surrounding street names. If a route has been calculated, the route and turns are highlighted. The 2D Map screen follows your direction of travel unless the Map Display preference is set to North (see “Map Display” page 75).
■ Tap and drag the screen, to move across the map.
Tap the map, to view the Map Menu (see "How do I use the Map Menu?" on page 49).
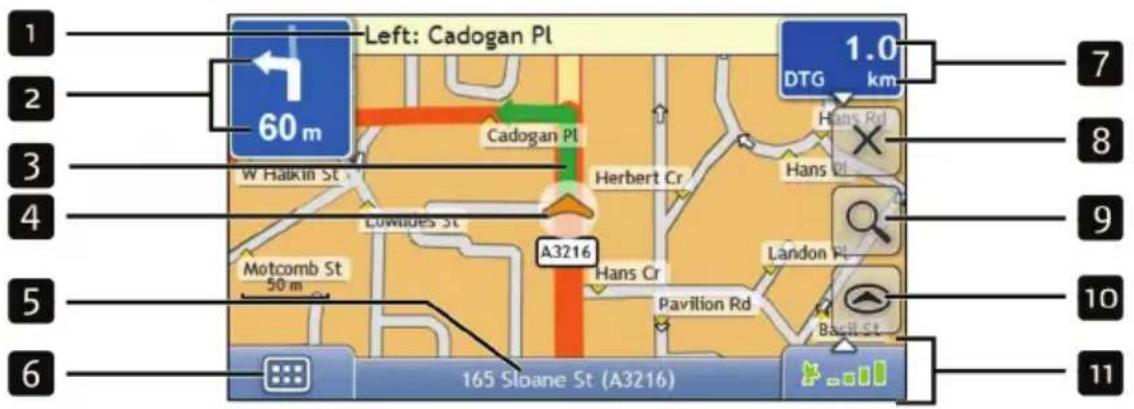
Note: Depending on the country you are travelling in, the colour of the direction and distance buttons may differ from the above example.
| Item Description | ||
| 1 | Next instruction The direction and name of the street to turn in to. | |
| 2 | Direction and distance of next turn | The direction and distance to your next turn.Note: To repeat the spoken prompt of your next turn, tap the turn arrow. |
| 3 | Route Your current route is highlighted. | |
| 4 | Current position | Your current position is marked with [IMAGE]. |
| 5 | Status bar Displays one of the following:The name of the street you are located onSpeed warningsActive POIs.Tap to display the Main Menu screen.Note: The Status Bar is replaced by current Traffic events, when Traffic is enabled. For more information, see “Traffic” on page 85. | |
| 6 | Main Menu | The Main Menu button allows you to enter an address for your destination and customise preferences. |
| 7 | Distance and Time Information | Tap to expand and see the following options:Timekm/h or mph (Speed)TTG (Time to Go)DTG (Distance to Go)ETA (Estimated Time of Arrival).Tap to cycle through the options |
 |
* TMC feature is not available on all models.
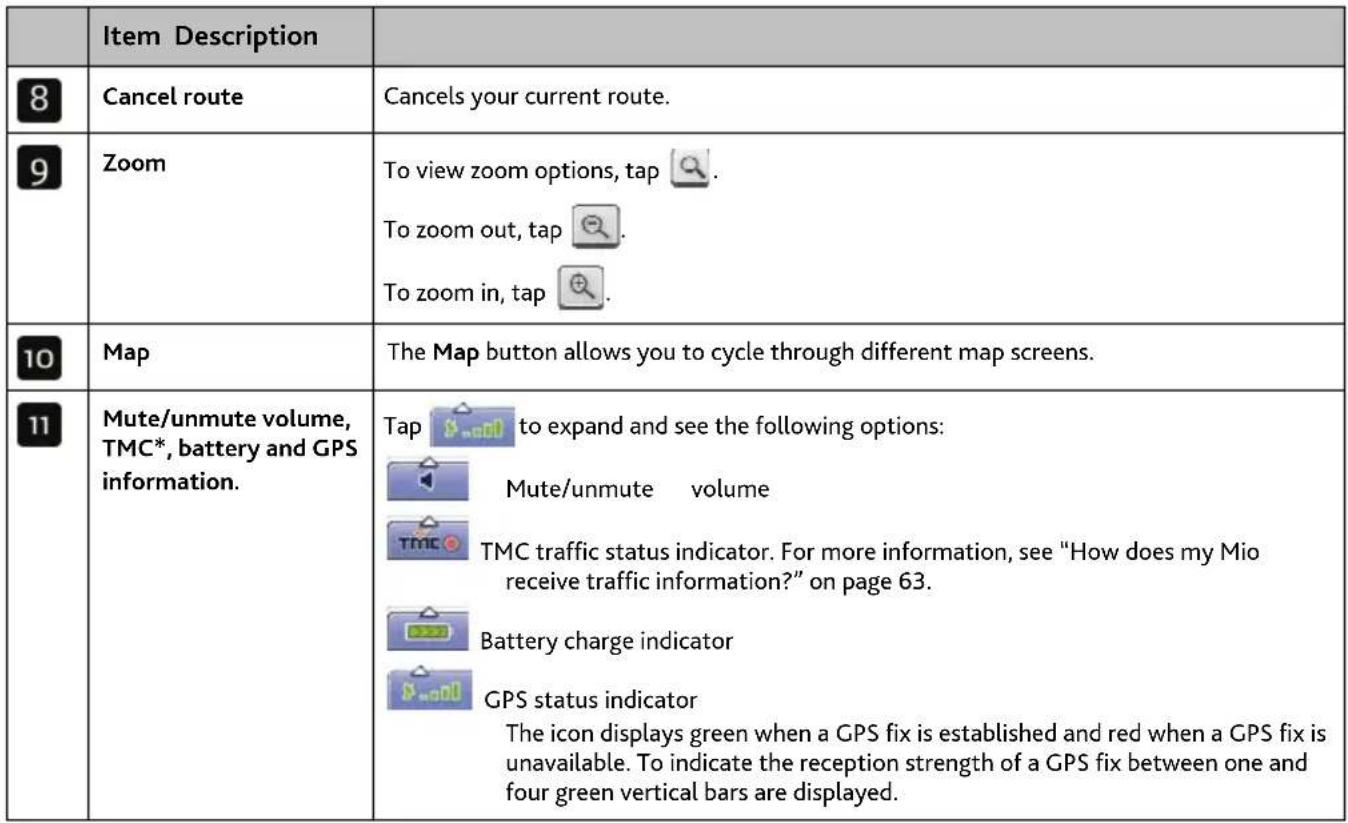
Traffic Overview screen (select models only)
Note: Traffic information is only available on selected model and in selected countries.
The Traffic Overview screen displays a general overview of the traffic situation on your route, including all events in the immediate vicinity.
■ Tap and drag the screen, to move across the map.
Tap the map, to view the Map Menu (see "How do I use the Map Menu?" on page 49)
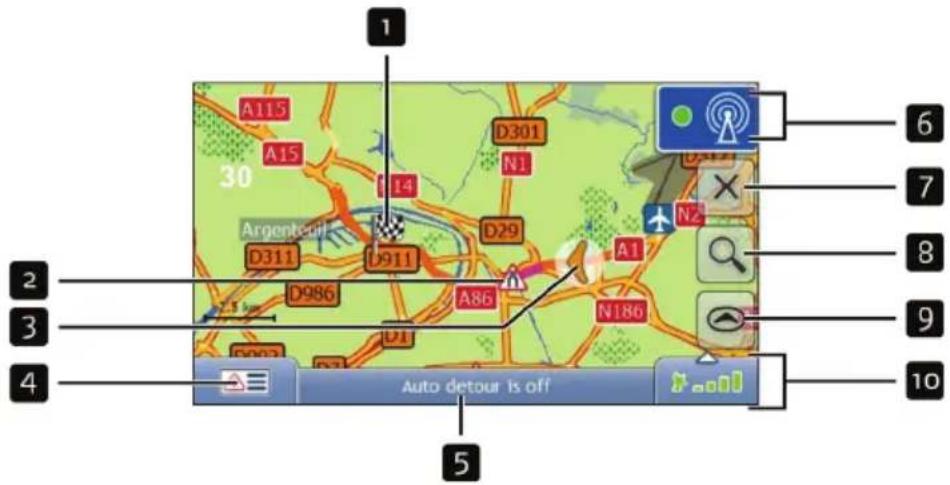
| Item Description | ||
| 1 |  | Your final destination |
| 2 | Event icon Displays icon to indicate type of event | |
| 3 | Current position | Your current position is marked with [IMAGE]. |
| 4 |  | Tap to display the Event List screen |
| 5 | Status bar Displays one of the following:The name of the street you are located onSpeed warningsActive POIs.Tap to display the Main Menu screen.Note: The Status Bar is replaced by current Traffic events, when Traffic is enabled. For more information, see “Traffic” on page 85. | |
| 6 |  | Tap to display the Traffic System Status screen. |
| 7 | Cancel route Cancels your current route. | |
| 8 | Zoom | To view zoom options, tap [CBD7]To zoom out, tap  To zoom in, tap To zoom in, tap  |
9 | MapMute/unmute volume, TMC*, battery and GPS information. | The Map button allows you to cycle through different map screens.Tap to expand and see the following options: Mute/unmute volume Mute/unmute volume TMC traffic status indicator. For more information, see “How does my Mio receive traffic information?” on page 63. TMC traffic status indicator. For more information, see “How does my Mio receive traffic information?” on page 63. Battery charge indicator Battery charge indicator GPS status indicatorThe icon displays green when a GPS fix is established and red when a GPS fix is unavailable. To indicate the reception strength of a GPS fix between one and four green vertical bars are displayed. GPS status indicatorThe icon displays green when a GPS fix is established and red when a GPS fix is unavailable. To indicate the reception strength of a GPS fix between one and four green vertical bars are displayed. |
* TMC feature is not available on all models.
Route Overview screen
The Route Overview screen gives you a bird's eye view of your trip.
Note: A route must first have been calculated for this screen to be available.
■ Tap and drag the screen, to move across the map.
Tap the map to view the Map Menu (see "How do I use the Map Menu?" on page 49).
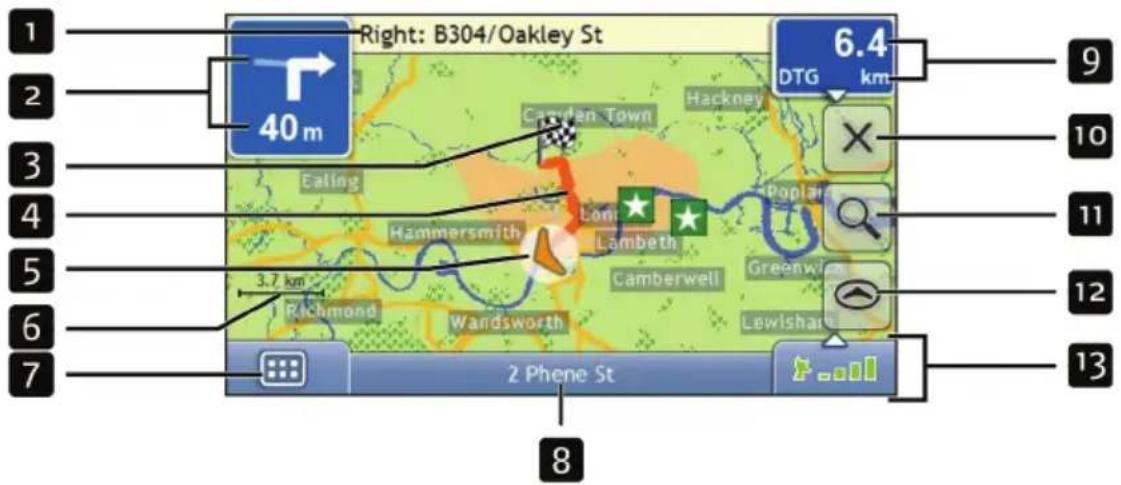
Note: Depending on the country you are travelling in, the colour of the direction and distance buttons may differ from the above example.
| Item Description | ||
| 1 | Next instruction The direction and name of the street to turn in to.Note: To repeat the spoken prompt of your next turn, tap the turn arrow. | |
| 2 | Direction and distance of next turn | The direction and distance to your next turn.Note: To repeat the spoken prompt of your next turn, tap the turn arrow. |
| 3 | Your final destination | |
| 4 | Route Your current route is highlighted. | |
| 5 | Current position | Your current position is marked with ; if visible. |
| 6 | Scale bar Displays map scale. | |
| 7 | Main Menu | The Main Menu button allows you to enter an address for your destination and customise preferences. |
| 8 | Status bar Displays one of the following:The name of the street you are located onSpeed warningsActive POIs.Tap to display the Main Menu screen.Note: The Status Bar is replaced by current Traffic events, when Traffic is enabled. For more information, see “Traffic” on page 85. | |
| 9 | Distance and Time Information | Tap to expand and see the following options:Timekm/h or mph (Speed)TTG (Time to Go)DTG (Distance to Go)ETA (Estimated Time of Arrival).Tap to cycle through the options. |
| 10 | Cancel route Cancels your current route. | |
| 11 | Zoom | To view zoom options, tapTo zoom out, tapTo zoom in, tap |
| 12 | Map | The Map button allows you to cycle through different map screens. |
| 13 | Mute/unmute volume, TMC*, battery and GPS information. | Tap to expand and see the following options:Mute/unmute volumeTMC traffic status indicator. For more information, see “How does my Mio receive traffic information?” on page 63.Battery charge indicatorGPS status indicatorThe icon displays green when a GPS fix is established and red when a GPS fix is unavailable. To indicate the reception strength of a GPS fix between one and four green vertical bars are displayed. |
* TMC feature is not available on all models.
Turn-by-Turn screen
The Turn-by-Turn screen displays the next four turns of your route, the turn direction, the street name and the distance to the turn. You can view all the turns in the list, using the up and down arrows. A route must first have been calculated for this screen to be available.
Note: A route must first have been calculated for this screen to be available.
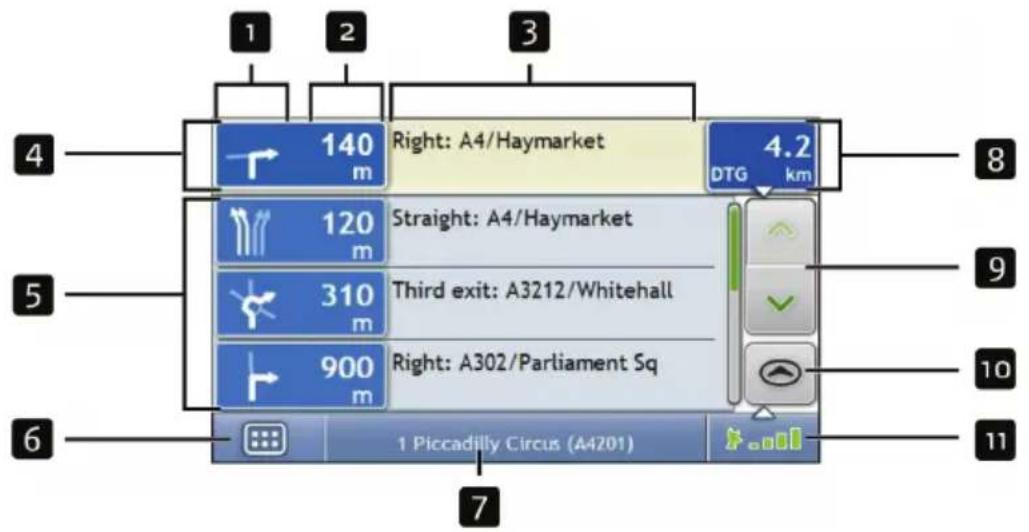
Note: Depending on the country you are travelling in, the colour of the direction and distance buttons may differ from the above example.
| Item Description | ||
| 1 | Direction of turn The direction of the turn. Your next turn is highlighted.Note: To Repeat the spoken prompt of your next turn, tap the turn arrow. | |
| 2 | Distance to turn | The distance to your next turn. Your next turn is highlighted. |
| 3 | Instruction | The direction and name of the street to turn in to. Your next turn is highlighted. |
| 4 | Next turn Your next turn is at the top of the list. | |
| 5 | Upcoming turns The direction and distance of upcoming turns. | |
| 6 | Main Menu | The Main Menu button allows you to enter an address for your destination and customise preferences. |
| 7 | Status bar Displays one of the following:The name of the street you are located onSpeed warningsActive POIs.Tap to display the Main Menu screen.Note: The Status Bar is replaced by current Traffic events, when Traffic is enabled. For more information, see “Traffic” on page 85. | |
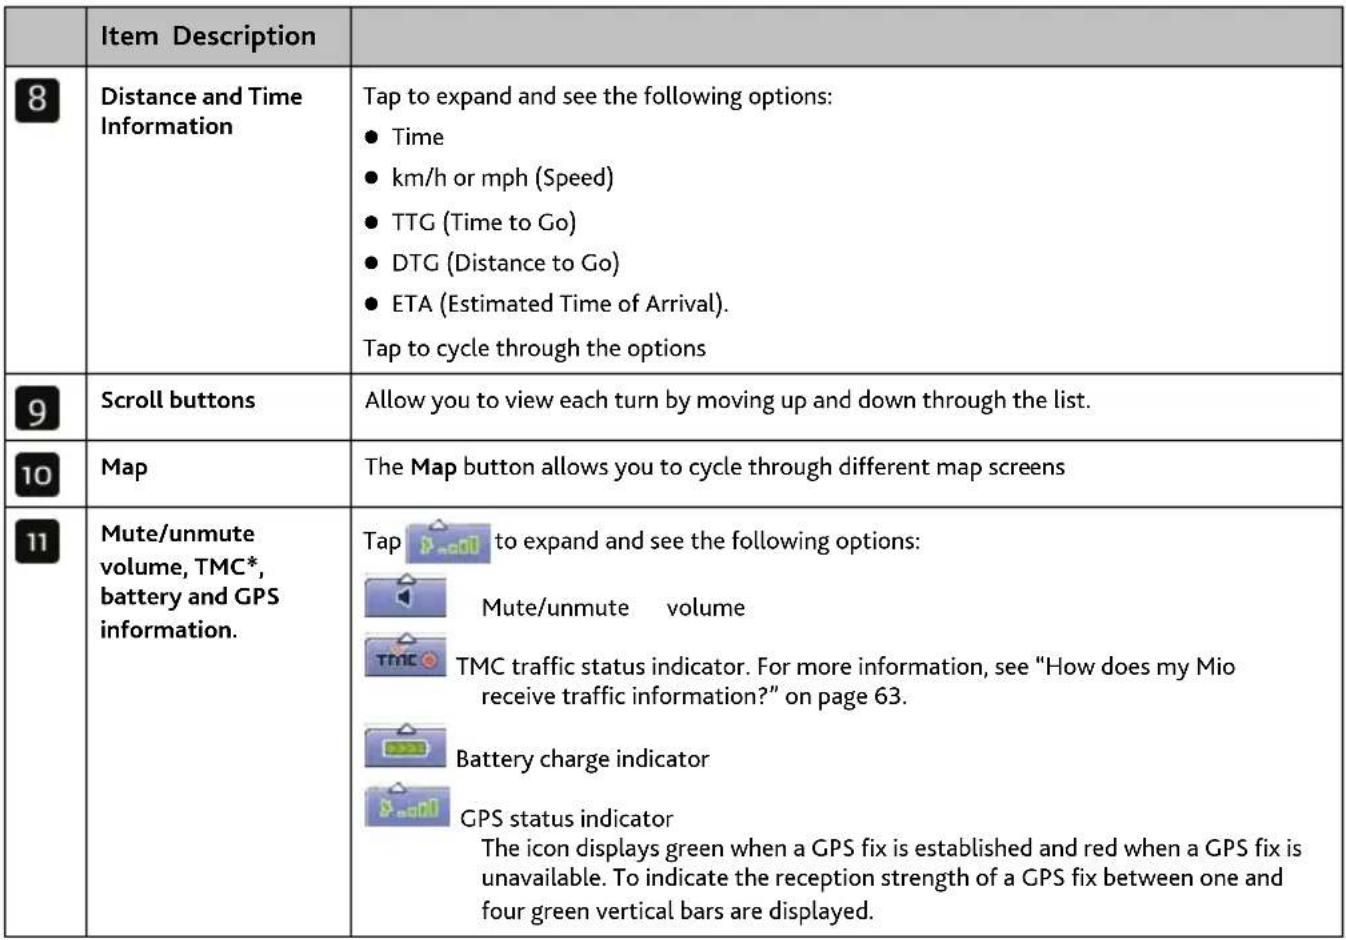 |
* TMC feature is not available on all models.
How do I use the Map Menu?
The Map Menu allows you to access navigational functions from the 3D Map and 2D Map screens.
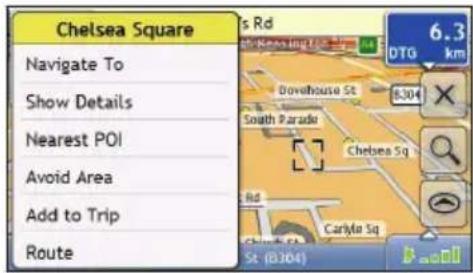
Displaying the Map Menu
-
Tap 🔍 to display the 3D Map or 2D Map screen.
-
Tap and drag to move around the map to your selected location.
-
Tap the map. The Map Menu will display.
Map Menu options
The following options are available via the Map Menu:
| Menu Option Description | |
| Navigate To | Calculates a route from your current location, if your Mio has a GPS fix. |
| Show Details | Displays thePreview screen from where you can:View details of the locationAdd the location to your multi-stop tripSaves the location as a favouriteNavigate to the location |
| Nearest POI | Displays the Select POI Category screen. Select the Category, then Search for a POI to navigate to. For further information, see “How do I search for a Point of Interest (POI)?” on page 31. |
| Avoid Area | Allows you to add an Avoid Area by tapping and dragging the map. For further information, see “How do I add an Avoid Area?” on page 50. |
| Un-Avoid Area | Deletes the selected Avoid Area. For further information, see “How do I delete an Avoid Area?” on page 50. |
| Add to Trip Adds | the location to your multi-stop trip. |
| Route Displays the | Route sub-menu from where you can:Set as Start. Sets the location as your departure point.Demonstrate. Starts the route demonstration, demonstrating navigation from your current position or departure point.Stop Demonstration. Stops the route demonstration.Skip Waypoint. Skips the next stop on your multi-stop trip.Show Summary. Displays a summary of your route, including your departure and destination addresses, total distance and total estimated time to your destination.Detour. Detours your route to avoid the next 1, 2, 5, 10 or 20 kilometres. |
How do I avoid an area?
Your Mio can calculate a route that avoids a specified area on the map. Avoid Areas are displayed as shaded areas.
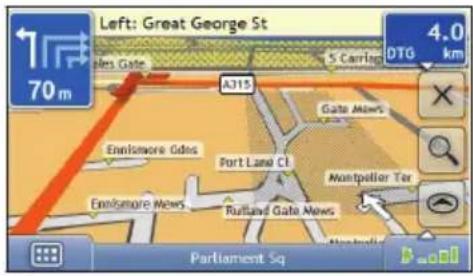
CAUTION:
- If no alternative route around an Avoid Area exists, the route calculation will fail.
- If your destination is in an Avoid Area, your Mio will navigate you into that Avoid Area.
How do I add an Avoid Area?
- Tap the 3D Map or 2D Map screen to display the Map Menu.
- Select Avoid Area.
- Tap and drag to set the Avoid Area to the correct size and position. The Avoid Area is added.
How do I delete an Avoid Area?
- Find the Avoid Area that you want to delete.
- Tap the Avoid Area to display the Map Menu.
- Select Un-Avoid Area. The Avoid Area is deleted.
How do I delete all Avoid Areas?

flowchart
graph LR
    A["Grid"] --> B[">"]
    B --> C["Mouse Icon"]
    C --> D[">"]
    D --> E[">"]
    E --> F["Mouse Icon"]
The Saved Information screen will display.
- Tap Delete Avoid Areas.
- When the Caution dialog-box opens, tap Yes to confirm. All Avoid Areas are permanently deleted.
How do I preview a route?
Route demonstration allows you to:
■ Preview a route.
■ Plan and view a route without a GPS fix, such as when you are inside a building.
The following steps will show you how to preview one route.
1. Select a departure point
If you have a GPS fix, you do not need to select a departure point unless you want the demonstrated route to start elsewhere.
a) Tap the 3D Map or 2D Map screen at your desired departure point. The Map Menu will display.
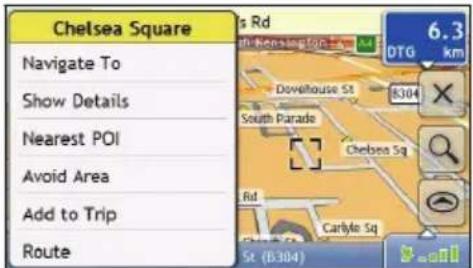
b) Tap Route. The Route submenu will display.
c) Tap Set As Start. The Map Menu will close, and the selected point is set as your departure point.
2. Select a destination point
Set a destination either by using the address entry wizard or by using the Map Menu:
a) Locate your destination.
b) Tap your destination to display the Map Menu.
c) Tap Navigate To. The Map Menu will close and the map screen will display the calculated route.
3. Demonstrate the route
Once the route has been determined, you can demonstrate the route by completing the following:
a) Tap the map screen to display the Map Menu.
b) Tap Route. The Route submenu will display.
c) Tap Demonstrate. The Map screen will display the calculated route in Route Demonstration mode.
How do I view my route statistics?
Note: This feature is not available on all models.
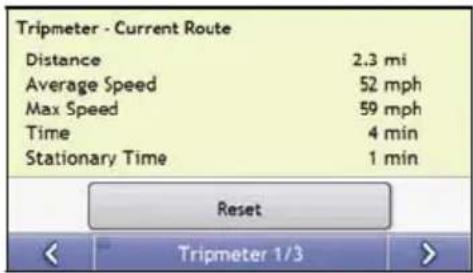
The Mio provides information on your:
■ distance travelled
■ average speed
■ maximum speed
■ time taken for trip
■ stationary time.
Trip information is presented in two different ways. These are:
■ information for the current trip
■ information for all trips to date, or since the tripmeter was last reset.
How do I view statistics on my current route?
The Tripmeter - Current Route screen is used to view statistical information for your current trip.

flowchart
graph LR
    A["Grid Icon"] --> B[">"]
    B --> C[">"]
    C --> D["-112"]
Note: A long press on the top right button of the main map screen will also shortcut to this feature.
The Tripmeter - Current Route screen will display.
Complete the following:
| If you want to ... Then ... | |
| view statistics for your trips to date | tap ➤ to display the Tripmeter - Global screen. |
| reset the tripmeter tap Reset. | tap Yes to reset.The Tripmeter - Current Route screen will display |
How do I view statistics of my trips to date?
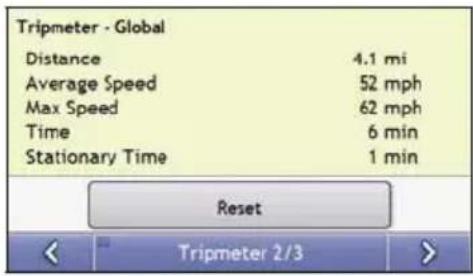
The Tripmeter - Global screen is used to view statistical information for all of your trips to date, or since the trip meter was last reset.

flowchart
graph LR
    A["Grid"] --> B[">"]
    B --> C[">"]
    C --> D["-1124"]
    D --> E[">"]
The Tripmeter - Global screen will display.
Complete the following:
| If you want to ... Then ... | |
| view your trip logs | tap ➤ to display the Trip Recorder screen. |
| view statistics for your current route | tap ➔ to display the Tripmeter - Current Route screen. |
| reset the tripmeter tap Reset. | A Warning dialog box will display.tap Yes to reset.The Tripmeter - Global screen will display. |
How do I view my trip logs?
Note: Trip Recorder is only available on some models.
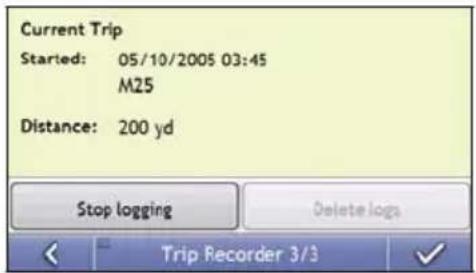
The Trip Recorder screen is used to record trip logs of your current trip. The Trip Recorder only records trip logs if you have chosen to record the logs.

flowchart
graph LR
    A["Input"] --> B[">"]
    B --> C[">"]
    C --> D[">"]
    D --> E[">"]
    E --> F[">"]
    F --> G[">"]
The Trip Recorder screen will display.
Complete the following:
| If you want to ... Then ... | |
| view statistics for your current route | tap twice to display the Tripmeter - Current Route screen. |
| stop recording your trip logs | tap Stop Logging. |
| delete your trip logs tap Stop Logging | tap Delete Logs to remove the logs. |
How do I use NavPix™?
Note: NavPix ^TM functionality is only available on some models.
Pictures with a GPS fix are called NavPix ^TM and can be used to navigate to the photographed location.
How do I manage my NavPix™?
Album management
The albums contain all your NavPix ^TM and display them as thumbnails. You can store your NavPix ^TM in customisable albums on the Mio internal memory.
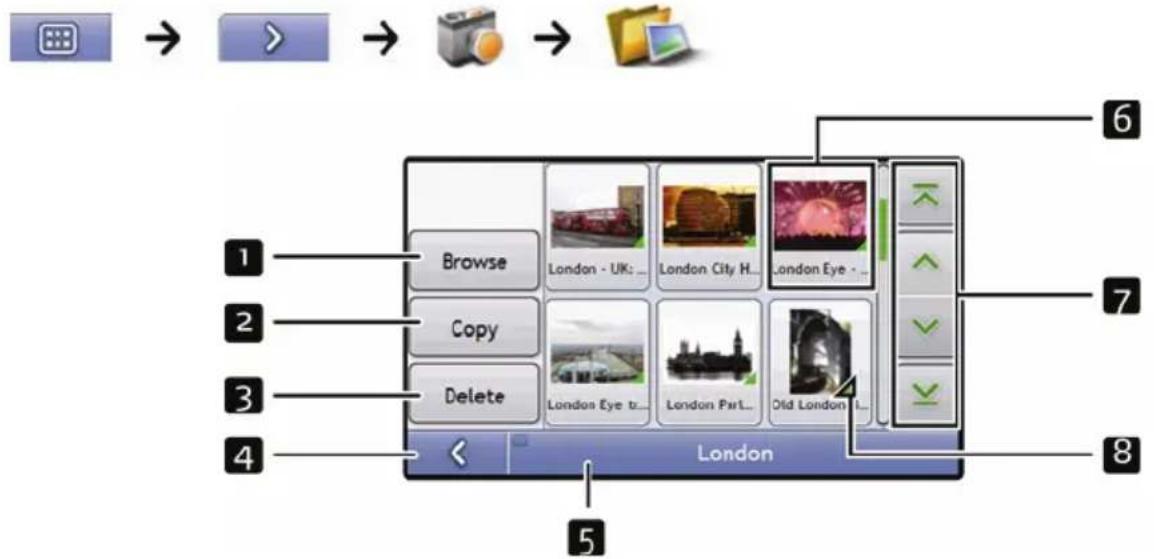
| Element Description | |
| 1 | Browse Displays the Select an Album screen, from where you can select another album. |
| 2 | Delete Deletes selected NavPixTM from the displayed album. |
| 3 | |
| 4 | Album title The title of the album. Tapping this bar allows you to return to the main menu. |
| 5 | NavPixTM thumbnail in the displayed album:To select a NavPix TM, tap the thumbnail. The NavPixTM Details screen will displayTo select multiple NavPix TM, tap and hold the first thumbnail, then drag across the other thumbnails.When a NavPixTM is selected it displays with a green border.Note: If the NavPixTM has been given a title it will display beneath the NavPixTM. If the NavPixTM has not been given a title, the file name of the NavPixTM will display. |
| 6 | Scroll buttons Use the scroll buttons to scroll through the NavPixTM. |
| 7 |
How do I delete NavPix ^TM from an Album?
NavPix ^TM can be deleted from an Album on your Mio internal memory.
Note: When a NavPix ^TM has been saved as a Favourite destination, you will not delete the Favourite if you subsequently remove the NavPix ^TM .
- From the Album screen, tap Browse.
The Select an Album screen will display.
-
Select the Album you want to view.
-
Tap and hold, then drag across the screen to select the NavPix™ you want to delete. As each NavPix™ is selected, a green border will appear around it.
■ To cancel a selection, tap and drag across the NavPix™ again.
-
When you have finished the selection, tap Delete.
-
A warning screen will display, asking you to confirm or cancel the procedure. If confirmed, the NavPix™ will be deleted.
Tip: You can also delete a single NavPix ^TM via the Photo Details screen.
NavPix™ management
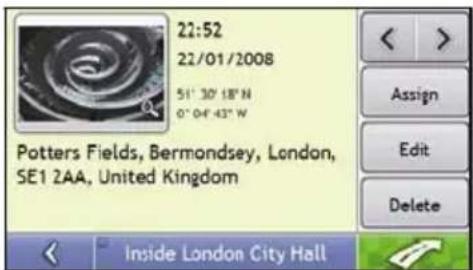
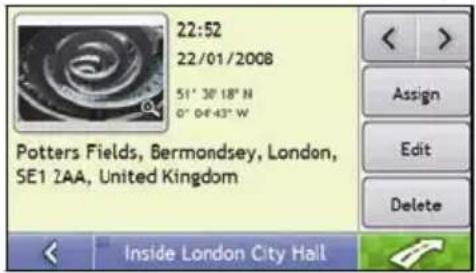
The NavPix™ Details screen displays information about your NavPix™. Tap a NavPix™ to display the Photo Details screen.
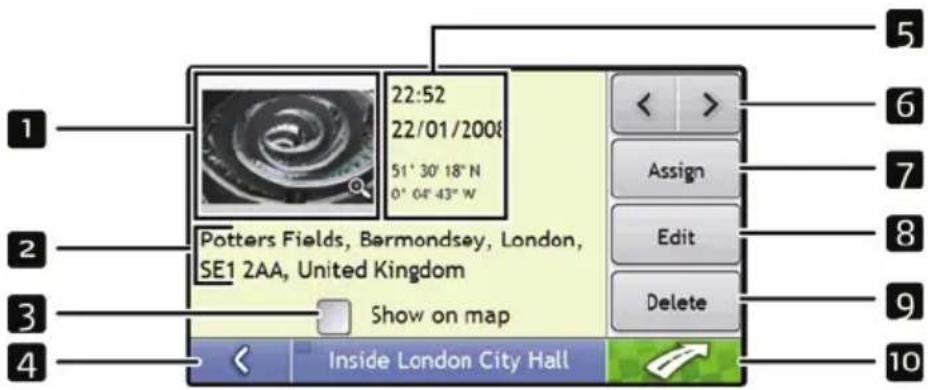
| Element Description | ||
| 1 | Thumbnail A thumbnail of | the NavPixTM.Tap to display the NavPixTM in full-screen. |
| 2 | NavPix Title The title of the | NavPixTM, tap Edit to add a title or edit the existing title. |
| 3 | Show on Map When selected | d, displays an icon on the map at the location the NavPixTM was taken.Note: Show on map is available only if this is a NavPixTM with embedded GPS coordinates. |
| 4 | Tap to return to your album. | |
| 5 | Time / Date and Location Coordinates | Displays the time and date the NavPixTM was taken. Displays the GPS coordinates if available. |
| 6 | Tap the scroll buttons to scroll through your album. | |
| 7 | Assign Allows you to save a | NavPixTM to an existing favourite or as a POI, if GPS coordinates are associated with the NavPixTM. |
| 8 | Edit Allows you to edit the name of the NavPixTM using the Keyboard screen. | |
| 9 | Delete Deletes a | NavPixTM from the album on your Mio. |
| 10 |  | Your route will be calculated and displayed on the 3D Map screen.Note: This button is only available if this is a NavPixTM with embedded GPS coordinates. |
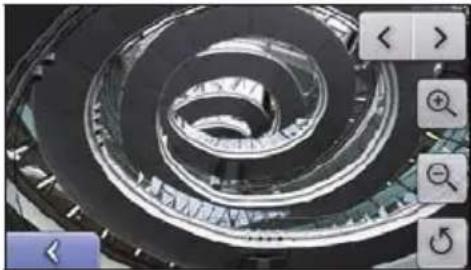
How do I view a NavPix ^TM in full-screen?
- From the NavPix ^TM Details screen, tap the thumbnail of the NavPix ^TM . The NavPix ^TM will appear in full-screen.
natural_image
Close-up of a spiral mechanical component with no visible text or symbolsNote: The icons disappear after a few seconds; tap the screen to have them reappear.
- Complete the following:
| If you want to ... Then ... | |
| zoom into the NavPixTM | Tap  |
| zoom out of the NavPixTM | Tap  |
| rotate the NavPixTM | Tap  . The NavPixTM will rotate 90 degrees anticlockwise each timeis tapped; the NavPixTM is saved at the new angle. . The NavPixTM will rotate 90 degrees anticlockwise each timeis tapped; the NavPixTM is saved at the new angle. |
| view parts of the NavPixTM not displayed on-screen | tap a  old the NavPixTM, then drag across the screen. old the NavPixTM, then drag across the screen. |
| return to the NavPixTM Details screen | Tap [SKCG] |
| scroll through your NavPixTM | Tap  > > |
How do I add or edit a NavPix ^TM description?
A description can be added to your NavPix ^TM or an existing description can be edited. The description can be a maximum of 34 characters.
- From the NavPix ™ Details screen, tap Edit.
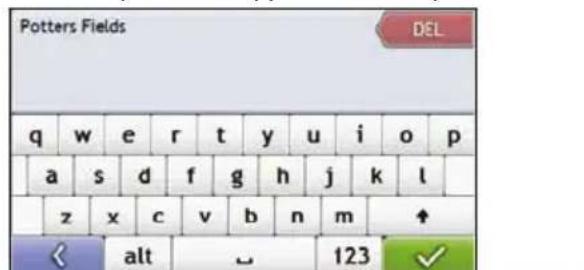
The Keyboard screen will display.
- Tap each character as required.
The description will appear at the top of the screen
- When the description is completed, tap
The NavPix ^TM Details screen will display, with a new description under the thumbnail.
Note: A description can be added to your NavPix™ or an existing description can be edited only if you have saved the NavPix™ as a POI or as a favourite. For more information see "How do I save a NavPix™ to a favourite?" on page 55 or "How do I save a NavPixTM to a POI?" on page 61.
How do I navigate to a NavPix™?
Your Mio contains preinstalled NavPix ^TM that you can navigate to. If you have not yet navigated to a NavPix ^TM , three of the preinstalled NavPix ^TM will display on the Go To NavPix ^TM screen. Otherwise, three of your recently used NavPix ^TM are displayed.
Note: To navigate to a NavPix ^TM location, either a GPS fix must have been available when the NavPix ^TM was taken, or GPS coordinates have been added using MioMore Desktop.
How do I navigate to a recent NavPix™?
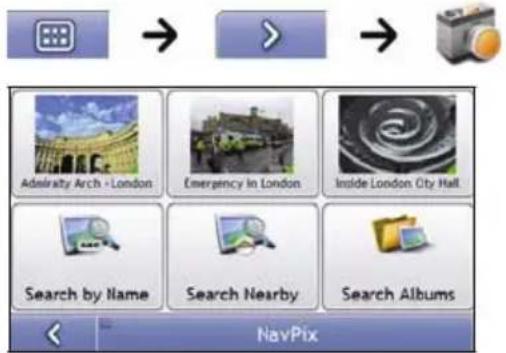
- Tap the NavPix ^TM you want to navigate to.
The Preview screen will display.
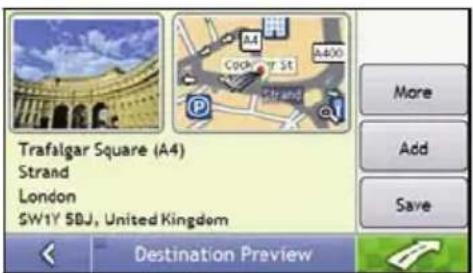
- Tap

Your Mio will calculate the route from your current location. The 3D Map screen will display.
How do I navigate to a NavPix™ I have downloaded, or was preinstalled?



- Tap a NavPix™.
The NavPix™ Details screen will display.
- Tap
Your Mio will calculate the route from your current location. The 3D Map screen will display.
How do I save a NavPix ^TM to a favourite?
Note: When a NavPix ^™ is saved to an existing favourite, only the image, and not the GPS coordinates, are associated with the favourite.




- From the Album screen, select and tap a NavPix™. The NavPix™ Details screen will display.
- From the NavPix™ Details screen, tap Assign. The Save Photo screen will display.
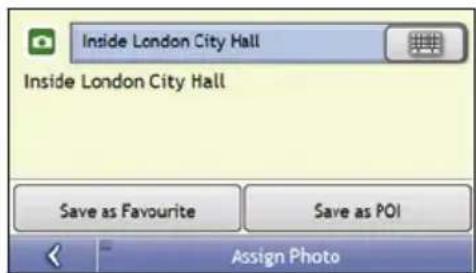
- Complete the following:
| If you want to ... Then ... | |
| edit the name of the favourite | tapThe Keyboard screen will display.Enter a name for your Favourite, then tap |
| save the NavPixTM as a Favourite (when GPS coordinates are associated with a picture) | tap Save as Favourite and select A new favourite from the list.The NavPixTM is saved as a new Favourite and the Photo Details screen will display.Note: You cannot save a NavPixTM as a favourite if GPS coordinates are not available. |
| save a picture to an address | tap Save as Favourite and select a favourite from the list.The NavPixTM is saved to a favourite and the Photo Details screen will display. |
How do I save a NavPix ^TM to a POI?

flowchart
graph LR
    A["Grid"] --> B[">"]
    B --> C["Camera"]
    C --> D[" folder"]
Note: Only a NavPix™ with embedded GPS coordinates can be saved as a POI.
- From the Album screen, select and tap a NavPix™. The NavPix™ Details screen will display.
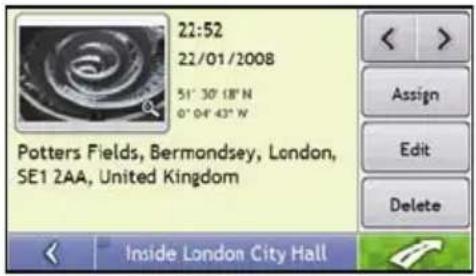
- From the NavPix™ Details screen, tap Assign. The Save Photo screen will display.
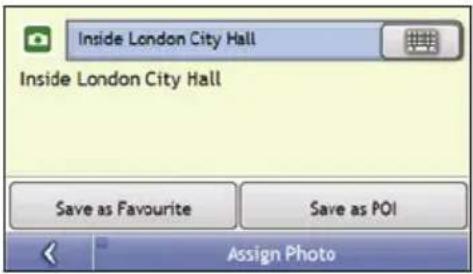
-
Tap Save as POI. The Select POI Categories screen will display.
-
Complete the following:
| If you want to ... Then ... | |
| edit the name of the POI |  tapThe Keyboard screen will display.Enter a name for your POI, then tap tapThe Keyboard screen will display.Enter a name for your POI, then tap  |
| save the NavPixTM as a POI (when GPS coordinates are associated with a picture) | tap Save as POI and select POI Category from the list, then tap  .Note: You cannot save a NavPixTM as a favourite if GPS coordinates are not available. .Note: You cannot save a NavPixTM as a favourite if GPS coordinates are not available. |
| create a new custom POI category and save a NavPixT as a POI | tap New category to create a custom POI category.The Keyboard screen will display.Enter a name for your POI category, then tap  The Select POI Categories screen will display the new POI category.select the POI Category from the list, then tap The Select POI Categories screen will display the new POI category.select the POI Category from the list, then tap  |
What is Mio Connect (Local Search)?
Note: Mio Connect is not available on all models.
Using Mio Connect you can search for and navigate to POIs you have downloaded using MioMore Desktop.
How do I search for a POI using Mio Connect?




1. Tap MioMore Locations.
The List of Results screen will display.
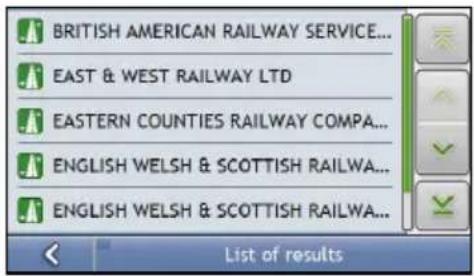
2. Select a POI.
The Preview screen will display.
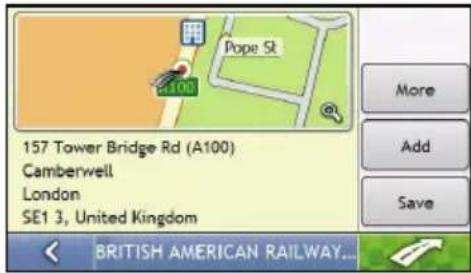
3. Complete the following:
| If you want to ... Then... | |
| calculate the route and open the 3D Map screen | TapYour route is calculated; the 3D Map screen will display. |
| view the position on the 2D Map screen | tap the map to display the position on the 2D Map screen. |
| view more information about your POI tap | More.The Details screen will display. |
| add the POI to a multi stop trip tap Add. | The Multi-stop Trip Planner screen will display. The address is listed as a waypoint on the multi-stop trip. See “How do I create a trip with multiple stops?” on page 27. |
| save the POI as My Home tap Save. | The New Favourite screen will display.tap Save as My Home. |
| save the POI as a favourite tap Save. | The New Favourite screen will display.tap Save as Favourite. |
How do I receive current traffic information? (Select models only)
Note: Traffic information is only available on selected model and in selected countries.
Your Mio can receive current traffic information for all main roads and motorways, enabling you to avoid potential delays on your route. Event messages and traffic icons will display as they occur. If an event message obscures your current location, the map will adjust to display both the message and your location.
How does my Mio receive traffic information?
You can receive current traffic information on your Mio via an optional traffic accessory. The TMC service is subscription-free.
Note: To receive traffic information, you must connect your Mio to the in-car charger.
The Traffic Message Channel (TMC) broadcasts real-time traffic and weather information via the FM Radio Data System (RDS). FM radio stations transmit TMC data on a cycle of several minutes, with hundreds of events able to be broadcast to TMC receivers, such as the Mio Traffic module.
Traffic status
Your current traffic status is indicated by the colour of the TMC icon.
To view your current traffic status from the map screens, tap

and then tap

The following table describes the three traffic status icons:
| Traffic Status | Description |
 | The TMC status is grey if traffic is currently inactive due to one of the following conditions:Your Mio or Traffic module is connecting to the TMC service.Your Mio or Traffic module cannot receive TMC data. This may be due to poor radio coverage in the local vicinity.You are in a country that is not supported by the Mio Traffic module.Tap to display the Traffic Overview screen. |
 | The TMC status is orange if one of the following conditions apply:You have navigated into a country that is not supported by Mio Traffic, but there are still traffic events listed on the Event List screen.You have separated your Mio from the Mio Traffic module, or the Mio Traffic module is not receiving power but there are still traffic events listed on the Event List screen.Tap to display the Traffic Overview screen. |
 | The TMC status is green if your Mio or Traffic module is active and receiving traffic events. Tap to display the Traffic Overview screen. |
Your traffic status is displayed in more detail on the Traffic System Status screen.
How will I know when a Traffic Event occurs?
Incoming events are handled according to your Traffic preferences. For more information, see “Traffic” on page 85.
When travelling through an area in which you can receive traffic status, your Mio will decode these events and display them on-screen. An icon will display at the event location on the map screens, and an audible warning is given if an event is on your route. Where the extent of an event is a specific distance, the road will be highlighted and arrows will indicate the direction affected.
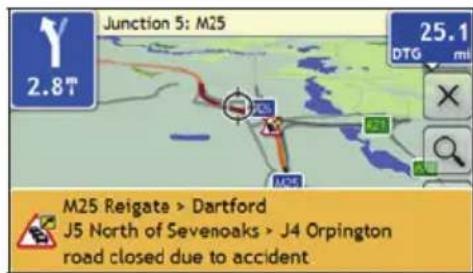
A message will display at the bottom of the screen with the road name, the section of road affected and the type of event that has occurred. The message remains on screen for 8 seconds and is added to the Event List.
How do I view a list of all events on my route?
Your Mio creates a list of events as they are received, which is displayed on the Event List screen. This screen can only be viewed if the TMC icon is green or orange.
From the Traffic Overview screen, tap
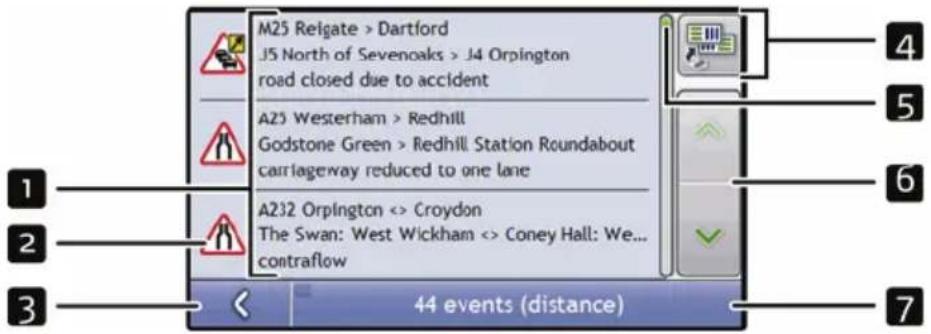
| Item Description | ||
| 1 | Event description Displays details of the Event, including:Name of road and direction in which Event is taking place.Location of where Event begins and ends.> indicates an Event from a location, to a location.<> indicates an Event between locations.Type of Event. | |
| 2 | Event icon | Displays icon to indicate type of event. See page 128 to view list of icons. |
| 3 |  | Tap to return to the previous screen. |
| 4 |  | Tap to display the Select event sorting type screen, where you can sort events by distance, road name or age. |
| 5 | Position indicator | Displays your position in the Event List screen |
| 6 | Scroll buttons | Allow you to view all events by moving up and down through the list. |
| 7 | Event number Displays | the number of events in current list. |
How do I view traffic details?
There are several ways to view details of an event received by your Mio.
Choose one of the following:
| Location Option | |
| From any of the screens used to view your route | Tap the Event message when it appears on screen.TheEvent Detailsscreen will display. |
| From theTraffic Overview screen | Tap  .TheEvent Listscreen will display.Select and tap the event you want to view.TheEvent Detailsscreen will display. .TheEvent Listscreen will display.Select and tap the event you want to view.TheEvent Detailsscreen will display. |
| From theMap Menu | Tap and hold the traffic icon, which displays at the location of the event.TheMap Viewmenu will display.Tap Show Details.TheEvent Detailsscreen will display. |
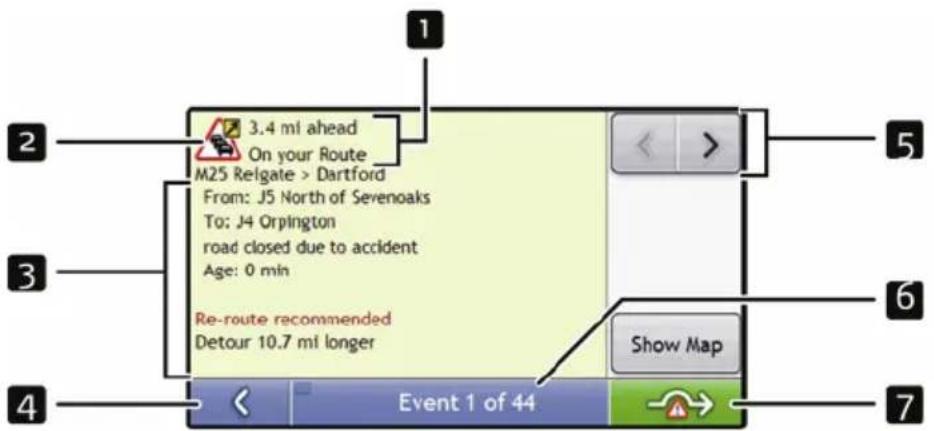
| Item Description | ||
| 1 | Event description Displays details of the Event, including:Name of road and direction in which Event is taking place.Location of where Event begins and ends.> indicates an Event from a location, to a location.<> indicates an Event between locations.Type of Event. | |
| 2 | Event icon | Displays icon to indicate type of event. See page 128 to view list of icons. |
| 3 | Detour information | Displays details of detour recommendation, if any. For more information, see “How do I know if a detour is recommended?” on page 67. |
| 4 | Tap to return to the previous screen. | |
| 5 | Tap > to view next Event in list.Tap to view previous Event in list. | |
| 6 | Event number | Displays the number of the event currently displayed and the total number of events in the list. |
| 7 |  | Tap to initiate a new route to avoid the event.Only available if a detour or re-route is available.Note: Un-avoid area is represented by [IMAGE] and is displayed when a re-route has been calculated. |
How do I know if a detour is recommended?
When a Traffic or Clearance event occurs on your route, a detour will always be recommended. The detour event message will display in the status bar on map screens.
Note: Detours are only recommended for Traffic or Clearance Events on a calculated route.
How do I avoid an event on my route?
From the Traffic Overview screen, tap
-
From the Event List screen, tap the event. The Event Details screen will display.
-
If a detour has been calculated to avoid an event on your route, is available; tap to accept the new route and avoid the event. The 3D Map screen will display.
How do I cancel a detour around an event on my route?
If you have chosen to avoid an event and a new route has been calculated, you can cancel the detour around the event and return to your original route.
-
From the Event List screen, tap the Event you want to un-avoid. The Event Details screen will display.
-
Re-route information displays at the bottom of the screen.
If a re-route has been calculated, is available; tap to accept the new route. The 3D Map screen will display.
How do I automatically avoid all traffic and clearance events on my route?
To automatically avoid all traffic and clearance events see Traffic preferences on page 85.
Traffic Messages
The Event Details screen displays detour status information.
Detour Not Available messages
If a detour is not available, one of the following messages will display:
| Message Description | |
| This Event is not locatableThis clearance is not locatable | A specific location for the Event cannot be identified. |
| This Event does not affect your routeThis clearance does not affect your route | The Event is not on the current leg of your journey, or is behind your current position. |
| You are avoiding this EventYou have accepted this clearance | The Event is not on the current leg of your journey. |
| You are too distant to re-routeYou are too distant to accept this clearance | The Event is currently too distant to affect your journey. |
| Detour not foundClearance route not found | A detour / re-route could not be calculated. |
Detour recommended messages
If a detour is recommended, one of the following messages will display:
| Message Description | |
| Finding detour...Recalculating route... | Your Mio is calculating a new route. During calculation, the % complete will display.Note: Exiting this screen before the new route is calculated will cancel the operation. |
| Detour distance...Clearance change | A detour has been calculated.The difference between the distance of your current route and the proposed route is displayed. |
What can I customise?
There are various customisation options available to enhance your navigation experience.
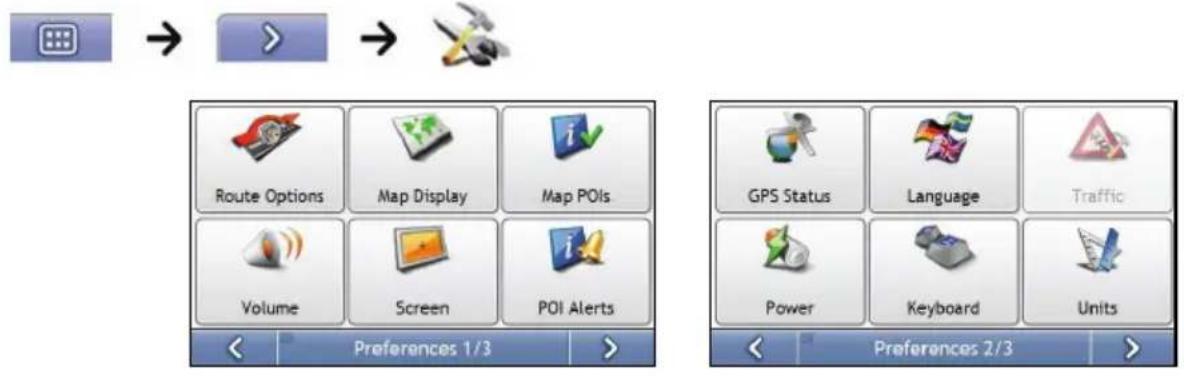
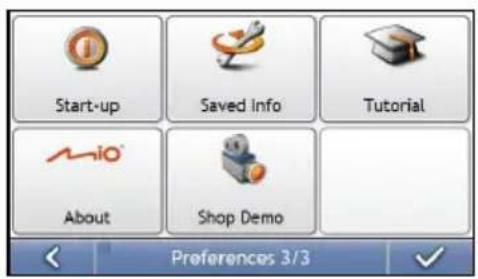
Note: The Preferences screens may differ from those displayed above, depending on your Mio model.
■ To move forward through the Preferences screens, tap
■ To revisit the previous screen, tap
Route Options
You can enhance your navigation experience by modifying aspects of your route and route calculation.
Route Calculation 1/5
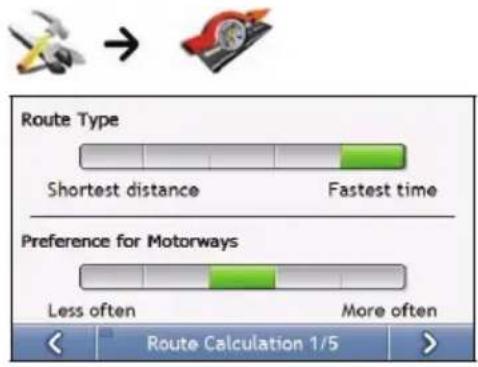
Complete the following:
| If you want to ... Then ... | |
| change the route type | move theRoute Typeslider towards Fastest timeto give high priority to the fastest time when calculating a route.move theRoute Typeslider towardsShortest distanceto give high priority to the shortest distance when calculating a route.Note:Selecting Shortest distance over Faster time can cause much longer journey time. |
| change the preference for motorways | move thePreference for Motorwaysslider towardsLess oftento use roads other than motorways where possible when calculating a route.Note:This option may not completely remove Motorways from a route.move thePreference for Motorways slider towardsMore oftento use motorways where possible when calculating a route. |
Your preferences are automatically saved.
Road Types 2/5

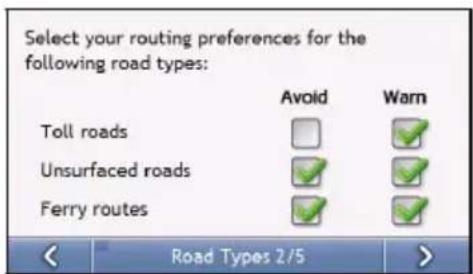
Complete the following:
| If you want to ... Then... | |
| avoid toll roads receive a warning if your route includes toll roads | select the Toll roads check box in the Avoid column. select the Toll roads check box in the Warn column. The warning will display at the start of every trip containing a toll road. |
| avoid unsurfaced roads receive a warning if your route includes unsurfaced roads | select the Unsurfaced roads check box in the Avoid column. select the Unsurfaced roads check box in the Warn column. The warning will display at the start of every trip containing unsurfaced roads. |
| avoid ferry routes receive a warning if your route includes ferry routes | select the Ferry routes check box in the Avoid column. Note: Avoiding ferry routes may prevent you from navigating between certain countries, even when a bridge or tunnel exists. select the Ferry routes check box in the Warn column. The warning will display at the start of every trip containing ferry routes. |
Your preferences are automatically saved.
Road Types 3/5
This special zone is the restricted area where you can set to avoid when calculating a route. For example, in Greece, you are not allowed to drive in the pollution zone when the air pollution is reached to certain level.
Note: The actual use of this special zone varies from country to country.

flowchart
graph LR
    A["Robot Icon"] --> B["Computer Monitor"]
    B --> C[">"]
    C --> D[">"]
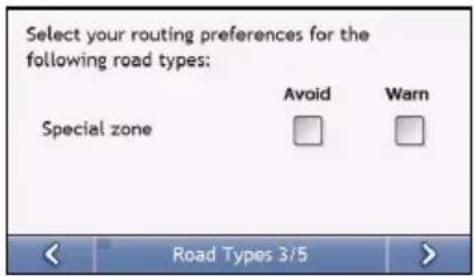
Complete the following:
| If you want to ... Then... | |
| avoid special zone receive a warning if your route includes a special zone | select the Special zone check box in the Avoid column. select the Special zone in the Warn column. The warning will display at the start of every trip containing special zone. |
Your preferences are automatically saved.
Driver Alerts 4/5

flowchart
graph LR
    A["Start"] --> B["Process Step 1"]
    B --> C["Next Step"]
    C --> D["Next Step"]
    D --> E["Next Step"]
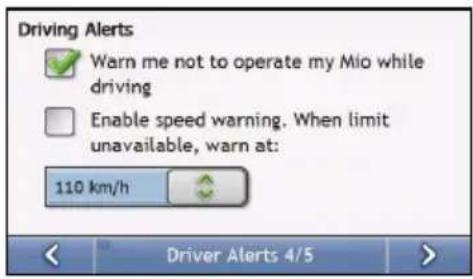
Complete the following:
| If you want to ... Then... | |
| enable a visual warning if the Main Menu screen is accessed in a moving vehicle | select the Warn me not to operate my Mio while driving check box. |
| enable a warning chime when travelling at or above a designated speed | select the Enable speed warning...... check box. |
| select your preferred speed | select your preferred speed from the Speed box. |
Your preferences are automatically saved.
Data Recording 5/5

flowchart
graph LR
    A["Robot"] --> B["Target"]
    B --> C[">"]
    C --> D[">"]
    D --> E[">"]
    E --> F[">"]
    F --> G[">"]
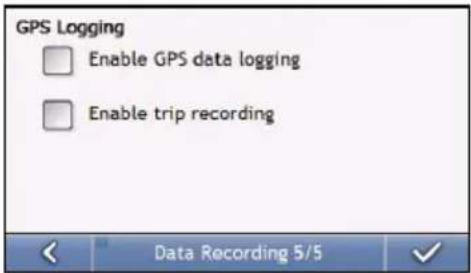
Complete the following:
| If you want to ... Then... | |
| record a GPS log of your trips | select the Enable GPS data logging check box. |
| record mileage that can be imported into MioMore Desktop to create expense reports | select the Enable trip recording check box.Note: This option is not available on all models. |
Map Display
You can change the look and behaviour of the Map screens by customizing the Map Display preferences.
Map Display 1/3

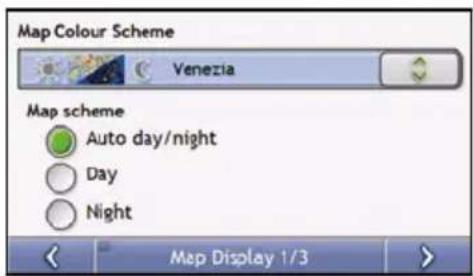
Complete the following:
| If you want to ... Then... | |
| change the map colour scheme | select your preferred scheme from theMap Colour Schemebox. |
| set the screen contrast to automatically adjust | select theAutoday/nightoption. |
| improve screen contrast in light or dark conditions | select either theDayor theNightoption to manually adjust the contrast. |
Your preferences are automatically saved.
Map Display 2/3
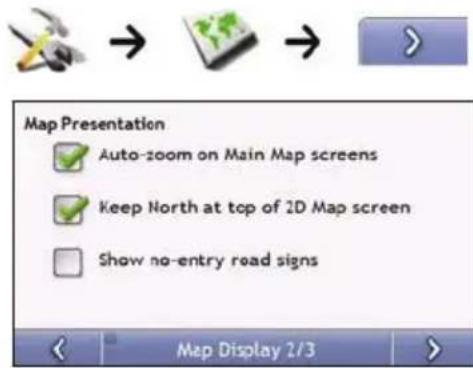
Complete the following:
| If you want to ... Then... | |
| enable automatic zooming during navigation | select the Auto-zoom on main map screens check box. If selected, the 3D Map screen will automatically zoom in or out, depending on your speed, to allow optimal viewing of your route. |
| display North at the top of the 2D Map screen | select the Keep North at top of 2D Map screen check box.Note: If not selected, the direction you are travelling in will display at the top of the 2D Map screen. |
| display “no entry” icons on “no entry” roads on the 2D Map and 3D Map screens | select the Show no-entry road signs check box. |
Your preferences are automatically saved.
Select Map 3/3
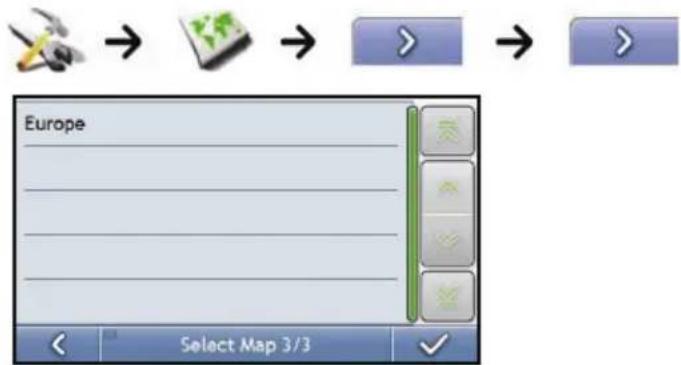
Complete the following:
| If you want to ... Then... | |
| use maps from a different continent | select a different continent from the maps you are currently using. When selected, the maps for the new continent will load and the 3D Map screen will display. |
Your preferences are automatically saved.
Map POIs
Points of Interest (POIs) are grouped into categories. You may choose to either display (or hide) icons of all POI categories on the map screens, or only display the icons from selected categories.
For example, you may only be interested in entertainment venues and want to disable other categories such as schools.

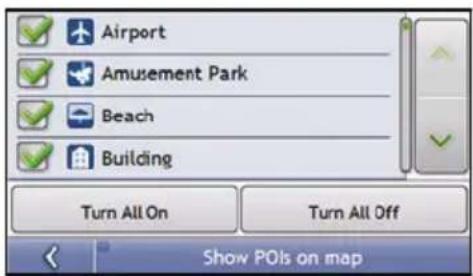
Complete the following:
| If you want to ... Then... | |
| display all POI icons (ie, icons from all categories) | Tap Turn All On. |
| display no POI icons Tap Turn All Off. | |
| select a specific POI category icon for display on the map screens | select the required POI category checkbox;repeat until all required categories are selected. |
Your preferences are automatically saved.
Volume

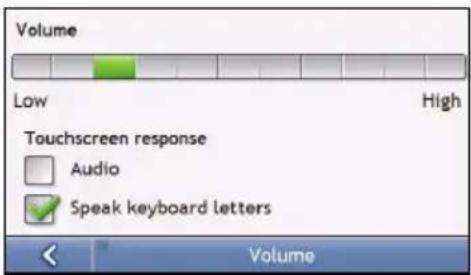
Complete the following:
| If you want to ... Then... | |
| increase or decrease the volume | move the Volume slider towards High to increase the volume.move the Volume slider towards Low to decrease the volume. |
| hear a tone when you tap the touch screen | select the Audio check box. |
| hear keyboard characters spoken to you | select the Speak keyboard letters check box. |
Your preferences are automatically saved.
Screen
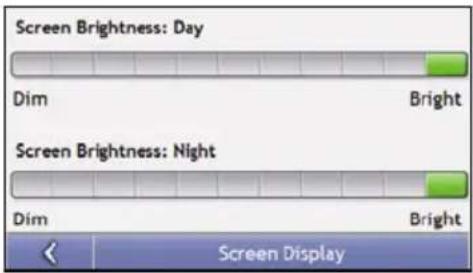
Complete the following:
| If you want to ... Then... | |
| change the screen brightness | move theScreen Brightnessslider towardsBrightto increase screen brightness.move theScreen Brightnessslider towards Dimto decrease screen brightness.Warning:Your Mio can heat up when theBrightness scale is set above 70% - i.e., when more than seven rectangles are coloured - therefore, use lower brightness whenever acceptable. |
Your preferences are automatically saved.
POI Alerts
The POI Alert preferences allow you to set a warning chime and/or visual warning to Point of Interest categories that you have installed via MioMore Desktop (Custom POIs). You may also be able to set warnings to certain POI categories that were preinstalled on your Mio or available by subscription, such as Safety Cameras.
If you have a route set, the warnings will occur when you are a certain distance (set by the Warning Distance preference) from the POI on your route.
If you do not have a route set, the warnings will occur when you are in the vicinity of the POI.

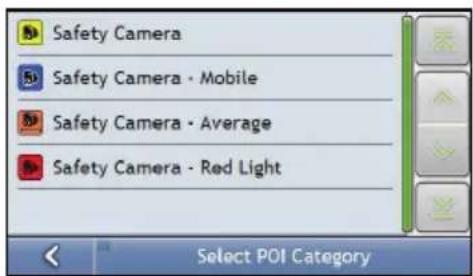
- Tap a custom POI category.
The activation preferences for the selected category will display.
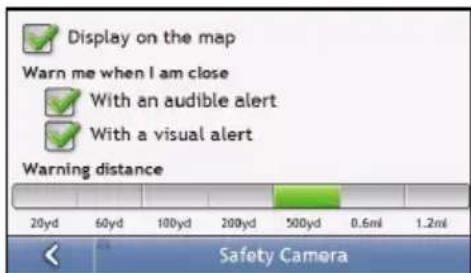
- Complete the following:
| If you want to ... Then... | |
| display locations in this category on the map | select the Display on the map check box. |
| enable a warning chime when locations in this category are in close proximity | select the With an audible alert check box. |
| enable a visual warning when locations in this category are in close proximity | select the With a visual alert check box. |
| select the distance at which the warnings will activate | move the Warning distance slider to select the distance at which the warnings will activate. |
Your preferences are automatically saved.
GPS
GPS Status
Signals are transmitted by Global Positioning System (GPS) satellites orbiting the Earth. The GPS Status screen provides a visual representation of the information being received.
Latitude and longitude are displayed, along with ground speed and the heading in degrees. The strength of each satellite is displayed on a bar chart.
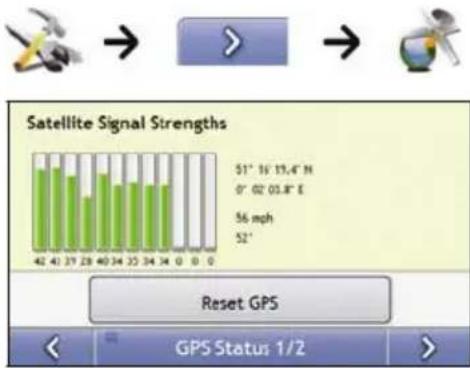
bar
Satellite Signal Strengths | Signal Strength (mV) | Value | | :--- | :--- | | 42 | 51' | | 41 | 15' | | 39 | 13.4" N | | 28 | 0' | | 40 | 02' | | 34 | 03.8" E | | 35 | 56 mph | | 34 | 52' | Reset GPS GPS Status 1/2The satellites available from your current position are shown as grey, red and green coloured bars:
| Bar colour Description | |
| Grey | No signal. |
| Red | A valid signal, but not being used to fix your position. |
| Green A valid signal being used to fix your position. | |
Resetting your GPS fix
Occasionally, the GPS fix may need to be reset. This may occur if the receiver has been transported a long distance since last being used; for example, to a different country, and is still trying to establish the previous position.
Complete the following:
| If you want to ... Then... |
| reset the GPS tap Reset GPS. |
Setting your GPS mode
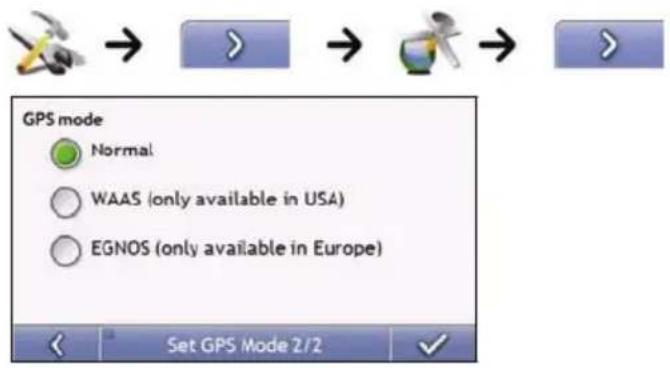
Complete the following:
| If you want to ... Then... | |
| use GPS select the Normal option. | |
| use WAAS select the | WAAS (only available in USA) option. |
| use EGNOS | select the EGNOS (only available in Europe) option. |
Note:
WAAS - Wide Area Augmentation System is a navigation system developed for civil aviation by the Federal Aviation Administration (FAA), a division of the United States Department of Transportation (DOT).
EGNOS - European Geostationary Navigation Overlay Service is a satellite based augmentation system (SBAS) under development by the European Space Agency, the European Commission and EUROCONTROL.
Tip: You should only change the default setting if you are experiencing poor GPS performance.
Your preferences are automatically saved.
Language
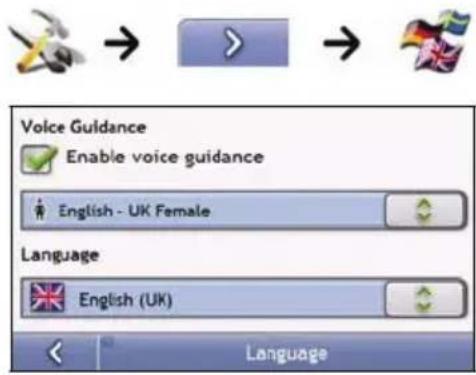
Complete the following:
| If you want to ... Then... | |
| enable voice guidance | select the Enable voice guidance check box. |
| change the on-screen language | select your preferred language from the Language box and tap Yes.Your language preference is saved and the map screen is displayed. |
| change the voice scheme | select your preferred voice scheme from the Voice Guidance box.Note: Only voice schemes that are compatible with the chosen language are displayed. |
Your preferences are automatically saved.
Traffic
Note: Traffic information is only available on selected model and in selected countries.
You can view your current traffic system status and change options by customizing the traffic preferences.
Traffic System Status

OR
From the Traffic Overview screen:

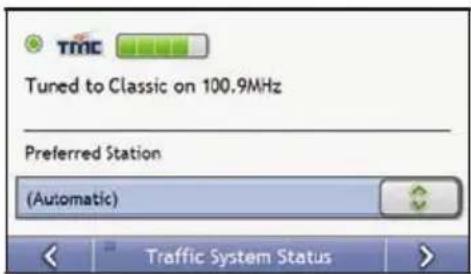
The Tuner section displays the name and frequency of the radio station currently being used to receive traffic event information. A bar shows the strength of the traffic signal being received; the more green bars, the stronger the signal.
Complete the following:
| If you want to ... Then... | |
| change your preferred radio station | select your preferred radio station from the Preferred Station dropdown. |
Your preferences are automatically saved.
Traffic Event Notification

flowchart
graph LR
    A["Red Rabbit Icon"] --> B[">"]
    B --> C["→"]
    C --> D["Warning Triangle"]
    D --> E["→"]
OR
From the Traffic Overview screen:
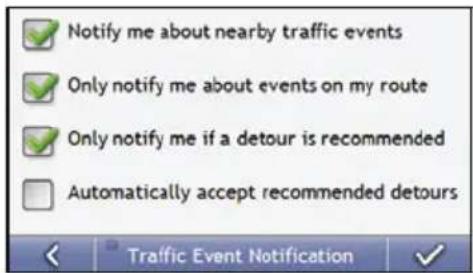
Complete the following:
| If you want to ... Then ... | |
| turn on/ off traffic event notification | select the Notify me about nearby traffic events check box to receive traffic event notification.clear the Notify me about nearby traffic events check box to turn off traffic event notification.Note: Event icons will still display on the 3D and 2D Map screens. |
| be notified about events that affect your current route | select the Only notify me about events on my route check box. |
| be notified only when a detour is recommended | select the Only notify me if a detour is recommended check box |
| automatically accept recommended detours and have a new route calculated | select the Automatically accept recommended detours check box. |
Your preferences are automatically saved.
Select event sorting type
From the Traffic Overview screen:
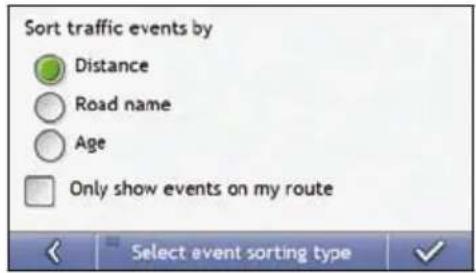
Complete the following:
| If you want to ... Then ... | |
| sort events by distance select the Distance | check box. |
| sort events by road name select the Road name | check box. |
| sort events by age select the Age check box | |
| only see events that occur on your route | select the Only show events on my route check box. |
Your preferences are automatically saved.
Power
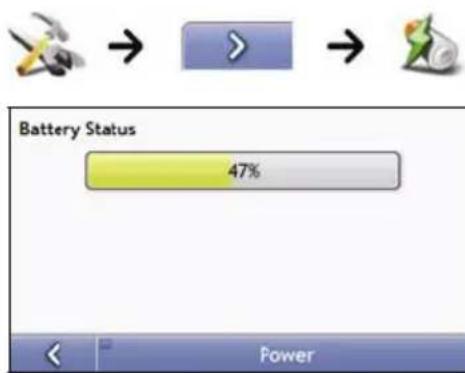
The Battery Status bar shows the percentage of power left in the Mio battery; the words External Power will display when the battery is charging from an external power source. To charge the battery, see "How do I charge the battery?" on page 14.
Keyboard
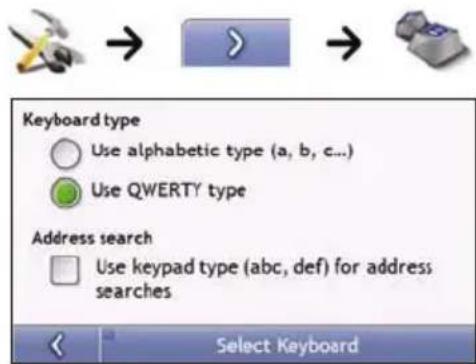
Complete the following:
| If you want to ... Then... | |
| use an alphabetic keyboard for entering information | select the Use alphabetic type (a, b, c...) option. |
| use a QWERTY keyboard for entering information | select the Use QWERTY type option. |
| use a keypad-type keyboard (predictive text) when searching for an address | select the Use keypad type (abc, def...) for address searches check box. |
Your preferences are automatically saved.
How does predictive text (abc, def...) work?
Predictive text allows addresses to be searched by a single key-press for each letter, as opposed to the multiple key- presses. As you enter a letter of an address, your Mio will compare all possible combinations against the maps you have installed and determine which address you intended to type.
For example:
To enter London, tap JKL MNO MNO DEF MNO MNO.
Your Mio will compare all possible combinations and display London as a search result. You can add further letters to narrow the search.
Units
You can change the units used by your Mio by customizing the measurements preferences.
Units 1/2
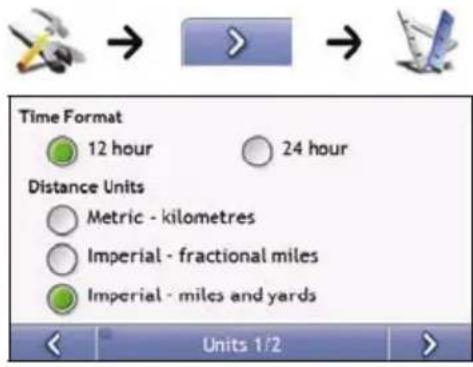
Complete the following:
| If you want to ... Then... | |
| change the time format | select either the 12 hour or 24 hour option. |
| change the distance units | select your preferred distance unit type from the Distance Units options. |
Your preferences are automatically saved.
Units 2/2

flowchart
graph LR
    A["Rabbit Icon"] --> B[">"]
    B --> C["Rocket Icon"]
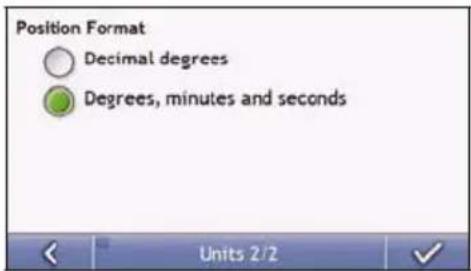
Complete the following:
| If you want to ... Then ... | |
| change the latitude,longitude position format | select either the Decimal degrees or the Degrees, minutes and seconds option. |
Your preferences are automatically saved.
Start-up

flowchart
graph LR
    A["Mouse Icon"] --> B[">"]
    B --> C[">"]
    C --> D["①"]
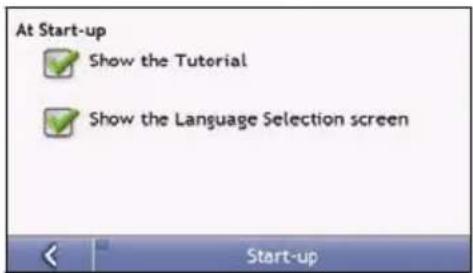
Complete the following:
| If you want to ... Then... | |
| show the Tutorial when you turn on your Mio | select the Show the Tutorial checkbox. |
| show the Language Selection screen when you turn on your Mio | select the Show the Language Selection screen checkbox. |
Your preferences are automatically saved.
Saved Info

flowchart
graph LR
    A["Rabbit Icon"] --> B["Arrow 1"]
    B --> C["Arrow 2"]
    C --> D["Arrow 3"]
    D --> E["Arrow 4"]
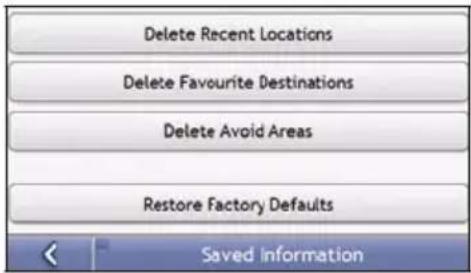
Complete the following:
| If you want to ... Then... | |
| delete recent locations tap Delete | Recent Locations. |
| delete favourites tap Delete Favourite | Destinations. |
| delete avoid areas tap Delete Avoid Areas. | |
| restore factory default settings | tap Restore Factory Defaults.Note: The Restore Factory Defaults option does not delete recent locations or saved favourite destinations. |
| clear all settings; for example,for use in a rental car | complete all of the above. |
When the warning dialog box displays, tap Yes.
Tutorial
The Tutorial displays when you turn your Mio on, unless you have cleared the Show tutorial on start-up check box.
You can view the Tutorial at any other time:

flowchart
graph LR
    A["Rabbit Icon"] --> B[">"]
    B --> C[">"]
    C --> D[">"]
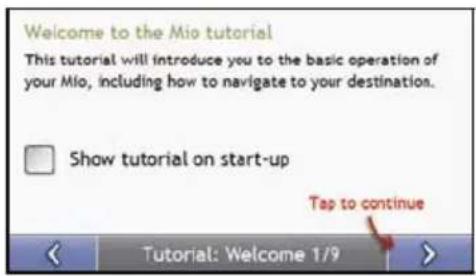
- To prevent the Tutorial from displaying again on startup, clear the Show tutorial on start-up check box to clear it.
■ To move forward through the Tutorial screens, tap
■ To revisit the previous screen, tap
About




This preference contains copyright and trademark information.
Shop Demo




Complete the following:
| If you want to ... Then... | |
| enable a shop demonstration of MioMap to be played | tap Shop Demo on the preference screen. After a short delay, a route will be demostrated. |
What is MioMore Desktop?
MioMore Desktop is a suite of tools you can use to access greater functionality and product information via your computer.
MioMore Desktop allows you to:
■ obtain software updates
■ search online for local POIs
■ manage maps
■ manage custom POIs
■ manage safety camera subscriptions
■ report trip mileage
■ browse the Mio website for special offers.
■ transfer pictures from your Mio using Photo Album
Can I use MioMore Desktop with my computer?
Ensure your computer has the following minimum system requirements before installing MioMore Desktop:
■ IBM compatible PC,
■ Microsoft® Windows XP SP2 or Vista x32,
■ Internet Explorer 6 or higher,
■ DVD drive,
■ USB port,
■ Internet connection for activation.
Note: For Windows 2000 and XP users, Microsoft .NET 2.0 will be installed on your computer as part of the installation of MioMore Desktop.
How do I install a map for the first time?
The most common task performed using MioMore Desktop is the installation of a new map to your Mio internal memory. Complete the following procedures:
| Step | Action |
| 1 | Install MioMore Desktop on your computer (see “How do I install MioMore Desktop onto my computer?” on page 97). |
| 2 | Check for software updates for MioMore Desktop on your Mio (see “How do I keep MioMore Desktop up-to-date?” on page 99). |
| 3 | Install one or more maps on your Mio (see “How do I install maps onto my Mio?” on page 102). |
How do I install MioMore Desktop onto my computer?
CAUTION: Before you begin, ensure that your computer meets the minimum system requirements for MioMore Desktop, especially:
- Ensure that Internet Explorer 6 or higher is installed on your computer before you install MioMore Desktop, even if it is not your default browser.
-
Windows XP users, ensure that Windows XP Service Pack 2 or higher has been applied before you install MioMore Desktop.
-
Close all programs on your computer.
-
Insert the MioMore Desktop Application Installer DVD into your computer DVD drive. The MioMore Desktop installer will start.
If your computer does not automatically launch the DVD, start the installation manually: Start → Run.
Type D:\Install.exe where "D" is the letter assigned to your DVD drive, then click OK.
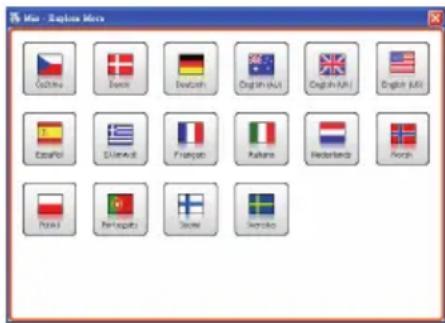
- Select your preferred language for MioMore Desktop.
- Click Install Software → Install MioMore Desktop 2008.
- Follow the screen prompts to install MioMore Desktop:
■ Review and accept the Licence Agreement for MioMore Desktop when prompted.
■ Select a destination folder for MioMore Desktop when prompted.
■ When the installation has finished, click Finish. MioMore Desktop will open.
- If prompted to connect your Mio to your computer, complete the following:
- Plug the large end of the USB cable directly into a USB port on your computer (not a USB hub) and plug the small end into the USB Socket on the ⬆ bottom of your Mio.
Tip: Where possible, plug the USB cable into a USB port at the back of your computer.
- Push the Power switch to the ON position, to turn on your Mio. The following screen will display on your Mio.
natural_image
Three computer monitors on a dark background: desktop, keyboard, and monitor (no text or symbols visible)- If prompted to update your Mio software, follow the on-screen prompts.
You are now ready to use MioMore Desktop to install maps to your Mio.
MioMore Desktop features
Note: Depending on your Mio model certain MioMore Desktop features may not be available.
Start → All Programs → Mio → MioMore Desktop
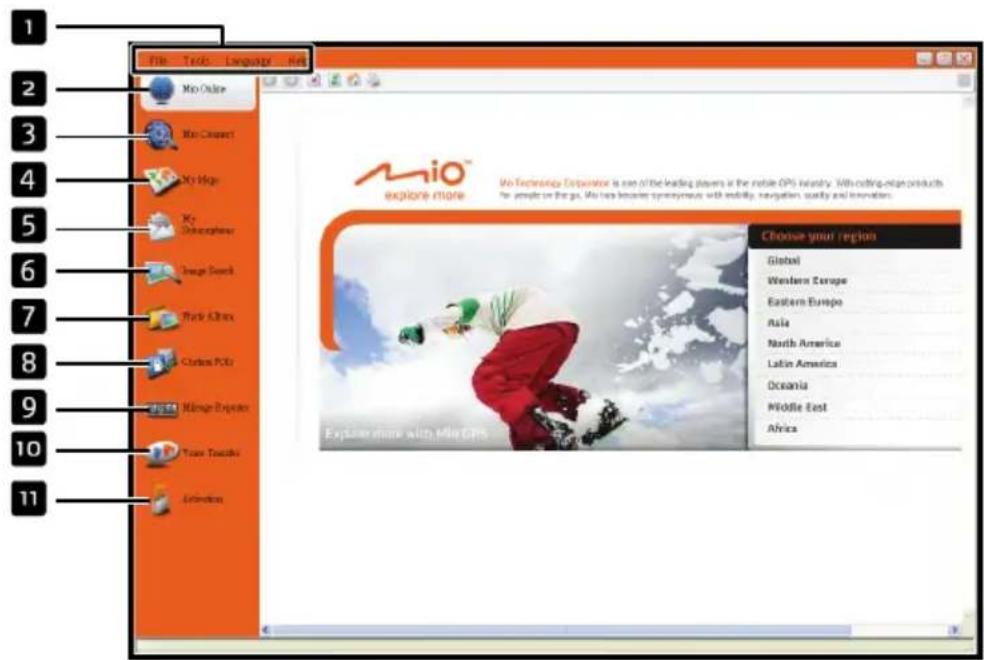
| Element Description | ||
| 1 | Menu bar | Menus that provide access to basic MioMore Desktop functionality. |
| 2 | Mio online Displays the Mio website. | |
| 3 | Mio Connect | Application used to search and install local POIs for a route.Note: Mio Connect is not available on all models. |
| 4 | My Maps Application used to install and manage maps. | |
| 5 | My Subscriptions | Information on your current subscriptions, including safety camera subscription. |
| 6 | Image Search Search and download NavPixTM from a website.Note: This feature is powered by Flickr. | |
| 7 | Photo Album Application used to transfer NavPixTM from your Mio to your computer. The software enables you to:Manage albumsCopyDeleteMove NavPixTM or albums between the NavPixTM library on your Mio and the NavPixTM library on your computer. | |
| 8 | Custom POIs | Application that allows you to import custom POIs. |
| 9 | Mileage Reporter | Uses data recorder on your Mio allowing you generate expense reports on the mileage/estimated fuel usage of your trip. |
| 10 | Voice Transfers | Application that allows you to install or remove voice files from your Mio. |
| 11 | Activation | Application used to activate a product key when you purchase a subscription or maps. |
How do I keep MioMore Desktop up-to-date?
We recommend that you regularly use MioMore Desktop to check the Mio server for MioMore Desktop software updates.
How do I update MioMore Desktop?
Start → All Programs → Mio → MioMore Desktop → Tools → Options → General
Select Auto check for updates checkbox.
When you select this option, every time you access MioMore Desktop, the latest service packs and bug fixes if available are downloaded from the Mio server and applied to your Mio.
Note: Updating software is different from upgrading software. To upgrade MioMore Desktop, you must first purchase a new version of MioMore Desktop from a retailer, then install it on your Mio.
MioMore Desktop Preferences
Tools → Options → General
Complete the following:
| If you want to ... Then ... | |
| upgrade from a previous version of MioMore Desktop | Follow the instructions in the Installation Guide or Upgrade Guide that came with your MioMore Desktop upgrade. |
| change the MioMore Desktop measurement to metric units | Select the Use metric units check box. |
| change the MioMore Desktop measurement to decimals | Select the Use Decimal degrees check box. |
Mio Online
Note: Make sure that your computer is connected to the Internet.
Clicking the Mio Online button on the left side displays the company's official website in the embedded browser window. You can also check the Mio e-shop for accessories or additional maps.
Mio Connect
Note: Mio Connect is not available on all models.
Mio Connect is a MioMore Desktop application that allows you to search and install local POI information from your computer to your Mio.
Tip: Before you begin, ensure your Mio is correctly plugged into your computer: Plug the large end of the USB cable directly into a USB port on your computer (not a USB hub); plug the small end into the USB Socket on the side of your Mio.
Start → All Programs → Mio → MioMore Desktop → Mio Connect
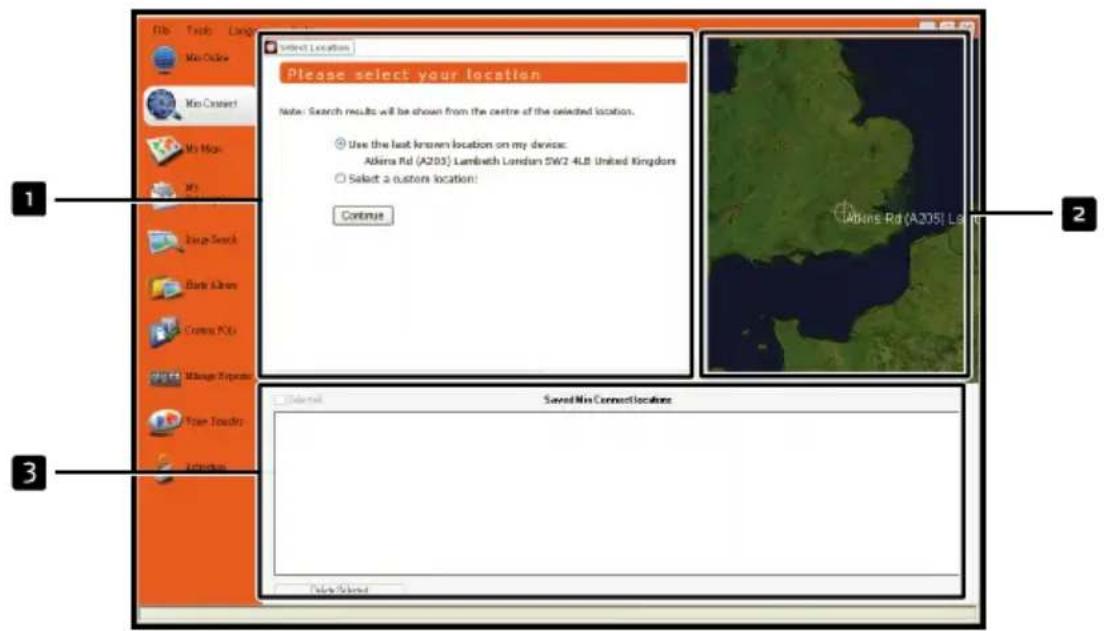
| Element Description | |
| 1 | Search location Displays search fields |
| 2 | Globe Displays selected place name results. |
| 3 | Saved Mio Connect locations |
How do I search for a POI using Mio Connect?
- Select the last known location on your Mio or a custom location and click Continue.
- For a custom location, perform step 3 to 6 to set up your preferred location.
- From the country drop down box, select a Country.
- From the Region/State drop down box select a Region/State if required.
- In the Place name box, enter the first few letters of a city and then select your preference.
- Click Continue.
The Available Services page will display.
- Select your preferred search service.
The selected services page will display.
Note: Depending on the country you are navigating, the available search services may vary.
Note: For some countries you are required to accept the terms of use.
- Enter your search keyword and then click Search.
A list of search results will display.
How do I install POIs from my computer to my Mio?
- Perform step 1 to 6 of "How do I search for a POI using Mio Connect?" on page 100.
- Click next to the POI you want to import to your Mio.
Note: You can install a maximum of 200 POIs on your Mio via Mio Connect.
How do I delete a POI from my Mio?
- From Saved Mio Connect locations select the checkbox of the POI you want to delete.
- Click Delete Selected.
The POI is deleted from your Mio.
- Repeat step 1 and 2 to delete more POIs to your Mio.
Note: To delete all the POIs installed on your Mio, select the Select All check box and then click Delete Selected.
My Maps
The My Map application allows you to install new maps, remove maps from your device and purchase new maps.
Note: You can purchase new maps directly from the Mio e-shop. Simply click Mio Online or click Purchase a map from the Mio online store link at the bottom. Make sure that your computer is connected to the Internet.
Start → All Programs → Mio → MioMore Desktop → My Maps
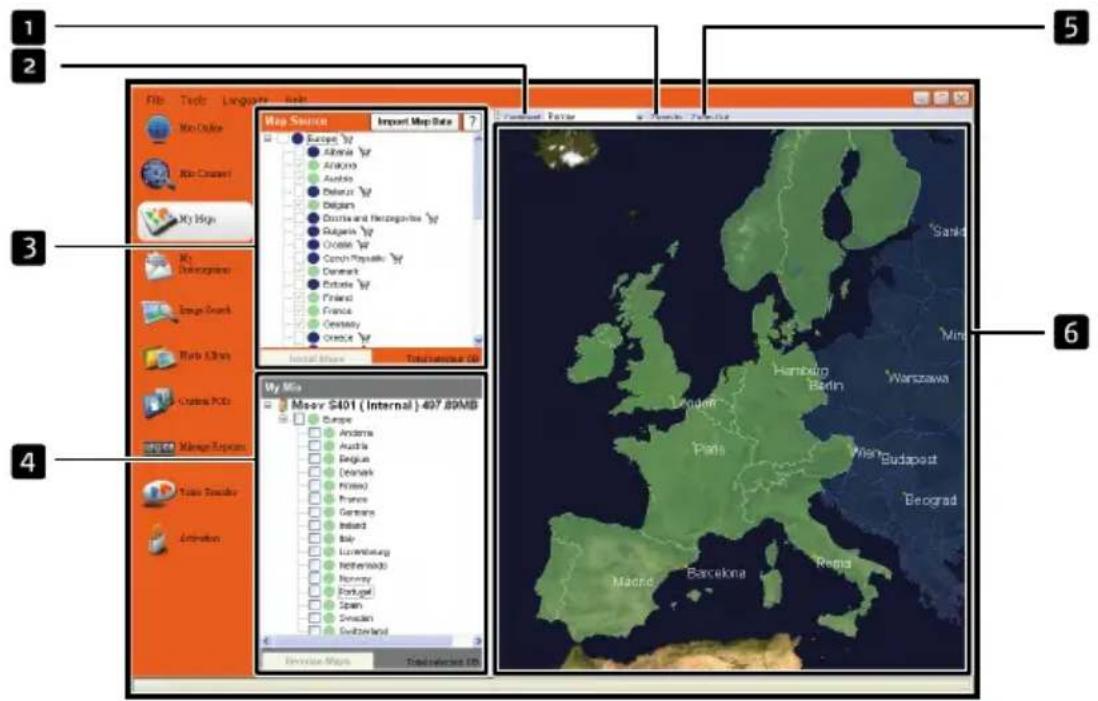
| Element Description | |
| 1 | Zoom In Click to zoom in. |
| 2 | Continent A drop down list of continents that have maps available for your Mio. |
| 3 | Map Source A list of maps on the DVD or available for purchase via the Mio store website. |
| 4 | My Mio A list of maps installed on your Mio. |
| 5 | Zoom Out Click to zoom out. |
| 6 | Globe A map of the world or a continent selected indicating the maps:on the current DVD,installed on your Mioavailable from Mio. |
How do I install maps onto my Mio?
Your Mio comes with one or more pre-activated maps.
You can install maps from the enclosed DVDs to your Mio internal memory; however you may need to purchase a Map Product Key to activate the maps.
If you are not sure which map contains the town or city that you want to install, you can use the Find City window to identify the correct map. For more information, see "How do I know which map contains a particular city or town?" on page 105.
How do I install maps from DVD?
-
Open MioMore Desktop, if it is not already open: Start → All Programs → Mio → MioMore Desktop
-
Click My Maps. The My Maps application will display.
-
Insert a Map DVD into your computer DVD drive.
■ The maps that are already installed on your Mio are green.
■ The maps that are unlocked and ready to be installed to your Mio are yellow.
■ The maps that require activation before being installed to your Mio are red.
■ The maps that are available for purchase from Mio are blue.
Note: If your computer opens Windows Explorer when the DVD is inserted, close the Windows Explorer window.
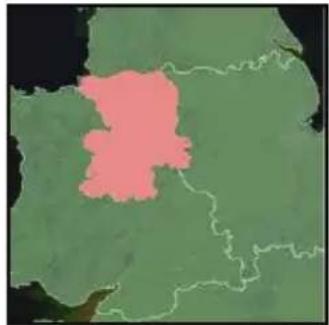
natural_image
Geographic map highlighting a pink region within a green landmass (no text or labels visible)- Complete the following:
| If the map to be installed is ... Then ... | |
| yellow go to step 7. | |
| red | the map needs to be activated via the Internet before it can be installed; continue to step 5. |
-
If you connect to the Internet via a dial-up connection, connect to the Internet now.
-
Follow the prompts to activate your Map Product Key, including:
■ Enter the Map Product Key when prompted.
- Your computer will connect to the Internet and activate your Map Product Key.
■ When activation has completed, the map will change colour to amber; continue to step 7.
natural_image
Geographic map highlighting a specific region in yellow against a green background, with no visible text or labels.- Click the map you want to install to your Mio.
The map will change colour to yellow to indicate it has been selected.
■ To deselect a map, click the map again.
Note: You may need to install multiple maps to cover the required geographical area.
- Complete the following:
| If you want to ... Then ... | |
| select an yellow map go back to step 7. | |
| select a red map | the map needs to be activated via the Internet before it can be installed; go back to step 5. |
| install the selected maps to your Mio continue to step 9. | |
- Select the destination media for the selected maps, then click Transfer Now. The selected maps will be installed and change colour to green.
natural_image
Abstract green-toned map outline with irregular white outlines, no visible text or symbols- To use your Mio, disconnect the USB cable.
WARNING: Do not disconnect the USB cable from the Mio USB Socket until the installed map or maps have changed colour to green.
How do I remove maps from my Mio?
- Click My Maps.
The My Maps application will display.
-
From the My Mio panel, select the check box next to the map you want to remove.
-
Click Remove Maps to remove the selected maps.
-
Confirm that you want to remove the selected map when prompted. The map is removed from your Mio.
How do I know which map contains a particular city or town?
Use the Find City window to find the map that contains a particular city or town.
- Click My Maps.
The My Maps application will display.
- On the Globe panel, right click and select Find City. The Search for City window will open.
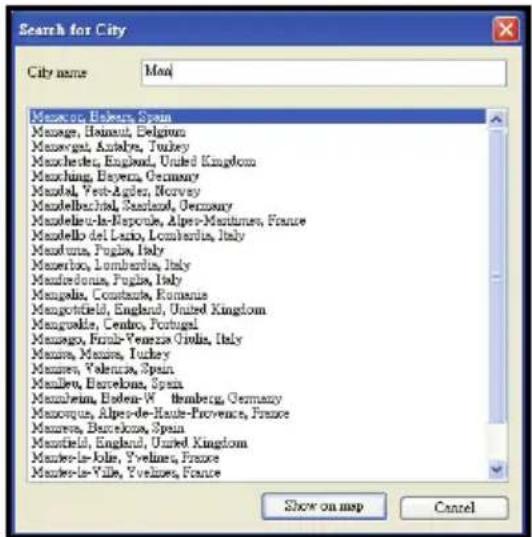
-
Type the name of the city or town in the City Name field. The list of available cities will reduce to match your search.
-
Select the name of the city or town, then click Show on Map. The globe will rotate to centre on the selected city or town
How do I download maps to my computer?
-
Make sure that your computer is connected to the Internet.
-
Click Tools → Options → My Maps and click Change to assign a folder on your computer for the map data.
-
Click My Maps.
The My Maps application will display.
- From the Map Source panel, click Import Map Data.
The Map Selection window will open.
- Select the map you want to download and click OK. The map will be downloaded to the folder that you have assigned.
Note: To disable the free map offer messages, click Tools → Options → My Maps and click Suppress Free Map Offer messages check box.
What is a Major Road Network map?
Note: Navigation between particular countries is not available on all models.
Continuous continental navigation
Major Road Network maps allow you to seamlessly navigate between installed maps without installing maps of all regions along your route. Each Major Road Network map covers a large area, such as Western Europe, and contains main roads that connect cities and towns. You can select a road or Point of Interest on the Major Road Network map as your departure point or destination.
All Major Road Network maps:
■ contain roads and ferry connections of high national and international importance.
■ use less memory than would be necessary to install all equivalent detailed maps.
■ exclude smaller roads and have a reduced level of geographical detail.
How do I install or reinstall a Major Road Network map?
Major Road Network maps can be installed or reinstalled to your Mio the same way detailed maps are installed. For more information, see "How do I install maps from DVD?" on page 103.
My Subscriptions
Note: Safety camera information is only available for selected countries.
Your Mio contains pre-loaded safety camera information. To subscribe to current Mio safety camera information, use the enclosed DVD to install MioMore Desktop software on your computer.
For the latest safety camera coverage, to subscribe to safety camera information and to see our latest offers, visit www.mio.com.
Each country has a coloured circle indicating the status of your subscription.
Alerts
Safety Camera alerts can be set to enable a warning sound or visual warning when on your route (see "POI Alerts" on page 81).
How do I install Safety Camera information?
Complete the following steps to install safety camera information on your Mio.
- Purchase a subscription.
- Activate your subscription.
How do I know which Safety Camera information is available?
Start → All Programs → Mio → MioMore Desktop → My Subscriptions
- From the Available Subscription section, select the country for which you want to purchase the subscription.
-
Left click and select Activate my subscription.
The Activation window will display.
Note: Subscriptions are available only for those countries for which you have purchased maps. -
Enter a product key and follow the prompts to activate your subscription.
Purchase a Subscription
- To purchase a subscription to safety camera information, on the Subscriptions menu, select the country for which you want to purchase the safety camera and then select Purchase an activation key from the Mio store.
The Mio Store website will open. - Follow the prompts to purchase your subscription.
A product key will be sent to you via email when you have subscribed. You will need to use this product key to activate your subscription.
Activate your Subscription
Start → All Programs → Mio → MioMore Desktop
-
From Available Subscriptions section, select the country for which you want to activate the safety camera.
-
Right click and select Activate my subscription. The Activation window will display.
-
Enter the subscription product key in the Product Key field.
-
Click Continue. Follow the prompts to update your subscription.
Your software will update automatically.
How do I update Safety Camera information on my Mio?
Start → All Programs → Mio → MioMore Desktop → My Subscriptions
My Mio section will display a list of subscriptions already installed on your device.
| Icon Description | |
| red | Expired subscriptions.right click to purchase a new subscription. |
| Yellow | Available subscriptions.right click to update and purchase new subscription. |
| green | Active subscriptions.Note: No updates are available for these subscriptions. |
Image Search
Image Search is a MioMore Desktop application powered by Flickr™ allowing you to download photos and import them to Photo Album. You can then upload the photo to Flickr website, transfer photos to your Mio, export pictures to Google Earth or search for other NavPix™ near the longitude and latitude of your NavPix™.
Start → All Programs → Mio → MioMore Desktop → Image Search
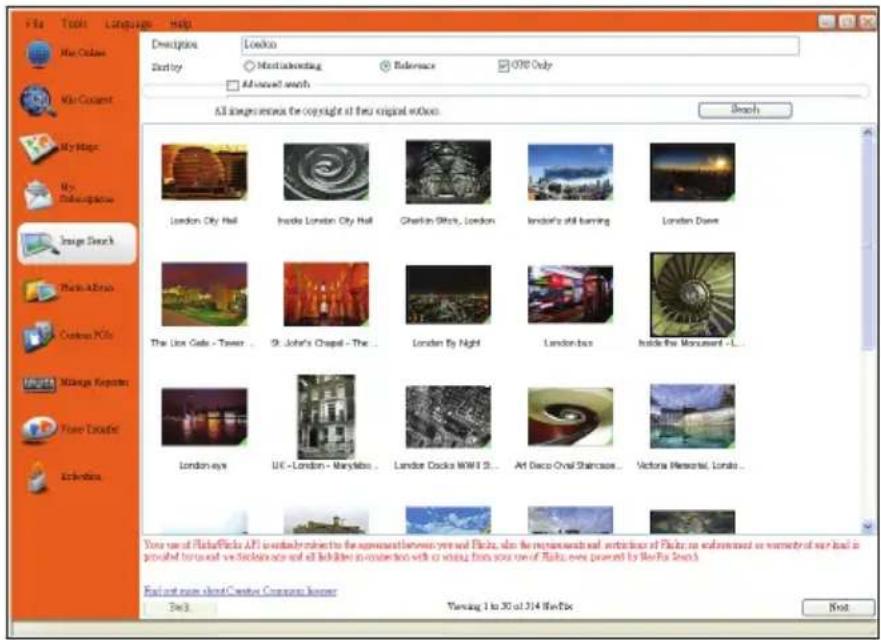
How do I download NavPix™ from the internet?
- In the Description field enter a search description for the image you are looking for.
- Select one of the Sort by options.
- Click Search.
Thumbnails of the NavPix ^TM will display in the NavPix ^TM display area.
Note: You can narrow your search by selecting the Advance Search check box and then selecting a city from the drop down list or by entering longitude and latitude details.
How do I import NavPix™ to Photo Album?
- From the NavPix ^TM display area select a picture or group of pictures you want to upload to your Photo Album.
- Right click and select Import to Photo Album.
A new album is created in the Desktop album section of Photo Album.
For more information, see "Photo Album" on page 110.
Photo Album
Note: Depending on your Mio model certain Photo Album features may not be available.
Photo Album is a MioMore Desktop application which allows you to copy, delete or move pictures or albums between the NavPix™ library on your Mio and the NavPix™ library on your computer.
Start → All Programs → Mio → MioMore Desktop → Photo Album
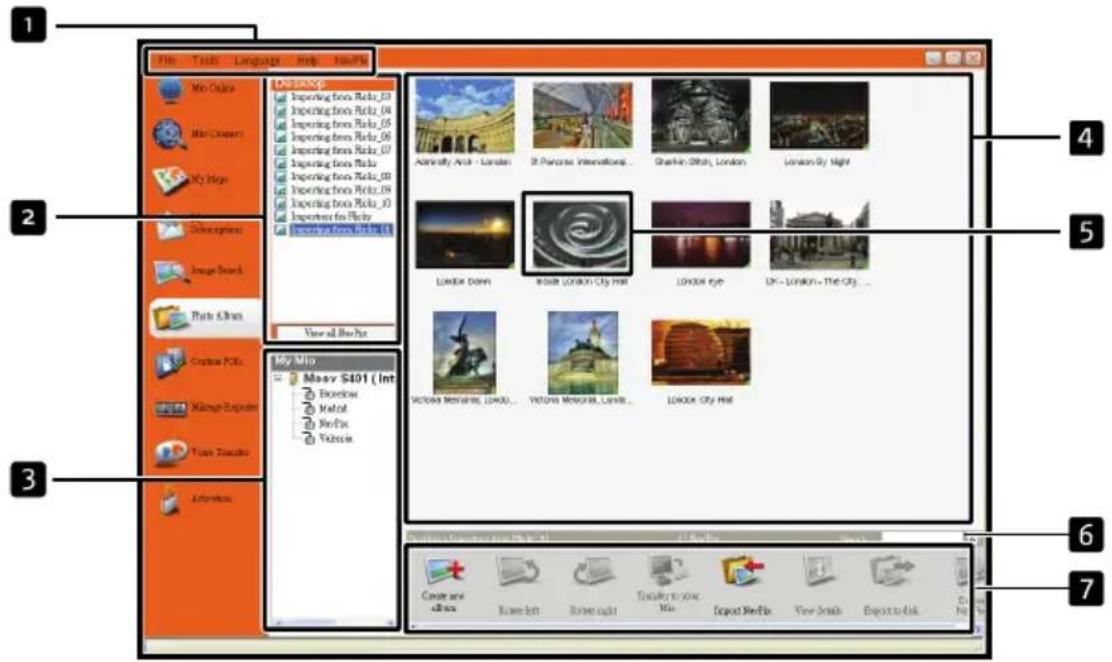
| Element Description | |
| 1 | NavPixTM menu Gives access to Photo Album functionality. |
| 2 | Desktop albums Displays a list of all albums stored in the NavPixTM library on your computer.Click an album to display its contents in the Album display area.Click the View all pictures button to display all pictures stored in theNavPixTM library on your computer. |
| 3 | My Mio albums Displays a list of albums stored on the Mio internal memory.Click an album to display its contents in the Album display area. |
| 4 | Album display area Displays thumbnails of pictures in the selected album. |
| 5 | Selected picture When a thumbnail is selected it displays with a blue border. |
| 6 | Search Type to search for a NavPixTM by name. |
| 7 | Toolbar When a picture is selected, the icons which can be used will be active. |
Toolbar

flowchart
graph LR
    1["1"] --> A["文件夹"]
    2["2"] --> B["文件夹"]
    3["3"] --> C["文件夹"]
    4["4"] --> D["电脑"]
    5["5"] --> E["文件夹"]
    6["6"] --> F["文件夹"]
    7["7"] --> G["文件夹"]
    8["8"] --> H["文件夹"]
The following options are available on the toolbar.
| Element Description | |
| 1 | Create new album Click to create a new album in the NavPixTM library you are viewing. |
| 2 | Rotate left Rotates the selected NavPixTM 90° to the left. |
| 3 | Rotate right Rotates the selected NavPixTM 90° to the right. |
| 4 | Transfer to your Mio or Transfer to your computerIf you are viewing NavPixTM in the NavPixTM library on your computer, this will display as Transfer to your Mio. Click to transfer the selected NavPixTM to your Mio.If you are viewing NavPixTM in the Mio library this will display as Transfer to your computer.Click to transfer the selected NavPixTM to the NavPixTM library on your computer. |
| 5 | Import NavPixTMImports NavPixTM from your computer to the NavPixTM library on your computer. |
| 6 | View details Click to view the selected NavPixTM and edit NavPixTM details, including: NavPixTM name, latitude, longitude, description. |
| 7 | Export to disk Click to save NavPixTM to your computer or a network drive. |
| 8 | Delete NavPixTMClick to delete the selected NavPixTM. |
How do I copy NavPix ^TM or albums from my Mio to Photo Album?
Your Mio comes with a few pre-installed NavPix ^TM that can be can be saved on your computer, printed, emailed to friends or shared with other NavPix ^TM users around the world.
- From the My Mio section, select the album containing your required NavPix™.
Thumbnails of the NavPix ^TM in the selected album will display in the Album display area.
- Either click and drag the required NavPix™ to an album in the Desktop albums section, or click the Transfer to your computer icon on the toolbar.
Note: If an album is not selected in the Desktop albums section, you will be prompted to either select one, or create a new album.
- Repeat steps 1 and 2 to copy NavPix ^TM from another album.
How do I transfer pictures from Photo Album to my Mio?
You can transfer pictures from your computer to your Mio. You can import any JPEG (.jpg) into Photo Album, add or edit GPS information, and then copy the picture to your Mio.
- From the Toolbar section, select Import NavPix.
The Open dialog box will display.
- Navigate to select a NavPix ^TM from an album on your computer and click Open.
Thumbnails of the NavPix ^TM will display in the Album display area.
- Either click and drag the required NavPix ^TM to an album in the My Mio section, or click the Transfer to your Mio icon on the toolbar.
Note: If you have transferred a NavPix ^™ with GPS coordinates you can then navigate to where the picture was taken.
How can I view and edit pictures or albums on my computer?
| If you want to ... Then ... | |
| rotate a picture to left select the picture from the Album display area.click Rotate left on the toolbar. | |
| rotate a picture to right select the picture from the Album display area.click Rotate Right on the toolbar. | |
| view the picture details select the picture from the Album display area.right click and select View Details or click View Details on the toolbar. | |
| edit GPS information select the picture from the Album display area.click on the picture or click View Details on the toolbar.Following information will display:NameLatitude and LongitudeDescriptionEdit the details you want to modify. Click OK to save the changes.Note: You can also use this function to create a NavPixTM from a normal JPEG image if you have the required Latitude and Longitude. | |
| delete a picture select the picture from the Album display area.right click and select Delete or click Deletes on the toolbar. | |
What else can I do with pictures and albums on my computer?
From the NavPix ^TM library on your computer, you can:
■ add a picture to another album
■ remove pictures from an album
■ view and edit details of a selected picture
■ upload pictures to Flickr™
■ export to disk
■ export pictures to Google Earth™
■ search for pictures
■ view all pictures in the library
| If you want to ... Then ... | |
| add a picture to another album | in the Desktop albums section, select the album containing the NavPixTM you want to include in another albumselect the NavPixTM then drag it to the other album.Note: The selected NavPixTM is included in the new album, but is not moved, i.e., one instance of the NavPixTM in the library may be included in multiple albums. |
| remove a picture from an album | in the Desktop albums section, select the album containing the NavPixTM you want to removeselect the NavPixTM, right click and select Remove from album.Note: Click the Delete icon on the toolbar if you want to delete the NavPixTM from all albums. |
| view and edit picture details | select the picture then click the View Details icon on the toolbar.edit the fields as required. |
| upload picture to the Flickr website | in the Desktop albums section, select the album containing the NavPixTM you want to upload to the Flickr website.select the NavPixTM, right click and then select Upload to Flickr.Note: You need a Flickr account to upload NavPixTM. To create a Flickr account visit_ www.flickr.com |
| save a picture to your computer | select the picture from the Album display area.right click and select Export to disk or click Export to disk on the toolbar%.Navigate to an album on your computer where you want to save the NavPixTM. |
| export to Google EarthTM (only NavPixTM with GPS coordinates can be exported to Google Earth) | in the Desktop albums section, select the album containing the picture you want to export to Google Earth.select the NavPixTM, right click and then select Export to Google Earth%. Navigate to a folder on your computer to save the file and then open in Google earth.Note: You need to install the Google Earth software on your computer to be able to view the file you have created. You can download Google Earth from earth.google.com |
| search for other NavPixTM You | can search for other NavPix TM near the longitude and latitude of your NavPixTM using Flickr. |
| view all pictures in the library | click the View all pictures button at the bottom of the Desktop album section. |
Photo Album Preferences
Tools → Options → Photo Album
Complete the following:
| If you want to ... Then ... | |
| change your NavPixTM location on your computer | click Change. The Save As dialog box will open.select a location for your NavPixTM library.click Save. The warning message will display and you will be prompted to confirm your action.Your NavPixTM library is moved to the new location. |
| receive a warning message before deleting an image from your device | select Warn me when permanently deleting an image from my device checkbox. |
| receive a warning message before deleting an image from your NavPixTM library | select Warn me when permanently deleting an image from my library checkbox. |
| create a new folder every time you import new photos | select Import photos to a new album checkbox. |
| view NavPixTM when on a route | select Show NavPix on map checkbox. |
Custom POIs
Note: Depending on your Mio model Custom POIs features may not be available.
The Custom POI application allows you to create or import your own POI files. These are called custom POIs. Unlike preinstalled POIs, custom POIs can be removed from your Mio and can have audio as well as visual alerts associated to them.
How do I install custom Points of Interest?
Start → All Programs → Mio → MioMore Desktop → Custom POIs
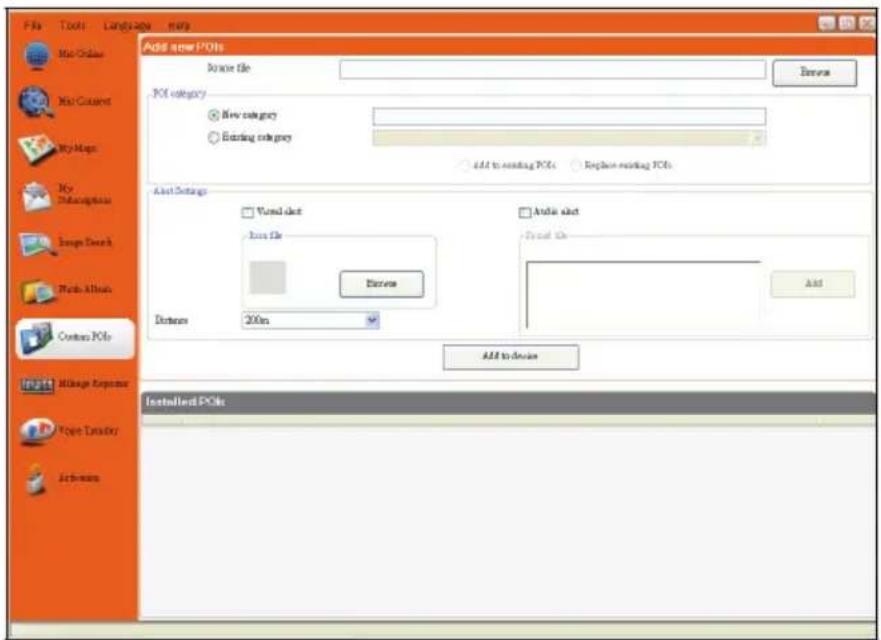
Note: Various POI files are available for download free or by subscription from third-party websites. Ensure that downloaded files are in .csv (Comma Separated Values) format.
CAUTION: Mio is not responsible for the content or accuracy of the information or the reliability or availability of the third-party websites. The use of information regarding safety camera locations may be subject to local laws in the country of use. You are responsible for checking that you can use the information in your country or in the country where the information will be used.
- In the Add new POIs section, click Browse to select a source file. The open dialog box will open.
- Select the file from your local or network drive, then click Open.
- From the POI Category section:
| If you want to ... Then ... | |
| use an existing custom POI category | select the Existing Category option, then select a type from the drop down list. |
| create a new custom POI category | select the New Category option, then type a name for the POI category. |
4. Complete the following:
| If you want to ... Then ... | |
| select an icon to display on the map screens for POIs of the category | ClickBrowseto select the icon file from your local or network drive. When you have located the icon file, select it and clickOpen.The icon file must be a bitmap (.bmp) graphic with a minimum size of 6x6 pixels and a maximum size of 32x32 pixels.Note: If you do not select a custom icon, a default icon will display. |
| enable a visual warning when a POI of this category is in close proximity | select theVisual alertcheck box. |
| enable a warning sound when a POI of this category is in close proximity | select theAudio alertcheck box. |
| select the distance from a POI of this category at which the visual warning should display or the warning chime should sound | select the distance from theDistancebox.Note: To change the units used to measure distance for this POI category, from the tools menu click on options and from the general option select Use metric units check box. |
| select a custom sound alert file to play when a POI of this category is in close proximity | Either select a sound file from the list, orClickAddto select a sound file (.WAV format) from your local or network drive. When you have located the file, select it and clickOpen.Note: If you do not select a custom sound file, a default sound alert will play. |
5. Click on Add to device button to add the POI to your Mio.
Note: Each POI file corresponds to a POI category; for example, Hotels .csv will be listed in your Mio as the Hotels category.
How do I delete a Custom POI File from my Mio?
-
On the Installed POIs section click Delete next to the file name. The file is removed from the list, but is not yet deleted.
-
Accept the warning message. The selected file is deleted.
Mileage Reporter
Note: Mileage Reporter is not available for all models
Mileage Reporter is a MioMore Desktop feature that allows you to create expense reports (.csv format) based on the mileage and estimated fuel usage recorded by your Mio.
Start → All Programs → Mio → MioMore Desktop → Mileage Reporter
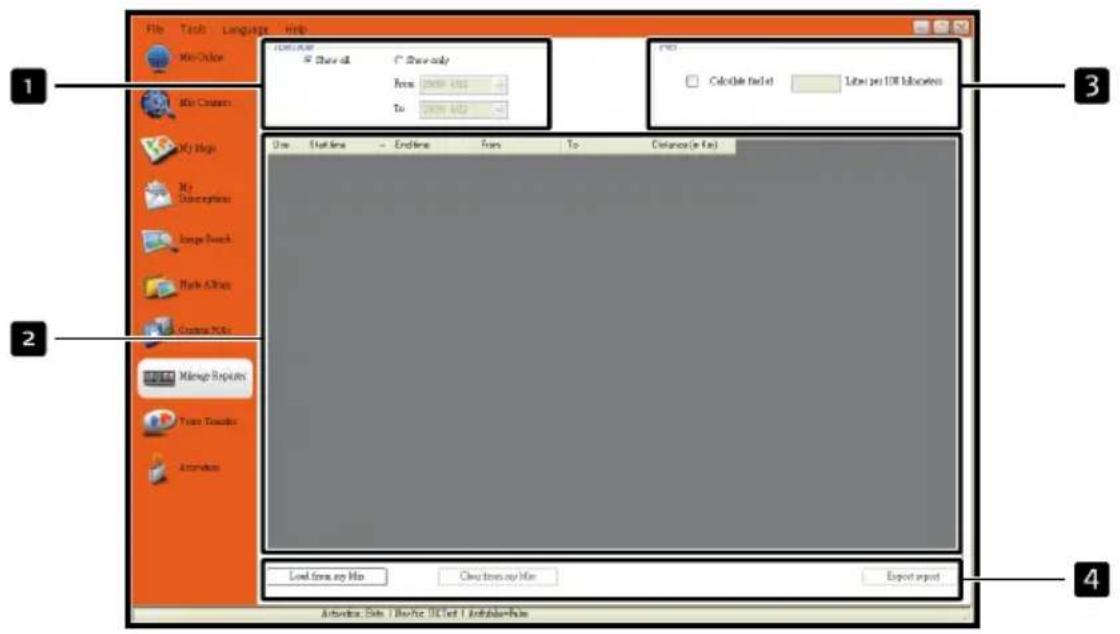
| Element Description | |
| 1 | Timeframe specifies the time for which the mileage report will be created.Select Show All to include all recorded mileage. |
| 2 | Report panel displays your trip logs. |
| 3 | Fuel Select to include the amount of fuel (estimate) used for the mileage recorded.If selected, specify the number of miles travelled per gallon, or kilometres travelled per litre. |
| 4 | Report data buttons click to input report data from your Mio or export to a report (.csv). |
To set the trip recording preference on your Mio, see "Data Recording 5/5" on page 74.
How do I input my trip data?
- Select Show All in the Timeframe section.
- Select the Calculate fuel check box and enter the fuel consumption.
- Click Load from Device on the Report data button section. The Transfer Log progress bar will display.
All your trip logs can now be viewed in the Report panel section.
How do I export a mileage report?
- Select a trip log from the report panel section.
- Click Export report on the Report data button section. The open dialogue box will open.
- Select the file from your local or network drive, enter a name for your mileage report and then click Save.
Note: Mileage report is saved in .csv format.
You can view your mileage report by clicking on the file.
How do I delete travel logs from my Mio?
- Select a trip log from the report panel section.
- Click Delete from device on the Report data button section.
- Click Yes to delete all travel logs.
Mileage Reporter preferences
Tools → Options → Mileage Reporter
Complete the following:
| If you want to ... Then ... | |
| receive a warning when mileage logs are deleted from your device | Select the Warn me when deleting all log files from my Mio checkbox. |
| calculate fuel economy preference by Distance per volume | select the Distance per volume option. |
| calculate fuel economy preference by Volume per distance | select the Volume per distance option. |
Voice Transfer
The Voice Transfer application is part of MioMore Desktop and allows you to install or remove voice files.
Voice files take up space on your Mio's internal memory. If you do not use a voice file, you can remove it to free up space. You can later reinstall it to your Mio if required.
Start → All Programs → Mio → MioMore Desktop → Voice Transfer
How do I install a voice file?
In the Available voice files section, select the voice file you would like to install, then click Install selected voices.
How do I remove a voice file?
In the Available voice files section, select the voice file you would like to remove, then click Remove selected voices.
How do I backup my Mio?
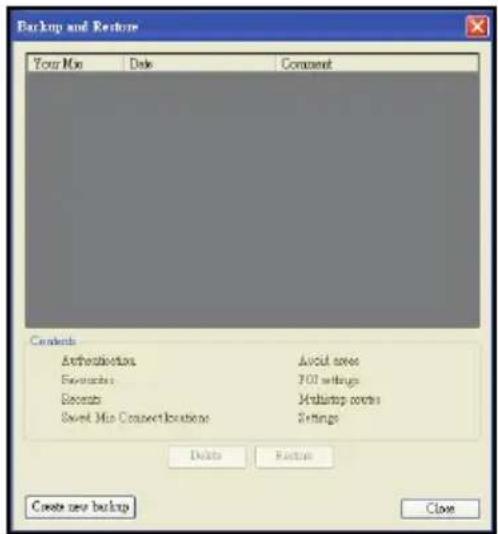
You can save backups of the following information, and later restore them to your Mio:
■ Favourites and My Home
■ Preferences, including Point of Interest and NavPix™ preferences
■ Recent locations.
■ Multi-stop trips
How do I Backup my Mio?
- Tools → Backup & Restore The Backup & Restore window will open.
- Click Create new backup. The Create new backup window will display.
- Select the data you would like to backup, then enter a description for the backup in the Description field.
- Click OK. The New Backup window will close and your backup will be saved to your computer. The backup will be listed on the Backup & Restore window.
How do I Restore a Backup to my Mio?
- Tools → Backup & Restore The Backup & Restore window will open.
- Select the backup from the list, then click Restore, then click OK. The backup will be restored to your Mio.
How do I Delete a Backup?
- Tools → Backup & Restore The Backup & Restore window will open.
- Select from the list the backup to delete.
- Click Delete, then click OK. The backup is deleted.
Reference
Troubleshooting
Note: If you encounter a problem you cannot solve, contact an authorised service center for assistance.
| Problems Solutions | |
| Power does not turn on when using battery power. | The remaining battery power may be too low to run your Mio. Charge the battery. |
| Screen responds slowly. | Make sure that your Mio is not running out of battery power. If the problem still persists, reset your Mio. |
| Screen freezes. Reset your Mio. (See “Shutdown and hardware reset” for information.) | |
| Screen is hard to read. | Make sure that the backlight of the display is set to a high-enough brightness. |
| Cannot establish a connection with a computer. | Make sure that your Mio and your computer are both turned on before trying to establish a connection.Make sure that the cable is securely plugged into the USB port on your computer and on the Mio. Connect the USB cable directly to your computer—do not run the cable through a USB hub.Reset your Mio before connecting the cable. Always disconnect your Mio before you restart your computer. |
Point of Interest categories
| Icon Description Icon Description | |||
| [480D] | Airline Access Airport | [TY4A] | |
 | Amusement Park ATM | [3AH4S] | |
 | Beach Camping Ground | [X8B0] | |
 | Car Dealer Car Repair Facility | [X2D2] | |
 | Casino | [05ZW] | Cemetery |
 | Cinema College/University | [XD4T] | |
| [243A] | Concert Hall Convention Centre | [CTKT] | |
 | Courthouse |  | Cultural Centre |
| [4HCZ] | Dentist Doctor |  | |
 | Embassy Exhibition Centre | [20AK] | |
| [222T] | Ferry Terminal Frontier Crossing | [Y2X5] | |
| [248C] | General POI Golf course | [M4WZ] | |
| [XY4T] | Government Office |  | Hospital/Polyclinic |
 | Hotel or Motel Ice Skating Rink |  | |
 | Important Tourist Attraction | [T46Z] | Leisure Centre |
| [0H4A] | Library | [3H4A3] | Mountain Pass |
 | Mountain Peak | [20AK] | Museum |
| [WYCS] | Music Centre | [0677] | Nightlife |
| [83HK] | Open Parking Area | [086X] | Opera |
| [170D] | Park and Recreation Area | [4HWKD] | Parking Garage |
| [3H2X] | Petrol Station | [3A4W5] | Pharmacy |
| [00H7] | Place of Worship | [KXZ4] | Police Station |
 | Post Office | [T8KT] | Public Transport Stop |
| [XSTC] | Railway Station | [07ZC] | Rent-a Car Facility |
| [W0ZD] | Rent-a Car Parking | [0Y24] | Rest Area |
| [6ZZD] | Restaurant | [0XDX] | Restaurant Area |
[W4HS] | Scenic / Panoramic ViewShopping Centre Sports Centre | [3X0X] | Shop |
 | Stadium Swimming Pool |  | |
 | Tennis Court Theatre |  | |
 | Toll Gate Tourist Information Office |  | |
 | Veterinarian Water Sport |  | |
 | Winery Yacht Basin |  | |
 | Zoo | ||
BrandedRθ of Interest
Branded Points of Interest are available on some maps. These include well-known restaurants, accommodation providers, tourist attractions, petrol stations, etc. The icon will usually display the company logo.
Point of Interest categories by Mio
| Icon Description | |
 | Favourite destination |
 | Multiple route trip |
| [WWZY] | My home |
| [KZSA] | NavPixTM |
Po categories by subscription int of Interest c
| Icon Description | |
 | Safety Cameras |
 | Safety Camera - Average |
 | Safety Camera - Mobile |
 | Safety Camera - Red Light |
Traffic and other TMC Events
Note: Traffic information is only available on selected model and in selected countries.
Each TMC Event is sorted in to one of nine categories. When an Event is received, one of the following icons will display:
| Event | Avoided Event | Message Type | Event Description |
 |  | Danger | There is a dangerous situation on the route; for example, people are on the road. |
| [64×6] |
If a Traffiear Cl rance event has a recommended detour, the following icons will display:
 |
Note: Avoided Event icons will only display on the 2D Map and 3D Map, at the Event location.
Safety Camera POIs
Mio products are designed to be used as an aid to safer driving. You can receive messages to alert you to locations of safety cameras, which will enable you to monitor your speed through these areas. Mio does not warrant that all types and locations of safety camera data are available, as cameras may be removed, relocated or new cameras installed. Mio does not condone speeding or any other failure to comply with your local traffic laws. It is your responsibility to drive within the posted speed limit at all times and to drive in a careful manner. Mio accepts NO liability whatsoever for you receiving any speeding fines or points on your license through using this device. Mio does not guarantee the accuracy of the data contained within this database either expressed or implied. In the event you receive a fine or any other penalty for speeding or contravention of any traffic law, or are involved in an accident, Mio is not responsible for any damages of any type. In some countries the data information regarding safety or speed cameras may conflict with local law and/or regulations. It is your responsibility to make sure that your use of the data is in compliance with local laws and/or regulations. Usage is at your own risk.
Disclaimer
Due to continued product development this information may change without notice. Mio does not warrant that this document is error-free. The screenshots and other presentations shown in this manual may differ from the actual screens and presentations generated by the actual product.
All such differences are minor and the actual product will deliver the described functionality as presented in this User Manual in all material respects.
Compliance
Note: Moov M300-Series is assigned a model number of N254 and Moov M400-Series is assigned a model name of N255.
CE
Products with the CE marking comply with Radio & Telecommunication Terminal Equipment Directive (R&TTE) (1999/5/EC), the Electromagnetic Compatibility Directive (2004/108/EC) and the Low Voltage Directive (2006/95/EC) - issued by the Commission of the European Community.
Compliance with these directives implies conformity to the following European Standards:
EN 301 489-1: Electronic compatibility and Radio spectrum Matters (ERM), ElectroMagnetic Compatibility (EMC) standard for radio equipment and services; Part 1: Common technical requirements
EN 301 489-17: Electronic compatibility and Radio spectrum Matters (ERM), ElectroMagnetic Compatibility (EMC) standard for radio equipment and services; Part 17: Specific conditions for 2,4 GHz wideband transmission systems and 5 GHz high performance RLAN equipment
EN 55022: Radio disturbance characteristics
EN 55024: Immunity characteristics
EN 61000-3-2: Limits for harmonic current emissions
EN 61000-3-3: Limitation of voltage fluctuation and flicker in low-voltage supply system
IEC 60950-1:2001: Product Safety
The manufacturer cannot be held responsible for modifications made by the User and the consequences thereof, which may alter the conformity of the product with the CE Marking.
Hereby, Mio Technology declares that this N254/N255 is in compliance with the essential requirements and other relevant provisions of Directive 1999/5/EC.
The software is based in part on the work of the Independent JPEG Group.
The software application uses modified versions of the Minimal XML Library, Flickr Library and Python Library. The libraries and their use are covered by the GNU Lesser General Public License (www.gnu.org/licenses/lgpl.html).
The modified source code is available from the following URLs:
■ Minimal XML Library: http://download.mio.com/opensource/gnu/mxml.zip
■ Flickr Library: http://download.mio.com/opensource/gnu/FlickrNet.zip
■ Python Library: http://download.mio.com/opensource/gnu/python25.zip
Copyright
© 2009 MiTAC International Corporation. Mio is either a registered trademark or trademark of MiTAC International Corporation and is used under licence by Mio Technology Limited. All rights reserved.
The software contains proprietary information of MiTAC International Corporation; it is provided under a licence agreement containing restrictions on use and disclosure and is also protected by copyright law. Reverse engineering of the software is prohibited.
No part of this publication may be reproduced, stored in a retrieval system, or transmitted in any form or by any means, electronic, mechanical, photocopying, recording or otherwise, without the prior written permission of Mio.
Back-On-Track, Drive-Away, MioMore Desktop, Mio Connect, NavPix™, MioMap and Turn-by-Turn are either registered trademarks or trademarks of MiTAC International Corporation and are used under licence by Mio Technology Limited. All rights reserved.
Microsoft, Windows, Windows Vista and Internet Explorer are either registered trademarks or trademarks of Microsoft Corporation in the United States and/or other countries. All rights reserved.
Location Identifiers © 2005 International Air Transport Association.
POI Data © 2007 InfoUSA.
RDS-TMC Traffic Information Services France © ViaMichelin 2008
All other trademarks and registrations are the property of their respective owners.
Published in New Zealand.
For more information
Online support
For 24/7 help and support with Mio products, join Mio club at: www.mio.com
Mio Club
You can register your Mio with the Mio Club - a section of our website dedicated exclusively to owners of Mio navigation products: www.mio.com
As a registered Mio Club member, you'll have access to the safety camera database, software updates, a regular newsletter, tips, FAQs and much more!
- Moov M300/M400-Series
- User Manual
- Important safety information
- WARNING
- CAUTION
- Home Charger-specific safety information
- Internal battery-specific safety information
- Warning Notice to Drivers in the United States
- Caring for your Mio
- Contents
- Welcome
- Important information for using the manual
- Formatting
- Terms
- How do I install my Mio?
- CAUTION:
- Moov M300-Series Installation
- Moov M400-Series Installation
- Receiving TMC information
- Getting to know your Mio
- Moov M300-Series
- Moov M400-Series
- Turning on and off
- Shutdown and hardware reset
- How do I monitor the battery status?
- How do I charge the battery?
- Charging the battery via the USB cable
- Navigating on the screen
- How do I adjust the volume?
- How do I get started?
- How do I turn my Mio on for the first time?
- What are the main screens I will use?
- Main Menu screen
- Map screens
- How do I navigate with GPS?
- How does my Mio receive GPS signals?
- How do I view my GPS status?
- How do I go from A to B?
- What if I miss a turn?
- Back-On-Track™ Automatic Rerouting
- How do I search for an address?
- Quick Steps
- Case Study: How do I search for an address?
- Open the Destination Search screen
- Select the country
- Search for the City/Area
- Search for the street name and house number
- Using the Keyboard screen
- Using the Destination Search screen
- How do I create a trip with multiple stops?
- Case Study: How do I navigate to multiple addresses?
- How do I skip a waypoint during a multi-stop trip?
- How do I search for a Point of Interest (POI)?
- Case Study: How do I search for a Point of Interest?
- Search for a POI
- How do I save Favourites and My Home?
- Can I save a NavPix™ to a Favourite?
- How do I save a Favourite or My Home?
- How do I navigate to a Favourite?
- How do I navigate to My Home?
- Option 1 - Via the Main Menu
- Option 2 - Via the Favourite Destinations screen
- How do I edit the name of a Favourite?
- How do I delete a Favourite?
- How do I navigate to a recent location?
- Tap a recent location.
- Complete the following:
- How do I view my route?
- 3D Map screen
- 2D Map screen
- Traffic Overview screen (select models only)
- Route Overview screen
- Turn-by-Turn screen
- How do I use the Map Menu?
- Displaying the Map Menu
- Map Menu options
- How do I avoid an area?
- How do I add an Avoid Area?
- How do I delete an Avoid Area?
- How do I delete all Avoid Areas?
- How do I preview a route?
- Select a departure point
- Select a destination point
- Demonstrate the route
- How do I view my route statistics?
- How do I view statistics on my current route?
- How do I view statistics of my trips to date?
- How do I view my trip logs?
- How do I use NavPix™?
- How do I manage my NavPix™?
- Album management
- NavPix™ management
- How do I view a NavPix TM in full-screen?
- How do I navigate to a NavPix™?
- How do I navigate to a recent NavPix™?
- How do I save a NavPix TM to a favourite?
- How do I save a NavPix TM to a POI?
- What is Mio Connect (Local Search)?
- How do I search for a POI using Mio Connect?
- Tap MioMore Locations.
- Select a POI.
- Complete the following:
- How do I receive current traffic information? (Select models only)
- How does my Mio receive traffic information?
- Traffic status
- How will I know when a Traffic Event occurs?
- How do I view a list of all events on my route?
- How do I view traffic details?
- How do I know if a detour is recommended?
- How do I avoid an event on my route?
- How do I cancel a detour around an event on my route?
- How do I automatically avoid all traffic and clearance events on my route?
- Traffic Messages
- Detour Not Available messages
- Detour recommended messages
- What can I customise?
- Route Options
- Route Calculation 1/5
- Road Types 2/5
- Road Types 3/5
- Driver Alerts 4/5
- Data Recording 5/5
- Complete the following:
- Map Display
- Map Display 1/3
- Map Display 2/3
- Select Map 3/3
- Map POIs
- Volume
- Screen
- POI Alerts
- GPS
- GPS Status
- Resetting your GPS fix
- Setting your GPS mode
- Note:
- Language
- Traffic
- Traffic System Status
- Traffic Event Notification
- Select event sorting type
- Power
- Keyboard
- How does predictive text (abc, def...) work?
- Units
- Units 1/2
- Units 2/2
- Start-up
- Saved Info
- Tutorial
- About
- Shop Demo
- What is MioMore Desktop?
- Can I use MioMore Desktop with my computer?
- How do I install a map for the first time?
- How do I install MioMore Desktop onto my computer?
- MioMore Desktop features
- How do I keep MioMore Desktop up-to-date?
- MioMore Desktop Preferences
- Mio Online
- Mio Connect
- How do I install POIs from my computer to my Mio?
- How do I delete a POI from my Mio?
- My Maps
- How do I install maps onto my Mio?
- How do I install maps from DVD?
- How do I remove maps from my Mio?
- How do I know which map contains a particular city or town?
- How do I download maps to my computer?
- What is a Major Road Network map?
- Continuous continental navigation
- How do I install or reinstall a Major Road Network map?
- My Subscriptions
- Alerts
- How do I install Safety Camera information?
- How do I know which Safety Camera information is available?
- Purchase a Subscription
- Activate your Subscription
- How do I update Safety Camera information on my Mio?
- Image Search
- How do I download NavPix™ from the internet?
- How do I import NavPix™ to Photo Album?
- Photo Album
- Toolbar
- How do I copy NavPix TM or albums from my Mio to Photo Album?
- How do I transfer pictures from Photo Album to my Mio?
- How can I view and edit pictures or albums on my computer?
- What else can I do with pictures and albums on my computer?
- Photo Album Preferences
- Custom POIs
- How do I install custom Points of Interest?
- Complete the following:
- Click on Add to device button to add the POI to your Mio.
- How do I delete a Custom POI File from my Mio?
- Mileage Reporter
- How do I input my trip data?
- How do I export a mileage report?
- How do I delete travel logs from my Mio?
- Mileage Reporter preferences
- Voice Transfer
- How do I backup my Mio?
- How do I Restore a Backup to my Mio?
- How do I Delete a Backup?
- Reference
- Troubleshooting
- BrandedRθ of Interest
- Point of Interest categories by Mio
- Po categories by subscription int of Interest c
- Traffic and other TMC Events
- Safety Camera POIs
- Disclaimer
- Compliance
- CE
- Copyright
- For more information
Brand : MIO
Model : Navman M315
Category : Gps