
SAT-A1 - Satellite receiver SONY - Free user manual and instructions
Find the device manual for free SAT-A1 SONY in PDF.


| Product Type | Satellite Receiver |
| Brand | Sony |
| Model | SAT-A1 |
| Dimensions (W x H x D) | 250 x 50 x 200 mm |
| Weight | 1.2 kg |
| Power Consumption | 15 W (max) |
| Input Voltage | 220-240 V AC, 50/60 Hz |
| Input Frequency Range | 950 – 2150 MHz |
| LNB Current | 13/18 V, 500 mA max |
| Video Outputs | HDMI, SCART, Composite (RCA) |
| Audio Outputs | Digital Optical, Stereo RCA |
| Number of Channels | Up to 5000 |
| DiSEqC Support | DiSEqC 1.0/1.2 |
| Remote Control | Included (batteries not included) |
| Display | LED front panel |
| Operating Temperature | 0°C to 40°C |
| Safety Features | Overvoltage protection, auto-standby |
| Cleaning | Wipe with dry cloth; no liquids |
| Spare Parts | Remote control, power adapter available |
| Reparability | Repairable by qualified technician |
Frequently Asked Questions - SAT-A1 SONY
User questions about SAT-A1 SONY
0 question about this device. Answer the ones you know or ask your own.
Ask a new question about this device
Download the instructions for your Satellite receiver in PDF format for free! Find your manual SAT-A1 - SONY and take your electronic device back in hand. On this page are published all the documents necessary for the use of your device. SAT-A1 by SONY.
USER MANUAL SAT-A1 SONY
Digital Satellite Receiver
Operating Instructions
BEFORE USING YOUR DSS SYSTEM
YOU MUST ACTIVATE YOUR PROGRAMMING SERVICE BY CALLING YOUR PROGRAM PROVIDERS:
DIRECTV® 1-800-347-3288
USSB 1-800-204-8772
RF ANTENNA
The DSS receiver is shipped with IR reception enabled and RF reception disabled. To use the RF feature (and the antenna), you must change the factory setting (IR ONLY) to the RF setting (RF ONLY) using the on-screen displays.
WARNING
To prevent fire or shock hazard, do not expose the unit to rain or moisture.


This symbol is intended to alert the user to the presence of uninsulated "dangerous voltage" within the product's enclosure that may be of significant magnitude to constitute a risk of electric shock to persons.

This symbol is intended to alert the user to the presence of important operating and maintenance (servicing) instructions in the literature accompanying the appliance.
Caution
To prevent electric shock, do not use this polarized plug with an extension cord, receptacle, or other outlet unless the blades can be fully inserted to prevent blade exposure.
Note to the CATV Installer
This reminder is provided to call the CATV system installer's attention to Article 820-40 of the NEC that provides guidelines for proper grounding and, in particular, specifies that the cable ground shall be connected to the grounding system of the building as close to the point of cable entry as practical.
Note to the DSS® Satellite Dish Installer
This reminder is provided to call the DSS satellite dish installer's attention to Article 810 and in particular Article 810-15 of the NEC, which covers proper installation and grounding of television receiving equipment, as well as to Article 820-40 of the NEC, which specifies that the satellite dish cable ground shall be connected to the grounding system of the building as close to the point of cable entry as practical.
Telephone Line Interruption
Periodically, information on your DirecTicket and Pay-Per-View selections is sent, free of charge, via your telephone line to an 800 number. During the time the information is being forwarded, you cannot use your telephone and you will hear static noise for approximately 30 seconds. If you would like to use your telephone while the information is being sent, you can interrupt the sending of this information at any time by unplugging the phone line to the receiver.
Owner's Record
The model and serial numbers are located on the back of the receiver. The number for the access card is on the front of the card and on the carton label. Record these numbers in the space provided below. Refer to these numbers whenever you need to call your sales or service representative regarding this product.
Model Number: SAT-A1
Serial Number:
Access Card Number:
Customer Support
For DSS Programming
For subscription information, or to resolve problems related to DSS programming, call:
DIRECTV® at 1-800-DIRECTV (347-3288) or USSB at 1-800-204-USSB (8772).
For DSS Hardware and Installation
To arrange for the installation of your DSS system, call the dealer from whom you purchased your system.
For general information, or to resolve problems related to the operation of your satellite receiver or antenna, please contact your Sony brand DSS dealer. If your dealer or installer is unable to answer your questions, call the Sony DSS Customer Support line at 1-800-838-7669.
Trademark and Copyrights
Express Navigator is a trademark of Sony Corporation. DIRECTV and DSS are registered trademarks of DIRECTV, Inc., a unit of Hughes Electronics. USSB and USSB Entertainment Plus are official service marks of the United States Satellite Broadcasting Company, Inc. HBO is a registered trademark of Time Warner Entertainment Company, L.P. Showtime is a service mark of Showtime. MTV: Music Television is a registered trademark of MTV Networks, a division of Viacom International Inc. Comedy Central is a registered trademark of Comedy Partners.
Macrovision Information
This product incorporates copyright protection technology that is protected by U.S. patents and other intellectual property rights. Use of this copyright protection technology is granted by Macrovision for home and other limited DSS IRD pay-per-view uses only. Reverse engineering or disassembly is prohibited.
Note on Recording Programming
Programming may be taped for home viewing only. All other taping is expressly prohibited. Some programming may not be taped. An additional taping fee may be applied. Call your program providers for details.
StarSight Licensed
The manufacture and sale of the television schedule feature of this product was licensed under one or more of the following patents of StarSight Telecast, Inc.: U.S. Patent Nos. 4,706,121; 4,977,455; 5,151,789; and 5,353,121; with use rights reserved.
Contents
Chapter 1
Introducing the DSS System
5 DSS Features
6 Unpacking
7 Inserting Batteries into the Remote Control
Chapter 2
Using Basic Functions
10 Using the Master Guide
11 Using the Station Index
Chapter 3
Connecting Your System
13 Overview
14 TV Only
16 TV and VCR
18 Hi-Fi TV, Hi-Fi VCR, Audio Receiver
20 Home Entertainment System
(Hi-Fi TV, Hi-Fi VCR, Audio/Video Receiver)
22 Setting Up the RF Antenna
23 Setting Up Your DSS System
Chapter 4
Using the System Features
25 Overview
26 Before You Get Started ...
27 Using the On-Screen Displays: Highlight and Select
28 Displaying the Master Guide
29 Features of the Master Guide
30 Moving Through the Master Guide
32 Selecting a Program from the Guide
33 Selecting Program Guides and Lists By Category
35 Selecting the Custom Guide
36 Using the Station Index
38 Selecting the Favorite Station Guide
39 Selecting Other (Program Provider) Guides
40 Using DISPLAY and JUMP
41 Selecting Alternate Audio
42 Canceling Purchases
43 Checking Your Purchase Record
44 Setting Up the Timer
47 Reading Your Messages
Chapter 5
Using the Custom Setup Menu
49 Overview
50 Displaying the Custom Setup Menu
51 Setting Up a Favorite Station Guide
53 Setting a Default Language
54 Setting Locks and Limits
59 Setting Up a List of Custom Stations
61 Selecting Data Services
Chapter 6
Using the Installation Menu
63 Overview
64 Displaying the Installation Menu
65 Setting Up the Satellite Antenna
66 Replacing Your Access Card
68 Setting the Aspect Ratio
69 Setting Up the Remote Control
72 Running a System Test
Appendix
Other Information
74 Location and Function of Controls
76 Using the Remote Control
79 Programming the Remote
82 Using the Learn Function
83 Troubleshooting
86 Precautions
87 FCC Regulations and Information
88 Limited Warranty
89 Specifications
90 Index
Chapter 1
Introducing the DSS System
Welcome to the Sony brand DSS (Digital Satellite System), the ultimate digital entertainment experience. Read this chapter for an overview of the features of the system and to check the carton contents of the DSS receiver. This chapter also describes how to insert batteries into the remote control.
DSS Features
Here are just a few benefits of the DSS system that you'll enjoy:
Excellent Performance
☐ Superior, digital-quality video that rivals the performance of most laser-disc players.
□ Crisp digital-quality audio that will enhance your TV or home theater experience.
Premium Entertainment
☐ Choose from a variety of program packages available through your program providers, DIRECTV® and USSB ^SM .
Convenience and Ease-of-Use
Order premium pay-per-view movies with the remote control. Pay-per-view programs start as often as every 30 minutes, so you can watch programs when you want to see them. To watch a program, just use the remote to select it directly from the Master Guide.
- Sony's Express Navigator™ on-screen display system guides you through all the system features and functions.
☐ Select from a variety of program guides that are sorted by program categories, including Sports, Movies, News, and more.
☐ Use the Timer feature in coordination with your VCR's timer recording function to automate the recording of DSS programs.
Customizable
☐ Create a Custom Program Guide and up to three of your own Favorite Station Guides for stations you watch most often.
☐ Set up a passcode, which lets you set up spending limits and control viewing of programs by rating and station.
□ Compatible with both 4:3 (standard) or 16:9 (widescreen) TVs.
Unpacking
Check to make sure you've received the following items in the DSS receiver's carton:
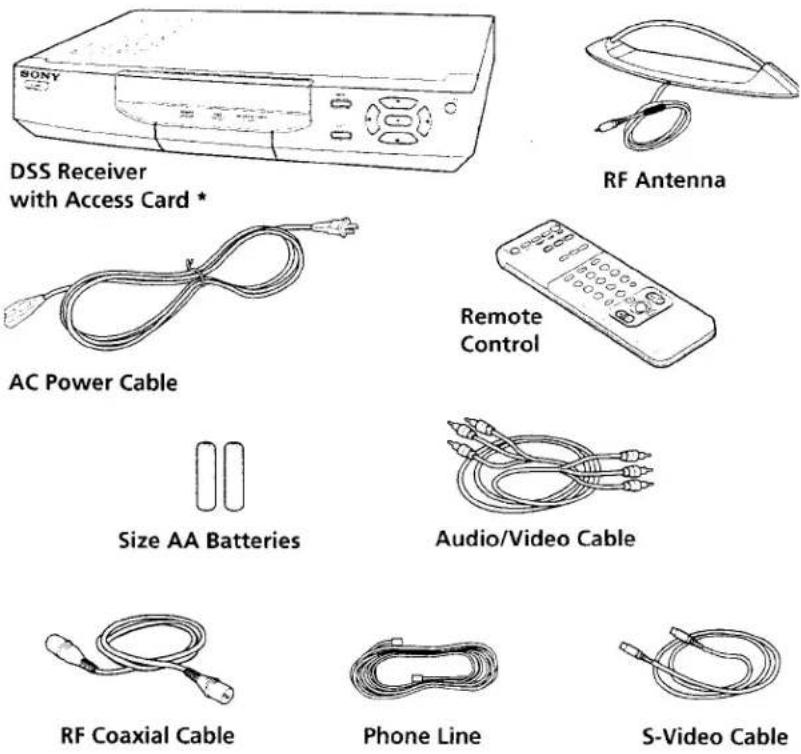
* The access card comes already inserted into the DSS receiver.
If you are missing items, contact the dealer from whom you purchased the DSS receiver.
Note
Keep the original carton and packing materials to safely transport the system in the future.
Inserting Batteries into the Remote Control
Before you can use the remote control, you must first insert the supplied batteries. If you want to use this remote control to operate your TV, cable box, VCR, or laser-disc player, you must also program the remote, as described in the Appendix on page 79.
To install the batteries:
1 Push and slide open the battery compartment.
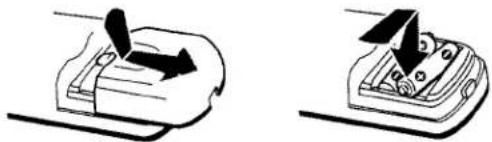
natural_image
Two-step diagram showing a mechanical device with arrows indicating motion or assembly (no text or symbols)2 Insert two size AA batteries (supplied). Be sure to line up the + and - on the batteries with the + and - on the battery compartment.
Notes on Batteries
☐ If the remote control does not operate properly, the batteries might be worn out. When replacing batteries, replace both of them with new ones, and do not mix different types of batteries together.
☐ When you remove the batteries — to replace them, for example — any codes you've set may be erased. If this happens, you must reprogram the remote. See "Programming the Remote" on page 79 for details.
Chapter 2
Using Basic Functions
You can start watching programs using just a few buttons on the remote control. Here's an overview of the buttons you'll use most often.
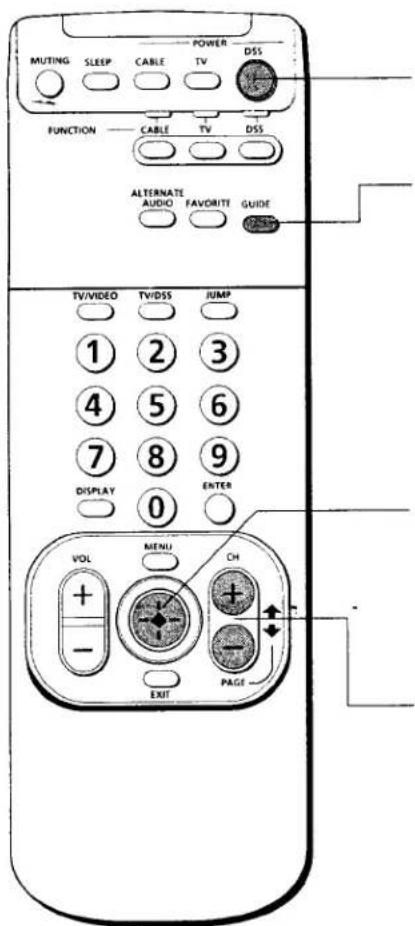
DSS POWER Button
Turns the DSS receiver on and off.
GUIDE Button
Brings up the Master Guide.
Joystick
Moving the joystick up, down, left, right, and diagonally scrolls through the Master Guide. Pressing the joystick selects the program that's highlighted. When a program guide is not displayed, pressing the joystick brings up the Station Index.
CH/PAGE Buttons
Changes the channel. When a program guide is displayed, pressing the CH/PAGE buttons pages through the guide.
The following pages describe a quick start to using the Master Guide and the Station Index.
Chapter 4 contains procedures for using all the system features.
Using the Master Guide
[NO TEXT]
The Master Guide is the main program guide. It contains all the programming that's available from your program providers, including the programming to which you subscribe.
1 Press the GUIDE button to bring up the Master Guide.
Your Master Guide may not look exactly like this. The stations displayed depend on the program provider(s) you select.
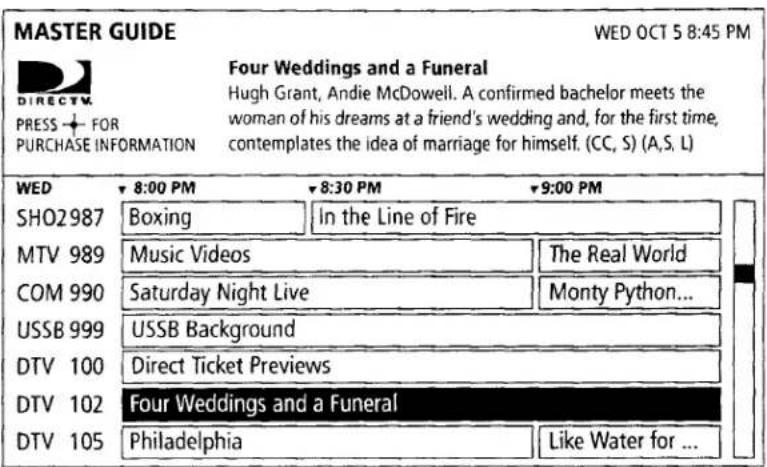
2 Move the highlight to the name of the program you want.
You'll hear the audio and see the video (in the background) of each program as they are highlighted.
The table below lists the various ways in which you can move around in the guide.
3 Press the joystick to select the highlighted program.
Moving Around In the Master Guide
| To Do This ... | Press This Button |
| Go to other stations in the guide one station at a time | Move the joystick up and down |
| Go to other time slots in the guide | Move the joystick left and right to move one time slot at a time.Or press the GUIDE button repeatedly to move ahead in time quickly. |
| Go to other stations in the guide one “page” at a time | PAGE (CH+) andPAGE (CH-) buttons |
| Go to a station directly | 0-9 buttons(to specify the station number) |
| Return to the last station you were watching | EXIT button |
Using the Station Index
You can use the Station Index to select a station by its station logo/call letters (such as CNN), rather than its current program's name.
Note
Before you can bring up the Station Index, you must first clear the program guide from your TV screen. Pressing EXIT removes all on-screen displays. Also, you may need to change to another station if a message appears, which requests that you press the joystick to purchase the program, etc.
1 Press the joystick to bring up the Station Index.
Your Station Index may not look exactly like this. The stations displayed depend on the programming you've ordered.
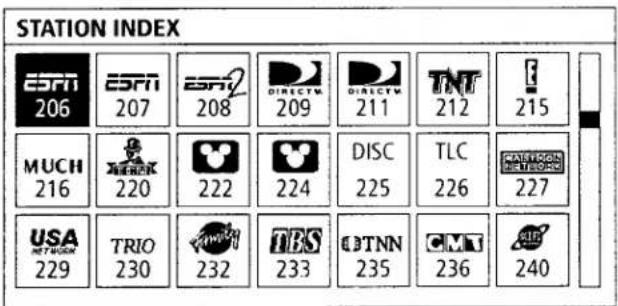
2 Move the highlight to the station you want.
You'll hear the audio and see the video (in the background) of each program, as they are highlighted.
The table below lists the various ways in which you can move around in the Station Index.
3 Press the joystick to tune to the program that's playing on the station you've highlighted.
Moving Around In the Station Index
| To Do This ... | Press This Button |
| Go to other stations in the guide, one station at a time | Move the joystick in any direction |
| Go to other stations in the guide, one "page" at a time | PAGE (CH+) and PAGE (CH-) buttons |
| Go to a station directly | 0-9 buttons(to specify the station number) |
| Return to the last station you were watching | EXIT button |
Chapter 3
Connecting Your System
Read this chapter to set up your DSS receiver for the first time, or to add or remove audio or video components connected to your system.
Overview
You can connect the DSS receiver in a variety of configurations. The answers to the following questions will determine how you hook up and operate your DSS receiver. For example:
☐ Do you have cable TV or a broadcast (terrestrial) TV antenna?
☐ What type of connectors do your TV and VCR have: S-VIDEO, A/V (RCA-type), or RF coaxial?
☐ Do you plan to integrate your DSS receiver with your audio or video system?
General Recommendations
Detailed hookup instructions are provided on the pages that follow. For optimum audio and video performance, follow these general recommendations as much as possible when hooking up your components:
If you have an audio or audio/video system, consider integrating the DSS receiver into a home entertainment configuration to take advantage of your hi-fi system's audio capabilities.
☐ If your TV has an S-VIDEO jack, use it to connect your TV to the DSS receiver. An S-Video connection provides a better picture than RCA-type video or RF connections.
If your TV doesn't have an S-VIDEO jack, use your TV's A/V connectors to connect your components. An A/V connection provides a better picture and audio when compared to an RF connection.
☐ If you have other Sony components that include CONTROL-S jacks, you can connect these components via their CONTROL-S jacks in order to pass remote control signals between the DSS receiver and these components. This allows you to hide components behind cabinet doors.
Control-S is disabled when receiver is in RF ONLY mode.
TV Only
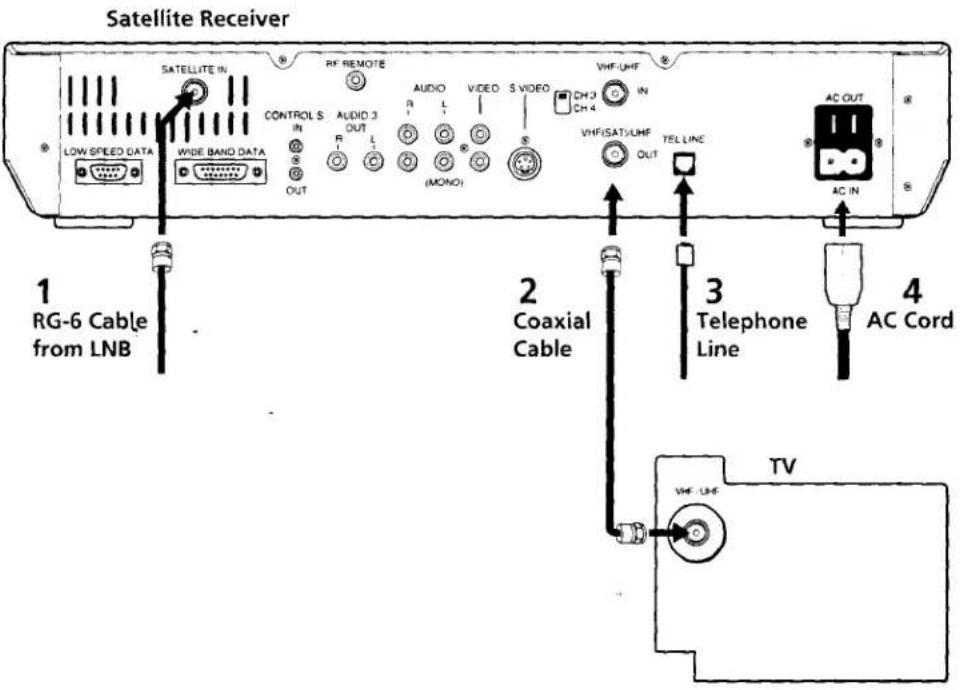
TV With RF Connector Only
Some TVs label this jack RF IN, instead of VHF/UHF IN.
Refer to the illustration below.
1 Connect the RG-6 cable from the satellite antenna's LNB to the DSS receiver's SATELLITE IN jack.
2 Connect the DSS receiver's VHF(SAT)/UHF OUT jack to the TV's VHF/UHF IN jack.
Note
A VHF/UHF connection does not provide stereo sound. To receive stereo sound, you must use an A/V connection (described on page 15).
3 Connect one end of the telephone line cord to the DSS receiver's TEL LINE jack. Connect the other end to your home's modular telephone outlet.
4 Connect one end of the AC power cord to the DSS receiver's AC IN jack. Connect the plug end to an AC outlet.
Optional Connections
☐ If you have a cable input, cable box, or a terrestrial TV antenna, connect it to the DSS receiver's VHF/UHF IN jack.
To connect the DSS receiver to your audio system, use audio cables to connect the DSS receiver to your audio receiver's AUDIO IN jacks.
TV With A/V Connectors
If your TV has only one AUDIO IN jack, connect the lower (mono) AUDIO L jack on the DSS receiver to the TV's AUDIO IN jack.
Refer to the illustration below.
1 Connect the RG-6 cable from the satellite antenna's LNB to the DSS receiver's SATELLITE IN jack.
2 Connect the DSS receiver's A/V jacks to the TV's A/V IN jacks.
3 Connect one end of the telephone line cord to the DSS receiver's TEL LINE jack. Connect the other end to your home's modular telephone outlet.
4 Connect one end of the AC power cord to the DSS receiver's AC IN jack. Connect the plug end to an AC outlet.
Satellite Receiver

Some TVs label this jack RF IN, instead of VHF/UHF IN.
Optional Connections
☐ If you have a cable input, cable box, or a terrestrial TV antenna, connect it to the TV's VHF/UHF IN jack.
☐ Best Connection: If your TV has an S-VIDEO jack, use an S-VIDEO cable to connect the DSS receiver's S-VIDEO jack to the TV's S-VIDEO IN jack. This provides the best picture quality. Then use audio cables to connect one set of the DSS receiver's audio jacks to the TV's AUDIO IN jacks.
To connect the DSS receiver to your audio system, use audio cables to connect the DSS receiver to your audio receiver's AUDIO IN jacks.
TV and VCR
Some VCRs and TVs label this jack RF IN, instead of VHF/UHF IN.
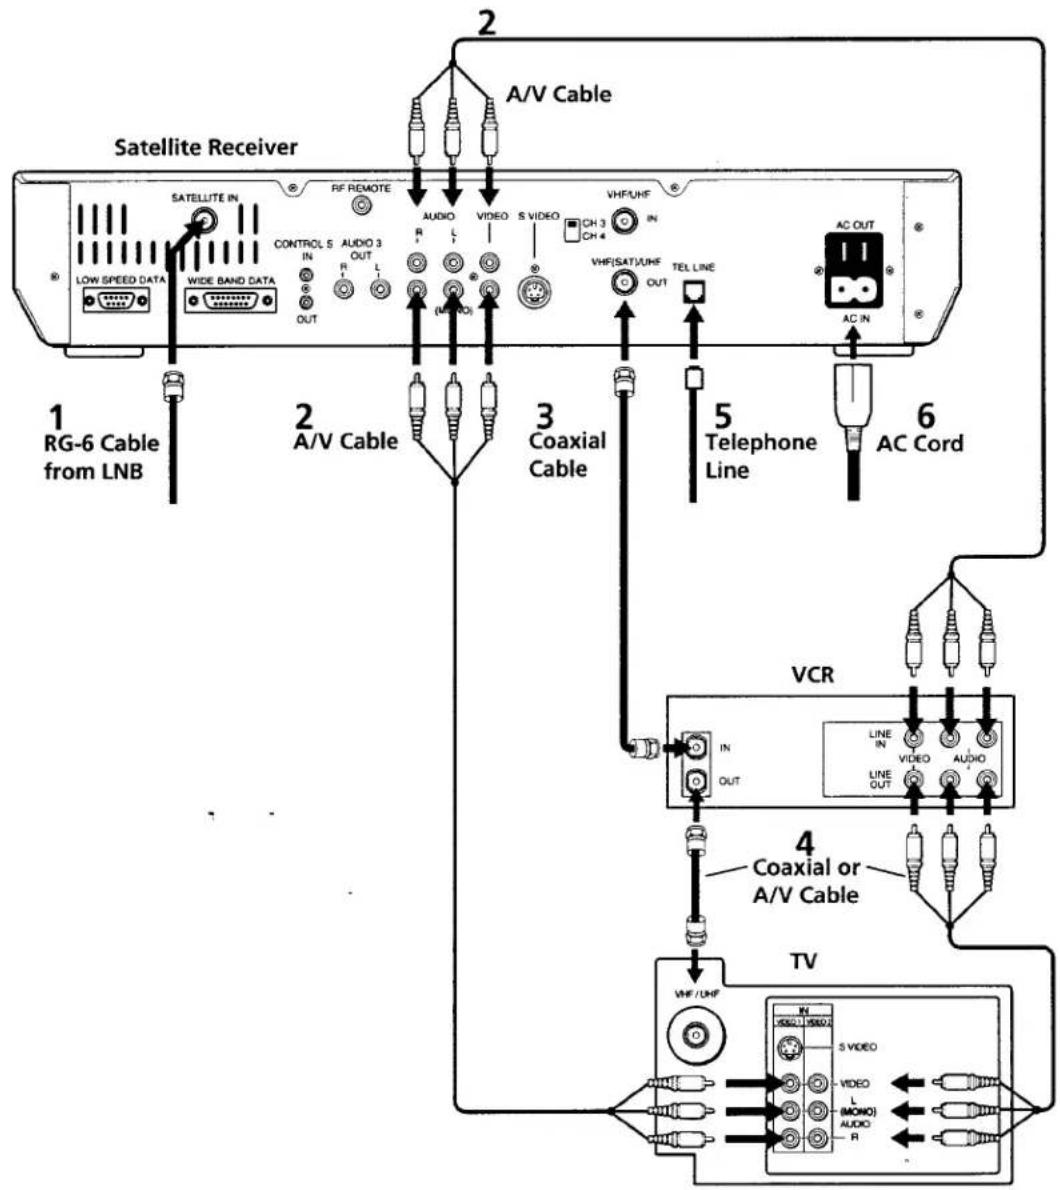
Refer to the illustration on the opposite page.
1 Connect the RG-6 cable from the satellite antenna's LNB to the DSS receiver's SATELLITE IN jack.
2 Connect the DSS receiver's A/V jacks to the A/V IN jacks on the the TV and VCR. If your VCR has only one AUDIO IN jack (monoaural VCR), connect it to the lower (mono) AUDIO L jack on the DSS receiver.
3 Connect the DSS receiver's VHF(SAT)/UHF OUT jack to the VCR's VHF/UHF IN jack.
4 Complete one of the following to connect the VCR to the TV:
☐ Better Connection: If both your TV and VCR have A/V jacks, connect the VCR's A/V OUT jacks to the TV's A/V IN jacks.
Good Connection: If your TV or VCR has only an RF jack, connect the VCR's VHF/UHF OUT jack to the TV's VHF/UHF IN jack.
5 Connect one end of the telephone line cord to the DSS receiver's TEL LINE jack. Connect the other end to your home's modular telephone outlet.
6 Connect one end of the AC power cord to the DSS receiver's AC IN jack. Connect the plug end to an AC outlet.
Optional Connections
☐ If you have a cable input, cable box, or a terrestrial TV antenna, connect it to the DSS receiver's VHF/UHF IN jack.
☐ Best Connection: If your TV has an S-VIDEO jack, use an S-VIDEO cable to connect the DSS receiver's S-VIDEO jack to the TV's S-VIDEO IN jack. This provides the best picture quality. Then use audio cables to connect one set of the DSS receiver's audio jacks to the TV's AUDIO IN jacks.
To connect the DSS receiver to your audio system, use audio cables to connect the DSS receiver to your audio receiver's AUDIO IN jacks.
Note
When watching a program that is protected by Macrovision, turn the VCR off to ensure a quality picture.
flowchart
graph TD
    A["Satellite Receiver"] --> B["1 RG-6 Cable from LNB"]
    A --> C["2 A/V Cable"]
    A --> D["3 Coaxial Cable"]
    A --> E["4 Coaxial or A/V Cable"]
    A --> F["5 Telephone Line"]
    A --> G["6 AC Cord"]
    A --> H["VCR"]
    H --> I["TV"]
    I --> J["Coaxial or A/V Cable"]
    J --> K["AC OUT"]
    J --> L["AC IN"]
    J --> M["VHF/LHF"]
    J --> N["L (MONO)"]
    J --> O["AUDIO"]
    J --> P["S VIDEO"]
    J --> Q["IN OUT"]
    J --> R["OUT"]
    J --> S["IN OUT"]
    J --> T["IN OUT"]
    J --> U["IN OUT"]
    J --> V["IN OUT"]
    J --> W["IN OUT"]
    J --> X["IN OUT"]
    J --> Y["IN OUT"]
    J --> Z["IN OUT"]
Hi-Fi TV, Hi-Fi VCR, Audio Receiver
Refer to the illustration on the opposite page.
1 Connect the RG-6 cable from the satellite antenna's LNB to the DSS receiver's SATELLITE IN jack.
2 Connect the DSS receiver's audio OUT jacks to the audio receiver's audio IN jacks.
3 Connect the DSS receiver's A/V jacks to the VCR and TV's A/V IN jacks.
4 Connect the DSS receiver's VHF(SAT)/UHF OUT jack to the VCR's VHF/UHF IN jack.
5 Complete one of the following to connect the VCR to the TV:
☐ Better Connection: If both your TV and VCR have A/V jacks, connect the VCR's A/V OUT jacks to the TV's A/V IN jacks.
Good Connection: If your TV or VCR has only an RF jack, connect the VCR's VHF/UHF OUT jack to the TV's VHF/UHF IN jack.
6 Connect one end of the telephone line cord to the DSS receiver's TEL LINE jack. Connect the other end to your home's modular telephone outlet.
7 Connect one end of the AC power cord to the DSS receiver's AC IN jack. Connect the plug end to an AC outlet.
Optional Connections
Some VCRs label this jack RF IN, instead of VHF/UHF IN.
☐ If you have a cable input, cable box, or a terrestrial TV antenna, connect it the VCR's VHF/UHF IN jack.
☐ Best Connection: If your TV has an S-VIDEO jack, use an S-VIDEO cable to connect the DSS receiver's S-VIDEO jack to the TV's S-VIDEO IN jack. This provides the best picture quality. Then use audio cables to connect one set of the DSS receiver's audio jacks to the A/V receiver's AUDIO IN jacks.
Note
When watching a program that is protected by Macrovision, turn the VCR off to ensure a quality picture.
18 Chapter 3: Connecting Your System

flowchart
graph TD
    A["Satellite Receiver"] -->|1 RG-6 Cable from LNB| B["Audio Cable"]
    A -->|2 Audio Cable| C["Coaxial Cable"]
    A -->|3 A/V Cable| D["VCR"]
    A -->|4 A/V Cable| E["TV"]
    A -->|5 Coaxial or A/V Cable| F["AC Cord"]
    A -->|6 Telephone Line| G["AC OUT"]
    A -->|7 AC Cord| H["AC IN"]
    A -->|8 A/V Cable| I["A/V Cable"]
    A -->|9 RF Remote| J["RF Remote"]
    A -->|10 Low Speed Data| K["SATELLITE IN"]
    A -->|11 WIDE BAND DATA| L["SATELLITE IN"]
    style A fill:#f9f,stroke:#333
    style B fill:#ccf,stroke:#333
    style C fill:#cfc,stroke:#333
    style D fill:#fcc,stroke:#333
    style E fill:#cff,stroke:#333
    style F fill:#ffc,stroke:#333
    style G fill:#fcc,stroke:#333
    style H fill:#fcc,stroke:#333
    style I fill:#ffc,stroke:#333
Chapter 3: Connecting Your System
Home Entertainment System (Hi-Fi TV, Hi-Fi VCR, Audio/Video Receiver)
Refer to the illustration on the opposite page.
1 Connect the RG-6 cable from the satellite antenna's LNB to the DSS receiver's SATELLITE IN jack.
2 Connect the DSS receiver's A/V jacks to the VCR and A/V receiver's A/V IN jacks.
3 Connect the VCR's A/V OUT jacks to one set of the A/V receiver's A/V IN jacks.
4 Connect the A/V receiver's MONITOR OUT jack to the TV's VIDEO IN jack.
5 Connect one end of the telephone line cord to the DSS receiver's TEL LINE jack. Connect the other end to your home's modular telephone outlet.
6 Connect one end of the AC power cord to the DSS receiver's AC IN jack. Connect the plug end to an AC outlet.
Optional Connections
☐ If you have a cable input, cable box, or a terrestrial TV antenna, connect it the VCR's VHF/UHF IN jack.
☐ Best Connection: If your TV has an S-VIDEO jack, use an S-VIDEO cable to connect the DSS receiver's S-VIDEO jack to the TV's S-VIDEO IN jack. This provides the best picture quality. Then use audio cables to connect one set of the DSS receiver's audio jacks to the A/V receiver's AUDIO IN jacks.
Note
In this configuration, the A/V receiver must be turned on in order to pass the video signals through to your TV. When watching a program that is protected by Macrovision, turn the VCR off to ensure a quality picture.

flowchart
graph TD
    A["Satellite Receiver"] --> B["1 RG-6 Cable from LNB"]
    A --> C["2 A/V Cable"]
    A --> D["3 A/V Cable"]
    A --> E["4 Video Cable"]
    A --> F["5 Telephone Line"]
    A --> G["6 AC Cord"]
    A --> H["TV"]

    subgraph Satellite Receiver
        I["SATellite Antenna IN LOW SPEED DATA"]
        J["WIDE BAND DATA"]
        K["CONTROL S: AUDIO 3 OUT"]
        L["R OUT"]
        M["AUDIO"]
        N["VIDEO"]
        O["S VIDEO"]
        P["VHF/UHF CH 3 IN CH 4"]
        Q["IN"]
        R["OUT"]
        S["TEL LINE"]
        T["AC OUT"]
    end

    subgraph A/V Cable
        U["A/B Cable"]
        V["A/B Cable"]
        W["A/B Cable"]
        X["A/B Cable"]
    end

    subgraph VCR
        Y["LINE IN OUT"]
        Z["VIDEO LINE OUT"]
        AA["VIDEO LINE OUT"]
        AB["VIDEO LINE OUT"]
    end

    subgraph TV
        AC["TV VHF/UHF IN S VIDEO L (MONO) AUDIO R"]
    end
Setting Up the RF Antenna
The RF antenna lets you take advantage of the RF (radio frequency) feature, which enables the remote control to operate the DSS receiver even if the receiver is located in another room. In other words, with the RF feature, the remote control does not require a direct line-of-sight to the front panel of the DSS receiver.
Note
You must set up the RF antenna only if you plan on taking advantage of the RF feature.
To set up the RF antenna:
1 Connect the RF antenna to the DSS receiver's RF REMOTE jack.
2 Place the RF antenna at least one foot away from the DSS receiver.
3 Use the on-screen displays to set up the DSS receiver to accept RF transmission (RF ONLY). See "Setting Up the Remote Control" on page 69 for details.
Note
Do not place the RF antenna directly on top of the DSS receiver or near other metal objects. For best result, place the RF antenna in a visible location.
The DSS receiver is shipped with IR reception enabled and RF reception disabled. To use the RF feature, you must first change the factory setting (IR ONLY) to the RF setting (RF ONLY) using the on-screen displays, as described on page 69.

Note
The operating range of the DSS remote control is about 100 ft. This may decrease due to ambient radio wave conditions, your room's walls, etc.
Optional Setup
☐ The RF antenna can be mounted to a wall using the enclosed screws or by using two pieces of double-sided tape (supplied).
22 Chapter 3: Connecting Your System
Setting Up Your DSS System
Viewing Satellite Programs
1 Turn on the TV, and then set the TV's line input to the DSS receiver. (For example, set the TV to channel 3 or 4, if you used an RF connection; or set to VIDEO1, etc., if you used an A/V connection.)
2 Turn on the VCR and A/V receiver, if you connected these components. Then set their output switches accordingly.
3 Turn on the DSS receiver and select a station.
Viewing Cable or Off-Air Programs
Note
The following instructions apply only if you connected your cable TV or terrestrial antenna to your DSS receiver.
1 Turn off your DSS receiver, or press the TV/DSS button to set the DSS receiver to TV mode (DSS indicator on the front panel is off).
2 Turn on the TV and then:
☐ If you have a cable box, turn it on and then tune the TV to the output channel of your cable box, usually channel 3 or 4.
If you don't have a cable box, just tune your TV to the station you want to watch.
Recording Satellite Programs While Watching Cable or Off-Air Programs
Note
The following instructions apply only if you connected your cable TV or terrestrial antenna to your DSS receiver.
1 Turn on the TV and then:
☐ If you have a cable box, turn it on and then tune the TV to the output channel of your cable box, usually channel 3 or 4.
☐ If you don't have a cable box, tune your TV to the station you want to watch.
2 Turn on the DSS receiver, and tune to the program you want to record. Then set the VCR to line input, and start recording, according to your VCR's instruction manual.
3 Press the TV/DSS button to set the DSS receiver to TV (DSS indicator on the front panel is off).
The DSS receiver's signal is sent to the VCR, while the off-air signal is sent to your TV for you to watch.
Note
For information on using the DSS receiver's automatic timer, see "Setting Up the Timer" on page 44.
Note
You cannot record one satellite program while watching another satellite program (unless you have a second DSS receiver). When watching a program that is protected by Macrovision, turn the VCR off to ensure a quality picture.
Chapter 4
Using the System Features
Read this chapter to learn how to use system features including the Master program guide, Station Index, Favorite Station Guide, and the ordering of pay-per-view programs.
Overview
This chapter provides detailed instructions for using most of the features of your DSS receiver. Topics include:
☐ Checking to make sure your system is completely set up and ready to be used (page 26).
☐ Using Highlight and Select, the simple, two-step process for operating all the on-screen displays (page 27).
☐ Displaying and navigating through the Master Guide (page 28).
☐ Selecting subscription and pay-per-view programs from the program guides (page 32).
☐ Choosing from the two program guide formats, Guide and List, and selecting special program guides sorted by category and subcategory (page 33).
☐ Using the Custom Guide (page 35).
☐ Using the Station Index (page 36).
☐ Using the three Favorite Station Guides (page 38).
☐ Using other (program provider) guides (page 39).
☐ Displaying the Program Banner and using the JUMP feature (page 40).
- Selecting an alternate audio track for the program you're currently watching (page 41).
☐ Canceling pay-per-view programs you've ordered (page 42).
☐ Checking your pay-per-view purchase record (page 43).
☐ Setting the automatic timer (page 44).
☐ Reading mail messages sent to your DSS receiver (page 47).
Before You Get Started ...
Make sure you (or your DSS system installer) have completed the following procedures before you start using your DSS receiver:
1 Install the satellite antenna, as described in the Satellite Antenna Installation Manual.
Note
Make certain that you (or your DSS system installer) have optimized the signal strength. If the signal is not optimized, you may experience losses in audio or video, especially during rain, snow, or other conditions that tend to degrade signal performance. See the Satellite Antenna Installation Manual for details on pointing the dish and optimizing the antenna's signal strength.
2 Connect the satellite antenna to your DSS receiver. Then connect the receiver to your television and telephone line. (See Chapter 3.)
Note
Your phone line must be connected to the DSS receiver in order for you to purchase a pay-per-view program with the DSS remote control.
3 Make sure the access card is inserted into the DSS receiver. The receiver comes with the card already inserted. (See page 66 for details on inserting the access card.)
4 Call your program providers (DIRECTV and USSB) to activate your service. You'll need to provide information, including the model and serial numbers of your DSS receiver and the access card number.
DIRECTV® 1-800-DIRECTV (347-3288)
USSB 1-800-204-USSB (8772)
If Your System Is Not Completely Installed ...
See the manual that came with the satellite antenna and Chapter 3 of this manual for complete installation instructions. Or, see your DSS dealer to arrange for a professional installation or the purchase of the Sony-brand DSS Installation Kit.
Using the On-Screen Displays: Highlight and Select
All of the features and functions of the DSS receiver can be operated using a simple, two-step process: Highlight and Select. These two steps are explained below.
Step 1: Highlight
☐ To highlight, move the joystick on the remote to move the on-screen highlight to the item that you want to select.
Step 2: Select
After you've highlighted the item that you want, select it by pressing the joystick.
Example: Highlight and Select
1 In the sample menu that follows, moving the joystick up moves the highlight from ITEM 5...
Tip
In many of the on-screen displays you can move the joystick in eight directions: left, right, up, down, and diagonally (up left, up right, down left, and down right).
| SAMPLE MENU | ||
| ITEM 1 | ITEM 2 | ITEM 3 |
| ITEM 4 | ITEM 5 | ITEM 6 |
| ITEM 7 | ITEM 8 | ITEM 9 |
... to ITEM 2.
| SAMPLE MENU | ||
| ITEM 1 | ITEM 2 | ITEM 3 |
| ITEM 4 | ITEM 5 | ITEM 6 |
| ITEM 7 | ITEM 8 | ITEM 9 |
2 Pressing the joystick selects ITEM 2.
You can apply this basic operation of highlighting and selecting to perform any of the system's functions.
Displaying the Master Guide
You can select programs using the CH+ and CH- buttons, or you can enter the station number directly using the 0-9 buttons. However, because DSS offers you such a variety of programming choices, you'll get the most out of the system by using one of the on-screen program guides to find the programs you want to watch.
The Master Guide, the main program guide, lists all the programs being offered by your program providers, including regular programs and pay-per-view events.
To display the Master Guide:
☐ Press the GUIDE button on the remote
OR
☐ Press the MENU button to bring up the Main Menu. To display the Master Guide, highlight and then select MASTER GUIDE from the menu.
| MAIN MENU | ||||
| SELECT GUIDE | 1 | MASTER GUIDE | 2 | SELECT LIST 3 |
| MOVIES GUIDE | 4 | EXIT | 5 | MOVIES LIST 6 |
| OTHER GUIDES | 7 | CUSTOM GUIDE | 8 | SYSTEM MENU 9 |
Tip
You can select menu items directly by pressing the corresponding number button. For example, press 2 to select the Master Guide.
The symbol indicates that this selection has a submenu that contains additional selections.
The Master Guide is discussed in more detail on the following pages.
Features of the Master Guide
When you select the Master Guide from the Main Menu or press the GUIDE button on the remote, the Master Guide appears:
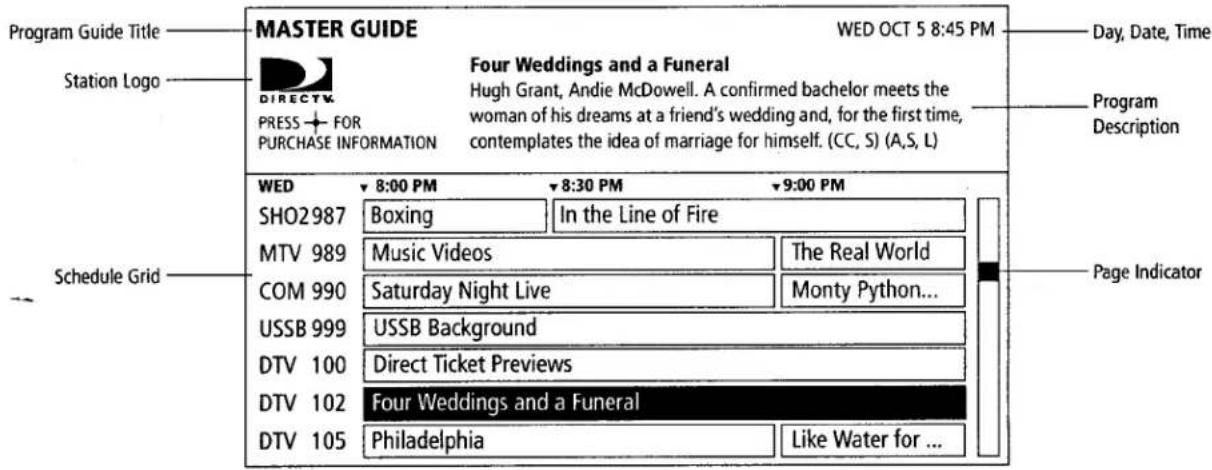
Program guides, such as the Master Guide shown above, feature a variety of elements, including:
☐ Program guide title, such as Master Guide, Movie Guide, Sports Guide, etc.
☐ Current day of the week, date and time.
☐ Station logo (when available) and program description of the currently highlighted station.
☐ Schedule grid, which includes:
□ Station names, numbers, and program titles. These appear in ascending numerical order from top to bottom.
☐ Time slots. These appear left to right, with the current time's programming in the leftmost position.
Page indicator. This shows you approximately which page you're on, relative to all the pages in the guide. The size of the indicator is proportional to the overall size of the entire program guide.
Moving Through the Master Guide
| The on-screen program guides are displayed only one page at a time. Because the program guide usually contains many pages, you need to move through the guide to see more of the programs contained in the guide. You can move by scrolling, paging, and direct station tuning. | |
| Scrolling | To scroll, use the joystick to move the highlight one position at a time. You can scroll to different stations or time slots.To move to other stations in the guide one station at a time:Move the joystick up and down.To move to other time slots in the guide:Move the joystick left and right. |
| Paging Vertically Through the Stations | To page, use the PAGE buttons to move through the guide a page at a time. This allows you to move through the guide more quickly than scrolling.To page through the guide:Press the PAGE↑ and PAGE↓ buttons.The PAGE↑ button pages in the up direction. The PAGE↓ button pages in the down direction. |
| Paging Through Later Program Start Times | To display future time slots in the guide:Press the GUIDE button.Pressing the GUIDE button repeatedly cycles through all the available time slots in the guide as they are made available by your program providers (for example, THU 3:00 PM, THU 10:00 PM, FRI 3:00 AM, etc.).NoteTo select a future program guide directly, press the MENU button and then select OTHER GUIDES. See page 39 for details. |
| Direct Station Tuning | To move to a station directly:Press the 0-9 buttons to specify the station number. Press the ENTER button to change the station more quickly. |
Displaying Favorite Stations
To see your favorite stations in the program guide:
☐ Press the FAVORITE button.
Pressing the FAVORITE button repeatedly cycles through the stations currently set for the three Favorite Station Guides (FAV A, B, and C), and then back to the normal guide.
Note
See page 51 for instructions on setting up your favorite stations.
Exiting the Guide
There are two ways to exit the program guide:
☐ Select a program from the guide by pressing the joystick. (See "Selecting a Program from the Guide" on page 32 for details.) OR
☐ Press the EXIT button on the remote. You will be returned to the last program you were watching before the Master Guide was displayed.
Selecting a Program from the Guide
For all programs except pay-per-view (PPV), you can select a program from the guide just by pressing the joystick. If the program is currently showing, the guide disappears and the program you selected appears.
Watching a PPV program is similar, except it requires you to order the program before you can watch it beyond the free preview period (usually about five minutes after the program starts).
Note
Your phone line must be connected to the DSS receiver in order for you to purchase a pay-per-view program with the DSS remote control.
Ordering Pay-Per-View Programs
Selecting RETURN returns you to the previous screen, without purchasing the program.
Selecting TIMES brings up a list of additional show times that you can choose from for the program you selected.
A PREVIEW button, which gives you a free preview of the program, appears only when the preview is available.
If the BUY button does not appear (and the message "Purchase information not available" appears), you must call your program provider to order the program.
Selecting NO returns you to the previous screen, without purchasing the program.
About Copy-Protection
To order a PPV program listed in the program guide:
1 Highlight the program name in the guide and press the joystick.
2 Select BUY from the Purchase Program screen.
PURCHASE PROGRAM
| Title: | Four Weddings and a Funeral |
| Description: | Hugh Grant, Andie McDowell. A confirmed bachelor meets the woman of his dreams at a friend's wedding and, for the first time, contemplates the idea of marriage for himself. (CC, S) (A,S, L) |
| Channel: | 102 |
| Time: | Wed Oct 5 8:00PM - 9:30PM |
| Rating: | R |
| Price/View: | $2.99 |
RETURN
BUY
TIMES
HELP
3 When the Confirm Purchase screen appears, select YES to confirm your purchase.
CONFIRM PURCHASE
| Title: | Four Weddings and a Funeral |
| Price: | $2.99 |
| Time: | Wed Oct 5 8:00PM - 9:30PM |
| Channel: | 102 |

Do you want to purchase this program?
To watch the program, just tune to the station when the program is about to start. Your program providers will bill you automatically.
Some PPV programs are copy-protected by Macrovision at the discretion of the copyright owner. When watching a PPV program, turn the VCR off to ensure a quality picture.
32 Chapter 4: Using the System Features
Selecting Program Guides and Lists By Category
In addition to using the Master Guide, you can use the SELECT GUIDE and SELECT LIST options in the Main Menu to select subsets of the Master Guide. These subsets are sorted by program categories, such as Movies, Sports, News, and so on. You can also choose from two program guide formats: Guide and List.
☐ The Guide format lists stations in ascending numerical order (such as the Master Guide).
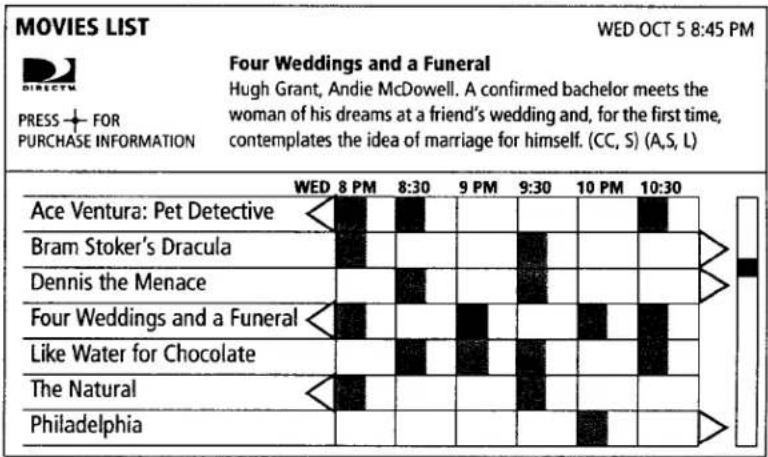
☐ The List format lists programs in alphabetical order by program title, as shown below.
The buttons that appear for each program indicate start times.
To select a program, highlight the start time button and then press the joystick.
For example, in this sample Movie List, "Four Weddings and a Funeral," with a start time of 9:00PM, is highlighted.
How SELECT GUIDE and SELECT LIST Change the Main Menu
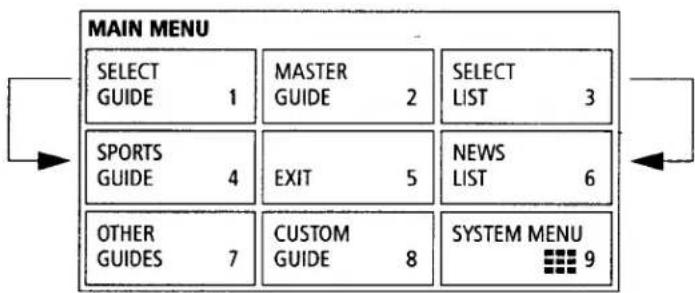
The selections you make using SELECT GUIDE and SELECT LIST affect the program categories displayed in the Main Menu. The category you select using SELECT GUIDE changes button 4 of the Main Menu. The category you select using SELECT LIST changes button 6 of the Main Menu.
This feature allows you to recall the last program guide or list that you selected.
Example: If you select the Sports Guide using SELECT GUIDE, button 4 of the Main Menu automatically changes to SPORTS GUIDE.
Similarly, button 6 of the Main Menu automatically updates to the last selection you made using SELECT LIST.
flowchart
graph TD
    A["MAIN MENU"] --> B["SELECT GUIDE 1"]
    A --> C["MASTER GUIDE 2"]
    A --> D["SELECT LIST 3"]
    A --> E["SPORTS GUIDE 4"]
    A --> F["EXIT 5"]
    A --> G["NEWS LIST 6"]
    A --> H["OTHER GUIDES 7"]
    A --> I["CUSTOM GUIDE 8"]
    A --> J["SYSTEM MENU 9"]
Selecting a Program Guide or List By Program Category
Selecting CANCEL returns you to the previous screen, without saving your selections.
Selecting ALL places a checkmark beside all the subcategories. Selecting NONE removes the checkmark from all the subcategories.
Selecting CANCEL returns you to the previous screen, without saving your selections.
To select another guide or program guide format:
1 Press the MENU button to bring up the Main Menu.
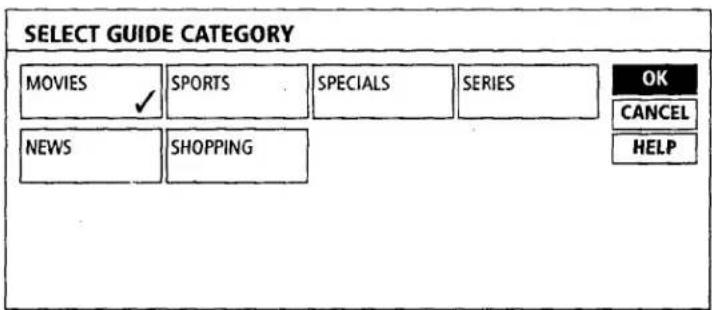
2 Select SELECT GUIDE or SELECT LIST from the Main Menu. The Select Category screen appears.
Select a program category, such as MOVIES. A selected category appears with a checkmark (√) beside it. Then select OK.
3 If the category you select has subcategories, the Select Subcategory screen appears.
Select the program subcategories you want (you can select more than one subcategory). A selected subcategory appears with a checkmark (√) beside it. To deselect a subcategory, just select it again. The checkmark disappears. After you've made your selections, select OK.
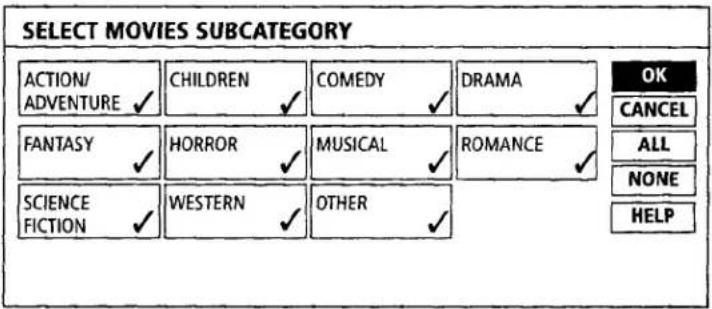
The program guide or list, which includes only stations that include programs in the category and subcategories you selected, appears.
The next time you display the Main Menu, it will include the Guide or List category that you selected. To change category selections, select SELECT GUIDE or SELECT LIST from the Main Menu.
Selecting the Custom Guide
The Custom Guide is a program guide that you can create to include only the stations you want.
Note
See "Setting Up a List of Custom Stations" on page 59 for instructions on setting up your custom stations.
To select the Custom Guide:
1 Press the MENU button to bring up the Main Menu.
2 Select CUSTOM GUIDE from the Main Menu.
| MAIN MENU | |||
| SELECT GUIDE 1 | MASTER GUIDE 2 | SELECT LIST 3 | |
| SPORTS GUIDE 4 | EXIT 5 | NEWS LIST 6 | |
| OTHER GUIDES 7 | CUSTOM GUIDE 8 | SYSTEM MENU 9 | |
The Custom Guide appears, which includes only stations that you specified when you set up your list of custom stations.
Using the Station Index
The Station Index is an on-screen display that contains the station logo (or call letters) of all the stations in the system. You'll find the Station Index useful when you want to tune to a specific station, rather than to a specific program.
Note
Before you can bring up the Station Index, you must first clear the program guide from your TV screen. Pressing EXIT turns off the on-screen displays. Also, you may need to change to another station if a message appears, which requests that you press the joystick to purchase the program, etc.
To display the Station Index:
☐ Press the joystick.
The Station Index appears. The station you are currently tuned to is automatically highlighted.
Your Station Index may not look exactly like this. The stations displayed depend on the programming you've ordered.
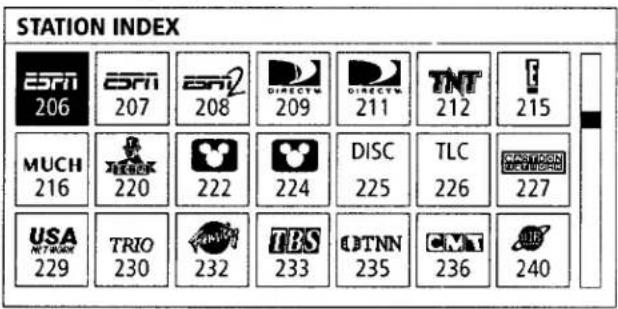
Moving Through the Station Index
To move through the Station Index:
☐ Move the joystick to move one station at a time.
☐ Press the PAGE ↑ and PAGE ↓ buttons to page (move up or down two rows at a time).
☐ Enter the station number, using the 0-9 buttons.
Displaying Favorite Stations in the Station Index
To display your favorite stations on the top row of the Station Index:
☐ Press the FAVORITE button.
Pressing the FAVORITE button repeatedly cycles through the three Favorite Station Guides (FAV A, B, and C).
The top row contains your seven favorite stations from FAV A, FAV B, or FAV C.
The other rows represent all the other stations in the system.
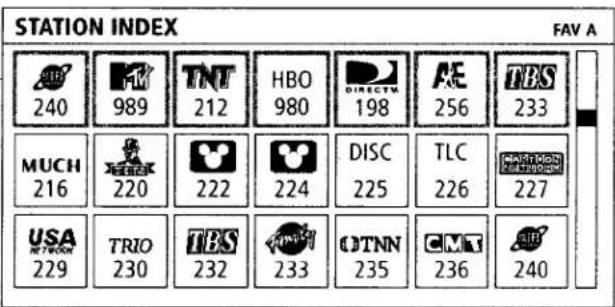
Note
See page 51 for instructions on setting up your favorite stations.
Selecting a Program from the Station Index
To select a program:
☐ Press the joystick to tune to the highlighted station. The Station Index disappears.
To exit the Station Index without changing stations:
☐ Press the EXIT button. The Station Index disappears, and you return to the station you were watching before displaying the Station Index.
Selecting the Favorite Station Guide
The Favorite Station Guide is a program guide that you can create to include up to seven of your favorite stations. You can create up to three Favorite Station Guides, identified as FAV A, FAV B, and FAV C.
Note
See page 51 for instructions on setting up your favorite stations.
To bring up the Favorite Station Guide:
☐ Press the FAVORITE button.
Note
Before you can bring up the Favorite Station Guide, you must first clear the program guide from your TV screen. Pressing EXIT turns off the on-screen displays.
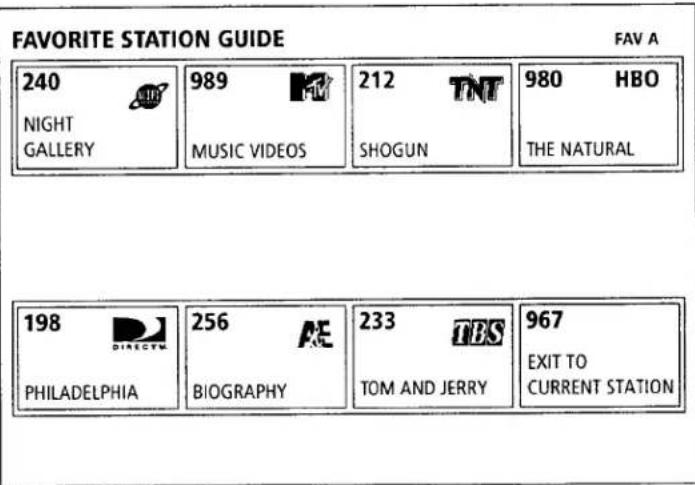
Moving Through the Favorite Station Guide
To move through the Favorite Station Guide:
☐ Move the joystick to move one station at a time OR
☐ Enter the station number, by using the 0-9 buttons and pressing the ENTER button.
To cycle through the three Favorite Station Guides (FAV A, FAV B, and FAV C):
☐ Press the FAVORITE button repeatedly.
To select a program:
☐ Press the joystick to tune to the highlighted station. The Favorite Station Guide disappears.
To exit the Favorite Station Guide without changing stations:
☐ Select "Exit to Current Station," which appears in the bottom right corner of the Favorite Station Guide (or press the EXIT button).
Selecting Other (Program Provider) Guides
The Other Guides option includes alternative program guides, which are made available by your program providers, such as DIRECTV and USSB. These guides may contain groups of stations with similar subjects, for example, special promotions or pay-per-view programs. OTHER GUIDES also includes buttons for going directly to future time slots in the program guide.
To select one of these other guides:
1 Press the MENU button to bring up the Main Menu.
2 Select OTHER GUIDES from the Main Menu. The Select Other Guide screen appears.
Select a program category. A selected program provider guide appears with a checkmark (√) beside it. Then select OK to display the category and subcategory selection screens.
This list of program guides may change, as guides are added or changed by your program providers.
Selecting CANCEL returns you to the previous screen, without saving your selections.
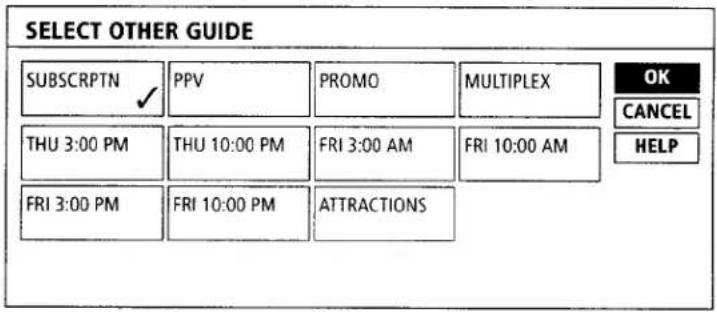
3 Select a program category and subcategory, as described on page 34.
The program provider guide, which includes only stations that include programs in the category and subcategories you selected, appears.
Using DISPLAY and JUMP
Displaying the Program Banner
The program banner provides useful information about the program you're currently watching.
Note
Before you can bring up the Program Banner, you must first clear the program guide from your TV screen. Pressing EXIT turns off the on-screen displays. Also, you may need to change to another station if a message appears, which requests that you press the joystick to purchase the program, etc.
To display the Program Banner:
☐ Press the DISPLAY button.

The Program Banner shows the program title, station name and number, start and end times, current date and time, and rating. It may also indicate that data services (☐) and alternate audio tracks (☐) are available, that new mail has been received (☐), and whether or not the system is locked (☐).
To turn off the Program Banner, press the DISPLAY button again.
For information about selecting data services, see page 61; alternate audio tracks, see page 41; mail messages, see page 47; system lock, see page 54.
Jumping Back and Forth Between Stations
You can use the JUMP button to switch or "jump" back and forth between two stations.
To display the last station you selected:
☐ Press the JUMP button.
Note
You cannot jump to stations you tuned to using the CH+/CH- buttons.
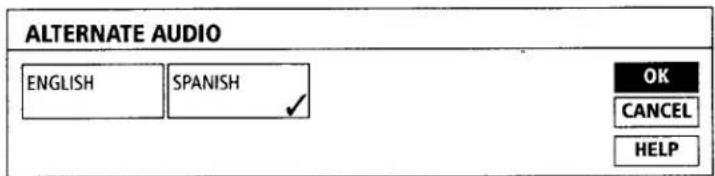
Selecting Alternate Audio
How to Determine if Alternate Audio Tracks Are Available for a Program
Selecting an Alternate Audio Track
Selecting CANCEL returns you to the previous screen, without saving your selections.
Your program providers may broadcast multiple audio tracks with a single video source. For example, a football game might use a different audio track for each sports commentator or a movie might include both English and Spanish language audio tracks.
To determine if an alternate audio track is available:
1 Tune to the program.
2 Press the DISPLAY button to bring up the Program Banner.
If the Program Banner includes the alternate audio symbol ( ), this indicates that alternate audio tracks are available for that program.
To select an alternate audio track using the remote control:
☐ Press the ALTERNATE AUDIO button on the remote control. To cycle through all the available audio tracks for the current program, press the ALTERNATE AUDIO button repeatedly.
To select an alternate audio track using the on-screen menus:
1 Press the MENU button to bring up the Main Menu.
2 Select SYSTEM MENU to bring up the System Menu.
3 Select ALTERNATE AUDIO.

4 The Alternate Audio screen appears, which lists only the audio tracks available for the program you are currently tuned to. Select an audio track. Then select OK to return to the System Menu.
5 Select EXIT from the System Menu to return to the program you were watching.
The alternate audio track you select is available only while the current program airs. To change the default language for the audio of all programs, see "Setting a Default Language" on page 53.
Canceling Purchases
Use the Cancel Purchase screen if you order a pay-per-view program, and then decide you'd like to cancel the order before the program begins.
Note
The Cancel Purchase screen lists only purchases made using the DSS receiver's remote control. It doesn't include purchases made by calling your program provider.
1 Press the MENU button to bring up the Main Menu.
2 Select SYSTEM MENU to bring up the System Menu.
3 Select CANCEL PURCHASE.
Once you tune to a purchased program, you cannot cancel its purchase.
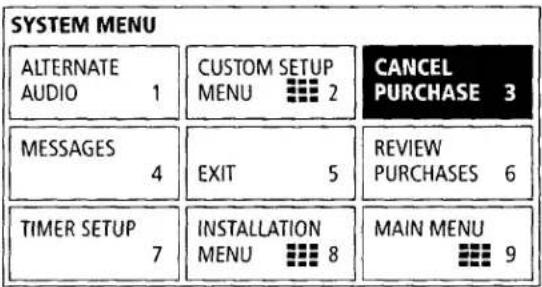
Selecting RETURN returns you to the previous screen, without canceling the program's purchase.
4 Select the program you want to cancel. You can cancel only one program at a time. The selected program appears with a checkmark (√) beside it. Then select CANCEL PPV.
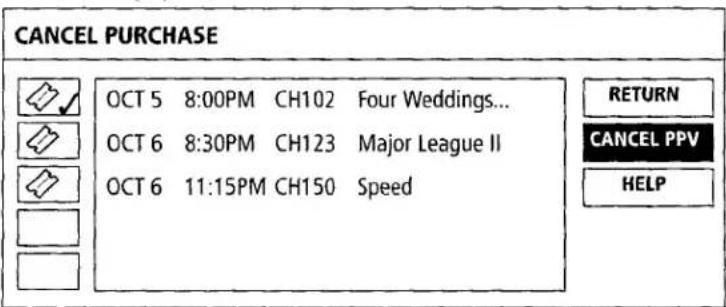
Selecting NO returns you to the previous screen, without canceling the program's purchase.
5 The Confirm Cancel Purchase screen appears. Select YES to confirm your cancellation and return to the System Menu.

6 Select EXIT from the System Menu to return to the program you were watching.
42 Chapter 4: Using the System Features
Checking Your Purchase Record
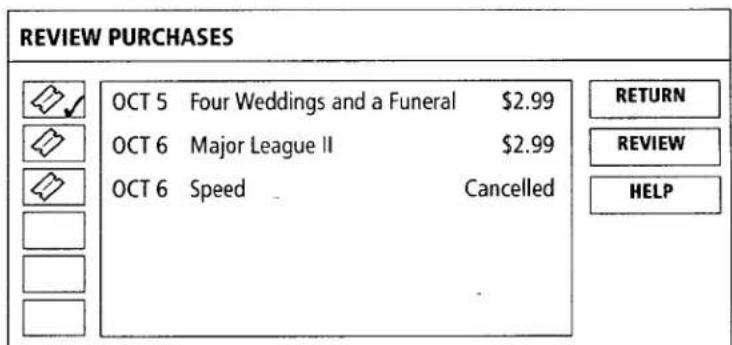
Use the Review Purchases screen to see a record of recent purchases you've made through your DSS receiver.
Note
The Review Purchases screen lists only purchases made using the DSS receiver's remote control. It doesn't include purchases made by calling your program provider.
To check the purchase record:
1 Press the MENU button to bring up the Main Menu.
2 Select SYSTEM MENU to bring up the System Menu.
3 Select REVIEW PURCHASES.

The Review Purchases screen appears, which lists the programs purchased and canceled.
4 After you've reviewed your purchases, select RETURN to return to the System Menu. Or, for more details, select the program name and then select REVIEW.
To review more than one page of purchases, press the PAGE and PAGE buttons to page through the displays.
Setting Up the Timer
Use the Timer Setup screen to specify a day and time on which you want the DSS receiver to automatically tune to a specific station. You can use this feature in coordination with your VCR's timer recording function to automate the recording of DSS programs.
Note
When recording programs from the DSS receiver, your TV need not be turned on. However, you must set up your VCR for timer recording and specify the DSS receiver as the line-in source. See your VCR manual for details.
Setting the Timer
To set the timer:
1 Press the MENU button to bring up the Main Menu.
2 Select SYSTEM MENU to bring up the System Menu.
3 Select TIMER SETUP. The Timer Setup screen appears.

4 Select one of the seven timer setting buttons. Then move the joystick right to highlight the DAY field (today's date automatically appears).

Setting the Daily/Weekly Timer
With the DAY item highlighted, move the joystick down repeatedly to cycle through all the available DAY options.
5 Set the day, start time, stop time, and channel number as follows:
☐ To set each item (day, time, channel), move the joystick up and down.
☐ To move to the next or previous item, move the joystick right and left.
Note
You can set the timer up to 30 days in advance. You can also set the timer for every day or for the same day(s) every week. See "Setting the Daily/Weekly Timer" below.
6 Select OK to save your selections and return to the System Menu. Or, to make additional timer settings, repeat steps 4 through 6.
To set the timer for every day or for the same day(s) every week:
1 In step 5 (above), move the joystick down repeatedly to select one of the DAY options, which are displayed in the following sequence:
Current Date → SUN-SAT → MON-SAT → MON-FRI → EVERY SAT ... → EVERY MON → EVERY SUN → 1 Month Later → (Cycles backward) → Current Date

2 Set the start time, stop time, and channel as described in step 5 above, then select OK to save your changes and return to the System Menu.
Changing/Checking/ Clearing Timer Settings
To change, check, or clear timer settings:
1 Bring up the Timer Setup screen, as described on page 44.
2 Check your settings.
If you don't want to make any changes, select OK to return to the System Menu.
☐ If you want to change or clear settings, select the numbered button of the timer setting you want to change.

3 Change or clear the setting as follows:
☐ To change the setting, move the joystick left or right to highlight the item you want to change. Then reset the item by moving the joystick up or down.
☐ To clear the setting, select CLEAR.
4 Select OK to save your selections and return to the System Menu.
Notes on Using the Timer
☐ After the timer is set, the MESSAGE/TIMER indicator on the front panel lights, indicating that the timer has been set.
☐ To use the timer to record a PPV program, you must first purchase it in advance of its showing. See "Ordering Pay-Per-View Programs" on page 32.
If locks and limits are set (and the system is locked), check to make sure they do not conflict with the program you're trying to record.
☐ About 60 seconds before the timer automatically tunes to the specified channel, a message appears. To cancel the timer setting and continue watching the current program, press the EXIT button.
☐ If you set overlapping (conflicting) timer settings, the DSS receiver handles these timer settings as follows:
☐ If you set two timer settings to start at the same time, the timer setting that's listed first has priority over any other conflicting timer settings. Conflicting timer settings are automatically cleared from the Timer Setup screen when the first timer setting is activated.
☐ If you set a second timer setting to start before the first timer setting is set to stop, the second timer setting will start before the first timer setting stops.
46 Chapter 4: Using the System Features
Reading Your Messages
How to Determine When You've Received Mail
Occasionally, your program providers will send messages to your DSS receiver. These messages contain useful information about your system, such as information about new services, program promotions, or billing.
There are several ways to tell if you have unread mail:
The DSS receiver's front panel MESSAGE/TIMER indicator blinks.
Note
If the timer is set and you have an unread message, the indicator will stay lit.
☐ An envelope (☒) appears in the Program Banner, accessed by pressing the DISPLAY button.
☐ An envelope (✉) appears in menu item 9 (System Menu) of the Main Menu.
Displaying Your Messages
To display your messages:
1 Press the MENU button to bring up the Main Menu.
2 Select SYSTEM MENU.
| MAIN MENU | |||
| SELECT GUIDE 1 | MASTER GUIDE 2 | SELECT LIST 3 | |
| MOVIE GUIDE 4 | EXIT 5 | MOVIE LIST 6 | |
| OTHER GUIDES 7 | CUSTOM GUIDE 8 | SYSTEM MENU [IMAGE] [IMAGE] 9 | |
3 Select MESSAGES.
| SYSTEM MENU | ||
| ALTERNATEAUDIO 1 | CUSTOM SETUPMENU 2 | CANCELPURCHASE 3 |
| MESSAGES4 | EXIT 5 | REVIEWPURCHASES 6 |
| TIMER SETUP7 | INSTALLATIONMENU 8 | MAIN MENU9 |
The message's date, along with the first few words of the message, appear.
Reading a Message
To read a message:
1 Select the envelope from the Messages screen. A selected message appears with a checkmark (√) beside it. Then select READ.
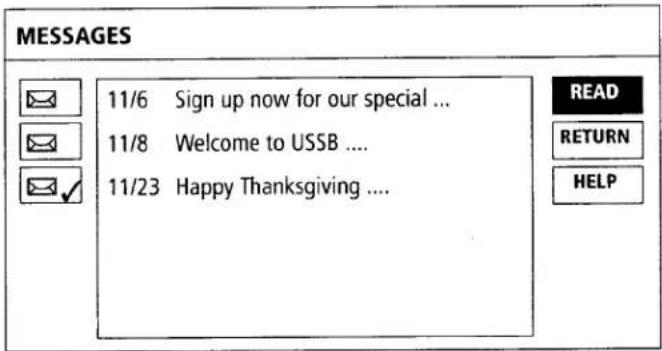
The full text of the message appears.
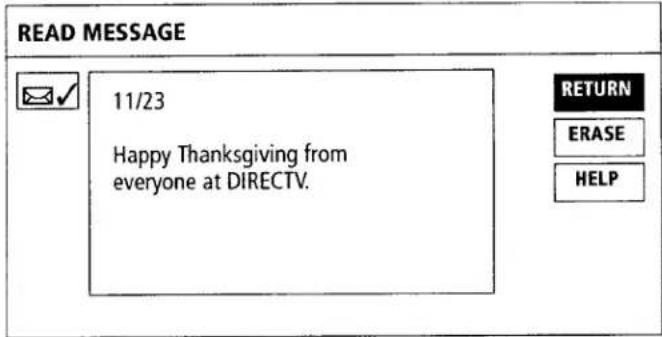
2 To erase a message after you've read it, select ERASE. To keep a message after you've read it, select RETURN.
Note
Your mailbox can hold about 50 messages before exhausting the receiver's memory. To prevent accidental erasure, get in the habit of deleting your messages after you read them.
48 Chapter 4: Using the System Features
Chapter 5
Using the Custom Setup Menu
Read this chapter to get information about customizing your system to match your personal viewing habits.
Overview
Your DSS receiver includes several features you can use to customize your system to meet your individual preferences. You can:
☐ Create up to three Favorite Station Guides, with each containing up to seven stations (page 51).
☐ Set a default language for the audio of programs broadcast in multiple languages (page 53).
☐ Set system locks and limits, which allow you to control program viewing by ratings, spending amount, and station (page 54).
☐ Specify custom stations. In the Set Custom Stations screen, you specify stations from the Master Guide you want to skip. After you've set skipped stations, they will not appear in the Custom Guide (available in the Main Menu). These stations are also skipped over in the Station Index, and when you use the CH+/CH-buttons to change channels (page 59).
☐ Select a data service (page 61).
Displaying the Custom Setup Menu
To customize your system, first bring up the Custom Setup Menu, as follows:
1 Press the MENU button to bring up the Main Menu.
2 Select SYSTEM MENU.
| MAIN MENU | |||
| SELECT GUIDE 1 | MASTER GUIDE 2 | SELECT LIST 3 | |
| MOVIES GUIDE 4 | EXIT 5 | MOVIES LIST 6 | |
| OTHER GUIDES 7 | CUSTOM GUIDE 8 | SYSTEM MENU 9 | |
3 Select CUSTOM SETUP MENU.
| SYSTEM MENU | ||
| ALTERNATEAUDIO 1 | CUSTOM SETUPMENU 2 | CANCELPURCHASE 3 |
| MESSAGES4 | EXIT 5 | REVIEWPURCHASES 6 |
| TIMER SETUP7 | INSTALLATIONMENU 8 | MAIN MENU 9 |
The Custom Setup menu appears.
| CUSTOM SETUP MENU | ||
| SET FAVORITE STATIONS 2 | ||
| SET DEFAULT LANGUAGE 4 | EXIT 5 | SET LOCKS AND LIMITS 6 |
| SET CUSTOM STATIONS 8 | SYSTEM MENU 9 | |
The following pages describe how to use the Custom Setup Menu to personalize your system.
Setting Up a Favorite Station Guide
The Favorite Station Guide is a program guide that you create. You can create up to three Favorite Station Guides, with each guide containing up to seven of your favorite stations.
To set up a Favorite Station Guide:
1 Select SET FAVORITE STATIONS from the Custom Setup Menu.
2 Select FAV A, FAV B, or FAV C from the Set Favorite Stations screen.

A setup screen for the guide that you selected appears.
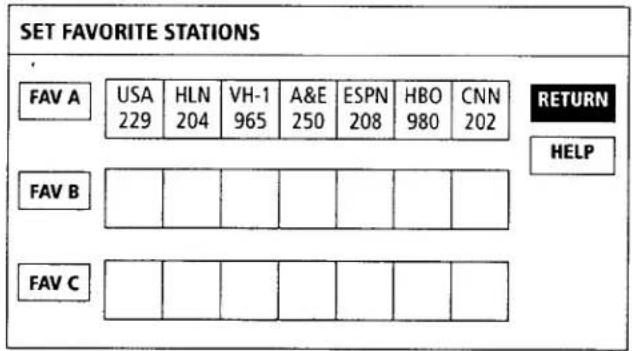
The Set Favorite Stations screen displays three rows of seven stations. Each row represents one of the three Favorite Station Guides, labeled FAV A, FAV B, and FAV C.
The top row represents the stations that are currently set for the Favorite — Station Guide you selected.
The bottom rows represent all the other stations in the system.

The system is shipped with no favorite stations set, so the first time you see this screen, the top row is blank.
3 To add or change a station, first highlight a button in the top row.
4 Do one of the following:
☐ To select a station from the bottom rows of stations, press the joystick. The highlight automatically moves to the stations in the bottom rows. Then go to step 5.
To select a station directly, enter the station's number, using the 0-9 buttons. Then repeat steps 3 and 4 for each station you want to include in the Favorite Station Guide.
You can select CLEAR to automatically clear all the stations from the top row. Selecting CANCEL returns you to the previous screen, without saving your selections.
5 To replace a favorite station in the top row, select a station from one of the bottom rows of stations.
Note
Use the PAGE ↑ and PAGE ↓ buttons to quickly move through the lower rows of stations.
The new station you select automatically replaces the highlighted station in the top row, and the highlight automatically moves to the next favorite station button in the top row.

6 Repeat steps 4 and 5 for each station you want to include in the Favorite Station Guide.
7 Select OK when you're finished setting your favorite stations.
8 Select RETURN when you're finished. Or, repeat steps 2 through 7 to set up another Favorite Station Guide (FAV A, B, or C).
See "Selecting the Favorite Station Guide" on page 38 for instructions on displaying and using the Favorite Station Guides.
52 Chapter 5: Using the Custom Setup Menu
Setting a Default Language
Use the Set Default Language screen to specify the language you want to hear for programs broadcast in multiple languages.
For example, if you set the default language to Spanish and a program is broadcast in both English and Spanish, you'll automatically hear the audio in Spanish.
Note
If the default language you select is not available for a program that you tune to, you will not hear the default language. Instead, you'll hear one of the languages available for that program (usually English).
To set a default language:
1 Select SET DEFAULT LANGUAGE from the Custom Setup Menu.
2 Select a language and then select OK.
Selecting CANCEL returns you to the previous screen, without saving your selections.

You return to the Custom Setup Menu, and the DSS receiver is set to play back the selected language, when that language is available.
Note
You can change the audio track for a program that uses multiple audio tracks (indicated by the 🔒 symbol in the Program Banner) without changing the default language. For details, see "Selecting Alternate Audio" on page 41.
Setting Locks and Limits
The Locks and Limits feature gives you control over the use of your system. You can restrict program viewing by cost, ratings, and station. You can also set a lock to prevent the ordering of pay-per-view programs.
To display the Set Locks and Limits screen:
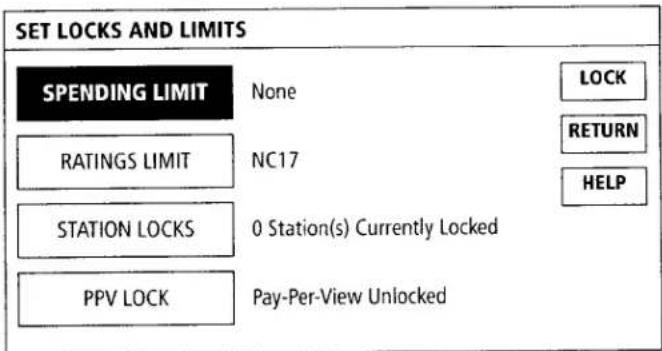
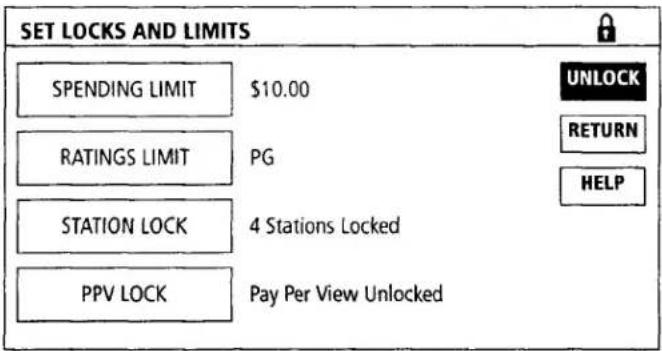
1 Select SET LOCKS AND LIMITS from the Custom Setup Menu. The Set Locks and Limits screen appears, with the current settings shown next to each button.
2 Select a lock or limit from the screen (see the descriptions below).
If your system is locked, the padlock symbol appears (☐), and you must first unlock it before you can make any changes to the locks and limits settings. See "Unlocking Your System" on page 58 for details.
Note
Your DSS receiver is shipped to you unlocked, with the default settings as described below.
| Spending Limit | Lets you set a maximum spending limit for a single pay-per-view program. When the system is locked, you cannot purchase a program that costs more than the amount set. The default setting is $10.00. |
| Ratings Limit | Allows you to set a maximum ratings limit. When the system is locked, you cannot view programs rated higher than the rating set. The default rating is R. |
| Station Locks | Lets you prevent the viewing of stations that you lock. When the system is locked, programs that appear on locked stations cannot be viewed. The default is no stations locked. |
| PPV Lock | Allows you to prevent PPV purchases. When the system and the PPV option are locked, pay-per-view programs cannot be purchased. The default setting is unlocked. |
Note
After you've set a lock or limit, you must lock the system before any locks or limits take effect. Locking the system is described on page 57.
Setting a Spending Limit
Selecting NO LIMIT allows you to purchase any pay-per-view program, no matter how much it costs.
Selecting CANCEL returns you to the previous screen, without saving your selections.
Setting a Ratings Limit
Selecting ALL allows viewing of all programs. Selecting NONE prevents the viewing of all programs.
Selecting CANCEL returns you to the previous screen, without saving your selections.
To set a spending limit:
1 Select SPENDING LIMIT from the Set Locks and Limits screen.
2 Enter a spending limit. Use the 0-9 or move the joystick up and down to enter the numerical value. (If you use the joystick to enter the value, move the joystick left or right to move to the previous or next position.)
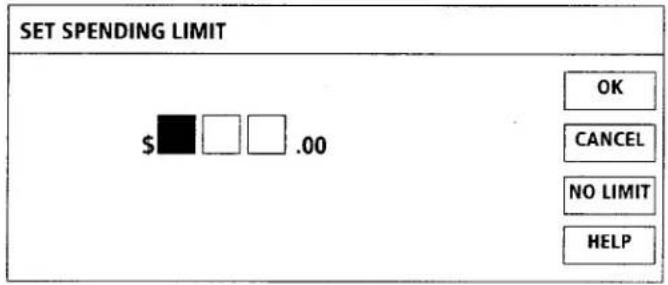
3 Select OK to return to the Set Locks and Limits screen. Then set any other locks and limits, if necessary.
4 Lock your system, as described in "Locking Your System" on page 57.
To set a ratings limit:
1 Select RATINGS LIMIT from the Set Locks and Limits screen.
2 Select a rating, beyond which programs cannot be watched. Locked ratings appear with a key (●) beside them. For example, in the following screen, the ratings limit has been set to PG.

3 Select OK to return to the Set Locks and Limits screen. Then set any other locks and limits, if necessary.
4 Lock your system, as described in "Locking Your System" on page 57.
Setting Station Locks
To quickly unlock or lock all stations, select ALL (to lock all) or NONE (to unlock all). Selecting CANCEL returns you to the previous screen, without saving your selections.
Setting the Pay-Per-View Lock.
Selecting CANCEL returns you to the previous screen, without saving your selections.
To set station locks:
1 Select STATION LOCKS from the Set Locks and Limits screen.
2 Select stations that you want to lock from viewing. A locked station appears with a key (●) beside it. For example, in the following screen, stations 203, 204, 206, and 209 have been locked.
To unlock a station, just select it again. The key (—) disappears.
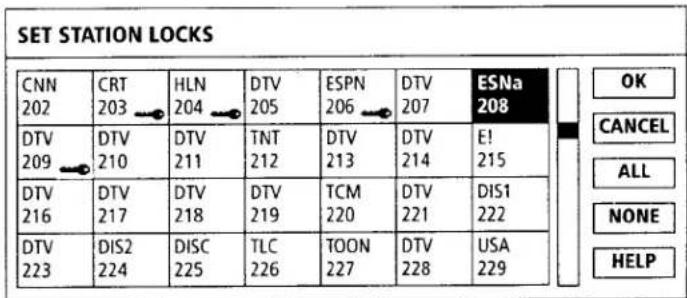
Note
You can use the PAGE ↑ and PAGE ↓ buttons to quickly move through the rows of stations. You can also use the 0-9 buttons to enter the station number directly.
3 Select OK to return to the Set Locks and Limits screen. Then set any other locks and limits, if necessary.
4 Lock your system, as described in "Locking Your System" on page 57.
To set the pay-per-view lock:
1 Select PPV LOCK from the Set Locks and Limits screen.
2 Select LOCK to prevent PPV program purchases. Select UNLOCK to allow PPV program purchases.
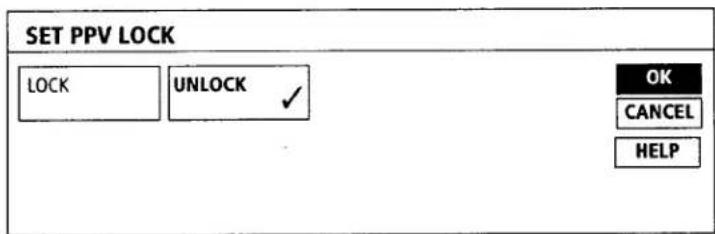
3 Select OK to return to the Set Locks and Limits screen. Then set any other locks and limits, if necessary.
4 Lock your system, as described in "Locking Your System" on page 57.
Note
You can also set a PPV lock by setting the spending limit to \$0.00. See "Setting a Spending Limit" on page 55 for details.
Locking Your System
To lock an unlocked system:
1 Select LOCK from the Set Locks and Limits screen.
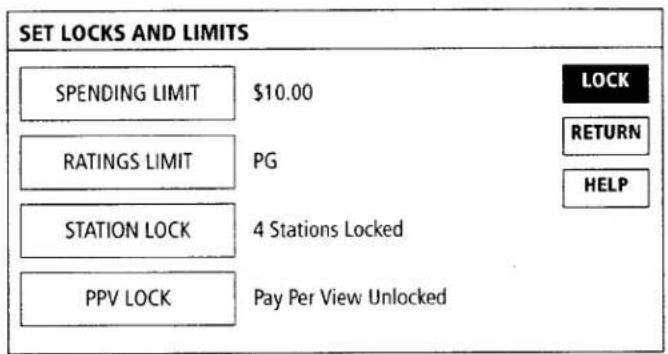
2 The Set Passcode screen appears. Enter a four-digit passcode number. Use the 0-9 buttons or move the joystick up and down to enter the numerical value. (If you use the joystick to enter the value, move the joystick left or right to move to the previous or next position.)
Each number you enter appears as an asterisk (*), which keeps your passcode secret.
Selecting CANCEL returns you to the previous screen, without saving your selections.

Note
DON'T FORGET YOUR PASSCODE. You'll need this number to unlock your system or to make any changes to the locks and limits you've set. If you do forget your passcode, call your program provider for assistance.
3 When prompted, enter your passcode again. (This confirms your selection of a passcode number.)
4 Select OK to return to the Set Locks and Limits screen.
Your system is now locked, as indicated by the closed padlock (🔒) in the Set Locks and Limits screen. All locks and limits you've set are now in effect. The padlock also appears in the Program Banner to remind you of the locked status.
Overriding the System Lock
You can temporarily override any locks or limits that have been set if you know the system passcode.
For example, if you try to watch a program on a locked station, a message identifies the lock or limit exceeded. After you press the joystick, the passcode screen appears. By entering the passcode, you can temporarily unlock the system. The system remains unlocked until you reset the lock.
To reset a system lock override:
☐ Turn off the DSS receiver, and then turn it on again.
The system locks, and all locks and limits are again in effect.
Note
If you override the system lock, be sure you reset the lock. If you want to unlock the system on a more permanent basis, follow the procedures under "Unlocking Your System" below.
Unlocking Your System
To unlock a locked system:
1 Select SET LOCKS AND LIMITS from the Custom Setup Menu. The Set Locks and Limits screen appears, with the current settings shown next to each button. The padlock (🔒) indicates that the system is currently locked.
2 Select UNLOCK from the Set Locks and Limits screen.
3 When the Set Passcode screen appears, enter the correct four-digit passcode.
4 Select OK.
Your system is now unlocked, and all locks and limits previously set are no longer in effect.
Determining the Status of the System Lock
While you're watching programs, you can check the status of the system lock by pressing the DISPLAY button to bring up the Program Banner. If no padlock appears, this means the system is unlocked. A closed padlock (💡) means the system is locked. An open padlock (💡) means the system has been temporarily unlocked using the system lock override.
58 Chapter 5: Using the Custom Setup Menu
Setting Up a List of Custom Stations
If there are stations listed in the Master Guide that you don't subscribe to or watch often, you can use the Set Custom Stations feature to specify which stations from the Master Guide you want to skip. After you've set skipped stations, they will not appear in the:
☐ Custom Guide (a program guide available in the Main Menu)
Station Index
□ Stations that appear when you're using the CH+/CH- buttons to change channels
Note
Skipped stations will continue to be available in the Master Guide and all other program guides.
To define a list of custom stations:
1 Select SET CUSTOM STATIONS from the Custom Setup Menu.
2 Select stations that you want to skip.
A station that appears with a checkmark (√) beside it will be skipped. For example, in the following screen, stations 203, 208, and 213 are set to be skipped.
To set a station so that it is not skipped, just select it again. The checkmark (√) disappears.
To have the DSS receiver automatically skip all stations from the Master Guide that you are not authorized to receive, select AUTO. See "Using the AUTO Skip Feature" on page 60 for details.
To quickly skip or "unskip" stations, select ALL (to skip all) or NONE (to skip none).
Selecting CANCEL returns you to the previous screen, without saving your selections.
| CNN 202 | CRT 203 | HLN 204 | DTV 205 | ESPN 206 | DTV 207 | ESNa 208 |
| DTV 209 | DTV 210 | DTV 211 | TNT 212 | DTV 213 | DTV 214 | E! 215 |
| DTV 216 | DTV 217 | DTV 218 | DTV 219 | TCM 220 | DTV 221 | DIS1 222 |
| DTV 223 | DIS2 224 | DISC 225 | TLC 226 | TOON 227 | DTV 228 | USA 229 |
Note
Use the PAGE and PAGE buttons to quickly move through the rows of stations. You can also use the 0-9 buttons to enter the three-digit station number directly.
3 Select OK when you're finished setting skipped stations.
To see the results of your Custom Stations settings:
☐ Use the Custom Guide (page 35), Station Index (page 36), or CH+/CH- buttons.
Using the AUTO Skip Feature
When you select the AUTO button, the DSS receiver automatically scans all the stations in the current Master Guide. During this scanning process, the DSS receiver determines which stations you are not authorized to watch and then sets these stations to be skipped. You can use this feature as a starting point to creating your own list of custom stations.
For example, if there are stations that appear in the Master Guide to which you do not subscribe, the AUTO function automatically marks these stations to be skipped. This saves you the trouble of having to determine which of the 150+ stations in the Master Guide you cannot view and then having to manually set each of these stations to be skipped.
To use the AUTO Skip feature:
1 Select SET CUSTOM STATIONS from the Custom Setup Menu.
2 Select the AUTO button.
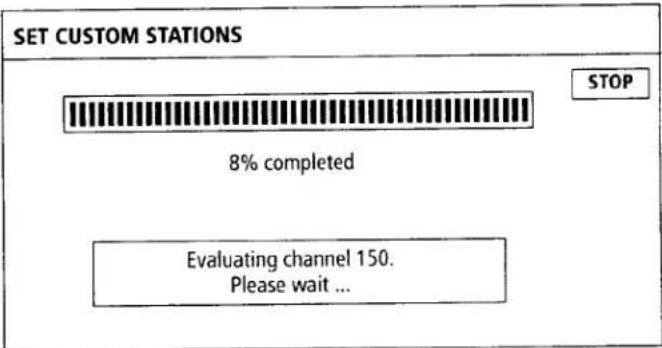
The DSS receiver begins to evaluate all the stations in the Master Guide, and displays a status bar, similar to the following.
Selecting STOP interrupts the Auto Skip process and returns you to the previous screen, which displays the stations that have been set to be skipped thus far.
Note
This process may take a few minutes to complete.
When the DSS receiver is finished scanning, the station list reappears, with checkmarks (√) beside stations that are set to be skipped.
3 Select OK to save your selections. Or select additional stations to be skipped or unskipped.
Note
You may want to re-run the Auto skip procedure periodically in case your program providers make changes or additions to their station lineups.
Selecting Data Services
In the future, your program providers may make available data services, which you can access through specific stations using the DSS receiver's wide band and low-speed data ports. For details about using the data ports to access these data services, call your program providers.
How to Determine if Data Services Are Available on a Station
To determine if data services are available on a specific station:
1 Tune to the station.
2 Press the DISPLAY button to bring up the Program Banner.
If the Program Banner includes the data services symbol (D), this indicates that data services are available for that specific station.
Selecting a Data Service
DATA SERVICES appears only when the station you're tuned to includes data services.
To select a data service:
1 Select DATA SERVICES from the Custom Setup Menu.
| CUSTOM SETUP MENU | ||
| SET FAVORITE STATIONS 2 | ||
| SET DEFAULT LANGUAGE 4 | EXIT 5 | SET LOCKS AND LIMITS 6 |
| DATA SERVICES 7 | SET CUSTOM STATIONS 8 | SYSTEM MENU 9 |
Selecting CANCEL returns you to the previous screen, without saving your selections.
The screen will be titled "Wide Band" or "Low Speed," depending on which type of data service is available for that station.
The titles of the data services may be different, based on the service being provided.
2 The Data Services screen appears, which lists only the data services that are available for the station you are currently tuned to.
| WIDE BAND DATA SERVICES | ||||
| DATA 1√ | DATA 2 | DATA 3 | DATA 4 | OK |
| CANCEL | ||||
| DATA 5 | DATA 6 | DATA 7 | DATA 8 | DEFAULT |
| BAUD | ||||
| HELP | ||||
3 Select one of the following:
| To Do This ... | Do This ... |
| Change the data service for the current station only | Select the data service and then select OK. |
| Change the data service for all stations | Select DEFAULT (then see “Changing the Default Data Service” below). |
| Change the baud rate for the DSS receiver’s wide band data port | Select BAUD (then see “Setting the Baud Rate” below). |
Changing the Default Data Service
Use the Default Data Services screen to select a default data service for all stations that provide data services.
To change the data service for all stations:
1 Select DEFAULT from the Data Services screen.
2 Select a default data service and then select OK.
Selecting CANCEL returns you to the previous screen, without saving your selections.
The titles of the data services may be different, based on the service being provided.

Setting the Baud Rate
Selecting CANCEL returns you to the previous screen, without saving your selections.
The baud rates displayed may be different, depending on which data port is being used.
To set the baud rate for the DSS receiver's data ports:
1 Select BAUD from the Data Services screen.
2 Select a baud rate for the data port and then select OK.
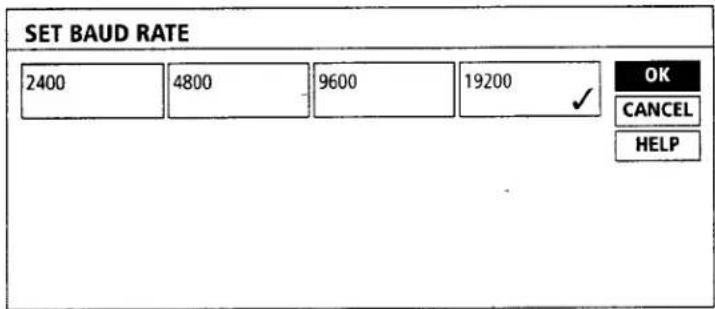
62 Chapter 5: Using the Custom Setup Menu
Chapter 6
Using the Installation Menu
Read this chapter to set up your DSS receiver for the first time, check the antenna's signal strength, or to run a system test to diagnose any difficulties you may be having with your system.
Overview
The Installation Menu includes several options you can use to set up and troubleshoot your system.
Use the Installation Menu to:
☐ Set up and point your satellite antenna (page 65).
☐ Replace your access card (page 66).
☐ Change the aspect ratio of the DSS receiver to match your TV screen: standard or widescreen (page 68).
☐ Change the DSS receiver to receive only IR (infrared) remote control signals or RF (radio frequency) remote control signals (page 69).
☐ Run a system test to check the operation of your system, including the access card, phone line, and satellite antenna (page 72)
Displaying the Installation Menu
To set up your system, first bring up the Installation Menu, as follows:
1 Press the MENU button to bring up the Main Menu.
2 Select SYSTEM MENU from the Main Menu.
| MAIN MENU | |||
| SELECT GUIDE 1 | MASTER GUIDE 2 | SELECT LIST 3 | |
| MOVIES GUIDE 4 | EXIT 5 | MOVIES LIST 6 | |
| OTHER GUIDES 7 | CUSTOM GUIDE 8 | SYSTEM MENU 9 | |
Select INSTALLATION MENU from the System Menu.
| SYSTEM MENU | ||
| ALTERNATEAUDIO 1 | CUSTOM SETUPMENU 2 | CANCELPURCHASE 3 |
| MESSAGES4 | EXIT 5 | REVIEWPURCHASES 6 |
| TIMER SETUP7 | INSTALLATIONMENU 8 | MAIN MENU9 |
The Installation Menu appears:
| INSTALLATION MENU | |||
| REPLACE ACCESS CARD 2 | |||
| SET UP ANTENNA | 4 | EXIT 5 | SET ASPECT RATIO 6 |
| SET UP REMOTE | 7 | RUN SYSTEM TEST 8 | SYSTEM MENU 9 |
The following pages describe how to use the Installation Menu to set up your system.
Setting Up the Satellite Antenna
To install the satellite antenna, or to check the current signal level of the antenna, use the Set Up Antenna screen.
Note
Make certain that the signal strength of the satellite antenna is optimized. If the signal is not optimized, you may experience losses in audio or video, especially during rain, snow, or other conditions that tend to degrade signal performance. See the Satellite Antenna Installation Manual for details on using the Set Up Antenna screen to point the dish and optimize the antenna's signal strength.
1 Select SET UP ANTENNA from the Installation Menu.
2 The Set Up Antenna screen appears.
Selecting RETURN returns you to the Installation Menu.
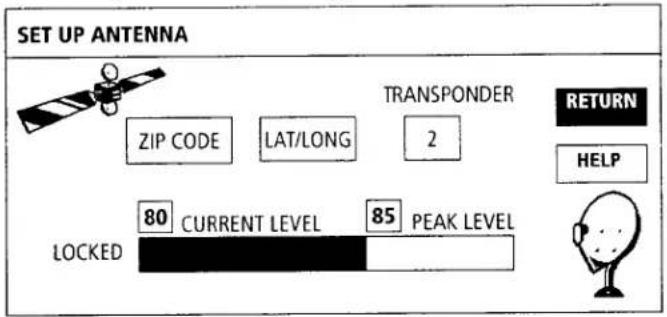
To determine the elevation and azimuth settings for the satellite antenna, select ZIP CODE or LAT/LONG.
☐ ZIP CODE uses your five-digit zip code to determine the elevation and azimuth settings.
☐ LAT/LONG uses your location's latitude and longitude to determine the azimuth and elevation settings.
☐ The Signal Strength Meter indicates the current signal strength of the antenna.
☐ The Transponder option allows you to select a transponder number from 1 to 32. You should not need to change this number (the default is 2) unless you're instructed to do so by your program provider.
See the Satellite Antenna Installation Manual for details on using the Set Up Antenna screen to point the dish and optimize the antenna's signal strength.
3 Select RETURN to return to the Installation Menu.
Replacing Your Access Card
In the event that your program providers need to send you a new access card, use the Replace Access Card option to initialize your new card. During this process, you'll follow the on-screen instructions to copy information from the old card onto the new card. After you initialize the new card, your old card becomes invalid.
To replace your access card:
1 Insert your old access card, if you removed it, as follows:
Open the door to the access card: Place your fingertip in the slot as shown (or carefully use the edge of a coin), and gently pull the door down.
Caution
Handle the door gently to avoid breaking it.
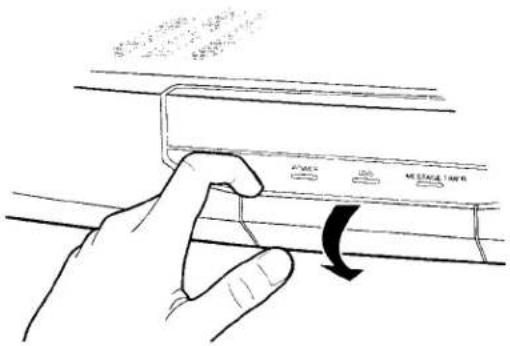
Then insert the card, arrow side up, as shown, and gently push the door up to close it.
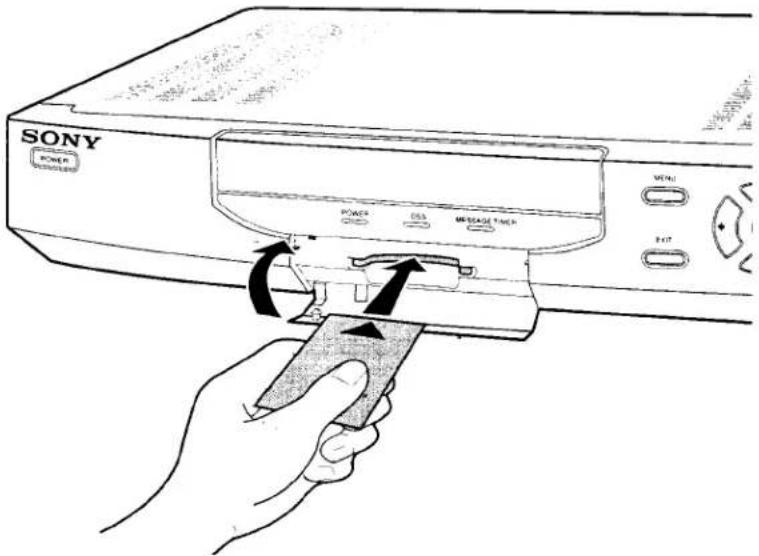
2 Select REPLACE ACCESS CARD from the Installation Menu.
| INSTALLATION MENU | |||
| REPLACE ACCESS CARD 2 | |||
| SET UP ANTENNA 4 | EXIT 5 | SET ASPECT RATIO 6 | |
| SET UP REMOTE 7 | RUN SYSTEM TEST 8 | SYSTEM MENU 9 | |
3 When the Replace Access Card screen appears, select OK to begin copying your old access card.
Selecting RETURN returns you to the Installation Menu, without starting the initialization process.
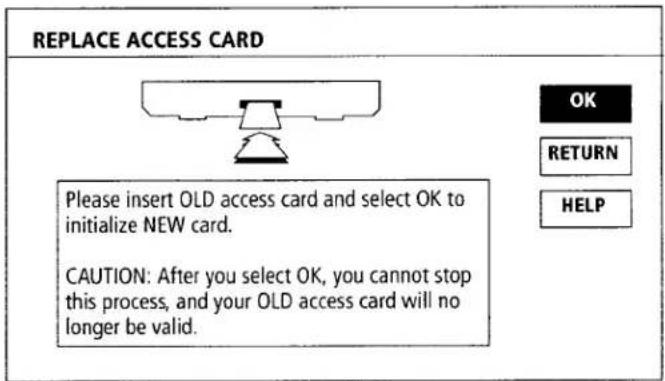
4 Follow the instructions as they are displayed to complete the procedure.
When the message "Replace Access Card Procedure Complete" appears, select OK to return to the Installation Menu.
Setting the Aspect Ratio
Use the Set Aspect Ratio option to set the DSS receiver's display to match your TV's picture.
To set the aspect ratio:
1 Select SET ASPECT RATIO from the Installation Menu.
2 Select one of the options, based on the type of TV you have:
☐ If you have a standard TV, select 4:3.
☐ If you have a wide-screen TV, select 16:9.
Selecting CANCEL returns you to the Installation Menu, without saving your selection.

3 Select OK to return to the Installation Menu.
Setting Up the Remote Control
The Set Up Remote screens let you set up the DSS receiver to accept IR (infrared) or RF (radio frequency) signals from the DSS remote control and to change the RF security code for the DSS receiver.
Selecting IR/RF Transmission
In addition to having IR remote control capability, your DSS system includes an RF feature, which enables the remote control to operate the DSS receiver even if the receiver is located in another room. In other words, with the RF feature, the remote control does not require a direct line-of-sight to the front panel of the DSS receiver.
Note
You must set up the RF antenna to take advantage of the RF feature. See "Setting Up the RF Antenna" on page 22 for details.
The DSS receiver is shipped with IR reception enabled and RF reception disabled. To use the RF feature, you must change the factory setting (IR ONLY) to the RF setting (RF ONLY).
To select IR or RF transmission:
1 Select SET UP REMOTE from the Installation Menu.
2 Select REMOTE SIGNAL.
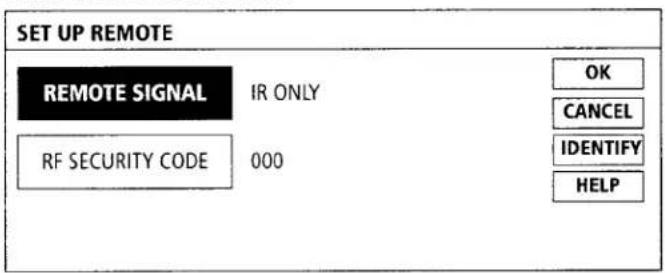
The DSS receiver is shipped with only IR enabled.
3 Select a transmission type (IR or RF) and then select OK to return to the Setup Remote screen.
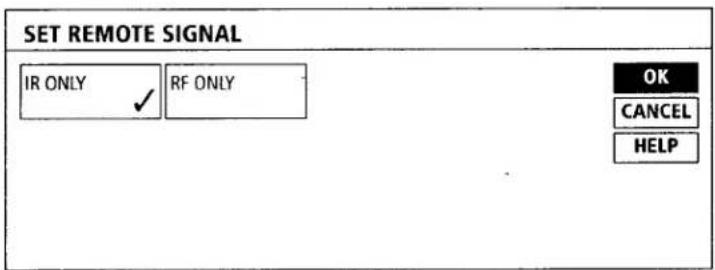
4 Select OK from the Setup Remote screen to save your selections and return to the Installation Menu.
Setting the Security Code
If the DSS receiver is accepting or receiving signals from another RF remote control in your home (or from a neighbor's house), you can eliminate this problem by changing the security codes for the DSS receiver and remote control.
Note
As an alternative, you can eliminate this problem by disabling the RF capability of the DSS receiver, if you have no need for RF transmission. See "Selecting IR/RF Transmission" on page 69 for details.
There are two steps to changing the RF security code: Step 1 is changing the DSS receiver's security code; step 2 is changing the DSS remote control's security code. Both the receiver and the remote control must use the same three-digit security code.
Step 1: Select the DSS Receiver's RF Security Code
1 Select SET UP REMOTE from the Installation Menu.
2 Select RF SECURITY CODE.
The DSS receiver and remote control are shipped with the RF security code set to 000.
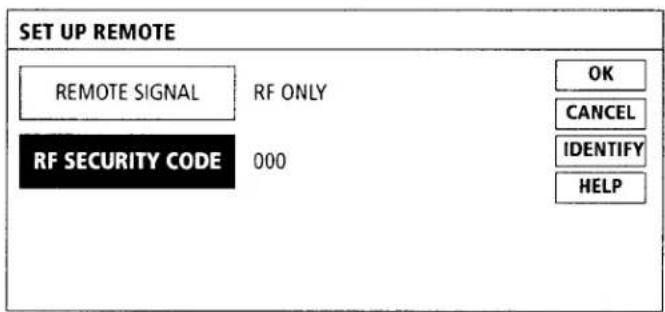
3 Select a different security code and then select OK.
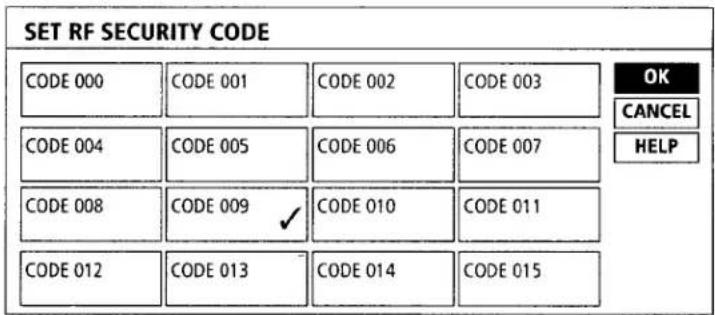
4 Select OK from the Set Up Remote screen to save your changes and return to the Installation Menu.
5 Go to "Step 2: Set the DSS Remote Control's RF Security Code" on page 71 to continue.
Step 2: Set the DSS Remote Control's RF Security Code
1 Press the CODE SET button on the DSS remote control.
2 Using the number buttons on the DSS remote control, enter the three-digit security code you selected for the DSS receiver in step 3 on page 70.
3 Press the ENTER button on the remote control.
The RF security code is now changed for both the DSS receiver and remote control.
To Determine the Current Security Code for the DSS Remote Control
You can determine the current RF security code for the DSS remote control using the IDENTIFY button in the Set Up remote screen.
1 Bring up the Setup Remote screen, as described on page 69.
2 Select IDENTIFY.

3 When the message "Press the joystick within 5 seconds" appears, press the joystick before the 5 seconds expire.
The current RF security code for the DSS remote control appears.
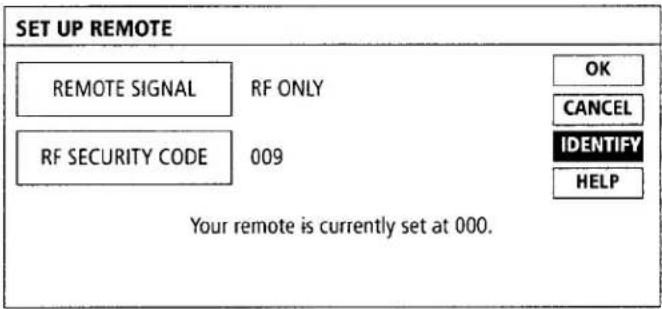
Note
If the message, "Security code could not be identified" appears, check to make sure that RF is enabled. See "Selecting IR/RF Transmission" on page 69.
4 Select OK to return to the Installation Menu.
Running a System Test
The System Test lets you check the integrity of your system's components, including:
Antenna signal
System tuning
Phone line
Access card
Use the System Test if you are experiencing problems with your system.
To run the System Test:
1 Select RUN SYSTEM TEST from the Installation Menu.
2 Select TEST.

flowchart
graph TD
    A["SIGNAL"] --> B["TUNING"]
    B --> C["PHONE"]
    C --> D["CARD"]
    E["TEST"] --> F["RETURN"]
    G["HELP"] --> H["Feedback to SIGNAL"]
The System Test checks all the components automatically, and displays the result of each test.
3 Select RETURN to return to the Installation Menu.
If The System Test Reports Any Problems...
Check your system for any of the following:
☐ The access card test will fail if you have not yet called your program providers to establish service. After your service has been established, the access card test should pass.
☐ Check that all cables are connected properly to the DSS receiver.
☐ Check that the satellite antenna is installed correctly, and that the signal has been optimized. See the manual that came with the satellite antenna for details.
☐ Check that the phone line connected to the DSS receiver is working properly.
☐ Check that the access card is inserted properly.
If you cannot resolve problems reported by the System Test, see "Customer Support" on page 2.
72 Chapter 6: Using the Installation Menu
Appendix
Other Information
This appendix includes supplementary information, including:
☐ Locations and descriptions of the controls and indicators on the front and back panels of the DSS receiver (page 74).
☐ Remote control button descriptions (page 76).
☐ Programming the remote to operate your TV, cable box, VCR, and laserdisc player (page 79).
☐ Troubleshooting information (page 83).
☐ Precautions (page 86).
☐ FCC Information (page 87).
☐ Limited warranty (page 88).
Specifications (page 89).
□ Index (page 90).
Location and Function of Controls
Front Panel
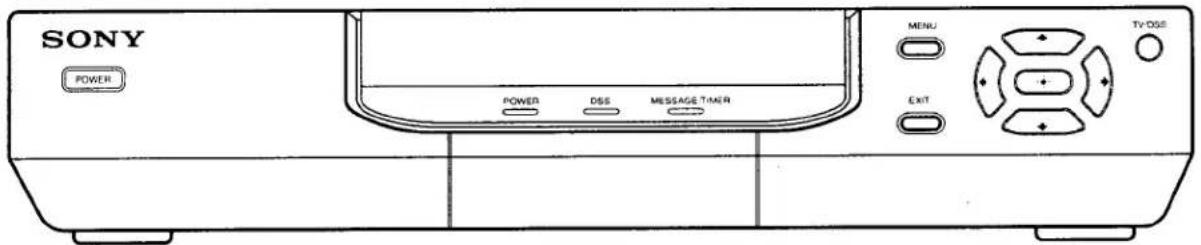
| Button | Description |
| POWER Button | Turns the DSS receiver on and off. |
| MENU Button | Brings up the Main Menu. |
| EXIT Button | Clears all on-screen displays, including program guides, menus, etc. If you press EXIT before you complete your selections, the previous selections are restored. |
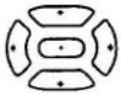 | The arrow buttons highlight items in the on-screen displays (program guides, menus, etc.). The ➕ button selects highlighted items. When pressed during normal DSS-viewing, the ➕ button brings up the Station Index (unless a message appears). |
| TV/DSS Button | Switches the output of the DSS receiver between TV (normal TV programs), if you've connected a TV cable or antenna, and DSS programs. |
| Power Indicator | Indicates whether the DSS receiver is on or off. |
| DSS Indicator | Indicates whether the receiver is set for DSS mode (on) or TV mode (off) |
| Message/Timer Indicator | Flashes to indicate you have an unread message. Stays lit to indicate the timer is set.NoteIf the timer is set and you have an unread message, the indicator will stay lit. |
Back Panel
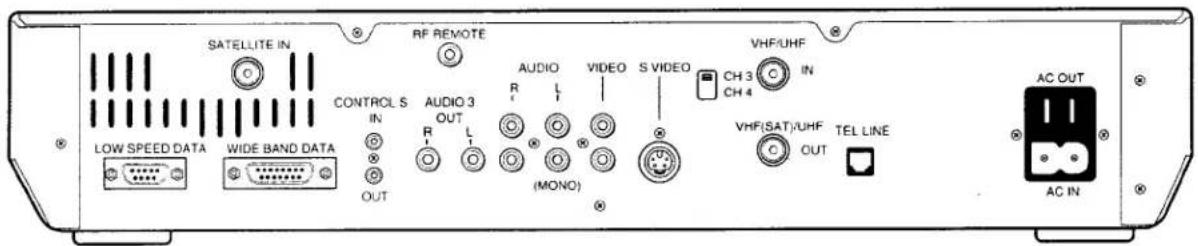
| Connector | Description | Cable Type |
| LOW SPEED DATA | Allows you to connect your DSS receiver to new technologies, as they are introduced. Additional accessories may be required. | Depends on future applications (D-sub 9 pin) |
| SATELLITE IN | Connects to the LNB on the satellite antenna. | RG6 Coaxial (75-ohm/F-type) |
| WIDE BAND DATA | Allows you to connect your DSS receiver to new technologies (such as high-definition television), as they are introduced. Additional accessories may be required. | Depends on future applications (D-sub 15 pin) |
| CONTROL-S (IN/OUT) | Allows you to pass on remote control signals to another Sony infrared-controlled audio or video component. | Audio mono miniplug |
| RF REMOTE | Connects to the RF antenna. | RCA-type |
| AUDIO 3 OUT (R)/(L) | Connects your DSS receiver to the right and left audio inputs of your audio or video component. | Audio (2) (RCA-type) |
| AUDIO (R)/(L) OUT | Connects your DSS receiver to the right and left audio inputs of your audio or video component. | Audio (2) (RCA-type) |
| VIDEO OUT | Connects your DSS receiver to your TV or VCR's video input. | Video (RCA-type) |
| S-VIDEO OUT | Allows you to connect your DSS receiver directly to your TV (if your TV has S-VIDEO IN). | S-Video (4-pin mini DIN) |
| CH3/CH4 Switch | Determines the TV channel on which programs from the DSS receiver can be viewed. | |
| VHF/UHF IN | Allows you to connect your DSS receiver to your normal (terrestrial) TV or cable TV service. | RG59 Coaxial (75-ohm/F-type) |
| VHF(SAT)/UHF OUT | Connects to your TV or VCR. | RG59 Coaxial (75-ohm/F-type) |
| TEL LINE | Connects your DSS receiver to a telephone jack. This allows you to order pay-per-view programs using the remote control. | Telephone (RJ-11) |
| AC IN | Connects your DSS receiver to a 120V AC outlet. | AC |
| AC OUT | Connects other components within a rating of AC 120V/300W/3A max. | AC |
Using the Remote Control
After you've installed the batteries and programmed the remote control, use these procedures to operate your system components:
1 Select the component that you want to use: To operate a cable box, TV, or the DSS receiver, press the corresponding FUNCTION button. To operate a VCR or laserdisc player, open the lid on the remote control and set the slide switch to the position that you set for the component.
2 Aim the remote control at the component.
3 Press the POWER button of the component to turn it on and off.
To control other functions of the component, see the table that follows.
Remote Control Button Descriptions
Outside Panel
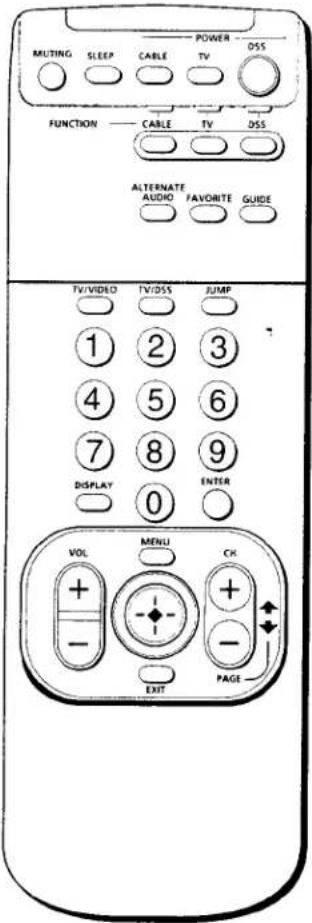
Note
Buttons described in the following table can operate components other than the DSS receiver only if you've programmed the remote and the component supports the function described. See page 79 for instructions on programming the DSS remote.
| Button | Operates | Description |
| MUTING | TV | Mutes the volume. Press again to restore the volume. |
| SLEEP | TV | Automatically turns off the TV, after the time period that you specify. |
| POWERCABLE TV DSS | CABLE: Turns the cable box on and off.TV: Turns the TV on and off.DSS: Turns the DSS receiver on and off. | |
| FUNCTION CABLE TV DSS | CABLE: Puts the remote in cable mode. In cable mode, the remote operates your cable box.TV: Puts the remote in TV mode. In TV mode, the remote operates your TV.DSS: Puts the remote in DSS receiver mode. In DSS mode, the remote operates your DSS receiver. | |
| ALTERNATE AUDIO | DSS | Selects an alternate audio track for the current program, if one is available. When pressed repeatedly, cycles through all the available alternate audio tracks. |
FAVORITE | DSSDSS | Brings up the Favorite Station Guide, if you've created one. When pressed repeatedly, cycles through all the Favorite Station Guides that have been created.Brings up the Master Guide. If you're already in a program guide, pressing GUIDE repeatedly brings up future time slots in the guide. |
 | TV | Switches the input of the TV. |
TV/DSS  | DSS | Switches the output of the DSS receiver to TV (normal TV programs), if you've connected a TV cable or antenna, or to DSS programs. |
 | DSS TV Cable | Tunes to the last station you were tuned to. |
 | DSS TV Cable | Specifies the station number. DSS: In menus, selects the menu item with the corresponding number. Also, in some screens, used to enter numerical values (such as a spending limit or passcode). |
| [HXB3] | DSS TV | Brings up (or removes) the Program Banner (DSS) or other display (TV). |
 | DSS TV Cable box | Used with 0-9 buttons to change stations without any delay in tuning. |
 | TV | Raises and lowers the volume. |
 | DSS TV | Brings up the Main Menu (Sony-brand TVs only.) |
 | DSS TV | When moved forward, back, left, right, and diagonally, highlights items in the on-screen displays (program guides, menus, etc.). When pressed, selects highlighted items. When pressed during normal DSS-viewing, brings up the Station Index (unless a message appears). |
 | DSS TV | Clears all on-screen displays, including program guides, menus, etc. If you press EXIT before you complete your selections, the previous selections are restored. |
 | DSS TV | Moves to the next (+) or previous (-) station during normal viewing. In DSS program guides and some setup screens, these buttons page through the on-screen displays. |
Inside Panel
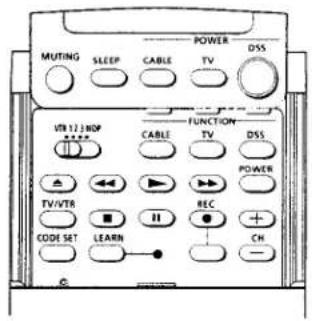
| Button | Operates | Description |
 | VCR Laserdisc | Switches to VCR or laserdisc mode, depending on how you've set up the remote for these positions. |
 | VCR Laserdisc | Eject (used only with Sony brand components) |
 | VCR Laserdisc | Rewind |
 | VCR Laserdisc | Play |
 | VCR Laserdisc | Fast-forward |
 | VCR Laserdisc | Turns the VCR or laserdisc player on and off. |
 | VCR | Changes the VHF/UHF output of the VCR. |
 | VCR Laserdisc | Stop |
 | VCR Laserdisc | Pause |
 | VCR | Record |
 | VCR Laserdisc | Changes the channel (VCR) or chapter (laserdisc). |
 | DSS | Used for programming the remote to operate your TV, cable box, VCR, or laserdisc player. Also used to change the RF security code. |
 | DSS | Used for setting up the remote commander to operate components that are not listed in "Programmable Codes" on page 80. |
Programming the Remote
The DSS receiver's remote control is preset at the factory to operate Sony brand TVs.
If you have a TV other than Sony brand, or you have a cable box, VCR, or laserdisc player that you want to control with the DSS receiver's remote, use the following procedures to program the remote to control these components.
Note
Your components must have infrared (IR) remote control capability in order to be used with the DSS receiver's remote.
To program the DSS receiver's remote:
You must perform step 4 within 10 seconds of step 3, or you must start again from step 3.
You must perform step 5 within 10 seconds of step 4, or you must start again from step 3. To cancel the operation, press the ENTER button.
1 Manually turn on the component that you want to program.
2 Turn to "Programmable Codes" on page 80 through page 81, and find the three-digit code number for your component. If more than one code number is listed, use the number listed first to complete the following procedures.
3 Press the CODE SET button.
4 Press the FUNCTION button (CABLE or TV) for the component you're setting up. To set up a VCR or laser-disc player, set the slide switch to any position (VTR1/2/3/MDP).
5 Enter the three-digit code number.
6 Press the ENTER button.
To Check if the Code Number Works
Use the following procedure to make sure the code you've entered works:
1 Aim the DSS receiver's remote at the component and press the POWER button that corresponds to that component.
If the component responds, try the CH+ and CH- buttons. If the component responds, you're done. If the code doesn't work:
☐ Try programming the remote using the other codes listed for your component.
☐ If you cannot get your component to respond to the DSS receiver's remote — even after trying all the code numbers for your component — follow the procedure described in "Using the Learn Function" on page 82.
Programmable Codes
TV Codes
| Manufacturer | Code |
| Sony | 101 |
| Admiral (M. Wards) | 102, 114, 109 |
| ABC | 112 |
| Bell & Howell (M. Wards) | 114, 109, 138 |
| Brocsonic | 103, 112 |
| Craig | 122, 123, 120, 121 |
| Croslex | 111 |
| Curtis Mathis | 103, 119, 123 |
| Daewoo | 135, 136, 103 |
| Daytron | 113 |
| Emerson | 122, 113, 120, 121, 123, 103, 115 |
| Fisher | 125 |
| General Electric | 102, 118, 103, 107 |
| Goldstar | 103, 113, 112, 130 |
| Hitachi | 131, 113, 103, 132 |
| JC Penny | 103, 102, 130, 107 |
| JVC | 128, 129 |
| KTV | 133, 113, 103, 123, 134 |
| LXI (Sears) | 102, 103 111, 125, 119, 112 |
| Magnavox | 111, 112, 113, 107 |
| Mitsubishi/MGA | 124, 103, 112 |
| NEC | 103, 112 |
| Panasonic | 118, 116, 117, 107 |
| Philco | 111, 118, 109 |
| Philips | 111 |
| Pioneer | 137, 118, 119 |
| Portland | 103, 108 |
| Quasar | 110, 107 |
| Radio Shack | 102, 112, 124, 123 |
| RCA/Proscan | 102, 103, 104, 105, 106, 107, 108 |
| Samsung | 126, 112, 113, 103 |
| Sanyo | 125 |
| Scott | 123, 112 |
| Sharp | 114, 113, 115 |
| Signature 2000 (M. Wards) | 114, 109 |
| Manufacturer | Code |
| Sylvania | 111, 112, 108 |
| Symphonic | 123, 139 |
| Toshiba | 119, 114 |
| Videch | 131, 103, 112 |
| Wards | 113, 103, 115, 112 |
| Zenith | 108, 110 |
Cable Box Codes
| Manufacturer | Code |
| Hamlin/Regal | 222, 223, 224, 225, 228 |
| Jerrold/G.I. | 201, 202, 203, 204, 205, 206, 207208, 218 |
| Oak | 227, 228, 229 |
| Panasonic | 219, 220, 221 |
| Pioneer | 214, 215 |
| Scientific Atlanta | 209, 210, 211 |
| Tocom | 216, 217 |
VCR Codes
| Manufacturer | Code |
| Sony | 301,302, 303 |
| Aiwa | 338 |
| Audio Dynamic | 314, 347 |
| Bell & Howell (M. Wards) | 330, 343 |
| Brocsonic | 319 |
| Canon | 309, 308 |
| Citizen | 332 |
| Craig | 315, 302, 332 |
| Curtis Mathis | 304, 338, 309 |
| Daewoo | 341, 312, 309 |
| DBX | 314, 336, 337 |
| Dimensia | 304 |
| Emerson | 319, 320, 316, 317, 318 |
| Fisher | 330, 334, 335, 333 |
| Funai | 338 |
| General Electric | 329, 304, 309 |
| Goldstar | 332 |
| Hitachi | 306, 304, 305 |
| Instant Replay | 309, 308 |
| JC Penny | 309, 305, 304, 330, 314, 336, 337 |
| JVC | 314, 336, 337 |
| Kenwood | 314, 336, 332, 337 |
| LXI (Sears) | 332, 305, 333, 334, 330, 335 |
| Magnavox | 310, 308, 309 |
| Marantz | 314, 336, 337 |
| Marta | 332 |
| Memorex | 309, 335 |
| Minolta | 305, 304 |
| Mitsubishi/MGA | 323, 324, 325, 326 |
| Multitech | 325, 338, 321 |
| NEC | 314, 336, 337 |
| Olympic | 309, 308 |
| Panasonic | 308, 309, 306, 307 |
| Pentax | 305, 304 |
| Philco | 308, 309 |
| Philips | 310, 308, 309 |
| Pioneer | 308 |
| Quasar | 308, 309 |
| RCA/Proscan | 304, 305, 308, 309, 310, 311, 312, 313 |
| Realistic | 309, 330, 328, 335, 324, 338 |
| Sansui | 314 |
| Singer | 315 |
| Samsung | 322, 313, 321 |
| Sanyo | 330, 335 |
| Scott | 312, 313, 321, 335, 323, 324, 325, 326 |
| Sharp | 327, 325 |
| Shintom | 315 |
| Signature 2000 (M. Wards) | 336, 327 |
| Sylvania | 310, 308, 309, 338 |
| Symphonic | 338 |
| Manufacturer | Code |
| Tashiro | 332 |
| Tatung | 314, 336, 337 |
| Teac | 314, 336, 338, 337 |
| Technics | 309, 308 |
| Toshiba | 312, 311 |
| Wards | 327, 328, 335, 331, 332 |
| Yamaha | 330, 314, 336, 337 |
| Zenith | 331 |
Laserdisc Player Codes
| Manufacturer | Code |
| Sony | 701 |
| Kenwood | 707 |
| Magnavox | 703 |
| Marantz | 702 |
| Mitsubishi | 702 |
| Panasonic | 704 |
| Philips | 703 |
| Pioneer | 702 |
| RCA | 702 |
| Sanyo | 706 |
| Sharp | 705 |
| Yamaha | 703 |
Using the Learn Function
You can program the DSS remote commander to learn the functions of another component's remote control. Use this function to operate components that are not listed in "Programmable Codes" on page 80.
To use the Learn function:
1 Set the slide switch in the inside panel to VTR3 or MDP.
2 Place the DSS remote commander and the other component's remote control directly facing each other, about two inches apart.
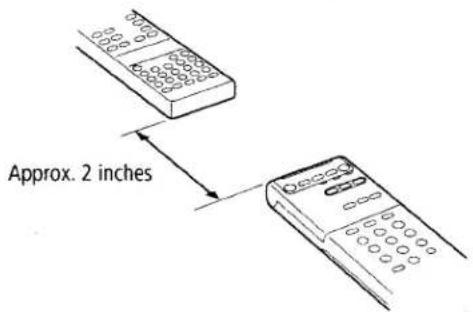
3 Press the LEARN button. The Learn indicator lights.
4 Press the button on the DSS remote commander that you want to learn a function. The Learn indicator flashes off, then on, indicating that the DSS remote commander is now ready to learn.
5 Hold down the corresponding button on the other component's remote control. When the Learn indicator flashes off, then on, release the button on the other component's remote control. If the indicator doesn't flash, repeat steps 4 and 5.
6 To learn other functions, repeat steps 4 and 5.
About the Learn Function
☐ The Learn function does not work in the VTR1 and VTR2 slide switch positions.
☐ During the learning procedure, do not move the remote controls.
☐ If you press a button on this remote commander that cannot be used for learning, the Learn indicator flashes four times.
☐ To clear all learned signals from memory, set the slide switch inside the lid to MDP, press the LEARN button, press the DSS POWER button while holding down the VOL- button, and then press the LEARN button again.
☐ When you remove the batteries — to replace them, for example — any codes you've set may be erased.
82 Appendix: Other Information
Troubleshooting
| Symptom | Possible Causes and Remedies |
| No picture (poor picture quality or loss of picture) | If you are receiving only stations 100, 200, and 999, call your program providers to have your programming activated.Check to make sure the DSS receiver is on and set to DSS mode. See page 74.Check to make sure your access card is inserted properly into the DSS receiver.Run the System Test to verify that your system is working properly. See page 72.Check the satellite antenna's signal strength. See page 65.Check the connections to your TV (and other components). See the Satellite Antenna manual and Chapter 3 of this manual.Check to make sure your TV (and other components) are set to receive the DSS signal (channel 3 or 4, VIDEO1, etc.), as appropriate to the way your system is connected. See Chapter 3.Some pay-per-view programs may be protected by Macrovision copy-protection at the discretion of the copyright owner. To ensure a quality picture, make sure that the signal is coming directly from the DSS receiver and not through your VCR. Call your program providers for details.Make sure the RG-6 cable is properly connected to the antenna's LNB. If the Signal Seeker is not flashing on the LNB, there may be an electrical short in the RG-6 cable and you will need to replace it.In rare cases, the picture may be distorted if you connected a terrestrial TV antenna to the UHF/VHF IN jack of the receiver. This distortion could occur if the channel selector on the back of the receiver is set to a channel that is normally received on channel 3 or 4 of your TV. For example, you can receive a local station on channel 4, and the channel selector is set to channel 4. If this happens, set the channel selector to the other channel (3 or 4), whichever one is not used on your TV. |
| Cannot access program | Check to make sure that you are subscribing to the station you are trying to tune to. Call your program providers if you are not sure.Check to make sure the system is not locked. See Chapter 5.Check to make sure the station isn't set to be skipped. See page 59. |
| Cannot order pay-per-view program | Check to make sure you've connected the DSS receiver to a phone line.It may be too late to purchase this program. Check for other show times. See page 32.If the message "Purchase information not available" appears, you must call your program provider (DIRECTV or USSB) to order the program.Check to make sure the PPV option is not locked. See Chapter 5.Your access card may be full. Call your program provider. |
| Cannot find the station of the pay-per-view program you've ordered | See "Checking Your Purchase Record" on page 43 to get information (station, start times, etc.) about programs you've ordered. |
| Cannot cancel a pay-per-view order via the Cancel Purchase menu option | You cannot cancel pay-per-view orders that you've watched or tuned to. Also, you can cancel only programs you've ordered using the DSS remote control. Call your program providers for details. |
| Program guide does not bring up the program you've chosen | You must press the button to select the program you've highlighted. Although the guide automatically tunes to stations you highlight in any of the guides, you must press the button to complete your selection. |
| Cannot bring up the Station Index (button) | You cannot bring up the Station Index while a program guide is displayed or if a message such as, "Press to purchase" appears. Press the EXIT button to clear any on-screen displays. Also, try switching to another non-PPV station. |
| Cannot display favorite stations | You must set up your Favorite Station Guides before favorite stations can be displayed. See page 51. |
| Ratings limit, spending limit, or pay-per-view lock not working properly | Check locks and limits. Then check that the system is locked. See Chapter 5. |
| Cannot access locks or limits screens | The system must be unlocked before you can make changes to the locks and limits. See Chapter 5. |
| Cannot lock or unlock the system | Make sure you've entered the correct passcode. If you've lost or forgotten your passcode, call your program provider. See "Customer Support" on page 2. |
| Alternate audio track is not available | Not all programs offer alternate audio tracks. See page 41. |
| Language of audio track is incorrect | Check default language setting. The program provider may not make available all the languages displayed in the Set Default Language screen. See page 53. Check alternate audio track setting. See page 41. |
| Cannot record DSS program on VCR | Check to make sure the VCR is connected correctly, and that the VCR is set to receive the signal from the DSS receiver. See Chapter 3.If you're using the automatic timer to facilitate the recording of programs, make sure the program you're trying to record does not conflict with any locks or limits that have been set. If you're using the timer for PPV programs, you must purchase these programs in advance, which may require that you call your program provider to order the program.Make sure you are not trying to record a pay-per-view program that is copy-protected by Macrovision. Some pay-per-view programs are copy-protected at the discretion of the copyright owner. Call your program provider for details. |
| Main Menu, buttons 4 and 6, do not include the program categories that you want | Use SELECT GUIDE to change the program category shown in button 4. Use SELECT LIST to change the program category shown in button 6. See page 33. |
| Access card problems | Check that the card is inserted properly. See page 66.Call your program providers. See "Customer Support" on page 2. |
| Remote control doesn’t work | To operate your components, make sure you’ve programmed the remote properly. See “Programming the Remote” on page 79. Note: The remote codes may be erased whenever you remove the batteries. Program the remote again if you’ve removed or replaced the batteries.Press the appropriate FUNCTION button for the component you want to operate.Check to make sure the batteries are inserted correctly, and that the batteries are not dead. See page 7.RF problems: Check that the RF antenna is connected properly and that you’re using the remote control within operating range of the DSS receiver (see “Setting Up the RF Antenna” on page 22). Make sure that RF transmission is enabled (see “Selecting IR/RF Transmission” on page 69).Make sure the DSS receiver and remote control are using the same security code (see“Setting the Security Code” on page 70). |
If you are unable to resolve problems with your system, please see "Customer Support" on page 2 for customer support information and telephone numbers.
Precautions
| On Safety | □ If you spill or drop anything into the cabinet, unplug the receiver and have it checked by qualified personnel before operating it any further. |
| □ Operate the receiver only on 120 V AC. | |
| □ For detailed safety precautions, see the “Important Safeguards” leaflet that came with the receiver. | |
| On Power Sources | □ The receiver continues to draw power from the AC power source as long as it is connected to the wall outlet, even if the receiver itself has been turned off. |
| □ If you are not going to use the receiver for a long time, be sure to disconnect the receiver from the wall outlet. To disconnect the AC power cord, grasp the plug itself; never pull the cord. | |
| □ One blade of the plug is wider than the other for the purpose of safety and will fit into the wall outlet only one way. If you are unable to insert the plug fully into the outlet, contact your dealer. | |
| □ If the AC power cord gets damaged and needs to be replaced, have it done at a qualified service shop only. | |
| On Placement | □ Place the receiver in a location with adequate ventilation to prevent heat build-up in the receiver and prolong the life of the receiver. |
| □ Do not place the receiver in a location where it will be exposed to extreme hot or cold temperatures. Avoid direct sunlight and do not place near heat sources. | |
| □ Do not place the receiver in a location subject to excessive dust or mechanical vibration. Protect from vibration at all times. | |
| □ Do not place anything on top of the receiver, which might block the ventilation holes and cause malfunctions. | |
| □ Before connecting other components, be sure to turn off and unplug the receiver. | |
| On Cleaning | □ Clean the cabinet, panel, and controls with a soft cloth slightly moistened with a mild detergent solution. Do not use any type of abrasive pad, scouring powder, or solvent such as alcohol or benzine. |
| On Repacking | □ Keep the original cartons and packing materials to safely transport the equipment in the future. |
FCC Registration Information
Your digital satellite receiver has been registered by the Federal Communication Commission (FCC) as not being harmful to the telephone network when connected directly to the telephone lines. In order to fully comply with the Rules of the FCC, the following instructions should be read carefully and followed completely where applicable:
1 The Federal Communication Commission (FCC) has established Rules which permit this device to be directly connected to the telephone network. Standardized jacks are used for these connections. This equipment should not be used on party lines or coin phones.
2 If this device is malfunctioning, it may also be causing harm to the telephone network; this device should be disconnected until the source of the problem can be determined and until repair has been made. If this is not done, the telephone company may temporarily disconnect service.
3 The telephone company may make changes in its technical operations and procedures; if such changes affect the compatibility or use of this device, the telephone company is required to give adequate notice of the changes. You will be advised of your right to file a complaint with the FCC.
4 If the telephone company requests information on what equipment is connected to their lines, inform them of:
a The telephone number to which this unit is connected.
b. The ringer equivalence number.
c. The USOC jack required.
d. The FCC Registration Number.
5 Items (b) and (d) are indicated on the label. The Ringer Equivalence Number (REN) is used to determine how many devices can be connected to your telephone line. In most areas, the sum of the RENs of all devices on any one line should not exceed five (5). If too many devices are attached, they may not ring properly.
Service Requirements
In the event of equipment malfunction, all repairs should be performed by our Company or an authorized agent. It is the responsibility of users requiring service to report the need for service to our company or to one of our authorized agents. For service, call 1-800-838-7669.
Radio Interference Information
This equipment has been tested and found to comply with the limits for a Class B digital device, pursuant to Part 15 of the FCC Rules. These limits are designed to provide reasonable protection against harmful interference in a residential installation. This equipment generates, uses and can radiate radio frequency energy and, if not installed and used in accordance with the instructions, may cause harmful interference to radio communications.
However, there is no guarantee that interference will not occur in a particular installation. If this equipment does cause interference to radio or television reception (which you can determine by turning the equipment off and on), you are encouraged to try to correct the interference by one or more of the following measures:
☐ Reorient or relocate the receiving antenna (the antenna for radio or television that is receiving the interference)
☐ Change the position of the DSS receiver with respect to the radio or television equipment that is receiving the interference
☐ Move the DSS receiver away from the equipment that is receiving the interference
☐ Plug the DSS receiver into a different outlet so that the DSS receiver and the equipment receiving the interference are on different branch circuits
Shielded cables and I/O cords must be used for this equipment to comply with the relevant FCC regulations. Changes or modifications not expressly approved in writing by Sony Electronics, Inc., void the user's authority to operate this equipment.
If these measures do not eliminate the interference, you should consult your digital satellite system dealer or an experienced radio/television technician for additional suggestions. In addition, you may find the following booklet prepared by the Federal Communications Commission helpful: "How to Identify and Resolve Radio-TV Interference Problems." This booklet is available from the U.S. Government Printing Office, Washington, D.C., 20402 Stock No. 004-000-00345-4.
Canadian Residents
SONY ELECTRONICS INC. ("SONY") warrants this Product (including any accessories) against defects in material or workmanship as follows:
1 LABOR. For a period of 90 days from the original date of purchase, if the Product is determined to be defective, SONY will repair or replace the Product at no charge. After this 90 day period, you must pay for all labor charges.
2 PARTS. For a period of one (1) year from the original date of purchase, SONY will supply, at no charge, new or rebuilt replacements in exchange for defective parts. Any replacements will be warranted for the remainder of the
original warranty period or ninety (90) days from installation by SONY's authorized facility, whichever is longer.
3 ACCESSORIES. Parts and labor for all accessories are for one (1) year.
4 IN-HOME. For a period of one (1) year from installation date, if the unit was professionally installed by an authorized SONY Digital Satellite System Installer and the LNB (Electronic Antenna Element) fails to function properly, SONY will repair or replace the LNB with a new or rebuilt part. Labor to repair or replace the LNB (after 90 days from purchase) will be at your expense. If no problem is found, or any other item fails, it will be your responsibility to pay the installer their regular rate for an in-home service call.
To obtain warranty service, you must take the Product, or deliver the Product freight prepaid, in either its original packaging or packaging affording an equal degree of protection, to a SONY authorized Digital Satellite System service facility. Please see the telephone number at the end of this section for a number to call to locate the closest facility.
This warranty does not cover customer instruction, installation, setup adjustments or signal reception problems.
This warranty does not cover cosmetic damage or damage due to acts of God, accident, misuse, abuse, negligence, commercial use, or modification of, or to any part of the Product, including the antenna. This warranty does not cover improper installation (if self-installed), loss of use of the product, or wasted programming charges due to product malfunction. This warranty does not cover damage due to improper operation or maintenance, connection to improper voltage supply, or attempted repair by anyone other than a facility authorized by SONY to service the Product. This warranty does not cover Products sold AS IS or WITH ALL FAULTS. This warranty is valid only in the United States.
Proof of purchase in the form of a bill of sale or receipted invoice which is evidence that the unit is within the Warranty period must be presented to obtain warranty service.
REPAIR OR REPLACEMENT AS PROVIDED UNDER THIS WARRANTY IS THE EXCLUSIVE REMEDY OF THE CONSUMER. SONY SHALL NOT BE LIABLE FOR ANY INCIDENTAL OR CONSEQUENTIAL DAMAGES FOR BREACH OF ANY EXPRESS OR IMPLIED WARRANTY ON THIS PRODUCT. IN NO EVENT SHALL SONY BE LIABLE FOR ANY INCIDENTAL OR CONSEQUENTIAL DAMAGES WHATSOEVER ARISING OUT OF THE USE OR INABILITY TO USE THE PRODUCT. UNDER NO CIRCUMSTANCES SHALL SONY'S LIABILITY, IF ANY, EXCEED THE PURCHASE PRICE PAID FOR THE PRODUCT. EXCEPT TO THE EXTENT PROHIBITED BY APPLICABLE LAW, ANY IMPLIED WARRANTY OR MERCHANTABILITY OR FITNESS FOR A PARTICULAR PURPOSE ON THIS PRODUCT IS LIMITED IN DURATION TO THE DURATION OF THIS WARRANTY.
This warranty is invalid if the factory applied serial number has been altered or removed from the Product.
Some states do not allow the exclusion or limitation of incidental or consequential damages, or allow limitations on how long an implied warranty lasts, so the above limitations or exclusions may not apply to you. In addition, if you enter into a service contract with the SONY Partnership within 90 days of the date of sale, the limitation on how long an implied warranty lasts does not apply to you. This warranty gives you specific legal rights, and you may have other rights which vary from state to state.
For your convenience, SONY ELECTRONICS INC. has established telephone numbers for frequently asked questions. To locate the servicer or dealer nearest you, for assistance or resolution of a service problem, or for product information or operation, call:
SONY DIGITAL SATELLITE SYSTEM INFORMATION CENTER
1-800-838-7669
For an accessory or part not available from your authorized dealer, call:
1-800-488-7669
About Sony Customer Support
Every Sony brand DSS unit comes with Sony's Express Support at no charge to you. In the event of a system failure, our Express Support Program can have a replacement receiver on its way to you via overnight Federal Express (for calls Monday-Friday until 11:00 pm; Saturday delivery depends upon zip code). All it takes is a valid credit card to cover a security deposit, and Sony will pay freight in both directions. Our Express Support continues with our 800 number, staffed by dedicated technical representatives who can answer questions on dealer locations, system operation, installation, hookup, accessories, and how to get the most out of your home entertainment system. Sony's Express Support program: another expression of our commitment to excellence in customer service.
Specifications
| Input Jacks | UHF/VHF75 ohm external terminalSatellite Antenna75 ohm external terminalRF RemoteCONTROL-S (mini-jack)5 Vp-pAC Power (120V, 60 Hz) |
| Output Jacks | S-VIDEO OUT4-pin mini DINVIDEO (RCA jacks) (2)AUDIO R/L (RCA jacks) (3)VHF(SAT)/UHFLow-Speed Data9-pin D-Sub FemaleWide Band Data15-pin D-Sub FemaleTEL LINECONTROL-S (mini-jack)AC Power Unswitched(120V, 60 Hz) |
| Input Frequency | 950 - 1450 MHz |
| Power Requirements | AC 120 V |
| Power Consumption | 23 W max |
| Dimensions(w/h/d) | 430 x 85 x 290 mm16.9 x 3.2 x 10.8 inches |
| Weight | Set: 3.18kg (7lbs)Unit: 2.56 kg (5.65lbs) |
| Supplied Accessories | Remote Control RM-Y130 (1)Size AA Batteries (2)Access Card (1)Audio/Video Cable (1)S-VIDEO Cable (1)RF Antenna (1)RF Cable (1)Telephone Line Cord (1)AC Power Cord |
| Optional Sony-brand DSS Accessories | Installation KitANJ-DS1AmplifierEAC-DA1DiplexerEAC-DD1Voltage SwitchEAC-DV1Multi-Room Distribution SystemMRD-D1IR Target (for MRD-D1 System)EAC-T1Universal Remote CommanderRM-Y130Flat CableSAK-F1Coaxial Cable (25 ft.)SAK-C25Coaxial Cable (75 ft.)SAK-C75 |
Index
0-9 buttons 28, 30, 77
16:9 aspect ratio 68
4:3 aspect ratio 68
◀ (alternate audio symbol) 40, 41, 90
(D) (data services symbol) 40, 61
(lock symbol) 40, 90
✉ (messages symbol) 40, 90
A
access card, replacing 66
alternate audio 41
ALTERNATE AUDIO button 76
antenna
connecting to receiver 14
See also RF antenna.
setting up 65
signal level 65
arrow buttons 74
aspect ratio, setting 68
azimuth 65
B
back panel connectors 75
batteries, inserting into remote 7
baud rate, setting 62
C
CH button 78
CH/PAGE buttons 9, 77
CODE SET button 78
connecting
audio system 14, 15, 16
cable TV, terrestrial antenna 14, 15, 16, 18, 20
Hi-Fi A/V system 18
home entertainment system 20
RF antenna 22
TV and VCR 16
TV with A/V jacks 15
TV with RF jack 14
CONTROL-S jacks 13
Custom Guide 35, 59
Custom Setup Menu, displaying 50
.custom stations, setting 59
customer support numbers 2, 88
D
data services, setting 61
default language, setting 53
DISPLAY button 40, 47, 77
DSS indicator 74
E
Eject button 78
elevation 65
ENTER button 77
EXIT button 10, 11, 31, 37, 74, 77
Express Navigator 5
F
Fast-forward button 78
FAVORITE button 31, 38, 77
Favorite Station Guide
displaying 38
setting up 51
features, described 5
front panel controls 74
FUNCTION buttons 76
G
GUIDE button 9, 28, 30, 77
Guide format 33
H, I, J
Highlight and Select, explained 27
Installation Menu, displaying 64
interference, RF 69
joystick 77
JUMP button 40, 77
L
languages. See default language and alternate audio.
latitude and longitude, for setting antenna 65
LEARN button 78
Learn function 82
List format 33
lock, determining the status 58
locking the system 57
locks and limits
setting 54–58
with timer settings 46
M
Macrovision copy-protection 32
mail. See messages.
Main Menu 28
Master Guide
displaying 9, 28
displaying favorite stations in 31
exiting 31
features 29
using 10
MENU button 28, 74, 77
Message/Timer indicator 46, 74
messages
erasing 48
reading 48
receiving 47
MUTING button 76
0
opening, access card door 66
overriding the system lock 58
P
paging 30
passcode, setting 57
Pause button 78
pay-per-view
canceling programs 42
free preview 32
Macrovision copy-protection 16, 18, 20
reviewing purchases 43
watching programs 32
pay-per-view lock
explained 54
setting 56
Play button 78
POWER buttons 9, 74, 76, 78
power indicator 74
precautions 86
problems
diagnosing 72
troubleshooting 83
Program Banner 40, 47
program category, selecting 34
Program guide. See Master Guide.
program provider guides 39
R
ratings limit
explained 54
setting 55
REC button 78
recording DSS programs 23
remote control
button descriptions 76
inserting batteries 7
Learn function 82
programming 79
RF security code 70
setting IR and RF 69
troubleshooting 85
Rewind button 78
RF antenna 22
S
satellite antenna, setting 65
scrolling 30
SELECT button 9, 74
SELECT GUIDE 33
SELECT LIST 33
SLEEP button 76
spending limit
explained 54
setting 55
Station Index
displaying 9, 11, 36
displaying favorite stations in 37
exiting 37
selecting programs in 11, 37
station locks
explained 54
setting 56
Stop button 78
S-VIDEO jack 13, 15, 16, 18, 20
system test, running 72
T
timer
checking and changing 46
setting 44
troubleshooting 84
transponder 65
troubleshooting 83
TV/DSS button 74, 77
TV/VIDEO button 77
TV/VTR button 78
U, V, W, Z
unlocking the system 58
VOL button 77
VTR1/2/3/MDP switch 78
Warranty 88
zip code, for setting antenna 65
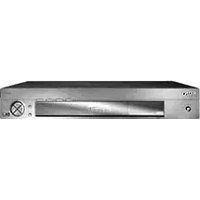
- Digital Satellite Receiver
- RF ANTENNA
- WARNING
- Caution
- Note to the CATV Installer
- Note to the DSS® Satellite Dish Installer
- Telephone Line Interruption
- Owner's Record
- Customer Support
- For DSS Programming
- For DSS Hardware and Installation
- Trademark and Copyrights
- Macrovision Information
- Note on Recording Programming
- StarSight Licensed
- Contents
- Chapter 1
- Introducing the DSS System
- Chapter 2
- Using Basic Functions
- Chapter 3
- Connecting Your System
- Chapter 4
- Using the System Features
- Chapter 5
- Using the Custom Setup Menu
- Chapter 6
- Using the Installation Menu
- Appendix
- Other Information
- DSS Features
- Excellent Performance
- Premium Entertainment
- Convenience and Ease-of-Use
- Customizable
- Unpacking
- Note
- Inserting Batteries into the Remote Control
- To install the batteries:
- Notes on Batteries
- DSS POWER Button
- GUIDE Button
- Joystick
- CH/PAGE Buttons
- Using the Master Guide
- Using the Station Index
- Overview
- General Recommendations
- TV Only
- TV With RF Connector Only
- Optional Connections
- TV With A/V Connectors
- TV and VCR
- Hi-Fi TV, Hi-Fi VCR, Audio Receiver
- Chapter 3: Connecting Your System
- Home Entertainment System (Hi-Fi TV, Hi-Fi VCR, Audio/Video Receiver)
- Setting Up the RF Antenna
- To set up the RF antenna:
- Optional Setup
- Chapter 3: Connecting Your System
- Setting Up Your DSS System
- Viewing Satellite Programs
- Viewing Cable or Off-Air Programs
- Recording Satellite Programs While Watching Cable or Off-Air Programs
- Before You Get Started ...
- Using the On-Screen Displays: Highlight and Select
- Step 1: Highlight
- Step 2: Select
- Example: Highlight and Select
- Tip
- Displaying the Master Guide
- To display the Master Guide:
- Features of the Master Guide
- Moving Through the Master Guide
- Displaying Favorite Stations
- To see your favorite stations in the program guide:
- Exiting the Guide
- There are two ways to exit the program guide:
- Selecting a Program from the Guide
- Ordering Pay-Per-View Programs
- About Copy-Protection
- To order a PPV program listed in the program guide:
- Chapter 4: Using the System Features
- Selecting Program Guides and Lists By Category
- How SELECT GUIDE and SELECT LIST Change the Main Menu
- Selecting a Program Guide or List By Program Category
- To select another guide or program guide format:
- Selecting the Custom Guide
- To select the Custom Guide:
- To display the Station Index:
- Moving Through the Station Index
- To move through the Station Index:
- Displaying Favorite Stations in the Station Index
- To display your favorite stations on the top row of the Station Index:
- Selecting a Program from the Station Index
- To select a program:
- To exit the Station Index without changing stations:
- Selecting the Favorite Station Guide
- To bring up the Favorite Station Guide:
- Moving Through the Favorite Station Guide
- To move through the Favorite Station Guide:
- To cycle through the three Favorite Station Guides (FAV A, FAV B, and FAV C):
- To exit the Favorite Station Guide without changing stations:
- Selecting Other (Program Provider) Guides
- To select one of these other guides:
- Using DISPLAY and JUMP
- Displaying the Program Banner
- To display the Program Banner:
- Jumping Back and Forth Between Stations
- To display the last station you selected:
- Selecting Alternate Audio
- Canceling Purchases
- Chapter 4: Using the System Features
- Checking Your Purchase Record
- To check the purchase record:
- Setting Up the Timer
- Setting the Timer
- To set the timer:
- Setting the Daily/Weekly Timer
- To set the timer for every day or for the same day(s) every week:
- Changing/Checking/ Clearing Timer Settings
- To change, check, or clear timer settings:
- Notes on Using the Timer
- Chapter 4: Using the System Features
- Reading Your Messages
- How to Determine When You've Received Mail
- Displaying Your Messages
- To display your messages:
- Select MESSAGES.
- Reading a Message
- To read a message:
- Chapter 4: Using the System Features
- Displaying the Custom Setup Menu
- Setting Up a Favorite Station Guide
- To set up a Favorite Station Guide:
- Chapter 5: Using the Custom Setup Menu
- Setting a Default Language
- To set a default language:
- Setting Locks and Limits
- To display the Set Locks and Limits screen:
- Setting a Spending Limit
- Setting a Ratings Limit
- To set a spending limit:
- To set a ratings limit:
- Setting Station Locks
- Setting the Pay-Per-View Lock.
- To set station locks:
- To set the pay-per-view lock:
- Locking Your System
- To lock an unlocked system:
- Overriding the System Lock
- To reset a system lock override:
- Unlocking Your System
- To unlock a locked system:
- Determining the Status of the System Lock
- Chapter 5: Using the Custom Setup Menu
- Setting Up a List of Custom Stations
- To define a list of custom stations:
- To see the results of your Custom Stations settings:
- Using the AUTO Skip Feature
- To use the AUTO Skip feature:
- Selecting Data Services
- How to Determine if Data Services Are Available on a Station
- Selecting a Data Service
- To select a data service:
- Changing the Default Data Service
- To change the data service for all stations:
- Setting the Baud Rate
- To set the baud rate for the DSS receiver's data ports:
- Chapter 5: Using the Custom Setup Menu
- Displaying the Installation Menu
- Setting Up the Satellite Antenna
- Replacing Your Access Card
- To replace your access card:
- Setting the Aspect Ratio
- To set the aspect ratio:
- Setting Up the Remote Control
- Selecting IR/RF Transmission
- To select IR or RF transmission:
- Setting the Security Code
- Step 1: Select the DSS Receiver's RF Security Code
- Step 2: Set the DSS Remote Control's RF Security Code
- To Determine the Current Security Code for the DSS Remote Control
- Running a System Test
- To run the System Test:
- If The System Test Reports Any Problems...
- Chapter 6: Using the Installation Menu
- Location and Function of Controls
- Using the Remote Control
- Remote Control Button Descriptions
- Inside Panel
- Programming the Remote
- To Check if the Code Number Works
- Programmable Codes
- Using the Learn Function
- To use the Learn function:
- About the Learn Function
- Appendix: Other Information
- Precautions
- FCC Registration Information
- Service Requirements
- Radio Interference Information
- Canadian Residents
- SONY DIGITAL SATELLITE SYSTEM INFORMATION CENTER
- About Sony Customer Support
- Index
- A
- B
- C
- D
- E
- F
- G
- H, I, J
- L
- M
- 0
- P
- R
- S
- T
- U, V, W, Z
Brand : SONY
Model : SAT-A1
Category : Satellite receiver